

Page 1
1.
3.
LED-1
Lead Extruder Die
for use in Corbin Hydro-press
2.
4.
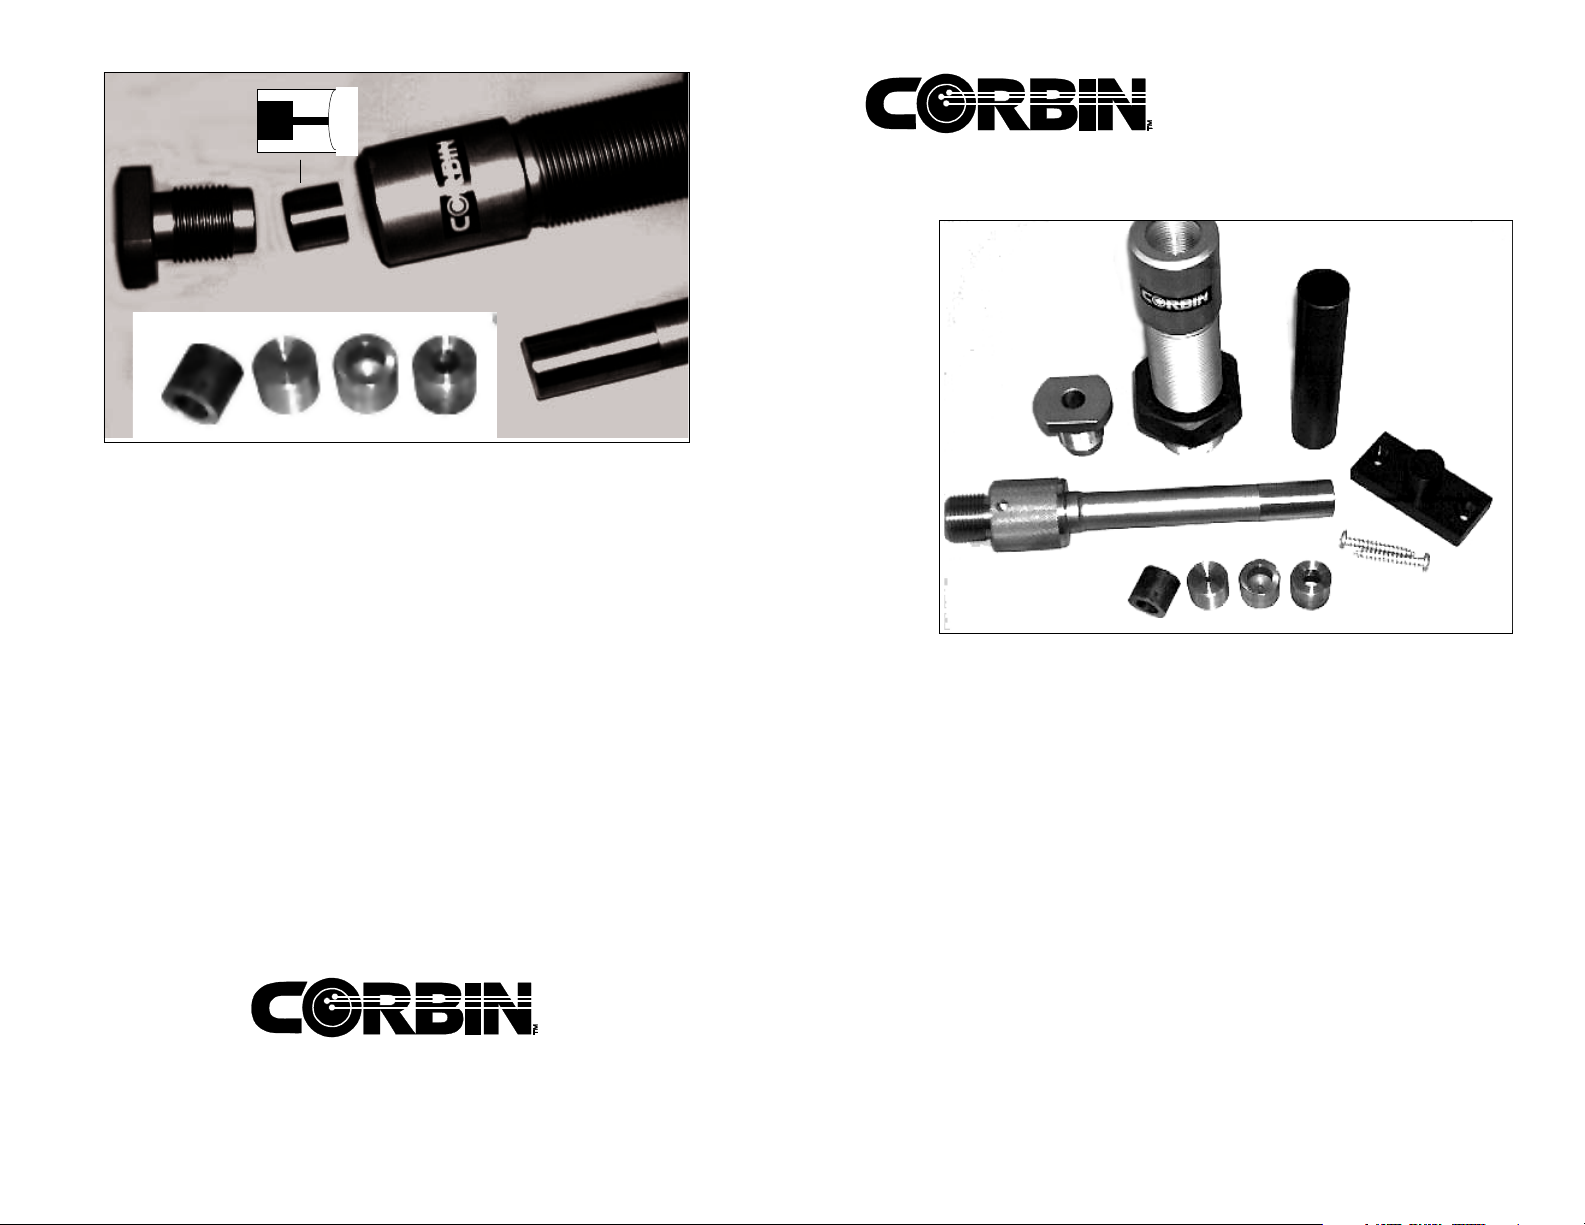
1. Retainer Bushing
2. LED-D Extruder Die Insert
3. Extruder Body
4. Extruder Punch
Make certain that the extruders punch is correctly aligned with the bore of
the die before applying pressure. The punch must be securely screwed
into its threaded base, which in turn screws into the top of the press ram.
The punch must be able to move at least one inch into the die cavity
before any pressure is generated. Otherwise, the punch may dig into the
die walls and destroy the tool. The LED-1 is designed to extrude soft lead
only (Bhn 5.0). To extrude harder alloys requires a custom made press,
such as the Corbin X-Press, or a smaller bore on the extruder.
Always make sure the retainer bushing is securely threaded into the top of
the extruder before applying pressure, to avoid tearing threads off the bushing or from the top of the extruder. Pressures used in this operation are
tremendous: follow instructions to avoid damage to the tool or injury to
yourself!
The Corbin LED-1 Lead Extruder Die is used in the Corbin CHP-1 Hydropress or the Corbin CSP-2H Hydraulic Mega-Mite press, to produce lead
wire from soft lead.
The kit consists of a billet moulding set (two billet mould tubes approximately 4 inches long with a 0.785-inch bore and a mounting base, which
supports a tube while it is being filled with hot lead), and the extruder itself,
which consists of a die body with 0.825 inch bore, a threaded retained that
screws into the top of the body to hold the die in place, one or more LEDD extruder dies for each diameter of wire desired (four are provided with
the kit), a locking nut for the extruder body, and a two-part punch and base,
which screws into the press ram.
PO Box 2659
White City, Oregon 97503 USA
541-826-5211 (phone - Mon to Thurs, 9am-5pm)
5410826-8669 (fax - 24hrs)
To make lead wire, pure soft lead is first melted and poured into the billet
tubes to form lead cylinders (or billets) about 4-inches long. There are two
tubes and one base. The base is normally mounted to your bench top with
two long screws, provided, or fastened to a piece of two by four lumber
which can then be clamped in a vise. The tubes slip over a plug on this
base, which seals the lead and holds the tube upright during pouring.
Page 2

Wearing heat-resistant gloves, you can remove the tube within
seconds of pouring the lead, set it aside, and slip another tube over the
base. Pour the second tube full of lead, and then give the first tube a
sharp down and up shake to dislodge the lead billet. Switch tubes, and
continue making billets in this manner.
Always wear eye protection and follow standard precautions
involving the use of hot lead to avoid burns and health risks. Make
the billets in a well-ventilated area. Do not eat or smoke while performing this operation. Make certain no rain or other water droplets
can fall into the molten lead, which may cause an explosion from the
expanding steam.
As the lead cools in the tube, it will tend to shrink at the center
and form a deep hole. You can either ignore this, or fill it with more hot
lead before removing the billet tube from the base. The hole will tend to
make folds or breaks in the lead wire if you extrude this portion through
the die. You can either cut off the end of the billet, or just cut off the bad
wire that will be formed. Do not make the lead billets longer than 4 inches,
to allow proper alignment of the punch in the extruder body.
After the billets have cooled, lubricate them generously with a film
of Corbin Swage Lube. Make sure the billets are kept very clean: grit or dust
on the surface will scratch the extruder walls.
Remove the knock-out bar and ejection pin from the ram of the
Hydro-press. Adjust the bottom sensor position so that the ram will go
down as far as possible without crushing the spring. Make sure the spring is
not compressed to the point where the coils touch each other, or it may be
broken.
Screw the extruder base and punch into the Hydro-press ram. Screw
the extruder body into the press head. Remove the retainer bushing from
the top of the die, and adjust the position of the extruder body so that the
punch enters the mouth of the extruder at least one diameter or about an
inch. Push one of the lubricated lead billets down into the top of the extruder until it rests on the punch. Then set the desired size of extruder die
insert into the top of the extruder body, resting on top of the lead.
The extruder die inserts (LED-D) have one recessed side, and one
smooth, curved side. The smooth, curved side goes against the lead. The
deep recessed hole points up, toward the top of the extruder body. Screw the
retainer bushing into the top of the extruder body.
Turn on the press. Turn off the pressure reverse, load position, and
position reverse switches. Before running the ram up, be sure to read and
understand the following precautions:
CAUTION:
Trapped air, compressed in the die, can cause a piece of lead to
break off the last part of the extruded lead wire and shoot it with
lethal force from the top of the extruder under some rare circumstances. Therefore, never place any part of your body over the top
of the die while extruding lead wire!
It is highly recommended that you arrange a metal pipe or tube to
guide the lead above the height where a person could lean over the
extruder top or even reach over it, and to mount a thick piece of
wood on the ceiling over the extruder so that if a piece of lead
should ever be expelled at high speed, it would not penetrate the
ceiling!
The velocity at which lead is extruded depends on the ratio of diameters between the billet, and the wire. Small diameter wires will
shoot rapidly from the die. Friction generated by extrusion will cause
the lead to become heated, possibly enough to cause serious burns.
Therefore, handle the lead only with thick gloves when it first extrudes from the die.
Start the ram moving up, and increase the drive pressure until lead extrudes from the top of the die. Once lead begins extruding, it usually moves
very fast as the die heats up. The extrusion pressure on the gauge may be as
high as 1,950 psi with small diameter wires. The lead should extrude completely in a few seconds. There will be a small amount of lead still in the die
insert, which holds it to the top of the extrusion chamber. Lower the ram,
and unscrew the punch from the punch base to insert another lubricated
billet of lead (lubrication can cut the force by as much as half - be sure to
do it). The individual lead billets probably will not weldtogether in the
wire, but will leave a section of wire that has an over-lapping joint, not
mechanically sound. You may wish to snip off the ends of the wire to get
rid of this defective segment at the start of each following extrusion.
To remove the die insert, unscrew the retainer bushing and use the punch
to push the die out the top of the extruder body. (Lead may hold it too
firmly in place to move by hand).
 Loading...