

Page 1

REFRIGERADOR
FRIDGE
ZC 340 D4
LIBRO DE INSTRUCCIONES
INSTRUCTION BOOKLET
2222 285-52
Page 2

2
ADVERTENCIAS Y CONSEJOS IMPORTANTES
Es muy importante conservar este libro de instrucciones junto al aparato por si fuera necesario
consultarlo. Si el aparato se vendiese o transfiriese a otra persona, acuérdese de entregarlo junto con
él para que el nuevo propietario conozca el funcionamiento de la máquina y sus advertencias.
En caso de que este aparato, dotado de cierre magnético, sustituya uno con cierre automático,
aconsejamos que la cerradura de este último quede inservible, antes de deshacerse de él. Así se
evitará que los niños, jugando, puedan quedarse encerrados dentro, con grave peligro de sus vidas.
Estas advertencias han sido redactadas para su seguridad y para la seguridad de los demás. Le
rogamos, por lo tanto, leerlas atentamente antes de instalar y utilizar el aparato.
Seguridad
• Desenchufar el aparato antes de efectuar
cualquier operación de limpieza y mantenimiento
(como la sustitución de la bombilla de iluminación
en los aparatos que la poseen).
• Este aparato ha sido proyectado para ser usado
por adultos. Por lo tanto, tener cuidado que los
niños no se acerquen para jugar con él.
• Es peligroso modificar o intentar modificar las
características de este aparato.
• Quitar siempre el enchufe de la toma de corriente
antes de efectuar cualquier operación de limpieza o
manutención (como la substitución de la bombilla en
aquellos aparatos que la tienen).
• No consumir nunca los cubitos de hielo recién
sacados del congelador ya que podrían provocar
quemaduras.
• Estos aparatos son pesados. Tener cuidado en
los desplazamientos.
• Este aparato contiene hidrocarburos en el circuito
refrigerante; por lo tanto el mantenimiento y la
recarga deben ser efetuados exclusivamente por
personal autorizado de la empresa.
• Este aparato no contiene en el circuito
refrigerante y en el aislamiento, gases
refrigerantes nocivos para el ozono. El
aparato no debe ser eliminado junto con los
deshechos urbanos y chatarras. Se debe
evitar el daño del circiuto refrigerante, sobre
todo en la parte posterior cerca del
intercambiador.
Las informaciones sobre los centros de
recepción son suministradas por las
autoridades municipales.
• Prestar la máxima atención durante las
operaciones de desplazamiento para no dañar
las partes del circuito refrigerante a fin de
evitar las posibles salidas de líquido.
• El aparato no debe ser colocado cerca de
termosifones o cocinas a gas.
• Evitar la exposición prolongada del aparato a
los rayos solares.
• La parte posterior del aparato debe recibir
una circulación de aire suficiente y se debe
evitar cualquier daño al circuito refrigerante.
• Solamente para los congeladores (excluidos
los empotrados): su mejor ubicación es el
sótano.
Asistencia
• Cualquier modificación que eventualmente fuese
necesaria a la instalación eléctrica doméstica
para poder instalar el aparato tiene que ser
realizada sólo por personal competente.
• Para eventuales intervenciones dirigirse a un
Centro de Asistencia Técnica autorizado y exigir
las piezas de repuesto originales.
• En caso de necesitar reparaciones no intentar
hacerlas personalmente. Las reparaciones
efectuadas por personas no competentes pueden
provocar daños. Ponerse en contacto con el
Centro de Asistencia más cercano y emplear sólo
repuestos originales.
Uso
• Los frigoríficos y/o congeladores domésticos
están destinados sólo a la conservación y/o
congelación de alimentos.
• Las mejores prestaciones se obtienen con
temperaturas ambiente comprendidas entre
+18°C y +43°C (Clase T); +18°C y +38°C (Clase
ST); +16°C y +32°C (Clase N); +10°C y +32°C
(Clase SN); la clase de pertenencia está indicada
en la placa matrícula situada en la cámara al lado
del cajón verduras.
Atención: en caso de temperaturas ambiente
diferentes de las indicadas para la clase climática
a la cual pertenece este producto, es preciso
observar las indicaciones siguientes: cuando la
temperatura ambiente desciende por debajo del
valor mínimo puede suceder que la temperatura
de conservación en el vano congelador no esté
garantizada; por lo tanto, se aconseja que se
consuman a lo más pronto los alimentos
presentes en su interior.
Imprimido en papel reciclado
19
Rear spacers
In the bag with the documentation, there are two
spacers which must be fitted in the two top
corners.
Slacken the screws and insert the spacer under the
screw head, then re-tighten the screws.
D594
Changing the opening direction of
the doors
Before carrying out any operations, remove the plug
from the power socket.
To change the opening direction of the door,
proceed as follows:
1. pull off the ventilation grille (D) which is clipped
into place;
2. remove the bottom hinge (E) by unscrewing its
three fixing screws;
3. remove the door, releasing it from the upper pin
(G);
4. unscrew the upper pin (G) and refit it on the
opposite side;
5. remove the two plugs of the door (where
available), discovering the holes for the hinge
pins, assemble them on the opposite side;
6. reassemble the door;
7. using a 10 mm spanner, unscrew the hinge pin
(E) and reassemble it on the opposite side of the
hinge;
8. reassemble the lower hinge (E) on the opposite
side, using the screws previously removed; insert
the hole cover (G) on the lower hinge. Slide the
hole cover (F) out of the ventilation grille (D) by
pushing it in the direction of the arrow and
reassemble it on the opposite side;
9. refit the ventilation grille (D), clipping it into
place.
10.Dismantle the handle and reassemble it on the
opposite side. Cover the holes left open with the
plugs contained in the documentation pack.
Warning:
After having reversed the opening direction of
the doors check that all the screws are properly
tightened and that the magnetic seal adheres to
the cabinet. If the ambient temperature is cold
(i.e. in Winter), the gasket may not fit perfectly to
the cabinet. In that case, wait for the natural
fitting of the gasket or accelerate this process by
heating up the part involved with a normal
hairdrier.
G
F
D
PR18
F
F
F
E
E
D162/a
Page 3
3
INDICE
Advertencias y consejos importantes 2
Uso 4
Limpieza de las partes internas 4
El tablero de control 4
Arranque 4
Regulacíon de la temperatura 4
Refrigeracíon de alimentos y bebidas 5
Rejillas movibles 5
Ubicación estantes de la contrapuerta 5
Botellero 5
Circulación de aire 6
Consejos 7
Consejos para refrigeración 7
Manutención 7
Limpieza periódica 7
Temporadas largas de inactividad 7
Lámpara de iluminación 7
Desescarche 8
Como actuar si el aparato no funciona 8
Instalación 9
Colocación 9
Conexión elétrica 9
Retenes-Repisas 9
Distanciadores posteriores 10
Reversibilidad de la puerta 10
Protección del
ambiente
Este aparato no contiene en el circuito refrigerante y en el aislamiento, gases refrigerantes
nocivos para el ozono. El aparato no debe ser
eliminado junto con los deshechos urbanos y
chatarras. Se debe evitar el dano del circinto
refrigerante, sobre todo en la parte posterior
cerca del intercambiador. Las informaciones
sobre los centros de recepciõn son
suministradas por las autoridades municipales;
Los materiales usados en este aparato
marcados con el simbolo son reciclables.
• En todos los aparatos de refrigeración y congelación
existen superficies que se cubren con escarcha.
Según el modelo, la escarcha puede ser eliminada
automáticamente (desescarche automático) o
manualmente. No intentar nunca quitar la escarcha
con un objeto puntiagudo ya que se podría dañar
irremediablemente el evaporador. Utilizar para ello
sólo el rascador de plástico que se suministra con el
aparato. Por el mismo motivo no despegar nunca las
cubetas del hielo con un cuchillo o cualquier otro
objeto puntiagudo.
• No colocar en el compartimiento de la baja
temperatura (congelador o conservador) bebidas
gaseosas que podrían explotar
Instalación
• El aparato se calienta considerablemente en la
proximidad del condensador y del compresor, por lo
tanto hay que verificar que el aire pueda circular
libremente alrededor del mismo. Una ventilación
insuficiente puede causar un mal funcionamiento y
daños al aparato. Seguir cuidadosamente las
instrucciones que se dan para la instalación.
• Una vez instalado el aparato verificar que no esté
apoyado sobre el cable de alimentación.
Importante: en caso de que el cable de
alimentación se dañe, deberá ser sustituido con
un cable especial. Ambos cables pueden ser
solicitados al fabricante o al Servicio de
asistencia.
• Si el aparato es transportado en forma horizontal
es posible que el aceite contenido en el
compresor pase al circuito refrigerante. Esperar
por lo menos dos horas antes de poner en
marcha el aparato para dar tiempo a que el
aceite regrese al compresor.
18
Electrical connection
Before plugging in, ensure that the voltage and
frequency shown on the serial number plate
correspond to your domestic power supply. Voltage
can vary by ±6% of the rated voltage.
For operation with different voltages, a suitably sized
auto-transformer must be used.
The appliance must be earthed.
The power supply cable plug is provided with a
contact for this purpose.
If the domestic power supply socket is not earthed,
connect the appliance to a separate earth in
compliance with current regulations, consulting a
specialist technician.
The Manufacturer declines all responsibility if
the above safety precautions are not observed.
This appliance complies with the following
E.E.C. Directives:
- 87/308 EEC of 2/6/87 relative to radio interference
suppression.
- 73/23 EEC of 19.2.73 (Low Voltage Directive) and
subsequent modifications;
- 89/336 EEC of 3.5.89 (Electromagnetic
Compatibility Directive) and subsequent
modifications.
INSTALLATION
Location
The appliance should be installed well away from
sources of heat such as radiators, boilers, direct
sunlight etc.
Ensure that air can circulate freely around the back
of the cabinet. To ensure best performance, if the
appliance is positioned below an overhanging wall
unit, the minimum distance between the top of the
cabinet and the wall unit must be at least 100 mm
(A). Ideally, however, the appliance should not be
positioned below overhanging wall units (B).
Accurate levelling is ensured by one or more
adjustable feet at the base of the cabinet.
It must be possible to disconnect the appliance from
the mains power supply; the plug must therefore be
easily accessible after installation
Shelf holders
Your appliance is equipped with shelf retainers that
make it possible to secure the shelves during
transportation.
To remove them proceed as follows:
Move the shelf holders in the direction of the arrow,
raise the shelf from the rear and push it forward until
it is freed and remove the retainers.
100 mm10 mm
A
NP00
B
10 mm
A
B
C
Page 4

4
Limpieza de las partes internas
Antes del empleo limpiar todas las partes internas
con agua tibia y jabón neutro, a fin de eliminar el
característico olor de nuevo y secarlas luego
cuidadosamente.
No emplear detergentes o polvos
abrasivos que podrían dañar las
superficies.
Arranque
Introduzca el enchute eléctrico en la toma de
corriente de pared más cercana
Gire el botón del termostato (B) hacia la derecha
inasta una posición intermedia (se encenderá la luz
de la temperatura (A)).
Regulación de la temperatura
La temperatura se regula automaticámente y puede
ser aumentada (menos frío) girando el mando hacia
los ● o bien se puede disminuir (más frío) girándolo
hacia ● . De todos modos, la colocación del mando
se determina teniendo en cuenta que la temperatura
interna depende:
• de la temperatura ambiente;
• de la frecuencia de aperatura de la puerta;
• de la cantidad de alimentos conservados;
• de la colocación del aparato.
USO
Importante:
En las posiciones de máximo frío, con
temperatura ambiente elevada, el
funcionamiento puede ser continuo, con
consiguiente formación de escarcha en la parte
posterior del compartimiento; en tal caso es
necesario girar el mando a una posición de
menor frío, a fin de consentir la eliminacíon
automática de la escarcha y, como
consecuencia, obtener un consumo menor de
energía eléctrica.
El tablero de control
A - Luz de control de funcionamiento
B - Botón del termostato
17
CUSTOMER SERVICE AND SPARE PARTS
If the appliance is not functioning properly, check
that:
• the plug is firmly in the wall socket and the mains
power switch is on;
• there is an electricity supply (find out by plugging
in another appliance);
• the thermostat knob is in the correct position.
• If there are water drops on the bottom of the
cabinet, check that the defrost water drain
opening is not obstructed (see “Defrosting”
section).
• If your appliance is still not working properly after
making the above checks, contact the nearest
service centre.
To obtain fast service, it is essential that when you
apply for it you specify the model and serial number
of your appliance which can be found on the
guarantee certificate or on the rating plate located
inside the appliance, on the bottom left-hand side.
Defrosting
Frost is automatically eliminated from the evaporator
of the refrigerator compartment every time the motor
compressor stops, during normal use. The defrost
water drains out through a trough into a special
container at the back of the appliance, over the
motor compressor, where it evaporates.
It is important to periodically clean the defrost
water drain hole in the middle of the refrigerator
compartment channel to prevent the water
overflowing and dripping onto the food inside.
Use the special cleaner provided, which you will
find already inserted into the drain hole.
Important:
Never use sharp metal tools to scrape off frost
from the evaporator as you could damage it.
Do not use a maechanical device or any artificial
means to speed up the thawing process other
than those recommended by the manufacturer.
D037
A B
Page 5

5
Ubicación estantes de la
contrapuerta
Para poder colocar confecciones de varios tamaños
es posible colocar los estantes de la contrapuerta a
varias alturas.
La operación se efectúa de la siguiente manera:
Empujar gradualmente el estante en el sentido
indicado por las flechas hasta llegar a
desengancharlo, luego volverlo a montar en la
posición deseada.
PR260
D338
Rejillas movibles
En las paredes del compartimento existen unas
guías que consienten poner las rejillas a distintas
alturas.
Refrigeracíon de alimentos y bebidas
Para utilizar de la mejor manera el compartimiento
refrigerante, es necesario:
• no introducir comidas calientes o líquidos en en
evaporacíon;
• tapar o envolver los alimentos, especialmente si
son aromáticos;
• no colocar sobre las rejillas papeles, cartones o
plásticos que obstaculicen la circulacíon del aire.
Botellero
Poner las botellas (con la boca hacia adelante) en la
repisa prevista.
Si la repisa está puesta horizontal, poner sólo
botellas cerradas.
Esta repisa botellero se puede inclinar para poder
guardar botellas ya abiertas.
Para ello tirar de la repisa hacia arriba de manera
que pueda girarse y engancharse en la ranura
superior.
16
MAINTENANCE
Periods of non-operation
When the appliance is not in use for long periods,
take the following precautions:
remove the plug from the wall socket;
remove all food;
defrost and clean the interior and all accessories;
leave the door ajar to allow air to circulate to prevent
unpleasant smells.
HINTS
Hints for refrigeration
Useful hints:
Meat (all types): wrap in polythene bags and place
on the glass shelf above the vegetable drawer.
For safety, store in this way only one or two days
at the most.
Cooked foods, cold dishes, etc..: these should be
covered and may be placed on any shelf.
Fruit and vegetables: these should be thoroughly
cleaned and placed in the special drawer(s)
provided.
Butter and cheese: these should be placed in
special airtight containers or wrapped in aluminium
foil or polythene bags to exclude as much air as
possible.
Milk bottles: these should have a cap and should
be stored in the bottle rack on the door.
Bananas, potatoes, onions and garlic, if not
packed, must not be kept in the refrigerator.
Interior light
If it becomes necessary to replace the lamp, press
on the rear hook and at the same time
slide the cover in the direction indicated by the arrow.
Attention:
Replace the lamp with one of the same power (the
maximum power is shown on the light diffuser).
Unplug the appliance before carrying out
any maintenance operation.
Warning
This appliance contains hydrocarbons in its cooling
unit; maintenance and recharging must therefore
only be carried out by authorized technicians.
Periodic cleaning
Many proprietary kitchen surface cleaners
contain chemicals that can attack/damage the
plastics used in this appliance. For this reason it
is recommended that the outer casing of this
appliance is only cleaned with warm water with a
little washing-up liquid added.
Clean the inside with warm water and bicarbonate of
soda.
Rinse and dry thoroughly.
Clean the condenser (black grill) and the
compressor at the back of the appliance with a
brush or a vacuum cleaner.This operation will
improve the performance of the appliance and save
electricity consumption.
Page 6

6
Circulación de aire
El compartimiento frigorífico está provisto de un
ventilador especial D.A.C. (Dynamic Air Cooling) que
se activa actuando sobre el interruptor (ver fig. 1); el
piloto verde encendido indica que el ventilador está
en marcha.
Se aconseja el uso del ventilador (D.A.C.) cuando la
temperatura ambiente exceda de los 25°C.
Cabe recordar que el mando del termostato del
frigorífico debe ajustarse (ver fig. tablero de control)
dentro del sector .
Este dispositivo consiente la refrigeración rápida de
los alimentos y la máxima uniformidad de temperatura
en el compartimiento.
Fig. 1
15
Air recycling
The refrigerator compartment is equipped with a
special D.A.C.(Dynamic Air Cooling) fan which can
be turned on with the switch ( see fig. 1).The green
light, when on, means that the fan is working.
It is suggested that the fan (D.A.C.) be used when
the ambient temperature exceeds 25°C .
It should be remembered that the thermostat knob
must be placed (see fig. Control Panel) within the
sector .
This device allows for rapid cooling of foods and a
more uniform temperature in the compartment.
SWITCH
Fig. 1
INTERRUPTOR
Page 7

7
CONSEJOS
Consejos para refrigeración
Para un correcto uso aconsejamos:
Carne: debe ser envuelta en saquitos de plástico y
colocada en el espacio situado sobre los cajones
verdura.
En esta posicíon la carne puede ser conservada
al máximo por 1 a 2 dias.
Alimentos cocinados , platos fríos, etc. tienen
que conservarse bien cubiertos y se pueden colocar
en cualquier bandeja del frigorífico.
Fruta y verdura: una vez lavada, ha de colocarse
en el cajón (cajones) inferior.
Mantequilla y queso: deben colocarse en los reci-
pientes adecuados o envueltos en hojas de aluminio
o politileno, a fin de evitar el contacto con el aire.
Leche embotellada: bien tapada, en la contropuerta.
Bananas, papas, cebollas y ajo, si no están
confeccionados, no se deben colocar en
frigorífico.
MANUTENCIÓN
Temporadas largas de inactividad
Durante los períodos en los cuales el aparato no
esté funcionando observar las siguientes
precauciones:
• desenchufarlo;
• sacar todos los alimentos;
• limpiar cuidadosamente el interior y todos los
accesorios.
• Dejar las puertas entornadas para facilitar la
circulación del aire, a fin de evitar la formación de
olores desagradables.
Lámpara de iluminación
Para la sustitución eventual de la lámpara oprimir el
enganche posterior y al mismo tiempo sacar la tapa
en dirección de las flechas.
Atención:
Sustituir la lámpara por otra de igual potencia (la
potencia máxima está indicada en el difusor de luz).
Desenchufar siempre el aparato antes de
proceder a cualquier operación de
limpieza.
Atención
Este aparato contiene hidrocarburos en el circuito
refrigerante; por lo tanto el mantenimiento y la
recarga deben ser efectuados exclusivamente por
personal autorizado por la empresa.
Limpieza periódica
Muchos detergentes específicos para las
superficies de cocina contienen agentes
químicos que puede atacar/perjudicar las partes
en plástico presentes en este aparato. Se
aconseja pues limpiar el revestimiento de este
aparato sólo con agua caliente que contenga
una pequeña cantidad de detergente líquido para
vajillas.
Limpiar el interior con agua templada y bicarbonato
y las partes exteriores esmaltadas con cera a la
silicona; limpiar el condensador y el motocompresor
con un cepillo o un aspirador.
Esta operación mejorará el funcionamiento con el
consiguiente ahorro de energia.
14
Positioning the door shelves
To permit storage of food packages of various sizes,
the door shelves can be placed at different heights.
To make these adjustments proceed as follows:
Gradually pull the shelf in the direction of the arrows
until it comes free, then reposition as required.
Movable shelves
The walls of the refrigerator are equipped with a
series of runners so that the shelves can be
positioned as desired.
Fresh food refrigeration
To obtain the best performance:
• do not store warm food or evaporating liquids in
the refrigerator;
• do cover or wrap the food, particularly if it has a
strong flavour.
• Position food so that air can circulate freely round
it.
Bottle holder
Place the bottles (with the opening facing front) in
the pre-positioned shelf.
If the shelf is positioned horizontally, place only
closed bottles.
This bottle holder shelf can be tilted in order to store
previously opened bottles.
To obtain this result, pull the shelf up so it can rotate
upwards and be placed on the next higher level.
D338
PR260
Page 8

8
COMO ACTUAR SI EL APARATO NO FUNCIONA
Si el aparato presentase anomalías será oportuno
controlar:
• Que esté bien enchufado y que el interruptor de
la instalación eléctrica esté conectado.
• Que no haya un corte de energía eléctrica.
• Que el mando del termostato se encuentre en su
posición correcta.
• Si el compresor funciona sin interrupción,
verificar que el termostato no se encuentre en
una posición
• Además si el aparato hace demasiado ruido
verificar que los costados no estén en contacto
con muebles que pueden causar ruidos o
vibraciones y que la unidad refrigerante no vibre.
• Si se ven restos de agua en el fondo del
refrigerador comprobar que el orificio de
desagüe de la escarcha derretida no esté
obturado (ver cápitulo Desescarche).
Después de hacer las verificaciones anteriores, si la
anomalía persiste, llame al Centro de Asistencia
Técnica más cercano.
Es importante en el momento de llamar
proporcionar la referencia del modelo y el
número de matrícula del aparato indicados en el
certificado de garantía o en la tarjeta matrícula.
Desescarche
La escarcha del evaporador del compartimento
refrigerante se elimina automáticamente a cada
interrupcion del motocompresor. El agua de la
escarcha derretida, mediante un canal adecuado, se
recoge en un pequeño depósito colocado en la
parte posterior sobre el motocompresor del aparato,
de donde evapora.
Se recomienda limpiar periódicamente el agujero
de desagüe del agua de desescarche, situado en
la parte central del canal en el compartimiento
refrigerante, utilizando el «limpiador» adecuado
que se encuentra en el agujero, para evitar que
el agua de desescarche caiga sobre los
alimentos.
Atención
Se recomienda no utilizar utensilios metálicos
para quitar la escarcha a fin de evitar graves
daños al aparato.
No usar dispositivo mecánico alguno u otro
medio artificial para acelerar el processo de
desescarche excepto los recomendados.
13
Cleaning the interior
Before using the appliance for the first time, wash
the interior and all internal accessories with lukewarm water and some neutral soap so as to remove
the typical smell of a brand-new product, then dry
thoroughly.
Do not use detergents or abrasive
powders, as these will damage the finish.
Temperature regulation
The temperature is automatically regulated and can
be increased to achieve a higher temperature
(warmer) by rotating the thermostat knob toward
●
settings or reduced (colder) rotating the knob
towards ● settings.
However, the exact setting should be chosen
keeping in mind that the temperature inside the
refrigerator depends on:
• room temperature;
• how often the door is opened;
• the quantity of food stored;
• location of appliance.
USE
Important
If the ambient temperature is high or the
appliance is fully loaded, and the appliance is
set to the lowest temperatures, it may run
continuously causing frost to form on the rear
wall. In this case the dial must be set to a higher
temperature to allow automatic defrosting and
therefore reduced energy consumption.
Control panel
A B
A. Pilot light
B. Thermostat knob
Operation
Insert the plug into the wall socket.
Turn the thermostat knob (B) to the right to a
medium setting (the function indicator light (A) will
light up .
D037
Page 9

9
Conexión eléctrica
Antes de enchufar el aparato, asegurarse de que la
tensión y la frecuencia indicadas en la tarjeta
matrícula, correspondan a las de la instalación
doméstica. Se admite una oscilación de 6% sobre la
tensión nominal.
Para el funcionamiento a tensiones distintas, habrá
que utilizar un autotransformador de potencia
adecuada. Asegurarse de que la toma de corriente y
el enchufe sean compatibles entre sí sin tener que
interponer reducciones ladrones o adaptadores
varios. Si fuera necesario, cambiar la toma de la
instalación de la casa con una adapta.
Es indispensable conectar el aparato a una toma
de tierra eficaz.
Para ello el enchufe del cable de alimentación está
dotado de un adecuado contacto. Si la toma de
corriente de la instalación doméstica no estuviera
conectada a tierra, conectar el aparato a una
instalación de tierra, conforme a las leyes en vigor,
consultando para ello con un técnico especializado.
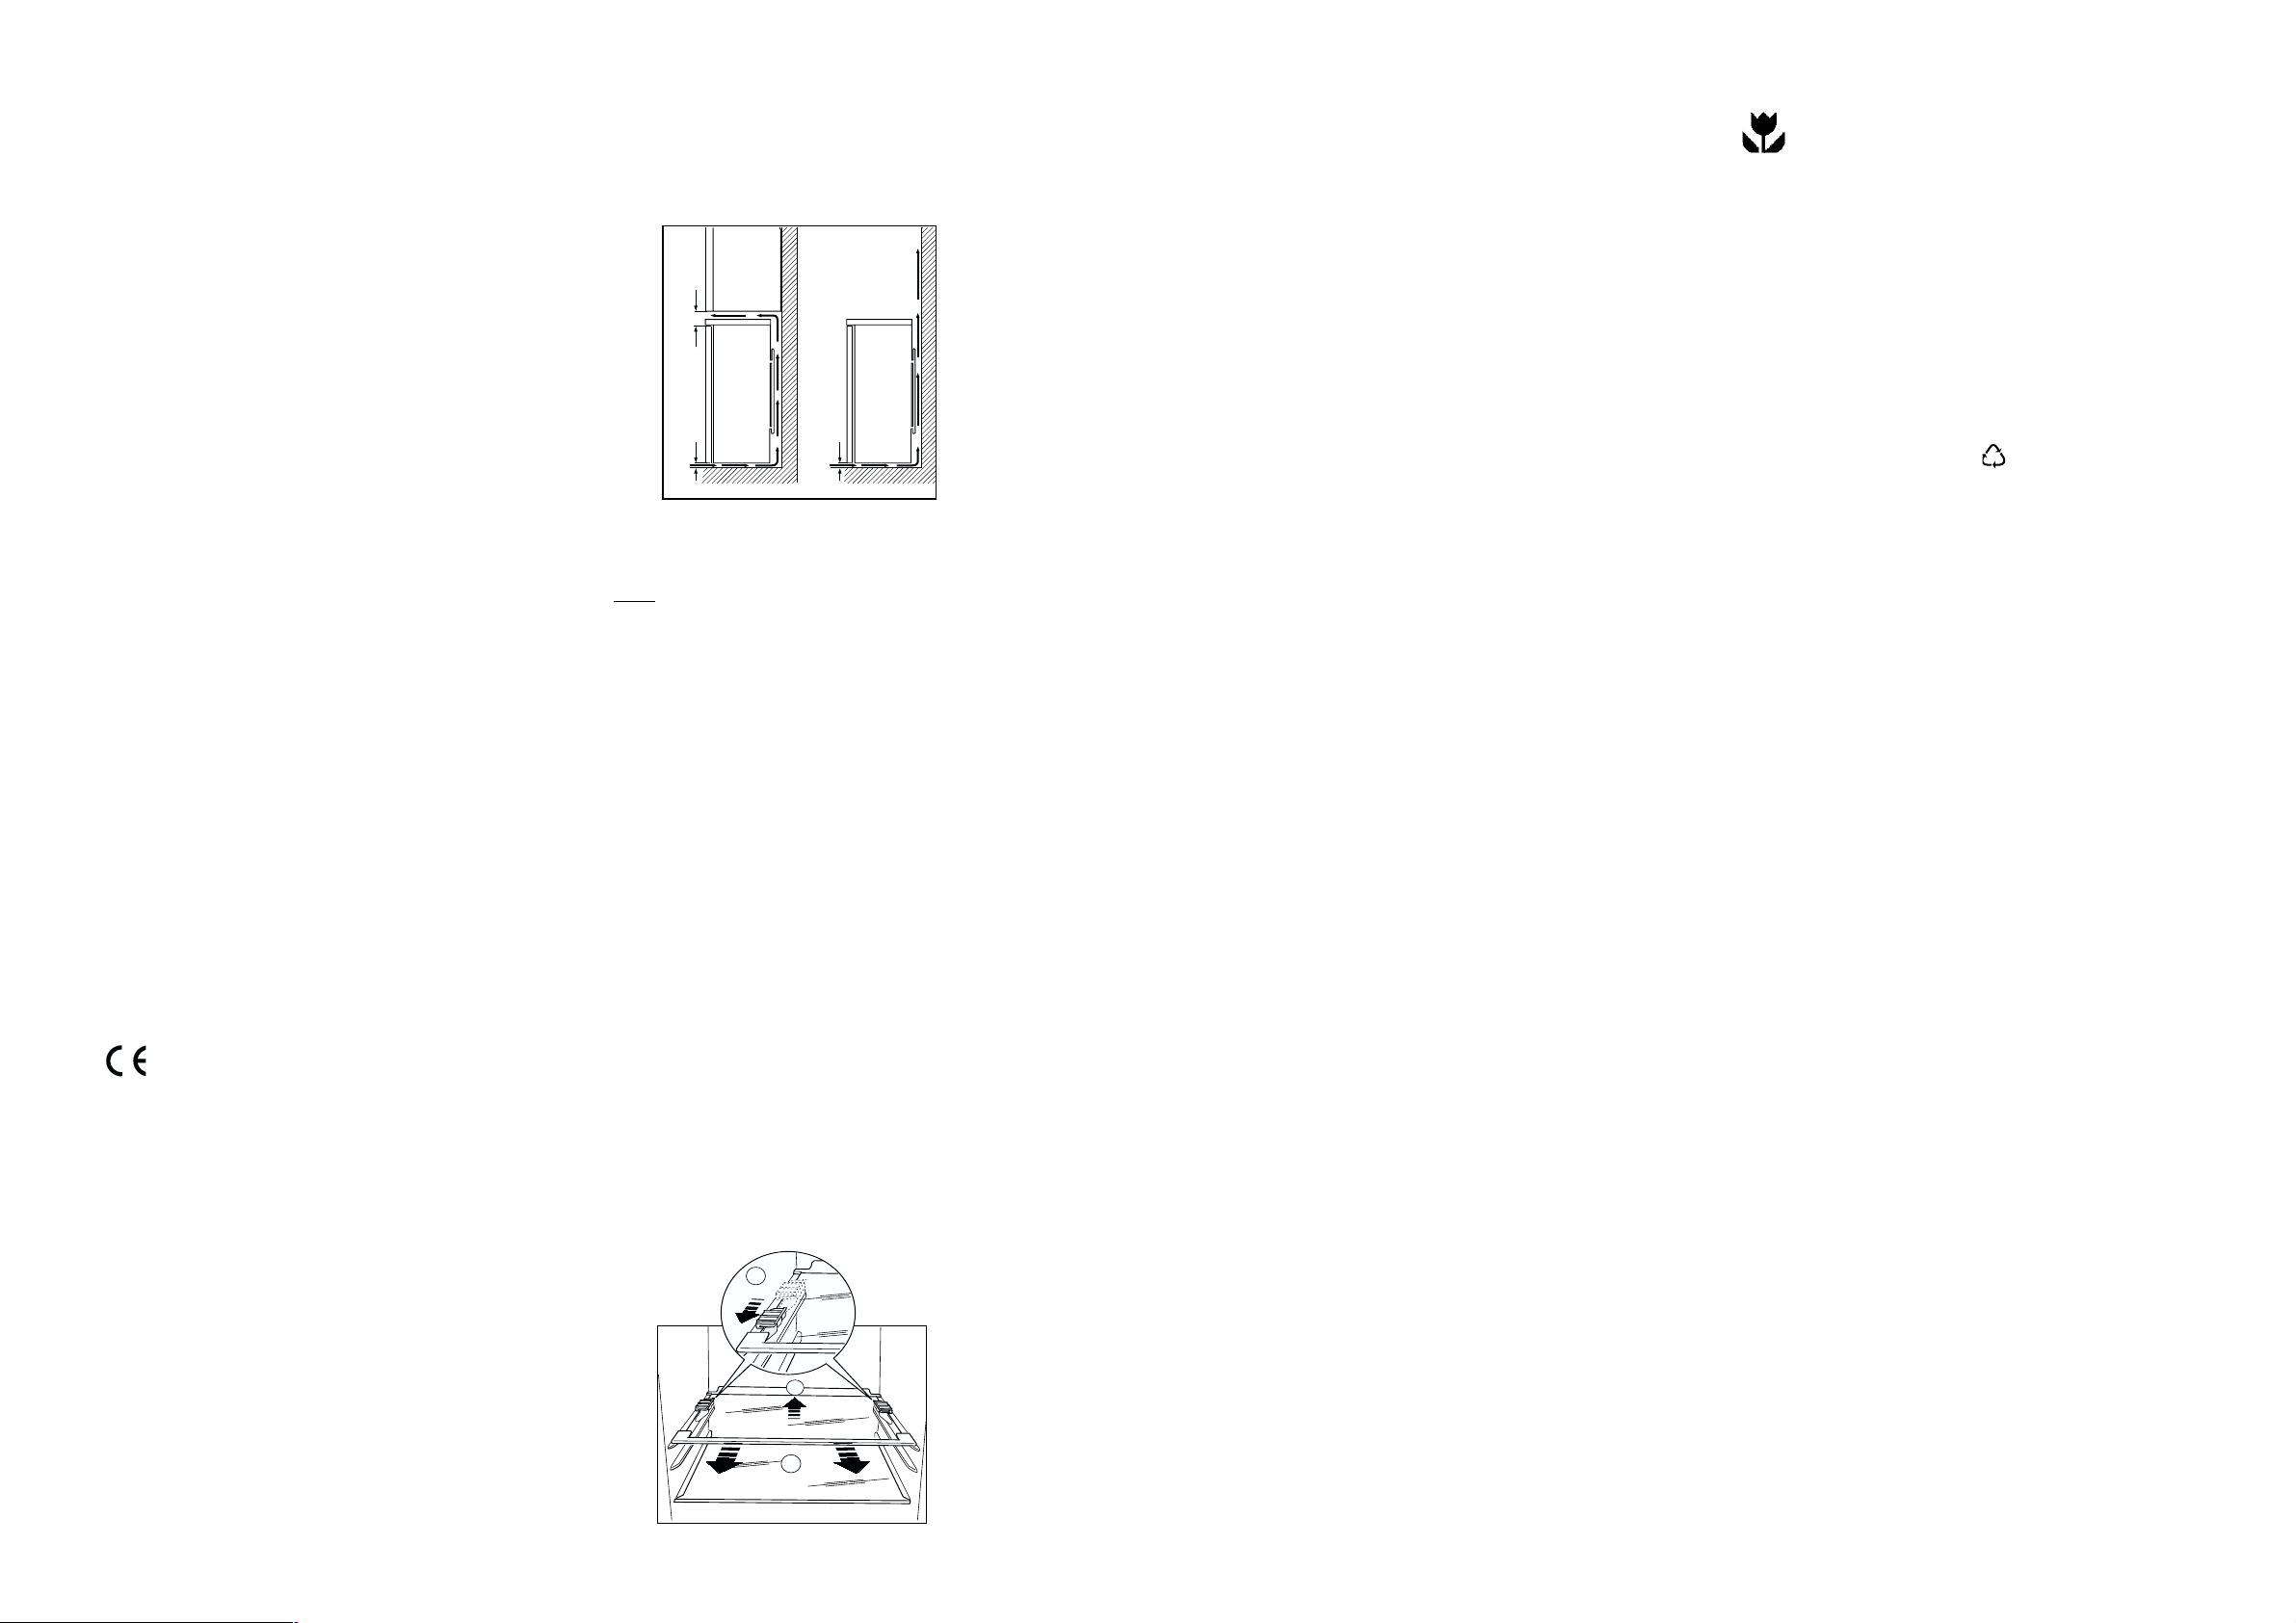
INSTALACIÓN
Colocación
Situar el aparato lejos de fuentes de calor, como:
radiadores, estufas, exposición directa a los rayos
del sol, etc.
Asegurarse de que en les partes posterior, superior
e inferior no haya ningún obstáculo que impida la
circulacidn del aire.
Para que el aparato rinda mejor, la distancia mínima
entre la parte superior y el eventual mueble pénsil
de encima, debería ser por lo menos de 100 mm
(A).
La solución preferible, de todos modos, seria la
ilustrada en la B (sin mueble).
Dos patas graduables, situadas en la base del
mueble, consienten rivelarlo a la perfección.
Asegurarse de que la toma de corriente y el enchute
sean compatibles entre sí sin tener que interponer
reducciones ladrones o adaptadores varios. Si fuera
necesario, cambiar la toma de la instalación de la
casa con una adepta.
100 mm10 mm
10 mm
A
B
NP00
Se debe poder desenchufar el aparato; por lo tanto
una vez efectuada la instalación es necesario que el
enchufe no quede escondido
El fabricante declina toda responsabilidad en el
caso que esta norma no sea respetada.
Este aparato es conforme a las siguientes
Directivas Comunitarias:
- 87/308 CEE del 2/6/87 relativa a la supresión de
interferencias radio.
- 73/23 CEE 19/02/73 (Baja tensión) y
modificaciones sucesivas;
- 89/336 CEE 03/05/89 (Compatibilidad
electromagnética) y modificaciones sucesivas.
Retenes-Repisas
Su aparato dispone de retenes-repisas que
permiten bloquear las repisas durante el transporte.
Para quitarlos actuar como sigue:
mover los retenes-repisas en la dirección de la
flecha, subir el vidrio por la parte trasera y
empujarlo hacia adelante hasta que queda libre,
seguidamente quitar los retenes.
A
C
B
12
CONTENTS
Warnings 11
Use 13
Cleaning the interior 13
Control panel 13
Operation 13
Temperature regulation 13
Fresh food refrigeration 14
Movable shelves 14
Positioning the door shelves 14
Bottle holder 14
Air recycling 15
Hints 16
Hints for refrigeration 16
Maintenance 16
Periodic cleaning 16
Periods of no operation 16
Interior light 16
Defrosting 17
Customer service and spare parts 17
Installation 18
Location 18
Electrical connection 18
Shelf holders 18
Rear spacers 19
Changing the opening direction of the door 19
Environment Protection
This appliance does not contain gasses which
could damage the ozone layer, in either its
refrigerant circuit or insulation materials.The
appliance shall not be discarded together with
the urban refuse and rubbish. Avoid damaging
the cooling unit, especially at the rear near the
heat exchanger. Information on your local
disposal sites may be obtained from municipal
authorities.The materials used on this appliance
marked by the symbol are recyclable.
Installation
• During normal operation, the condenser and
compressor at the back of the appliance heat up
considerably. For safety reasons, minimum
ventilation must be as shown in the instructions.
Attention: keep ventilation openings clear of
obstruction.
• Care must be taken to ensure that the appliance
does not stand on the electrical supply cable.
Important: if the supply cord is damaged, it must
be replaced by a special cord or assembly available from the manufacturer or its service agent.
• If the appliance is transported horizontally, it is
possible that the oil contained in the compressor
flows in the refrigerant circuit. It is advisable to
wait at least two hours before connecting the
appliance to allow the oil to flow back in the
compressor.
• There are working parts in this product which
heat up. Always ensure that there is adequate
ventilation as a failure to do this will result in
component failure and possible food loss. See
installation instructions.
• Parts which heat up should not be exposed.
Wherever possible the back of the product should
be against a wall.
Page 10

10
Reversibilidad de la puerta
Desconecte el enchufe antes de efectuar cualquier
tipo de operación.
Para cambiar la dirección de apertura de la puerta,
proceda de la manera siguiente:
1. Extraiga la rejilla de ventilación (D) encajada.
2. Desmonte el cubreagujero (G) y la bisagra
inferior (E) desenroscando los dos tornillos que
la fijan.
3. levante y saque la puerta del perno (G),
desenrosque el perno y colóquelo en el lado
opuesto;
4. Quite los dos tapones de las puertas (donde
están previstos), dejando descubiertos los
agujeros para los pernos de la bisagra y vuelva a
montarlos en el lado opuesto;
5. vuelva a montar la puerta;
6. Con una llave de 10 mm desenrosque el perno de
la bisagra (E) y vuelva a montarlo en el lado
opuesto de la bisagra.
7. Vuelva a montar la bisagra inferior (E) en el lado
opuesto utilizando los tornillos que se habían
quitado; introduzca los cubreagujeros (G) en la
bisagra inferior. Quite los cubreagujeros (F) de la
rejilla de ventilación (D) empujándolos en el
sentido de la flecha y móntelos nuevamente en el
lado opuesto.
8. Vuelva a montar la rejilla de ventilación (D)
encajándola.
9. Desenrosque la manilla. Colóquelas nuevamente
en el lado opuesto después de haber perforado
los tapones con un punzón. Cubra los agujeros
que han quedado descubiertos con los tapones
contenidos en la bolsita entregada junto con la
documentación.
Atención
Terminada la operación de reversibilidad de la
puerta, controlar que la empaquetadura magnética
esté adherida al mueble. Si la temperatura ambiente
es fría (por ejemplo en invierno), puede suceder que
la empaquetadura no adhiera perfectamente al
mueble. En este caso esperar que la
empaquetadura se recobre en forma natural o bien
acelerar dicho proceso calentando la parte
interesada con un normal secador de cabellos.
Distanciadores posteriores
En la bolsita de la documentacion hay dos
distanciadores que deberàn ser montados como se
muestra en la figura.
Aflojar los tornillos, introducir el distanciador debajo
de la cabeza del tronillo y volver a atornillar.
11
WARNINGS
It is most important that this instruction book should be retained with the appliance for future
reference. Should the appliance be sold or transferred to another owner, or should you move house
and leave the appliance, always ensure that the book is supplied with the appliance in order that the
new owner can be acquainted with the functioning of the appliance and the relevant warnings.
If this appliance featuring magnetic door seals is to replace an older appliance having a spring lock
(latch) on the door or lid, be sure to make that spring lock unusable before you discard the old
appliance. This will prevent it from becoming a death-trap for a child.
These warnings are provided in the interest of safety.You must read them carefully before installing or
using the appliance.
General Safety
• This appliance is designed to be operated by
adults. Children should not be allowed to tamper
with the controls or play with the product.
• It is dangerous to alter the specifications or
modify this product in any way.
• Before any cleaning or maintenance work is carried
out, be sure to switch off and unplug the appliance.
• This appliance is heavy. Care should be taken
when moving it
• Ice lollies can cause frost burns if consumed
straight from the appliance.
• Take utmost care when handling your
appliance so as not to cause any damages to
the cooling unit with consequent possible
fluid leakages.
• The appliance must not be located close to
radiators or gas cookers.
• Avoid prolonged exposure of the appliance to
direct sunlight.
• There must be adequate ventilation round the
back of the appliance and any damage to the
refrigerant circuit must be avoided.
• For freezers only (except built-in models): an
ideal location is the cellar or basement.
• Do not use other electrical appliances (such
as ice cream makers) inside of refrigerating
appliances.
Service/Repair
• Any electrical work required to install this
appliance should be carried out by a qualified
electrician or competent person
• This product should be serviced by an authorized
Service Centre, and only genuine spare parts
should be used.
• Under no circumstances should you attempt to
repair the appliance yourself. Repairs carried out
by inexperienced persons may cause injury or
more serious malfunctioning. Refer to your local
Service Centre, and always insist on genuine
spare parts.
• This appliance contains hydrocarbons in its
cooling unit; maintenance and recharging must
therefore only be carried out by authorized
technicians.
Use
• The domestic refrigerators and freezers are
designed to be used specifically for the storage
of edible foodstuffs only.
• Best performance is obtained with ambient
temperature between +18°C and +43°C (class T);
+18°C and +38°C (class ST); +16°C and +32°C
(class N); +10°C and +32°C (class SN).The
class of your appliance is shown on its rating
plate.
Warning: when the ambient temperature is not
included within the range indicated for the class
of this appliance, the following instructions must
be observed: when the ambient temperature
drops below the minimum level, the storage
temperature in the freezer compartment cannot
be guaranteed; therefore it is advisable to use the
food stored as soon as possible.
• Frozen food must not be re-frozen once it has
been thawed out.
• Manufacturers’ storage recommendations should
be strictly adhered to. Refer to relevant
instructions.
• The inner lining of the appliance consists of
channels through which the refrigerant passes. If
these should be punctured this would damage the
appliance beyond repair and cause food loss. DO
NOT USE SHARP INSTRUMENTS to scrape off
frost or ice. Frost may be removed by using the
scraper provided. Under no circumstances should
solid ice be forced off the liner. Solid ice should be
allowed to thaw when defrosting the appliance.
• Do not place carbonated or fizzy drinks in the
freezer as it creates pressure on the container,
which may cause it to explode, resulting in
damage to the appliance.
D594
G
F
F
PR18
D162/a
E
D
E
F
F
 Loading...