

Page 1
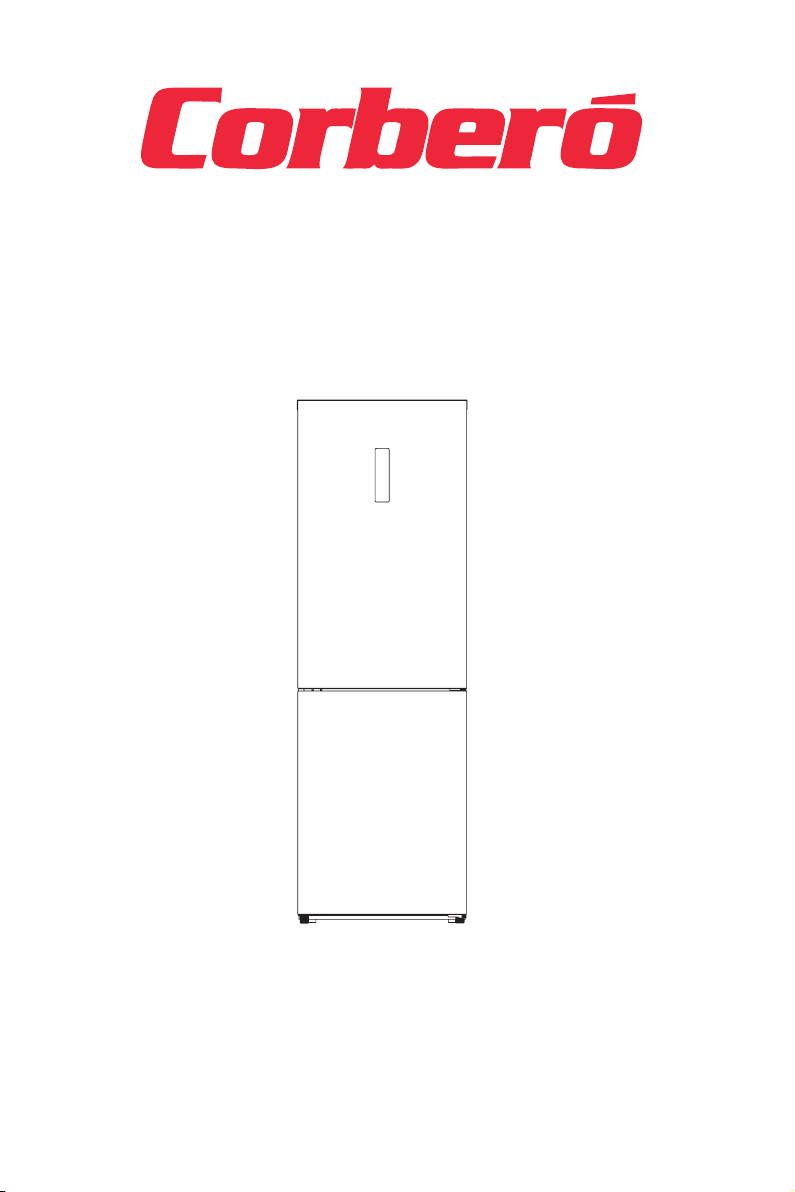
Frigorífico Combi Dos Puertas
con Tecnología NO FROST
Congelador - Frigorífico
Manual de Instrucciones
CCGLH1850W
CCGLH1850N
Para asegurar un uso correcto de este aparato y para su seguridad, por favor,
lea este manual completamente antes de empezar a utilizar el dispositivo.
Page 2

Page 3
INFORMACIÓ N DE SEGURIDAD
Información de seguridad
1
En aras de su seguridad y para garantizar el
uso correcto, antes de la instalación y el primer de
uso de este aparato, lea atentamente este manual
de usuario, incluidos los consejos y advertencias.
Para evitar errores innecesarios y accidentes, es
importante asegurarse de que todas las personas
que utilicen el aparato están completamente
familiarizadas con su funcionamiento y medidas
de seguridad. Guarde estas instrucciones y no
olvide mantenerlas junto al aparato en caso de su
desplazamiento o venta para que quienes lo
utilicen a lo largo de su vida sean debidamente
informados sobre su uso y seguridad. Para la
preservar seguridad de vidas y bienes, siga las
precauciones de este manual de instrucciones ya
que el fabricante no se hace responsable por
daños y perjuicios causada por omisión.
SEGURIDAD EN NIÑ OS Y PERSONAS
VULNERABLES.
● Este aparato no debe ser utilizado por niños ni
personas con las capacidades físicas, sensoriales
o mentales reducidas o con falta de experiencia
y conocimiento, si no es con la supervisión de un
adulto.
Page 4
●Los niños deben ser supervisados para
Información de seguridad
2
asegurarse de que no jueguen con el aparato.
● La limpieza y el mantenimiento del usuario no
deberán ser realizados por niños a menos de que
tengan edades de 8 años en adelante y sean
supervisados.
● Mantener el embalaje lejos de los niños. Puede
● Si usted va a desechar el aparato desconecte el
cable de la toma de corriente, corte el cable de
conexión (tan cerca del aparato como pueda), y
retire la puerta para evitar que algún niño jugando
sufra una descarga eléctrica o quede atrapado en
su interior.
SEGURIDAD GENERAL
ADVERTENCIA! Mantenga las aberturas de
ventilación internas y externas del aparato libre de
obstáculos.
ADVERTENCIA! No utilice dispositivos mecánicos u
otros medios para acelerar el proceso de
descongelación que no sean los recomendados
por el fabricante.
ADVERTENCIA! No dañe el circuito de frío.
ADVERTENCIA! No utilice otros aparatos eléctricos
en el interior de los aparatos de refrigeración, a
Page 5
menos que sean autorizados para tal fin por el
Información de seguridad
3
fabricante.
● No guarde latas de aerosol con un propulsor
inflamable en este aparato, podrían explotar
● El isobutano (R600a) que contiene el frigorífico
dentro del circuito del aparato, es un gas natural
con un alto nivel de compatibilidad
medioambiental, aunque es inflamable.
● Durante el transporte y la instalación del
aparato, asegúrese que ninguno de los
componentes del circuito refrigerante se dañe.
Evite fuegos y fuentes de inflamación.
● Ventile bien la habitación en la que el aparato se
encuentra.
●Es peligroso alterar las características o modificar
el producto en cualquier manera. Cualquier daño
en el cable puede causar un cortocircuito, fuego y
/ o descarga eléctrica. Este aparato está
diseñado para ser utilizado en usos domésticos.
ADVERTENCIA! Cualquiera de los componentes
eléctricos (enchufe, cable de alimentación,
compresor y etc.) deben ser reemplazados por un
agente servicio autorizado o personal cualificado.
● El cable de alimentación no debe ser
manipulado.
● Asegúrese de que el enchufe no esté roto o
Page 6

dañado por la parte trasera del aparato. Un
Información de seguridad
4
enchufe aplastado o dañado puede recalentarse y
provocar un incendio.
● Asegúrese de que se puede llegar a la clavija de
alimentación del aparato.
● No tire del cable de red.
● Si la toma de corriente está suelta, no inserte la
clavija de alimentación. Hay riesgo de descarga
eléctrica o un incendio.
● Usted no debe utilizar el aparato sin la lámpara.
Este aparato es pesado. Se debe tener cuidado al
moverlo.
● No retire ni toque elementos del
compartimento del congelador si tiene las manos
húmedas/mojadas, ya que esto podría causar
abrasiones de la piel o quemaduras por el hielo.
● Evitar la exposición prolongada del aparato a la
luz solar directa.
USO DIARIO
● No ponga cosas calientes en las partes de
● No coloque los alimentos directamente contra la
pared posterior.
● Los alimentos congelados no se deben volver a
congelar una vez descongelados.
Page 7
● Almacene alimentos pre envasados congelados
Información de seguridad
5
siguiendo las instrucciones del fabricante de la
comida congelada.
● Las recomendaciones de almacenamiento del
fabricante deben ser seguidas estrictamente.
Consulte las instrucciones pertinentes.
● No coloque bebidas gaseosas en el congelador
porque crea presión en el envase, lo que puede
ocasionar que explote y podría dañar el aparato.
● Los polos de helado pueden causar quemaduras
si se consumen al instante en el que son sacados
del aparato.
CUIDADO Y LIMPIEZA
● Antes del mantenimiento, apague el aparato y
desconecte el enchufe de la toma de corriente.
●
● No utilice objetos puntiagudos para eliminar la
escarcha del aparato. Utilice una espátula de
plástico.
● Examine periódicamente el desagüe en el
refrigerador del agua descongelada. Si es
necesario, limpie el desagüe. Si el desagüe está
obstruido, el agua se acumula en la parte inferior
del aparato.
Page 8
INSTALACIÓ N
Información de seguridad
6
¡Importante! Para la conexión eléctrica, siga
cuidadosamente las instrucciones dadas en los
párrafos específicos.
● Desempaque el aparato y compruebe si hay
daños en el mismo. No conecte el aparato si está
dañado. Informe de los posibles daños y perjuicios
inmediatamente al lugar donde lo compró. En este
caso, conservar el embalaje.
● Es aconsejable esperar al menos cuatro horas
antes de conectar el aparato para permitir que el
aceite regrese al compresor.
● La circulación de aire adecuada debe ser
alrededor del aparato, la falta de esto provoca
sobrecalentamiento. Para conseguir una
ventilación adecuada, siga las instrucciones
pertinentes de instalación.
● Siempre que sea posible debe haber un espacio
entre el producto y la pared para evitar que se
alcancen las zonas cálidas o se toquen (compresor,
condensador) para evitar posibles quemaduras
● El aparato no debe ser colocado cerca de
● Asegúrese de que el enchufe de la red es
accesible después de la instalación del aparato.
Page 9

REPARACIONES
Información de seguridad
7
● Cualquier trabajo de tipo eléctrico necesario
para efectuar la reparación del aparato debe ser
realizado por una persona competente o
electricista cualificado.
● Este producto debe ser reparado por un centro
de servicio autorizado, y únicamente se deben
usar las piezas de repuesto.
AHORRO DE ENERGIA
● No coloque alimentos calientes en el aparato.
● No coloque alimentos muy cerca uno del otro.
Esto impide que el aire que circule correctamente.
● Asegúrese de que los alimentos no toquen la
parte posterior de los compartimentos.
● Si la electricidad se apaga, no abra la puerta.
●
● No mantenga la puerta (s) abierta durante
● No coloque el termostato excediéndose en las
temperaturas bajas.
● Algunos accesorios tales como cajones, se
pueden quitar para obtener mayor volumen de
almacenamiento y un menor consumo energético.
Page 10

Protección ambiental
Información de seguridad
8
Este refrigerador no contiene gases que
puedan dañar la capa de ozono, ni en su circuito
refrigerante ni en los materiales de aislamiento. La
aplicación no debe ser desechada junto con los
residuos domésticos. La espuma de aislamiento
contiene gases inflamables; el refrigerador, por
tanto, debe ser desechado de acuerdo a las
disposiciones específicas estipuladas por las
autoridades locales. Evite dañar la unidad de
enfriamiento, especialmente el intercambiador de
calor. Los materiales utilizados en este
electrodoméstico marcados con el símbolo
son reciclables.
El símbolo en este producto o en su
embalaje indica que este producto no debe
ser tratado como residuo doméstico, sino
que debe ser llevado a un centro de
recolección adecuado para el reciclaje
de sus componentes eléctricos y
electrónicos. Al asegurarse que el
producto sea eliminado de forma
correcta, ayudará a prevenir las
potenciales consecuencias negativas
para el medio ambiente y la salud
humana, que podrían ser causadas de
otra forma por el manejo inapropiado
Page 11
de desechos de este producto. Para
Información de seguridad
9101112131415
obtener más información sobre el reciclaje de
este producto, contáctese con el municipio
local, su servicio de eliminación de residuos
domésticos local o el local donde compró el
producto.
Materiales de embalaje
Los materiales con el símbolo son reciclables.
Deseche el embalaje en los contenedores de
recolección para reciclaje. Eliminación del
refrigerador
1. Desc
onecte el cable de conexión a red del
tomacorriente de red.
2. Corte el cable y deséchelo.
Page 12
Page 13
Page 14
Page 15
Page 16
Page 17

Page 18

16
Panel de control
1.1 FUNCIÓN DE BOTONES
A. Control de temperatura del frigorífico
B. Control de temperatura del congelador
C. Modo / Bloqueo / Desbloqueo
1.2 DISPLAY LED
1. Temperatura del frigorífico
2. Temperatura del congelador
3. Modo ECO
4. Modo Vacaciones
5. Modo Super
6. Bloqueo / Desbloqueo
2.0 CONDICIONES DE FUNCIONAMIENTO
A. El panel de control ilumina al 100% durante 3 segundos, que funciona
exactamente en cada modo (modo y temperatura) antes de apagarlo. El
sistema estará bloqueado 25 segundos después de la última operación.
Desbloqueo, la luz del panel estará apagado durante 30 segundos después de
la última operación.
B. Los dos presentan temperatura del frigorífico y congelador en la
pantalla.
2.1 PANTALLA
2.1.1. El panel ilumina durante 2 minutos una vez que la puerta del
frigorífico o congelador esté abierta (suena una vez que se abre la puerta)
Page 19

17
2.1.2 El panel se ilumina apretando cualquier botón mientras que
debería estar 2 minutos apagado después de la última operación.
2.1.3 Pantalla durante operación normal
Pantalla de temperatura del frigorífico: indica la temperatura del
ajuste actual.
Pantalla de temperatura del congelador: indica la temperatura del
ajuste actual.
3.0 ILUSTRACIÓN DE LOS BOTONES
3.1 Control de temperatura del frigorífico
a. Control de temperatura del frigorífico:
Este botón funciona tanto en Modo Definido como en Modo Super.
Después de introducir el control de temperatura del frigorífico, este
ilumina. Presionando el botón consecutivamente, la temperatura
debería cambiar en círculos de 2ºC,3ºC,4ºC,5ºC,6ºC,7ºC,8ºC, OFF,
después de 5 segundos de flash demuestra que la temperatura está
seleccionada.
b. Apagar el compartimento del frigorífico:
Presionando la temperatura del compartimento del frigorífico, escoja
''OFF'', 5 segundos de flash significa que se ha seleccionado, de este
modo el frigorífico debería de dejar de funcionar.
3.2. Control de temperatura del congelador
Control de temperatura del congelador: Este botón funciona tanto en
Modo Definido como en Modo Vacaciones. Después de introducir el
control de temperatura del congelador, este ilumina. Presionando el
botón consecutivamente, la temperatura debería cambiar en círculos
de -16ºC a 22ºC, después de 5 segundos de flash significa que la
selección de temperatura está ajustada.
3.3 Modo / Bloqueo / Desbloqueo
a. Presionando el botón consecutivamente, el modo seleccionado del
frigorífico cambiará en círculo a modo ECO-Vacaciones, Modo Super,
Modo Definido. 5 segundos de flash indica la temperatura está
seleccionada.
b. Mantener presionado para introducir / Salir de modo de bloqueo
- Desbloqueo: Presione por 3 segundos en modo de bloqueo, todos los
botones deberían desbloquear después de sonar un beep.
- Bloqueo: Presione por 3 segundos en modo desbloqueo, todos los
botones deberían bloquear después de sonar un beep.
3.4 Botón de presión
Sonará un beep cada vez que se aprete un botón.
Todos los botones serán validos en modo desbloqueo.
3.5 Función Bloqueo
En 25 segundos, la pantalla se bloqueará.
Page 20

4.0 Modo ECO
Presione el modo de escoger modo ECO, el icono ECO iluminará
después de 5 segundos de flash. Las temperaturas predeterminadas en
modo ECO son las siguientes: 5º en frigorífico y -18º en congelador.
Salir de Modo Eco
Presione el mismo botón de nuevo para salir del modo ECO durante 5
segundos, así desactivará el modo Eco.
4.1 Modo Vacaciones
Presione el modo para escoger modo Vacaciones, el icono iluminará
después de 5 segundos de flash, así activando el modo Vacaciones.
Las temperaturas predeterminadas del modo Vacaciones en frigorífico
es de 17º, botón de frigorífico en vano, el icono de vacaciones hará
flash tres veces para avisar.
Salir de modo vacaciones: presione el modo durante 5 segundos para
desactivar el modo Vacaciones.
4.2 Modo Super Freezing
Escoja el modo, el icono iluminará después de 5 segundos de flash,
activando el modo de congelación.
Las temperaturas no son ajustables del congelador, el botón freezer en
vano, el icono hará flash tres veces para avisar.
Para salir del modo congelación: hay dos condiciones.
- Se desactiva manualmente el modo de congelación.
- Se desactiva si está en modo congelación por más de 50 horas.
18
Page 21

192021
Page 22

Page 23

Page 24

Proceso correcto de desecho de este producto
Corbero
CCGLH1850W / CCGLH1850N
A++
CE CB GS EMC/ERP
237kWh / a ño
222L
95L
4
No-
1200min
15kg/24h
SN,N,ST,T
43dB
600x685x1852
220-240V
1.3A
Frost
mm
22
Page 25

Refrigerator Combi Two Doors with
Technology NO FROST
Freezer - Refrigerator
User Manual
CCGLH1850W
CCGLH1850N
To ensure proper use of this appliance and your safety, please read
the instruction manual completely before operating this appliance.
Page 26

Safety information
1
In the interest of your safety and to ensure the
correct use, before installing and first using
the appliance, read this user manual carefully,
including its hints and warnings. To avoid
unnecessary mistakes and accidents, it is
important to ensure that all people using the
appliance are thoroughly familiar with its
operation and safety features. Save these
instructions and make sure that they remain
with the appliance if it is moved or sold, so
that everyone using it through its life will be
properly informed on appliance use and
safety.
For the safety of life and property keep the
precautions of these user’s instructions as the
manufacturer is not responsible for damages
Children and vulnerable people safety
●This appliance can be used by children
aged from 8 years and above and persons
with reduced physical, sensory or mental
capabilities or lack of experience and
knowledge if they have been given super
Page 27

Safety information
vision or instruction concerning use of the
appliance in a safe way and understand the
●Children should be supervised to ensure
●Cleaning and user maintenance shall not be
made by children unless they are aged from 8
●Keep all packaging well away from children.
●If you are discarding the appliance pull the
plug out of the socket, cut the connection
cable (as close to the appliance as you can)
and remove the door to prevent playing
children to suffer electric shock or to close
●If this appliance featuring magnetic door
seals is to replace an older appliance having
a spring lock (latch) on the door or lid, be sure
to make that spring lack unusable before you
discard the old appliance.
This will prevent it from becoming a death
trap for a child.
2
Page 28

Safety information
3
General safety
WARNING! Keep ventilation openings, in the
appliance enclosure or in the built-in structure,
clear of obstruction.
WARNING! Do not use mechanical devices
or other means to accelerate the defrosting
process, other than those recommended by
the manufacturer.
WARNING! Do not damage the refrigerant
circuit.
WARNING! Do not use other electrical
appliances (such as ice cream makers) inside
of refrigerating appliances, unless they are
approved for this purpose by the
manufacture.
WARNING! Do not touch the light bulb if it
has been on for a long period of time because
it could be very hot.1)
●Do not store explosive substances such as
aerosol cans with a flammable propellant in
●The refrigerant isobutane (R600a) is
contained within the refrigerant circuit of the
Page 29

Safety information
4
appliance, a natural gas with a high level of
environmental compatibility, which is
●During transportation and installation of the
appliance, be certain that none of the
components of the refrigerant circuit become
damaged.
- avoid open flames and sources of ignition
- thoroughly ventilate the room in which the
appliance is situat
●It is dangerous to alter the specifications or
modify this product in any way. Any damage
to the cord may cause a short circuit, fire
●This appliance is intended to be used in
household and similar applications such as
- staff kitchen areas in shops, offices and
other working environments; .
- farm houses and by clients in hotels, motels
and other residential type environments;
- bed and breakfast type environments;
- catering and similar non-retail applications.
Page 30

Safety information
5
WARNING! Any electrical components(plug,
power cord, compressor and etc.) must be
replaced by a certified service agent or
qualified service personnel.
WARNING! The light bulb supplied with this
appliance is a “special use lamp bulb” usable
only with the appliance supplied. This “special
use lamp” is not usable for domestic lighting1).
1) If there is a light in the compartment.
Page 31

Safety information
6
●
●Make sure that the power plug is not
squashed or damaged by the back of the
appliance. A squashed or damaged power
●Make sure that you can come to the mains
●
●If the power plug socket is loose, do not
insert the power plug. There is a risk of
●You must not operate the appliance without
●This appliance is heavy. Care should be
●Do not remove nor touch items from the
freezer compartment if you hands are
damp/wet, as this could cause skin abrasions
●Avoid prolonged exposure of the appliance
to direct sunlight.
Page 32

Safety information
7
Daily use
●Do not put hot on the plastic parts in the
●Do not place food products directly against
the rear wall.
●Frozen food must not be re-frozen once it
has been thawed out
1)
●Store pre-packed frozen food in accordance
with the frozen food manufactures
instructions
1)
●Appliances manufactures storage
recommendations should be strictly adhered
●Do not place carbonated of fizzy drinks in
the freezer compartment as it creates
pressure on the container, which may cause it
to explode resulting in damage to the
appliance
1)
●Ice lollies can cause frost burns if consumed
straight from the appliance1).
Care and cleaning
●Before maintenance, switch off the appliance
and disconnect the mains plug from
Page 33

Safety information
8
●Do not clean the appliance with metal
●Do not use sharp objects to remove frost
from the appliance. Use a plastic scraper
1)
●Regularly examine the drain in the
refrigerator for defrosted water. If necessary,
clean the drain. If the drain is blocked, water
will collect in the bottom of the appliance2).
1) If there is a freezer compartment.
2) If there is a fresh-food storage compartment.
Page 34

Safety information
9
Installation
Important! For electrical connection carefully
follow the instructions given in specific
●Unpack the appliance and check if there are
damages on it. Do not connect the appliance
if it is damaged. Report possible damages
immediately to the place you bought it. In that
●It is advisable to wait at least four hours
before connecting the appliance to allow the
●Adequate air circulation should be around
the appliance, lacking this leads to
overheating. To achieve sufficient ventilation
follow the instructions relevant to
●Wherever possible the spacers of the
product should be against a wall to avoid
touching or catching warm parts (compressor,
con-
●The appliance must not be located close to
●Make sure that the mains plug is accessible
Page 35

Safety information
10
after the installation of the appliance.
S
●Any electrical work required to do the
servicing of the appliance should be carried
out by a qualified electrician or competent
●This product must be serviced by an
authorized Service Center, and only genuine
spare parts must be used.
Energy saving
●
●Don’t pack food close together as this
●Make sure food don’t touch the back of the
comp
●If electricity goes off, don’t open the
●
●Don’t keep the door(s) open for too long
●Don’t set the thermostat on exceeding cold
Page 36

Safety information
11
●Some accessories, such as drawers, can be
removed to get larger storage volume and
lower energy consumption.
Environment Protection
This appliance does not contain gasses
which could damage the ozone layer, in either
its refrigerant circuit or insulation materials.
The appliance shall not be discarded together
with the urban refuse and rubbish. The
insulation foam contains flammable gases:
the appliance shall be disposed according to
the appliance regulations to obtain from your
local authorities. Avoid damaging the cooling
unit, especially the heat exchanger. The
materials used on this appliance marked by
the symbol are recyclable.
The symbol on the product or on its
packaging indicates that this product
may not be treated as household waste.
Instead it should be taken to the appropriate
collection point for the recycling of electrical
and electronic equipment. By ensuring this
product is disposed of correctly, you will help
Page 37

Safety information
12
prevent potential negative consequences for
the environment and human health, which
could otherwise be caused by inappropriate
waste handling of this product. For more
detailed information about recycling of this
product, please contact your local council,
your household waste disposal service or the
shop where you purchased the product.
Packaging materials
The materials with the symbol are recyclable.
Dispose the packaging in a suitable collection
containers to recycle it.
Disposal of the appliance
1. Disconnect the mains plug from the mains
socket.
2. Cut off the mains cable and discard it.
Page 38

Overview
13
Fridge
Balconies
Fridge
Shelves
Crisper
Freezer
Drawers
Note: Above picture is for reference only. Real appliance probably is different.
Page 39

Installation
14
SpaceRequirement
y Select a location w ithout d irect ex posure to sunlight;
y Select a location with enough space for the refrigerator doors to open
easily;
y Select a location with level (or nearly level) flooring;
y Allow sufficient space to install the refrigerator on a flat surface;
y Allow clearance to the right, left, back and top when installing. This
will help reduce power consumption and keep your energy bills lower.
y Keep at least 50mm gap at two sides and back.
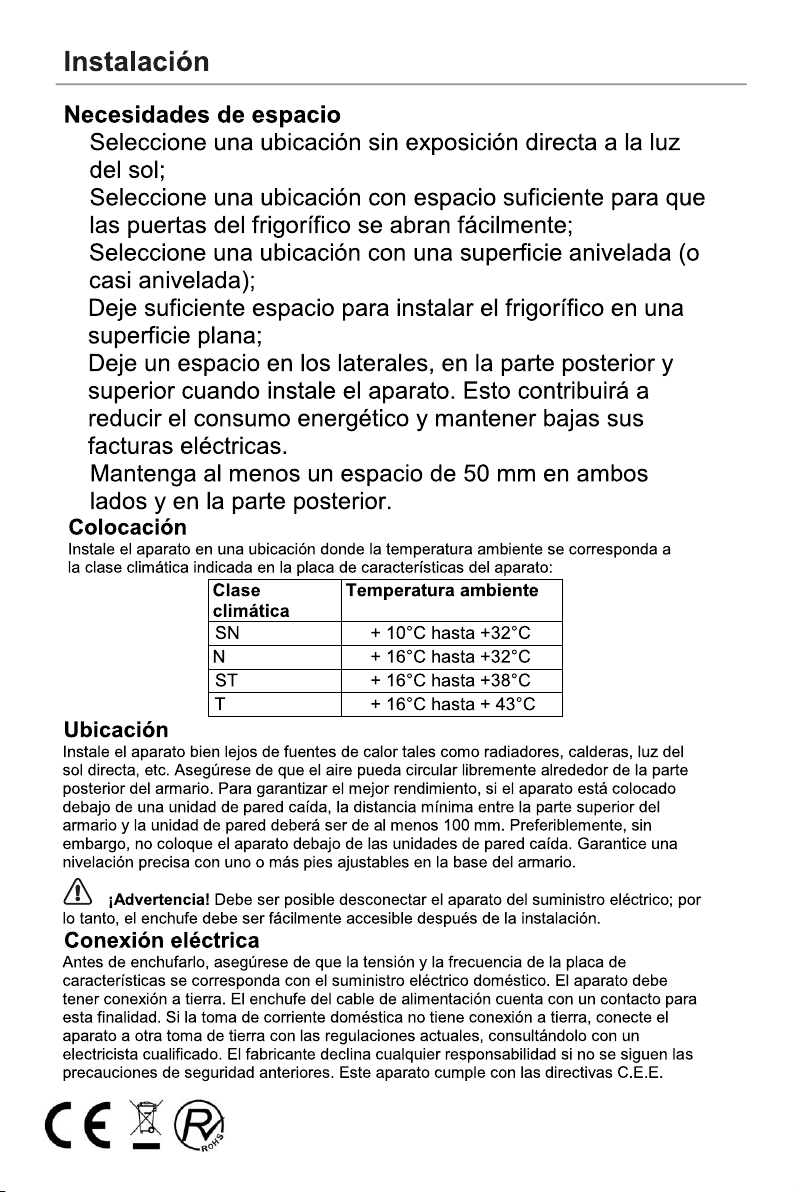
Positioning
Install this appliance at a location where the ambient temperature corresponds to the climate class
indicated on the rating plate of the appliance:
Climate class
SN
N
ST
T
Ambient temperature
oo
+10 C to +32 C
oo
+16 C to +32 C
oo
+16 C to +38 C
oo
+16 C to +43 C
Location
The appliance should be installed well away from sources of heat such as radiators, boilers, direct sunlight
etc. Ensure that air can circulate freely around the back of the cabinet. To ensure best performance, if the
appliance is positioned below an overhanging wall unit, the minimum distance between the top of the cabinet and th e wa ll u ni t must be a t le as t 100 mm. I de al ly, how ev er, th e ap pl iance s ho ul d no t be po si ti on ed
below overhanging wall units. Accurate leveling is ensured by one or more adjustable feet at the base of
the cabinet.
Warning! It must be possible to disconnect the appliance from the mains power supply; the plug must
therefore be easily accessible after installation.
Electrical connection
Before plugging in, ensure that the voltage and frequency shown on the rating plate correspond to your
domestic power supply. The appliance must be earthed. The power supply cable plug is provided with a
contact for this purpose. If the domestic power supply socket is not earthed, connect the appliance to a
separate earth in compliance with current regulations, consulting a qualified electrician.
The manufacturer declines all responsibility if the above safety precautions are not observed.
This appliance complies with the E.E.C. Directives.
Page 40

Installation
15
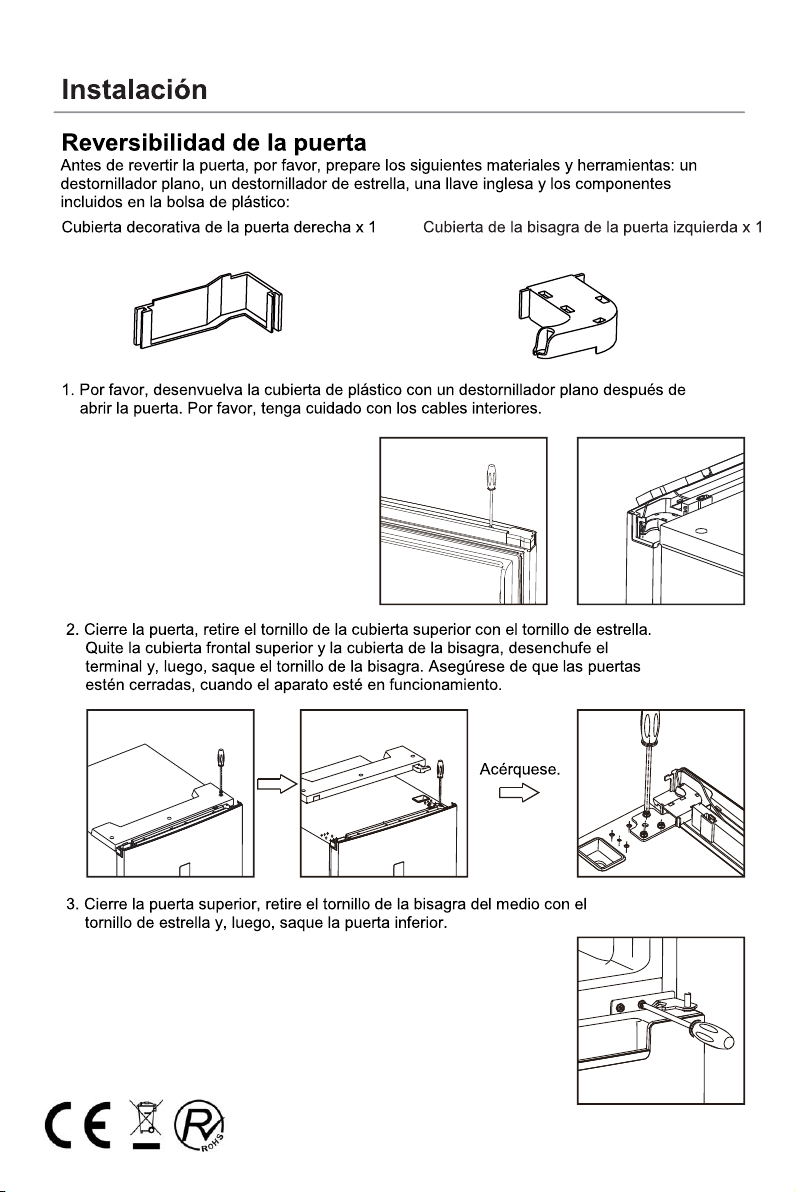
Door Reversibility
Before reversing the door, please be prepared below tools and material: straight screwdriver, cross
screwdriver, spanner and the components included in the poly bag:
Decorative Cover of Right Door x1 Left Door Hinge Cover x 1
1. Please upwarp and take off plastic cover by straight screwdriver after opening the door. Please
be careful of the wire inside.
2. Close the door, take out the screw from the top cover by cross screwdriver.
Take off front top cover and hinge cover, unplug the terminal, then take out the screw from the
hinge. Make sure door are closed when operation.
Zoom in
3. Take off the upper door, take out the screw from the middle hinge by cross screwdriver,
then take off the lower door.
Page 41

Installation
16
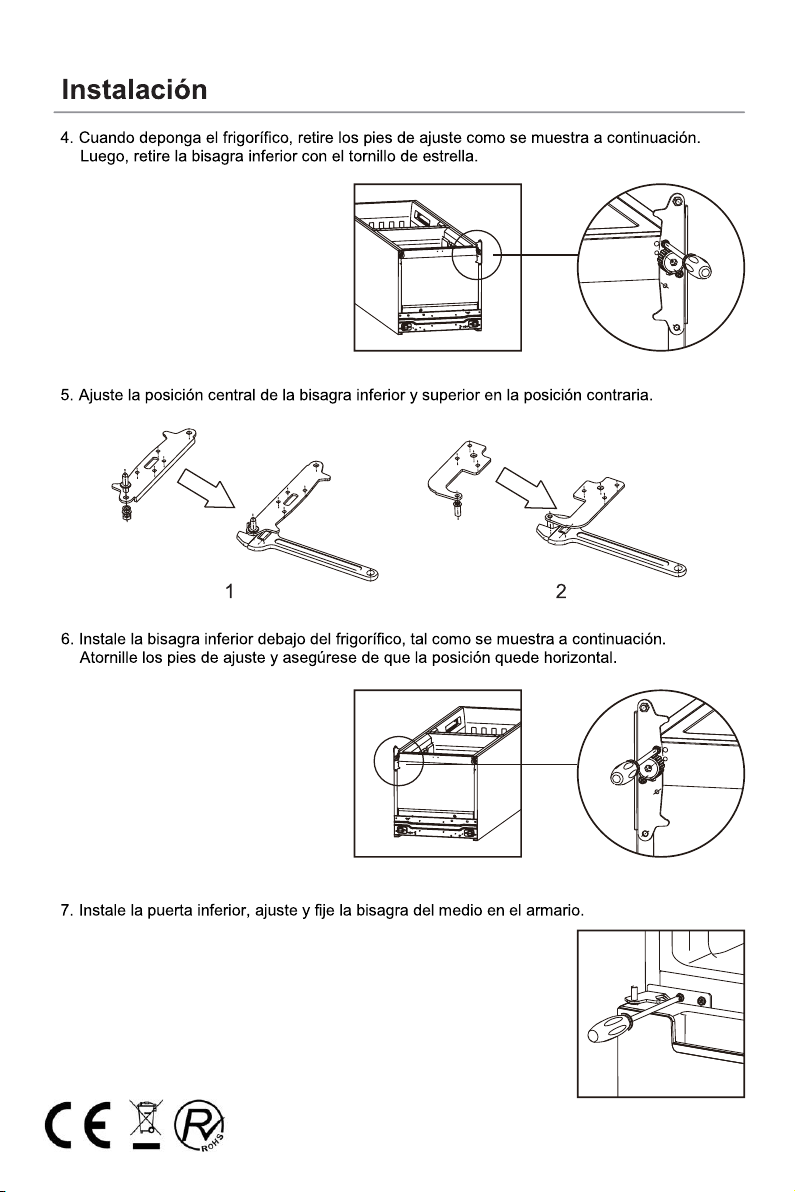
4. Laying down the refrigerator, take out the adjusting feet as below, then take off the lower hinge
by cross screwdriver.
5. Adjusting the hinge core position of the lower hinge and upper hinge to opposite position
12
6. Install the lower hinge under to the refrigerator like below, screwing in the adjusting feet, make
sure the position in horizon.
7. Install the lower door, adjust and fix the middle hinge onto the cabinet.
Page 42

Installation
17
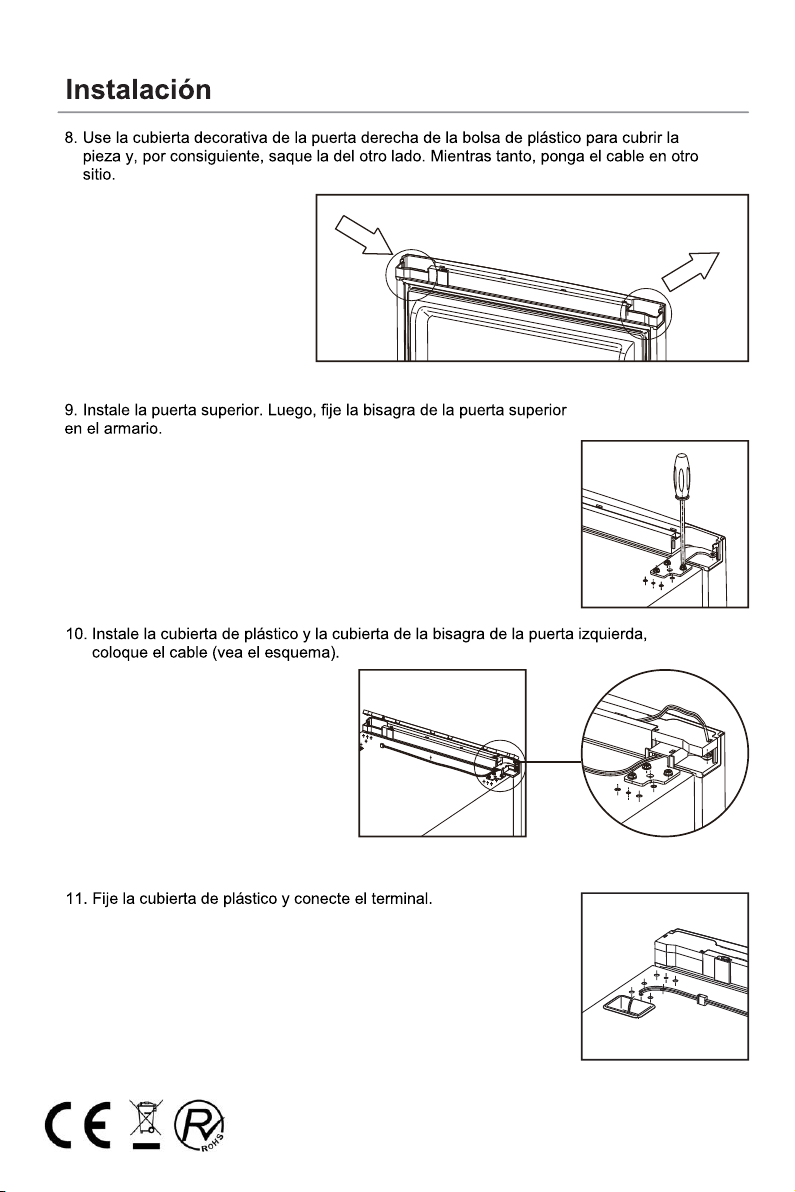
8. Using the Decorative Cover of Right Door from poly bag to cover the insert and take out the other
side one accordingly.In the meanwhile change the wire to another side.
9. Install the upper door, then fix the upper door hinge onto the cabinet.
10. Install the plastic cover and Left Door Hinge Cover from poly bag onto the product, settle the
wire (see diagram)
11.Fix the plastic cover and connect the terminal.
Page 43

Installation
18
12.Change the Decorative Cover from one to another side.
Follow the instruction to take out of the decorative cover, be careful not to ruin the cover.
13. Lastly, using the screw to fix the top cover.
Page 44

Daily UseDaily Use
19
Using the Control Panel
1
2
3
4
5
6
A
B
C
1.1 KEY OPERATION
A.Temperature Control of Fridge Compartment
B.Temperature Control of Freezer Compartment
C.Mode/ Locking / Unlocking
1.2 LED DISPLAY
1.Temperature of Fridge Compartment
2.Temperature of Freezer Compartment
3.ECO Mode
4.Holiday Mode
5.Super Mode
6.Locking / Unlocking
2.0 OPERATING CONDITION
a.The control panel is 100% lit up for 3 seconds, which operates exactly as per the setting
(mode and temperature) before the poweroff. The system will be automatically locked 25
seconds after the last key operation. After locking, the light of the panel would be out 30
seconds after the last key operation.
b.Both preset temperatures of fridge compartemnt and freezer compartment would be shown
on the display.
2.1 DISPLAY
2.1.1The panel will be lit up for 2 minutes once the door of fridge compartment or freezer
compartment is opened. (one door signal is sensed at a time)
Page 45

Daily UseDaily Use
20
2.1.2 The panel will be lit up by any key operation whereas the light would be out 2 minutes
after the last operation.
2.1.3 Display during normal operation
Temperature Display of the Fridge Compartment: Indicating the temperature of the
current setting.
Temperature Display of the Freezer Compartment: Indicating the temperature of the
current setting.
3.0 ILLUSTION OF THE KEY
3.1 Temperature Control of the Fridge Compartment
a.Temperature Control of the Fridge Compartment:
This key is workable both in User Defined Mode as well as Super Mode. After entering
the temperature control of the fridge compartment, this key flashes. By touching the key
consecutively, the temperature would change in a circle of “2℃, 3℃ , 4℃, 5℃, 6℃, 7℃,
8℃, OFF”, after which 5-second flashing means the selection of temperature is settled.
b. Shutoff of t
Press the key of “Temperature Control of Fridge Compartment”, choose “OFF”, a 5-second
flashing means the selection of temperature is made, namely the fridge compartment would
stop refrigeration.
3.2 Temperature Control of the Freezer Compartment
Temperature Control of the Freezer Compartment: This key is workable both in User Defined
Mode as well as Holiday Mode. After entering the temperature control of the freezer compartment,
the key flashes. By touching the key consecutively, the temperature would change in a circle from
-16℃ to -22℃, after which a 5-second flashing means the selection of temperature is settled.
3.3 Mode/ Locking / Unlocking
a.By touching this key consecutively, the operation mode of the refrigerator will change in a circle
of “ECO Mode-Holiday Mode-Super Mode-User Defined Mode. A 5-second flashing means the
selection of temperature is settled.
b.Long Press to Enter / Exit Locking Mode
·Unlocking: Press for 3 seconds in the mode of locking, all the keys would be unlocked after
the a beep.
·Locking: Press for 3 seconds in the mode of unlocking, all the keys would be locked after the
a beep.
3.4 Press Button
Short beep after per press button
All buttons will only valid under unlock mode.
3.5 Lock Function
No operation in 25 seconds, the refrigerator will be automatically locked in current mode.
he Fridge Compartment:
Page 46

Daily UseDaily Use
21
4.0 ECO mode
Press mode to choose ECO mode, ECO icon keeps bright after 5 sec flashing.
5°in fridge compartment and -18°in freezer compartment under eco mode,
“Freezer”&“Fridge“ button in vain while eco icon will flash three times in alarm.
Exit eco mode
Press mode again to exit eco mode after 5 sec, entering the selected mode.
4.1 Holiday Mode
Press mode to choose Holiday Mode, the icon keeps bright after 5 sec flashing, entering
holiday mode.
Temperature fix at 17°in fridge compartment, “fridge” button
flash three times in alarm.
Exit holiday
mode: choose mode, exit holiday mode after 5 sec, entering the selected mode.
4.2 Super Freezing mode
Choose mode, icon keeps bright after 5 sec flashing, entering freezing mode.
Freezing mode:
Temperature nonadjustable in freezing compartment, “freezer” button in vain, while freezing
icon will flash three times in alarm.
Exit freezing mode: meeting below conditions.
-manually exit freezing mode
-freezing period more than 50 hours
Mode remains the same before entering super freezing mode.
in vain, while holiday icon will
Page 47

Daily Use
22
Daily Use
First use
Cleaning the interior
Before using the appliance for the first time, wash the interior and all internal accessories with lukewarm
water and some neutral soap so as to remove the typical smell of a brand new product, then dry thoroughly.
Important! Do not use detergents or abrasive powders, as these will damage the finish.
Daily use
Freezing fresh food
y The freezer compartment is suitable for freezing fresh food and storing frozen and deep-frozen food for
a long time.
y Place the fresh food to be frozen in the bottom compartment.
y The maximum amount of food that can be frozen in 24 hours is specified on the rating plate.
y The freezing process lasts 24 hours: during this period do not add other food to be frozen.
Storing frozen food
When first starting-up or after a period out of use. Before putting the product in the compartment let the
appliance run at least 2 hours on the higher settings.
Important! In the event of accidental defrosting, for example the power has been off for longer than the
value shown in the technical characteristics chart under “rising time”, the defrosted food must be
consumed quickly or cooked immediately and then re-frozen (after cooked).
Thawing
Deep-frozen or frozen food, prior to be used, can be thawed in the freezer compartment or at room
temperature, depending on the time available for this operation.
Small pieces may even be cooked still frozen, directly from the freezer. In this case, cooking will take
longer.
Helpful hints and tips
Hints for freezing
To help you make the most of the freezing process, here are some important hints:
y the maximum quantity of food which can be frozen in 24 hrs. is shown on the rating plate;
y the freezing process takes 24 hours. No further food to be frozen should be added during this period;
y only freeze top quality, fresh and thoroughly cleaned, foodstuffs;
y prepare food in small portions to enable it to be rapidly and completely frozen and to make it possible
subsequently to thaw only the quantity required;
y wrap up the food in aluminium foil or polythene and make sure that the packages are airtight;
y do not allow fresh, unfrozen food to touch food which is already frozen, thus avoiding a rise in
temperature of the latter;
y lean foods store better and longer than fatty ones; salt reduces the storage life of food;
y water ices, if consumed immediately after removal from the freezer compartment, can possibly cause
the skin to be freeze burnt;
y it is advisable to show the freezing in date on each individual pack to enable you removal from the
freezer compartment, can possibly cause the skin to be freeze burnt;
y it is advisable to show the freezing in date on each individual pack to enable you to keep tab of the
storage time.
Page 48

Daily UseDaily Use
23
Hints for storage of frozen food
To obtain the best performance from this appliance, you should:
make sure that the commercially frozen foodstuffs were adequately stored by the retailer;
be sure that frozen foodstuffs are transferred from the food store to the freezer in the shortest possible
time;
not open the door frequently or leave it open longer than absolutely necessary.
Once defrosted, food deteriorates rapidly and cannot be refrozen.
Do not exceed the storage period indicated by the food manufacture.
Hints for fresh food refrigeration
To obtain the best performance:
y Do not store warm food or evaporating liquids in the refrigerator
y Do cover or wrap the food, particularly if it has a strong flavour
Hints for refrigeration
Useful hints:
y Make (all types): wrap in polythene bags and place on the glass shelves above the vegetable drawer.
y For safety, store in this way only one or two days at the most.
y Cooked foods, cold dishes, etc...: these should be covered and may be placed on any shelf.
y Fruit and vegetables: these should be thoroughly cleaned and placed in the special drawer(s) provided.
y butter and cheese: these should be placed in special airtight containers or wrapped in aluminum foil or
polythene bags to exclude as much air as possible.
y Milk bottle: these should have a cap and should be stored in the balconies on the door.
y Bananas, potatoes, onions and garlic, if not packed, must not be kept in the fridge.
Cleaning
For hygienic reasons the appliance interior, including interior accessories, should be cleaned regularly.
Caution! The appliance may not be connected to the mains during cleaning. Danger of electrical
shock! Before cleaning switch the appliance off and remove the plug from the mains, or switch off or
turn out the circuit breaker or fuse. Never clean the appliance with a steam cleaner. Moisture could
accumulate in electrical components, danger of electrical shock! Hot vapors can lead to the damage
of plastic parts. The appliance must be dry before it is placed back into service.
Important! Ethereal oils and organic solvents can attack plastic parts, e.g. lemon juice or the juice form
orange peel, butyric acid, cleanser that contain acetic acid.
y Do not allow such substances to come into contact the appliance parts.
y Do not use any abrasive cleaners
y Remove the food from the freezer. Store them in a cool place, well covered.
y Switch the appliance off and remove the plug from the mains, or switch off or turn out the circuit breaker
of fuse.
y Clean the appliance and the interior accessories with a cloth and lukewarm water. After cleaning wipe
with fresh water and rub dry.
y After everything is dry place appliance back into service.
Page 49

Daily UseDaily Use
24
Troubleshooting
Caution! Before troubleshooting, disconnect the power supply. Only a qualified electrician of
competent person must do the troubleshooting that is not in this manual.
Important! There are some sounds during normal use (compressor, refrigerant circulation).
Problem
Appliance dose not
work
Appliance freezes or
cools too much
The food is not frozen
enough.
Heavy build up of
frost on the door
seal.
Unusual noises
Possible cause
Mains plug is not plugged in
or is loose
Fuse has blown or is defective
Socket is defective
Temperature is set too cold
or the appliance runs at SUPER
modes.
Temperature is not properly
adjusted.
Door was open for an extended
period.
A large quantity of warm food
was placed in the appliance
within the last 24 hours.
The appliance is near a heat
source.
Door seal is not air tight.
Appliance is not level.
The appliance is touching the
wall or other objects.
A component, e.g. a pipe, on
the re ar o f th e ap pli an ce i s
touching another part of the
appliance or the wall.
Solution
Insert mains plug.
Check fuse, replace if necessary.
Mains malfunctions are to be
corrected by an electrician.
Turn the temperature regulator to a
warmer setting temporarily.
Please look in the initial Temperature
Setting section.
Open the door only as long as
necessary.
Turn the temperature regulation to
a colder setting temporarily.
Please look in the installation
location section.
Carefully warm the leaking sections of
the door seal with a hair dryer (on a cool
setting). At the same time shape the
warmed door seal by hand such that it
sits correctly.
Re-adjust the feet.
Move the appliance slightly.
If necessary, carefully bend the
component out of the way.
If the malfunction shows again, contact the Service Center.
These data are necessary to help you quickly and correctly. Write the necessary data here, refer to the
rating plate.
Page 50

Correct disposal process of this product
According to the directive Waste of Electrical and Electronic
Equipment (WEEE), the waste WEEE must be collected and
treated separately. If in the future you need to dispose of this
product DO NOT put it with household waste, send it to the
WEEE collection points if they exist.
Corbero
CCGLH1850W / CCGLH1850N
A++
CE CB GS EMC/ERP
237kWh / year
222L
95L
4
Frost
No-
1200min
15kg/24h
SN,N,ST,T
43dB
600x685x1852
220-240V
1.3A
mm
25
Page 51

PN:261800401383
Page 52

CKCBR-B01-A
 Loading...