

Page 1
REFRIGERATOR
INSTRUCTION MANUAL
MODEL: CCML1970NFX
Page 2
1
INTRODUCTION
Before use
Please read these instructions and the Safety guidelines on page 1 carefully before using
your new Fridge/Freezer. The Fridge/Freezer is for indoor, domestic use only.
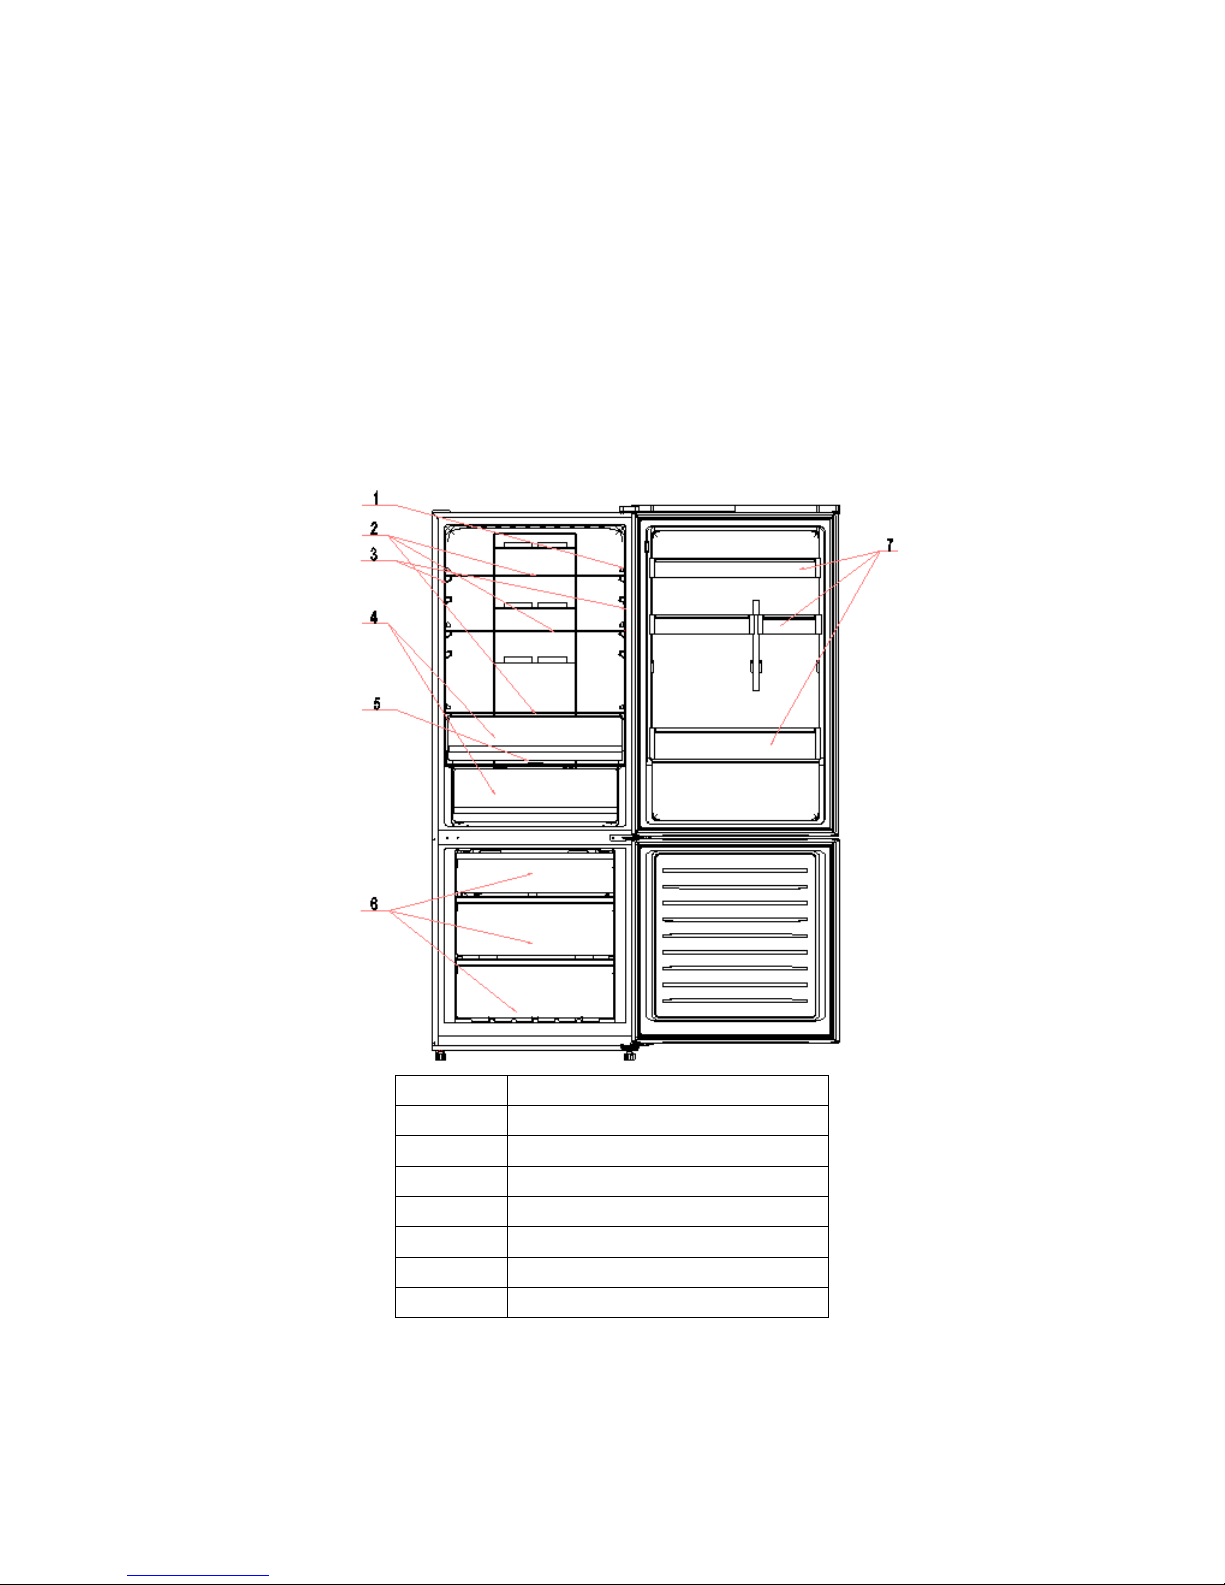
No
Description
1
Lighting switch
2
Cooling room shelves
3
Light
4
Vegetable and fruit crisper
5
Vegetable and fruit crisper cover
6
Freezing drawers
7
Door balcony
INSTALLATION
Page 3
2
Location
When selecting a position for your Fridge/Freezer you should make sure the floor is flat
and firm, and the room is well ventilated with an average room temperature of between
16℃ and 43℃. Avoid locating your Fridge/Freezer near a heat source, eg, cooker, boiler
or radiator. Also avoid direct sunlight in out-buildings or sun lounges. If you are placing
your Fridge/Freezer in an out-building such as a garage or annex ensure that the
Fridge/Freezer is placed above the damp course, otherwise condensation will occur on
the Fridge/Freezer cabinet. Never place the Fridge/Freezer in a wall recessed or into fitted
cabinets or fumiture when your Fridge/Freezer is working, the grille at the back may
become hot and the sides warm. It must therefore be installed so that the back of the
Fridge/Freezer has at least 9cm(31/2”) of free space and the sides have 2cm(3/4”). Do not
drape the Fridge/Freezer with any covering.
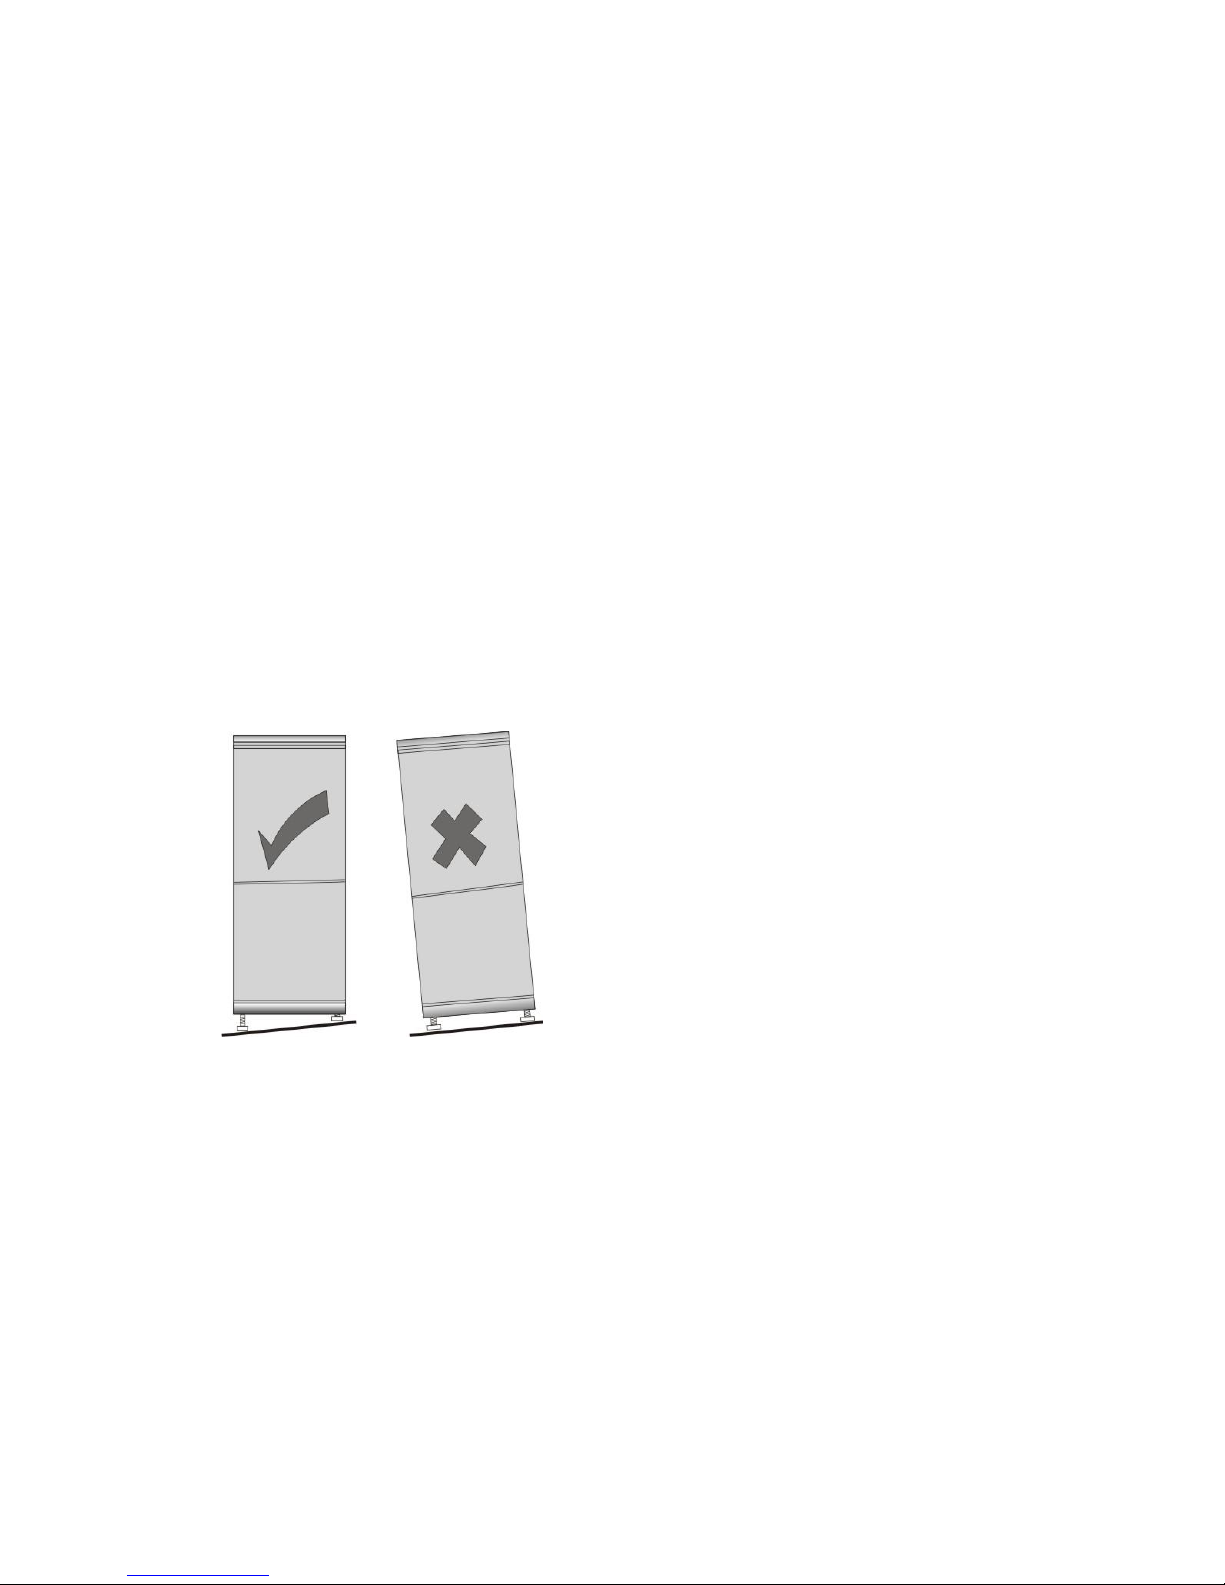
Leveling the Fridge/Freezer
If the Fridge/Freezer is not level, the door and magnetic seal alignment will be affected
and may cause you Fridge/Freezer to work incorrectly. Once the Fridge/Freezer is placed
in its final location, adjust the leveling feet at the front by turning them.
Cleaning before use
Wipe the inside of the Fridge/Freezer with a weak solution of bicarbonate of soda. Then
rinse with warm water using a damp sponge or cloth. Wash the baskets and shelves in
warm soapy water and dry completely before replacing in the Fridge/Freezer. The external
parts of the Fridge/Freezer can be cleaned with wax polish.
Page 4
1
Before plugging in YOU MUST
Check that you have a socket which is compatible with the plug supplied with the
Fridge/Freezer. If not see the section called ELECTRICAL INFORMATION
Before switching on!
DO NOT SWITCH ON UNTIL FOUR HOURS AFTER MOVING THE FRIDGE/FREEZER.
The coolant fluid needs time to settle. If the appliance is switched off at any time, wait 30
minutes before switching back on to allow the coolant fluid to settle.
Before filling your Fridge/Freezer
Before storing foods in your Fridge/Freezer, turn the Fridge/Freezer on and wait for 24
hours, to make sure it is working properly and to allow the Fridge/Freezer to fail to the
correct temperature.
START Testing
1. Clean the parts of the refrigerator with lukewarm water containing a littleneutral
detergent and with clear water, and wipe them dry.
Notes: Electric parts of the refrigerator can only be wiped by dry cloth.
2.Turn on electricity. The compressor begins to work.
3.Open the door 30 minutes later, if the temperature in the refrigerator
decreased obviously, it shows that the refrigerator system works well.
When the refrigerator operates for a period of time, the temperature
controller will automatically set the temperature within limits it opens.
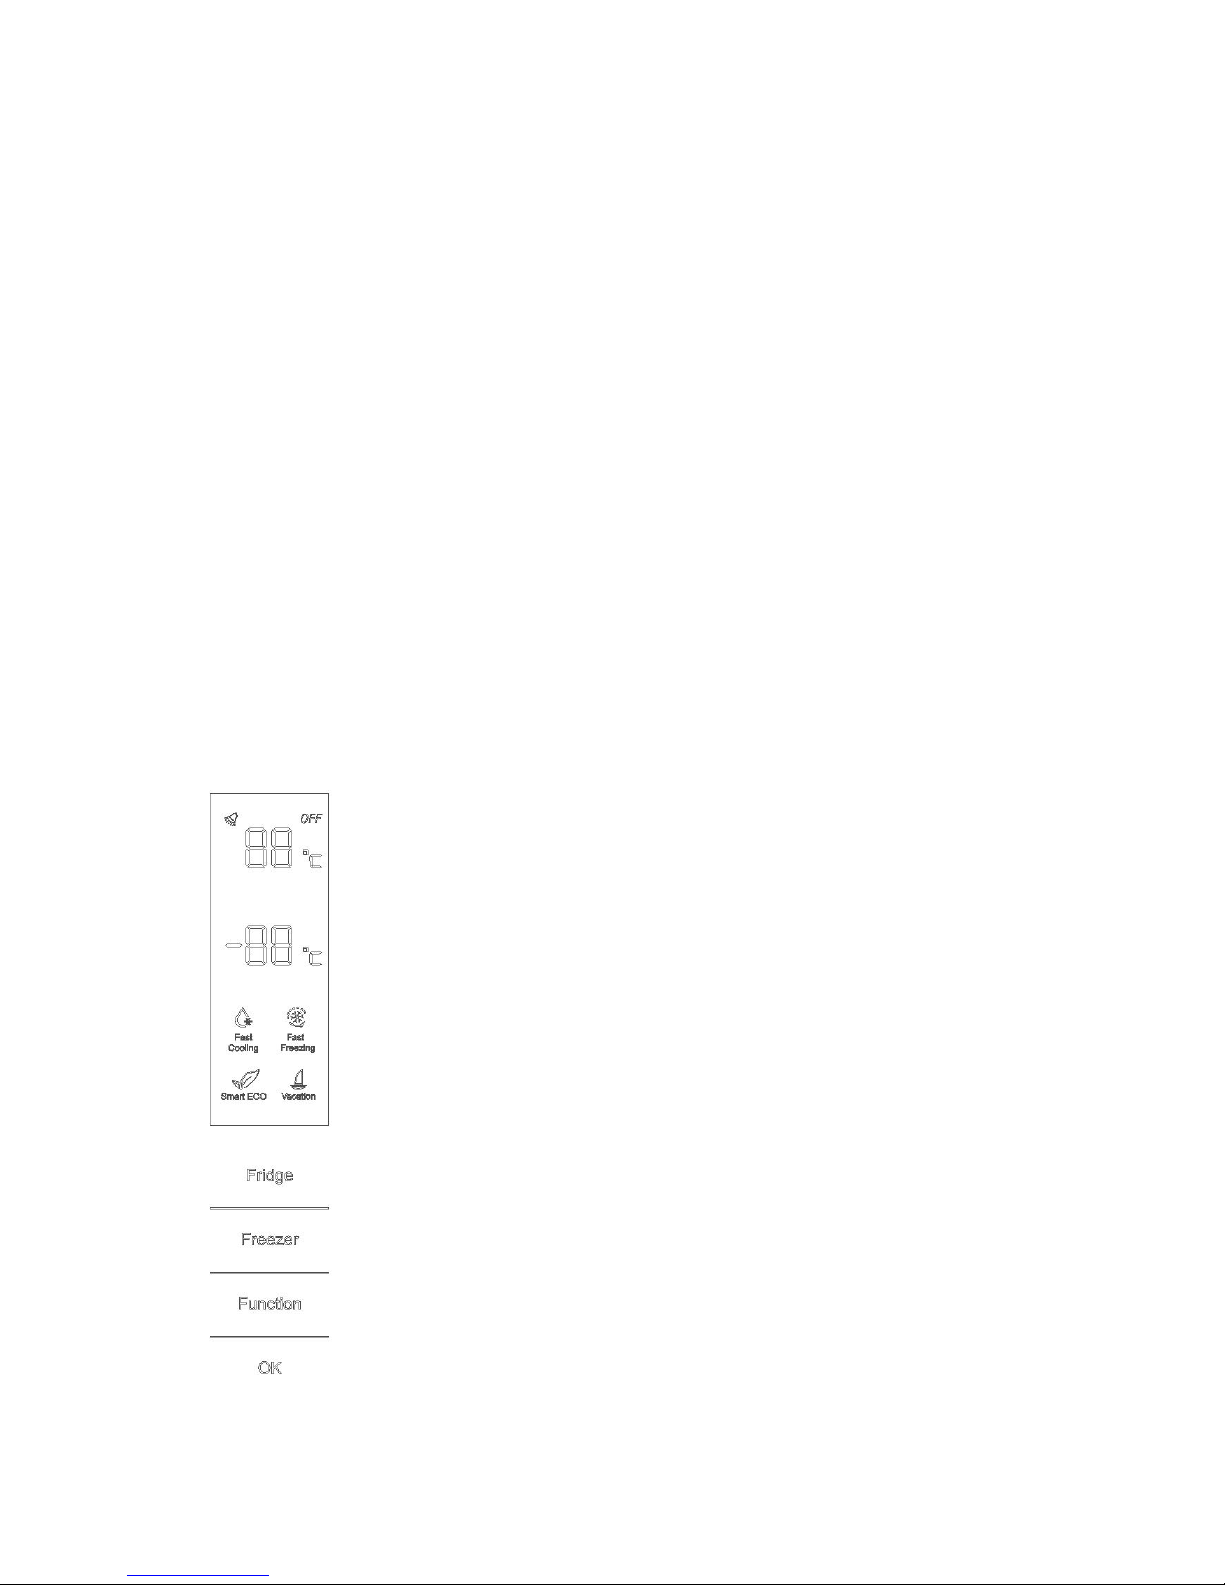
The display is located in the middle of the refrigerator door. Please refer to the
below figure for the layout.
Introduction of the buttons
(1) Fridge: to set the refrigerator temperature
(2) Freezer: to set the freezer temperature
(3) Function: to choose functions of fast cooling, fast freezing, intelligence
and vacation
(4) OK: to enter or to quit the existing function
Function setting
★ appliance connected to power at the first time
When the appliance is connected to power at the first time, the display will be lit
for 2 seconds before going normal and the appliance runs with intelligence
function.
★display control
Page 5

2
When the refrigerator door is closed and there is no button operation in 3 minutes, the display
light goes off.
When the display light is off, open the refrigerator door or click any button to light it up.
★temperature setting
1) Click the “refrigerator” or “freezer” button and when it flickers in the symbol, temperatures
can be set; each time when the button is clicked, the temperature changes accordingly
(the display shows the temperature accordingly).
(Temperatures cannot be set under functions of fast cooling, fast freezing, intelligence and
vacation,)
2) Under temperature setting, if there is no button operation in 5 seconds, the button stops
flickering and the set temperature comes into effect.
3) Temperature cycle
Refrigerator: 2℃→3℃→4℃→5℃→6℃→7℃→8℃→OFF→2℃;
Freezer: -24℃→-23℃→-22℃→-21℃→-20℃→-19℃→-18℃→-17℃→-16℃→-24℃;
★intelligence
Under intelligence, it is 4℃ in the refrigerator and -18℃ in the freezer.
Temperatures cannot be changed and you can click the temperature zone button to check the
temperature.
1) To enter intelligence
Click “option” until it flickers and then click “OK” to enter this function.
2) To quit intelligence
Under intelligence, click “option” until it goes to intelligence, click “OK” to quit this function and
the light goes off.
Temperatures of each chamber go back to the value beforeintelligence function.
★fast cooling
Under fast cooling, it is 2℃ in the refrigerator and the refrigerator temperature cannot be
changed.
1)To enter fast cooling
Click “option” until it flickers in “fast cooling” and then click “OK” to enter this function.
2) To quit fast cooling
Under fast cooling, click “option” until it goes to “fast cooling” and then click “OK” to quit this
function.
The light in fast cooling goes off and the refrigerator temperature goes back to the value before
fast cooling.
★fast freezing
Under fast freezing, refrigerator temperature can be set but not for the freezer temperature.
1) To enter fast freezing
Click “option” until it flickers in “fast freezing” and then click “OK” to enter this function.
2) To quit fast cooling
Page 6

3
Under fast freezing, click “option” until it goes to “fast freezing” and then click “OK” to quit this
function.
The light in fast freezing goes off and the freezer temperature goes back to the value before
fast freezing.
When fast freezing time is up (26 hours), it quits automatically.
When it goes to intelligence, fast freezing stops.
★vacation
Under vacation, it is 14℃ in the refrigerator and the temperatures in this chamber cannot be
changed.
1) To enter vacation
Click “option” until it flickers in “fast freezing” and then click “OK” to enter this function.
2) To quite vacation
Under vacation, click “option” until it goes to “vacation” and then click “OK” to quit this function.
The light in vacation goes off and the refrigerator temperature goes back to the value before
vacation.
Vacation quits under functions of intelligence and fast cooling.
★power off memory
With this design, the refrigerator can automatically keep all the setting in case of power off.
When the unit is plugged in again, the refrigerator will run with the setting before power off.
★Power-On Delay
To prevent harm to the refrigerator in case of sudden power cut and power on, the unit does
not start immediately if the power off time is less than 5 minutes.
★Freezer over-temperature alarm (only in case of power on)
When the freezer temperature is higher than 10℃at the first time connected to power, the
symbol light of the freezer chamber goes on and the number representing temperature
flickers.
Press any button or wait for 5 seconds, flickering stops and it goes back to the temperature
that was set.
★Refrigerator door opening alarm
When the refrigerator is open over 3 minutes, the buzzer will buzz. Close the door or press any
button to stop the alarm, but for the latter, the alarm will go off again after 3 minutes.
★Sensor fault alarm
When it shows “E0”, “E1”, “E2” or other abnormal symbols, it means sensor faults and the
refrigerator needs repair.
IN USE
Tips for keeping food perfect in the Fridge
Page 7

4
Take extra care with meat and fish
Cooked meats should always be stored on a shelf above raw meats to avoid bacterial
transfer. Keep raw meats on a plate which is large enough to collect juices and cover it
with cling film or foil.
Leave space around food
This allows cold air to circulate around the Fridge, ensuring all parts of the Fridge are kept
cool.
Wrap up food!
To prevent transfer of flavors and drying out, food should be separately packed or covered.
Fruit and vegetables need not be wrapped.
Pre-cooked food should be cooled properly
Allow pre-cooked food to cool down before placing in the Fridge. This will help to stop the
internal temperature of the Fridge from rising.
Shut the door!
To prevent cold air escaping, try to limit the number of times you open the door. When
retuning from shopping, sort foods to be kept in your Fridge before opening the door. Only
open the door to put food in or take it out.
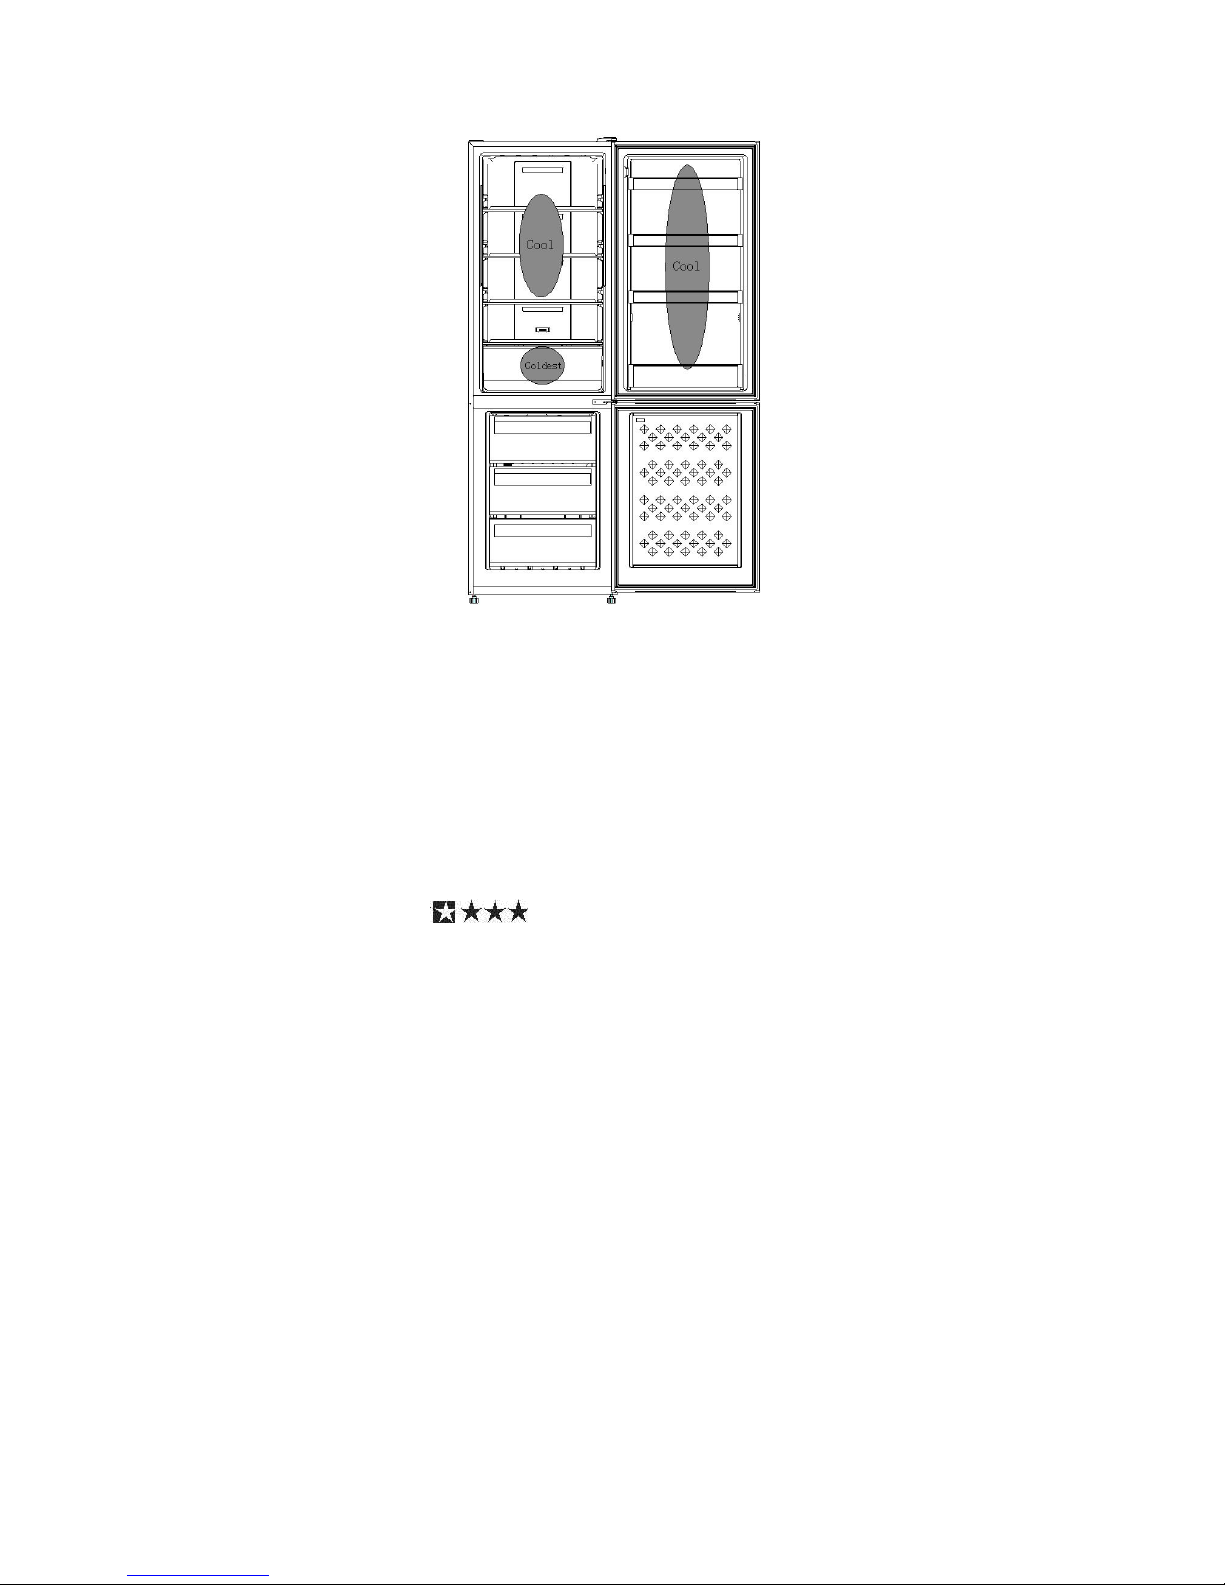
Where to store your foods in the fridge
Cool area
This is where to store foods which will keep longer if they are kept cool. Milk, eggs, yogurt,
fruitjuices, hard cheeses eg. Cheddar. Opened jars and bottles of salad dressings, sauces
and jams. Fats, eg. Butter, margarine, low-fat speads, cooking fats and lard.
Coldest area: 2℃ to 5℃
This is where foods which must be cold to keep them safe should be kept:
·Raw and uncooked foods should always be wrapped.
·Pre-cooked chilled foods, eg. Ready meals, meat pies, soft cheeses.
·Pre-cooked meats eg. Ham,
·Prepared salads(including pre-packed mixed green salads, rice, potato salad etc).
·Desserts, eg. Fromage frais, home-prepared food and leftovers or cream cakes.
Page 8
5
Salad bin
This is the most humid part of the Fridge. Vegetables, fruit, fresh salad items eg.
Unwashed whole lettuce, whole tomatoes, radishes etc can be stored here.
WE RECOMMEND THAT ALL PRODUCE KEPT IN THE SALAD BIN IS WRAPPED.
NOTE:Always wrap and store raw meat, poultry and fish on the lowest shelf at the bottom
of the fridge. This will stop them dripping onto, or touching other foods. Do not store
inflammable gasses or liquids in the fridge.
Tips for shopping for frozen foods
Your Freezer is 4 star
When you are buying frozen food, look at the Storage Guidelines on the packaging. You
will be able to store each item of frozen food for the period shown against the 4 star rating.
This is usually the period stated as “Best, Before”, found on the front of the packaging.
Check the Fridge/Freezer temperature
Check the temperature of the frozen food cabinet in the shop where you buy your frozen
foods. It should show a temperature lower than -18℃.
Choose packs carefully
Make sure the frozen food package is in perfect condition.
Purchase frozen food last
Always buy frozen products last on your shopping trip or visit to the supermarket.
Keep frozen foods together
Try to keep frozen food together whilst shopping, and on the journey home as this will help
to keep the food cooler.
Page 9

6
Store food straight away
Don’t buy frozen food unless you can freeze it straight away. Special insulated bags can
be bought from most supermarkets and hardware shops. These keep frozen food cold for
longer.
Thawing frozen food
For some foods, thawing before cooking is unnecessary. Vegetables and pasta can be
added directly to boiling water or steam cooked. Frozen sauces and soups can be put into
a saucepan and heated gently until thawed.
Freezing fresh foods, useful tips
Use quality food and handle it as little as possible. Freeze food in small quantities, it
freezes faster, takes less time to thaw and enables you to eat it in the quantity you need.
Freezing fresh foods
First, estimate the amount of food you will be freezing. If you are freezing large amounts of
fresh food, remember to turn the control dial to Max. This will lower the temperature in the
Freezer (approx -30℃), freezing your food quicker and helping to keep the goodness in.
However you should do this sparingly to conserve energy.
Preparations for freezing
Leave cooked food to cool completely.
Chill food in a Fridge before freezing if possible.
Consider how you want to cook the food before freezing it.
Don’t freeze food in metal containers as you may want to microwave it straight from the
Freezer.
Use special Freezer bags available from supermarkets, Freezer film, polythene bags,
plastic containers, aluminum foil for acidic foods(such as citrus fruits).
Do not use thin cling film or glass. Do not use used food containers (unless cleaned
thoroughly first).
Exclude as much air from the container as possible. You could buy a special vacuum
pump which sucks excessive air out of the packaging.
Leave a small amount of “air space” when freezing liquids, to allow for expansion.
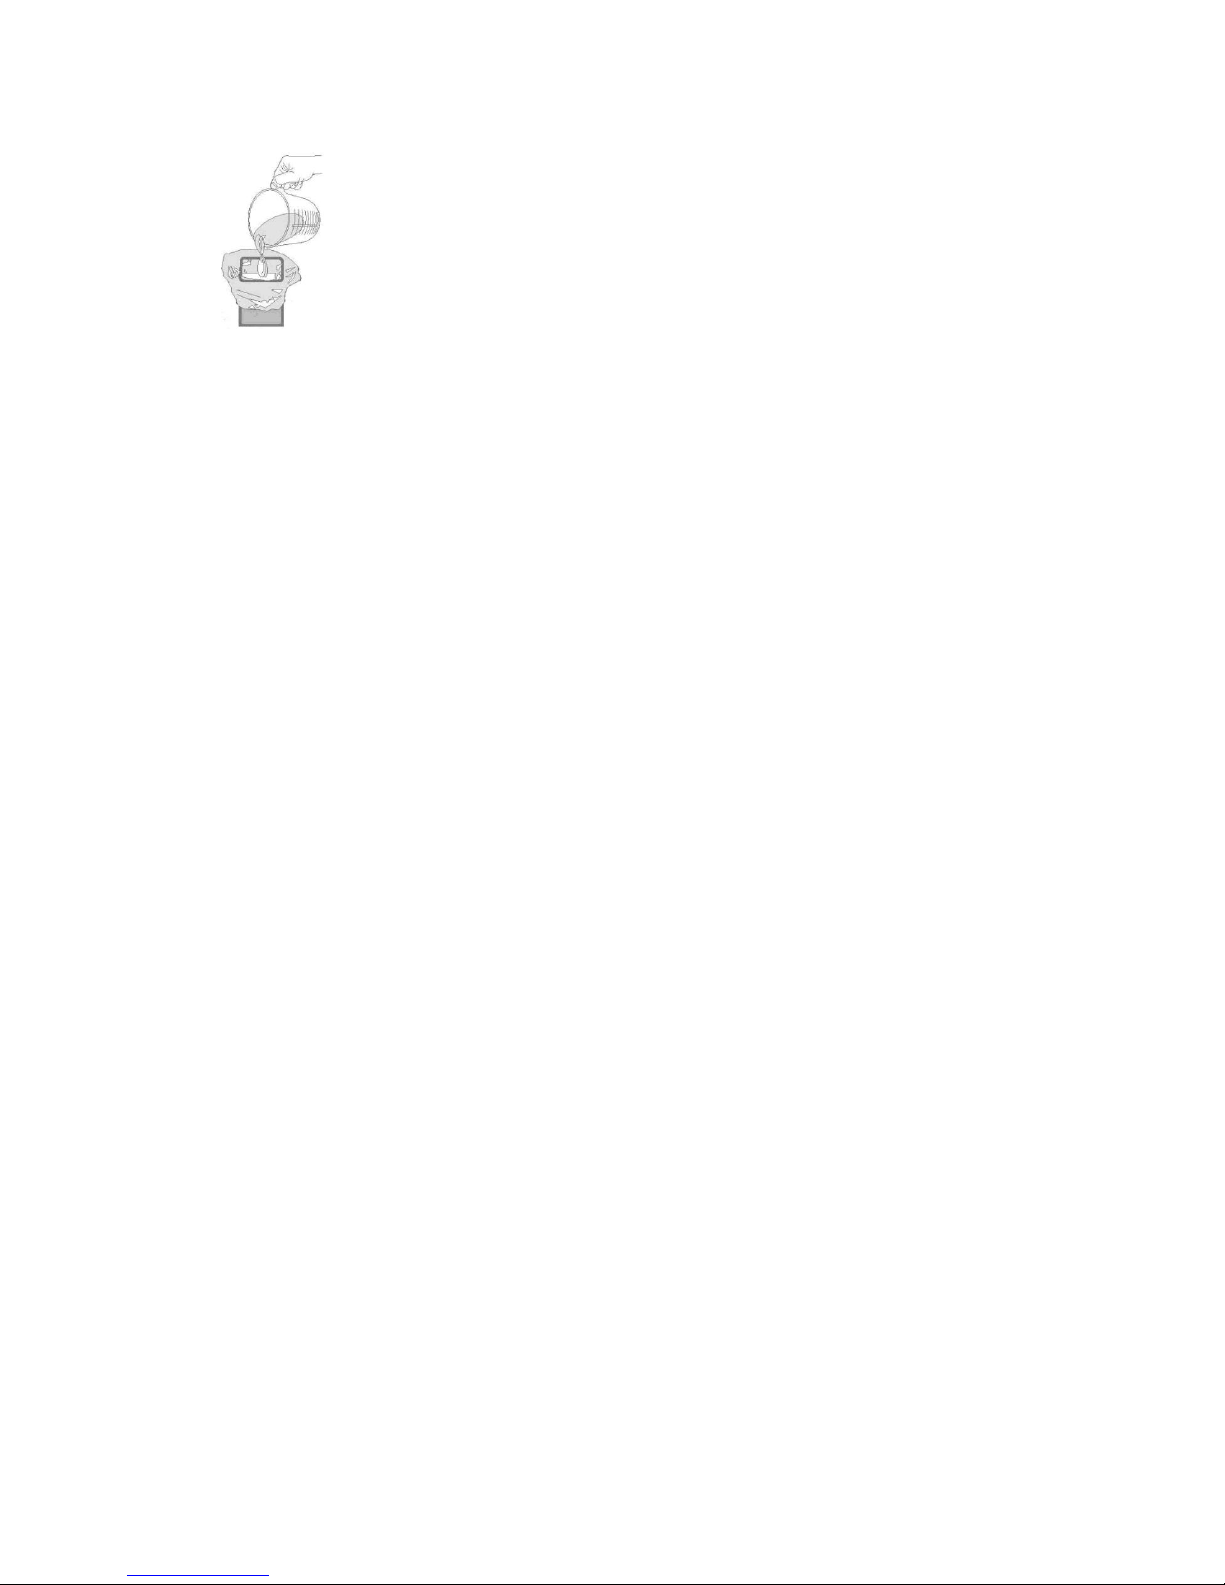
You can use the space in the Freezer most efficiently if you freeze liquids(or solids with
liquids, such as stew) in square blocks.
This is known as “performing” Pour the liquid into a polythene bag which is inside a square
sided container. Freeze it like this, then remove it from the container and seal the bag.
Page 10
7
Defrosting
This appliance is designed as automatic defrosting ,no need to defrost by hand.
Recommended storage periods
For recommended food storage time, refer to the information given on your food
packaging.
Cleaning inside the Fridge/Freezer
You should clean the Fridge/Freezer internally with a weak solution of bicarbonate of soda.
Then rinse with warm water using a damp sponge or cloth and wipe dry. Wash the baskets
in warm soapy water and ensure they are completely dry before replacing in the
Fridge/Freezer.
Cleaning outside the Fridge/Freezer
Use standard non-abrasive detergent diluted in warm water to clean the Fridge/Freezer
exterior.
The grille of the condenser at the back of the Fridge/Freezer and the adjacent
components can be vacuumed using a soft brush attachment.
Do not use harsh cleaners, scouring pads or solvents to clean any part of the
Fridge/Freezer
TROUBLESHOOTING AND MAINTENANCE
Trouble Shooting
Power cut
If the internal temperature of the Fridge/Freezer compartment is -18℃ or less when the
Page 11

8
power returns, your food is safe. The food in your Fridge/Freezer will remain frozen for
approx 16 hours with the door closed. Do not open the Fridge/Freezer door more than
necessary.
The Fridge/Freezer is exceptionally cold
You may have accidentally set the refrigerator temperature to a higher position.
The Fridge/Freezer is exceptionally warm
The compressor may not be working. Set the refrigerator temperature to maximum setting
and wait a few minutes. If there is no humming noise, it is not working. Contact the local
store where your purchase was made.
The Fridge/Freezer is not working
Check it is plugged in and switched on. Check that the fuse in the plug has not blown.
Plug in another appliance, such as a lamp, to see if the socket is working. The
Fridge/Freezer should be placed in a well ventilated room with an ambient temperature of
between 16℃and 32℃. Leave the Fridge/Freezer for 30 minutes.
Condensation appears on the outside of the Fridge/Freezer
This may be due to a change in the room temperature. Wipe off any residue of moisture. If
the problem continues, contact the local store where your purchase was made.
GURGLING, WHOOSHING
These noises are caused by the circulation of the refrigerant liquid in the cooling system. It
has become more pronounced since the introduction of CFC free gases. This is not a fault
and will not affect the performance of your Fridge/Freezer.
HUMMING, PURRING OR PULSATING
This is the compressor motor working, as it pumps the refrigerant around the system.
Page 12
9
Servicing
This product should be serviced by an authorized engineer and only genuine spare parts
should be used.
Under no circumstances should you attempt to repair the appliance yourself.
Repairs carried out by inexperienced persons may cause injury or serious malfunctioning.
Contact the local store where your purchase was made.
When the appliance is not in use for long periods, disconnect from the electricity supply,
empty all foods and clean the appliance, leaving the door ajar to prevent unpleasant
smells.
Lamp Replacement
LED light is used in this appliance, which with low energy consumption & long life.
If anything abnormal, please contact after-sale service for help.
Reversing the Door Swing
一: Disassemble the refrigerator/freezer door
1. a. Use a tool to remove the screw off the hinge cover, and then remove the latter.
Insert the communication line to the hole on the cabinet top.
b. Use a tool to remove the 4 screws off the upper hinge cover and then remove the latter.
Pry up the door bush and small end cap cover on the door.
Page 13

10
c.Insert the door bush and door communication line into the hole on the door and then put
on the small end cap cover.
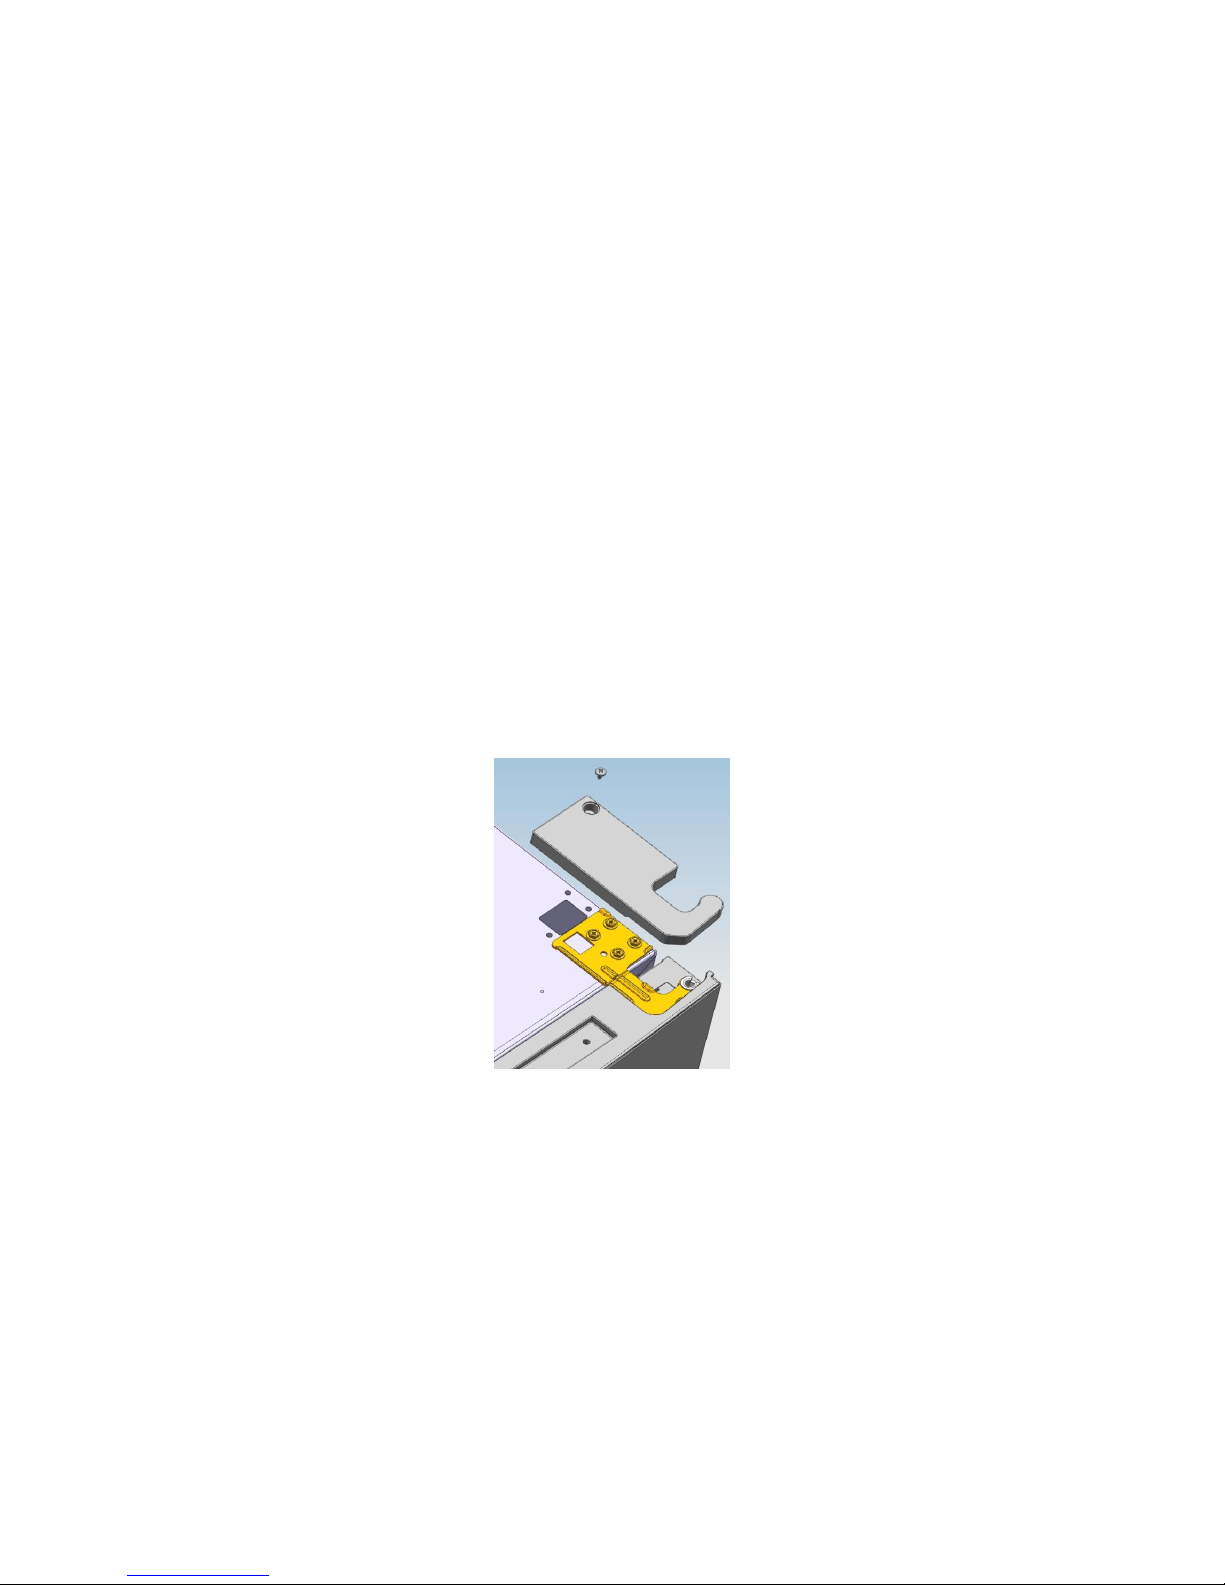
d. Use a tool to remove the 2 screws as shows in the below figure to remove the hole
cover on the cabinet top and get the cabinet communication line out of the hole.
Pry up the small end cap cover on the door and get out the door bush and door
communication line.
e. Insert the door bush into the round hole on the door and then put on the small end cap
cover.
Page 14

11
f. Move the refrigerator door upward over 50mm to remove the door.
2. a. Use a tool to remove the 3 screws off the middle hinge cover and then remove the
middle hinge.
b. Move the freezer door upward over 50mm to remove the door.
Page 15

12
c. Remove the adjustable front feet under the lower hinge; use a tool to remove the 4
screws from the lower hinge and then disassemble the lower hinge.
Door disassembly is finished.
二: Assemble the door, lower hinge accessories to the corresponding positions of the other
Page 16

13
side.
1. a. Use a tool to get the door bush out as shown in the below figure and assemble it to the
corresponding position of the other side.
b. Use a tool to remove the screws off the stopper ass as shown in the below figure and
then assemble them to the other side of the door.
c. Use a tool to remove the axle and two stoppers on the lower hinge and then assemble
them to the position as shown in the below figure.
Page 17

14
三: Assemble the refrigerator door and freezer door to the opposite side.
1、a.Remove the adjustable front foot as shown below by hand and then assemble the
lower hinge to the other side of the cabinet and fix the screws by using a tool.
b. Assemble the shorter adjustable front foot to the lower hinge side and adjust the height
of the foot to make the refrigerator stay in level.
Page 18

15
2、Put on the freezer door and turn the middle hinge by 180 ℃ and then assemble it to the
other side of the cabinet; use a tool to screw up the 3 screws to fix the middle hinge.
3、Put on the refrigerator door and assemble the left upper hinge to the other side of the
cabinet; use a tool to screw up the 4 screws to fix the upper hinge.
After that, connect the door communication line and the cabinet communication line and
then put on the left upper hinge cover and fix it using a screw.
4、Assemble the hole cover to the other side of the cabinet and use a tool to screw up the
hole cover.
Door disassembly is finished here.
Figure of door opening from the right
Page 19

16
Figure of door opening from the left
Page 20

17
NOTE: If you want to have the door swing reversed, we recommend that your contact a
qualified technician. You should only try to reverse the door yourself if you believe that you
are qualified to do so.
All parts removed must be saved to do the reinstallation of the door. You should rest the
fridge freezer on something solid so that it will not slip during the door change process. Do
not lay the fridge freezer flat as this may damage the coolant system. Ensure the fridge
freezer is unplugged and empty. We recommend that 2 people handle the fridge freezer
during assembly.
Page 21

18
Correct Disposal of this product
This marking indicates that this product should not be
disposed with other household wastes throughout the EU. To
prevent possible harm to the environment or human health
from uncontrolled waste disposal, recycle it responsibly to
promote the sustainable reuse of material resources. To
return your used device, please use the return and collection
systems or contact the retailer where the product was
purchased. They can take this product for environmental safe
recycling.
Page 22

19
Servicio Assistencia Técnica Atención al cliente: 902 107 122
CERTIFICADO DE GARANTIA
Imprescindible la presentación de la factura de compra acompañada del presente certificado de garantía
RIESGOS CUBIERTOS
Este aparato está garantizado contra cualquier defecto de funcionamiento,siempre que se destine a uso doméstico,
procediéndose a su reparación dentro del plazo de garantía y solo por la red de SAT Autorizados.
EXCEPCIONES DE LA GARANTIA
A.— Que la fecha del certificado no cioncida con la fecha de venta de la factura original.
B.— Averías producidas por golpe,por caída o cualquier otra causa de fuerza mayor.
C.—Si el aparato ha sido manipulado por personal no autorizado.
D.—Las averías producidas o derivadas como consecuencia de un uso inadecuado,por defectos
de instalación, o por introducir modificaciones en el aparato que alteren su funcionamiento.
E.—Puestas en marcha, mantenimiento, limpiezas, componentes sujetos a desgaste, lámparas,
piezas estéticas, oxidaciones, plásticos, carcasas, gomas.
“ESTAS EXCEPCIONES ANULAN LA GARANTIA,SIENDO LA REPARACIÓN CON CARGO AL CLIENTE”
PERIODO AMPARADO EN APARATOS SEGÚN LEY DE GARANTIAS EN LA VENTA DE BIENES DE CONSUMO
Ley 23/2/2003, de 10 de julio
PN:261800401383
Page 23

20
FRIGORÍFICO
MANUAL DE INSTRUCCIONES
Modelo No.: CCML1970NFX
Page 24

21
INTRODUCCIÓN
Antes del uso
Lea atentamente estas instrucciones y las pautas de seguridad en la página 1 antes de utilizar su nuevo frigorífico /
congelador. El frigorífico / congelador es solo para uso interno y doméstico.
No
Descripción
1
Interruptor de la luz
2
Estantes del frigorífico
3
Luz
4
Cajón de frutas y verduras
5
Tapa del cajón de frutas y verduras
6
Cajones del congelador
7
Estantes de las puertas
Page 25

22
INSTALLATION
INSTALACIÓN
LOCALIZACIÓN
Al seleccionar una posición para su Congelador, debe asegurarse de que el suelo sea plano y firme, y que la habitación esté bien ventilada, con
una temperatura ambiente promedio de entre 16 ℃ y 38 ℃. Evite ubicar su congelador cerca de una fuente de calor, p. Ej., Cocina, caldera o
radiador. También evite la luz solar directa en edificios exteriores o salones de sol. Si va a colocar su congelador en un edificio exterior, como un
garaje o un anexo, asegúrese de que el congelador esté colocado por encima del camino húmedo, de lo contrario se producirá condensación en
el gabinete del congelador. Nunca coloque el congelador en una pared empotrada o en gabinetes o muebles instalados cuando su congelador
esté funcionando, la rejilla en la parte posterior y los lados pueden calentarse. Por lo tanto, debe instalarse de modo que la parte posterior del
congelador tenga al menos 9 cm (31/2 ") de espacio libre y los lados tengan 3 cm (3/4"). No cubra el congelador con ninguna cubierta.
Nivelando el congelador
Si el Congelador no está nivelado, la alineación de la puerta y del sello magnético se verá afectada y puede causar que el Congelador funcione
incorrectamente. Una vez que el congelador se coloca en su ubicación final, ajuste las patas niveladoras en el frente girándolas.
Limpieza antes del uso
Limpie el interior del congelador con una solución débil de bicarbonato de sodio. Luego enjuague con agua tibia usando una esponja o paño
húmedo. Lave las cestas y estantes con agua tibia y jabón y seque completamente antes de volver a colocarlos en el congelador. Las partes
externas del congelador se pueden limpiar con cera para pulir. Vea la página 9 para más detalles sobre la limpieza.
Antes de enchufar DEBE
Verifique que tenga un enchufe que sea compatible con el enchufe suministrado con el congelador. Si no, mire la sección llamada
INFORMACIÓN ELÉCTRICA.
Antes del encendido!
NO ENCIENDA HASTA CUATRO HORAS DESPUÉS DE MOVER EL CONGELADOR.
El fluido refrigerante necesita tiempo para asentarse. Si el aparato se apaga en cualquier momento, espere 30 minutos antes de volver a
encenderlo para permitir que se asiente el líquido refrigerante.
Antes de llenar su congelador
Antes de almacenar alimentos en su congelador, encienda el congelador y espere 24 horas, para asegurarse de que esté funcionando
correctamente y para permitir que el congelador no alcance la temperatura correcta.
Page 26

23
INICIO
1. Limpie las partes del frigorífico con agua tibia que contenga un poco de detergente
neutro y con agua limpia, y límpielas.
Notas: Las partes eléctricas del frigorífico solo se pueden limpiar con un paño seco.
2. Encienda la electricidad. El compresor comienza a funcionar.
3. Abra la puerta 30 minutos más tarde, si la temperatura en el frigorífico disminuyó
obviamente, muestra que el sistema del frigorífico funciona bien. Cuando el frigorífico
funciona por un período de tiempo, el controlador de temperatura establecerá
automáticamente la temperatura dentro de los límites que abre.
La pantalla está ubicada en el medio de la puerta del frigorífico. Por favor,
consulte la figura a continuación para el diseño.
Instrucción de los botones:
(5) Nevera: para configurar la temperatura del frigorífico
(2) Congelador: para configurar la temperatura del congelador
(3) Función: para elegir funciones de enfriamiento rápido, congelación rápida,
inteligencia y vacaciones
(4) OK: para ingresar o salir de la función existente
ajuste de función
★ aparato conectado a la potencia en el primer momento
Cuando el dispositivo se conecta a la alimentación por primera vez, la pantalla
se iluminará durante 2 segundos antes de que sea normal y el dispositivo se
ejecutará con la función de inteligencia.
★ control de pantalla
Cuando la puerta del frigorífico está cerrada y no hay botón de operación en 3
minutos, la luz de la pantalla se apaga.
Cuando la luz de la pantalla esté apagada, abra la puerta del frigorífico o haga
clic en cualquier botón para encenderla.
★ ajuste de temperatura
Haga clic en el botón "frigorífico" o "congelador" y cuando parpadee en el
símbolo, se pueden establecer las temperaturas; cada vez que se hace clic en el botón, la
temperatura cambia en consecuencia (la pantalla muestra la temperatura en consecuencia).
(Las temperaturas no se pueden configurar en función de enfriamiento rápido, congelación
rápida, inteligencia y vacaciones)
2) En la configuración de temperatura, si no hay operación de botón en 5 segundos, el botón
deja de parpadear y la temperatura establecida entra en vigencia.
3) Ciclo de temperatura
Frigorífico: 2℃→3℃→4℃→5℃→6℃→7℃→8℃→OFF→2℃;
Congelador: -24℃→-23℃→-22℃→-21℃→-20℃→-19℃→-18℃→-17℃→-16℃→-24℃;
★ inteligencia
Bajo inteligencia, es 4 ℃ en el frigorífico y -18 ℃ en el congelador.
Las temperaturas no se pueden cambiar y puede hacer clic en el botón de la zona de
temperatura para verificar la temperatura.
Page 27

24
1) Para ingresar a la inteligencia
Haga clic en "opción" hasta que parpadee y luego haga clic en "Aceptar" para ingresar a esta
función.
2) Para abandonar la inteligencia
En inteligencia, haga clic en "opción" hasta que vaya a la inteligencia, haga clic en "Aceptar"
para salir de esta función y la luz se apaga.
Las temperaturas de cada cámara vuelven al valor antes de la función de inteligencia.
★ enfriamiento rápido
Bajo enfriamiento rápido, es de 2 ℃ en el frigorífico y la temperatura del frigorífico no se
puede cambiar.
1) Para entrar en enfriamiento rápido
Haga clic en "opción" hasta que parpadee en "enfriamiento rápido" y luego haga clic en
"Aceptar" para ingresar a esta función.
2) Para salir de un enfriamiento rápido
En enfriamiento rápido, haga clic en "opción" hasta que pase a "enfriamiento rápido" y luego
haga clic en "Aceptar" para salir de esta función.
La luz de enfriamiento rápido se apaga y la temperatura del frigorífico vuelve al valor antes de
un enfriamiento rápido.
★ congelación rápida
Bajo congelación rápida, la temperatura del frigorífico puede ajustarse, pero no para la
temperatura del congelador.
1) Para entrar en congelación rápida
Haga clic en "opción" hasta que parpadee en "congelación rápida" y luego haga clic en
"Aceptar" para ingresar a esta función.
2) Para salir de un enfriamiento rápido
En congelación rápida, haga clic en "opción" hasta que pase a "congelación rápida" y luego
haga clic en "Aceptar" para salir de esta función.
La luz en la congelación rápida se apaga y la temperatura del congelador vuelve al valor antes
de la congelación rápida.
Cuando el tiempo de congelación rápido es superior (26 horas), se cierra automáticamente.
Cuando se trata de inteligencia, la congelación rápida se detiene.
★ vacaciones
En vacaciones, es de 14 ℃ en el frigorífico y las temperaturas en esta cámara no se pueden
cambiar.
1) Para ingresar vacaciones
Haga clic en "opción" hasta que parpadee en "congelación rápida" y luego haga clic en
"Aceptar" para ingresar a esta función.
2) De vacaciones
En vacaciones, haga clic en "opción" hasta que pase a "vacaciones" y luego haga clic en
"Aceptar" para salir de esta función.
La luz de vacaciones se apaga y la temperatura del frigorífico vuelve al valor antes de las
vacaciones.
Modo vacaciones se cierra bajo funciones de inteligencia y enfriamiento rápido.
★ memoria de apagado
Con este diseño, el frigorífico puede mantener automáticamente todo el ajuste en caso de
apagado. Cuando la unidad se enchufa nuevamente, el frigorífico funcionará con la
Page 28

25
configuración antes de apagarla.
★ Retraso de encendido
Para evitar daños al frigorífico en caso de corte repentino de energía y encendido, la unidad
no arranca inmediatamente si el tiempo de apagado es de menos de 5 minutos.
★ Alarma de sobrecalentamiento del congelador (solo en caso de encendido)
Cuando la temperatura del congelador es superior a 10 ℃ la primera vez que se conecta a la
corriente, la luz de símbolos de la cámara del congelador se enciende y el número que
representa la temperatura parpadea.
Presione cualquier botón o espere 5 segundos, el parpadeo se detiene y vuelve a la
temperatura establecida.
★ Alarma de apertura de la puerta del frigorífico
Cuando el frigorífico está abierto durante 3 minutos, el zumbador sonará. Cierre la puerta o
presione cualquier botón para detener la alarma, pero para este último, la alarma se activará
de nuevo después de 3 minutos.
★ alarma de falla del sensor
Cuando muestra "E0", "E1", "E2" u otros símbolos anormales, significa fallas del sensor y el
frigorífico necesita reparación.
EN USO
Consejos para mantener la comida perfecta en el frigorífico
Tenga especial cuidado con la carne y el pescado
Las carnes cocinadas siempre deben almacenarse en un estante por encima de las
carnes crudas para evitar la transferencia bacteriana. Mantenga las carnes crudas en un
plato que sea lo suficientemente grande como para recolectar los jugos y cúbralo con
papel film o papel de aluminio.
Deje espacio alrededor de la comida
Esto permite que el aire frío circule alrededor del frigorífico, asegurando que todas las
partes del frigorífico se mantengan frías.
¡Envuelve la comida!
Para evitar la transferencia de sabores y la desecación, los alimentos deben envasarse o
cubrirse por separado. Las frutas y verduras no necesitan ser envueltas.
La comida precocinada debe enfriarse adecuadamente
Deje que los alimentos precocinados se enfríen antes de colocarlos en el frigorífico. Esto
ayudará a evitar que la temperatura interna del frigorífico suba.
Page 29

26
¡Cerrar la puerta!
Para evitar que escape el aire frío, intente limitar la cantidad de veces que abre la puerta.
Cuando regrese de las compras, clasifique los alimentos que debe conservar en su
frigorífico antes de abrir la puerta. Solo abra la puerta para poner comida o sacarla.
Dónde guardar tus alimentos en el frigorífico
Área fresca
Aquí es donde almacenar alimentos que se mantendrán más tiempo si se mantienen
frescos. Leche, huevos, yogurt, jugos de frutas, quesos duros, por ej. Queso Cheddar.
Frascos y botellas de aderezos para ensalada, salsas y mermeladas. Grasas, ej.
Mantequilla, margarina, grasas bajas en grasa, grasas de cocina y manteca de cerdo.
Área más fría: 2 ℃ a 5 ℃
Aquí es donde deben conservarse los alimentos que deben estar fríos para mantenerlos
seguros:
· Las comidas crudas y crudas siempre deben ser envueltas.
· Alimentos refrigerados precocinados, ej. Platos preparados, pasteles de carne, quesos
blandos.
· Carnes precocinadas, por ej. Jamón,
· Ensaladas preparadas (incluidas las ensaladas verdes mixtas pre envasadas, arroz,
ensalada de papas, etc.).
· Postres, ej. Comida casera y sobras o tortas de crema.
Ensaladera
Esta es la parte más húmeda de la nevera. Vegetales, frutas, ensaladas frescas, por
ejemplo. Lechugas enteras sin lavar, tomates enteros, rábanos, etc. se pueden
almacenar aquí.
RECOMENDAMOS QUE TODOS LOS PRODUCTOS MANTENIDOS EN LA ENSALADA
SE ENVUELVEN.
NOTA: siempre envuelva y almacene carne cruda, aves y pescado en el estante más bajo
en la parte inferior del frigorífico. Esto evitará que goteen o toquen otros alimentos. No
Page 30

27
almacene gases o líquidos inflamables en el frigorífico.
Consejos para comprar alimentos congelados
Su congelador es 4
Cuando compre alimentos congelados, consulte las Pautas de almacenamiento en el
empaque. Podrá almacenar cada artículo de comida congelada durante el período que se
muestra en comparación con la calificación de 4 estrellas. Este suele ser el período
indicado como "Mejor, antes", que se encuentra en la parte frontal del paquete.
Verifique la temperatura del frigorífico / congelador
Verifique la temperatura del gabinete de alimentos congelados en la tienda donde compra
sus alimentos congelados. Debería mostrar una temperatura inferior a -18 ℃.
Elija los paquetes cuidadosamente
Asegúrese de que el paquete de alimentos congelados esté en perfectas condiciones.
Compra de comida congelada por última vez
Siempre compre productos congelados al último en su viaje de compras o visite el
supermercado.
Mantenga juntas las comidas congeladas
Trate de mantener los alimentos congelados juntos mientras hace las compras, y en el
viaje a casa, ya que esto ayudará a mantener la comida más fresca.
Almacene la comida de inmediato
No compre alimentos congelados a menos que pueda congelarlos de inmediato. Bolsas
con aislamiento especial se pueden comprar en la mayoría de los supermercados y
ferreterías. Estos mantienen la comida congelada fría durante más tiempo.
Descongelar alimentos congelados
Para algunos alimentos, descongelar antes de cocinar es innecesario. Las verduras y las
pastas se pueden agregar directamente al agua hirviendo o al vapor cocinado. Las sopas
y salsas congeladas se pueden poner en una olla y calentar suavemente hasta que se
descongele.
Congelación de alimentos frescos, consejos útiles
Use alimentos de calidad y manipúlelos lo menos posible. Congele la comida en
pequeñas cantidades, se congela más rápido, tarda menos tiempo en descongelarse y le
permite comerla en la cantidad que necesita.
Congelación de alimentos frescos
Primero, calcule la cantidad de alimentos que congelará. Si está congelando grandes
cantidades de alimentos frescos, recuerde girar el dial de control a Máx. Esto reducirá la
temperatura en el congelador (aproximadamente -30 ℃), congelará la comida más rápido
y ayudará a mantener la bondad. Sin embargo, debe hacerlo con moderación para
ahorrar energía.
Page 31

28
Preparaciones para congelar
Deje que los alimentos cocinados se enfríen por completo.
Enfríe la comida en un frigorífico antes de congelar si es posible.
Considera cómo quieres cocinar la comida antes de congelarla.
No congele los alimentos en recipientes de metal, ya que es posible que quiera hornear
en microondas directamente desde el congelador.
Utilice bolsas especiales para congelar disponibles en supermercados, film congelador,
bolsas de polietileno, recipientes de plástico, papel de aluminio para alimentos ácidos
(como cítricos).
No use película delgada ni vidrio. No use recipientes de comida usados (a menos que los
haya limpiado completamente).
Excluya tanto aire del contenedor como sea posible. Podría comprar una bomba de vacío
especial que absorba aire excesivo del embalaje.
Deje una pequeña cantidad de "espacio de aire" cuando congele líquidos, para permitir la
expansión.
Puede usar el espacio en el congelador de la manera más eficiente si congela líquidos (o
sólidos con líquidos, como el estofado) en bloques cuadrados.
Esto se conoce como "rendimiento". Vierta el líquido en una bolsa de polietileno que se
encuentra dentro de un recipiente de lados cuadrados. Congélelo así, luego quítelo del
contenedor y selle la bolsa.
Descongelación
Este electrodoméstico está diseñado como descongelación automática, no es necesario
descongelar a mano.
Períodos de almacenamiento recomendados
Para conocer el tiempo de almacenamiento de alimentos recomendado, consulte la
información que figura en su paquete de alimentos.
Limpieza dentro del frigorífico / congelador
Debe limpiar el frigorífico / congelador internamente con una solución débil de
bicarbonato de soda. Luego enjuague con agua tibia usando una esponja o paño húmedo
y seque. Lave los cestos con agua tibia y jabón y asegúrese de que estén completamente
secos antes de volver a colocarlos en el frigorífico / congelador.
Page 32

29
Limpieza fuera del frigorífico / congelador
Use detergente estándar no abrasivo diluido en agua tibia para limpiar el exterior del
frigorífico / congelador.
La rejilla del condensador en la parte posterior del frigorífico / congelador y los
componentes adyacentes se pueden aspirar utilizando un accesorio de cepillo suave.
No use limpiadores fuertes, estropajos o solventes para limpiar cualquier parte del
frigorífico / congelador
SOLUCIÓN DE PROBLEMAS Y MANTENIMIENTO
Solución de problemas
Corte de energía
Si la temperatura interna del compartimiento del frigorífico / congelador es de -18 ℃ o
menos cuando la energía vuelve, la comida está segura. La comida en su frigorífico /
congelador permanecerá congelada por aproximadamente 16 horas con la puerta
cerrada. No abra la puerta del frigorífico / congelador más de lo necesario.
El frigorífico / congelador es excepcionalmente frío
Es posible que accidentalmente haya colocado la temperatura del frigorífico en una
posición más alta.
El frigorífico / congelador es excepcionalmente cálido
El compresor puede no estar funcionando. Ajuste la temperatura del frigorífico a la
configuración máxima y espere unos minutos. Si no hay un zumbido, no está funcionando.
Póngase en contacto con la tienda local donde realizó su compra.
El frigorífico / congelador no funciona
Verifique que esté enchufado y encendido. Verifique que el fusible en el enchufe no se
haya fundido. Enchufe
En otro dispositivo, como una lámpara, para ver si el socket está funcionando. El
frigorífico / congelador debe colocarse en una habitación bien ventilada con una
temperatura ambiente de entre 16 ℃ y 32 ℃. Deje el frigorífico / congelador por 30
minutos.
La condensación aparece en el exterior del frigorífico / congelador
Esto puede deberse a un cambio en la temperatura ambiente. Limpie cualquier residuo
de humedad. Si el problema continúa, contáctese con la tienda local donde realizó su
compra.
GORGOTEOS
Estos ruidos son causados por la circulación del líquido refrigerante en el sistema de
enfriamiento. Se ha vuelto más pronunciado desde la introducción de gases libres de
CFC. Esto no es una falla y no afectará el rendimiento de su Nevera / Congelador.
ZUMBIDO, PÁLPITOS
Este es el funcionamiento del motor del compresor, ya que bombea el refrigerante
Page 33

30
alrededor del sistema.
Servicio
Este producto debe ser reparado por un ingeniero autorizado y solo se deben usar
repuestos originales.
En ningún caso debe intentar reparar el aparato usted mismo.
Las reparaciones llevadas a cabo por personas inexpertas pueden causar lesiones o un
mal funcionamiento grave. Póngase en contacto con la tienda local donde realizó su
compra.
Cuando el electrodoméstico no esté en uso por períodos prolongados, desconéctelo del
suministro eléctrico, vacíe todos los alimentos y limpie el aparato, dejando la puerta
entreabierta para evitar olores desagradables.
Reemplazo de la lámpara
La luz LED se usa en este electrodoméstico, que tiene un bajo consumo de energía y una
larga vida útil.
Si hay algo anormal, póngase en contacto con el servicio postventa para obtener ayuda.
Inversión de la apertura de la puerta
一:Desmontar la puerta del frigorífico / congelador
1. a. Use una herramienta para quitar el tornillo de la cubierta de la bisagra y luego retire la
última.
Inserta la línea de comunicación en el agujero en la parte superior del gabinete.
2. Use una herramienta para quitar los 4 tornillos de la cubierta de la bisagra superior y luego
retire esta última.
Levante el casquillo de la puerta y la tapa de la tapa pequeña en la puerta.
Page 34

31
c. Inserte el casquillo de la puerta y la línea de comunicación de la puerta en el orificio de la
puerta y luego coloque la tapa de la tapa pequeña.
d. Use una herramienta para quitar los 2 tornillos como se muestra en la figura a continuación
para quitar la tapa del orificio en la parte superior del gabinete y sacar la línea de
comunicación del gabinete del orificio.
Levante la tapa de la tapa pequeña de la puerta y salga del casquillo de la puerta y de la línea
de comunicación de la puerta.
e. Inserte el casquillo de la puerta en el orificio redondo de la puerta y luego coloque la tapa de
la tapa pequeña.
Page 35

32
f. Mueva la puerta del frigorífico hacia arriba más de 50 mm para quitar la puerta.
1. a. Use una herramienta para quitar los 3 tornillos de la cubierta de la bisagra del
medio y luego retire la bisagra del medio.
b. mueva la puerta del congelador hacia arriba más de 50 mm para quitar la puerta.
Page 36

33
c. Retire los pies delanteros ajustables debajo de la bisagra inferior; use una herramienta para
quitar los 4 tornillos de la bisagra inferior y luego desmonte la bisagra inferior.
El desmontaje de la puerta está terminado.
二:Monte la puerta, baje los accesorios de la bisagra a las posiciones correspondientes del
otro lado.
1. a. Use una herramienta para sacar el casquillo de la puerta como se muestra en la
Page 37

34
figura a continuación y móntelo en la posición correspondiente del otro lado.
b. Use a tool to remove the screws off the stopper ass as shown in the below figure and
then assemble them to the other side of the door.
Monte la puerta, baje los accesorios de la bisagra a las posiciones correspondientes del otro
lado.
1. a. Use una herramienta para sacar el casquillo de la puerta como se muestra en la figura a
continuación y móntelo en la posición correspondiente del otro lado.
Page 38

35
三:Monte la puerta del frigorífico y la puerta del congelador en el lado opuesto.
1, a.Retire a mano el pie delantero ajustable como se muestra a continuación y luego monte la
bisagra inferior en el otro lado del gabinete y fije los tornillos con una herramienta.
b. Monte el pie delantero ajustable más corto en el lado inferior de la bisagra y ajuste la
altura del pie para que el frigorífico permanezca nivelado.
2, coloque la puerta del congelador y gire la bisagra del medio por 180 ℃ y luego armela al
otro lado del gabinete; use una herramienta para atornillar los 3 tornillos para fijar la bisagra
Page 39

36
del medio.
3, coloque la puerta del frigorífico y monte la bisagra superior izquierda en el otro lado del
gabinete; use una herramienta para atornillar los 4 tornillos para arreglar la bisagra superior.
Después de eso, conecte la línea de comunicación de la puerta y la línea de comunicación del
gabinete y luego coloque la cubierta superior izquierda de la bisagra y fíjela con un tornillo.
4, monte la tapa del orificio en el otro lado del gabinete y use una herramienta para atornillar la
tapa del orificio.
El desmontaje de la puerta está terminado aquí.
figura de apertura de la puerta desde la derecha
Page 40

37
figura de apertura de la puerta desde la izquierda
Page 41

38
NOTA: Si desea que la puerta se balancee hacia atrás, le recomendamos que contacte a
un técnico calificado. Solo debe tratar de revertir la puerta usted mismo si cree que está
calificado para hacerlo.
Todas las partes eliminadas deben guardarse para hacer la reinstalación de la puerta.
Debe apoyar el congelador en algo sólido para que no se deslice durante el proceso de
cambio de puerta. No acueste el frigorífico de forma plana ya que podría dañar el sistema
de refrigeración. Asegúrese de que el frigorífico esté desenchufado y vacío.
Recomendamos que 2 personas manejen el frigorífico durante el montaje.
Page 42

39
Correcta eliminación de este producto
Esta marca indica que este producto no debe eliminarse junto
con otros desechos domésticos en toda la UE. Para evitar
posibles daños al medioambiente o a la salud humana debido
a la eliminación incontrolada de residuos, recíclelo
responsablemente para promover la reutilización sostenible
de los recursos materiales. Para devolver su dispositivo
usado, use los sistemas de devolución y recolección o
comuníquese con el vendedor donde compró el producto.
Pueden tomar este producto para un reciclaje ambiental
seguro.
Page 43

40
Servicio Asistencia Técnica Atención al cliente: 902 107 122
CERTIFICADO DE GARANTIA
Imprescindible la presentación de la factura de compra acompañada del presente certificado de garantía
RIESGOS CUBIERTOS
Este aparato está garantizado contra cualquier defecto de funcionamiento, siempre que se destine a uso doméstico,
procediéndose a su reparación dentro del plazo de garantía y solo por la red de SAT Autorizados.
EXCEPCIONES DE LA GARANTIA
A.— Que la fecha del certificado no cioncida con la fecha de venta de la factura original.
B.— Averías producidas por golpe,por caída o cualquier otra causa de fuerza mayor.
C.—Si el aparato ha sido manipulado por personal no autorizado.
D.—Las averías producidas o derivadas como consecuencia de un uso inadecuado,por defectos
de instalación, o por introducir modificaciones en el aparato que alteren su funcionamiento.
E.—Puestas en marcha, mantenimiento, limpiezas, componentes sujetos a desgaste, lámparas,
piezas estéticas, oxidaciones, plásticos, carcasas, gomas.
“ESTAS EXCEPCIONES ANULAN LA GARANTIA,SIENDO LA REPARACIÓN CON CARGO AL CLIENTE”
PERIODO AMPARADO EN APARATOS SEGÚN LEY DE GARANTIAS EN LA VENTA DE BIENES DE CONSUMO
Ley 23/2/2003, de 10 de julio
PN:261800401383
 Loading...