

Page 1
XTR 60
Powered subwoofer
Page 2
INSTALL & TUNE
E' necessario leggere attentamente questo manuale e seguire passo-passo le istruz io ni
per ottenere le migliori prestazioni dal subwoofer e prevenire l'insorgere di eventuali problemi.
It is necessary to read carefully this manual and follow the directions step by step
to obtain the best results from the subwoofer and to prevent against possible problems.
FUSE
XX XX
[ 1 ] [ 2 ]
-
REM RLRL LEVEL XTR PHASE
+
-
+-+
[ 3 ] [ 4 ] [ 5 ] [ 6 ] [ 7 ] [ 8 ] [ 9 ]
0 180
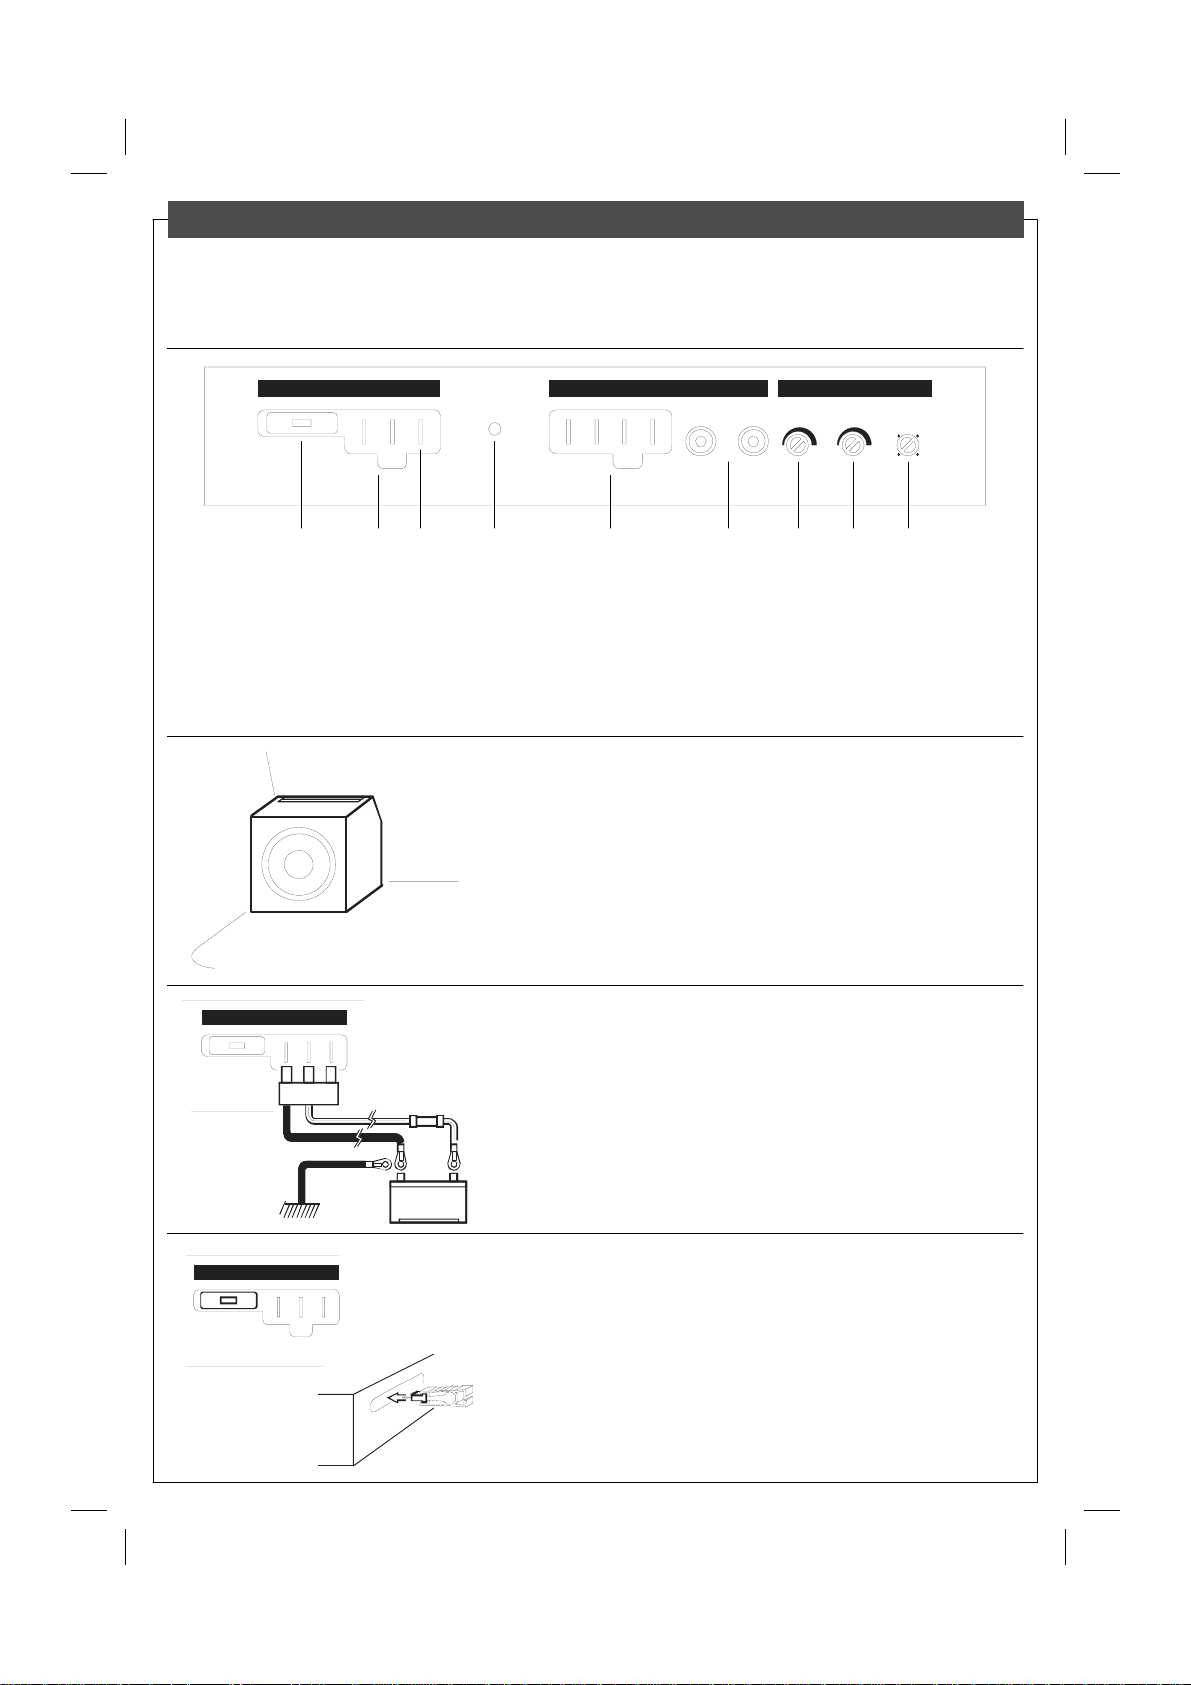
1 - FUSE Fusibile interno. Internal fuse.
2 - POWER SUPPLY Terminali alimentazione 12 Volt. 12 Volt power supply terminals.
3 - REMOTE Terminale accensione remota. Remote on/off terminal.
4 - ON LED Indica l’accensione dell’amplificatore. Shows the amplifier on.
5 - BOOSTER INPUT Terminali ingresso booster. Booster input terminals.
6 - RCA INPUT Connettori d’ingresso RCA. RCA input jacks.
7 - LEVEL CONTROL Regola il livello di uscita. Adjusts the output level.
8 - XTR CONTROL Regola l’estensione dei bassi. Adjusts the bass extension.
9 - PHASE CONTROL Regola la fase. Adjusts the phase.
Fissate il subwoofer ad una solida superficie,
in un luogo ben aerato e protetto da polvere ed umidità.
Se l’aerazione non è sufficiente, la protezione termica disattiva il
subwoofer, che si riattiva spegnendo e riaccendendo l’autoradio.
Fix the subwoofer on a steady surface,
in a good aired place and protected from dust and moisture.
If the ventilation is not enough, the thermic protection shut’s down
the subwoofer. It’s reactivable turning off and on the car radio.
XX XX
FUSE
XX XX
REM
-
+
Inserite il connettore d’alimentazione (in dotazione)
e collegate i cavi direttamente alla batteria:
quello rosso al positivo (+), quello nero al negativo (-).
Introducete un fusibile da 20 A, vicino alla batteria,
sul cavo rosso, per proteggere la vettura.
FUSE
20A
Il fusibile interno non sostituisce quello sulla batteria.
Plug in the power supply connector (outfit)
and link the cables directly to the battery:
GND
-
BATTERY
the red one to the positive (+), the black one to negative (-).
+
Place a 20 A fuse, near the battery,
on the red conductor, to protect the vehicle.
The internal fuse does not substitute the battery fuse.
Sul retro del subwoofer è presente un fusibile.
Se necessario, rimpiazzatelo con uno uguale.
Non sostituite il fusibile prima di aver rimosso la causa
del guasto, ciò provocherebbe danni alla circuitazione.
There is a fuse on the subwoofer back side.
If necessary, replace it whit one of the same type.
Do not replace the fuse before removing the cause of damage,
as this can damage the internal circuit.
Page 3

XX XX
INSTALL & TUNE
Collegate il cavo blu del connettore d’alimentazione
REMOTE
OUT
REM
-
+
all’uscita remote dell’autoradio.
In caso di malfunzionamento, la protezione disattiva il subwoofer.
Prima di riattivarlo, verificate tutti i collegamenti.
Il subwoofer si riattiva spegnendo e riaccendendo l’autoradio.
Link the blue cable of supply connector
to the car radio remote output.
In case of malfunction, the protections shut’s down the subwoofer.
Before turn on the subwoofer again, check all the connections.
The subwoofer is reactivated by turning off and on the car radio.
RLRL
-
+-+
collegate l’autoradio all’ingresso RCA [6].
Se la sorgente non è dotata di uscita di segnale,
collegate i terminali [5] con l’uscita altoparlanti della radio.
By good quality signal cable,
connect the car radio to the RCA input [6].
If the source is not provided with signal output,
link the terminals [5] to the radio speaker outputs.
Impostate il LEVEL [7] al minimo ed accendete l’impianto.
Con un cavo di segnale di buona qualità,
LEVEL
Ascoltate un normale programma musicale e
ruotate il LEVEL [7] in senso orario
sino ad ottenere il giusto bilanciamento tonale.
Set the LEVEL [7] to the minimum and switch on the system.
Play a normal music program and
turn clockwise the subwoofer LEVEL [7],
until you hear the right tonal balance.
Con il controllo XTR [8],
XTR
regolate l’estensione delle basse frequenze.
Ruotate in senso orario per aumentare.
By the XTR control [8],
adjust the bass frequency extension.
Turn it clockwise to increase.
PHASE
0 180
Con il controllo PHASE [9],
bilanciate il suono tra subwoofer e l’impianto principale.
By the PHASE control [9],
balance the sound between subwoofer and main system.
Page 4

TECHNICAL DATA
XTR 60
music power W 100
rms power W 50
input sensitivity mV 200 - 4000
input impedance Ohm 30 K
low-pass cut frequency Hz 80 - 150
low-pass filter slope dB/oct 12
phase control - 0° - 180°
frequency range Hz 50 - 150
nominal supply Volt 12
current consumption A 10
size (L x W x H) mm 260 x 290 x 260
GARANZIA
Coral Electronic sostituirà quelle parti che risultassero difettose di fabbricazione entro due anni dalla data di acquisto,
Coral Electronic warrants the characteristics
Coral Electronic garantisce le caratteristiche ed il perfetto funzionamento dei suoi prodotti.
certificata dal documento di vendita. La garanzia decade in caso di utilizzo improprio o di manomissione.
WARRANTY
GARANTIE
Coral Electronic garantiert für die Eigenschaften sowie
and the perfect operation of its product.
Coral Electronic will replace those parts
which should prove defective within
two years from the date of purchase,
certified by the sales receipt.
The warranty is void in
case of misuse or illegal opening.
für die einwandfreie Funktionsweise seiner Produkte.
Coral Electronic wird defekte Teile, die
Herstellungsfehler aufweisen, innerhalb von zwei
Jahren nach dem auf dem Verkaufsprotokoll
angegebenen Erwerbsdatum ersetzen. Der Anspruch
auf Garantieleistungen verfällt bei unsachgemäßer
Verwendung oder unerlaubten Abänderungen.
GARANTIE
Coral Electronic garantit les caractéristiques et le
fonctionnement parfait de ses produits.
Coral Electronic s’engage à remplacer les parties
présentant des défauts de fabrication dans les
deux ans suivant la date d’achat, contre
présentation du document de vente.
La garantie déchoit en case
d’utilisation impropre ou d’altération.
Coral Electronic garantiza las características y el
perfecto funcionamiento de sus productos.
Coral Electronic sustituirá las piezas que presenten
defectos de fabrica dentro de dos años a partir
inadecuado o de alteración del producto.
Coral Electronic srl - 10090 Rivoli - Torino - Italy - corso Allamano 74
tel. (+39) 011 959 44 55 - fax (+39) 011 957 23 55
GARANTIA
de la fecha de compra, certificada
por el documento de venta.
La garantía expira en el caso de uso
 Loading...