

Page 1
Page 2
Version 1.0 03/10/2011 First Release JR
Version 2.0 18/01/2012 Updated JR
Page 3

WARNING
To avoid electrical shock hazards, unit covers should only be removed by
authorised personnel.
©
COPYRIGHT
This document is the property of Copytrax Technologies UK Ltd and it may
not be reproduced, copied or exhibited to a third party without permission
from Copytrax.
ENVIRONMENTAL PROTECTION
Waste electrical products should not be thrown away with household
waste. Please recycle where facilities exist. Check with your local authority
or retailer for recycling advice.
Copytrax reserve the right to amend or modify the specifications and design criteria applying to
these products.
Page 4
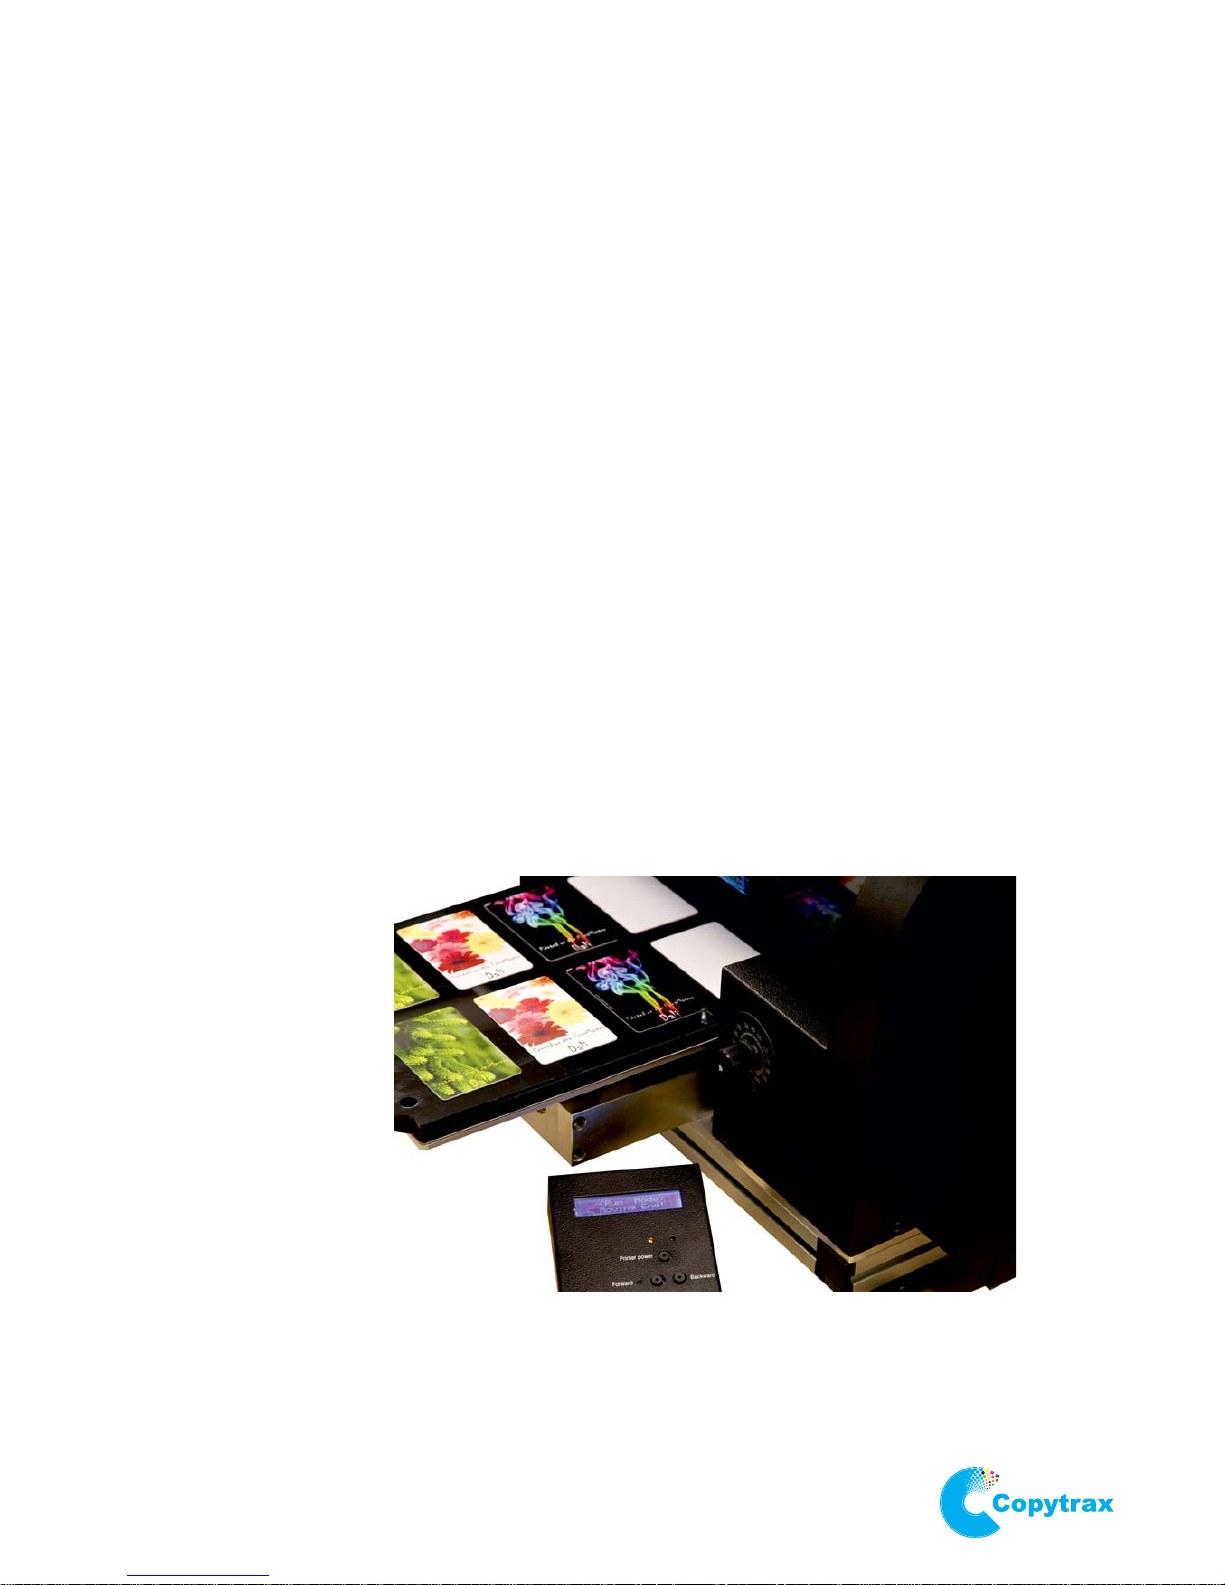
PrintMaster Monet.
Contents.
Page
Unpacking 5
Setup 6
Driver Installation and Printing Preferences 7
Basic Operation 8
Maintenance 9
Troubleshooting 14
Name of Parts 17
Warranty & Support 18
Daily 9
Weekly 9
Monthly 10
Quarterly 10
Annually 11
Workflow for Ink Flow Problems 16
Control Panel and Printer Operation 12
Page 5
1.
Prepare a clean and sturdy desk space to place your printer. Allow enough space for the flatbed to
extend fully to the front and rear of the printer.
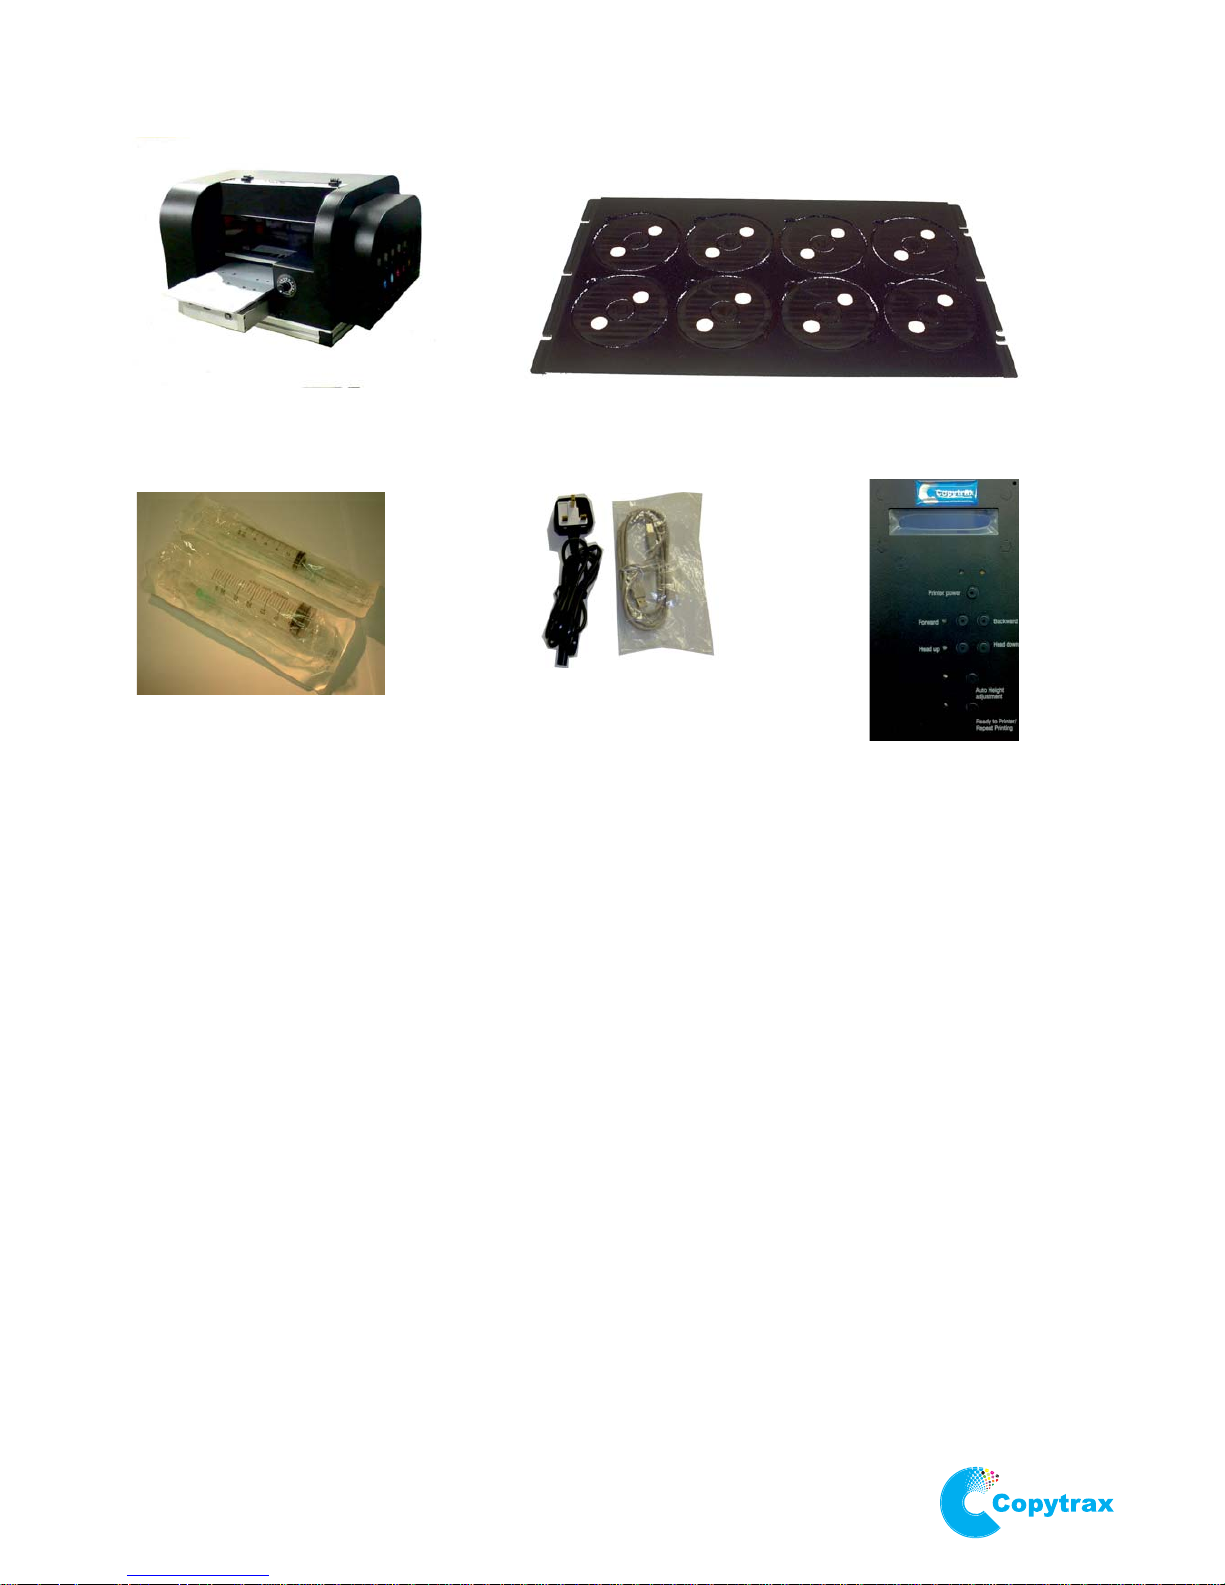
Check that all of the parts shown are included in the box.
Note.
*Templates for custom jigs will not necessarily be included and should be requested via e-mail from your
supplier.
Do not discard the box. Store it safely in case the printer should ever need to be returned for any
reason.
Unpacking.
PrintMaster Monet.
Unpacking.
Printer
Custom Jig (Type and quantity of jig(s)
included will depend on the individual order)
Syringe set
Power lead and
USB cable
5.
Control panel
and cable
Page 6
PrintMaster Monet.
Set Up.
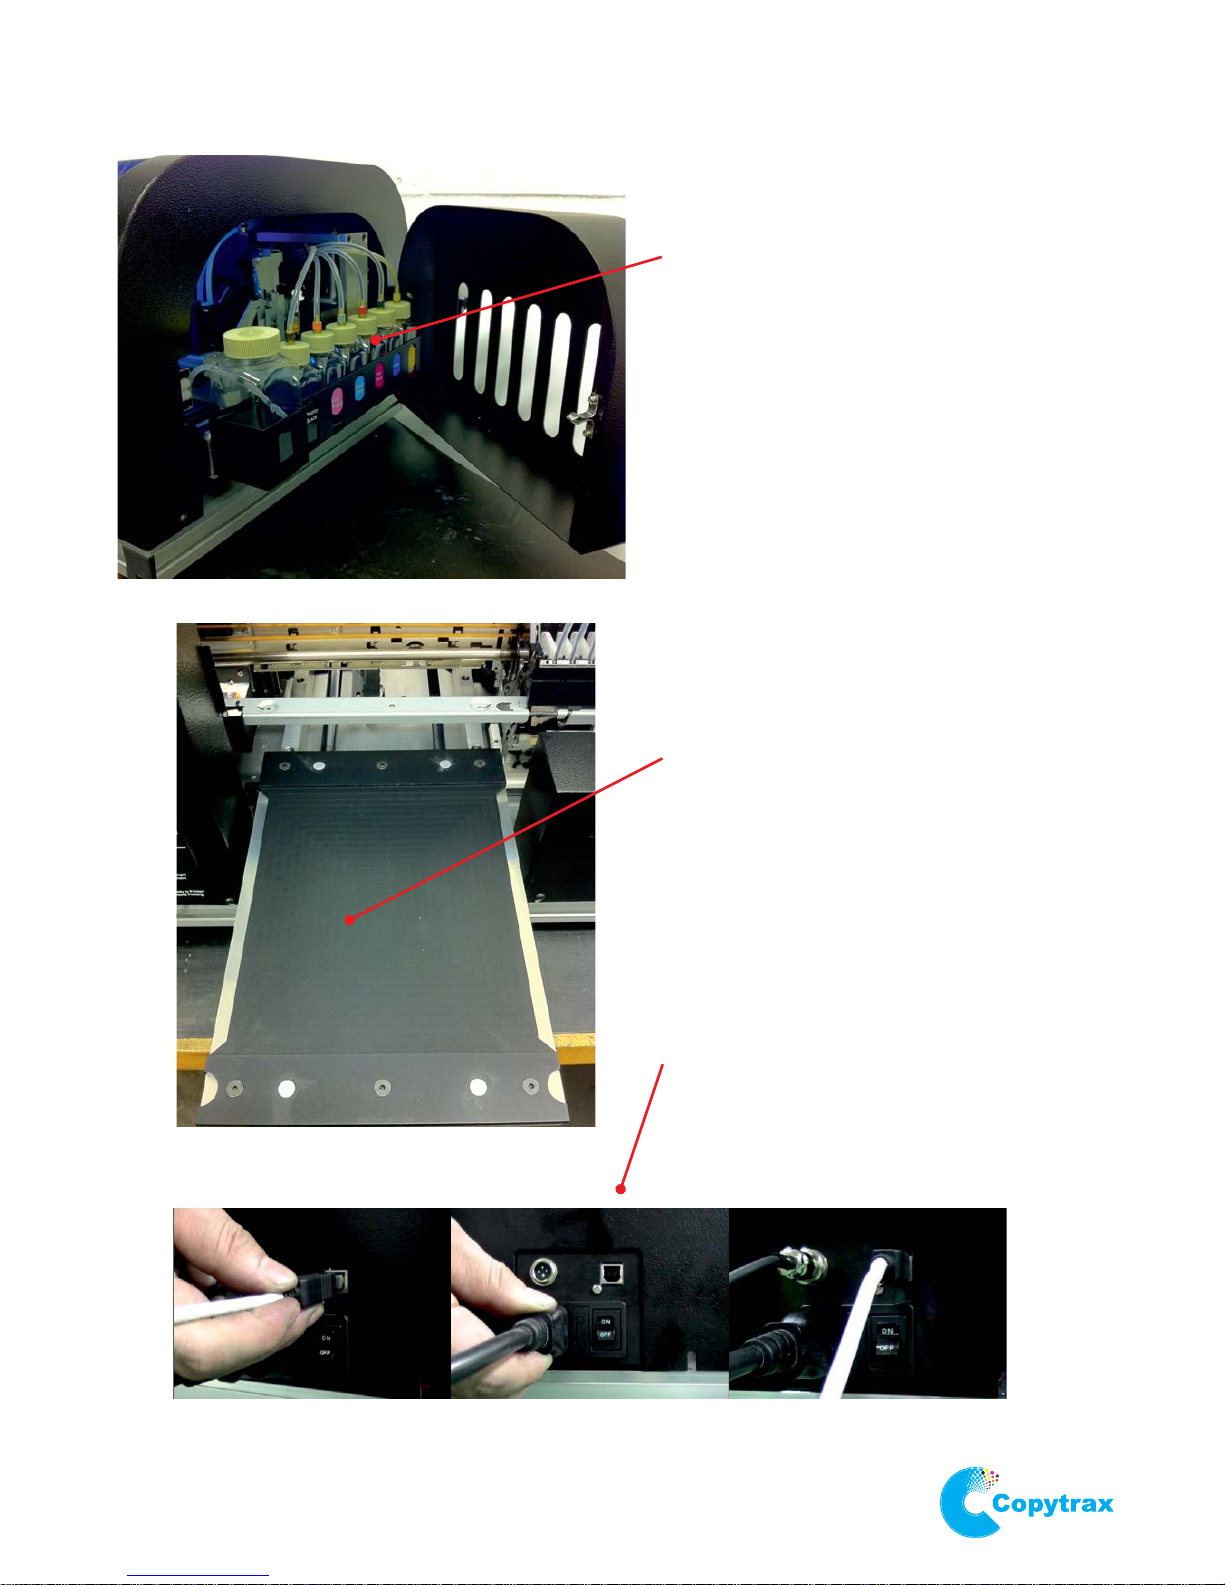
Open right hand side door to reveal
the ink supply bottles and waste bottle
Unscrew lids of supply bottles and fill
each with ink. The shoulder of the
bottle should be the maximum fill
level. The minimum fill level should be
considered as a fingers width from the
bottom of the supply bottle
Empty the waste bottle before it is
full. Contact your supplier for disposal
advice.
The flatbed is fitted with a magnetic
base to attach and fix your custom jig
in place for printing
Connect the power lead, USB cable
and control panel cable as below. Do
not power on until the ink supply
tanks are filled with ink and you are
promted to do so during the first time
driver installation process
Please Note: Do not allow the
supply bottle to run dry as this can
cause damage to the ink supply
system and print head
Fitting Custom Jig.
Cable fitting
6.
Page 7
PrintMaster Monet.
Driver Installation and Printing Preferences.
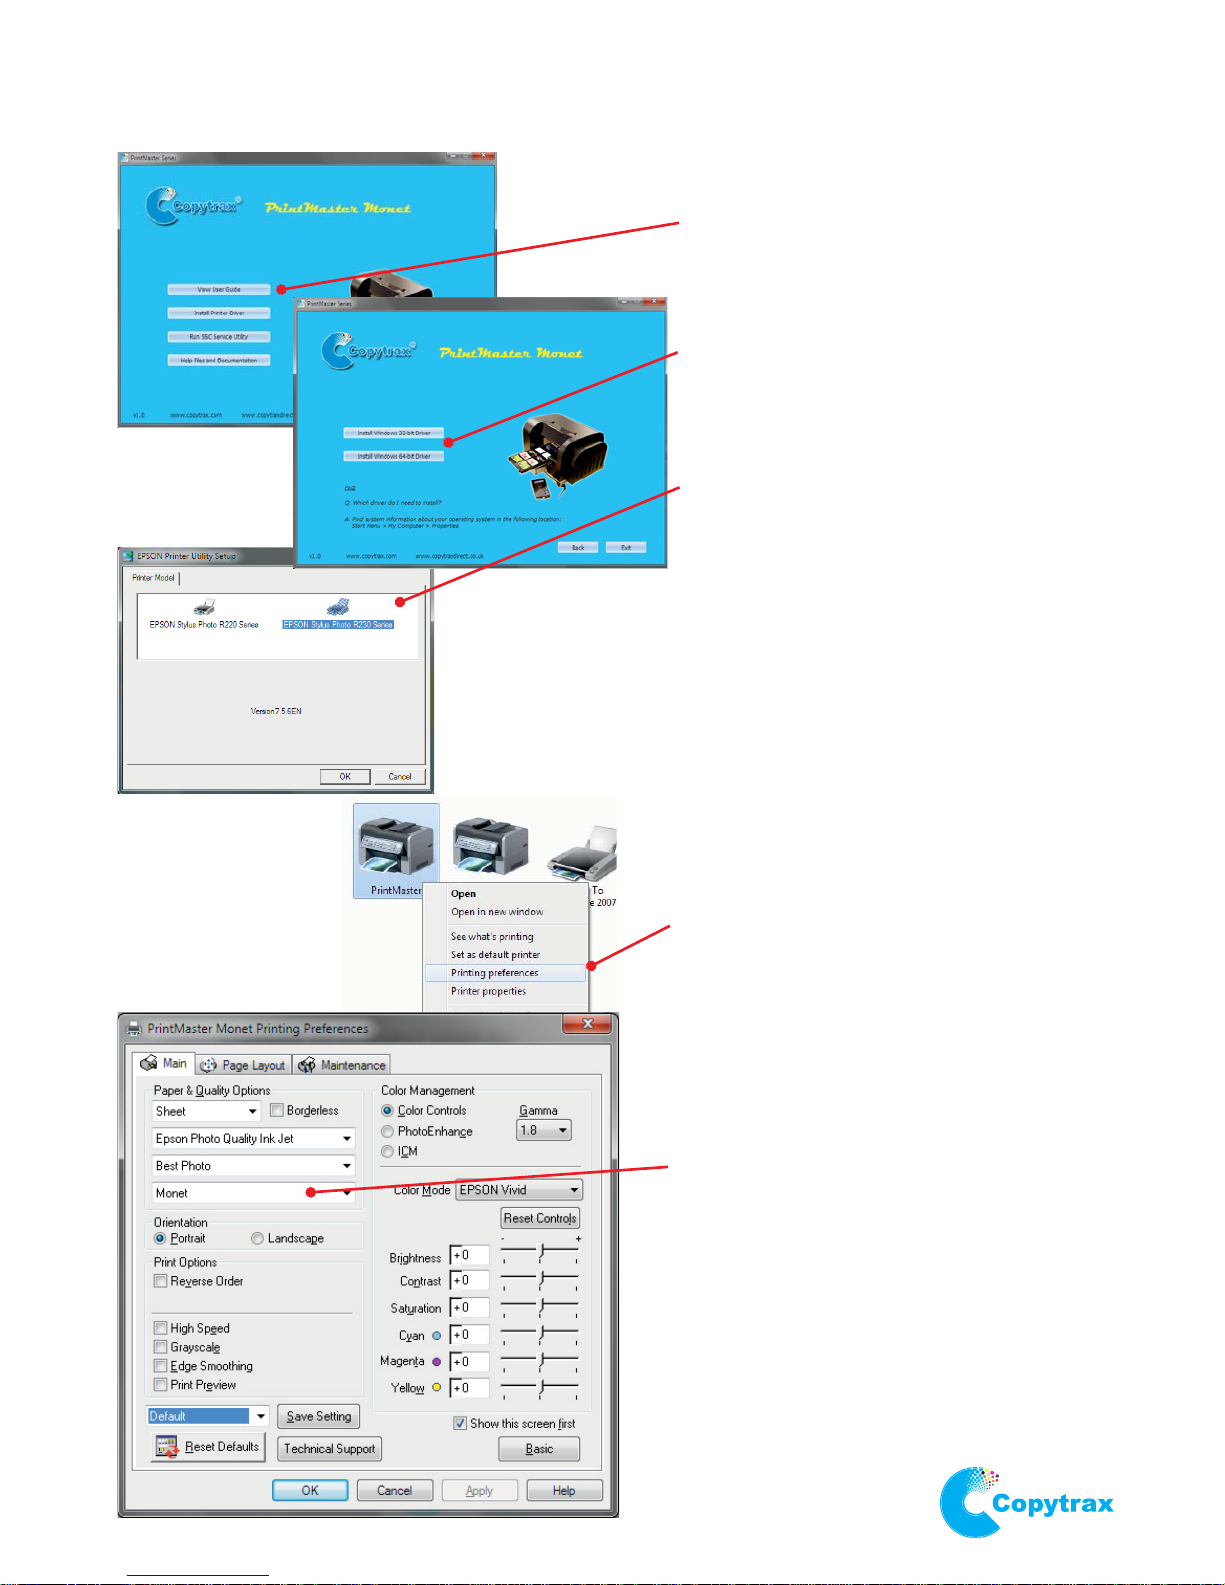
Insert the CD-ROM into your computer.
It should Autorun if this function is
enabled on your system. If it does not
Autorun explore the disc and double
click
Select
Select the relevant driver for your
operating system (32 or 64-bit)
If prompted select
Set the after
successful driver installation.
Open
window in right click on
and select
Select If prompted select
and
.
Setup a custom by selecting
in the drop down list.
Input the following values:
Paper Width = 2100
Paper Height = 3200
Set the as
and select followed by .
Use these settings as a starting point
and save the configuration. Different
materials may need adjustment to these
settings but these will be a sufficient
default to get started.
‘autorun.exe’
Install Printer Driver
EPSON Stylus Photo
R230 Series
MAC users should insert the CD-ROM
and explore the disc to locate the
printer driver:
AutoPlay > MAC driver
For Windows: Printers & Faxes
Control Panel,
Epson Stylus R230 (or PrintMaster
Monet if you choose to rename the
printer) Printing Preferences.
Advanced. ( Do
not display this message again
Continue)
Page Size
User Defined
Paper Size Name PrintMaster
Monet Save OK
Follow the on-screen instructions to
complete the printer installation
Printing Preferences
NOTE: This custom page size should
be set in the software you choose to
print from as well.
7.
Page 8
PrintMaster Monet.
Basic Operation.
8.
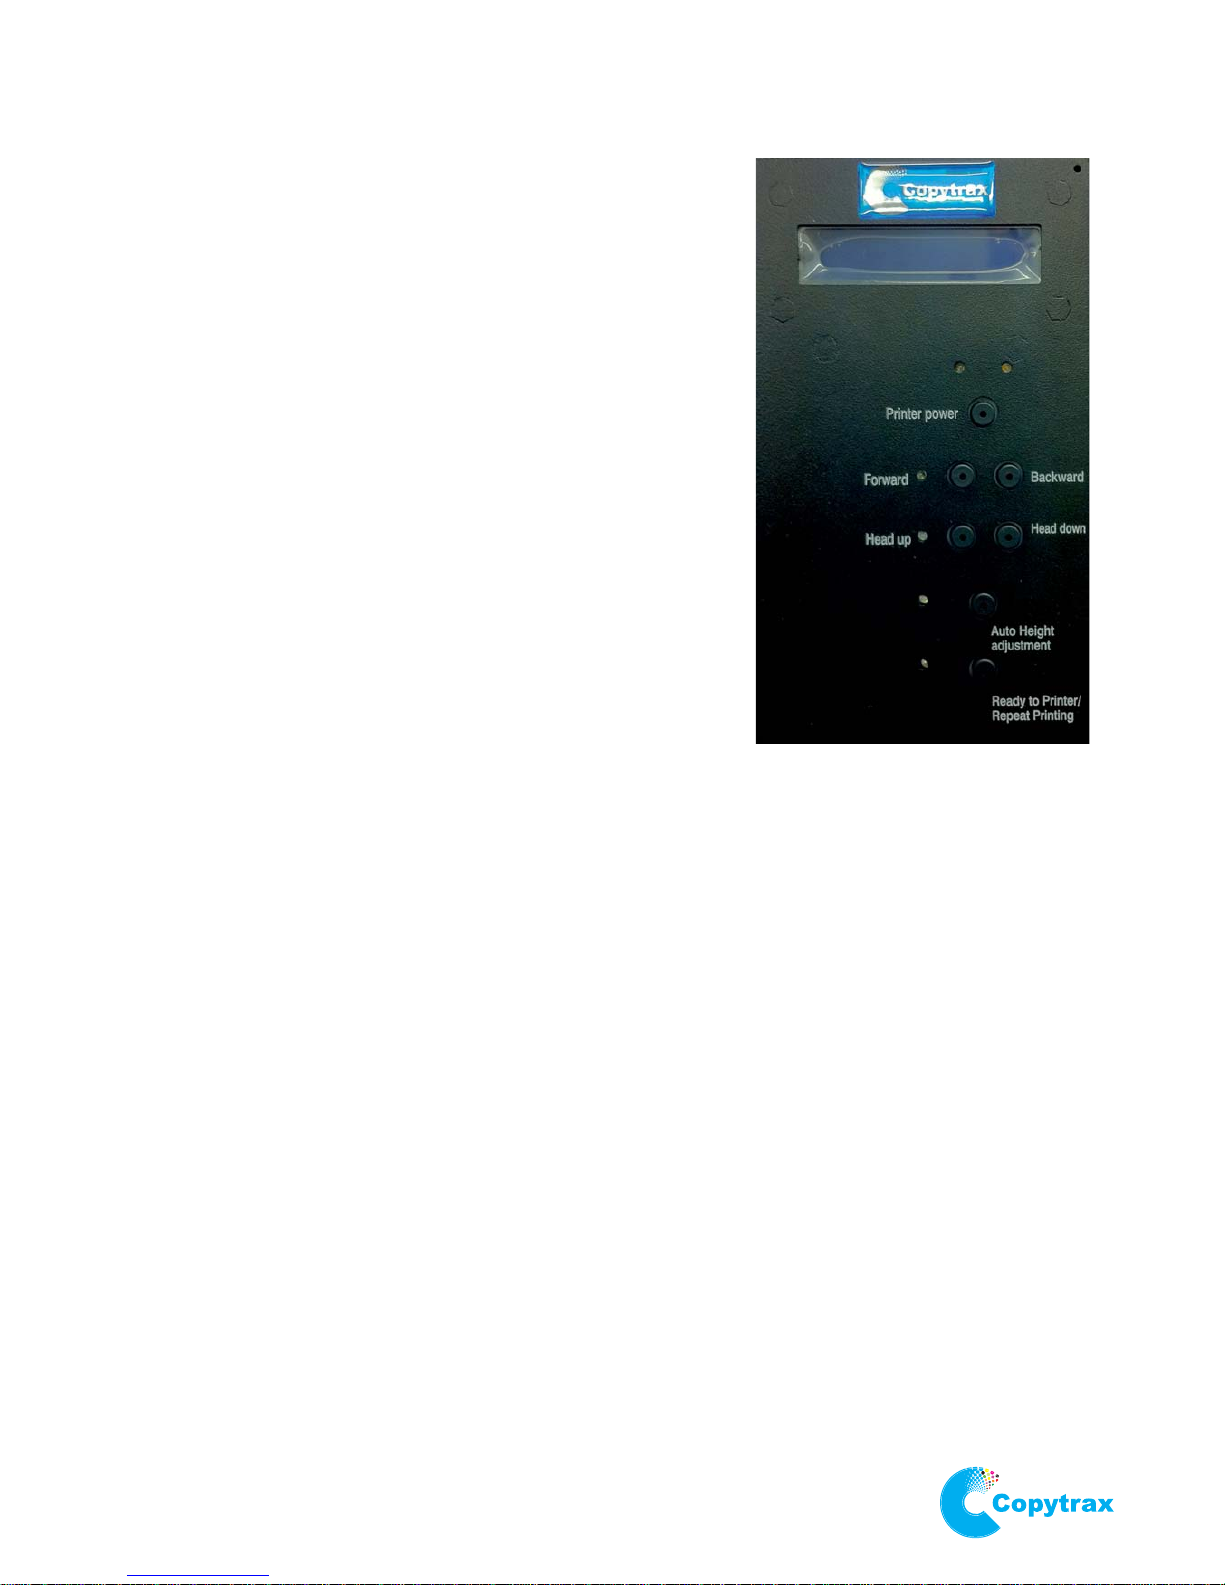
Attention: Do not load media before you power on
Switch on the PrintMaster Monet by the button next to the
power cable on the left side of the printer
The printer will start up into
Wait 5 seconds then press button marked
The printer will now initialise
When ready the top two leds will stop flashing and turn
to solid lights
Press the button to move the flatbed to the front
of the printer
Press the button to move the flatbed to the rear
of the printer
The PrintMaster Monet is now initialised and the flatbed position
is calibrated. The control panel should read “
Press the button to fully extend the flatbed to the
front of the printer
Load media into your custom jig
Press button to perform the auto height function
When the flatbed is at the rear of the printer and the height is set the PrintMaster Monet is ready for
printing from the software of your choosing with the template provided for your custom jig.
After a print, unload the jig and reload with unprinted media. If the media is the same as the previous
print there is no need to use the function to load the flatbed ready for printing. Instead
use the button load the flatbed.
Some materials provide a better print result when heat is added. This can be done using the halogen
lamp inside the PrintMaster Monet.
The halogen lamp is automatic and will ignite at the start of a print and extinguish after the flatbed
has ejected
See section for instructions on how to adjust the brightness of the lamp and
how to enable/disable this function
To power off the printer properly press button on the control panel. The machine will
then enter When in this state you may press the power switch on the left side of the
printer to fully turn off the machine. If the power switch is pressed without first powering off the
printer by the control panel, the print head may not fully cap on the cleaning station allowing the ink
in the nozzles to dry.
TEST MODE
Printer power
Forward
Backward
Ready to print”
Forward
Auto Height adjustment
auto height
Ready to Printer/Repeat Printing
Run Mode Functionality
Printer power
TEST MODE.
Page 9
Daily
A . Nozzle Check:
a. Tape down a piece of blank paper on the flatbed
b. Press button to get the PrintMasterBackwards into “Ready to print” mode
g. If Nozzle C heck print is irregular (missing dots, bending, and/or blurry), run a head
cleani ng
B. Head Cleaning:
a. Printers and Faxes Method:
1. Power on the printer
2. Go to “Start” and open “Printers and Faxes”
3. Right-Click on “Epson Stylus Photo R230” and select “Printing Preferences”
4. Click on the “Mai ntenance” Tab
5. Click “Hea d Cleaning”
C. If print result still isn’t perfect, try head cleaning 3 more times
D. If print result is still not good, refer to the workflow section for ink flow issues
Weekly
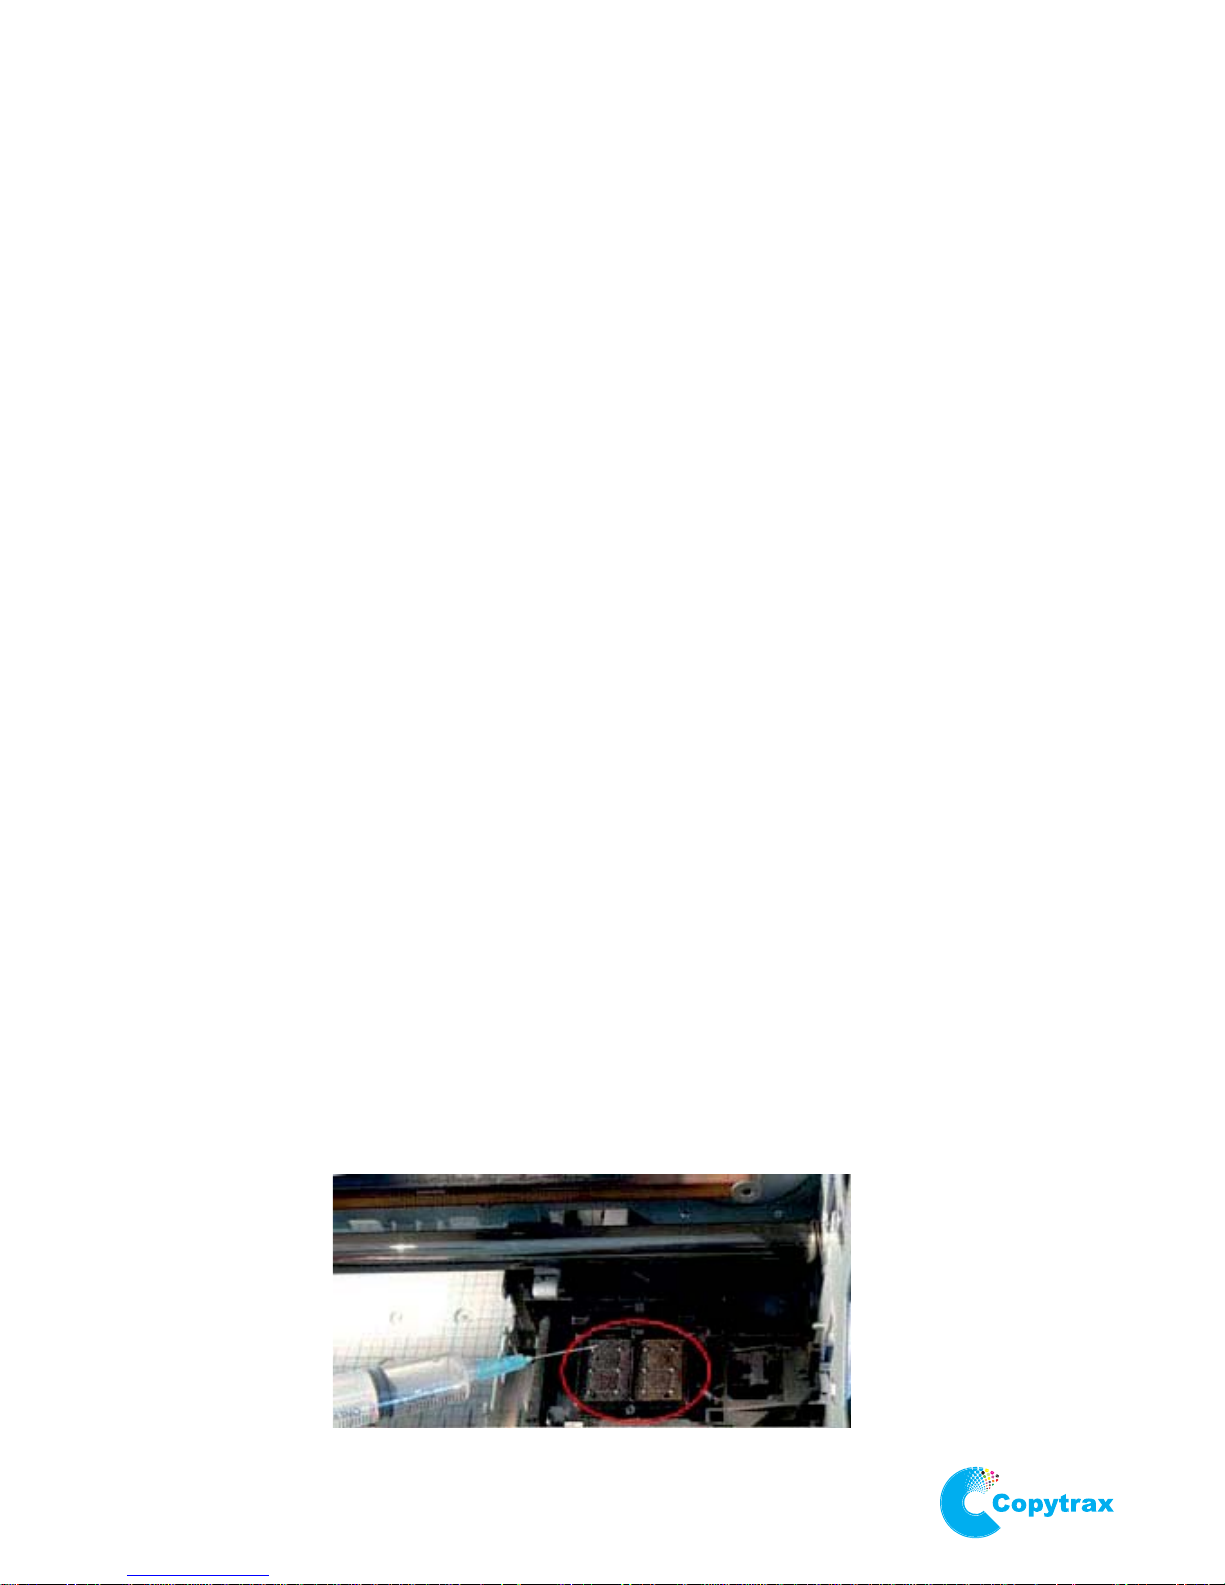
A . Capping Station Cleaning:
a.
b.
Disconnect the mains power supply
c.
d.
Manually move the head to the middle to expose the capping station
Fill syringe with cleaning solution (provided)
Squirt the solution all over both pads in the capping station, as seen in the picture below.
PrintMaster Monet.
Maintenance.
c.
Go to “Start” and open “Printers and Faxes”
d. Right-Click on “Epson Stylus Photo R230” and select “Printing Preferences”
e. Click on the “Mai ntenance” Tab
f. Click “Nozzle Check”
9.
e. Manual move head back to Capping Station
f.
g.
Fully power on the printer
Run a head clean
Page 10
Monthly
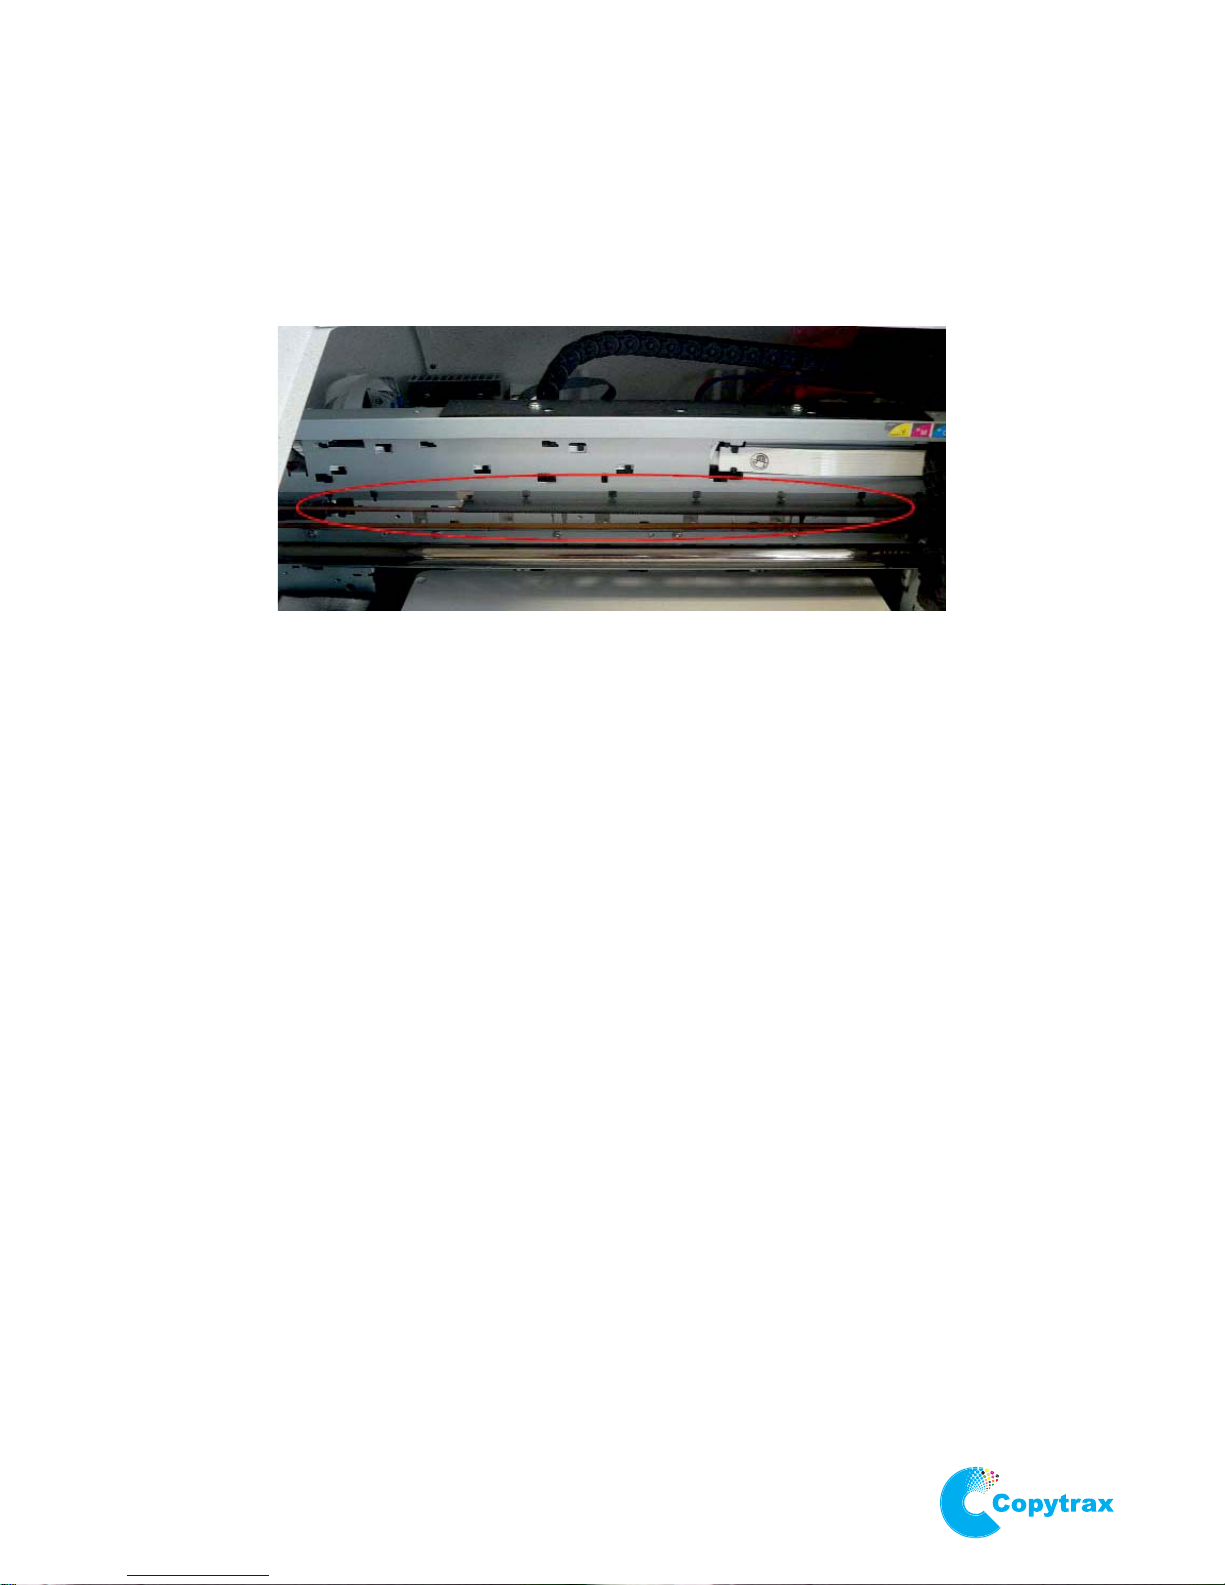
A . Clean the horizontal encoder strip (seen below) in the front of the printer frame with rubbing
alcohol and cotton buds.
B. Cleaning vertical encoder:
a. Located at rear of printer near vertical motor
Quarterly (or as needed)
A . Capping Station Replacement:
a. If nozzle check is not good after head cleaning, check the change date of capping
station
b. If change date is 3 months old, your PrintMaster needs a capping station replacement:
1. Power off printer
2. Open printer cover
3. Release screws for supporting capping station
4. Disconnect signal cable
5. Take capping station out from the printer frame
6. Put new capping stationinto the printer frame
7. Reconnect signal cable
8. Tighten support screws for capping station
9. Make sure the waste ink tube is emptying into the waste ink bottle
PrintMaster Monet.
Maintenance.
10.
Page 11
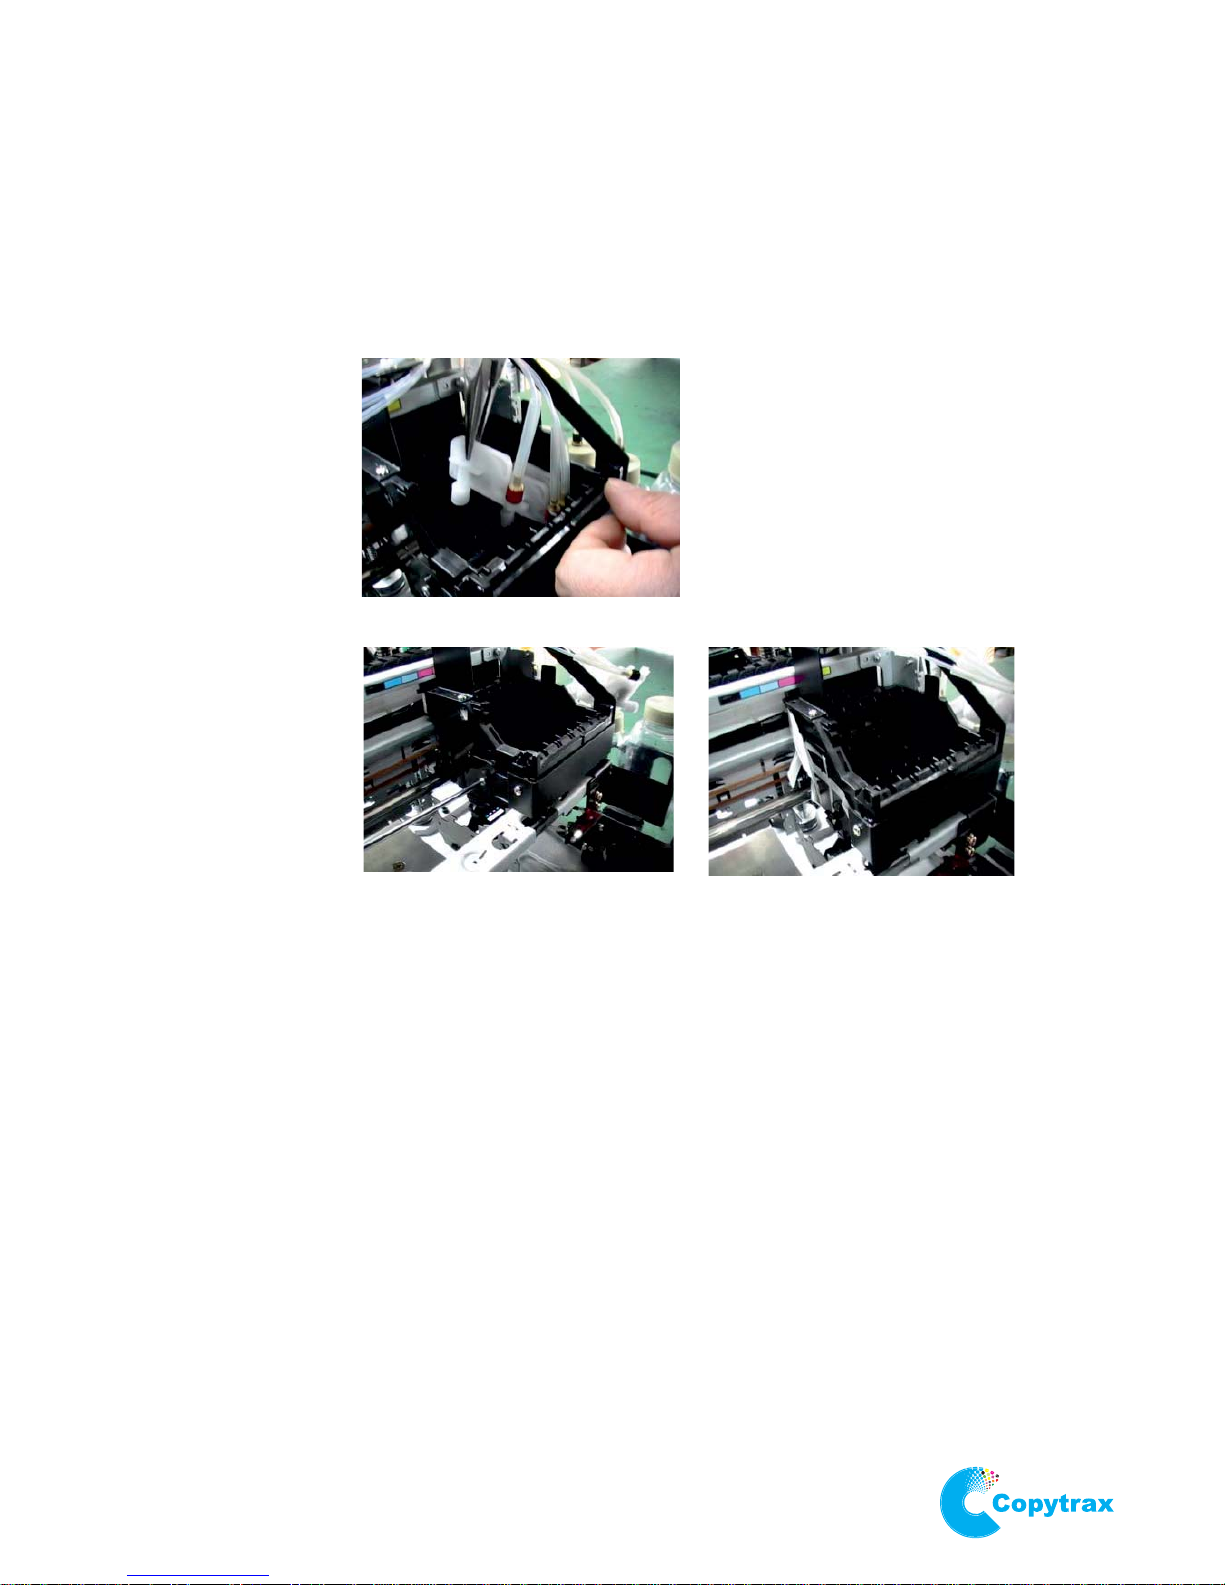
a. If nozzle check is continuously bad after printer head cleaning & capping station
replacement,you may needto replace your printer head:
1. Power off printer
2. Take all dampers out from printer head carriage
3. Remove screw on side of head carriage and remove side cover
Note: These arms are very delicate, so do not lift with a lot of force.
4. Remove two fixing screws and lift our print head
5. Disconnect two FFC head cables from printer head
6. Replace printer head andreconnect cables
7. Put new printer head back in original position
8. Tighten two screws on the printer head
9. Put flat cables coverback in original position
10. Power printer on
b. Ink charge procedure (Windows only):
1. Run SSC Service Utility from the CD-ROM
2. Select your printer from the drop down lists in the configuration window
3. Close the window
4. Select initial charge from the head cleaning menu in the taskbar icon
5. Wait for completion
PrintMaster Monet.
Maintenance.
Annually ( or as needed )
A . Printer Head replacement
11.
Page 12
PrintMaster Monet.
Control Panel and Printer Operation.
12.
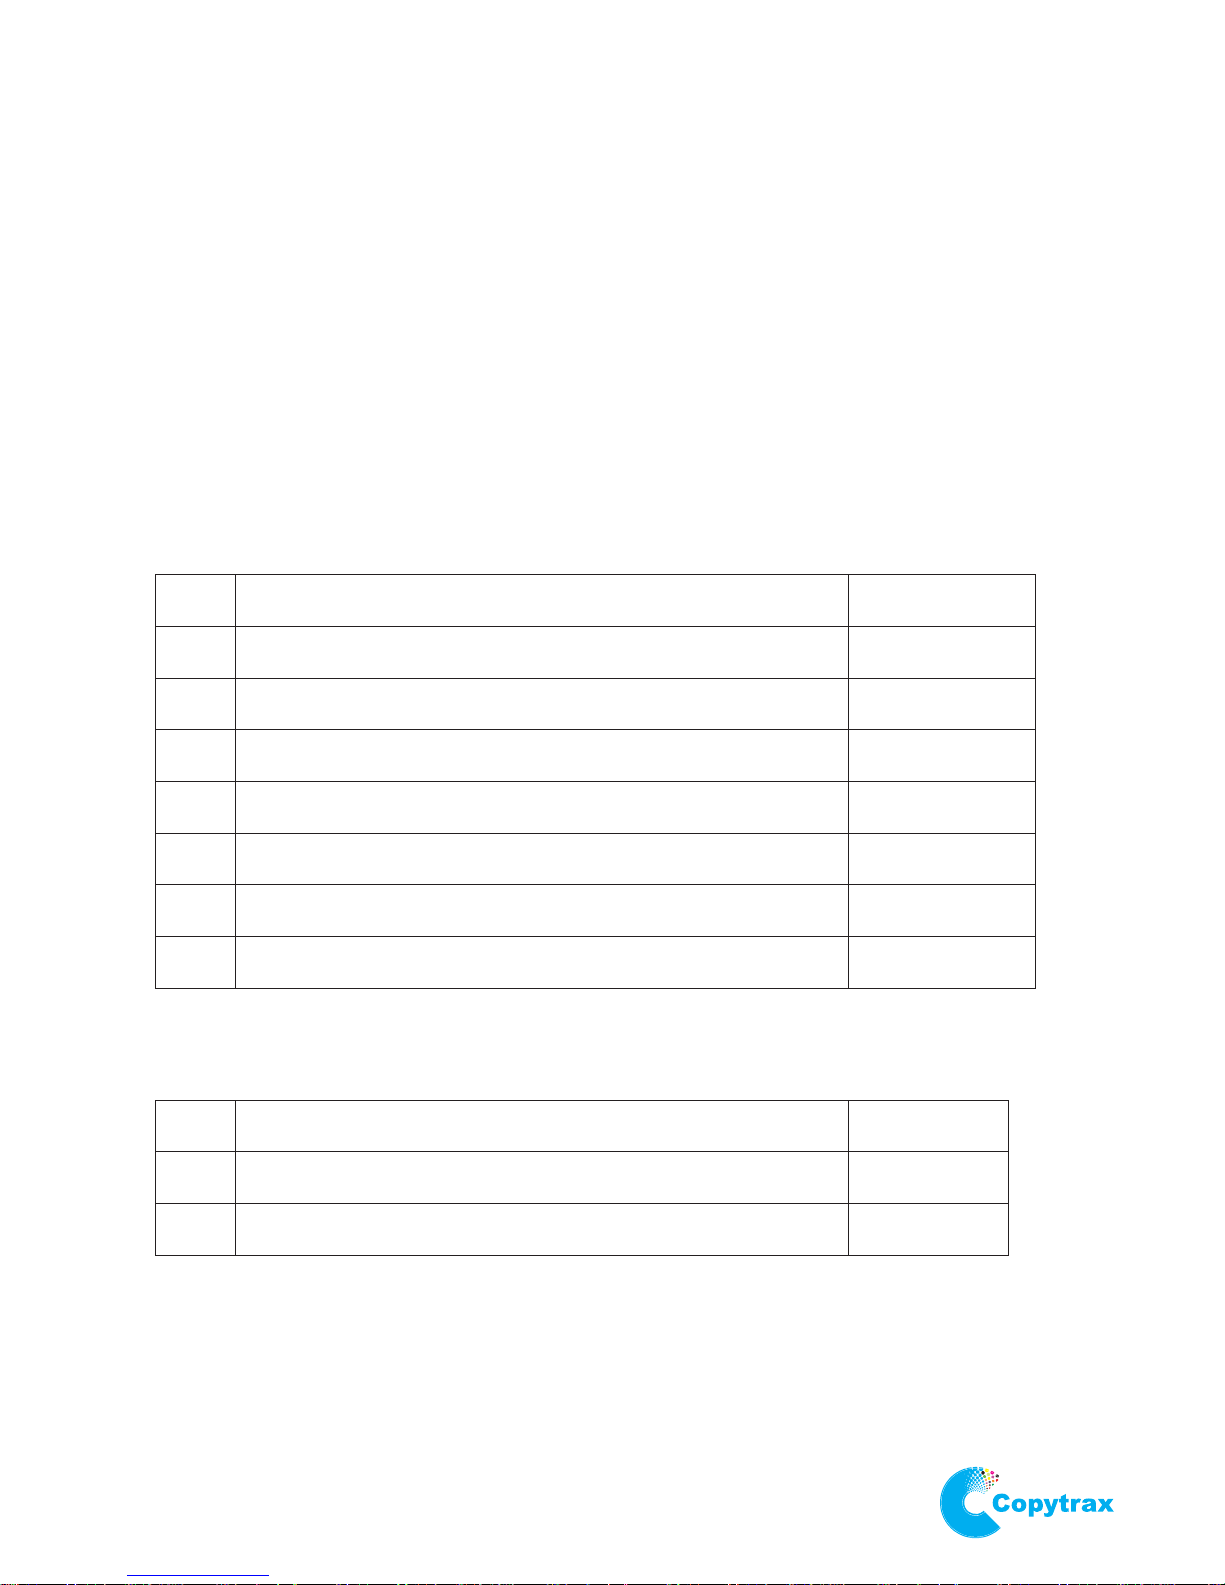
A. Control panel operation
Button “1” Power
Button “2” Forward
Button “3” Backward
Button “4” Head up
Button “5” Head down
Button “6” Auto height adjust
Button “7” Ready to print/ Repeat print
B. Printer Mode
Test mode function
When unit is switched on, printer will start in Test mode. In this mode you can do
Button Printer operation Display
1 Power on printer and print goes to Run Mode
2 Flatbed moves forward at one touch and stop at another touch
3 Flatbed moves backward at one touch and stops at another touch
4 Print head moves up away from flatbed
5 Print head moves down towards flatbed
6 Initiate auto height adjustment
7 Push and hold 5 seconds and to enter Function Mode
Run mode function
After printer initialisation you can do the following:
1 Power off printer and goes to Test Mode
2 Flatbed moves forward at one touch and stop at another touch
Call to Supplier
Ready to print
the following:
Button Printer operation Remark
table continued over page...
Page 13
13.
3 Flatbed moves backward at one touch and stop at second touch
6 Push button for 3 seconds to start a head clean (flatbed must be
in print ready position)
When printer is printing, printing will stop when pressing this button
Startautoheightfunctionwhenflatbedisatthefrontposition
7 Ready to print and enable multi print with same images by touch
Push and hold for 3 seconds to enter Function mode
Function Mode
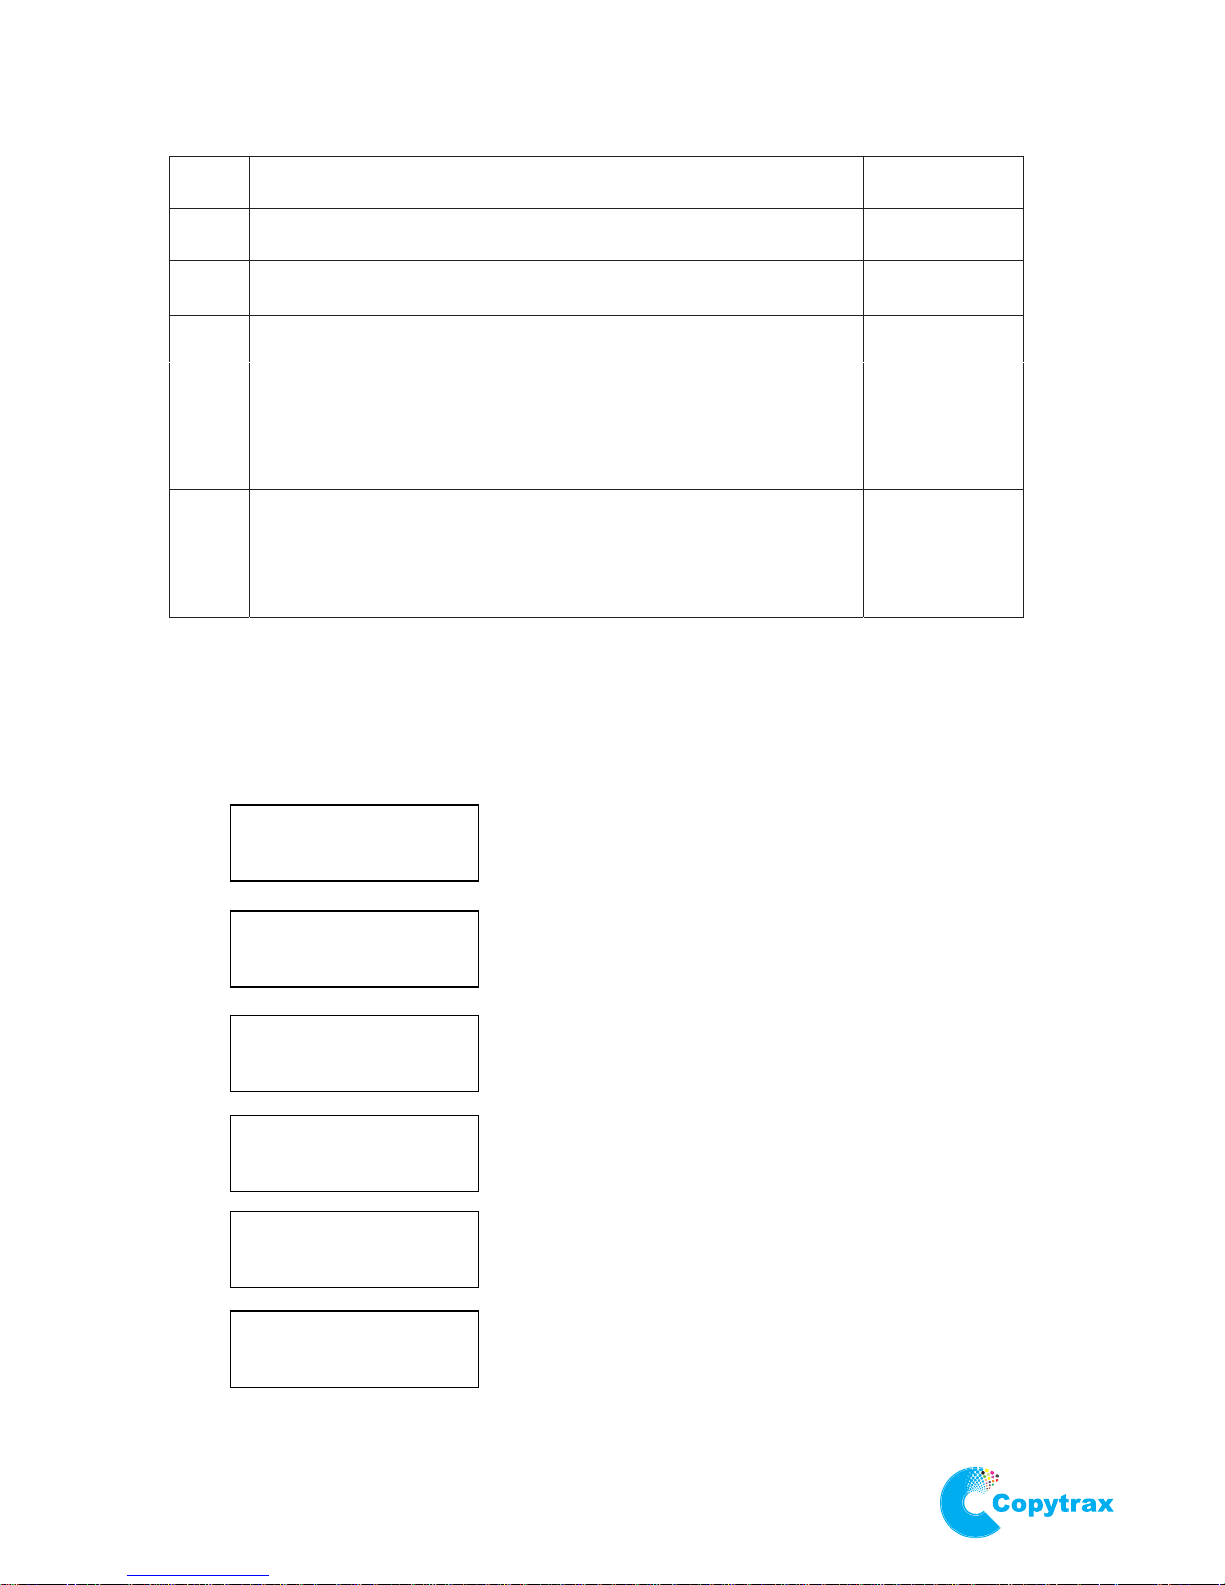
This mode can be used for adjusting printer settings. Press and hold button 7 for 3
seconds to enter this menu (in Test or Run mode)
Press button 7 to cycle to the next setting. Button 4 increases value and button 5 decreases value.
Halogen lamp on/ off
Auto head clean timer
FlatBed forward speed control
(recommended speed 40% ~ 50%)
FlatBed backward speed control
(recommended speed 40% ~ 50%)
1.SETTemperatur
e(30%)
2.SET Temperatur
eMODE (OFF)
3.Automatic Clea
ning (48h)
4.FRONTSPEED SET
SPEED (40%)
5.BACK SPEED SET
SPEED (40%)
PrintMaster Monet.
Control Panel and Printer Operation.
4 Print head moves up away from flatbed
5 Print head moves down towards flatbed
after print
Halogen lamp temperature control
6.1234567
---Y---
Sensor test
Page 14

PrintMaster Monet.
Troubleshooting.
Problem: Nozzle check pattern is not complete.
Solutions:
Problem: The ink has drained from the supply bottles to the waste bottle.
Solutions:
Problem: Control panel shows EPSON PRNT ERR.
Solution:
Problem: How do I access status monitor?
Solution:
Problem: Status monitor shows a maintenance request “parts inside your printer need to be
replaced”.
Solution:
Problem: The print appears to be shifting.
Solution:
Are the ink supply bottles correctly positioned on the side of the printer?
Is the shipping tape removed from the ink bottle lids?
Are the ink bottle lids open?
Are the ink supply tubes filled with ink? If not:
a. Perform a head clean
b. Prime cartridges with a syringe
Is the capping station clear? Perform weekly maintenance and suck the cleaning solution from the
waste pipes with a syringe. Replace capping station if it has an immovable blockage.
If there is still no solution contact your supplier.
Make sure the ink supply bottles are not above the level of the cartridges in the printer.
Is the ink level too high? The ink supply bottles should not be over 2/3 full or there is too much
pressure on the ink flow.
Perform capping station maintenance and check for flowing ink to the waste bottle through both
waste pipes. A clogged capping station will bridge the capping station and print head to cause a free ink
flow.
How was the printer powered off? If the printer is not powered off when in idle state the print head
may not be capped by the capping station and it will not have kept a seal.
Cycle the power on your printer to clear the error.
If the fault persists record the status monitor message and contact your supplier for assistance.
Windows: START MENU -> CONTROL PANEL -> ( PRINTING PREFERENCES ->
MAINTENANCE TAB -> STATUS MONITOR.
Perform the waste ink pad counter reset in the SSC Service Utility included on your CD-ROM.
Clean the encoder.
(cartridge printers only - dampers do not require priming)
right click on printer)
14.
Page 15

PrintMaster Monet.
Troubleshooting.
Problem: How do I perform an ink charge?
Solution:
Problem: My print has lines in.
Solution:
Using the initial charge function from the SSC Service Utility included on the CD-ROM.
Perform a head clean.
Is the printer set to bi-directional (high speed) printing? If yes please disable this function in the
printing preferences.
15.
Page 16
PrintMaster Monet.
Troubleshooting.
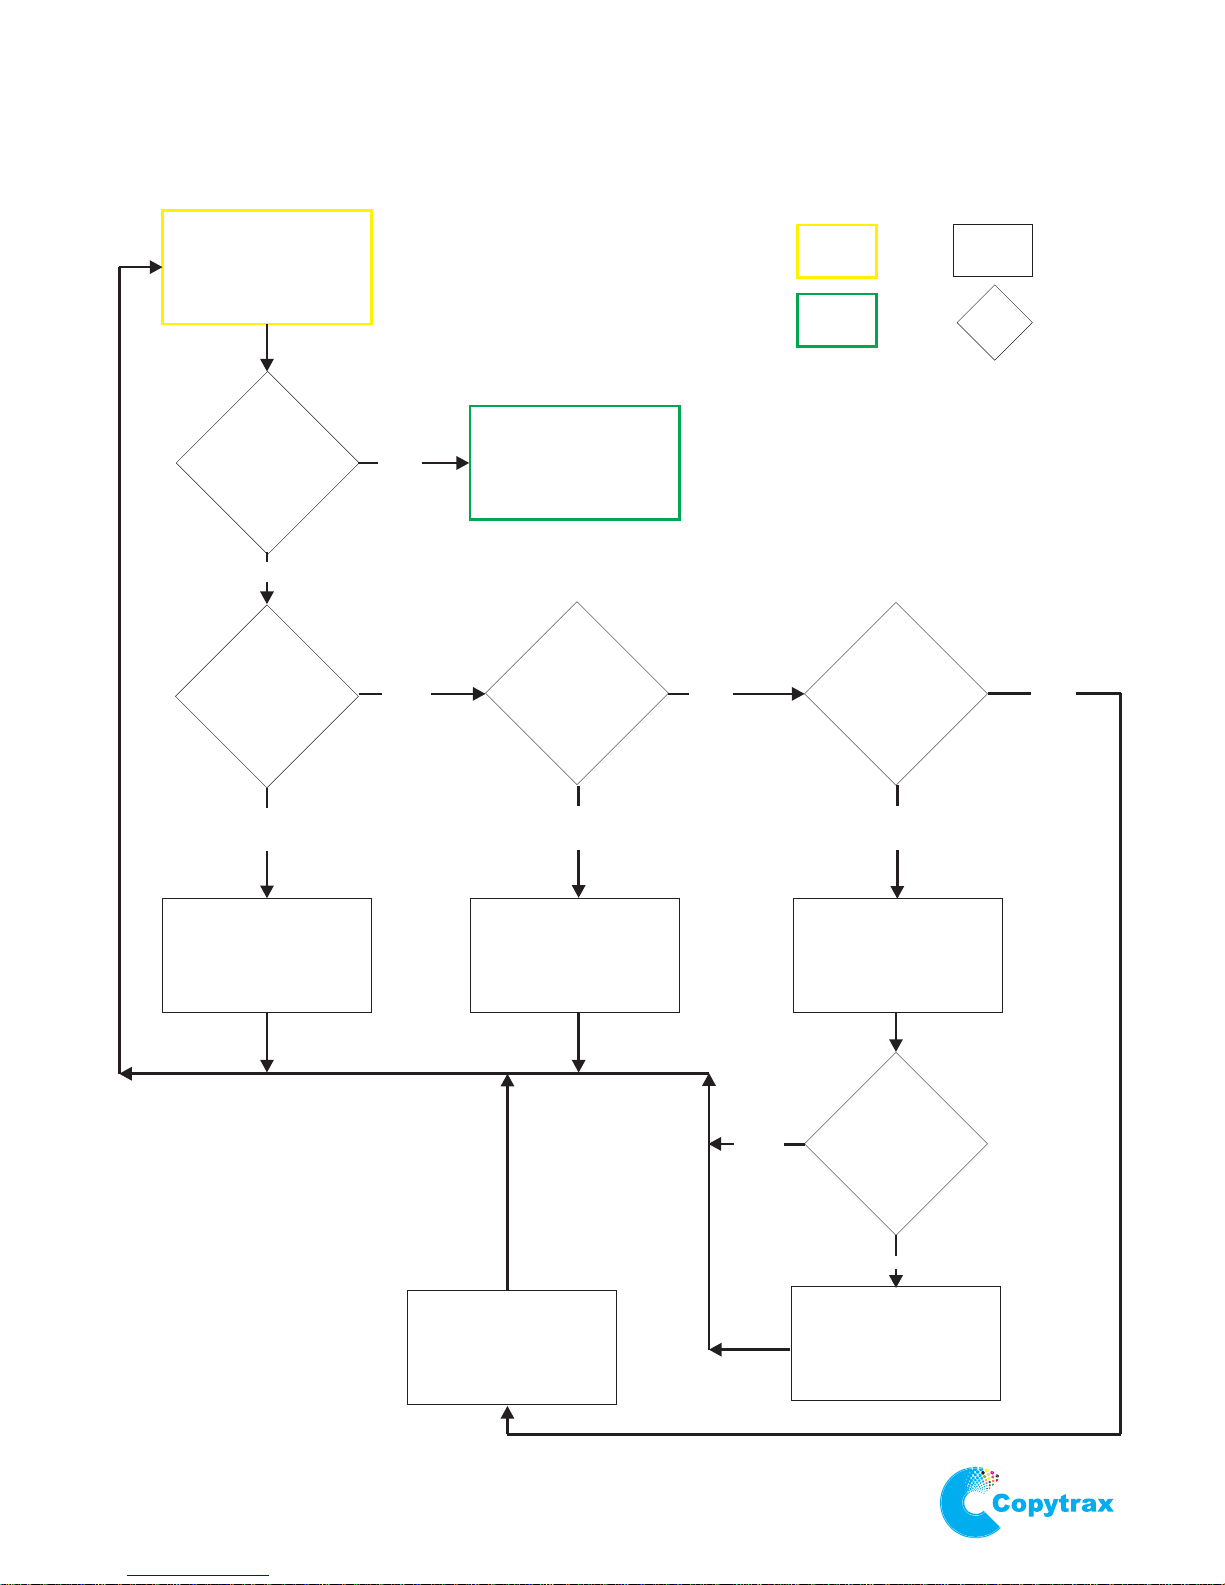
Workflow for Ink Flow Problems.
Ink flow problems can be confirmed by being unable to print a complete nozzle check pattern.
If no solution is found from this workflow please contact your supplier for more assistance.
yes
no
yes
no
no
yes
yes
Advanced: Prime
cartridges* and
manually flush
print head nozzles.
Have three
head cleans
been carried
out?
Has an ink
charge already
been carried
out?
Is the capping
station clear?
Is nozzle
check
pattern
complete?
Carry out weekly
capping station
maintenance.
Perform ink charge
in Adjustment
Software.
Printer is in
working order.
Resume
normal printing.
Print nozzle
check pattern.
Perform
head clean.
no
yes
Replace capping
station.
=Start
=Finish
=Question
=Action
Key:
Is the capping
station clear?
no
16.
*Cartridge systems only. Damper sets do not require priming.
Page 17
PrintMaster Monet.
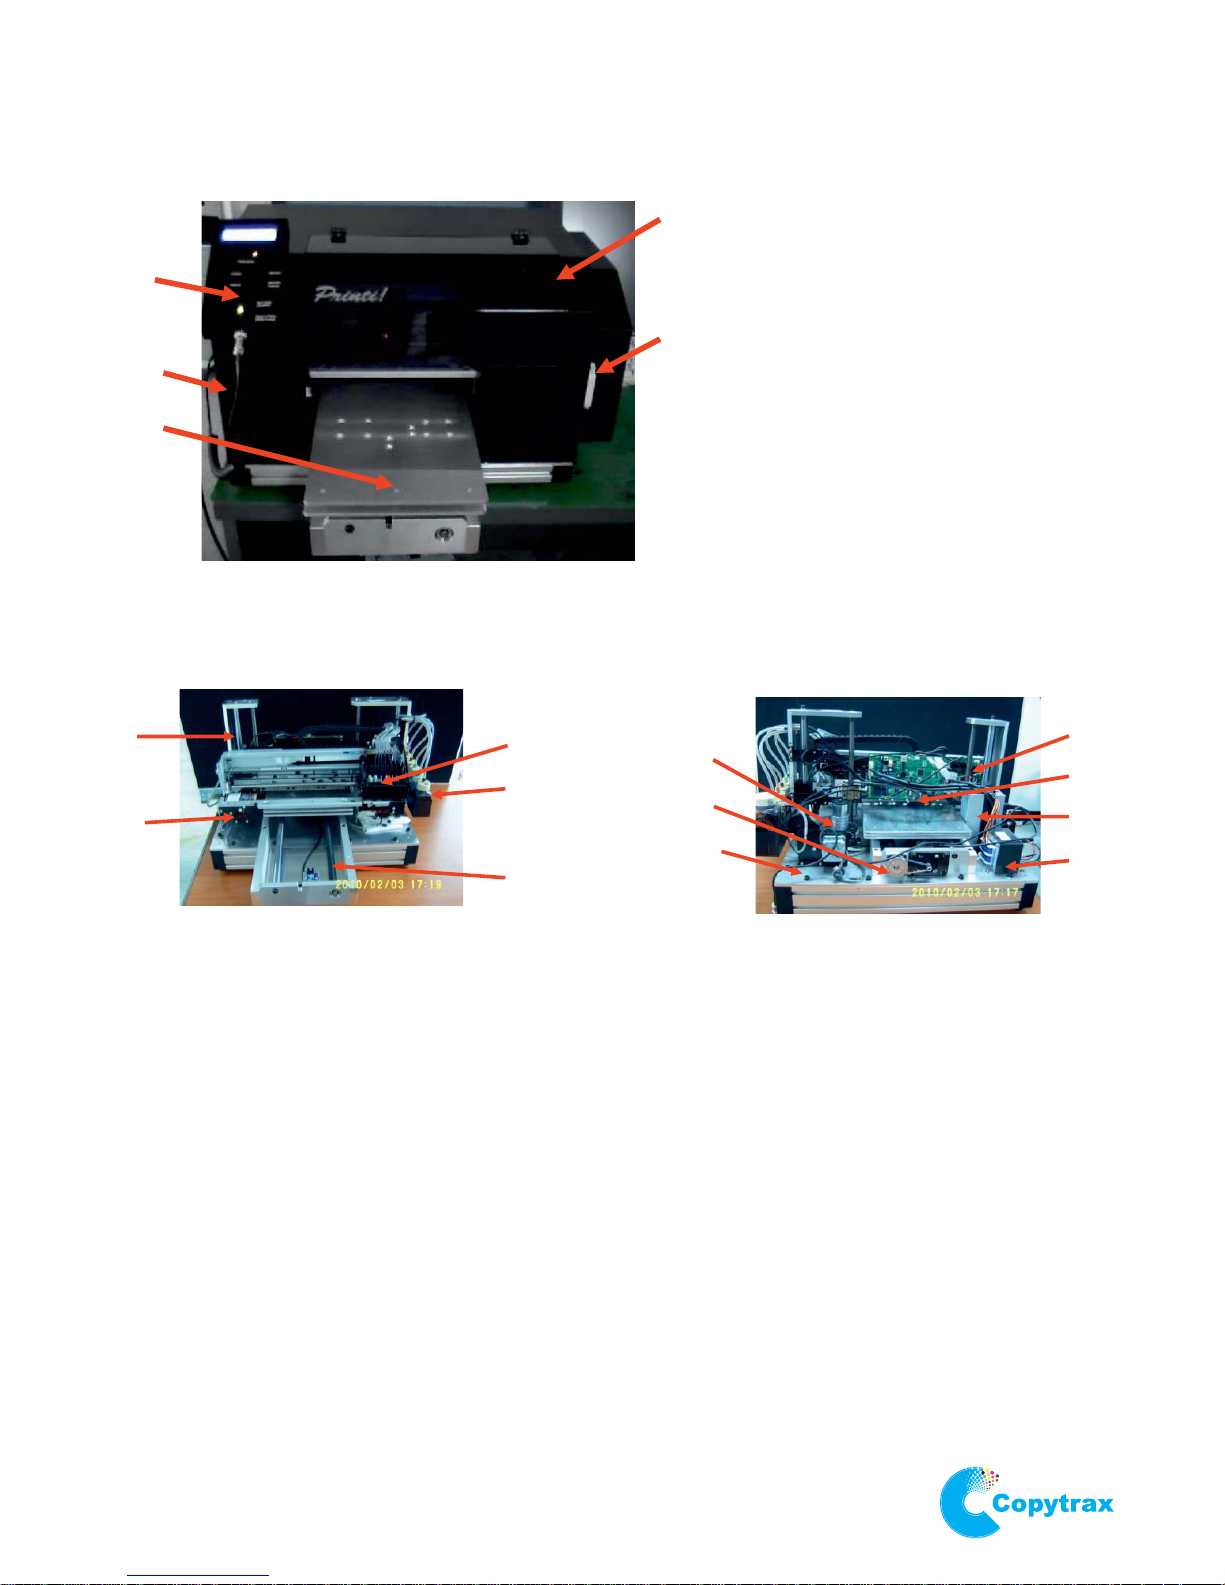
Name of Parts.
17.
Overall view
Components
<< Front view >>
F
G
H
I
J
A
B
D
C
E
A. Control panel
B. Power connector, USB port & Control
panel cable connector
C.
Flatbed
D. Printer cover
E. Ink bottles set and waste ink bottles
F. Screw for up/down motion
G. Auto height adjust sensor
H. Ink chips and dampers
I. Ink bottles and waste ink bottle
J. Screw for back/forward motion
K. Motor for Up/Down
L. Motor for Back/Forward
M. Motor for capping station
N. Motion control board
O. Epson board
P. Power adapter
Q. Transformer
<<Backsideview>>
N
O
P
Q
K
L
M
Page 18

Copytrax Technologies UK Ltd. (manufacturer)
35 Dry Drayton Industries
Scotland Road
Dry Drayton
Cambridge
Cambridgeshire.
CB23 8AT
United Kingdom.
Telephone UK: 0844 815 6225
International: +44 1954 212200
Fax UK: 01954 211950
International: +44 1954 211950
Web
e-mail
Registered No. 6691594 VAT No. GB938 6097 79
www.copytrax.com
COPYRIGHT
ENVIRONMENTAL
TRADEMARKS
LIMITED LIABILITY
© Copytrax Technologies UK Ltd. 2008. All rights reserved. This manual and the software described in it are
copyrighted with all rights reserved. No part of this publication may be reproduced, transmitted, transcribed,
stored in a retrieval system or translated into any language in any form by any means without the
written permission of Copytrax Technologies UK Ltd.
Waste electrical products should not be thrown away with household waste. Please recycle where facilities
exist. Check with your local authority or retailer for recycling advice. Copytrax are available to dispose of
equipment free of charge to UK customers only.
Copytrax is the registered trademark of Copytrax Technologies UK Ltd.
Brand names and product names are trademarks or registered trademarks of their respective companies.
You must return the product
to Copytrax or an authorised Copytrax dealer within the warranty period accompanied by proof of purchase.
Copytrax DISCLAIMS ALL IMPLIED WARRANTIES ON THE PRODUCT, INCLUDING WITHOUT LIMITATION
WARRANTIES OF MERCHANTABILITY, PERFORMANCE AND FITNESS FOR A PARTICULAR PURPOSE. Copytrax
WILL NOT BE LIABLE FOR ANY BUG, ERROR, OMISSION, DEFECT, DEFICIENCY, OR NONCONFORMITY IN
ITS HARDWARE. AS A RESULT THE HARDWARE IS SOLD “AS IS” AND THE PURCHASER ASSUMES THE
ENTIRE RISK AS TO ITS QUALITY AND PERFORMANCE.
Copytrax SHALL IN NO EVENT BE LIABLE FOR DIRECT, INDIRECT, SPECIAL, INCIDENTAL, CONTINGENT OR
CONSEQUENTIAL DAMAGES RESULTING FROM ANY DEFECT IN THE HARDWARE OR ITS DOCUMENTATION
INCLUDING DAMAGES FROM LOSS OF DATA, EVEN IF Copytrax OR AN AUTHORIZED Copytrax DEALER HAS
BEEN ADVISED OF THE POSSIBILITY OF SUCH DAMAGES YOU AGREE THAT Copytrax’s LIABILITY ARISING
OUT OF CONTRACT, NEGLIGENCE, STRICT LIABILITY OR TORT OR WARRANTY SHALL NOT EXCEED ANY
AMOUNTS PAID BY YOU FOR THIS PRODUCT. any written or oral information or advice given by Copytrax
dealers, distributers, agents or employees will in no way increase the scope of this warranty. Nor may you
rely on such oral or written communication. Some states do not allow the exclusion or limitation of implied
warranties or liability for incidental or consequential damages, so the above limitation or exclusion may
not apply to you. This warranty gives you specific legal rights, and you may also have other rights which
vary from state to state.
PRODUCT WARRANTY
The PrintMaster is warrantied for 12 months from the date of purchase from Copytrax.
Print heads & ink systems are limited to 3 months warranty. All warranties are limited to manufacturing
defects only. Fair wear & tear or misuse of the printer or components are not covered by the warranty.
Warranty on products purchased from an authorised Copytrax distributer are covered by the distributor
& not by Copytrax direct. Copytrax will work with the distributor to resolve any issues quickly.
Copytrax warranty is a return to base(Cambridge, UK). All returns must be assigned an RMA number
before returning to Copytrax. No on-site service is provided by Copytrax.
For support tel. UK: 0844 815 6225 Intl: +44 1954 212200
e-mail: [email protected]
PrintMaster Monet.
Warranty & Support.
18.
 Loading...