

Page 1
User Manual
MONET 5000 Pro
and
MONET 5000 Pro-Recorder
April 2005 Issue1
Page 2

COPYTRAX TECHNOLOGIES MONET 5000 Pro & Pro-Recorder
May 2005 www.copytrax.com 2
1 General ................................................................................................................ 3
1.1 Introduction........................................................................................................ 4
1.1.1 Front View .................................................................................................. 4
1.1.2 User Buttons and Status-LED’s .................................................................. 4
1.1.3 Rear view ................................................................................................... 7
2 Printer driver ....................................................................................................... 8
2.1 Installation ......................................................................................................... 8
2.1.1 First Installation (Plug & Play) ................................................................... 8
2.1.2 Manual Installation ................................................................................... 10
2.1.3 Uninstalling ............................................................................................... 17
2.1.4 Driverupdate ............................................................................................. 19
2.2 Description ...................................................................................................... 29
2.2.1 Printer Properties ..................................................................................... 30
2.2.2 Maintenance Dialog ................................................................................. 34
2.2.3 How to set print quality and mode ............................................................ 38
3 Maintenance and Cleaning .............................................................................. 40
3.1 Lubrication Of Shafts ....................................................................................... 40
3.2 Maintenance waste Ink Pad ............................................................................ 41
3.2.1 Required Parts and Tools......................................................................... 41
3.2.2 Description Waste Ink Pad Replacement ................................................. 41
3.3 Maintaining The Printer Body .......................................................................... 45
3.3.1 Printer Case Exterior ................................................................................ 45
3.3.2 Printer Interior .......................................................................................... 45
3.3.3 Printer Cradle Bar .................................................................................... 45
3.3.4 Handling And Storage .............................................................................. 45
4 Troubleshooting ............................................................................................... 46
4.1 The CDP print engine shows an error ............................................................. 46
4.2 Printer-LED’s are on or flashing ...................................................................... 47
4.2.1 Functions of LED’s ................................................................................... 47
4.2.2 Print Cartridge-Status LED on or flashing ................................................ 47
4.2.3 Resume-LED flashing .............................................................................. 47
4.2.4 Power-LED flashing ................................................................................. 47
4.2.5 All LED’s are flashing ............................................................................... 47
5 Technical Data .................................................................................................. 48
Page 3

COPYTRAX TECHNOLOGIES MONET 5000 Pro & Pro-Recorder
May 2005 www.copytrax.com 3
1 General
Description:
The CD Printer 5000 Pro & Pro-Recorder is a CD/DVD ink jet printer, based on the HP
DeskJet 5000 series printer technology from Hewlett Packard. The form feed is
replaced by a compact disc printer drawer (Tray).
The CD Printer 5000 Pro & Pro-Recorder prints directly to the surface of printable CDs
or DVDs coated for ink jet colour print.
The CD Printer 5000 pro Recorder, has the added feature of an internal CD / DVD
recorder and as such can simultaneously both print & record CD & DVD discs in
dedicated trays.
System Requirements:
PC
USB port.
Full speed (USB 1.1) or High speed (USB 2.0)
The CD Printer 5000 Pro& Pro-Recorder operates with Windows 2000 or Windows XP
Macintosh
USB port.
Full speed (USB 1.1) or High speed (USB 2.0)
The CD Printer 5000 Pro& Pro-Recorder operates with OS X
Important !!!
Due to the inkjet – technology used in this printer, an aerosolor mist of ink particles can
migrate through the interior of the system. Additional regular maintenance like
lubricating the tray shafts & cleaning the interior of the printer as well as cleaning of the
decoder wheel and the decoder strip is required.
Page 4
COPYTRAX TECHNOLOGIES MONET 5000 Pro & Pro-Recorder
May 2005 www.copytrax.com 4
1.1 Introduction
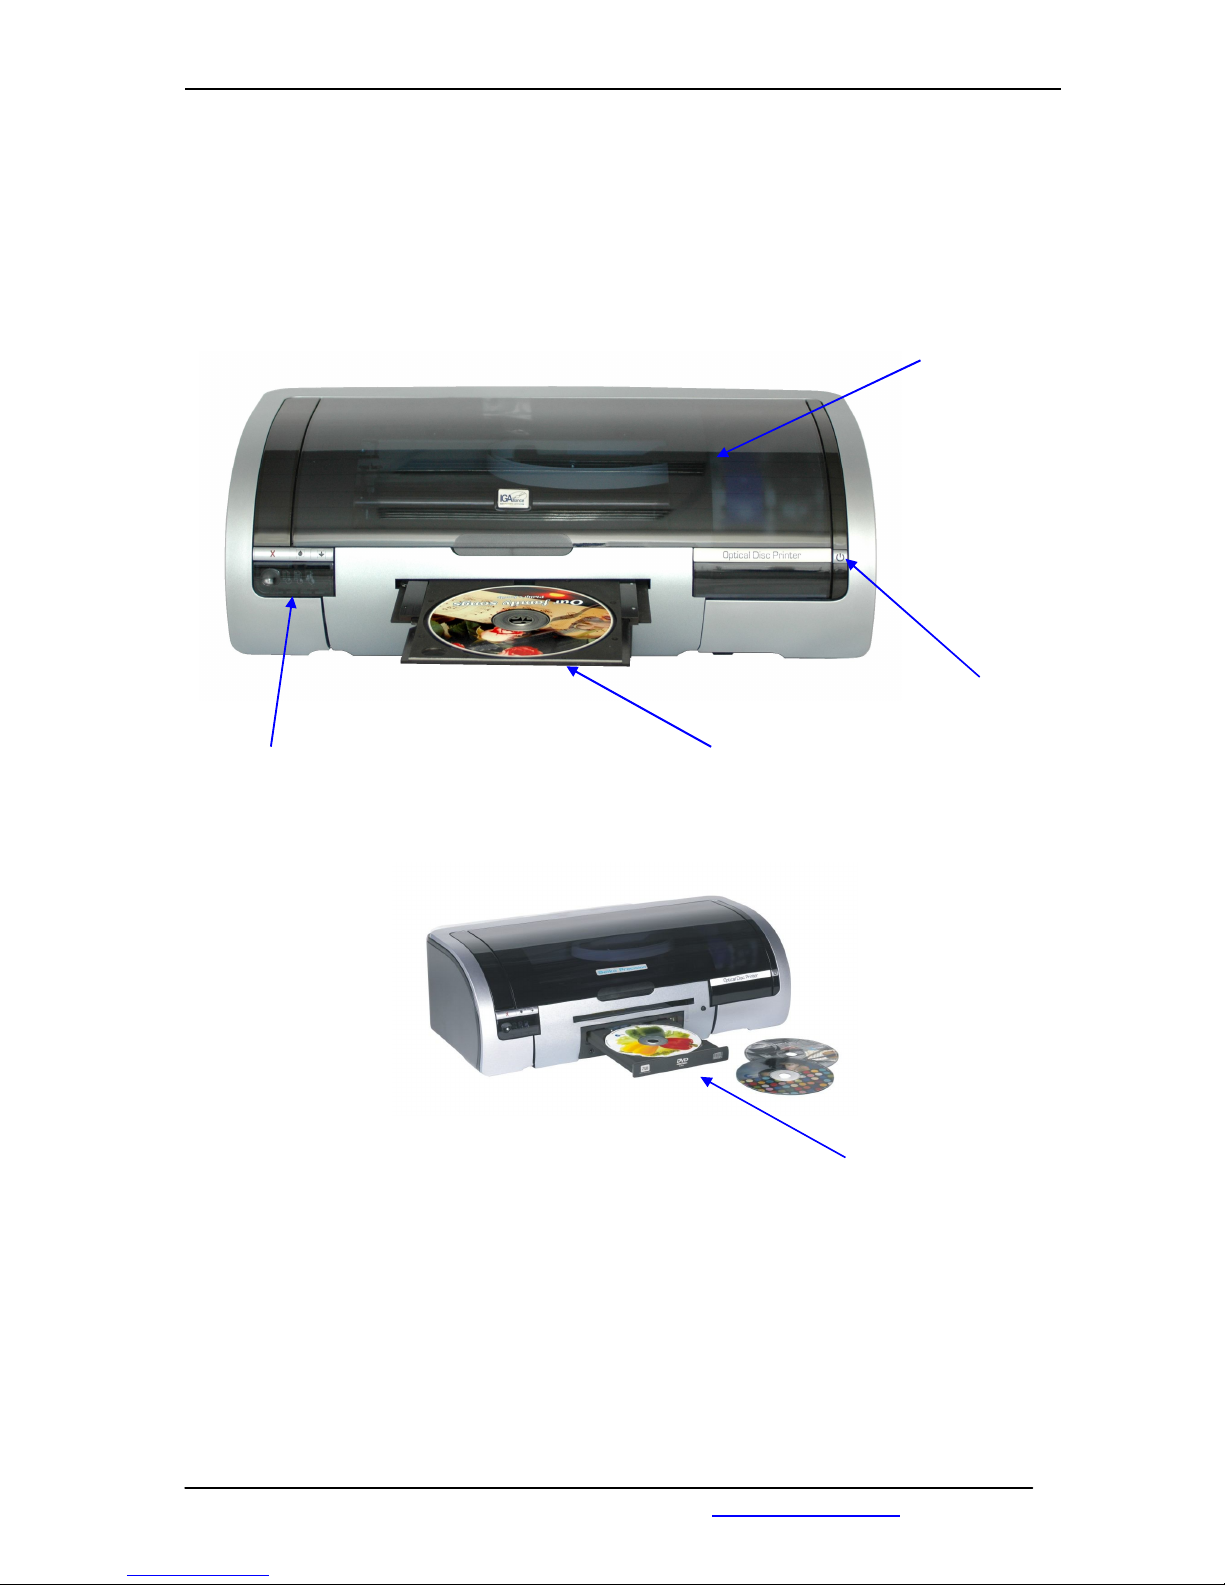
1.1.1 Front View
Front cover to
access cartridges
and printer mechanics
Power on switch
and Power LED
User buttons and Media Tray – Print only.
Status LED`s
Optional CD / DVD Recorder
( 5000 Pro – Recorder )
1.1.2 User Buttons and Status-LED’s
With the user buttons, the CD Printer 5000 Pro & Pro-Recorder can be switched on or
off, theprint & record trays can be ejected and inserted.
and a print job can be aborted or restarted.
The Status-LED’s give information about the printer status.
Page 5
COPYTRAX TECHNOLOGIES MONET 5000 Pro & Pro-Recorder
May 2005 www.copytrax.com 5
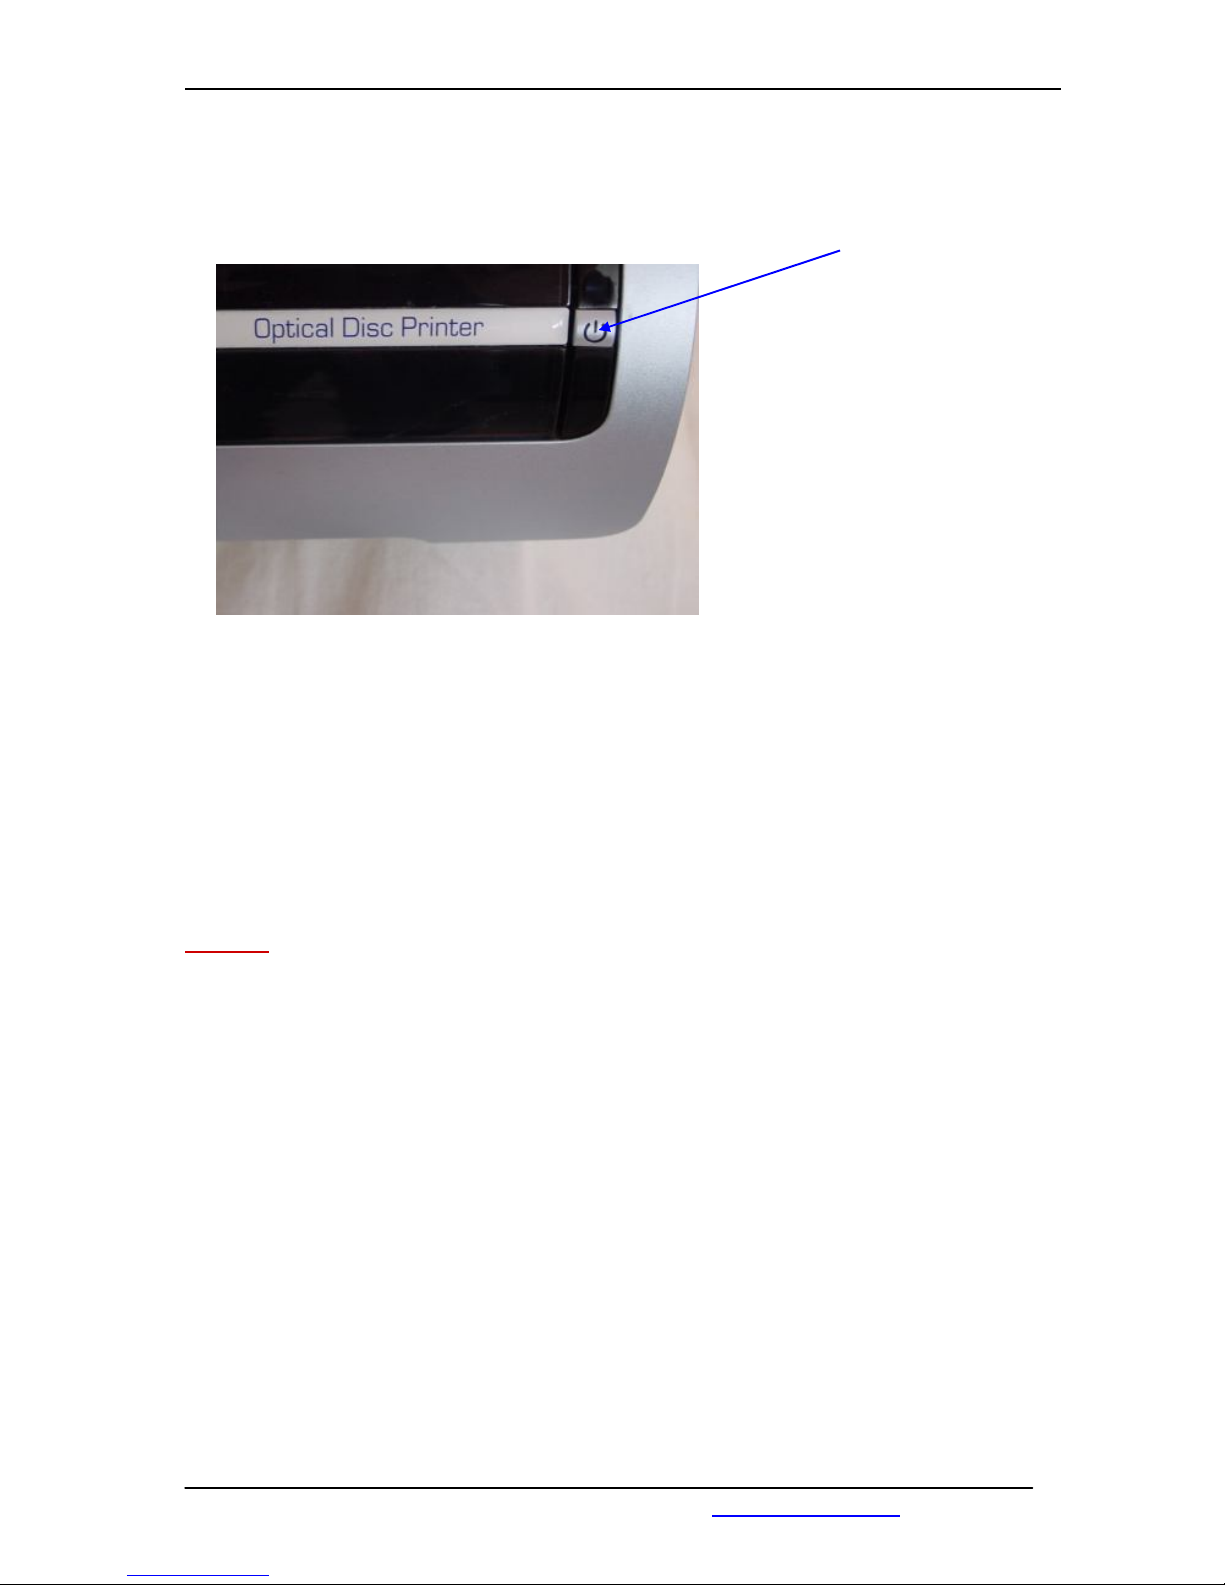
Power on switch
and Power LED
Power Button and - LED
With the Power Button you can switch the printer on and off.
After pressing it takes a couple of seconds until the printer becomes ready.
The Power LED blinks when printing data is being processed.
Caution!
Always use the Power button to turn on or off.
Using a power strip, surge protector, or a wall-mounted switch to turn the printer on and
off may cause printer failure.
Switch for opening and closing the printer tray
Press the Resume Button for 2 sec. ( see page 6 ) to open the tray for putting discs into
the tray or getting discs from the tray. On the same way you can close the tray.
Page 6
COPYTRAX TECHNOLOGIES MONET 5000 Pro & Pro-Recorder
May 2005 www.copytrax.com 6
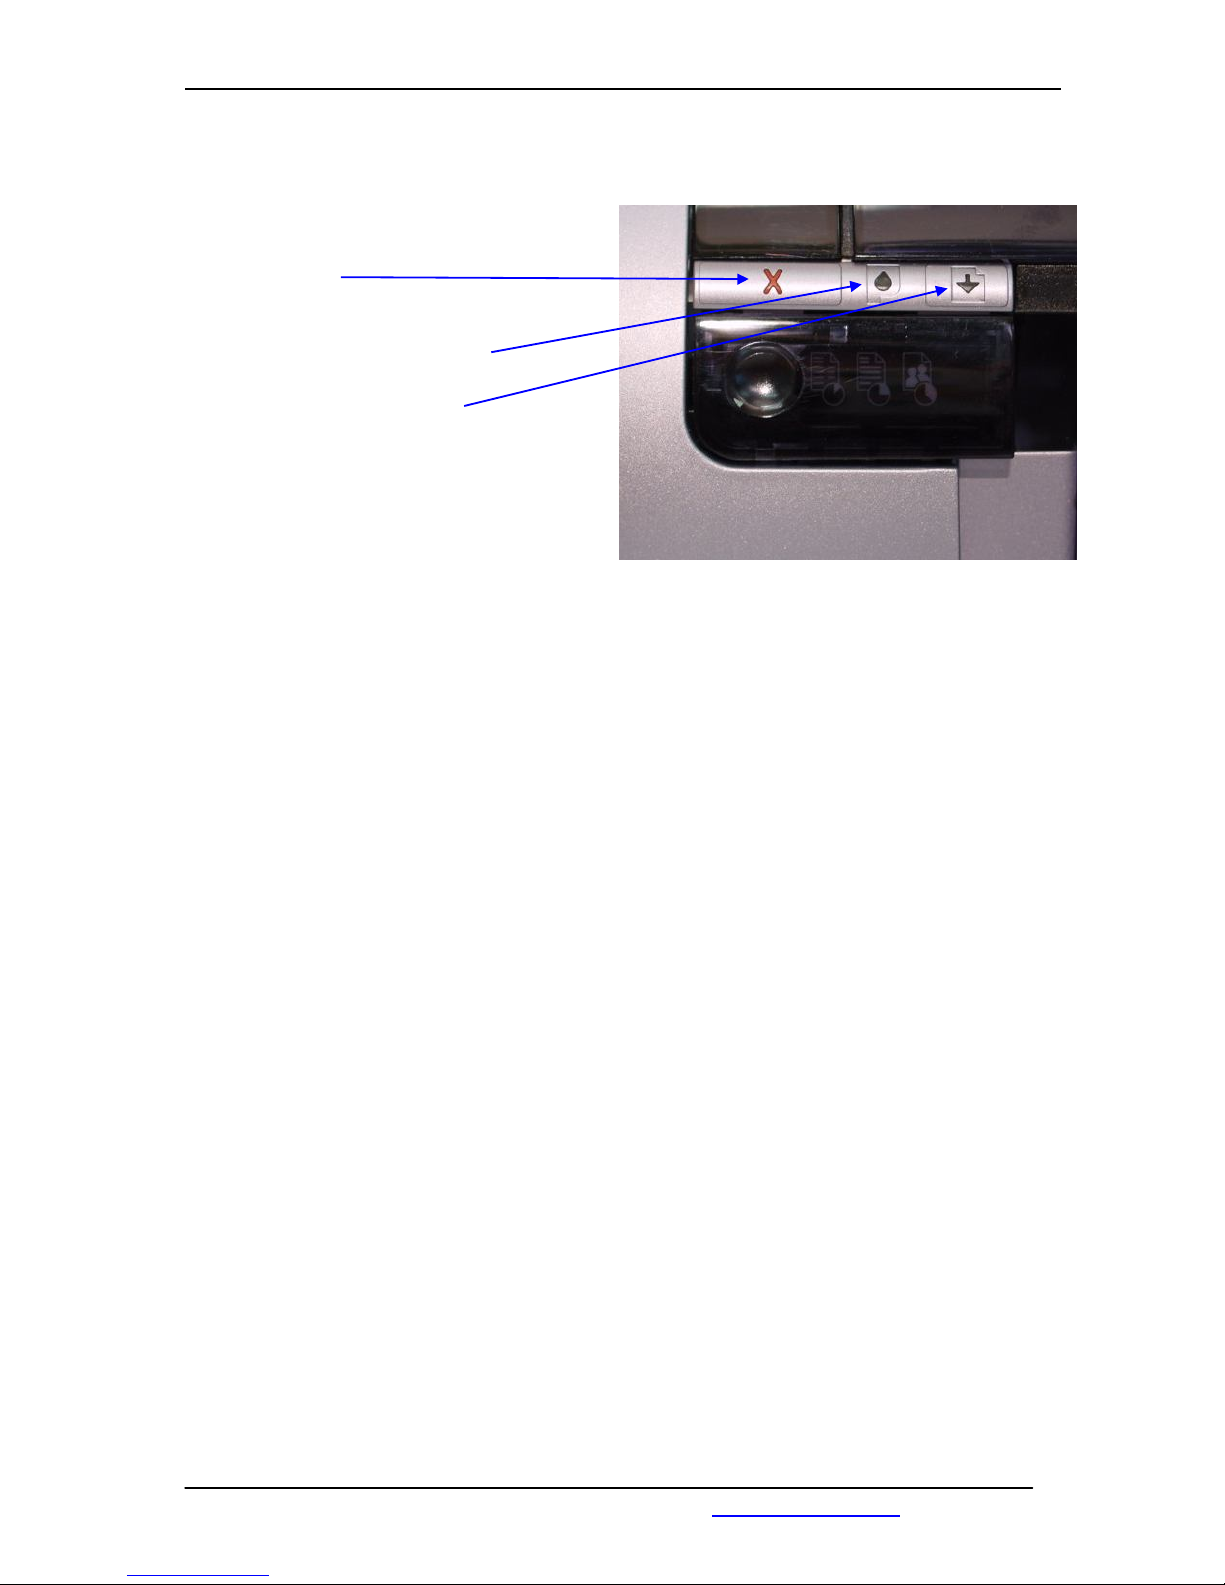
Cancel Button
Print Cartridge Status - LED
Resume Button and LED
Cancel Button
The current print job is aborted by pressing the Cancel Button.
Print Cartridge Status - LED
The Print Cartridge Status LED blinks when a cartridge needs to be replaced or requires
maintenance as well as when the front cover is open.
Resume Button and - LED
The Resume Button blinks in case of a general error, or if no disc is present in the
printing tray.
Put a disc into the drawer and press the resume button to start the printing.
If the resume LED is blinking, you can not use the black switch at the right side,
You have to press the resume button.
Page 7
COPYTRAX TECHNOLOGIES MONET 5000 Pro & Pro-Recorder
May 2005 www.copytrax.com 7
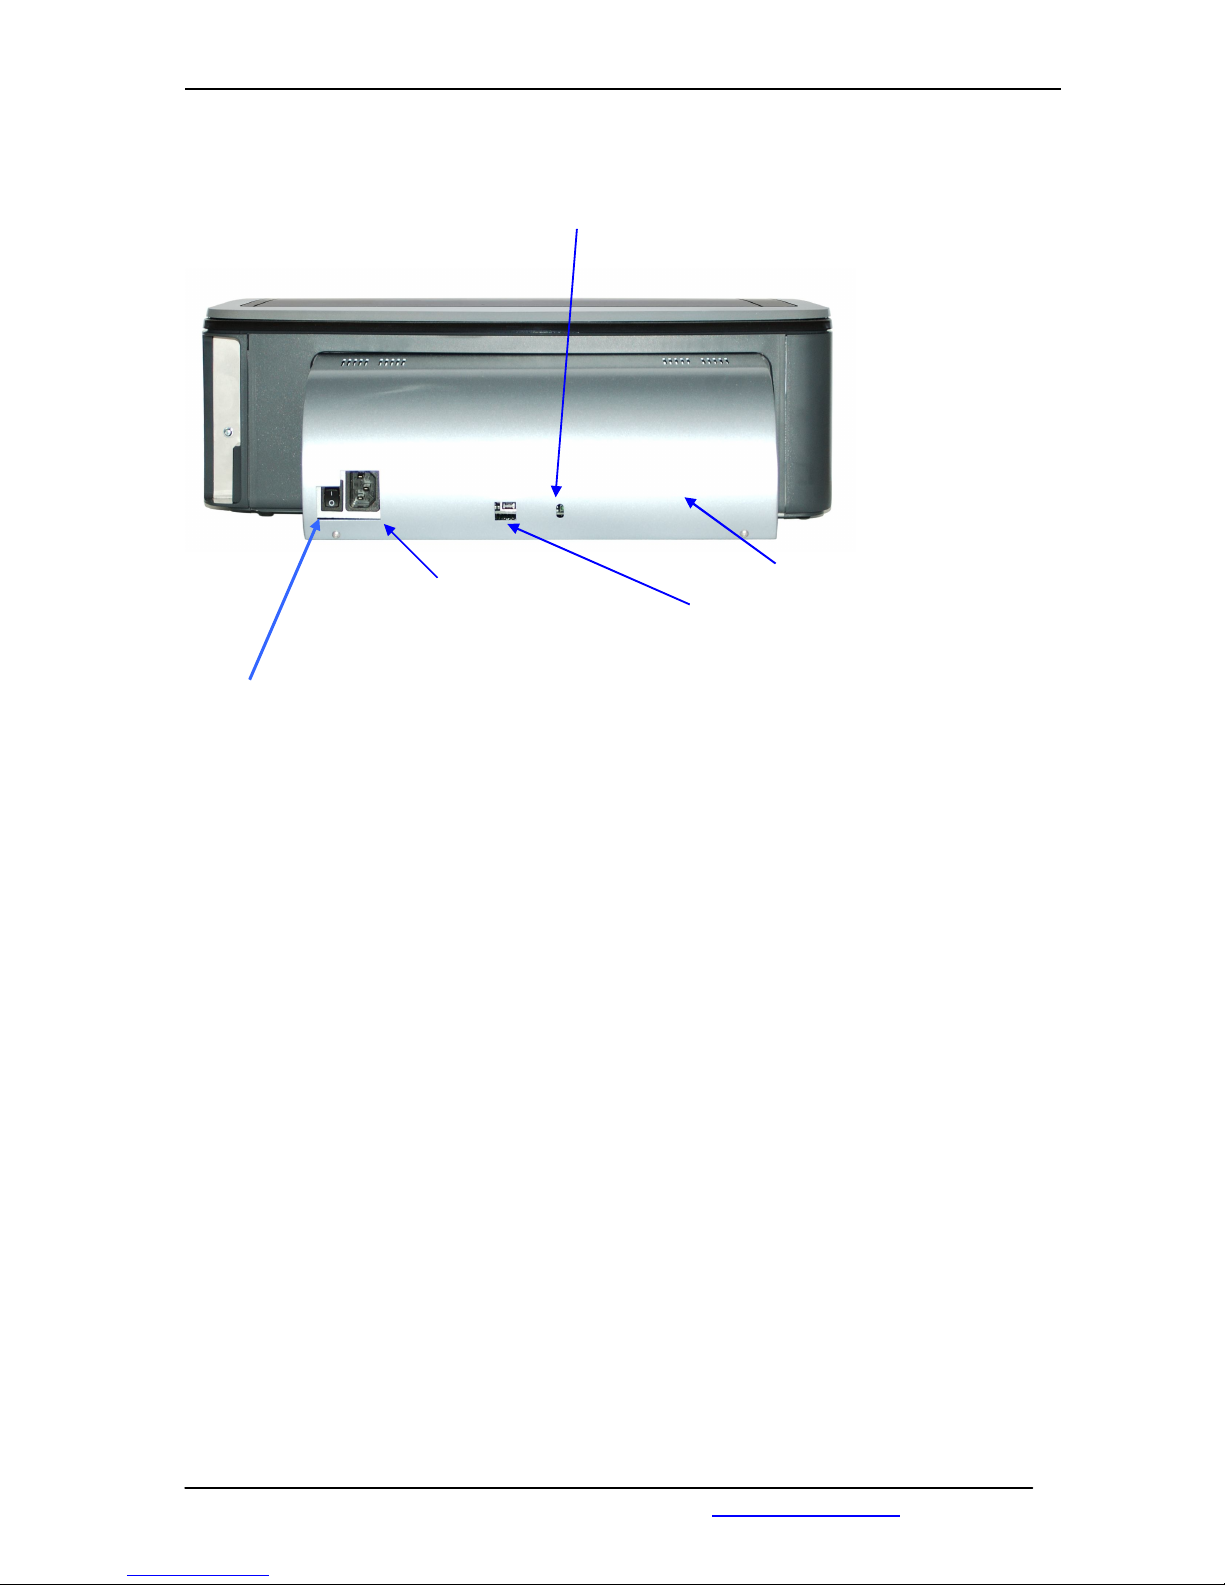
1.1.3 Rear view
Power LED ( Green )
Rear cover
Power connector
100 - 230V USB connector
(CDP 5000 Pro & Pro-Recorder)
On / Off Switch
Page 8
COPYTRAX TECHNOLOGIES MONET 5000 Pro & Pro-Recorder
May 2005 www.copytrax.com 8
2 Printer driver
2.1 Installation
2.1.1 First Installation (Plug & Play)
Connect the CD Printer 5000 Pro & Pro-Recorder to the power supply.
Switch-on is not necessary since the personal computer recognizes the printer also in
idle status.
Connect the printer with a USB cable to the PC.
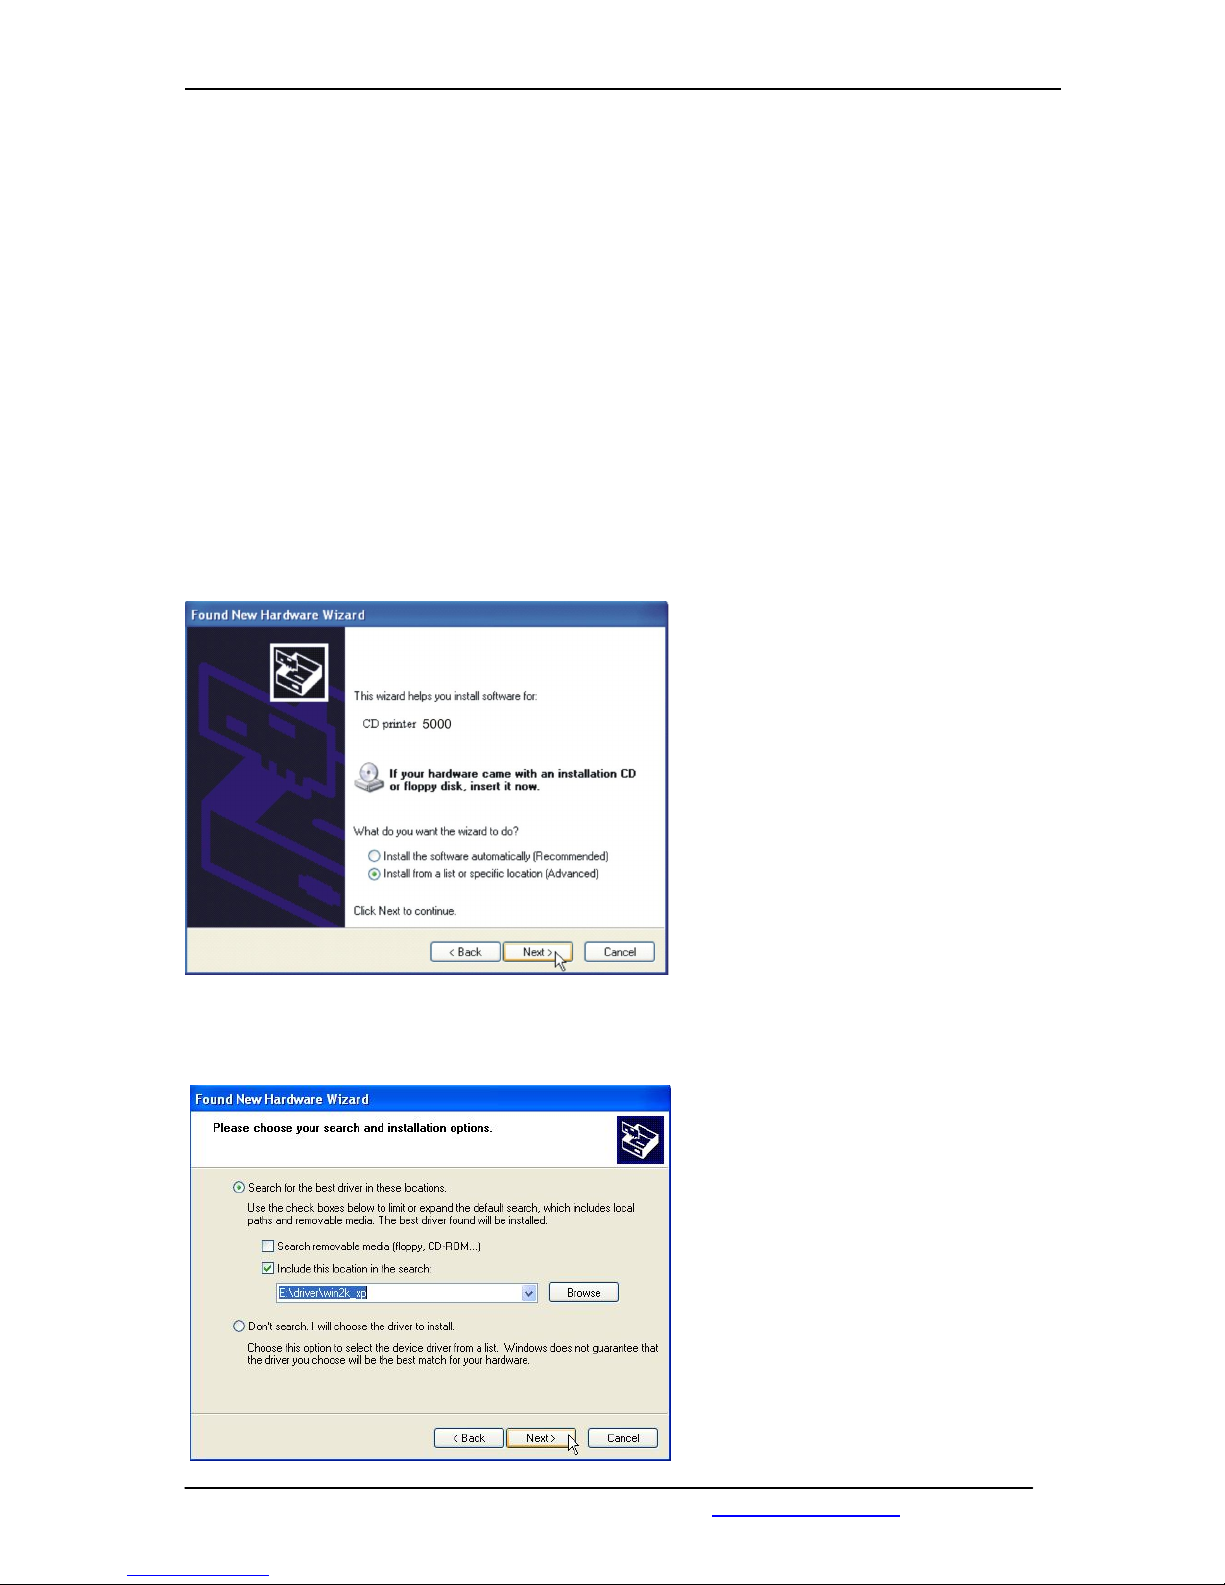
The Plug & Play function recognizes now automatically that a new printer is connected
and starts the installation routine.
Set the options like they are set in the
screen shot on the left.
With the button „Browse“, you can set
the path to the installation file called
„lsf5600k.inf”.
Again, click „Next“ to continue.
Please chose the option „Install from
a list or specific location (Advanced)“.
Only with this option, you have the
full control and you make sure to
install the proper driver.
Click „Next“ to continue.
Page 9
COPYTRAX TECHNOLOGIES MONET 5000 Pro & Pro-Recorder
May 2005 www.copytrax.com 9
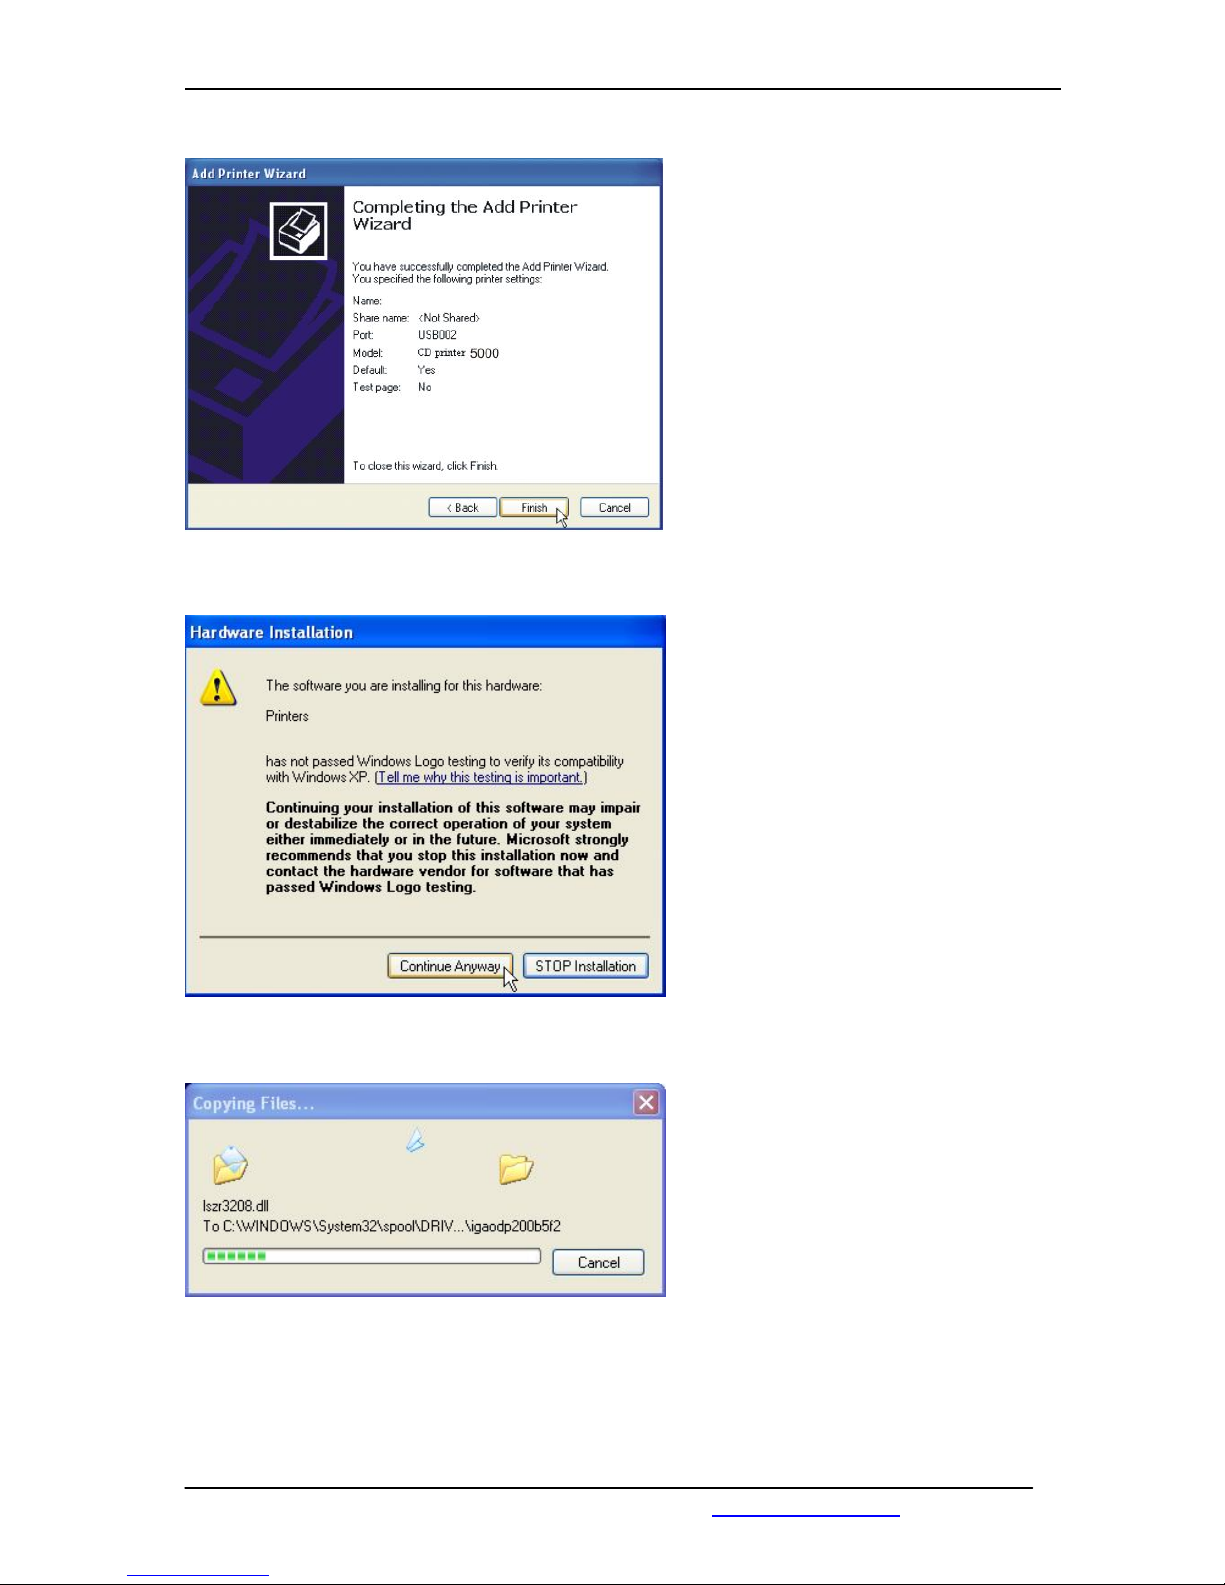
This dialog field informs you that the
driver is not registered officially with
the manufacturer of the operating
system.
It does not state, however, anything
about the quality of the driver.
You can be sure, that the driver is
programmed and tested with the
latest programs and tools.
You can continue the installation
without any doubt.
Please wait until the driver is installed
and all files were copied.
This can take some minutes.
NOTE : At the end of the installation the personal computer must be
restarted!
Completing the Add Printer Wizard and
starting the installation, by pressing the
button „Finish“.
Page 10
COPYTRAX TECHNOLOGIES MONET 5000 Pro & Pro-Recorder
May 2005 www.copytrax.com 10
2.1.2 Manual Installation
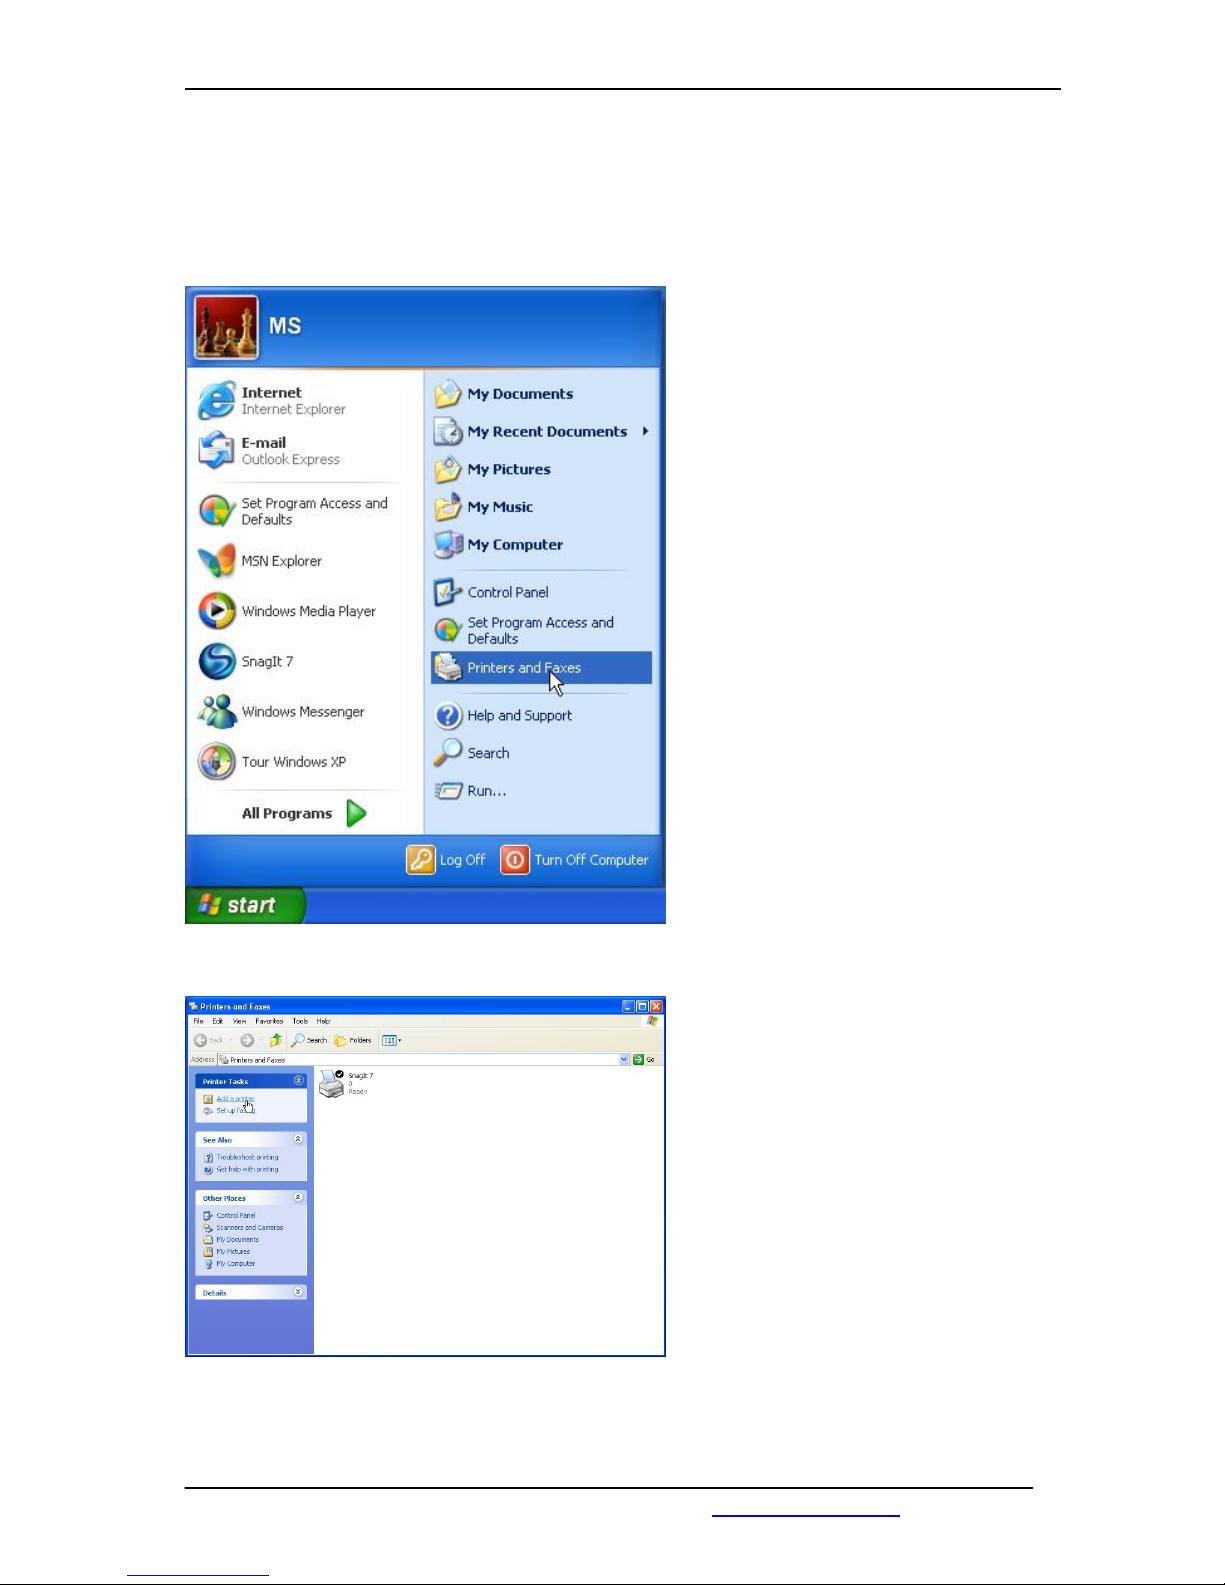
Please open the dialog „Printers and
faxes“.
Run the „Add Printer Wizard“ by
pressing the button „Add a printer“.
Page 11
COPYTRAX TECHNOLOGIES MONET 5000 Pro & Pro-Recorder
May 2005 www.copytrax.com 11
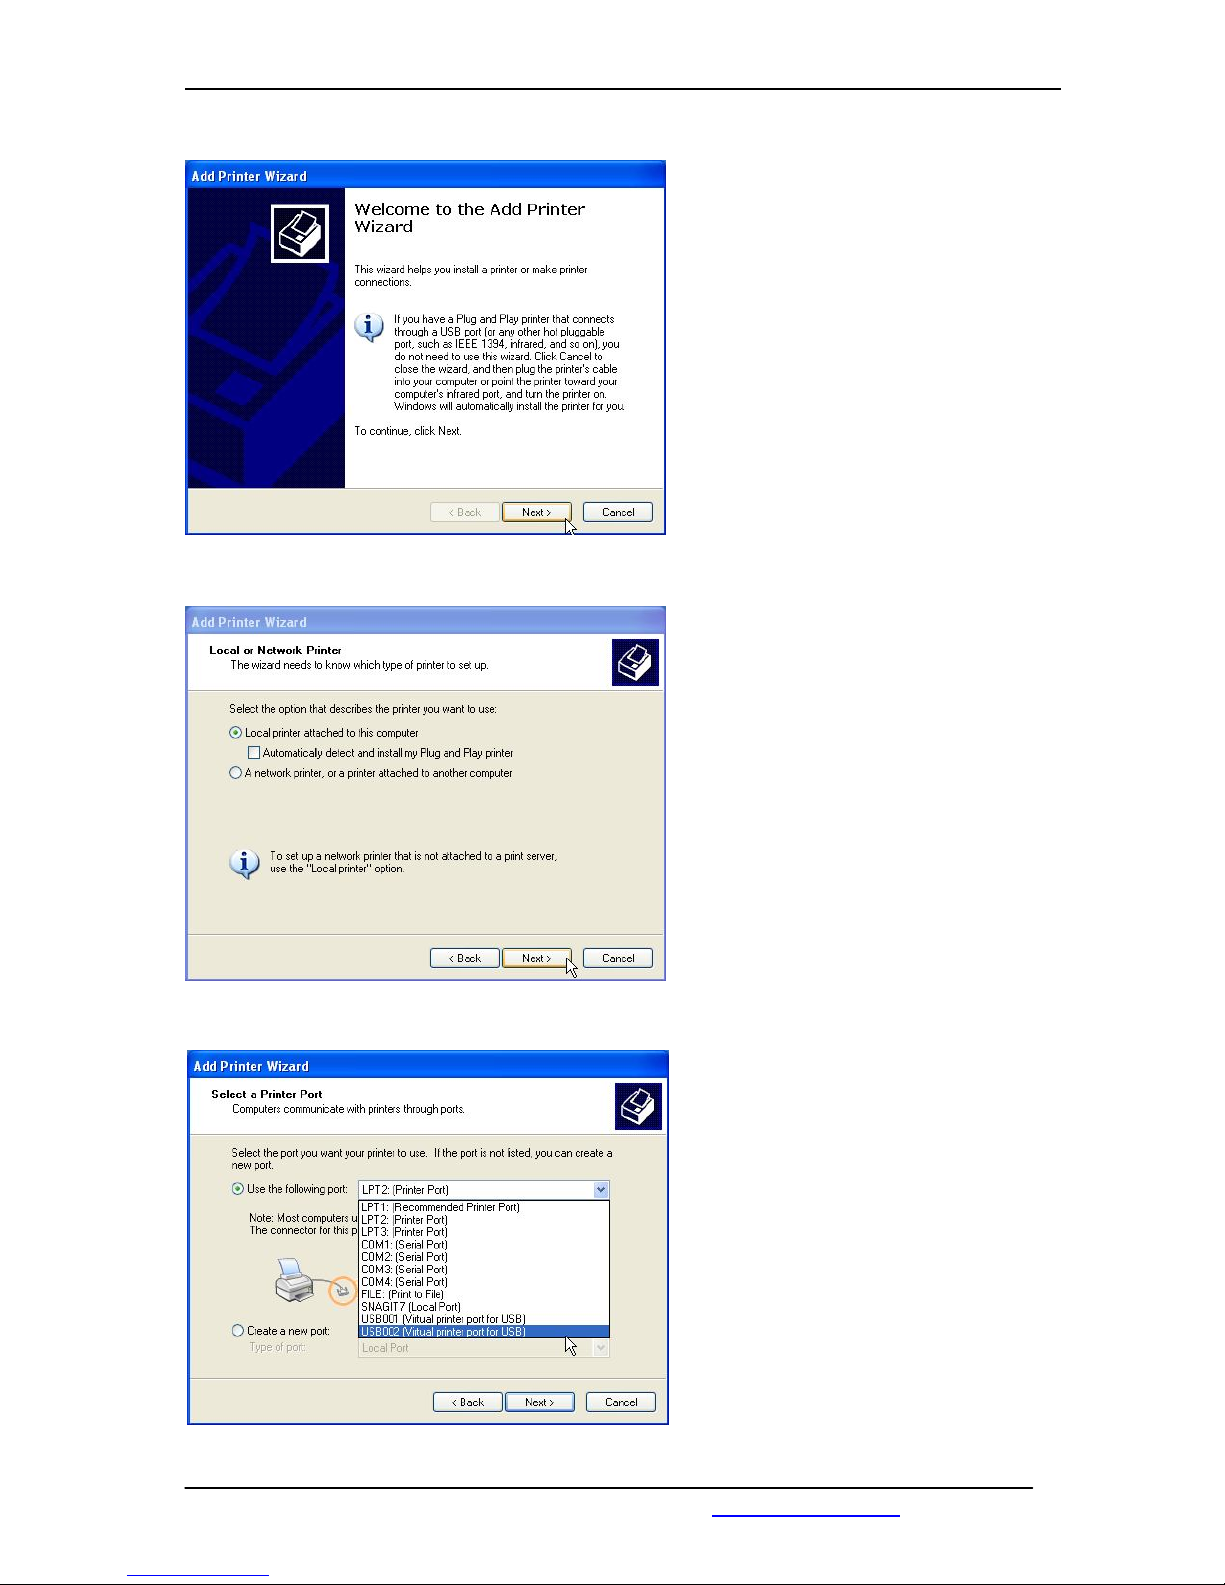
Click “Next” to continue.
Select the option „Local printer
attached to this computer“ and press
the „Next“ button to continue.
Select a free USB Port.
Page 12
COPYTRAX TECHNOLOGIES MONET 5000 Pro & Pro-Recorder
May 2005 www.copytrax.com 12
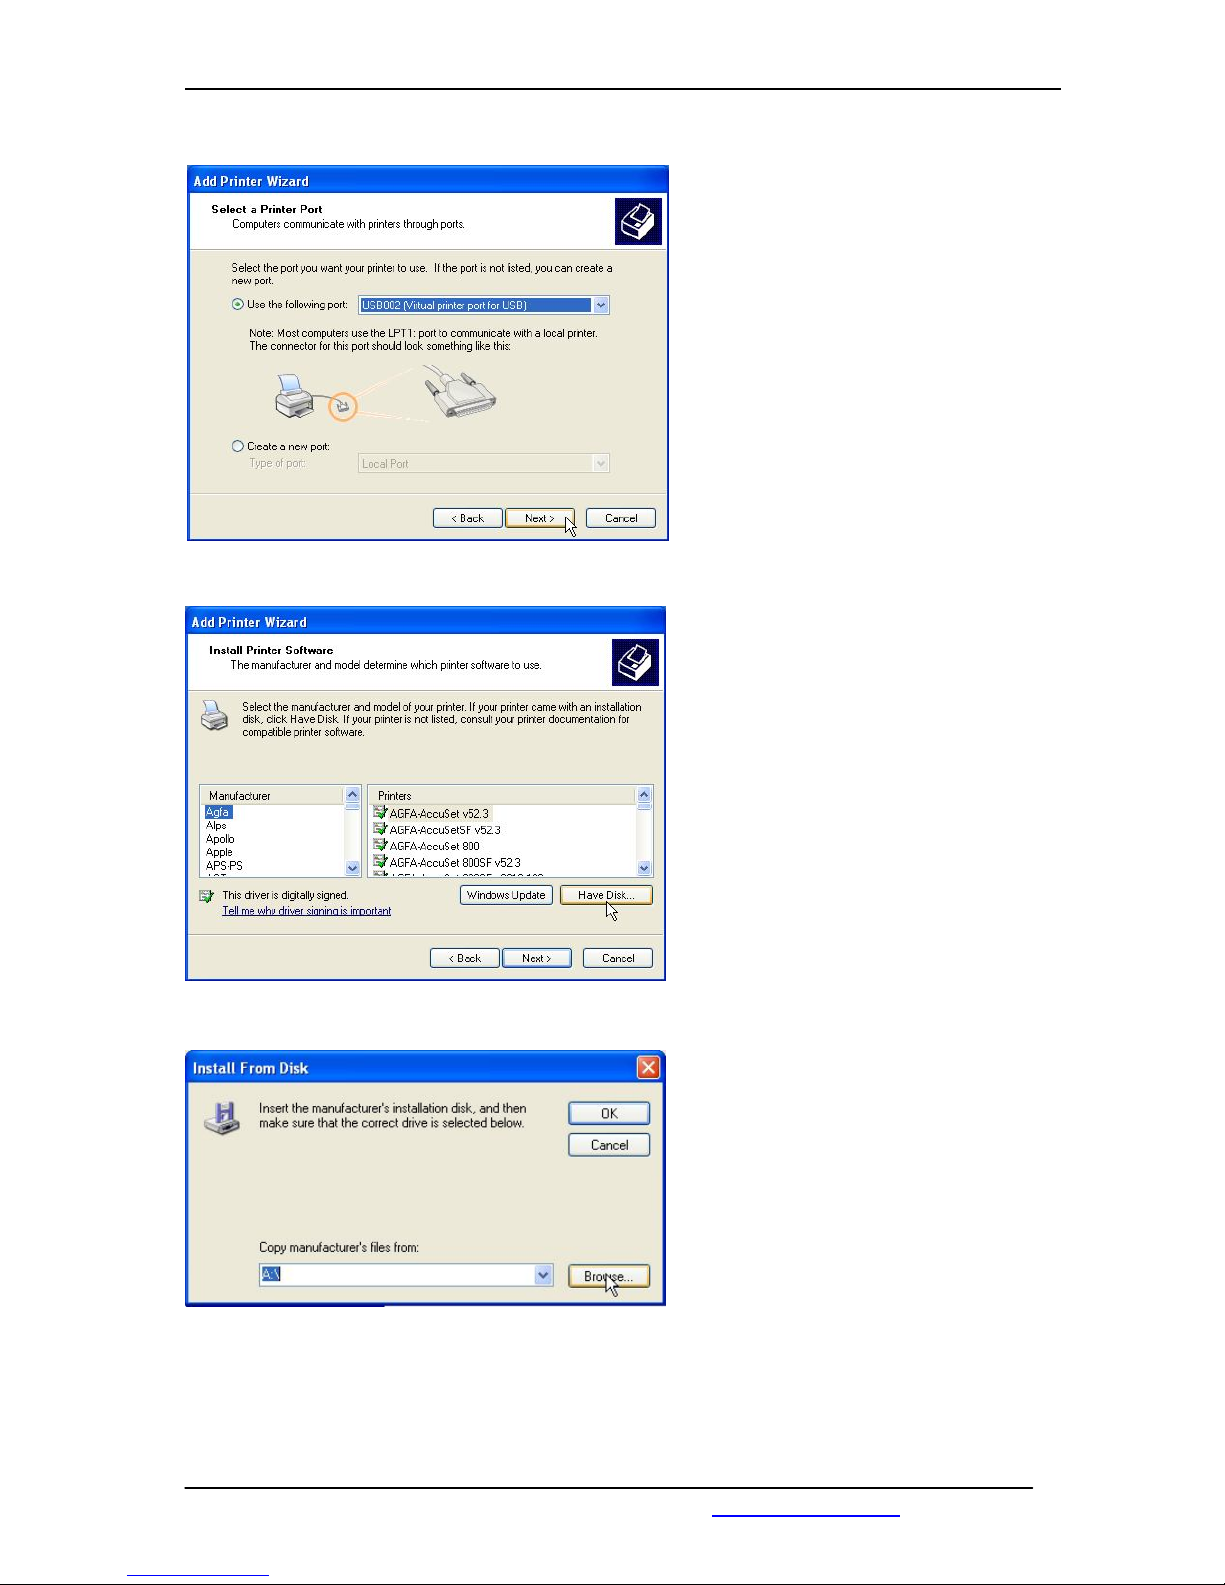
Again, click „Next“ to continue.
Press the button „Have Disk...“.to
select the path to the installation file
Search the path by clicking on the
button „Browse...“.
Page 13
COPYTRAX TECHNOLOGIES MONET 5000 Pro & Pro-Recorder
May 2005 www.copytrax.com 13
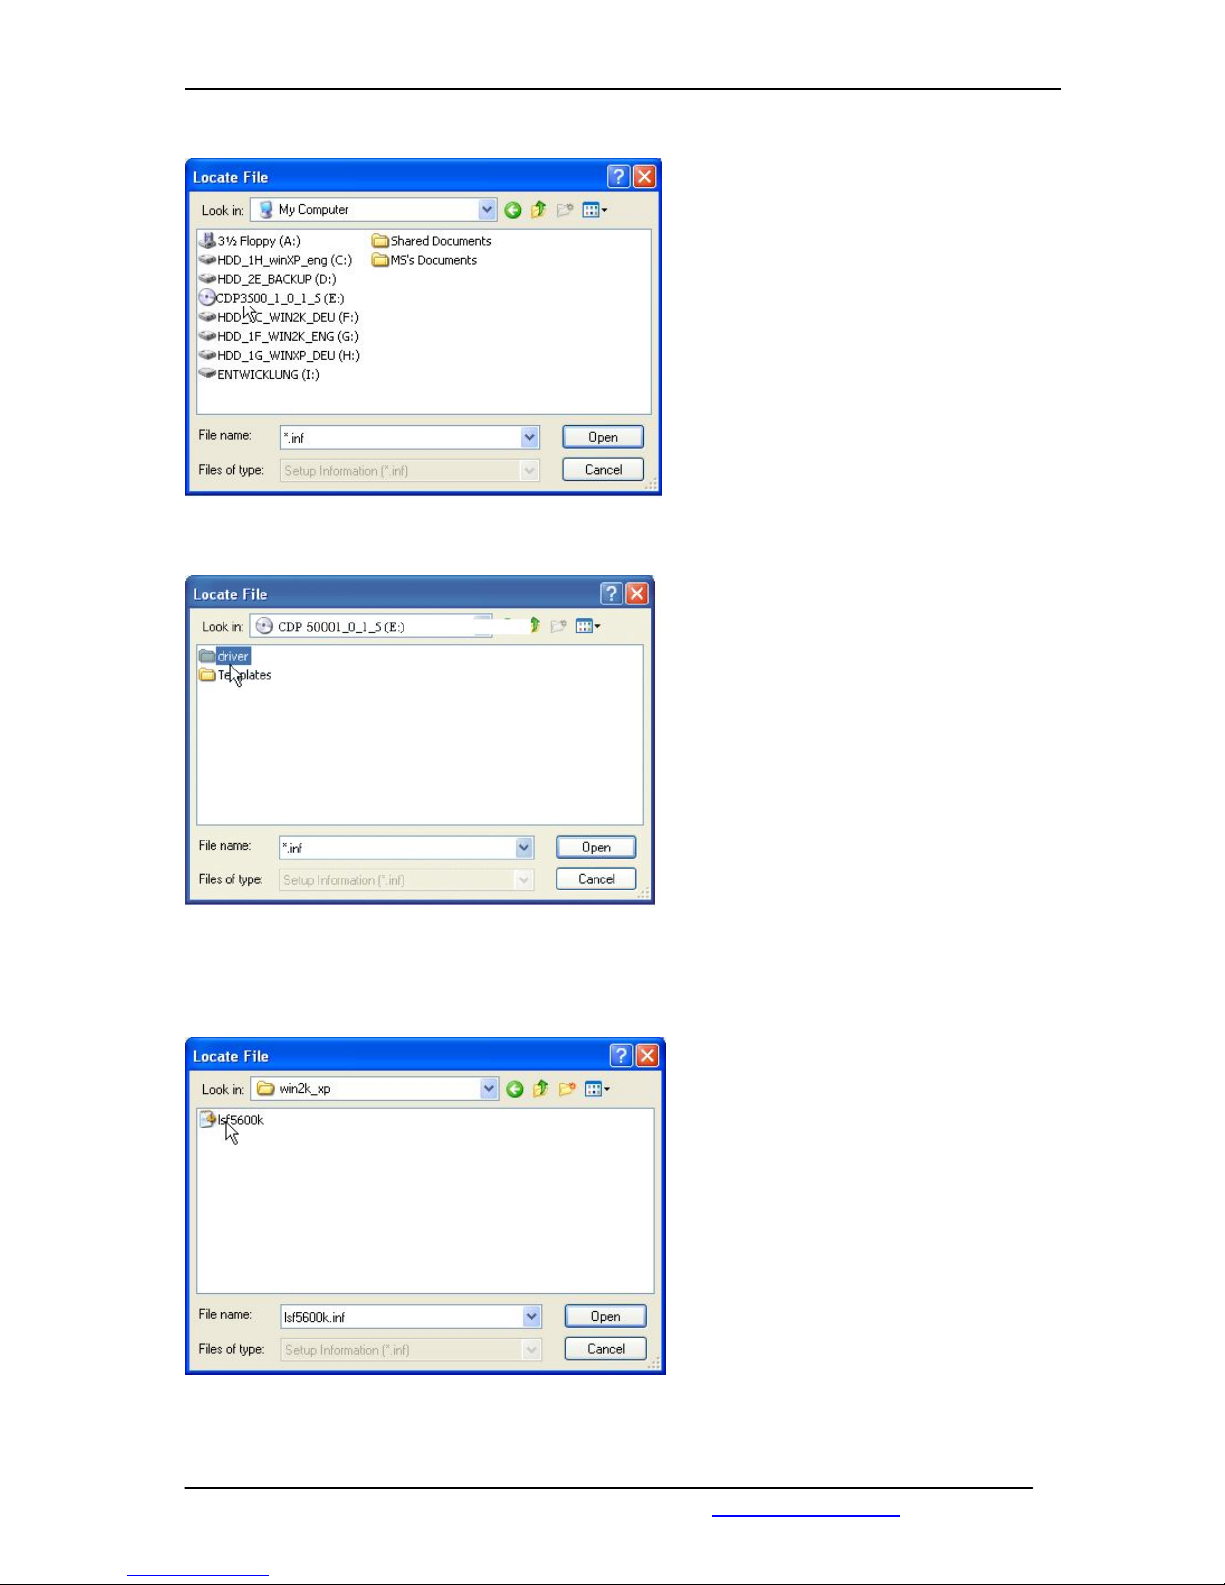
Select the installation file.
Select the drive.
Select the path.
Page 14
COPYTRAX TECHNOLOGIES MONET 5000 Pro & Pro-Recorder
May 2005 www.copytrax.com 14
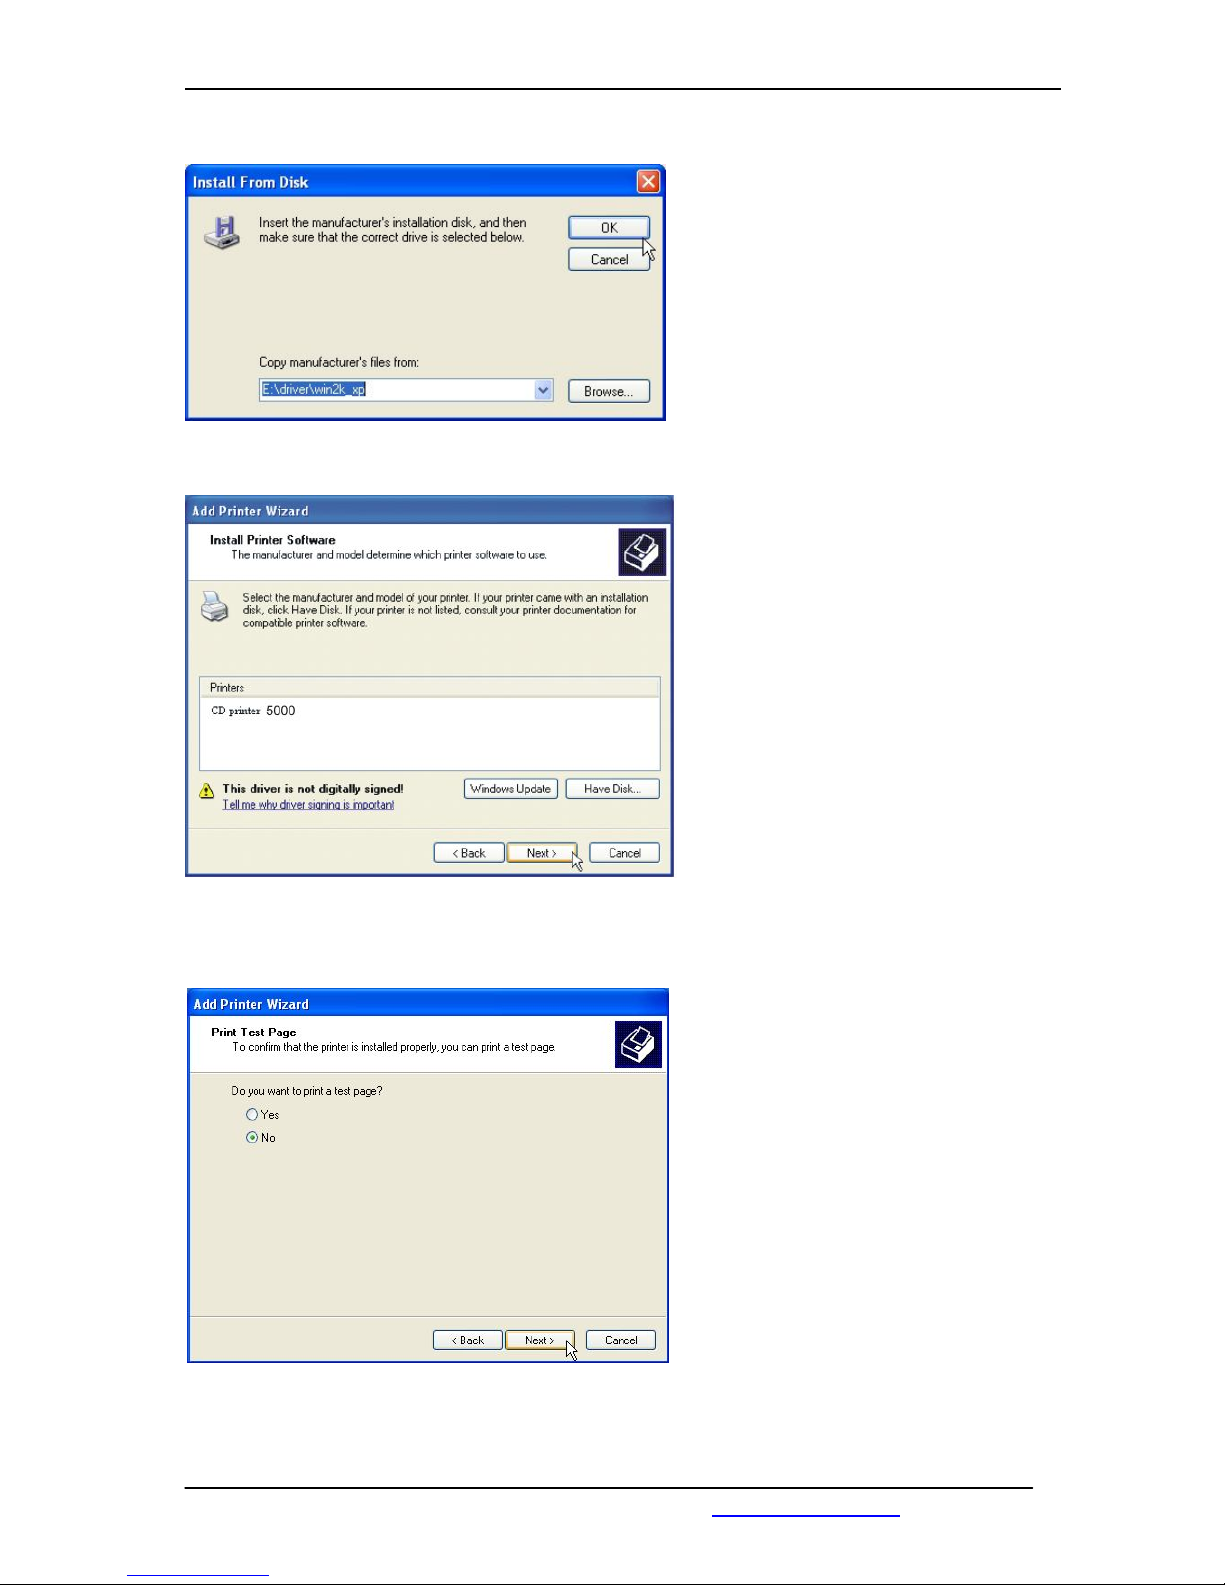
Press “OK” to continue.
It is not necessary to print a test
page.
To continue the installation press “Next”.
Page 15
COPYTRAX TECHNOLOGIES MONET 5000 Pro & Pro-Recorder
May 2005 www.copytrax.com 15
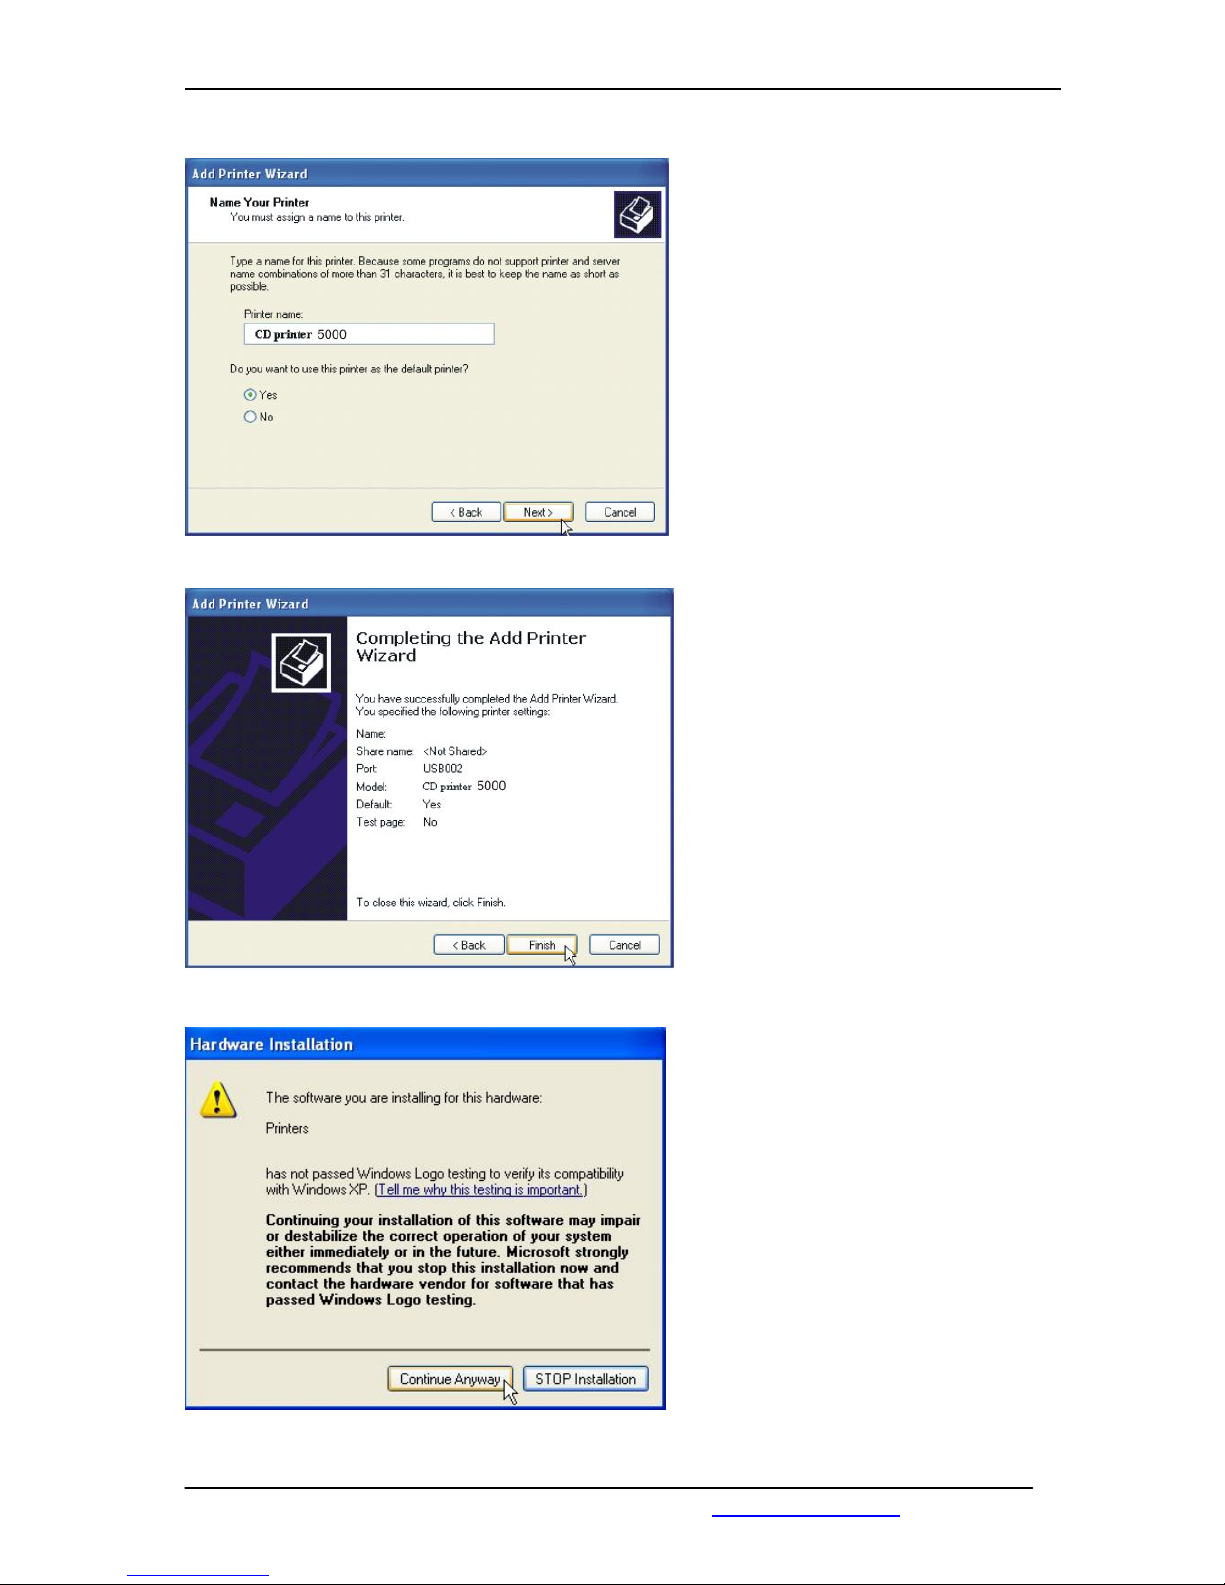
This dialog field informs you that the
driver is not registered officially with
the manufacturer of the operating
system.
It does not state, however, anything
about the quality of the driver.
You can be sure, that the driver is
programmed and tested with the
latest programs and tools.
You can continue the installation
without any doubt.
In this dialog, you can change the
name of the printer and you can set
the printer as default.
We recommend to use the suggested
name CD PRINTER 5000.
Complete the Add Printer Wizard and start
the installation by pressing the button
„Finish“.
Page 16

COPYTRAX TECHNOLOGIES MONET 5000 Pro & Pro-Recorder
May 2005 www.copytrax.com 16
Please wait until the driver is installed
and all files were copied.
This can take some minutes.
NOTE : At the end of the installation the personal computer must be
restarted!
Page 17
COPYTRAX TECHNOLOGIES MONET 5000 Pro & Pro-Recorder
May 2005 www.copytrax.com 17
2.1.3 Uninstalling
In order to uninstall the printer driver,
the personal computer must be restarted first of all.
This is necessary so that all files which are used by the old printer driver are not blocked
by other applications or the operating system.
Blocked files can not be removed during the deinstallation.
This may cause problems, in the case of a later reinstallation..
All programs must be closed before the deinstallation of the printer driver.
1.) Deleting the CD Printer 5000 Pro & Pro-Recorder
printer symbol in the printer status monitor.
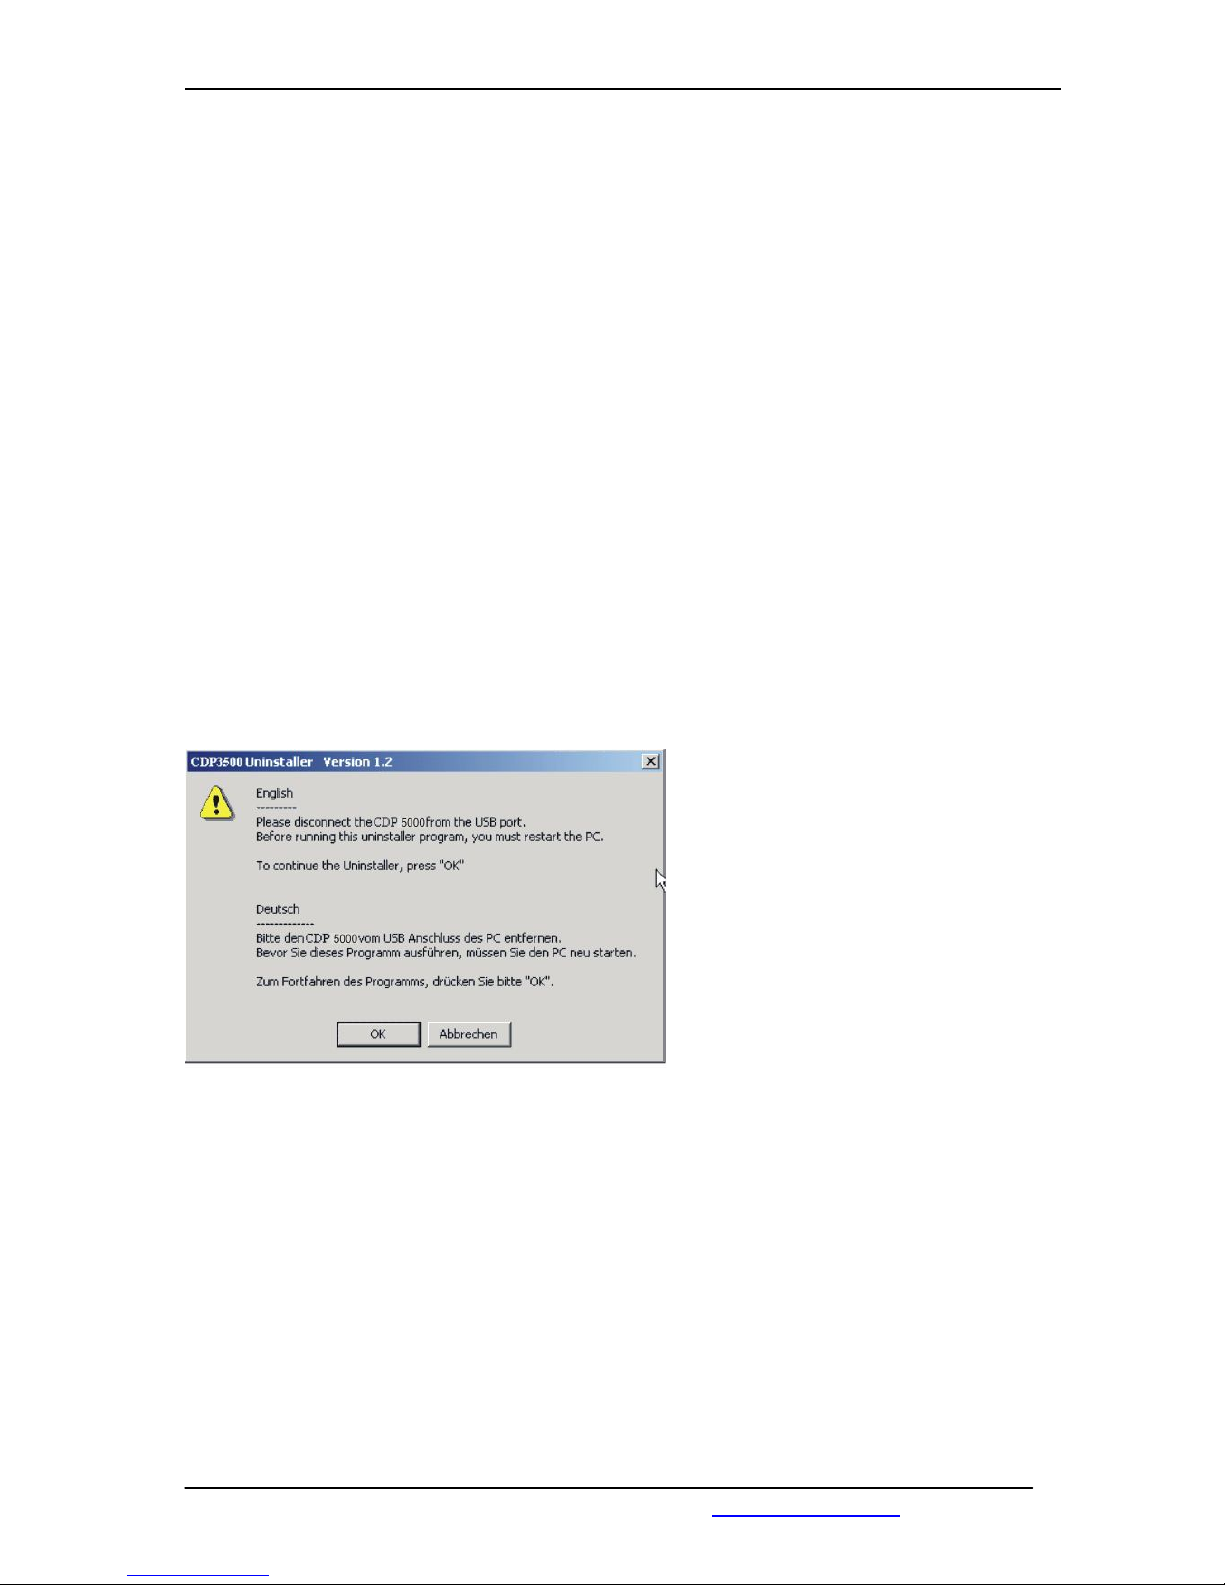
2.) To delete the CD Printer 5000 Pro & Pro-Recorder driver files, run the program
“O2uninst.exe” from the
directory „C:\Windows\System32\ and follow the instructions
Start the uninstalling by
pressing the “OK” button.
Page 18
COPYTRAX TECHNOLOGIES MONET 5000 Pro & Pro-Recorder
May 2005 www.copytrax.com 18
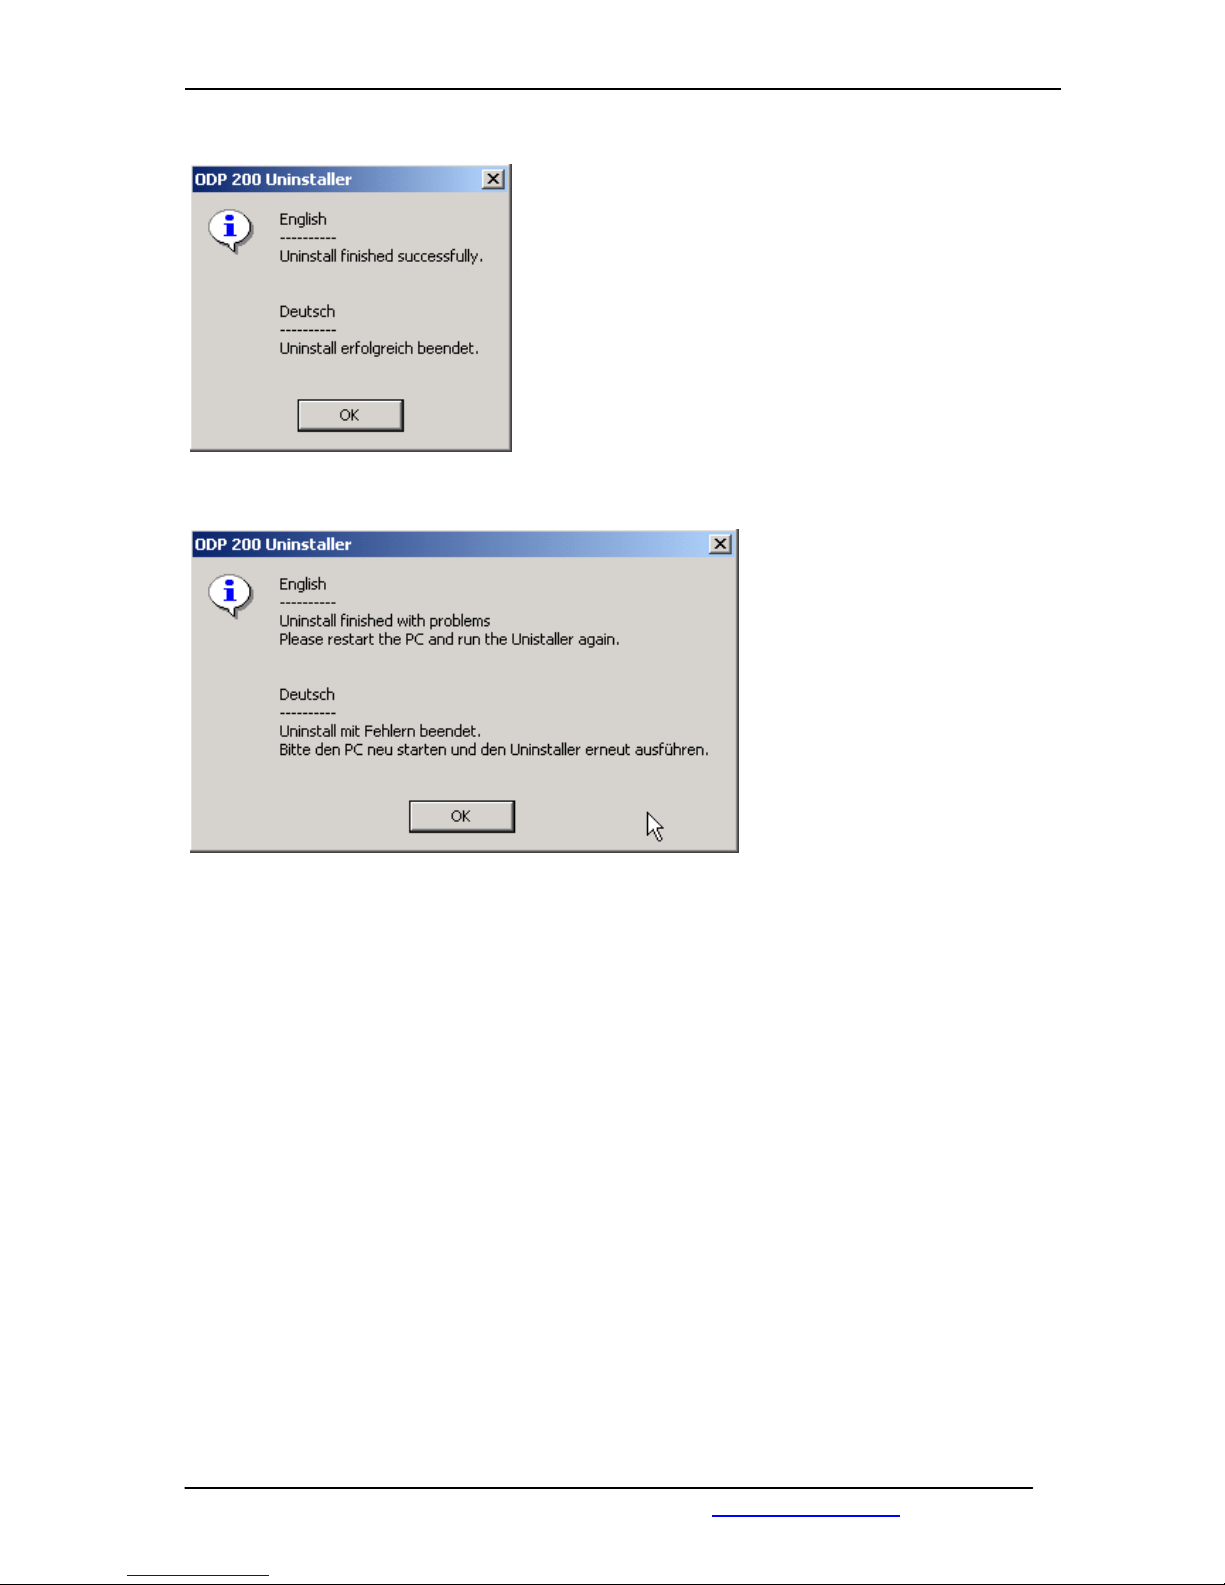
If no problems occur during the installation, you get
this Information dialog.
The uninstalling is finished after the restart of the
Personal Computer.
This window comes up, when
some files could not deleted
by the Uninstaller.
Please restart the Personal
Computer and run this
uninstaller application again.
NOTE : At the end of the uninstalling the personal computer must be
restarted!
Page 19
COPYTRAX TECHNOLOGIES MONET 5000 Pro & Pro-Recorder
May 2005 www.copytrax.com 19
2.1.4 Driverupdate
At first, download the latest driver from the FTP download server
if the latest driver is available on CD.
Look on www.copytrax.com to find the latest CD PRINTER 5000 PRO driver.
In order to update the printer driver,
the personal computer must first be restarted.
This is necessary so that all files which are used by the old printer driver are not blocked
by other applications or the operating system.
Blocked files can not be removed during the update process.
All programs, which have access to the printer driver, must be closed before the update.
Please disconnect the USB connection of the CDP and the PC.
There are three possible ways to get the printer driver up to date.
a.) Only changed files of the driver will be replaced.
b.) All files of the driver will be replaced.
c.) Windows specific updatesolution, which we not recommend to use,
because you can not be sure that all necessary files are updatet
succesfully.
Update a.) Only changed files of the driver will be replaced.
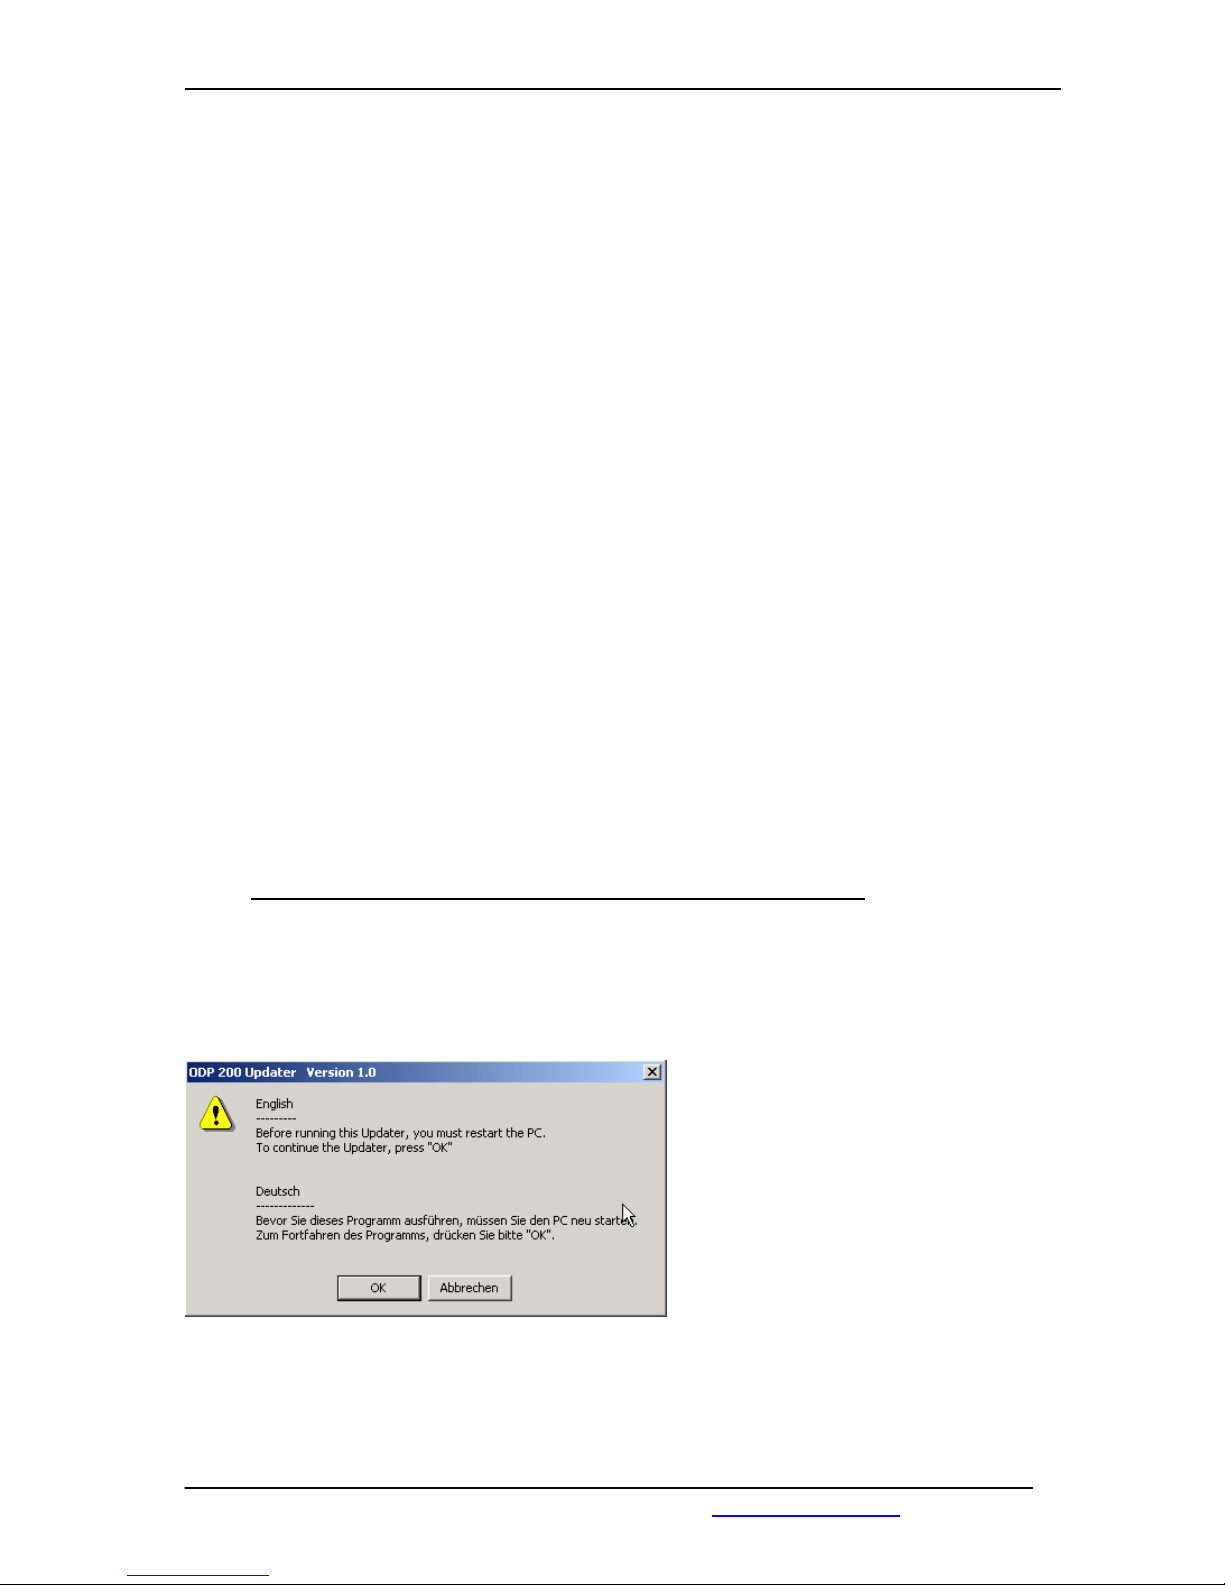
After restarting the PC and disconnecting the USB connection of the printer,
You have to start the program „O2Update,exe“ gestartet.
This programm is part of the driver and is located in the main directory.
Press OK to start the Update process.
Page 20
COPYTRAX TECHNOLOGIES MONET 5000 Pro & Pro-Recorder
May 2005 www.copytrax.com 20
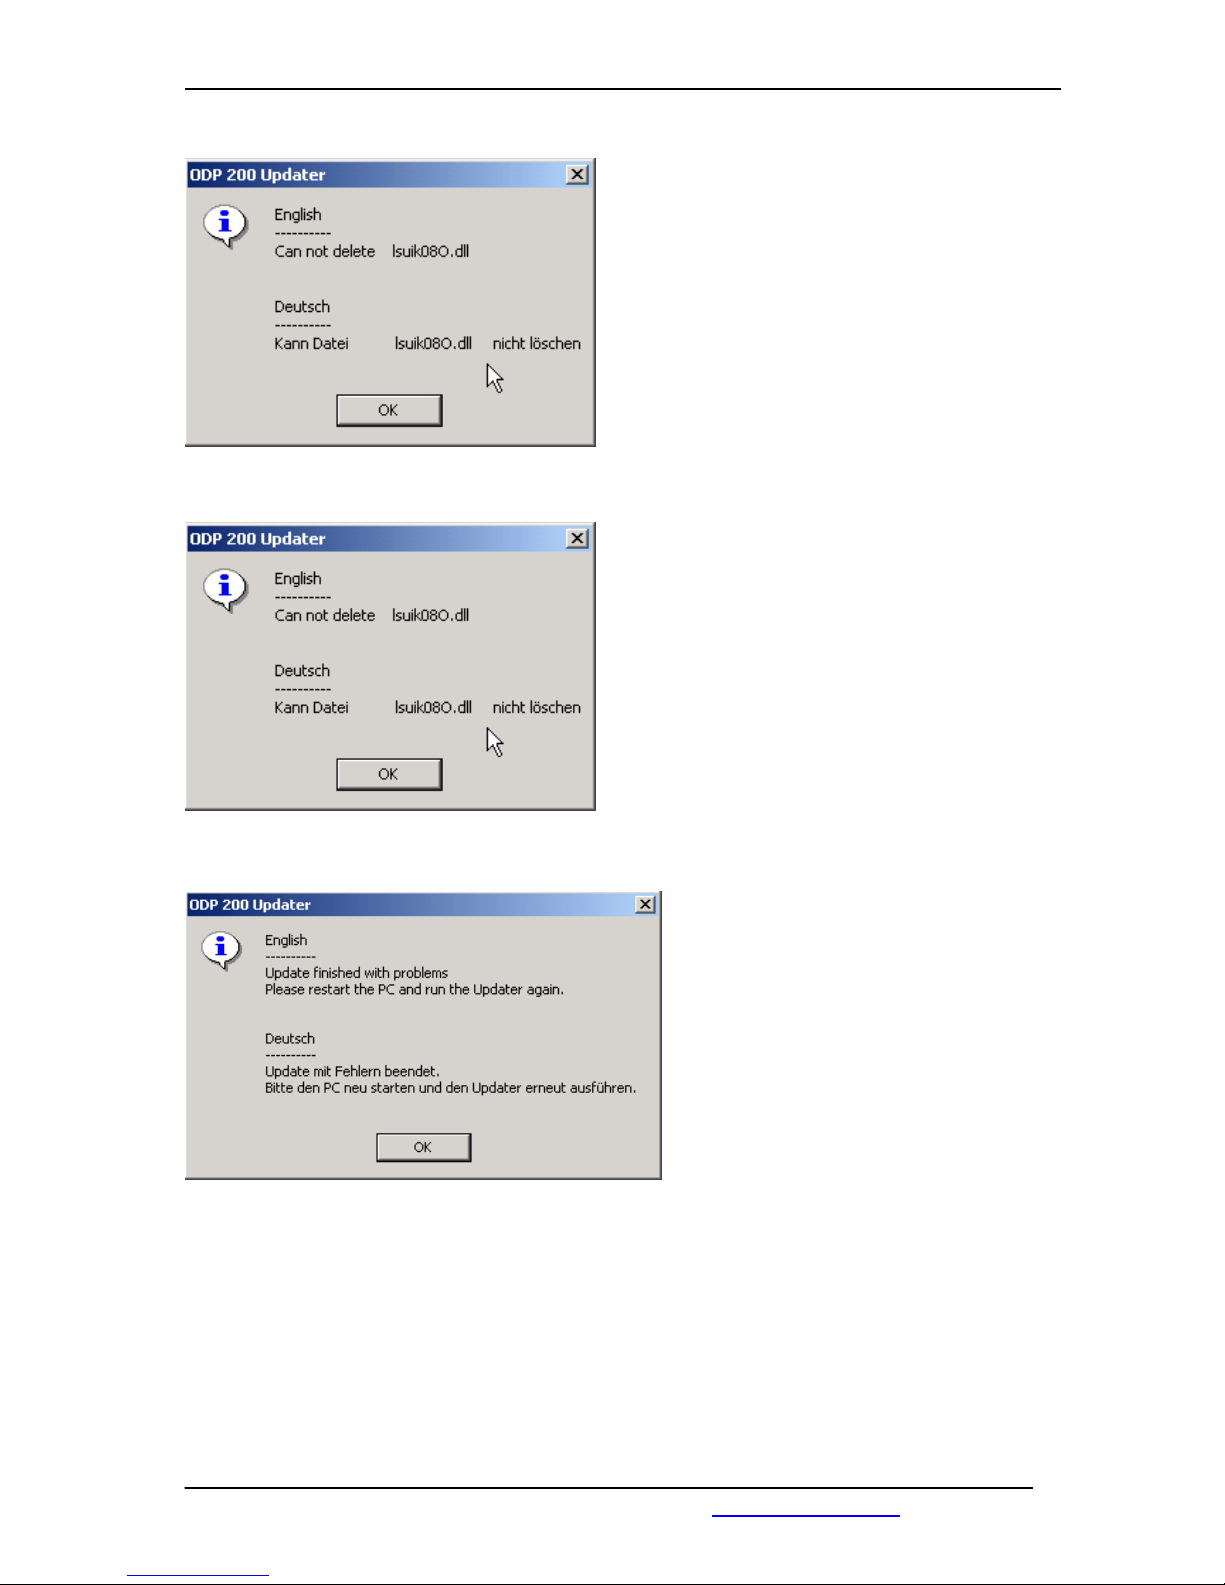
If one file can not be deleted,
this dialog box appears.
Press OK to go on with the update.
In this case, take care of the Finish Dialog.
Restart the PC after finishing the program
and run the Update program again.
If one file can not be deleted,
this dialog box appears.
Press OK to go on with the update.
In this case, take care of the Finish Dialog.
Restart the PC after finishing the program
and run the Update program again.
This Dialog appears, when an error
during the update occurs.
Restart the PC after finishing the
program and run the Update program
again.
Page 21
COPYTRAX TECHNOLOGIES MONET 5000 Pro & Pro-Recorder
May 2005 www.copytrax.com 21
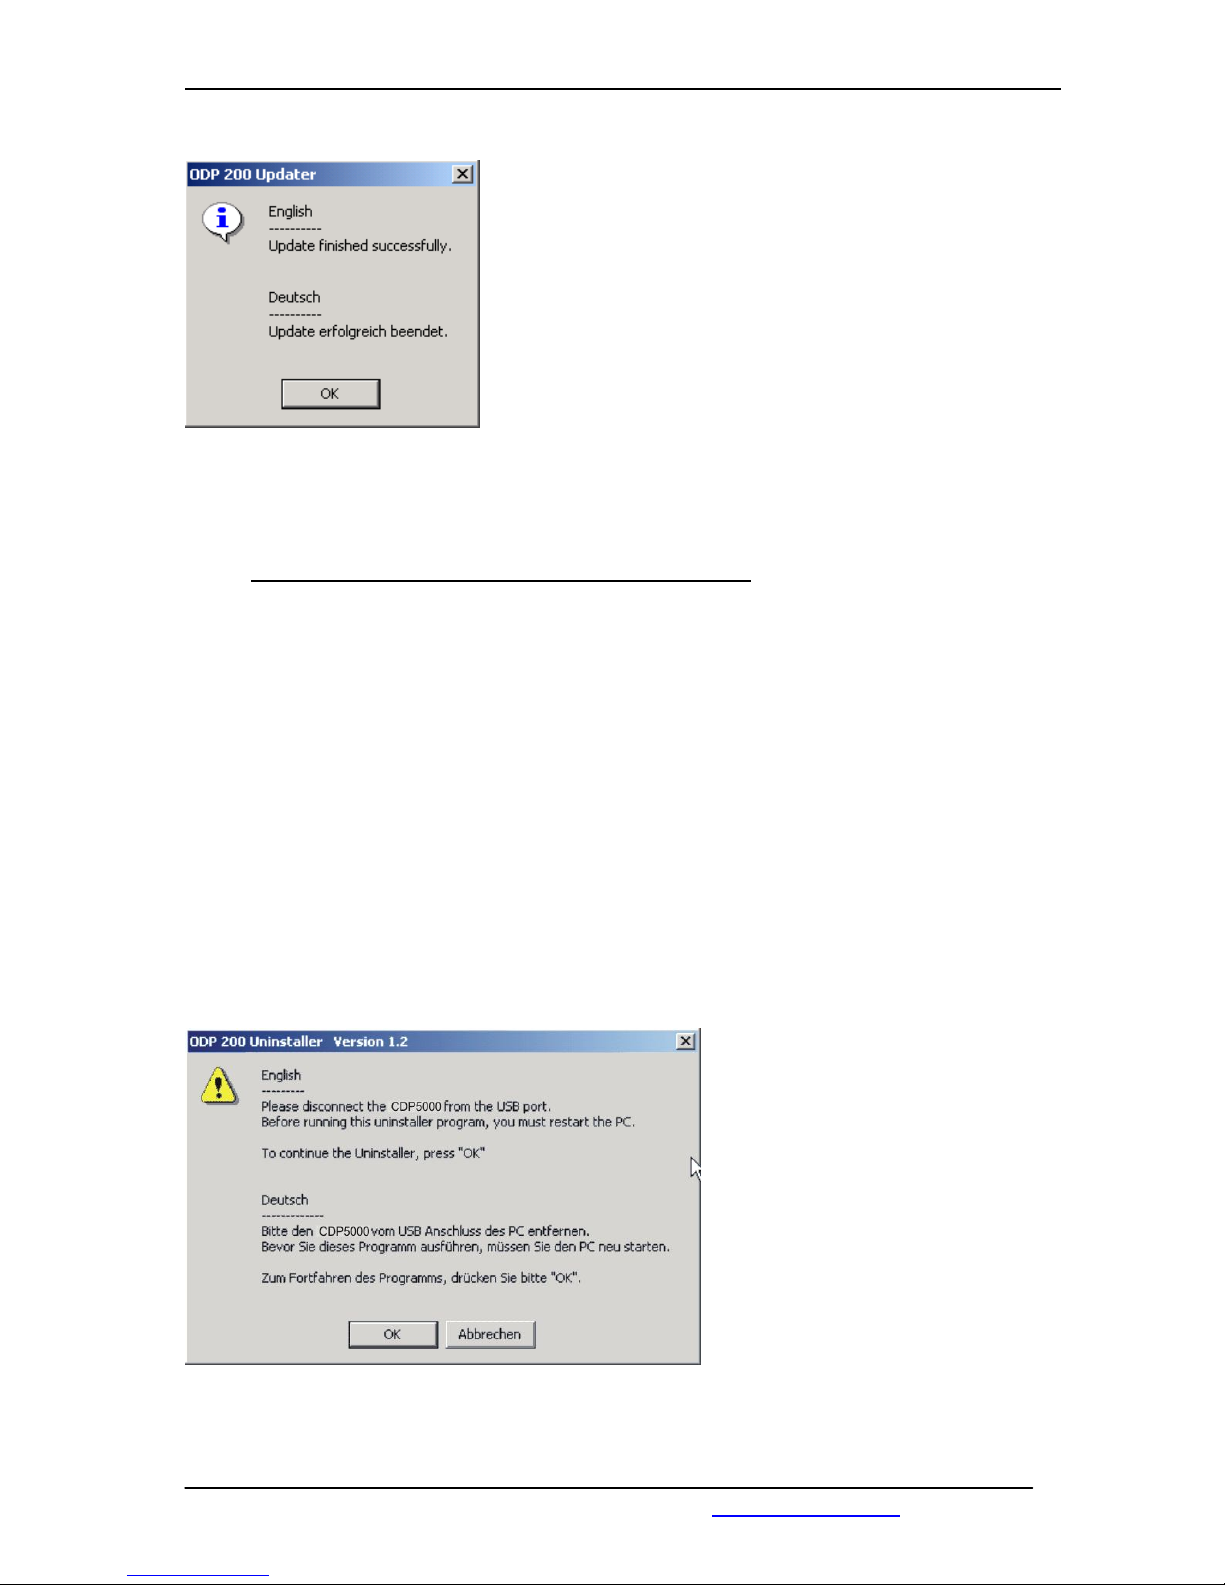
If this Dialog Box appears, the update was successfull.
Press OK to finish the Update program.
NOTE : At the end of the update the personal computer must be
restarted!
Update b.) All files of the driver will be replaced.
This kind of update is a combination of uninstalling and manual new installing.
Anyway, it is fast and sure that all necessary files are up to date at the end.
In order to update the printer driver, the PC must be restarted first of all.
This is necessary so that all files which are used by the old printer driver are not blocked
by other applications or the operating system.
Blocked files can not be removed during the update process.
All programs, which have access to the printer driver, must be closed before the update.
Please disconnect the USB connection of the CDP and the PC.
At first, run the program „O2uninst.exe“ from the directory „C:\Windows\System32\“ .
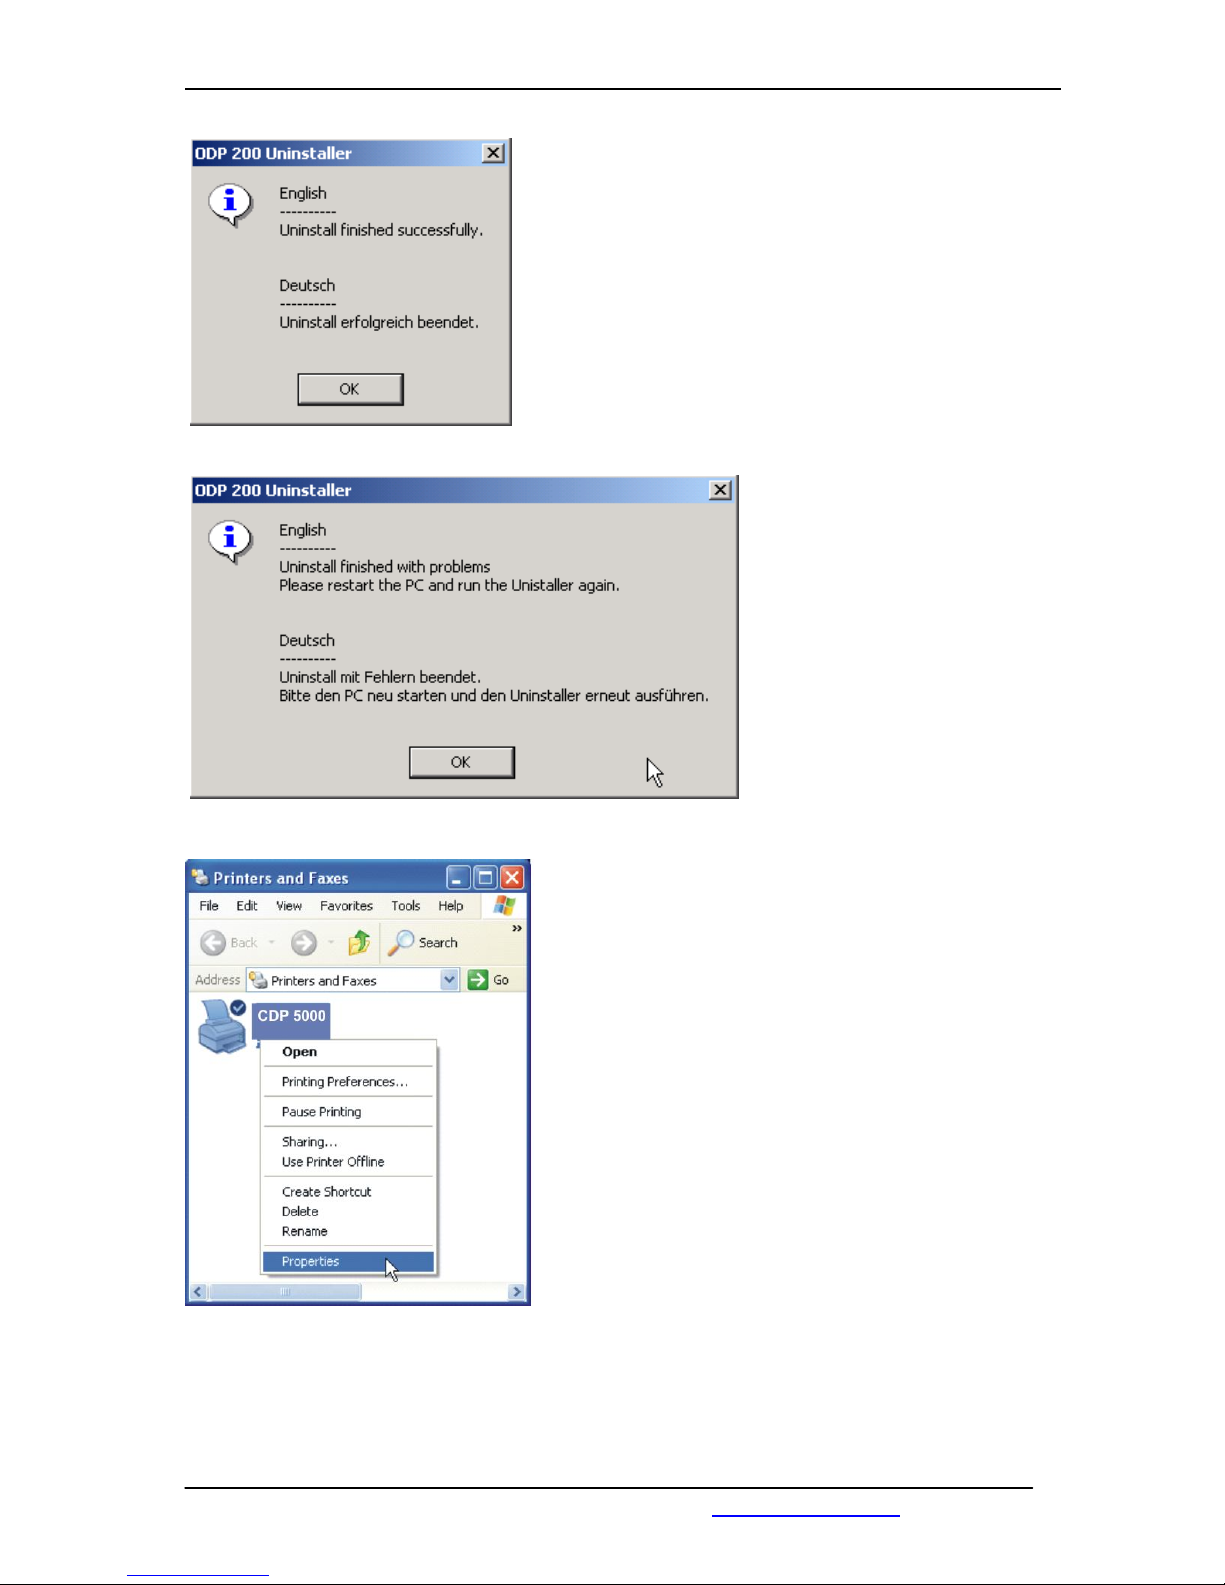
Unistaller Startdialog
Page 22
COPYTRAX TECHNOLOGIES MONET 5000 Pro & Pro-Recorder
May 2005 www.copytrax.com 22
Press OK if the PC was restarted.f no problems occur
during the uninstall, this Dialog Box will finish the first
step of the update process.
Press OK to continue.
If the Uninstaller finishes with
this error, not all of the
necessary files could be
deleted.
Restart the PC and run the
uninstaller again.
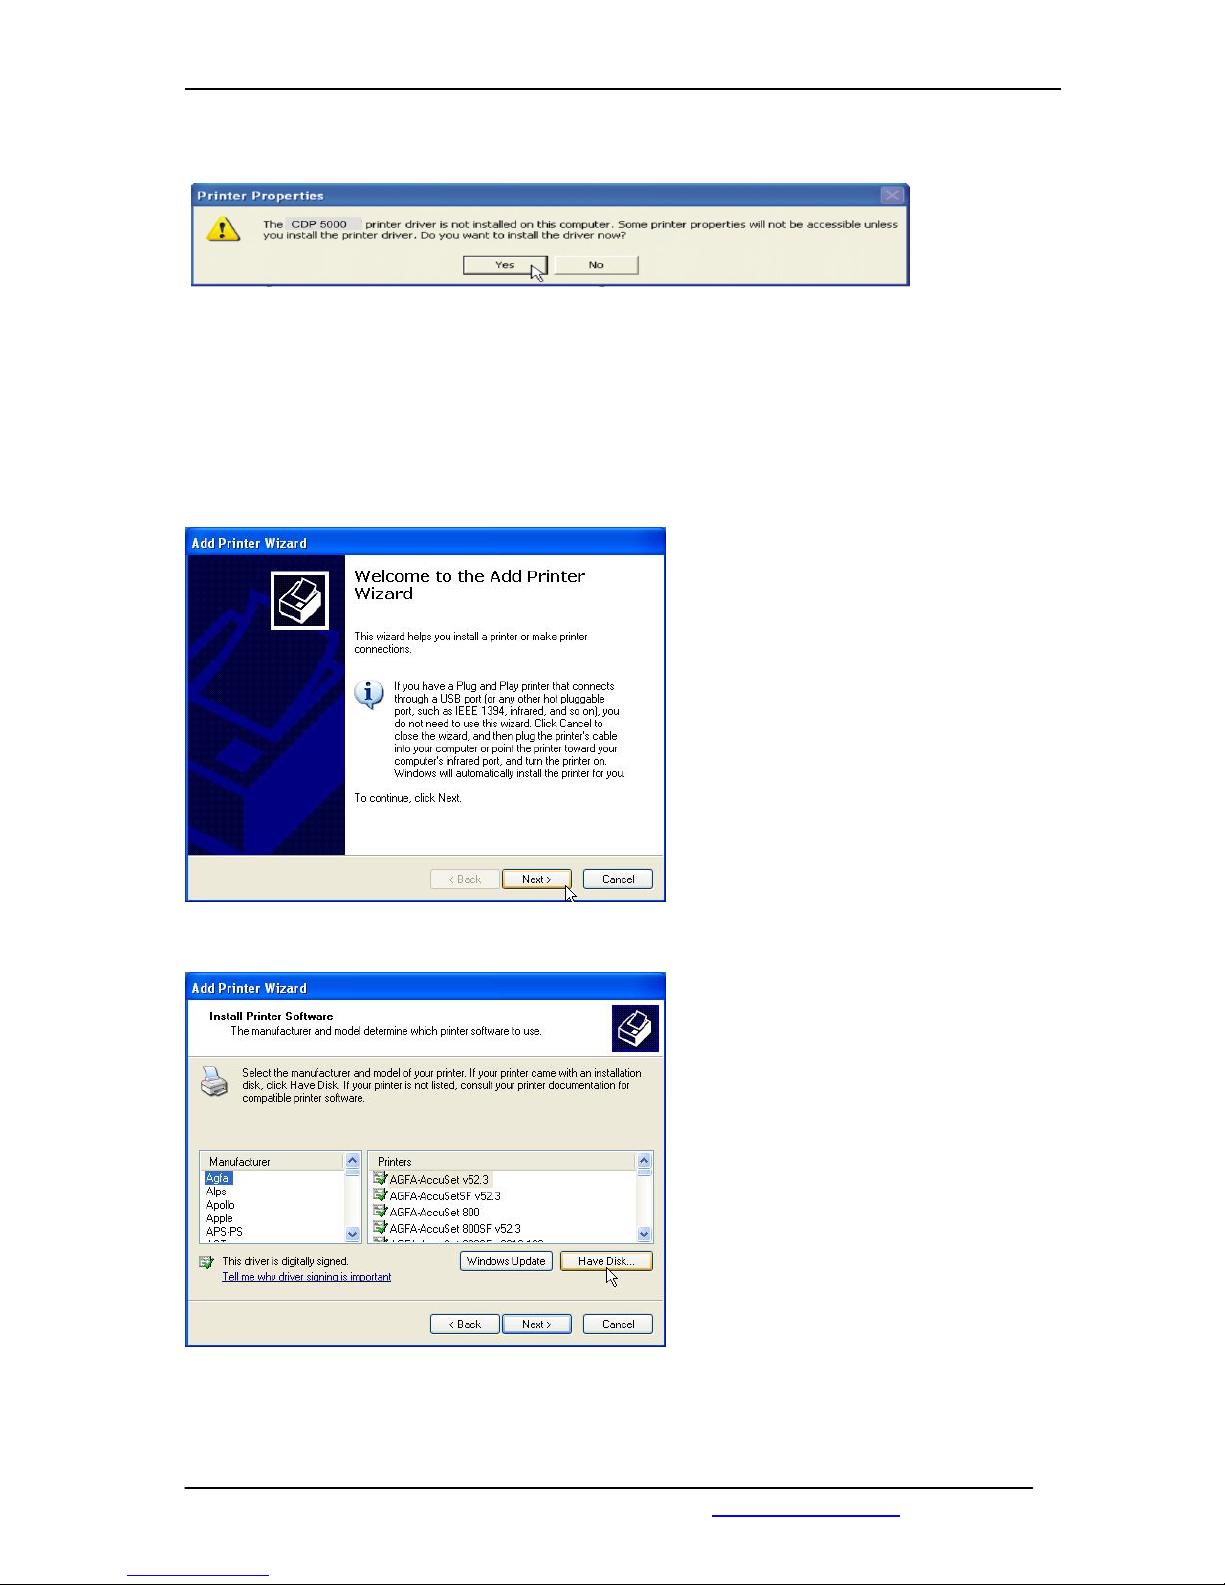
Was the deleting of the old driver files successful;
call the printer properties of the CD PRINTER 5000.
Page 23
COPYTRAX TECHNOLOGIES MONET 5000 Pro & Pro-Recorder
May 2005 www.copytrax.com 23
Open the Context menu with a right mouse click and select the properties.The following
Message Box comes up on the Screen:
:
Press the „Yes“ button to continue the update process.
Click “Next” to continue.
Press the button „Have Disk” to select
the path to the installation file.
Page 24
COPYTRAX TECHNOLOGIES MONET 5000 Pro & Pro-Recorder
May 2005 www.copytrax.com 24
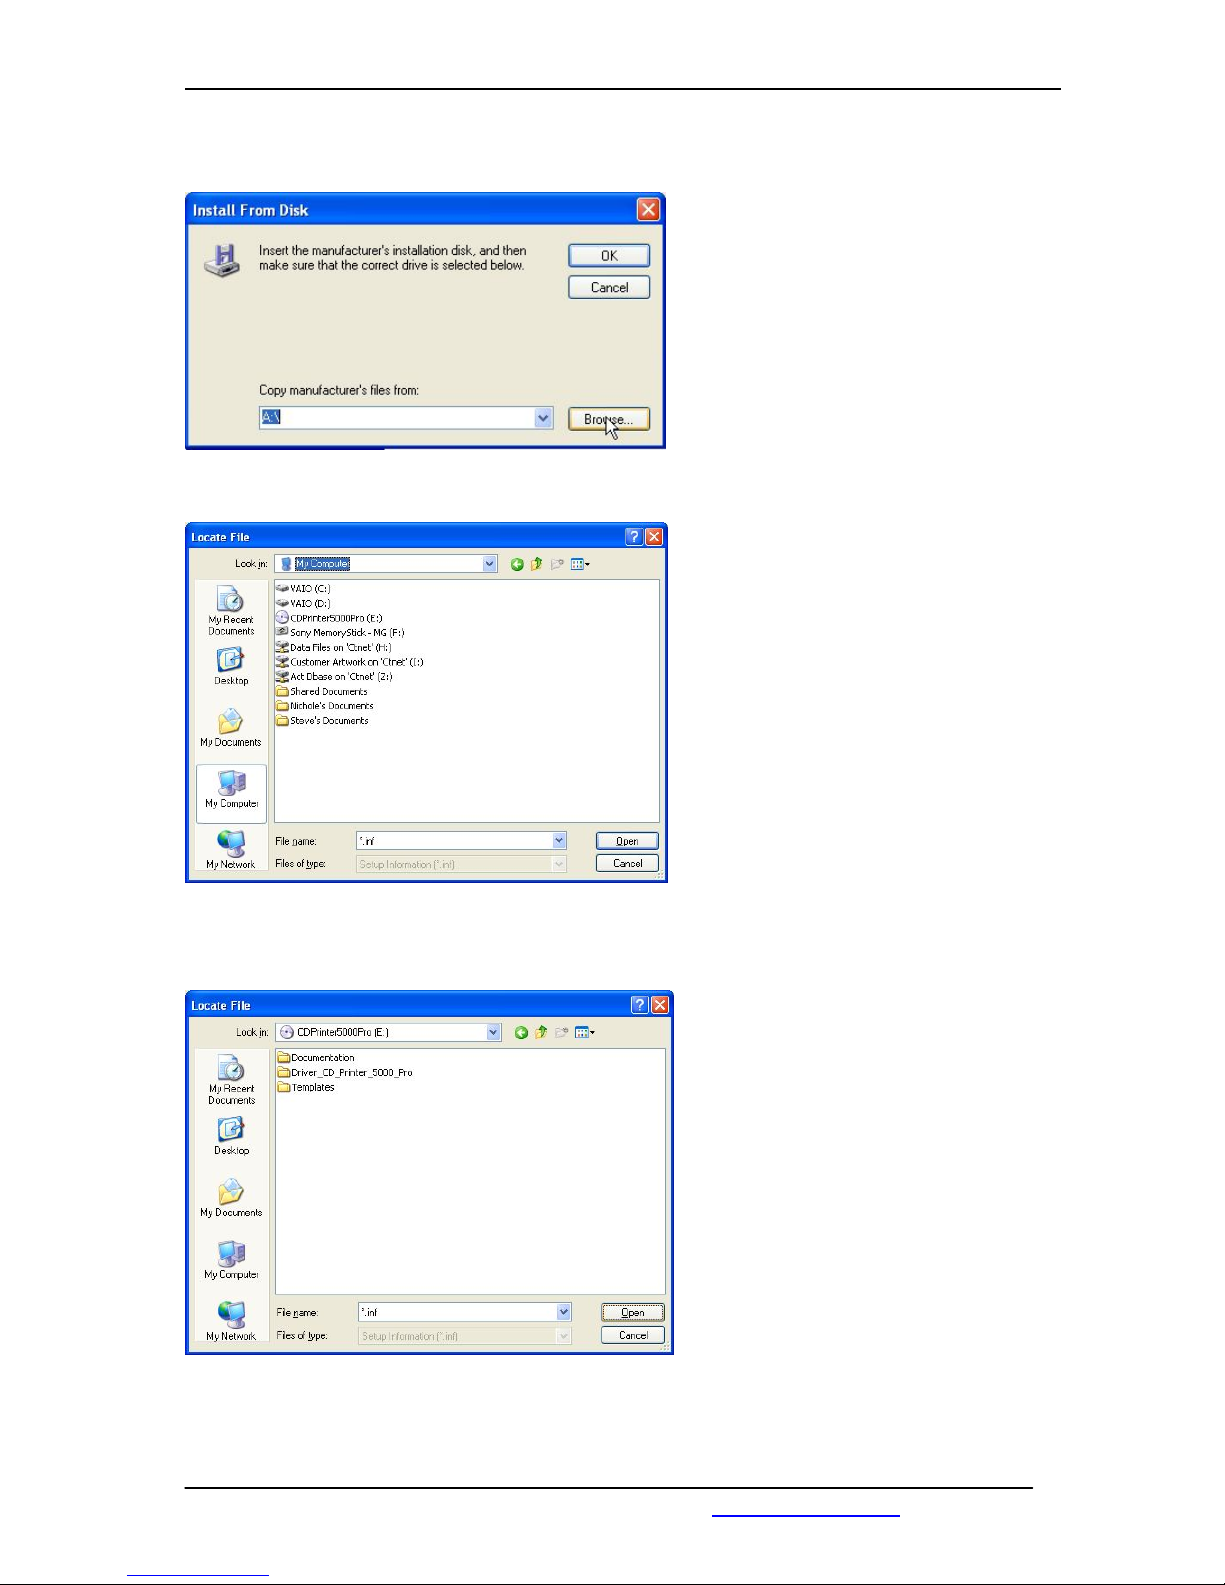
Search the path by clicking on the
button „Browse...“.
Select the drive.
Select the path.
Page 25
COPYTRAX TECHNOLOGIES MONET 5000 Pro & Pro-Recorder
May 2005 www.copytrax.com 25
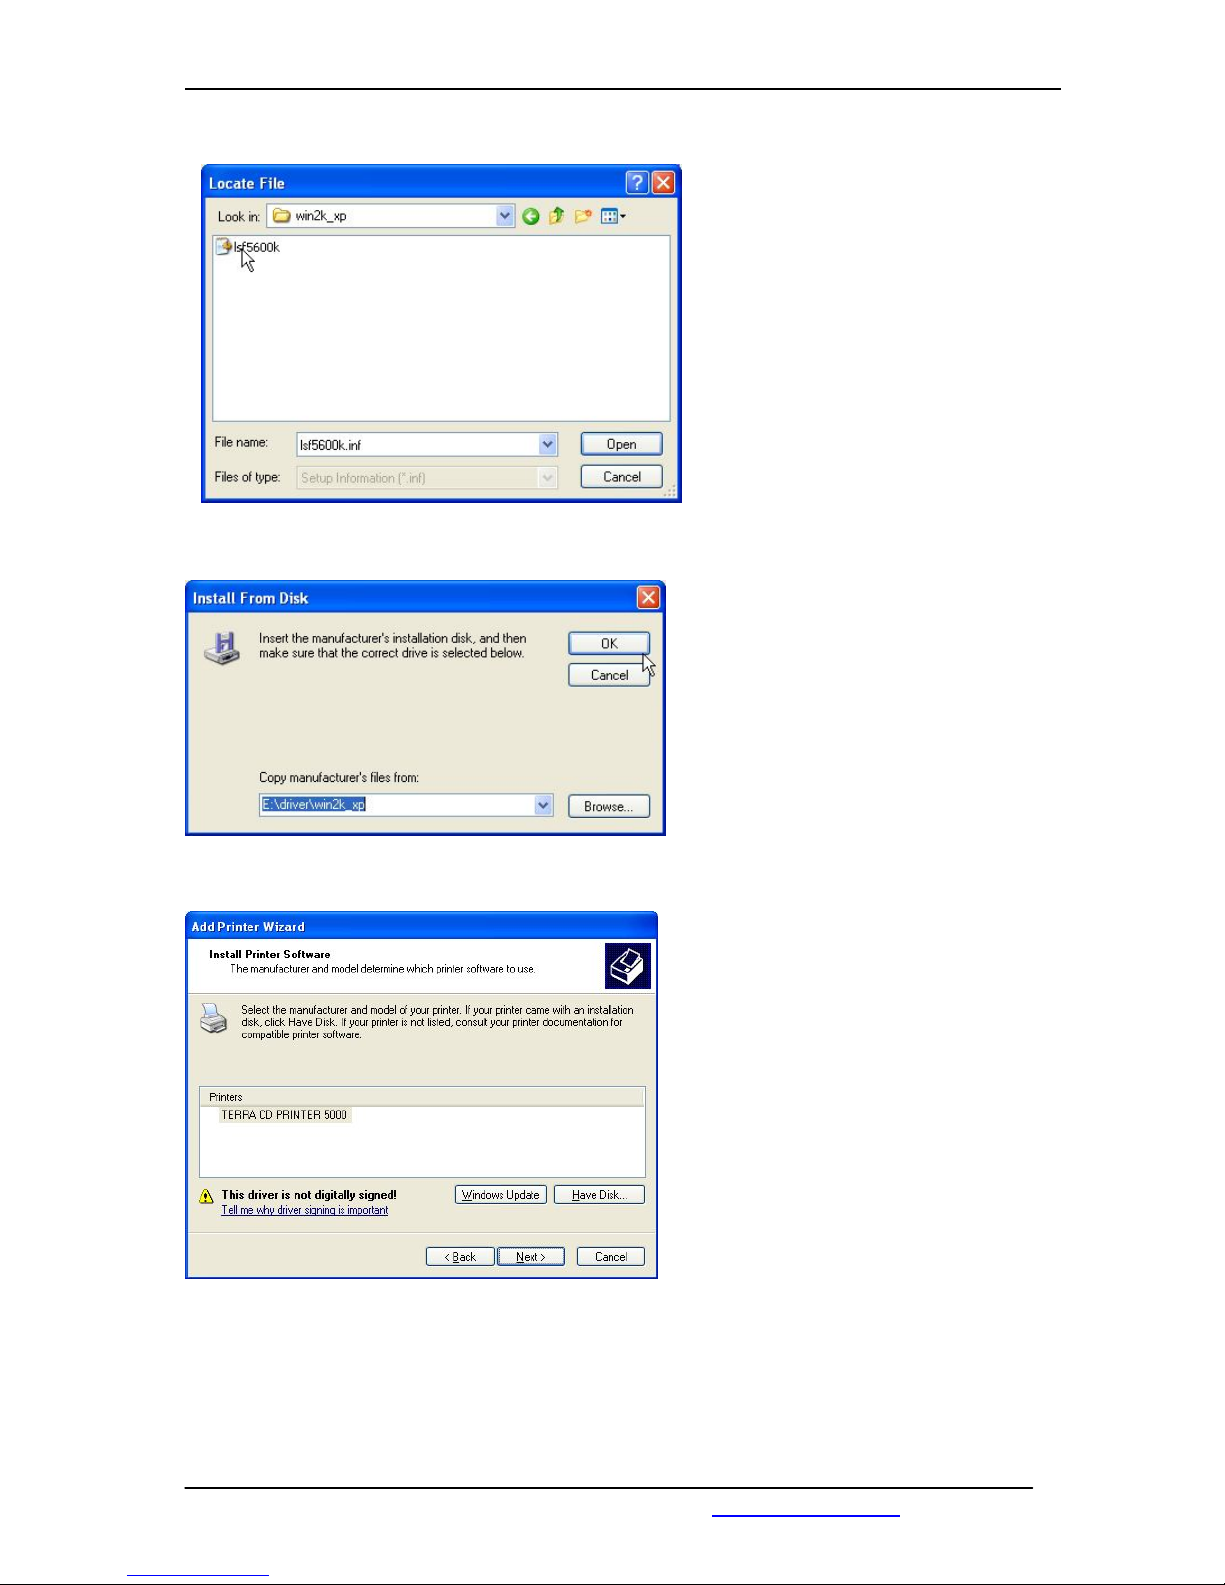
Select the installation file.
Press “OK” to continue.
To continue the installation press “Next”.
Page 26
COPYTRAX TECHNOLOGIES MONET 5000 Pro & Pro-Recorder
May 2005 www.copytrax.com 26
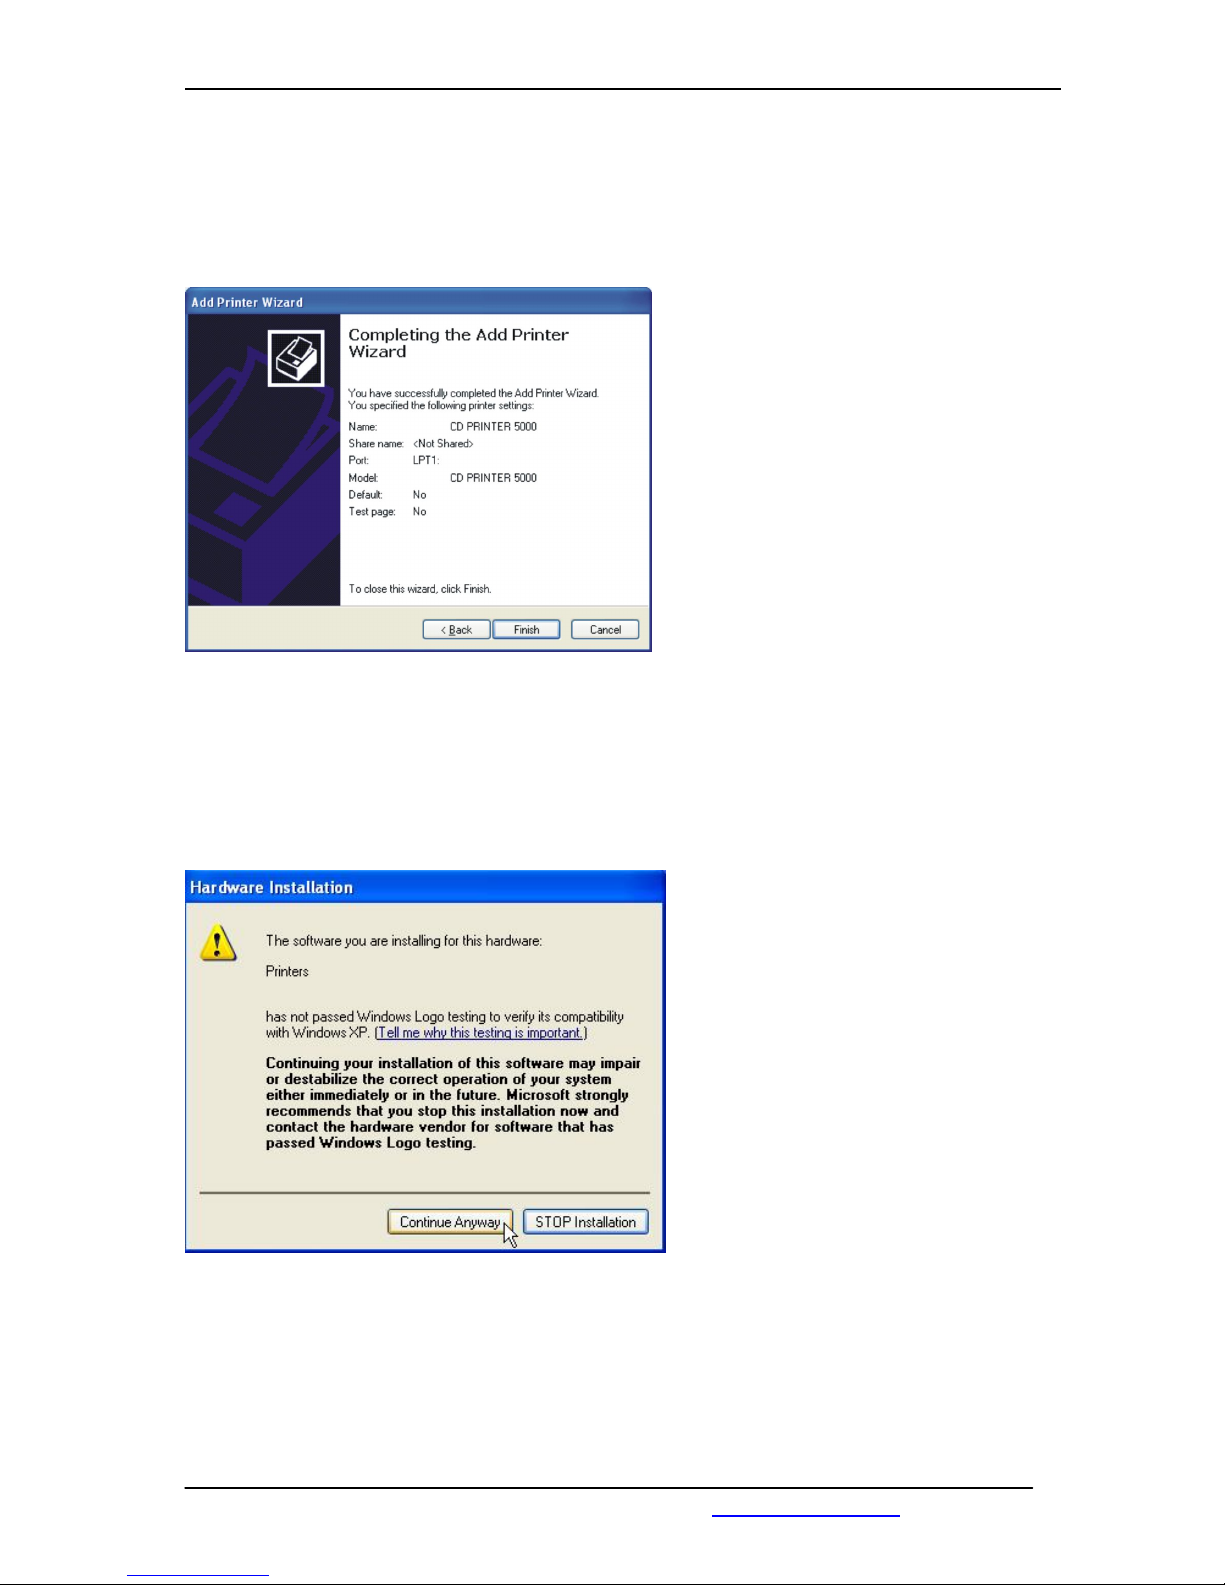
When a Dialog Box appears on the screen, which ask you what to do with the old driver,
select the option „replace existing driver“ and click on „Next“ to continue.
Complete the Add Printer Wizard and
start the installation, by pressing the button „Finish“.
This dialog field informs you that the
driver is not registered officially with
the manufacturer of the operating
system.
It does not state, however, anything
about the quality of the driver.
You can be sure, that the driver is
programmed and tested with the
latest programs and tools.
You can continue the installation
without any doubt.
Page 27
COPYTRAX TECHNOLOGIES MONET 5000 Pro & Pro-Recorder
May 2005 www.copytrax.com 27
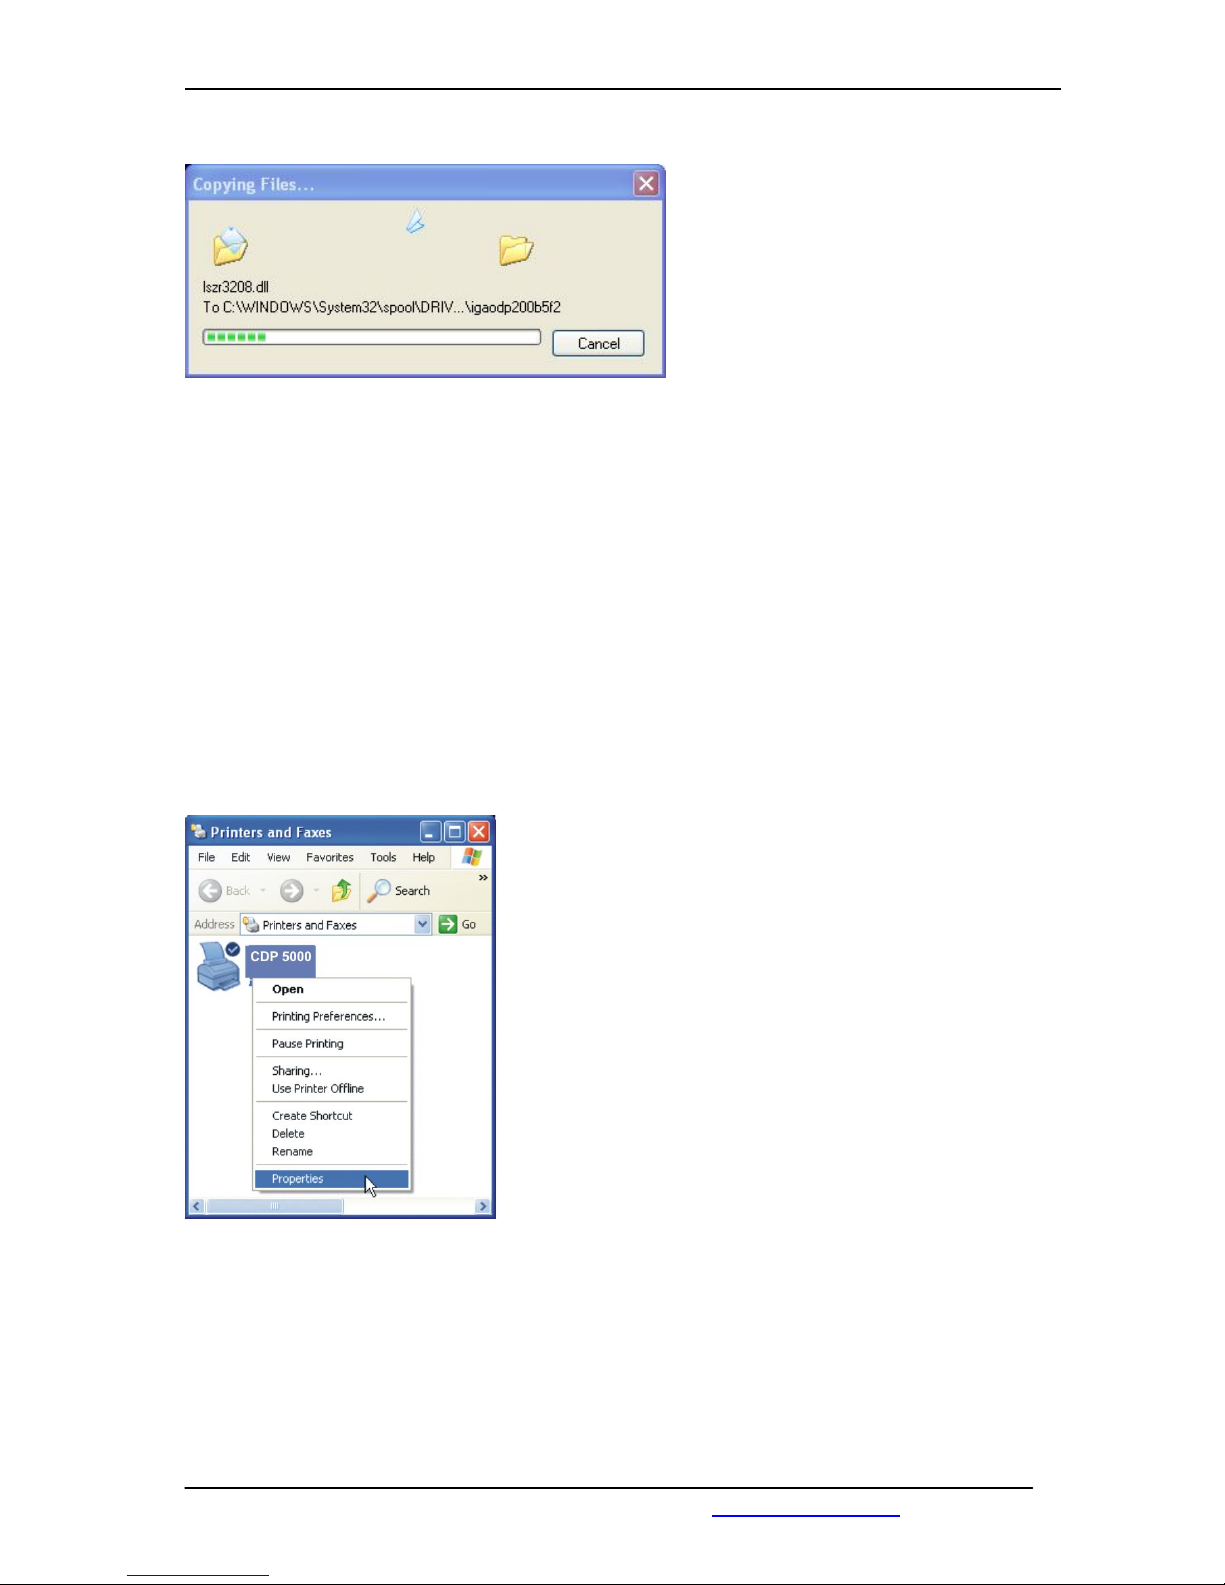
Please wait until the driver is installed
and all files were copied.
This can take some minutes.
NOTE : At the end of the update the personal computer must be
restarted!
c.) Windows specific update solution, which we not recommend to use, because
you can not be sure that all necessary files are updatet succesfully.
We mention this update possebility, because it is used by the Operating system,
but we recommend not to use it.
In order to update the printer driver, the PC must be restarted first of all.
This is necessary so that all files which are used by the old printer driver are not blocked
by other applications or the operating system.
Blocked files can not be removed during the update process.
All programs, which have access to the printer driver, must be closed before the update.
Please disconnect the USB connection of the CDP and the PC.
If you do so, the update can work.
If a file could not be replaced, the Operating system
will not give an error message.
The Operating System will always tell the update was successful, also when it was not
successful.
As result, you have a driver which is mixed with files from different driver versions.
That is reason, why we recommend: Do not use this way to update the driver,
Use the other ones a.) and b.) which are described above.
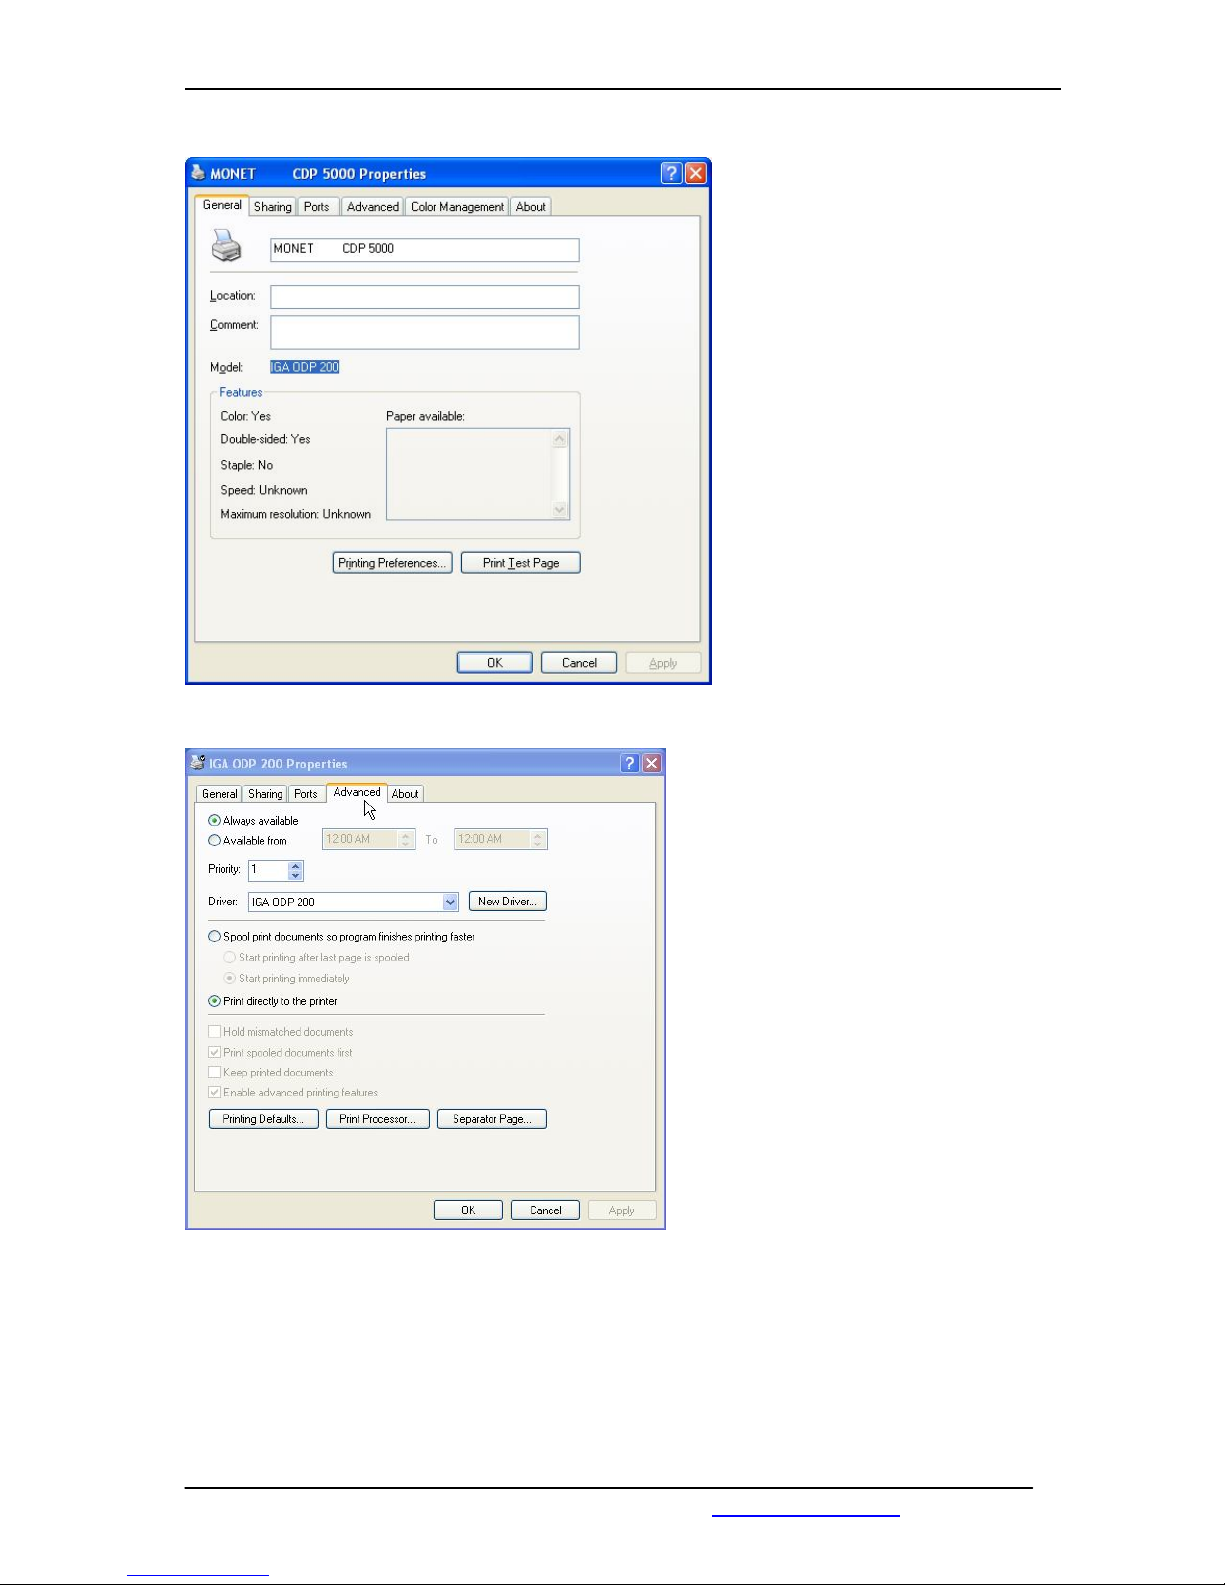
Open the Context menu with a right mouse click and select the properties.
Page 28
COPYTRAX TECHNOLOGIES MONET 5000 Pro & Pro-Recorder
May 2005 www.copytrax.com 28
Select Advanced
Press New Driver.
We will stop the description at this point, because of the known reasons.
Use the other update possebilies a.) and b.) which are described above.
Page 29
COPYTRAX TECHNOLOGIES MONET 5000 Pro & Pro-Recorder
May 2005 www.copytrax.com 29
2.2 Description
The printer software, which is called printer driver sends the printing requests from the
different applications to the printer.
Many options are possible to modify the printing data which will be sent to the printer.
To achieve best results, it is necessary to make some tests with different options.
The printing driver software consists off well known MS Windows functions and some
special functions in the Maintenance dialog.
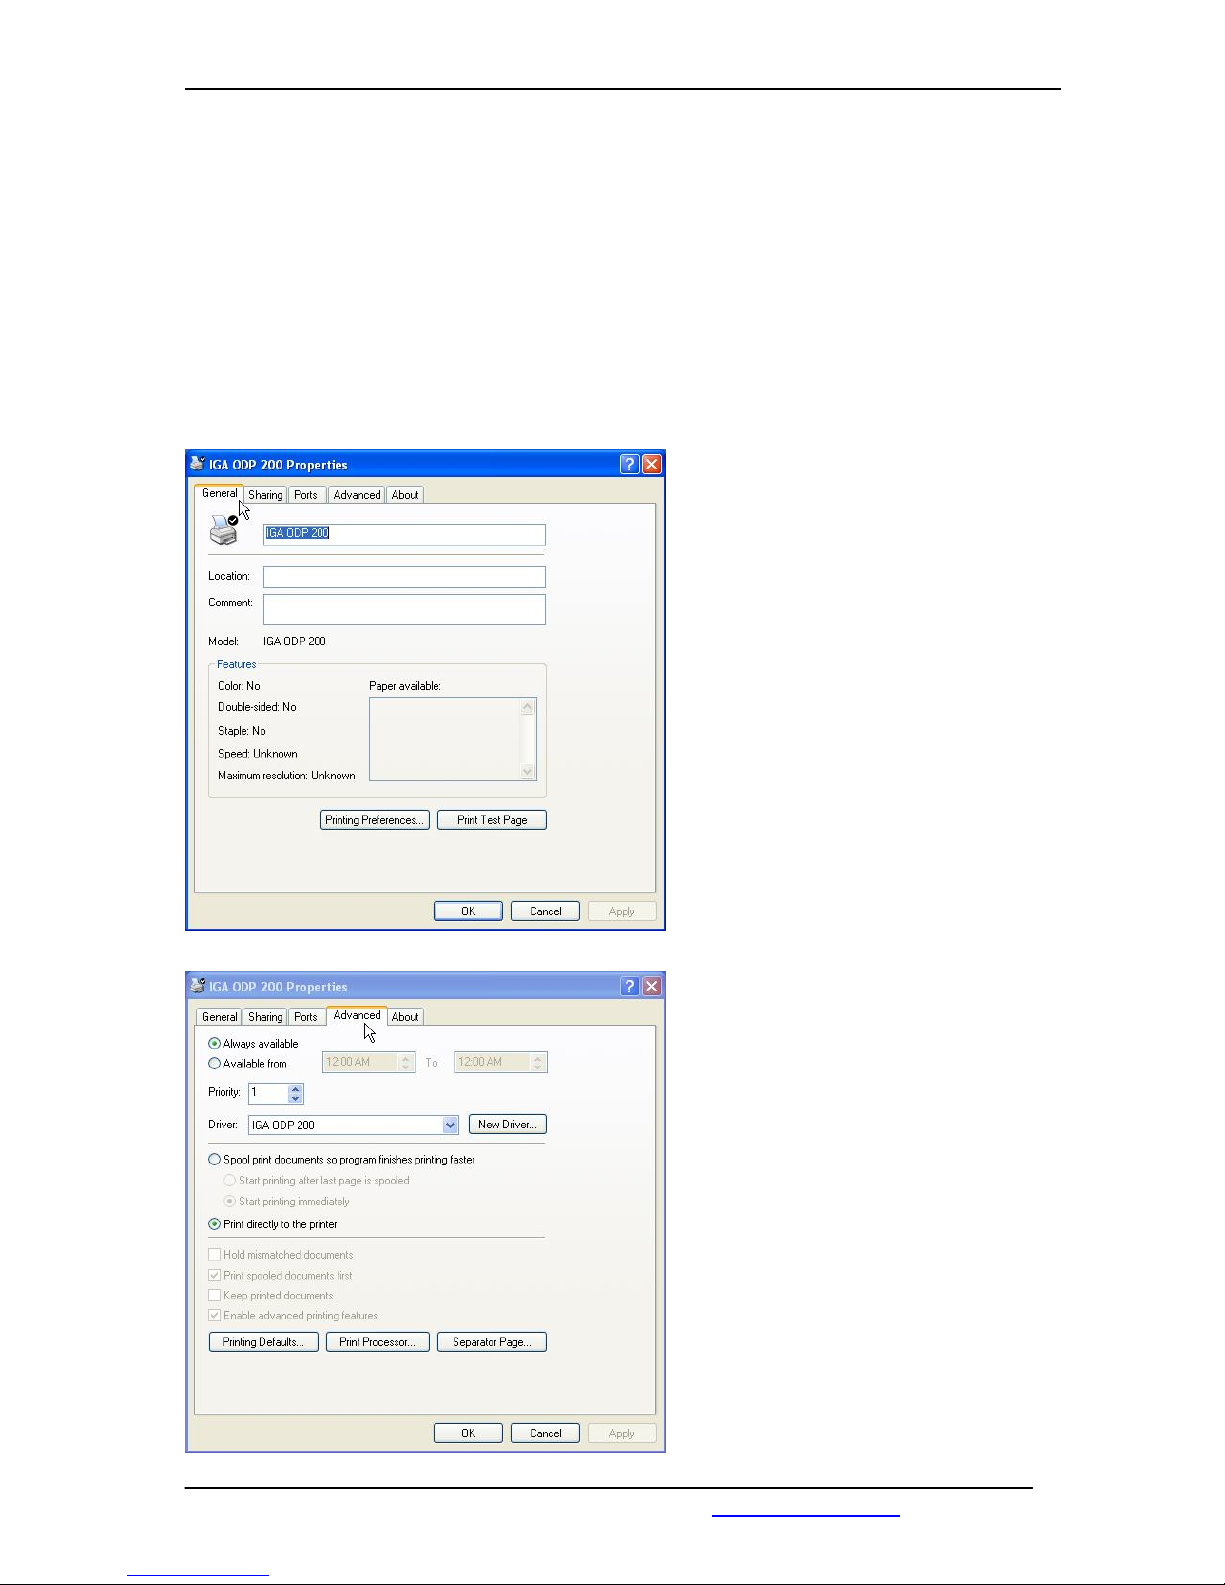
CD PRINTER 5000 PRO Properties.
Dialog „General“
With the button „Printing Preference“
you can reach the special printer
properties.
Dialog „Advanced“
If the CDP will be driven in an
CD/DVD autoloader environment, the
option „Print directly to the printer“
should be selected.
This setting enables an optimal
coordination between printer and
autoloader software.
Page 30
COPYTRAX TECHNOLOGIES MONET 5000 Pro & Pro-Recorder
May 2005 www.copytrax.com 30
2.2.1 Printer Properties
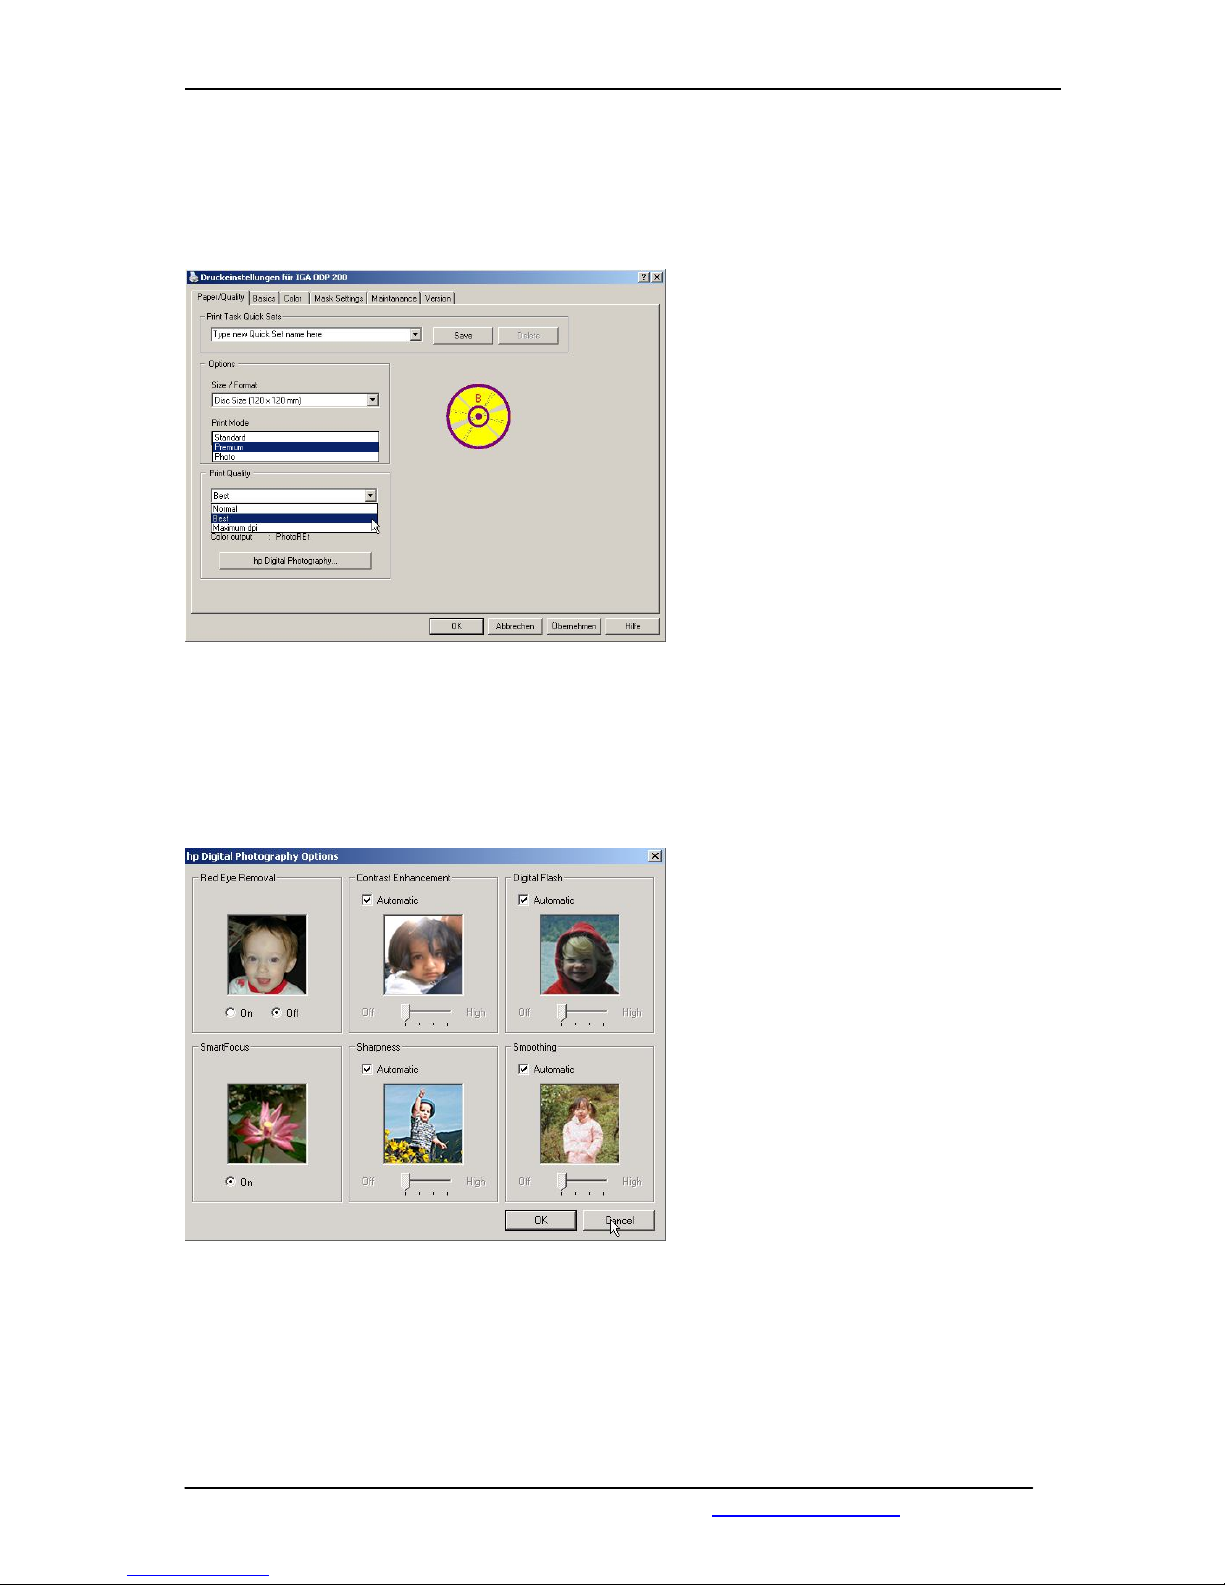
The current settings will be saved with
the option „Print Task Quick Sets.
The CDP 5000 Pro supports 120 mm
* 120 mm CD and DVD formats.
*cd & Recordable Cards is possible
with proper templates and settings.
The possible print modes
„Standard, Premium and Photo“,
and also the possible print qualities
„Normal, Best und Maximum dpi“ will
be explained in the chapter
„How to set print quality and mode“
The button „hp Digital Photography“ opens a further dialog for modifying the color.
The yellow CD in the dialog is only an optical hint for the current settings.
The dialog „hp Digital Photography“
enables the possibility to optimise
the photo printing.
Page 31
COPYTRAX TECHNOLOGIES MONET 5000 Pro & Pro-Recorder
May 2005 www.copytrax.com 31
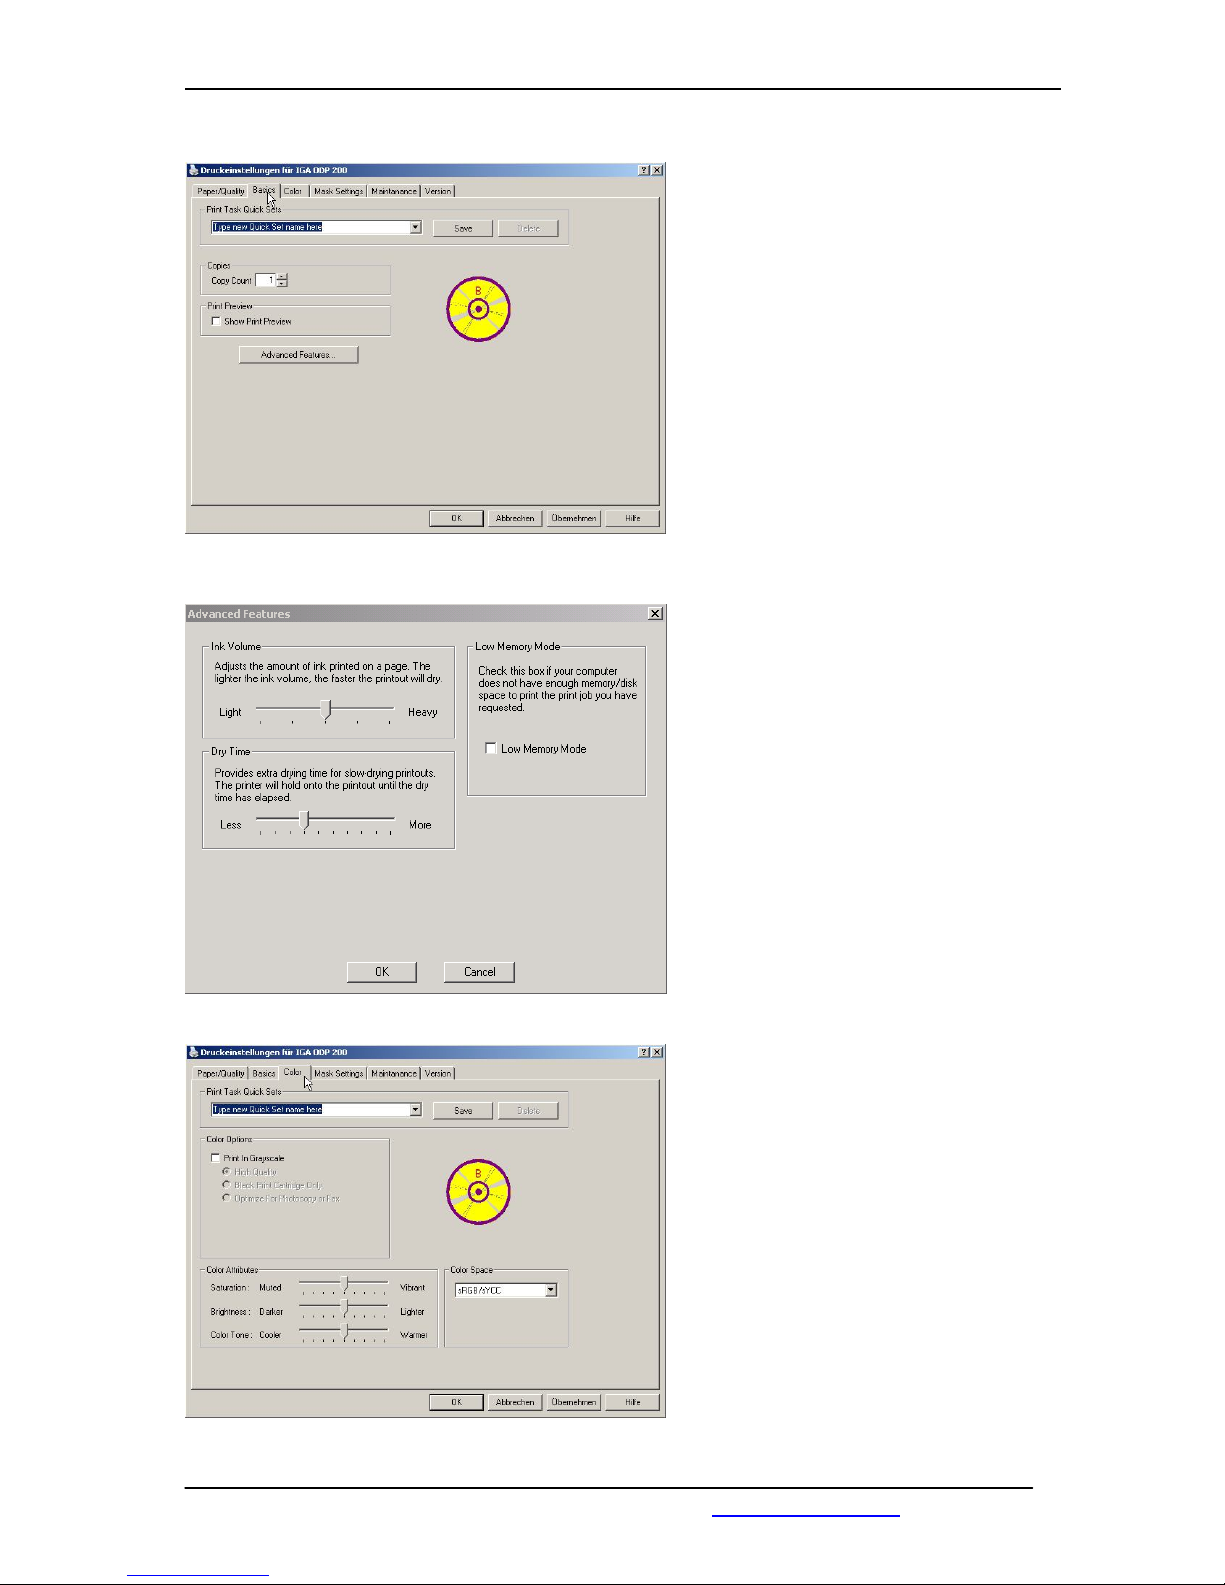
In the „Basics“ dialog, you can set the
number of copies and enable the print
preview.
If the CDP is driven by an autoloader,
you have to disable the print preview
and the number of copies has to be 1.
Otherwise, the printer is not able to
work automatically.
The „Advanced Features“ allows you
to set the ink volume and the dry time.
These settings are depending very
much on the chosen print quality and
mode.
The option „Low Memory Mode“
is normally not necessary.
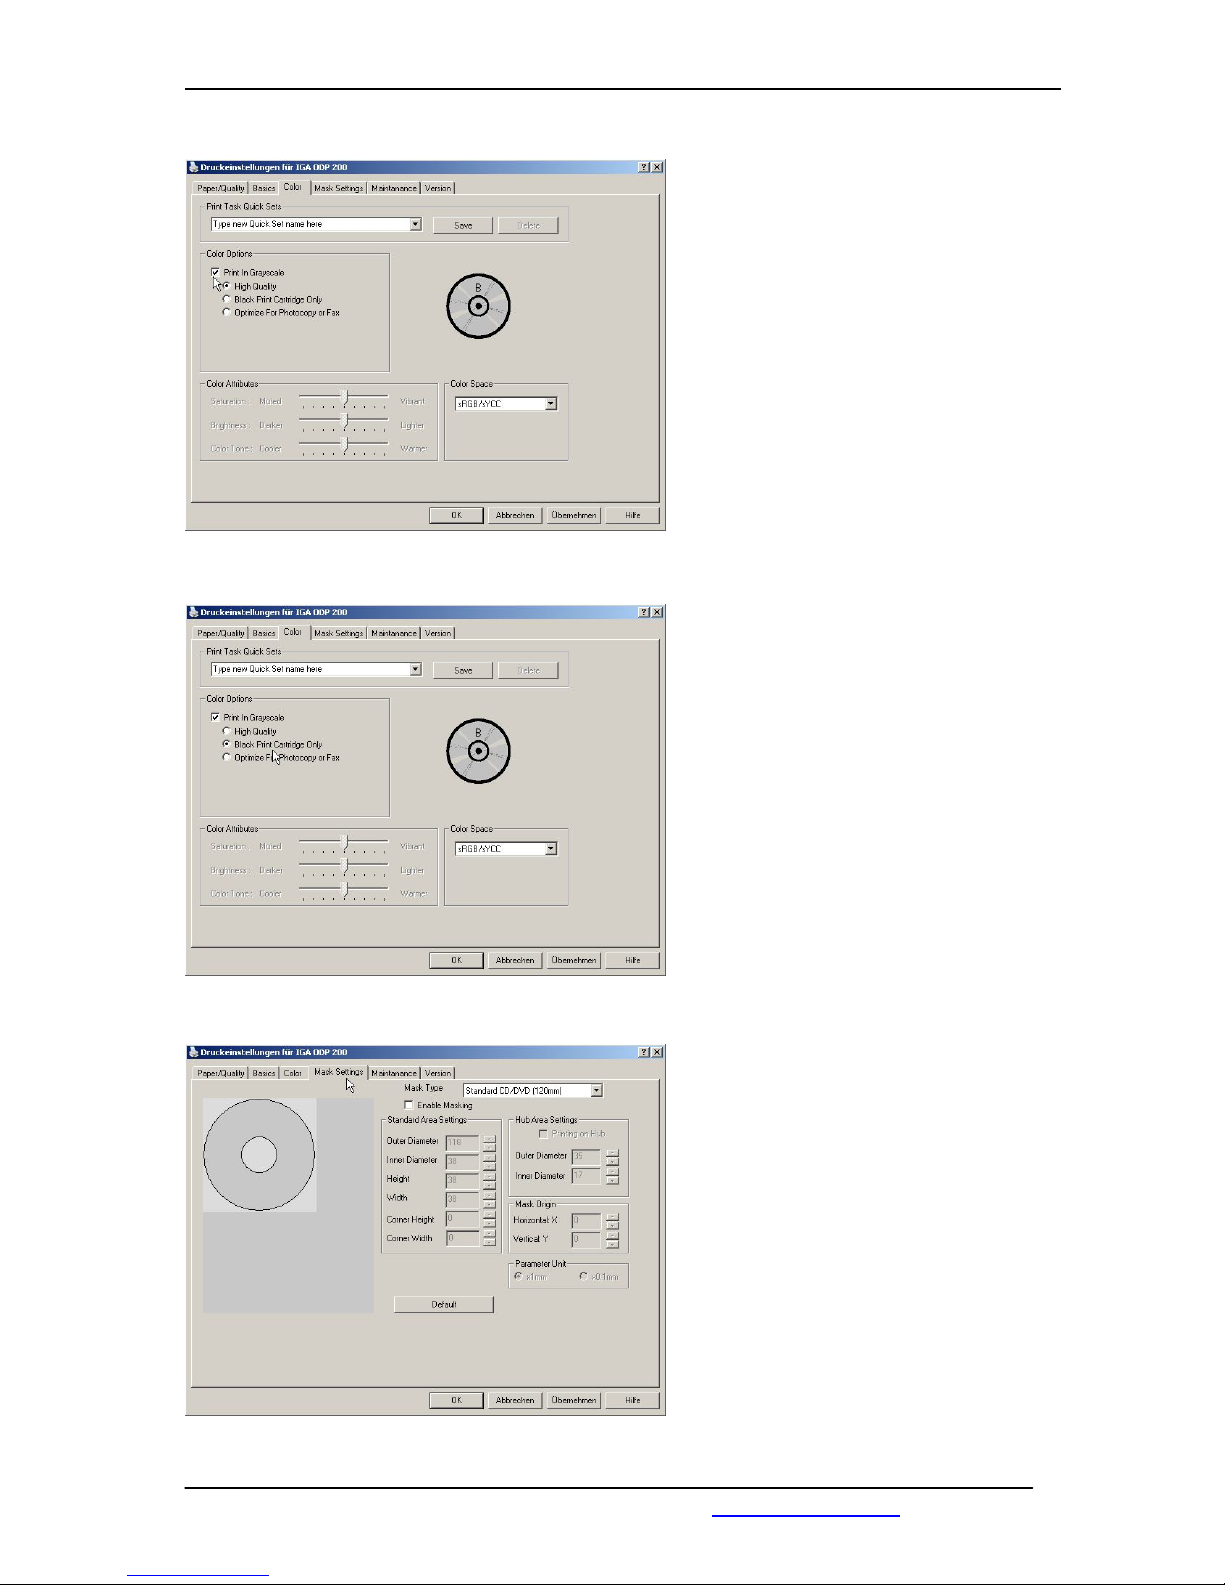
The „Colour“ dialog is the main dialog
to modify the color settings.
The color options will be explained
later in this manual.
In this dialog is also the possibility to
change the „Saturation, Brightness,
Colour tone and Colour space”.
Page 32
COPYTRAX TECHNOLOGIES MONET 5000 Pro & Pro-Recorder
May 2005 www.copytrax.com 32
This setting forces the printer to print
in Greyscale.
More information is given in the
chapter „How to set print quality and
mode”
To print without colour and photo
Cartridge, you can set the option
„Black Print Cartridge Only“.
This setting is not possible with the
print mode “Photo“.
Look for information in the chapter
“How to set print quality and mode”
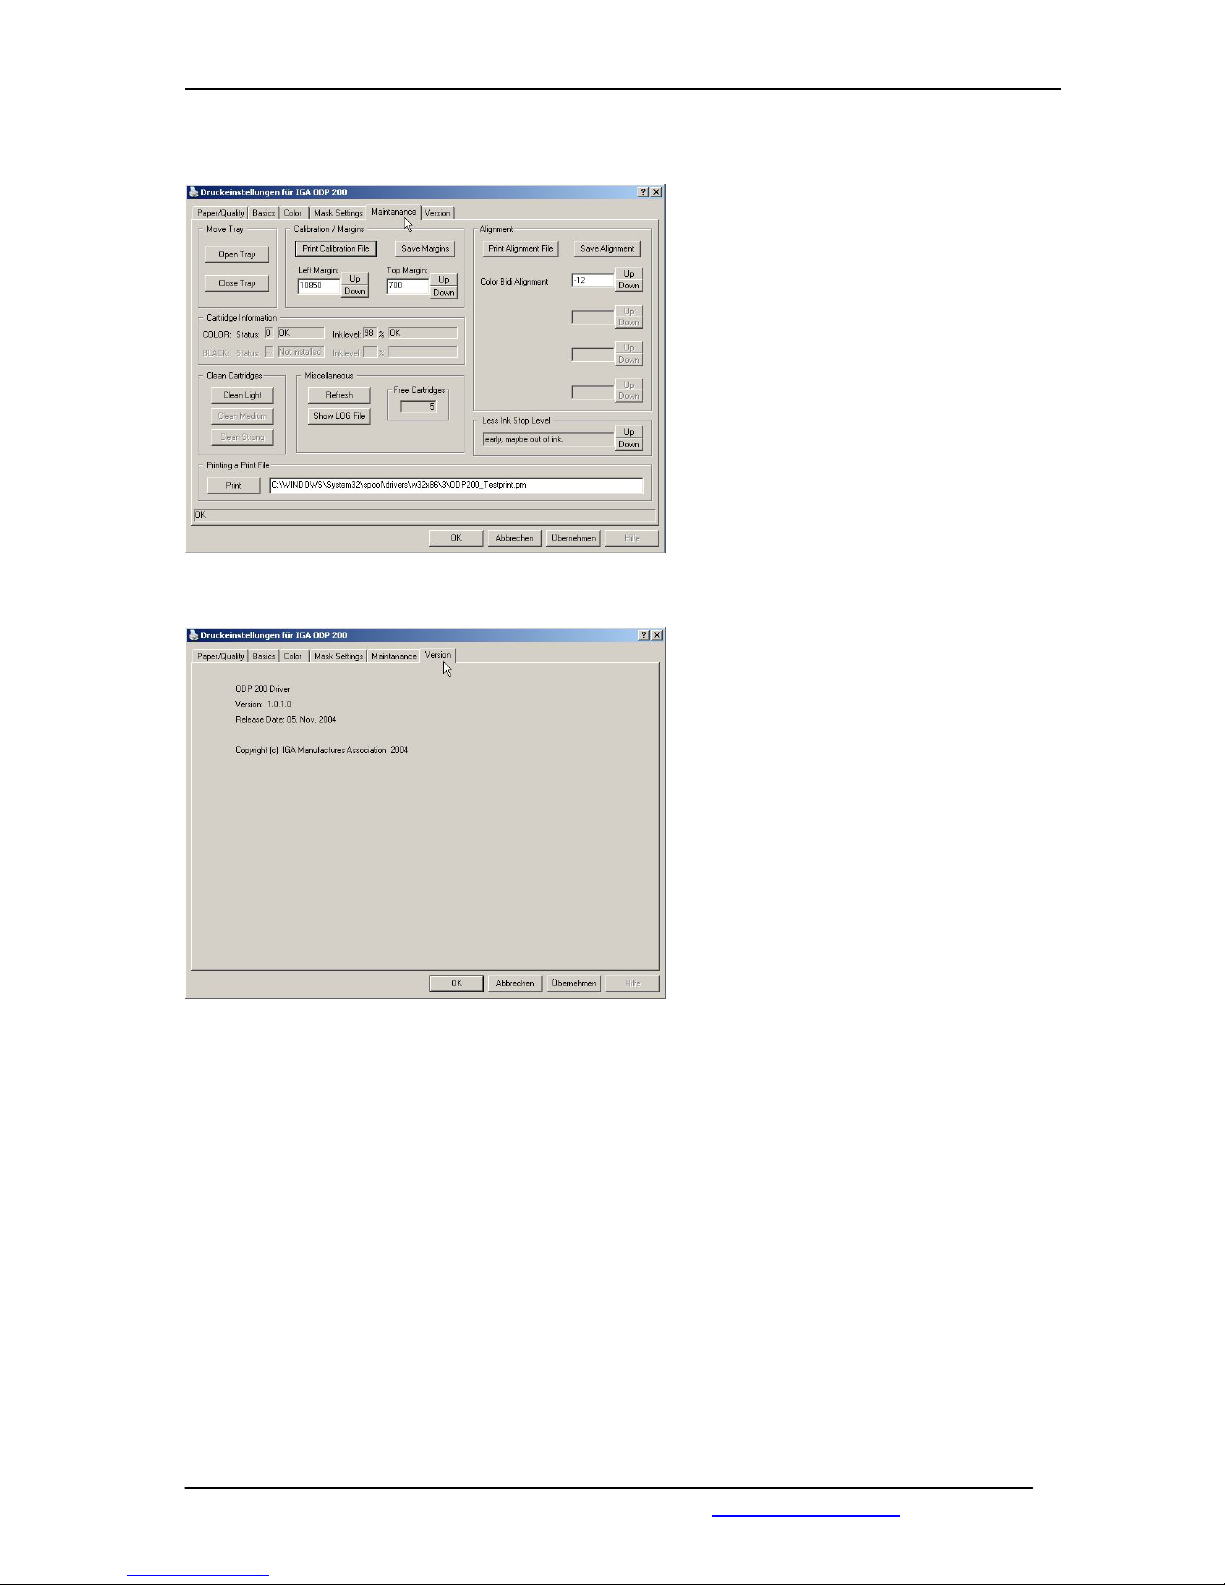
This dialog allows you to fit the print
image onto the different possible
media sizes.
Page 33
COPYTRAX TECHNOLOGIES MONET 5000 Pro & Pro-Recorder
May 2005 www.copytrax.com 33
The dialog Maintenance
helps you to set and check the
physical options of the CDP 5000 Pro
and will be explained in the next
chapter.
Version number of the driver
Page 34
COPYTRAX TECHNOLOGIES MONET 5000 Pro & Pro-Recorder
May 2005 www.copytrax.com 34
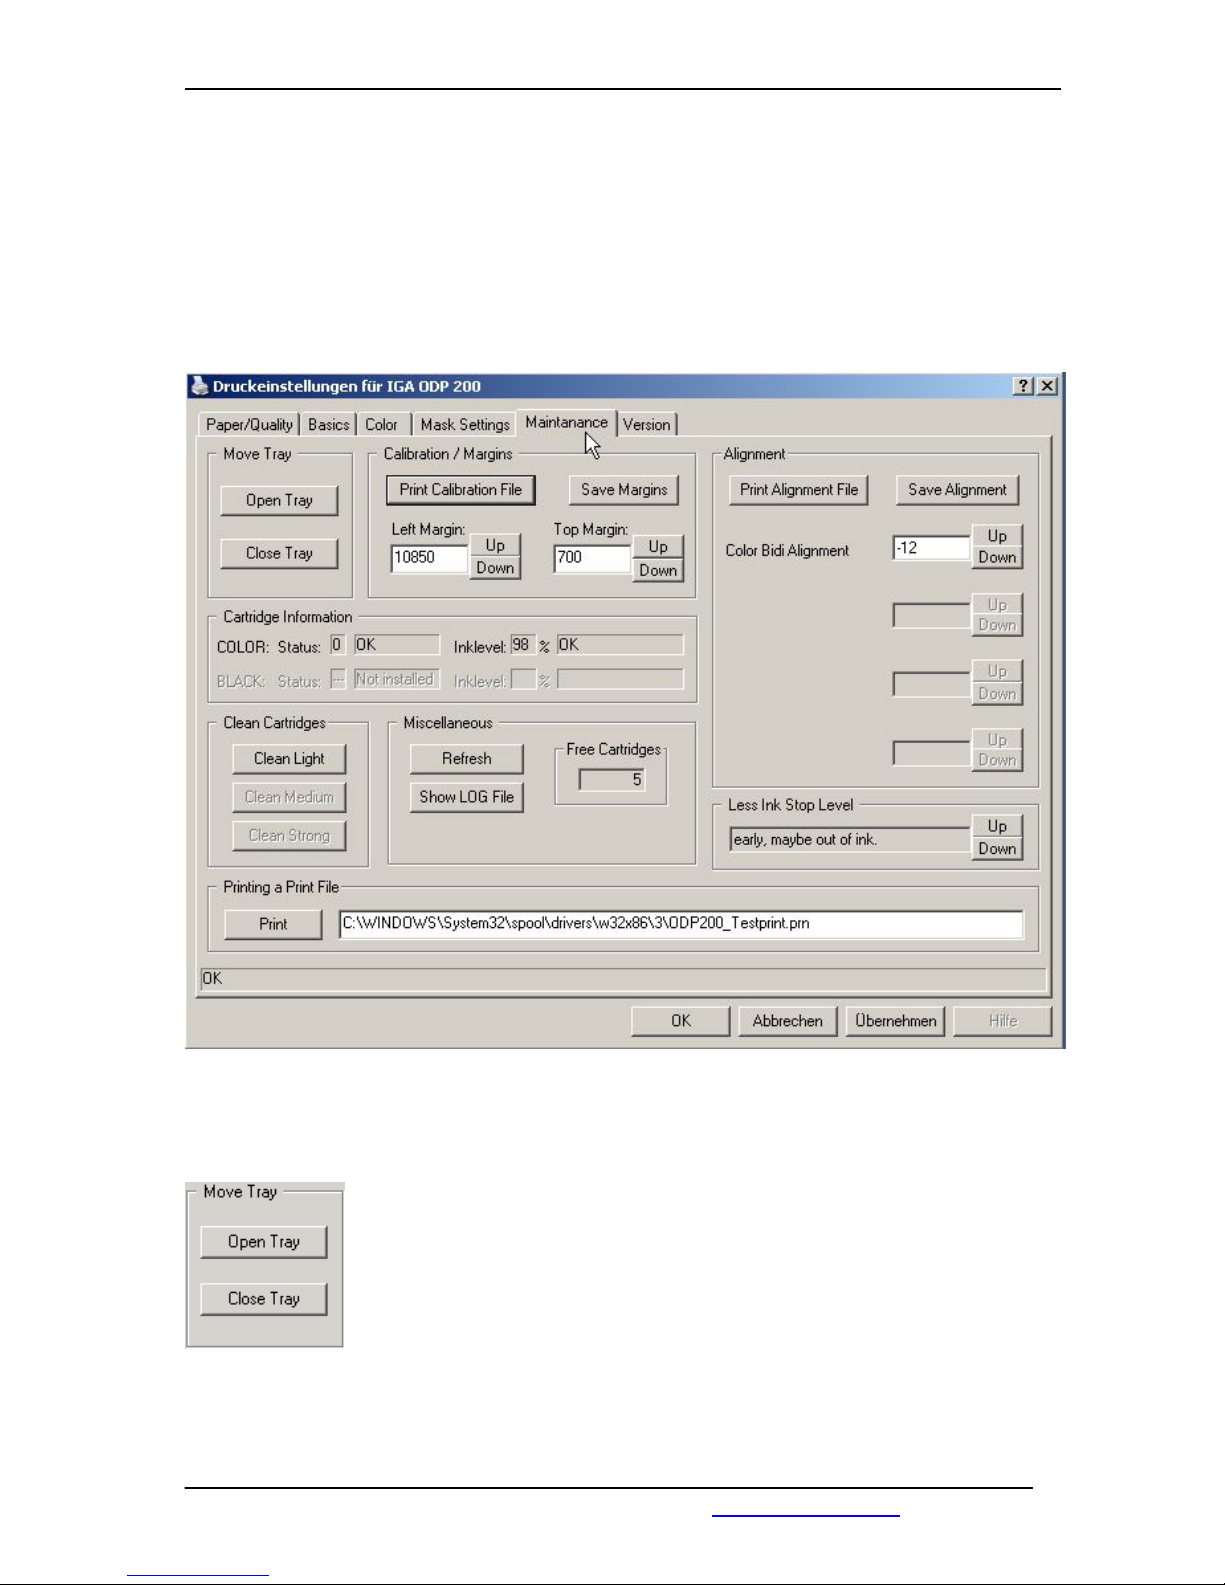
2.2.2 Maintenance Dialog
This dialog box helps you to set and check the physical options of the CD PRINTER
5000 Pro.
Each option of this dialog will be explained separately.
ThePrinting tray of the CD PRINTER 5000 PRO RECORDER can be
opened and closed with this two buttons. These buttons has the same
function than the resume button ( see page 6 ) at the left hand front of
the printer.
Is the printer busy or in an error state, these buttons are disabled.
Page 35
COPYTRAX TECHNOLOGIES MONET 5000 Pro & Pro-Recorder
May 2005 www.copytrax.com 35
50 50
40 40
30 30
30 30
40 40
50 50
50 40 30
50 40 30
30 40 50
30 40 50
Decrease
Top Margin
verringern
Increase
Top Margin
vergrößern
Increase
Left Margin
vergrößern
Decrease
Left Margin
verringern
100 Steps = 1 mm
100 Schritte = 1mm
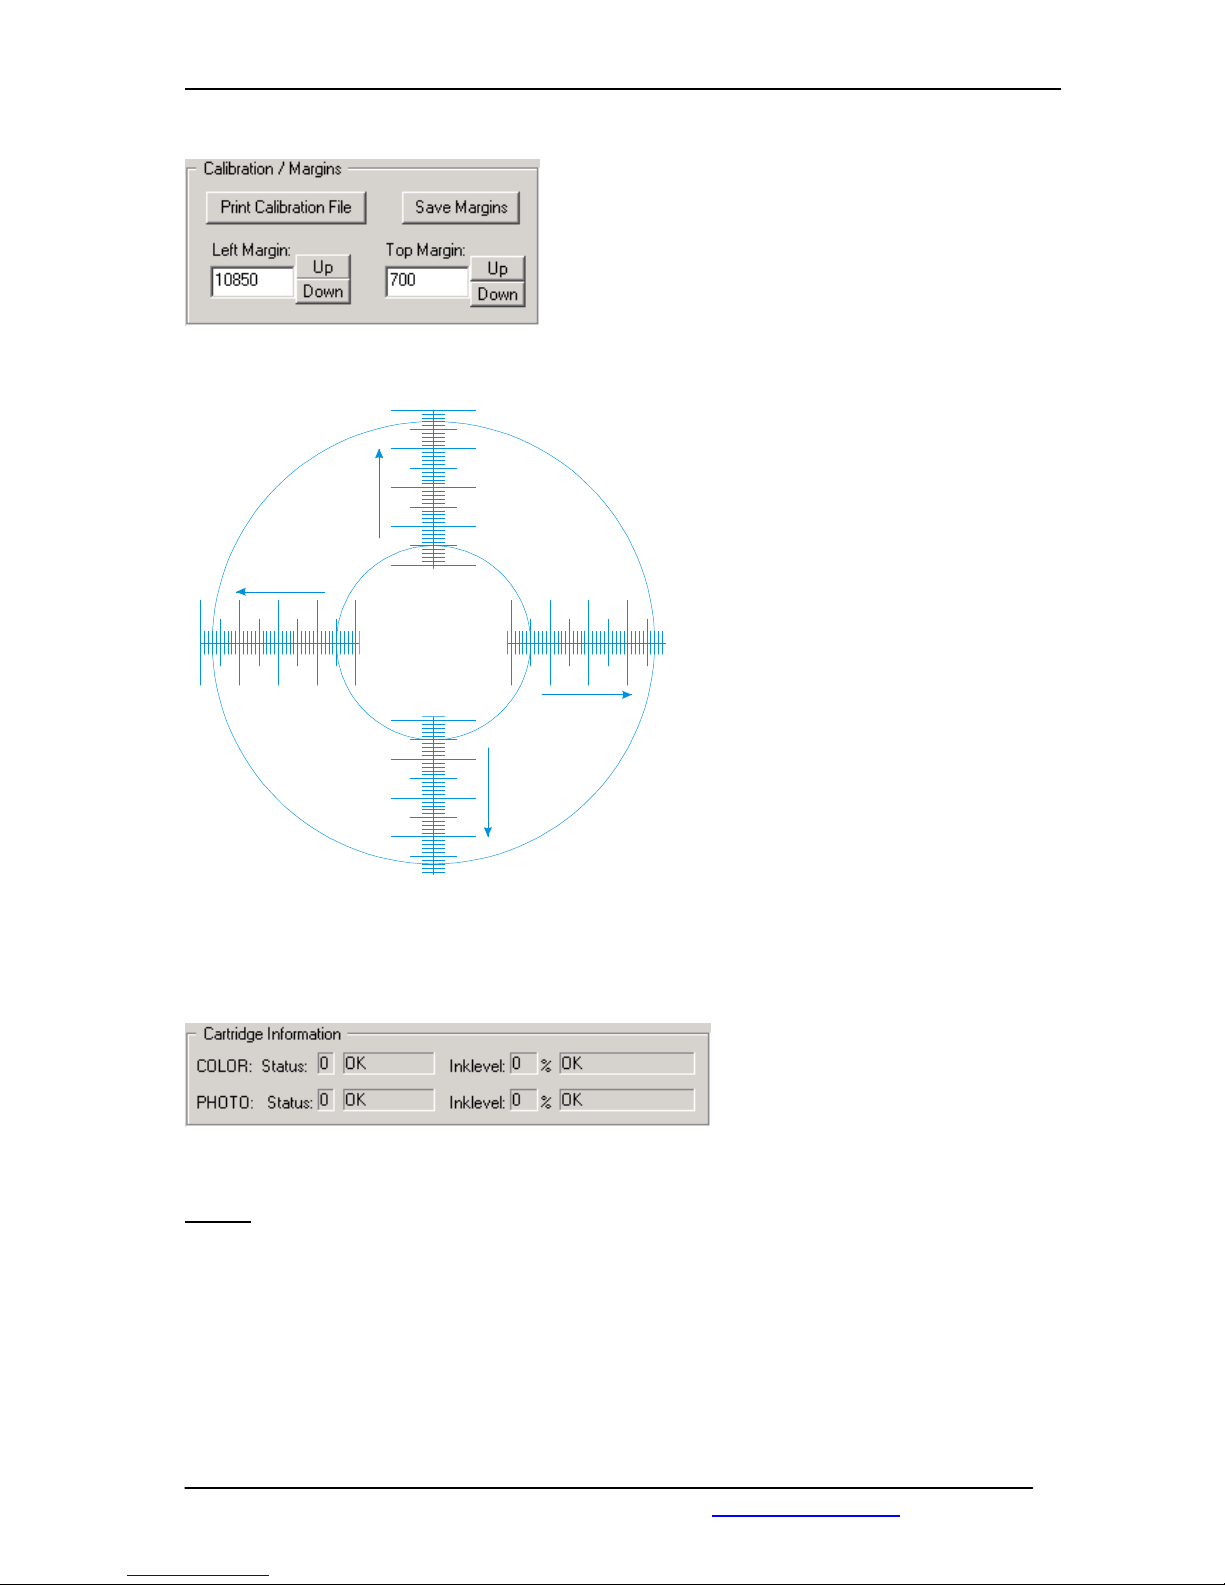
This group of functions allows the calibrating of the
printer.
Pressing the button „Print Calibration File“
generates a special print image, which will be used
to calibrate and centre the printout.
These print image shows the values
how much the printing is away from
the centre of the printer tray.
A distance from 1 mm equals a
value of 100 steps.
Put the values into the „Left Margin“ and „Right Margin“ fields and save them by
pressing the „Save Margins“ button.
In this area is shown the ink level
and the life time of the cartridges.
Note: The ink level is calculated by the driver and depends on the print image,
print mode and quality.
This calculated value is stored inside the printer memory.
The actual ink level inside the cartridge may vary from this calculated
value.
Page 36
COPYTRAX TECHNOLOGIES MONET 5000 Pro & Pro-Recorder
May 2005 www.copytrax.com 36
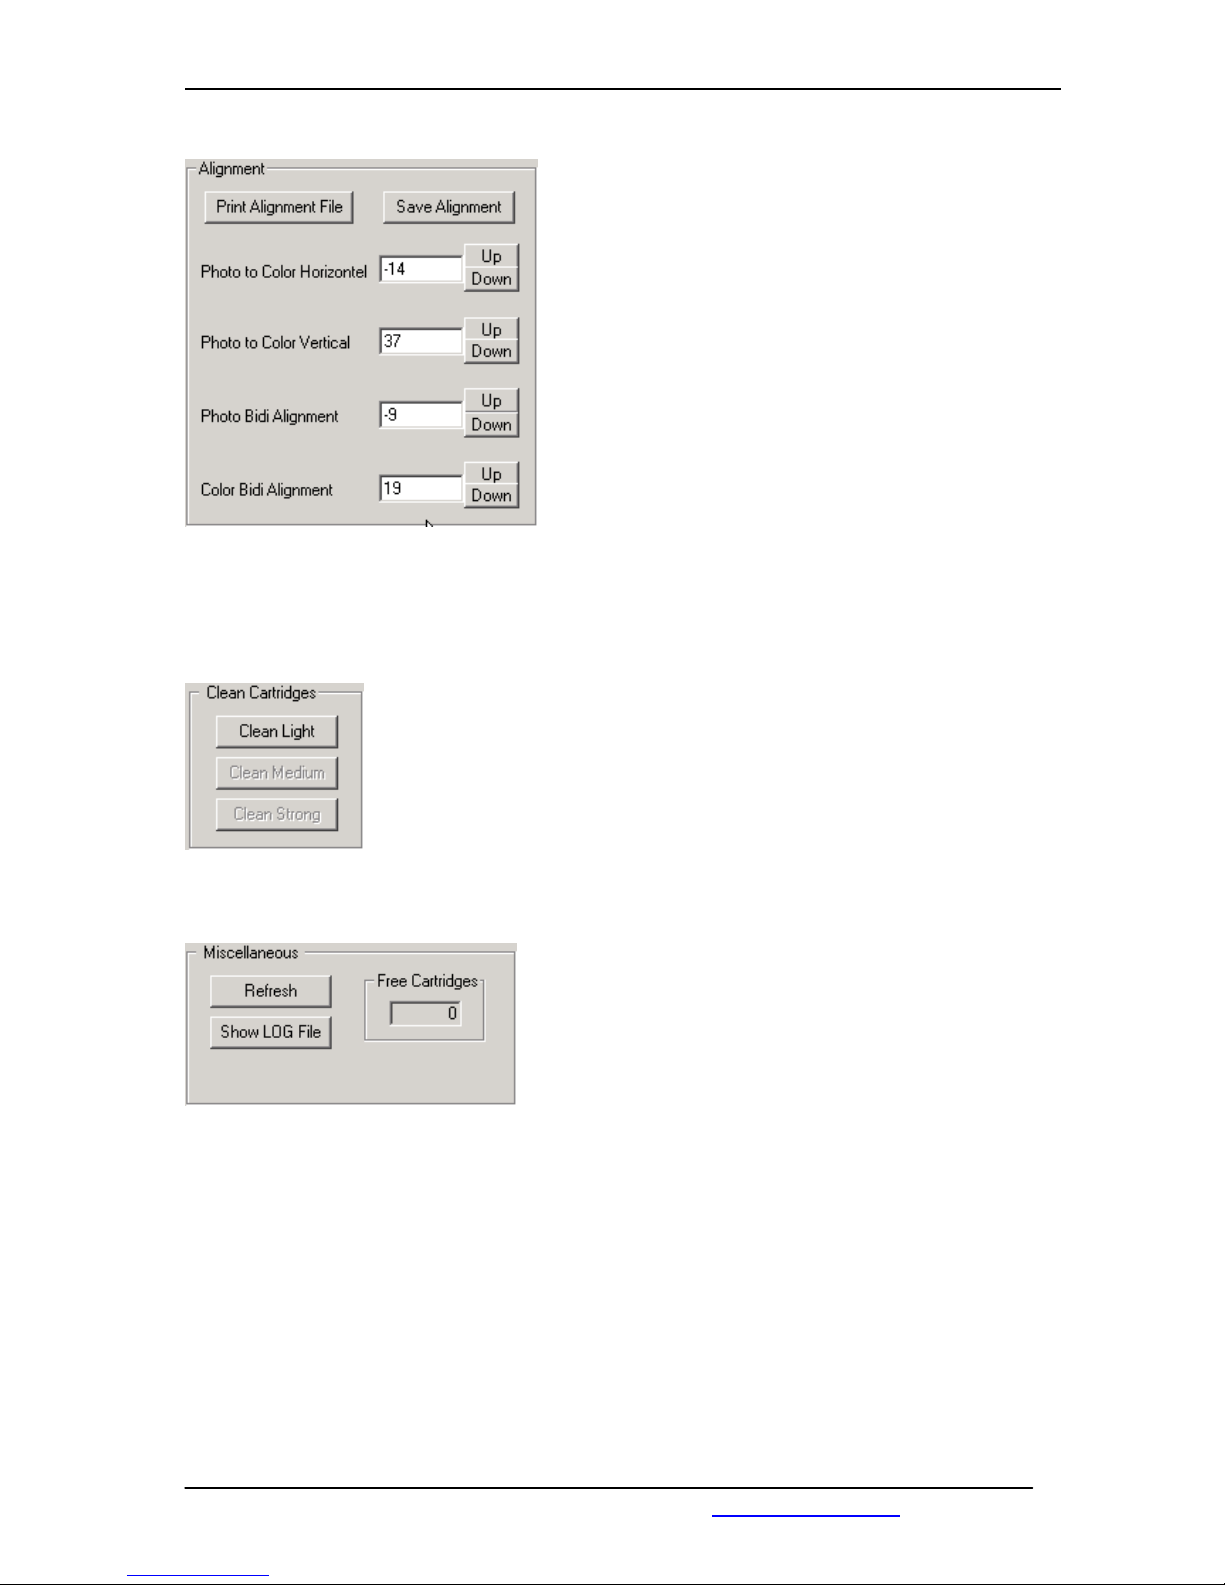
This area is used for the cartridge alignment.
Press the button „Print Alignment File“ to print a
special print image, which shows you the
alignment plot.
Choose the values, where the lines are straight,
write values into the proper fields and press the
button „Save Alignment“ to store the value inside
the printer memory.
Depending on the installed cartridges, the
alignment plot and alignment dialog looks different.
We recommend to do an alignment print after every changed cartridge.
Use these buttons to clean the cartridges.
After changing a cartridge, you can refresh the
Maintenance tab.
The button “Show LOG File” brings the
printer LOG file onto the screen.
Under „Free Cartridges“ you can see the amount of free, unprotected cartridges.
There are two free pens after the first installation.
Page 37
COPYTRAX TECHNOLOGIES MONET 5000 Pro & Pro-Recorder
May 2005 www.copytrax.com 37
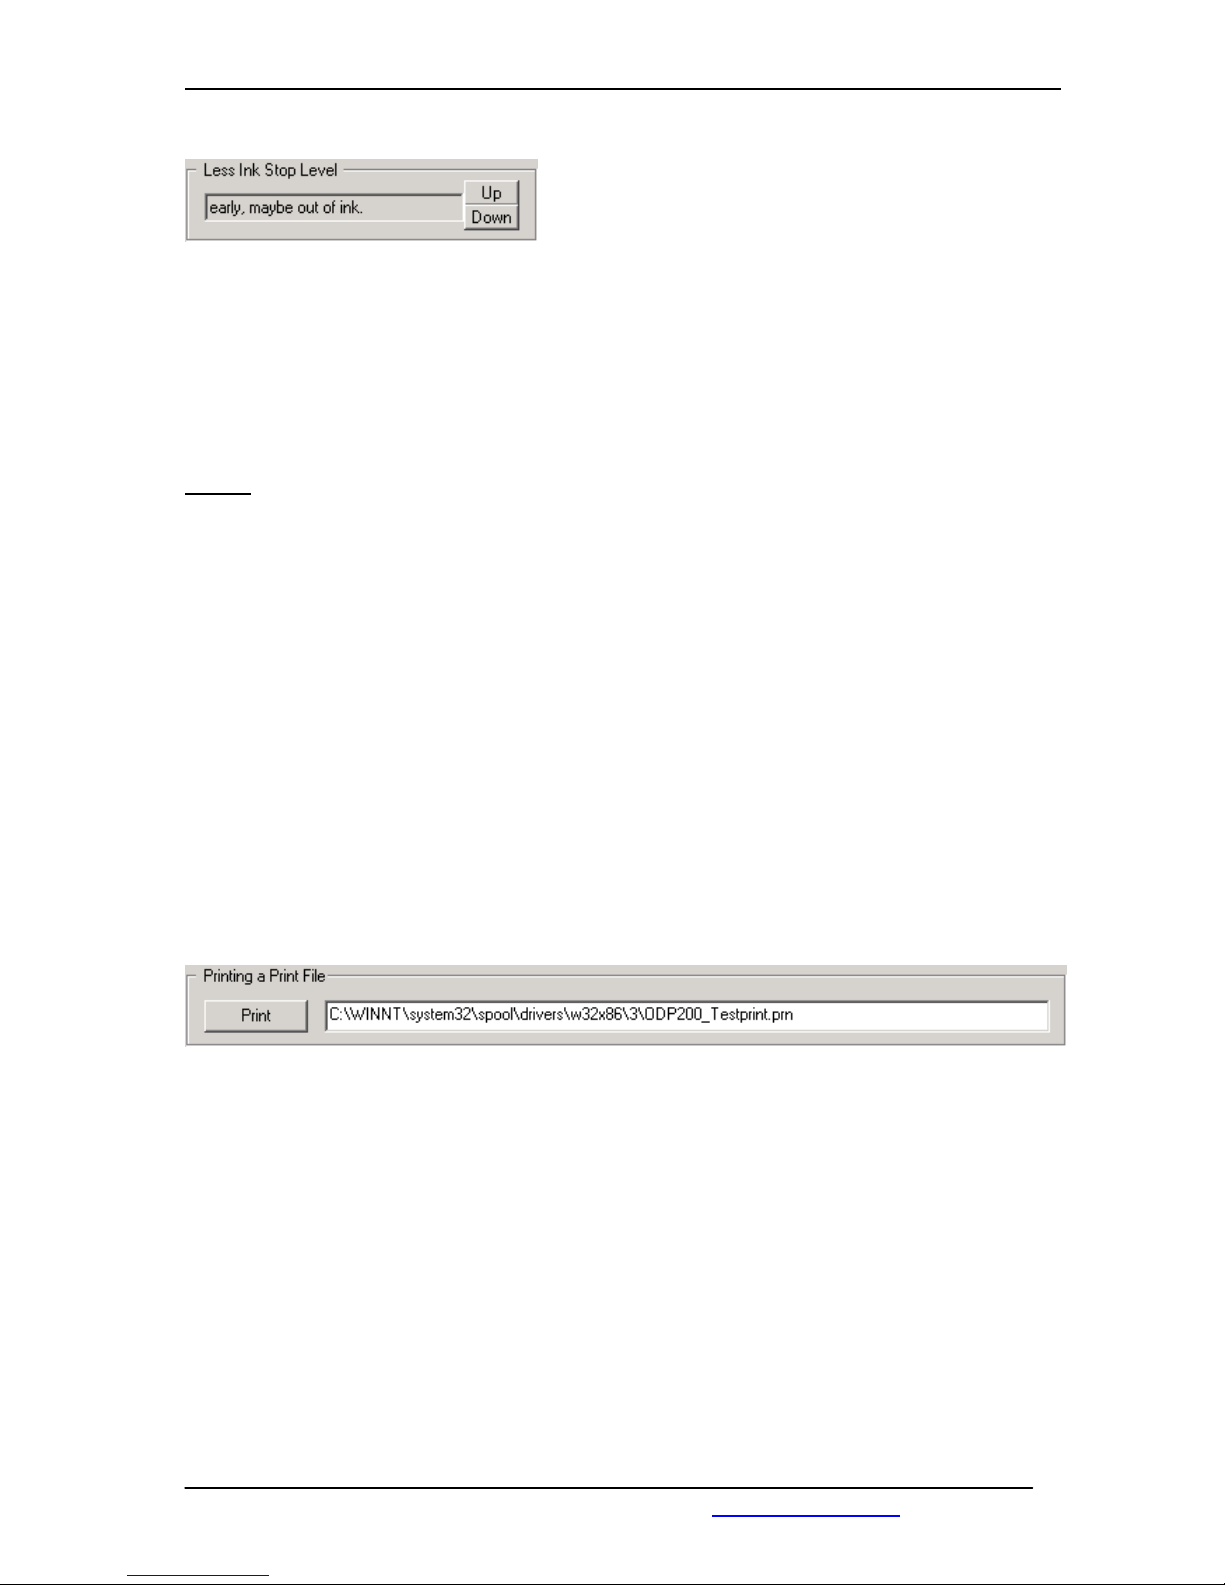
This setting allows you to set a level which stops
the printing if the calculated ink level is less.
There are 4 different settings available.
Early: Stop printing, when the ink level is less than 10 %.
Normal: Stop printing, when the ink level is less than 0 %.
Late: Stop printing, when the cartridge is definitely out of ink.
Never: Do not stop printing. (Do not care about the ink level)
Note: The ink level is calculated by the driver and depends on the print image,
print mode and quality.
This calculated value is stored inside the printer memory.
The actual ink level inside the cartridge may vary from this calculated
value.
If the level is reached, a little Dialog Box appears on the screen.
The user has to click on the “OK” button to print further on.
After pressing “OK”, the printing process is going on.
It is up to the user, to stop the automated process now, or not.
The default value is „Early”, but our experience shows us
that the setting “Normal” is a good choice.
But this depends on the print image and has to be checked before.
Select „Never“, if the duplication software takes care about the ink level.
Use this option to print existing print files.
Page 38
COPYTRAX TECHNOLOGIES MONET 5000 Pro & Pro-Recorder
May 2005 www.copytrax.com 38
2.2.3 How to set print quality and mode
Mode:
Quality:
Standard
Premium
Photo
(In this mode, the printer
does not use the
black cartridge.)
Normal
(fast printing)
Simple Text
and
Test printings
Text and Graphics Simple Photos
Best
Text and simple
Graphics
Demanding
Text and Graphics
Photos and
unicoloured
backgrounds
Maximum dpi.
(Printing is
optimised up to
4800 * 1200 dpi)
Highest resolution for
simple
Text and Graphics
Highest resolution for
demanding
Text and Graphics
Highest resolution for
Photos and
unicoloured
backgrounds.
Notes for the print mode „Photo“
- In Photo mode you can use the special Photo cartridge instead of the black
cartridge, because the printer does not use the black cartridge in „Photo“ mode.
- If you do not use a Photo cartridge, you can use the color cartridge without any
other cartridge. It is not necessary to use two cartridges.
- If the print image contains photos and graphics, you should use always the
„Photo“ mode.
- If the print image has an unicoloured background, you should also use the „Photo“
mode.
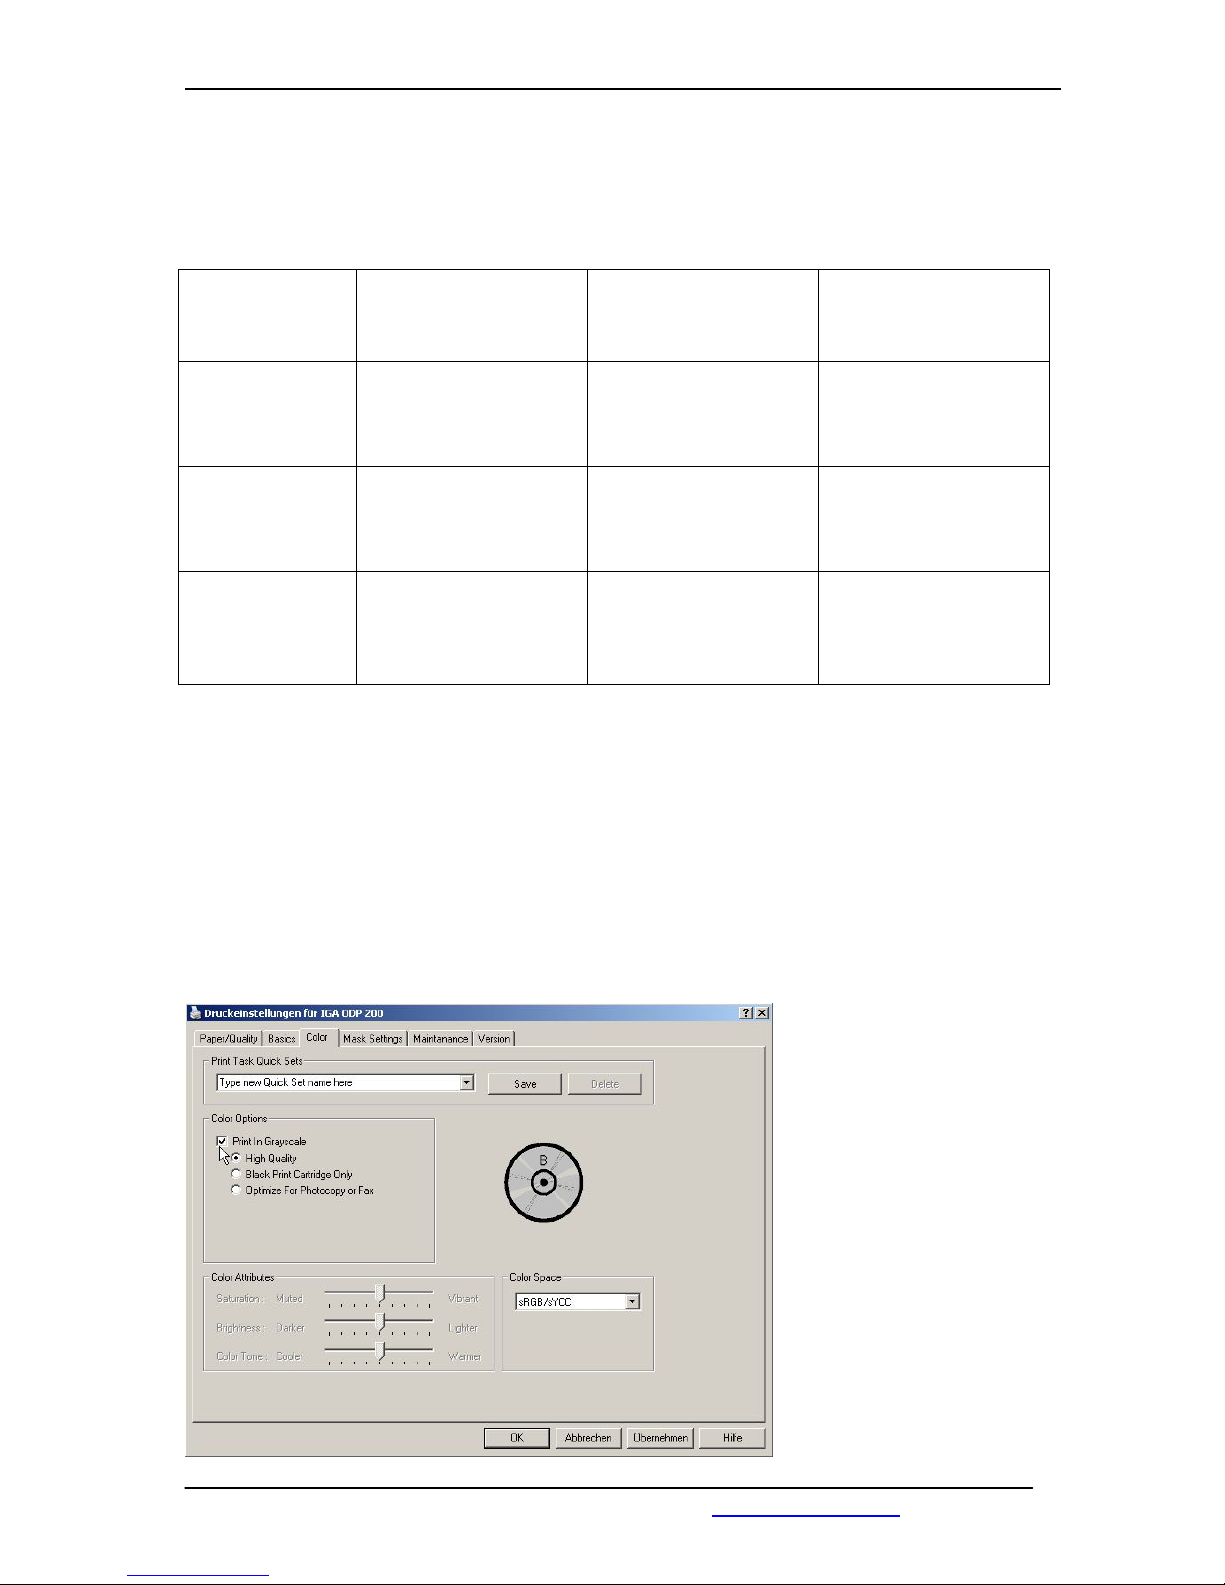
For printing in Greyscale,
you have to set “Premium”
or “Standard” mode,
because „Photo“ mode
does not support printing in
greyscale.
You have to activate the
greyscale printing in the
Color Options.
Page 39
COPYTRAX TECHNOLOGIES MONET 5000 Pro & Pro-Recorder
May 2005 www.copytrax.com 39
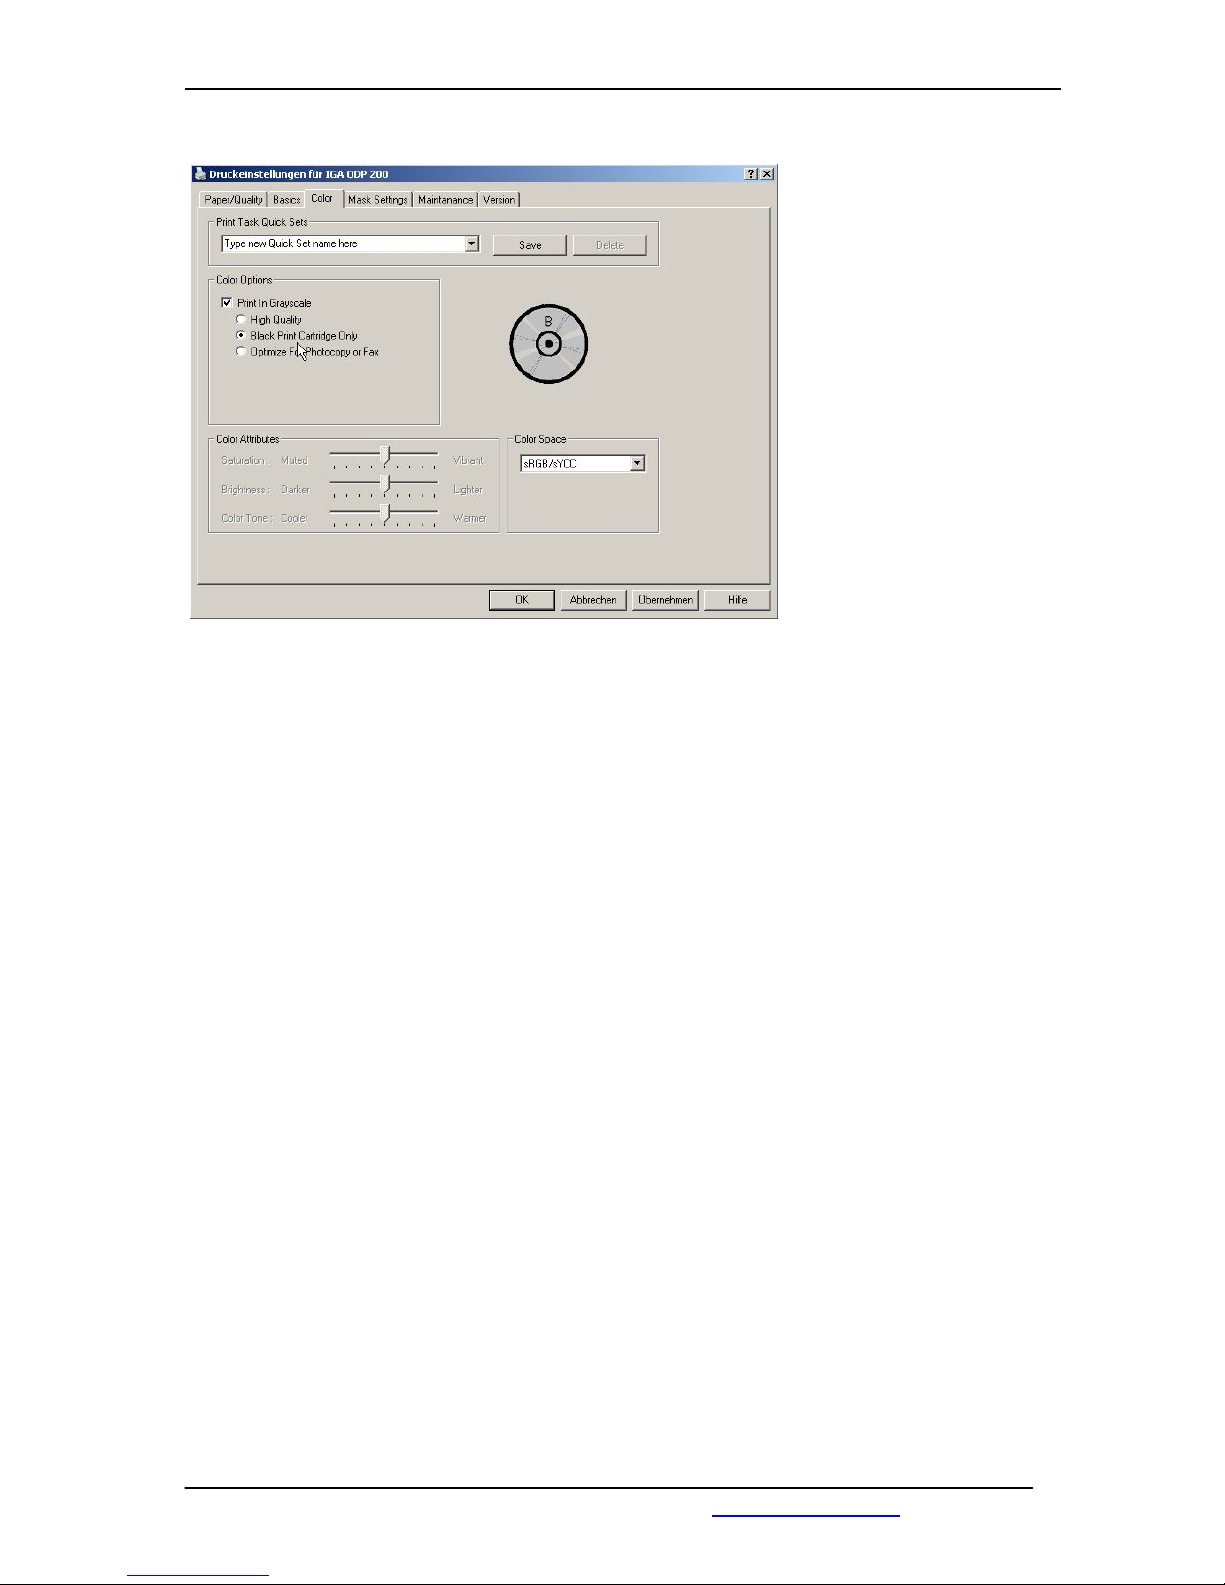
You can force the printer
to use the black cartridge
only, when you select it in
the Colour options.
You can use the CD Printer 5000 Pro with only one cartridge.
If you do so, you are able to remove the other cartridge completely out of the printer.
Removing the unused cartridge will save ink during the cleaning cycle.
For example, you can remove the colour cartridge if you are printing greyscale with
the selected option „Black Print Cartridge Only“.
If you are printing in Photo mode only with the colour cartridge, you can remove the
black one.
Page 40
COPYTRAX TECHNOLOGIES MONET 5000 Pro & Pro-Recorder
May 2005 www.copytrax.com 40
3 Maintenance and Cleaning
3.1 Lubrication of Shafts
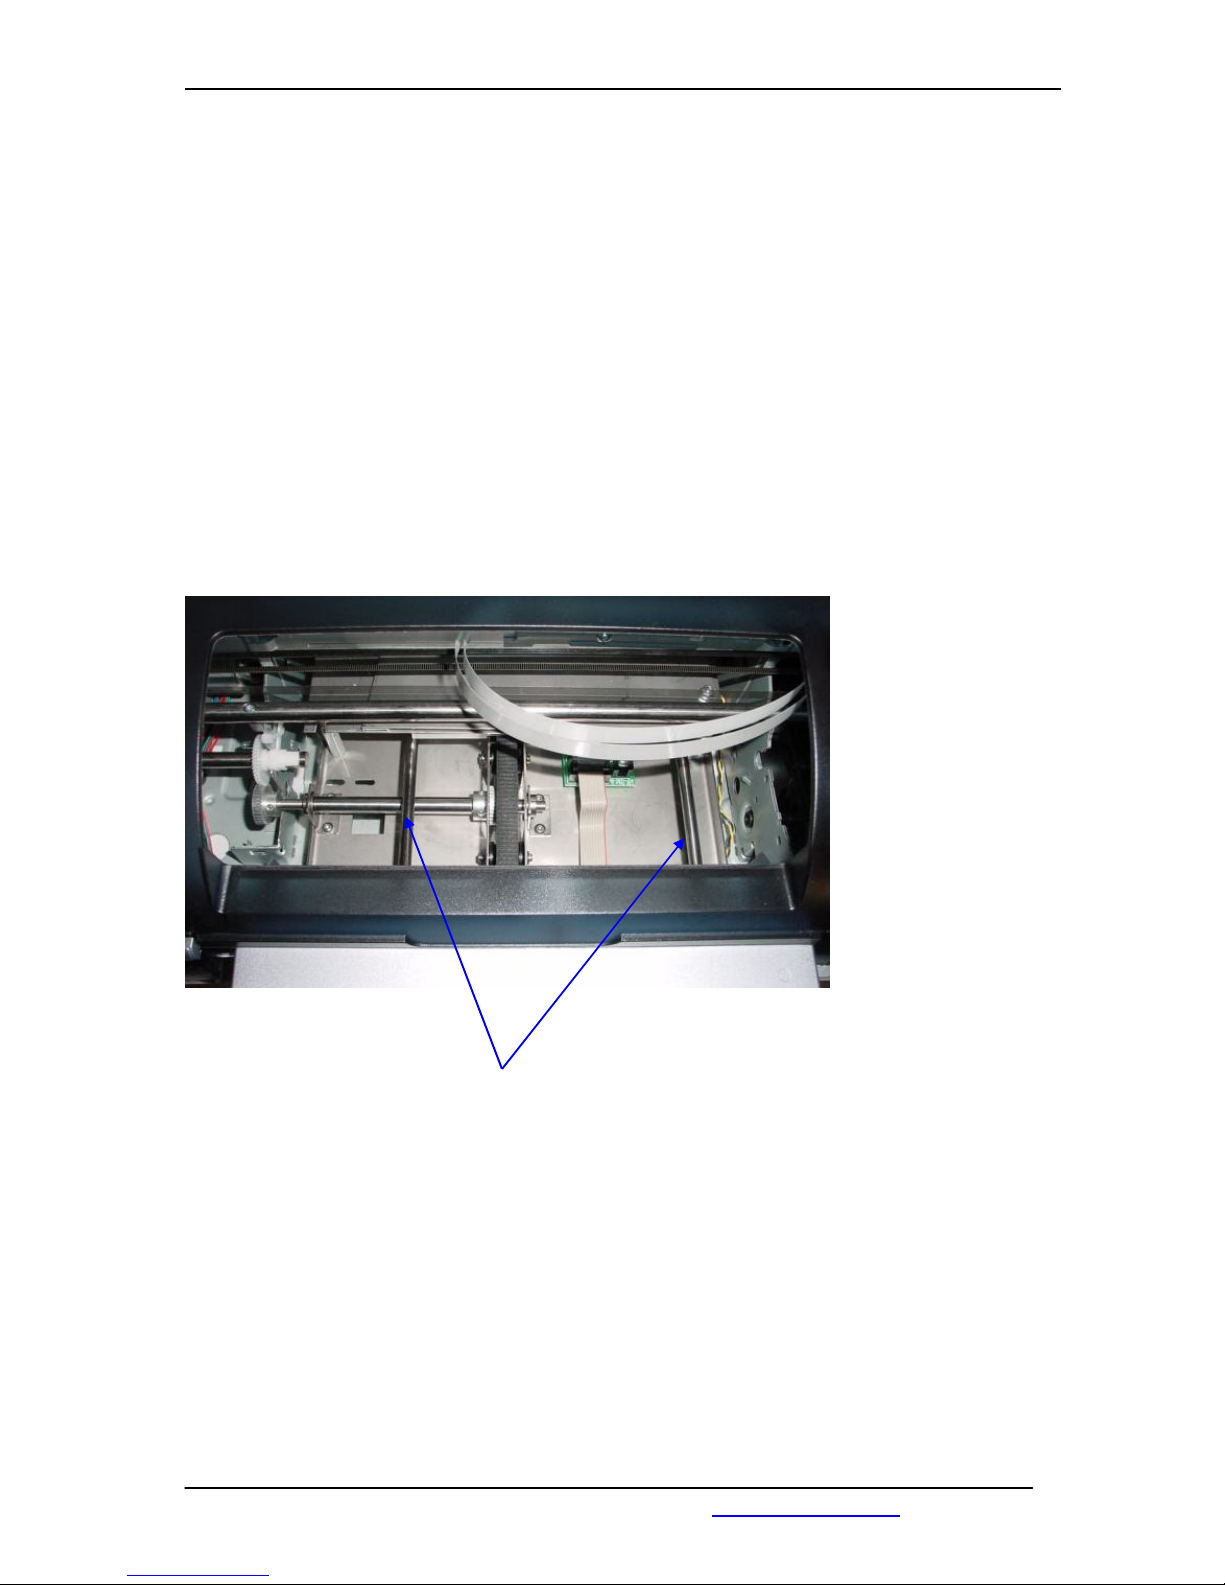
Because of dirt and remains of ink it’s necessary to clean and lubricate the shafts of the
tray frequently.
Open the front cover. Put tone drop of oil onto the shafts (left and right, inner and outer
position). Make sure that no oil is spilled into the printer!
Ask the service department of your local dealer for the right lubricant.
Shafts
Page 41
COPYTRAX TECHNOLOGIES MONET 5000 Pro & Pro-Recorder
May 2005 www.copytrax.com 41
3.2 Maintenance – Replacement of waste Ink Pads.
3.2.1 Required Parts and Tools
Screw driver
Tweezers
Gloves
Insert for ink-jet head clean Part-No.: 37-9006-01
To make sure, that the printer will work without problems, we recommend the waste Ink
pads should be replaced after 12 sets cartridges.
Before shipping the printer, you must either remove or replace the waste
ink pads – due to risk of ink spillage during transportation !!!
3.2.2 Description waste Ink Pad Replacement
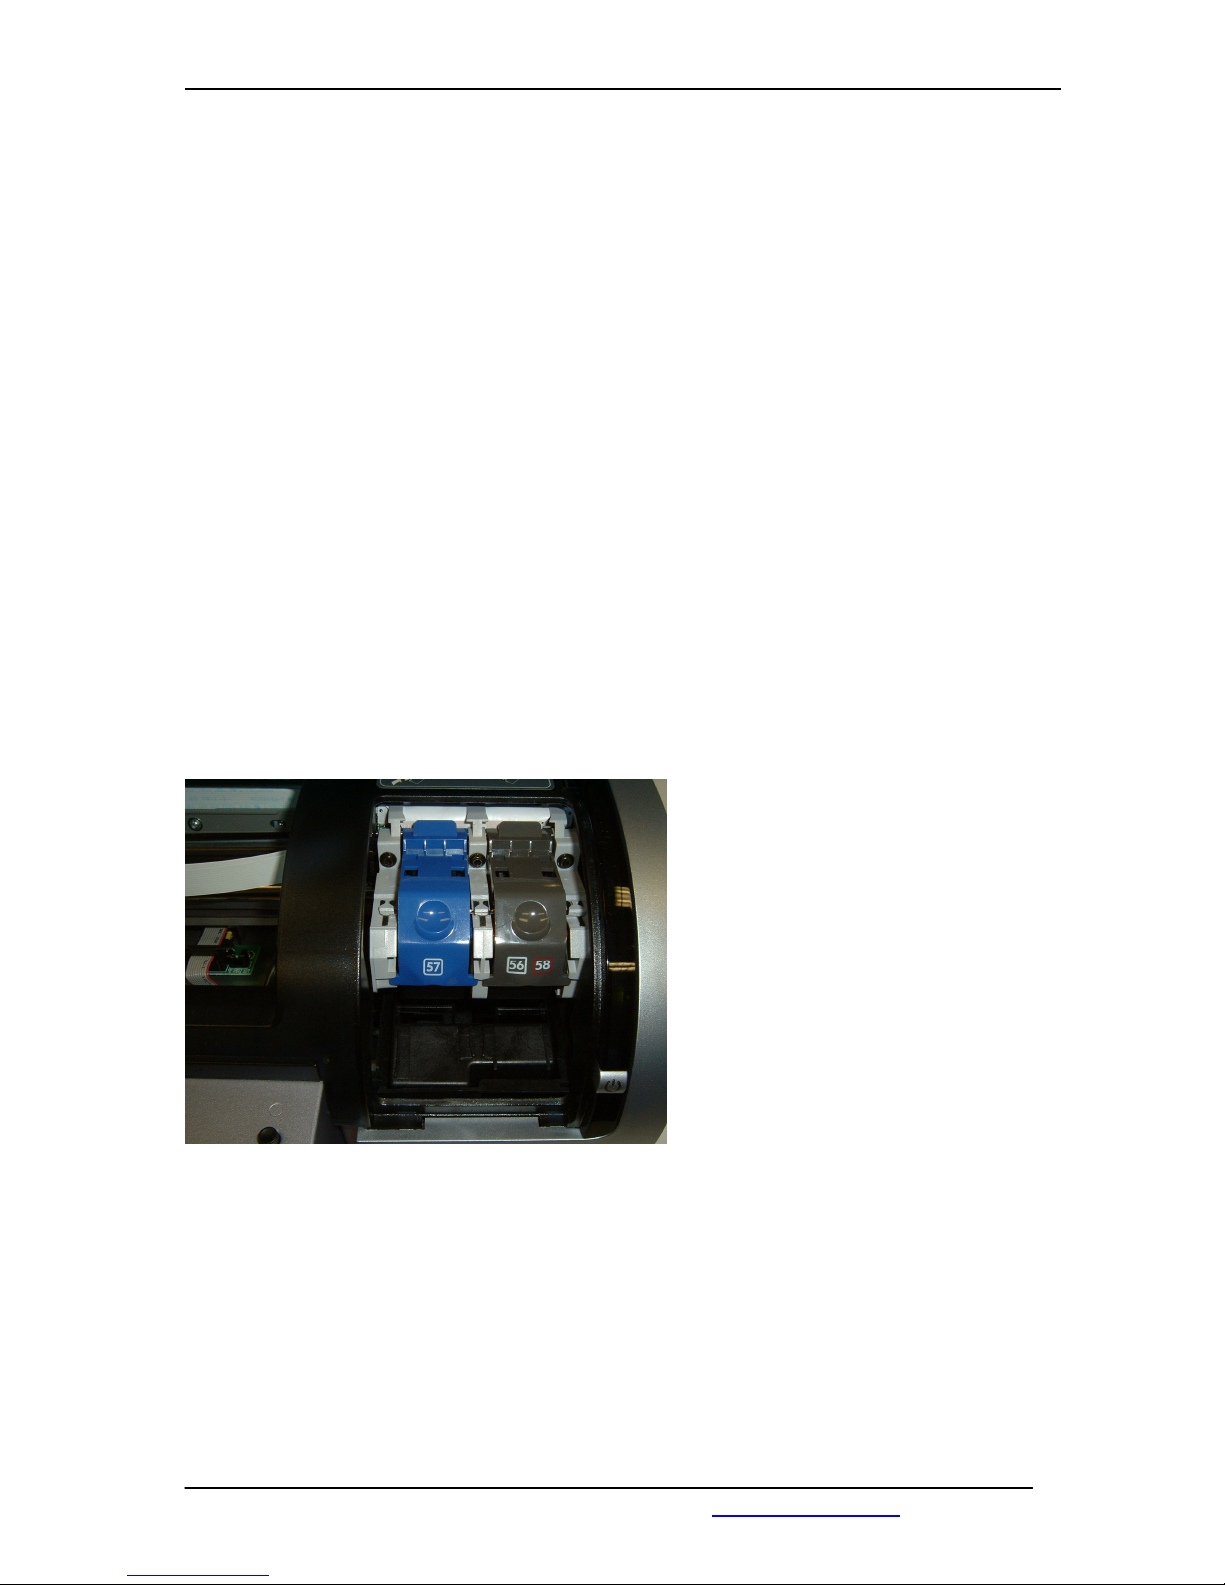
Connect the printer to the power and
switch the printer on.
After initialisation open the cover
Wait while the cleaning station
releases the cartridges.
Page 42
COPYTRAX TECHNOLOGIES MONET 5000 Pro & Pro-Recorder
May 2005 www.copytrax.com 42
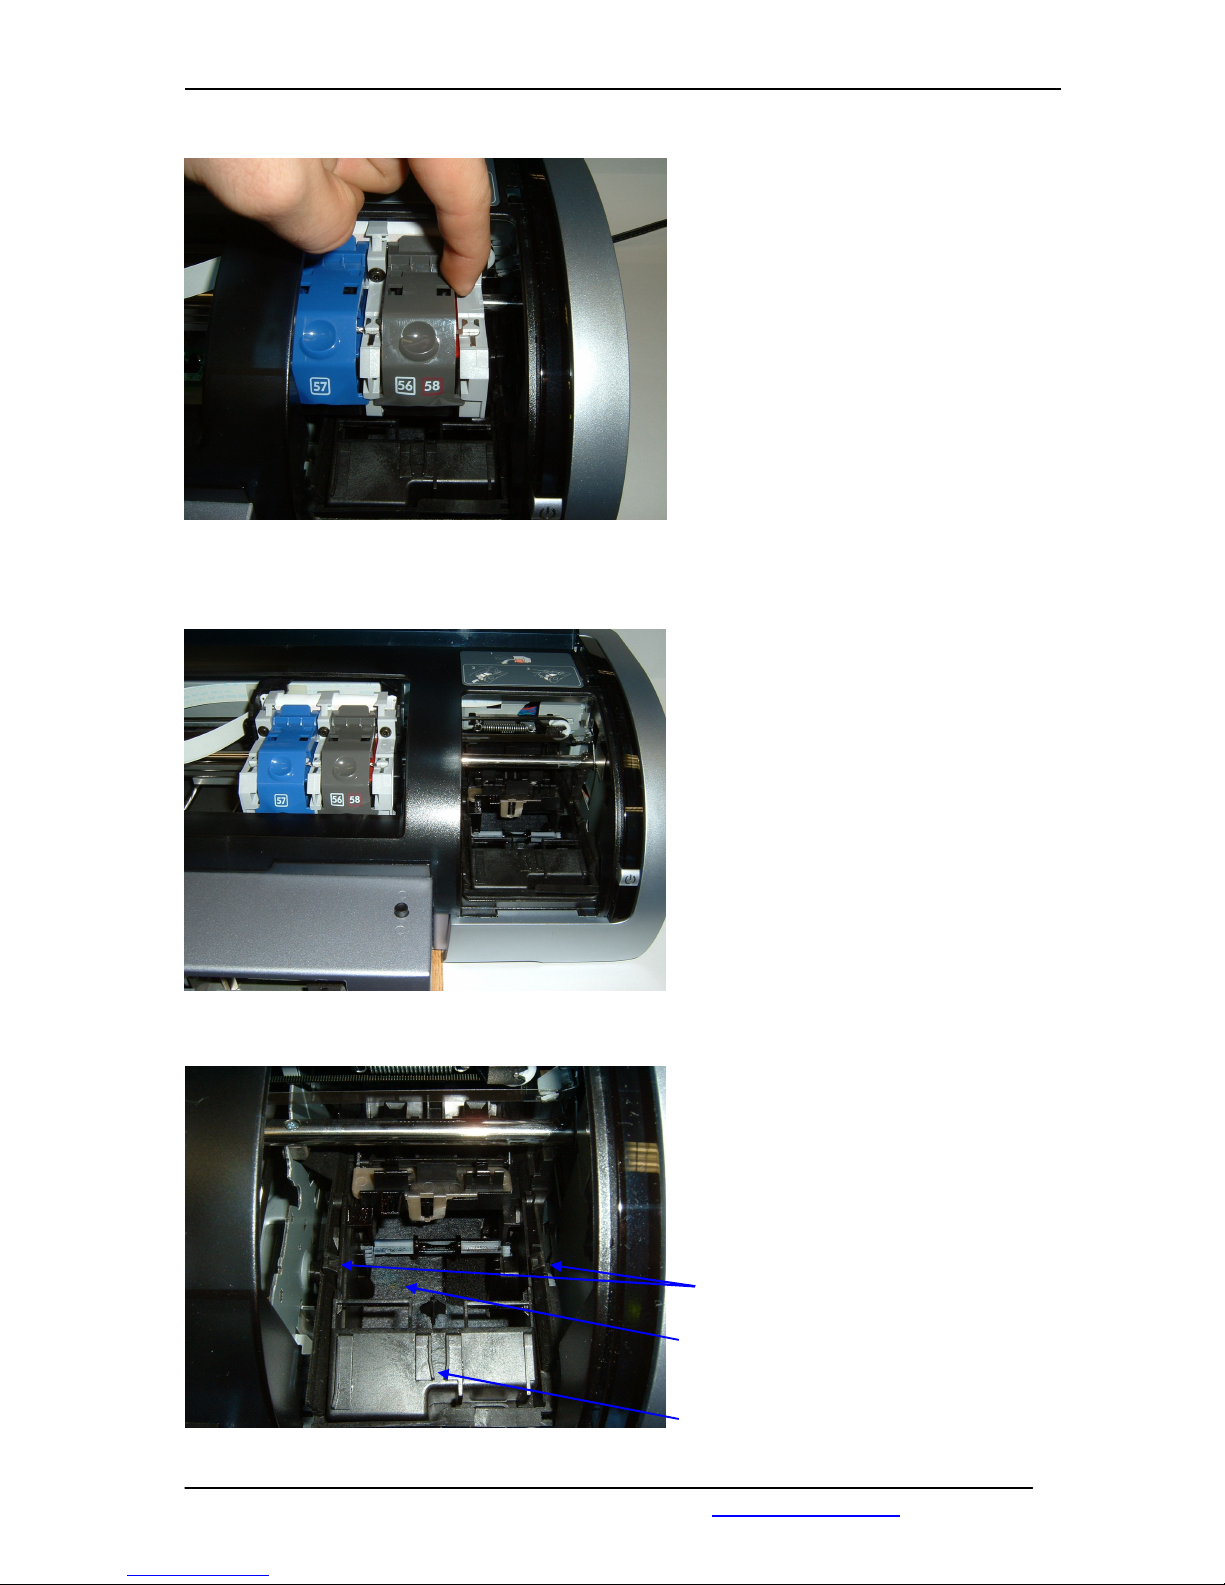
Move the cartridges carefully to the
left.
Now you can see the waste ink pads
at the bottom.
Now, you can see the clamping
mechanism.
clamper
waste ink Pad
small waste ink pad cover
Page 43
COPYTRAX TECHNOLOGIES MONET 5000 Pro & Pro-Recorder
May 2005 www.copytrax.com 43
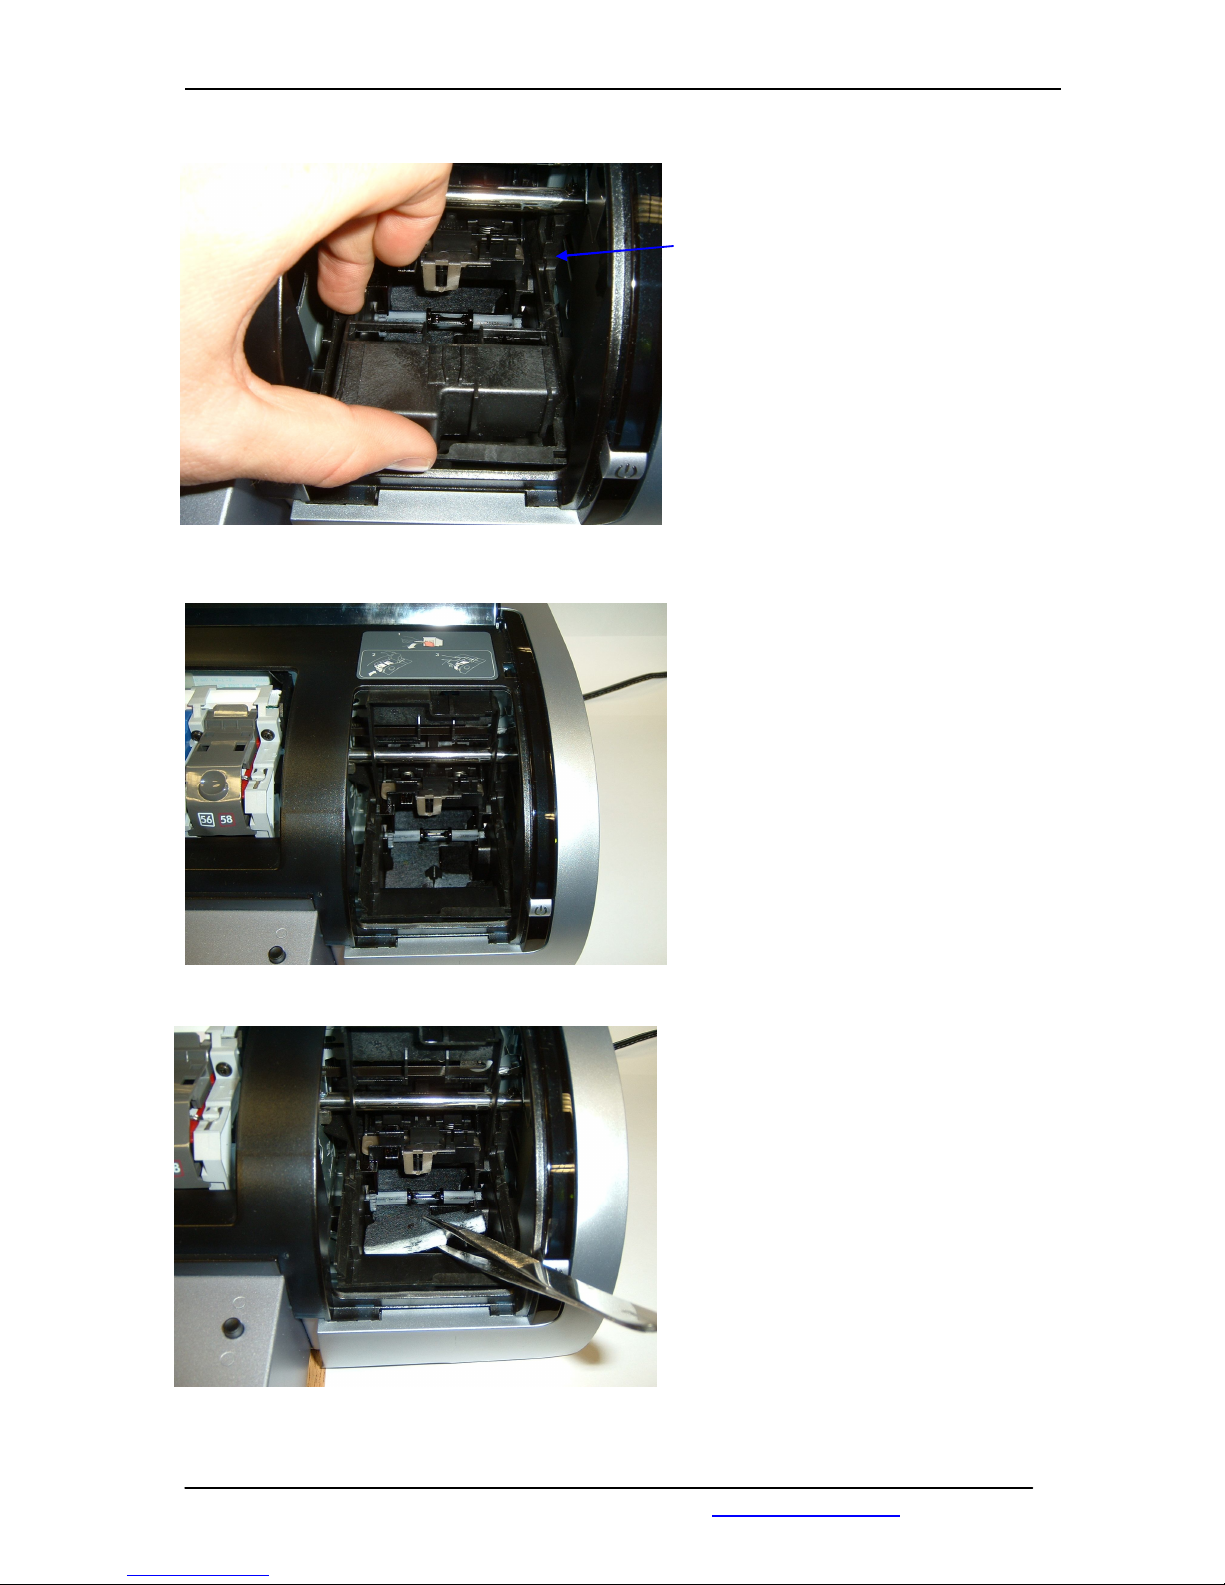
Lift up the small cover, by releasing
the bails.
Lift the cover up to the topmost
position.
Now, remove the ink waste Ink pad
with the tweezers.
Page 44
COPYTRAX TECHNOLOGIES MONET 5000 Pro & Pro-Recorder
May 2005 www.copytrax.com 44
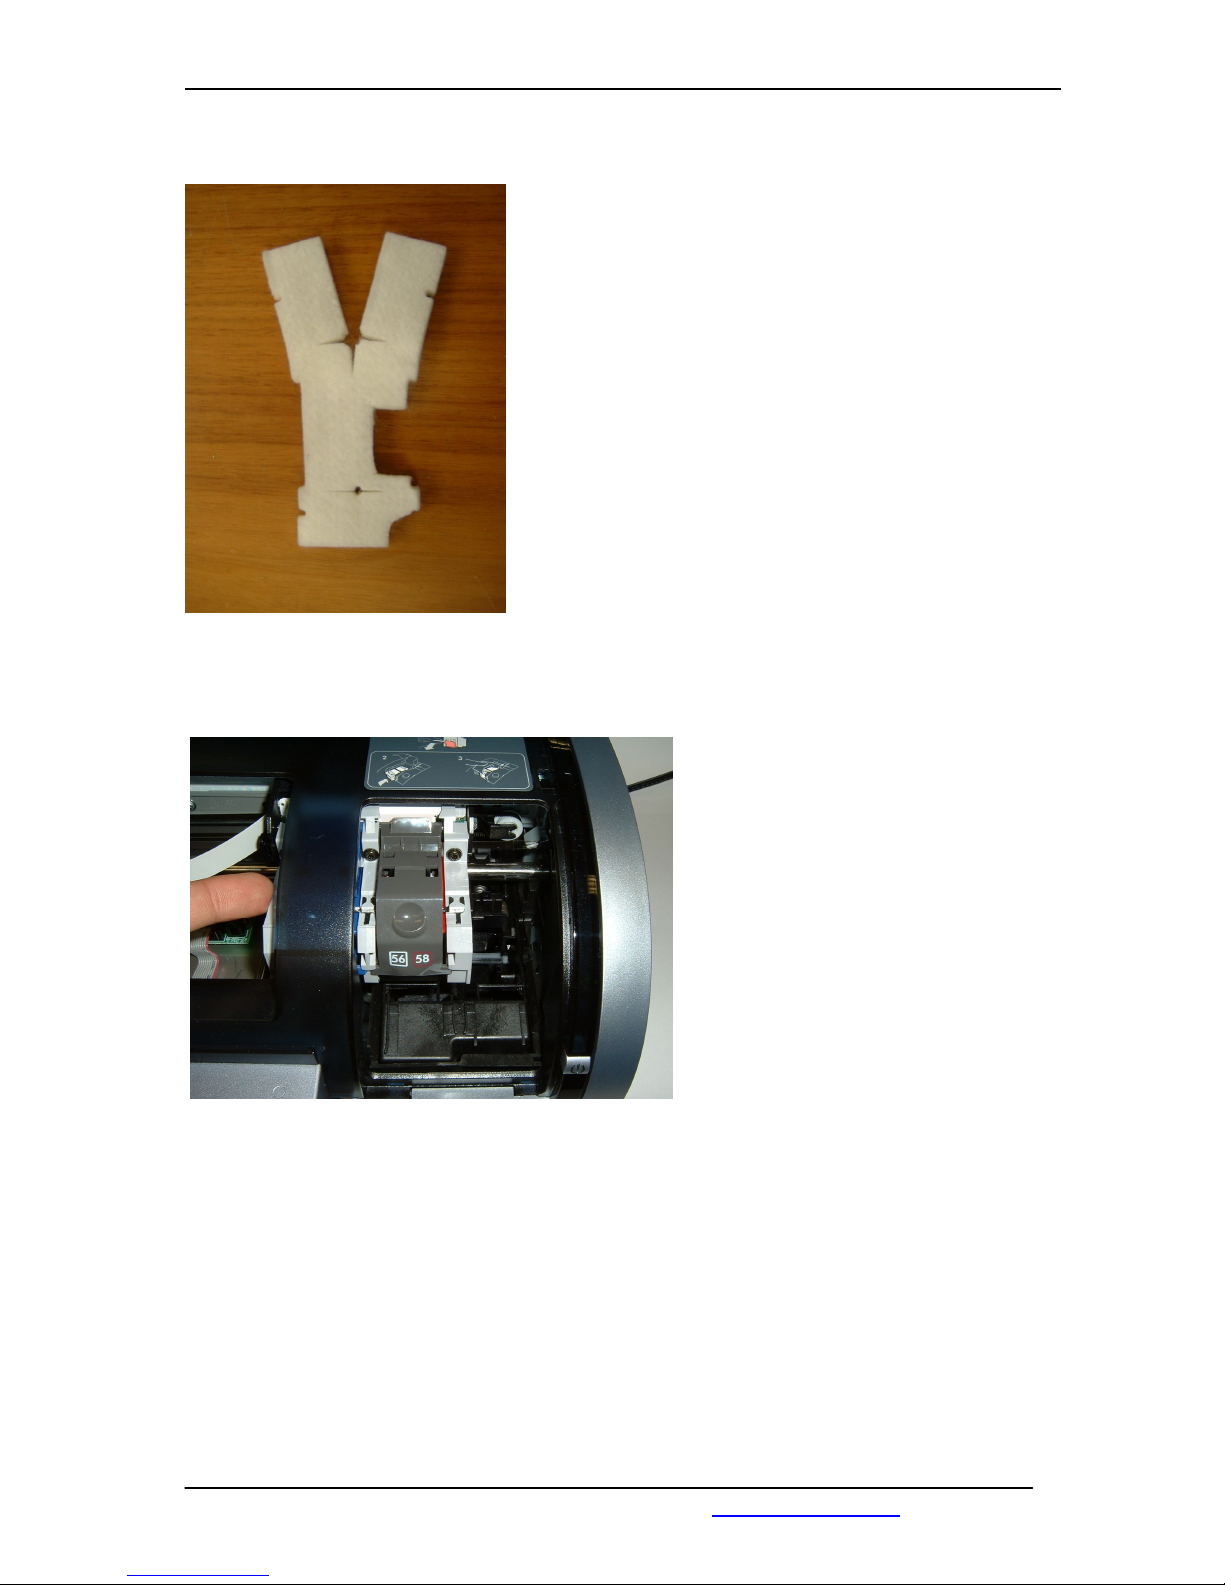
Put the new waste Ink pad under the clamping
mechanism.
After changing the waste Ink pad,
move the small cover back down and
move carefully the cartridges back to
the basic position.
Finally, close the main cover and wait until the printer has finished the initialisation.
Please wait, this can take some minutes.
When the power LED stops flashing, the initialisation has finished.
Page 45

COPYTRAX TECHNOLOGIES MONET 5000 Pro & Pro-Recorder
May 2005 www.copytrax.com 45
3.3 Maintaining the Printer Body
3.3.1 Printer Case Exterior
Follow these guidelines when cleaning the outside of the printer:
Use distilled water only. Do not use household cleaners or detergents.
Use a soft, damp cloth to remove dust, smudges, stains, and spilled ink from
the exterior of the printer case.
3.3.2 Printer Interior
Caution! Do not clean the printer’s interior. Keep all liquids out of the
interior.
3.3.3 Printer Cradle Bar
Do not lubricate the bar on which the print cradle moves. It is normal to
hear noise when the printer is new.
3.3.4 Handling and Storage
Handle and store the printer in an upright, level position for maximum
performance and reliability.
Page 46

COPYTRAX TECHNOLOGIES MONET 5000 Pro & Pro-Recorder
May 2005 www.copytrax.com 46
4 Troubleshooting
4.1 The CD Printer 5000 Pro print engine shows an error
If the Printer has an error condition and the ink or paper LEDs are flashing,
the opening and closing function of the drawer will not work.
The power LED needs to be on permanently.
To continue, the error condition needs to be eliminated.
a.) Close Cover.
b.) Insert Or Replace Print Cartridges.
c.) Switch Printer Off And On.
d.) Remove USB Cable from the USB Connector. Insert USB cable into the USB
Connector.
e.) Unplug Power Cable. Plug Power Cable Back In.
f.) Remove Printer Jobs From The Printer Status Monitor.
Press the “Cancel“-button on the printer to abort the current print job.
If an error occurs during printing, the print job needs to be aborted in the Printer Status
Monitor.
Page 47

COPYTRAX TECHNOLOGIES MONET 5000 Pro & Pro-Recorder
May 2005 www.copytrax.com 47
4.2 Printer-LED’s are on or flashing
4.2.1 Functions of LED’s
Printer-LED’s display the printer status.
4.2.2 Print Cartridge-Status LED on or flashing
Top Cover is open
Close Top Cover
This may be a problem with a print cartridge
Verify that the correct print cartridges are installed.
Check if a print cartridge is low on ink or improperly installed.
4.2.3 Resume-LED flashing
There is a print job available in the spooler.
Please put a disc onto the drawer and press the Resume button.
The drawer will be moved in and the printing starts.
4.2.4 Power-LED flashing
Printer prepares to print
The LED stops flashing when the printer has received all data.
4.2.5 All LED’s are flashing
The printer may need to be restarted
Press the power button, to turn off the printer, then press the power button to restart the
printer.
If flashing of LED’s continues:
Press the power button, to turn off the printer.
Disconnect printer from the power source.
Reconnect printer to the power source.
Press the power button, to turn off the printer.
Page 48

COPYTRAX TECHNOLOGIES MONET 5000 Pro & Pro-Recorder
May 2005 www.copytrax.com 48
5 Technical Data
Category
Value
Power consumption
Max. 2 Watt if printer is switched off.
Min. 4 Watt in Stand By Mode
Max. 32 Watt average while printing.
Voltage
100
- 240 VAC (+/
- 10 %)
Frequency
50/60 Hz (+/
- 3 Hz)
Ink
Cartridges
Order code
Black Cartridge
CRT6656A
-
B Colo
u
r Cartridge
CRT6657A
-
C Photo Cartridge
CRT6658A
-P
Print
Image
Mode Maximum Resolution in dots per inch (dpi)`
Colour
Normal
Best
Max.dpi
600 x 600 dpi
Photoret IV (1200 x 600)
Photoret IV (4800 x 1200)
1200 x 600 dpi and 4800 x 1200 dpi are optimised
with a resolution from 1200 x 1200 dpi
Dimensions
149 mm
Height
449 mm
Width
367 mm
Depth
7,45 kg
Weight
Page 49

COPYTRAX TECHNOLOGIES MONET 5000 Pro & Pro-Recorder
May 2005 www.copytrax.com 49
CD/DVD Recording
Push EJECT button on recorder
Put blank CD/DVD onto the tray of recorder. Push EJECT button again and tray will go
back into recorder.
Start the programm NERO Burning ROM on your PC.
Select the files you want to burn onto disc and start burning.
For more information use Quick Start by NERO Burning ROM software.
Page 50

COPYTRAX TECHNOLOGIES MONET 5000 Pro & Pro-Recorder
May 2005 www.copytrax.com 50
For consumables or Support please contact your local dealer or supplier
Manufactured by :
Copytrax Technologies Ltd
4 Viking Way, Bar Hill,
Cambridge. CB3 8EL
UK.
TEL : +44 (0) 1954 782929
FAX: +44 (0) 1954 784646
Email: [email protected]
www.copytrax.com
 Loading...