

Page 1

PowerPro II
CopyPro PowerPro II
PowerPro II Printer
Version IIAa
Table of Contents
Introduction 3
Printer Installation Overview 4
Quick Setup Directions 5
Installation - Unpacking 6
Installation - Parts Identification 7
Installation - Connecting the Printer 8
PowerPro II Printer Driver Installation 9
Printer Driver Installation for Windows 98 10
Printer Driver Installation for Windows NT 11
Printer Driver Installation for Windows 2000 12
Label Software Installation 13
Windows 98: Installation of CD Painter software: 13
Windows 2000: Installation of CD Painter software: 13
Windows NT: Installation of CD Painter software: 14
Printer Operation 15
Printer Ribbon Installation 15
CD Label Printing 16
Control Panel Operation 17
Manual Loading CD Media 18
CD Label Printing 19
Multi-tray Feature 20
Changing the CD Tray 21
Maintenance: General 22
Storage 22
Startup and Shutdown 22
Maintenance: Printer Ribbon Installation 23
Installing Print Ribbon 23
Printer Ribbon Installation Chart – Part 1 25
Printer Ribbon Installation Chart – Part 2 26
1
Page 2

PowerPro II
CopyPro PowerPro II
Maintenance: Printhead 27
Cleaning the Print Head 27
Printhead Replacement 29
Printhead Replacement Procedure 30
Troubleshooting Section 32
Quick Recovery Strategy 32
Test CD Strategy 32
Common Printer Issues 32
Printer is not printing checklist 33
Print Quality 35
Fuzzy prints and smudges 35
Faded prints 35
Horizontal Streaks or Arc shaped Streaks 35
Sticking or Torn Ribbon 35
CD Positioning Errors 35
CD Printing Techniques Section 36
Please see the following CD Printing Techniques Chart for more detailed
information on CD Label printing techniques. 36
PowerPro II CD Media & Ribbon Selection Guide 37
Graphics Tips 38
Common Label Issues 39
Strobe Setting Examples 41
CD Media & Strobe Setting examples 42
Printer Driver Settings: Win 98 43
Printer Driver Settings: Win 2000 45
Optimizing Color Labels 48
CD Printing Techniques Chart 51
Thermal Transfer & Inkjet CD Printer Comparison 56
Supported Ribbon and Ribbon Specifications 58
Ribbon Usage with a Minimum Print Size 58
Autoloader Port 59
Autoloader Port Pinouts: 59
Error Codes for Status LED 60
Copyright 2002 CopyPro, Inc
2
Page 3
PowerPro II
CopyPro PowerPro II
Introduction
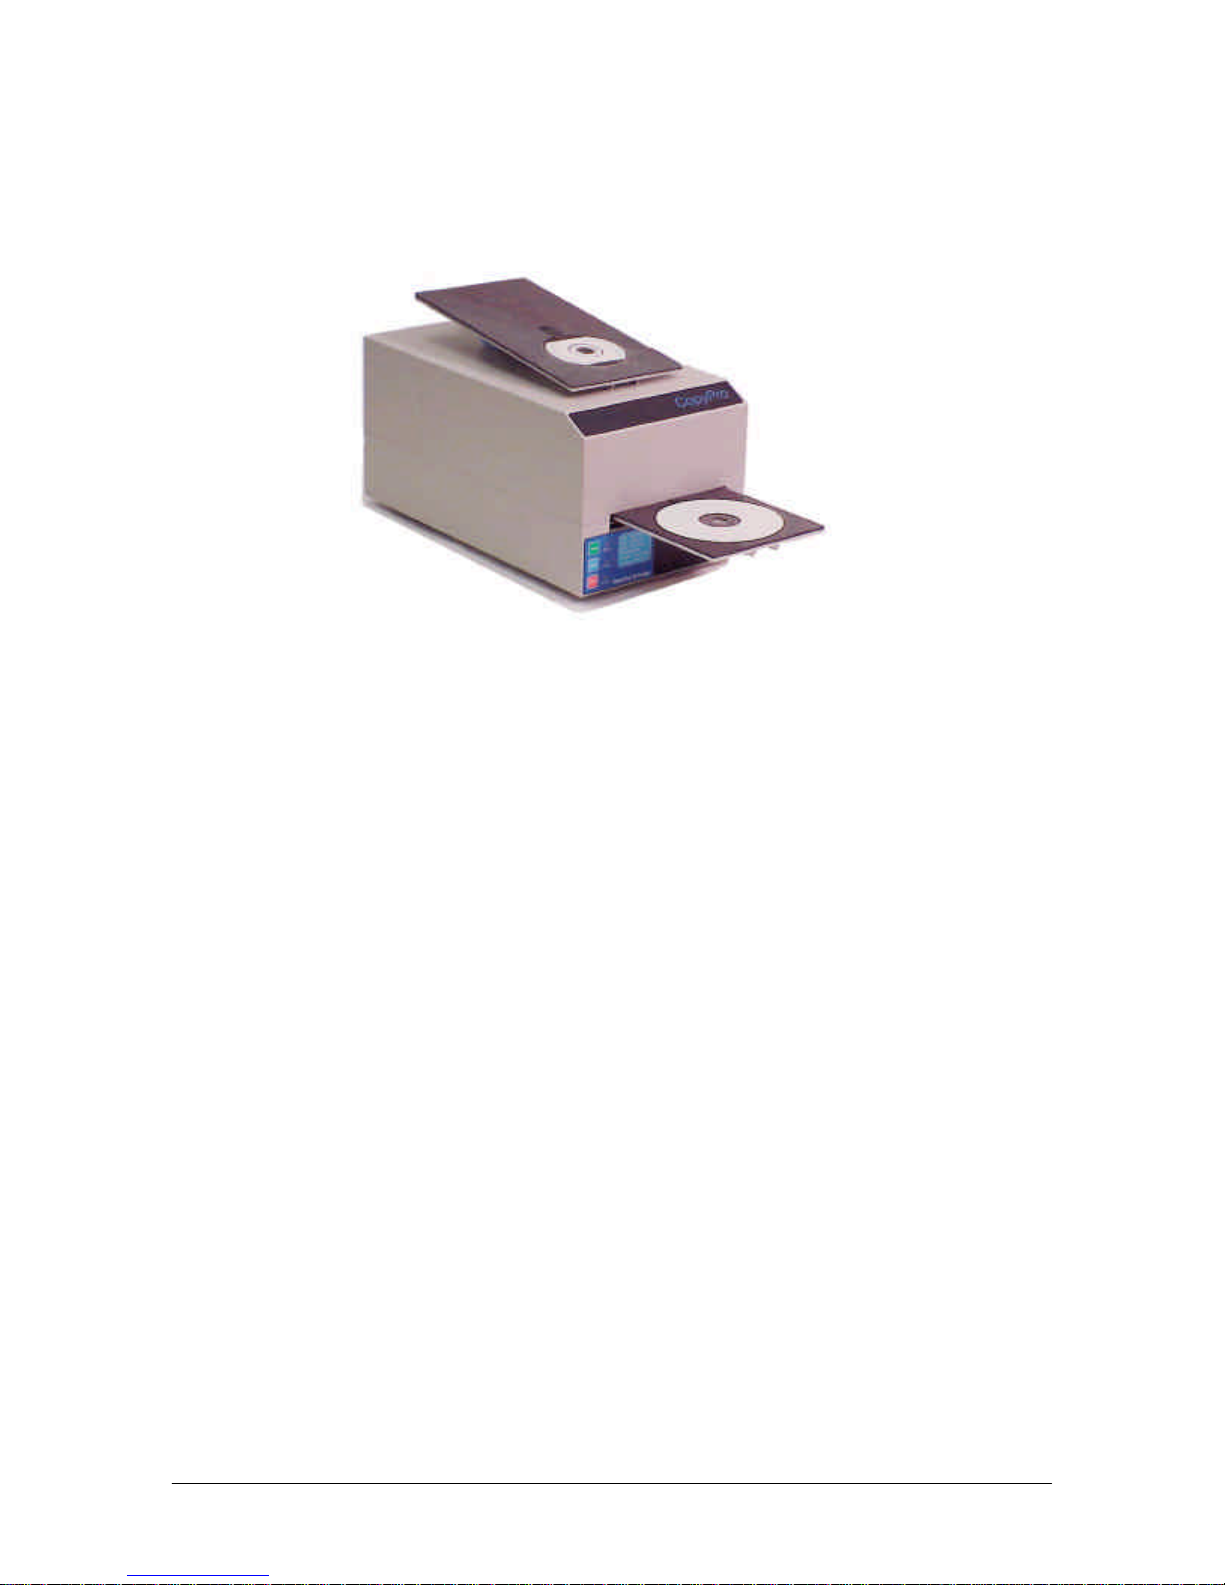
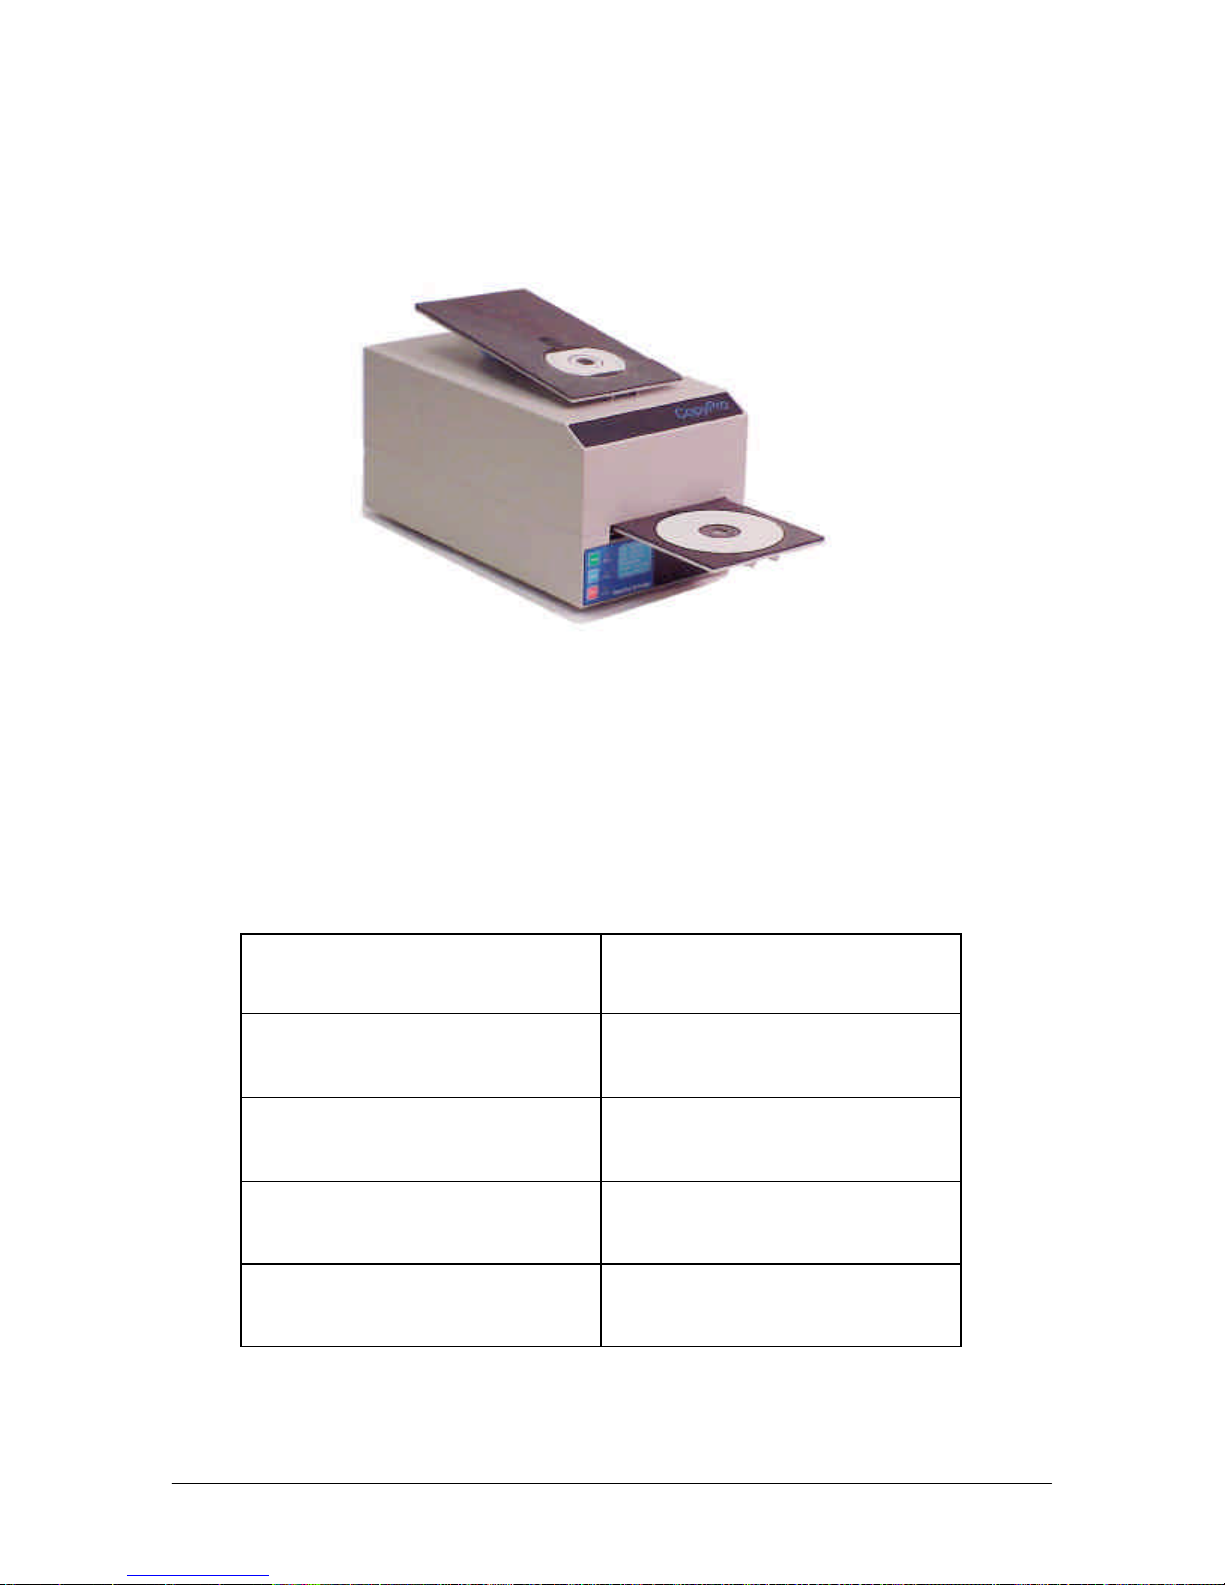
Figure 1: CopyPro PowerPro II CD Printer shown with optional Business Card CD Tray
PowerPro II CD Printer
The CopyPro PowerPro II CD Printer is a thermal transfer printer capable of printing
labels up to 600 dots per inch (DPI) on several types of CD-R, DVD-R or CD-ROM
media surfaces, using appropriate wax/resin thermal transfer ribbons. CopyPro’s thermal
transfer CD labeling technology allows creation of cost effective, durable, waterproof
labels that are printed directly on the surface of the disc.
The PowerPro II CD Printer prints CD labels designed using the CopyPro CD Labeling
software (CD Painter software). Labels created with the CD Painter software can
contain text, and graphics. The PowerPro II Printer Driver for the Windows
environment controls the operation and performance configurations for the PowerPro II
CD printer. The PowerPro II Printer Driver must be installed prior to printing with the
PowerPro II CD printer.
PowerPro II CD Printer Key features
The CopyPro PowerPro II CD Printer offers several features not found on other CD
printers:
• Instant re-print of last label printed
• Removable CD trays for printing on variety of business card shapes discs
• Flip open chassis to allow easy ribbon changed or printhead maintenance
• Software and hardware support for automated printing systems
3
Page 4

PowerPro II
CopyPro PowerPro II
Printer Installation Overview
The PowerPro II User’s Guide, includes:
Quick Setup Directions
• These are brief instructions for printer and software setup by
technical computer users
Standard Setup Directions
• These are more detailed instructions for printer and software setup
by non-technical computer users
General information and Appendix follow Setup Directions
• Printer maintenance
• Ribbon replacement
• Optimizing label print quality
4
Page 5
PowerPro II
CopyPro PowerPro II
Quick Setup Directions
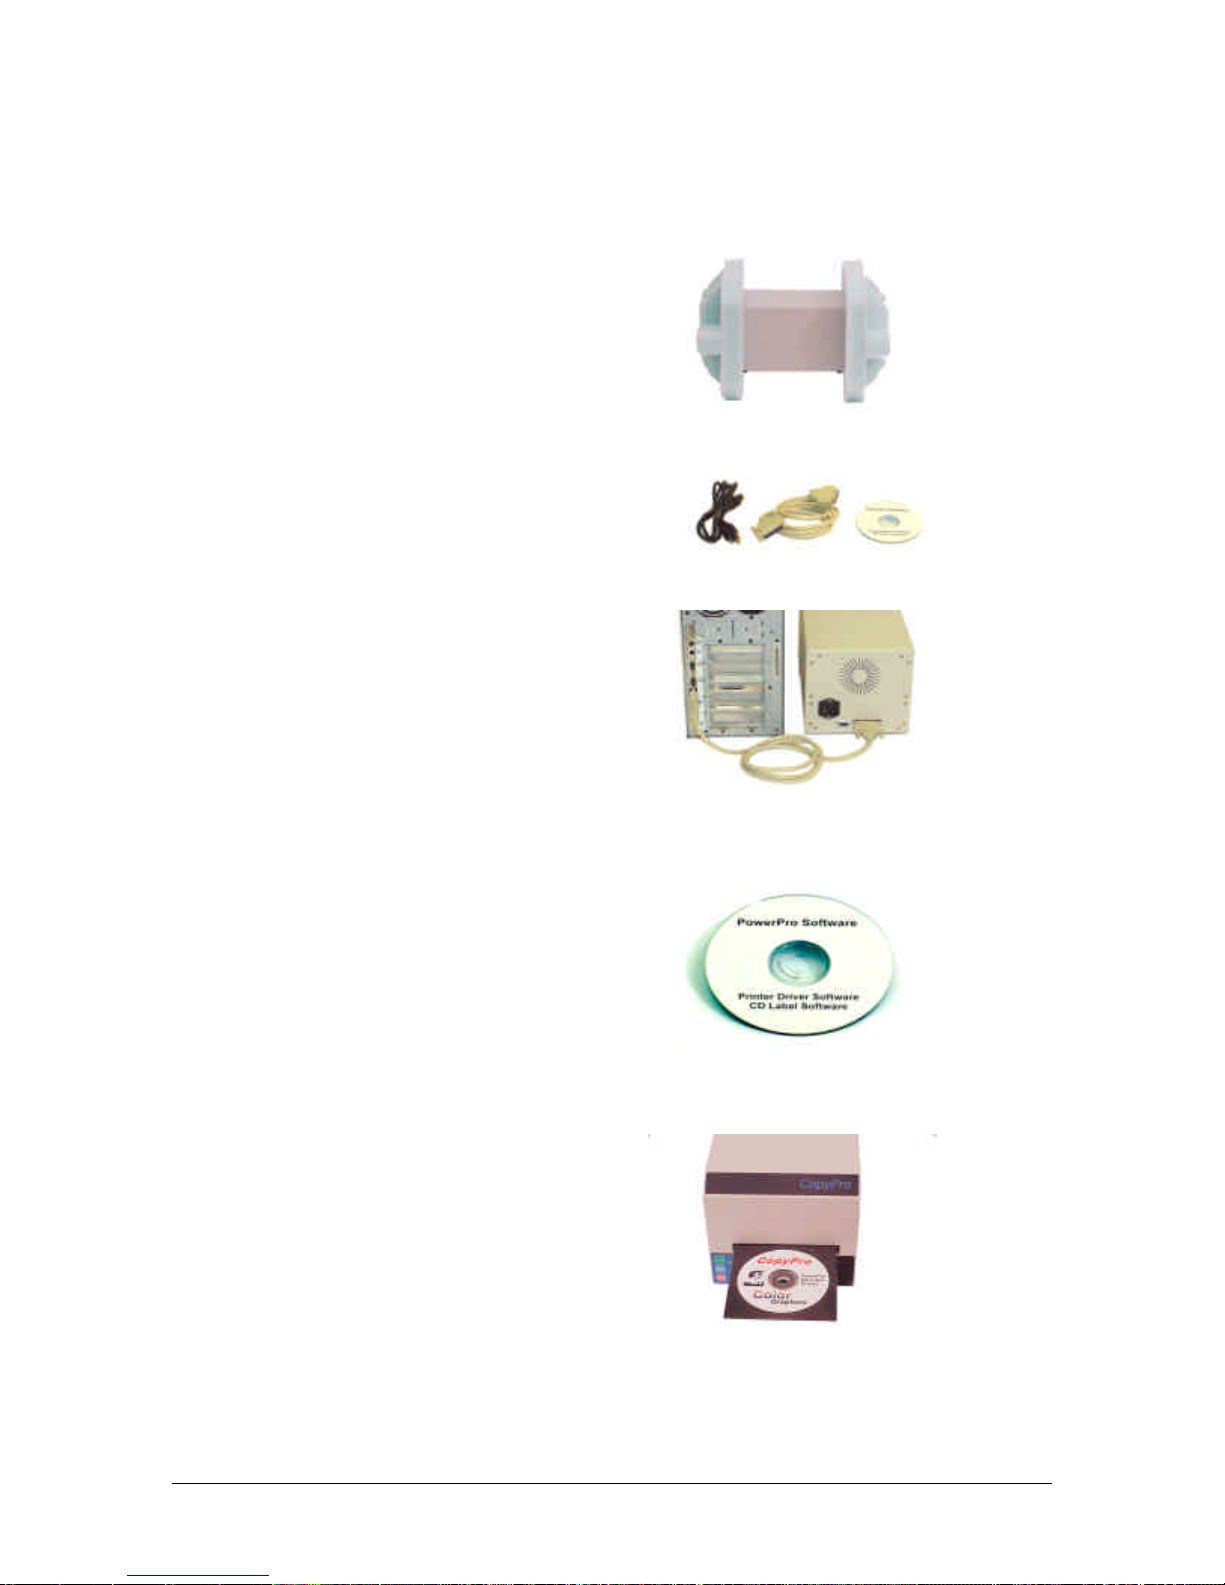
Unpack Printer
• Remove Printer from shipping box and foam
inserts
Printer is shipped with:
• Power Cable
• Data cable
• Printer Software (CD-ROM disc)
• Printer is shipped with a black ribbon installed
Connect printer to computer and power
• Data cable is Grey (DB-25 to DB-25 type of
cable) that connects to computer’s parallel port
• Power Cable connects to 110/220 VAC power
• Note: power supply is auto switching and
compatible with 110/220 VAC power
Install Printer Driver Software
• Printer Driver Software is located on PowerPro
Software CD-ROM
• The printer driver are located in PowerPro II
directory
• Follow standard printer driver install or Add
Printer Wizard procedures and select
appropriate drivers the version of Windows on
the computer connected to the printer
Install CD labeling software (CD Painter
Software )
• CD labeling software is located on PowerPro
Software CD-ROM
• The CD labeling software is located in CD
Painter directory
• Follow standard software install (add program)
procedures and select the Setup file for CD
Painter application
Start CD labeling software (CD Painter)
• Load blank CD (label side up) into printer
(Press Tray button on printer to open tray
• Click on CD Painter Icon to start program
• Create Label design and save label to a file
• Select PowerPro II Printer Driver
• Select File Menu, then Print, (confirm
PowerPro II is selected) then Click OK to print.
5
Page 6
PowerPro II
CopyPro PowerPro II
Installation - Unpacking
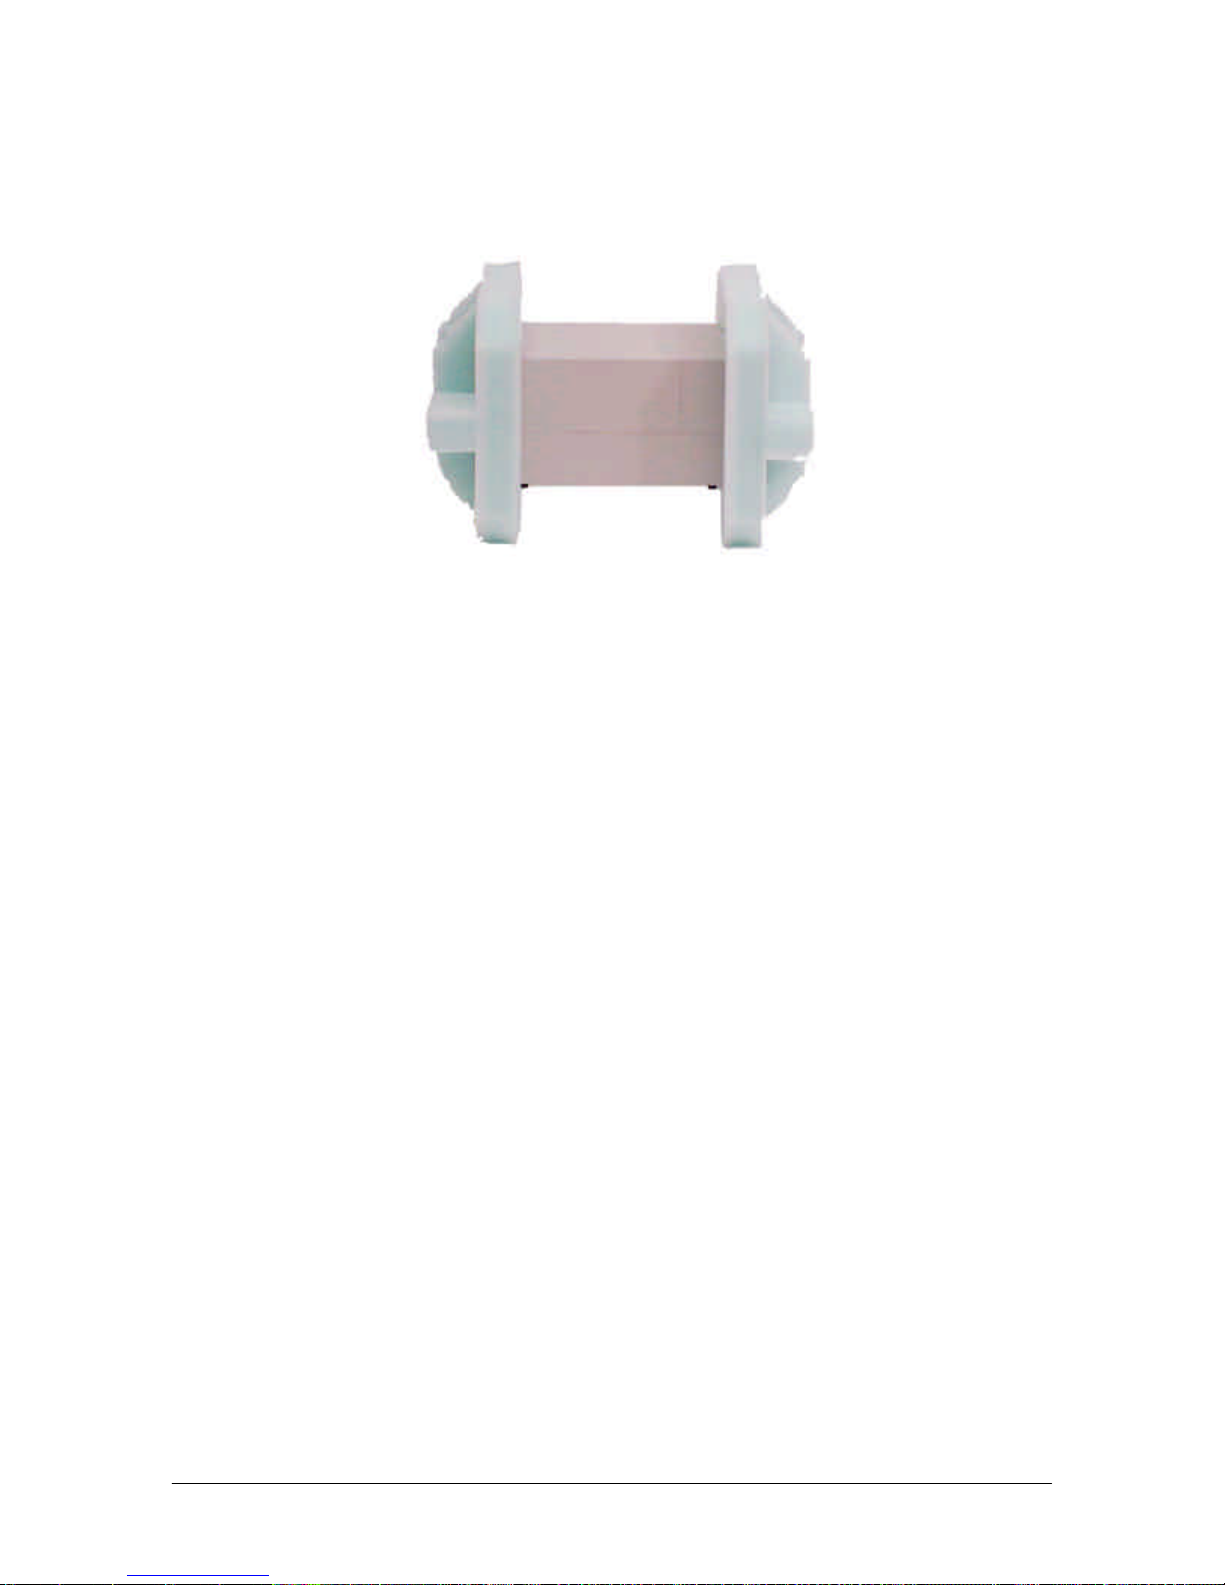
Figure 2: PowerPro II, unboxed, but still in protective shipping foam
Unpacking
• Open the top of the box
• Lift the PowerPro II by gripping the underside of the narrow sides of the unit
• Set the PowerPro II and foam on a sturdy, flat surface
• Support either end of the PowerPro II with an arm and carefully pull the foam off the
elevated end. Repeat for the shipping foam on the other end
Note:
• Printer is shipped with black ribbon installed
• Printer is shipped with top cover secured by plastic wrap
Re-packing for shipment
• Important: Make sure Printer Chassis is locked. Check by lifting chassis up, chassis
should not move. To re-lock, pull Chassis Lock Knob out, then release and check by
lifting chassis, when locked the chassis will not open. (See Parts Identification
section for location of Chassis Lock Knob)
• When re-packing for shipment, secure outer top cover by plastic wrap or tape before
placing printer into foam pieces
6
Page 7
PowerPro II
CopyPro PowerPro II
Note: Chassis flips up to
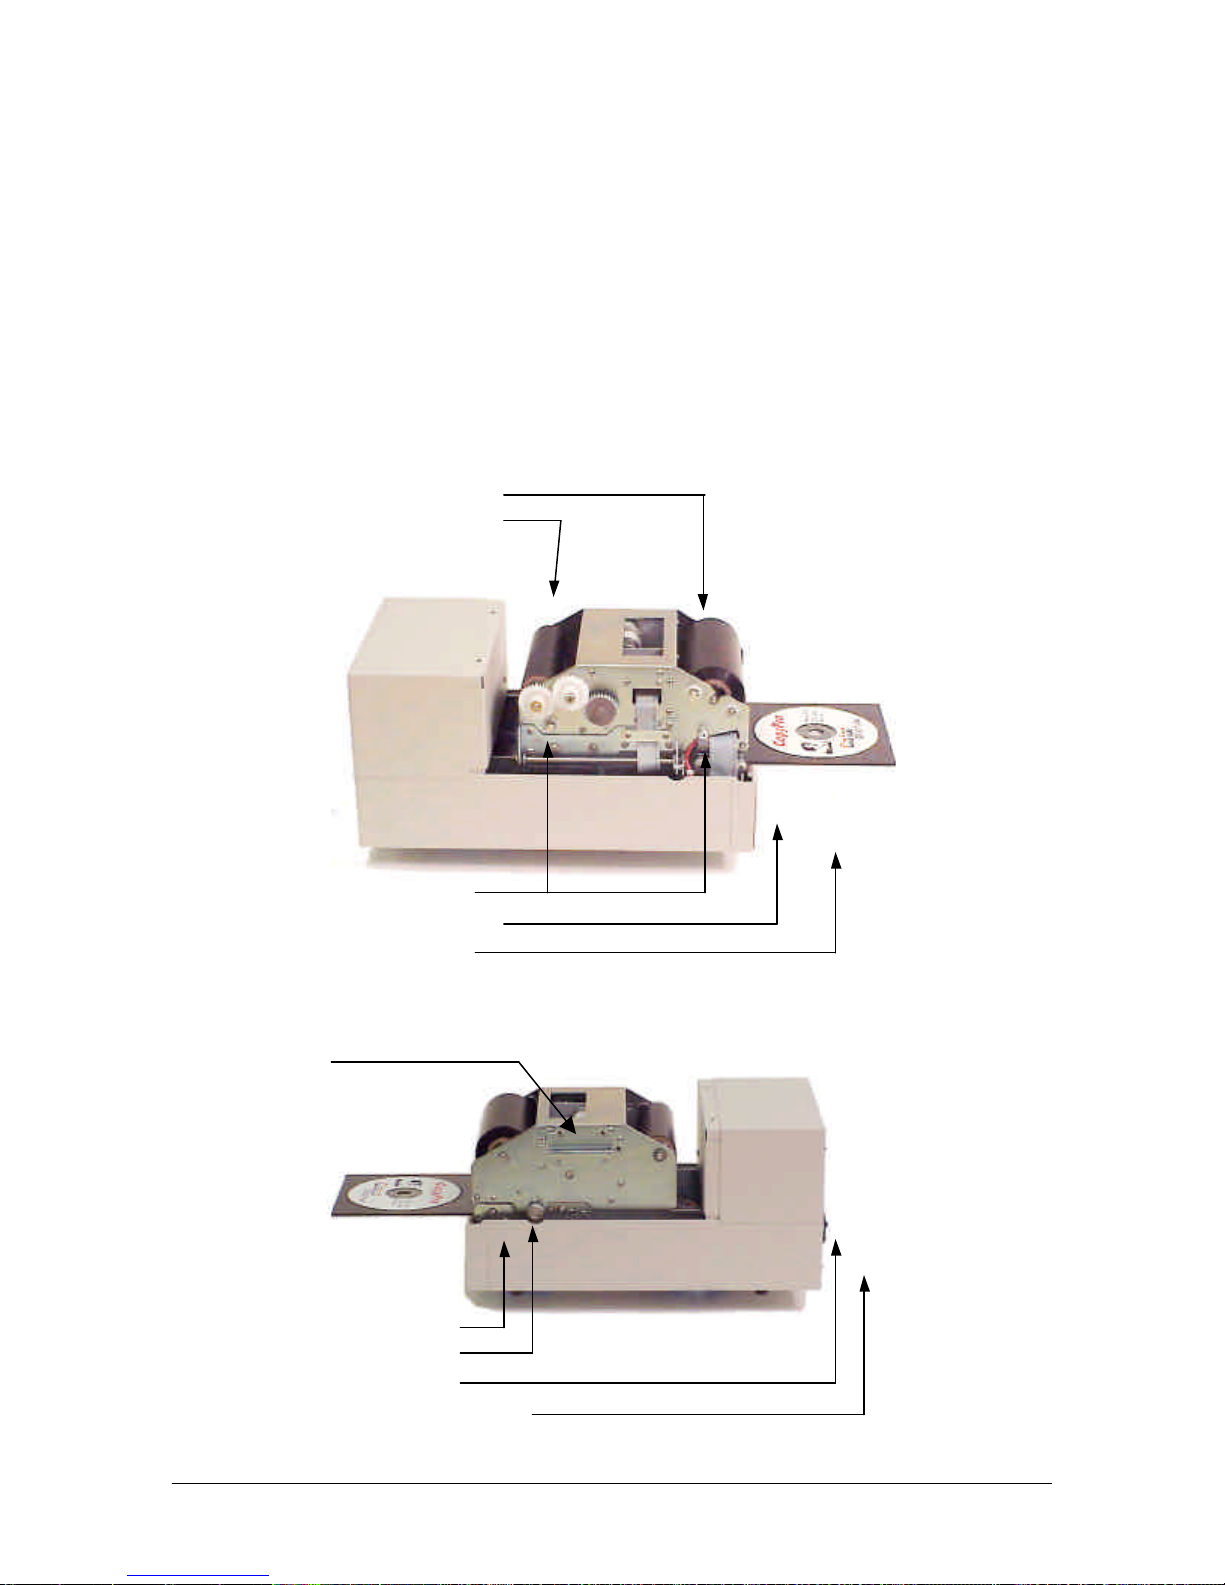
Installation - Parts Identification
You should become familiar with the parts of the printer before attempting to operate it.
See the Maintenance section of this manual for help installing printer ribbons.
• Power switch
• Control panel
• Printer ribbon
• Ribbon supply roller
• Take-up roller (geared)
Printer ribbon:
Supply roller
Take up roller
• Roller clips
• CD Tray
• Parallel Port
• Power Cord
• Autoloader Port
Roller clips
Control panel
CD Tray
Chassis
allow ribbon replacement
Tray Release button
Chassis Lock Knob
Power Switch
Power and Data connectors
7
Page 8
PowerPro II
CopyPro PowerPro II
Installation - Connecting the Printer
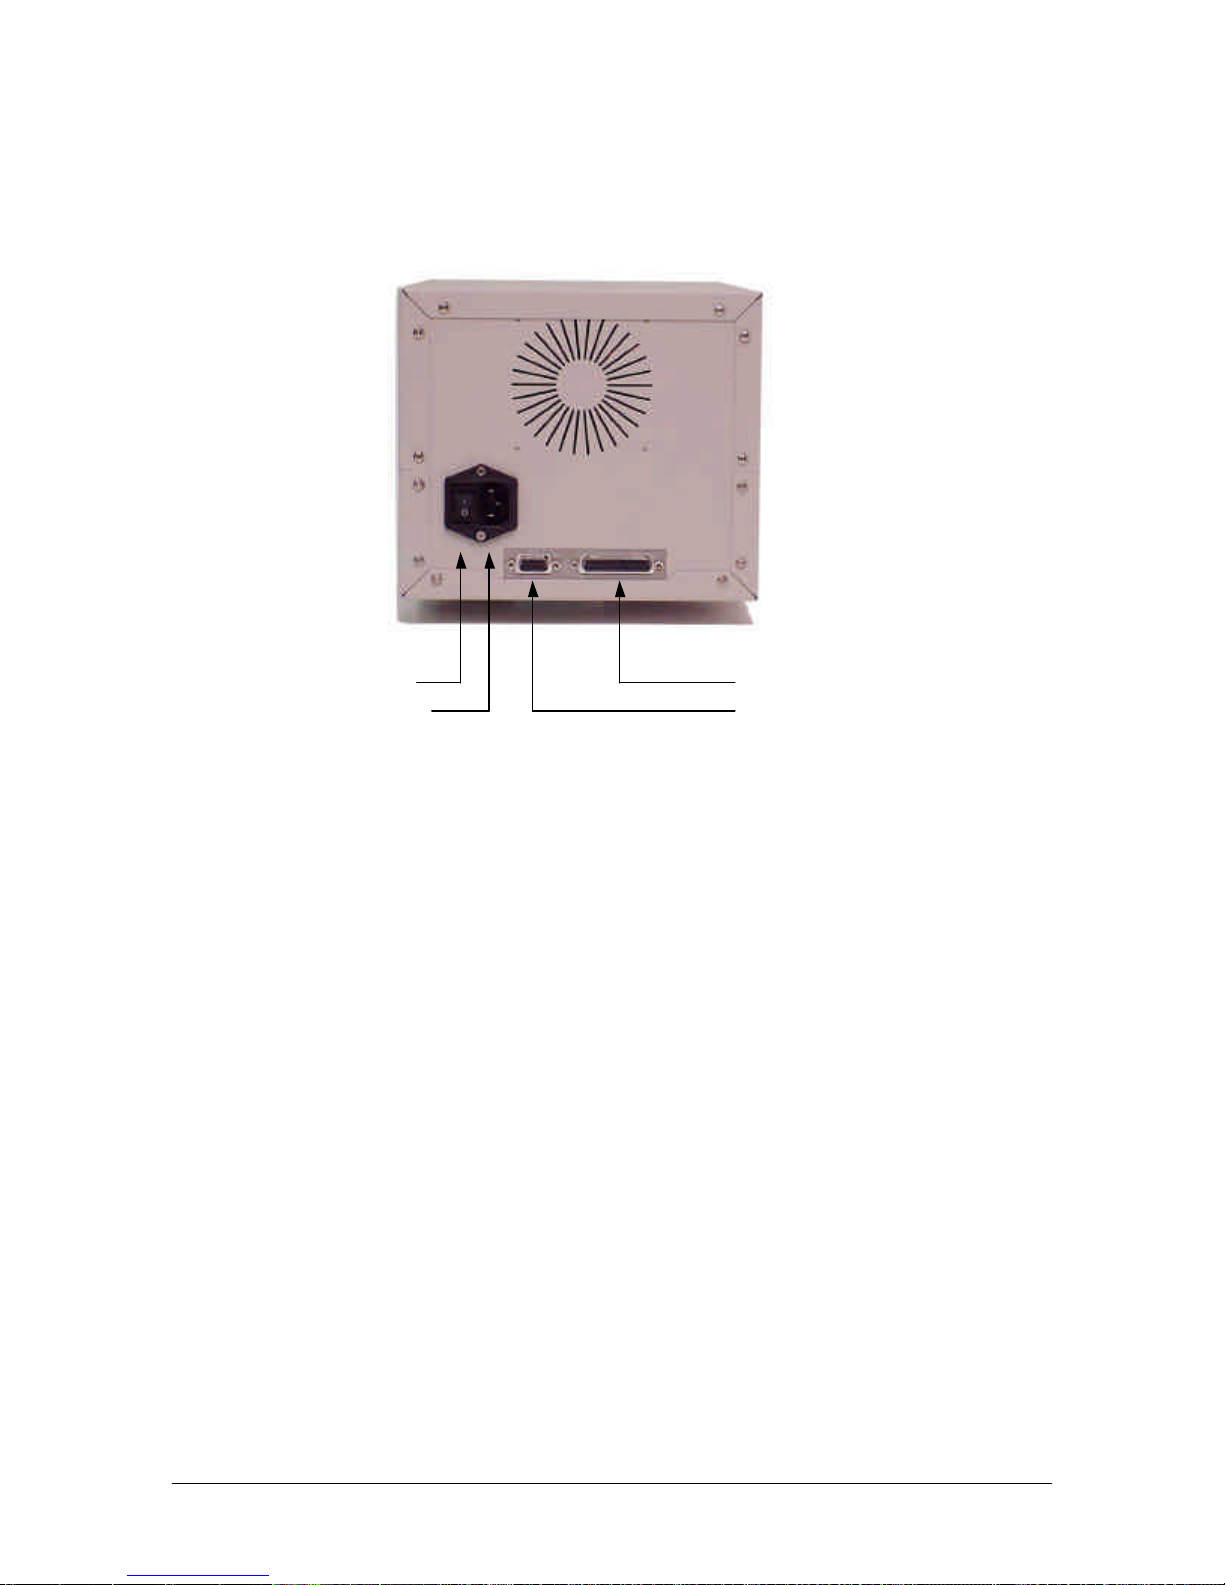
Power switch
Power connection
Figure 3: PowerPro II data and power connections
Parallel port
Autoloader port
Connecting the Printer
The CopyPro PowerPro II has two main connections for operation:
• AC power connection – for 110/220 VAC power
• Parallel port connection – DB-25 “straight through” cable
Before operating the PowerPro II, make sure these connections have been made:
• Plug the supplied power cord into the power connection at rear of the PowerPro II
• Connect the supplied parallel printer cable to the parallel port on the PowerPro II, and
to the printer port on your host computer
• Printer is shipped with a black ribbons installed. If a printer ribbon is not installed,
follow the instructions in the Installing Print Ribbon section
8
Page 9
PowerPro II
CopyPro PowerPro II
PowerPro II Printer Driver Installation
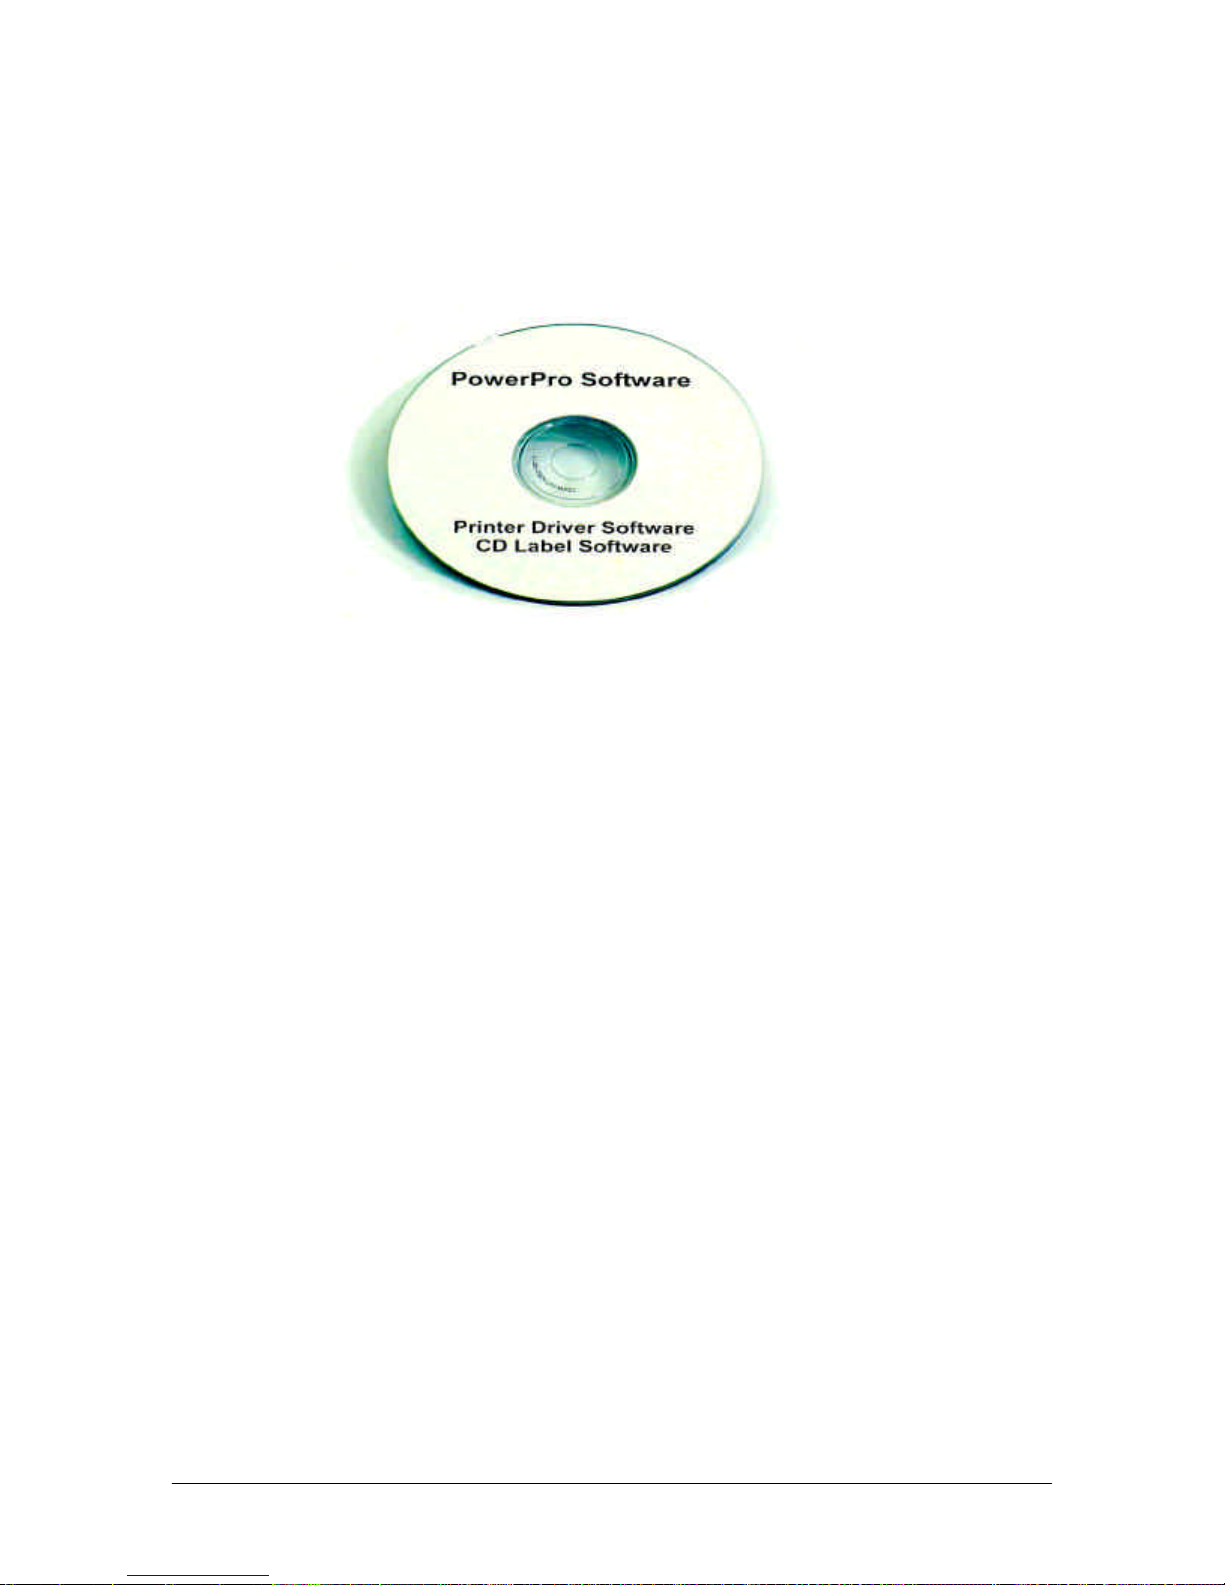
Figure 4: PowerPro Software CD
PowerPro Software
The PowerPro II requires:
• Printer Driver for Windows 98, NT, or 2000
• PowerPro CD labeling software
This software is on the PowerPro Software CD included with printer.
Printer Driver
The printer driver controls the operation for the PowerPro II. The printer driver must be
installed prior to using the PowerPro II for the first time. The printer driver installation
varies with the version of Windows used, see detailed instructions for specific version of
Windows. The printer driver allows the CopyPro CD Labeling software or other labeling
programs to be used with the printer.
CD Label Software
The CD Label Software, which is named CD Painter, is used to create the label that will
be printed on the CD. The CD Label Software provides tools to incorporate text and
graphics of the label. The CD Label program provides convenient CD templates that
correspond to a variety of CD media. In addition, the CD Label software can import
graphic files (such as entire labels) from other programs.
9
Page 10

PowerPro II
CopyPro PowerPro II
Printer Driver Installation for Windows 98
In order to print labels on discs, the PowerPro II printer needs to be connected to a
computer that has the PowerPro II printer driver software installed. The printer driver
software controls the printer's functions and allows adjusting the print density (darkness
or lightness of label), and other printing characteristics. Typically, when printing a disc
label, the printer driver dialog box is displayed showing the name of the printer and
choices for selecting number of copies and selecting printer properties. Listed below are
instructions for installing the PowerPro printer driver for Windows 98.
Printer driver installation for Windows 98:
• Place PowerPro II CD-ROM disk into computer's CD-ROM drive
• Click on Start from Windows Menu Bar
• Select Settings
• Click on Printers
• Double click Add Printer
• Click Next
• Click Have Disk button
• Click Browse, under Drive List Box, select the CD-ROM drive that contains
PowerPro II CD-ROM disk
• Double Click Drivers PowerPro 2A folder
• Click on Win98 folder
• Select PPRO_2A.INF and then Click OK
• Click OK again
• Confirm that CopyPro PowerPro 2A is selected and Click Next
• Select LPT1: Port
• Click Next
• To set the PowerPro II Printer as Default, select Yes (select No if another printer is
normally the default printer)
• Click Next
• When prompted to print test page, select No
• Click Finish
• Windows 98 requires re-starting computer to complete the installation process
10
Page 11

PowerPro II
CopyPro PowerPro II
Printer Driver Installation for Windows NT
In order to print labels on discs, the PowerPro II printer needs to be connected to a
computer that has the PowerPro II printer driver software installed. The printer driver
software controls the printer's functions and allows adjusting the print density (darkness
or lightness of label), and other printing characteristics. Typically, when printing a disc
label, the printer driver dialog box is displayed showing the name of the printer and
choices for selecting number of copies and selecting printer properties. Listed below are
instructions for installing the PowerPro printer driver for Windows NT.
Printer driver installation for Windows NT:
• Place PowerPro II CD-ROM disk into computer's CD-ROM drive
• Click Start button (found on Windows toolbar)
• Select Settings (a list will be displayed)
• Click on Printers
• Double Click Add Printer
• Select My Computer
• (If not selected, Click Next, Select LPT1:, Click Next, Click Have Disk Button
• Click Browse, click Cancel when A:\ is not accessible
• Select the CD-ROM Drive that has the PowerPro II Software CD
• Double Click Drivers folder
• Double Click PowerPro II folder
• Double Click WinNT folder
• Double Click Color folder
• Select PPNTC600.INF
• Click Open, then Click OK
• Select CopyPro PowerPro Color
• Click Next
• At Printer Name Click Next
• Set settings to Not Shared
• Click Next
• When prompted to print test page, Select No
• Click Finish
• Re-start Computer
11
Page 12

PowerPro II
CopyPro PowerPro II
Printer Driver Installation for Windows 2000
In order to print labels on discs, the PowerPro II printer needs to be connected to a
computer that has the PowerPro II printer driver software installed. The printer driver
software controls the printer's functions and allows adjusting the print density (darkness
or lightness of label), and other printing characteristics. Typically, when printing a disc
label, the printer driver dialog box is displayed showing the name of the printer and
choices for selecting number of copies and selecting printer properties. Listed below are
instructions for installing the PowerPro printer driver for Windows 2000.
Printer driver installation for Windows 2000:
• Place PowerPro II CD-ROM disk into computer's CD-ROM drive
• Click Start button (found on Windows toolbar)
• Select Settings
• Click on Printers
• Double Click Add Printer
• Click Next at Add Printer Wizard, make sure Local Printer is selected, then click Next
• Select LPT1: then Click Next
• Click Have Disk Button
• Click Browse
• Select the CD-ROM Drive that has the PowerPro II Software CD
• Double Click Drivers folder
• Double Click PowerPro II folder
• Double Click WIN2000 folder
• Select PowerPro II, Click Open
• Click OK
• Highlight CopyPro PowerPro II, Click Next
• Select Yes to set printer as default, Click Next. (this makes the PowerPro printer
selected first over other printers attached to the computer.
• Select Do Not Share this printer, Click Next
• When prompted to print test page, Select No
• Complete the Add Printer selection, Click Finish
• Wait for the Driver installation process to finish, then re-start the computer
12
Page 13

PowerPro II
CopyPro PowerPro II
Label Software Installation
The CopyPro Label Software (named CD Painter) is a graphics program with built-in
disc label templates that allow the design and creation of labels to be printed on CD
media. The CD Painter software is supplied on the PowerPro Software CD-ROM.
Windows 98: Installation of CD Painter software:
• Place PowerPro II Software CD into CD-ROM drive
• From Windows Desktop, Click on: Start Icon
• Select Settings, Click on Control Panel
• Double Click on Add Remove Program Icon,
• Click Install, Follow Prompts
• Click Browse, then browse for CD-ROM drive
• Select CD-ROM drive, Select CD Painter Folder
• Select and Double Click on SETUP.EXE from PowerPro II CD-ROM from CD
Painter directory and follow Prompts to install the CD Painter software
• Run the CD Painter software and create a CD label
Windows 2000: Installation of CD Painter software:
• Place PowerPro II Software CD into CD-ROM drive
• From Windows Desktop, Click on: Start Icon,
• Select Settings
• Click on Control Panel
• Double Click on Add Remove Program Icon
• Select Add New Programs, Follow Prompts
• Click Browse, Browse for CD-ROM drive
• Select CD-ROM drive, Double Click on CD Painter Folder
• Select and Double Click on SETUP.EXE from PowerPro II CD-ROM from CD
Painter directory and follow Prompts to install the CD Painter software
• After Clicking on Finish, re-start computer
• Run the CD Painter software and create a CD label
13
Page 14

PowerPro II
CopyPro PowerPro II
Windows NT: Installation of CD Painter software:
• Place PowerPro II Software CD into CD-ROM drive
• From Windows Desktop, Click on: Start Icon,
• Select Settings
• Click on Control Panel
• Double Click on Add Remove Program Icon
• Select Add New Programs, Follow Prompts
• Click Install, Browse for CD-ROM drive
• Select CD-ROM drive, Double Click on CD Painter Folder
• Select and Double Click on SETUP.EXE from PowerPro II CD-ROM from CD
Painter directory and follow Prompts to install the CD Painter software
• After Clicking on Finish, re-start computer
• Run the CD Painter software and create a CD label
14
Page 15

PowerPro II
CopyPro PowerPro II
Printer Operation
Once the PowerPro II is properly connected to the host computer, printer ribbon installed,
and the printer driver and CD Painter software are installed on the host computer, the
printer is ready for use.
CD Printing Sequence Overview
• Connect printer power cord
• Connect printer to computer parallel port
• Computer must have PowerPro printer Driver and CD Label software installed
• The printer driver should be set to Black and White if black ribbon is used or Color if
color ribbon is used. Printer driver should show strobe set to 25 (see chart on
following page.
• Power ON printer
• Load CD into printer tray (press TRAY button to open printer tray)
• Create a CD label using the CD Labeling software
• Save the Label file
• Print the label
• If print is too light or too dark, try adjusting printer driver's print strobe setting and
print another disc from label software program
• The CD label is now stored in the printer re-print buffer, press PRINT button on
printer's control panel allows printing additional copies of this label.
Power ON and OFF information
• If the power cord is not already connected, make sure the power switch is off before
connecting the power cord.
• If the power cord is connected, then turn the power switch ON to power up the
PowerPro II. The PowerPro II CD Printer will flash Status LEDs and advance ribbon.
If Black ribbon is detected status LEDs will flash twice, if color ribbon detected the
LEDs flash four times. When power on process is complete printer will show Ready
LED. If an error, such as no ribbon is detected printer will flash status LED with
error code. See error code listing in the appendix for more details.
• To shutdown the PowerPro II, make sure no print jobs are executing, and turn the
power switch OFF. Always shutdown the PowerPro II with the power switch, and
avoid disconnecting the power cord with the power ON.
Printer Ribbon Installation
The thermal transfer ribbons used by the PowerPro II must be installed correctly for
proper label printing. See the Maintenance section for ribbon installation instructions.
15
Page 16

PowerPro II
CopyPro PowerPro II
CD Label Printing Steps
Printing a CD Label with CD Painter
To begin printing labels on CD media, first follow the Power Up and Loading procedures
outlined in the Printer Operation section
1) Select the Print from the File Menu of the CD Painter software
2) Make sure the PowerPro II is selected as the printer to be used.
3) Important: In Properties area select appropriate Color or Black and White selection
in print driver to match the type of ribbon (Color or Black) used in the printer
4) Important: In Properties area check that Strobe Setting, which controls print density
(darkness or lightens of label) is set to the CD Painter's recommended strobe settings
are shown below.
For steps 4 and 5, please see Maintenance section for more detail on Printer Driver
settings
Resolution 600 DPI mode 300 DPI mode
Ribbon type Black Color Black Color
Strobe Setting 25 45 to 65 25 45 to 65
Figure 5: Recommended strobe settings
5) When all preferences are set as desired, click ‘OK’ to begin printing the current label.
6) After one CD has been successfully printed, the label image is stored in the printer’s
memory. Successive prints can be done manually by pressing the ‘Print’ button after
loading a new disc. The label image stored in memory is lost after shutdown (power
off).
Note: A CD label printed on the PowerPro II is stored in the PowerPro II’s memory as
long as the PowerPro II is ON. Only one CD label will reside in the PowerPro II’s
memory at a time. To re-print additional CDs with this stored label, open printer tray by
pressing the TRAY button, load an unlabeled CD, then press the PRINT button on the
printer's control panel.
7) See the CD Painter User’s Guide for instructions using CD Painter to create CD
labels. Follow the procedures in the CD Painter User’s Guide to get a label file
ready for printing.
16
Page 17
PowerPro II
CopyPro PowerPro II
TRAY
PRINT
START
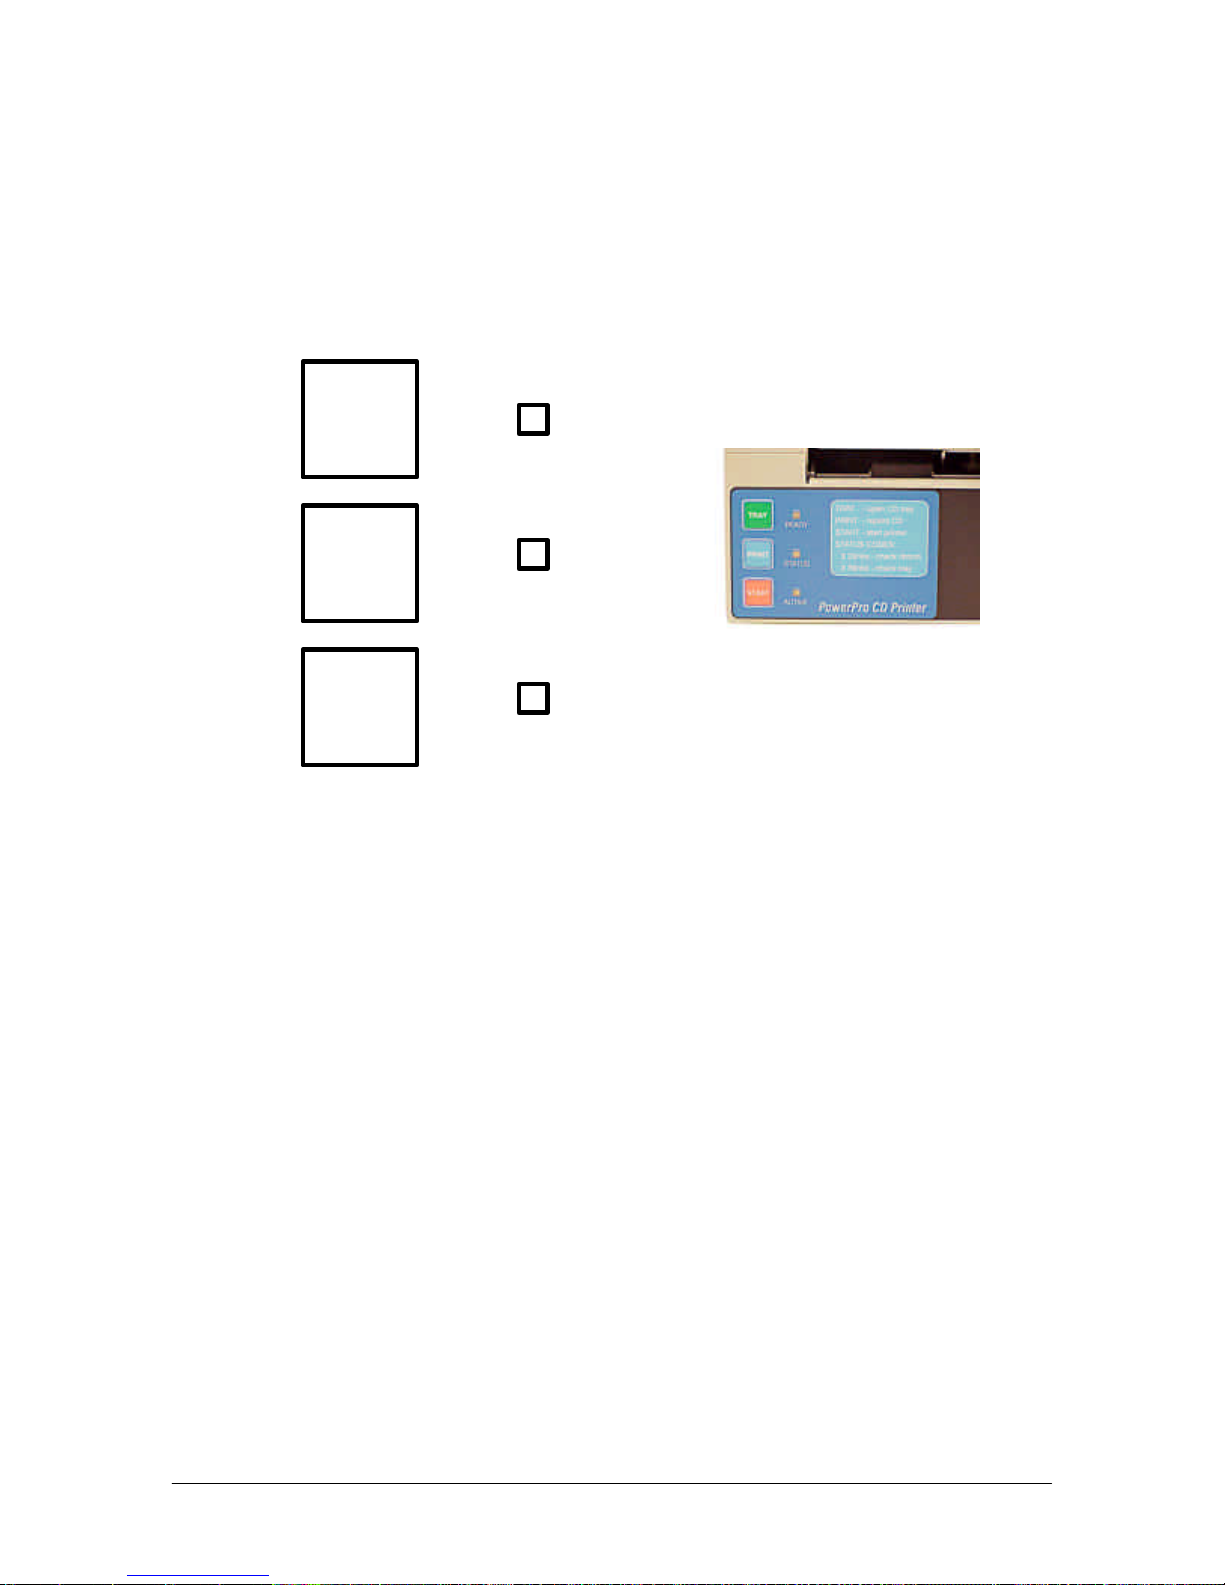
Control Panel Operation
PowerPro II keypad
The PowerPro's Control Panel consists of three buttons and status LEDs, which controls
the operation of the PowerPro II as described below.
READY
STATUS
Figure 6: PowerPro II Control Panel
ACTIVE
Tray Button
The ‘Tray’ button will extend and retract the CD tray. Use this button for manually
opening the CD tray for loading and unloading CD media
Print Button
The ‘Print’ button is used to reprint the most recent label. The CD tray is closed
automatically when the print is started.
Start Button
The ‘Start’ button is used to re-start printer after and error condition (ex. Ribbon out) is
cleared. Pressing 'Start' resets the printer and may allow quick resumption of the print
job. (Some errors may require resubmitting the print file after pressing 'Start')
Ready LED
This LED indicates printer is ON and ready to accept a print job
Status LED
This LED indicates error conditions by flashing error codes (See error code list section)
Active LED
This LED lights when printer is processing data or printing
17
Page 18
PowerPro II
CopyPro PowerPro II
Manual Loading CD Media
Prior to loading the CD
Before manually loading or unloading discs into the PowerPro II, first make sure the
power is on and the ‘Ready’ LED is on. If the CD tray is already extended, a new CD
may be placed with the printable side up on the cushioned surface. If the tray is not
extended, press the ‘Tray’ button to open it. The printable side of the CD surface is
facing up when the stacking ridge near the center edge of the CD is facing down, as
shown below. Please note: DVD media will have stacking ridge on both sides of disc.
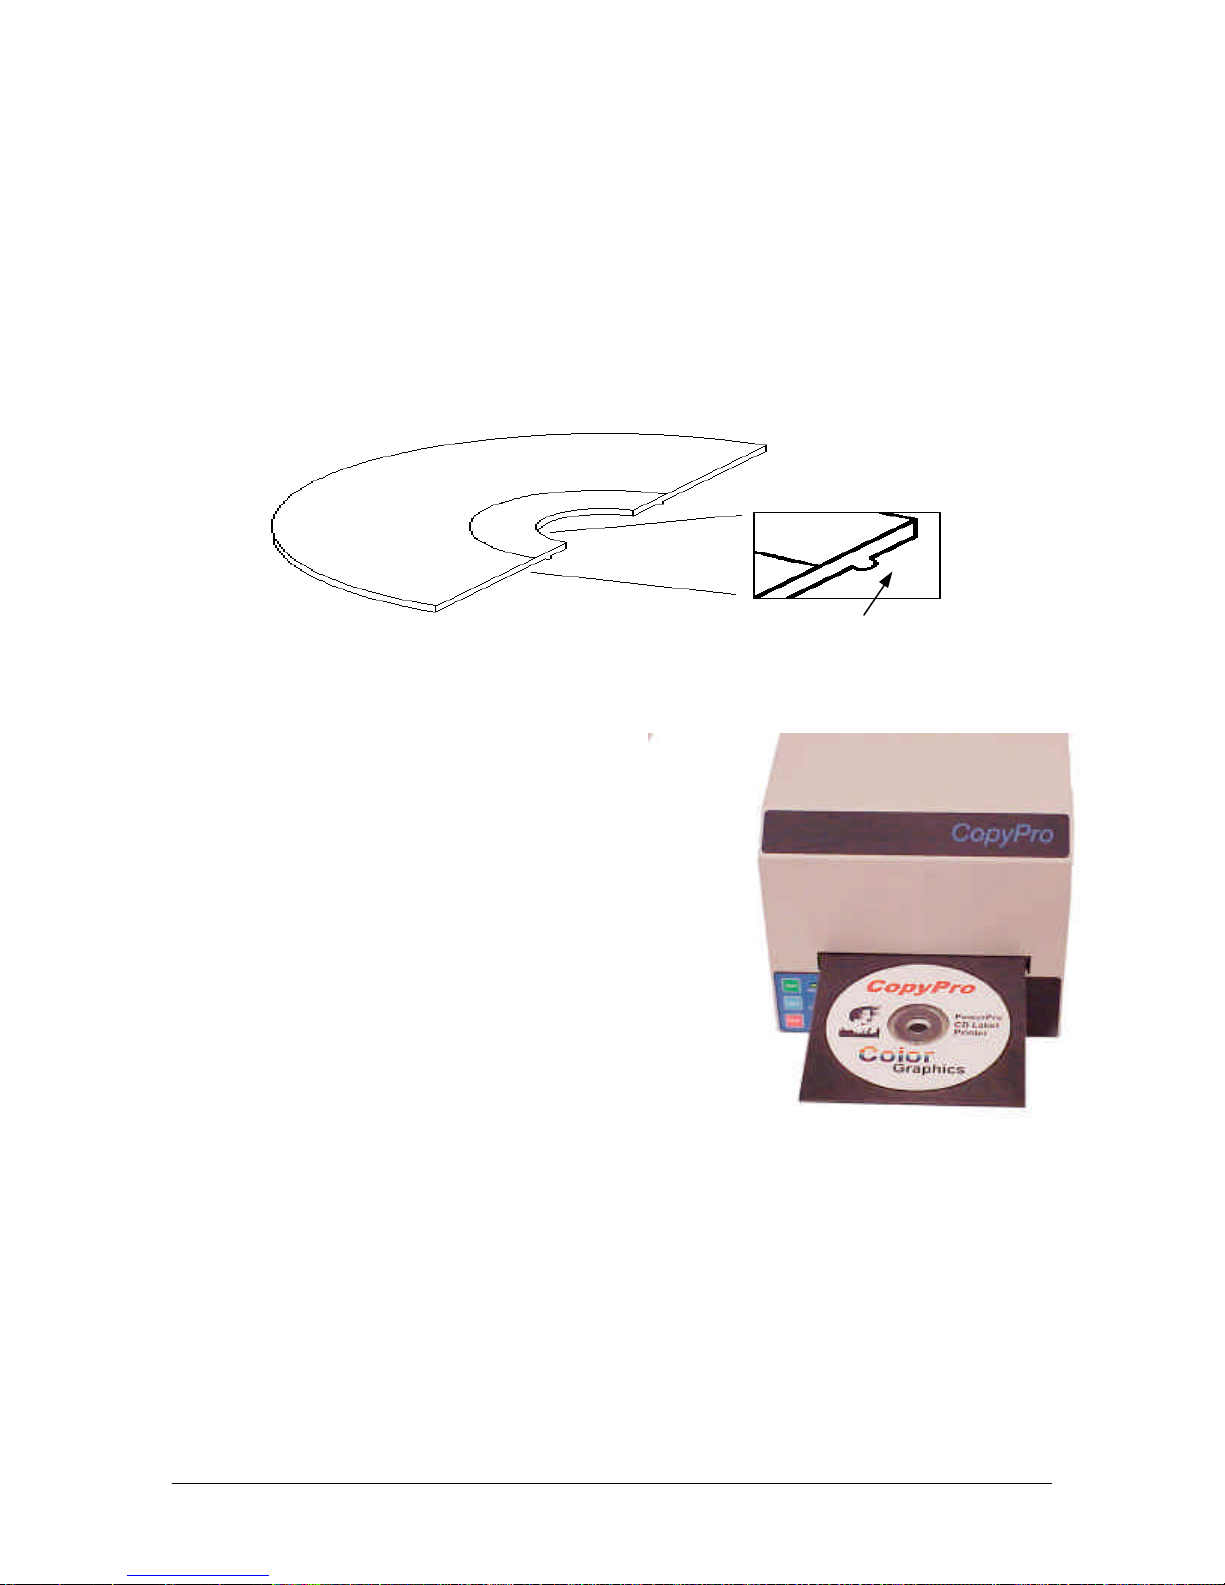
Printable Side Up
Stacking ridge
Figure 7: CD Stacking Ridge.
Loading the CD
Place the CD on the cushioned surface so that
it does not rest on any part of the CD
Positioning Surface or on the centering pin.
(See photo).
When the CD is properly positioned, press the
‘Tray’ button to retract the tray.
Note: When handling CD’s, always grip the
CD by only the center or outer edges. Avoid
touching the flat surfaces of the CD.
Fingerprints on the printable surface of the
CD may make printing inconsistent.
Figure 8: CD Tray open .
18
Page 19

PowerPro II
CopyPro PowerPro II
Printing CD Labels
For those new to the PowerPro II CD printer, CopyPro recommends experimenting with a
single CD and using a label design that only covers part of the CD (for example a vertical
bar). This allows repeated prints on the CD (by rotating the CD) and observing changes
made by adjusting the printer driver and label software settings.
Many printing issues can be resolved with adjustment of strobe setting, media type, or
graphics. For printing questions please contact your PowerPro dealer, if possible save
label file in question for review.
Guidelines using appropriate ribbon, media, and graphics
1) Use of appropriate CD-R media for the thermal transfer printing
• Silver media works best with a black ribbon
• White thermal transfer type media with a smooth surface works best with color
ribbon
• White inkjet type media with a rough surface will not provide good results
2) Use of appropriate strobe setting (which controls the darkness or lightness of the
label) for the type of CD-R media and label design
• PowerPro II printer driver software's "Auto" strobe setting should work with most
media
• If label is too light try increasing the strobe setting in increments of 5 until label
has best appearance. If printing does not improve try another brand of CD-R
media.
• If label is too dark light try decreasing the strobe setting in increments of 5 until
label has best appearance. If printing does not improve try another brand of CDR media. Typical strobe settings: Silver media 15, and white coated media 18
3) Use of appropriate text or graphics that are within the range of printer capabilities,
labels that print best include:
• Text only, line art, and clip art
• Mixed text and graphics
• Photos with limited range of colors
• Spot colors
4) Labels that may not print properly are:
• Large single color or revered out text or graphics
• Photos with wide range of color gradient
19
Page 20
PowerPro II
CopyPro PowerPro II
PowerPro printer's multi-tray feature
Figure 9: Printer with Standard CD tray installed and Business Card CD tray (Oval type) shown
Removable CD Tray System
The PowerPro II CD Printer uses different CD trays to handle different shaped CDs and
DVD discs.
CD-R/CD-ROM/DVD Disc PowerPro II CD Tray
• Standard Round Disc
• 120MM
• Mini Round Disc
• 80MM
• Business Card Disc
• Oval Type
• Business Card Disc
Standard Tray
Mini Round Tray
Business Card Oval
Business Card Rectangle
• Rectangle Type
20
Page 21
PowerPro II
CopyPro PowerPro II
Changing the CD Tray
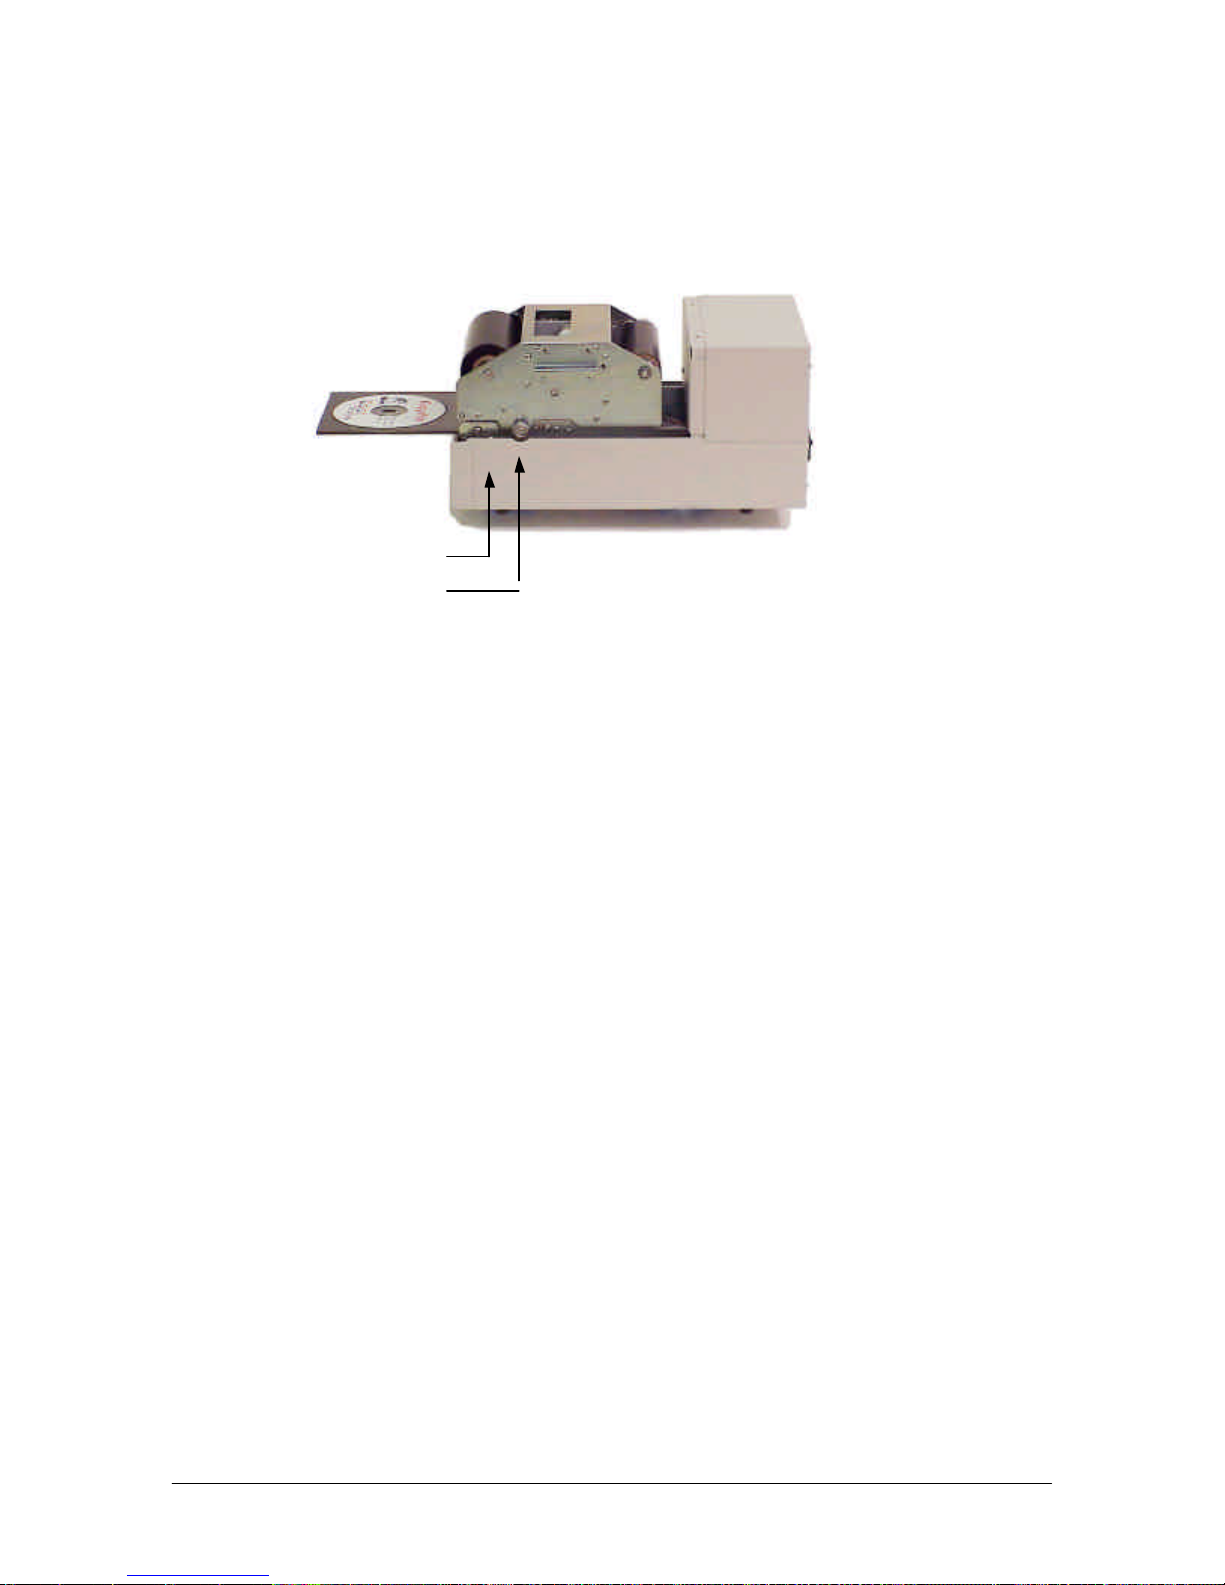
Tray Release Button
Chassis Lock Knob
Note: Tray Release Button is located inside printer case
Figure 10: PowerPro II Tray Release Button location
To Remove CD Tray
• Remove top cover
• From the Printer’s front control panel: Press Tray button to extend tray
• Press Tray Release button (this is a small metal button located near Chassis Release
Knob)
• Hold CD Tray with left hand and pull outward, while pressing Tray Release button
• CD Tray should disengage from printer
To Insert CD Tray
• Turn OFF Power, and remove top cover
• If there is a CD Tray in printer, remove CD tray from printe
• Hold CD tray in front of printer, with circular disc end oriented outward
• Gently guide end of tray into printer
• Try to guide CD Tray straight into printer
• Stop when Tray is at least halfway into printer
• Power ON printer
• At Power ON printer will bring tray into printer at proper position
21
Page 22

PowerPro II
CopyPro PowerPro II
Maintenance: General
To keep the PowerPro II functioning at its best, follow these Usage Guidelines:
Storage
• Keep the PowerPro II on a flat, stable surface.
• Keep the PowerPro II in a room temperature environment, and away from excessive
heat or cold
Startup and Shutdown
• Always use the power switch when powering up or shutting down the PowerPro II
• A power strip (surge protector) is always a good way to protect electronic equipment,
but is not meant as a means of turning on/off the power to the PowerPro II
22
Page 23
PowerPro II
CopyPro PowerPro II
Maintenance: Printer Ribbon Installation
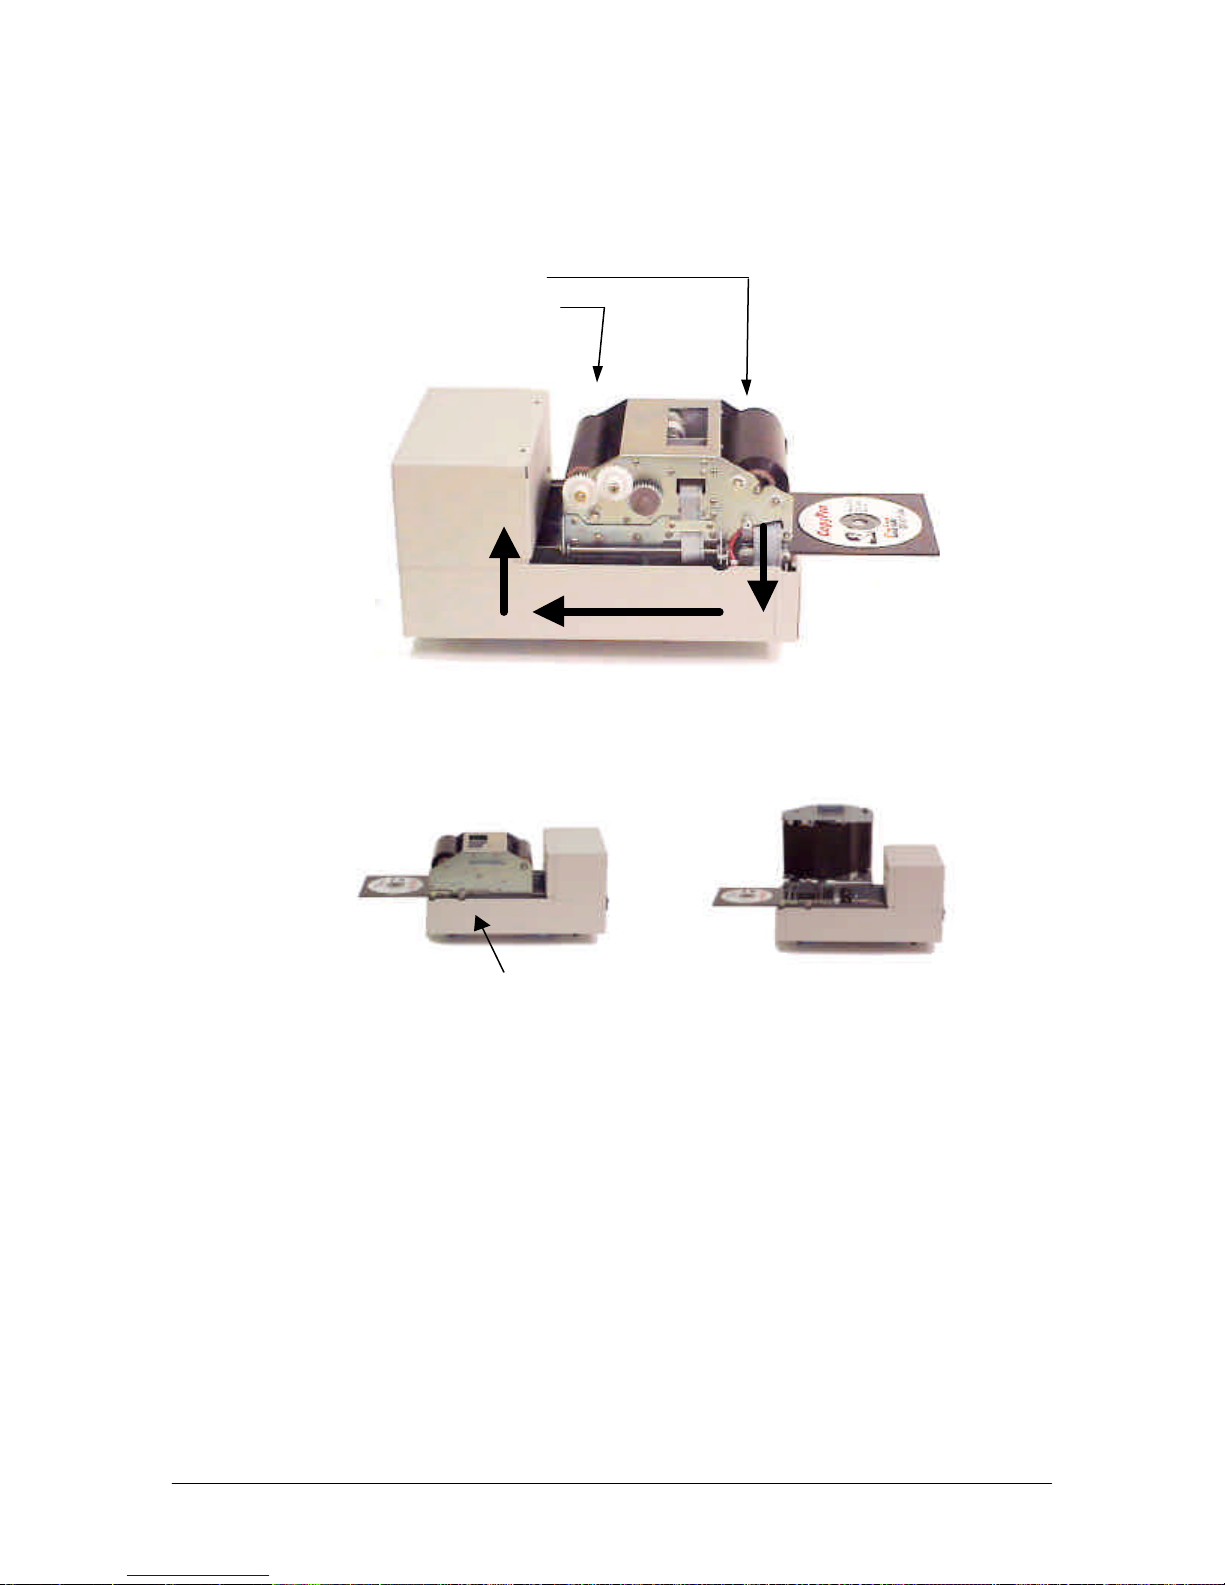
Printer ribbon:
Supply roller
Take up roller
Figure 11: Direction of ribbon travel shown with arrows
Chassis Lock Knob
Figure 12: Printer Chassis shown closed and open
Installing Print Ribbon
The Ribbon Installation procedure is easiest to perform with the CD tray open. It is
recommended that the PowerPro II be turned OFF during ribbon installation.
General information
• The PowerPro II uses ribbon rollers to hold the supply ribbon (ribbon rolled on tube)
and the take up core (empty cardboard tube).
• The supply ribbon is put on a silver roller and the take up core is placed on a grey
(geared) roller
23
Page 24

PowerPro II
CopyPro PowerPro II
• The supply ribbon roller is placed in slots in the front of the printer
• The take up core is placed in slots in central area of the printer
• The ribbon is threaded around the chassis and attached to the take up core using the
adhesive strip on the end of the ribbon (or adhesive tape).
• After the rollers are placed in the Printer Chassis, the chassis must be opened to
thread ribbon through the printer
• Open Printer Chassis by pulling out Chassis Lock Knob
• Lift Printer Chassis upward
• When printer ribbon is installed, close chassis gently, see that Chassis Lock Knob
clicks into place.
• Confirm that chassis is locked by lifting chassis upwards, chassis should not open.
• Ribbon is now installed and Printer ready for printing CD Labels
• Please see Printer Ribbon Installation Chart for more details.
24
Page 25
PowerPro II
CopyPro PowerPro II
Printer Ribbon Installation Chart – Part 1
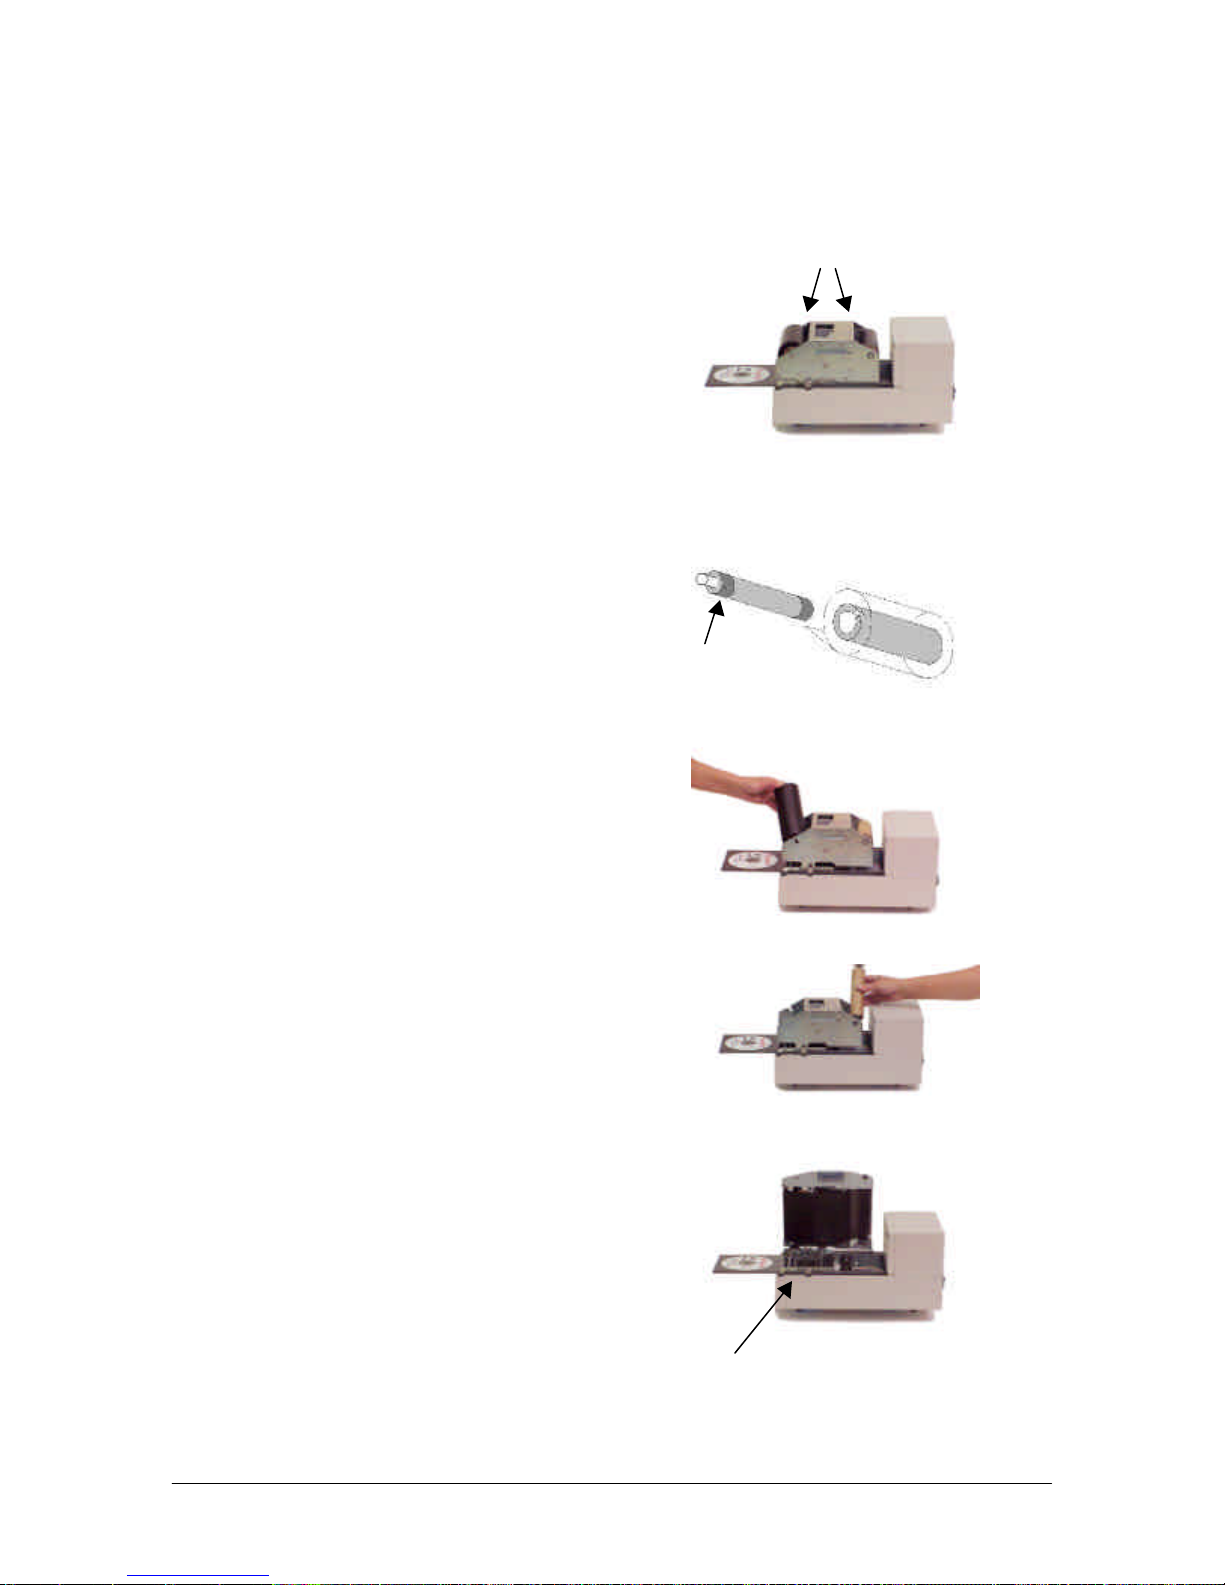
Remove Cover
• Remove the top cover by carefully lifting and
pulling forward. Remove used ribbon from
printer
Note: Ribbon rollers are held in place by locking
clips secured by thumbscrews. Loosen but do not
remove thumbscrews to adjust roller clips.
Load Ribbon Rollers
• Insert the Supply Ribbon core on to the silver
Supply spindle (shown)
• Insert the take up core on to the grey take up
spindle
Note: Ribbon Roller has a metal pin that fits into a
notch ribbon cores
Putting Rollers in printer
• Supply Roller is placed into area at the front of
the printer.
Locking clips
Pin
Note Supply Roller has metal shaft with square end
that fits into square hole in printer frame
• Take up core is placed in area at in the middle
of the printer.
Note Take up core Roller has metal shaft with round
end that fits into round hole in printer frame
Open printer chassis
• Open printer chassis
• Pull out chassis knob, to release chassis lock
Note: Lift chassis up using handle on side of the
chassis. Printer chassis will stay in vertical position
when it is fully opened
Chassis Lock Knob
25
Page 26
PowerPro II
CopyPro PowerPro II
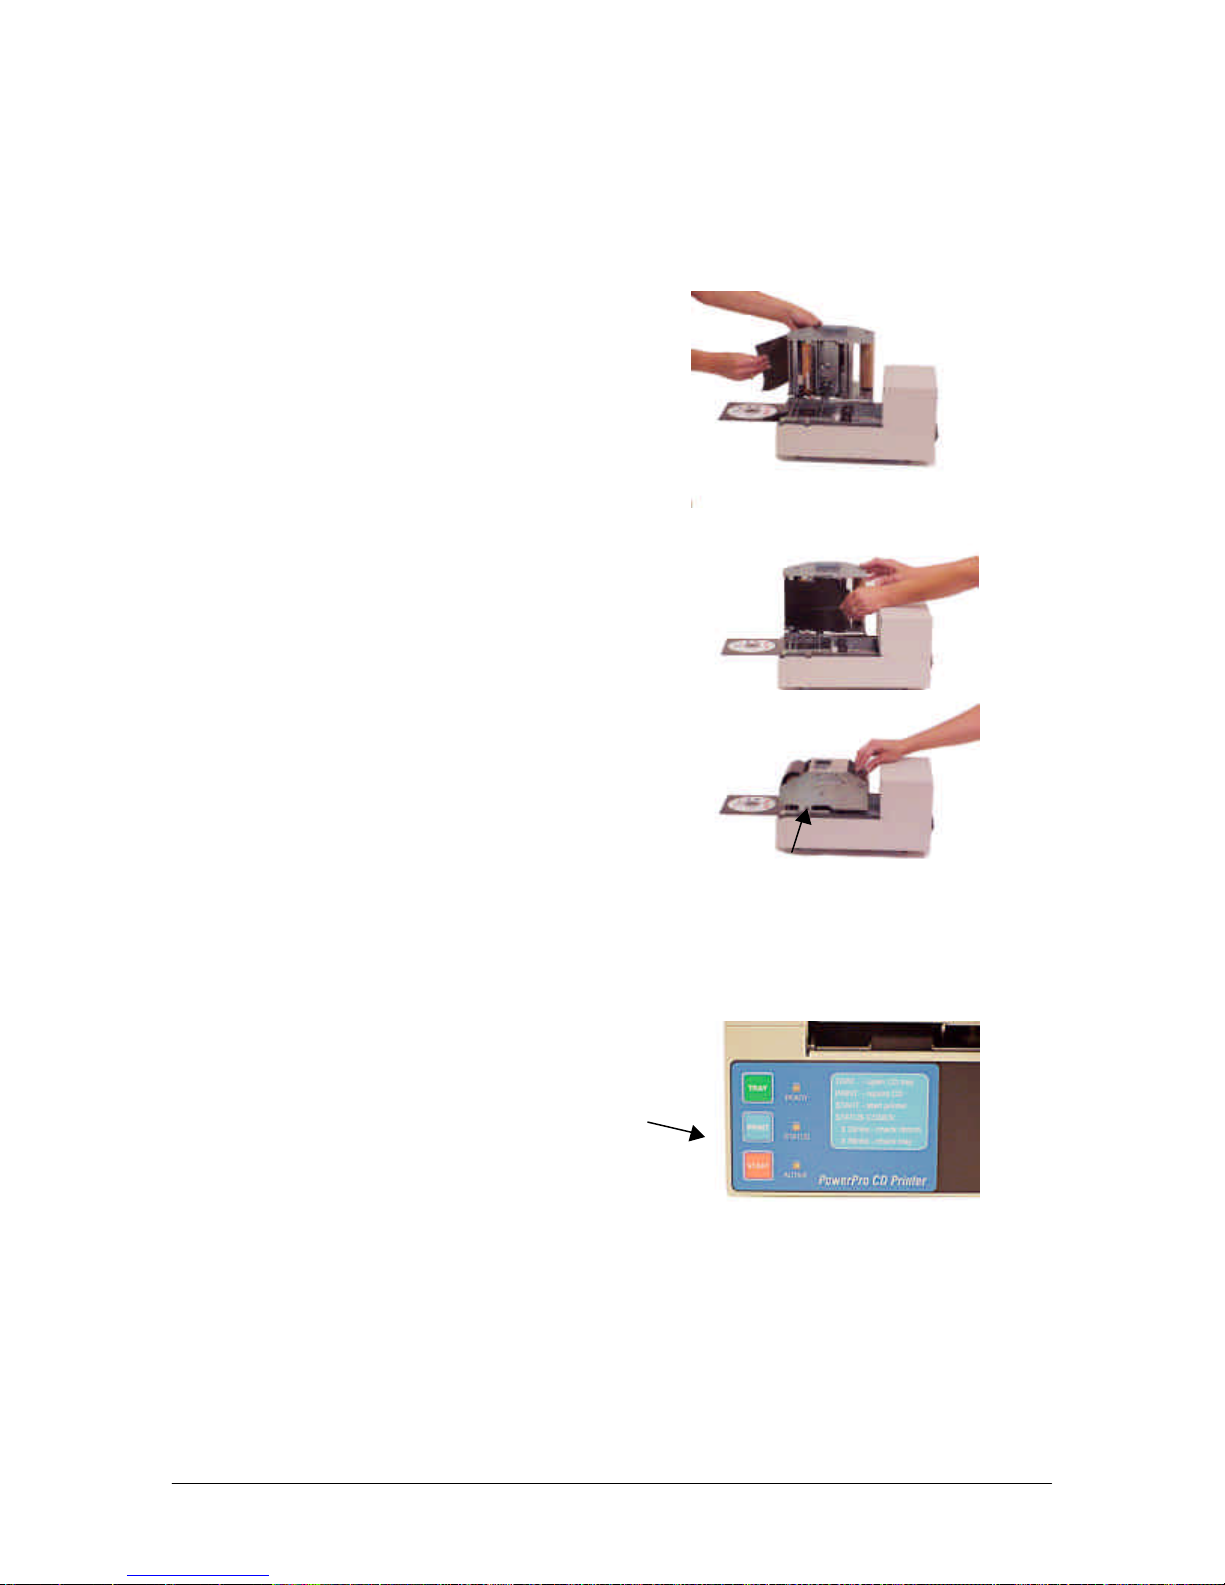
Start &
Printer Ribbon Installation Chart – Part 2
Feed ribbon from Supply to Take up
Roller
• Take end of ribbon from Supply Roller and pull
toward the rear of printer
• Take ribbon around backside of Take up Roller
• Close printer Chassis
Note: Check that Chassis Lock knob has slipped into
locked position.
• Attach ribbon to Take up Roller
New ribbons: the ribbon has a leader with an
adhesive strip, use this strip to adhere the ribbon
to the cardboard core of the Take up Roller
Used ribbons: use adhesive tape to secure the
ribbon to Take up Roller
Wind ribbon to remove slack
• Power ON printer. Printer will wind ribbon as
part of start up sequence
• Ribbon can also be wound by pressing Start and
Print buttons simultaneously
• Ribbon change complete, check software
settings for proper color or black ribbon
selection prior to printing.
Chassis Lock Knob
Print keys
26
Page 27
PowerPro II
CopyPro PowerPro II
Maintenance: Printhead
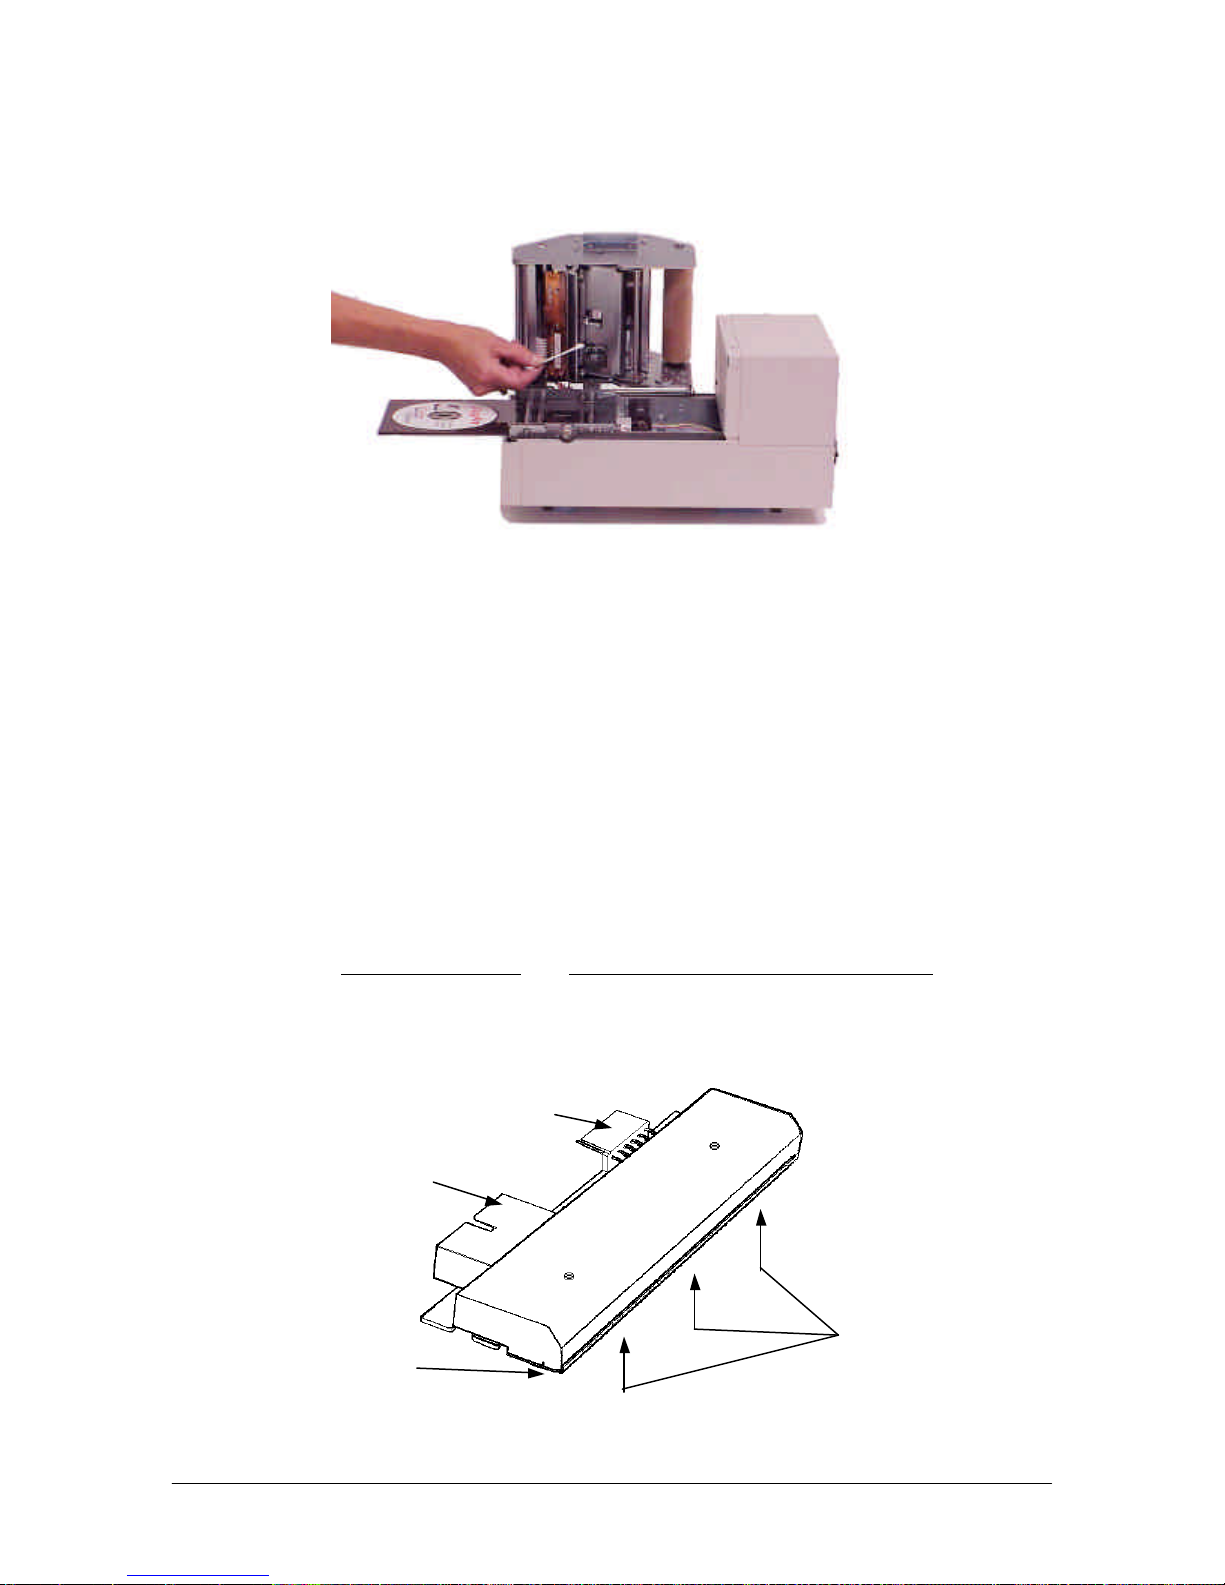
Figure 13: Printer open showing printhead
Cleaning the Print Head
If the CD prints begin to look smeared or develop vertical streaks, it may be time to clean
the print head. The printhead uses a row of heat producing "printing elements" to heat
the ribbon to transfer label ink to the disc. Typically the printhead may have a dust
particle or possible a melted piece of ribbon adhered to the heating elements. These
particles prevent the printhead from transferring ink to the disc label. Cleaning the
printhead, consists of rubbing a cotton swab soaked in alcohol (use standard alcohol
typically available at drug stores that is labeled Isopropyl or rubbing alcohol) over the
printing elements to remove any debris.
Important: The printhead is fragile and can be damaged by improper cleaning. Only use
cotton swabs with alcohol to clean the printhead. The printhead heating elements can be
damaged if touched by hard or abrasive objects. A damaged printhead may leave “white”
vertical lines through all labels, requiring replacement of printhead for proper label
appearance.
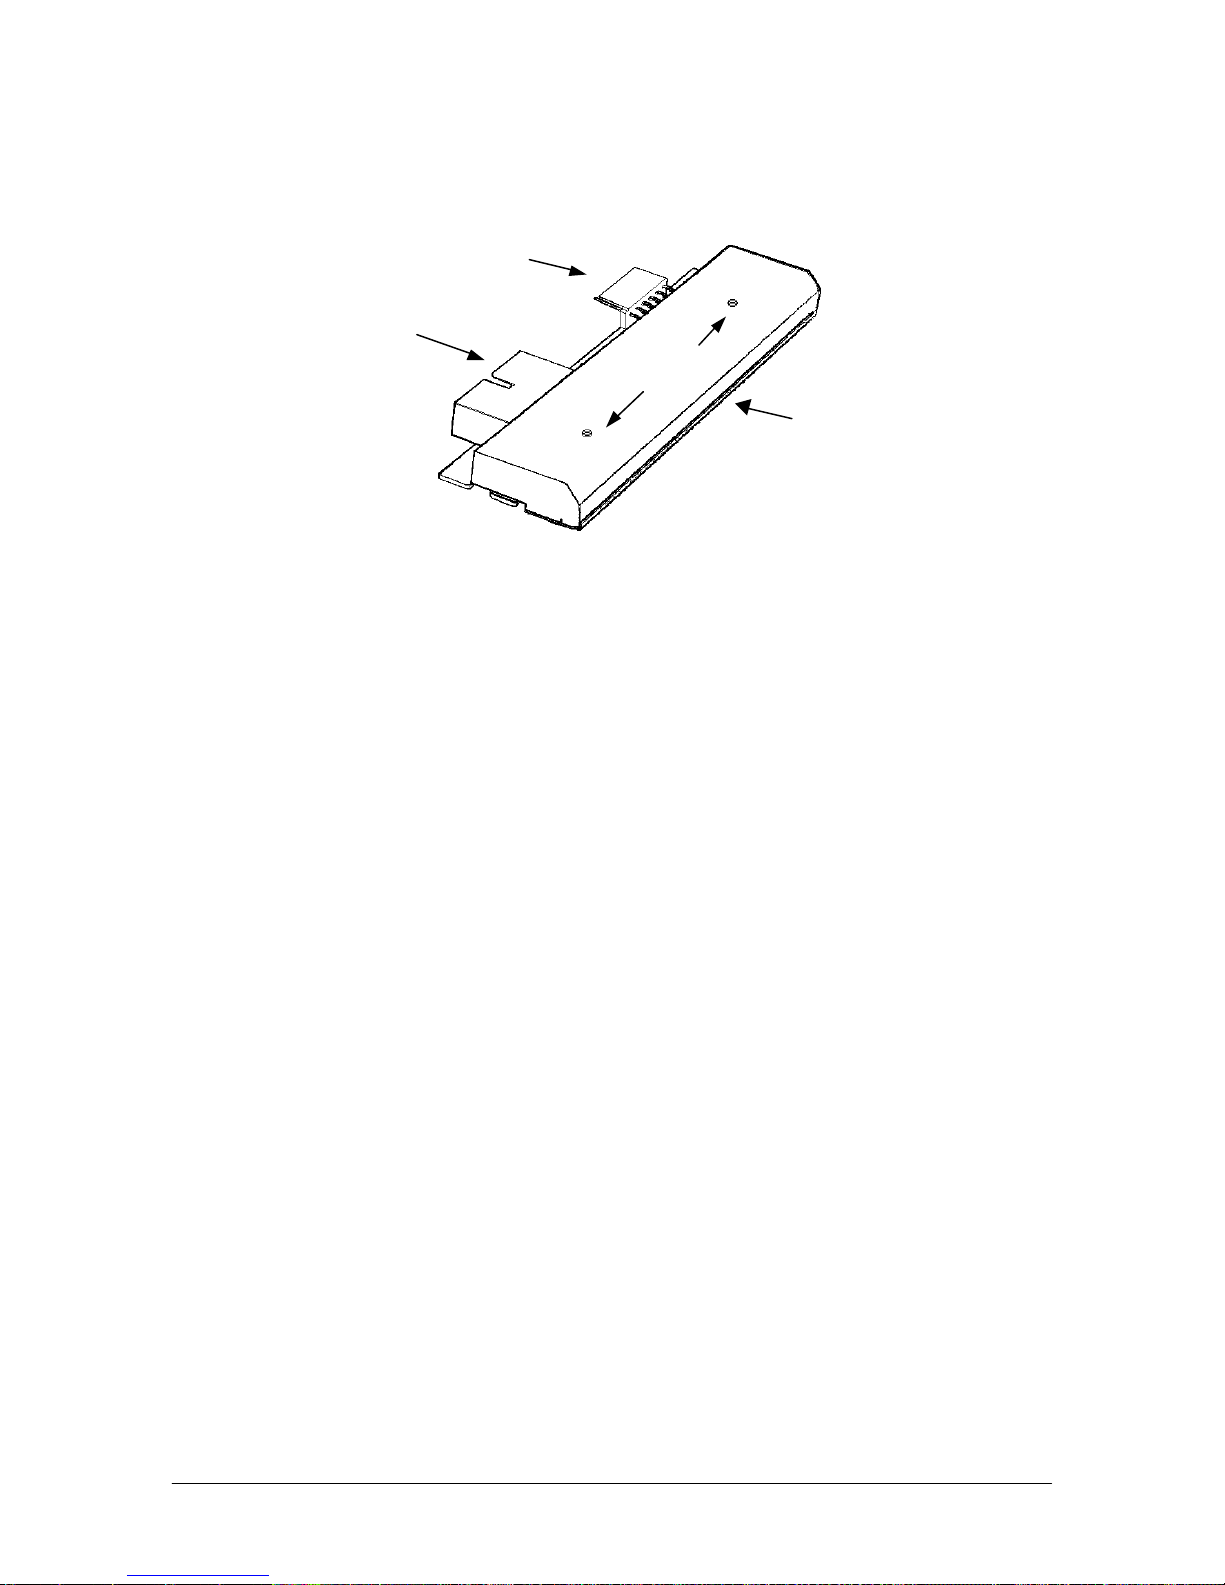
Power Connection
Print Control Connection
Printing Elements
Clean this area
Figure 14: Printhead Unit.
27
Page 28
PowerPro II
CopyPro PowerPro II
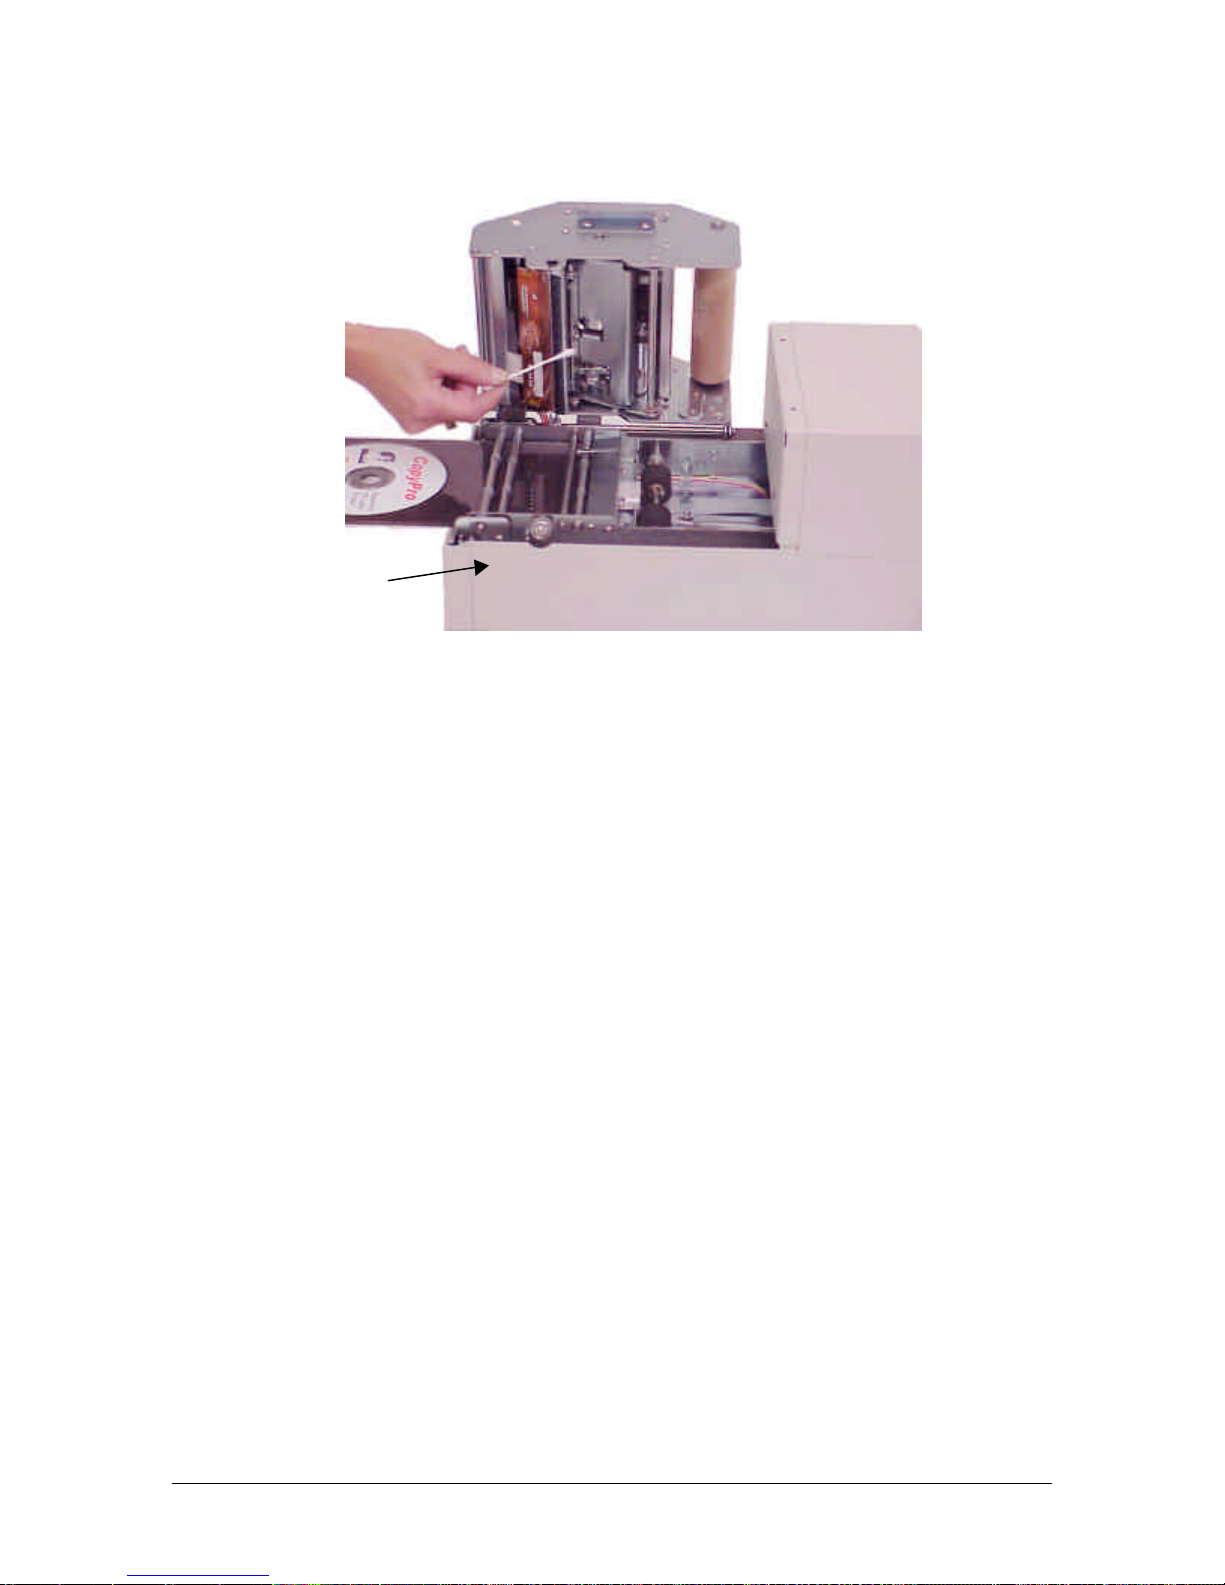
Chassis Release
Button is located
inside case
Figure 15: Printhead cleaning with ribbon removed
Printhead Cleaning Procedure
• If tray is in, press Tray Button to extend tray
• Remove the top cover by carefully lifting and pulling forward. Set the cover aside.
• Open printer chassis by: Pulling chassis release knob and lifting chassis up by chassis
handle
• Remove Ribbon Supply Roller from printer and place on CD Tray, this will expose
the printhead. (As an alternative remove ribbon completely from printer)
• Printhead is now visible from the inside of Printer chassis
• Move the Supply Ribbon roller and ribbon forward and away from the front of the
unit, exposing the printhead.
• Use a cotton swab or Q-tip with a few drops of isopropyl alcohol to gently rub the
printing surface of the print head.
• Use a sweeping motion starting from one end of the printhead to past the other end to
remove any dust particles (do not lift up Q tip in middle of printhead since that may
leave residue in that area)
• Allow the printhead a minute to dry before moving ribbon spindle back on to chassis
• Printer will wind slack ribbon at power ON, or pressing Start and Tray button
simultaneously will also wind slack ribbon
28
Page 29
PowerPro II
CopyPro PowerPro II
Printhead Replacement
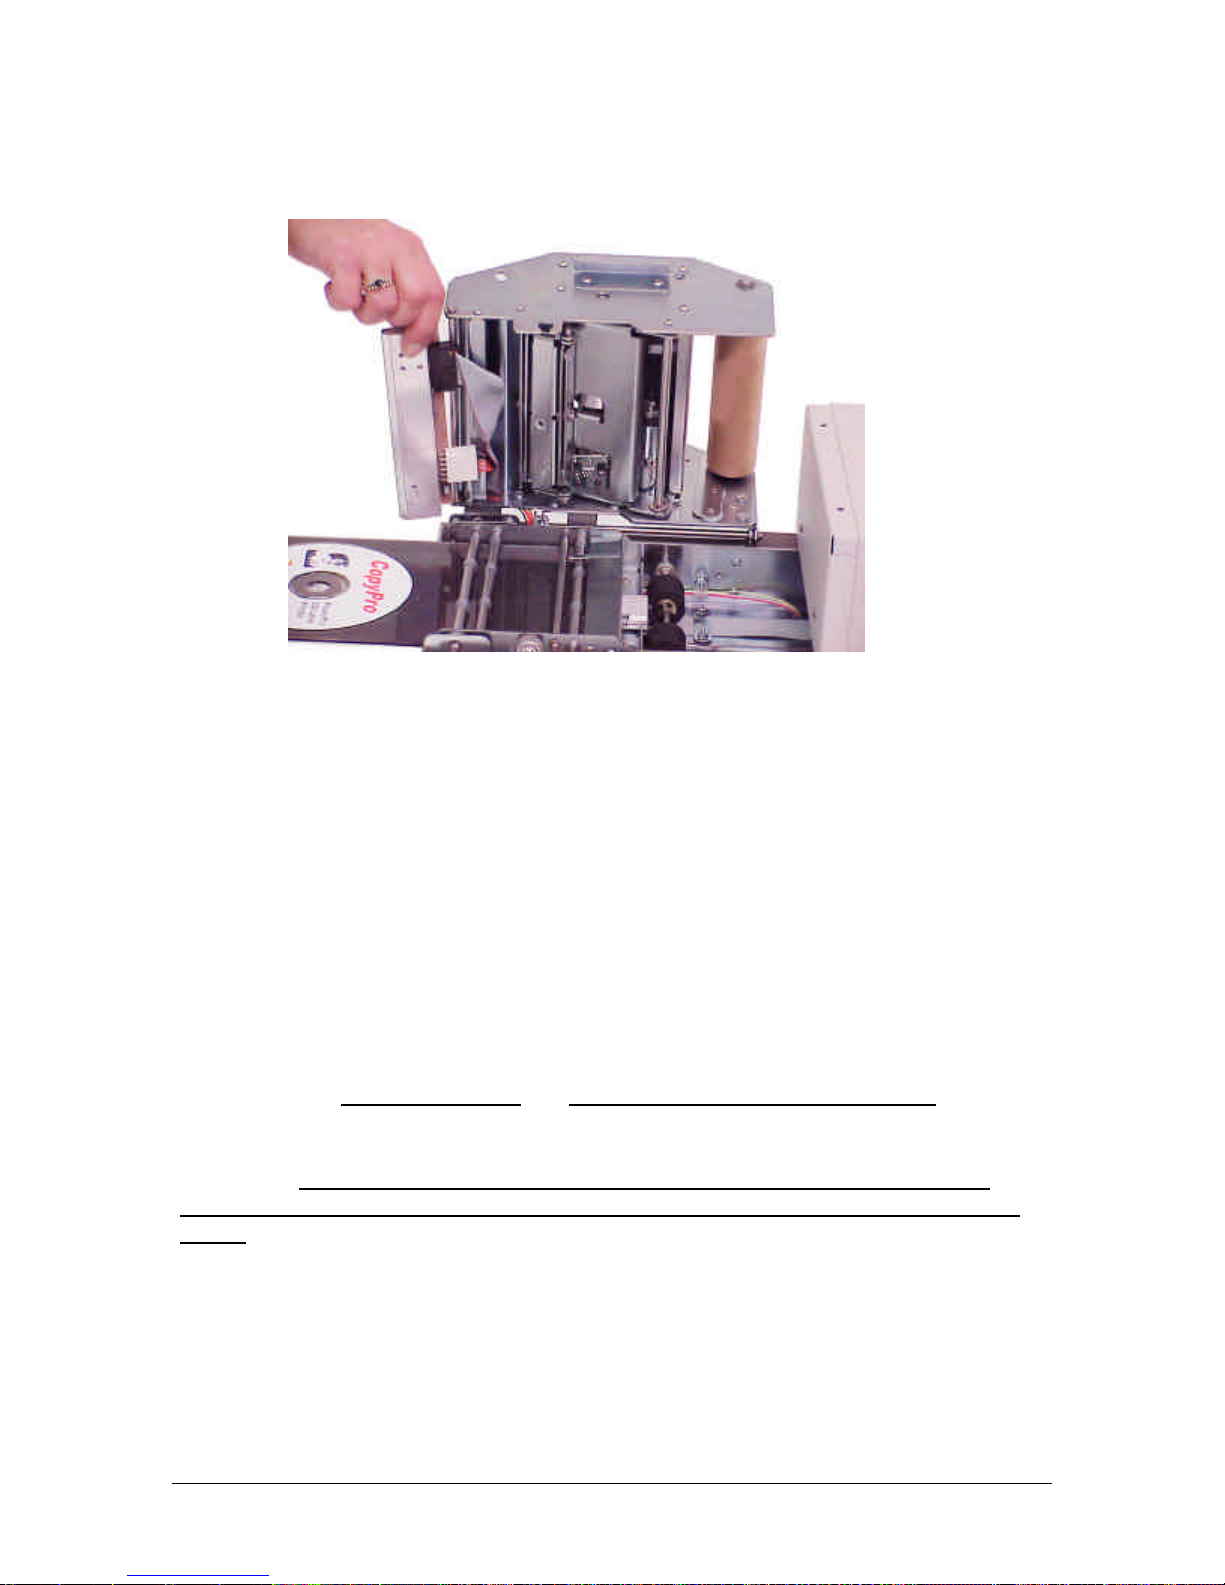
Figure 16: Printhead partially removed
Replacing the Printhead
A damaged printhead may leave “white” vertical lines through all labels, requiring
replacement of printhead for proper label appearance. If the print head must be replaced,
use the following guidelines for replacing the print head.
Note: A "dirty" printhead may produce prints similar to a damaged printhead. Always
clean the printhead and check with a test print to determine if printhead is not damaged,
but only needs to be cleaned.
Cautions in handling printhead
Important: The printhead is fragile and can be damaged by improper handling. The
printhead heating elements can be damaged if touched by hard or abrasive objects.
Important: Always place printhead on clean soft cloth or paper towel. Do not place
printhead on metal or other hard or abrasive surfaces. Printhead heating element area is
fragile.
Important: The printhead's power connector has three black ground wires. The black
ground wires must be connected to the pins of the power connector closest to the center
of the print head.
29
Page 30
PowerPro II
CopyPro PowerPro II
Securing Screw
Printhead Replacement Procedure
Power Connection
Print Control Connection
Holes
Figure 17: The printhead's printing element is fragile, avoid touching the printing element
To replace printhead, you will need the following tools:
Printing element
• Phillips-head screwdriver
Important: Always turn power off and unplug printer prior to removing print head.
Important: The printhead is fragile, avoid touching the printing element, always store
printhead on soft area such as clean paper towel
Wait until all printing has finished, and remove any CD still on the Tray.
• Power off and unplug printer
• Remove the top cover, remove ribbon, and set aside.
• Printhead is head by two Philips head screws
• Look down top of chassis to locate Philips head screws
• Use screw driver to loosen screw (note: screws are captive and will not fall out)
• Open Chassis (pull chassis knob out, and lift chassis)
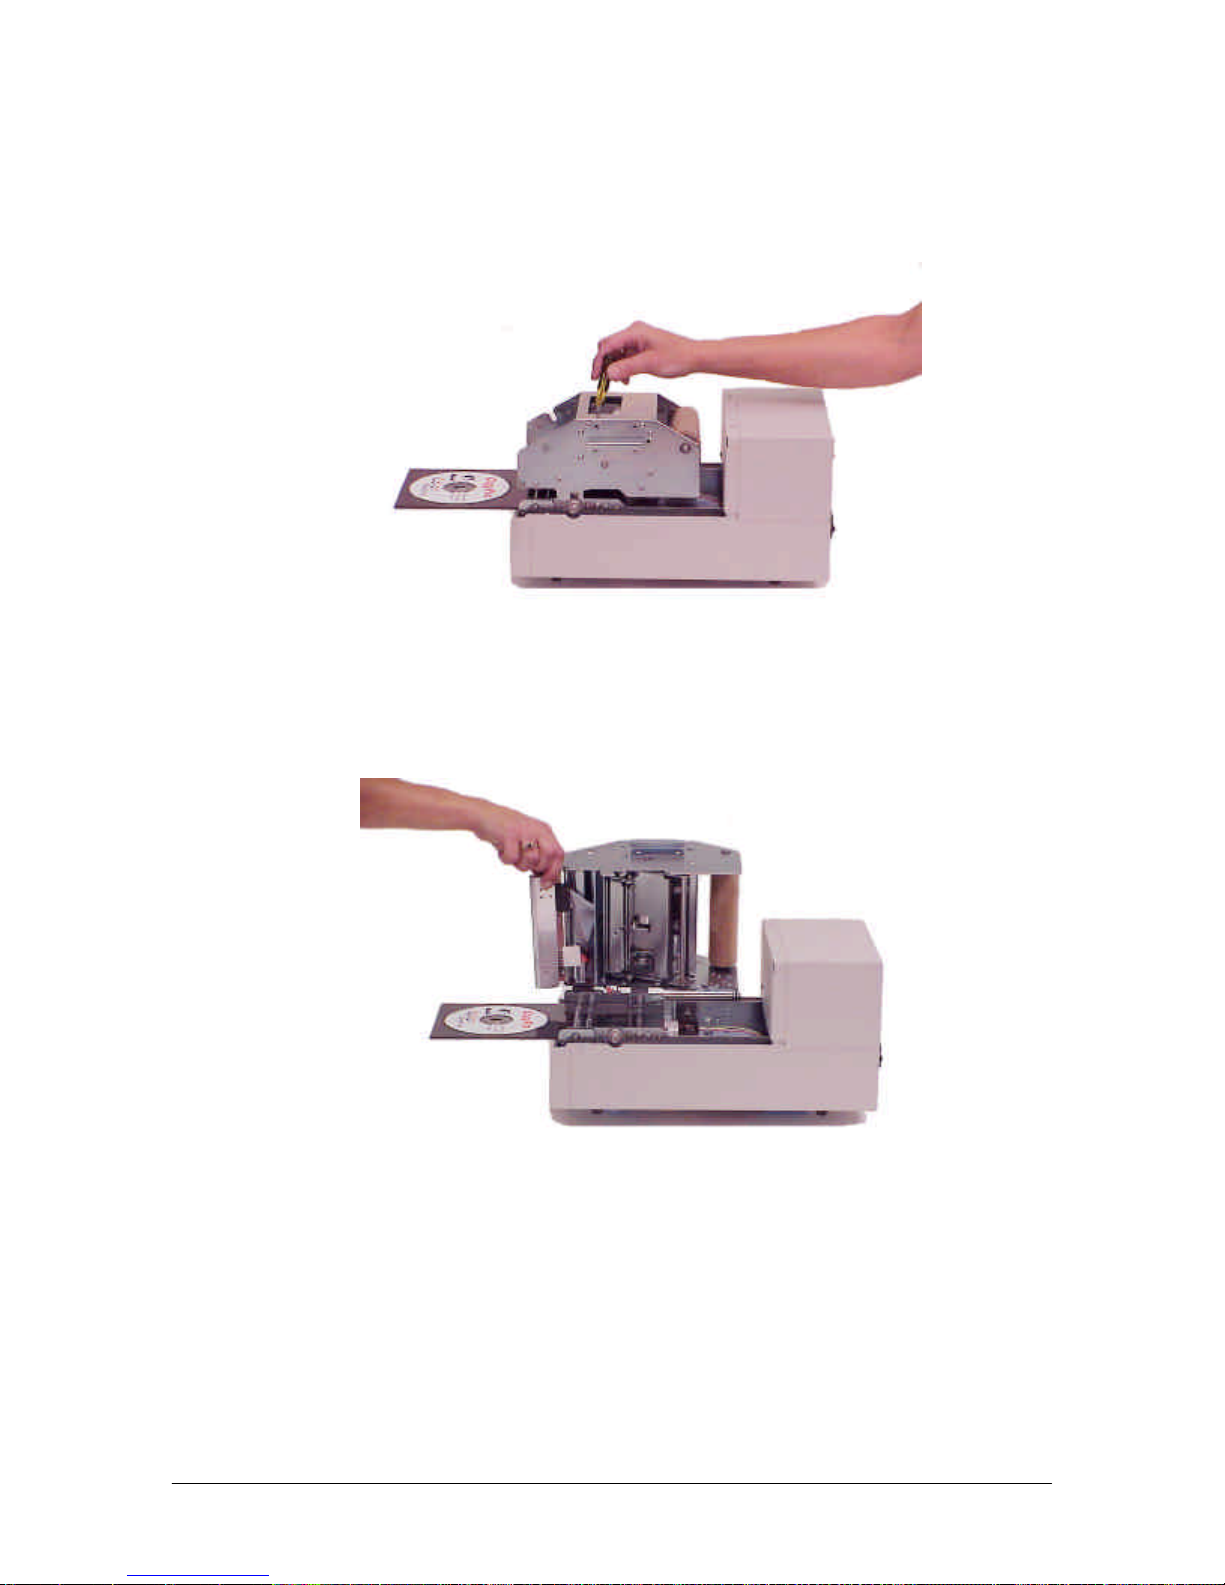
• Printhead will hang from two cable connectors
• Note the position and orientation of the connectors
• Remove printhead from cable connectors, and place aside
• Attach cable connectors (noting orientation) to new printhead
• Lightly hold printhead in place and tighten the two Philips head screws
• Close chassis and completely tighten screws
• Printer now ready to resume operation
30
Page 31
PowerPro II
CopyPro PowerPro II
Printhead Replacement, cont'd.
Figure 18: Printhead is retained by Philips type screws accessed from top of printer
Figure 19: Printhead power and data cables shown after printhead screws removed
31
Page 32

PowerPro II
CopyPro PowerPro II
Troubleshooting Section
Quick Recovery Strategy
• Clear error condition (if needed, see Error Code Chart at end of this document)
• Press “START” key (to reset printer) or power Printer OFF and then back ON
• Re-try printing label
Test CD Strategy
• For testing printer issues, make sure a CD is loaded in printer’s CD Tray
• To conserve media, while testing, test print with small label, and rotating the CD after
each print, this allows multiple test prints on a CD
Common Printer Issues
Printing Issues
• Fingerprints on CD may cause unprintable areas
• Strobe setting (CD label is printing too light or too dark)
• Printer driver set for Color when Black ribbon is installed (error results when
printing)
• PowerPro Printer driver not selected, therefore computer is not sending print data to
printer
• Parallel port on computer is set to ECP, SPP or EEP Modes, (change Parallel Port
setting to Normal mode)
32
Page 33

PowerPro II
CopyPro PowerPro II
Troubleshooting Section: Printer is not printing checklist
Use list below to determine cause for non-printing printer error.
Cables and connections
• Check “Status” LED for flashing Error Code (See ERROR CODES Chart below)
• Check all power connections, and make sure the printer is ON and “Ready” LED is
ON.
• Make sure the printer cable is connected to the parallel port on the PowerPro II, and
on the printer port of the host computer.
• Make sure there is a CD loaded properly on the tray.
• Make sure the PowerPro II Printer Driver is selected as the Windows print
destination.
• From Windows, select FILE menu, then PRINT, a dialog box will appear and the PowerPro II
printer should be listed. If not click on dialog box to select PowerPro II. If PowerPro II is not
shown as a selection, then the PowerPro II printer driver needs to be installed.
• Make sure Printer Driver is set for Black & White printing if Black ribbon is installed
• Make sure Printer Driver is set for Color printing if Color ribbon is installed
Active LED shows activity, but no label is printed
• Check if “Active” LED does not light, after issuing a print command.
• Windows 98 may not operate properly with very large graphics files, test by printing CD label
with smaller graphic files to check printer operation. Try printing label with PowerPro Printer
Drive set to 300 DPI. Also, try reducing file size as needed or attempt to print label by using
Windows NT/2000 host computer
Parallel port setting on computer
• Make sure the Computer’s Parallel Port mode is configured as: Normal, Compatible,
SPP or Output Only. Normal is the recommended setting. Note: ECP Mode works
with most systems.
To check parallel Port configuration requires checking the Computer’s BIOS Settings
and setting the Parallel Port setting to Normal.
To check Computer BIOS settings:
• Power OFF the computer
• Power ON the computer
• As the computer starts up it will display a message on how to check computer BIOS setup.
• Usually, this requires pressing the DEL or ALT or F2 or some other key
• After pressing the appropriate key, a list of choices or menu will be displayed
• Choose to review the advanced settings, look for Parallel Port Mode listing or Integrated
Peripherals listing
33
Page 34

PowerPro II
CopyPro PowerPro II
• Proper settings are:
• If any of these settings are used, exit the BIOS settings by selecting Exit without saving
• Parallel Port Mode setting shows: ECP or EPP
• Change to: Normal
• Exit the BIOS settings by selecting Exit with saving changes.
• Shutdown then re-start computer, then start CD Painter Program and try printing a CD label.
changes.
34
Page 35

PowerPro II
CopyPro PowerPro II
Troubleshooting Section: Print Quality
Fuzzy prints and smudges
• Make sure the CD print surface is a printable (lacquer or matte) surface.
• Check the CD surface for fingerprints, oils, etc.
• Clean the printing surface of the CD.
• Make sure the print ribbon is a supported ribbon type
• Check the CD position.
• Check the Printing Alignment in the CD labeling software.
Faded prints
• Check the Strobe setting (this controls darkness or lightness of print density). If
printing from CD Painter, check the Strobe setting on the host computer.
• Increase or raise Strobe Setting by 5 units and reprint
Horizontal Streaks or Arc shaped Streaks
• Lower or reduce Strobe Setting
• Re-arrange graphics to reduce large coverage areas
• Check the Strobe setting (this controls darkness or lightness of print density).
Sticking or Torn Ribbon
• Vertical Lines or streaks Printer makes snapping or popping sounds during printout
• Lower or reduce Strobe Setting
• Clean the Printhead
CD Positioning Errors
Reload CD on tray according to the loading instructions in the Printer Operation section
of this manual.
• Make sure the CD centering pin is positioning the CD when the tray closes. The CD
centering pin should touch only the outside edge of the CD. The CD should not rest
on top of the CD centering pin.
35
Page 36

PowerPro II
CopyPro PowerPro II
CD Printing Techniques Section
The PowerPro CD Printer offers a convenient way to print labels on CDs, this section
describes ways to get the best possible printouts within the printer's labeling capabilities.
Please see the following CD Printing Techniques Chart for more
detailed information on CD Label printing techniques.
36
Page 37
PowerPro II
CopyPro PowerPro II
PowerPro II CD Media & Ribbon Selection Guide
For best results, use the CD Media and Ribbon Section Guide to choose the appropriate
CD Media, Ribbon, and Printer Strobe setting for your CD labeling job.
Label Project:
• Black Text &
Graphics
Ribbon Black or Monocolor
Ribbon
CD Media Silver or Gold Discs
(lacquer finish)
Strobe Setting
Strobe setting controls
darkness or lightness
of print
25 45 to 65
Label Project:
• Color Text &
Graphics
Full Color Ribbon
White Discs
(Smooth white coated
finish)
Project Printing Tip
PowerPro II requires
thermal transfer type white
coated discs with smooth
coating for optimum color
results.
White coated inkjet type
discs (for inkjet CD
printers) with a rough
surface will not provide
good output
If label is too light try
increasing the strobe
setting in increments of 5
until label has best
appearance
To set strobe setting in
Windows: select File /
Print / Properties /
Device Option
Label Graphics
Labels the print best in
monocolor are:
• Text only
• Line art and Clip art
• Mixed text and
graphics
• Mixed graphics
• Photos with limited
grayscale range
Labels the print best in
color are:
• Text only
• Line art and Clip art
• Mixed text and
graphics
• Mixed graphics
• Photos with limited
range of colors
• Spot colors
If label is too dark light try
decreasing the strobe
setting in increments of 5
until label has best
appearance
Labels that may not print
properly are:
• Large single color
areas
• Reversed out graphics
(example: clear text on
solid black
background)
• Photos with wide
range of colors
37
Page 38

PowerPro II
CopyPro PowerPro II
Graphics Tips
Label Graphics Tips
Resolution
Web Graphics
Text Color
Color Graphics
Set resolution of graphics files for 600 DPI (or 300 DPI) prior to saving
graphics. If using Photo or Paint programs, save files as 300 or 600 DPI
JPEG files, with images sized for placement on CD. Import graphic file
to CD Painter. Set Printer Driver for 300 or 600 DPI mode accordingly
prior to printing.
Website graphics are typically 72DPI, which means they will shrink in
size when brought over to a label file. If possible, avoid expanding size
of graphics. Expanding to a larger size may result in “rough” looking
graphics
For color text, choose the 8 basic colors (bottom row of color selection
within CD Painter—this will consistently give best results. If using Photo
or Paint programs, set to CMY and select colors that utilize only one or
two of the CMY colors.
Most clip art in Windows Meta File format (WMF)provides good results
JPEG, BMP, and TIFF files may use dithering of CMY colors, you may
need to use a Photo or Paint program to adjust color density to achieve
best results.
Full disc single color graphics and reversed out graphics are not
recommended for thermal transfer CD printers
38
Page 39
PowerPro II
CopyPro PowerPro II
Common Label Issues
A
C
B
E
D
F
G
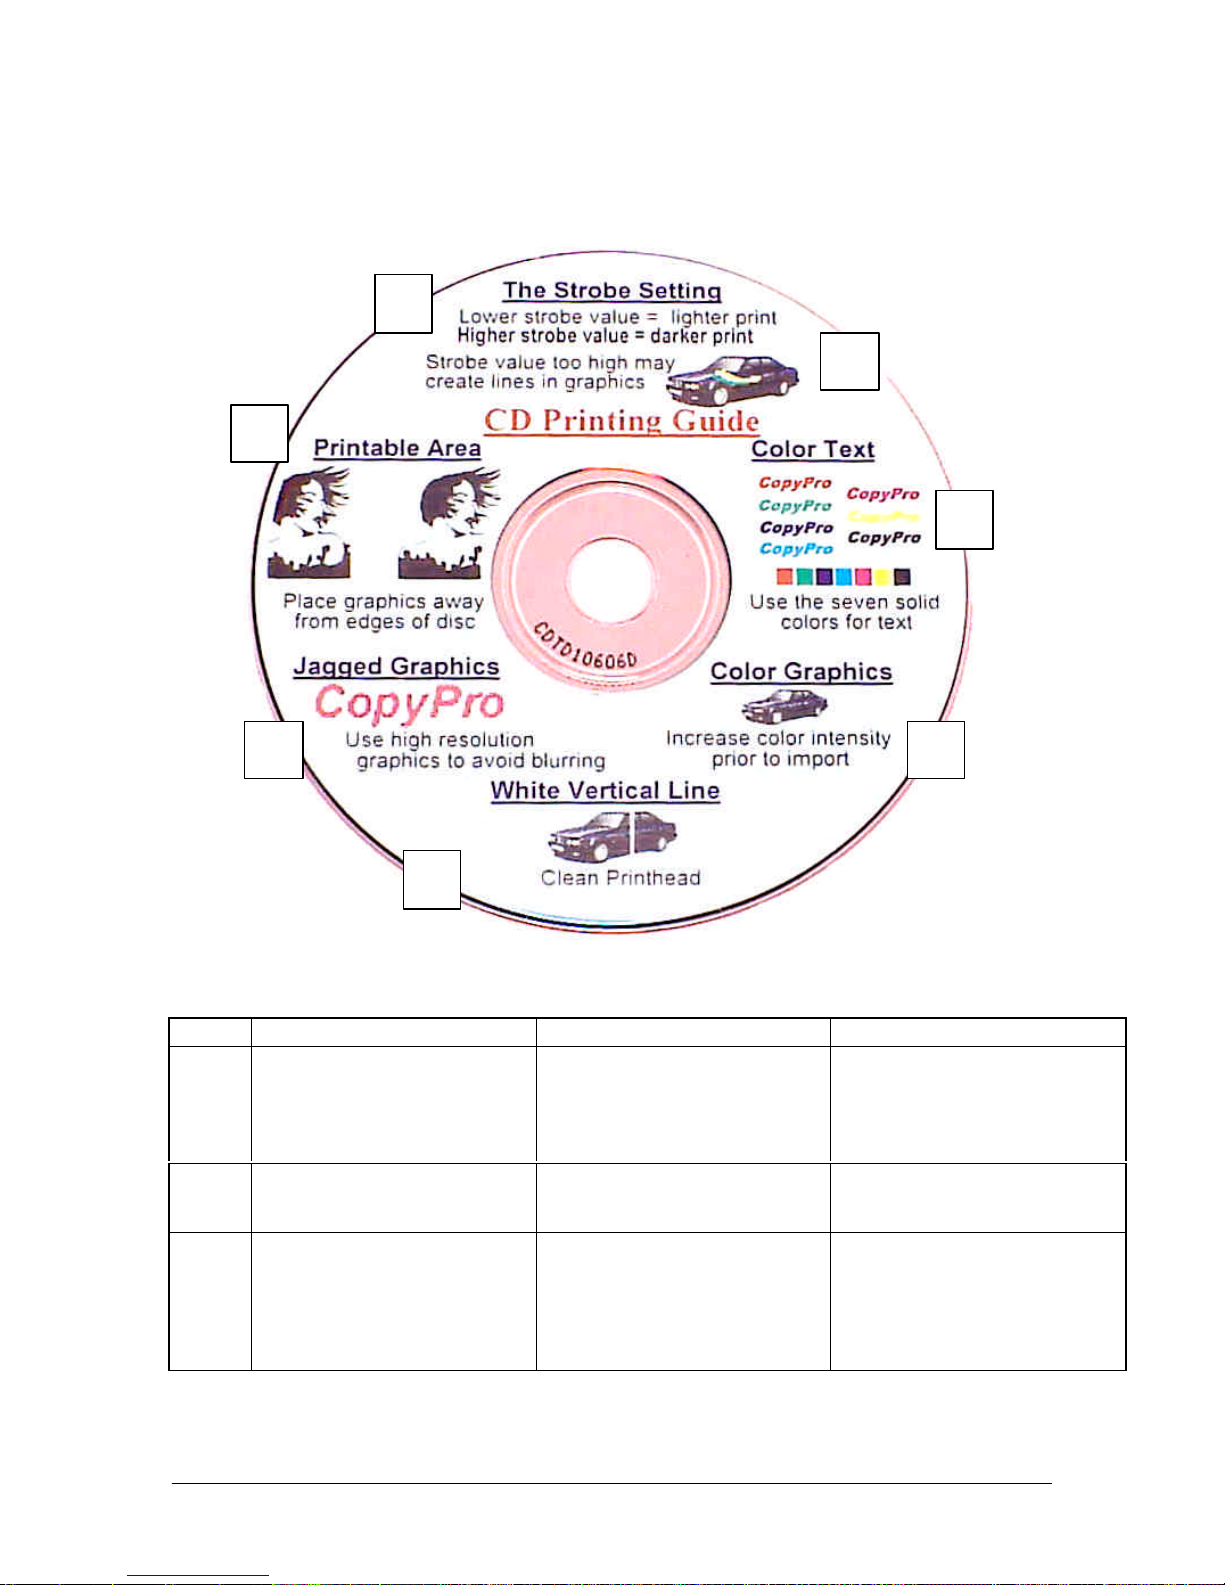
Figure 20: CD Label Text and Graphics Examples
Area Issue Cause Possible Correction
A
B
C
Label is too light or too dark Strobe Setting is either to high or
too low. The Strobe Setting
controls printhead heat and print
density.
Curved marks in graphic Strobe Setting is too high.
Overheated ribbon causing
"wrinkle" marks in graphics.
Graphics or text are not printed
near CD edge or hub
CD has unprintable areas near
outer edge and inner hub, also
check template size in CD label
program
If label is too dark decrease
Strobe Setting. If label is too
light increase Strobe Setting.
Make changes in 5 unit
increments.
Decrease strobe setting.
If needed, clean print head.
Template adjustment is made
from CD Label program, see
Settings Menu. Adjust label
template to mask unprinted areas.
Template mask creates uniform
boarder for crisp presentation.
39
Page 40
PowerPro II
CopyPro PowerPro II
D
E
E
F
G
NA
Jagged or rough looking
graphics or text that has been
imported from other program or
WebPages
Text appears light or faded
(text created in CD label
program)
Text appears light or faded (text
created in Photo or Paint
program and imported to label
program)
Graphics appear light or
incomplete
Vertical line across label White vertical line through label
Unprinted area or marks on
label
Low-resolution graphics appear
jagged or rough. Graphics re-
sized to larger size lose
resolution.
Text color not optimized for CD
printer
Text color not optimized for CD
printer
Some colors in graphic not
optimized for CD printer
indicates printed requires
cleaning
Possible finger print or dust disc
interferes with printing
Create graphics sized for label at
300 DPI, then import into CD
Label program. WebPage
graphics at 72 DPI will become
"rough" if resized.
From label program change text
color to one of the seven solid
colors. These colors are shown in
Custom Colors area of Color
Menu. See Optimizing Color
Labels.
From Paint or Photo program to
increase color density of text
prior to import to the label
program. Also change CMYK
values to minimize dithering. See
Optimizing Color Labels.
Use Paint or Photo program to
increase color density of graphic
prior to import to the label
program
Clean printhead, see Maintenance
Section of User Manual. If
cleaning does not correct issue
printhead may be damaged.
Avoid touching printable area of
CD prior to printing
40
Page 41
PowerPro II
CopyPro PowerPro II
Strobe Setting Examples
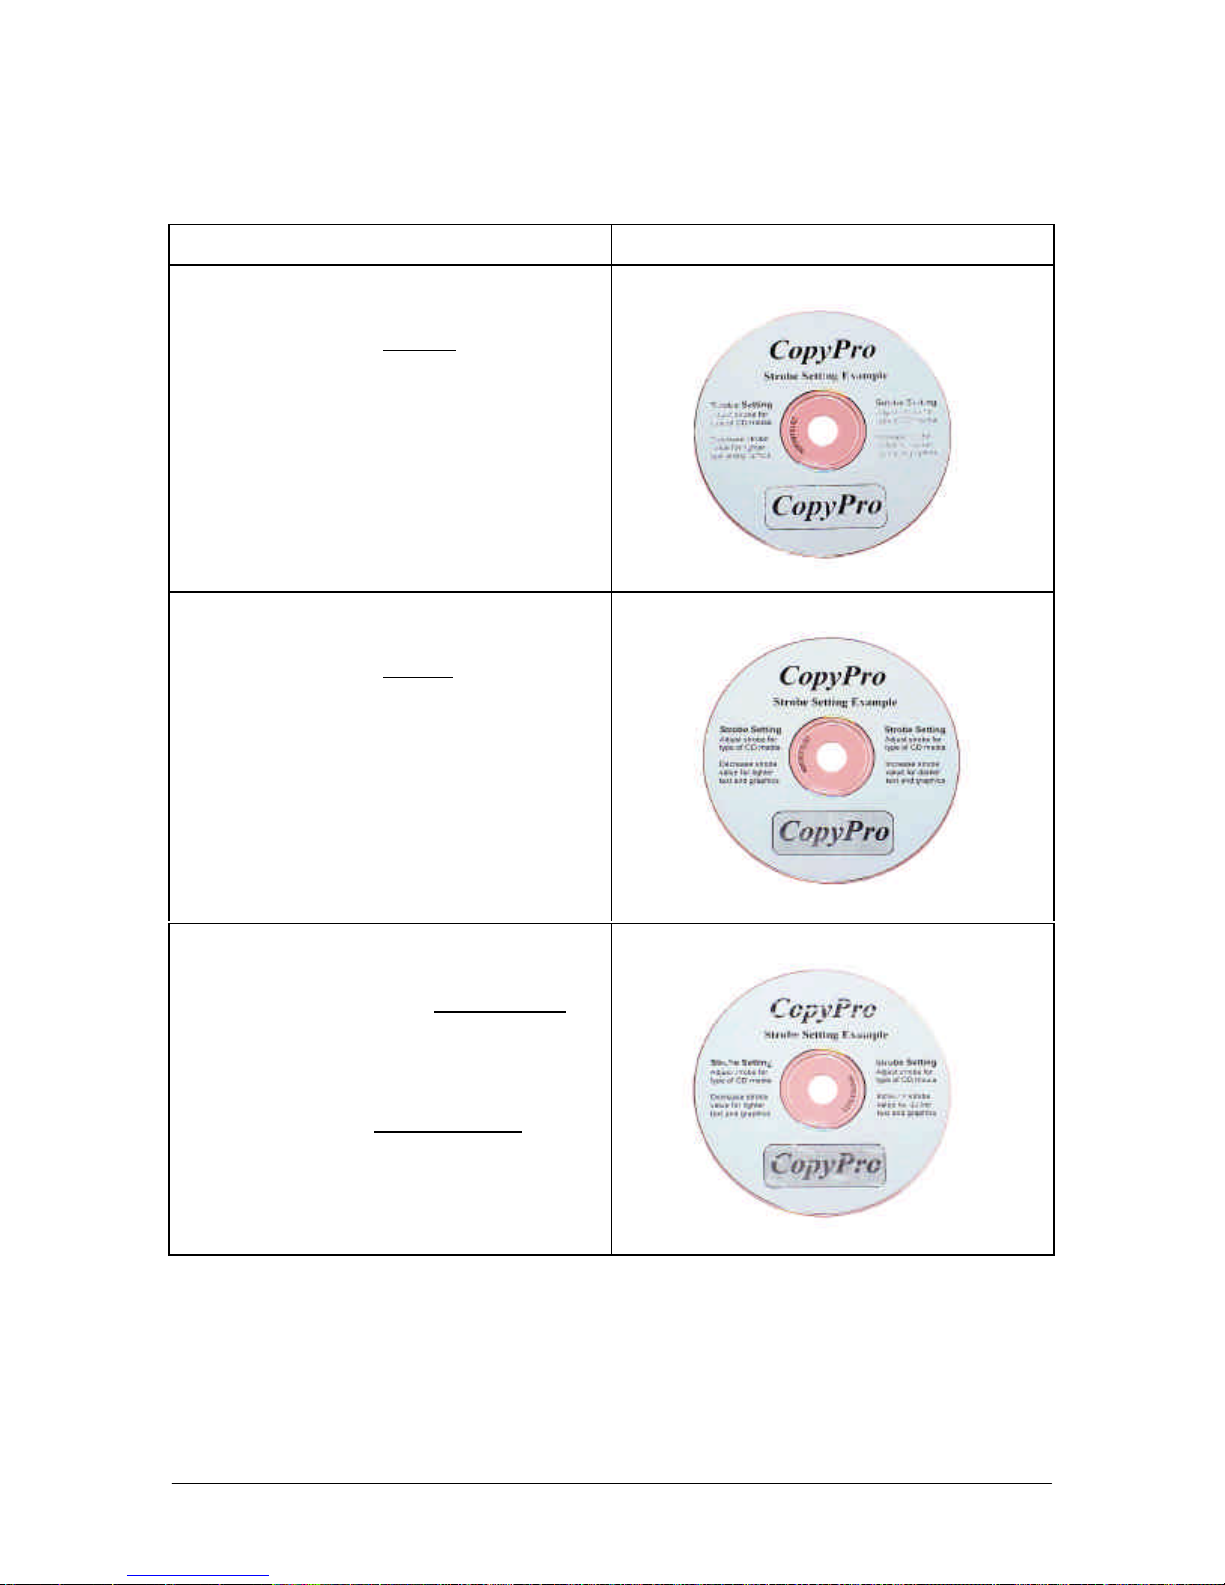
Strobe Setting Examples
1 Strobe setting is too low
• Print is light or no print at all
• Shaded graphics light or not printed
2 Strobe setting is correct
• Text and graphics are clear
• Shaded graphics are clear
1
2
3 Strobe setting is too high
Case 1 - strobe is set a little too high
• Print and graphics too dark
Case 2 - strobe is much too high
• Print and graphics very uneven
• Ribbon is tearing
3
41
Page 42
PowerPro II
CopyPro PowerPro II
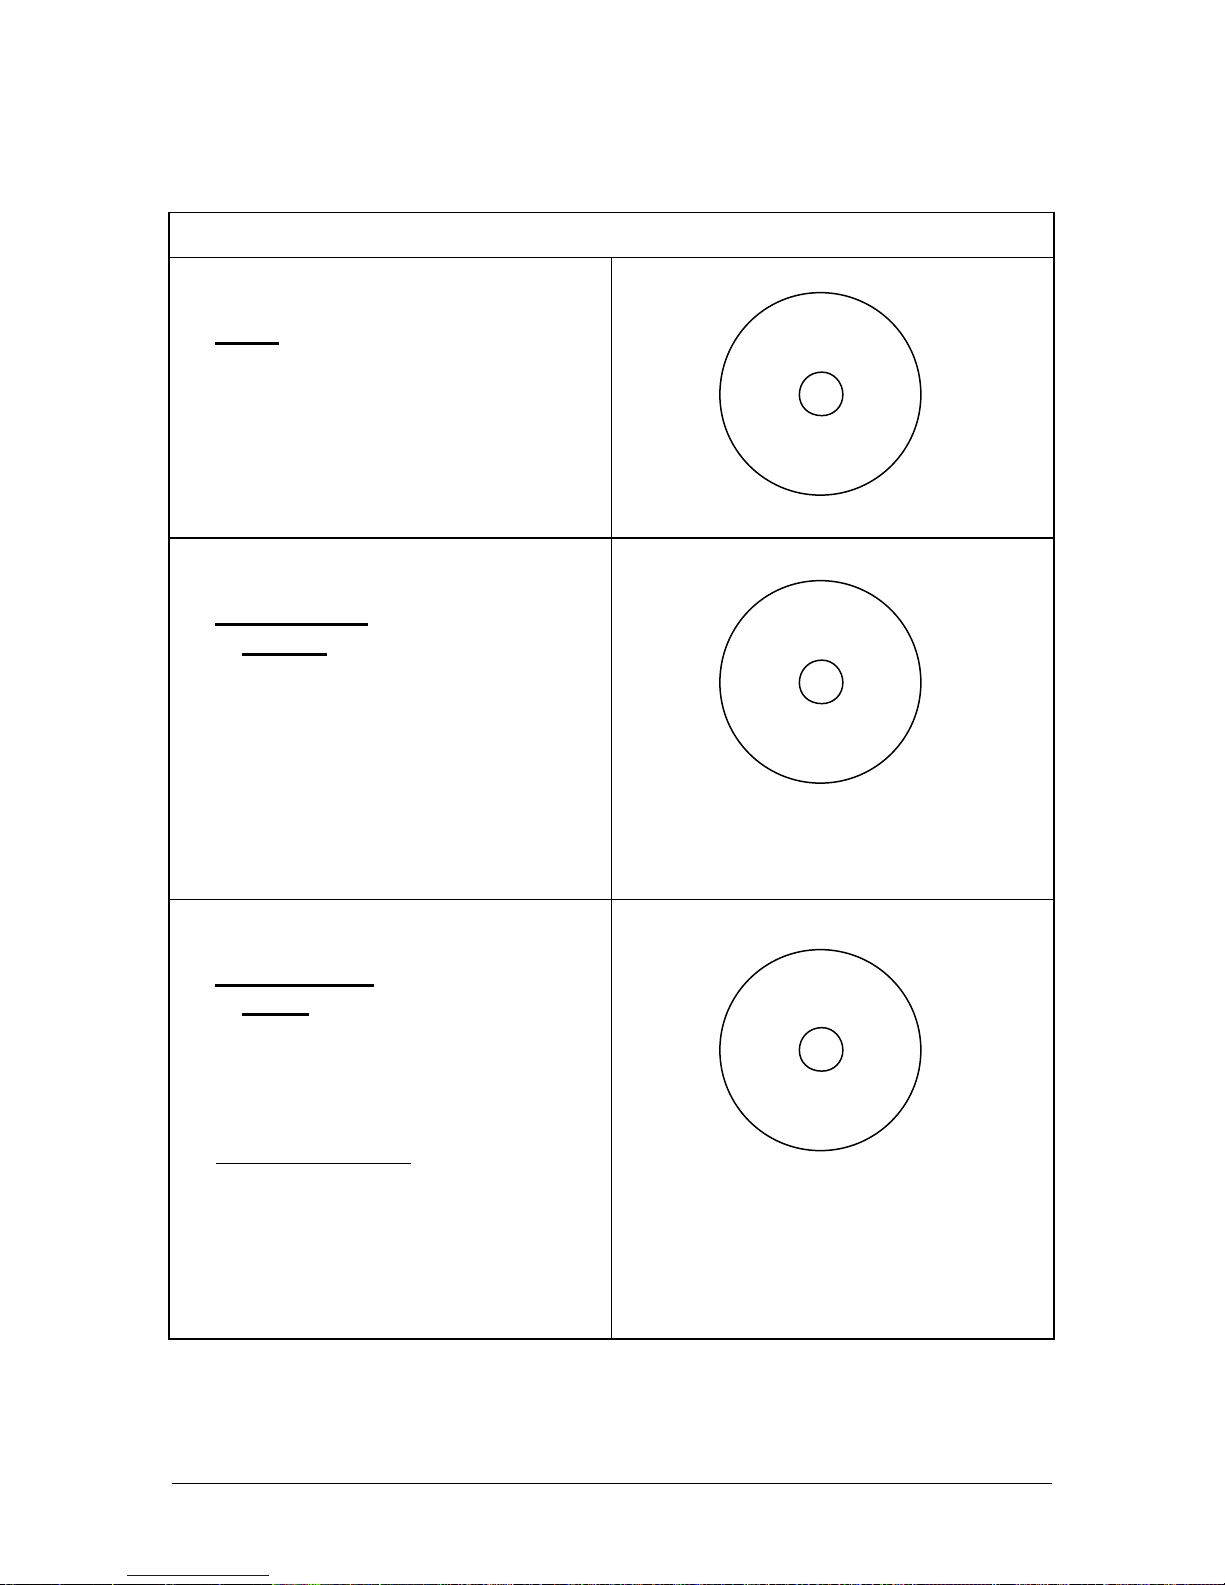
CD Media & Strobe Setting examples
Recommended CD media, ribbon type and strobe setting
A Sliver CD discs
(also called lacquer finish disc)
Recommendations:
• Use with black ribbon
• Strobe setting: 25
B White Coated CD discs
(with smooth surface)
Recommendations:
• Use with black ribbon
• Strobe setting: 25
• Use with color ribbon
• Strobe setting: 45
A
B
C White Coated CD discs
(with rough surface for use with
inkjet type CD printer)
Recommendations:
• Not recommended, light poor
quality output will result
• Disc's rough surface does not
accept label ink properly
C
42
Page 43
PowerPro II
CopyPro PowerPro II
Printer Driver Settings: Win 98
The key printer driver settings for the PowerPro CD printer are:
• Strobe Setting (controls lightness and darkness of label)
• Color or Black Ribbon selection (this setting is needs to match the type for ribbon
(black or color) ribbon installed in the printer)
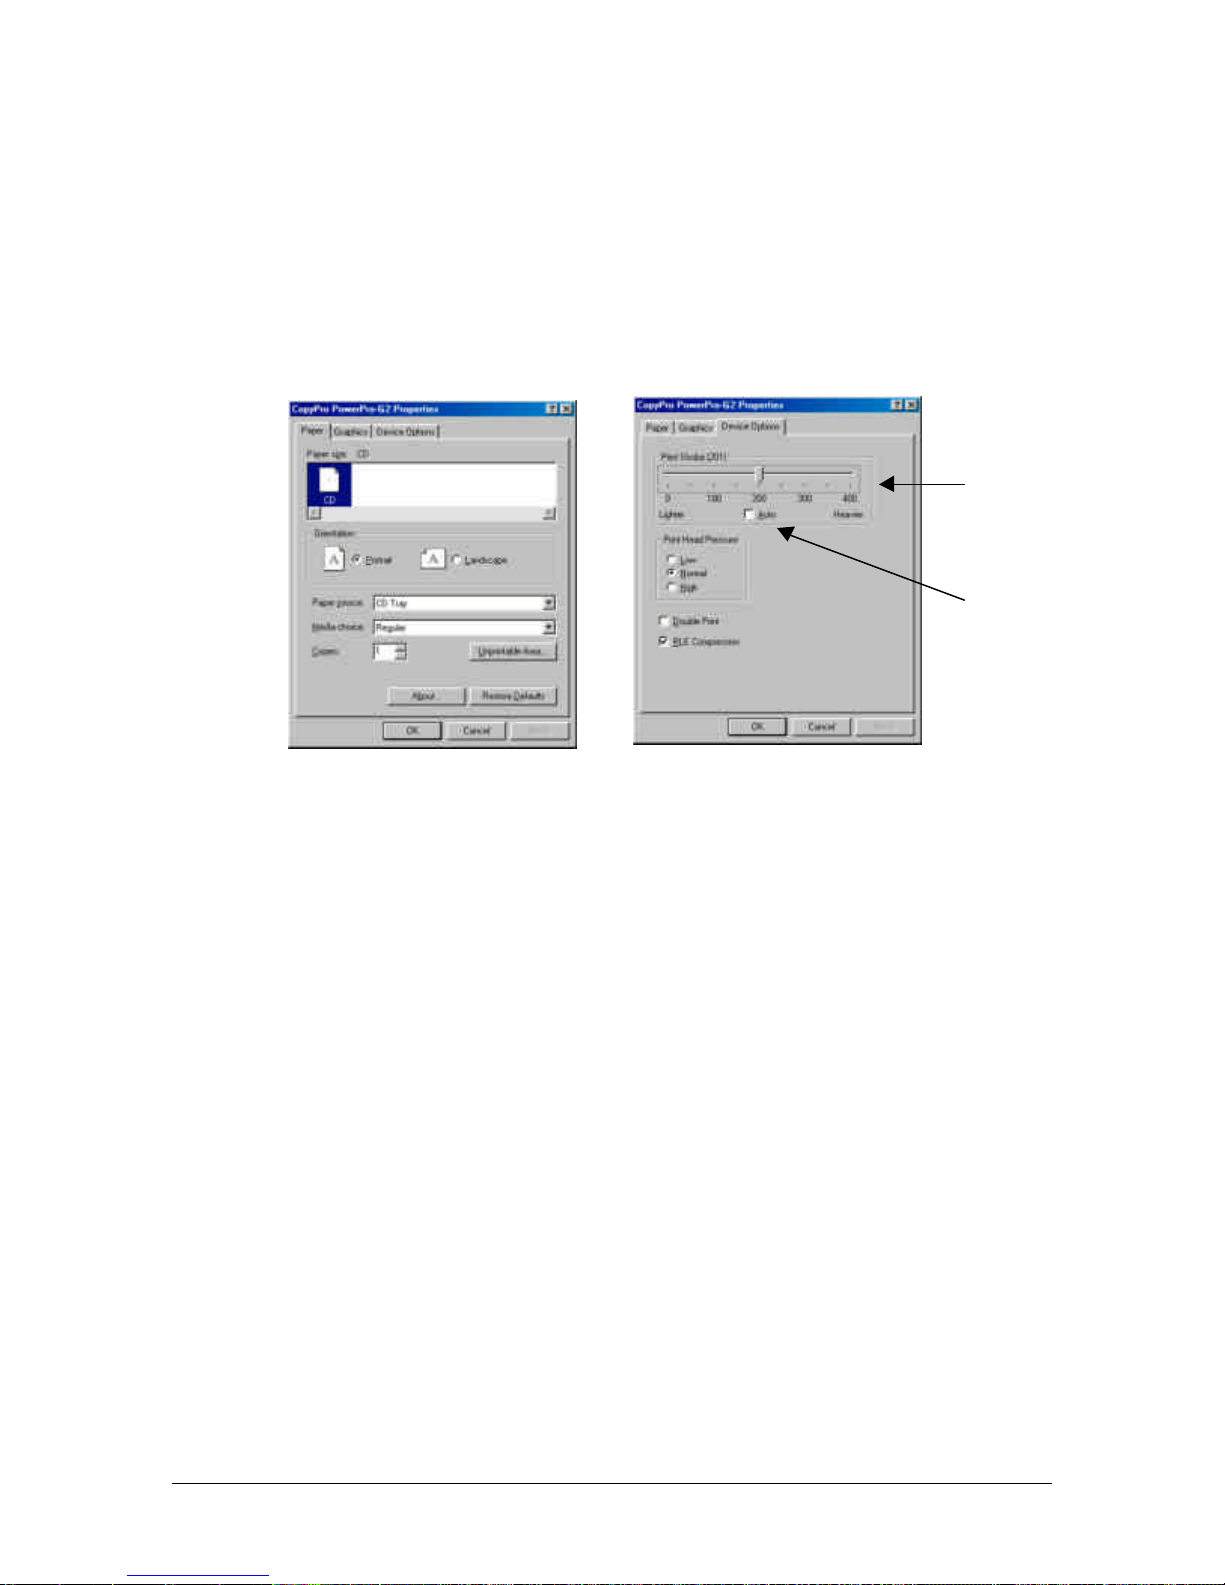
Strobe Setting
Strobe Setting slider
bar for manually
setting strobe value
Strobe Auto
checkbox for factory
set default Strobe
setting. The Auto
setting works with
most types of CD
media
Figure 21: Win 98 Print Driver Properties Window
Strobe Setting Adjustment
To adjust Printer Driver settings from Windows 98:
• From Windows Desktop, Click on: Start Icon
• Select Settings, Click on Printers
• Right Click on PowerPro II Icon,
• Double click Properties, Follow Prompts
• Click Device Options Tab, then check for Print Strobe setting
• Strobe value may beset by clicking the Auto check box (recommended) or
manually by slider bar selection (for fine tuning the darkness or lightness of print)
• For Auto setting: use Auto Checkbox to set Strobe to Auto. When checked
printer will use factory default settings, that should work with most standard CD
discs. While the value of the Auto Setting is not shown, typically for black ribbon
it is 15 and for a color ribbon is 15.
• For manually setting the Strobe Setting, use the Slider Bar to adjust strobe over a
range of values. In general, the higher strobe setting, results in darker labeling.
• If label is too dark reduce strobe setting by 5 units and re-print, repeat this
process until proper print out is obtained
43
Page 44
PowerPro II
CopyPro PowerPro II
• If label is too light increase strobe setting by 5 units and re-print, repeat this
process until proper print out occurs. Please note: if strobe setting is in above
the 15 unit range or higher and print is light, first try a lower strobe setting in
the 15 unit range and increase the strobe. In some cases a very high strobe
setting will result in too light a print, and increasing the strobe setting further
may cause the ribbon to melt or tear when printing, which may then require
cleaning the print head (see Maintenance Section for print head cleaning
information).
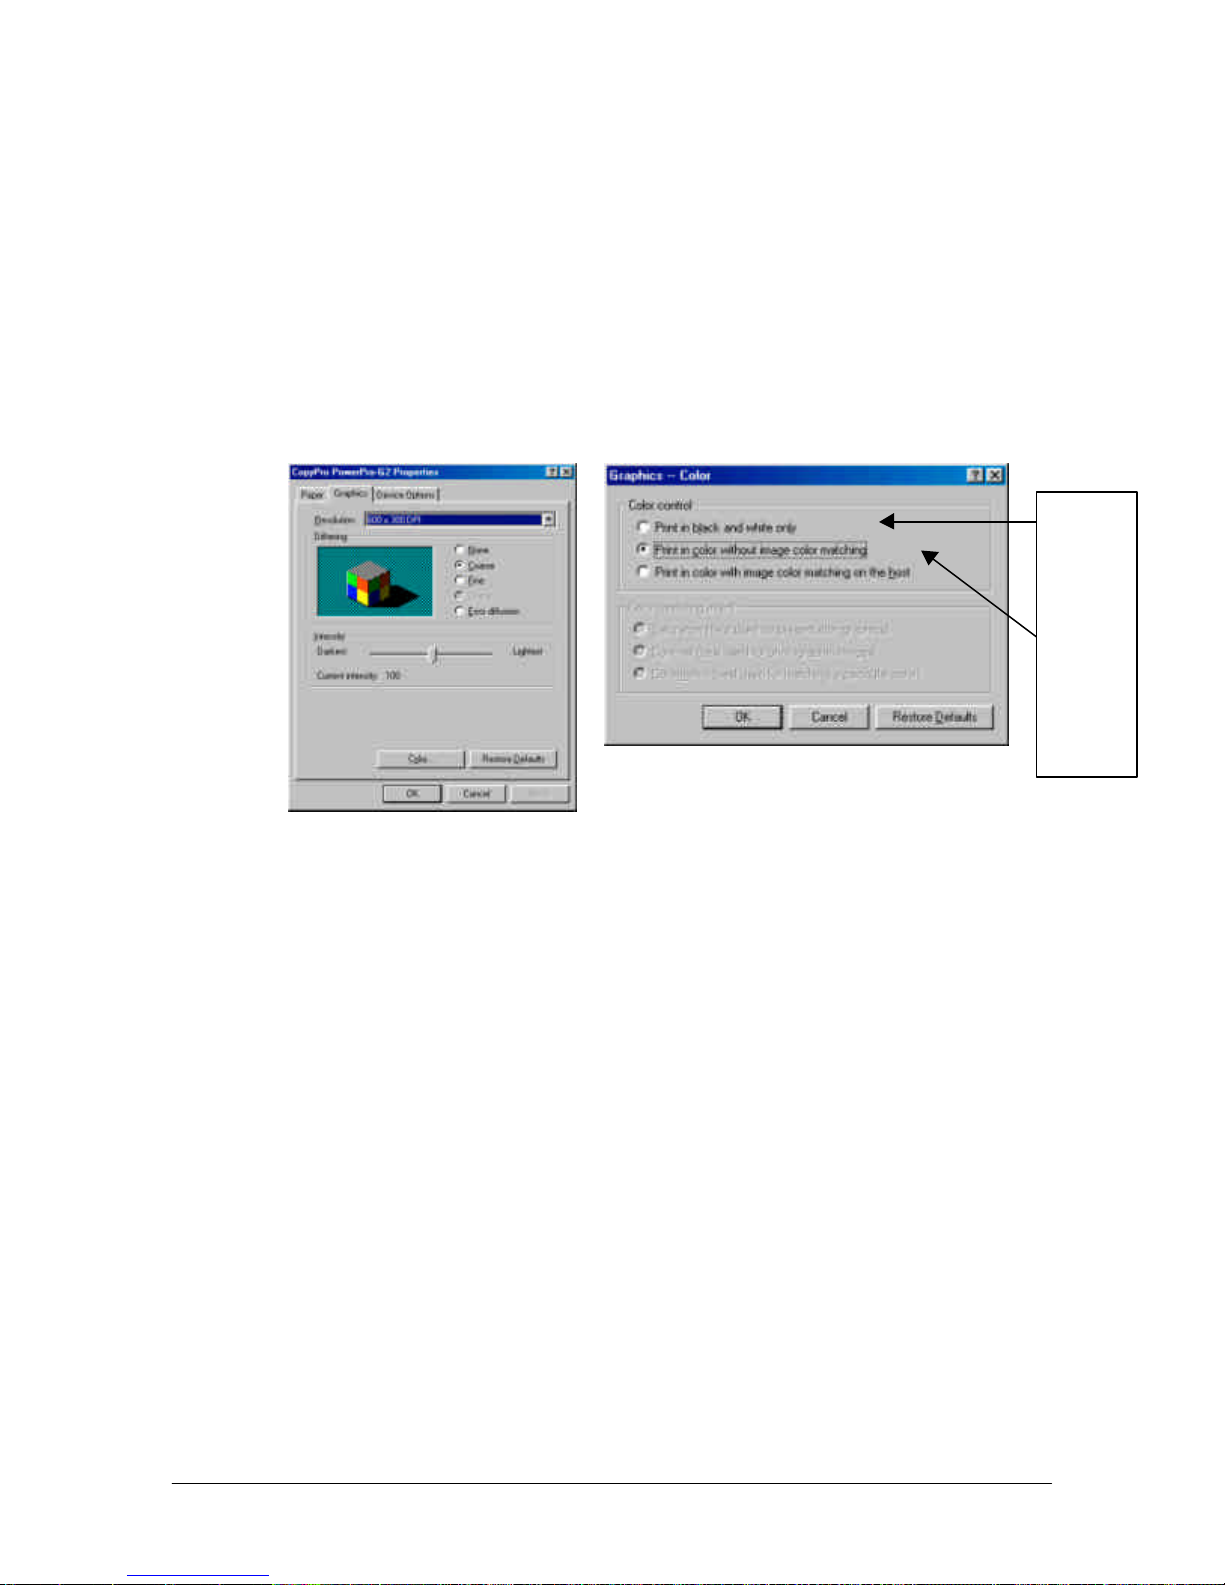
Black & White, or Color printing settings for Win 98
Black &
White
for
black
ribbon
Color
for color
ribbon
Color or Black Ribbon selection procedure:
• While in the Printer Driver Properties box
• Click Graphics Tab
• Note: recommended Dithering setting is the Course selection
• Click the Color button
• Select following:
• If black ribbon is installed in printer select: Black and White only
• If color ribbon is installed in printer select: Color without image matching
44
Page 45
PowerPro II
CopyPro PowerPro II
Printer Driver Settings: Win 2000
Strobe and Ribbon Color Settings
The key printer driver settings for the PowerPro CD printer are:
• Strobe Setting (controls lightness and darkness of label)
• Color or Black Ribbon selection (this setting is needs to match the type for ribbon
(black or color) ribbon installed in the printer)
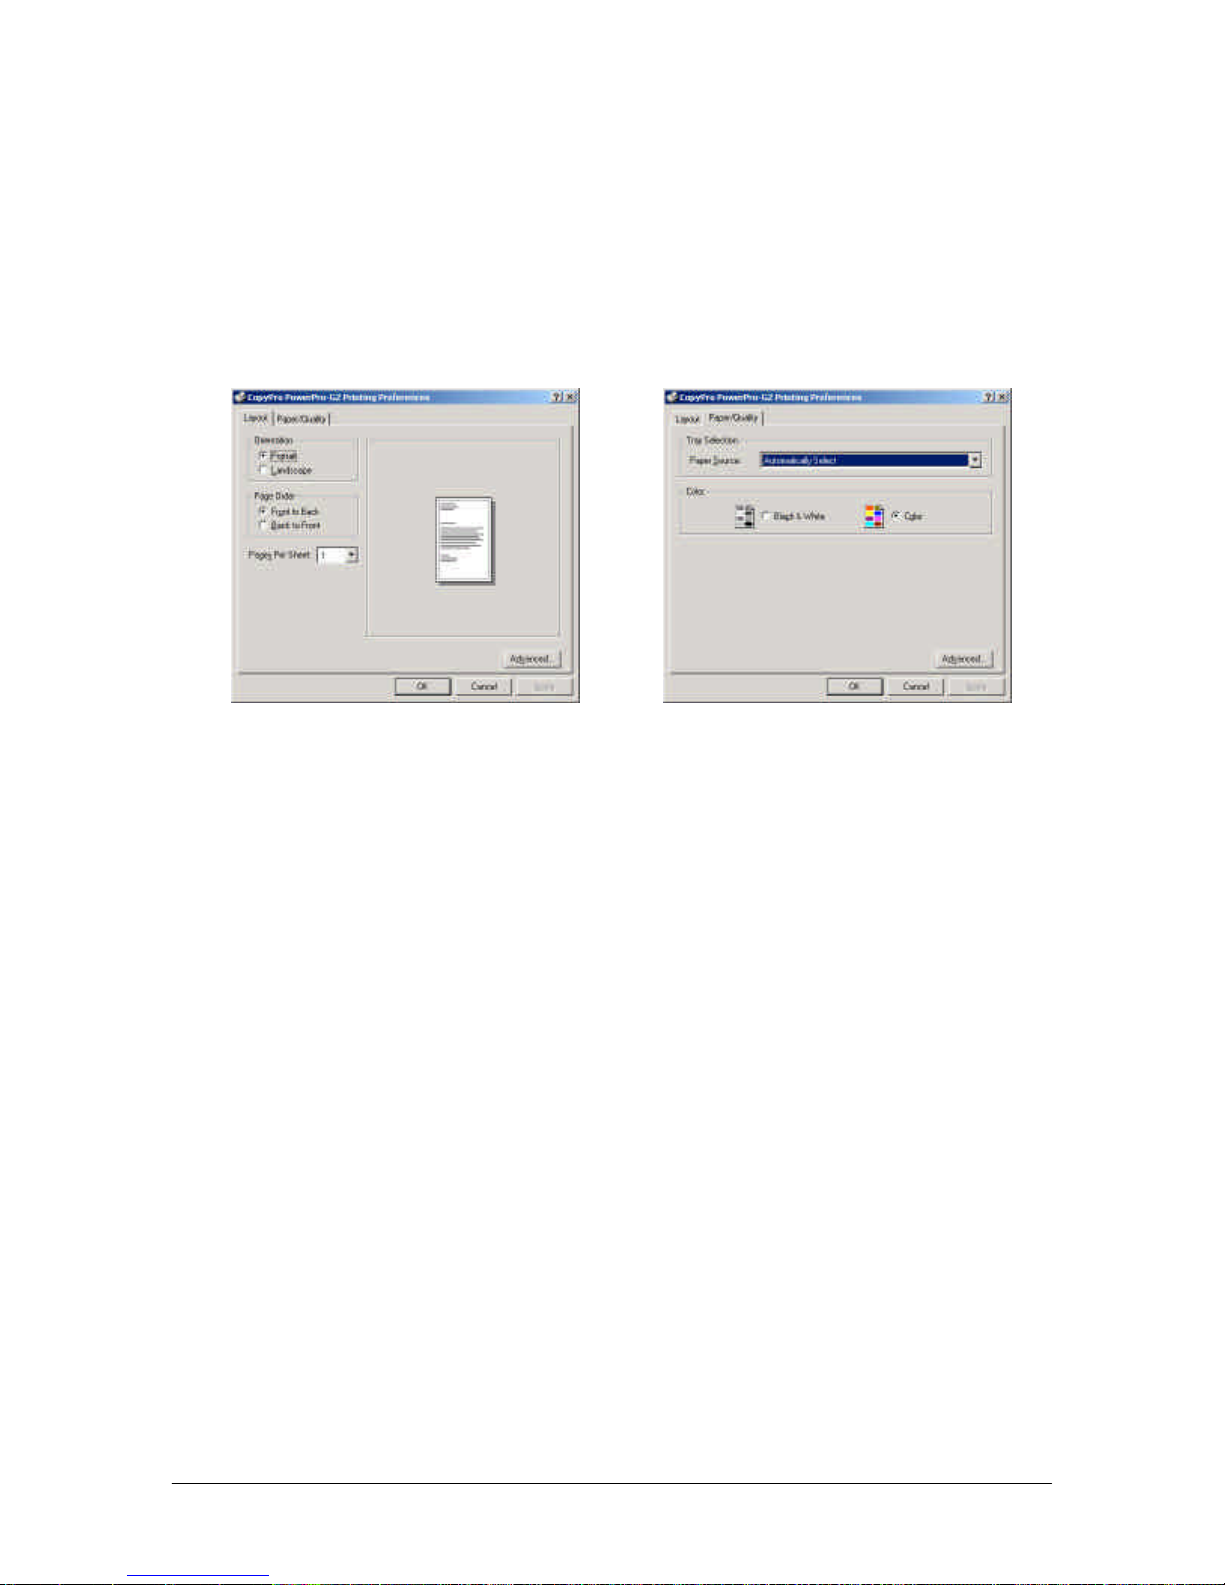
To adjust Printer Driver settings from Windows 2000:
• From Windows Desktop, Click on: Start Icon
• Select Settings, Click on Printers
• Right Click on PowerPro II Icon,
• Click Printing Preferences, Follow Prompts
• Click Paper Quality Tab
Ribbon Color Settings
• Select Black and White or Color setting to match type of ribbon installed in
printer
• Click Advanced Button, the Advanced Options box will display
45
Page 46
PowerPro II
CopyPro PowerPro II
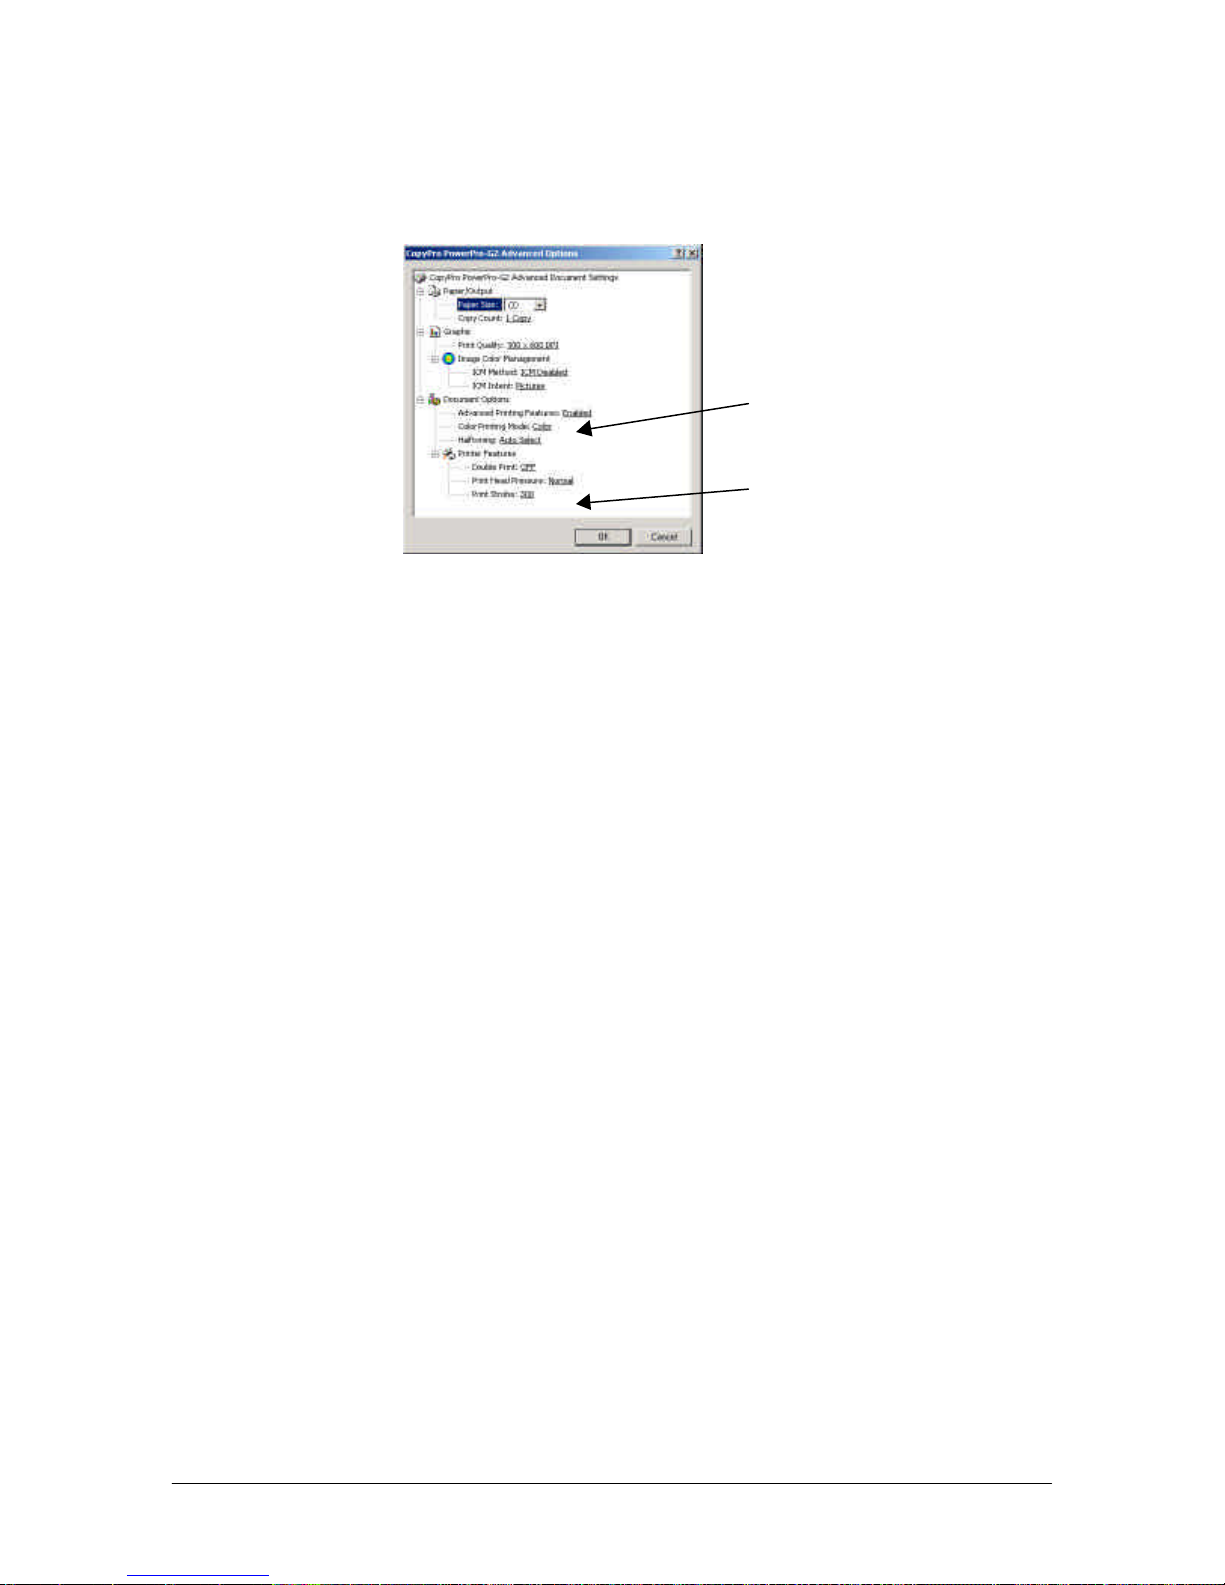
Strobe setting adjustment
• From the Printing Preferences Window
Ribbon Color Setting, this should
match type of ribbon installed in
printer
Strobe Setting, the higher the value
the increases darkness of label
• Click on Print Strobe number box
• Strobe value maybe set by clicking the Auto check box (recommended) or manually
by slider bar selection (for fine tuning the darkness or lightness of print)
• For Auto setting: use Auto Checkbox to set Strobe to Auto. When checked printer
will use factory default settings, that should work with most standard CD discs.
While the value of the Auto Setting is not shown, typically for black ribbon it is 15
and for a color ribbon is 15.
• For manually setting the Strobe Setting, use the Slider Bar to adjust strobe over a
range of values. In general, the higher strobe setting, results in darker labeling.
• If label is too dark reduce strobe setting by 5 units and re-print, repeat this process
until proper print out is obtained
• If label is too light increase strobe setting by 5 units and re-print, repeat this process
until proper print out occurs. Please note: if strobe setting is above the 15 unit range
or higher and print is light, first try a lower strobe setting in the 15 unit range and
increase the strobe. In some cases a very high strobe setting will result in a uneven
light a print, and increasing the strobe setting further may cause the ribbon to melt or
tear when printing. If this occurs, Click OK, then Click OK
• Close Printers Window to exit
• Print Strobe setting and ribbon setting (color or black) are now set
• Strobe value maybe set by clicking the Auto check box (recommended) or manually
by slider bar selection (for fine tuning the darkness or lightness of print)
• For Auto setting: use Auto Checkbox to set Strobe to Auto. When checked printer
will use factory default settings, that should work with most standard CD discs.
46
Page 47

PowerPro II
CopyPro PowerPro II
While the value of the Auto Setting is not shown, typically for black ribbon it is 15
and for a color ribbon is 15.
• For manually setting the Strobe Setting, use the Slider Bar to adjust strobe over a
range of values. In general, the higher strobe setting, results in darker labeling.
• If label is too dark reduce strobe setting by 5 units and re-print, repeat this process
until proper print out is obtained
• If label is too light increase strobe setting by 5 units and re-print, repeat this
process until proper print out occurs. Please note: if strobe setting is above the 15
unit range or higher and print is light, first try a lower strobe setting in the 15 unit
range and increase the strobe. In some cases a very high strobe setting will result
in a uneven light a print, and increasing the strobe setting further may cause the
ribbon to melt or tear when printing. If this occurs, reduce the strobe setting, and
check printout, if print out is fuzzy cleaning the print head may be required (see
Maintenance Section for print head cleaning information).
47
Page 48
PowerPro II
CopyPro PowerPro II
Optimizing Color Labels
Optimizing Color Labels
For full color printing, the PowerPro CD Printer uses a paneled ribbon that includes a
Cyan (blue), Magenta (Red), and Yellow panels, commonly referred to as CMY colors.
The printer mixes (by dithering) these colors to create the colors on the label. Mixing the
CMY panels creates a range of colors. For example, green would be a mix of blue and
yellow, and black a mix of all three panels. Due to the limitations of dithering some
color combinations appear more intense that others.
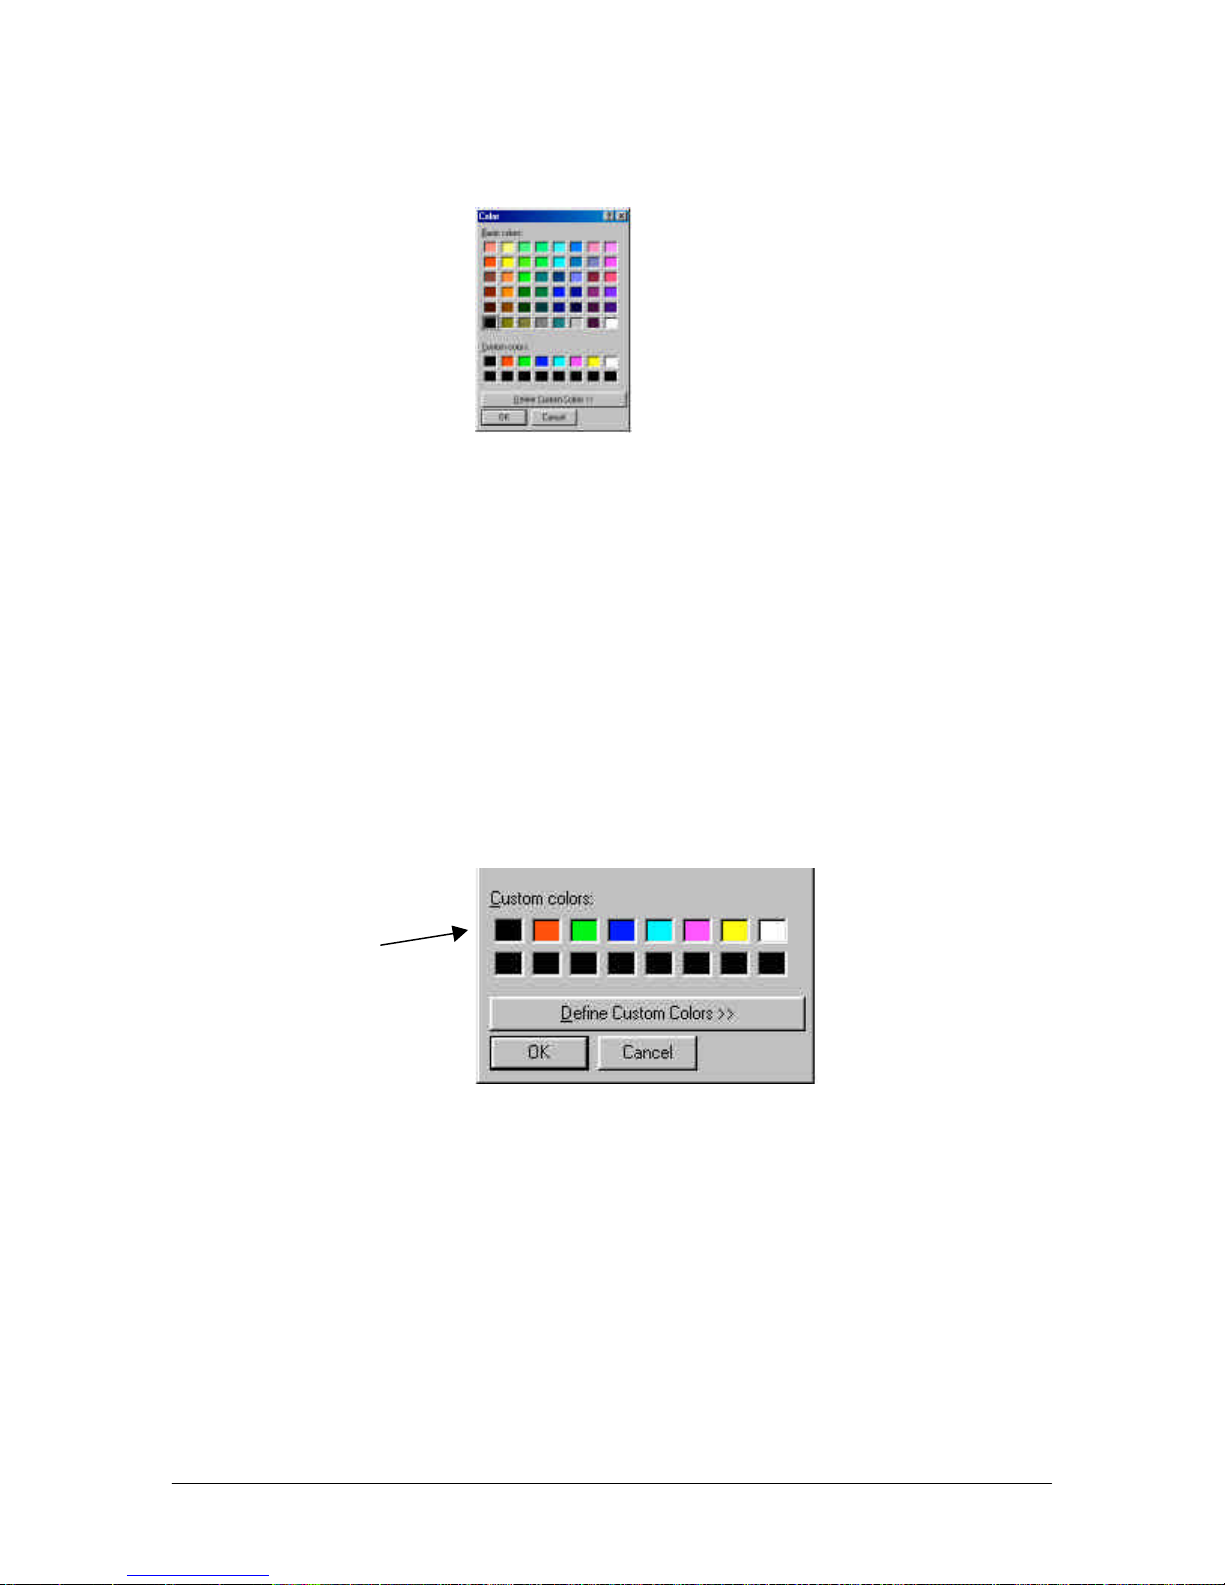
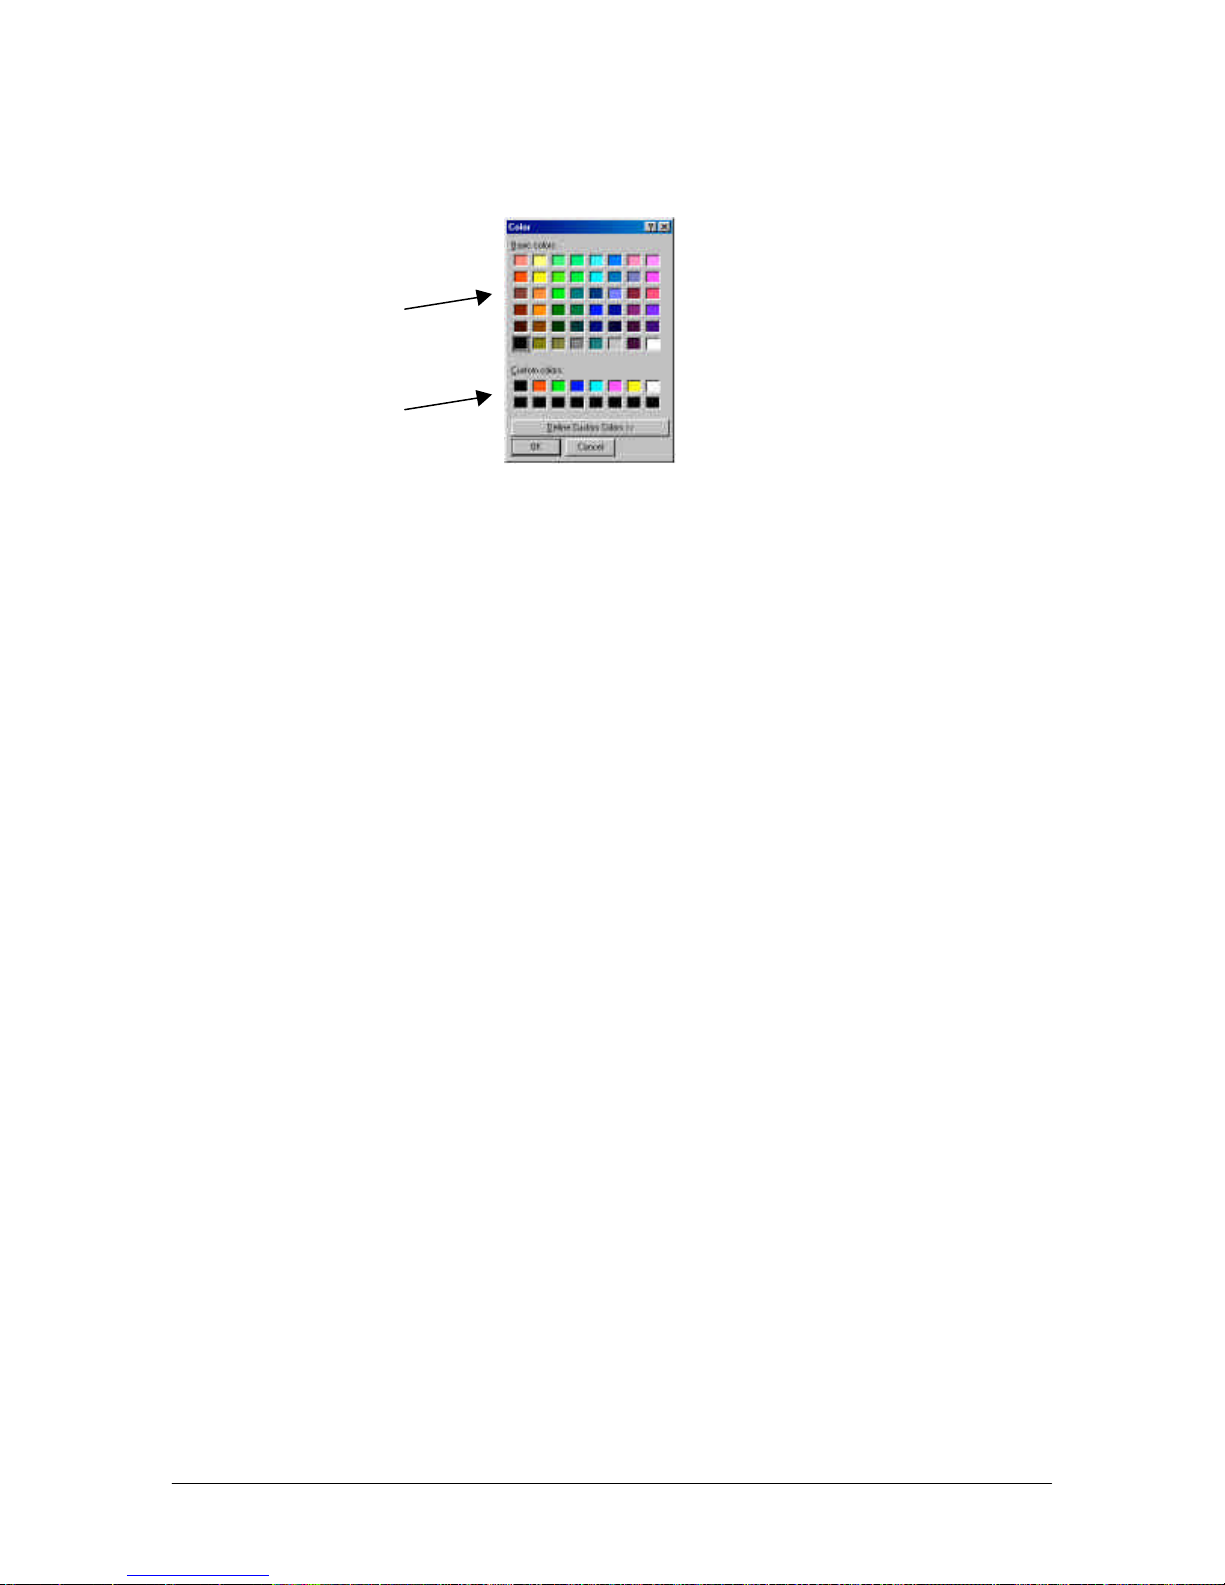
There are seven standard colors that provide good color intensity for text and graphics.
These colors are shown in the first row of the Custom Colors of the Color Selection
Menu in the CD Label program. These colors are red, green, blue, light blue, purple,
yellow, and black.
For best color output:
Use the Seven standard
colors shown in the
Custom Colors box.
(Note: white is not
printed)
Recommendation for optimum text and graphics: Use the seven standard colors for
text color or graphic shape color for boxes, circles, lines, and color filled shapes. These
colors selected from within the CD Label program.
48
Page 49
PowerPro II
CopyPro PowerPro II
In addition to the standard colors, are the basic colors, which provide more color choices,
but may appear to print lighter than they appear on-screen.
Additional colors
Seven basic colors
(Note: white is not
printed)
Preparing Color Graphics for import into the CD Label Program
The CD Label Program allows import of several standard graphics files, including
versions of BMP, JPG. And TIF file formats. The PowerPro II prints at 300 and 600 DPI
modes, so graphics should be set for 300 DPI resolution and properly sized for the disc
label. Typically, in Paint and Photo editing programs there are features that allow setting
resolution and imaging size. Having the correct size and resolution eliminates the need to
"re-size" the image in the CD Label software. Small images or low resolution images
may need to be stretched to a larger size, however this may cause the graphic to appear to
have a "rough" or "jagged edged" appearance.
Recommendation for preparing graphics for labels:
• Set graphic image resolution to 300 DPI when preparing graphic in Photo or Paint
programs
• Make text or graphic the correct size for the CD label
• If possible, avoid re-sizing graphic in CD Label program
• Importing a webpage graphics: on-screen webpage graphics are typically set for 72
DPI (low resolution) and will appear to "shrink" in size when imported into the CD
Label program which is displaying the graphic at 300 DPI. Re-sizing this type of
graphic to a larger size may cause the graphic to become fuzzy or have jagged edges.
Advanced recommendations:
• In Photo and Paint programs, if possible select colors that mix only two of the three
CMY colors to minimize dithering
• In Photo and Paint programs, adjust contrast and brightness settings to make
"brighter" and denser images
49
Page 50
PowerPro II
CopyPro PowerPro II
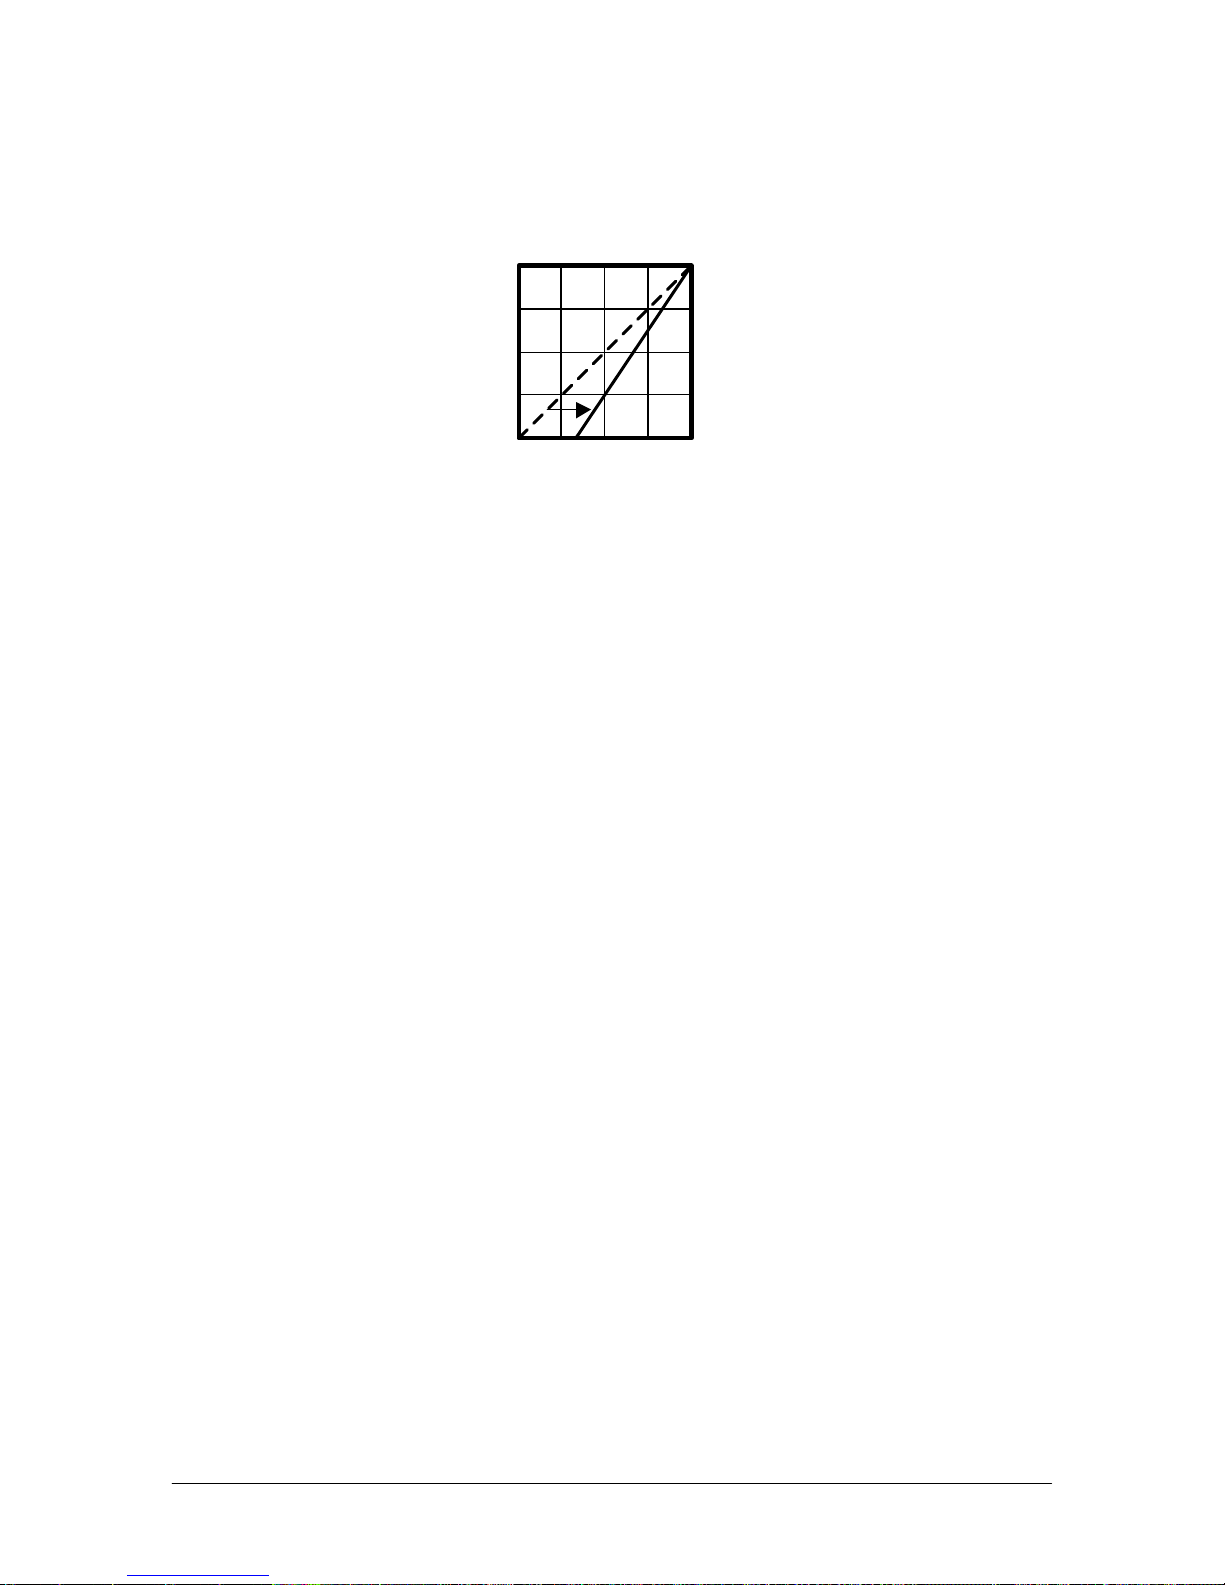
• In Photo and Paint programs, use the color saturation adjustment (Ex. color curves) to
increase color density of graphic
Figure 22: For graphics created in Photo and Paint programs, adjust the color curves to increase color
density of graphic for best color output
50
Page 51
PowerPro II
CopyPro PowerPro II
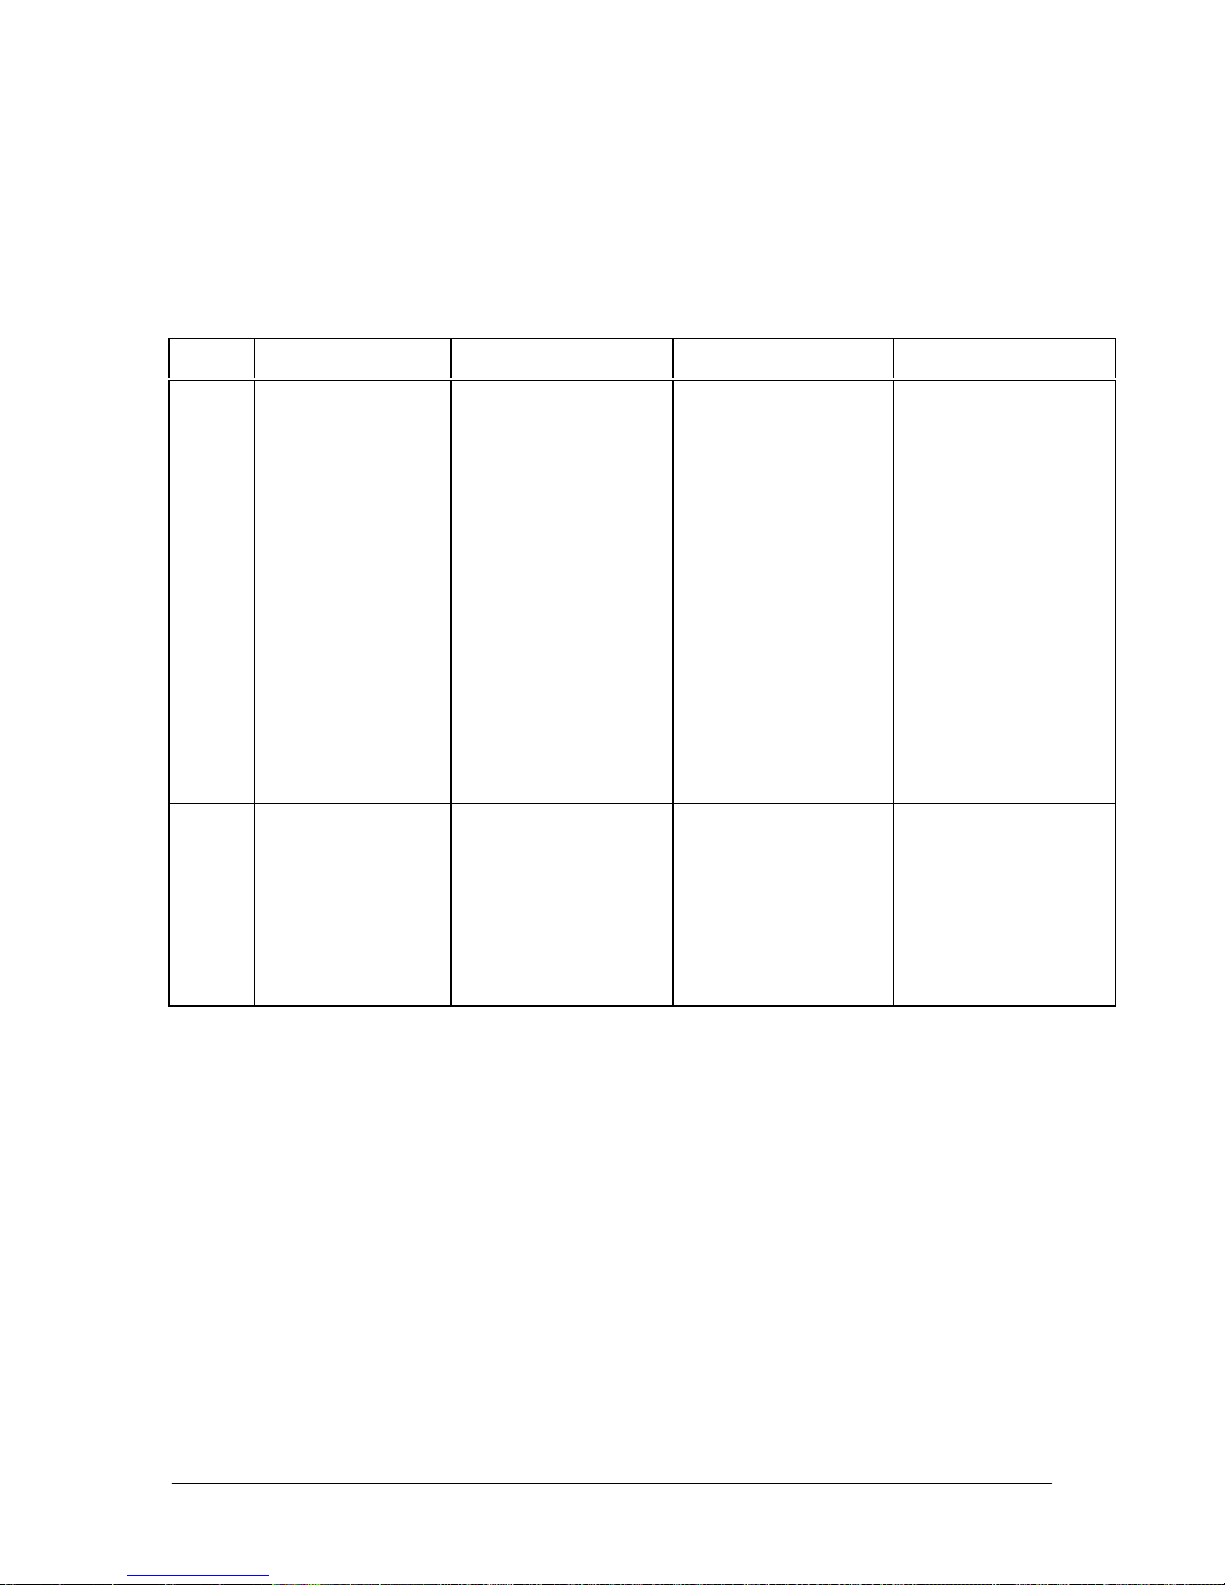
CD Printing Techniques Chart
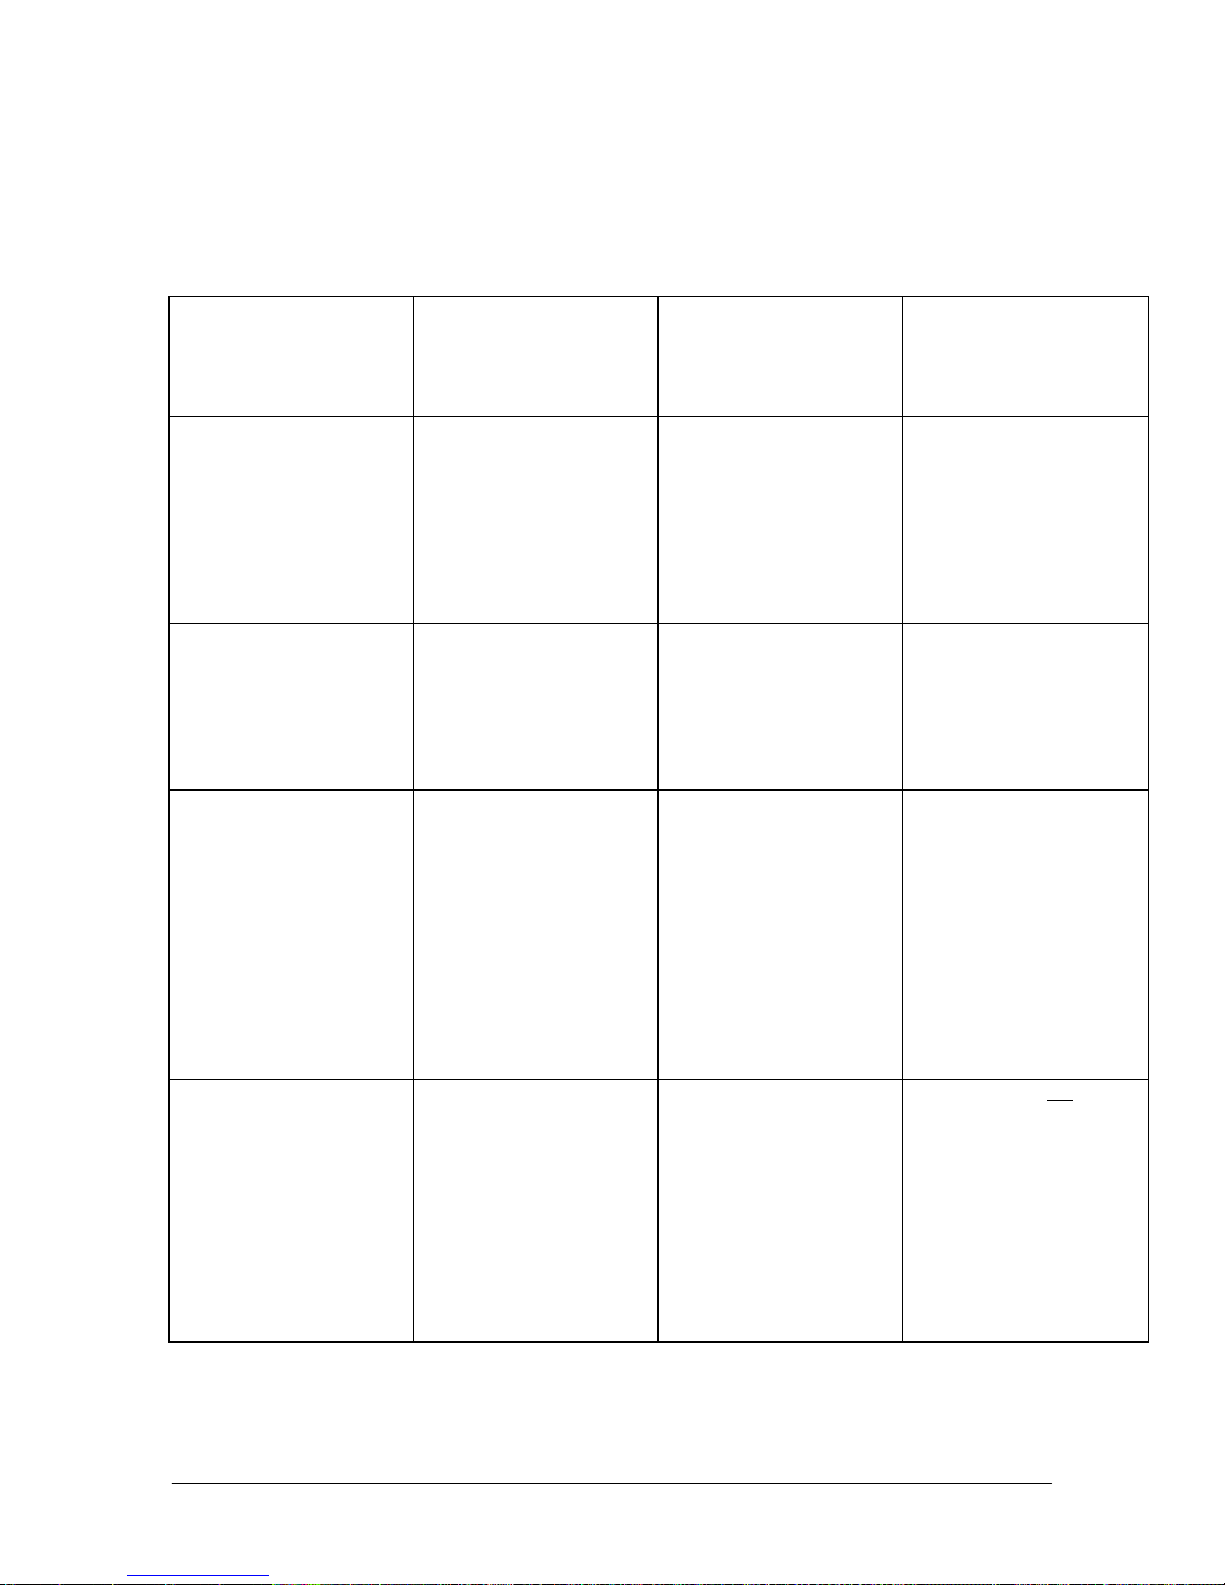
Use this chart with example CD Label example (Figure 18) shown on page 39 for
recommendations on printing issues. The CD Label example includes several label
graphics items representing typical disc label components. These label components are
marked as areas A, B, C D, E, F and G on the CD Label example.
Area Issue Reason Suggestion Additional tips
A With black
ribbon: Text
created in the CD
Painter program
does not print
clearly
B Graphics and
Text have light
horizontal lines
Check Strobe
setting. Setting of
too high or too low
will effect text
quality. If strobe is
too high you may
have a ribbon tear or
hear a ”crackle”
sound while
printing, indicating
ribbon is
overheated.
Check strobe
setting. See above.
Strobe setting is too
high, causing ribbon
to wrinkle
Try a Strobe setting
of 15 and increase
strobe value in
increments of 5 until
you have good
results.
CD media may not
be suitable for
thermal transfer
labeling. Try
different brand of
CD media.
51
Page 52
PowerPro II
CopyPro PowerPro II
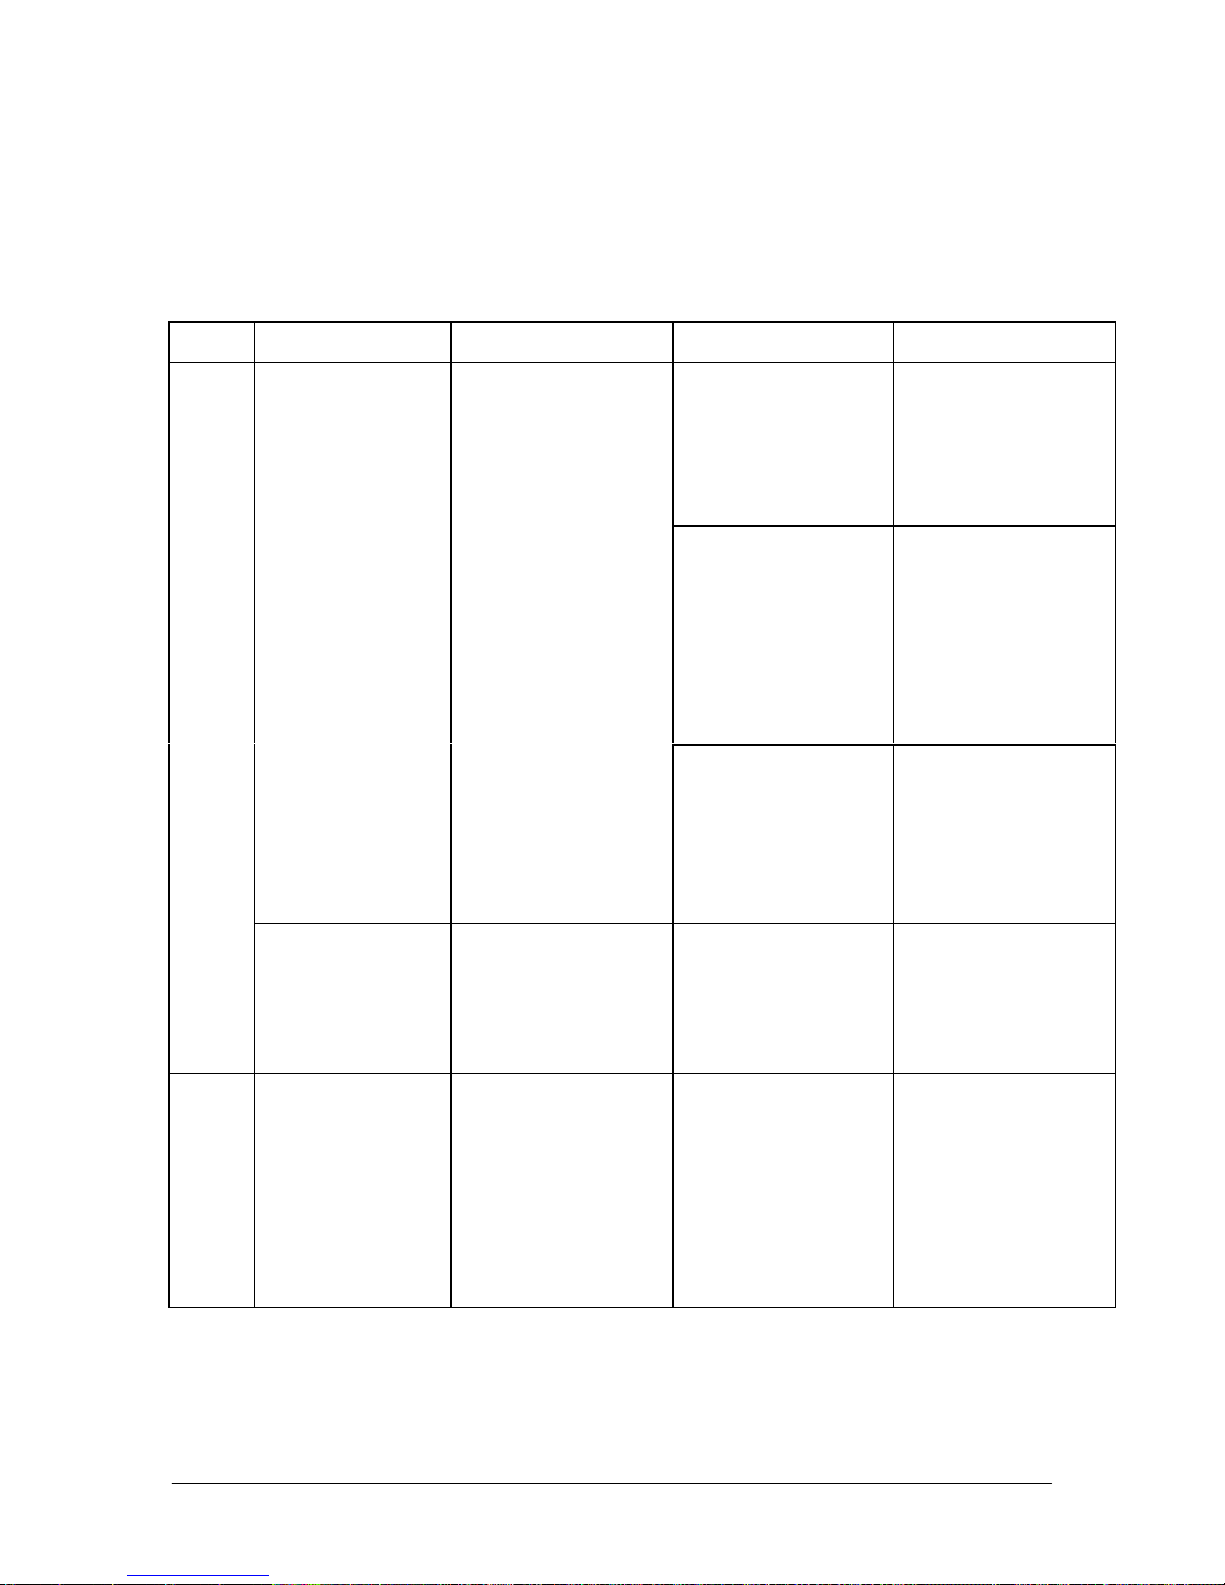
CD Printing Techniques Chart, continued.
Use this chart with example CD Label example (Figure 18) shown on page 39 for
recommendations on printing issues. The CD Label example includes several label
graphics items representing typical disc label components. These label components are
marked as areas A, B, C D, E, F and G on the CD Label example.
Area Issue Reason Suggestion Additional tips
C
Text or Graphic
fades at outer
edge of disc or
near hub ring area
Text or graphics
at top or bottom
of disc is not
printing or is
cutoff
Printer can not print
to outer edge of disc
or near hub ring
area
Some CD-R discs
are not perfectly flat
and have raised
areas near hub ring
area and on the
outer edges of the
disc. The raised
areas lifts the
printhead away
from the disc
causing print to fade
Print may not print
completely to edge
disc
1. Move text or
Graphic away
from edge or
hub area
2. Adjust Disc
Template. See
Settings Menu
in CD Painter,
select Template.
Adjust
3. Change to white
coated CD
media for better
results
See above.
White coated media
provides flatter /
smoother printing
surface compared to
some types of silver
CD media
D Web page
graphics copied
to a disc label
have a “rough” or
“jagged” quality
Web page graphics
are usually set at 72
DPI, which will
cause them to
appear very small
when imported into
CD Painter label
program
Do not enlarge or
stretch web
graphics. Enlarging
reduce quality of the
graphics
Tip: Some graphics
files (WMF files:
Windows Meta
Format) can be
enlarged without
reduction in quality
52
Page 53

PowerPro II
CopyPro PowerPro II
CD Printing Techniques Chart, continued.
Use this chart with example CD Label example (Figure 18) shown on page 39 for
recommendations on printing issues. The CD Label example includes several label
graphics items representing typical disc label components. These label components are
marked as areas A, B, C D, E, F and G on the CD Label example.
D Printed graphics
look “rough” or
“jagged” as
compared to what
is shown onscreen
The Graphics may
have been created or
saved at a low
resolution, then
placed in the label.
Low resolution
graphics may have
been “expanded” or
“stretched” to larger
size
Low resolution
graphics (72 DPI)
appear
Use high resolution
graphics for best
looking 300DPI or
600DPI printout
Create and Save all
Graphics at least
300DPI or higher.
Note: Graphics that
are created and
saved at a low
resolution can not
convert back to
higher resolution.
When creating
graphics, create
graphics close to
size used on CD
label. In your
graphics program, et
resolution to 300
DPI and use rulers
to check size. This
will eliminate the
need to expand” or
“stretch” graphics
which may reduce
the quality of the
graphic object
53
Page 54
PowerPro II
CopyPro PowerPro II
CD Printing Techniques Chart, continued.
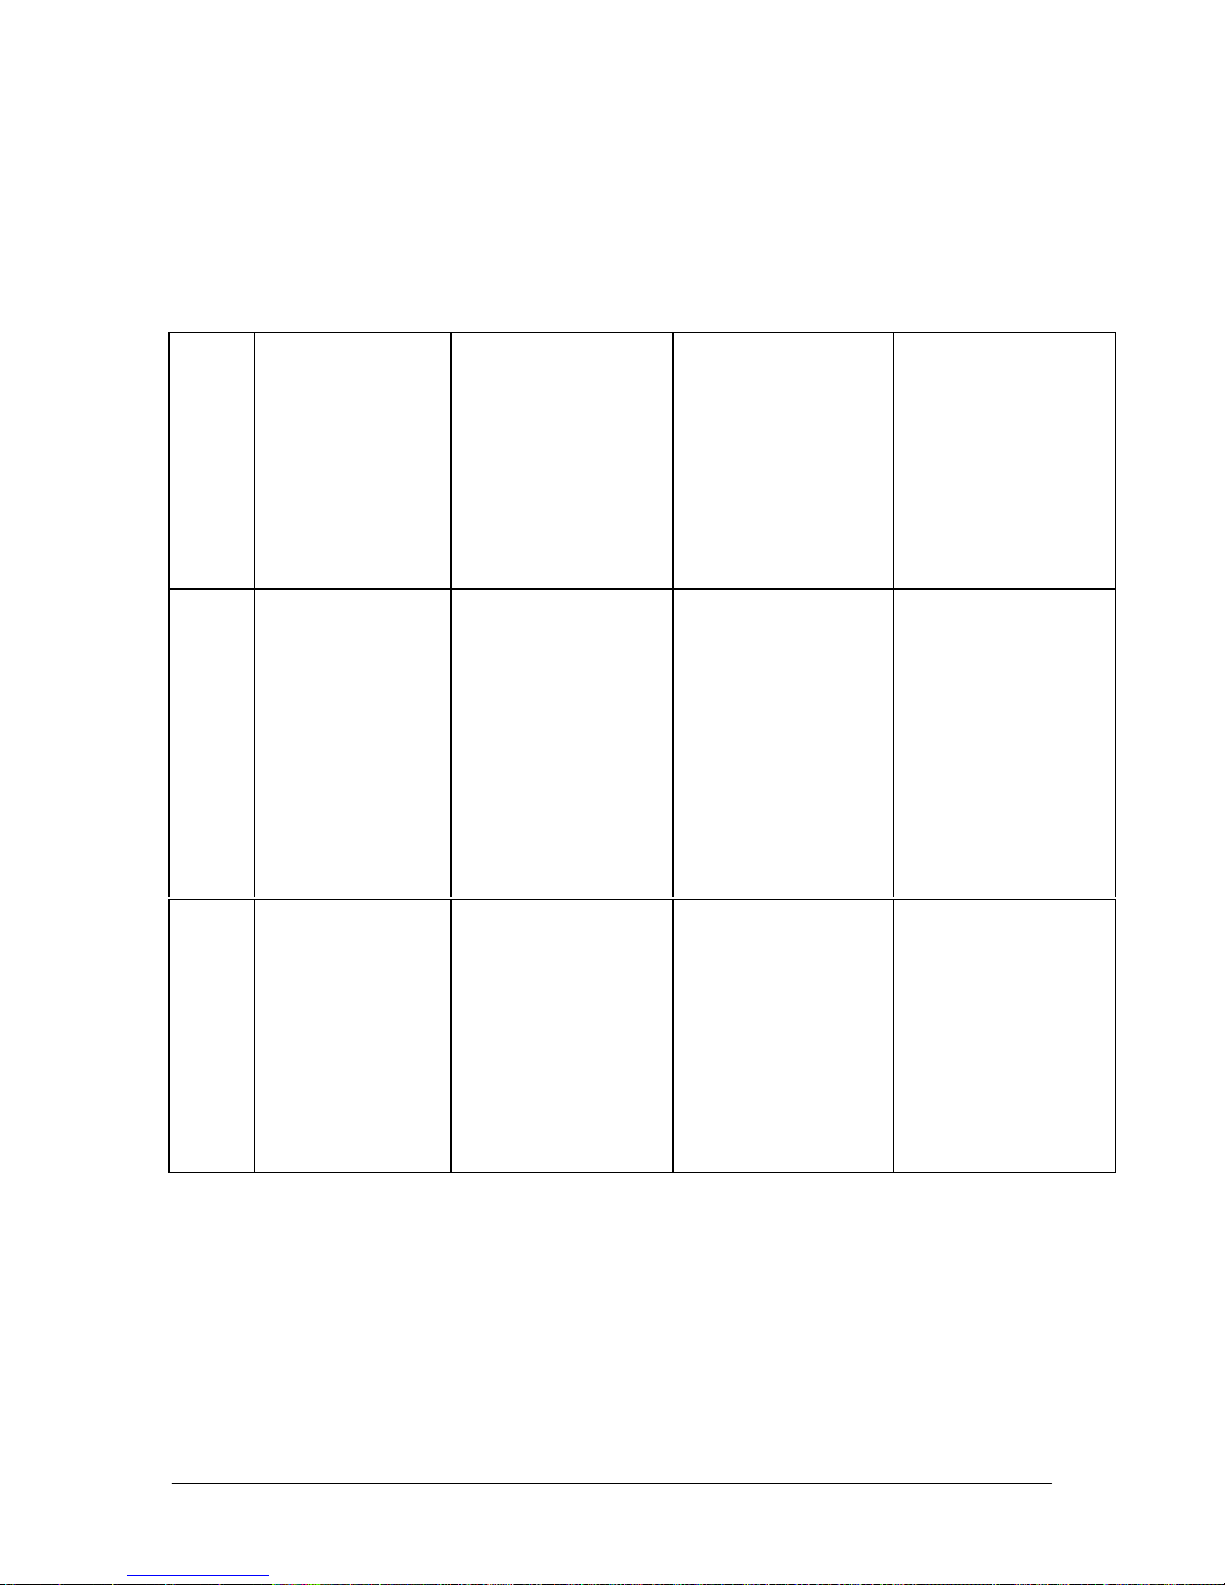
Use this chart with example CD Label example (Figure 18) shown on page 39 for
recommendations on printing issues. The CD Label example includes several label
graphics items representing typical disc label components. These label components are
marked as areas A, B, C D, E, F and G on the CD Label example.
E With color
ribbon: Text
created in the CD
Painter program
does not print
clearly
F With color
ribbon: Text
created in a 3
rd
party graphics
program does not
print clearly
F Graphics objects
appear washed
out or are not
completely
printing
For best text quality
use the one of the
printer’s seven
primary colors as a
text color.
Also, check strobe
setting. See above.
The text may be a
bitmap or JPEG
graphics, with a
color that does not
print well.
Check strobe
setting. See above.
IF Strobe setting
OK, graphic may be
too light.
Adjust to color of
the text to more
closely match the
printer’s seven
primary colors
Adjust graphics in
photo or paint
program by
increasing darkness
or density in 10%
increments and if
needed reduce
contrast by 10%.
Tip: If adjusting
colors does not
provide good
results. Use the CD
Painter software to
create the text or
text and
background.
CD media may not
be suitable for
thermal transfer
labeling. Try
different brand of
CD media.
54
Page 55
PowerPro II
CopyPro PowerPro II
CD Printing Techniques Chart, continued.
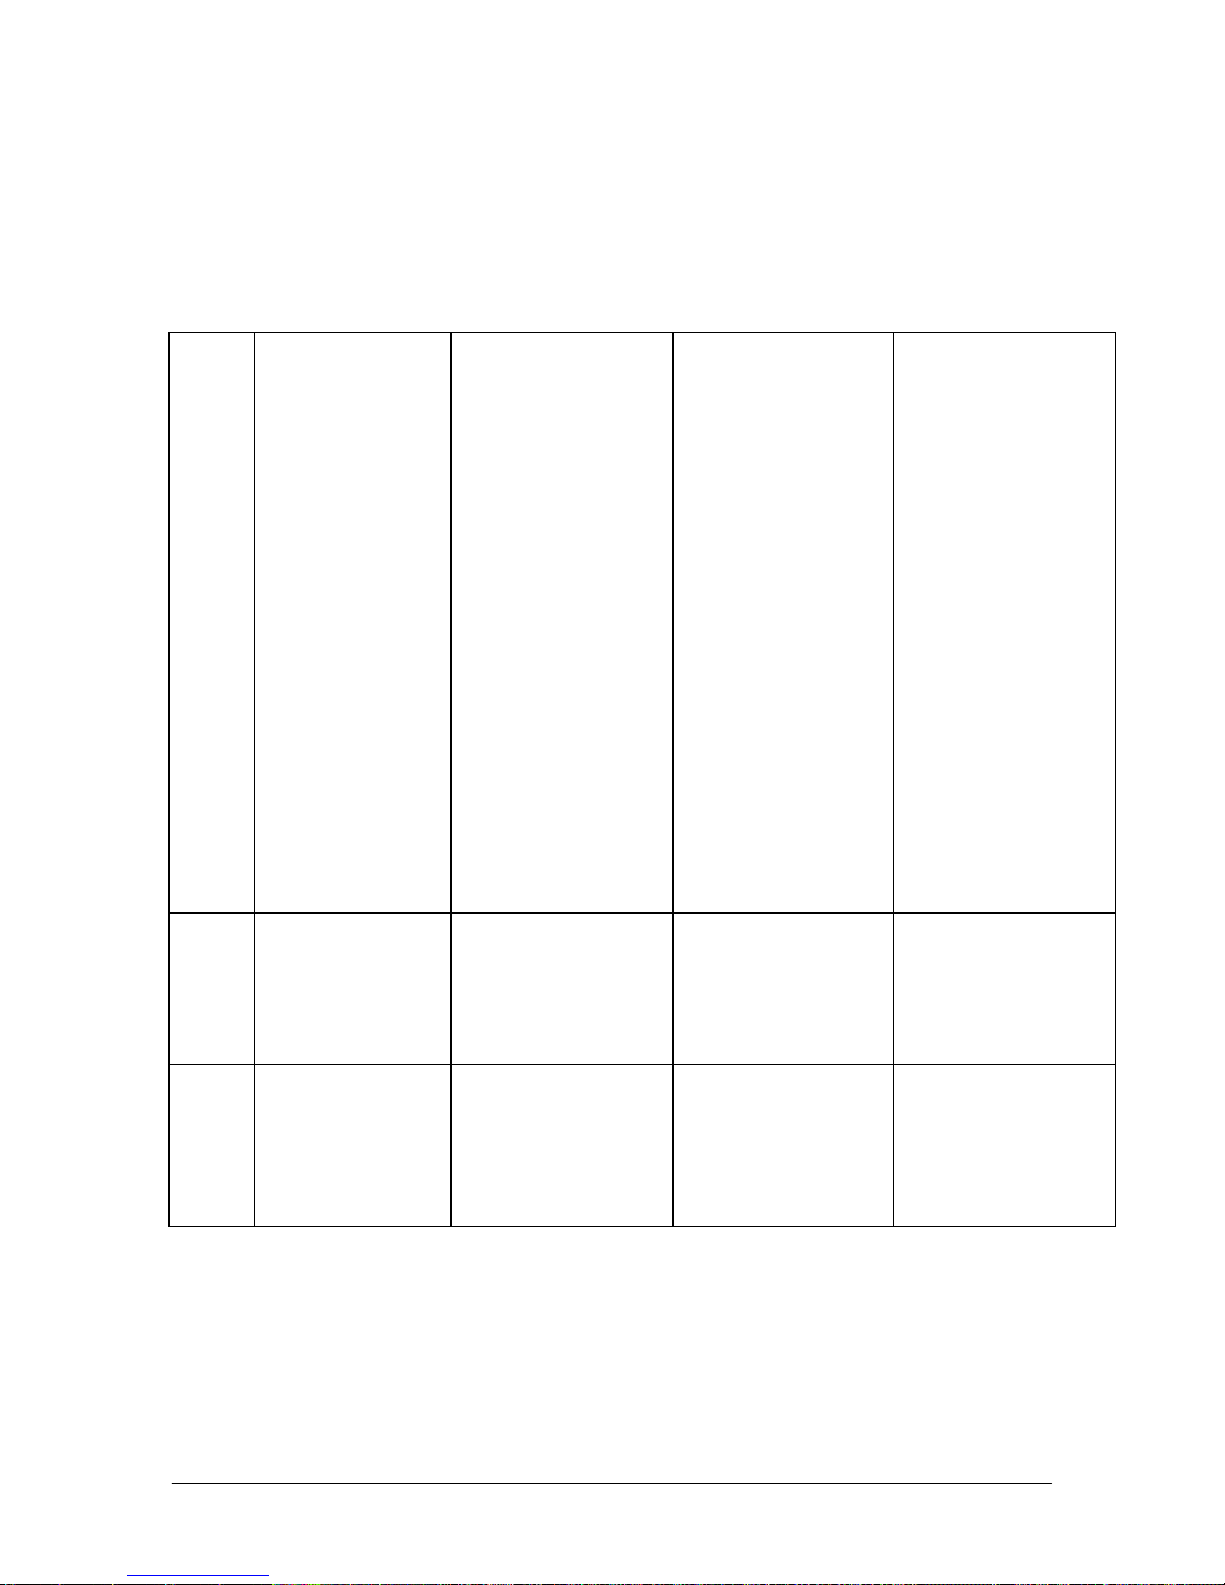
Use this chart with example CD Label example (Figure 18) shown on page 39 for
recommendations on printing issues. The CD Label example includes several label
graphics items representing typical disc label components. These label components are
marked as areas A, B, C D, E, F and G on the CD Label example.
G
Vertical “White”
line or non
printing line” is
across disc label
Printhead has a
particle of ribbon or
dust stuck to it.
It is possible that
printhead is
damaged and needs
replacement. If
cleaning printhead
does not correct
problem. Contact
CopyPro Service
department for
replacement
printhead.
Clean printhead Tip: If strobe
setting is too high,
this may cause
ribbon to melt and
ribbon particle stick
to printhead.
After cleaning
printhead, set strobe
setting to 15
increase in strobe
value increments of
5 until you have
good results.
G
G
One half of the
label is not
printed on all
discs
Dot or spec on
disc label
Print head may need
servicing, please
contact your reseller
or CopyPro service
department
Dust particles on
ribbon cause spots
on disc label
Check printer for
dust. Use printer in
less dusty area.
Operate printer with
top cover on.
Tip: Save a copy of
the labeled CD and
label file to allow
quick problem
solving
Take care not to
touch printhead
when inspecting for
dust.
55
Page 56
PowerPro II
CopyPro PowerPro II
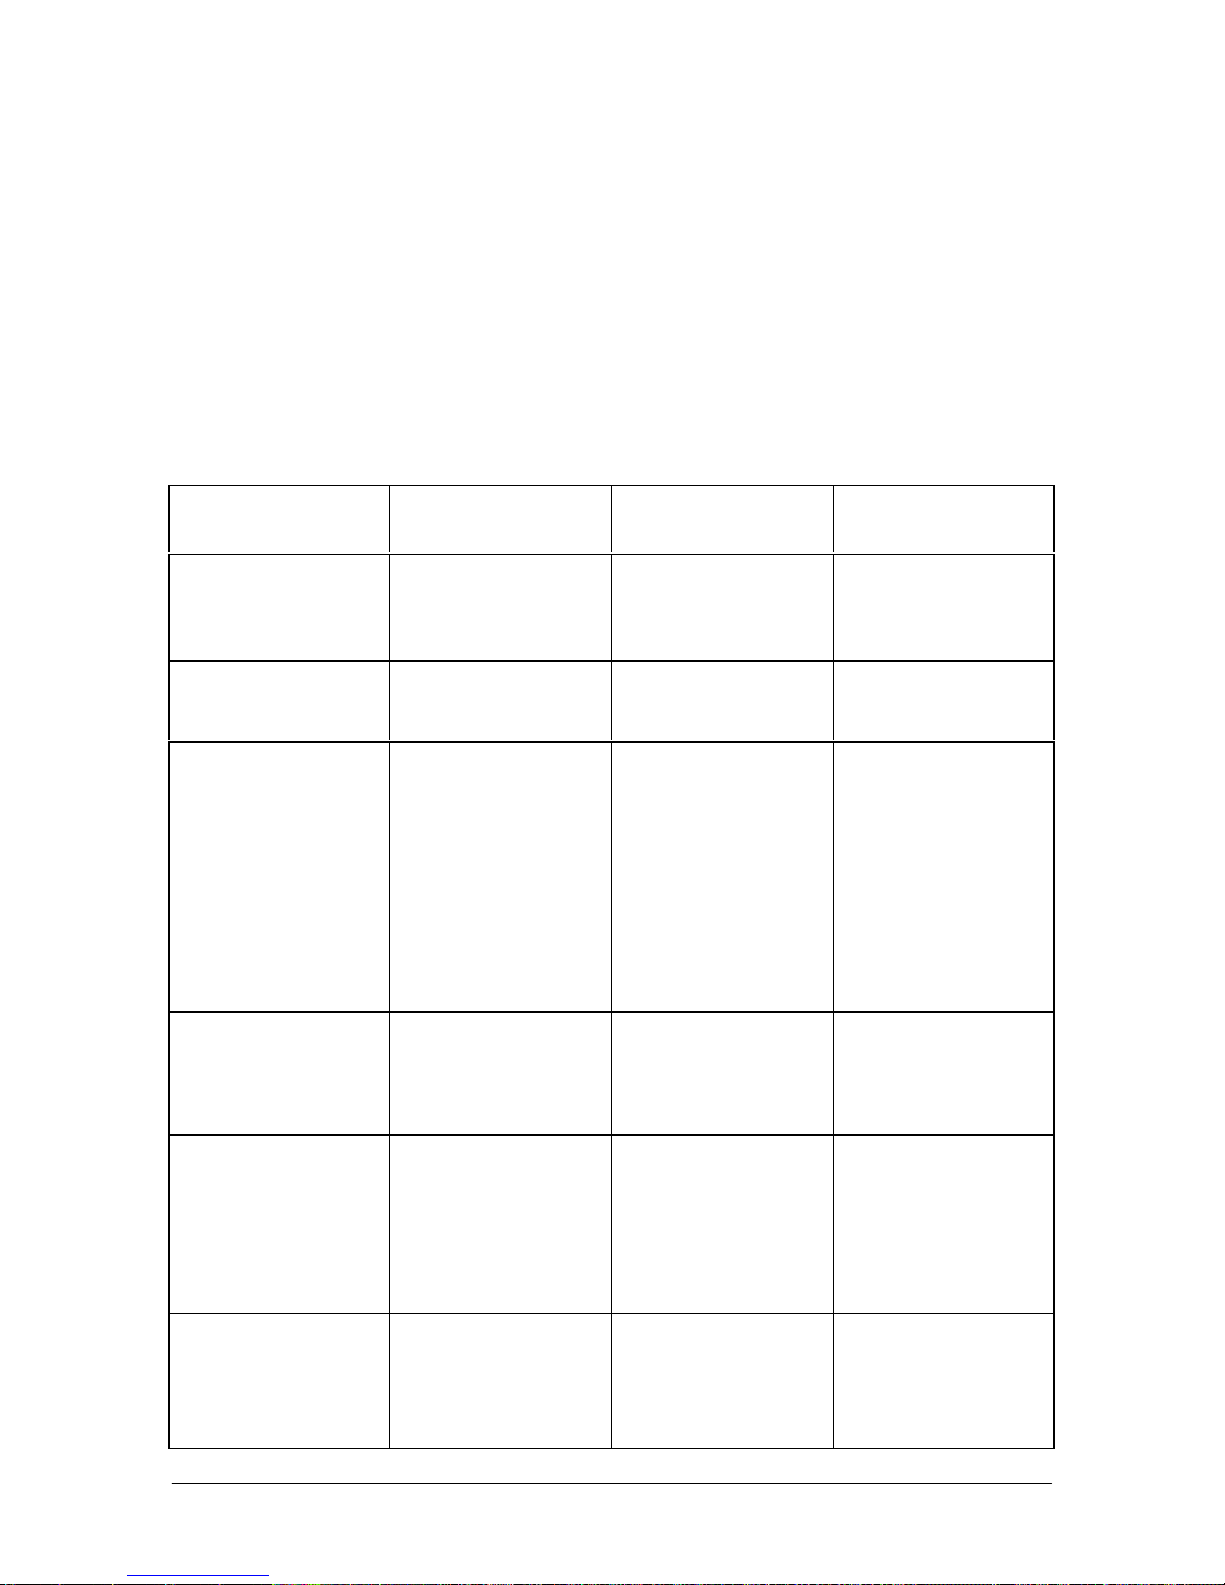
Thermal Transfer & Inkjet CD Printer Comparison
The PowerPro II series of printers use thermal transfer technology to apply resin type ink
to the surface of a plastic CD or DVD disc. Thermal transfer printers have a print head
that heats portions of a ribbon as disc moves under the printer head, as the disc goes pass
the print head the resin type ink cools and adheres to the surface of the disc. Thermal
Transfer CD printers provide one of the few methods to print on CD discs in an office
environment.
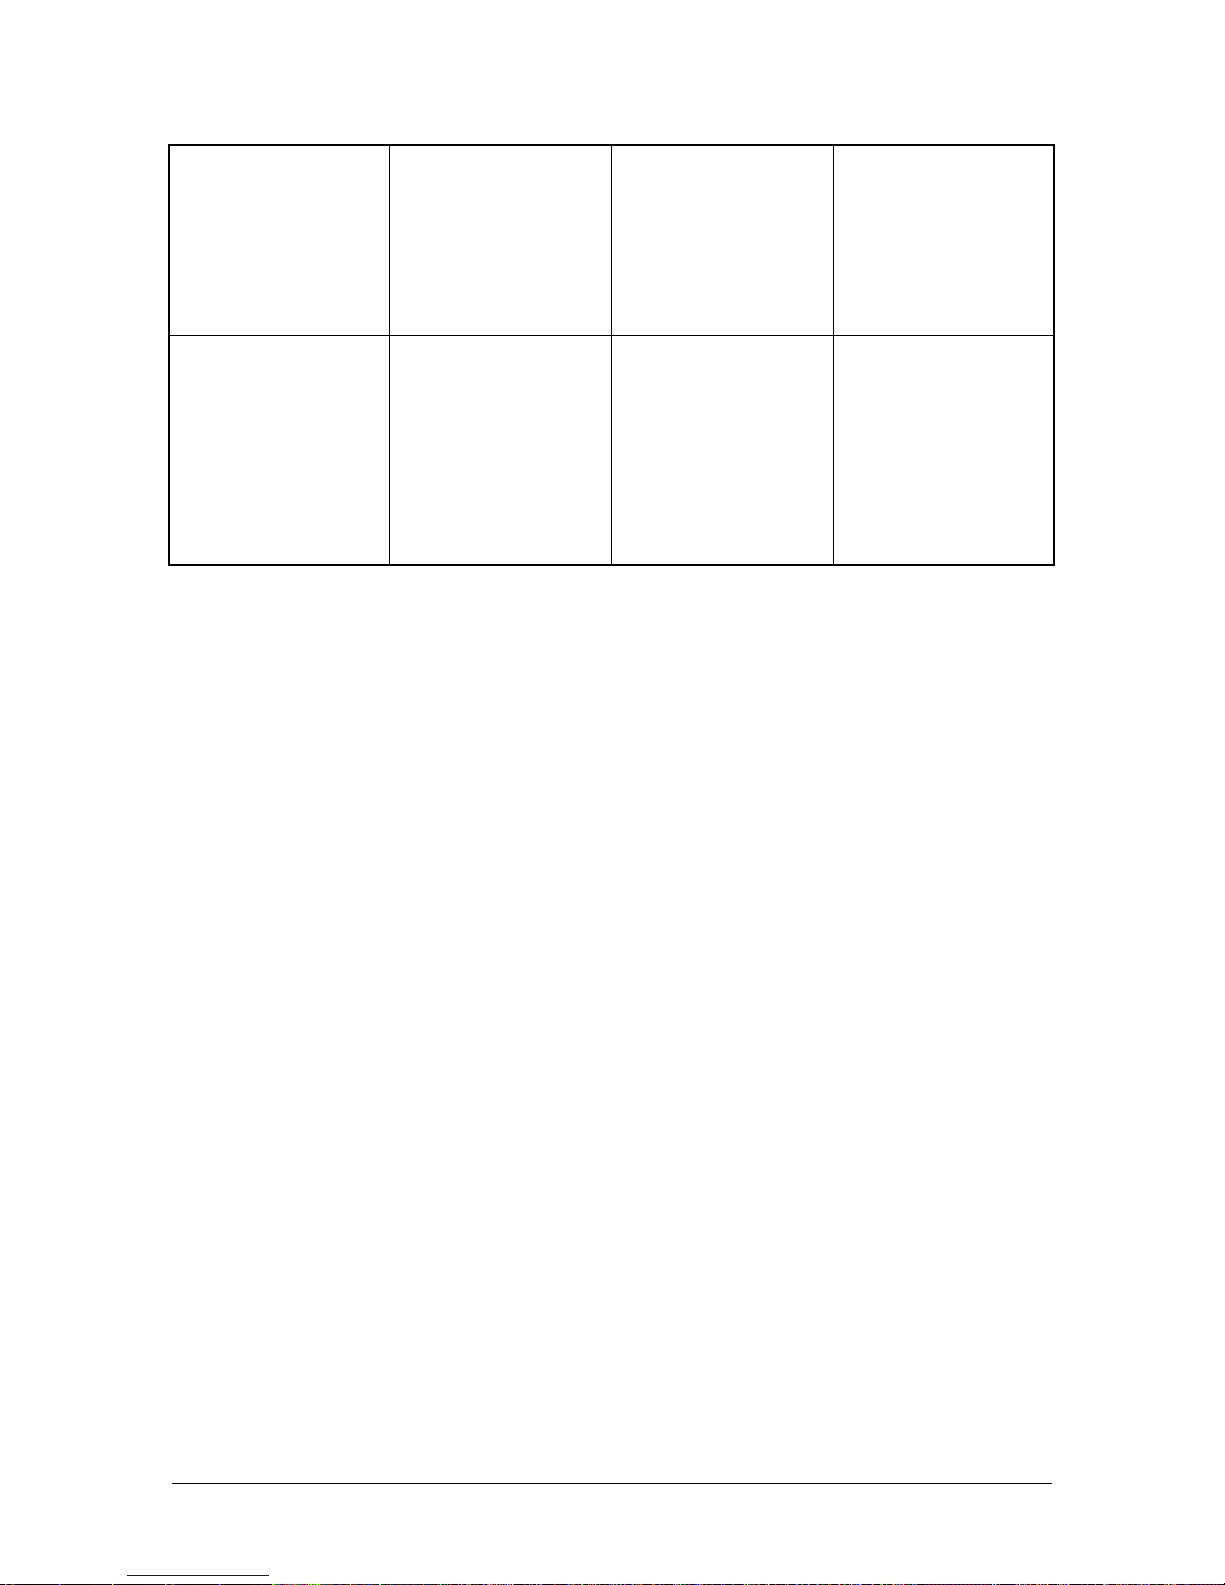
CD Printer Comparison Chart
Inkjet CD Printer Thermal Transfer
Key Point
CD printer
Fast Print speed Slow Fast Thermal Printer is
faster
Waterproof Label Not waterproof Waterproof Thermal Printer
label more durable
Requires coated CD
media
Yes No – prints black
directly on Silver or
gold media
Thermal Printer has
slowest cost per
label for black only
labels and media
Yes – prints color
on white coated
media
Quality of output Good Text
Excellent Graphics
Excellent Text
Good Graphics
Thermal transfer
Printer offer good
labeling
characteristics
Coverage of Disc Can cover entire
Best labeling
applications
disc with graphics
Color photos on
white inkjet type
coated media
Can cover most of
the disc with
graphics. Some
unprintable areas at
edges of disc and
hub area
Black text and
graphics on silver /
gold media
Spot color on silver
Thermal transfer
Printer label
coverage good for
most business CD
labeling applications
Thermal transfer
Printer allows wide
range of label types
56
Page 57
PowerPro II
CopyPro PowerPro II
on white coated
media
Mixed text and
color graphic on
white coated media
Not recommend
labeling applications
Permanent Labeling
of disc
Disc that will
handled in wet or
humid conditions
(ink will smear)
Full color photos or
graphics covering
the entire label area
of the disc
Thermal Transfer
Printer full coverage
labels possible but
not recommended
57
Page 58

PowerPro II
CopyPro PowerPro II
Supported Ribbon and Ribbon Specifications
The CopyPro PowerPro II supports the following thermal transfer ribbons.
Vendor Ribbon Type Spindle Width Labels per ribbon
CopyPro Black 130MM
• 2361 full CD
labels
• 4,000 to 6,000
partial CD labels
• Over 6,000
labels if label is
consists of
single line of
text
Rimage Full Color 122MM
• 500 labels full
CD
Ribbon Usage with a Minimum Print Size
The amount of ribbon used will vary depending on the particular print, and the amount of
CD surface the print is intended to cover. A minimum print (ex. line of text) is one that
uses the smallest amount of ribbon. The Take-up Roller typically winds 7/8” to 9/8” of
ribbon with a minimum print.
58
Page 59
PowerPro II
CopyPro PowerPro II
5 4 3 2 1
Autoloader Port
Connector and Signal information
Pin Number Signal Name I/0 Function Logic 1
(5 Volts)
1 CPBSY Output Printer Busy Printer Busy Printer
2 CTOUT Output Tray Out Tray
Extended
3 CTIN Output Tray In Tray
Retracted
4 CCDINTRAY Output CD on Tray CD Present No CD
5 P_CCMD Input Print Buffer
No Action Prints label
Command
6 O_CCMD Input Move Tray
No Action Toggles tray
Command
7 CPERR Output Printer Error Error Exists No Error
8 CRIBOUT Output Ribbon Out No Ribbon
Detected
Logic 0
Available
Tray
Retracted
Tray
Extended
Present
image in
buffer
In or Out
Ribbon
Detected
9 Ground Ground N/A N/A
Note:
• P_CCMD and O_CCMD must receive a logic low pulse of at least 70ms for the
command to be valid.
• CopyPro Autoloaders send valid P_CCMD and O_CCMD pulses of 800ms.
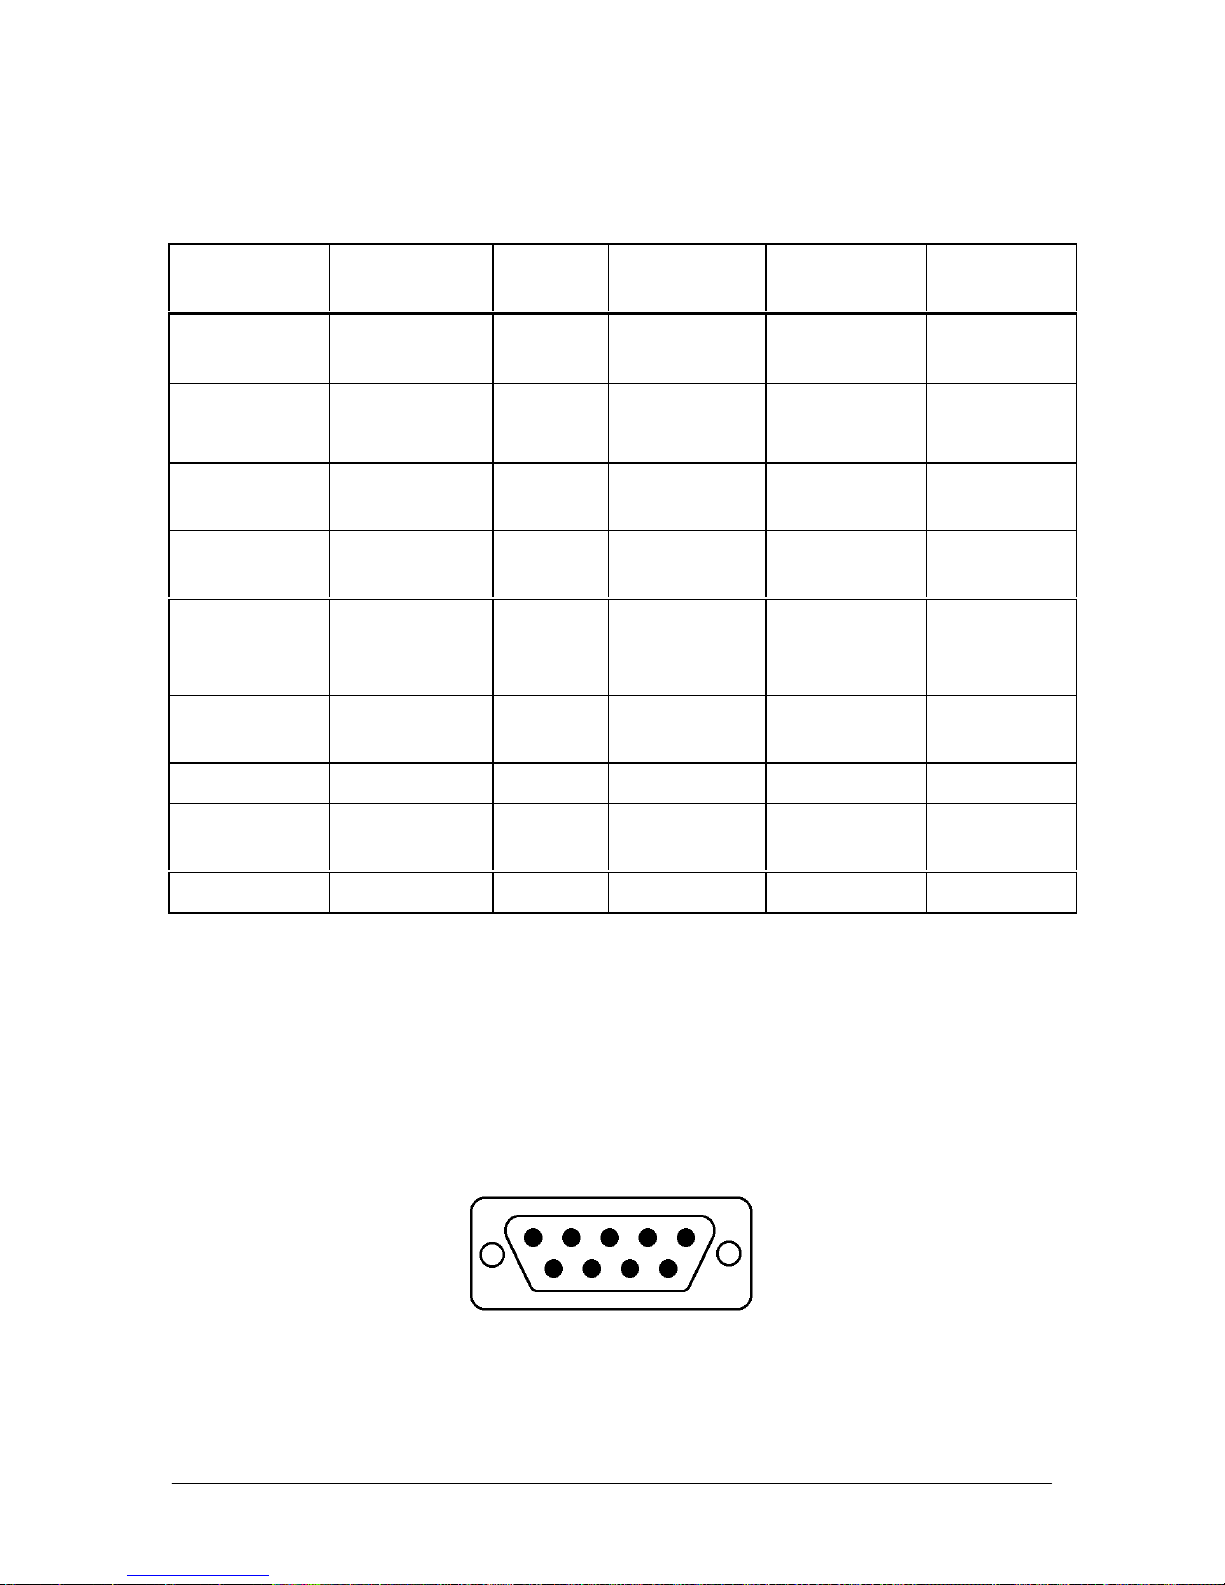
Autoloader Port Pinouts:
9 8 7 6
Figure 23: DB-9 Female type connector on printer
59
Page 60
PowerPro II
CopyPro PowerPro II
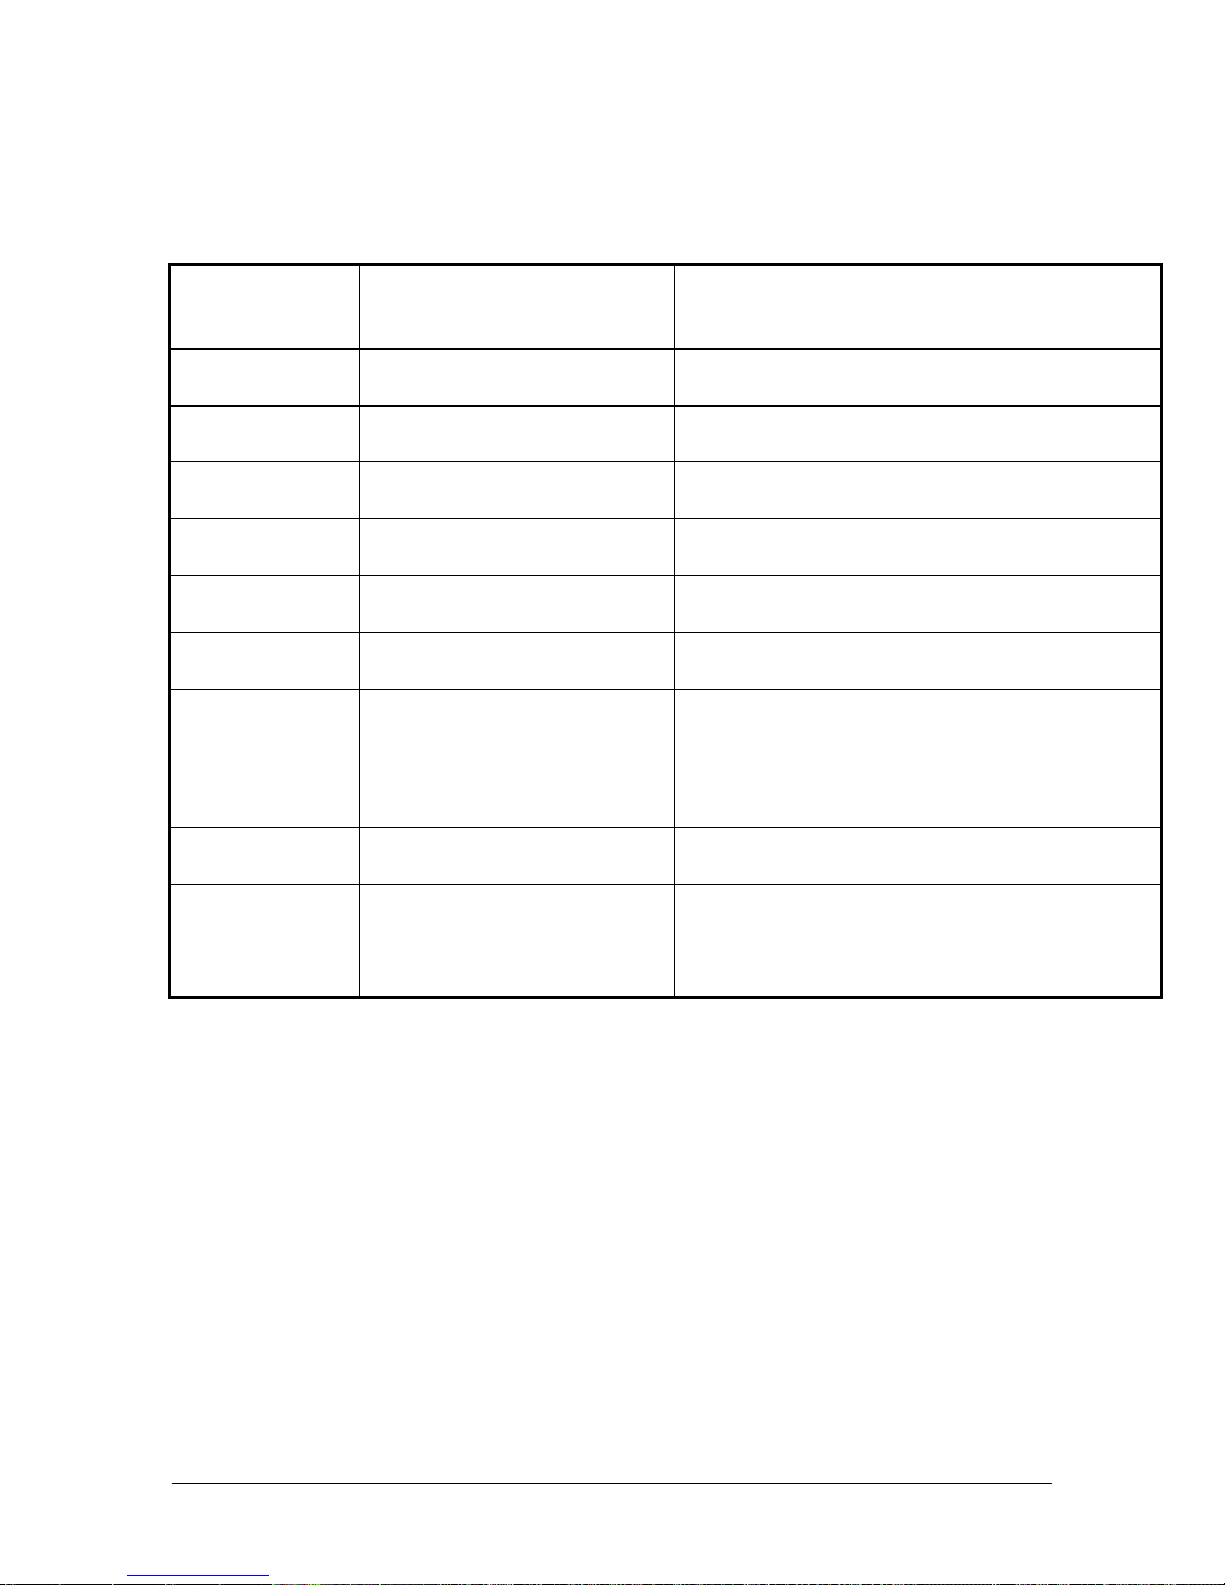
Error Codes for Status LED
The Status LED is located on the front of the printer.
Number of
Area to check Action
Flashes
1 Timeout Power OFF / Power ON printer
2 Ribbon out Install new ribbon, press START
3 No CD No CD in tray. Place CD in Tray, press
START to continue.
4 Tray error Press START to home tray
5 Head motor error Power OFF / Power ON printer
6 Memory error Memory error detected.
Power OFF / Power ON printer
7 Print buffer overflow Press START key
(also check label size, use RLL setting in driver
to reduce label)
8 Positioning Power OFF / Power ON printer
9 Data error Check driver color setting matches type of
ribbon installed in printer.
Power OFF / Power ON printer
60
 Loading...