

Page 1
TM
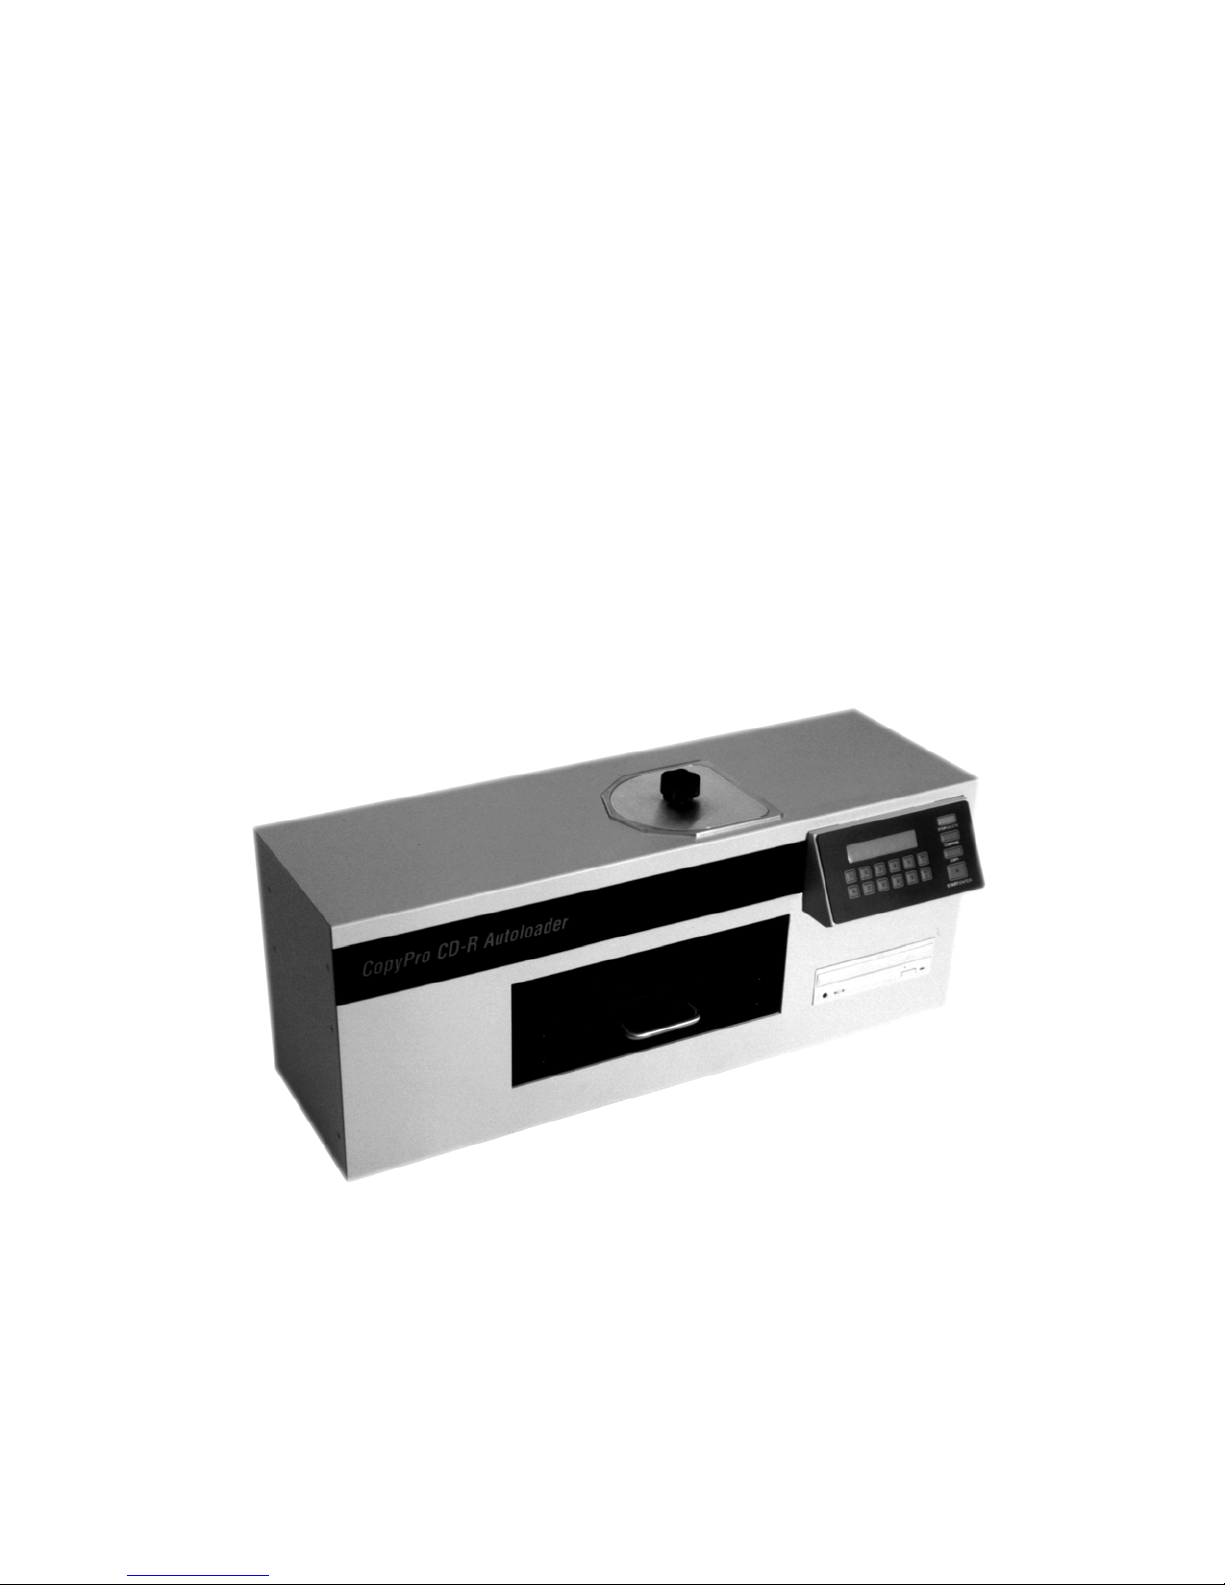
CopyPro CD-R 3500
CD-R Duplicating System
User’s Manual
Page 2

CopyPro
User’s Manual
CopyPro, Inc
4020 Pike Lane Concord, CA 94520
tel (925) 689-1200
fax (925) 689-1263
TM
CD-R 3500
Page 3

COPYRIGHT 1998 by
All Rights Reserved.
This manual is copyrighted and all rights reserved. This document may not, in whole or in part,
be copied, photocopied, reproduced, translated, or reduced to any electronic medium or
machine readable form without the prior written consent of CopyPro, Inc.
CopyPro Inc.
CopyPro, Inc.
4020 Pike Lane
Concord, CA 94520
tel: (925) 689-1200 fax: (925) 689-1263
cd35man.doc
Printed in the United States of America
Page 4

CopyPro CD-R 3500 Table of Contents
Table Of Contents
Unpacking 2
Parts List: 2
The CD Duplicator 5
The LCD Display 6
Setting up the Machine 7
Loading 8
CD Follower 11
Starting the System 12
Duplicating CD’s 12
Operating MODES 14
Duplicating MODE 14
Firmware Download Mode 15
Verify Enable Mode 17
Simulate Write Mode 17
Speed Setting 17
Recording method 17
Error Messages 18
Trouble Shooting 19
CopyPro CD-R 3500 1
Page 5

CopyPro CD-R 3500 Unpacking
Unpacking
Parts List:
The CD-R 3500 includes:
1. CD-R 3500 CD Duplicator
2. Reject Spindle
3. Output Spindle
4. Input Spindle
5. Drawer
6. Power Cord
7. Shipping screw (must be removed before use!)
-- see next page for details
8. CD Follower
CopyPro CD-R 3500 2
Page 6
CopyPro CD-R 3500 Unpacking
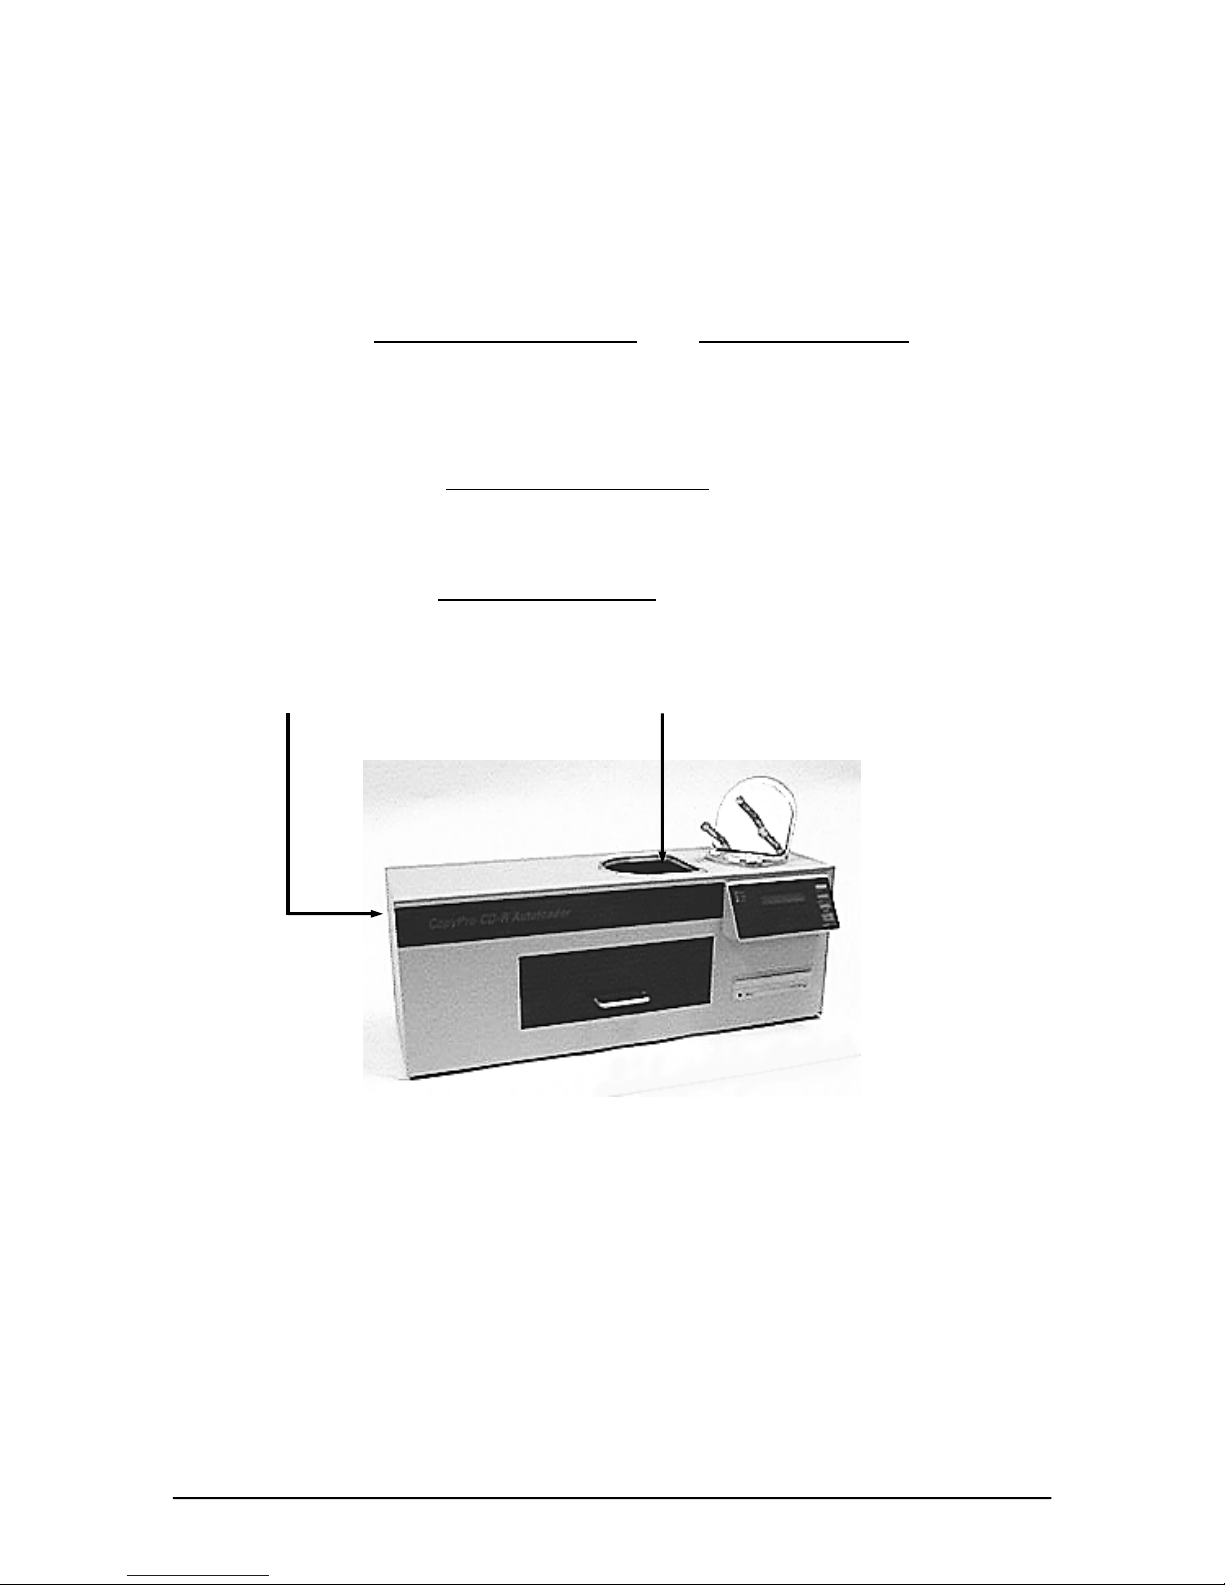
ATTENTION! ATTENTION!
Please remove SHIPPING SCREW and FOAM BLOCK before
use.
1. Please remove
SHIPPING SCREW
(Located at end of unit -- marked with RED TAG)
2. Please remove
FOAM BLOCK
(Inside the input spindle port)
Shipping Screw Foam Block
CopyPro CD-R 3500 3
Page 7
CopyPro CD-R 3500 Unpacking
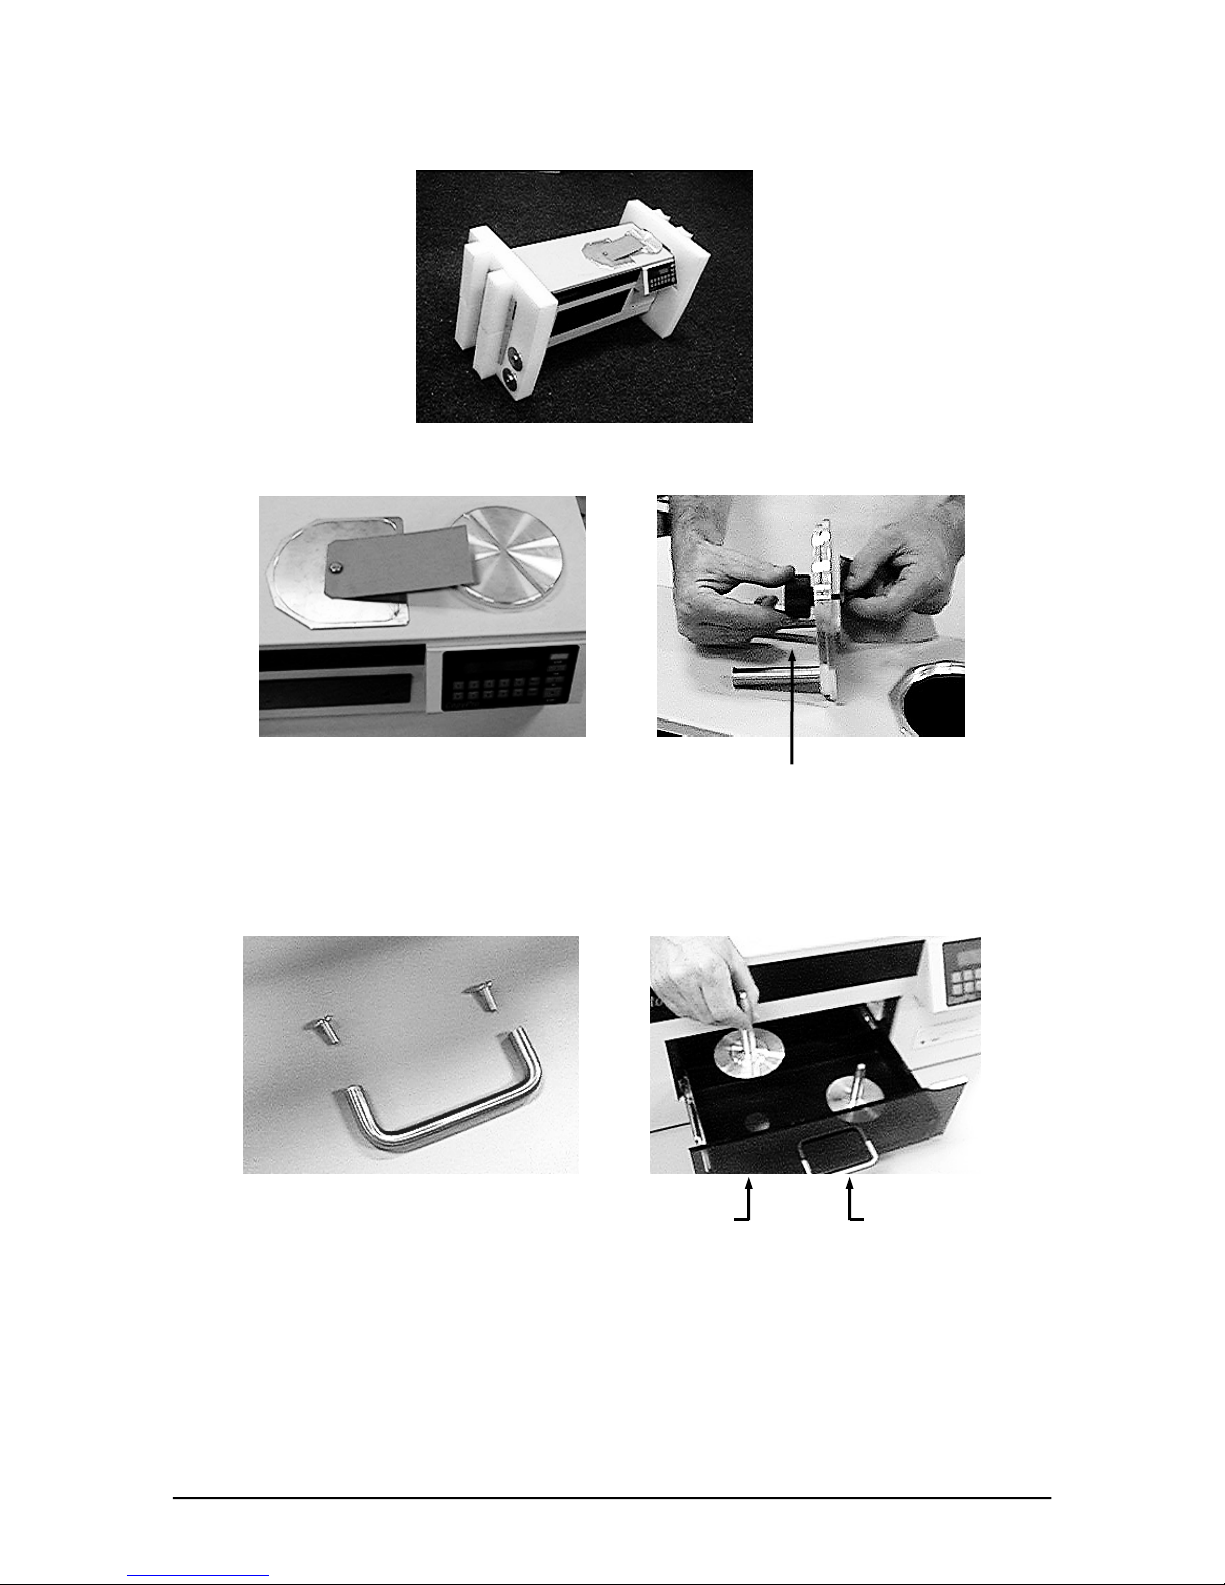
Output and Reject
spindles are placed
on the side of the
packing foam, these
need to be removed
first.
1. Remove the Reject and Output Spindles located on the side of the packing foam.
Card to pick up the Input Spindle
Black handle
2. Using the card, lift the Input Spindle on top of the machine. Unscrew the bolt to
remove the black handle. Set the handle aside for later use.
Disc drawer handle and screws
Reject Spindle Output Spindle
Disc drawer with handle attached
3. Attach the Disc drawer handle using the two screws provided.
4. Insert the Reject Spindle (short spindle) on the right side of the disc drawer and the
Output Spindle on the left side as shown in the diagram.
CopyPro CD-R 3500 4
Page 8
CopyPro CD-R 3500 The CD Duplicator
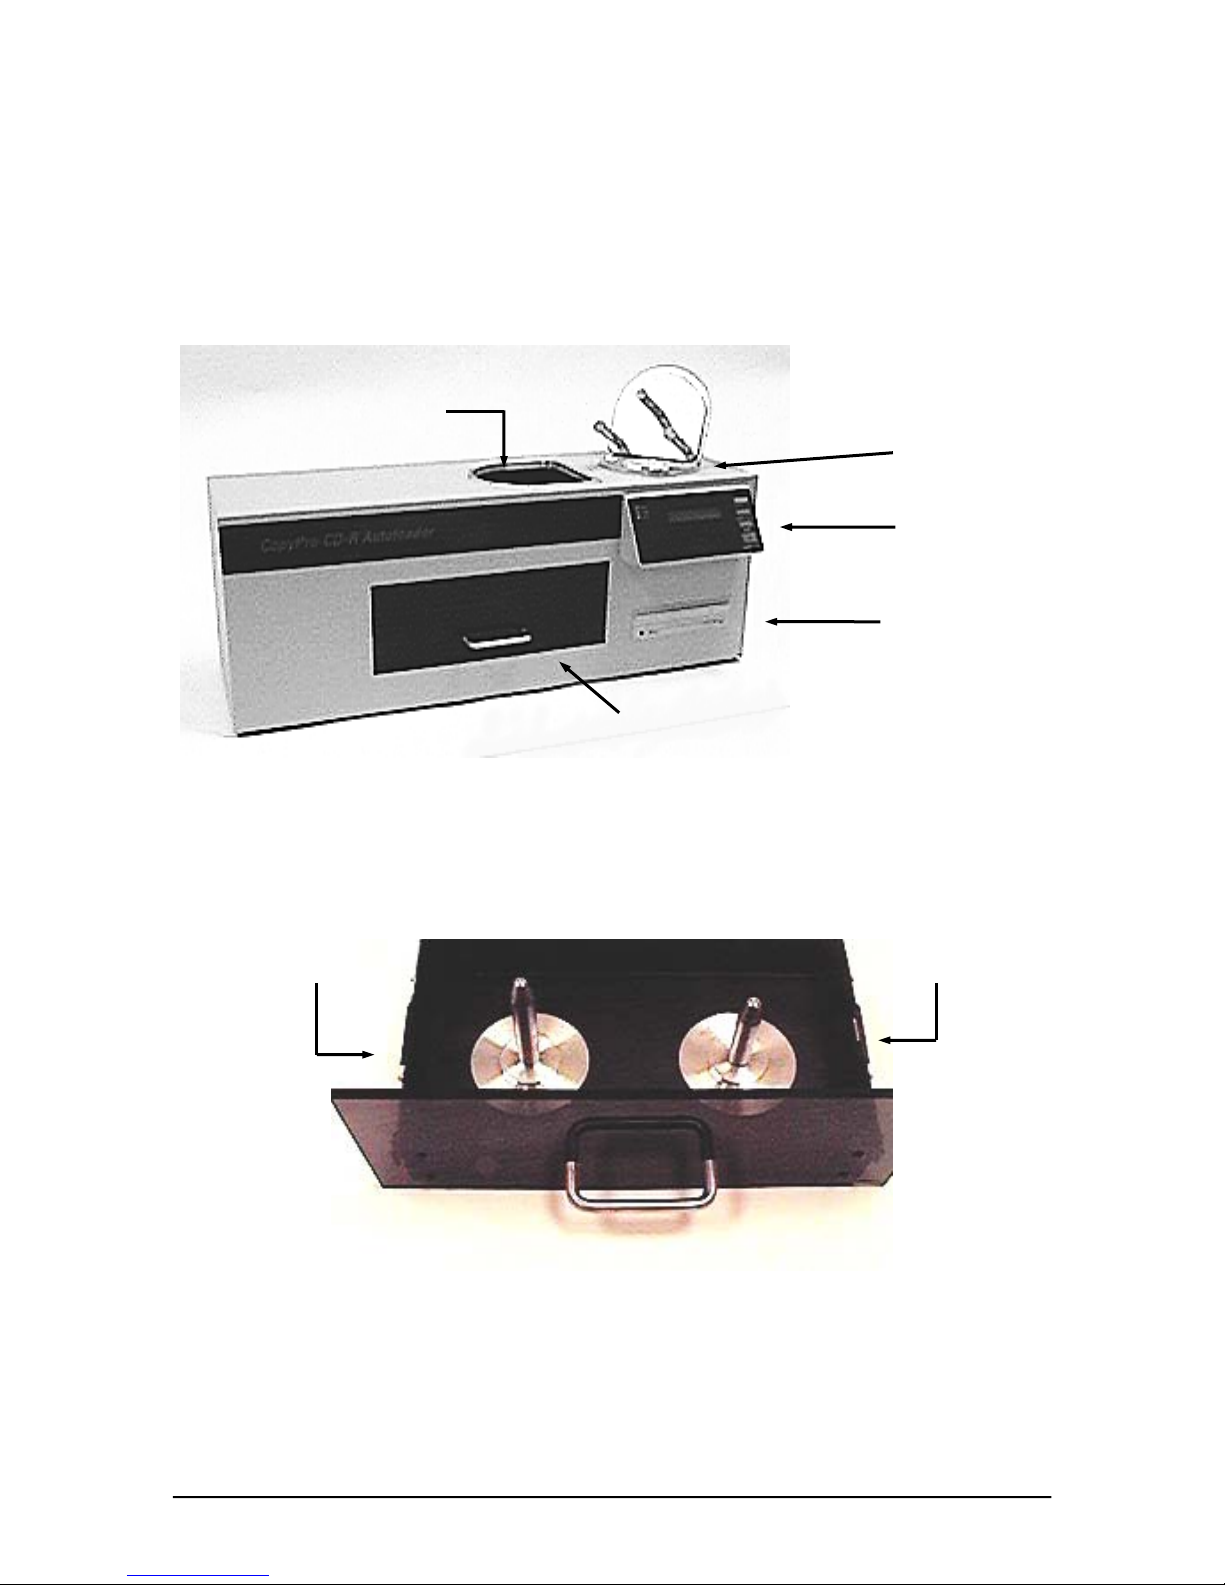
The CD Duplicator
Input Spindle Port
Output Spindle
(good discs)
Input Spindle Stand
Key Pad & LCD
External drive option
Disc drawer
Reject Spindle
(rejected discs)
CopyPro CD-R 3500 5
Disc drawer
Page 9
CopyPro CD-R 3500 LCD Display
The LCD Display
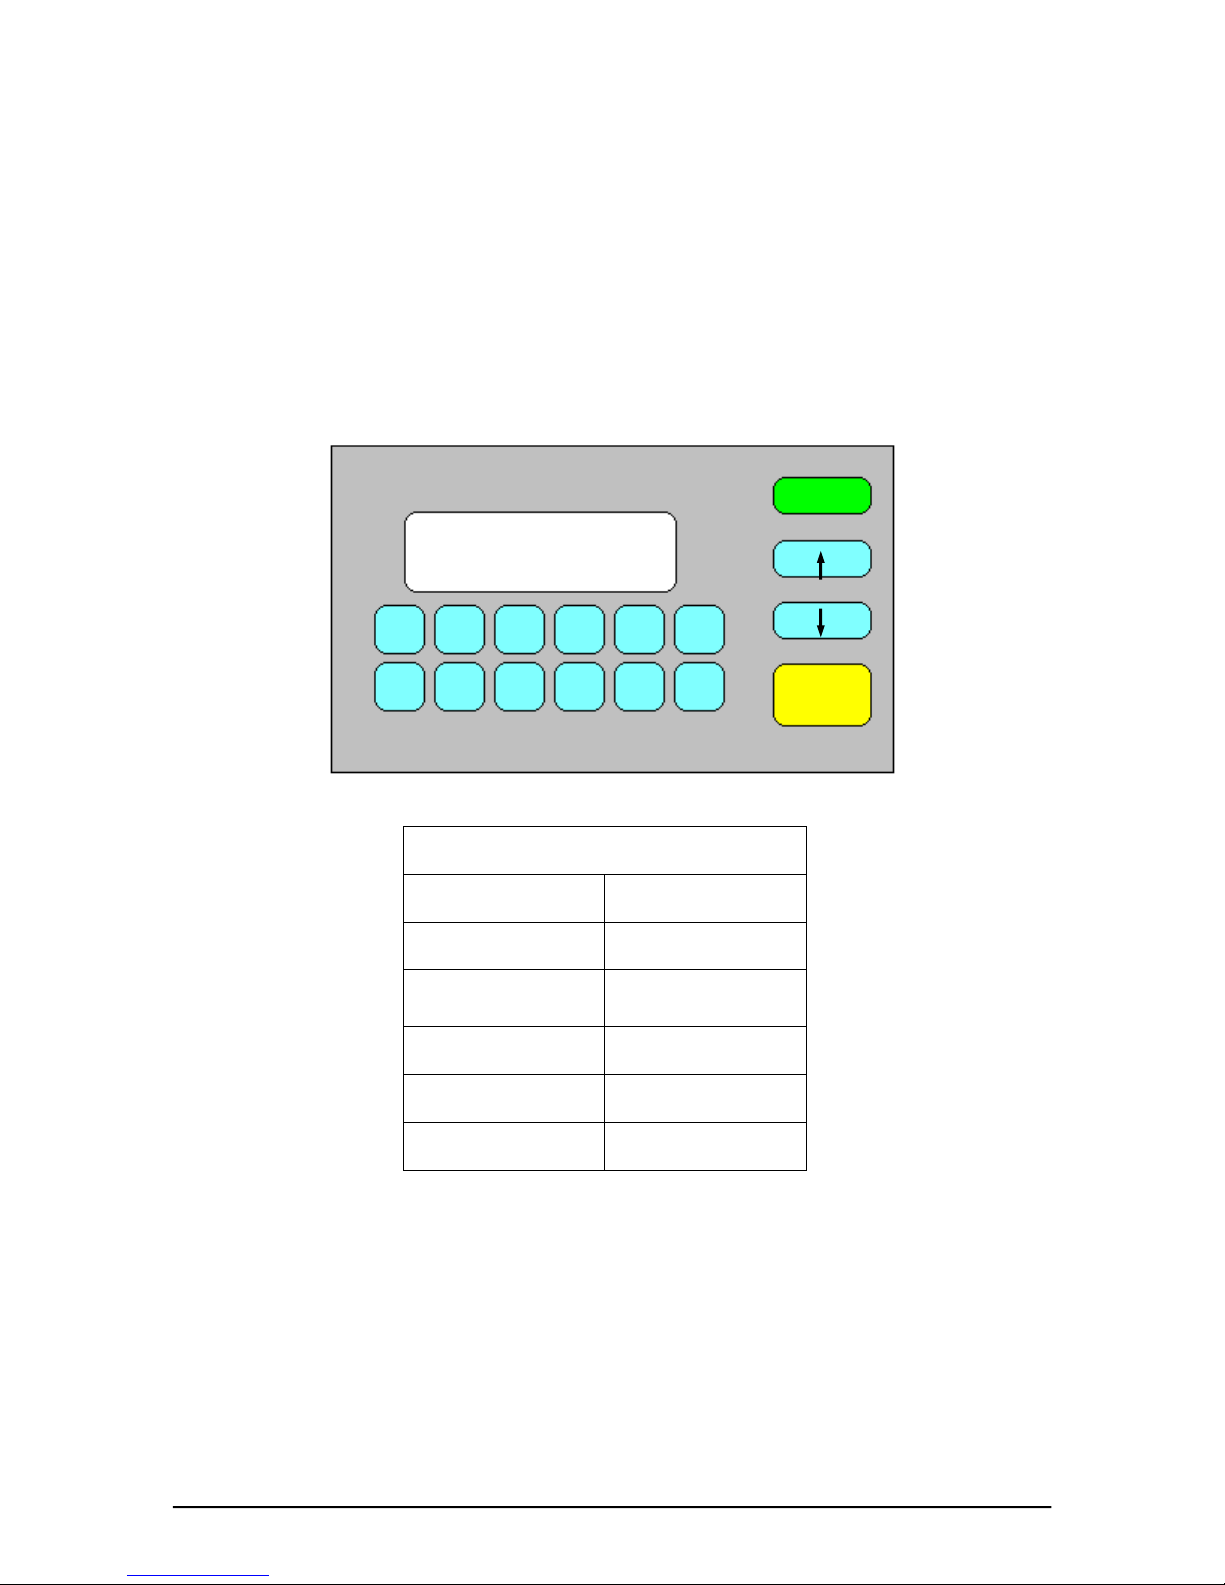
CopyPro CD-R 3500 is a standalone CD-R duplication system. The product
consists of a keypad with 16 keys, a two-line LCD display, one CD-writer drive
and autoloading mechanism. The system is controlled by using the keypad in the
front panel, which displays important status information. The unit’s front panel is
illustrated below:
LCD DISPLAY
1 2 3 4 5
6 7 8 9 0
Menu
Enter
STOP
YES
NO
*
CopyPro
START
STOP
Menu
Enter
YES / NO
Legend
Start Duplication
Abort Operation
Change Operating
Mode
Selection
Confirmation
START
CopyPro CD-R 3500 6
↑ / ↓
Navigation
Page 10
CopyPro CD-R 3500 Setting Up
Setting up the Machine
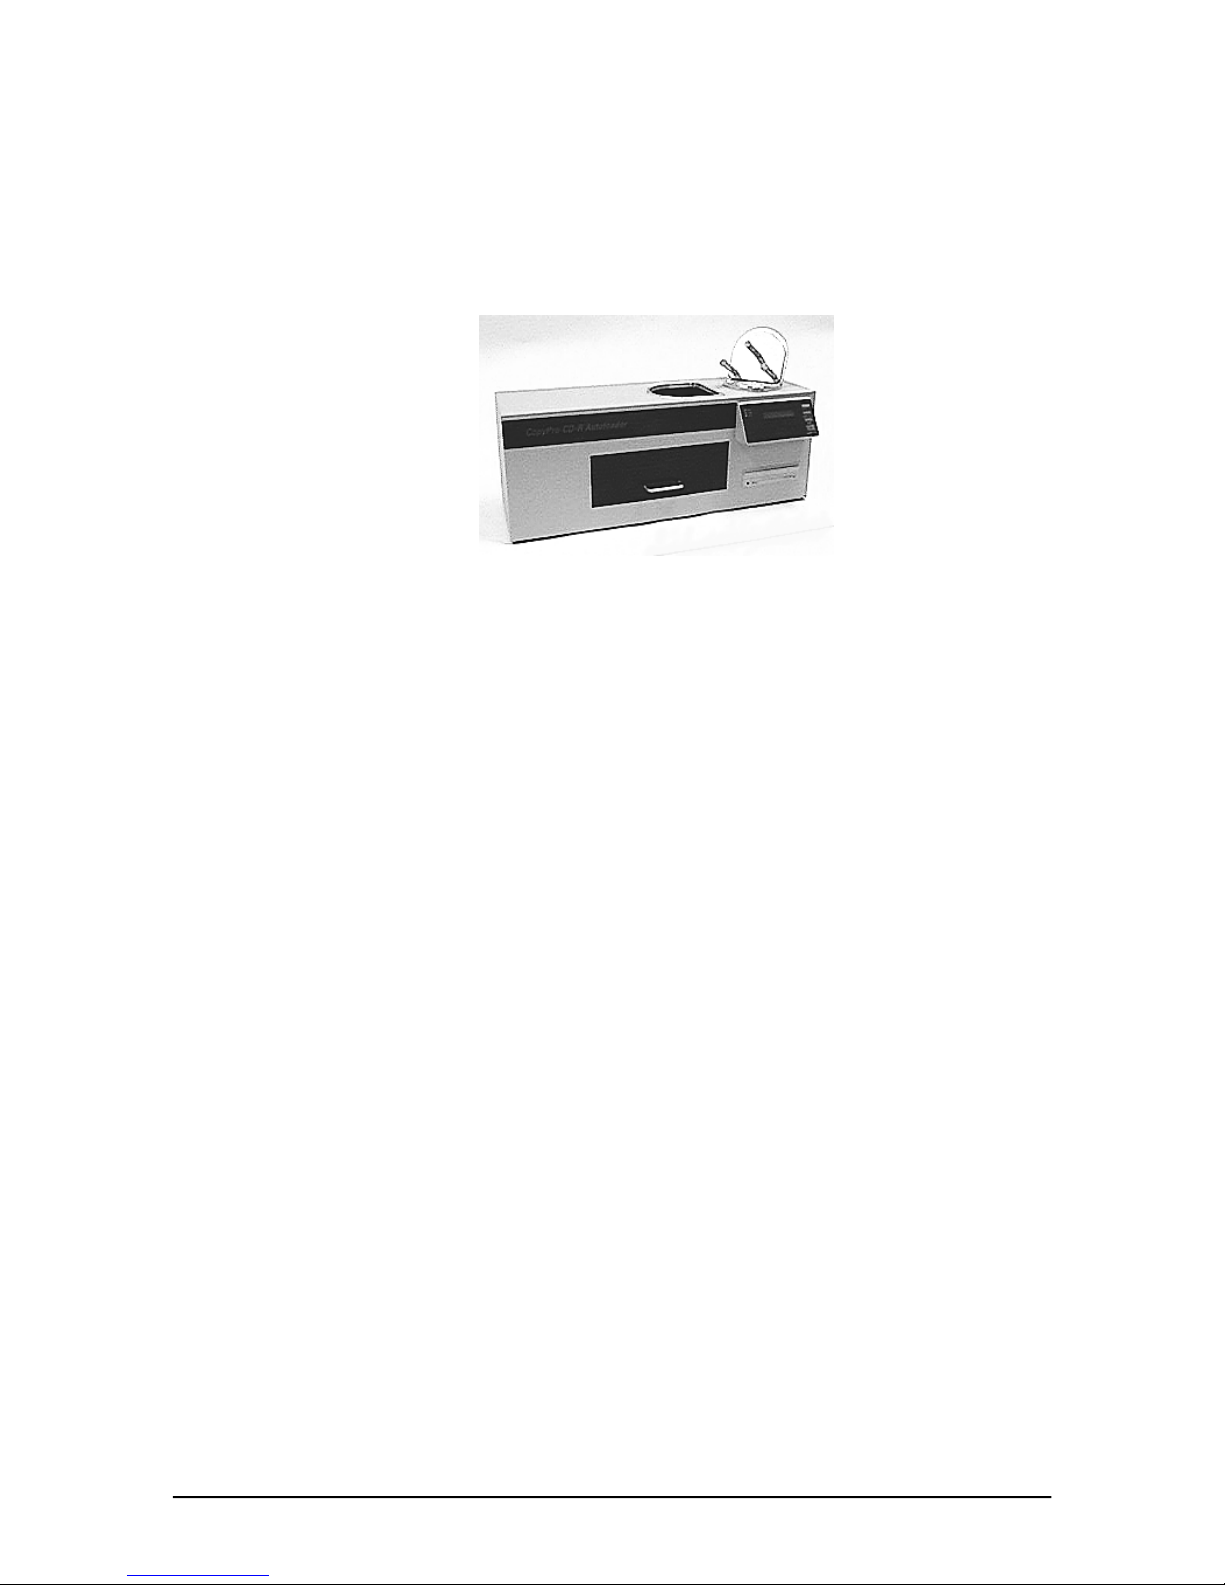
Place the CD-R 3500 on a clean and stable surface.
Vibration of the machine during operation may result in disc errors.
CD-R 3500 with empty Input Spindle placed in Spindle Stand.
CopyPro CD-R 3500 7
Page 11
CopyPro CD-R 3500 Loading
Loading
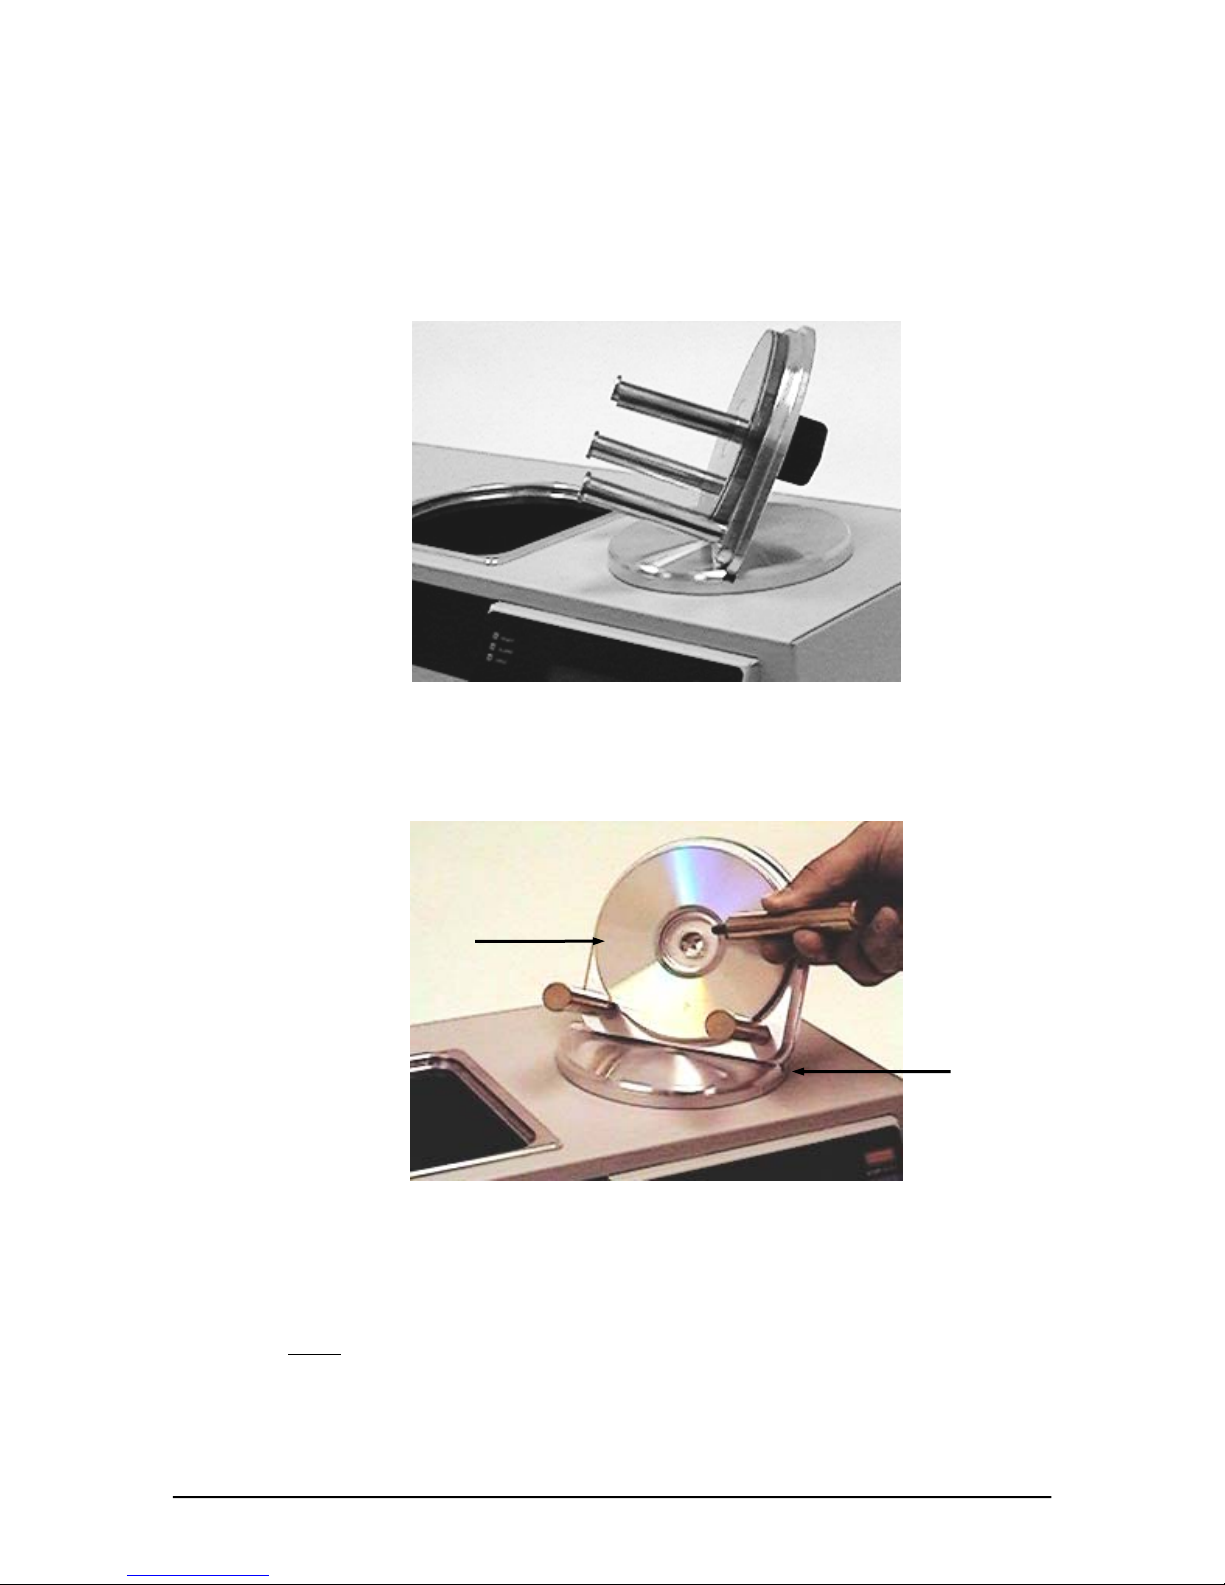
1. Lift Input Spindle out of duplicator and place it in the groove in the Input Spindle
Stand on top of the unit.
2. Unscrew the handle from the back of the holder and remove the Center Spindle.
Writeable side
faces out.
Input Spindle
Stand
3. Place blank CD-R discs on to the Input Spindle writeable side out (away from the
back plate) as shown.
4. Place the CD-ROM master disc readable side out, on top of the blank discs in holder.
Note: label side of the disc faces towards the metal disc holder.
CopyPro CD-R 3500 8
Page 12
CopyPro CD-R 3500 Loading
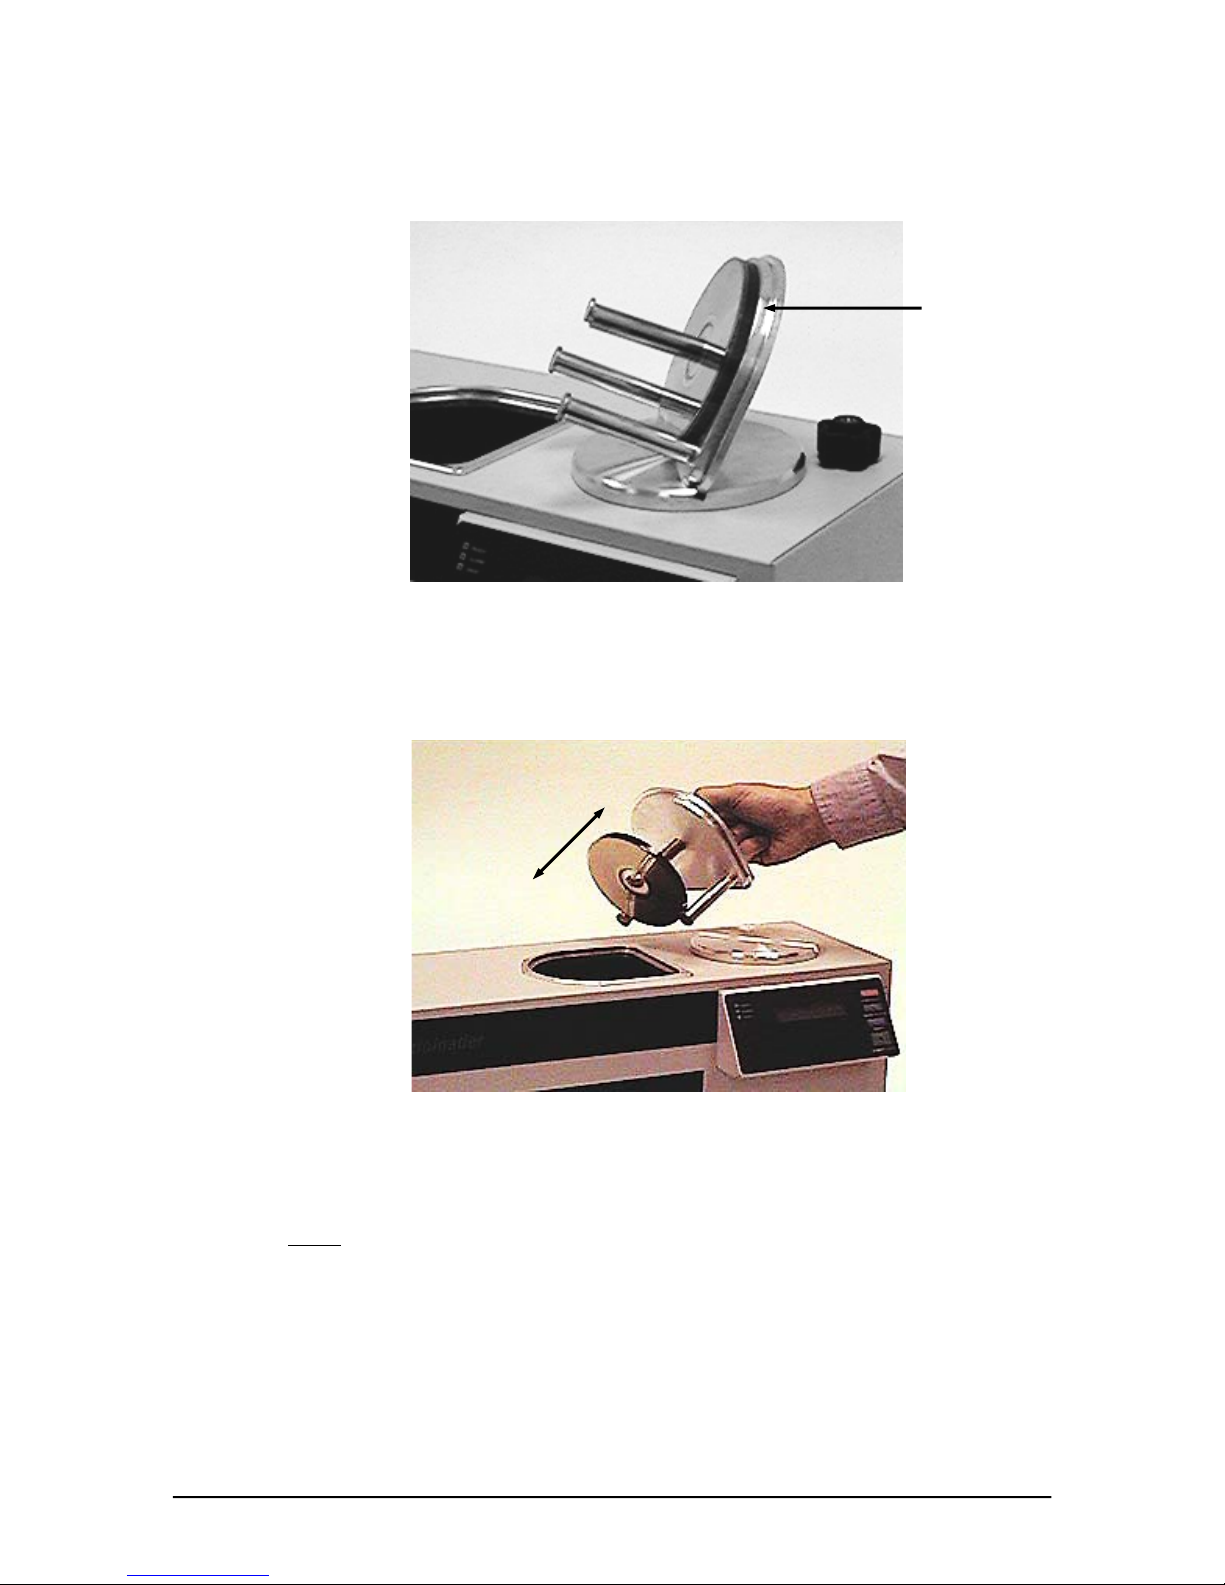
5. Insert the Center Spindle. The grooved Center Spindle will lock in place when
properly inserted. Screw the handle back on to holder.
The label side
of the disc
faces the metal
disc holder.
CAUTION: Be careful not to touch the writeable surface (bottom) of the CD.
Master disc label
side up, readable
side down
6. Pick up Input Spindle and place into the top of unit.
7. Master disc is at bottom of the stack now on the Input Spindle.
Note: The master disc is always below the stack of CD-R’s. If multiple masters are
loaded, the first master is first off the stack, then the blank CD-R’s for that master, then
the next master etc.
CopyPro CD-R 3500 9
Page 13
CopyPro CD-R 3500 Loading
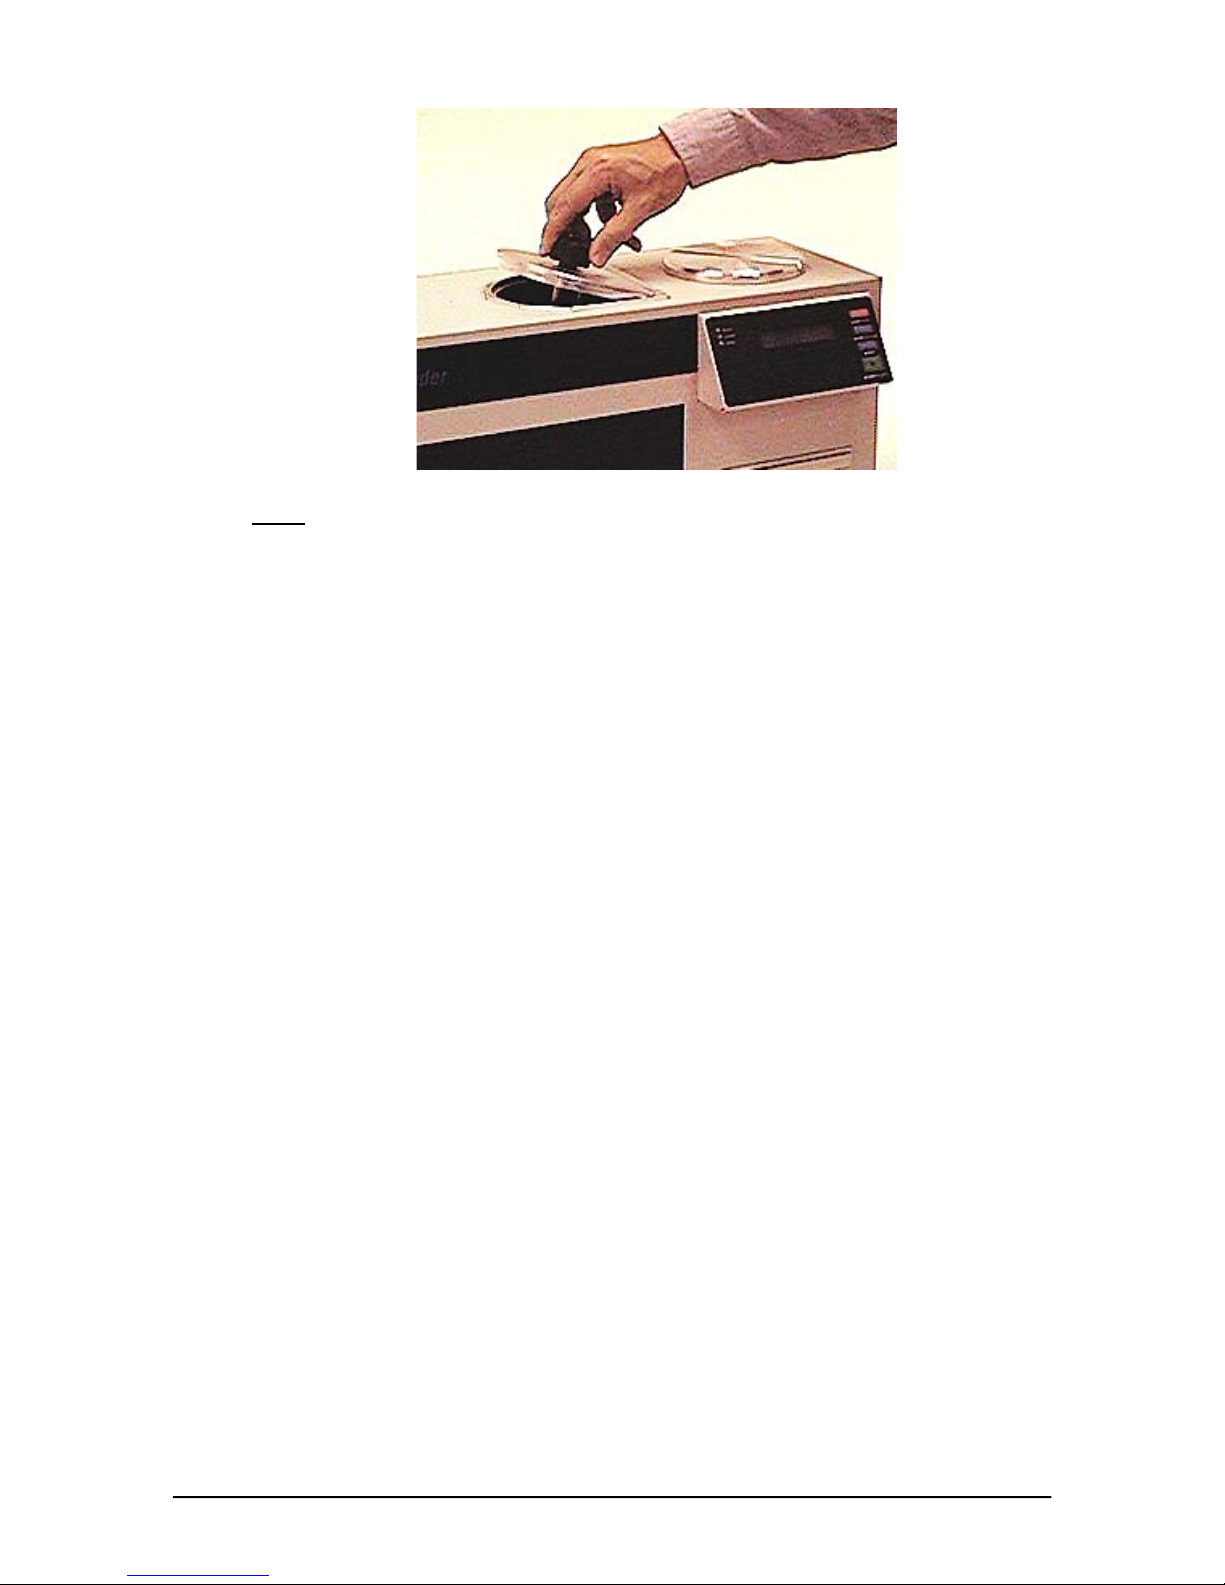
Note: With the Input Spindle in place, the label sides of the discs face up
You are now ready to record discs. Make sure the Output Spindle is loaded into the left
side of Disc Drawer & Reject Spindle (short spindle) is loaded on the right. (See photo,
page 5). Shut the Disc Drawer.
CopyPro CD-R 3500 10
Page 14
CopyPro CD-R 3500 Loading
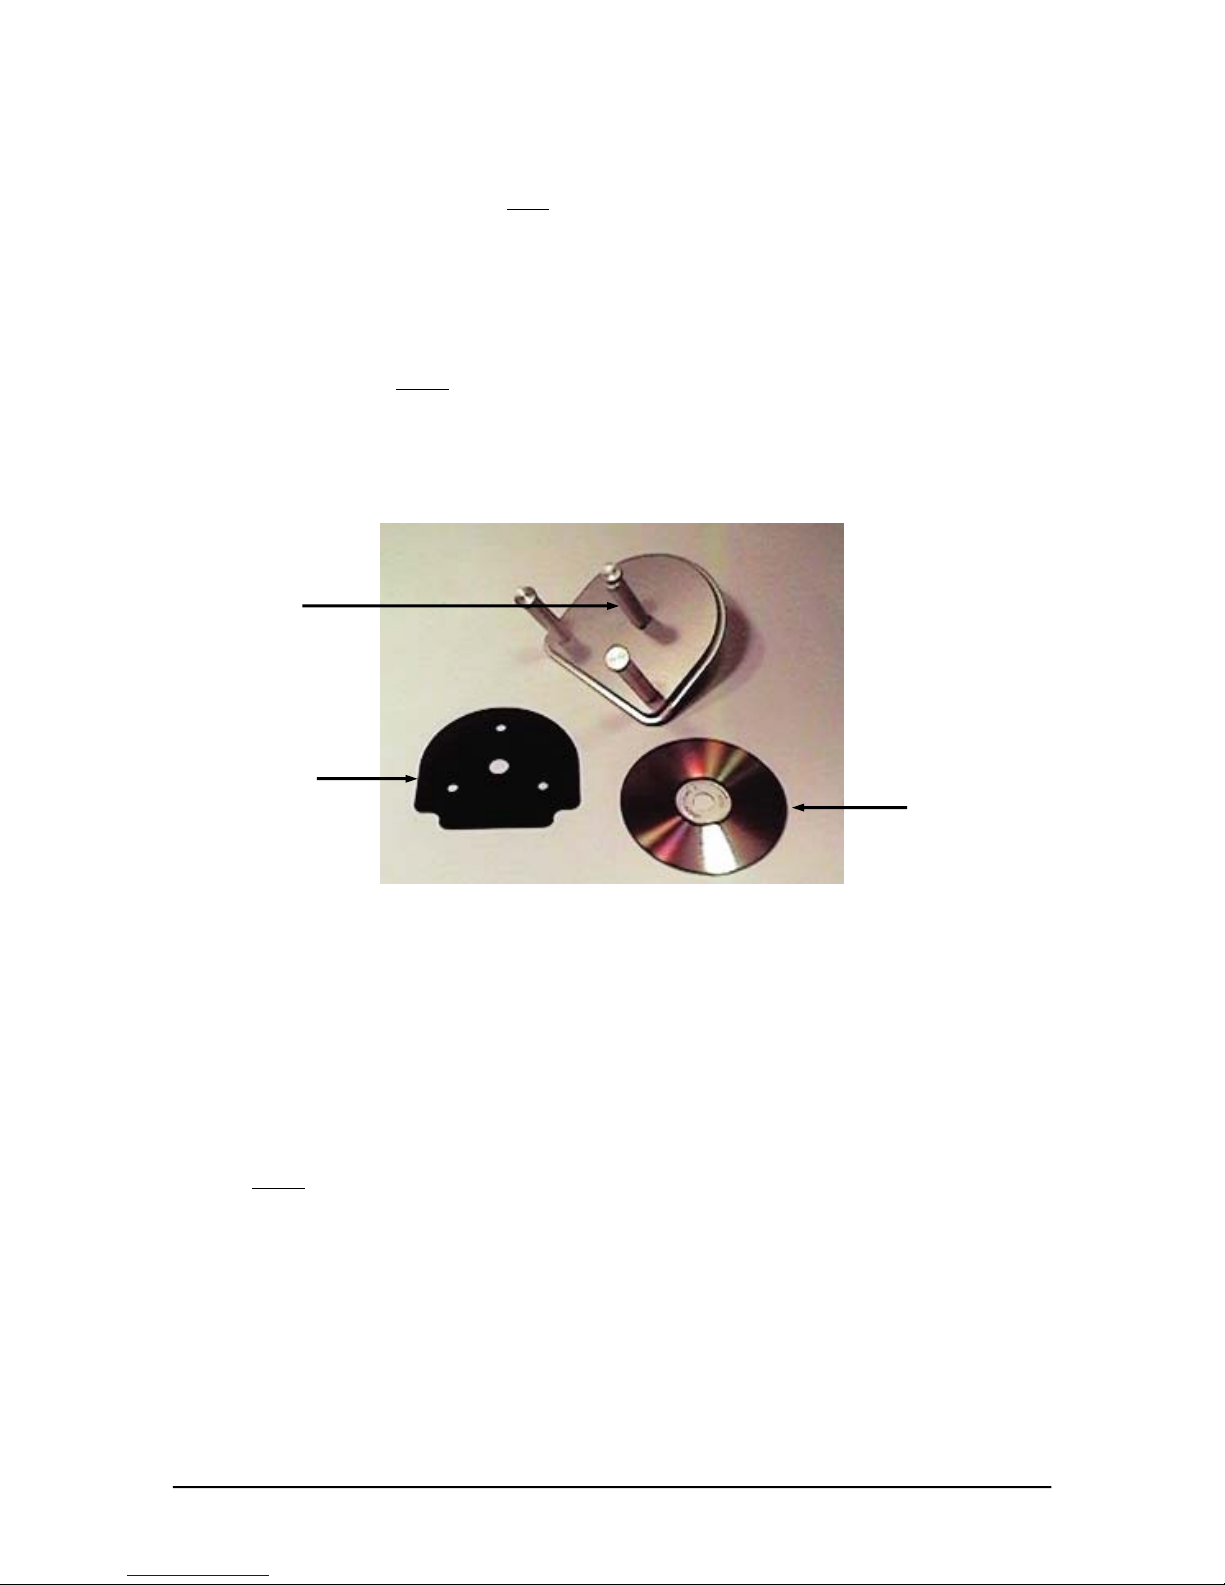
CD Follower
There are times when you may need an added weight to help move the blank
media down the spindle. This added weight is called the CD Follower. It is not
necessary to use the CD follower all of the time. The directions for use are as
follows:
1. Place the CD follower on the loading spindle first; with the silicon bumpers
toward the
removed to load CDs.
2. Load the desired number of blank media.
3. Then load your master and follow the operation directions.
Remove this
spindle for
loading.
metal lid. In addition, the middle removable spindle must be
CD Follower
When to use CD follower:
Note: Due to the differences in the CD-R Media available on the market today, it
is recommended that you separate and loosen the blank media before loading it
onto the spindle. This prevents the CD-R media from sticking together.
Blank Media
y When the loading spindle releases 2 CD’s at a time.
y This may occur when the loading spindle has less than 20 CD’s.
y If the unit is not releasing 2 CD’s at a time there is no need to use the CD
Follower.
CopyPro CD-R 3500 11
Page 15
CopyPro CD-R 3500 Starting the System
Starting the System
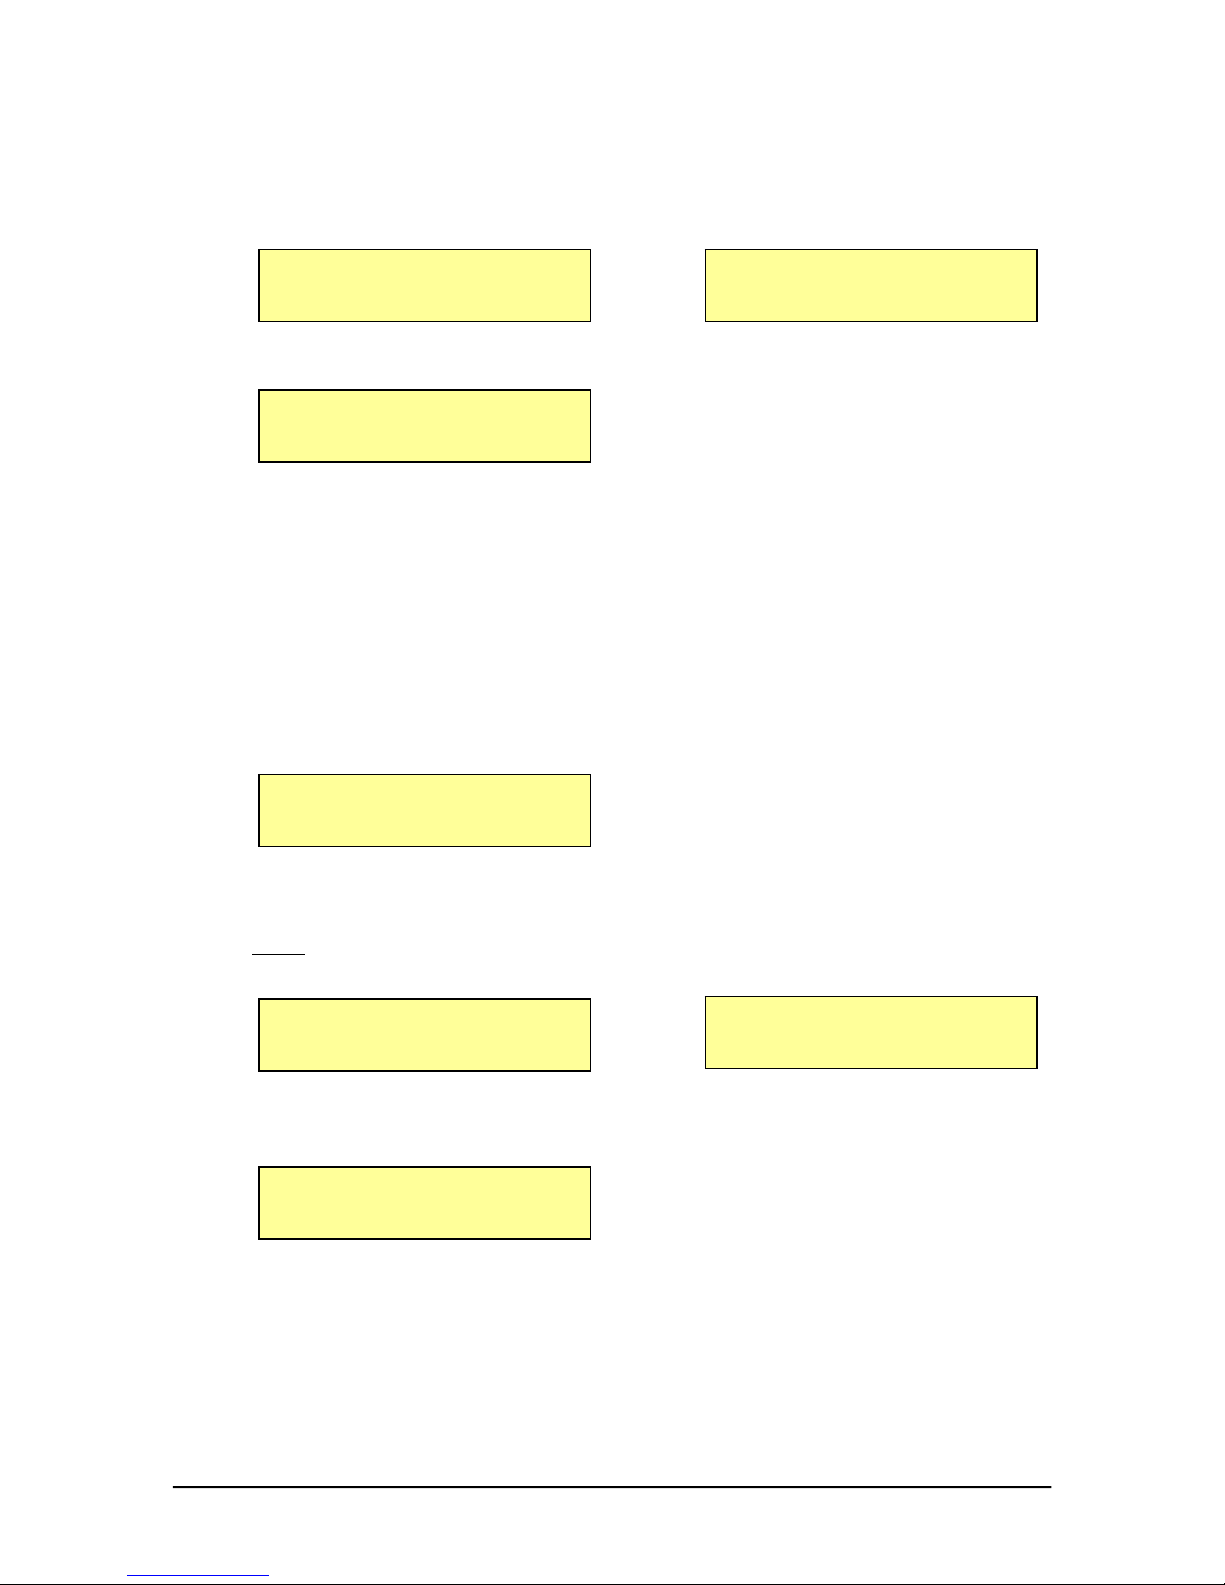
Plug in the system and power on. The following messages will be displayed:
Duplicating CD’s
CopyPro CD-R 3500
And
Autoloader Ready
Followed by:
Load Master & Blank
Discs - Press START
The system is now ready to start duplicating CD’s. If you do not get the above
message, please refer to the troubleshooting section
.
1. Load master disc and blank discs.
2. Push ‘Start’. The master disk will be loaded into the drive. The following
message will appear in the LCD screen.
Reading CD. Time
XXXXXXXXXXXXXXXX %
Once the reading of the master CD into the system’s hard drive is complete the
following messages will appear:
Note: Reading & writing time will vary, depending on the amount of data on the
master disc.
Read Successful
Please Wait...
And
Loading blank disc
Please Wait...
The master disk is removed to the Output Spindle and a blank disk will be loaded
into the drive.
Writing CDs Time
XXXXXXXXXXXXXXXX %
Once the first CD duplication is completed, the finished CD will automatically be
placed onto the output spindle from the CD-writer. All CD’s which were not
successfully copied will be placed automatically onto the reject spindle.
(Remember your master CD will also be placed onto the output spindle.)
CopyPro CD-R 3500 12
Page 16
CopyPro CD-R 3500 Starting the System
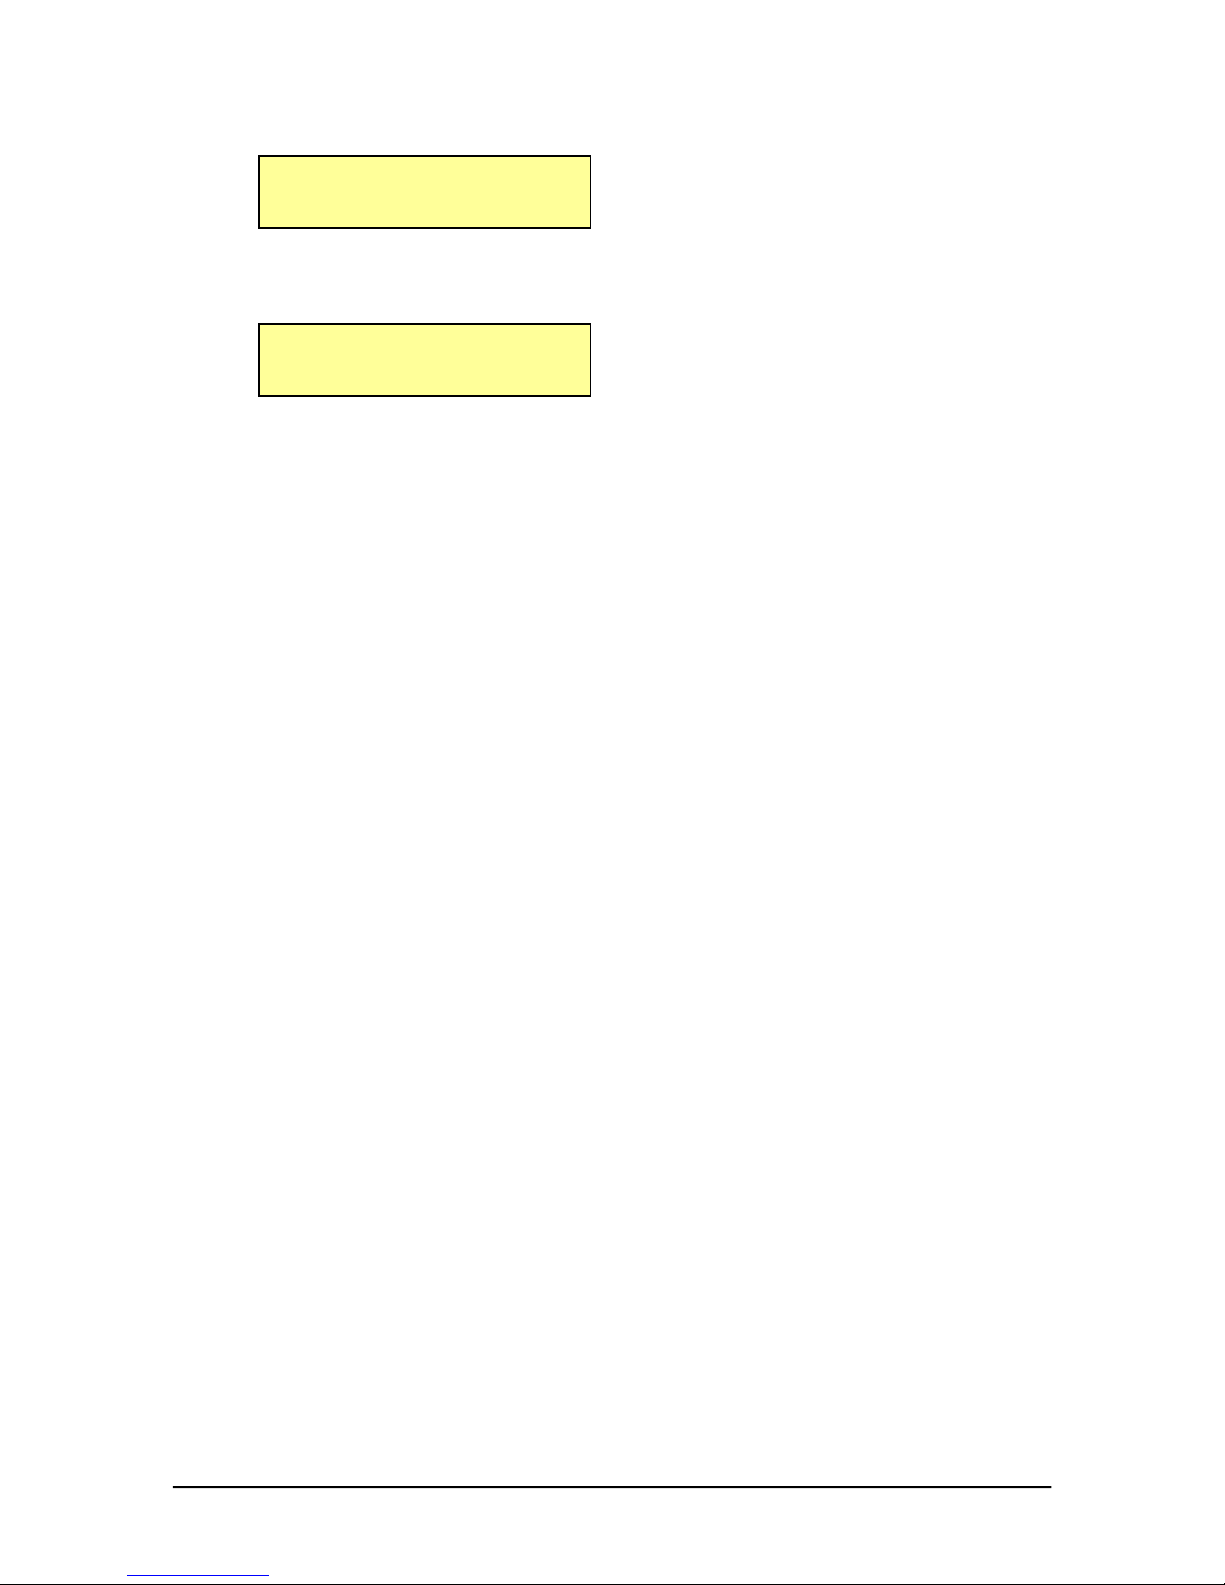
The following message will be displayed at the end of one session of duplication.
Write Successful
Loading Blank CDs
The machine will now duplicate all the blank CD’s loaded on the Input Spindle.
The duplication process will continue until the media spindles are emptied:
Input Bin Empty
Load Discs and START
At this time, you may reload the input spindles and continue the copy job, if
desired.
CopyPro CD-R 3500 13
Page 17
CopyPro CD-R 3500 Operating MODES
Operating MODES
You can change the Mode of Operation by pressing the ‘Menu’ key after startup, when
the LCD displays the following:
Each time you press the ‘Menu’ key the next Mode will be displayed on the LCD
display.
Load Master & Blank
Discs – Press START
The CD-R 3500 is configurable by the following operating modes:
y Duplicate Mode
y F/W DownLoad Mode (firmware)
y Verify Enable Mode
y Simulate Write Mode
y Speed Setting
y Recording Method
Note: Duplicating Mode is automatic default
Load Master & Blank
Discs – Press START
Press the ‘Menu’ button for mode options, then press the ‘Enter’ key to select
the mode on the LCD display.
Duplicating MODE
When you “ power on,” duplicating Mode becomes default.
The CD-R 3500 has batch mode default. If you have multiple master CD’s
loaded on the Input Spindle, the data from the next master CD will automatically
overwrite the existing data in the system CACHE. The CD-R 3500 will then
begin duplicating on the next set of blank discs.
CopyPro CD-R 3500 14
Page 18
CopyPro CD-R 3500 Operating MODES
Firmware Download Mode
This mode is used to upgrade the firmware of The CopyPro CD-R 3500 in the
field.
There are two ways to do this:
y Through Install CD.
y Through Serial Port.
To upgrade firmware, press ‘ENTER’ at the Firmware Download mode screen.
You will see:
Install CD [X]
Serial Port [ ]
Select the appropriate download method by pressing ‘YES’, ‘NO’, ‘↑’ or ‘↓’ and
press ‘ENTER’.
Firmware Download through Install CD
Set the operating mode to ‘Firmware Download’ and select ‘Install CD’ as
the download type and press ‘ENTER’.
The LCD message will be displayed as follows:
Insert Install CD
After the system detects the Install CD, a message will appear briefly…
Analyzing Install CD
If the system encounters a lower version of firmware on the Install CD
than of it’s own, you will get this warning…
Lower Ver Firmware
Proceed (Y/N)?
If you want to download a firmware lower than the existing one press
‘YES’ or ‘↑’. Selecting ‘NO’ will cancel the Firmware Download
process.
CopyPro CD-R 3500 15
Page 19
CopyPro CD-R 3500 Operating MODES
If the CD-R 3500 has encountered system files of a lower version on the
Install CD, you will get this warning…
Lower Ver Sys Files
Proceed (Y/N)?
If you want to download system files of a lower version than the existing
ones, press ‘YES’ or ‘↑’. Selecting ‘NO’ will cancel the Firmware
Download process.
After analyzing the Install CD, if the system detects a proper upgrade
version, it starts downloading the firmware.
Downloading Firmware
Please Wait...
Once the firmware is successfully downloaded into the CD-R 3500
through the Install CD, the following message will be displayed on the
LCD:
Rebooting
Please Wait...
Once the rebooting is done you will get the power-on startup message on
the LCD display as described in Starting the System. The system is now
ready with the new firmware.
Warning: Once you have started to download the firmware from the Host
computer, the operation should not be interrupted.
Firmware Download through Serial Port
To upgrade the firmware, connect the RS-232 port of the CD-R 3500 to
the Host computer and set the operating mode to ‘Firmware Download’,
select ‘Serial Port’ as download type and press ‘ENTER’.
The LCD message will be displayed as follows:
Downloading Firmware
Please Wait...
On the Host computer, insert the firmware upgrade disk into the drive and
run the executable program called upgrade.exe. Once the firmware is
successfully downloaded into the CopyPro 3500 over the RS-232 port, the
following message will be displayed on the LCD:
Rebooting
Please Wait...
CopyPro CD-R 3500 16
Page 20

CopyPro CD-R 3500 Operating MODES
Once the rebooting is done you will get the power-on startup message on
the LCD display as described in Starting the System. The system is now
ready with the new firmware.
Warning: Once you have started to download the firmware from the Host
computer, the operation should not be interrupted.
Verify Enable Mode
Selecting Verify Enable Mode allows you the option to verify each CD, which
has been recorded. By default, the CD-R 3500 does not verify each recorded CD.
Simulate Write Mode
The Simulate Write mode disables the laser in the CD-ROM drive. This mode
allows test writing. Blank CD’s will not be written to, but the writing process is
simulated in full.
Speed Setting
The Speed Setting mode allows you to manually choose the read and write speeds
the CD-R drive will use. By default, the CD-R is set to use the maximum read
and write speeds.
Recording method
The Recording methods supported by the CD-R 3500 are Disc At Once and
Track At Once. By default, Disc At Once recording is selected.
Note: Disc At Once is only supported by TEAC CD-R drives.
When you have selected the appropriate modes for your duplication job, press the ‘Menu’
button to return to Duplicate MODE and press ‘Enter’.
CopyPro CD-R 3500 17
Page 21
CopyPro CD-R 3500 Error Messages
Error Messages
The CD-R 3500 displays error messages in any of the operating modes if a
problem occurs during its operation. The error messages are shown below with
some suggested action items.
Error Message Description Action
Bad Master Disc
Reload and START
Blank Master Disc
Reload and START
Unable to read Source CD. The CD
can be damaged or CD-Writer has
failed to read.
A blank master disc is detected Source CD was expected, load a
Try loading master again or try another
master
master.
Rejecting Bad Disc
Or reload
Rejecting Bad Disc
Input Bin Empty
Load Discs and START
Reject Spindle Full
Check Output & START
Output Spindle Full
Check Output & START
Media Drawer Open
Close Drawer & START
Disc Load Error (34)
Check Output & START
Bad Media in Output
Check Output & START
A Bad (unwriteable) blank disc was
encountered
The autoloader did not detect a disc.
This is not an Input Bin Empty error.
Input spindle is empty or disc load was
not detected
The reject spindle (smaller spindle) is
too full.
The output spindle (larger spindle) is
too full.
The drawer is open and is interrupting
current activity.
The autoloader has detected a discloading malfunction.
A bad disc was placed in the output
spindle.
Replace disc
Replace or reload disc
Refill input spindle.
Open drawer and empty reject spindle.
Open drawer and empty output
spindle.
Close drawer and press START
Open drawer and look for obstruction
or dropped disc, and press START
Check output and remove possible bad
disc.
Disc Lost Error (40)
Check Output & START
Tray Close Error (45)
Check Tray & START
Tray Open Error (41)
Check Tray & START
** If an error cannot be cleared, the unit may need to be restarted.
CopyPro CD-R 3500 18
The disc destined for the output or
reject spindle was dropped.
The autoloader has detected a
malfunction in CD-R drive tray
operation.
The autoloader has detected a
malfunction in CD-R drive tray
operation.
Check output and press START to
resume.
Look for disc or obstruction or try to
manually close drive and START.
Try to manually open drive and
START
Page 22
CopyPro CD-R 3500 Trouble Shooting
Trouble Shooting
Please refer to the table below in the case of following start up messages:
Boot Error Message Description
HDD Not Detected
Problem in accessing HDD inside CD-R 3500XL
Unable To Access HDD
Loading SCSI Driver
Unsupported CDR
HDD Capacity Less
No CDR Found
Memory Not Detected
Memory Insufficient
Problem in accessing HDD inside CD-R 3500XL
Error occurred while loading ASPI device driver into memory
Trying to connect an unsupported CD-Writer. Only Yamaha and Teac
CD-Writers are supported in this version.
HDD of 650 MB capacity is required. If smaller capacity HDD is
connected, this warning message is displayed indicating that larger
capacity CDs may not be duplicated.
Problem in accessing CDRs in 3500.
Problem in accessing DRAM in the Controller Card of 3500.
Problem in accessing DRAM in the Controller Card of 3500.
For technical support, please call
CopyPro, Inc. 1-800-887-9906
CopyPro CD-R 3500 19
 Loading...