

COP Security 15-CD43RVB, 15-CD43RVBI, 15-CD43RVBC, 15-CD43RV, 15-CD43RVC Instruction Manual
...Page 1
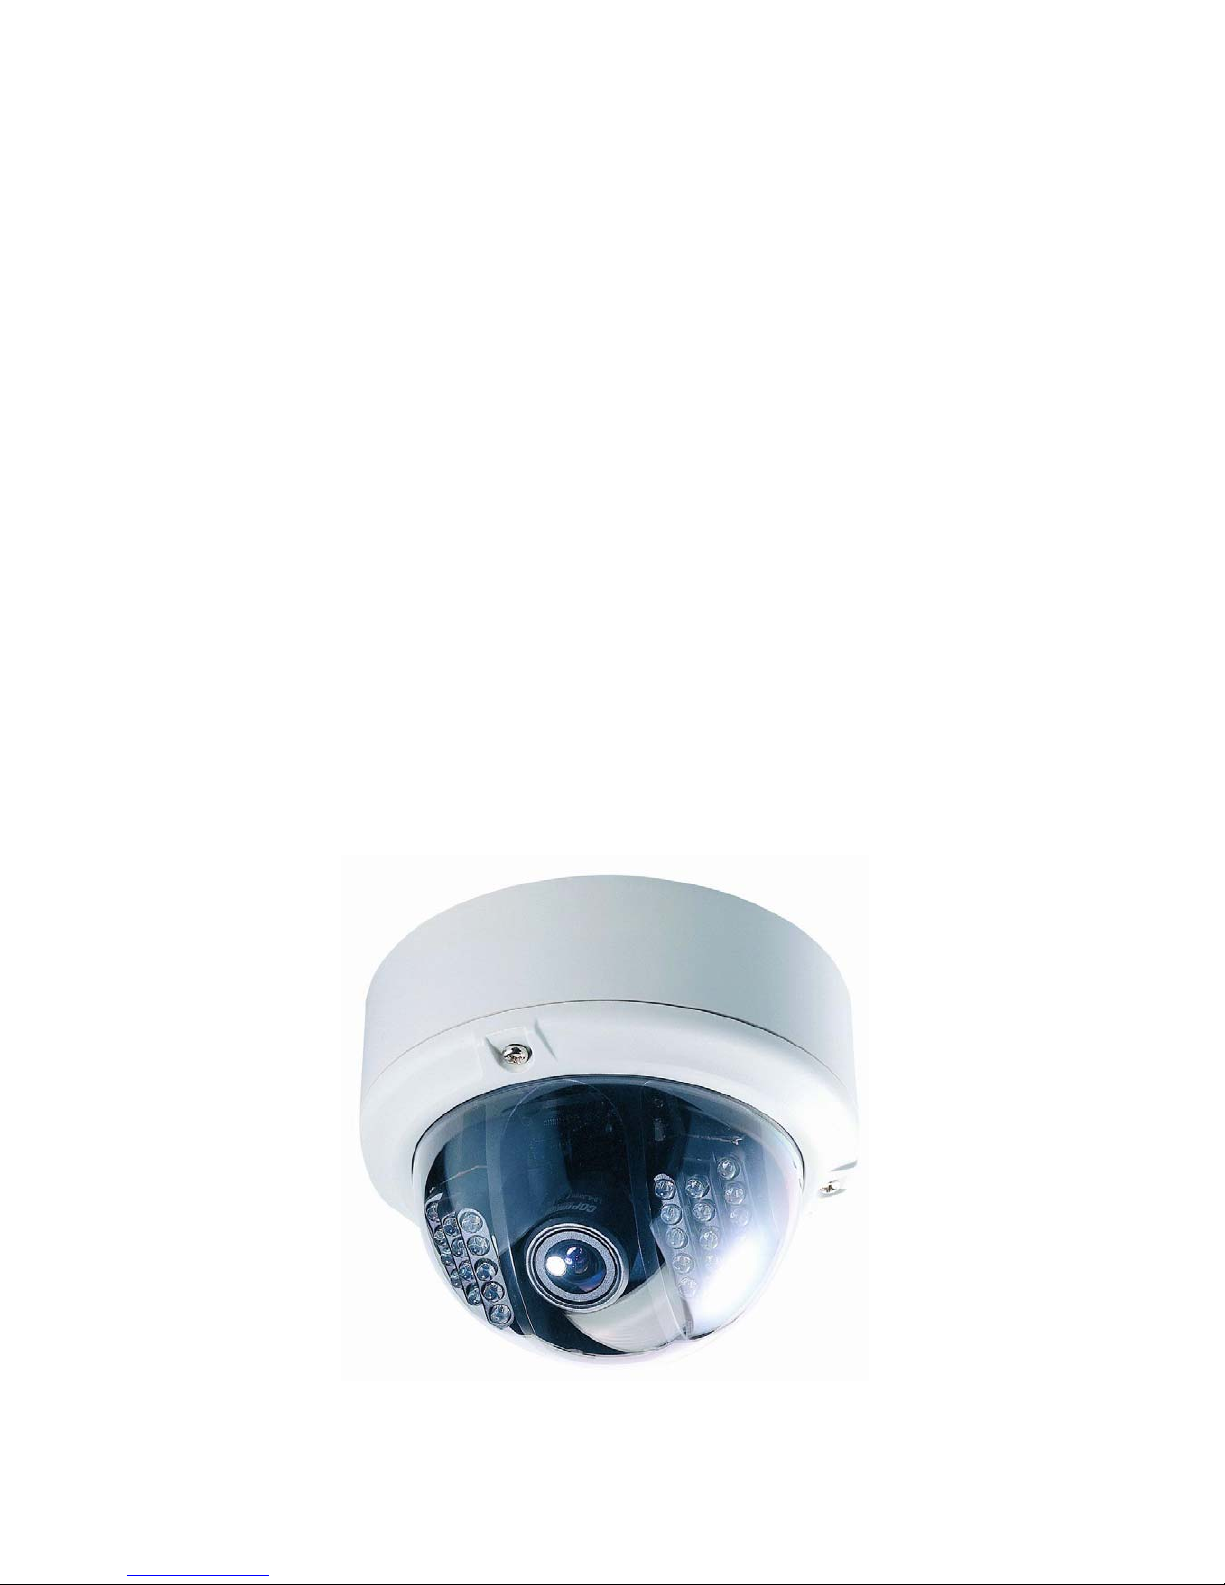
High Resolution High Sensitivity
HDR Wide Dynamic Dome Camera
INSTRUCTION MANUAL
□15-CD43RVB
□15-CD43RVBC
□15-CD43RVBI
□15-CD43RVBIC
□15-CD43RV
□15-CD43RVC
□15-CD43RVI
□15-CD43RVIC
Page 2

1
CONTENTS
PRECAUTION……………………………………………….2
FEATURES….……………………………………………….3
SPECIFICATIONS…………………………………………..3
INSTALLATION……………………………………………...5
REMOTE CONTROL DIAGRAM…………………………..6
OSD MENU OPERATION INSTRUCTION……………….7
Page 3

2
PRECAUTION
Do not open or modify
Do not adjust the camera's internal circuits or power supply modules, as it may
cause damage to the unit. For internal set up and repair, please consult our dealer.
Do not put objects inside the unit
Do not put metal objects or flammable substance inside the camera for it may
cause damage to the unit. If water or liquid gets inside of the camera please
disconnect power immediately and contact with your dealer.
Be careful when handling the unit
Do not drop the camera and avoid it from strong shock or vibration.
Install away from electric or magnetic fields
It may interfere or distort the image when camera is installed close to electric or
magnetic fields. Ex: TV, Speaker, and etc.
Avoid from humidity, dust and heat
a. Do not install the camera in smoky, dusty or steamy areas.
b. Do not install the camera close to heat generating devices (for ex: spotlights)
Protect the camera carefully from direct exposure to sunlight, rain, and etc.
Cleaning
Do not touch the CCD directly. If necessary, use a soft cloth moistened with alcohol
to wipe off dust.
Page 4
3
FEATURES
MODEL:15-CD43RVB、15-CD43RV、15-CD43RVBC、15-CD43RVC
15-CD43RVBIC、15-CD43RVIC、15-CD43RVBI、15-CD43RVI
z Super Hi- Res. CCD with Star-Light more than 600TV Lines (D/N)
z HDR Wide Dynamic Video Digital Signal Processor (SOC) IC
z Auto / Manual Electronic SHUTTER speed adjustable
z High Sensitivity, Low Smear, excellent anti-blooming
z Japan Original Vari-focal Lens
z On Screen Display (OSD) set-up Menu
z Support COP CAMERA Remote OSD control with 15-AU45 or 15-AU35M(option)
z Motion Detection, Privacy Marking, H / V Mirror, Freeze, Negative, Cross Line
z 2X Digital Zoom with Manual Pan / Tilt
z Back Light Compensation adjustable
z S/N Ratio with Auto 3D-DNR
z Challenging High Lighting Condition
z 0 Lux @ 24 IR LEDs, range up to 30M (15-CD43RVBI / 15-CD43RVBIC /
15-CD43RVI / 15-CD43RVIC)
z Special Shielding to Eliminate IR Reflections (15-CD43RVBI / 15-CD43RVBIC
15-CD43RVI /15-CD43RVIC)
z IR Cut Removable (15-CD43RVBC / 15-CD43RVBIC / 15-CD43RVIC
15-CD43RVC)
z Built-in Video/Power Surge Protection
z Vandal case with Water Resistance(15-CD43RVB、15-CD43RVBI、
15-CD43RVBIC、15-CD43RVBC)
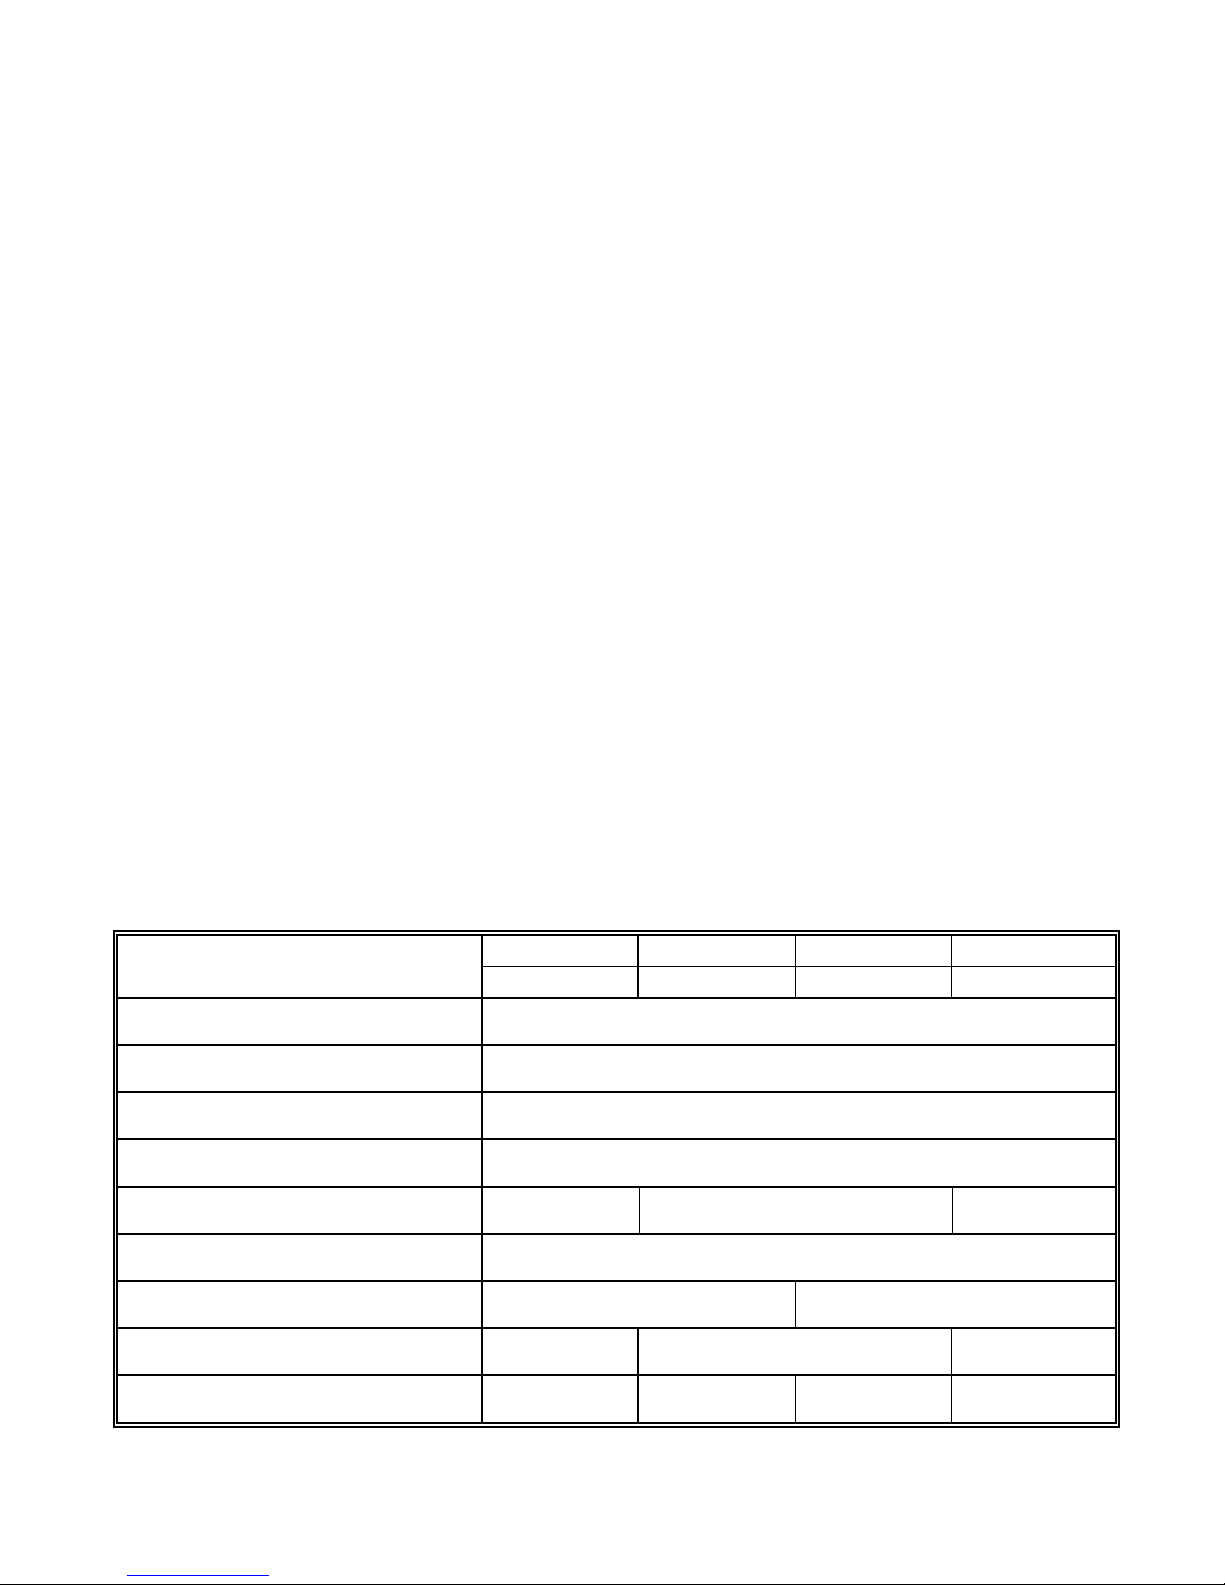
SPECIFICATIONS
15-CD43RVB 15-CD43RVBI 15-CD43RVBIC 15-CD43RVBC
Model No.
15-CD43RV 15-CD43RVI 15-CD43RVIC 15-CD43RVC
Image Pick-up Device 1/3“ CCD Image Sensor (HI- Res.)
Total Picture Elements NTSC: 811 x 507, PAL: 765 x 595
Effective Picture Elements NTSC: 771 x 492, PAL: 753 x 582
Horizontal Resolution 560TV lines (Color) / 600 TV lines (D/N)
Minimum Illumination 0.01 Lux 0 Lux IR ON 0.001 Lux
Auto Iris Lens 3.7~12mm
IR CUT X YES
IR LEDs X 24 x LEDs X
Rotation 3 Axis 2 Axis 2 Axis 3 Axis
Page 5

4
Digital Zoom 2X, Manual, PAN / TILT
S/N Ratio WITH Auto 3D-DNR More than 56 dB
Wide Dynamic Range 48dB
Gamma Characteristic 0.45 / 1.0
Auto/Manual Electronic Shutter NTSC: 1/60s~1/120,000s, PAL: 1/50s~1/120,000s
Digital Slow Shutter 2X~64X
Flickerless Mode YES
Mirror Function HORIZONTAL / VERTICAL / ROTATION
Image Function
FREEZE、NEGATIVE、CROSS LINE
Auto Gain Control ON/OFF (6 ~ 24dB adjustable)
White Balance Auto (ATW, AWB, FIXED, Manual)/ 3200 ~ 10000 ºK
Back Light Compensation ON/OFF (48 Area adjustable)
Motion Detection YES
Video Output 1 Vp-p / 75 Ohms
Day & Night Color Auto (Level adjustable), Color, B/W
Privacy Masking ON/OFF (4 Area adjustable)
Synchronous System EXT / INT.SYNC. / (LINE LOCK OPTION)
Power Supply
AC24/DC12 V
DC12V
AC24/DC12 V
Power Consumption 2W 5W 2W
Operating Temperature -10 ~65 (14 ~149 )℃℃℉ ℉
Dimension
Φ
136 (D) X 100 (H) mm
Packing / Weight
1 CTN:12pcs BOX:18(W)X14.7(H)X11.5(D)mm
Page 6

5
POWER INPUT
BNC(VIDEO OUT)
DUAL POWE
R
P
O
W
E
R
+
P
O
W
E
R
-
SINGLE POWER
POWER INPUT
BNC(VIDEO OUT)
INSTALLATION
Step1:
Remove the 3 screws from the domes
housing.
Step2:
Attach the base of the housing to the
wall/ceiling by fixing the screws into the
drilled holes.
Step3:
Connect power and video signal (see left)
Ensure the polarity is correct when
connecting power to the terminal block. +/-
Sept 4:
Adjust the cameras focus, angle and
functions.
Step 5:
Attach the domes cover and insert the
screws.
Page 7

6
OSD KEY DEFINE
15-CD43RVBI、15-CD43RVBIC
15-CD43RVB、15-CD43RVBC
REMOTE CONTROL DIAGRAM
Page 8

7
OSD Menu Operation Instruction
SETUP MANU (1/3)
I M A G E Q U A L I T Y
→
1 I R I S
2 A G C / S E N S
3 G A M M A / E N H A N C E
4 I R S E T T I N G
5 B A C K L I G H T
6 H D R
7 W H I T E B A L A N C E
N E X T . . .
SETUP MANU (2/3)
F U N C T I O N M E N U
→
1 M O T I O N D E T E C T
2 D I G I T A L Z O O M
3 H / V R E V E R S E
4 F R E E Z
5 C R O S S L I N E
6 M A S K
7 P O S I / N E G A
N E X T . . .
Page 9

8
SETUP MANU (3/3)
E X T R A S E T T I N G
→
1 L A N G U A G E
2 T I T L E
3 P R I O R I T Y
4 R E S E T / S Y N C .
R E T U R N
1. To display OSD MENU on the screen, please press the MENU
key for 2 seconds.
2. To turn of OSD MENU on the screen, please press the RETURN
key.
3. The UP, DOWN and RIGHT keys to move and make the decision.
DOWN
RETURN/LEFT
MENU/RIGHT
UP
Page 10

9
IRIS
I R I S
→
P E A K
→
O N / O F F
A — █ — — — — — — — P
A L C
→
A U T O / O F F [ V R / H O L D ]
— — — — █ — — — —
A E S
→
F I X / A U T O
O F F
[VR / HOLD]: ALC setting is controlled by VR on camera board.
Please reference to “PRIPROTY” function that in
extra setting menu for more detail.
AGC/SENS
A G C / S E N S
→
A G C
→
A U T O / F I X
— — — — █ — — — —
S E N S
→
A U T O / O F F
— █ — — — — — — —
Page 11

10
GAMMA/ENHNANCE
G A M M A / E N H A N C E
G A M M A
T Y P E 1 / 2
E N H A N C E L E V E L
L — — — — █ — — — — H
TYPE 1: GAMMA= 0.45
TYPE 2: GAMMA= 1.00
IR SETTING
I R S E T T I N G
→
A U T O / O F F / E X T [ S W I T C H ]
[SWITCH]: IR on/off is controlled by DIP switch.
Please reference to “PRIPROTY” function that in
extra setting menu for more detail.
Page 12

11
BACK LIGHT
B A C K L I G H T
→
O F F / O N
A R E A
48 backlight areas can be selected and show by gray marking.
1 2 3 4 5 6 7 8
9 10 11 12 13 14 15 16
17 18 19 20 21 22 23 24
25 26 27 28 29 30 31 32
33 34 35 36 37 38 39 40
41 42 43 44 45 46 47 48
Note: backlight areas setting is not less than 8 blocks
HDR
H D R
→
L O W
/
M I D
/
H I G H T / O F F
Page 13

12
WHITE BALANCE
W H I T E B A L A N C E
→
C O L O R
→
A U T O / O N / O F F
W B
→
A T W R — — — — █ — — — — B
A W B R — — — — █ — — — — B
G A I N
R — Y — — — — █ — — — —
B — Y — — — — █ — — — —
MOTION DETECT
M O T I O N D E T E C T
→
O F F / O N 6 0
→
A R E A
3 0
T I M E
→
1 0 S E C
S E N S
L — — — — █ — — — — H
D I S P L A Y O F F / O N
48 motion detection areas can be selected and show by gray
marking.
1 2 3 4 5 6 7 8
9 10 11 12 13 14 15 16
17 18 19 20 21 22 23 24
25 26 27 28 29 30 31 32
33 34 35 36 37 38 39 40
41 42 43 44 45 46 47 48
Page 14

13
DIGITAL ZOOM
D I G I T A L Z O O M
→
O F F / O N
H - P O S I T I O N 1 8 0
V - P O S I T I O N 0 6 0
D I S P L A Y O F F / O N
H/V REVERSE
H / V R E V E R S E
→
H
R E V E R S E
→
O F F / O N
V
R E V E R S E
→
O F F / O N
FREEZE
F R E E Z E
→
O F F / O N
CROSS LINE
C R O S S L I N E
→
O F F / O N
Page 15

14
MASK
M A S K
→
N O = 1
O F F / O N
→
H — S T A R T 0 0 0
H — E N D 3 8 3
V — S T A R T 0 0 0
V — E N D 2 3 9
POSI/NEGA
P O S I / N E G A
→
P O S I / N E G A
LANGUAGE
L A N G U A G E
→
E N G L I S H
繁 體 中 文
日 本 語
Page 16

15
TITLE
T I T L E
→
! " # $ % & ' ( ) * + - /
0 1 2 3 4 5 6 7 8 9 : ; < = > ?
@ A B C D E F G H I J K L N M O
P Q R S T U V W X Y Z [ \ ] ^ _
` a b c d e f g h i j k l n o
p q r s t u v w x y z { | } ~ █
P
O S I T I O N
→
O F F / U P / D O W N
PRIORITY
P R I O R I T Y S E T T I N G
→
I R I S C O N T R O L
O S D / V R
F U N C T I O N C O N T R O L
O S D / S W I T C H
Page 17

16
RESET/SYNC
R E S E T / S Y N C
→
R E S E T
→
O N
I D
→
0 0 1 ~ 1 2 7
P H A S E
→
O F F / O N [ U N D E T E C T E D ]
- █ — — — — — — — — — — — — — — — +
[UNDETECTED]: No Line-Lock Signal Input.
TH IS DEVIC E CO M PLIES WITH PART 15 OF THE FCC RULES.
OPERATIONS IS SUBJEC T TO THE FO L LOW I N G TW O
CO NDITIONS:(1) THIS DEVICE MAY NO T CAUSE HARMFUL
INTER FERE N C E AN D ( 2 ) THIS DEVICE MUST ACCEPT ANY
INTERFERENCE RECEIVED. IN C LUDING INTERFERENCE
THAT M A Y CAUSE UNDESIRABLE OPERATION. .
VER:20100902
 Loading...