

Page 1
CPDVR4GPS
Page 2

To register your 2 year warranty, please visit www.copilotdashcams.com/warranty
2
Page 3

Unit Ma intenance:
Avoi d contact with w ater and other li quid as the unit is n ot waterproof
•
Do no t attempt to ope n the unit, doing s o will void your wa rranty
•
Cle an with a soft da mp cloth only, do not u se any chemic al cleaners
•
If the vi deo is unclear o r blurry:
Cle an the lens with a s oft damp clot h
•
Che ck for dirt or ma rks on the wind ow the camera is fa cing
•
Warning s:
Pleas edisposeofthisunitresponsibly
•
Keepawayfromfire
•
DonotplacesoastoobstructtheDriversview
•
Donotplaceinanyair bagdeploymentzones
•
Page 4
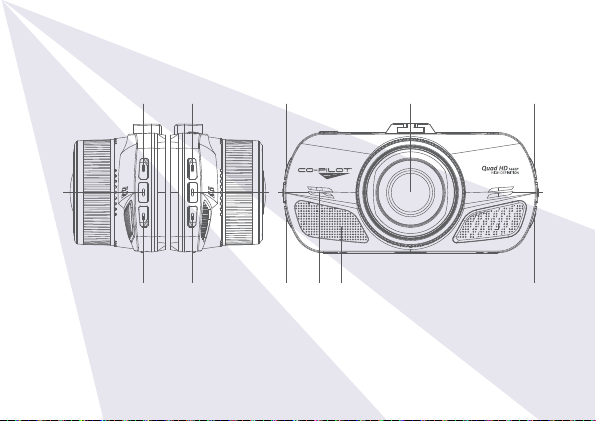
Unit St ructure Cha rt
1
4
2 5
3
6
1 MODE Button
2 MENU Button
3 SOS Emergency
4 MODE Button
5 MENU Button
6 SOS Emergency
4
4 9 61
7 86
7 Spea ker
8 Radiator Shutter
9 HD Camera
2
8
Page 5
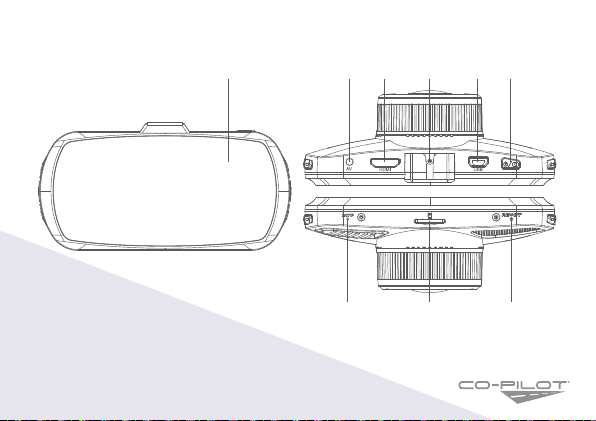
Unit St ructure Cha rt
10 LCD
11 AV-OU T GPS
12 HDMI Interface
2
13 Holder Connector
14 USB interface
15 Power/Photo taking button
1110 12 13 14 15
16 17 18
16 MIC
17 T F Slot
18 Reset
Page 6

Butto n & interfac e instructi ons
Button Name Button Function Instructions
1
Power/
Photo Button
Reset Reset Short Pre ss: Restar ts the unit whe n in standby mo de
OK Video st art/stop/
Up Menu Navigation
SOS Emergency Locks current recording file
Mode Switch Mode
Power on/off
Take photos
photograph Menu selection
Turn audio recording on/off
Take Screenshot
Short Pre ss: Power on, red l ight turn of f.
Long Pres s: Power off, red l ight will turn o ff
In video mo de, start/s top recordi ng
Takes pictures in photograph mode
Set/Con firm in menu mod e
In video mode turn off/off audio recording
Press to switch between photo/record/playback
In video mo de, takes a scre enshot
6
Page 7

Butto n & interfac e instructi ons
Button Name Button Function Instructions
TF card Slot TF card Slot Insert t he TF card into th is Slot
HDMI Interface High definition output Connect t he HD televis ion by HDMI cabl e, in the video mo de, view the
AV or GPS Slot AV Output or GPS Output The AV slot can’t b e acted as AV outp ut if the machin e be set with GPS , only
Holder Interface Install holder Install the holder on the machine
USB Output storage/charging Connect USB cable for auto recording, and view the video/photo.
Menu Photograph/record/ playback,
all functions setting
2
video/pho tos; in the photo graph mode, ma ke photos, view v ideo and phot os.
acted as G PS output.
The AV slot can ’t be acted as GP S output if the m achine be set w ithout GPS, on ly
acted as AV ou tput.
Connect USB cable for auto charging
In the vide o mode: short pr ess once to swi tch video set ting;
In the photograph mode: short press once to switch photograph setting;
In the vide o/photo playba ck mode: short p ress once to sw itch playbac k setting;
Page 8
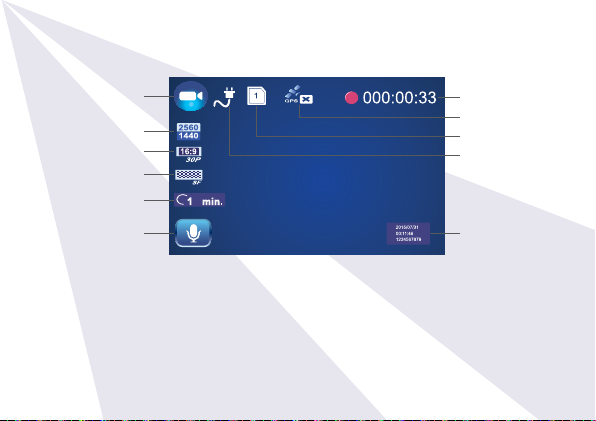
Photograph/Video/Playback basic operation instruction
1
Video Mode
Resolution
Image Frames
Image Quality
Loop Vi deo Time
Audio
Before installation, operate instructions by hand:
Power on /off by hand. Sho rt press Powe r button, the red i ndication lig ht will on. Enter th e video mode, L ong
press Pow er button agai n, the red indica tion light will o ff.
Attention: the devic e will be turn of f automatical ly after a warn ing of low batter y when the po wer is very low.
Charge by c onnecting th e computer vi a USB data cabl e
vehicle D VR mainly use w hile charging , the full built-i n battery co uld maintain a bout 10 minutes for s tandby, if
use for lon g time, must con nect the powe r cable for char ging; and use by co nnecting the m obile power at h ome.
8
Video Time
GPS
TF Card
Connected
Power
System time/
Date/Driver ID
Page 9
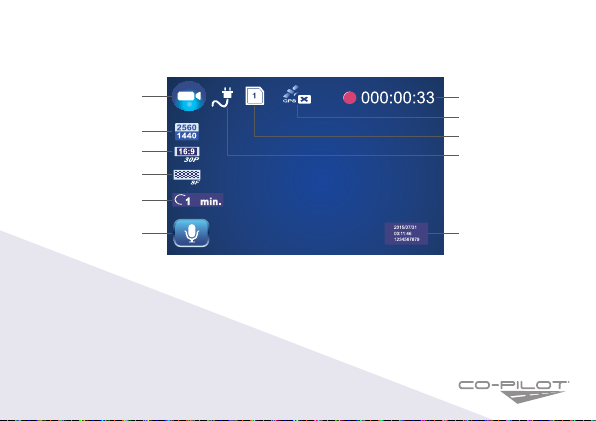
Photograph/Video/Playback basic operation instruction
2
Video Mode
Resolution
Image Frames
Image Quality
Video Time
GPS
TF Card
Connected
Power
Loop Vi deo Time
Audio
Video M ode: Short pre ss mode butto n to switch to vide o mode, there is a vi deo recording i con shown on th e
top left c orner of the LCD; sh ort press OK b utton to start r ecording, the r ed video indic ation light sta rt to flash,
that is the D VR is under reco rding, shor t press OK butto n again to stop reco rding.
Video process: Power on > ente r video mode > sh ort press OK bu tton to record > sh ort press OK b utton
again to sto p recording.
System time/
Date/Driver ID
Page 10
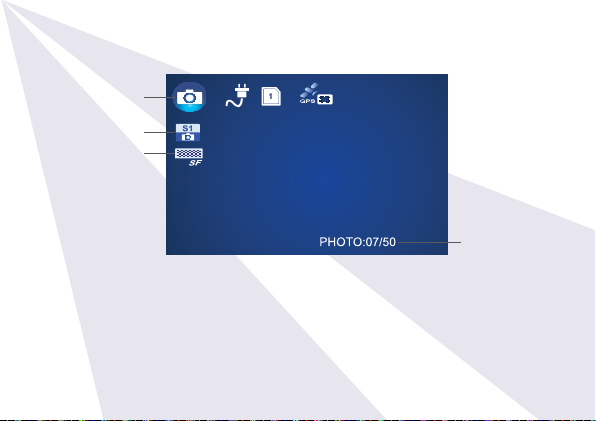
Photo Mode
Photo Mo de
Photo Resolution
Image Quality
Shor t press MODE but ton to switch to ph oto mode, there is a p hoto shooting i con shown on th e top left corne r
of the LCD, sho rt press Powe r or Photo Taking but ton to take photos, w hen photogra phy is finishe d, the LCD
will be fl ash one time.
Attention:This ma chine is limited o nly for 50 pcs ph otos, and can’t ta ke photos when o ver 50 pcs.
Photograph process: Power on > enter v ideo mode > pres s MODE butto n to switch the pho tograph mode
> press Pow er or Photo Taking bu tton to take photo s.
10
Photo Quality
Prompt
Page 11
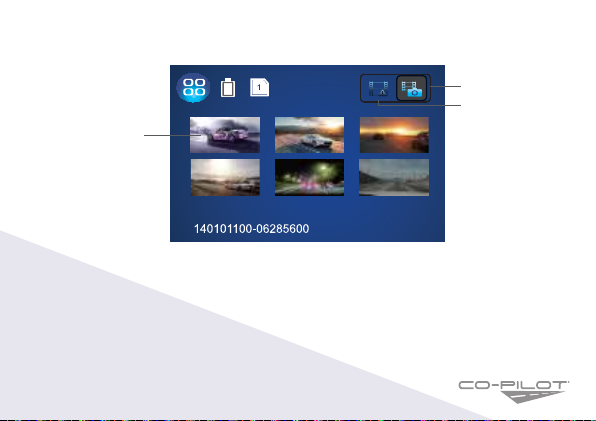
Video/Photo Playback
Normal File
Locked File
Video F ile
Shor t press MODE bu tton twic e to switch play back mode, th e playback ic on will be sho wn on the LCD top le ft corner:
1. Short pres s up/down butto n to selecting th e file section( locked secti on/ regular fi le section);
2. Short pres s OK button to ente r the playback s ection, then sh ort press up/d own button to se lecting the fi le,
press OK b utton again to en ter single file p layback (pre ss OK button aga in to start play back the vide o)
Attention: If it’s recordi ng, first stop rec ording, then pre ss MODE butto n twice to swi tch the playbac k mode
Playback process: Power on > enter p layback mode > p ress MODE but ton twice to sw itch the playb ack
mode > pre ss up/down but ton to enter the sec tion and press O K button to choo se > press OK but ton to enter
single fi le playback (p ress OK butto n again to start re play the video)
Page 12
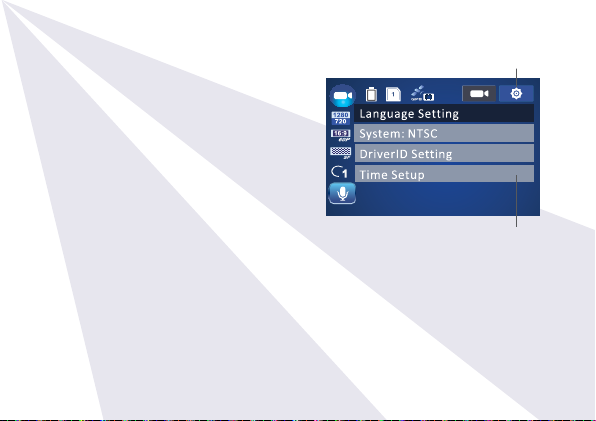
Menu Setting Instructions
Operation:
1. S hort press Up /Down but ton to switch the se tting option s.
2. S hort press O K button to enter th e setting, sho rt press
up/down b utton to modif y the setting .
3. S hort press O K button to confi rm the modific ation, if no
save the mo dification , just press menu b utton to exit.
Language Setting: English/ Simplified Chinese etc.
Syste m Format: MTSC/ PAL default is PAL
Driver I D setting: S et 1-9 9 positions
Time se tup: Set year/month/date/time
Stamp s etting: Thr ee modes: date/ time/vehic le driver no. the d efault is off
Format: Choose ◎ or ×, choose ◎ means format, choose × means no;
Defau lt setting: Choose ◎ or ×, choose ◎ means reset, choose × means no;
Auto Powe r off setti ng: Four modes: off 1 minute/3 minutes/5 minutes
Card vol ume: Three mode s: total capacit y/usage/sur plus
Warning tone setting: on/off, defaul t is on
Backl ight Off set ting: Four modes: off/1 minute/3 minutes/5 minutes
Withou t any buttons p ress operatio n for unit durin g the setting tim e, the screen wi ll off, but the uni t is still workin g.
Version info: View the version information;
1
System Settings
Menu Options
12
Page 13
Menu Setting Instructions
Photograph Settings:
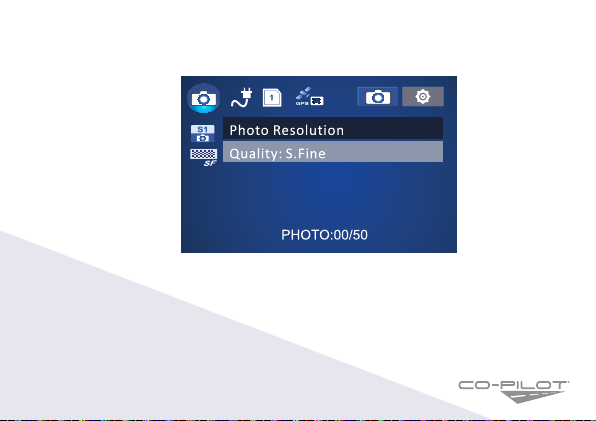
After p ower on, shor t press MODE but ton to switch the p hotograph mo de, the photo ico n will be shown o n the
LCD top lef t corner, press ME NU button to ente r the settings , there are 2 setti ng options: Photo r esolution,
Image qu ality; shor t press up/down b utton to switc h the setting op tions, short p ress OK butto n to enter the
settin g, short pres s up/down butto n to modify th e setting, and s hort press OK b utton to confi rm the modifi cation.
Photo resolution:
Four modes: 4M(26 88×1512 16:9)/8M(3264×2448 16:9)/14M(4384×3288 16:9)/16M(4608×3456 16:9)
Image quality: Three modes: superior/good/general
2
Page 14
Menu Setting Instructions
Playback setting
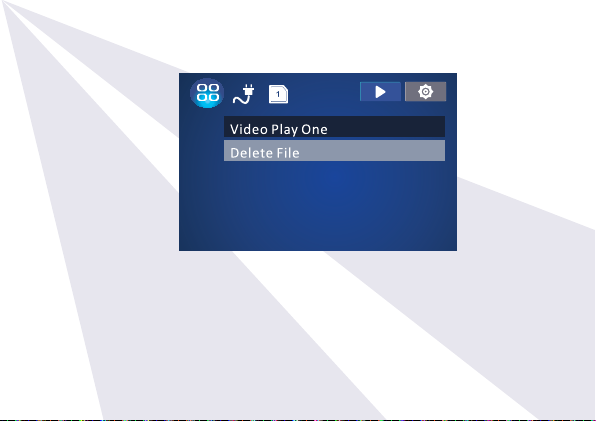
After p ower on, shor t press MODE but ton twice to s witch the playb ack setting, t he photo icon wi ll be shown on
the LCD top le ft corner, pres s MENU button o ne time to enter set ting, there are 2 s etting optio ns (Play mode
settin g, Delete the fil e); short p ress up/down bu tton to switch th e setting opti ons, short pre ss OK button to en ter
the sett ing, short p ress up/down b utton to modif y the setti ng, and shor t press OK but ton to confirm th e modificat ion.
Play mode s etting: Fou r modes: play sing le/ play all/ sin gle loop/all lo op the default is p lay single
Delete f ile: Two modes: delete the current file/delete all files the default is delete the current file
3
14
Page 15

Product Specifications
Product Feature HD Camera, HD Recording
G-sensor Built-in (to save the file e mergency, and c annot be delet ed anymore if th e collision of v ehicles hap pen)
LCD Size 2.7 LTPS 16:9
Lens 170 Degree A+ HD ult ra wide angle
Photo Pixel 1800 W
Video Pixe l 500W
Lens Aperture F=1. 8
Language English/Simplified Chinese etc
Video Format MOV.
Video Resolution Seven mode s: 2560x1440 3 0P 2304x129 6 30P 1920*1080 3 0P 1920*1080 60 P 1280*720 60 P HDR 2560x14 40
Video Codec.
Color Effect S tandard
Loop Recording Recording w ith seamles s, no leakage
Auto turn on /off while
vehicle power on/off
1
30P/H DR 1920* 1080 30 P
H.264
Suppor t turn on while veh icle start s. And turn of f while vehic le shutdowns.
Page 16

Product Specifications
Product Feature HD Camera, HD Recording
Motion Detection Support
Year/Month/Day/Hour/
Minute
Photo Pixel 4M/8M/14M/16M
Photo Format JPEG
Memory card TF (Supp ort Max 512GB )
MIC Support
Built-in Speaker Support
GPS Su pport Opti onal(Wit h GPS no AV, or With AV no GPS) )
ADAS Function LDWS, FCWS
USB Function 1: Storage 2: Cha rging
Power Interface 5V 1.5A/1+5-
Battery Bu ilt in Li-ion B attery
Park Mode Support
Normal operating
temperature range
2
Support
-30°to 80°
16
Page 17
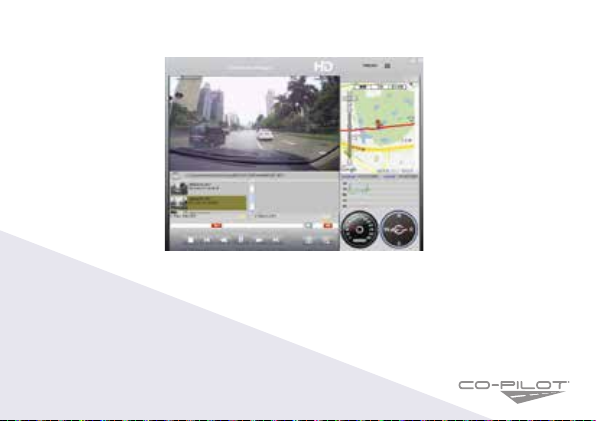
GPS playe r softwar e Installat ion and Using In structio n(Only suitab le for the unit s with GPS func tion)
If need ch eck the GPS info rmation, the p rofessional pl ayer must be inst alled firstly
Please in stall the file p rovided in the un it:
Please c opy the file to com puter and insta ll.
Using th e player soft ware:
1. Please open an d install it for th e first use.
2. Click File – Ope n to choose the fil e which need pl ay, and open the play m ode directly, as ab ove.
Page 18

Quick install instruction:
Make sure the lo cation is clea n and dry befor e mounting the un it
•
Connect to yo ur 12v power socke t via the cable c onnected to the U SB socket on the u nit
•
You should see a blu e light to indica te the unit is charg ing, once the un it is fully charg ed the light wil l turn off
•
The unit will a uto power on and o ff with the veh icles power so cket
•
For models w ith GPS, pleas e connect the G PS module befo re the power
•
Troubleshooting:
Unit will not record:
Please c heck that there i s enough spac e on the SD card, an d that is not locke d or in read only mo de.
Unit stops recording frequently:
For best p erformanc e, please make su re you are using a cla ss 10 SD card that is SD HC compatib le
Unit shows “wrong file” during playback:
The SD ca rd may be corru pted or format ted incorre ctly, please refo rmat before at tempting to us e again. This w ill
cause th e SD card to lose it ’s data.
18
Page 19

19
Page 20

CPDVR4GPS
 Loading...