

Page 1
CPDVR3 – Mirror Car Video
Recorder User Manual
For Help using or Fitting Product call: 0330 123 9040
Page 2

Disclaimer
CO-PILOT has made every effort to ensure that all the
information contained in this manual is accurate and reliable.
However, the information is subject to change without notice.
CO-PILOT assumes no responsibility for any damage or injury
resulting from the use of this product.
Under no circumstances should CO-PILOT products be
operated by the driver whilst the vehicle is in motion.
No part of this publication may be copied, distributed, transmitted
or transcribed without the permission of CO-PILOT.
Warranty and Registration
Your CO-PILOT device is guaranteed for one year from the date
of purchase from all manufacturing defects that occur with
normal use. If your unit fails to perform as specified in this user
guide please contact your retailer or ourselves with regards to
your warranty. To activate the 12 month warranty please visit
www.copilotmobile.co.uk
.
Continued use of this product by you, will constitute full
acceptance of the Disclaimer and Copyright notice and the terms
there under. If this product is installed in a vehicle that is used by
people other than yourself, you accept and agree without
reservation that it is your obligation to notif y other vehicle users
as to the safe working usage of this product.
Any attempts to open or dismatnte your device may invalidate
your warranty.
Page 3
Introduction
Thank you for purchasing your CO-PILOT device. It’s never been
more important to record your journeys on the road and be
prepared for any incidents that may occur along the way.
In today’s society fake insurance claims are becoming ever more
prevalent, not only is your health at risk but your insurance
premium could rise by up to 30%. CO-PILOT products are
specifically designed to fight back and protect yourself against
fraudulent claims as a simple, discreet accident camera suitable
for use in any vehicle.
It conti nuously records and saves footage as you drive, and in
the event of an accident uses G-Force sensors to capture the
footage which cannot be overwritten and need to be manually
deleted from the SD card.
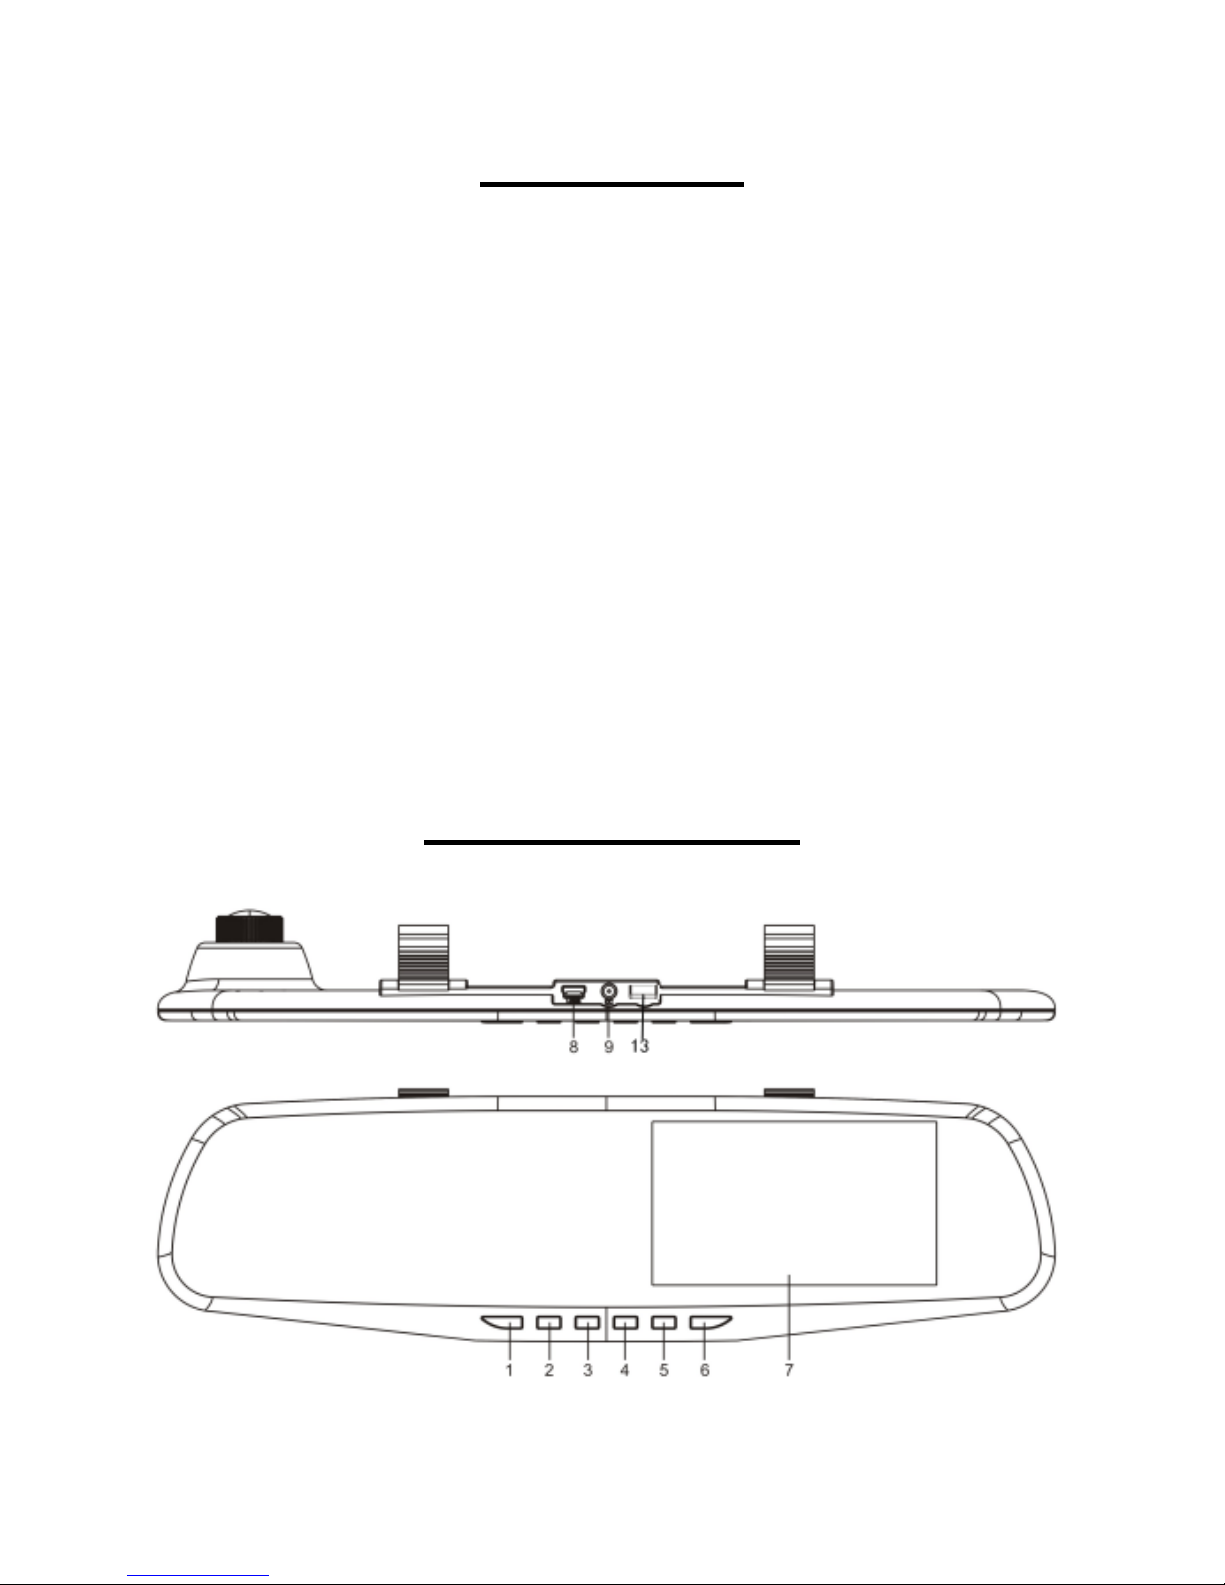
Product Anatomy
Page 4
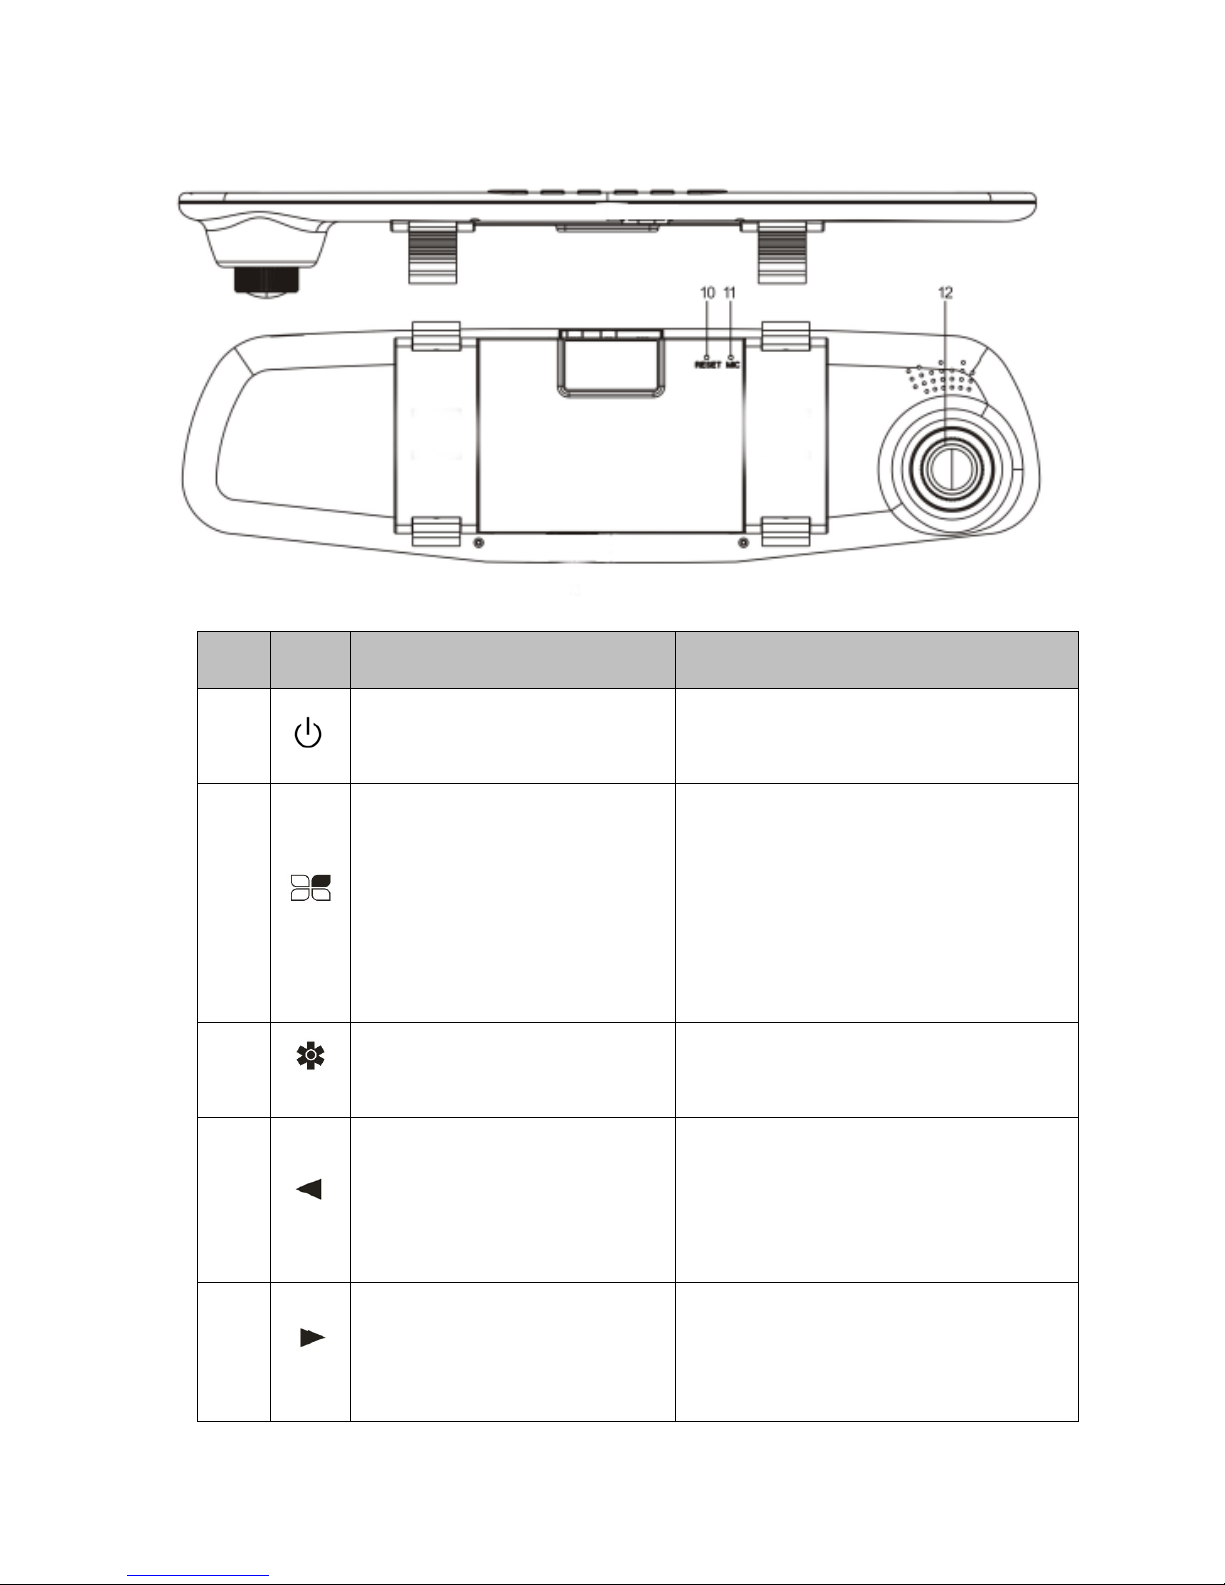
No. Icon Name Operating instructions
1 Power Button
Hold to turn on / off; press to toggle
screen back-light on / off;
2
The menu key /Video
Emergency lock button
In Standby mode, press the key to
transfer function setup men u;
Continuously press the key to switch
between the settings menu;
In Recording mode, press the button
to lock on the file, not be cyclic
covering;
3 Mode Button
For video / photo / Playback switch
function;
4
Page up /Playback Mode
sound Volume Adjust
Menu options, select the function key;
Standby or video mode;
Playback mode, press the button to
reduce the sound volume;
5
Turn down/Mute
Menu options, downward selection
function keys
In video mode, press this button to
mute the sound
Page 5
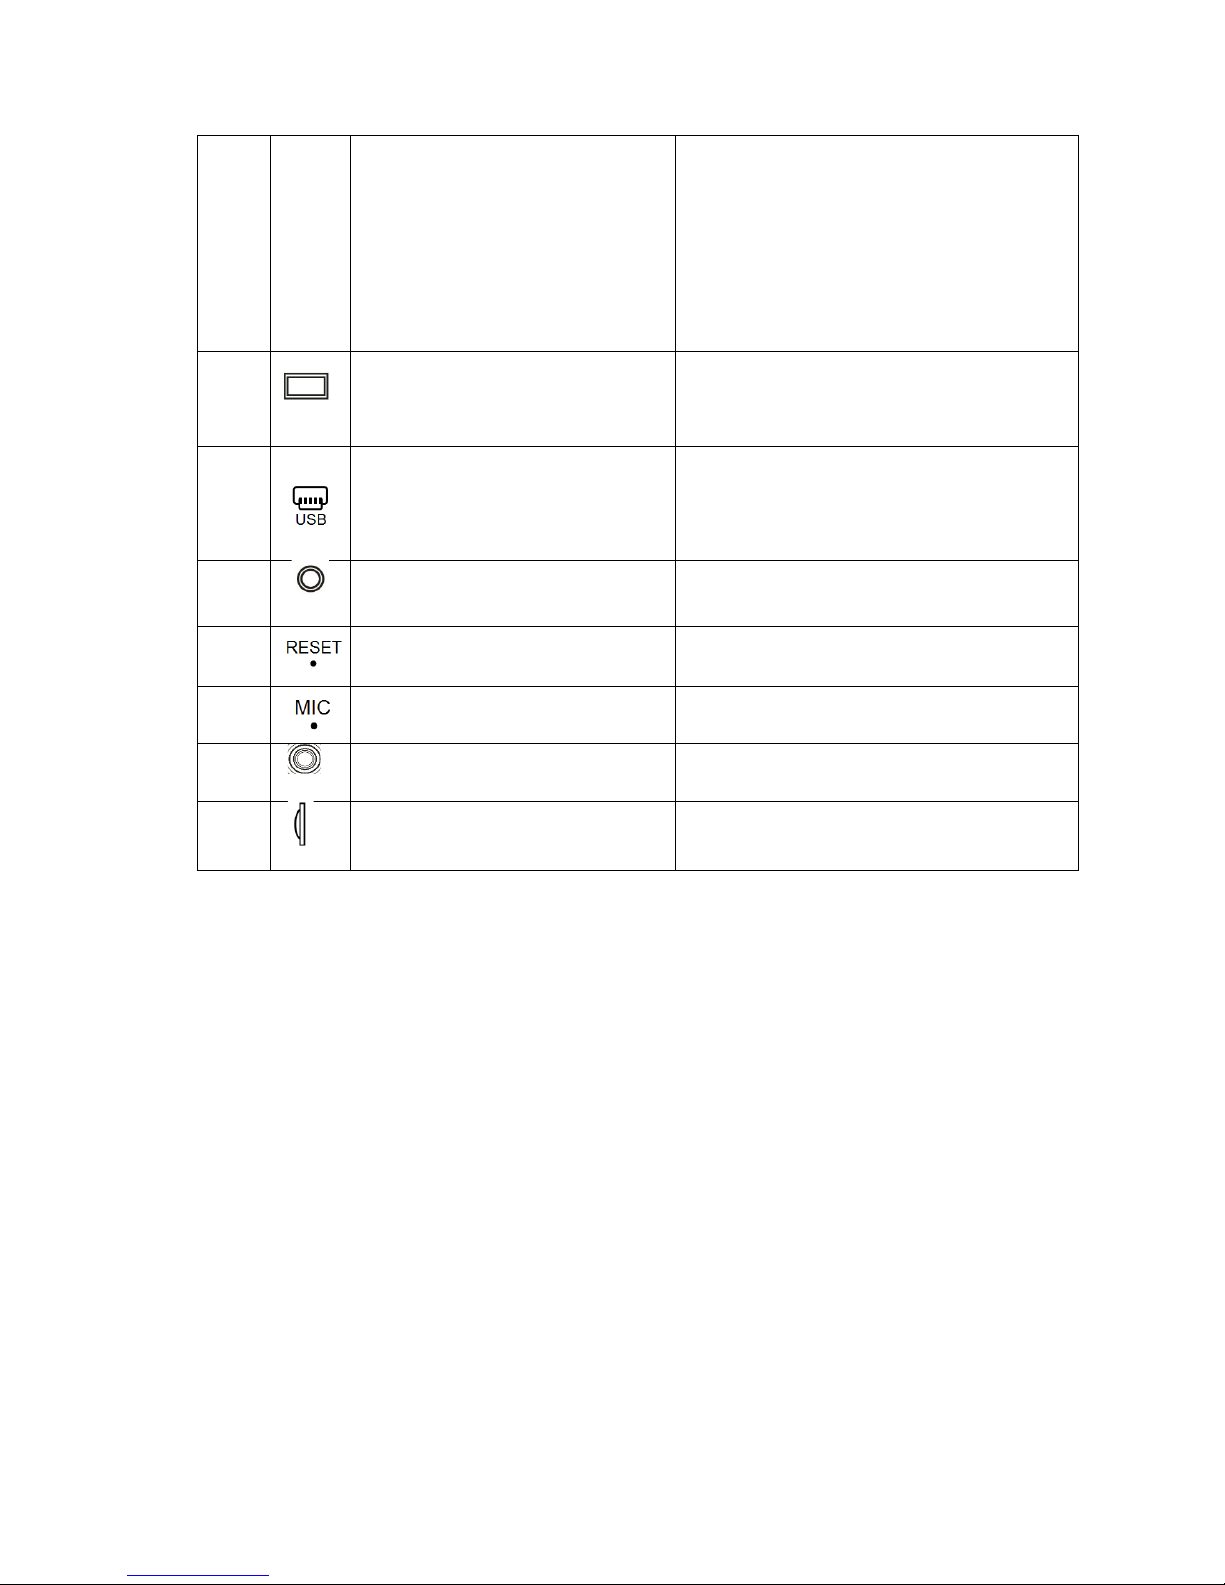
6
OK
Confirmation key/video record
& photo taking button
Video / Photo / Menu confirmation key
Standby mode, press this button to
launch the on / off camera;
Photograph mode, press the key to
take photos;
menu mode to confirm key;
7
Display
4.3 inch 16:9 TFT, high-definition
display screen;
8
The USB interface / Power
Input
Connected to a computer for data;
Power In connection
9 AV In Rear-view Camera connection port
10
Reset button System restart reset button;
11 Microphone Collection the sound
12 Front Camera Front Camera video/image collection
13
TF card slot TF memory card slot, 4GB to 32GB
Page 6
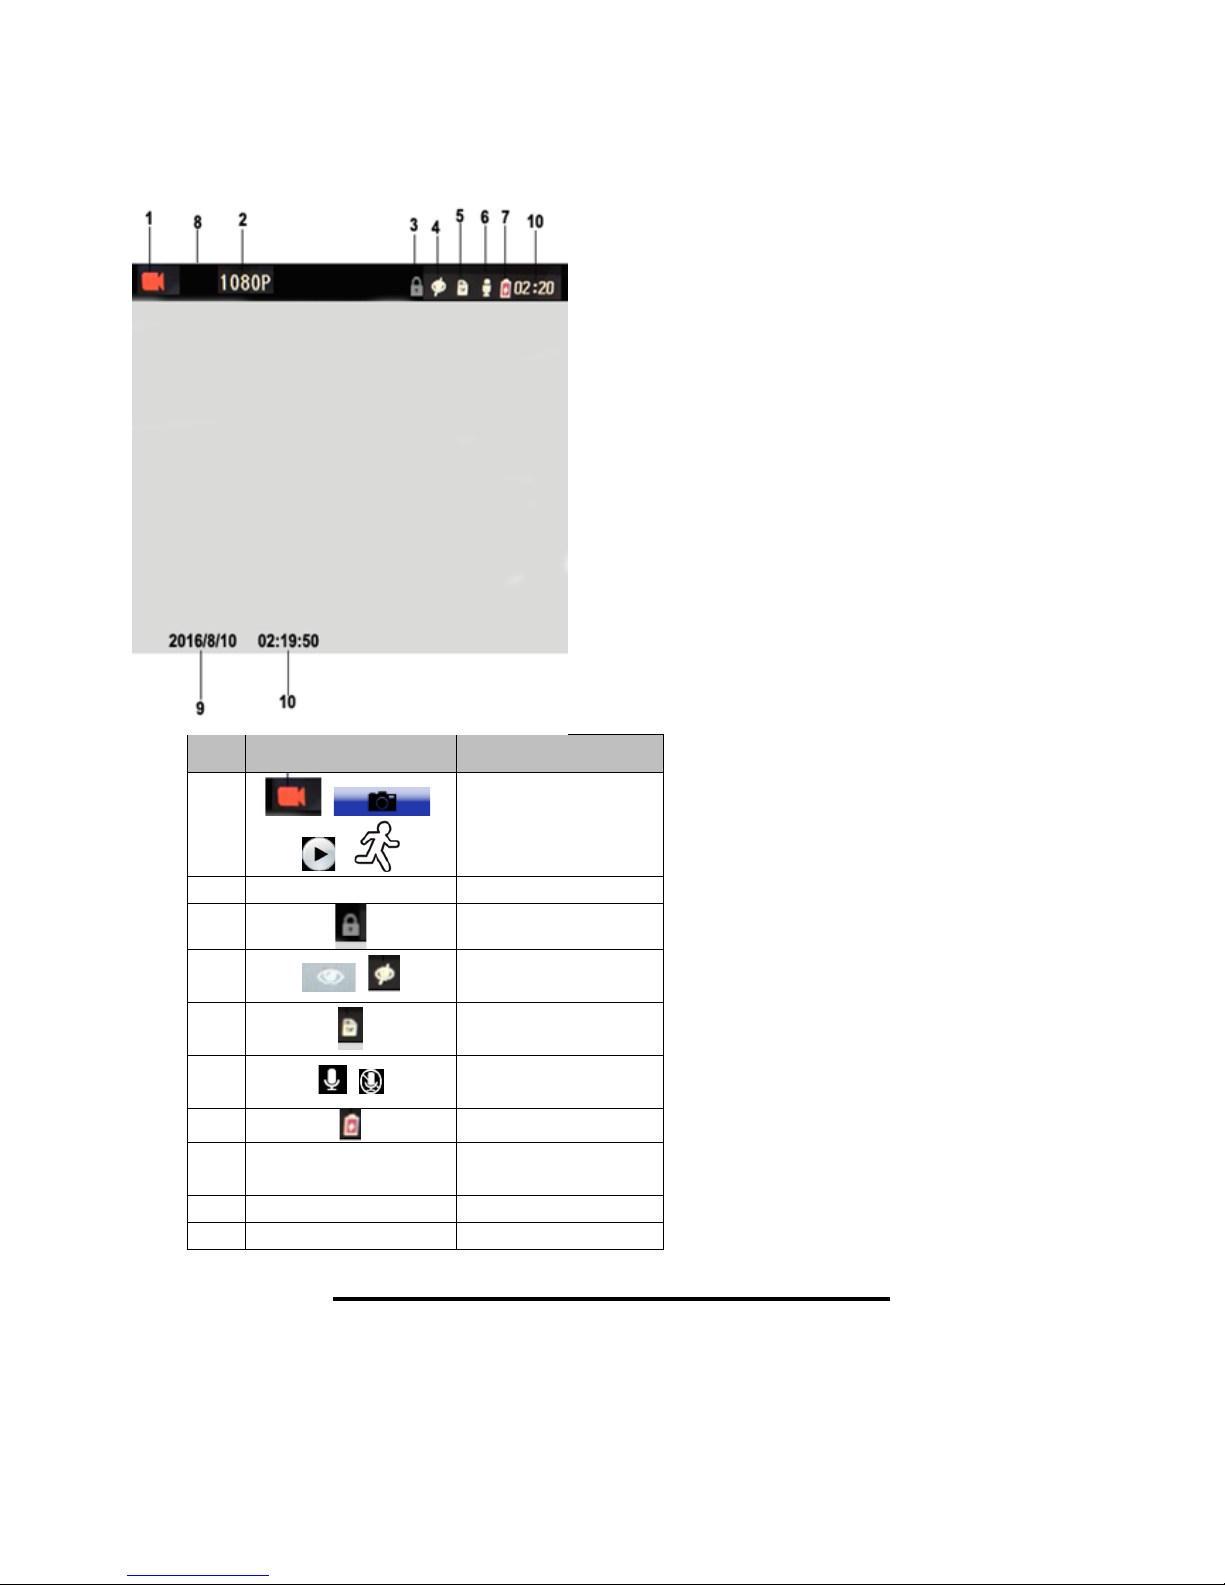
Display Icons
No.
Icon
Description
1
/ /
/
Video / Photo /
Playback / Motion
Detector mode
2
1080P
Video Resolution
3
Video Locked
4
/
Parking Control
On / Off
5
Memory Card
Present
6
/
Recording On /
Off
7 Battery Status
8 00:17
Video Runtime will
be here
9
2016/8/10
Date
10
02:19:50
Time
Installation and Operation
Quick Start
Page 7
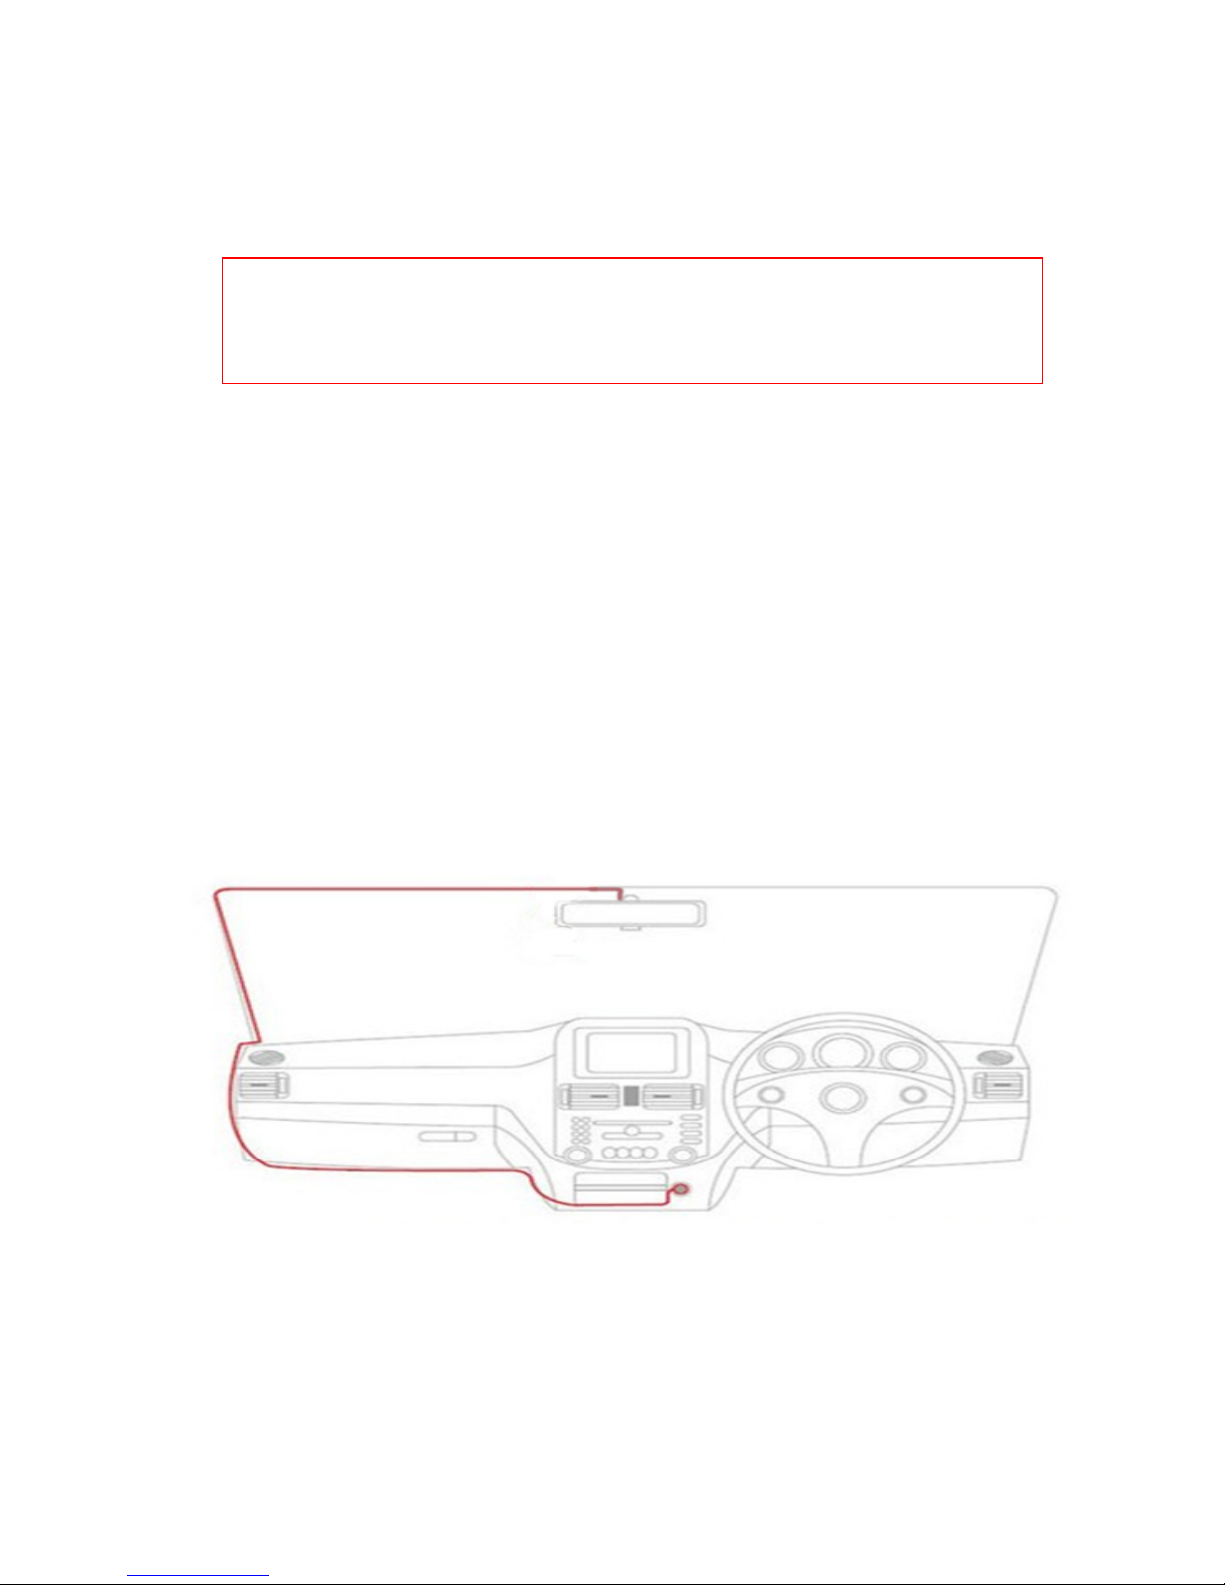
1. Please insert the Micro SD card in the TF slot, CPDVR3
supports the memory size from 4GB to 32G (Class 8 or
above).
2. The equipment will be installed to the left of the original
rear-view mirror. The equipment should be flush with the
mirror and be fastened in the original car rear-vie w mirror
with the provided attachments and adhesive pads. These
will securely hold the Mirror Cam in place and will allow for
removal if you need to move it to another vehicle.
3. Connect the power supply. Please use the original
charger, and connect one end of the charger into USB
interface of the camera, then insert the other end of the
car charger into the car cigarette port. We suggest you run
the extension cable as below.
Keep all cables and wires tidy and do not black you view.
4. The DVR automatically turns on will start recording
automatically when your car's engine starts, if the car
charger is constantly plugged in. The DVR will stop
recording and save the data to your micro SD card
automatically after 15 seconds of not receiving power and
will then turn off. If the memory card is full it will begin
overwriting data
Note: Please format the memor y card for first time usage and please do not
remove or insert the memory card whilst the device is on, it is easy to damage
the memory card
Page 8

5. Manual On / Off mode: Short Press the power button,
and you will hear the boot up sound, the DVR will start to
record automatically, To stop recording press "OK" Button,
the DVR will save the data to your SD card and be in
standby mode. Short Press " " Power ON/OFF button
again,the camera will turn off automatically.
6. Rear Camera.
The Mirror cam has a Rear-View Camera to record what
happening behind you, to fit this follow these simple steps.
• Connect the Rear Mirror Cam cable from the Mirror
cam to the rear of the vehicle following a safe and
discreet route. The cable should just tuck away under
trims.
• Once you have the cable to the rear of the car, plug in
the Rear Camera and check the picture appears on
the top right han d corner of the screen on the Mirror
cam.
• Once you can see the picture, position the Rear Cam
in the top center of the rear windscreen and s ecure it
in place using sticky pads.
• Hid any excess cable by tucking away under the trims.
Menu Settings
Menu options
Options
Video Quality 1080P/ 720P
Photo Quality
1M/ 2M/ 5M/ 8M
Video Length
2 min, 3 min, 5 min, off;
If you choose close, card will not be covered with
Page 9

automatic cycle.
Move Detect
OFF/ON
White Balance Auto/ Daylight/ Cloudy/ Tungsten/ Fluorescent
Sharpness
Strong/ Normal/ Soft
Exposure 0;-1/3;-2/3;-1.0;/-4/3;-5/3;-2
Power ON
Record
OFF/ON
Screen Saver 10 Seconds /20 Seconds /30 Seconds/Close
Record Voice OFF/ON
Park monitor OFF/ON
G-sensor
High/ Mid/ Low/ Close
Date /Time Can set the year, month, day, hour, minute, second
Language
English/ Simplified Chinese/ German/ Japanese/
French/ Polish/ Korean/ Italian/ Portuguese/ Russian/
Spanish/ Thai
Time
Watermark
OFF/ ON
Frequency
50HZ、60HZ,
Auto Power off 1 Min/ 3 Min/ Off
Format
SD Card
Factory Data
Reset
Cancel/OK
Firmware
The software version number
Time and Date Settings
1. Press the OK button, the device enters the standby state.
2. In standby mode, then press the button to enter the
menu setting, then press the “ ” and “ ” button to find
the “date” menu, then press “OK” button to enter into
setting.
3. By pressing “ “or “ ” button set the date, then press
button to switch. Click “OK” button to exit until the
complete setting.
Video/Photo operation
1. Press “ ” button to switch to video mode, the video
recording icon display in the upper left corner of the
screen.
2. Press “ ” button to switch to photo mode, press “ OK”
Page 10

key to take pictures, while the DVR takes a picture you will
hear a sound to confirm a photo has been taken correctly.
Video / Photo playback operation
1. In standby mode, press “ ”key twice and enter into
playback mode, the “ ”icon showing in the middle of the
screen.
2. Press“ “or “ ” keys to choose the file you need to view .
3. Short press “OK” key to play the selected video files; press
“ ” button to exit.
Special Functions:
The G-Sensor Function
• If the s tart of the G-sensor detects a collision, the footage
captured will become locked and cannot be overwritten by
the device. You will need to be manuall y deleted from the
SD card. You can adjust the Sensitivity of G-Sensor in the
menu setting.
File locking Function
• Press “ ” key to lock a fil e manually and the video file to
ensure the file cannot be overwritten
Parking Monitoring Function
• Enable this function through the menu setting first, when
the car’s engine is off. If the DVR detects any external
vibrations it w ill automatically start to record 10-15 seconds,
then the DVR turn off. The video files will be locked
automatically.
Motion Detection Function;
• The DV R is equipped with motion detection similar to the
parking mode. In standby mode enable the motion
Note: Please disable the Parking monitoring function when you want to
resume normal video recording
Page 11

detection from the menu setting, then the LCD display will
appear icon will appear in the middl e of up per cor ner of
the screen, if it detects movement from any object within 3
meters, the DVR start to record 10-30 seconds
automatically.
USB Mode
• When you use the USB cable to connect with computer, the
DVR will display two menu options automatically:
1. Storage – Y ou can navigate all the files on the SD card
2. Camera – You can record video or take photos using
the DVR in this mode
Reset
• If the DVR freezes or any abnormal operation are
occurring, you can use small needle through the hole to
touch “RESET” button to reset the machine operation.
Product Specifications
G-sensor Built-in
display size 4.3” TFT
Camera lens 140 A+ level lens
Page 12
Language Multi language
Video resolution 1920*1080P 1280*720P
Video format H.264, AVI
loop video Seamless loop video, no leakage.
Motion detection function Support
Date time Support
carrier medium built-in (total: 1024MB)
Photo 500M
Photo format JPEG
Memory card TF (Maximum support 32GB)
Microphone Support
Sound Built-in
Video format PAL/NTSC
current frequency 50HZ/60HZ
USB function 1: PC_data
Power interface 12-24V 2A
Battery Built-in 450mAh
 Loading...