

Page 1

Scroll Compressors
Replacement Guidelines
Page 2

1 Compressor Replacement...................................................................................................... 2
2 Scroll Compressor Replacement Procedure.........................................................................2
Torque Settings.................................................................................................................................................5
Copeland Replacement Part No’s..................................................................................... ................................5
Assembly Procedure.........................................................................................................................................6
Compressor Mounts .......................................................................... ................................................................6
Approved Oils................................................................................................................ ....................................6
Service Refill Quantity ... .... ..... ..... ......... .... ..... .... .......... .... ..... .... ..... ......... ..... .... ..... ......... .... ................................6
Lubricant Handling................................................................................................................................... .........7
3 System Evacuation and Charging Procedure ....................................................................... 7
Qualified Refrigerants........................................................................................... .... ..... ............. .......................7
4 Performance / Visual Checks..................................................................................................7
R404A Application Envelopes................................ ....................................................................................... ....8
C05.2.4/1007/E 1
Page 3
1 Compressor Replacement
The following is intended to assist the service engineer to ensure the correct method for fitting of a new scroll
compressor where replacement is necessary. In the event that a compressor ne eds replacement it is vital to
diagnose and rectify the system fault which caused the problem in order to avoid the need for further
replacements. It is important to ensure that when a scroll compressor replacement is required, certain
procedures are carried out in the same manner as when first built and installed by the original manufacturer.
The main areas to note are correct torque values for service valves and the use of correct rubber mounts for the
application. For ease and clarity the following procedure has been provided as a pictorial sequence (Our
thanks to Space Engineering Ltd, in the UK who provided the photo sequence).
In the case of a motor burn, the majority of contaminated oil will be removed with the compressor. The rest of
the oil is cleaned through the use of suction and liquid line filter driers. A 100% activated alumina suction filter
drier is recommended but must be removed after 72 hours. It is highly recommended that the suction
accumulator be replaced if the system contains one. This is because the accumulator oil return orifice or screen
may be plugged with debris or may become plugged shortly after a compressor failure. This will result in
starvation of oil to the replacement compressor and a second failure.
2 Scroll Compressor Replacement Procedure
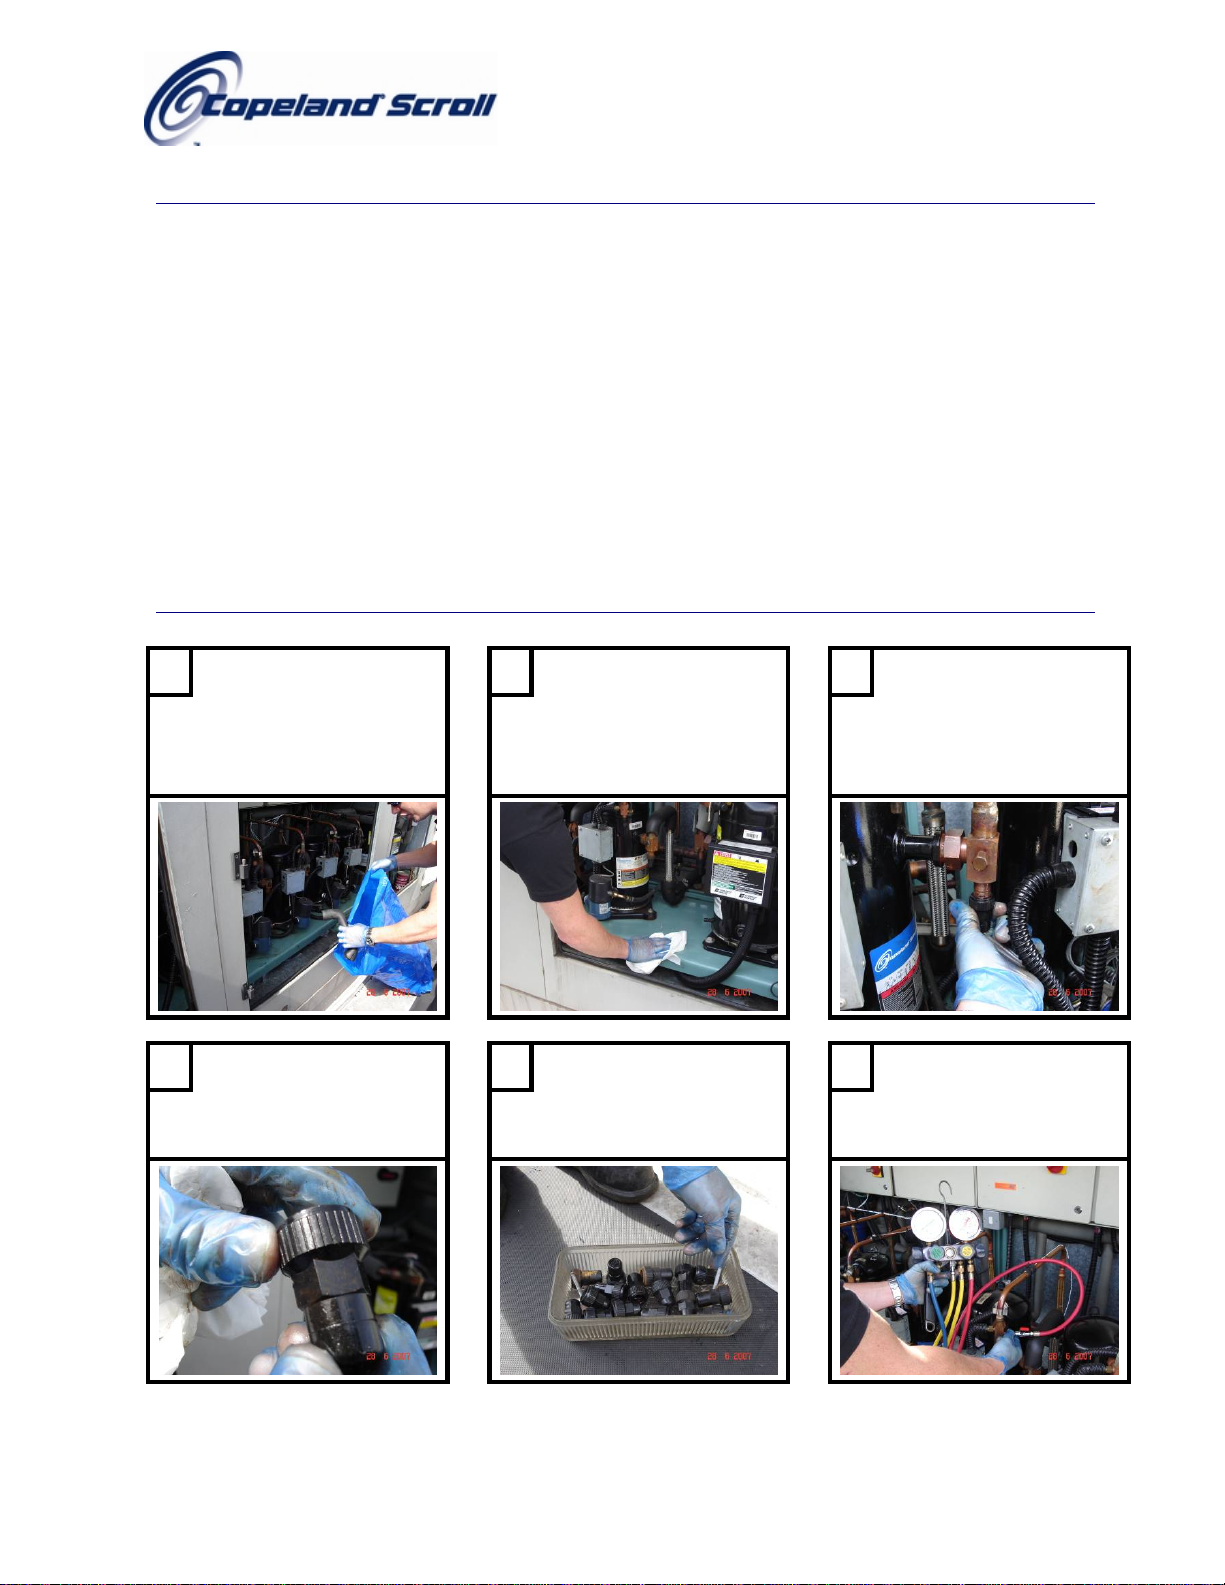
1
Begin by removing any
waste or rubbish from the
2
… clean away any dirt or
debris.
3
Remove all valve caps…
plant housin g …
4
… inspect for cracks or
damage…
5
… and store saf el y.
6
Select compressor, fit
service gauges, check
pressures.
2 C05.2.4/1007/E
Page 4

7
Isolate the oil supply to the
faulty compressor.
10
Fully 'front seat' the
discharge and suction
valves, isolate the
compressor from the
system.
8
Electrically isolate the
compressor (3 phase
9
… and the supply to the
crankcase heater).
supply…
11
Recover the compressor’s
12
Release the suction…
contained refrigerant to a
reclaim container.
13
… and discharge Rotalock
nuts and oil management.
14
Remove compressor
bolts…
15
… and discard the existing
rubber mounts and sleeves.
C05.2.4/1007/E 3
Page 5

16
Fit replacement hard rubber
mounts to new compressor.
Kit Part Number 8030450
17
… ensuring correct
placement of washers and
metal sleeve.
22
Apply thread lock paste to
compressor discharge and
suction connections.
23
Refit Rotalock nuts and
using the correct valve
retaining tool…
18
Refit mounting bolts and
tighten to correct torque
(see table). 2 mm gap
between bolt & rubber.
24
… tighten to correct torque
(see table). Ensure valve
position does not stress the
pipe work.
25
Remove oil sight glass and
assemble oil management.
Evacuate the compressor
using vacuum pump.
26
Open the oil supply to the
compressor.
27
'Back seat' the discharge
and suction ser v i ce valves
to remove service gauges.
4 C05.2.4/1007/E
Page 6

28
Leak test the Rot alock
fittings.
29
Refit all valve caps.
30
31 32 Correct tools (L to R) 33
Clear and correctly dispose
of all waste .
Valve retaining bar
Discharge torque spanner
Suction torque spanner
½” drive torque wrench
Restore the electrical power
supplies.
All Done!
(Return in 7 days to check
torque settings)
Torque Settings
Application Torque Nm
Compressor Mounting Bolt M8 12-14
Rotolock 3/4" - 16UNF 40-50
Rotolock 1" - 14UNF 70-80
Rotolock 1 1/4" - 12UNF 120-135
Rotolock 1 3/4" - 12UNF 135-160
Rotolock 2 1/4" - 12UNF 165-190
Sight glass 25
Copeland Replacement Part No’s
Description Part No.
Hard Mounts and Ferrules 8030450
PTFE Suction Gasket 2495939
PTFE Discharge Gasket 2495928
PTFE DTC Injection Gasket 8536083
DTC Injector Complete 8530541
NOTE: New PTFE gaskets are supplied and fitted to new compressors.
C05.2.4/1007/E 5
Page 7

The above sc roll compress or replacement procedure sho ws replacement typically for ZB medium temperature
application. For replacement of Copeland ZF Scroll typically low temperature application the same procedure
can be used but for one exception. The ZF scroll has a DTC valve fitted or for older models possibly capillary
injection.
IMPORTANT: Liquid line feed to the compressor injection port has to be isolated and compressor evacuated
before attempting to remove the injector.
Assembly Procedure
1 Verify Coil Spring is seated in the “Groove” located in the well on top of the compressor.
2 Thread the Discharge Temperature (DTC) valve onto the injection stub on the side of the compressor.
Torque setting 24-27N/M (216-240 in/Lbs)
3 Press the DTC bulb into the well on top of the compressor until the DTC bottoms out in the well.
4 Snap the Thermo. cap onto the DTC bulb on top of the compressor.
5 The copper tube from the DTC bulb should be approximately 0.125mm (1/8”) from the top of the compressor.
Compressor Mounts
New compressor mounts are recommended when a compressor is replaced. When purchasing a replacement
scroll compressor soft mounts are included. These soft mounts should not be used for multiple compressor pack
/ rack application.
Scroll compressors used in pack / rack design must use harder mounts which allow more load to be transmitted
via the feet. This will give flexibility and minimise the risk of resonance to connecting pipe work.
Hard Rubber Mount Set Part Number 8030450 Steel Mount Set Part Number 8522911
Approved Oils
Copeland only approves the use of the following polyolester lubricants: Mobil Arctic EAL 22CC or Emkarate
RL32-3MAF. Either oil can be used for top up and are suitable for use with both HCFC and HFC systems.
Service Refill Quantity
Model Name HP
Oil charge
supplied [l]
Oil charge
Service [l]
ZB15 2 1,0 1,0
ZB19 2,5 1,0 1,0
ZF09 ZS21 ZB21 3 1,24 1,12
ZF11 ZS26 ZB26 3,5 1,24 1,12
ZF13 ZS30 ZB30 4 1,95 1,83
ZF15 ZS38 ZB38 5 1,95 1,83
ZF18 ZS45 ZB45 6 1,77 1,66
ZF24 ZS56 ZB56 7,5 4,14 4,05
ZF33 ZS75 ZB75 10 4,14 4,05
ZF40 ZS92 ZB92 13 4,14 4,05
ZF48 ZS11M ZB11M 15 4,14 4,05
6 C05.2.4/1007/E
Page 8

Lubricant Handling
Polyolester lubricant products should pose little or no significant adverse health effects when properly used or
handled properly. Prolonged repeated skin contact should always be avoided. The lubricant supplier should be
contacted for specific health and safety documentation.
3 System Evacuation and Charging Procedure
Evacuating the system only on the suction side of a scroll compressor can occasionally result in a temporary nostart condition for the compressor. The reason for this is that the floating seal c ould axially seal with the scroll
set, with the higher pressure on the floating seal. Consequently, until the pressures equalize, the floating seal
and scroll set can be held tightly together.
The installation should be evacuated down to 0.3 mbar / 0.22 Torr or lower. Subsequently, the factory holding
charge of dry air in the compressor is released to the ambient. The shutoff valves are opened and the
installation, including the compressor, are once more evacuated as described after the system has been
recharged with dry nitrogen.
Highest demands are placed on the leak proof design of the installation and also on the leak testing methods
(please refer to EN378).
Rapid charging on the suction side of scroll compressors can occasionally result in a temporary no-start
condition for the compressor. The reason for this is that if the flanks of the spirals happen to be in a sealed
position, rapid pressurization of the low side without opposing high s ide pressure can cause the spirals to seal
axially. Consequently, until the pressures eventually equalize, the spirals can be held tightly together, preventing
rotation. The best way to avoid this situation is to charge on both the high and low side simultaneously at a rate
which does not result in axial loading of the spirals.
Qualified Refrigerants
R404A, R507, R22 and R134a are qualified for all refrigeration scroll compressors.
The ZB compressor family is also qualified for R407C.
It is essential that the glide of R407C refrigerant blends be given careful consideration when adjusting p ressure
controls.
4 Performance / Visual Checks
When having to replace a compressor installed in a pack design it is worthwhile to visually
check the condition of the remaining compressors, the rubber mounts and associated pipe
work.
Check the gauge pressure readings.
• Is the pack operating correctly?
• Is the operation within the manufacturer’s specification? (Check with the application envelope shown on
the following pages).
• Ensure the low pressure switch is set correctly if system pump down is applied. If the setting is too low
the compressor might be operating outside its operating envelope.
Compressor mounts
• Check to see that all mounts are secure and not damaged.
• Are the correct hard mounts fitted?
Lubrication
• Check that the regulator oil levels are correct including oil reservoir.
• Check the oil is still in an acceptable condition i.e. check for dirt and acidic content.
C05.2.4/1007/E 7
Page 9

Electrical
• Check all electrical connections for tightness.
• Check contactors for spring tension and contactor wear. If connectors are pitted, replace, DO NOT
FILE.
• Check overload functioning correctly.
• Check the compressor run current values.
• Check operation of crankcase heater, if fitted.
R404A Application Envelopes
ZF09K4E to ZF18K4E
Tc °C
Te °C
Tc °C
ZB15KC to ZB45KC
Te °C
8 C05.2.4/1007/E
Page 10

Benelux
Deltakade 7
NL-5928 PX Venlo
Tel. +31 (0) 77 324 0234
Fax +31 (0) 77 324 0235
UK & Ireland
17 Theale Lakes Business Parc
GB-Theale, Nr Reading-Berkshire RG7 4GB
Tel. +44 (0)1189 83 8000
Fax +44 (0)1189 83 8001
Asia/Pacific
10/F, Pioneer Building, 213 Wai Yip Street,
Kwun Tong, Kowloon - Hong Kong
Tel. +852 28 66 31 08
Fax +852 25 20 62 27
Deutschland/Österreich & Schweiz
Senefelder Straße 3
D-63477 Maintal
Tel. +49 (0)6109 6059 0
Fax +49 (0)6109 6059 40
France/Greece & Maghreb
8, Allee Du Moulin Berger
F-69130 Ecully
Tel. +33 (0)4 78668570
Fax +33 (0)4 78668571
Italia
Via Ramazzotti, 26
I-21047 Saronno (va)
Tel. +39 02 961781
Fax +39 02 96178888
España & Portugal
Diputacion, 238 AT.8
E-08007 Barcelona
Tel. +34 93 4123752
Fax +34 93 4124215
C5.2.4/1007/E
Sweden/Denmark/Norway & Finland
Pascalstr. 65
D-52076 Aachen
Tel. +49 (0) 2408 929 127
Fax +49 (0) 2408 929 528
Eastern Europe, Turkey & Iran
Pascalstr. 65
D-52076 Aachen
Tel. +49 (0) 2408 929 0
Fax +49 (0) 2408 929 525
Poland
11A, Konstruktorska
PL-02-673 Warszawa
Tel. +48 22 458 9205
Fax +48 22 458 9255
Russia & CIS
Letnikovskaya, 10, building 2, 5th floor
RUS-113114 Moscow
Tel. +7 495 981 9811
Fax +7 495 981 9816
Latin America
7975 North West 154Th Street - Suite 300
Miami Lakes, FL, 33016 - USA
Tel. +1 305 818 8880
Fax +1 305 818 8888
Middle East & Africa
PO BOX 26382, R/A 8, FD-2
Jebel Ali, Dubai - UAE
Tel. +9714 883 2828
Fax +9714 883 2848
Emerson Climate Technologies - European Headquarters - Pascalstrasse 65 - 52076 Aachen, Germany
Phone: +49 (0) 2408 929 0 - Fax: +49 (0) 2408 929 570 - Internet: www.eCopeland.com
The Emerson Climate Technologies logo is a trademark and service mark of Emerson Electric Co. Copeland Corporation is a subsidiary of Emerson Electric Co. Copeland is a registered trademark and Copeland Scroll is a trademark of Copeland
Corporation. All other trademarks are property of their respective owners. Information contained in this brochure is subject to change without notification.
© 2006 Copeland
 Loading...