

Page 1
SALON TİPİ KLİMA KULLANIM KILAVUZU
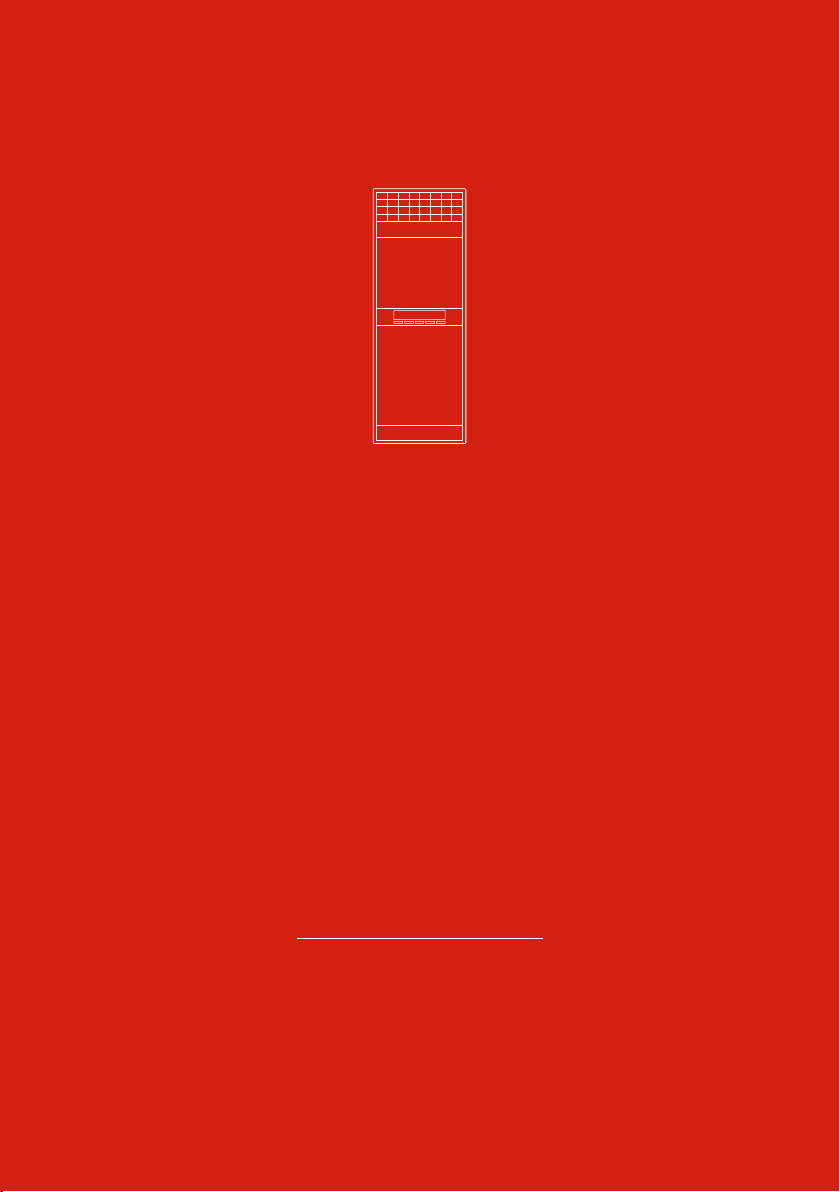
FLOOR STANDING
AIR CONDITIONER USER’S MANUAL
MODEL
COPA Salon Tipi 26
COPA Floor Standing 26
copa.com.tr
Page 2
Değerli Müşterimiz;
Klimalar değeri yüksek parçalardır. Yasal haklarınızı
ve menfaatlerinizi sağlamak için lüen montajı
profesyonel teknisyenlerin yapmasını sağlayın.
Bu kullanım kılavuzu Copa markalı split salon pi
klima modeli içindir. San aldığınız ürünün
görünümü kılavuzda açıklanandan biraz farklı
olabilir, fakat bu sizin işlemlerinizi ve kullanımınızı
etkilemez.
Lüen seçğiniz modele uygun bölümleri
dikkatlice okuyun ve daha sonra ulaşabileceğiniz
yerde kılavuzu saklayın.
kullanım ömrü 10 yıldır.
teşekkür ederiz.
1
Page 3

İÇİNDEKİLER
Kullanım Talimatları
•
• Parçaların İsimleri ve İşlevleri
• İşlem Paneli Kullanımı
Uzaktan Kumanda Kullanımı
•
• Bakım ve Temizlik
Sorunlar ve Çözümleri
Teknik Özellikler
3
4
7
8
14
15
15
2
Page 4
KULLANICI KILAVUZU
Kullanım Talimatları
Montaj ve Kurulum Talimatları
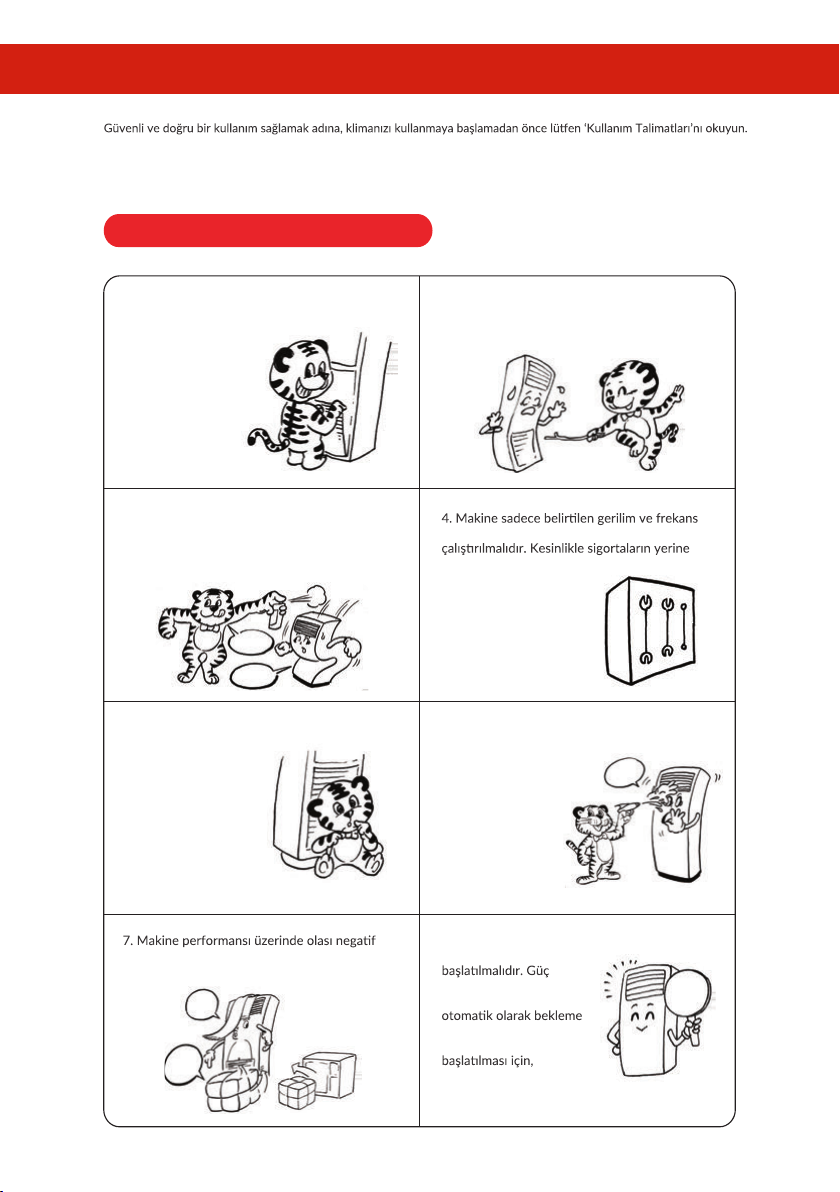
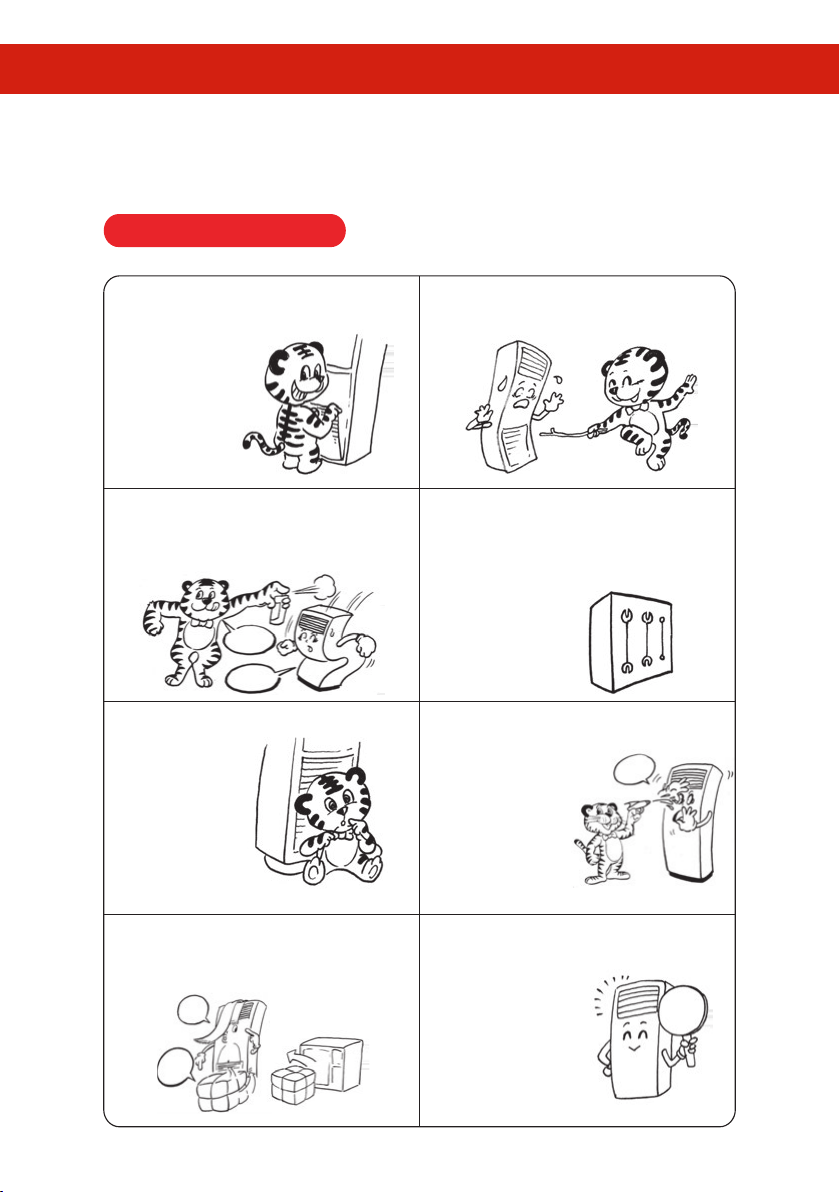
1. İşlemler sırasında hava geri
dönüş ızagaraları veya iç
ünitenin alt paneli
açılmamalıdır.
3. Girişin ve çıkışın yanına böcek ilaçları,
boyalar veya başka yanıcı maddeler
konulmamalı; bu tür maddeler doğrudan
ünitelere karşı püskürtülmemelidir.
5. Ünitelerin toprak
terminali, güç
kaynağının toprağına
iyi bağlanmalıdır.
2. Hava girişine ve çıkışına çubuk veya
benzeri nesneler sokulmamalıdır.
değerleriyle ve koruyucu aygıtlarla
bakır teller kullanmamalıdır; bu durum
çalışma arızalarına veya
yangın tehlikesine neden
olabilir.
6. Klima temizlenirken, makinenin üzerine su
püskürtülmemelidir.
Klimanın mikro
bilgisayar
parçalarına ve
devrelerine su
girmesi, arızaya
veya elektrik
çarpmasına neden
olabilir.
etki ve tehlikelerden kaçınmak için, iç ve dış
ünitelerin hava giriş-çıkışı engellenmemelidir.
8. Güç kaybından sonra
çalışma, tekrar
kaynağı tekrar çalışmaya
başladığında, klima
moduna girmektedir.
Çalışmanın yeniden
Açma/Kapama düğmesine
basılmalıdır.
3
Page 5
Kullanım Talimatları
KULLANICI KILAVUZU
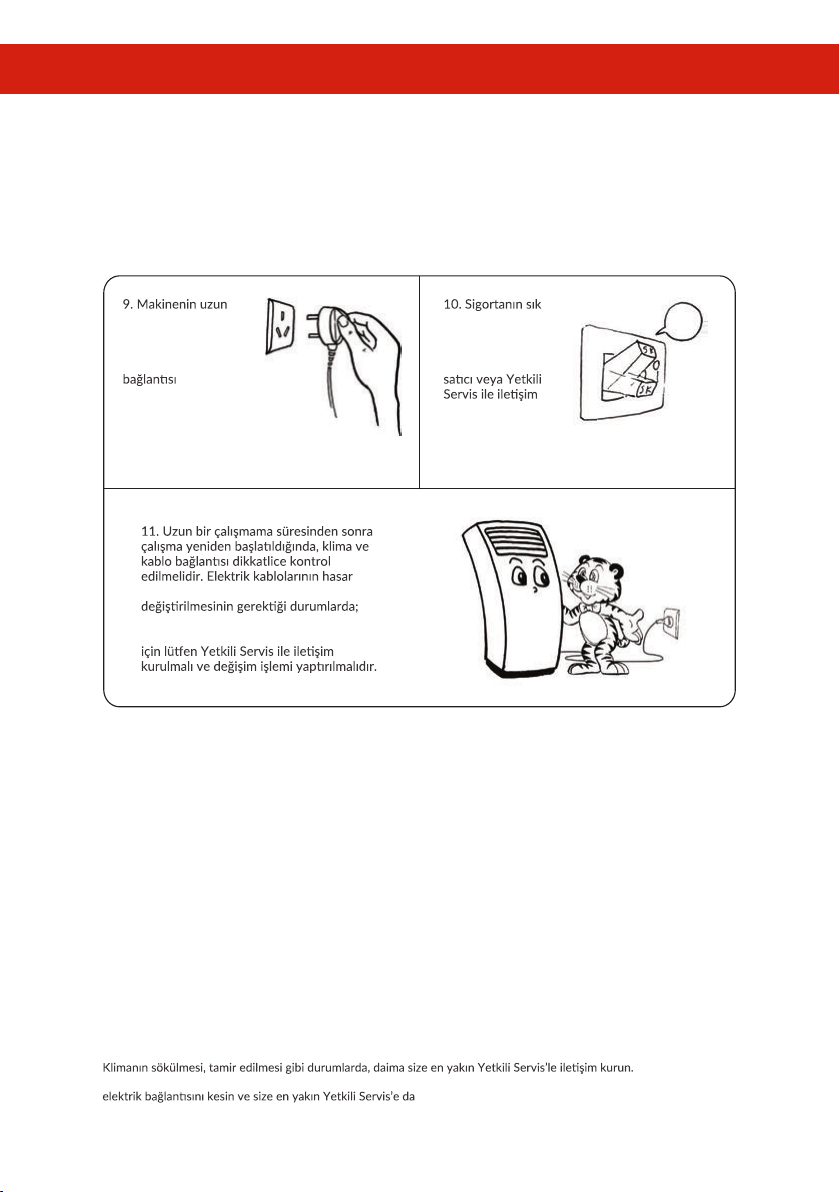
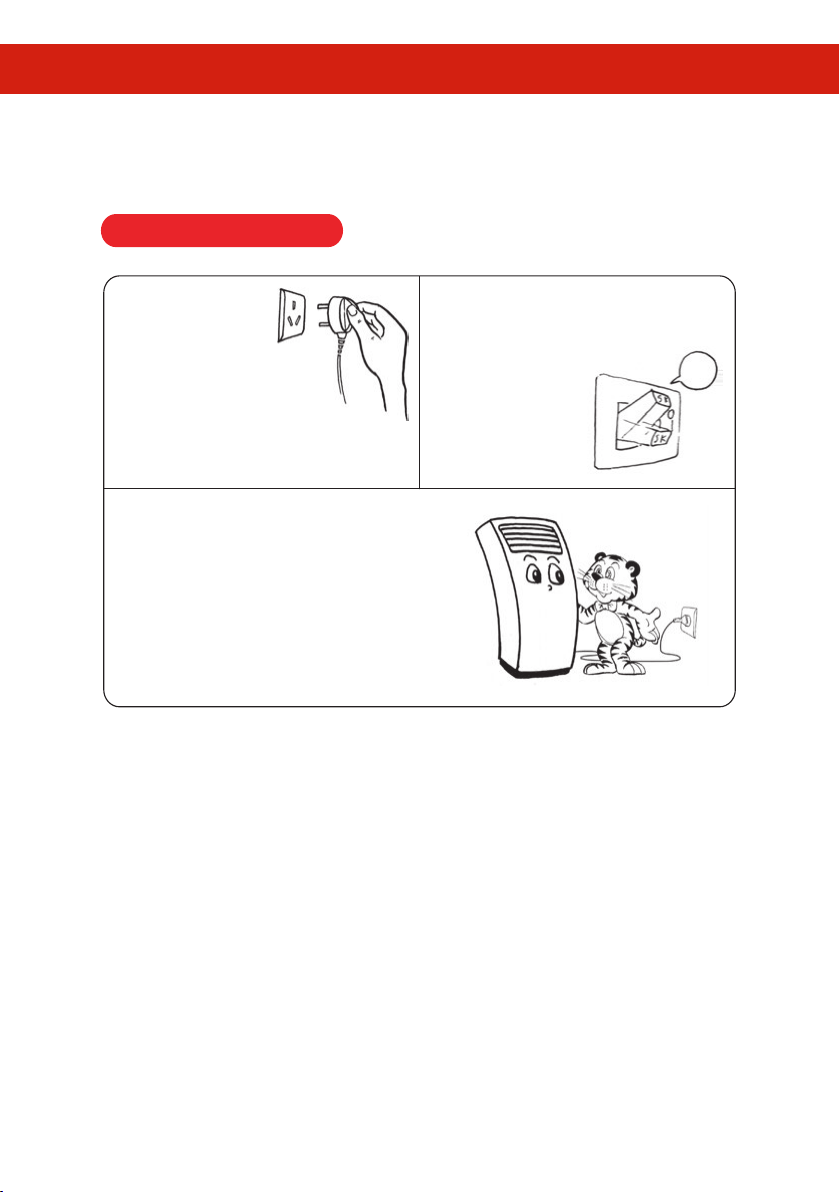
süre kullanılmaması
durumunda, güvenlik
ve güç tasarrufu için
güç kaynağı
kesilmelidir.
görmesi veya başka nedenlerle
elektrik çarpması, aşırı ısınma, yangın
tehlikesi veya diğer tehlikeleriden kaçınmak
sık atması
durumunda,
makinenin çalışması
durdurulmalı ve
kurulmalıdır.
Sökme ve Tamir Talimatları
Yanık kokusu gibi anormal durumlarda, klimanın çalışmasını derhal durdurun. Şalteri kapatarak ya da fişi çekerek bütün
nışın.
4
Page 6
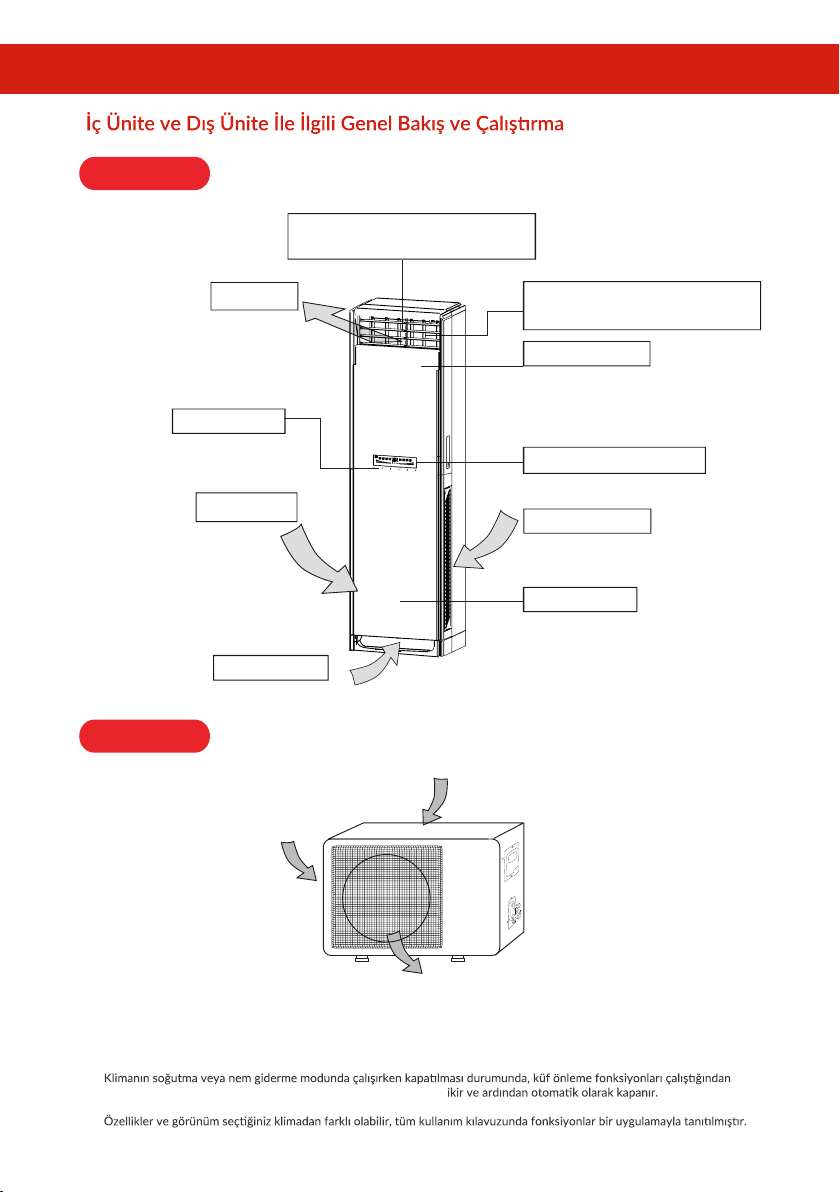
İç Ünite
KULLANICI KILAVUZU
Yukarı/Aşağı hava yönü kılavuzları
Dikey hava dağım yönlerini ayarlamak için
Dış Ünite
Hava çıkışı
Kumanda paneli
Sol hava girişi
Alt hava girişi
Hava Girişi
Sol/Sağ Hava Salınım Kanatları
Yatay hava dağım yönlerini ayarlamak için
Üst kayar Plaka
(Açıldıktan sonra otomak olarak aşağıya kayar,
yükseldikten sonra otomak kapanır)
Gösterge Ekranı
Sag hava girişi
Odanın havasını almak için
Alt panel
şi
Hava Girişi
Hava Çıkışı
Çalışma Özelliği
klima hava üflemeyi derhal kesmez. Üst kayar plaka 30 saniye gec
5
Page 7
KULLANICI KILAVUZU
İç Ünitedeki Göstergeler
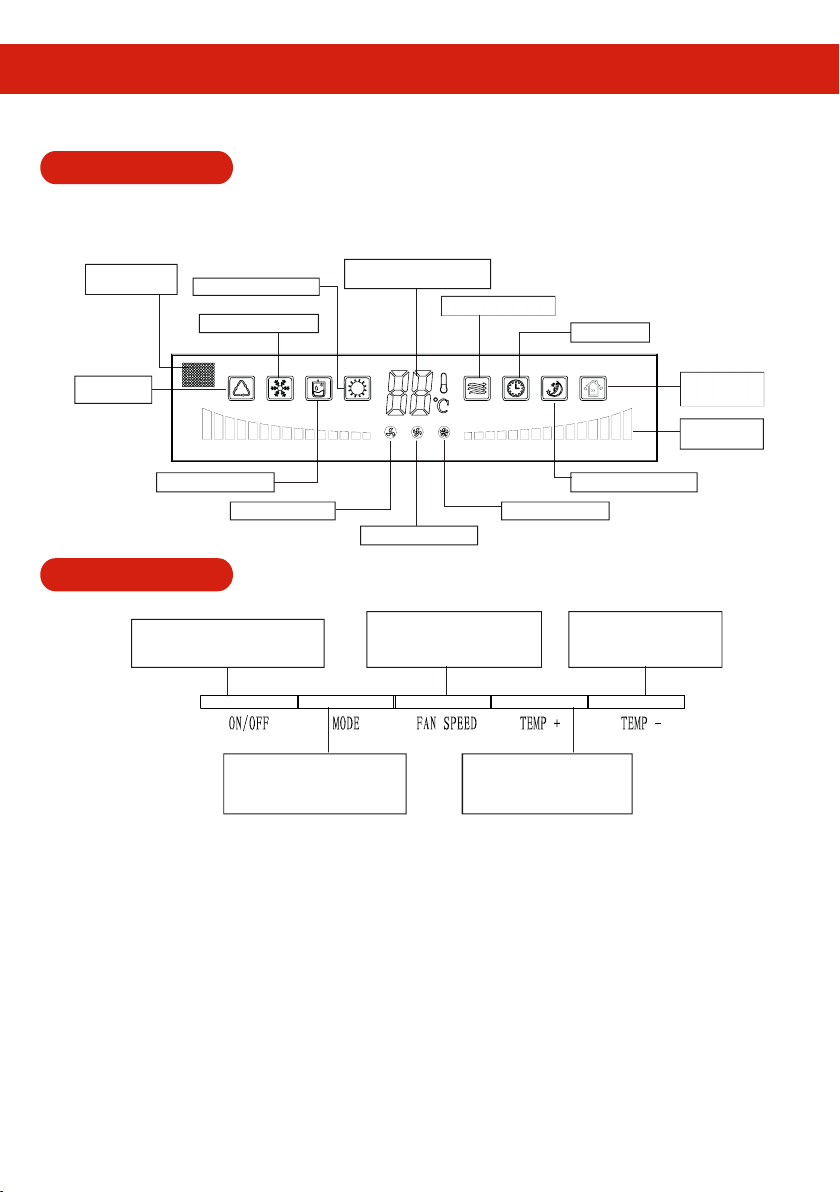
Gösterge Ekranı
San aldığınız ürün için gösterge ekranı aşağıdaki gibi olabilir
Uzaktan Sinyal
Algılama Penceresi
Oto. Çalışma
Göstergesi
Kuru çalışma göstergesi
İşlem Paneli
Açma/Kapama Düğmesi
Klimayı açmak veya kapatmak için bu
düğmeye basın.
Oda (ayar) sıcaklığı ve
Isıtma Modu Göstergesi
Soğutma Modu Göstergesi
Düşük Hız Göstergesi Yüksek Hız Göstergesi
Mod Seçme Düğmesi İstenen
çalışma modlarını seçmek için bu
düğmeye basın; Otomatik,
Soğutma, Kurutma, Isıtma(Fan)
Arıza kodu Göstergesi
Fan çalışma göstergesi
Orta Hız Göstergesi
Fan Hızı Ayar Düğmesi
Tercih ettiğiniz hava akış hızını
ayarlamak için bu düğmeye basın:
Otomatik, Düşük, Orta, Yüksek
Sıcaklık + Düğmesi
Ayarlı sıcaklığı 1°C arttırmak
için bu düğmeye basın; en
yüksek sıcaklık 32°C dir.
Zamanlayıcı
göstergesi
Temiz hava
göstergesi
Salınımlı hava
üfleme göstergesi
Uyku Modu Göstergesi
Sıcaklık - Düğmesi
Ayarlı sıcaklığı 1°C azaltmak
için bu düğmeye basın; en
düşük sıcaklık 16°C dir.
Not: Bu klima dokunmak düğme pine sahipr ve kullanıcının sadece düğmeye hafifçe dokunması gerekir.
Özellikler:
• Genellikle, gösterge ekranı sadece seçğiniz işlev durumunu ve işlem modunu gösterir.
• Oda sıcaklığı 100C ye eşit veya daha düşük olduğunda, nem alma işlemi kullanılamaz.
• Oda sıcaklığı ayarlanan sıcaklığa geldiğinde, klima ünitesi enerji tasarrufu için bir süre durur.
• Klima ünitesi otomak defrost işlemine sahipr ve makine defrost işlemi yaparken gösterge ekranında ısı çalışma göstergesi ışığı
yanıp söner.
• Isı pompalı klima ünitesi, ısıtma sırasında en iyi sonuca ulaşmak için oda sıcaklığına göre otomak açılan ve ya kapanan yardımcı
elektrikli ısıtma fonksiyonuna sahipr.
• Makinenin kapandıktan sonra hemen açılması durumunda, hızlandırılmış başlatma fonksiyonu makineyi koruma amaçlı 3 dakika
sonra otomak olarak açar.
Dikkat: Hava akış modu çalışırken, hava akış kanatları kapalı olsa bile doğrudan elinizle düzeltmeyin veya açısını değişrmeyin.
6
Page 8
KULLANICI KILAVUZU
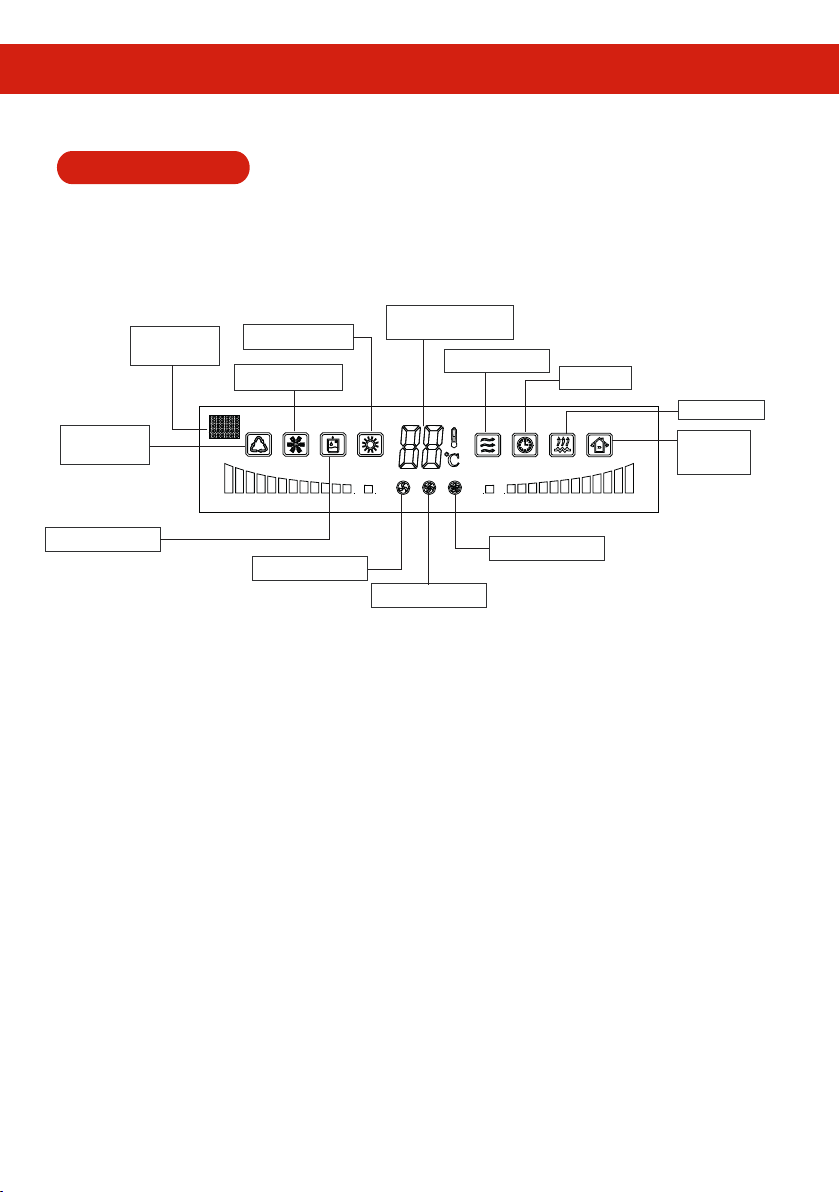
Gösterge Ekranı
Sat ın aldığınız ürün için gösterge ekranı aşağıdaki gibi olabilir.
Isıtma Modu Göstergesi
Soğutma Modu
Göstergesi
Otomat ik çalışma
göstergesi
Uzaktan Sinyal
Algılama Penceresi
Oda (ayar) Sıcaklığı ve
Arıza Kodu Göstergesi
Fan çalışma göstergesi
Zamanlayıcı
göstergesi
Elektrikli Isıtma
Temiz hava
gösterges
(isteğe bağlı)
Kuru çalışma göstergesi
Düşük hız göstergesi
Orta hız göstergesi
Yüksek hız göstergesi
Not: Bu klima dokunmak düğme pine sahipr ve kullanıcının sadece düğmeye hafifçe dokunması gerekir.
Özellikler:
• Genellikle, gösterge ekranı sadece seçğiniz işlev durumunu ve işlem modunu gösterir.
• Oda sıcaklığı 100C ye eşit veya daha düşük olduğunda, nem alma işlemi kullanılamaz.
• Oda sıcaklığı ayarlanan sıcaklığa eşit ve ya düşük olduğunda, klima ünitesi enerji tasarrufu için bir süre durur.
• Klima ünitesi otomak defrost işlemine sahipr ve makine defrost işlemi yaparken gösterge ekranında ısı çalışma göstergesi ışığı
yanıp söner.
• Isı pompalı klima ünitesi, ısıtma sırasında en iyi sonuca ulaşmak için oda sıcaklığına göre otomak açılan ve ya kapanan yardımcı
elektrikli ısıtma fonksiyonuna sahipr.
• Makinenin kapandıktan sonra hemen açılması durumunda, koruma amaçlı hızlandırılmış başlatma fonksiyonu makineyi 3 dakika
sonra otomak olarak açar.
Dikkat: Hava akış modu çalışırken, hava akış kanatları kapalı olsa bile doğrudan elinizle düzeltmeyin veya açısını değişrmeyin
7
Page 9
KULLANICI KILAVUZU
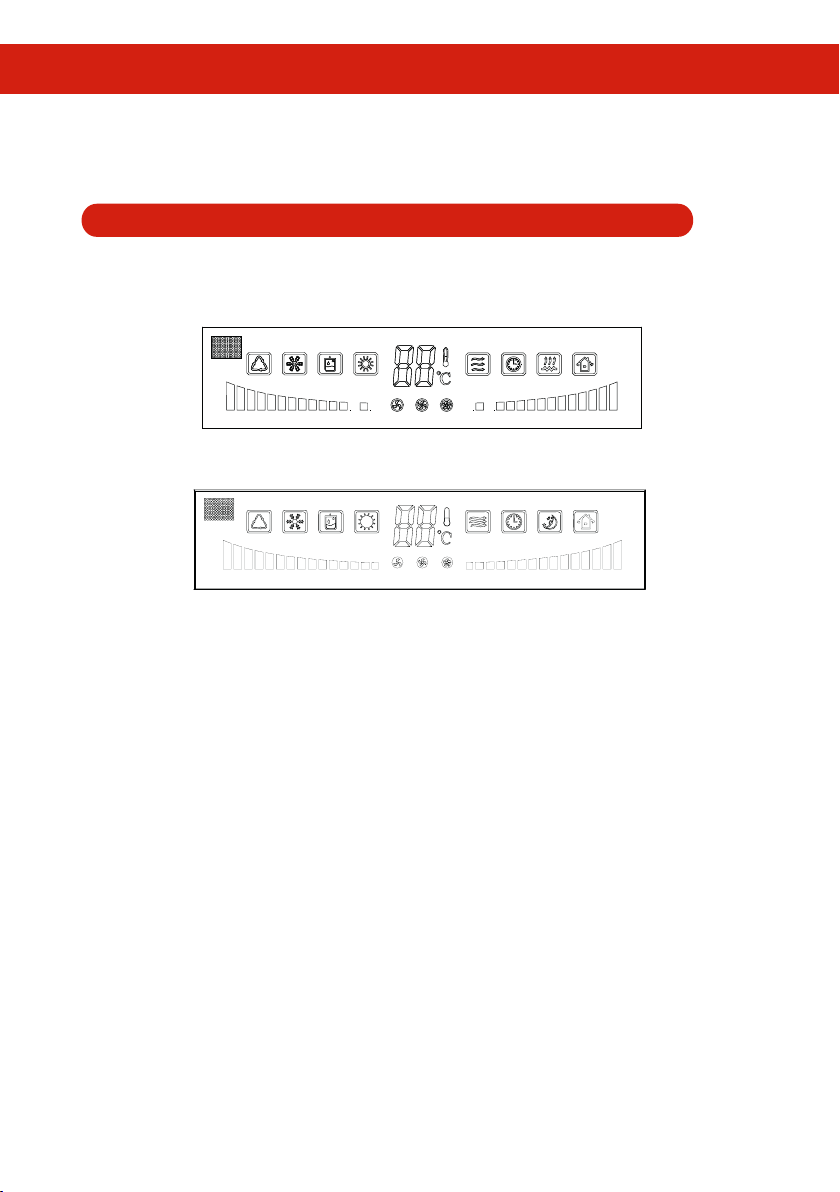
Kumanda Panel Kullanımı
Mod değişt irme işlemi: Otomat ik, Soğutma, Kurutma, Isıtma, Fan
1. ON/OFF (Açma/Kapama) düğmesine dokun.
2. İstediğin modu seçmek için MODE (mod) düğmesine dokun.
Fan modunu seçğin zaman, kompresor çalışmaz.
3. Oda sıcaklığını ayarlamak için TEMP +*- düğmesine dokun.
Ayarlanan oda sıcaklığı 16-320C arasındadır.
(Not: Otomak olarak 25˚C ayarlanabilir, (AUTO) Otomak veya (DRY) kuru modunda
ayarlanamaz)
4. İstediğin fan hızını seçmek için FAN SPEED (fan hızı) düğmesine dokun. Auto(otomak),
High(yüksek), Med(orta) ve Low(düşük). Nem alma modunda fan düşük hızda çalışır.
5. Durdurmak için tekrar ON/OFF(açma/kapama) düğmesine dokun.
Makinenin kapandıktan sonra hemen açılması durumunda, hızlandırılmış başlatma
fonksiyonu makineyi koruma amaçlı 3 dakika sonra otomak olarak açar.
Dikkat: Hava akış modu çalışırken, hava akış kanatları kapalı olsa bile doğrudan elinizle düzeltmeyin veya açısını değişrmeyin
8
Page 10
KULLANICI KILAVUZU
Uzaktan Kumanda Göstergeleri
Sat ın aldığınız ürün için uzaktan kumanda aşağıdaki gibi olabilir.
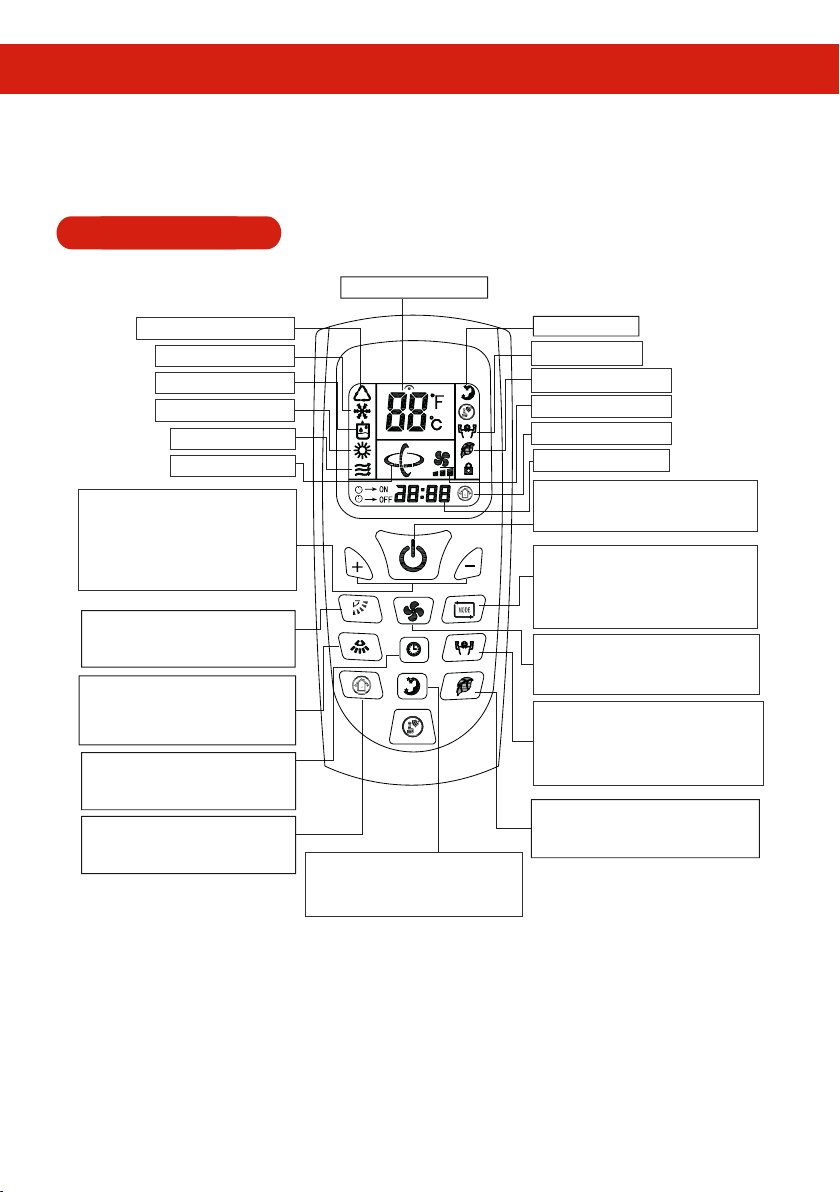
Uzaktan Kumanda 1
Sıcaklık ayar Göstergesi
Otomak çalışma göstergesi
Soğuk çalışma göstergesi
Kuru çalışma göstergesi
Sıcak çalışma göstergesi
Fan çalışma göstergesi
Hava Akış göstergesi
Sıcaklık Ayar düğmeleri
Oda sıcaklığını ayarlamak için bu
düğmeye basın. (+) düğmesine basınca
sıcaklık 1ºC arrılır, (-) düğmesine
basınca sıcaklık 1ºC azallır.
(Oda sıcaklığı ayar aralığı 16-32ºC.
Salınım düğmesi
Bu düğmeye basıldığında yukarı/aşağı
kanat modu değişir:doğal akış,
salınım veya sabit
Hava Akış Düğmesi
Bu düğme sağ/sol hava akış yönü
seçimi için kullanılır, basıldığı zaman
kanat sallanır ya da sabitlenir.
Zamanlayıcı Düğmesi
Bu düğme zamanlayıcıyı açma/kapama
ve süre ayarlama için kullanılır.
Temiz hava düğmesi (İsteğe bağlı)
Bu düğme temiz hava vanlatörünü
açıp kapamak için kullanılır.
Uyku Düğmesi
Bu düğmeye basınca uyku işlemine
geçer, tekrar basınca, uyku modu silinir.
Uyku Göstergesi
Turbo Göstergesi
Temiz Hava Göstergesi
Fan Hız Göstergesi
Taze Hava Göstergesi
Zamanlayıcı Göstergesi
ON/OFF (Açma/Kapama Düğmesi)
Bu düğmeye basıldığı zaman çalışmaya
başlar ve tekrar basıldığında durur.
Çalışma modu seçme düğmesi:
Bu düğme çalışma modunu değişrir:
Otomak, soğuk, kuru, sıcak (fan)
(Yalnızca soğutma olan modellerde
ısıtma modu fan içindir).
FAN Hız Düğmesi
Hızı ayarlamak için düğmeye basın;
otomak hız, yüksek hız veya düşük hız.
TURBO Düğmesi
Bu düğme turbo işlemini değişrir, kanat
fan hızıdır, bir kez daha basınca silinir.
(Otomak, nem alma ve fan modunda
çalışmaz.)
Temizle Düğmesi
İç mekan havasını temizlemek için bu
düğmeye basın, bir kez daha basınca
silinir.
Not :
• Temizleme fonksiyonu yalnızca klimanın uygun zamanında yapılabilir ve yapılması gereken bir işlem modu değildir. 6 dakika
temizleme işlemi devam ekten sonra, klima temizleme modundan otomak çıkacakr. Temizleme modunu her gün
kullanılmaz, ayda bir ya da iki kez kullanılması önerilir.
• Ayarlanan çalışma durumu klima kapandıktan sonra kaydedilebilir. Eğer ayarlanan durum değişrilmemişse, bir sonraki
başlangıç için On/off (açma/kapama) düğmesine basılır ve klima son çalışma modunda çalışmaya devam eder.
• Üst teki şekil açıklama amaçlı tüm göstergeleri gösterir ancak uygulamada, yalnızca ilgili kısımlar gösterilir. Klima yalnızca
soğutmalı bir model olduğunda, Isıtma, Fan yerine geçer.
• TURBO işlemi (super güçlü-rüzgar fonksiyonu) bir klima fonksiyonudur. Turbo işlemi seçildiğinde oda sıcaklığı sürekli işlem
yapılarak kontrol edilmez. Eğer oda sıcaklığının fazla soğuk veya fazla sıcak olduğunu hissediyorsanız, lüen TURBO işlemini
kapat ın.
9
Page 11
KULLANICI KILAVUZU
Uzaktan Kumanda Göstergeleri
Sat ın aldığınız ürün için uzaktan kumanda aşağıdaki gibi olabilir.
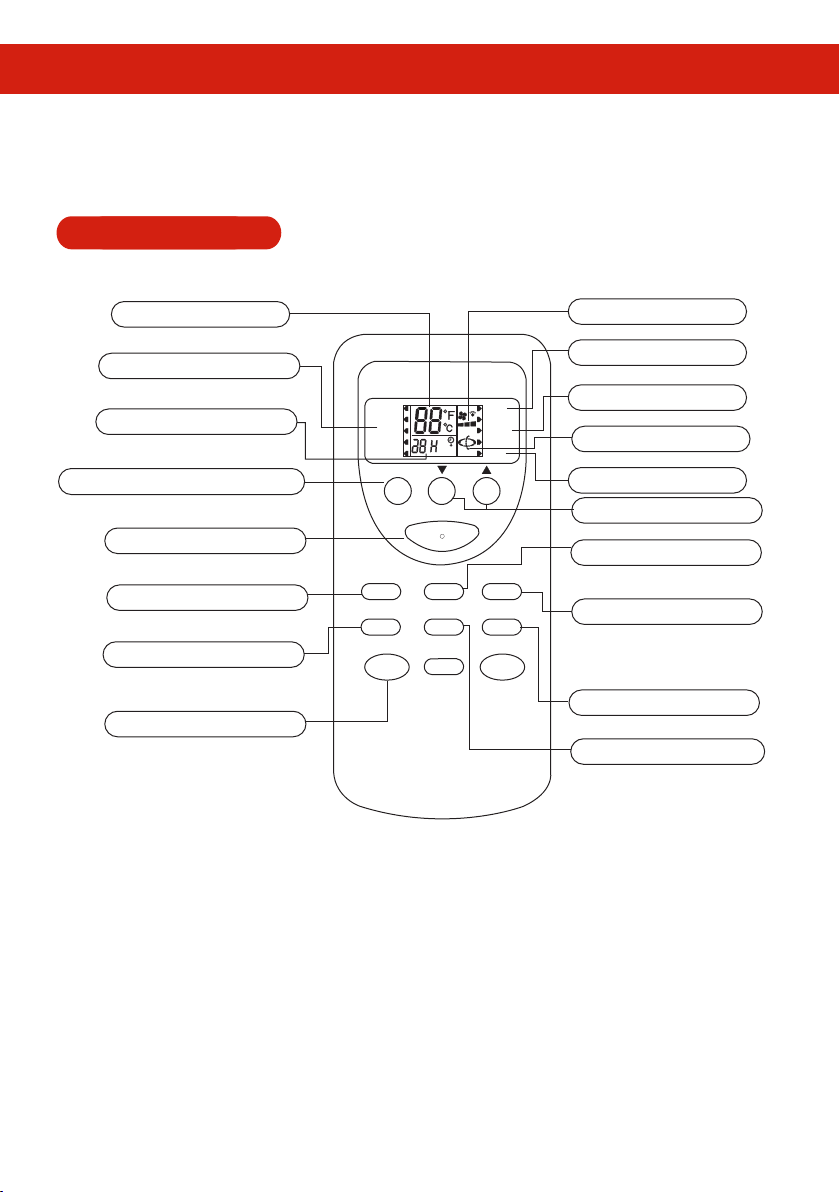
Uzaktan Kumanda 2
Sıcaklık Göstergesi
Ayar sıcaklığını gösterir.
İşletme Modu Göstergesi
Seçilen işletme modunu gösterir.
Zaman Göstergesi
Zamanlayıcı süresini gösterir.
OPERATION MODE Seçim Düğmesi
Bu düğme işlet im modunu değişt irmek için kullanılır:
Oto, soğutma, kurutma, ısıtma, fan.
Açma/Kapama Düğmesi
İşlem bu düğmeye basıldığında başlar ve
Tekrar basıldığında durur.
Fan Hızı Düğmesi
Bu düğme hava hızını ayarlar
Zamanlayıcı Düğmesi
Bu düğme açma, kapama ve zamanlayıcı
zamanını ayarlamak için kullanılır.
TURBO Düğmesi
Bu düğme Turbo işleme geçirir.
(Oto, kurutma ve fan modunda çalışmaz.)
AUTO
COOL
DRY
HEAT
FAN
MODE TEMP
ON/OFF
FAN SPEED
TIMER HOLD SLEEP
TURBO
SLEEP
LAMP
TURBO
CLEAN
ON
OFF
HOLD
SWING
AIR FLOW
LAMP CLEAN
Fan Hız Göstergesi
Ayarlanmış hava hızını gösterir.
Uyku Göstergesi
Uykuda işletme süresince görüntülenir
TURBO Göstergesi
Turbo işletmesi süresince görüntülenir.
Hava Akış Göstergesi
Seçilen modu gösterir.
Tuş Kilidi Göstergesi
Sıcaklığı Ayarla Düğmesi
Bu düğme oda sıcaklığı ayarlar.
Salınım Düğmesi
Bu düğme hava akış yönünü aşağı/yukarı
değişrir: doğal akış, salınım, sabit rüzgar.
Hava Akış Düğmesi
Bu düğme sağ/sol hava akış yönü
seçimi için Kullanılır, basıldığında
iç klape salınır ya da sabitlenir.
Uyku Düğmesi
Bu düğme uyku işlemine geçirir.
Tutma Düğmesi
Düğmeleri kilitlemek ya da mevcut kilidi
açmak için bu düğmeye basın.
Not :
• Üst teki şekil açıklama amaçlı tüm göstergeleri gösterir ancak uygulamada, yalnızca ilgili kısımlar gösterilir. Klima yalnızca,
soğutmalı bir model olduğunda, Isıtma, Fan yerine geçer.
• Turbo işlemi seçildiğinde oda sıcaklığı sürekli işlet im yapılarak kontrol edilmez. Eğer oda sıcaklığının fazla soğuk ve ya fazla
sıcak olduğunu hissediyorsanız, lüen TURBO işlet imini kapat ın.
10
Page 12
KULLANICI KILAVUZU
Uzaktan Kumanda Göstergeleri
Sat ın aldığınız ürün için uzaktan kumanda aşağıdaki gibi olabilir.
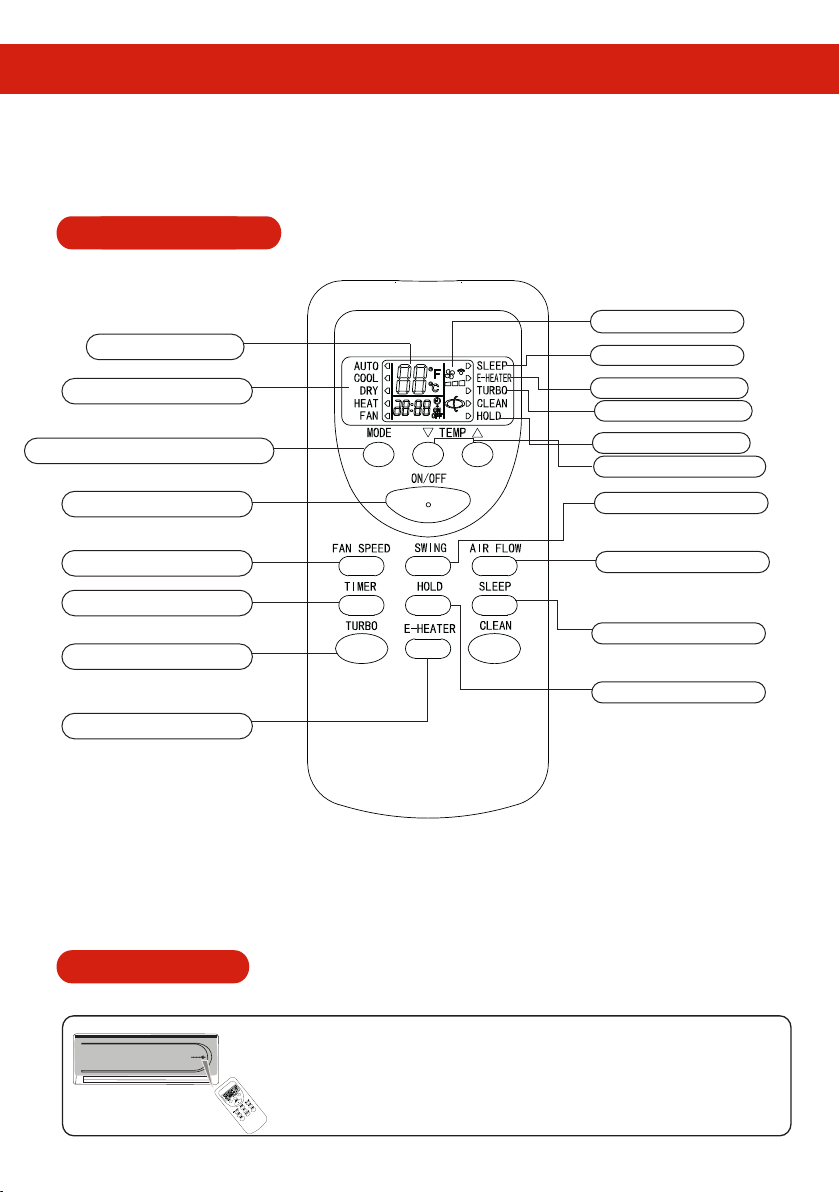
Uzaktan Kumanda 3
Sıcaklık Göstergesi
Ayar sıcaklığını gösterir.
İşletme Modu Göstergesi
Seçilen işletme modunu gösterir.
OPERATION MODE Seçim Düğmesi
Bu düğme işlet im modunu değişt irmek için kullanılır:
Oto, soğutma, kurutma, ısıtma, fan.
Açma/Kapama Düğmesi
İşlet im bu düğmeye basıldığında başlar ve
Tekrar basıldığında durur.
Fan Hızı Düğmesi
Bu düğme hava hızını ayarlar
Zamanlayıcı Düğmesi
Bu düğme açma, kapama ve zamanlayıcı
zamanını ayarlamak için kullanılır.
TURBO Düğmesi
Bu düğme Turbo işleme geçirir.
(Oto, kurutma ve fan modunda çalışmaz.)
E-HEATER Düğmesi
Bu düğme yapı içi elektrikli ısıtma
işlevi anahtarını control eder.
Fan Hız Göstergesi
Ayarlanmış hava hızını gösterir.
Uyku Göstergesi
Uykuda işletme süresince görüntülenir
E-HEATER Göstergesi
TURBO Göstergesi
Turbo işletmesi süresince görüntülenir.
Tuş Kilidi Göstergesi
Sıcaklığı Ayarla Düğmesi
Bu düğme oda sıcaklığı ayarlar.
Salınım Düğmesi
Bu düğme hava akış yönünü aşağı/yukarı
değişrir: doğal akış, salınım, sabit rüzgar.
Hava Akış Düğmesi
Bu düğme sağ/sol hava akış yönü
seçimi için Kullanılır, basıldığında
iç klape salınır ya da sabitlenir.
Uyku Düğmesi
Bu düğme uyku işlemine geçirir.
Tutma Düğmesi
Düğmeleri kilitlemek ya da mevcut kilidi
açmak için bu düğmeye basın.
Not :
• Üst teki şekil açıklama amaçlı tüm göstergeleri gösterir ancak uygulamada, yalnızca ilgili kısımlar gösterilir. Klima yalnızca
soğutmalı bir model olduğunda, Isıtma, Fan yerine geçer.
• Turbo işlemi seçildiğinde oda sıcaklığı sürekli işlem yapılarak kontrol edilmez. Eğer oda sıcaklığının fazla soğuk ve ya fazla
sıcak olduğunu hissediyorsanız, lüt fen TURBO işlet imini kapan.
İlet im Prosedürü
11
Uzaktan kumanda üzerindeki her bir düğmeye, kumanda klima ünitesine doğrultulmuş
halde basıldığında, sinyal gönderilir. Sinyal doğru bir şekilde alındığında, ünite sinyal
alma sesi verir.
Page 13

KULLANICI KILAVUZU
Çalışma Modları
1. Uzaktan kumandayı üniteye doğru tutun, On/Off (açma/kapama) düğmesine basın ve istediğiniz modu
seçmek için Mode (mod) düğmesine basın.
AUTO - Otomak
COOL - Soğutma
DRY - Kurutma
HEAT - Isıtma
FAN - Fan
2. İstediğiniz sıcaklık görüntülene kadar ekrandaki değeri arrmak veya azaltmak için Set Temperature
(Sıcaklığı Ayarla) düğmesine basın. Oda sıcaklığı ayar aralığı 16˚C-32˚C dir.
Soğutma/ısıtma işlemlerinde seçğiniz sıcaklık ile ortam sıcaklığı arasındaki 5°C sıcaklık farkı sağlığınız için
en uygun olanıdır.
Not: Otomak olarak 25˚C ayarlanabilir, (AUTO) Otomak veya (DRY) kuru modunda ayarlanamaz.
3. İstediğiniz hava akış yönünü aşağı/yukarı seçmek için Air Flow(hava akış) düğmesine basın: doğal akış
(ekranda ‘’ ‘’ görüntülenir.), salınım(ekranda " " göstergesi yanıp söner) , sabit rüzgar (ekranda " "
görüntülenir).
Not: Kurutma modunda otomak olarak sabit rüzgar hava akış yönü ayarlanabilir.
4. İstediğiniz hava hızını seçmek için FAN SPEED(fan hızı) düğmesine basın:Low(" "ekranda görüntülenir),
Med (ekranda görüntülenir " ",Hi (ekranda görüntülenir" ", Auto(ekranda " " göstergesi yanıp söner.
Kurutma modunda otomak olarak Sabit Rüzgar hava akış yönü ayarlanabilir.
Dikkat: Lüen hava çıkışının kılavuz kanatlarını doğrudan elinizle ayarlamayın, aksi takdirde makinenin
parçalarına zarar verebilirsiniz.
Zamanlayıcının Çalışması
Kapanma Zamanını Ayarlama
Ünitenin kapanacağı zamanı ayarlayarak, istediğiniz zaman klimanın otomak olarak kapanmasını
sağlayabilirsiniz.
1. Klima çalışırken Timer (Zamanlayıcı) düğmesine basın ve klima zamanlı kapanma moduna girecekr.
2. Timer (zamanlayıcı) düğmesine devamlı basın ve klimanın kapanma zamanını ayarlayın. Zamanlayıcı 1-24
saat arasında ayarlanabilir. Düğmeye her basğınızda gösterge şu şekilde değişir: 1 * 2 * ........ * 24 * iptal (
gösterim yok )* 1
3. Kapanma zamanı ayarlandıktan sonra ekranda görüntülenen süreden her geçen 1 saat için 1 düşer.
Görüntülenen süre, zamanlanmış kapama öncesinde kalan süreyi belirr.
12
Page 14
KULLANICI KILAVUZU
Açma Zamanını Ayarlama
Ünitenin açılacağı zamanı ayarlayarak, istediğiniz zaman klimanın otomak olarak kapanmasını sağlayabilirsiniz
1. Klima bekleme modundayken, TIMER (zamanlayıcı) düğmesine basın ve klima zamanlı açılma moduna
girecekr.
2. Timer (zamanlayıcı) düğmesine devamlı basın ve klimanın açılma zamanını ayarlayın. Zamanlayıcı 1-24 saat
arasında ayarlanabilir. Düğmeye her basğınızda gösterge şu şekilde değişir: 1 * 2 * ........ * 24 * iptal
(gösterim yok )* 1
3. Açma zamanı ayarlandıktan sonra, ekranda görüntülenen süreden her geçen 1 saat için 1 düşer.
Görüntülenen süre, açma zamanı öncesinde kalan süreyi belirr.
İptal Prosedürü
Ekranda gösterim 24 saat olduğunda zamanlayıcı düğmesine tekrar basarak zamanlayıcı modunu devreden
çıkartabilirsiniz.
Uyku İşlemi
Bu modu uyurken vs. çalışma sesini azaltmak için de kullanabilirsiniz.
Sleep (Uyku) düğmesine basın, iç üniteden gelen ses azallır.
Sleep (Uyku) düğmesine tekrar basıldığında bu mod iptal edilir.
NOT:
• Uyku modu uyumaya hazırlanırken kullanılabilir. Gün boyu bu mod kullanılırsa, ortam sıcaklığı çok yüksek
olacağından kapasite düşer. (Soğutma Modu)
• Soğutma işlemi sırasında, oda sıcaklığı makine uyku modunda çalışmaya başladıktan sonra kademeli olarak
2°C aralıklarla arrılır.
• Isıtma işlemi sırasında, oda sıcaklığı makine uyku modunda çalışmaya başladıktan sonra kademeli olarak 5°C
aralıklarla azallır.
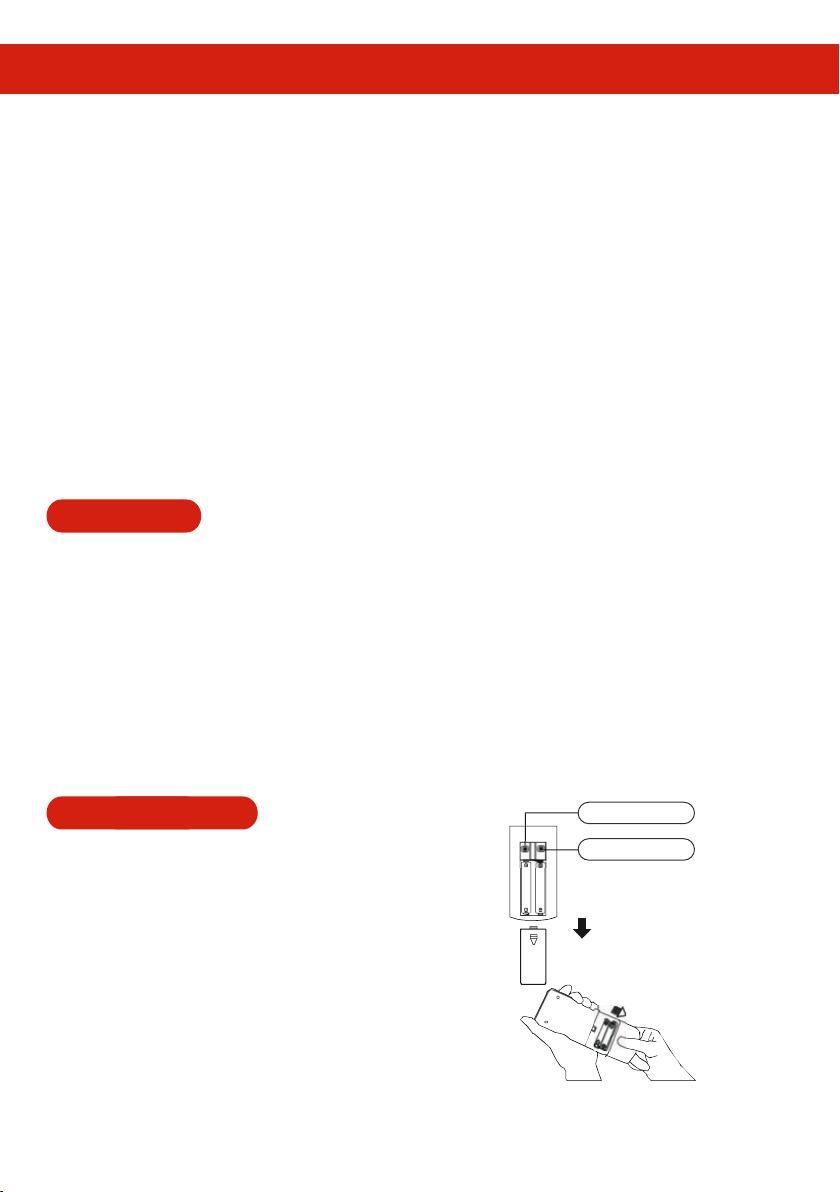
Pillerin Değişmesi
• Uzaktan kumandadan gelen sinyal zayıfladığında, iç ünite
art ık sinyal alamaz duruma geldiğinde ya da ekrandaki
gösterim bulanıklaşğında, arka kapağı kaydırarak açın ve
iki yeni pil ile değişrin.
• Yeni pilleri takarken ar ve eksi kutuplarına dikkat edin.
• Yeni piller eski pillerle aynı türden olmalıdır.
• Kumanda uzun süre kullanılmayacaksa, elektrolit sızınsı
olabilme tehlikesine karşı pilleri çıkarn.
• Uzaktan kumanda normal bir şekilde çalışmıyorsa, ekranı
temizlemek için pilleri çıkarabilirsiniz.
13
C L K R S T
CLK düğmesi
Bu modelde çalışmaz
RST düğmesi
Bu düğme bilgisayarı sıf ırlar.
(RST düğmesine basmak için bir kalem
ucu gibi sivri bir nesne kullanın.)
Arka kapağı açın
Uzaktan Kumanda 1
Uzaktan Kumanda 2
ve Uzaktan Kumanda 3
Page 15
KULLANICI KILAVUZU
Bakım ve Temizlik
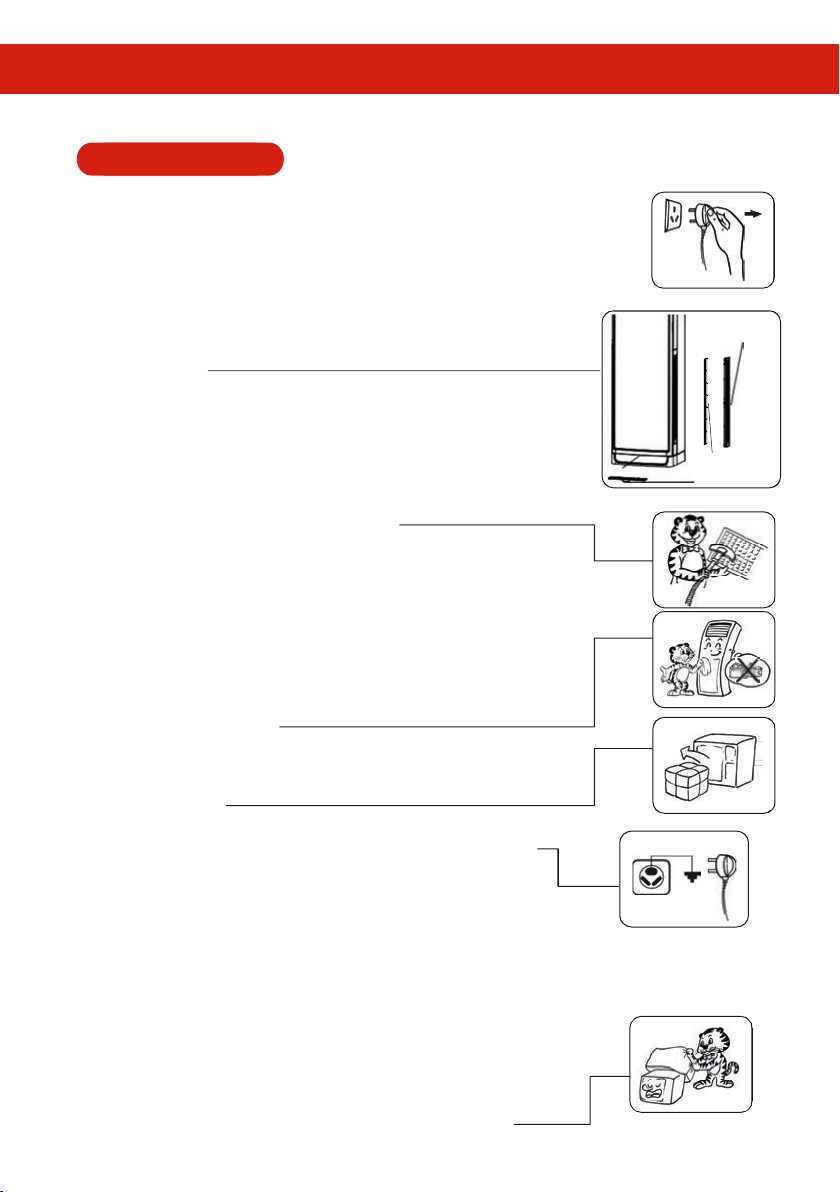
Bakım ve temizlik işlemlerine başlamadan önce klima mutlaka kapalmalı ve fişi
çekilmelidir.
Dikkat : Hava filtresini düzenli olarak temizleyin (ayda bir kere). Klima çok fazla
ses çıkardığı zaman, hava filtresi toz tutuyor olabilir, bunun sonucunda hava
girişi kanmış ve çok ses yapıyor olabilir.
I Filtre Eleğinin Çıkarılması
1. Klimanın çalışmasının tamamen durduğundan emin olun.
2. Giriş ızgarasını elinizle açın ve içine monte edilmiş filtreyi çıkarın.
( ok yönünde ) Sağ ve sol taraaki filtreleri çıkarın.
3. Klimanın alndaki diğer bir filtreyi doğrudan elinizle çıkarn.
II Filtre Eleğinin Temizlenmesi
Eleğe hafifçe vurun veya elektrikli süpürge kullanarak temizleyin. Eğer elekte
çok fazla kir birikmişse, temizlik için az miktarda doğal deterjanlı su kullanılabilir.
Temizledikten sonra, elek havada kurutularak tekrar yerine takılmalıdır.
Not: Filtre eleğini kurutmak için güneş ışığına maruz kalan bir yere veya rın
yakınına koymayın; temizlemek için 40°C’nin üstünde sıcak su kullanmayın.
III Klimanın Temizlenmesi
1. Emniyet için temizliğe başlamadan önce güç kapalmalıdır, aksi takdirde
elektrik çarpması meydana gelebilir
2. Üniteleri temizlemek için su kullanmayın.
3. Kuru ve yumuşak bir bez parçası kullanarak ünitelerin üzerindeki tozu alın.
4. Temizlik yaparken uçucu yağlar, benzin, seyrelci maddeler veya aşındırıcı
tozlar vb. kullanmayın.
5. Parmak izi veya yağ lekelerini temizlemek için doğal bir deterjan kullanın
IV Çalışma Mevsiminden Önce
1. İç ve dış ünitelerin giriş ve çıkışlarının engellenip engellenmediğini
kontrol edin.
2. Dış ünitenin koruyucu kapağı çıkarılmalıdır.
3. Elektrik kablosunun ve topraklama kablosunun uygun durumda olup
olmadığını kontrol edin.
4. Drenaj borularında herhangi bir bükülme, kalkık suç veya kanma olup
olmadığını kontrol edin.
5. Makineyi çalışrmadan önce hava filtresi eleğinin uygun şekilde takılmış
olduğundan emin olun. Eğer makine filtre eleği olmadan çalışrılırsa toz ve
yabancı nesneler klimanın arıza yapmasına neden olacakr
V Çalışma Mevsiminden Sonra
1. Klimayı kapan, elektrik fişini prizden çekin.
Not: Normal klima, bekleme durumunda kapandığı fakat fişi çekilmediği zaman
hala 5W elektrik tüker. Ancak bu klima bekleme durumundayken, sadece
evsel klimalar için işletme standardı Q/ZG 119 Bekleme Enerji Tükem Test
Yöntemlerine göre, 1W elektrik tüker
2. Hava filtresine ve diğer parçalar uygun bakımı yapın.
Air inlet grid conver
Air filter screen
14
Page 16
KULLANICI KILAVUZU
unpleasant
"ZZZ
----
"
The cooling
The air inside the
cigarette smoke or
patting
Sorunlar ve Çözümleri
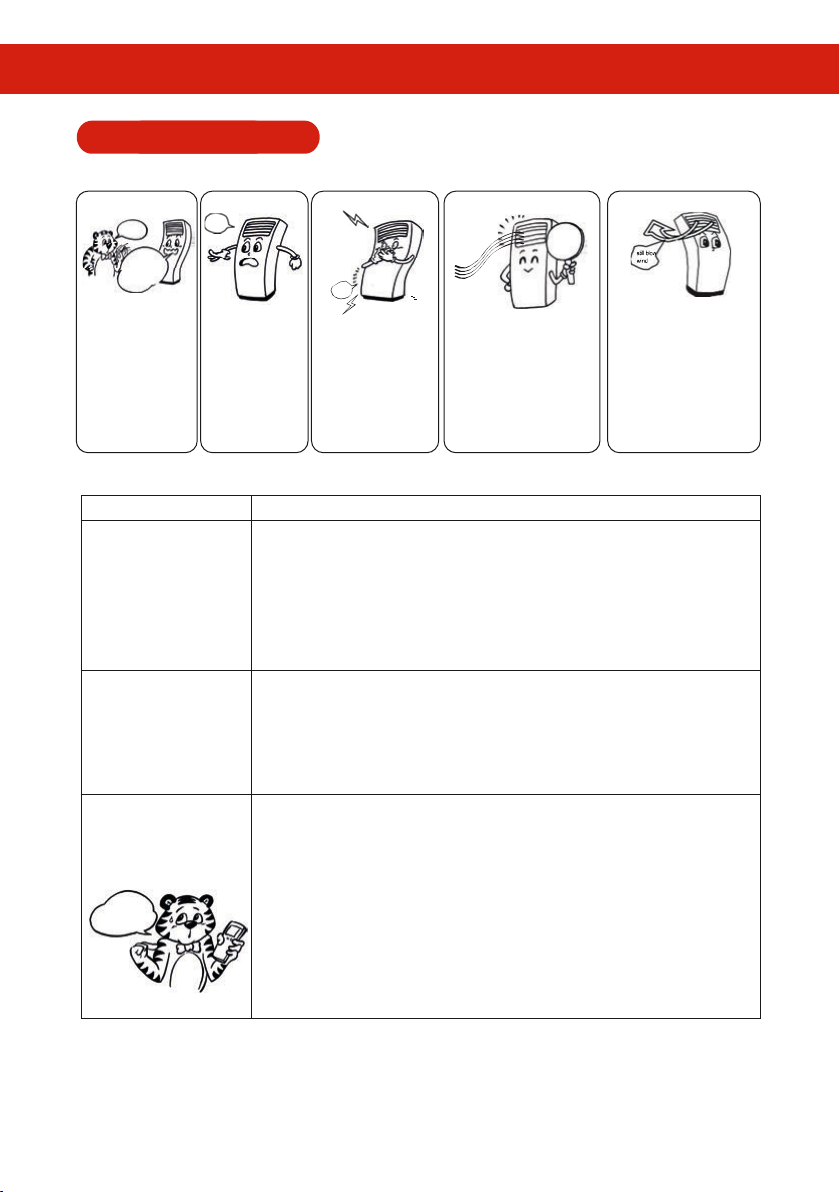
Aşağıdaki belir t iler arıza göstergesi değildir.
smell
room smells
other odd odors.
Bazen klimadan çıkan
hava kötü
kokabilir. Bunun
nedeni sigara
dumanı, kozmek
kokular, duvarların
veya odadaki
mobilyaların klimaya
geçen kokusudur.
Çalışma sırasında
veya makine
durduğunda, bir ses
duyulabilir. Bunun
nedeni, klimanın
içindeki soğutucu
akışkanın hala
akmaya devam
etmesidir.
sound
Soğutma veya ısıtma
başlaldığında veya
durdurulduğunda, bir
vuruntu sesi duyulabilir.
Bunun nedeni, sıcaklık
nedeniyle yüzey
panellerinin bazı
kısımlarının genişleyerek
sürtünme hareke
yapmasıdır. Bu bir
performans hatası
değildir
Soğutma çalışması
sırasında,bazen hava
çıkışında duman görülür.
Bunun nedeni, oda sıcaklığı
ve nem yüksekken oda
havasının hızlı şekilde
soğutulmasıdır. Oda
sıcaklığı ve nem
düştüğünde,
duman kaybolacakr.
is great!
Lüen bakım görevlilerine başvurmadan önce aşağıdaki içerikleri okuyun.
Sorunlar
Klima çalışmıyor
Klimanın ısıtma
veya soğutma
performansı
yetersiz
• Gücün açık olup olmadığını kontrol edin.
• Elektrik fişinin prize takılı olup olmadığını kontrol edin.
• Timer (Zamanlayıcı) ayarının açık olup olmadığını kontrol edin. Zaman ayarı
ON (Açma) ayarında olmalıdır.
• Gerilimin çok yüksek ya da çok düşük olmadığından emin olun.
• Elektrik kesinsi, atmış sigorta ya da devre kesicinin kapalı olup olmadığını
kontrol edin.
• Oda sıcaklığı ayarının uygun olup olmadığını kontrol edin.
• İç ve dış ünitenin giriş veya çıkışının kalı olup olmadığını kontrol edin.
• Hava filtresi eleğinin çok kirli veya kanmış olup olmadığını kontrol edin
• Kapı ve pencerelerin açık olup olmadığını kontrol edin
• Odada yakma ekipmanının kullanılıp kullanılmadığından emin olun.
Çözümler
Soğutma veya nem alma
modunda çalışırken
klimanın kapalması
durumunda, klima hava
üflemeyi hemen kezmez,
işlevine devam eder. Üst
kayar plaka 30 saniye
gecikir ve ardından
otomak olarak kapanır.
Uzaktan kumanda
çalışmıyor
• Uzaktan kumanda sinyal alıcısı doğrudan güneş ışığına veya güçlü ışığa maruz
kaldığında, uzaktan kumanda sinyali alamayabilir. Bu durumda, lüen güneş
ışığını engelleyin veya ışık şidedini azaln.
• Ünitenin sinyali alma uzaklığında olup olmadığını veya bir engel olup
olmadığını kontrol edin.
• Uzaktan kumanda pilinin voltaj değerinin yeterli olup olmadığını kontrol
edin, yeterli değilse pilleri değişrin.
• Uzaktan kumandanın ekranında anlaşılmaz görüntüler varsa, pilleri değişrin.
Aşağıdaki durumlar gerçekleşğinde, lüen çalışmayı durdurun, güç kaynağının bağlansını kesin,
ardından yetkili bakım yerimizin yetkili sacısıyla ileşim kurun.
• Sigorta veya akım kaçağı şalteri sık sık ayorsa.
• Elektrik kablosu aşırı sıcaksa veya çatlak varsa.
• Normal durumlardan farklı durumlar meydana geliyorsa.
15
Page 17
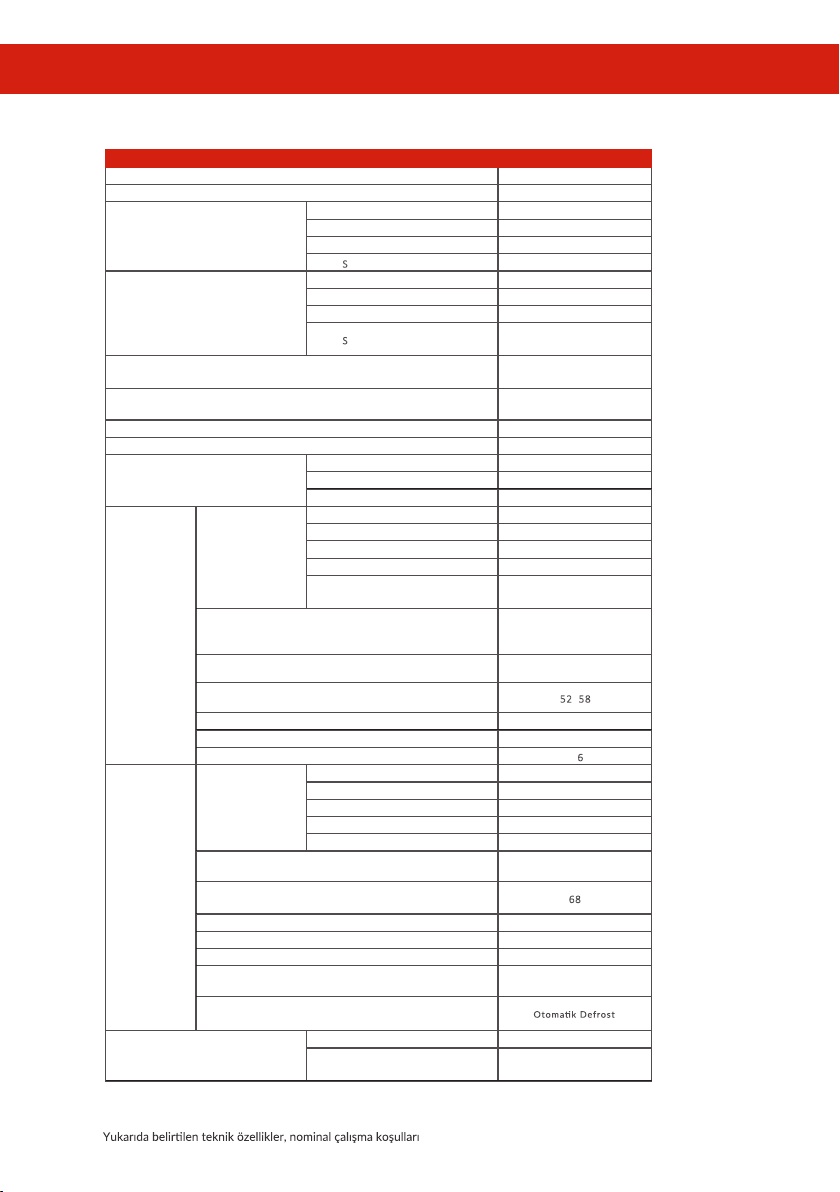
TEKNİK ÖZELLİKLER
MODEL
Kapa site
(P h-V-Hz) Çalışma Volt ajı
So ğutma
Isı tma
(W ) K apalı Termost at Gücü
(W ) B ekle me Modu
Ga z Ke lebeği Tipi
(L/h) Nem Alma
Kompr esö r
Fan Moto r
İç Ünite
Dıș Ünit e
Klima Gaz Borusu
(m m) Çapx Uzunl uk
(m3/ h) Hava Sirkül as yonu
(dB /A) Ses Se viyes i
Dimension (L×W×H)
(m m) A mb ala jl ı Boyutl ar (En xGeniș lik xB oy )
(Kg) Net/ Brüt Ağırl ık
Fan Motoru
(m m) Çapx Uzunl uk
(dB /A) Ses Se viyes i
(m m) Ne t Bo yutlar (En xG enișlik xBo y)
(m m) A mb ala jl ı Boyutl ar (En xGeniș lik xB oy )
(Kg) Net/ Brüt Ağırl ık
So ğutucu Ti p/Ağırlık
So ğutma M odu
KULLANICI KILAVUZU
FLOOR STANDING 26
26.000 BTU
(W ) K ap asit e
(W ) G üç G iriși
(A ) Çalıșm a Akım ı
(W/W) SEER
(W ) K ap asit e
(W ) G üç G iriși
(A ) Çalıșm a Akım ı
(W/W) SCOP
Model
Ti p (Döner\P ist on\ Sarmal )
Marka
Model
Power Typ e DC
(W ) G iriș G ücü
(uF ) Kapasi tans
Fan Hızı
RP M
(H igh/Med/ Low)
Model MDR-9538-901M
Güç T ipi DC
(W ) G iriș G ücü
(uF ) Kapasi tans
(r/ min) Fan H ızı
(m m) Sı vı B ölüm ü/G az Bölü mü /U zunlu k
(m) Max . G az Boru Uzunluğ u
Max . Sev iye Farkı
)
1- 220-240/5 0
7600(2600~8400)
2485(660~3000)
10.8(2. 6~13.0)
5. 1/A
8400(3500~8600)+2100
2470(900~3200)+2100
10.7(3. 9~13.9)+9.1
3. 8/A
91
1
EEV
2, 3
ATL232S DNC9 AUA
Dö ner
HIGH LY
MDR-9538-805D
70W/570rpm
/
540/510/430/ 400
φ352×160
1100
52~58
520×210×1690
618×460×1990
53/64
100
/
850
Φ460×180
68
870×310×700
990×410×780
58/6 2
R410A/2290g
φ6+φ 12×5000
15/5
Not:
nda ölçülen değerlerdir.
16
Page 18
Firma Bilgileri
copa.com.tr
İthalatçı Firma Bilgileri:
copa.com.tr
KULLANICI KILAVUZU
copa.com.tr
I
.com
17
Page 19
KULLANICI KILAVUZU
Önemli Notlar
1. Gümrük ve Ticaret Bakanlığı’nca ürünün tespit edilen kullanım ömrü 10 yıldır.
2. COPA’nı
malıdır.
kapsamından çıkmaktadır.
6. Klimanın montajı yapılmadan önce, klimanın kapasite ve montaj yeri uygunluğunu Yetkili
edilmelidir.
olarak kabul edilmektedir.
9. Arıza ve bakım sonrasında Yetkili Servis’ten Arıza ve Bakım Formu istenmelidir ve bu
10. Klima montajı yapılmadan önce, herhangi bir hasar olup olmadığı kontrol edilmelidir.
Klimada sorun olması durumunda, ithalatçı firmaya bildirilmelidir.
11. Klima montaj sonrasında ortaya çıkacak her türlü kırılma, çizilme ve benzeri tüm
, arızası ve
dışındadır.
yaratmaması için ürüne müdahalenin kolay olacağı yerler tercih edilmelidir.
18
Page 20
KULLANICI KILAVUZU
•
•
kapsamındadır.
•
dışına çıkar.
•
ilişkin arızanın servis istasyonuna; servis istasyonunun olmaması durumunda,
arıza bildirimini; telefon, fax, e-posta, iadeli taahhütlü mektup veya benzeri bir
yolla yapması mümkündür. Ancak, uyuşmazlık halinde ispat yükümlülüğü
19
etmek zorundadır.
• erekse montaj
• süresi içinde
fazla
arızalanmasının yanı sıra, bu arızaların maldan yararlanamamayı sürekli kılması,
Page 21
FLOOR STANDING
AIR CONDITIONER USER’S MANUAL
MODEL
COPA Floor Standing 26
Page 22
Dear Customer,
We have prepared this brochure for you all of our air
use and high yield. For this reason, the user manual and
Read carefully before doing you can easily reach for your
next we ask you to hide it in place. COPA Floor Standing
preference thank you.
ensure your lawful rights and interests, please have
you.
manufactured by our Co. The appearance of the units
that you purchase might be slightly different from
the ones described in the Manual, but it does not affect
21
specific model you choose, and keep the Manual
Page 23

İÇİNDEKİLER
Instrucons to users
•
• The name of each part and its funct ion
• Use of operaon panel
Use of remote controller
•
• Maintenance
Phenomena diagnosis and treatment
Technical Informat ıons
23
25
28
29
34
35
36
22
Page 24
USER'S MANUAL
Please read the Manual carefully before using the air condioner so as to ensure the normal operaons of the units.
Instruct ions to users
1. Do not open the air-return grids
or boom panel of the indoor unit
during operaons.
3. Do not place inseccides, paints
or other inflammables near the inlet
or outlet; do not spray such arcles
directly against the units.
5.The grounding
terminal of the
units must be
well connected
to the grounding
of the power
source.
2. Do not put the scks or other similar
objects into the air inlet and outlet.
4. Operate the machine only under the
nominated voltage and frequency and
with corresponding protecve devices.
Never use copper wires to substute
the fuses, which might lead to operaonal
faults or fire hazards.
6. When cleaning the aircondioner, please do
not spray water on the
machine. When the
microcomputer parts
and circuits in the aircondioner are
covered with water, it
is possible to casuse
failure or electric shock
disaster.
23
7. Do not block the air inlet and outlet of
the indoor or outdoor units so as to
avoid possible negat ive impacts upon
the machine performances or hazards.
Indoor unit
Outdoor unit
8. Re-start the operaon aer power failure.
When the power supply is resumed,
the air condioner will
automacally enter
the standby mode.
Press the On/Off
buon to restart the
operaon.
Page 25
USER'S MANUAL
Instruct ions to users
9. If the machine is not in use for long
me, the power source should be
disconnected for the sake of safety
and energy-saving.
11. When you restart the operaon aer a long period
of non-operaon, you should carefully check the
air condioner and the wire connecon.If the electric
wires are damaged or need to be replaced due
to other reasons, please ask our Co. aer-sale
service person or the professional technicians in
the authorized maintenance shops to do the
replacement so as to avoid possible electric shock,
overheang, fire hazards or other accidents.
10. In the case that the
breaker is frequently
disconnected, you should
stop the operaon
of the machine
and contact the dealer
or our Co. authorized
maintenance shop.
Instruct ions For Removal And Repairs
• If the unit needs to be removed for installaon elsewhere or for repairs, please contact our company dealer or authorized technicians.
• In case of occurrence of abnormality (burning smell, for example), please stop the operaon of the unit, disconnect the power and
contact our company dealer or authorized techincians.
24
Page 26
USER'S MANUAL
The name of each part and its funcon
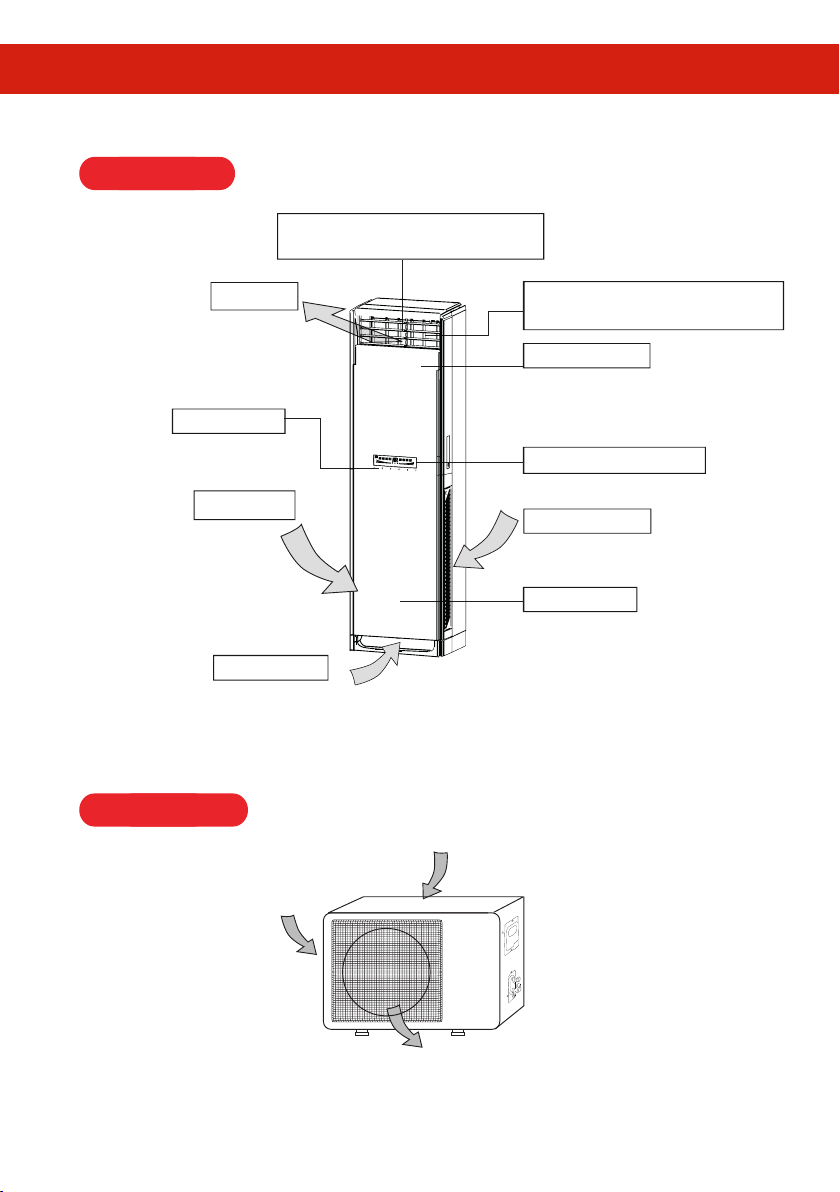
Indoor Unit
Up/down air direcon guides
For adjusng the vercal air delivery direcons
Air outlet
Le/right air swinging fins
For adjusng horizontal air delivery direcons
Up slide panel
( Slide down automacally aer boot, shut down
automacally aer the rising )
Operaton panel
Display screen
Le air inlet
Right air inlet
For intake of room air
Boom panel
Boom air inlet
şi
Funcon feature:
During closedown of the air condioner when it is running in refrigeraon or dehunidificaon status, the air
condioner will not stop supplying air immediately, as the air condioner is performing mould proofing funcons. The upper slide
plate will delay for 30 seconds and then automacally close.
Outdoor Unit
Air inlet
25
Air inlet
Air outlet
Features and appearance will vary.All the figures give a demonstraon to introduce the funcon.
Page 27
USER'S MANUAL
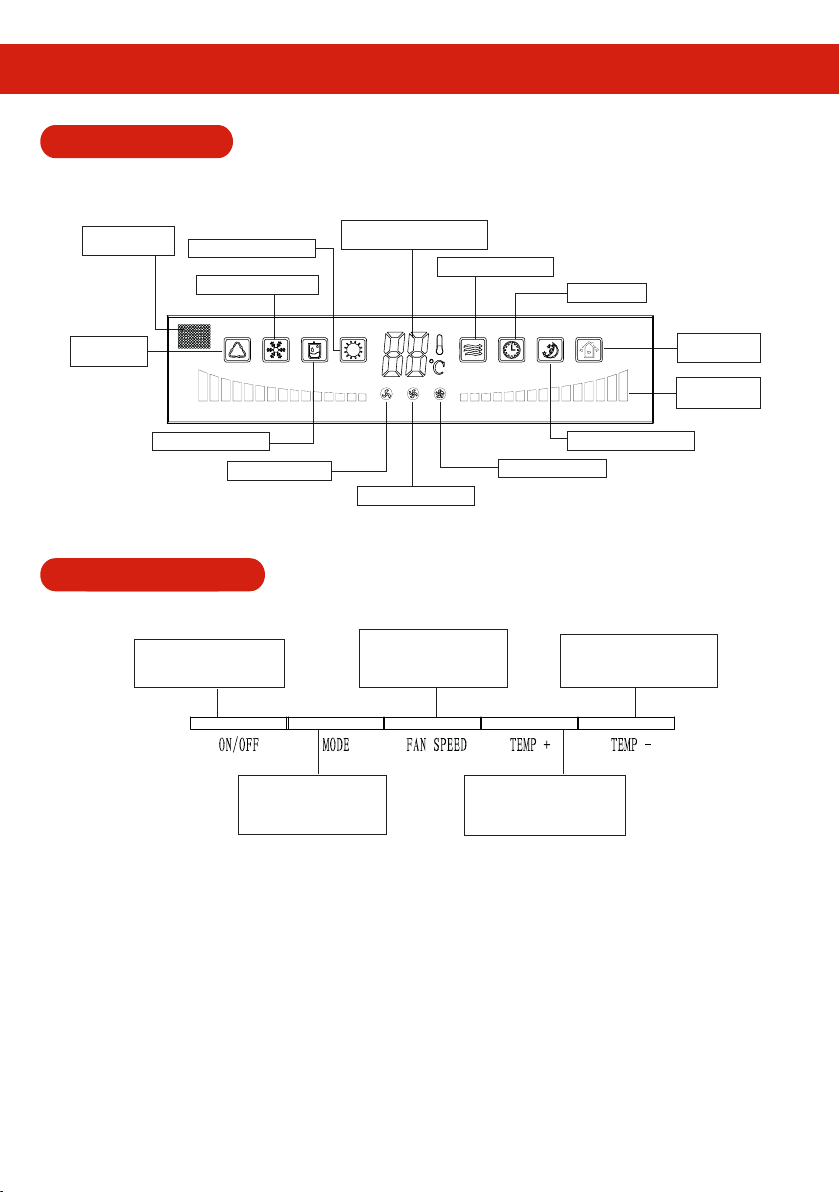
Display Screen
This display screen is the usuall one of our company,it can be used for many types of our air-condioners. We beg your
forgiveness that we would not introduce the indicator which is not applicable for the units you purchased.
Remote signal
receiving window
Heat operation indicator
Cool operation indicator
Room (set) temperature and
malfunction codeindicator
Fan operation indicator
Timer indicator
Auto operation
indicator
Dry operation indicator
Low speed indicator
Sleep operation indicator
High speed indicator
Middle speed indicator
Fresh indicator
(optional)
Swinging wind
set indicator
Operaon Panel
ON/OFF Key
Touch the key to turn on
or turn off the Air conditioner.
MODE Selection Key
Touch the key to choose
desirable operation modes:
Auto,Cool,Dry,Heat(Fan).
FAN SPEED Selection Key
Touch the key to set your
favorite air flow rate :Auto,
Low,Middle, High.
Touch the key once to increase
the set temperature by 1°°C, the
highest temperature is 32 C.
TEMP + Key
Note: This air conditoner adopts touch type buon operaon, and the user is only required to gently touch the buon.
Specificat ion:
• Usually,the display screen shows only the funcon mode and operaon status you choose.
• When room temperature equals to or is lower than 10 ºC ,the funcon of dehumidifying cannot be used.
• When room temperature equals to or is lower than set temperature,the AC unit stops for a period of me to save energy.
• The AC unit is equipped with automac defrosng funcon and the heat operaon indicator on the display screen flashes when
the machine defrosts.
• The AC unit with heat pump has auxiliary electric heang funcon,which will automacally turns on or off according
to room temperature during heang operaon to achieve the best heang result.
• If you turn on the machine immediately aer it is turned off,the machine with me-lapse starng funcon will
automacally turns on the machine aer 3 minutes to protect it.
Not ice : when air-flow is in operaon, do not adjust the air-flow vane using the hand directly, or which can cause the
vane operaon angle deflected , even closed.
TEMP - Key
Touch the key once to reduce
the set temperature by 1 C, the
lowest temperature is 16 C.
°
°
26
Page 28
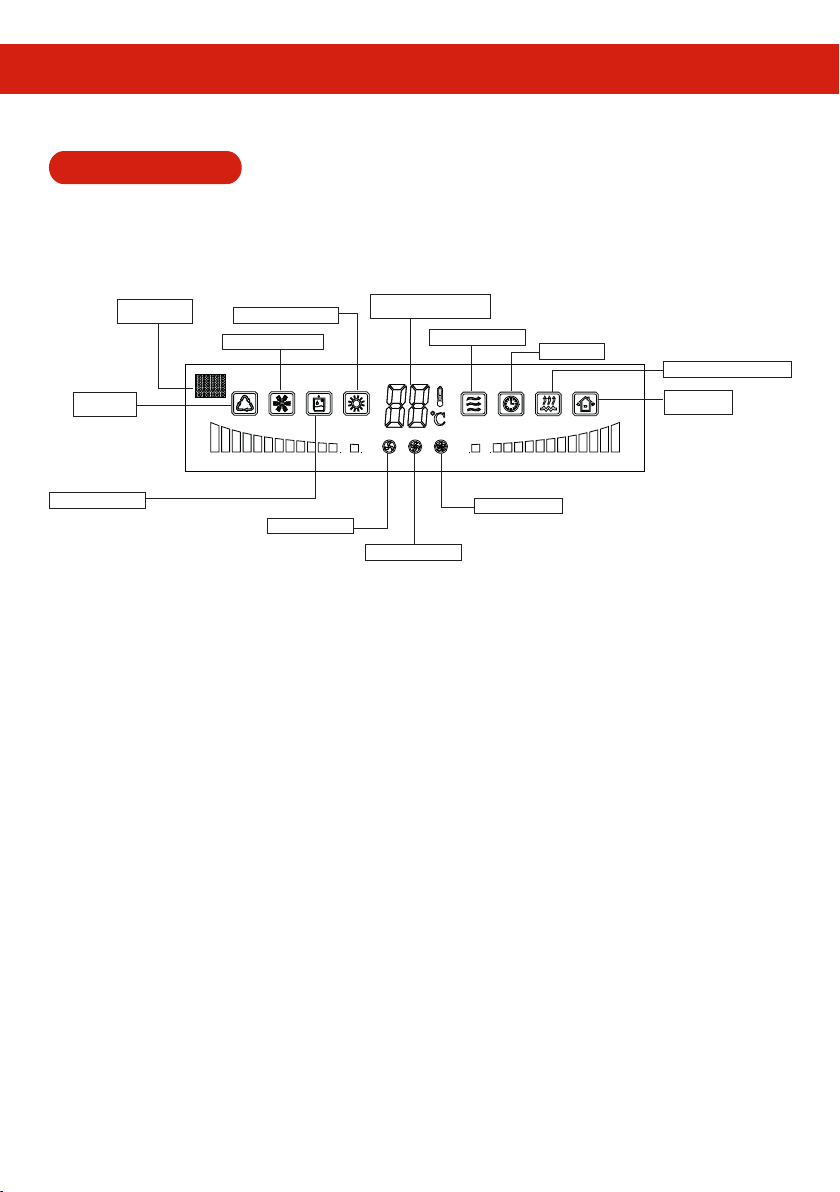
USER'S MANUAL
Display Screen
This display screen is the usuall one of our company,it can be used for many types of our air-condioners. We beg your
forgiveness that we would not introduce the indicator which is not applicable for the units you purchased.
Remote signal
receiving window
Auto operaon
indicator
Dry operaon indicator
Heat operaon indicator
Cool operaon indicator
Low speed indicator
Room (set) temperature and
malfuncon codeindicator
Fan operaon indicator
Middle speed indicator
Timer indicator
High speed indicator
The electric auxiliary heat
Fresh indicator
(oponal)
Note: This air conditoner adopts touch type buon operaon, and the user is only required to gently touch the buon.
Specificaon:
• Usually,the display screen shows only the funcon mode and operaon status you choose.
• When room temperature equals to or is lower than 10 ºC ,the funcon of dehumidifying cannot be used.
• When room temperature equals to or is lower than set temperature,the AC unit stops for a period of me to save energy.
• The AC unit is equipped with automac defrosng funcon and the heat operaon indicator on the display screen
flashes when the machine defrosts.
• The AC unit with heat pump has auxiliary electric heang funcon,which will automacally turns on or off according
to room temperature during heang operaon to achieve the best heang result.
• If you turn on the machine immediately aer it is turned off,the machine with me-lapse starng funcon will
automacally turns on the machine aer 3 minutes to protect it.
Not ice: when air-flow is in operaon, do not adjust the air-flow vane using the hand directly, or which can cause the
vane operaon angle deflected , even closed.
27
Page 29
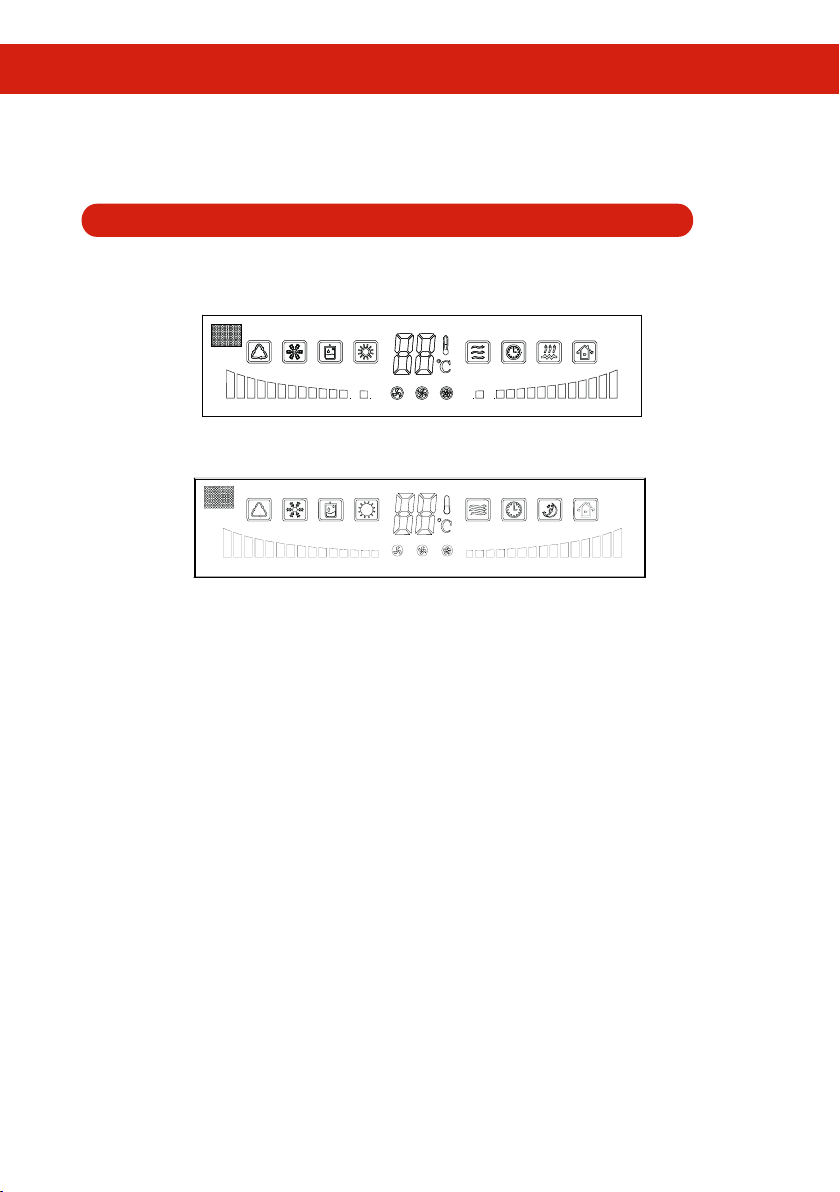
USER'S MANUAL
Use of operaon panel
Operaon of Mode change between Auto/Cool/Dry/Heat/Fan
1. Touch ON/OFF key.
2. Touch MODE key to choose the mode you want.
When you choose Fan mode,the compressor does not work.
3. Touch TEMP +*-key to set the room temperature.
The room set temperature range is from 16-32 ºC
(Note:it would be automacally set at 25 ºC and unadjustable in AUTO and DRY mode.)
4. Touch the FAN SPEED buon to choose needed the fan speed:Auto, High, Med and Low.
The fan operates in low speed under the mode of Dry.
5. Touch ON/OFF key once again to stop.
If you turn on the machine immediately aer it is turned off,the machine with
me-lapse starng funcon will automacally turn on the machine aer 3
minutes to protect it.
Not ice : when air-flow is in operaon, do not adjust the air-flow vane using the hand directly, or which can cause the
vane operaon angle deflected , even closed.
28
Page 30
USER'S MANUAL
Use of remote controller
This remote controller is the general one of our company,it can be used for many types of our air-condioners. We beg your
forgiveness that we would not introduce the buon or indicator which is not applicable for the units you purchased.
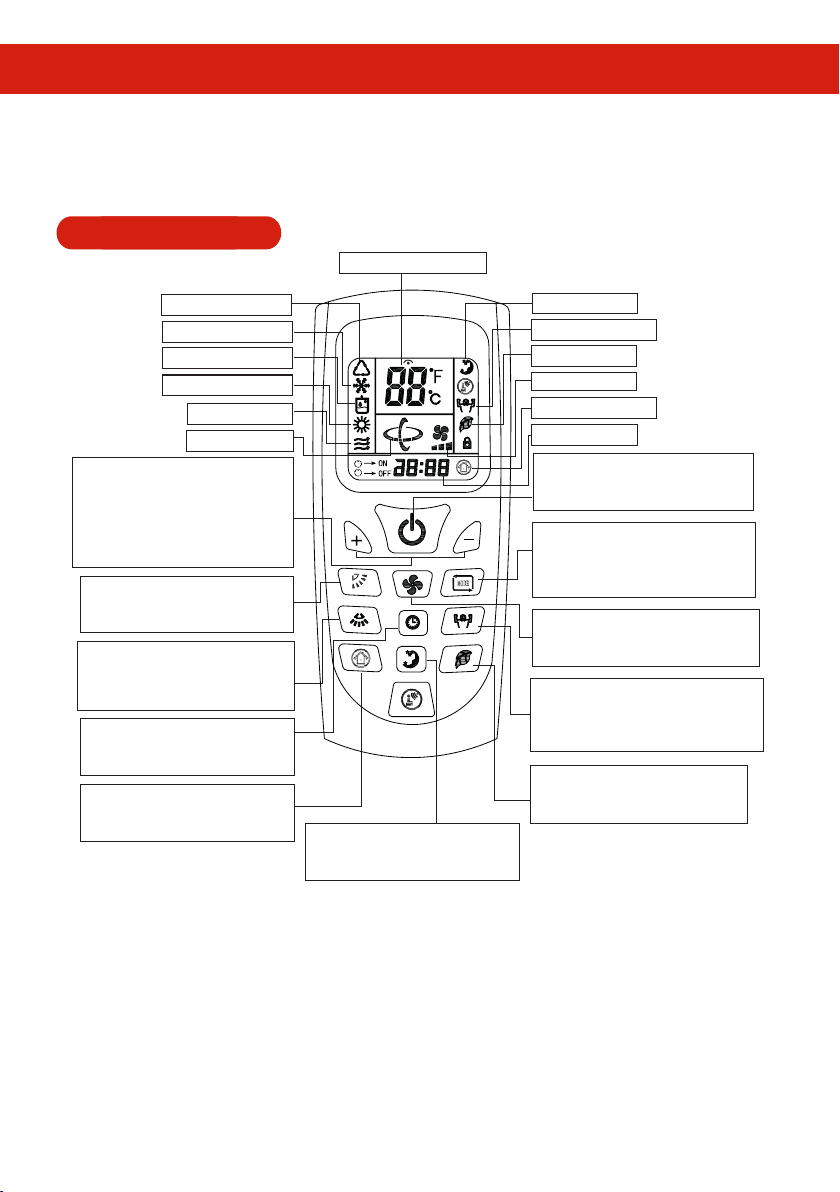
Remote Controller 1
Setting temperature indicator
Auto operation indicator
Cool operation indicator
Dry operation indicator
Heat operation indicator
Fan operation indicator
Air flow indicator
SET TEMPERATURE button
Press this button sets the room temperature.
press the TEMP+ key once to increase the
set temperture by 1
reduce the tempeture by 1
temperature range is from 16-32
Press this button changes the up/down flap
mode:natural flow ,swing or fixed wind.
This button used for selection of the left/right
air flow direction,whenever pressed the in flap
will swing or fix
This button is used to set the switch-on or
switch-off and the timer time.
This button is used to open or close the
fresh air ventilator.
O
C,press TEMP - key,
O
C.(The room set
O
C).
SWING button
AIR FLOW button
TIMER button
FRESH button (optional)
SLEEP button
PressThis button changes to SLEEP operation,
and press it once again will deleted.
Sleep indicator
Turbo operation indicator
Clean air indicator
Fan speed indicator
Fresh indicator (optional)
Timer time indicator
This button, when pressed starts operation and
stops when repressed.
(For the cooling-only models, the "Heating" mode is for fan).
This button changes to TURBO operation, the fan
speed for super-wind,press it once again will deleted.
(It does not work in AUTO,DRY,and FAN mode.)
ON/OFF button
OPERATION MODE select button
This button changes the operation mode:
AUTO,COOL,DRY,HEAT(FAN).
FAN SPEED button
Press this button to select the auto speed, high
speed, mid-speed or low speed of air delivery.
TURBO button
CLEAN button
Press this button to clean indoor air,press it
once again will deleted.
NOTE:
• The Cleaning funcaon only can that AC be in bide one's me, and not any mode operaon state under to do,
and aer connue operaon six minitues cleaning, the AC unit will quit cleaning automac. user doesn't using this
cleaning funcaon every day, suggest one mes only for half a mouth or one mouth.
• The set running status can be saved aer closedown of the air condioner. If the set status remains unchanged,
for startup for the next me, simply press the On/off buon, and the air condioner can connue running in the last
running mode.
• Above figure shows all indicaons for the purpose of explanaon, but praccally only the pernent parts are
indicated.When air-condioner is cooling-only model, the HEAT is for FAN.
• TURBO operaon(super strong-wind funcon) is the AC addon funcon. When TURBO operaon is selected,
room temperature is not controlled with operaon being connua lly.If you feel the room temperature is too cool or
too heat,please cancel the TURBO operaon.
29
Page 31
USER'S MANUAL
Use of remote controller
This remote controller is the general one of our company,it can be used for many types of our air-condioners. We beg your
forgiveness that we would not introduce the buon or indicator which is not applicable for the units you purchased.
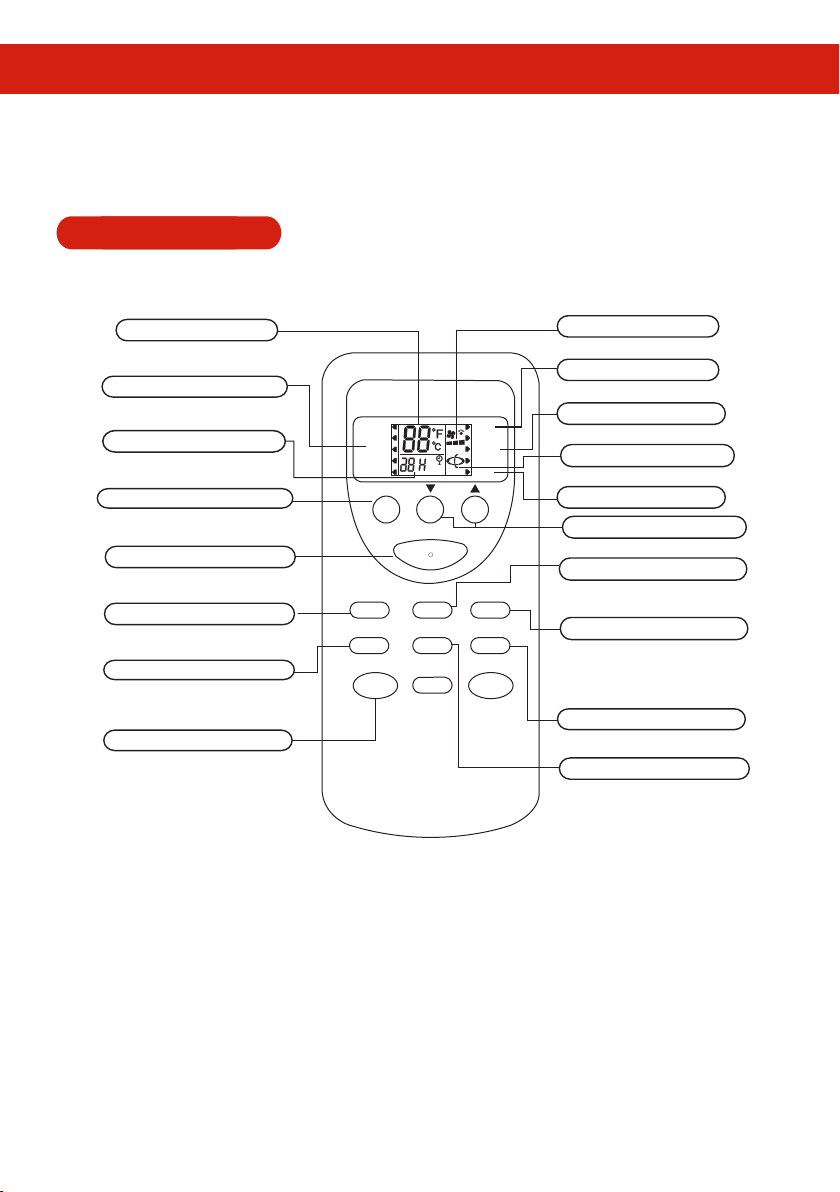
Remote Controller 2
Temperature indicator
Indicates the set temperature.
OPERATION MODE indicator
indicates selected operation mode
TIME indicator
Indicates timer time .
OPERATION MODE select button
This button changes the operation mode:
AUTO,COOL,DRY,HEAT,FAN.
ON/OFF button
This button, when pressed starts operation
and stops when repressed.
FAN SPEED button
This button set air rate.
TIMER button
This button is used to set the switch-on or
switch-off and the timer time.
TURBO button
This button changes to TURBO operation
(It does not work in AUTO,DRY,and FAN
mode.)
AUTO
COOL
DRY
HEAT
FAN
MODE TEMP
ON/OFF
FAN SPEED
TIMER HOLD SLEEP
TURBO
SLEEP
LAMP
TURBO
CLEAN
ON
OFF
HOLD
SWING
AIR FLOW
LAMP CLEAN
FAN SPEED indicator
Indicates the seted air rate.
SLEEP indicator
Indicates during sleep operation.
TURBO indicator
Indicates during TURBO operation.
AIR FLOW indicator
Indicates selected flap mode.
Key lock indicator
SET TEMPERATURE button
This button sets the room temperature.
SWING button
This button changes UP/DOWN air flow
direction :natural flow ,swing or fixed wind.
AIR FLOW button
This button used for selection of the left/right
air flow direction,whenever pressed the in
flap will swing or fix.
SLEEP button
This button changes to SLEEP operation.
HOLD button
Press this button to lock or unlock the
keyboard.
NOTE:
• Above figure shows all indicaons for the purpose of explanaon, but praccally only the pernent parts are
indicated.When air-condioner is cooling-only model, the HEAT is for FAN.
• When TURBO operaon is selected,room temperature is not controlled with operaon being connually.If you feel the room
temperature is too cool or too heat,please cancel the TURBO operaon.
30
Page 32
USER'S MANUAL
Use of remote controller
This remote controller is the general one of our company,it can be used for many types of our air-condioners. We beg your
forgiveness that we would not introduce the buon or indicator which is not applicable for the units you purchased.
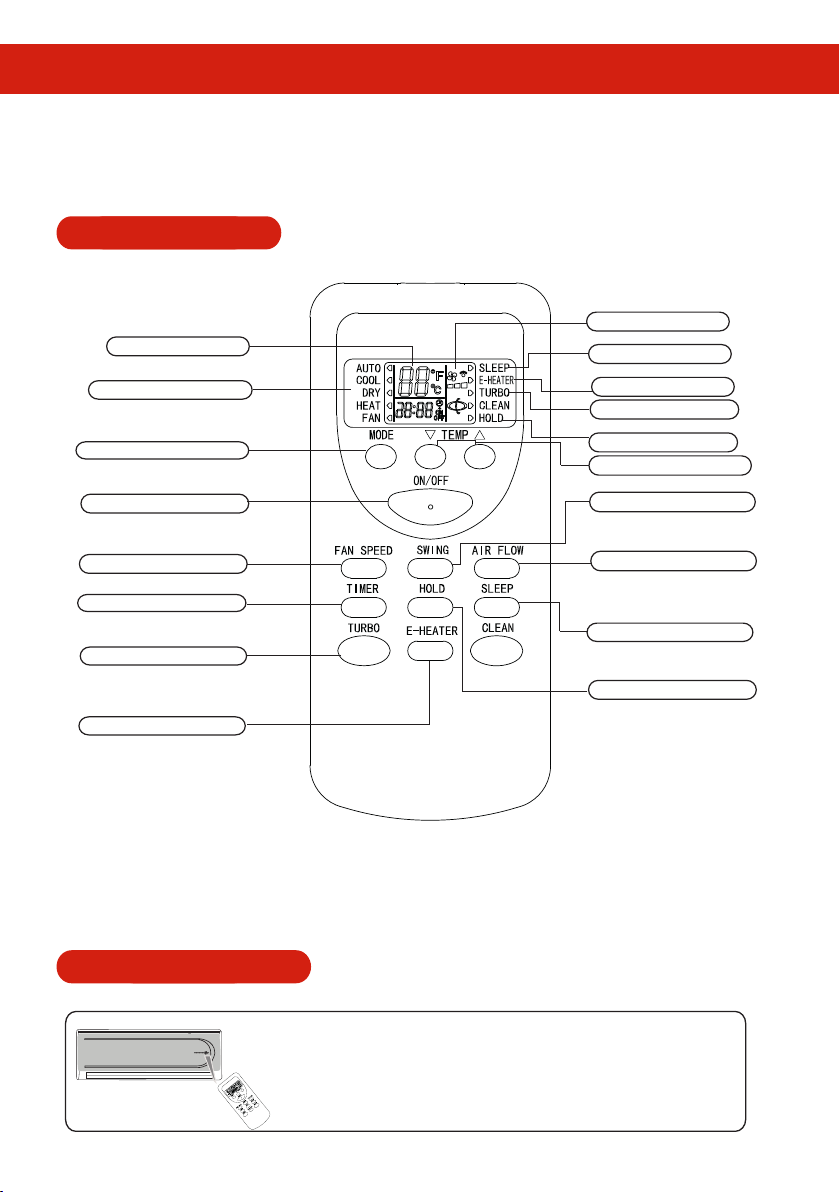
Remote Controller 3
FAN SPEED indicator
Temperature indicator
Indicates the set temperature.
OPERATION MODE indicator
indicates selected operation mode
OPERATION MODE select button
This button changes t he operation mode:
AUTO,COOL,DRY,HEAT,FAN.
ON/OFF button
This button, when pressed starts operation
and stops when repressed.
FAN SPEED button
This button set air rate.
TIMER button
This button is used to set the switch-on or
switch-off and the timer time.
TURBO button
This button changes to TURBO operation
(It does not work in AUTO,DRY,and FAN
mode.)
E-HEATER button
This button can control the switch of indoor
electric heating function.
Indicates the seted air rate.
SLEEP indicator
Indicates during sleep operation.
E-HEATER indicator
TURBO indicator
Indicates during TURBO operation.
Key lock indicator
SET TEMPERATURE button
This button sets the room temperature.
SWING button
This button changes UP/DOWN air flow
direction :natural flow ,swing or fixed wind.
AIR FLOW button
This button used for selection of the left/right
air flow direction,whenever pressed the in
flap will swing or fix.
SLEEP button
This button changes to SLEEP operation.
HOLD button
Press this button to lock or unlock the
keyboard.
NOTE:
• Above figure shows all indicaons for the purpose of explanaon, but praccally only the pernent parts are indicated.When
air-condioner is cooling-only model, the HEAT is for FAN.
• When TURBO operaon is selected,room temperature is not controlled with operaon being connually.If you feel the
room temperature is too cool or too heat,please cancel the TURBO operaon.
Transmission procedure
When each button on the remote controller is pressed with the remote
controller pointing toward the air conditioner unit, signal is sent.
When the signal is received correctly, the receiving sound is emitted
from the unit.
31
Page 33

USER'S MANUAL
Operang Machine In Selected Modes
1. Point the remote controller at the unit,press the ON/OFF button,then press the MODE button,select the needed
mode: ATUO,COOL,DRY,HEAT,or FAN.
2. Press the SET TEMPERATURE button to increase or decrease the readings until the needed temperaure
is displayed.The room set temperature range is from 16˚C-32˚C.
In cooling/heating operations,the temperature difference of 50C between the selected temperature and the ambiend
temperature is most suitable for your health.
(Note:It would be automatically set at 25˚C and unadjustable in AUTO and DRY mode.)
3. Press the Up/Down air flow button to choose the up/down air flow direction you want:natural flow( display indicates
" "),swing(display" " indicator flashing) ,fixed wind(display indicates " ").Press the Left/Right air flow button to
choose the left/right air flow direction you want:swing or fixed wind.
(Note:It would be automatically set at fixed wind air flow direction in DRY mode.)
4. Press the FAN SPEED button to choose the air rate you want:Low(display indicates" "),Med(display indicates
" ",Hi(display indicates" ",Auto(display" "indicator flashing).
(It would be automatically set at low speed and unadjustable in DRY mode.)
Attention:Please do not adjust the guide blades of air outlet by hand directly,or which can damage the parts
of the machine.
Timer Operaon
Set turning off time
Set the time for the unit to turn off and when it is time,the air conditioner will automatically stop operating.
1. During the operation of the air conditioner, press the TIMER button and the air conditioner will enter the timed
switch-off mode.
2. Continuely press the TIMER button to set the needed time for switching off the machine. The timer can make
the setting in the range from 1-24 hours.Every the button is pressed,indication change is the following sequence:
1 * 2 * ........ * 24 *
3. After the setting of the timed switch-off, the digits shown on the display screen will go down by 1 for every elapsed
hour. The displayed digits indicate the remaining time prior to the timed switch-off.
cancel (no indication)
* 1.
32
Page 34
USER'S MANUAL
Set turning on me
Set the time for the unit to turn on and when it is time,the air conditioner will automatically start operating.
1. When the air conditioner is in the standby mode, press the TIMER button and the air conditioner will enter the
timed switch-on mode.
2.Continuely press the TIMER button to set the needed time for switching on the machine. The timer can make
the setting in the range from 1-24 hours.Every the button is pressed,indication change is the following sequence:
1 * 2 * ........ * 24 *
3. After the setting of the timed switch-on, the digits shown on the display screen will go down by 1 for every elapsed
hour. The displayed digits indicate the remaining time prior to the timed switch-on.
Releasing procedure
When the indicaon on display screen is 24 hour,press the TIMER buon again to delete the med mode.
Sleep Operaon
Use this mode to reduce operation sound when sleeping,etc.
Press the SLEEP button,the air flow sound from the indoor unit is decreased.
Press the SLEEP button again can release the mode.
NOTE:
•
Use the sleep mode when you are going to bed.If this mode is used in the day,the capacity is reduced since the
ambient temperature is too high.(COOL MODE).
•
During the operation of cooling,the room temperature will be raised gradually by 20C higher than the setting after
the machine begins to operate in the sleeping mode.
•
During the operation of heating mode,the room temperature will be dropped gradually 50C lower than the setting
after the machine begins to operate in the sleeping mode.
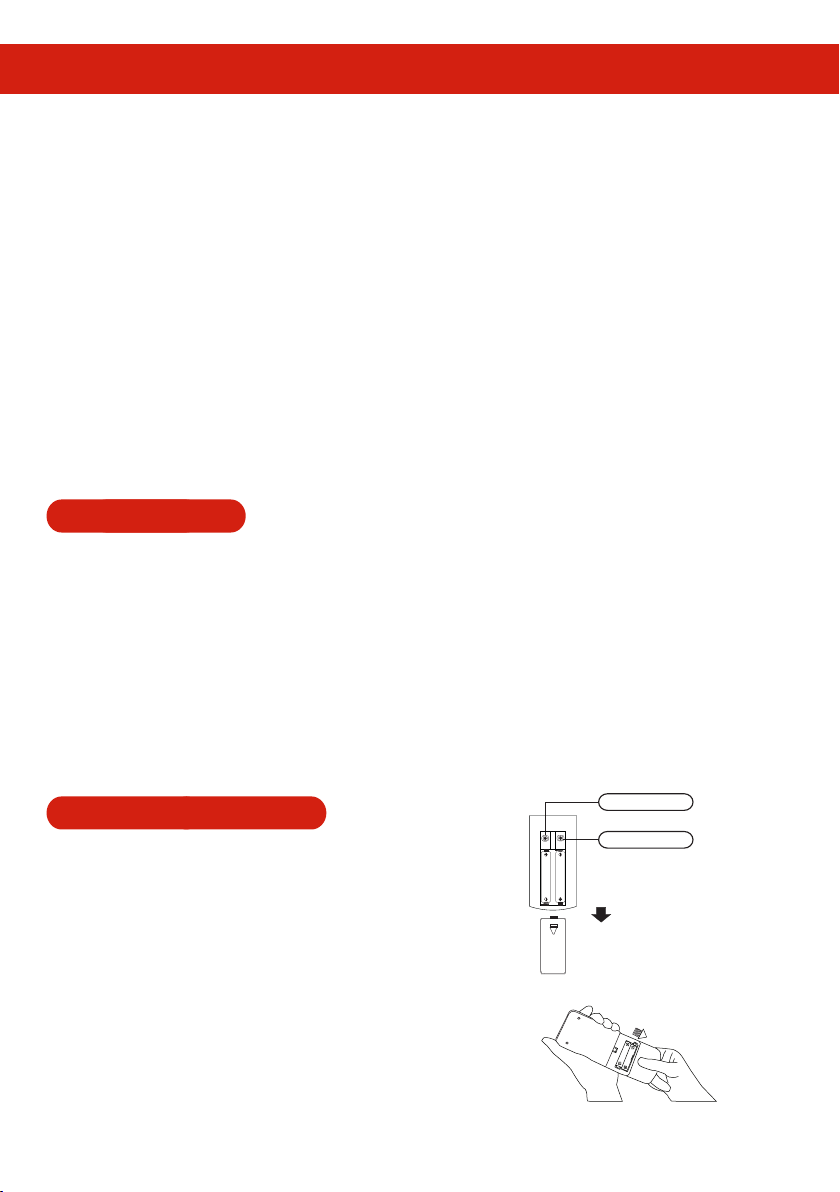
Replacement Of Bat teries
•
When the signal from the remote controller becomes weak and the
indoor unit can not receive it properly;or the indications on the display
screen becomes blurred,please slide the back cover and replace with
two new batteries.
•
The positive and negative poles must match the installation positions.
•
New batteries of the same type have to be used for replacement.
•
If the remote controller is not to be used for long time,take out the
batteries so as to prevent the leakage of the electrolyte from damaging
the controller.
•
If when the remote controller is at abnormal state,you can take out
the batteries on the back cover to clear off the display.
33
cancel (no indication)
* 1.
CLK button
It does not work on this model.
RST
CLK
RST button
This button let computer reset.
(push the RST button with the tip of a
ball pen,etc)
Unload the back Cover
Remote Controller 1
s
Remote Controller 2
and Remote Controller 3
l
i
d
e
t
h
e
b
a
c
k
c
o
v
e
r
Page 35
USER'S MANUAL
Maintenance
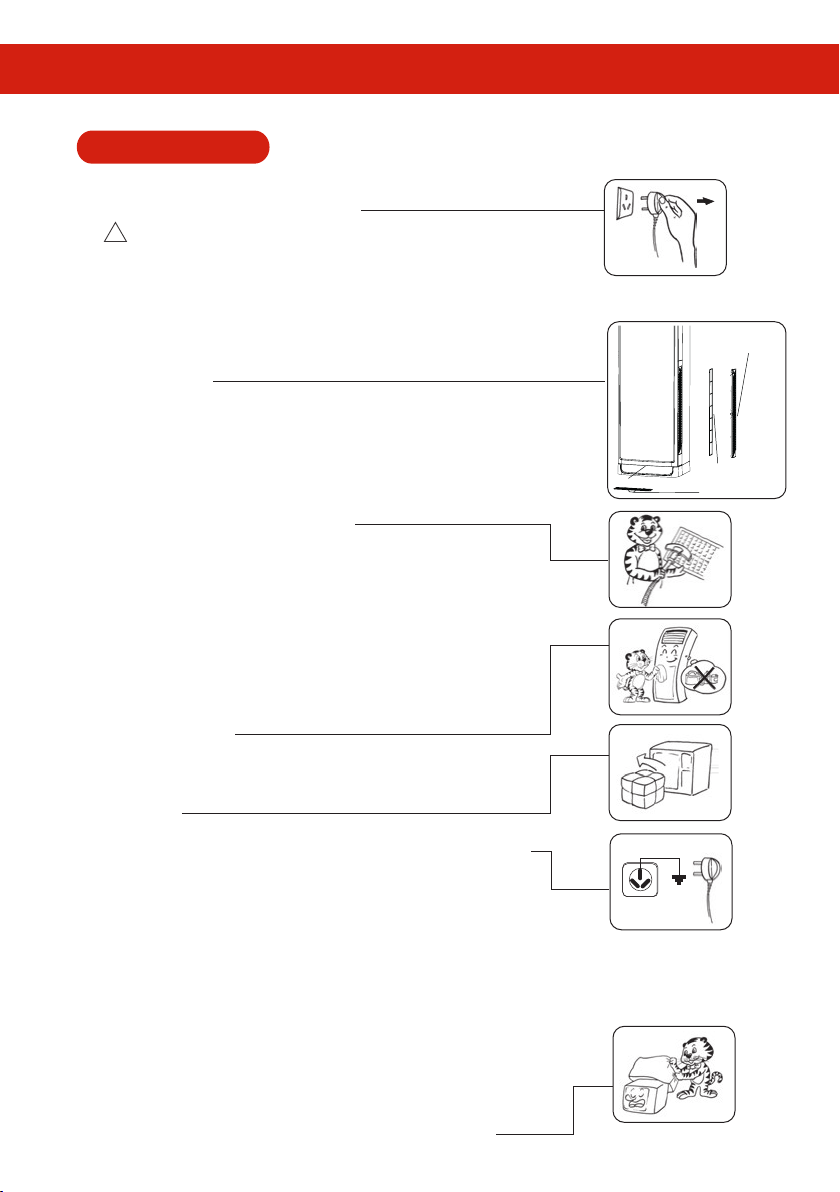
Make sure that the power of the air conditioner is turned off
before the maintenance is to be done.
! Attentions:
When the AC sent out terrifically sound, the air filter maybe keep long in stock
few dust, as a result air inlet by obstut, so sent out terrifically sound.
I Removal of the filter screen
1.Make sure that the operation of the air conditioner is fully stopped.
2.Open the intake grill directly with your hands and remove the filter
mounted inside (toward arrow direction). Remove the filters on the left
and right side.
3. Remove another filter from the bottom of the air conditioner directly
with your hands.
II Cleaning of the filter screen
Gently pat the screen or use a vacuum cleaner to do the cleaning.If too
much filth is accumulated on the screen,a small amount of neutral detergent
solution can be used for the cleaning.After the cleaning,the screen must
be dried in air and be put back into place.
Note:
Do not place the air filter screen under the exposure of sunlight
or near an over to dry;do not use warm water above 40˚C to do the
cleaning so as to avoid deformation.
III Cleaning of the air conditioner
1.To ensure safety,power must be turned off before doing the cleaning,
otherwise,it may cause electric shocks.
2.Do not use water to flush the units.
3.Use a piece of soft dry cloth to clear off the dust on the units.
4.Do not use volatile oil,gasoline,diluting agents or abrasive powder
in doing the cleaning.
5.Use household neutral detergent to clean the fingerprints or oil stains.
IV Prior to operational seasons
1.Check to see if the air inlets and outlets of the indoor and outdoor units
are blocked.
2.The protective cover of the outdoor unit must be removed.
3.Check to see if the power cable and grounding wire are in proper state.
4.Check and confirm that there is any bending,or raised ends or blockage
of the drainage tubes.
5.Make sure that the air filter screen is properly in place before operating
the machine.If the machine is operated with air filter screen removed,dust
and foreign objects will result in faulty performances of the air conditioner.
V After the operational seasons
1.Turn off the air conditioner,disconnect the power source.
Note:
The ordinary air conditoner, during the standby status when the
air conditioner is switched off but the attacking plug is not pulled out, will
still consume 5W electric power. But this air conditioner, during the standby
status, only consumes 1W electric power, which is measured according
to the enterprise standard Q/ZG 119 Standby Energy Consumption Test
Methods for Household Air Conditioners.
2.Make proper maintenance to the air filter screen and other parts.
Regular cleaning air filter(about one times one mouth).
etc.
Filter screen out from here
Air inlet grid conver
Air filter screen
The following filter screen out fhe
site by hand
34
Page 36
USER'S MANUAL
Phenomena diagnosis and treatment
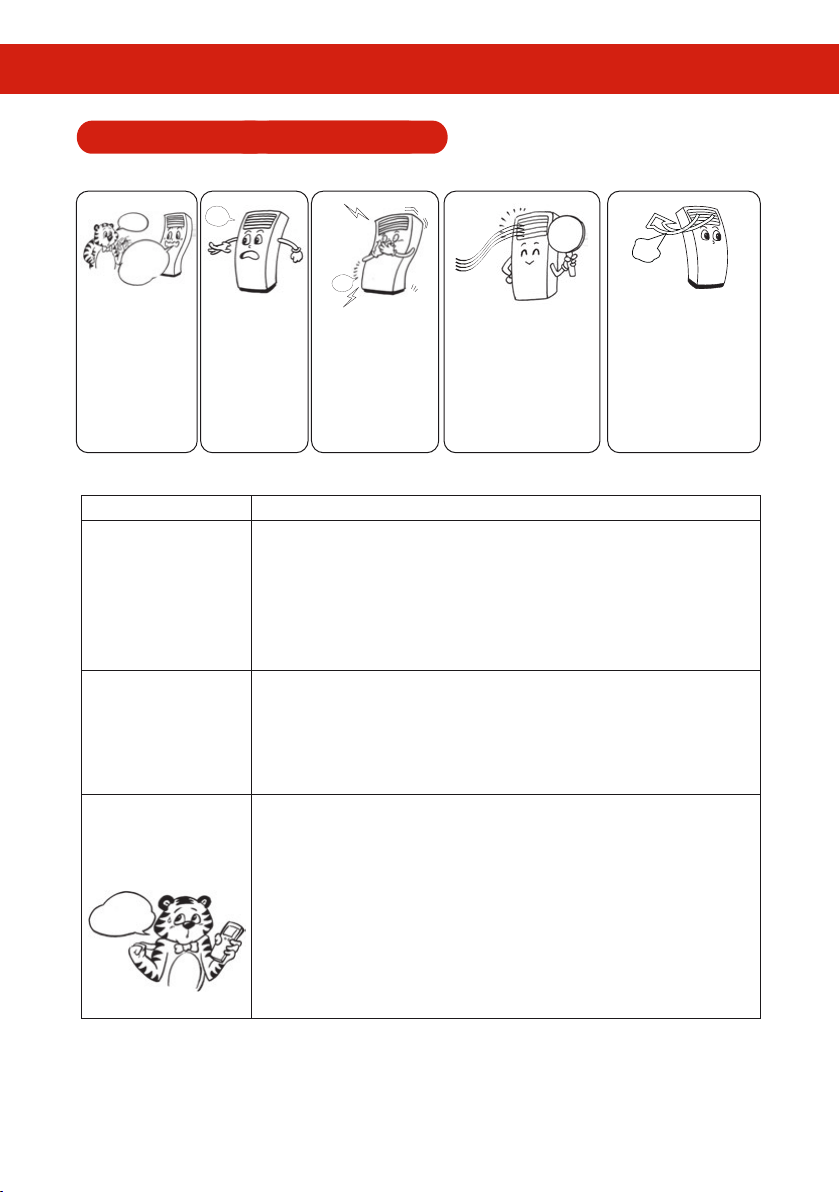
The following phenomena air not faulty operaonal performances
unpleasant
smell
The air inside the
room smells
cigarette smoke or
other odd odors.
Sometimes the air sent
out from the air
conditioner may smell
some odd odors. This is
due to the cigarette
smoke, the cosmetic
smell, the odors of walls
or furniture pieces in the
room that are stained on
the air conditioner.
"ZZZ----"
During the operation
or
when the machine is
stopped, some "ZZZ..."
sound may be heard.
This is because the
refrigerant inside the
air conditioner is still
flowing.
patting
sound
When the cooling or
heating operation is started
or stopped, some "patting"
sound may be heard. This
is because some parts of
the surface boards are
expanded due to changes
of temperature, which
results in the friction of
these parts. This is not a
performance fault.
The cooling
is great!
When cooling is in operation,
sometimes the haze emits from
the air outlet, which cause is that
when the indoor temperature and
humidity is higher, the indoor air
is rapidly refrigerated, after the
indoor temperature and humidity
lowers, the haze will disappear.
Please read the following contents before contacng the maintenance people.
Trouble Phenomena Trouble Diagnosis
• Whether power on.
Air condit ioner
does not work
Cooling or
heat ing effect
not good
• Whether connect to the power source.
• Whether have set med on/off.
• Whether the voltage too high or too low.
• Whether breaker in off posion.
• Whether room temperature properly adjusted.
• Whether the inlet or outlet of the indoor or outdoor units blocked.
• Whether the air filter screen too much dust blocking.
• Whether door or windows close.
• Whether using combusng apparatuses in room.
still blow
wind
During closedown of the air
conditioner when it is running in
refrigeration or dehunidification
status, the air conditioner will not
stop supplying air immediately,
as the air conditioner is performing
mould proofing functions. The
upper slide plate will delay for 30
seconds and then automatically
close.
Remote controller
doesn't work
• When the receiver for remote signal is shined directly by sunligh or strong
light,it is likely not to receive remote signal.Under this condion,please the
sunlight or adjust the light to be dim.
Why does
not work
• Whether it is within the receiving range?Or be warded off by obstacle?
• Check whether the voltage of the baery in the remote controller is enough,
or please replace the baery.
• When the remote controller displays obscurely ,please replace the baery.
When the following cases happen,please stop operaon,disconnect the power source,then contact our
co.dealer of the authorized maintenance shop.
• The fuse is burned out frequently,the current leakage switch switch off frequently.
• The line abnormally heats or cracks at the line insulaon coat.
• Other states different from the normal states.
35
Page 37
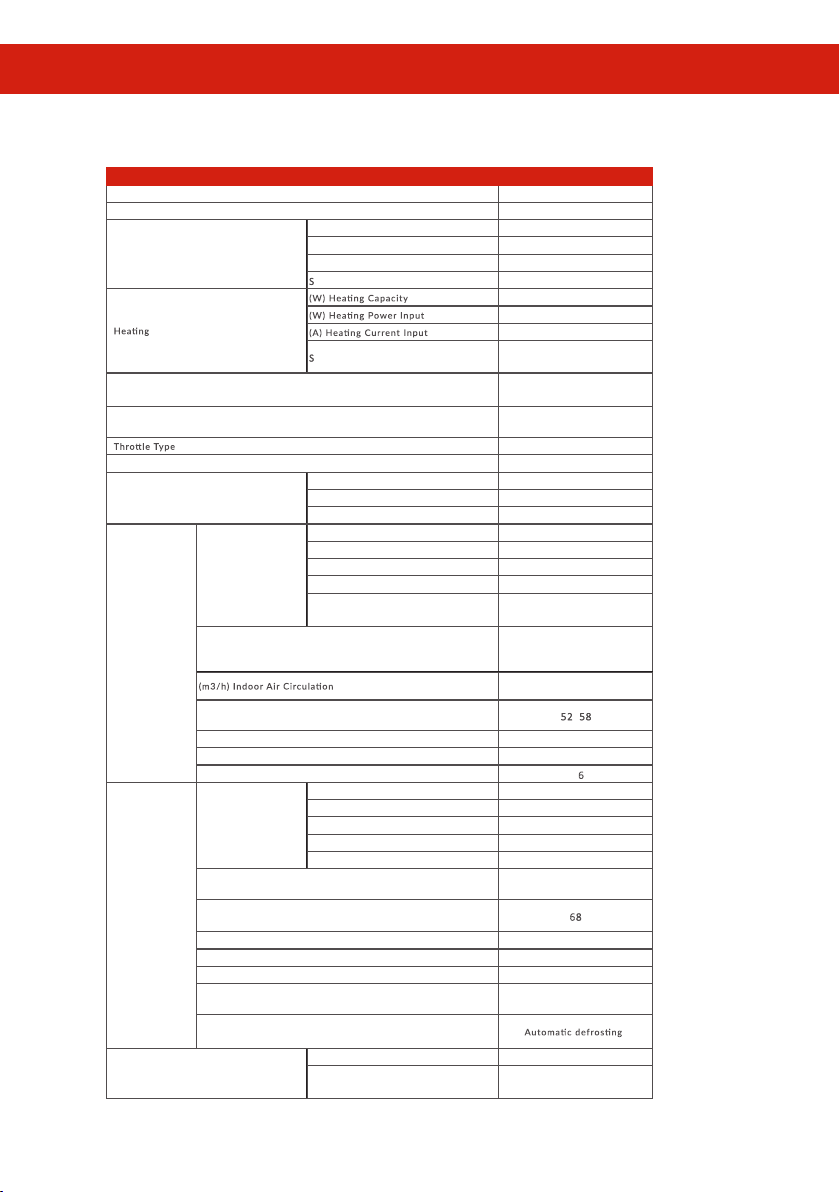
USER'S MANUAL
TECHNICAL INFORMATIONS
MODEL
Capa city
(P h-V-Hz) Rat ed Volt a n d Freq uency
Coolin g
(W ) T hermosta t- off Mode
(W ) Standb y M ode
(L/h) Moistu re Remo val
Co mpressor
Fan Moto r
Indoor
Ou tdoor
Ref riger ant Piping
(m m) Indoo r Fa n ( diameter×length )
(dB /A) Indoor Noise Leve l
Dimensi on (L×W×H )
Packi ng (L×W×H )
Net /Gr oss We igh t
Fan Moto r
(m m) Ou td oor Fan (diamet erxhigh )
Ou td oor Noise Leve l d B
(m m) Dimensi on (L×W× H)
(m m) Pa ckin g (L×W×H )
(Kg) Net/ Gross Weigh t
(g ) Ref riger ant Type/We ight
Defro st Mode
FLOOR STANDING 26
26.000 BTU
(W ) C ooling Capac ity 7600(2600~8400)
(W ) C ooling Po wer Inp ut 2485(660~3000)
(A ) C oo ling Curre nt Input 10.8(2. 6~13.0)
EER (W/W)
COP ( W/W)
Model ATL232S DN C9AUA
Type (Ro tary/P ist on/Sc rol l ) R otary
Bra nd HIGH LY
Model MDR-9538-805D
Power Typ e DC
(W ) Po wer In pu t 70W/570rpm
(uF) Cap acity /
Indoo r Fan S peed RPM
(H igh/Med/ Low)
Model MDR-9538-901M
Power Typ e DC
Power Input 100
Capa city /
Ou td oor Fan S peed RP M 850
(m m) Liquid Side/ Gas Side/ Length φ6+φ 12×5000
(m m) Ma x. R efri ger ant Pipe Lengt h
/Ma x. Di ffer ence in Lev el
1- 220-240/5 0
5. 1/A
8400(3500~8600)+2100
2470(900~3200)+2100
10.7(3. 9~13.9)+9.1
3. 8/A
91
1
EEV
2, 3
540/510/430/ 400
φ352×160
1100
~
520×210×1690
618×460×1990
53/64
Φ460×180
6
870×310×700
990×410×780
58/6 2
R410A/2290g
15/5
36
Page 38
USER'S MANUAL
Manufacturer Company:
COPA ISI SISTEMLERI SAN. VE TIC. A.S.
Minareliçavuş OSB Mah. Ceviz Cad. No: 21 16220 Nilüfer, BURSA / TURKEY
T : +90 224 324 74 00
F : +90 224 219 74 70
copa.com.tr
Importer Company:
COPA ISI SISTEMLERI SAN. VE TIC. A.S.
Minareliçavuş OSB Mah. Ceviz Cad. No: 21 16220 Nilüfer, BURSA / TURKEY
T : +90 224 324 74 00
F : +90 224 219 74 70
copa.com.tr
.DTL ,.OC GNINOITIDNOC RIA OGIHC GNODGNAUG
Guangdong / CHINA 528244
T. +86 757 85668114
www.chigogroup.com
,nahsoF ,iahnaN ,iuhsiL ,kraP lairtsudnI ogihC
37
Page 39

Page 40

 Loading...