

Page 1
Menu
Back
All ON
All OFF
1
All ON
Menu Back
All OFF
2
34
56
78
910
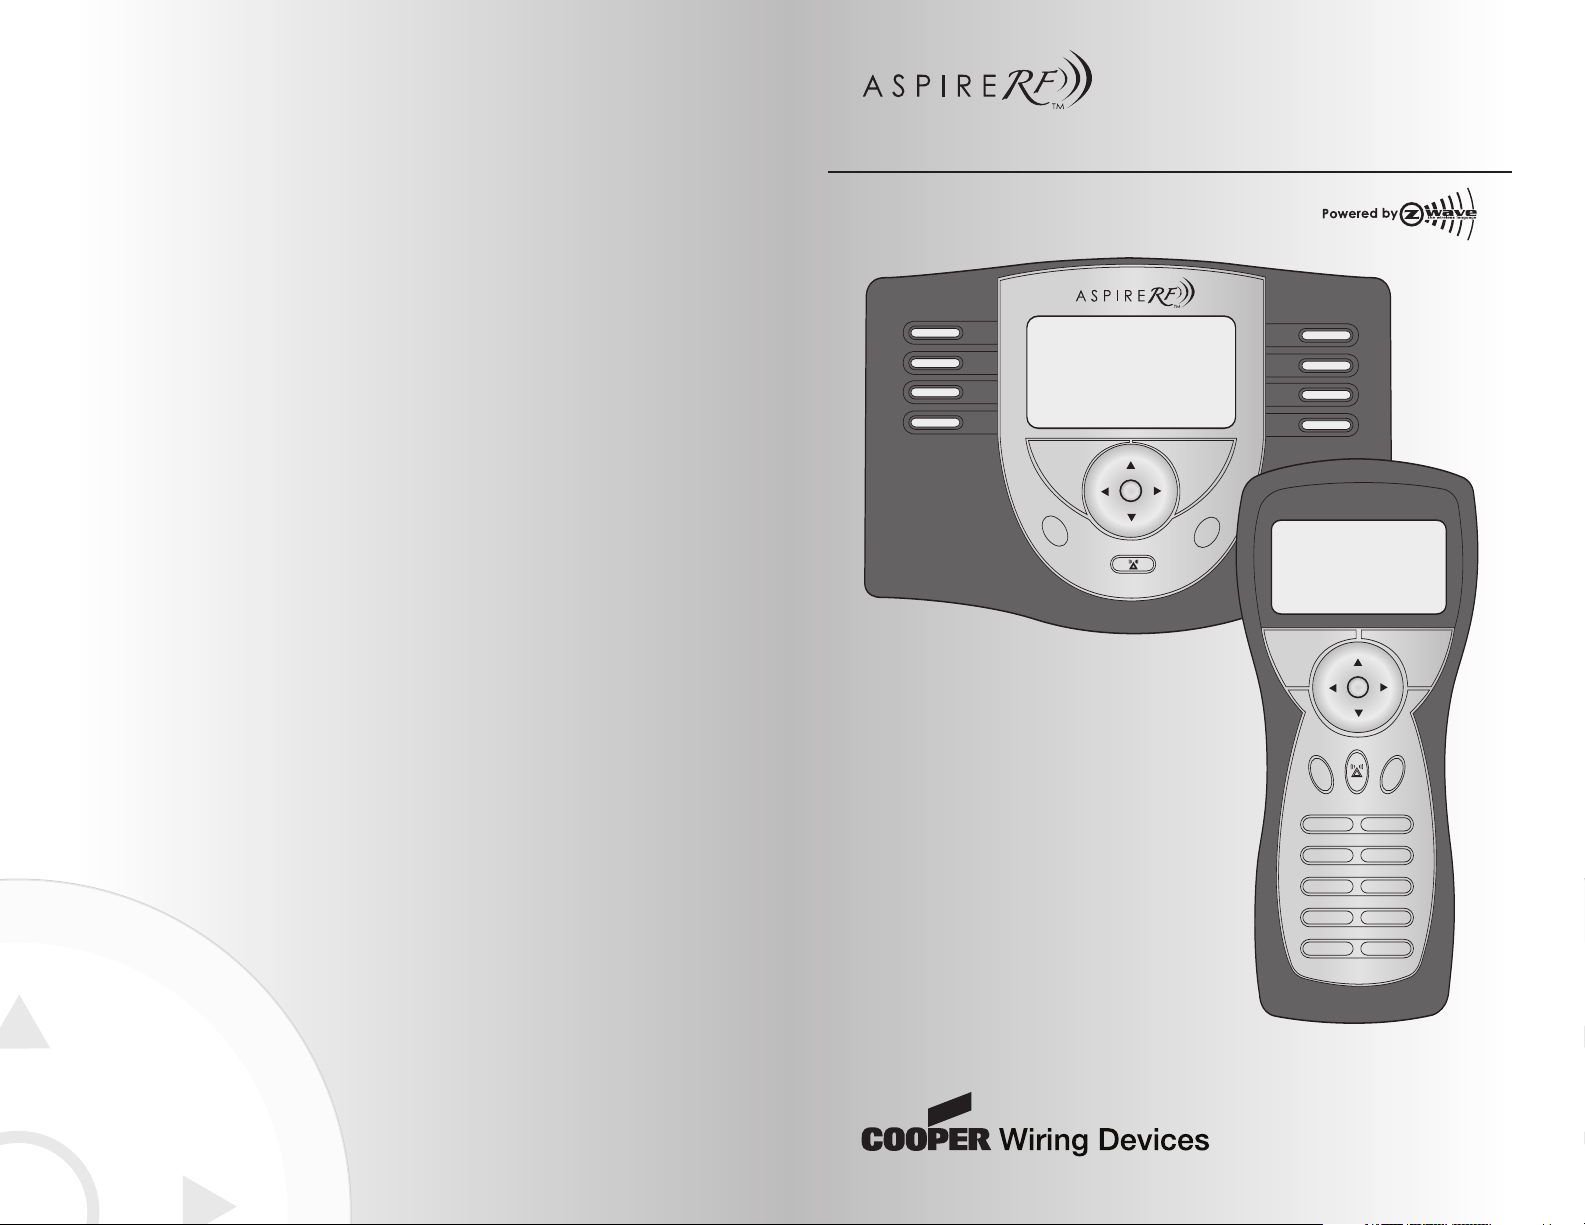
Wireless Control System
User Guide
A Step-by-Step Guide for
Planning, Installing, and
Operating a Complete Central
Home Device Control System
Page 2
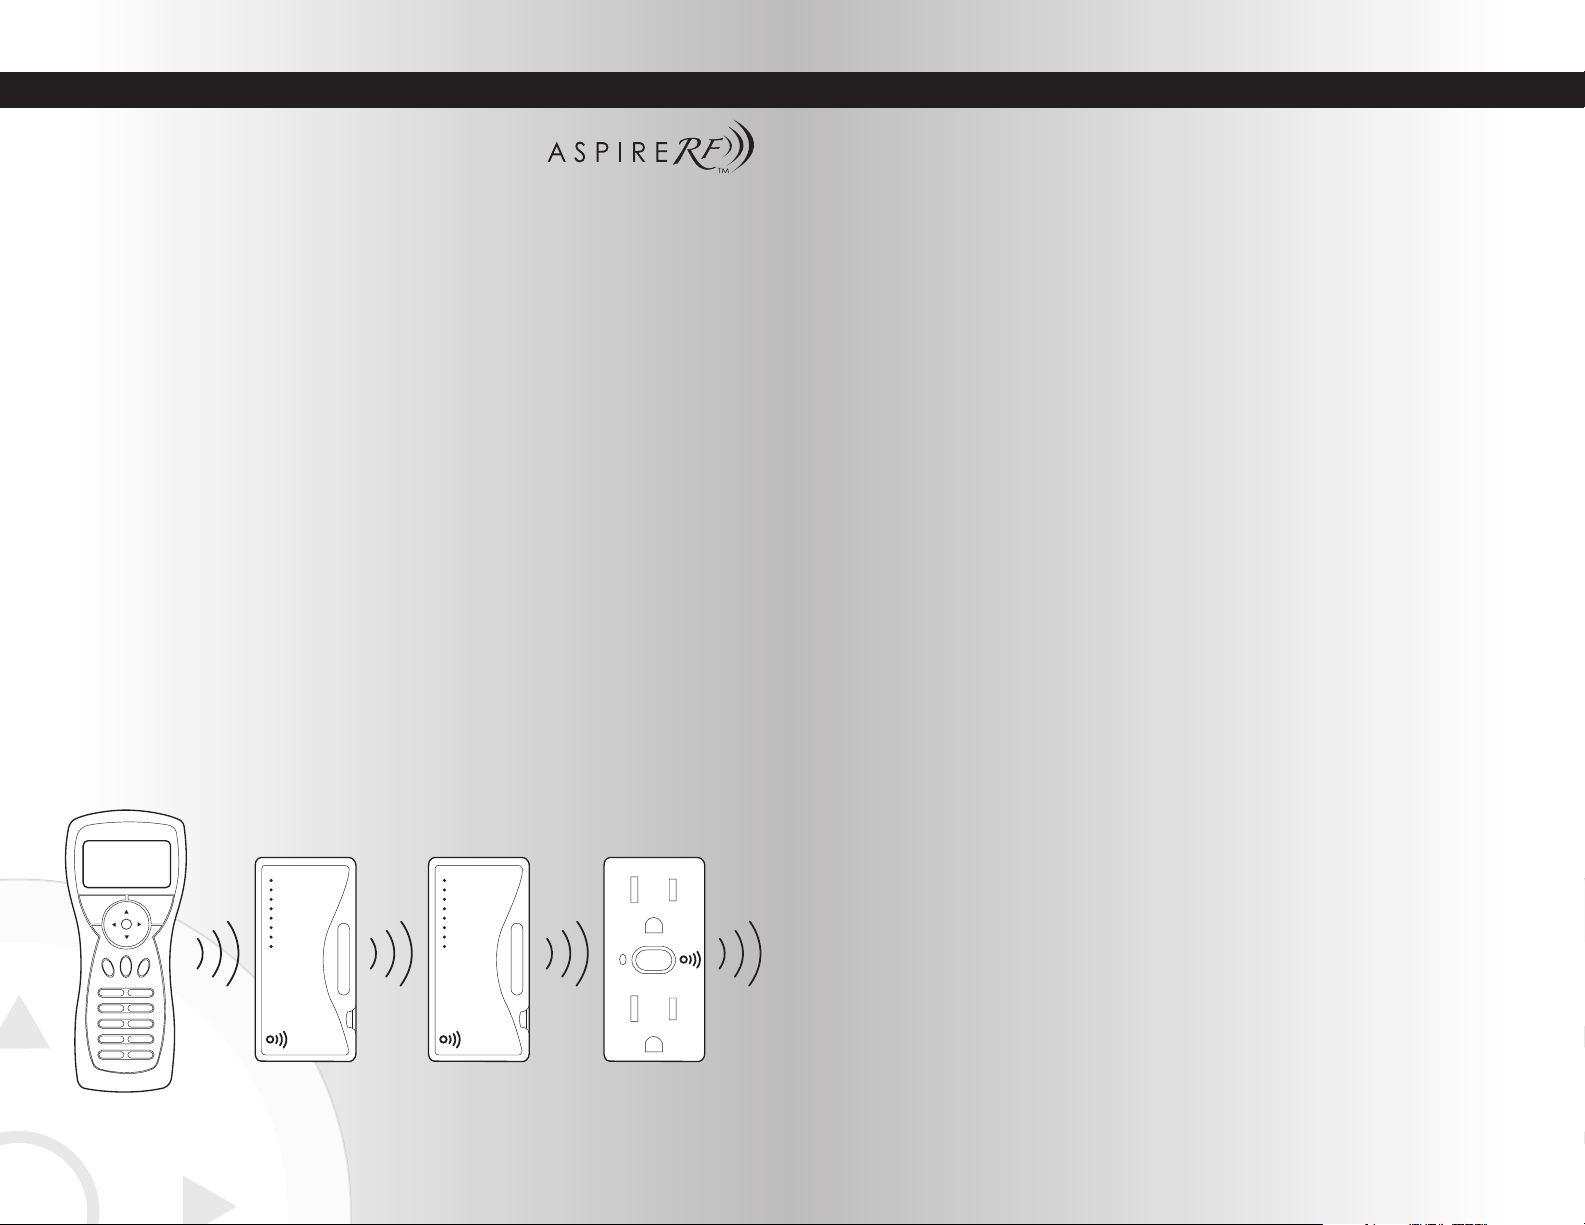
Table of Contents
3
Congratulations!
Congratulations on your Purchase of an
Wireless Control System!
Part of the next generation of convenient, dependable, and user-friendly wireless controls, your new system
allows you to create a wireless, two-way network within your family home, condo, or apartment. The network
puts you in command of a large number of compatible devices from a single, remote control. Some of the
benefits that you will enjoy with your new wireless control system include:
• Convenience and versatility – use the centralized control system for home lighting controls, appliances, and
your thermostat
• Safety – enjoy a safe arrival at night by coming home to a well-lit house by simply triggering your garage
door opener
• Enhanced Home Experience – set the mood for entertainment, romance, or relaxation by setting all light
levels for any group of fixtures with the touch of a button
• Ease of Installation – benefit from the simple and practical set-up process with a quick and painless install
every time
• Time and Energy Savings – turn off groups of lights from any location in the home and reduce energy bills
with one-touch control
How the System Works
Each ASPIRE RF device functions as a repeater, using 900 MHz signals to ensure that every command is
carried out. Rather than depending solely on line-of-sight communications like other technologies, the system
employs Z-Wave™, a technology that is able to get around obstacles by routing commands through other
devices in the network when required.
The controller is a portable device capable of both managing your Z-Wave network and controlling all of the
devices on your network.
In addition to your ASPIRE RF Wireless Control System, ASPIRE offers a fully integrated array of devices and
accessories, including smart dimmers, switches, duplex receptacles, and a wealth of accessories to link your
entire network.
Using This Guide
We recommend that you carefully review the contents of this guide to get the most from your wireless
system. If you have additional questions related to the installation or the operation of your Aspire RF
Wireless Control System, please call 1-866-853-4293 or go to
cooperwiringdevices.com/aspirerf.
I. Safety Information and FCC Information . . . . . . . . . . . . . . . . . . . . . . . . . . . . . . . . . . . . . . . . . . . . . . . . . . . . . . . . . . . . . . . . . . . . 4
II. Quick Reference Guide . . . . . . . . . . . . . . . . . . . . . . . . . . . . . . . . . . . . . . . . . . . . . . . . . . . . . . . . . . . . . . . . . . . . . . . . . . . . . . . . . . . . . . . . 5
III. Installing and Activating Devices . . . . . . . . . . . . . . . . . . . . . . . . . . . . . . . . . . . . . . . . . . . . . . . . . . . . . . . . . . . . . . . . . . . . . . . . . . . . 9
Installing a Device . . . . . . . . . . . . . . . . . . . . . . . . . . . . . . . . . . . . . . . . . . . . . . . . . . . . . . . . . . . . . . . . . . . . . . . . . . . . . . . . . . . . . . . . . . . 9
Checking Device Status . . . . . . . . . . . . . . . . . . . . . . . . . . . . . . . . . . . . . . . . . . . . . . . . . . . . . . . . . . . . . . . . . . . . . . . . . . . . . . . . . . . . . 10
Renaming a Device . . . . . . . . . . . . . . . . . . . . . . . . . . . . . . . . . . . . . . . . . . . . . . . . . . . . . . . . . . . . . . . . . . . . . . . . . . . . . . . . . . . . . . . . . 11
Configuring a Device . . . . . . . . . . . . . . . . . . . . . . . . . . . . . . . . . . . . . . . . . . . . . . . . . . . . . . . . . . . . . . . . . . . . . . . . . . . . . . . . . . . . . . . . 12
Activating Individual Devices . . . . . . . . . . . . . . . . . . . . . . . . . . . . . . . . . . . . . . . . . . . . . . . . . . . . . . . . . . . . . . . . . . . . . . . . . . . . . . . 13
Activating ALL ON and ALL OFF . . . . . . . . . . . . . . . . . . . . . . . . . . . . . . . . . . . . . . . . . . . . . . . . . . . . . . . . . . . . . . . . . . . . . . . . . . . . 15
Controlling Devices . . . . . . . . . . . . . . . . . . . . . . . . . . . . . . . . . . . . . . . . . . . . . . . . . . . . . . . . . . . . . . . . . . . . . . . . . . . . . . . . . . . . . . . . . . 16
Controlling the Thermostat . . . . . . . . . . . . . . . . . . . . . . . . . . . . . . . . . . . . . . . . . . . . . . . . . . . . . . . . . . . . . . . . . . . . . . . . . . . . . . . . . . 17
Customizing the All Switch . . . . . . . . . . . . . . . . . . . . . . . . . . . . . . . . . . . . . . . . . . . . . . . . . . . . . . . . . . . . . . . . . . . . . . . . . . . . . . . . . 18
Activating Panic Mode . . . . . . . . . . . . . . . . . . . . . . . . . . . . . . . . . . . . . . . . . . . . . . . . . . . . . . . . . . . . . . . . . . . . . . . . . . . . . . . . . . . . . . 19
Customizing Panic Group . . . . . . . . . . . . . . . . . . . . . . . . . . . . . . . . . . . . . . . . . . . . . . . . . . . . . . . . . . . . . . . . . . . . . . . . . . . . . . . . . . 19
IV. Creating and Controlling Scenes . . . . . . . . . . . . . . . . . . . . . . . . . . . . . . . . . . . . . . . . . . . . . . . . . . . . . . . . . . . . . . . . . . . . . . . . . . . . 21
Creating a Scene . . . . . . . . . . . . . . . . . . . . . . . . . . . . . . . . . . . . . . . . . . . . . . . . . . . . . . . . . . . . . . . . . . . . . . . . . . . . . . . . . . . . . . . . . . . . . 21
Activating a Scene . . . . . . . . . . . . . . . . . . . . . . . . . . . . . . . . . . . . . . . . . . . . . . . . . . . . . . . . . . . . . . . . . . . . . . . . . . . . . . . . . . . . . . . . . . . 23
Creating Favorite Scenes . . . . . . . . . . . . . . . . . . . . . . . . . . . . . . . . . . . . . . . . . . . . . . . . . . . . . . . . . . . . . . . . . . . . . . . . . . . . . . . . . . . . 24
Renaming a Scene . . . . . . . . . . . . . . . . . . . . . . . . . . . . . . . . . . . . . . . . . . . . . . . . . . . . . . . . . . . . . . . . . . . . . . . . . . . . . . . . . . . . . . . . . . 25
Renumbering a Scene . . . . . . . . . . . . . . . . . . . . . . . . . . . . . . . . . . . . . . . . . . . . . . . . . . . . . . . . . . . . . . . . . . . . . . . . . . . . . . . . . . . . . . . 26
Deleting a Scene . . . . . . . . . . . . . . . . . . . . . . . . . . . . . . . . . . . . . . . . . . . . . . . . . . . . . . . . . . . . . . . . . . . . . . . . . . . . . . . . . . . . . . . . . . . . . 27
Editing a Scene . . . . . . . . . . . . . . . . . . . . . . . . . . . . . . . . . . . . . . . . . . . . . . . . . . . . . . . . . . . . . . . . . . . . . . . . . . . . . . . . . . . . . . . . . . . . . . 28
Transferring a Scene . . . . . . . . . . . . . . . . . . . . . . . . . . . . . . . . . . . . . . . . . . . . . . . . . . . . . . . . . . . . . . . . . . . . . . . . . . . . . . . . . . . . . . . . 29
V. Creating and Controlling Events . . . . . . . . . . . . . . . . . . . . . . . . . . . . . . . . . . . . . . . . . . . . . . . . . . . . . . . . . . . . . . . . . . . . . . . . . . . . . 29
Creating an Event . . . . . . . . . . . . . . . . . . . . . . . . . . . . . . . . . . . . . . . . . . . . . . . . . . . . . . . . . . . . . . . . . . . . . . . . . . . . . . . . . . . . . . . . . . . . 29
Activating or Deactivating an Event . . . . . . . . . . . . . . . . . . . . . . . . . . . . . . . . . . . . . . . . . . . . . . . . . . . . . . . . . . . . . . . . . . . . . . . 32
Activating or Deactivating All Events . . . . . . . . . . . . . . . . . . . . . . . . . . . . . . . . . . . . . . . . . . . . . . . . . . . . . . . . . . . . . . . . . . . . . . 32
Renaming an Event . . . . . . . . . . . . . . . . . . . . . . . . . . . . . . . . . . . . . . . . . . . . . . . . . . . . . . . . . . . . . . . . . . . . . . . . . . . . . . . . . . . . . . . . . 33
Deleting an Event . . . . . . . . . . . . . . . . . . . . . . . . . . . . . . . . . . . . . . . . . . . . . . . . . . . . . . . . . . . . . . . . . . . . . . . . . . . . . . . . . . . . . . . . . . . . 34
Editing an Event . . . . . . . . . . . . . . . . . . . . . . . . . . . . . . . . . . . . . . . . . . . . . . . . . . . . . . . . . . . . . . . . . . . . . . . . . . . . . . . . . . . . . . . . . . . . . 35
VI. Editing and Controlling the Away Feature . . . . . . . . . . . . . . . . . . . . . . . . . . . . . . . . . . . . . . . . . . . . . . . . . . . . . . . . . . . . . . . . . . 36
Editing the Away Feature . . . . . . . . . . . . . . . . . . . . . . . . . . . . . . . . . . . . . . . . . . . . . . . . . . . . . . . . . . . . . . . . . . . . . . . . . . . . . . . . . . . . 36
Activating or Deactivating the Away Feature . . . . . . . . . . . . . . . . . . . . . . . . . . . . . . . . . . . . . . . . . . . . . . . . . . . . . . . . . . . . . . 38
VII. Making Advanced Changes to Your System . . . . . . . . . . . . . . . . . . . . . . . . . . . . . . . . . . . . . . . . . . . . . . . . . . . . . . . . . . . . . . . 39
Creating an Association Between Devices . . . . . . . . . . . . . . . . . . . . . . . . . . . . . . . . . . . . . . . . . . . . . . . . . . . . . . . . . . . . . . . . 39
Replicating Handheld Information to a Second Receiver . . . . . . . . . . . . . . . . . . . . . . . . . . . . . . . . . . . . . . . . . . . . . . . 41
Selecting a New Primary Controller . . . . . . . . . . . . . . . . . . . . . . . . . . . . . . . . . . . . . . . . . . . . . . . . . . . . . . . . . . . . . . . . . . . . . . . 42
Uninstalling a Device . . . . . . . . . . . . . . . . . . . . . . . . . . . . . . . . . . . . . . . . . . . . . . . . . . . . . . . . . . . . . . . . . . . . . . . . . . . . . . . . . . . . . . . . 43
Resetting the System . . . . . . . . . . . . . . . . . . . . . . . . . . . . . . . . . . . . . . . . . . . . . . . . . . . . . . . . . . . . . . . . . . . . . . . . . . . . . . . . . . . . . . . . 44
VIII. Personalizing System Settings . . . . . . . . . . . . . . . . . . . . . . . . . . . . . . . . . . . . . . . . . . . . . . . . . . . . . . . . . . . . . . . . . . . . . . . . . . . . . 45
Setting Current Day and Time . . . . . . . . . . . . . . . . . . . . . . . . . . . . . . . . . . . . . . . . . . . . . . . . . . . . . . . . . . . . . . . . . . . . . . . . . . . . . . 45
Selecting a Language . . . . . . . . . . . . . . . . . . . . . . . . . . . . . . . . . . . . . . . . . . . . . . . . . . . . . . . . . . . . . . . . . . . . . . . . . . . . . . . . . . . . . . . 46
Activating Child Protection . . . . . . . . . . . . . . . . . . . . . . . . . . . . . . . . . . . . . . . . . . . . . . . . . . . . . . . . . . . . . . . . . . . . . . . . . . . . . . . . . . 47
IX. Troubleshooting Guide and Maintenance . . . . . . . . . . . . . . . . . . . . . . . . . . . . . . . . . . . . . . . . . . . . . . . . . . . . . . . . . . . . . . . . . . . 48
Retrieving Version Information about Your System . . . . . . . . . . . . . . . . . . . . . . . . . . . . . . . . . . . . . . . . . . . . . . . . . . . . . . 48
Retrieving Version Information about an Individual Device . . . . . . . . . . . . . . . . . . . . . . . . . . . . . . . . . . . . . . . . . . . . . 49
Removing a Failed Device . . . . . . . . . . . . . . . . . . . . . . . . . . . . . . . . . . . . . . . . . . . . . . . . . . . . . . . . . . . . . . . . . . . . . . . . . . . . . . . . . . 50
Replacing a Failed Device . . . . . . . . . . . . . . . . . . . . . . . . . . . . . . . . . . . . . . . . . . . . . . . . . . . . . . . . . . . . . . . . . . . . . . . . . . . . . . . . . 51
Operating Network Discovery . . . . . . . . . . . . . . . . . . . . . . . . . . . . . . . . . . . . . . . . . . . . . . . . . . . . . . . . . . . . . . . . . . . . . . . . . . . . . . 52
X. Warranty . . . . . . . . . . . . . . . . . . . . . . . . . . . . . . . . . . . . . . . . . . . . . . . . . . . . . . . . . . . . . . . . . . . . . . . . . . . . . . . . . . . . . . . . . . . . . . . . . . . . . . . . . . 53
XI. Ordering Information for Cooper Wiring Devices . . . . . . . . . . . . . . . . . . . . . . . . . . . . . . . . . . . . . . . . . . . . . . . . . . . . . . . . . 54
Page 3
Safety Information & FCC Information
Safety First (Cautions and Warnings)
4
Menu
Back
All ON
All OFF
1
All ON
Menu Back
All OFF
2
34
56
78
910
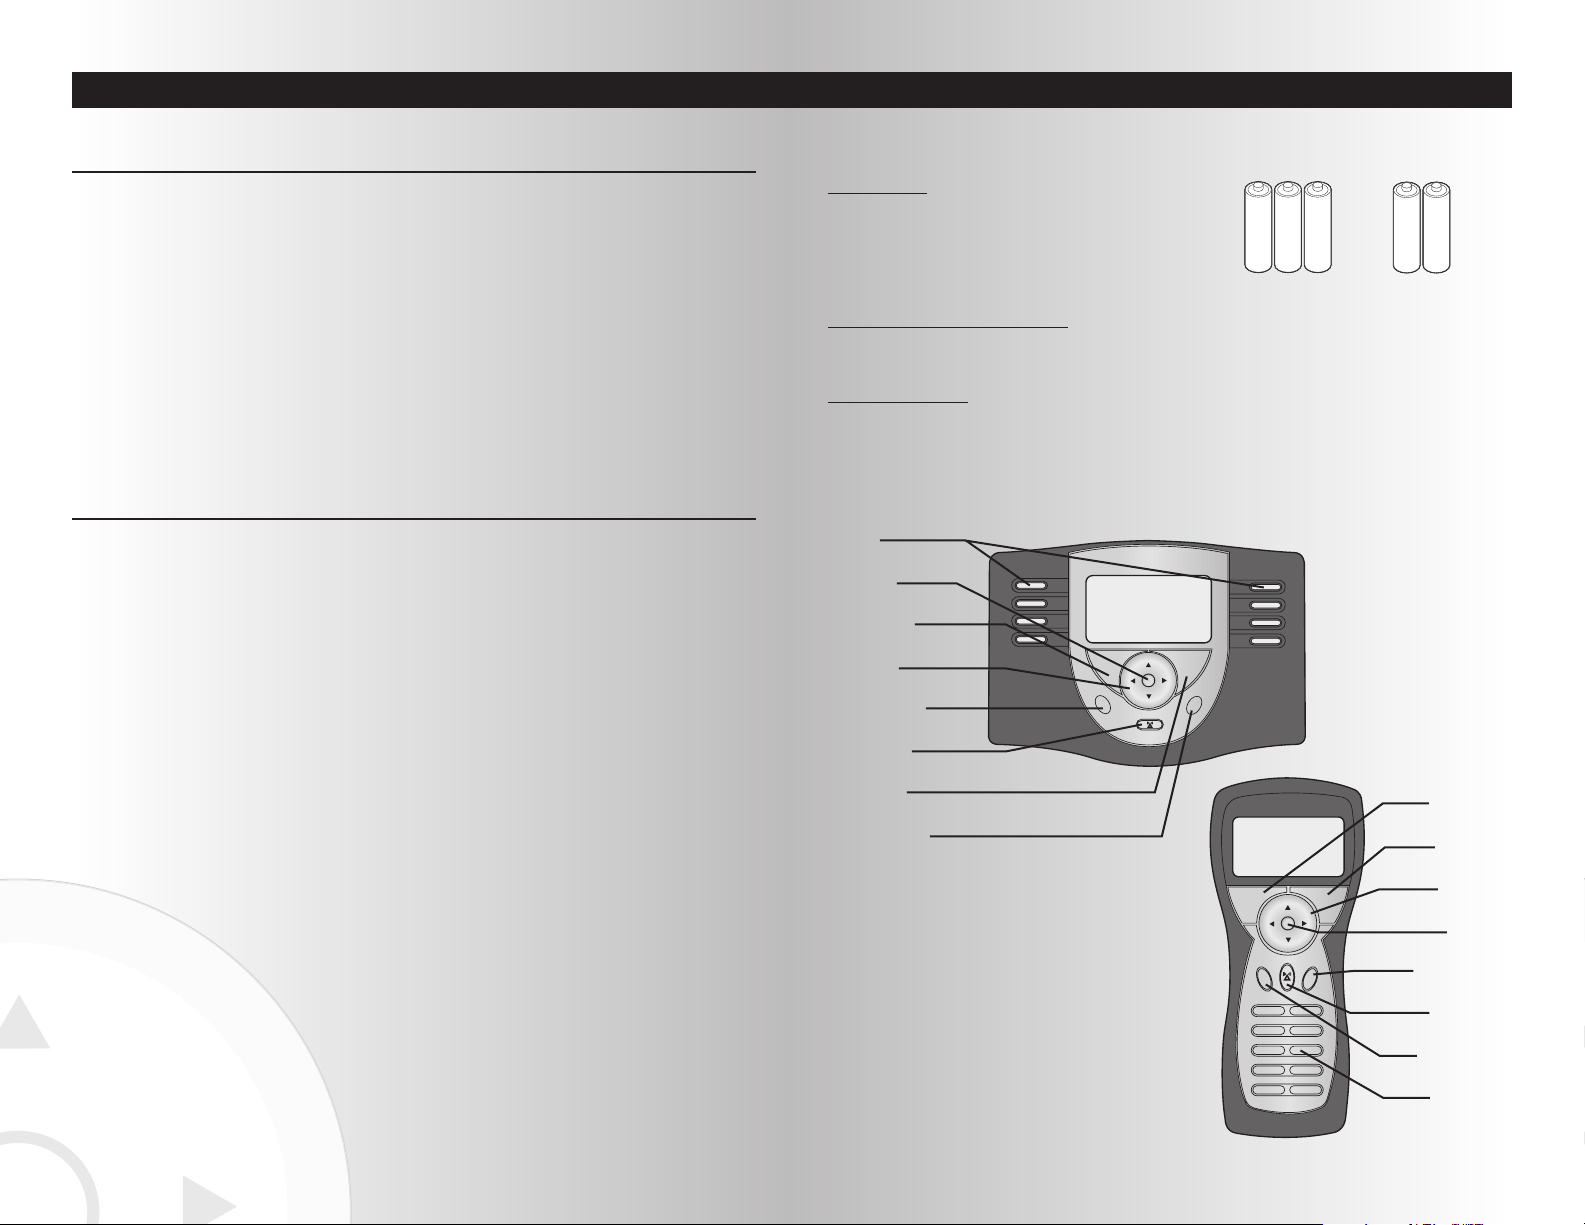
Favorite Scene
buttons
OK button
Menu button
Arrow pad
ALL ON button
Panic button
Back button
ALL OFF button
Menu button
Back button
Arrow pad
OK button
ALL OFF button
Panic button
ALL ON button
Number pad
Quick Reference Guide
5
Lorem ipsum dolor sit amet, consectetuer adipiscing elit. Nullam ac dui. Aliquam commodo adipiscing
lacus. Nunc eget erat. Sed consequat justo non leo. Integer id nisl vel nisi gravida iaculis. Proin vel sapien.
Suspendisse ut nunc. Aenean scelerisque consequat eros. Fusce suscipit. Praesent purus. Sed dictum mi
quis tellus laoreet suscipit. Nunc in turpis. Duis ac lacus. Fusce mattis scelerisque turpis. Mauris quis nisl
id metus consectetuer mattis. Morbi semper condimentum odio. Pellentesque vestibulum. Pellentesque
molestie lobortis pede.
\Aenean tempor mi ut eros. Praesent odio urna, posuere eu, sagittis non, congue ac, urna. Maecenas
vestibulum ipsum et dui. Nullam massa lorem, ornare id, elementum eu, condimentum vitae, felis.
Suspendisse quis nisi. Nulla eu lectus sit amet ligula bibendum molestie. Sed nisi neque, congue eget,
imperdiet a, gravida nec, eros. Curabitur nec mi. Maecenas purus. Phasellus nec velit et justo sollicitudin
iaculis. Duis quis magna. Pellentesque enim ligula, semper ut, lacinia eu, suscipit non, quam.
FCC INTERFERENCE STATEMENT
NOTE: This equipment has been tested and found to comply with the limits for a Class B digital
device, pursuant to Part 15 of the FCC Rules. These limits are designed to provide reasonable
protection against harmful interference in a residential installation. This equipment generates, uses
and can radiate radio frequency energy and, if not installed and used in
accordance with the instructions, may cause harmful interference to radio communications. However,
there is no guarantee that interference will not occur in a particular installation. If this equipment does
cause harmful interference to radio or television reception, which can be determined by turning the
equipment off and on, the user is encouraged to try to correct the interference by one or more of the
following measures:
• Reorient or relocate the receiving antenna.
• Increase the separation between the equipment and receiver.
• Connect the equipment into an outlet on a circuit different from that to which the receiver is
connected.
• Consult the dealer or an experienced radio/TV technician for help.
FCC CAUTION:
Any changes or modifications not expressly approved by Cooper Wiring Devices could void the user’s
authority to operate the equipment.
Cooper Wiring Devices, 302 Cooper Circle, Peachtree City, GA 30269 • 866-853-4293
SECTION IISECTION I
Follow these instructions to get started using your Aspire RF Wireless Control System right away.
Getting Star
ted
To use the wireless control system, first put information about
your home devices into the handheld and tabletop controllers.
In order to power on, each controller requires AA batteries:
Powering On and Of
f the Controllers
Pressing any button will activate the controllers. After thirty seconds of inactivity, the controller will
automatically power off.
Using the Contr
ollers
The controllers use a menu system to guide you. This section will introduce you to the following basic
concepts:
• Controller Buttons • Navigating Menu Screens
• Using the Controller • Creating Custom Names
Handheld controller
2 AA batteries
Tabletop controller
3 AA batteries
Handheld
Controller
Tabletop
Controller
Page 4
Events
1 Movie Night
2 Romantic Dinner
3 Bed time
4 Working
Events
1 Movie Night
2 Romantic Dinner
3 Bed time
4 Working
Devices
Mon 12:00 AM
Back
Quick Reference Guide
• To select a menu item from a list, use the
up and down arrows to highlight your choice.
Navigating Menu Screens
• To go to the menu item you selected,
press the OK button located at the center of
the arrow pad.
• To exit to a menu screen and return to the
previous menu, press the Back button.
7
Devices
Mon 12:00 AM
Quick Reference Guide
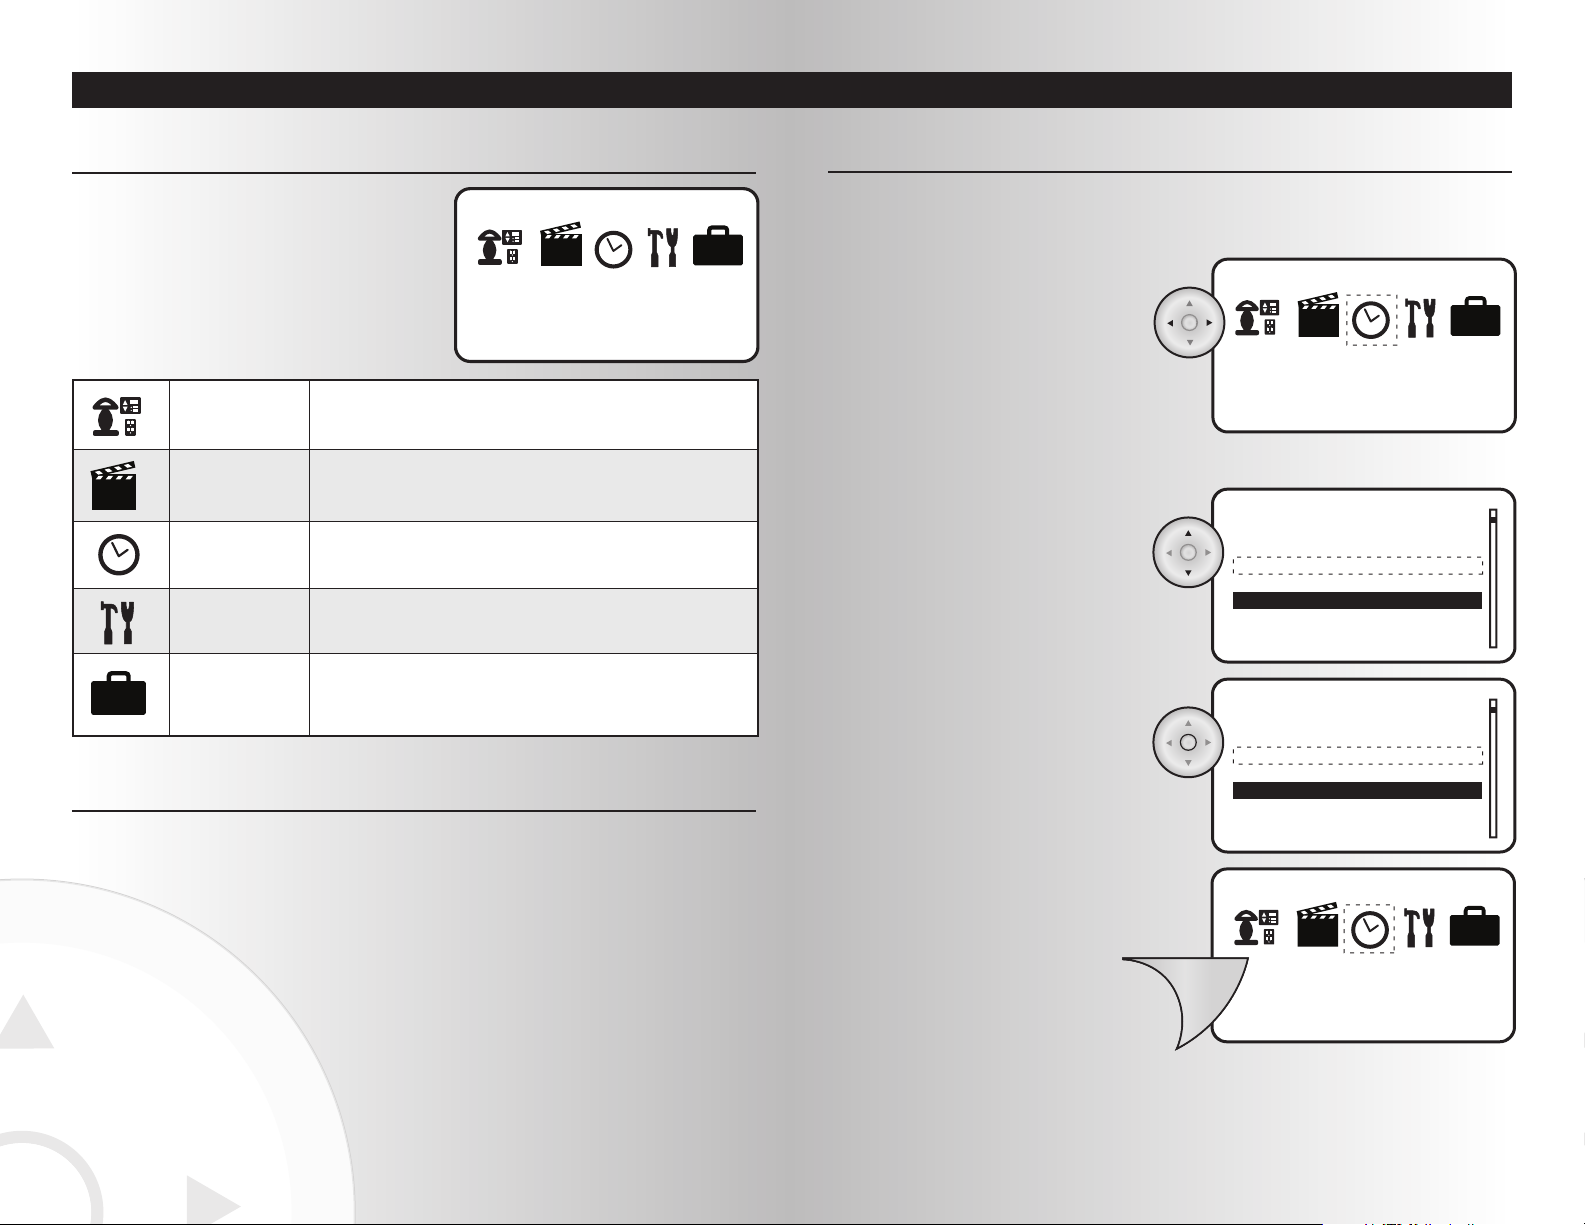
Menu Options
The controllers use an easy-to-navigate menu system
to provide all functionality for the wireless system.
When activating the controller, these icons represent
the five main menus.
Using the Controller
• To select a menu icon, use the left and right
arrows to highlight your choice.
6
Devices Menu
Use this menu to control the basic functions of the devices, such as
installation, de-installation, naming, child protection, and on/off operation.
Scenes Menu
Use this menu to direct any combination of lighting or devices to a desired
level. You can create a list of favorite scenes (such as Bedtime, Movie Time,
or Dinner) that will make it easy to make changes with one-touch control.
Events Menu
Use this menu to schedule one-time or recurring changes to devices in
your home. You can create, name, edit, change, delete, or schedule
individual or groups of events.
Settings Menu
Use this menu to customize your controller with your preferences for
day/time, language, panic mode settings, system information, and much
more.
Away Menu
Use this menu to edit and control functions that give the impression that
your house is occupied when you’re away for an extended
period of time.
You can easily navigate through the menu screens on your controllers. Here are some tips to help you become familiar
with the system:
Devices
Mon 12:00 AM
SECTION II
SECTION II
Page 5
Installing and Activating DevicesQuick Reference Guide
8
B
Enter the event name
B_
Enter the event name
Bathroom 2
Enter the event name
Bathroom 2
Enter the event name
Bathroom 2
Enter the event name
12
34
56
78
9
10
• To find a letter when entering a name,
use the up and down arrows to scroll
through a list containing the alphabet and
a space key.
Creating Custom Names
• To save an entry, press the right arrow once.
The cursor will move one space to the right.
• To enter a number instead of a letter
(handheld controller only), press the
number on the number pad.
• To enter a number instead
of a letter (tabletop
controller only), press one
of the Favorite Scene
buttons. Use the up and
down arrows to scroll
through numbers.
• To erase the previous letter or number,
press the left arrow once.
Several features of the wireless system give the option to create custom names. More detailed instructions
for each of these features is included in this manual. Here are some tips to introduce you to the process:
Device 1_
Device 1
Press the Install Button
on the Device
Added Device 1
Install Device
Control
Install
Associate
Uninstall
Devices
Press the Install Button
on the Device
Install Device
The wireless control system can be programmed to direct up to 232 individual devices (Handheld/Tabletop
is one of the 232 devices). After reviewing this section, you will be able to perform the following basic
functions:
• Installing a Device • Controlling Devices
• Checking Device Status • Controlling the Thermostat
• Renaming a Device • Customizing All Switch
• Configuring a Device • Activating Panic Mode
• Activating Individual Devices • Customizing Panic Group
• Activating ALL ON and ALL OFF
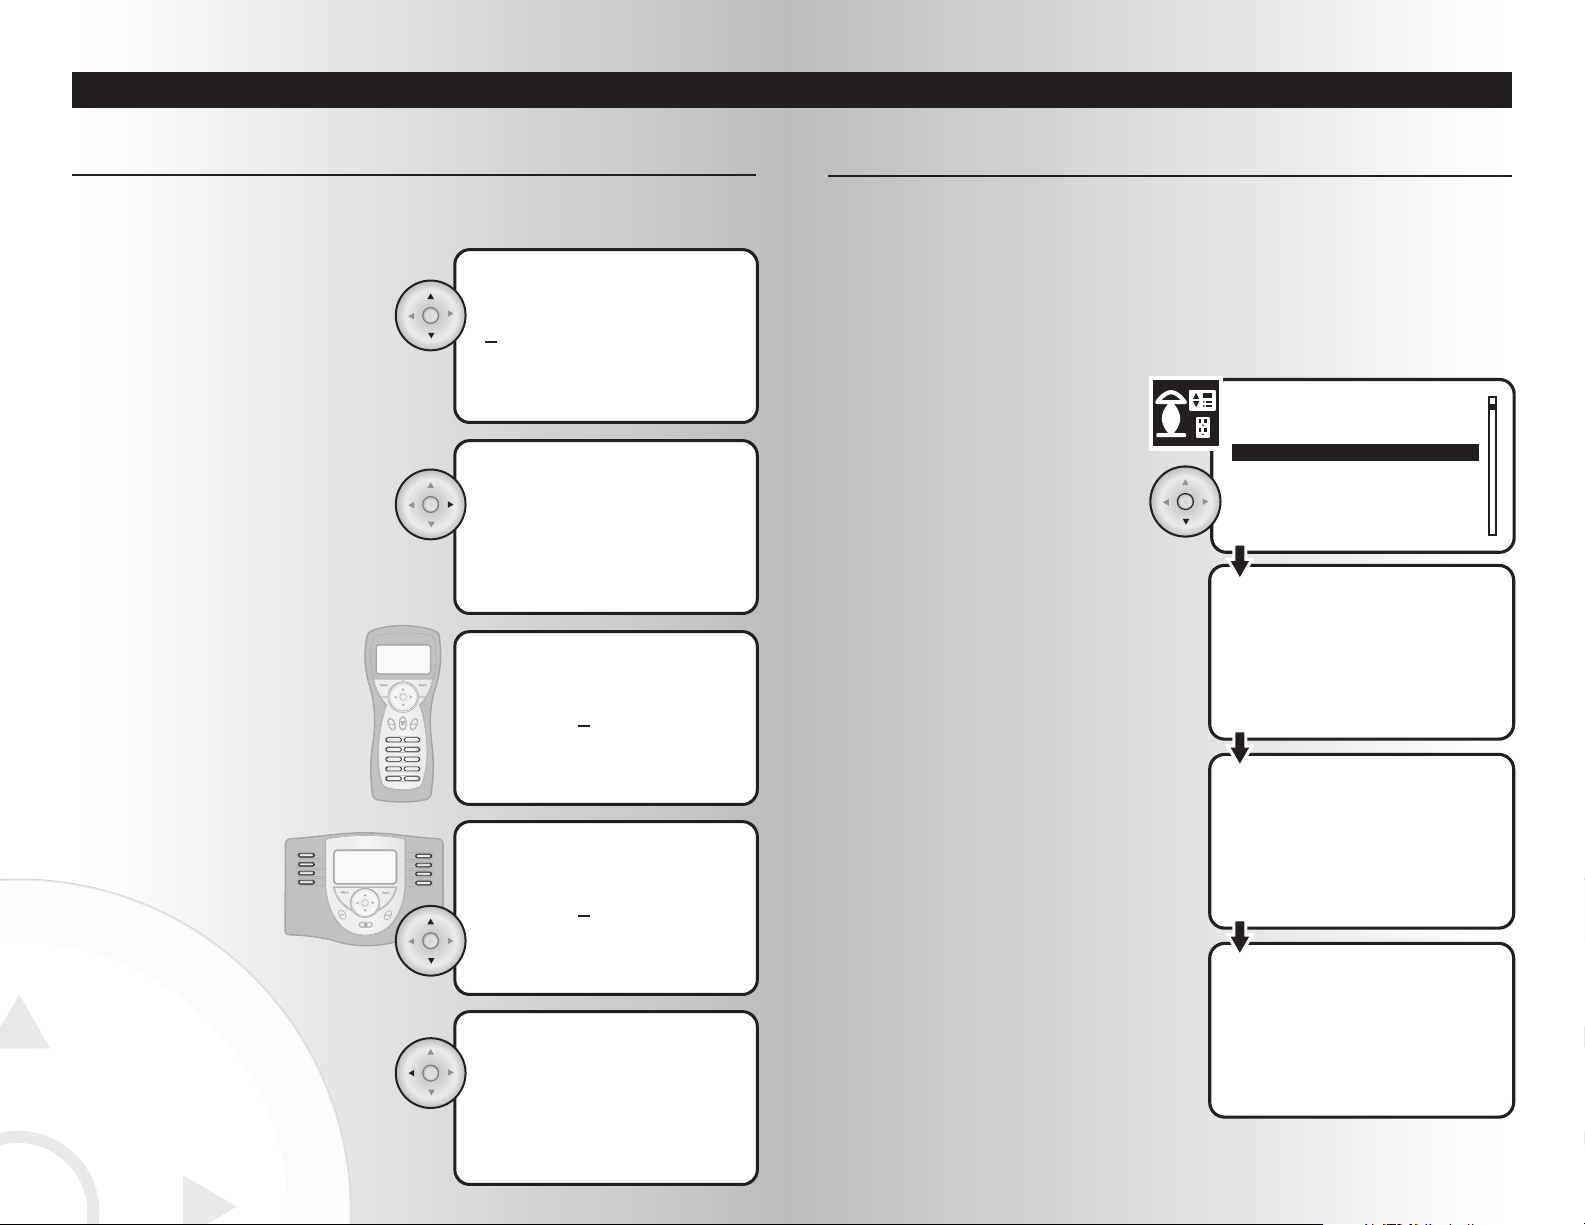
1. Select the “Install” option from the Devices
menu. Press the OK button (Located at the
center of the arrow pad).
2. Press the Install button on the device.
The installation process will last thirty
seconds. If you want to end the installation
process, press the Back button on your
controller during the waiting period.
3. When the installation process has
completed, the controller will assign a name
to the device.
• If the device is a Cooper Wiring product,
the name is read from the device. The device
will automatically be added to the All Switch
and Away groups of the wireless system.
(See pages
XX to learn more about these
features.)
• If the device is not a Cooper Wiring
product, the controller will assign a default
name based on the generic class of the
device. The device cannot be assigned to the
All Switch and Away groups of the system.
Installing a Device
9
SECTION IIISECTION II
Page 6
Installing and Activating Devices
10
SECTION III
Off Delay 10
Panic On Time 1
Panic Off Time 2
Save
Off Delay
Receptacle
8
9
10
11
Rename
Location
Configure
Version
Location
1 Device
2 Receptacle
Devices
Devices
Dining Room
Media Room
Bathroom
Smart Dimmer
All Cooper Wiring devices share common configuration options. You can select your preferred configuration for
each device on your system. The configuration options available are as follows:
• Off Delay • Power On State
• Panic On Time
• Panic Off Time
Configuring a Device (for compatible products only)
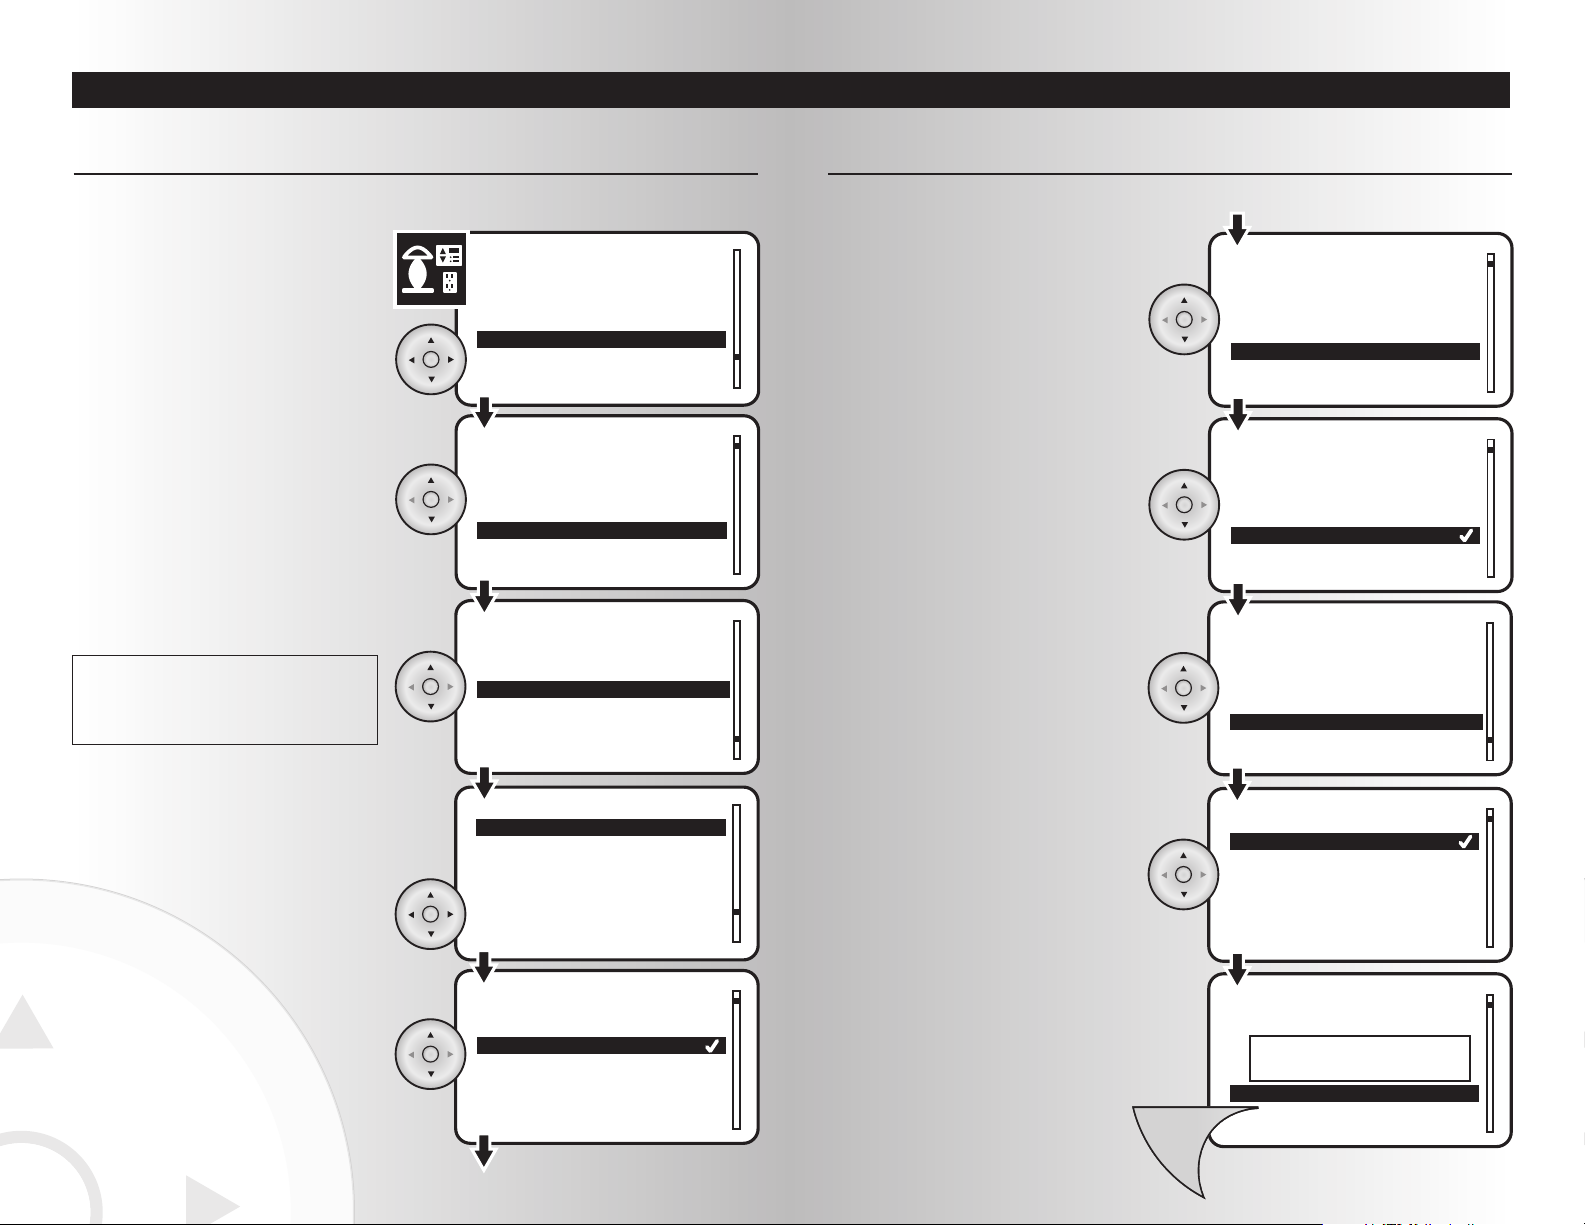
1. Select the “Configure” option from the
Devices menu. Press the OK button.
2. Highlight the location of the device that you would
like to configure. Press the OK button.
3. Highlight the specific device that you would
like to configure. Press the OK button.
4. Highlight Off Delay and press the OK button
to select it. This feature allows gives the user
time to leave a room before the light turns
off. To activate Off Delay, press and hold the
dimmer switch. The LEDs on the device will
flash until the desired amount of Off Delay
time passes.
! If you attempt to configure a device not
manufactured by Cooper Wiring, an error message
will appear. After two seconds, you can press the
Back button to return to the configuration menu.
Installing and Activating Devices
SECTION III
Panic On Time 1
Panic Off Time 2
Power On State Last
Save
Devices
On
Off
Last
Power On State
Panic On Time 1
Panic Off Time 2
Power On State On
Save
Devices
Menu
Device updated
Off Delay 10
Panic On Time 1
Panic Off Time 1
Save
Receptacle
0
1
2
3
Panic Off Time
Configuring a Device (for compatible products only) (continued)
7. Checkmarks indicate the Panic Off Time.
Using the arrow pad, highlight your preferred
Panic Off Time (in seconds). Press the OK
button to select the time. Repeat this for the
Panic On Time.
8. Highlight Power On State and press the OK
button to select it. The Power On state
defines what state the device powers up into
when power is applied.
6. Highlight Panic Off Time and press the OK
button to select it.
9. Checkmarks indicate the Power On State.
Using the arrow pad, highlight your preferred
Power On State. Press the OK button to
select the desired Power On State.
11
5. Checkmarks indicate the Off Delay time.
Using the arrow pad, highlight your preferred
Off delay time (in seconds). Press the OK
button to select the time.
10. Press the Menu button to Save the Device
Configuration. A window will display a
message saying the Device was updated.
Page 7
1312
Installing and Activating Devices
SECTION III
Control
Install
Associate
Uninstall
Dining Room
Media Room
Bathroom
Smart Dimmer
Location
Devices
1 Device 1
2 Receptacle
Devices
Device 1 is ON
1 Device 1
2 Receptacle
Devices
Dim level at 30%
ALL
ON
ALL
OFF
Activating Individual Devices
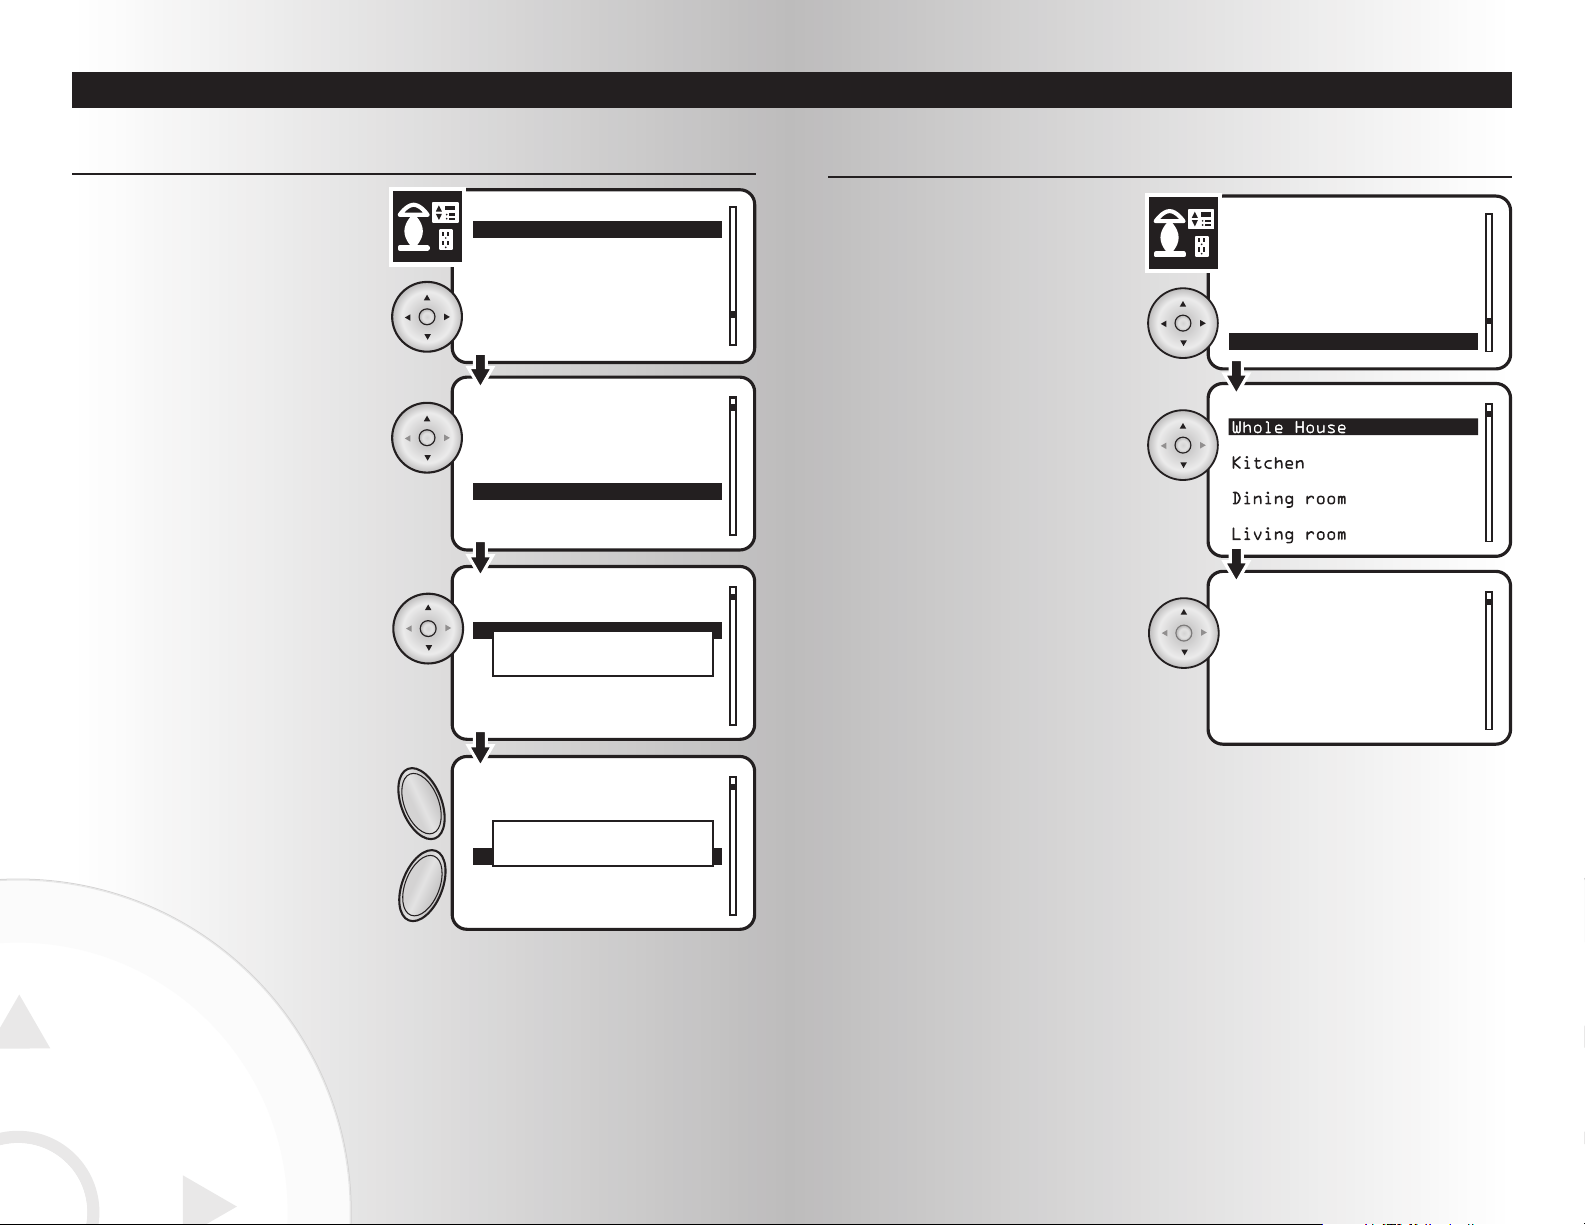
2. Highlight the location of the device you want
to activate. Press the OK button.
3. To turn a device on or off, highlight the
device. Press the OK button. This can also
be done by pressing the ALL ON button to
turn the device on and by pressing the ALL
OFF button to turn the device off.
1. Select the “Control” option from the devices
menu. Press the OK button.
4. For dimmer control, highlight the device then
use the ALL ON and ALL OFF buttons. A
window will display the dim level from 0%
to 100% .
To increase the brightness level, press and
hold the ALL ON button on the controller.
Release the ALL ON button when desired dim
level is reached.
To decrease the brightness level, press and
hold the ALL OFF button on the controller.
Release the ALL ON button when desired dim
level is reached.
Installing and Activating Devices
SECTION III
1. Select the “Device Status” option from the
devices menu. Press the OK button.
Checking Device Status
2. Select the location of the device(s) that you
are checking. Press the OK button.
Location
Devices
Livingroom Light On
Hall Light Off
Bedroom Light 80% 1
Kitchen Light On
Device Status
Remove
Replace
Child Protection
Device Status
3. Scroll through the menu, allowing a few
seconds for the system to fetch the device
state for each device.
Page 8
Installing and Activating Devices
1514
Installing and Activating Devices
1
All ON
Menu Back
All OFF
2
34
56
78
910
ALL
ON
ALL
OFF
Number Pad
1. Using the number pad on the handheld
controller, select the number of the device
you want to activate.
2. To increase the brightness level, press and
hold the ALL ON button on the controller.
Release the ALL ON button when desired dim
level is reached.
To decrease the brightness level, press and
hold the ALL OFF button on the controller.
Release the ALL ON button when desired dim
level is reached.
Each device is automatically renumbered after it is installed. You can use your handheld controller’s
number pad to quickly access and activate any device installed in the wireless control system.
SECTION III SECTION III
Bedroom 9
Bedroom 10
Bathroom 1
Bathroom 2
Location
Devices
Devices
Child Protection
Device Status
Rename
Location
Device 1_
Device 1
Vanity Light_
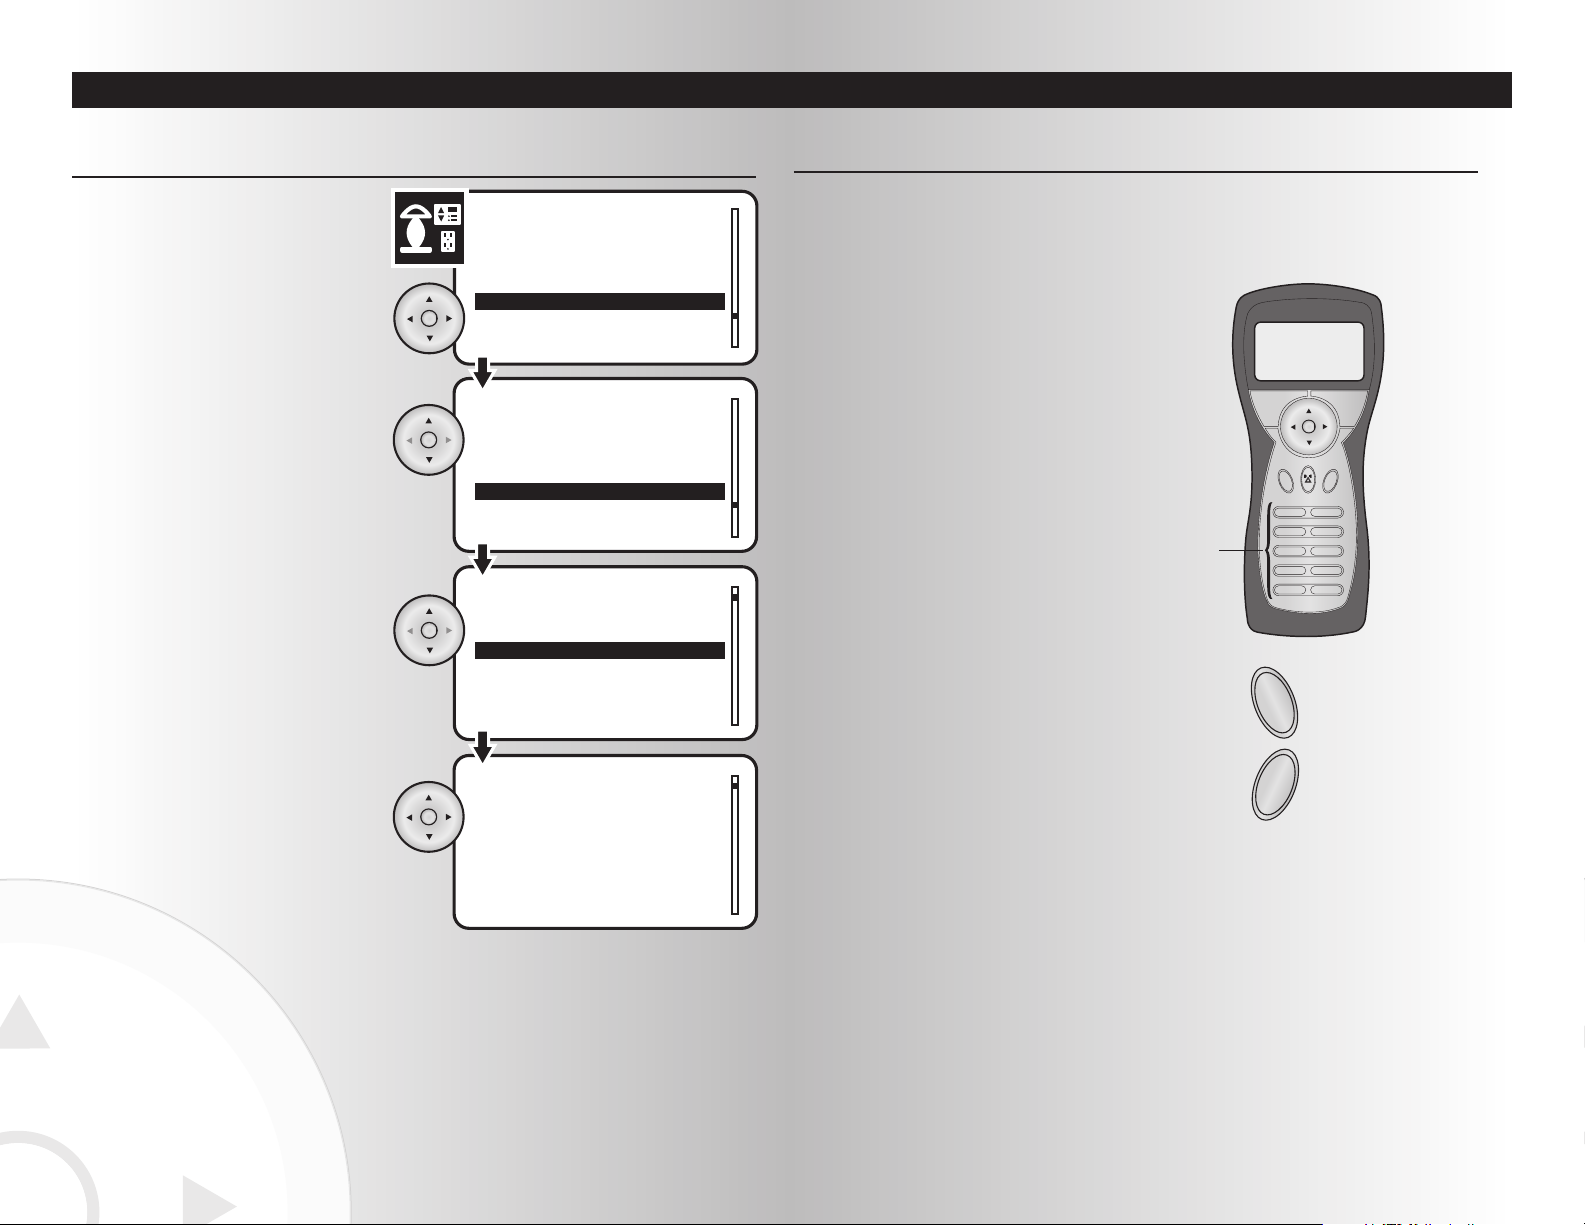
1. Select the “Rename” option from the devices
menu. Press the OK button.
Renaming a Device
2. Highlight the location of the device that you
would like to rename. Press the OK button.
3. Highlight the specific device that you would
like to rename. Press the OK button.
4. Using the arrow pad, enter the new name for
the device. Press the OK button to save the
new name.
Activating Individual Devices (Using the Handheld Controller)
Page 9
Installing and Activating Devices
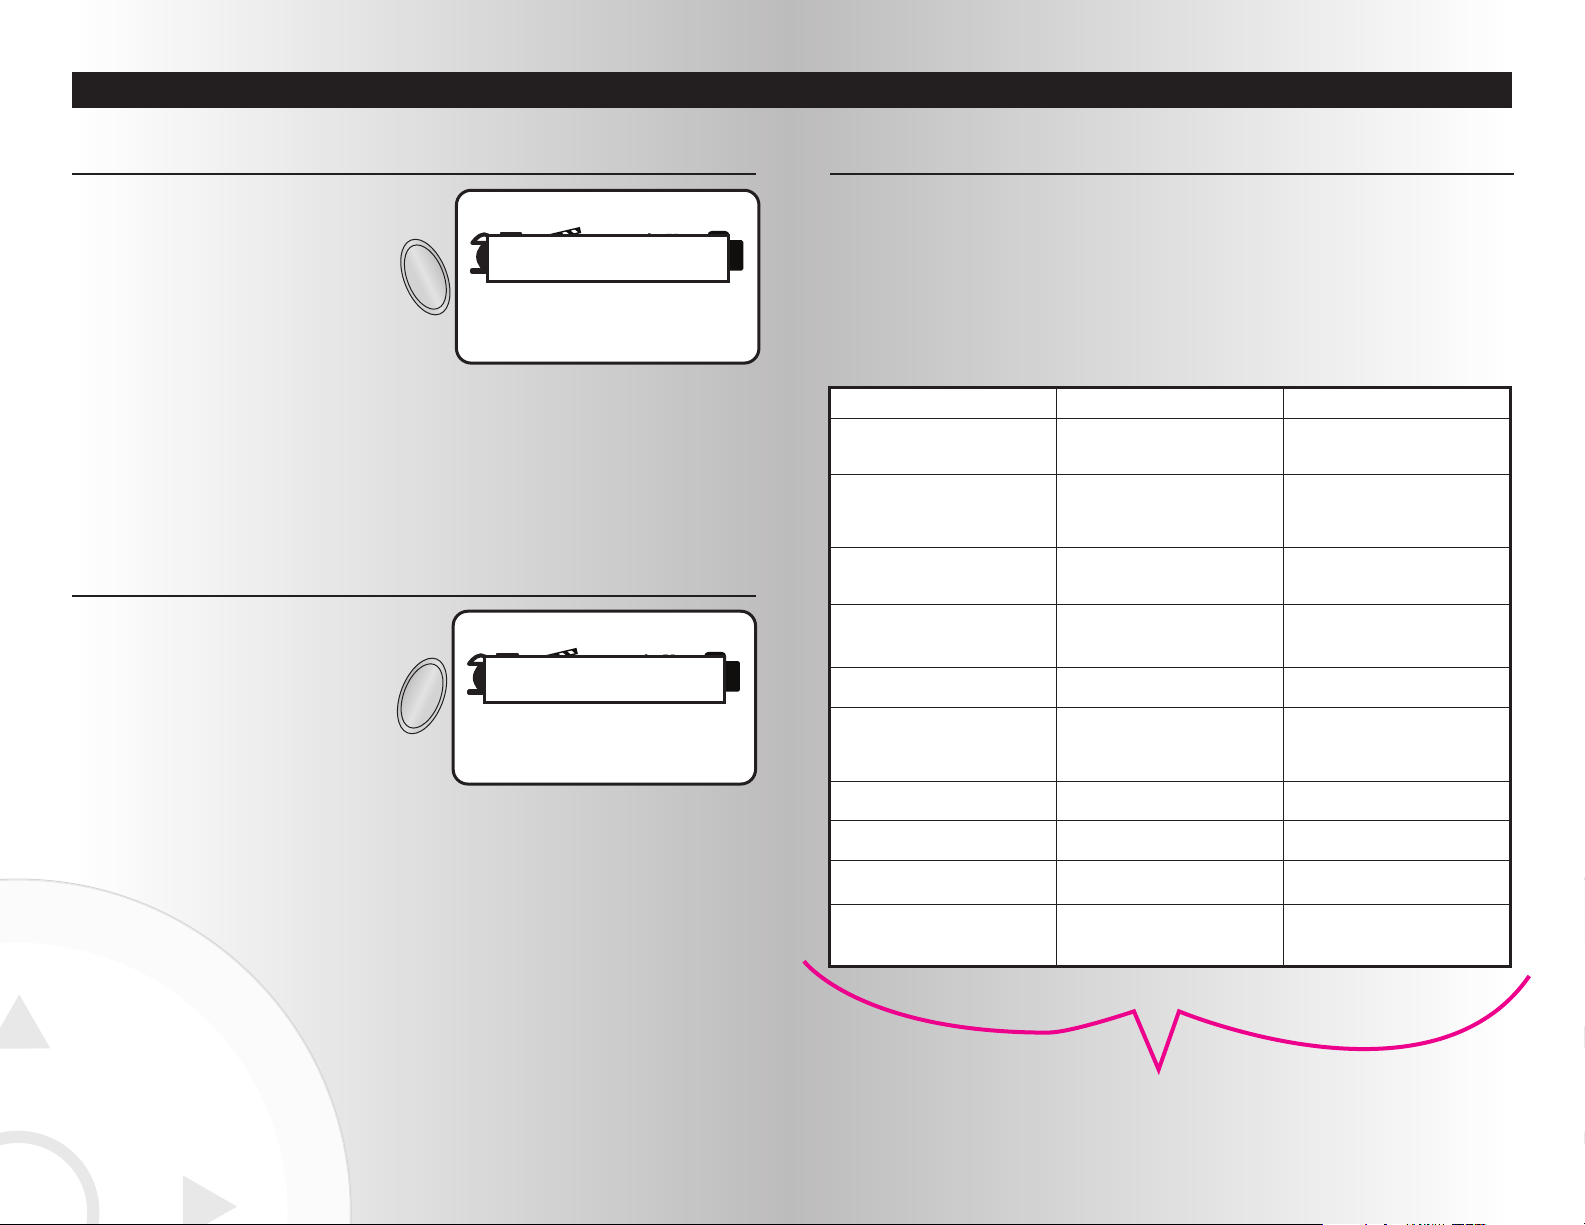
The control menu allows devices to be operated in a specific manner. When a device is entered into the
network, information is retrieved from the device and stored in the wireless control system. The amount and
type of information retrieved determines the extent to which the device can be controlled by the controller.
The system may not recognize all controls for some devices. If you try to select a device that is not
controllable in a specific way, a pop-up window will appear with an error message. The pop-up window
can be cancelled using the Back key, or simply wait two seconds for the message to automatically
disappear.
Below are some examples of devices, their generic/specific type, and the resulting functionality with
your system.
Controlling Devices
Device Generic/Specific Type Functionality
Binary Switch
None/Binary Switch, Binary
Switch/Binary Switch, Binary Power
Switch/Binary Switch
On button turns switch ON and off
button turns switch OFF.
Multilevel Switch
None/Multilevel Switch, Multilevel
Power Switch/Multilevel Power Switch
On button turns switch ON and off
button turns switch OFF. ON button
held down brightens switch.OFF button
held down dims switch.
Toggle Switch
Remote Switch
None/Basic, Binary Toggle Switch/
Binary Toggle Binary Toggle Remote
Switch/Binary Toggle
Both on and off buttons toggle switch.
Toggle Switch
Remote Switch
Multilevel Toggle Switch/Multilevel
Toggle Switch Multilevel Toggle Remote
Switch/Multilevel Toggle
Both on and off buttons toggle switch.
Both buttons held down toggle switch.
Remote Switch
None/Basic, Binary Remote
Switch/Binary Switch
On button turns switch ON and off
button turns switch OFF.
Remote Switch
Multilevel Remote Switch/Multilevel
Switch
On button turns switch ON and off
button turns switch OFF. ON button
held down brightens switch. OFF
button held down dims switch.
Entry Control None/Lock, Door Lock/Lock
On button activates lock and off button
deactivates.
Semi Interoperable Ignore/Basic
On button activates and off button
deactivates.
Window Covering
None/Basic, Simple Window Covering
Control/Basic Window Covering
On button opens window covering and
off button closes window covering.
Remote Controller, Static Controller,
Repeater Slave, Binary Sensor,
Multilevel Sensor, and Pulse Meter
No functionality available.
SECTION III
ALL
ON
Devices
All On Activated
Mon 12:00 AM
1. Press the ALL ON button on the controller. All
of the devices that are part of the ALL ON
group will turn on. Each device can be
programmed to be included with the
ALL ON command.
Activating ALL ON
1. Press the ALL OFF button on the controller.
All of the devices that are part of the ALL OFF
group will turn off. Each device can be
programmed to be included with the
ALL OFF command.
Activating ALL OFF
ALL
OFF
Devices
All Off Activated
Mon 12:00 AM
SECTION III
Installing and Activating Devices
1716
DDoo wwee nneeeedd tthhiiss??
Note from Loudwater–I’m not sure you’d want to have this table
shown to a user. It’s very ZWave specific. I think you need to ask
Cooper and Zensys on this.
Page 10
Installing and Activating Devices
Location
Configure
Version
All Switch
Location
Devices
Devices
Receptacle All Switch
Not Include
All On Only
All Off Onlyy
All On & All Off
Dining Room
Media Room
Bathroom
Bedroom
Menu
1 Device 1
2 Receptacle
ALL
ON
ALL
OFF
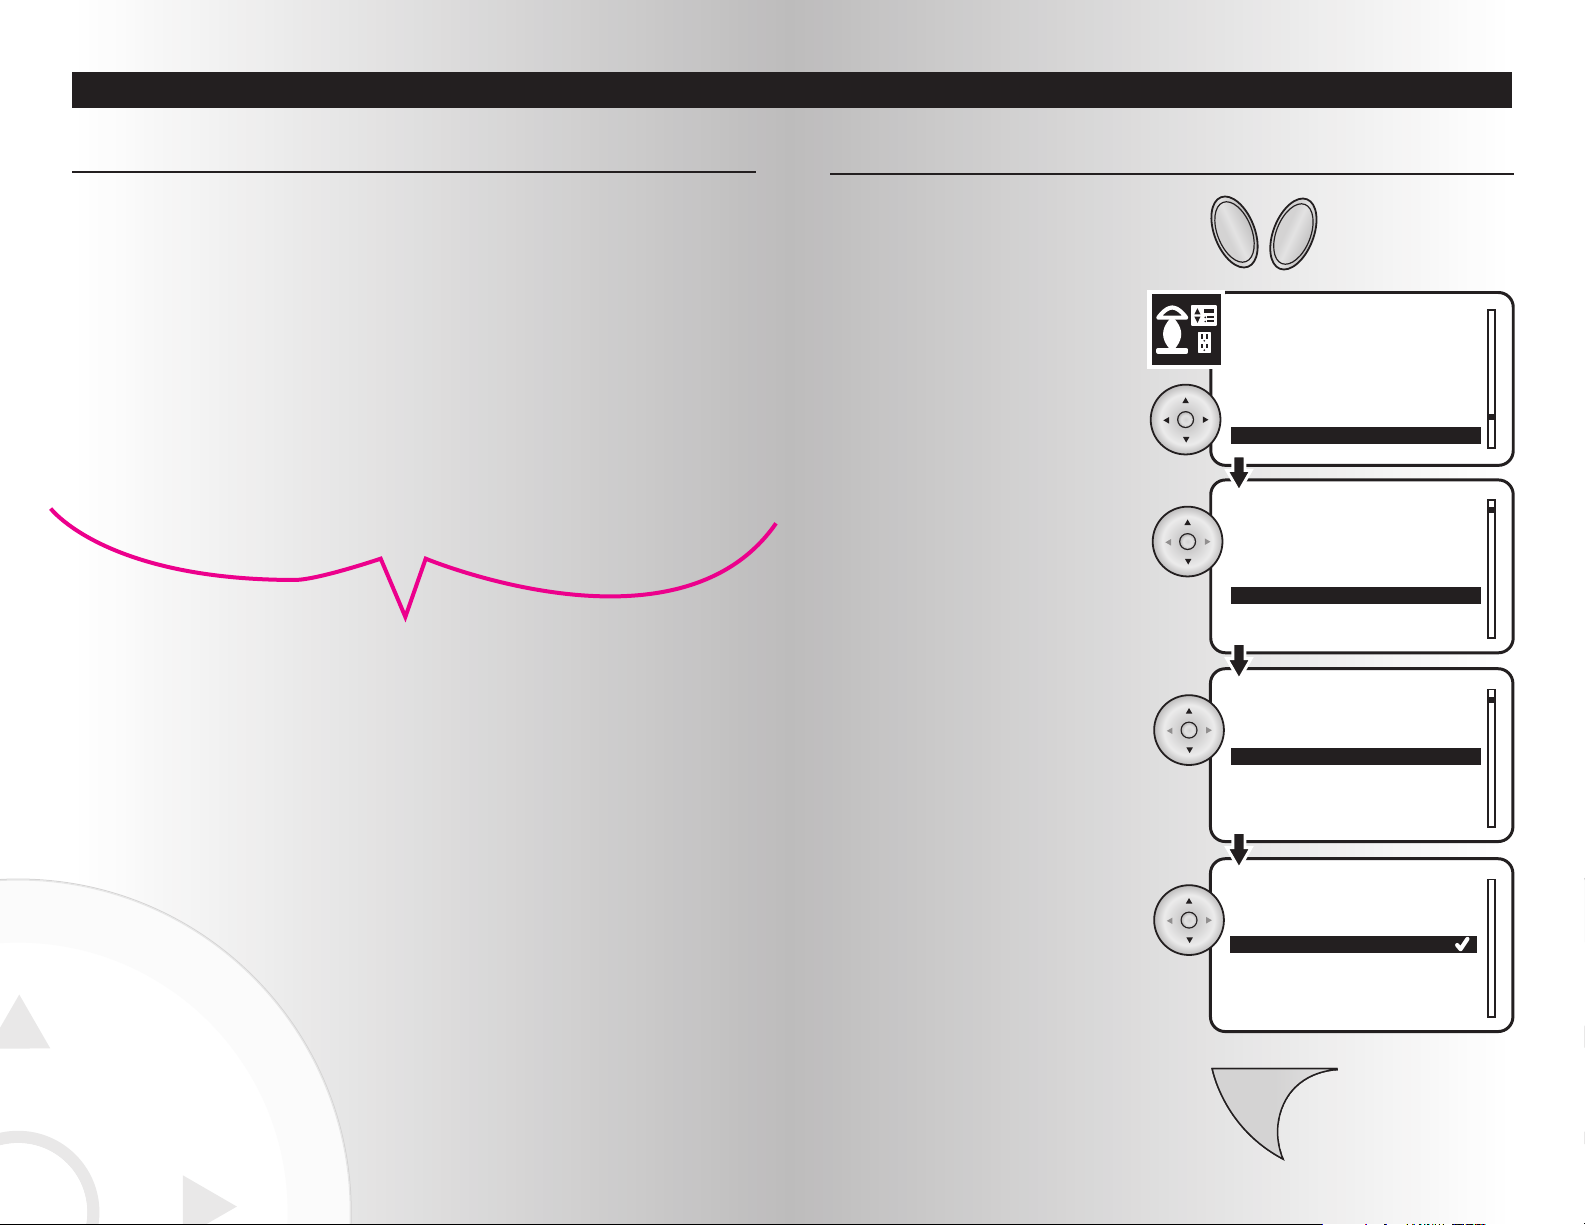
1. Select the “All Switch” option from the
Devices menu. Press the OK button.
Customizing All Switch (for compatible devices only)
2. Highlight the location of the device that you
would like to customize. Press the OK
button.
3. Highlight the specific device you would like
to customize. Press the OK button.
4. Checkmarks indicate the current all switch
settings. Using the arrow pad, highlight your
preferred level of functionality. Press the OK
button to select or deselect the function.
The All Switch feature allows you to select a
group of devices that will or will not be
triggered when the user presses the ALL ON
and ALL OFF buttons.
5. To save the changes, press the Menu button.
6. Repeat Steps 2-4 to customize other devices.
SECTION III
Installing and Activating Devices
Controlling A Thermostat
A thermostat is not directly controllable with the on and off buttons because the device requires control of
multiple points. You may have to follow additional steps to install and control this device within the network
of the wireless control system.
In the Control Menu
If your thermostat is supported by the wireless network, the screen will display the available options once
the device is selected.
Since each manufacturer offers different options, you may have to query the thermostat device to get the
specific features supported by your wireless control system. (DO YOU WANT TO LIST THESE INSTRUCTIONS?)
When the wireless control system receives correct features from the thermostat device, you can change the
settings that appear within the display window.
Use the arrow keys to scroll through the list of features. When the feature you would like to adjust is
highlighted, use the numeric keypad on your controller to enter new values for the thermostat.
In some cases, the fan mode is also supported by the thermostat device. The display will offer the option to
select fan mode and enter another window to make adjustments.
SECTION III
1918
DDoo wwee nneeeedd tthhiiss??
Note from Loudwater–The Handheld/Tabletop does not at the
moment support thermostats.
Page 11
Installing and Activating Devices
Device 1
Receptacle
Change
Panic
Menu
Customizing Panic Group (continued)
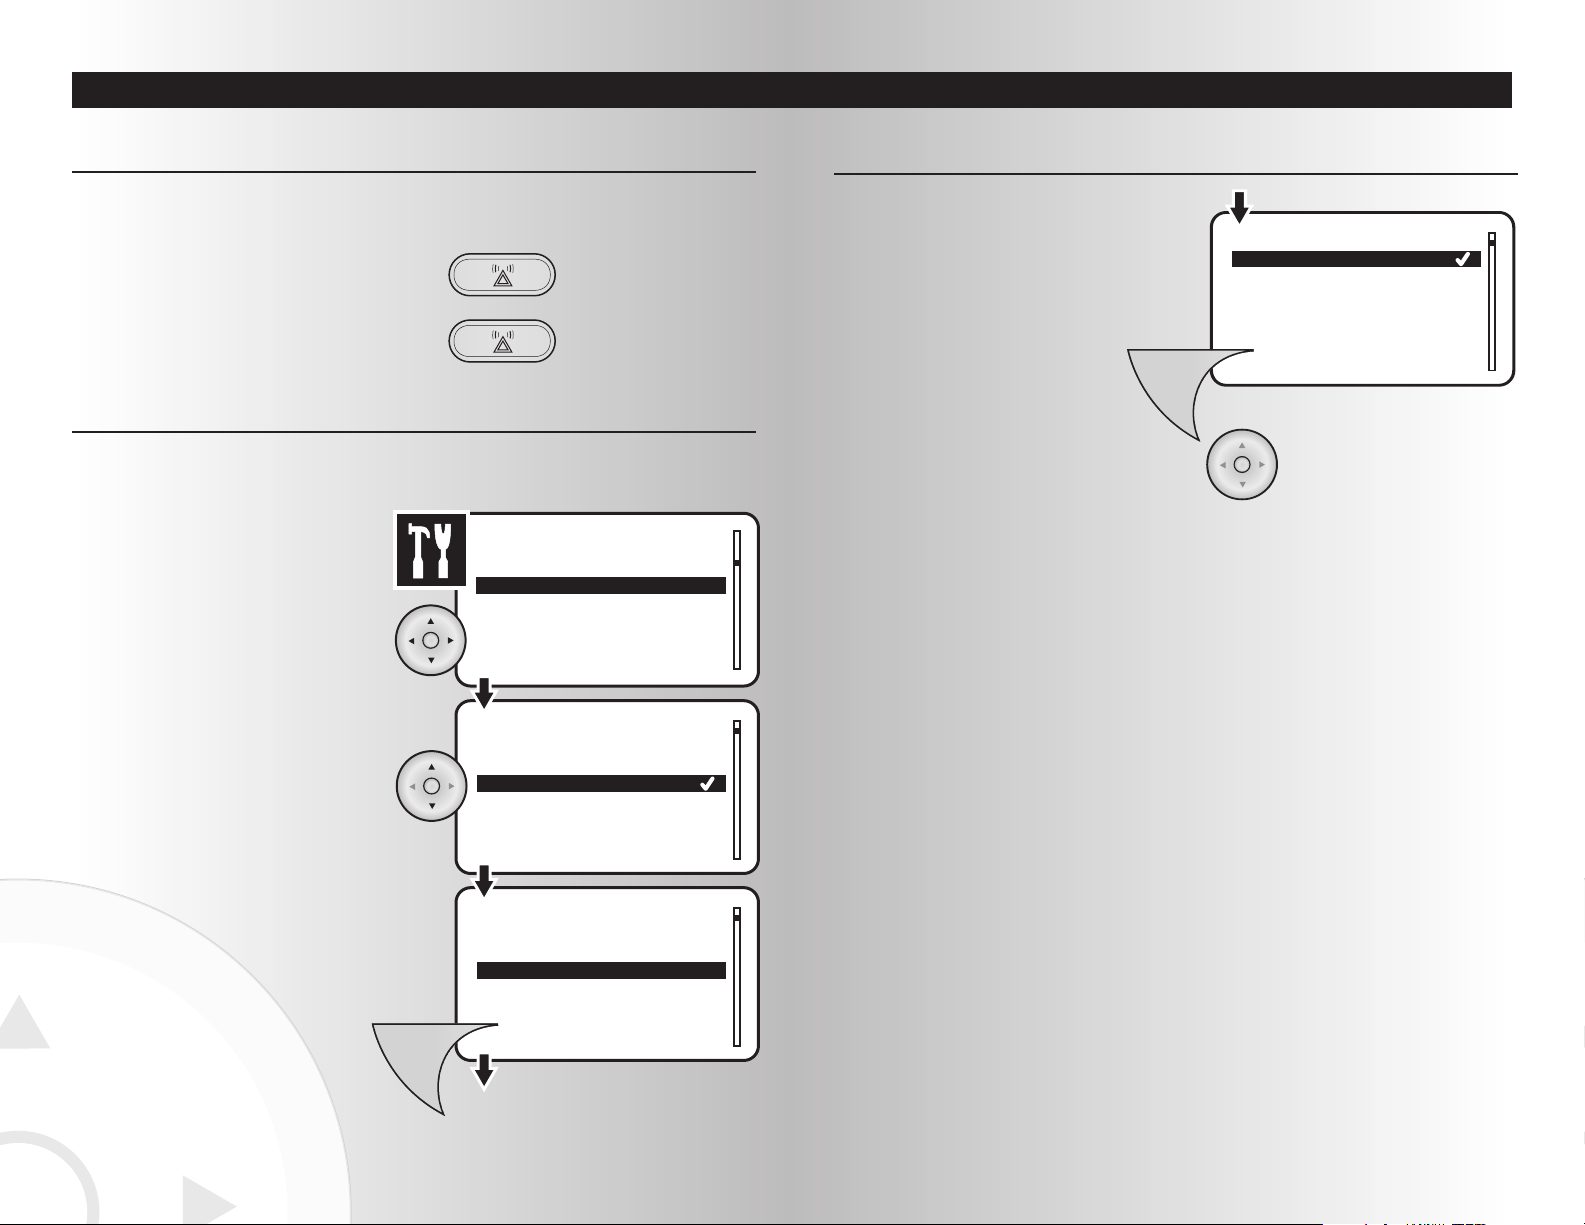
To add a device to the panic group, highlight
the device and press the Menu button. A
checkmark will appear next to the device.
3. To save changes, press the OK button.
SECTION III
Installing and Activating Devices
Activating Panic Mode
Panic mode allows the user to trigger a group of devices to turn off and on in a pattern that attracts
attention.
1. Press the Panic button on the handheld or
tabletop controller.
2. When ready to exit panic mode, press the
Panic button again.
Day/Time
Panic
Language
Version
Device 1
Receptacle
Change
Panic
Settings
Device 1
Receptacle
Change
Panic
Menu
Customizing Panic Group (for compatible devices only)
2. Checkmarks indicate the current panic group
settings. Using the arrow pad, highlight your
preferred level of functionality.
3. To remove a device from the panic group,
highlight the device and press the Menu
button. The checkmark will be removed.
Use this feature to select the group of devices you want included or excluded when you press the Panic
button.
1. Select the “Panic” option from the Settings
menu. Press the OK button.
SECTION III
2120
Page 12
Creating and Controlling Scenes
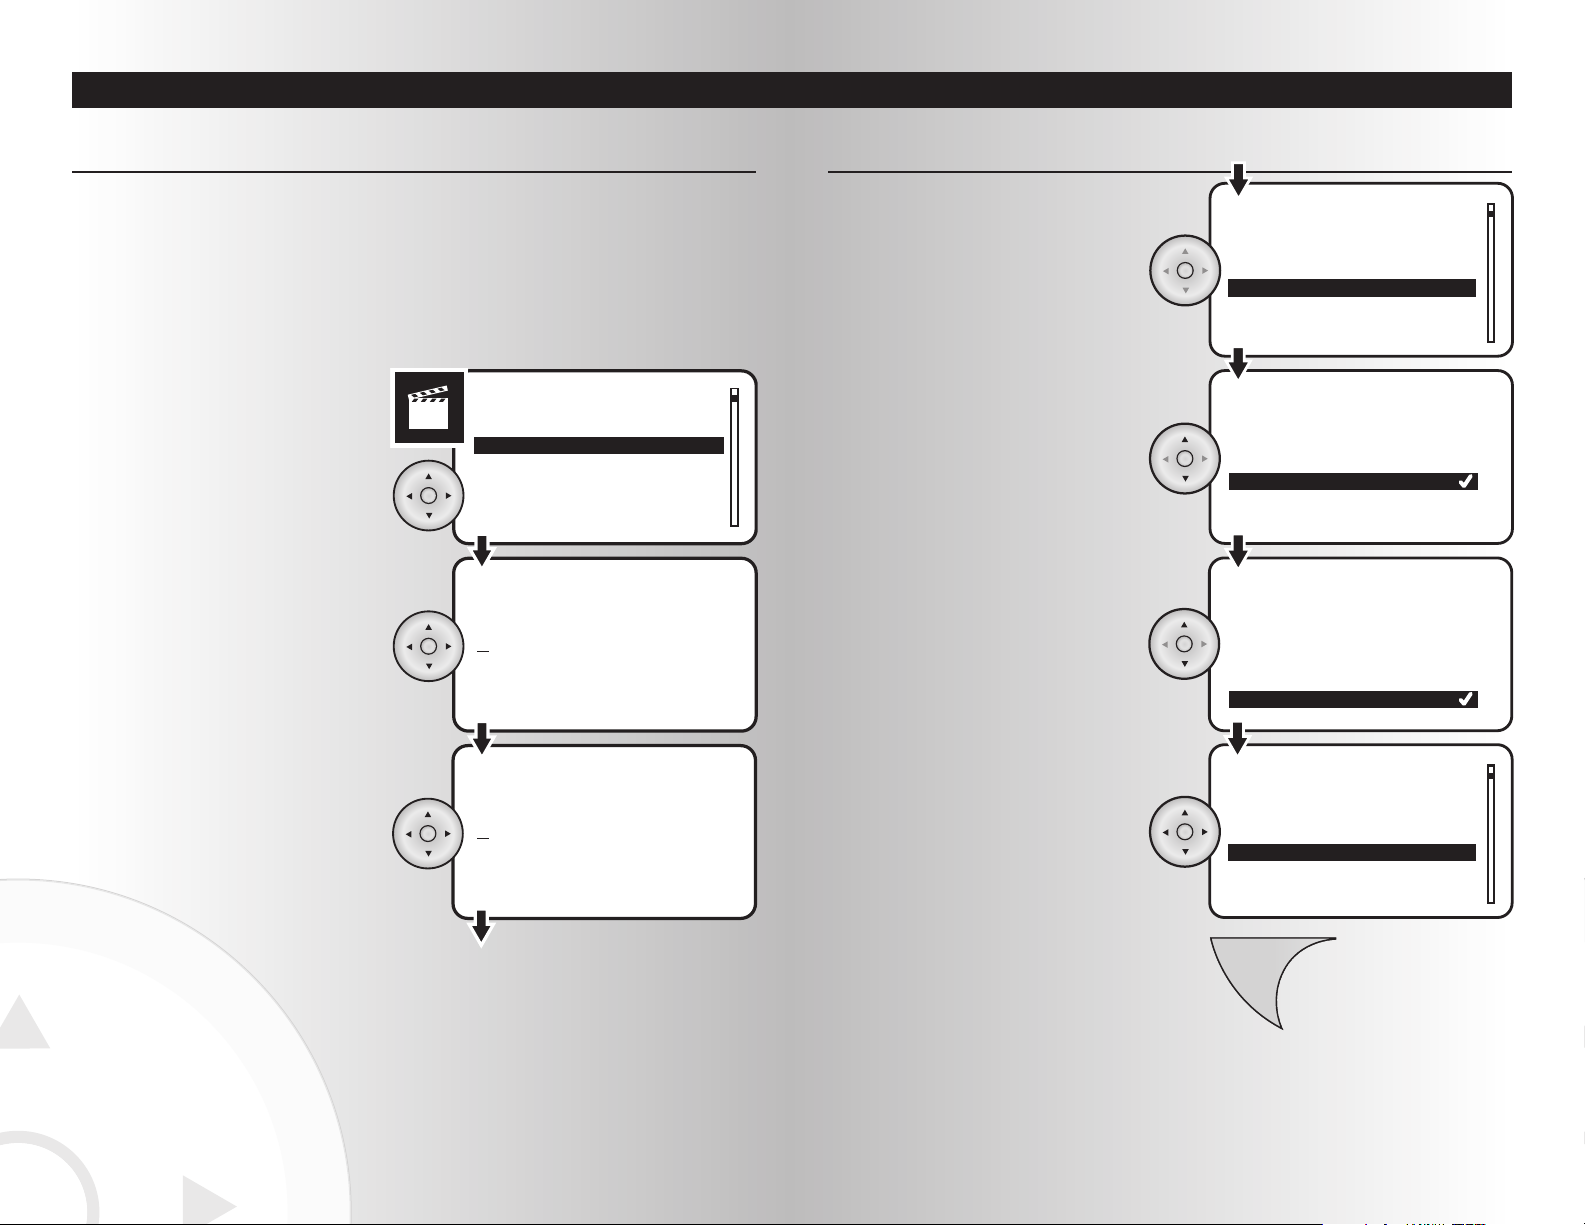
3. Highlight the specific device that you
would like in the scene and press the
OK button.
4. Highlight one of four setting options for
the device: Not used, On, Off, or a
specific light level. Press the OK button.
TToo sseelleecctt aa ssppeecciiffiicc lliigghhtt lleevveell
, you can
select a percentage from 0% to 100%.
Use the up and down arrows to enter the
number. Press the OK button when
finished. (If a device does not allow a
specific light level, you will receive a
window showing an Error message.)
5. Repeat Steps 3-5 for all devices within the
scene.
6. To save the scene, press the Menu button.
Device On
Receptacle Not Used
Lamp 1 10%
Save
Scary movie Lamp 1
Scary movie Lamp 1
Not used
On
Off
10%
Scene Scary movie
Not used
On
Off
10%
Menu
Scene Scary movie
Device On
Receptacle Not Used
Lamp 1 Off
Save
Creating a Scene (continued)
SECTION IV
Creating and Controlling Scenes
SECTION IV
Activate
Create
Delete
Edit
Enter the scene name
Enter the scene name
Bathroom
Scenes
Scary movie
Creating a Scene
1. Select the “Create” option from the Scenes
menu. Press the OK button.
2. Using the arrow pad, enter a name for the
scene.
To use one of the system’s preprogrammed scene names, press the up
arrow and scroll through the options until
you find the desired name. Press the OK
button to save.
A scene is a combination of lighting or appliance devices selected by the user that can be controlled as a
group by the wireless system. Now that you’ve installed devices into the system, you can program your
controllers to create and control scenes in your home. After reviewing this section, you will be able to
perform the following basic functions:
• Creating a Scene • Renumbering a Scene
• Activating a Scene • Deleting a Scene
• Creating Favorite Scenes • Editing a Scene
• Renaming a Scene
If you want another name, press the
down arrow once. Scroll through the
alphabet until you find the first letter of the
name. When the letter appears, press the
right arrow and continue the process until
the name is spelled out. Press the OK
button to save.
2322
Page 13
Creating and Controlling Scenes
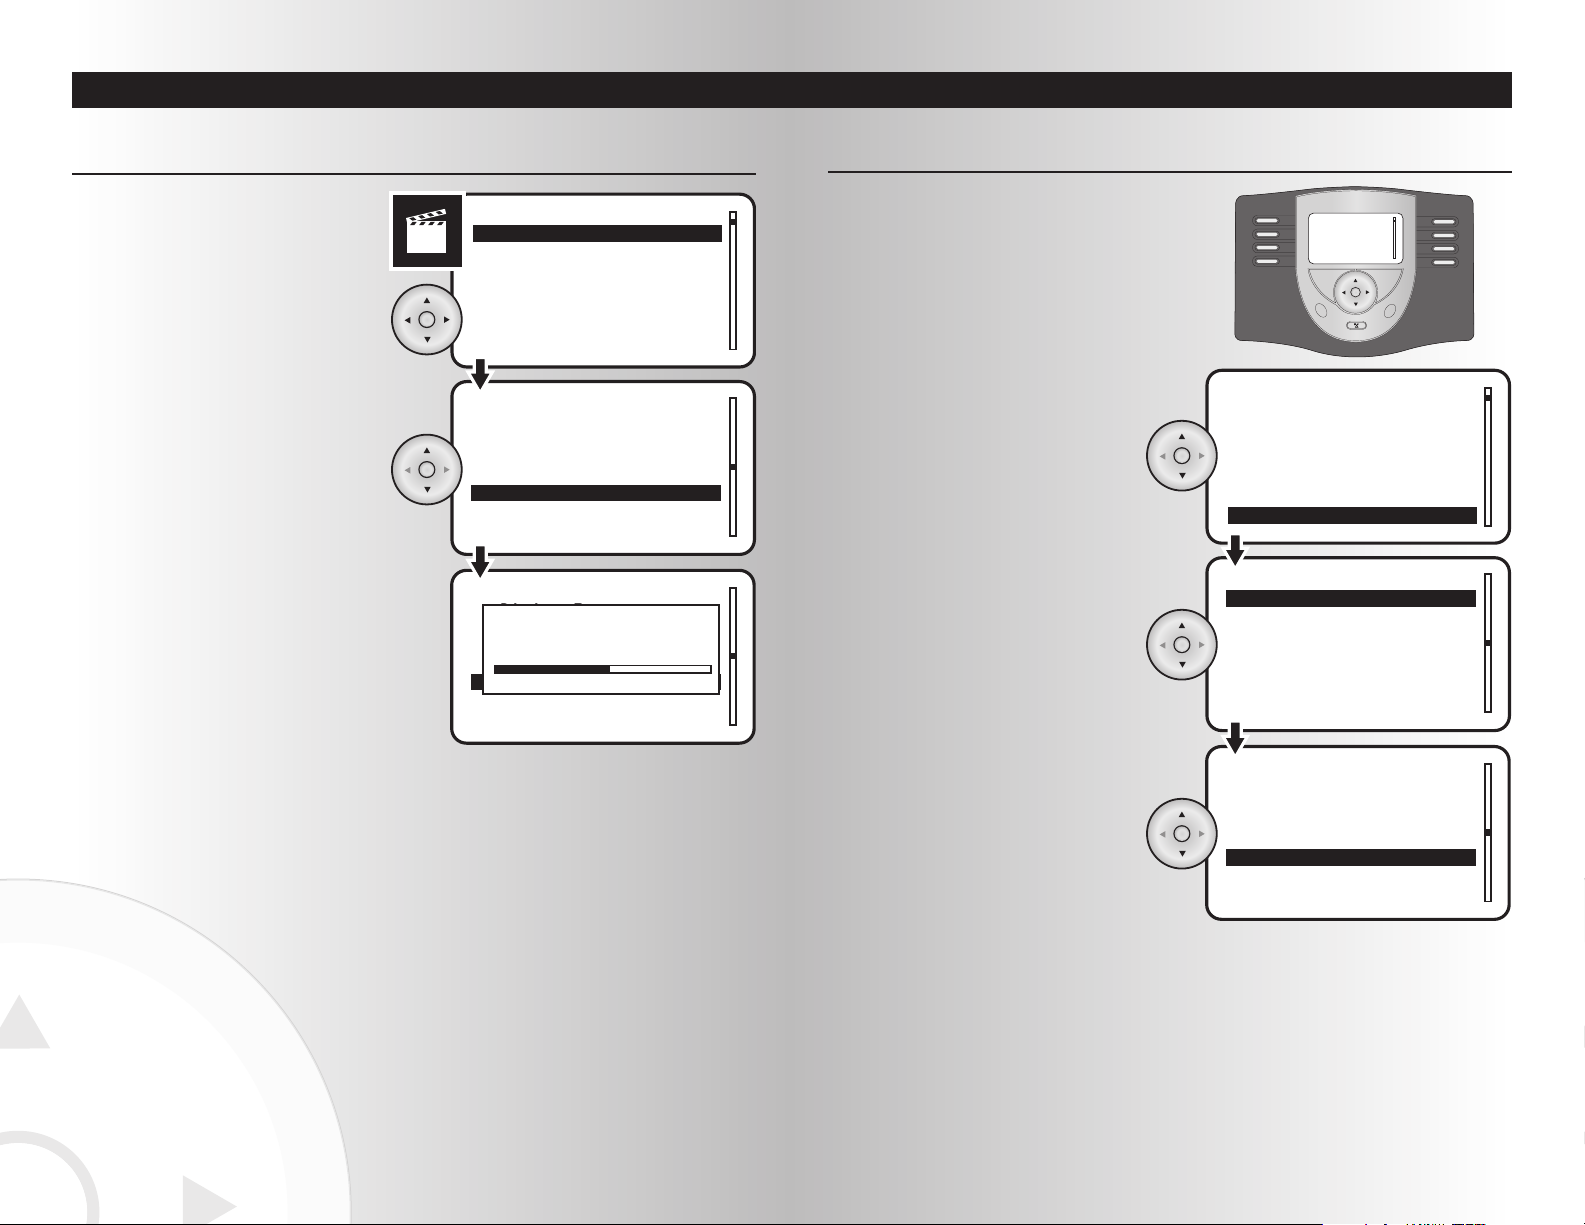
1. Select the “Favorites” option from the Scenes
menu. Press the OK button.
Edit
Rename
Renumber
Favorites
1 Not Used
2 Not Used
3 Not Used
4 Not Used
Scenes
Favorites
Bathroom
Evening
Movies
Favorite 1
2. Highlight the number that you would like to
assign to your favorite scene. Press the OK
button.
3. Highlight your favorite scene. Press the
OK button.
Menu
Back
All ON
All OFF
1 Not Used
2 Not Used
3 Not Used
4 Not Used
Favorites
Creating Favorite Scenes
The tabletop controller’s main menu is a scene screen
where eight of your favorite scenes can be accessed
directly. You will have easy one-touch control.
SECTION IV
Creating and Controlling Scenes
Activate
Create
Delete
Edit
1 Dining Room
2 Media Room
3 Bathroom
4 Bedroom
Scenes
Scenes
Scenes
1 Dining Room
2 Media Room
3 Bathroom
4 Bedroom
Activating
Bathroom
1. Select the “Activate” option from the Scenes
menu. Press the OK button.
Activating a Scene
2. Highlight the scene you want to activate.
Press the OK button.
3. When activation is complete, a window will
display a message saying whether or not the
operation was successful and you will return
to the Scenes menu.
SECTION IV
2524
Page 14
Creating and Controlling Scenes
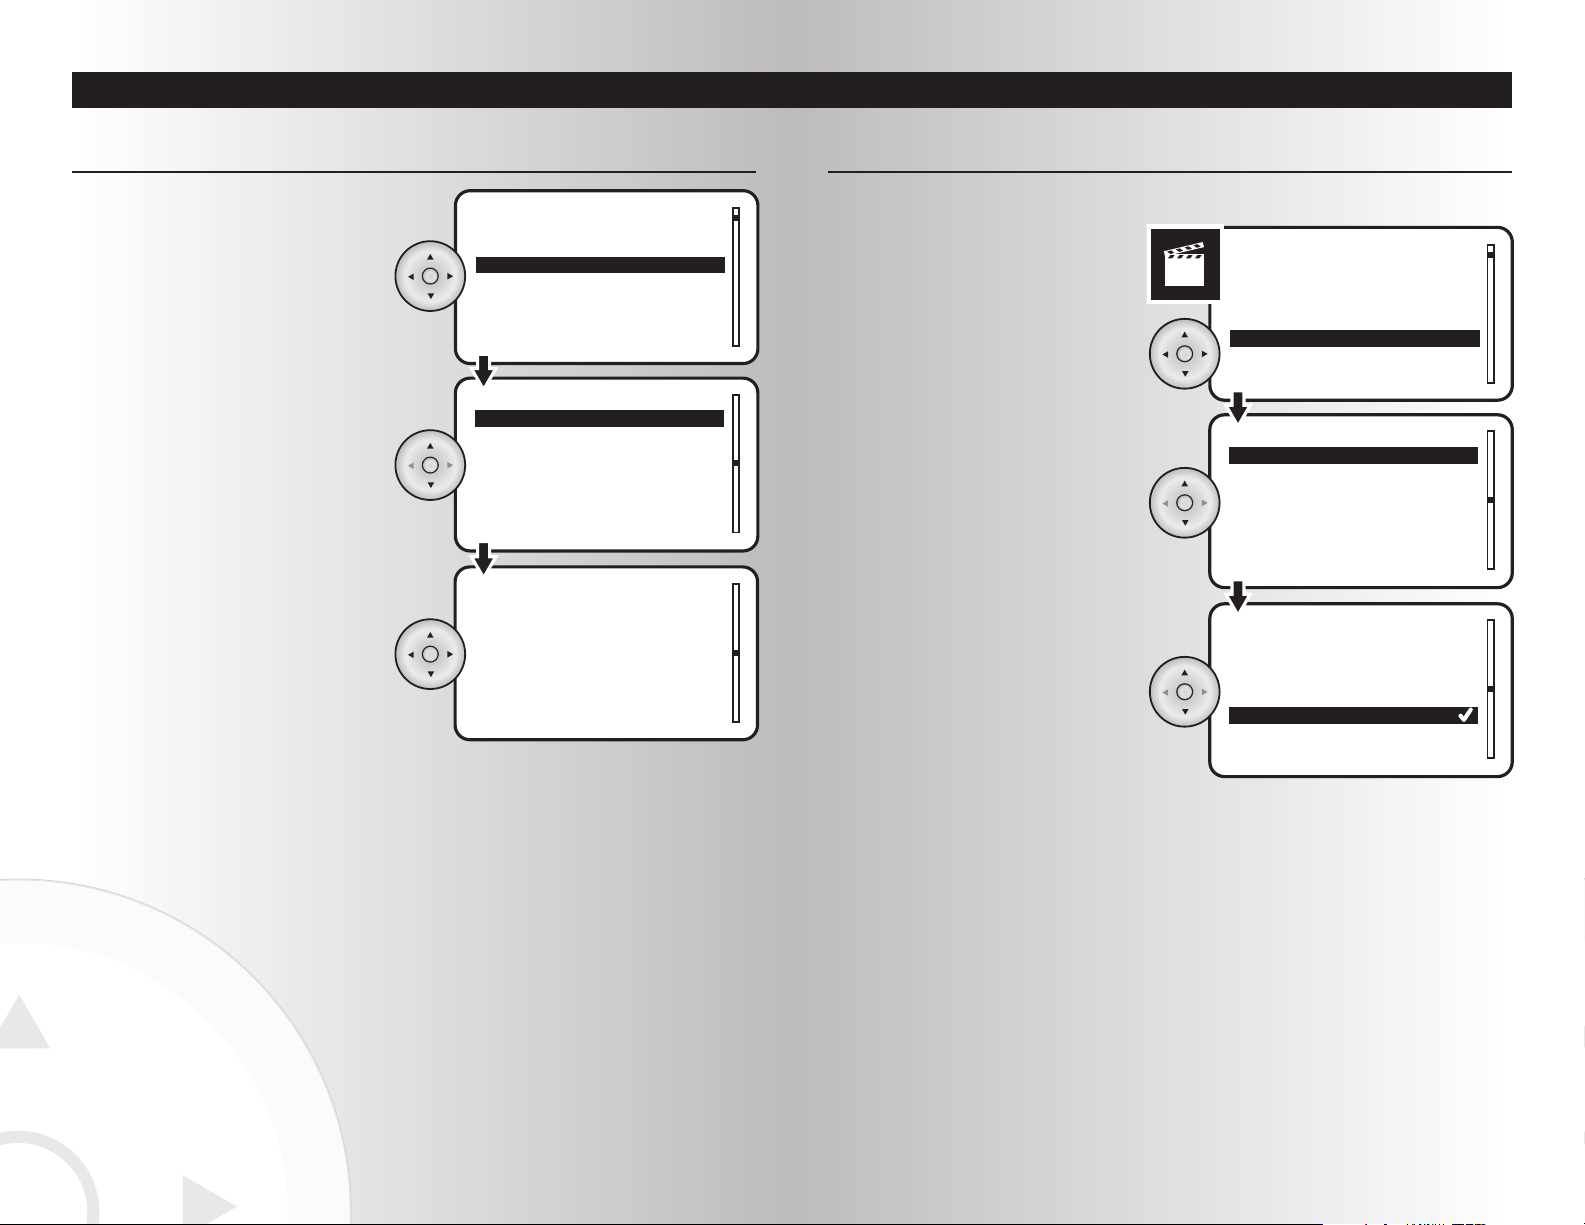
Renumbering a Scene
2. Highlight the scene to be renumbered. Press
the OK button.
3. A checkmark will appear next to the current
number of the scene. Using the arrow pad,
move the checkmark next to the new number
for the scene. Press the OK button.
Edit
Rename
Renumber
Favorites
Scenes
Scenes
Renumber Bathroom
1
2
3
4
1 Bathroom
2 Evening
3 Movies
4
1. Select the “Renumber” option from the
Scenes menu. Press the OK button.
This feature allows the user to reorder the scenes displayed on the selection menu.
SECTION IV
Creating and Controlling Scenes
Edit
Rename
Renumber
Favorites
1 Bathroom
2 Evening
3 Movies
4
Scenes
Scenes
Kids Bathroom_
Bathroom
1. Select the “Rename” option from the Scenes
menu. Press the OK button.
Renaming a Scene
2. Highlight the scene to be renamed.
Press the OK button.
3. Using the arrow pad, input the new scene
name. Press the OK button.
SECTION IV
2726
Page 15
Creating and Controlling Scenes
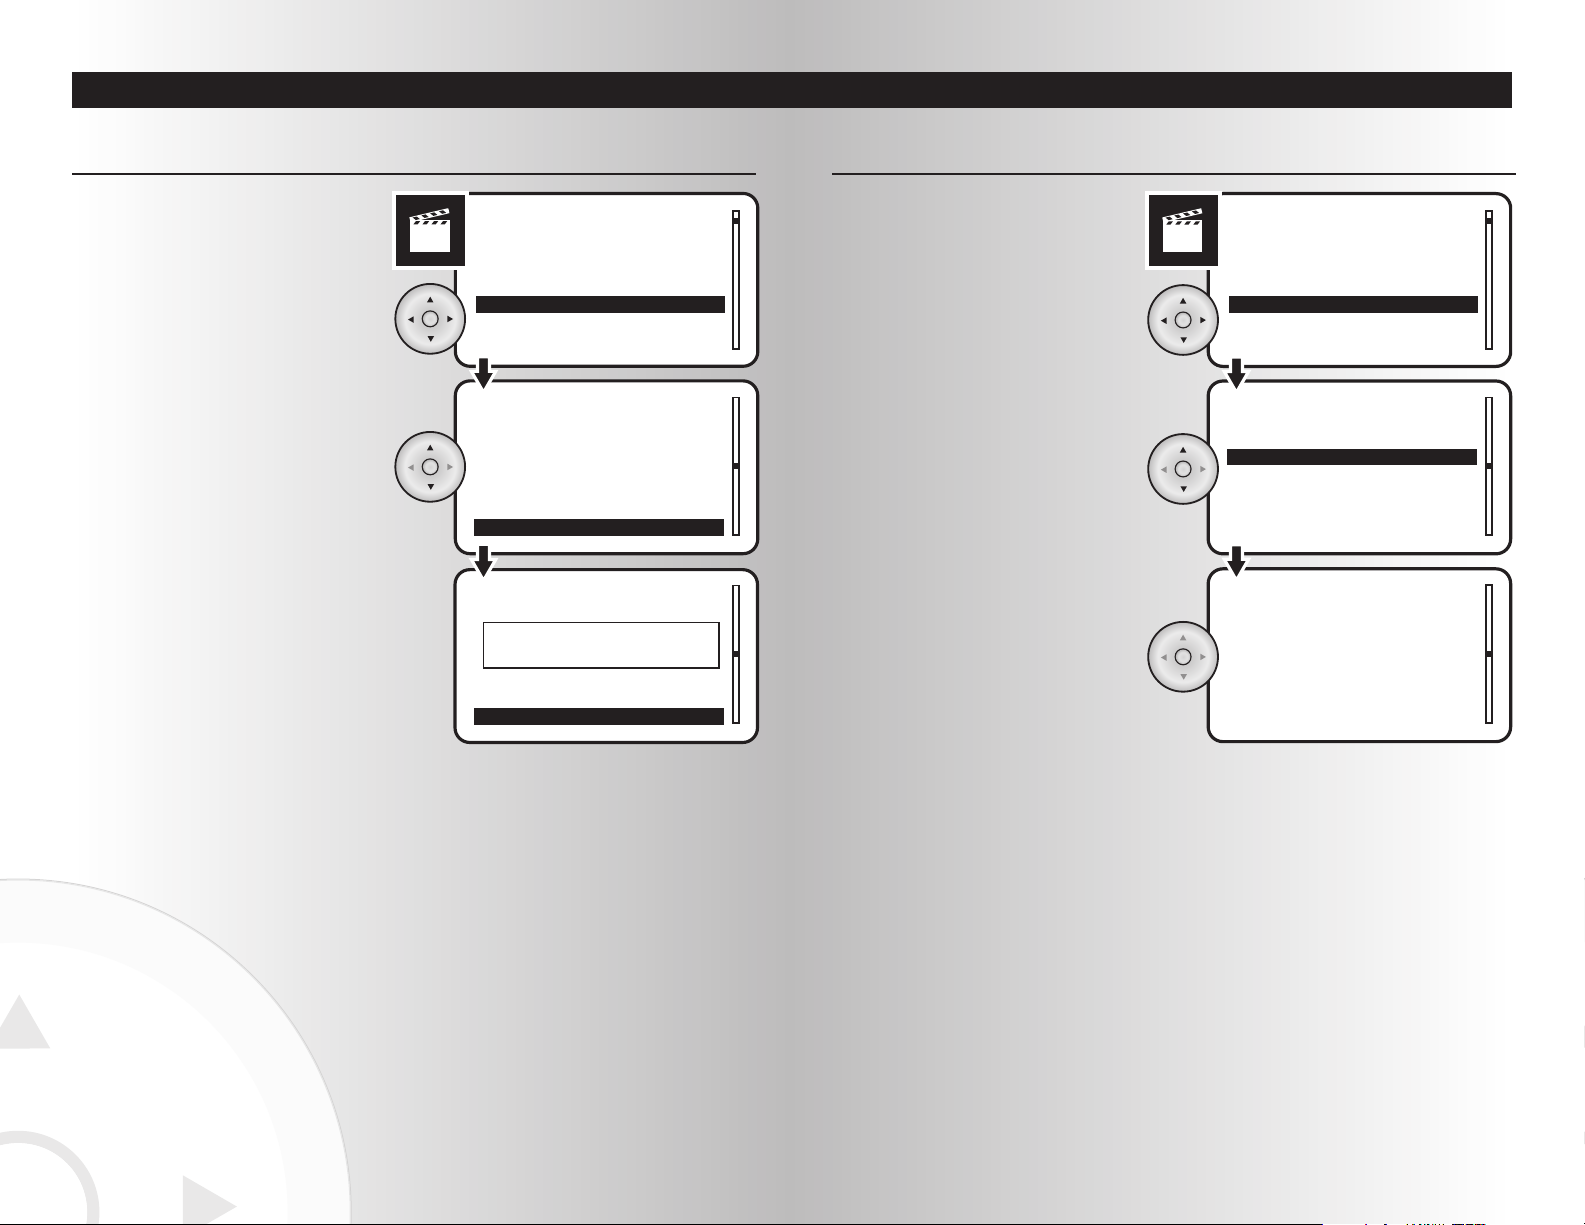
1. Select the “Edit” option from the Scenes
menu. Press the OK button.
2. Highlight the scene to be edited. Press the
OK button.
Create
Delete
Edit
Rename
Scenes
Scenes
1 Dining Room
2 Media Room
3 Bathroom
4 Bedroom
Lamp 1 10%
Overhead Off
Receptacle On
Save
Scene Media Room
Editing a Scene
3. You will go to a screen detailing the device
status for the selected scene. Press the
OK button.
4. You will go to a screen detailing the existing
settings for the selected scene. Follow steps
5-7 described on Page
XX’s Creating a
Scene to make and save your changes.
SECTION IV
Creating and Controlling Scenes
1. Select the “Delete” option from the Scenes
menu. Press the OK button.
Deleting a Scene
2. Highlight the scene to be deleted.
Press the OK button.
Active
Create
Delete
Edit
2 Media Room
3 Bathroom
4 Bedroom
5 Den
2 Media Room
3 Bathroom
4 Bedroom
5 Den
Scenes
Delete
Delete
Scene Deleted
3. When the scene is deleted, a window will
display a message saying the operation was
successful.
SECTION IV
2928
Page 16
Rename
Renumber
Transfer
Favorites
2 Media Room
3 Bathroom
4 Bedroom
5 Den
Scenes
Scenes
Transfer Scene
Press and hold the desired
scene button on the device
Transfer Scene
Transfer Complete
Creating and Controlling Scenes
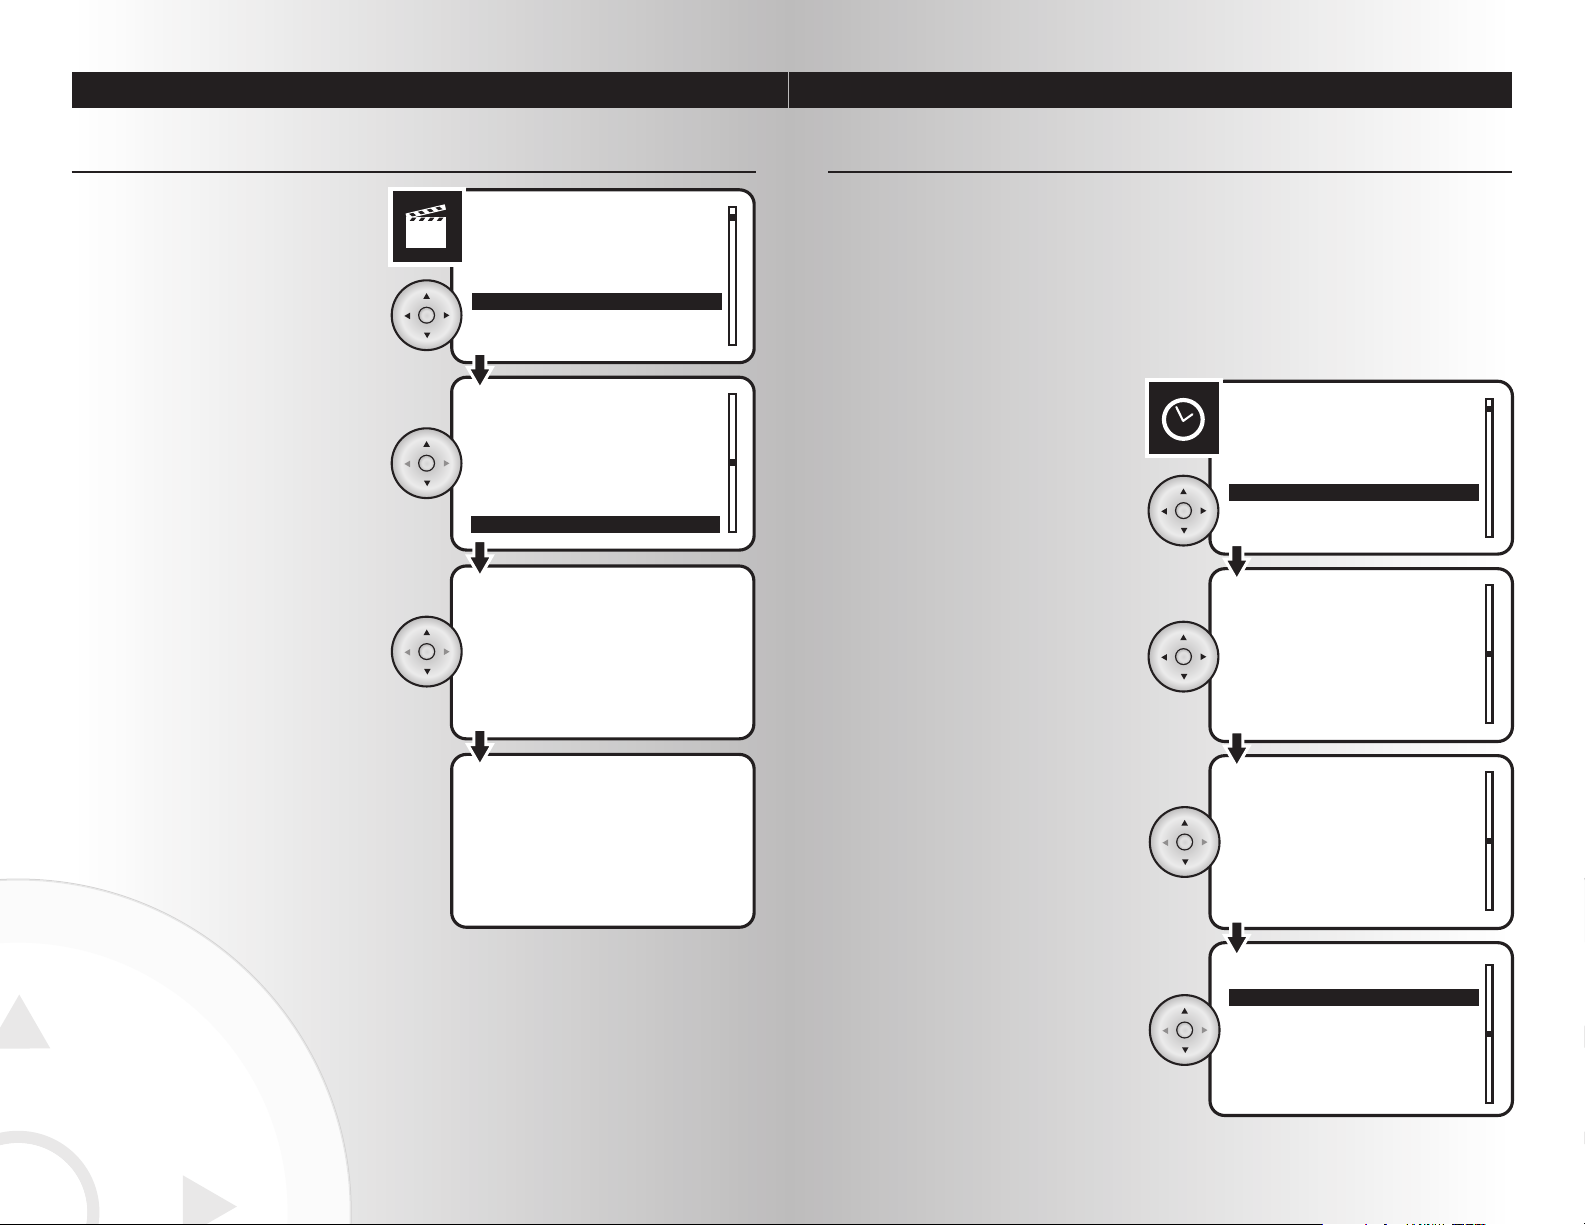
1. Select the “Transfer” option from the Scenes
menu. Press the OK button.
Transfering Scene
2. Highlight the scene to be transferred. Press
the OK button.
3. Press and hold the desired scene button on
the Cooper scene controller. A LED on the
Scene Controller will flash when it is
receiving information
4. When the transfer is complete, a window on
will display a message saying whether or
not the operation was successful.
30
Creating and Controlling Events
SECTION V
Creating an Event
An event is a scheduled one-time or recurring program that automatically controls a combination of lighting
or appliance devices for a desired period of time. You can program your controllers to create and control
events in your home. After reviewing this section, you will be able to perform the following basic functions:
• Creating an Event • Renaming an Event
• Activating and Deactivating an Event • Deleting an Event
• Activating or Deactivating All Events • Editing an Event
Activate
Deactivate
Create
Delete
Time 8:00 pm
Day Saturday
Type One time
Save
Events
Enter the event name
Romantic Dinner_
Romantic Dinner
Time 8:00 pm
Day Saturday
Type One time
Romantic Dinner
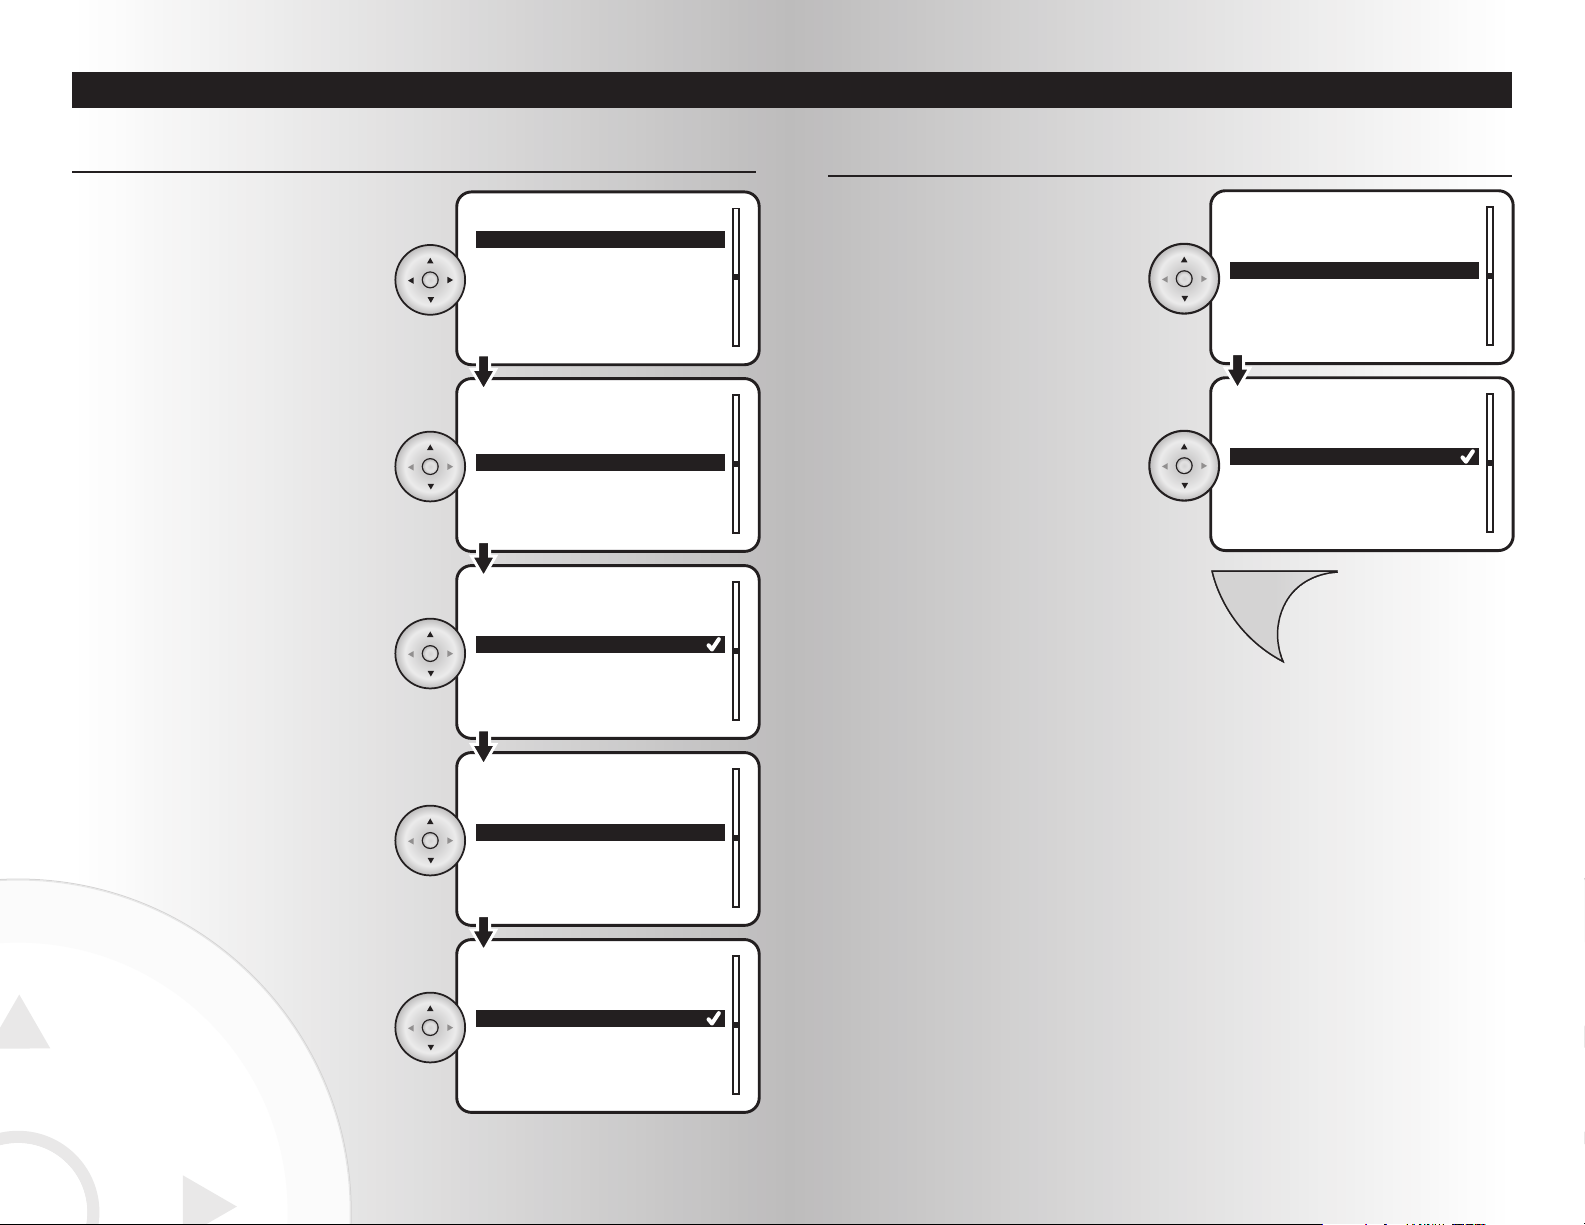
1. Select the “Create” option from the Events
menu. Press the OK button.
2. Using the arrow pad, enter a name for the
event. Scroll through the alphabet until you
find the first letter of the event name. When
the letter appears, press the right arrow and
continue the process until the name is
spelled out. Press the OK button to save.
3. Scroll through the menu to view the setting
options for the event: Time, Day, Type,
Scene, and Active.
To create the time, highlight “Time” and
press the OK button.
31
SECTION IV
Page 17
Creating and Controlling EventsCreating and Controlling Events
32
Day Friday
Type 0ne time
Scene Dining Room
Save
0ne Time
Recurring
Romantic Dinner Type
Time 8:30 pm
Day Saturday
Type 0ne time
Thursday
Friday
Saturday
Sunday
Romantic Dinner
Romantic Dinner Day
Romantic Dinner
Romantic Dinner
Time 8:30 pm
Day Saturday
Type 0ne time
Using the arrow pad, enter the correct time.
Press the OK button to save.
Creating an Event (continued)
To create the day, highlight “Day” and
press the OK button.
Using the arrow pad, highlight the day of the
week for the event. Press the OK button to
save.
To create the type, highlight “Type” and
press the OK button. You can make your
event a one-time or recurring event with this
setting.
Using the arrow pad, highlight “One Time” or
“Recurring”. Press the OK button to save.
Bedroom
Kitchen
Basement
Porch
Romantic Dinner
Romantic Dinner Scene
Menu
Type One time
Scene Dining Room
Active No
Save
To select the scene, highlight “Scene” and
press the OK button.
You will see a list of existing scenes in your
system. Using the arrow pad, highlight the
desired scene for the event. Press the OK
button to save.
4. To save the scene, press the Menu button.
Creating an Event (continued)
33
SECTION V SECTION V
Page 18
Creating and Controlling EventsCreating and Controlling Events
34
Activate
Deactivate
Create
Delete
Events
Events
Events
1 Movies
2 Sports
3 Family Time
4 Romantic Dinner
1 Movies
2 Sports
3 Family Time
4 Romantic Dinner
Event Activated
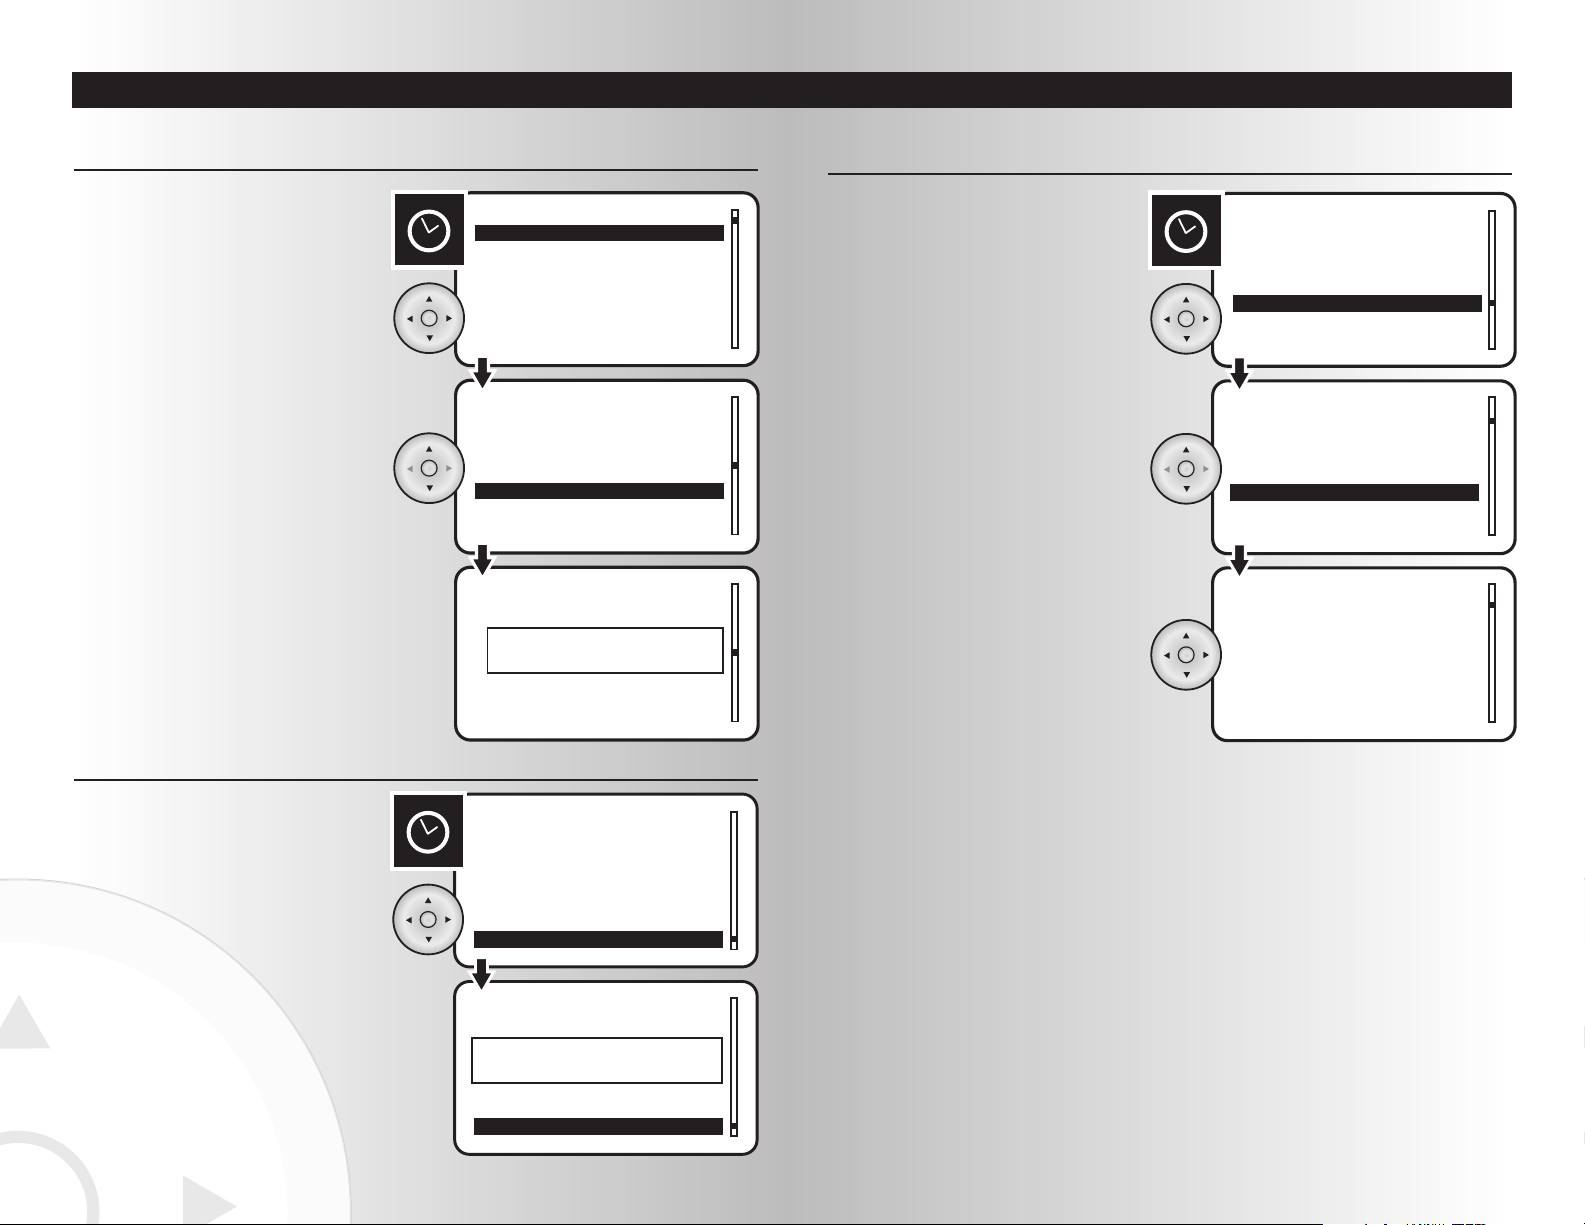
1. Select the “Activate” or “Deactivate” option
from the Events menu. Press the OK button.
Activating or Deactivating an Event
2. Highlight the event to activate or deactivate.
Press the OK button.
3. When the activation or deactivation is
complete, a window will display a message
saying the operation was successful.
Events
Edit
Rename
Activate All
Deactivate All
Events
Edit
Rename
Activate All
Deactivate All
All Events Deactivated
Activating or Deactivating All Events
2. When the activation or deactivation is
complete, a window will display a message
saying the operation was successful.
Delete
Edit
Rename
Activate All
Events
Events
1 Evening
2 Sports
3 Movies
4 Romantic Dinner
Movies Rename
Movies_
1. Select the “Rename” option from the Events
menu. Press the OK button.
Renaming an Event
2. Highlight the event to be renamed.
Press the OK button.
3. Using the arrow pad, input the new event
name. Press the OK button to save.
35
1. Select the “Activate All” or “Deactivate All”
option from the Events menu. Press the OK
button.
SECTION V SECTION V
Page 19
Creating and Controlling EventsCreating and Controlling Events
36
Deactivate
Create
Delete
Edit
Events
Events
Events
1 Movies
2 Sports
3 Family Time
4 Romantic Dinner
1 Movies
2 Sports
3 Family Time
4 Romantic Dinner
Event Deleted
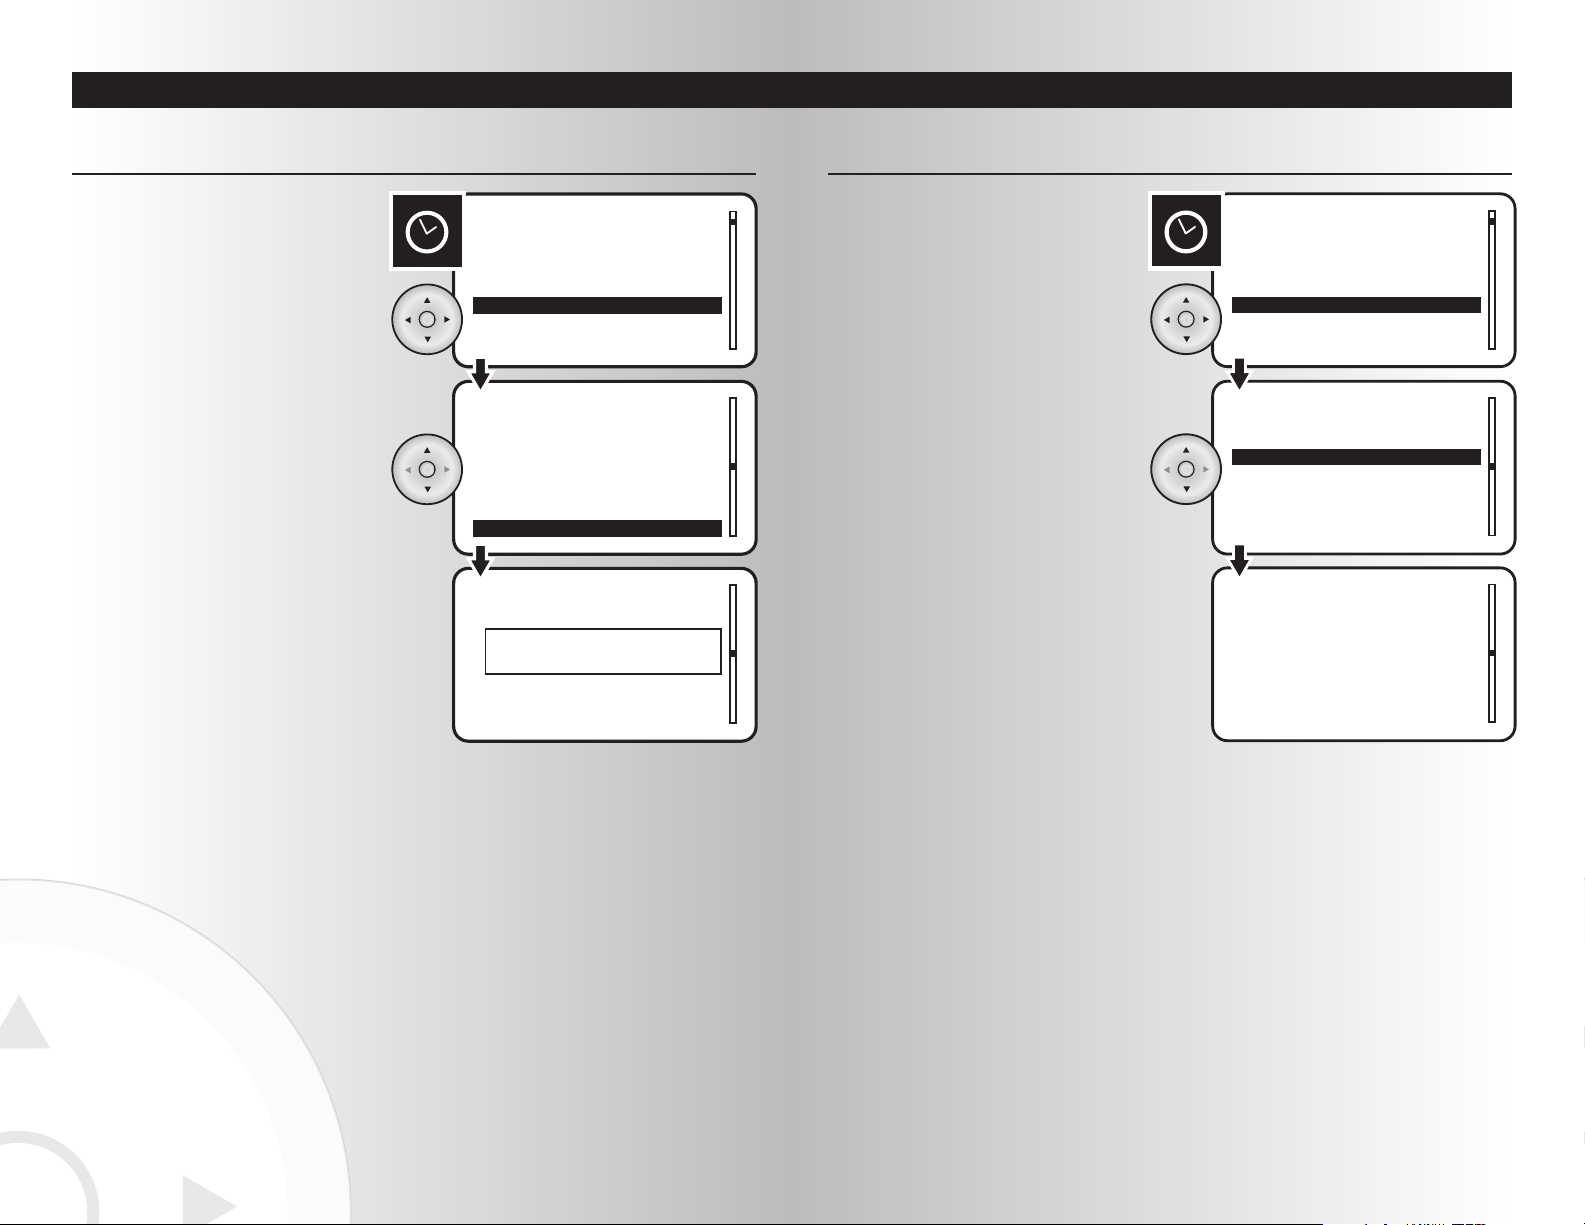
1. Select the “Delete” option from the Events
menu. Press the OK button.
Deleting an Event
2. Highlight the event to be deleted.
Press the OK button.
37
3. When the event is deleted, a window will
display a message saying the operation was
successful.
Create
Delete
Edit
Rename
Events
Events
1 Movies
2 Sports
3 Family Time
4 Bed time
Sports
Time 7:30 PM
Day Saturday
Type One time
Save
1. Select the “Edit” option from the Events
menu. Press the OK button.
2. Highlight the event to be edited.
Press the OK button.
Editing an Event
3. A screen detailing the existing options for the
selected event will be displayed. Follow steps
3-4 described on Pages 29-31 to make and
save your changes.
SECTION V SECTION V
Page 20
Editing and Controlling the Away Feature
39
Editing and Controlling the Away Feature
38
Away
Activate
Deactivate
Edit
Start 1:00 PM
Stop 1:00 AM
Devices
Save
Away
Away Start Time
05:00 PM
Start 5:00 PM
Stop 1:00 AM
Devices
Away
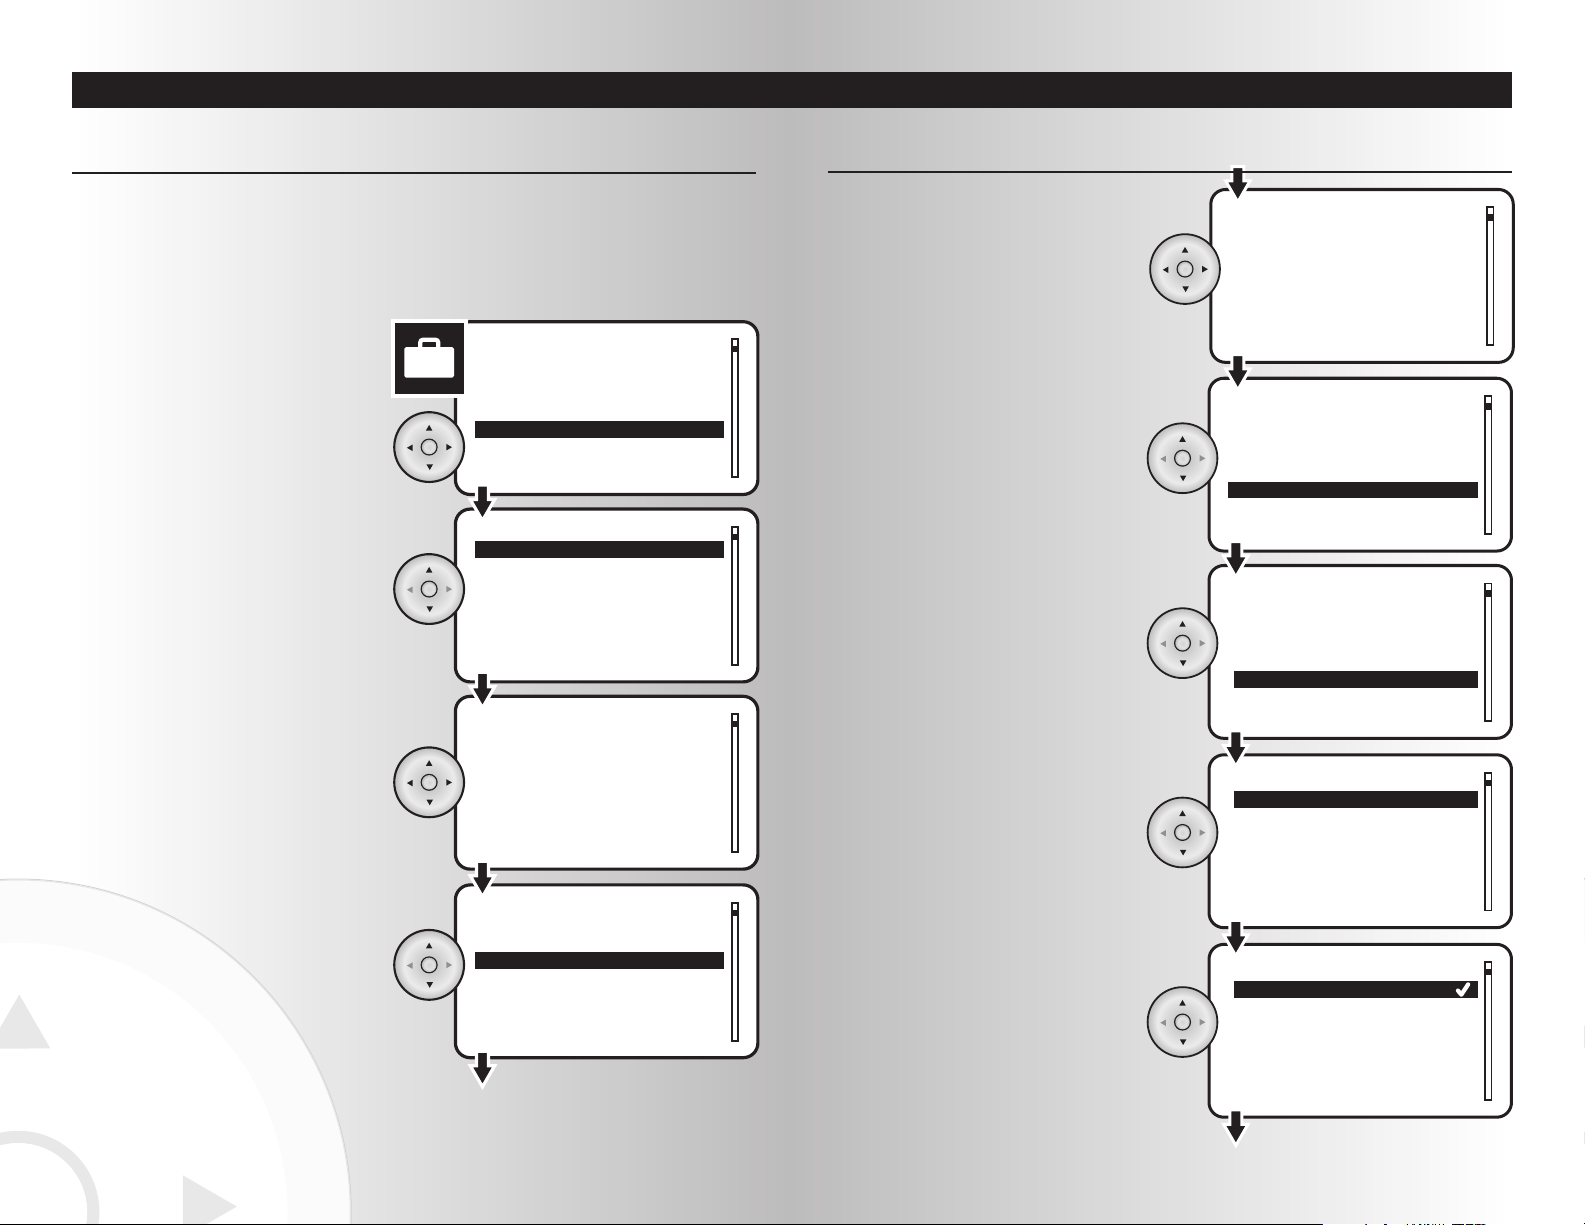
1. Select the “Edit” option from the Away menu.
Press the OK button.
The away menu allows the user to edit and control a group of devices that will be randomly controlled to
give the impression that the house is still occupied during the absence of its residents. After reviewing this
section, you will be able to perform the following functions:
• Editing the Away Feature
• Activating or Deactivating the Away Feature
2. Highlight the “Start” option to program the
time when the Away mode will begin. Press
the OK button.
3. Using the arrow pad, enter the start time.
Press the OK button to save.
4. Highlight “Stop” to program the time when
the Away feature will be deactivated.
Press the OK button.
SECTION VI
Start 5:00 PM
Stop 1:00 AM
Devices
Save
Away
1 Device
2 Lamp 1
3 Receptacle
4 Lamp 2
Away Stop Time
10:00 PM
Away Devices
Included No
On Time (mins) 1-30
Save
Away Receptacle
Yes
No
Included
5. Using the arrow pad, enter the stop time.
Press the OK button to save.
Editing the Away Feature (continued)
8. Highlight “Included” and press the OK button.
6. Highlight the “Devices” option to select the
devices to be included in the away mode.
7. Scroll through the list of devices. Highlight
and press the OK button to select a device.
Editing the Away Feature
SECTION VI
9. Using the arrow pad, highlight “Yes” or “No”.
Press the OK button to save.
Page 21
Editing and Controlling the Away Feature
Devices
Activate
Deactivate
Edit
Away
Activate
Deactivate
Edit
Away
Activated Away
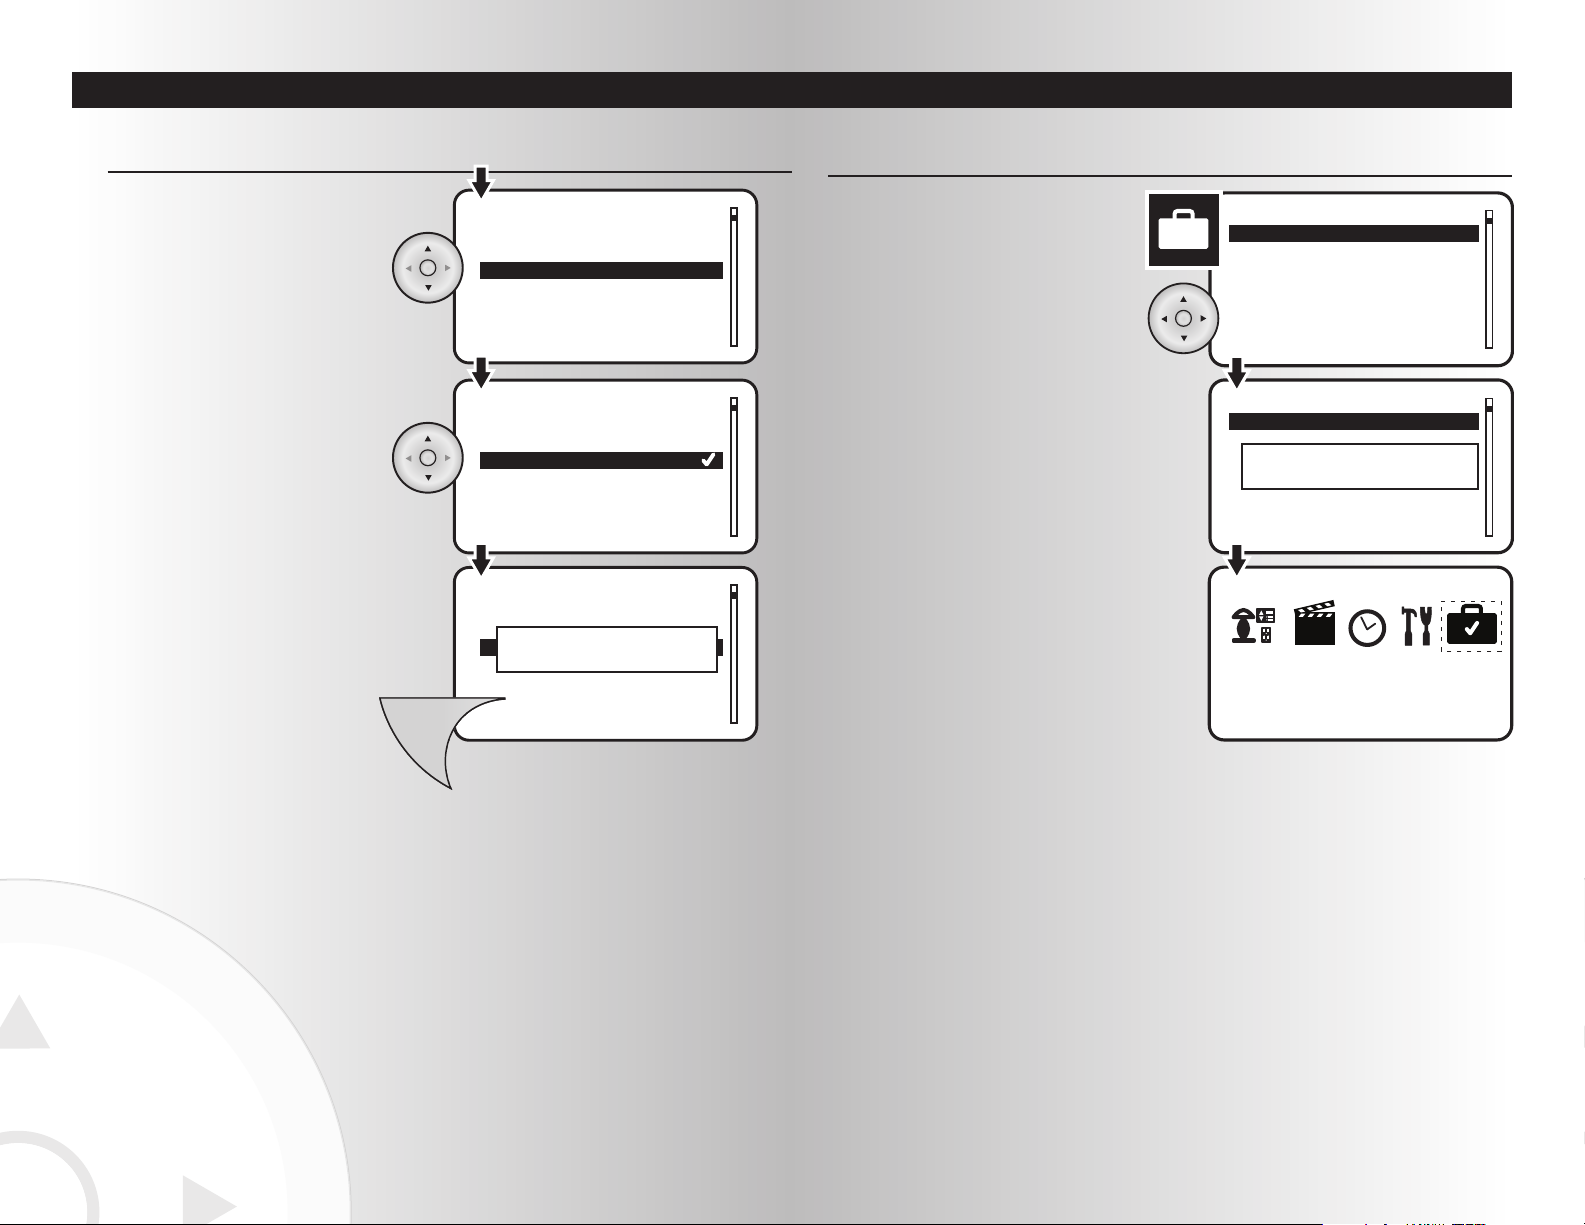
1. Select the “Activate” or “Deactivate” option
from the Away menu. Press the OK button.
Activating or Deactivating the Away Feature
2. When activation or deactivation is complete,
a window will display a message saying
whether or not the operation was successful.
3. When the away feature is activated, the
away icon on the main menu will show a
checkmark.
41
Editing and Controlling the Away Feature
40
10. Highlight “On Time (mins)” and press the
OK button.
11. Using the arrow pad, highlight the desired
on time. Press the OK button to save.
12. To save the scene, press the Menu button.
A window will display a message saying
the device was updated.
1-30 mins
31-60 mins
61-120 mins
121-240 mins
Random on time
Included Yes
On Time (mins) 1-30
Save
Away Receptacle
Included Yes
On Time (mins) 31-60
Save
Away Receptacle
Menu
Device updated
Editing the Away Feature (continued)
SECTION VI SECTION VI
Page 22
Making Advanced Changes to Your System
Devices – Chandelier
Information received
from destination device
1 Room lights
2 Bathroom
Dis/Associate
Devices – Chandelier
Devices – Chandelier
Information received
from source device –
Association Successful
Menu
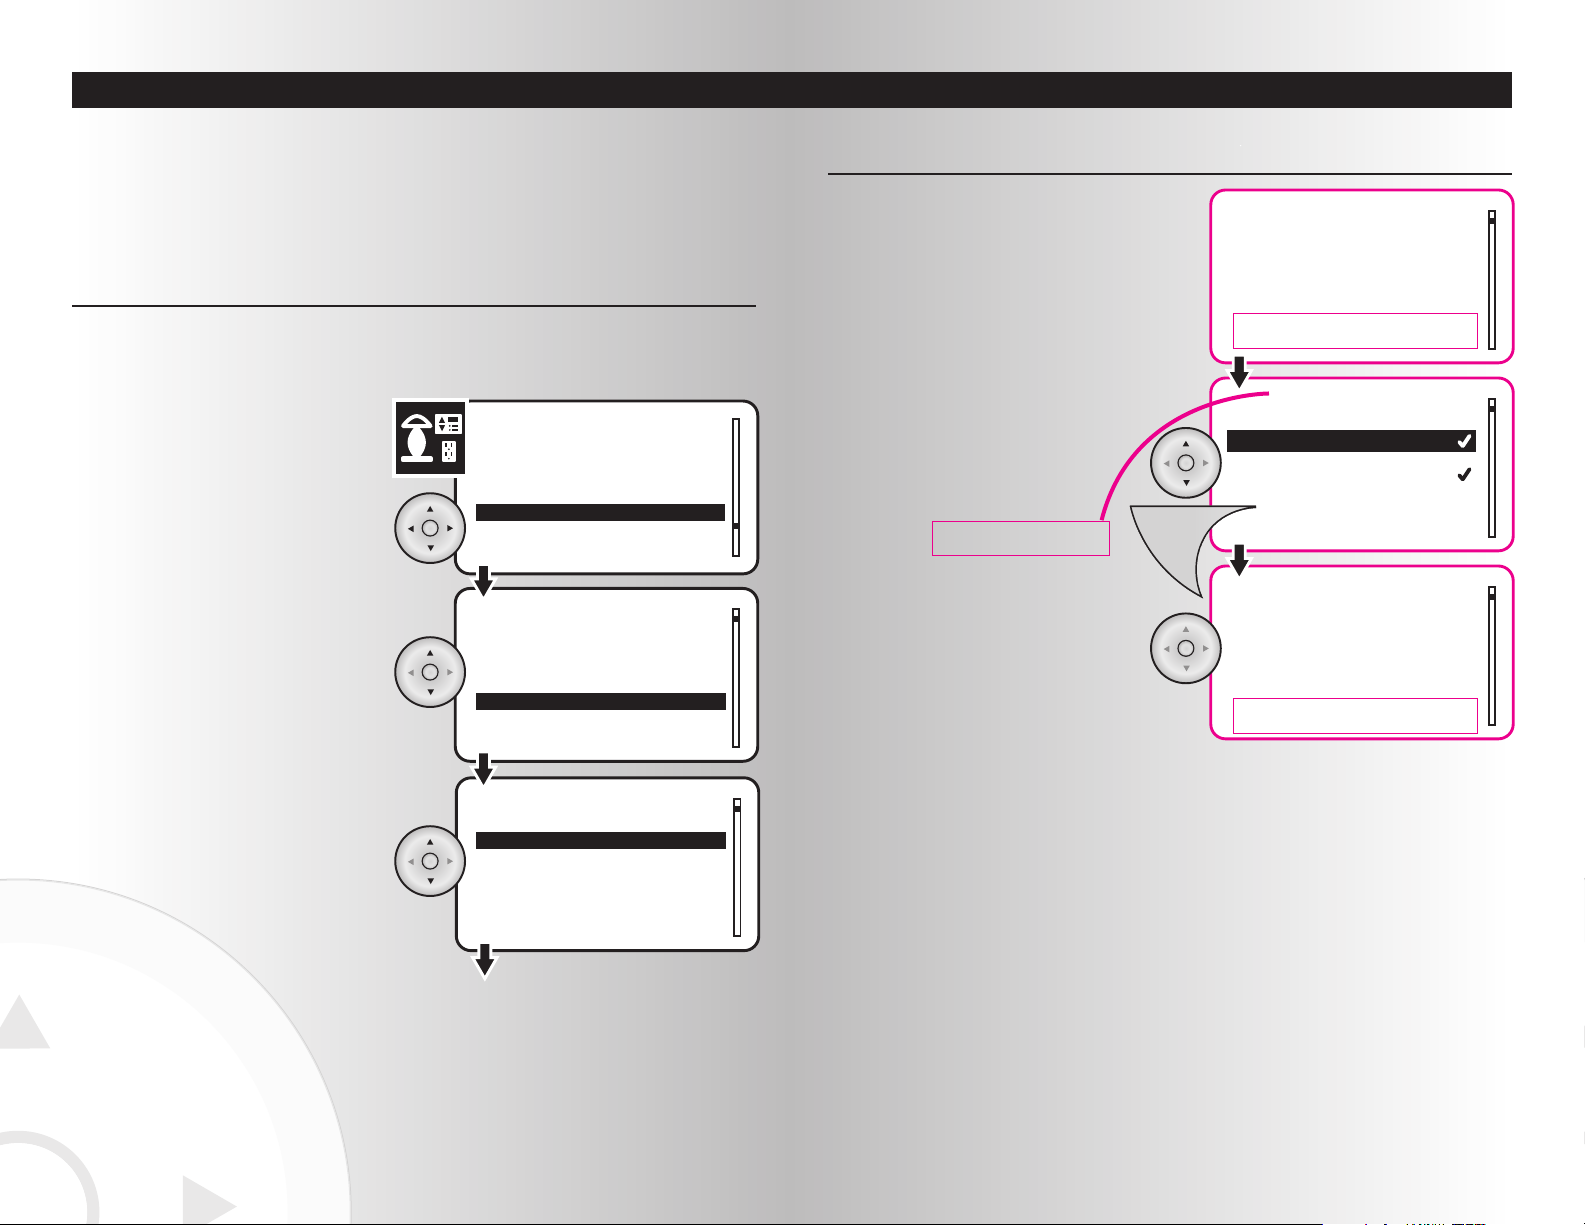
5. Using the arrow pad, highlight the desired
device. A checkmark indications associated
devices. Press the Menu button Associate or
Disassociate a device.
Note: The device does not have to have its
button pressed in order to be associated.
{Is this note needed?}
Creating an Association Between Devices (continued)
6. To save the association, press the
Ok button.
4. When selected, the handheld will fetch the
association information from the device and
then display a list of devices.
SECTION VII
Making Advanced Changes to Your System
SECTION VII
Control
Install
Associate
Uninstall
Whole House
Kitchen
Dining room
Living room
Location
1 Chandelier
2 Room lights
3 Bathroom
Devices
Devices
1. Select the “Associate” option from the
Devices menu. Press the OK button.
Creating an Association Between Devices
2. Highlight the location of the device that
you would like to associate and press the
OK button.
After learning about the basics of your wireless control system, you may want to make further changes to
the system. In this section, you will learn to perform these additional functions:
• Creating an Association Between Devices • Selecting a New Primary Controller {Is this Supported?}
• Replicating Handheld Information to a • Uninstalling a Device
Second Receiver • Resetting the System
An association is a feature that you can program to allow a device in your system (source device) to
control another device (destination device). Your Aspire RF wireless system supports up to five associations
for each source device.
3. Highlight the specific device that you would
like to associate and press the OK button.
4342
Do we need this box?
Is this correct?
Do we need this box?
Page 23
Making Advanced Changes to Your System
Send
Receive
Replicate
Replicate Complete
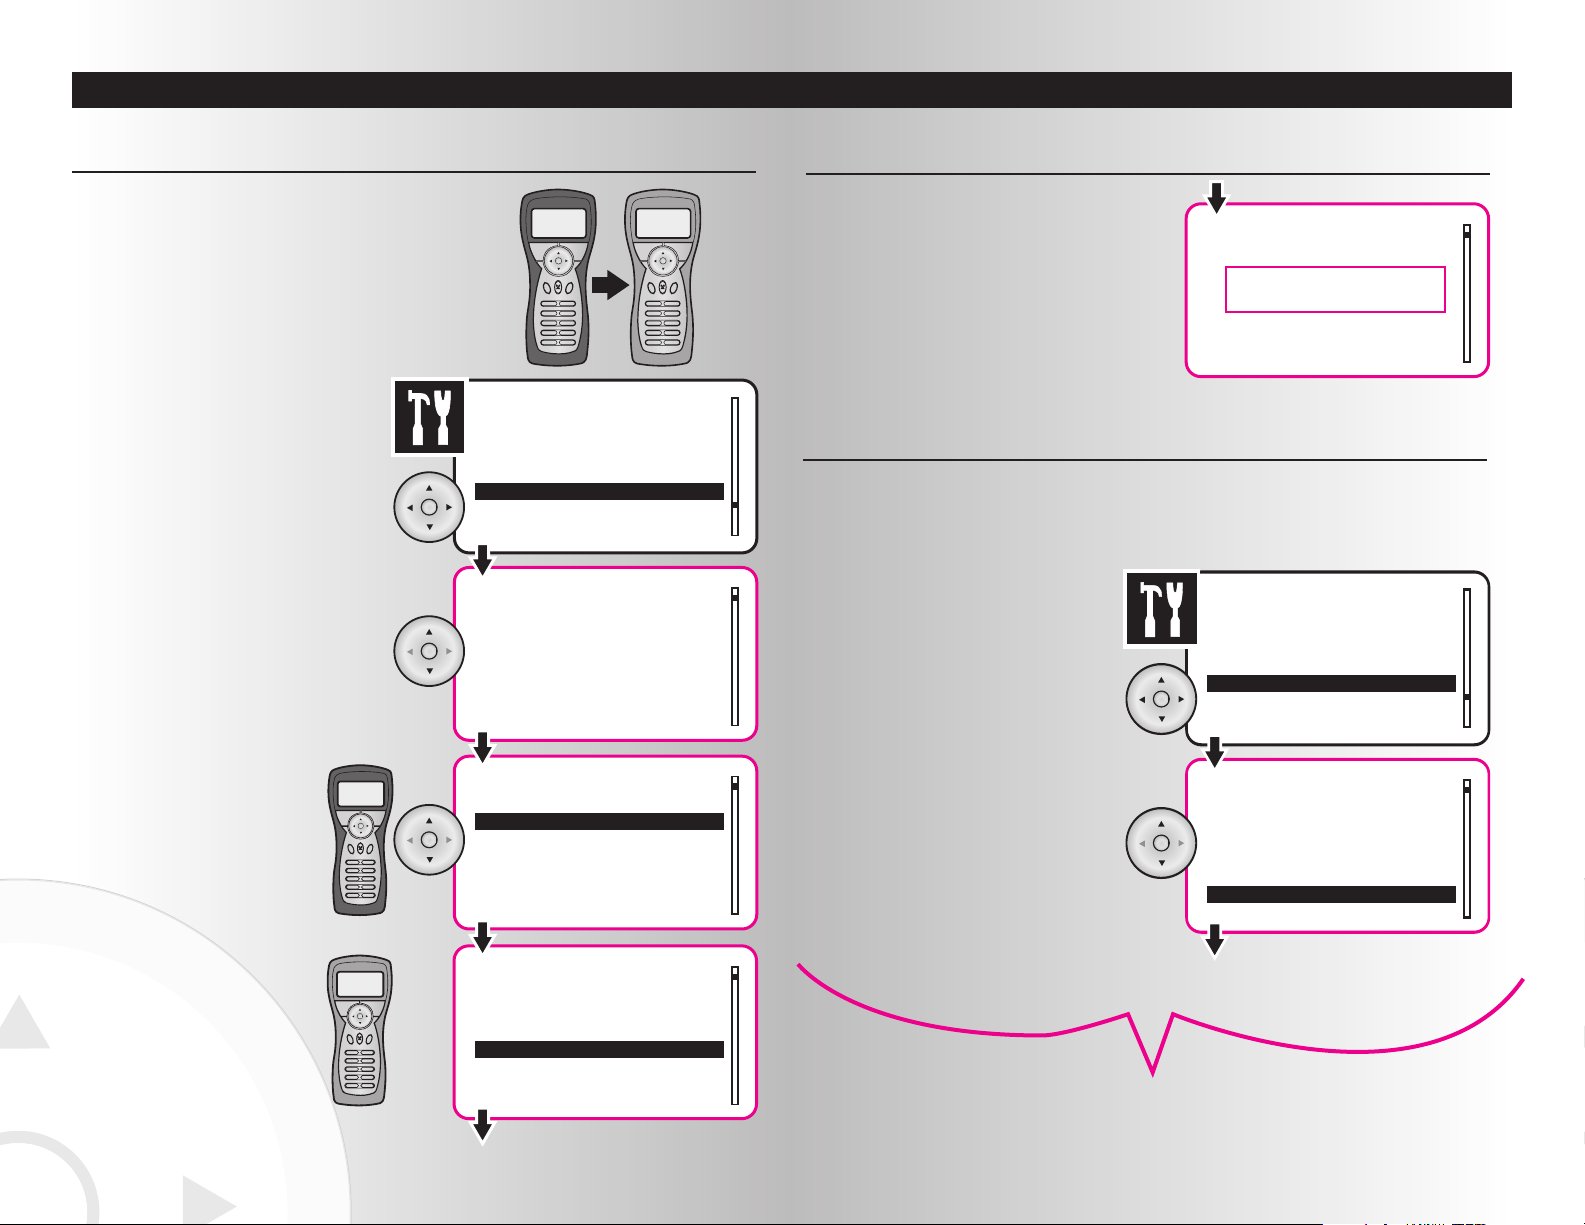
4. When the replication is complete, windows
on both controllers will display a message
saying whether or not the operation was
successful.
Replicating Handheld Information to a Second Receiver
1. On the primary controller, select the
“Replicate” option from the Settings menu.
Press the OK button.
2. On the primary controller, highlight “Shift
controller” on the Replicate menu.
Press the OK button.
3. Need direction on what happens next.
Selecting a New Primary Controller
The replicate function also allows a shifting of the primary controller to become the secondary controller.
Language
Version
Replicate
Network Discovery
Replicate
Settings
A Network Only
B Complete Replicate
C Shift controller
SECTION VII
Making Advanced Changes to Your System
Language
Version
Replicate
Network Discovery
A Network Only
B Complete Replicate
C Shift controller
Replicate
Settings
Send
Receive
1
All ON
Menu Back
All OFF
2
34
56
78
910
1
All ON
Menu Back
All OFF
2
34
56
78
910
Replicate
Send
Receive
Replicate
Replicating Handheld Information to a Second Receiver
1. On both controllers, select the Replicate
option from the Settings menu. Press the
OK button.
2. On both controllers, highlight one of two
replicate options: “Network Only”
(devices only) or “Complete Replicate”
(also includes events and scenes).
Press the OK button.
3. Prepare both controllers for the
replicate process.
On the primary controller, use
the arrow pad to highlight “Send”.
Press the OK button.
Replication allows you to duplicate the information from one
controller (primary) to another controller (secondary). The
primary controller is the only controller capable of adding
devices to the network.
Replication can include device information or complete
network information (everything including events and scenes).
1
All ON
Menu Back
All OFF
2
34
56
78
910
1
All ON
Menu Back
All OFF
2
34
56
78
910
Secondary
Controller
Primary
Controller
Primary
Controller
Secondary
Controller
SECTION VII
Loudwater says
Replication is up in
the air at the moment.
Controller shift and
Network Only aren’t
there but they
may be in the
coming weeks
4544
DDoo wwee nneeeedd tthhiiss?? DDooeess tthhiiss wwoorrkk ffoorr tthhee TTaabblleettoopp??
Note from Loudwater–The handheld does not support selecting a
new primary controller yet
Page 24
Resetting the System
46
Making Advanced Changes to Your System
Language
Replicate
Network Discovery
Reset
System Reset
Press 0K or Cancel to
exit without resetting
Press Reset to reset
Reset
Resetting
Please Wait
System Reset
Settings
Reset
Reset successful
System Reset
Menu
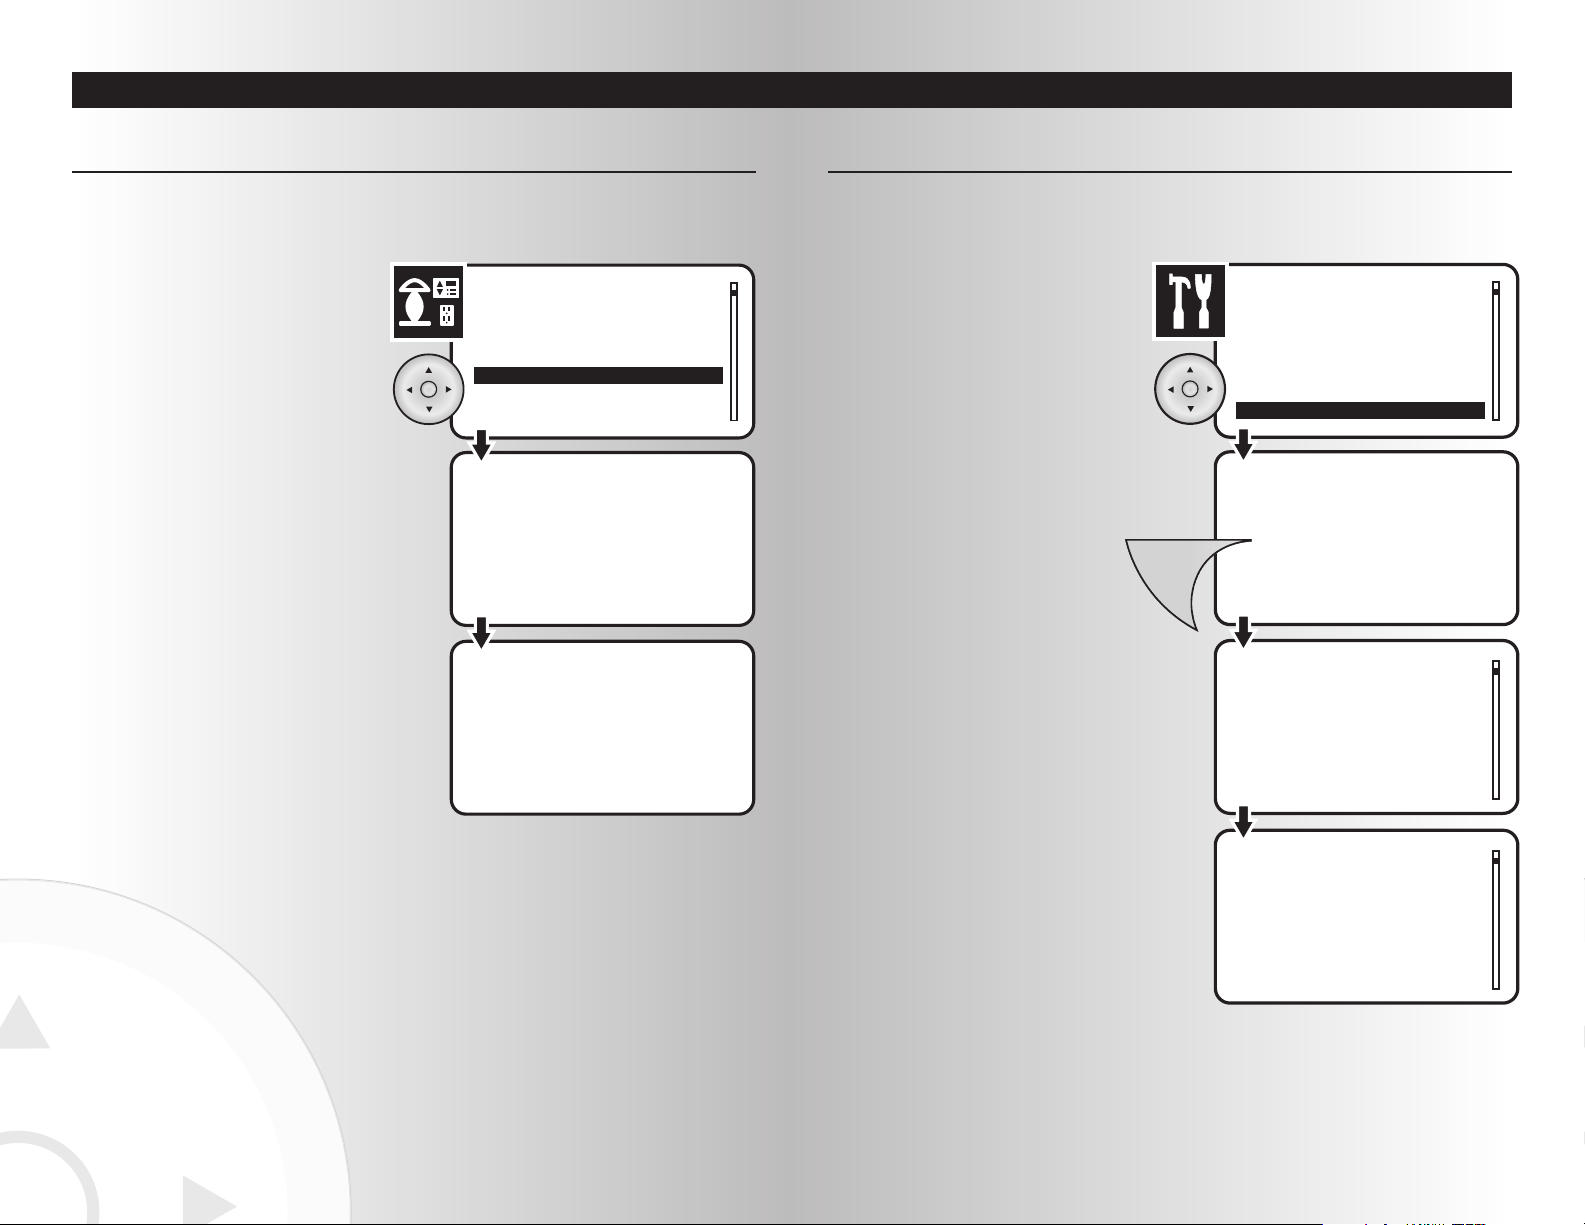
1. Select the “Reset” option from the Settings
menu. Press the OK button.
2. To reset the system, press the Menu button.
The process to reset the system will last
several seconds.
If you don’t want to reset the system,
press the Back button on the controller.
3. When the system reset is complete, a
window will display a message saying
whether or not the operation was successful.
This function allows you to clear your handheld controller of all devices, scenes, and events.
SECTION VII
Making Advanced Changes to Your System
Install
Associate
Uninstall
Remove
Uninstall Device
Press the install button
on the device
Uninstall Device
Device Removed
Devices
1. Select the “UnInstall” option from the
Devices menu. Press the OK button.
Uninstalling a Device
2. Press the Install button on the device that you
want to uninstall.
The process to uninstall the device will last
several seconds.
If you don’t want to install the device, press
the Back button on the controller during the
waiting period.
3. When the uninstall is complete, a window
will display a message saying whether or
not the operation was successful.
Before uninstalling a device, the device must be installed in the wireless system. If you receive an
“Unknown device” error message during this operation, the device is not installed in your system.
SECTION VII
47
Page 25
Day/Time
Panic
Language
Version
English
Espanol
Settings
Language
~
Back
Personalizing System Settings
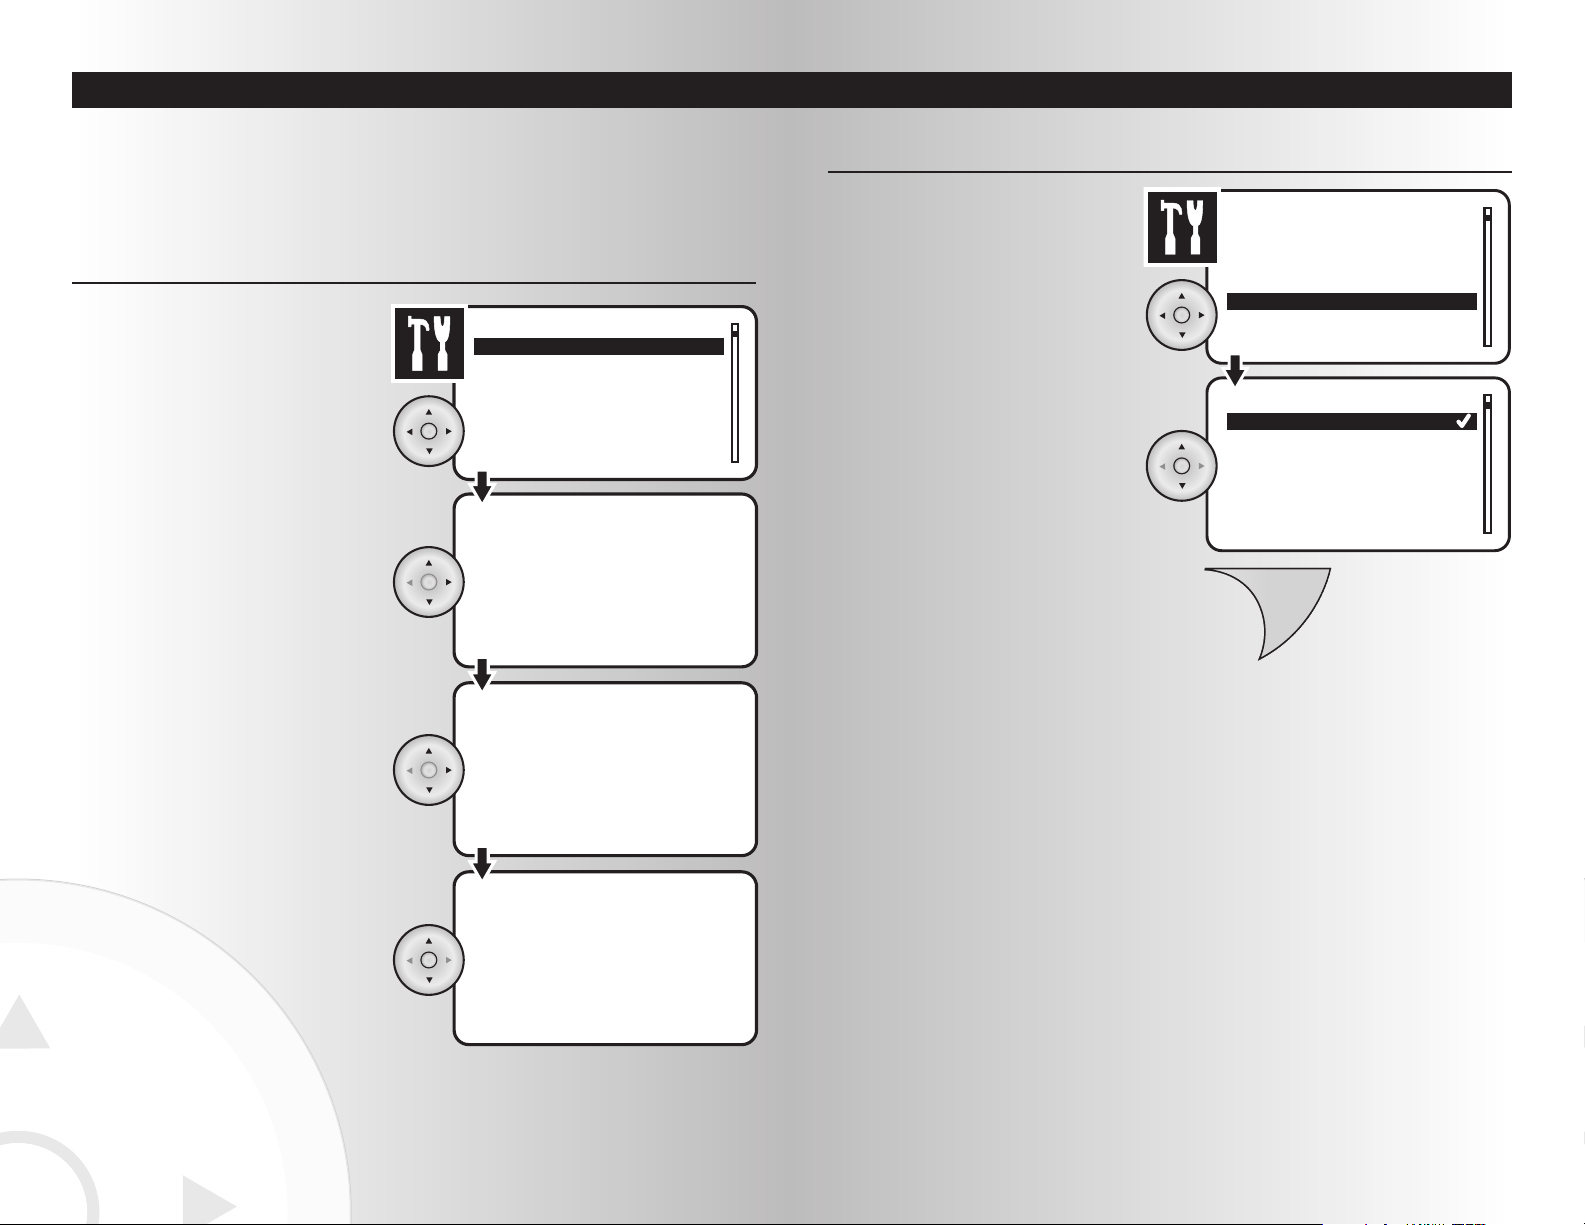
1. Select the “Language” option from the
Settings menu. Press the OK button.
Selecting a Language
2. Using the arrow pad, highlight the preferred
language and press the OK button. A
checkmark will be displayed next to the
selected language.
3. All text within the menu system will be
displayed in the selected language. To return
to the main menu, press the Back button.
SECTION VIII
Personalizing System Settings
SECTION VIII
Day/Time
Panic
Language
Version
Day/Time
Mon 12:00 Am
Settings
Day/Time
Thursday 03:45 Pm
Day/Time
Thursday 03:45 Am
1. Select the “Day/Time” option from the
Settings menu. Press the OK button.
Setting Current Day and Time
3. Use the up and down arrows to highlight the
current time. When finished, press the right
arrow to highlight AM/PM.
The wireless control system has several functions that can be customized to meet individual needs. After
reviewing this section you will be able to perform the following functions:
• Setting Current Day and Time • Activating Child Protection
• Selecting a Language
2. Use the up and down arrows to highlight the
current day. When finished, press the right
arrow to highlight the time.
4. Use the up and down arrows to highlight
AM or PM. Press the OK button to save the
current day and time
4948
Page 26
Panic
Language
Version
Replicate
Node ID 1
Home ID BEEF0003
Application 1.0.12
Protocol 1.59
Settings
Version
Back
OR
OR
Personalizing System Settings
SECTION VIII
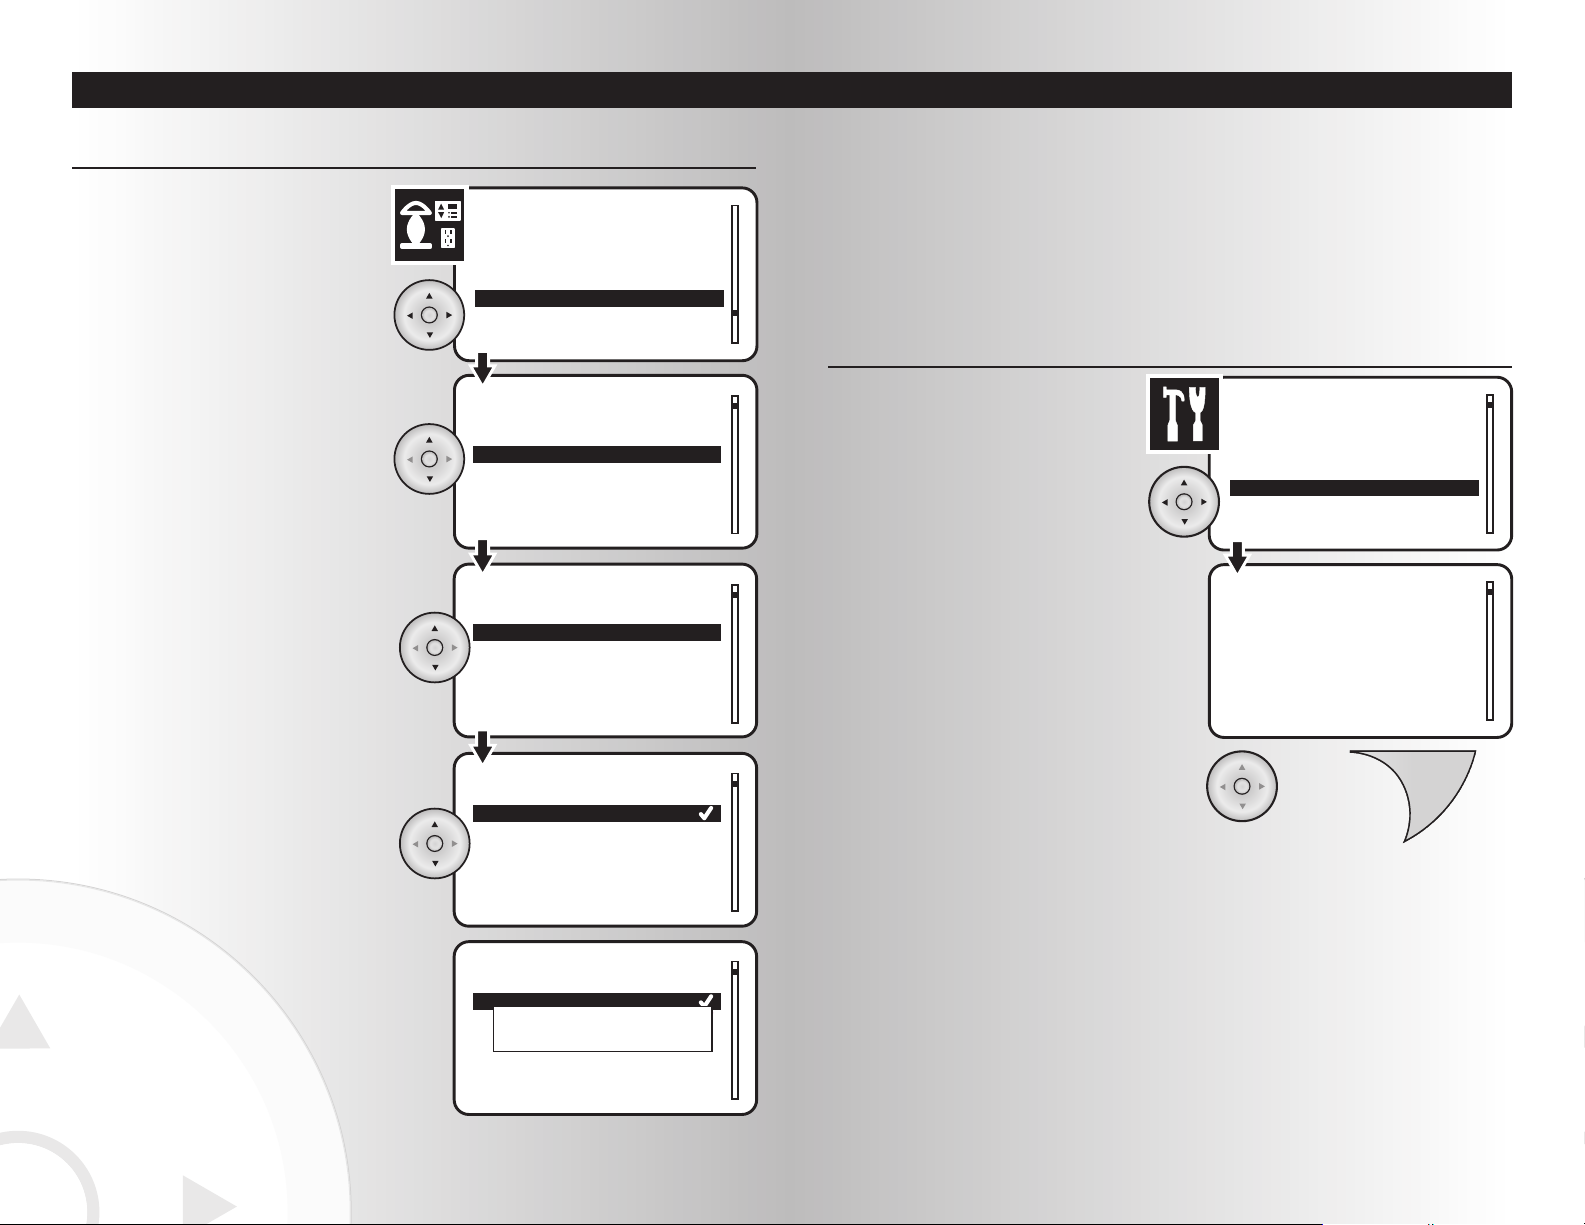
Retrieving Version Information about your System
1. Select the “Version” option from the Settings
menu. Press the OK button.
2. View version information about the wireless
control system.
3. When finished, press the OK or Back button
to return to the main settings menu.
You may encounter some problems while using your wireless control system. Use this section to learn
about the following functions:
• Retrieving Version Information about your System
• Retrieving Version Information about Individual Devices
• Removing a Failed Device
• Replacing a Failed Device
• Operating Network Discovery
Troubleshooting Guide and Maintenance
Remove
Replace
Child Protection
Device Status
Devices
Dining room
Media room
Bathroom
Bedroom
Location
Devices
1 Overhead lights
2 Light 2
Overhead lights Protection
No Protection
Sequence Control
Remote Control
Overhead lights Protection
No Protection
Sequence Control
Remote Control
Device updated
1. Select the “Child Protection” option from the
Devices menu. Press the OK button.
Activating Child Protection
2. Highlight the location of the device for child
protection. Press the OK button.
3. Highlight the specific device for child
protection. Press the OK button.
4. The current level of protection will be marked
with a checkmark. If you want a different
level, use the arrow pad to highlight one of
the three available protection levels.
Press the OK button.
If you want Unprotected, the device will not
be protected.
If you want Sequence control, two or more
devices can be controlled in consecutive
order.
If you want Remote control, the device will
only be controlled by the local controller.
5. To confirm changes, wait for a pop-up
window to display “Device updated.”
SECTION IX
5150
Page 27
52
Associate
Uninstall
Remove
Replace
Whole House
Dining Room
Bathroom 1
Bathroom 2
Location
Devices
Devices
1 Receptacle
2 Bathroom Lights
Devices
1 Receptacle
2 Bathroom Lights
Bathroom Lights removed
Troubleshooting Guide and Maintenance
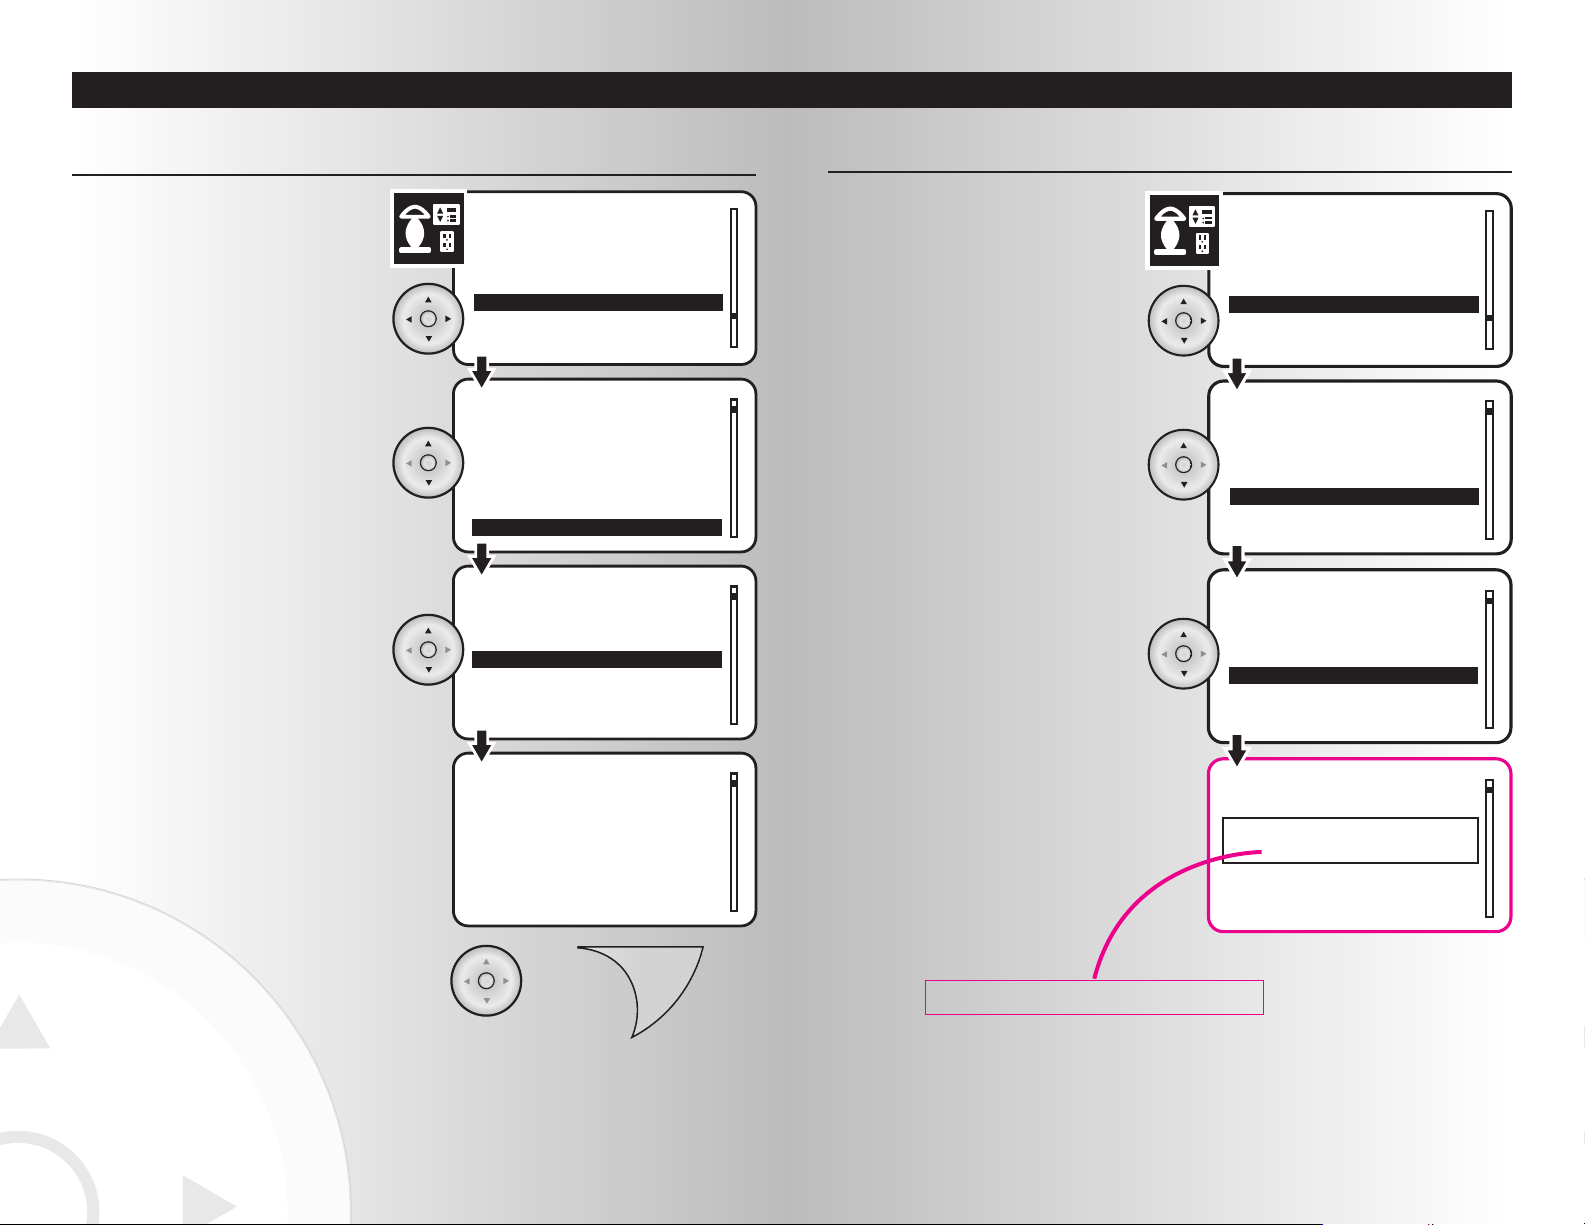
1. Select the “Remove” option from the Devices
menu. Press the OK button.
Removing a Failed Device
2. Highlight the location of the device to be
removed. Press the OK button.
3. Highlight the specific device to be removed.
Press the OK button.
4. The controller will check the system to
confirm that the device contains a failed
noted ID. A message will confirm whether or
not the device has been removed.
SECTION IX
Troubleshooting Guide and Maintenance
Location
Configure
Version
All Switch
Location
Devices
1 Overhead light
2 Receptacle
3 Device 3
Devices
Node ID 2
Application 0.15
Protocol 1.97
Library Rout Slave
Receptacle version
Bathroom 5
Sun room
Exercise room
Theater room
OR
OR
Back
1. Select the “Version” option from the Devices
menu. Press the OK button.
Retrieving Version Information about an Individual Device
2. Highlight the location of the device. Press the
OK button.
3. Highlight the specific device. Press the OK
button.
4. View version information about the device.
5. When finished, press the OK or Back button
to return to the main settings menu.
SECTION IX
53
Is this popup window correct?
Page 28
5554
Version
Replicate
Network Discovery
Reset
Discovery process
complete
Settings
Network Discovery
Troubleshooting Guide and Maintenance
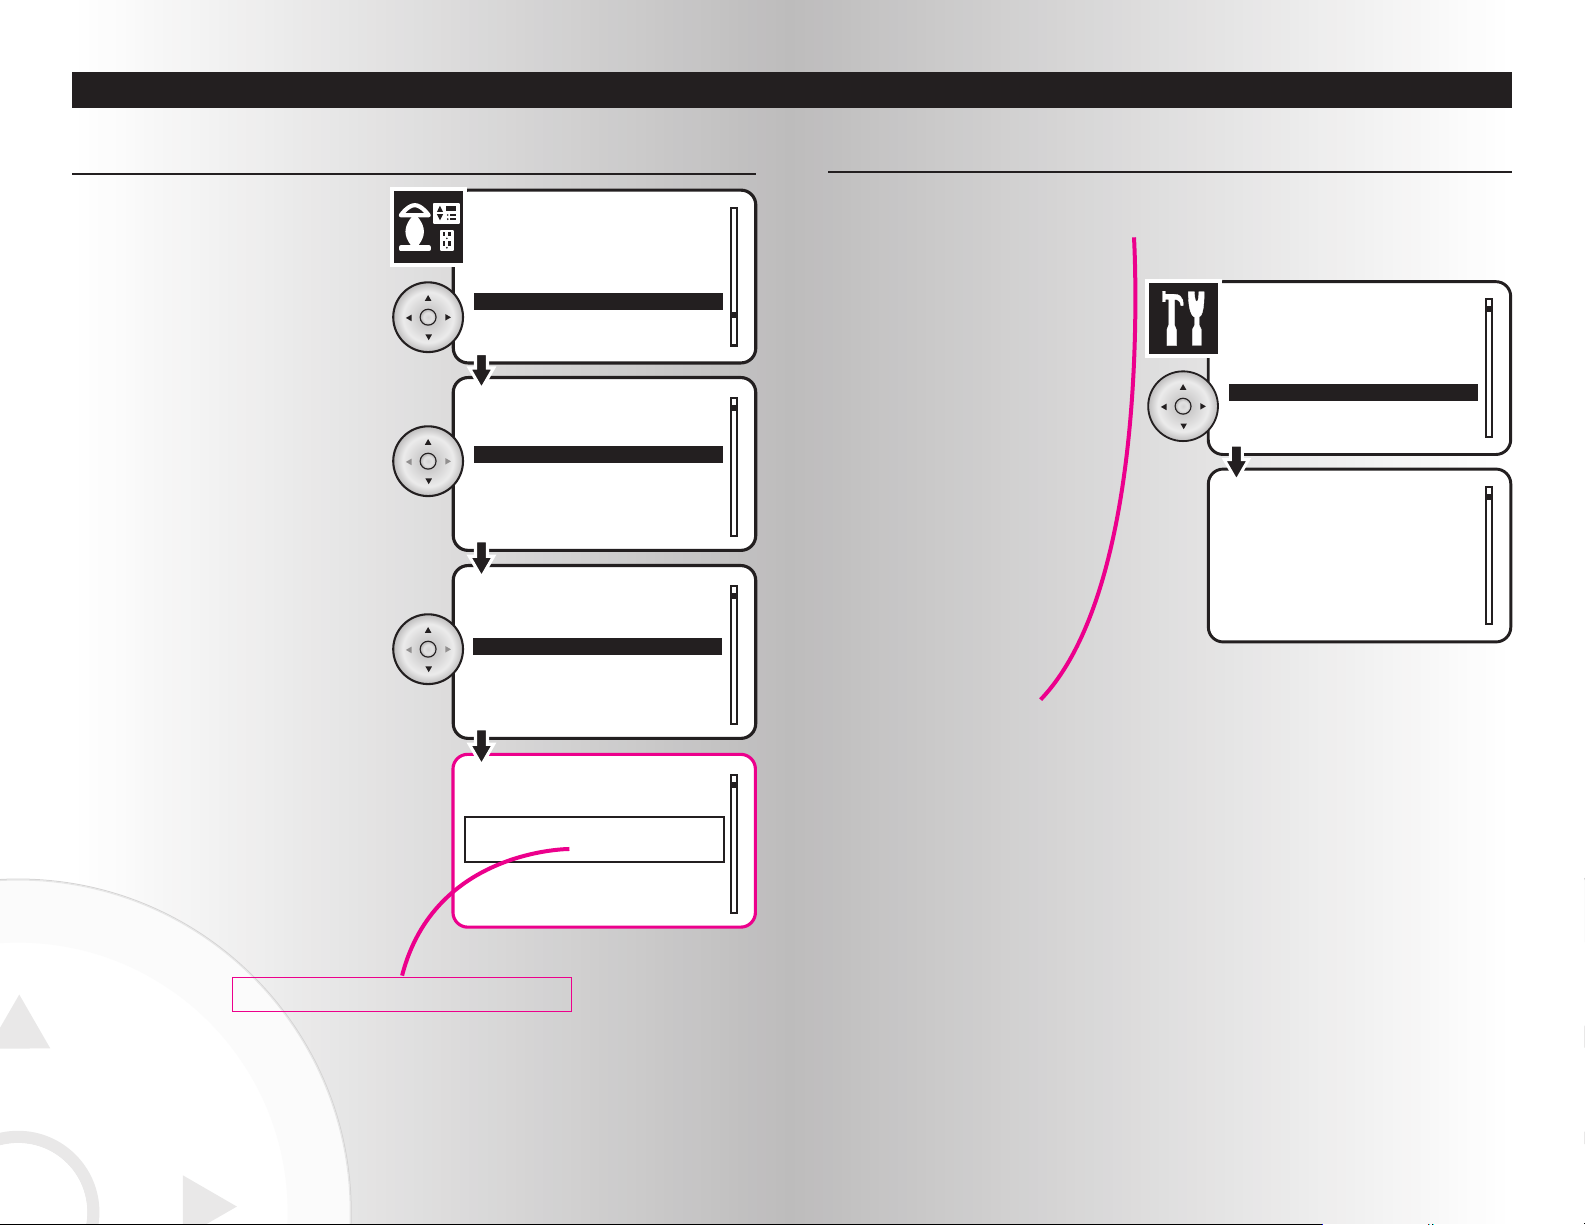
Operating Network Discovery
1. Select the “Network Discovery” option from
the Settings menu. Press the OK button.
2. The discovery process will last several
seconds. A pop-up window will display a
message when the operation is complete.
Network discovery is a network management function that forces the controller to search for devices and
update the network routing tables contained in the devices and in the handheld. It is rarely used in the dayto-day operation of the wireless system.
{Do users need this information or is it only used by service
technicians?}
SECTION IX
Troubleshooting Guide and Maintenance
1 Dining Room Dimmer
2 Bathroom Lights
3 Den Lights
4 Stereo Outlet
Devices
Uninstall
Remove
Replace
Child Protection
Whole House
Dining Room
Bathroom 1
Bathroom 2
Location
Devices
1 Dining Room Dimmer
2 Bathroom Lights
3 Den Lights
4 Stereo Outlet
Devices
Bathroom Lights replaced
1. Select the “Replace” option from the Devices
menu. Press the OK button.
Replacing a Failed Device
2. Highlight the location of the device to be
replaced. Press the OK button.
3. Highlight the specific device to be replaced.
Press the OK button.
4. Press the Install button on the new device.
5. The controller will generate new mode
information for the system and complete the
replacement process. A message will confirm
whether or not the device has been replaced.
SECTION IX
Is this popup window correct?
Note from Loudwater–The network discovery is something the
users may never use. Not sure if there will be such a thing as a
service technician. It may be that they will be instructed to use this
over the phone with support.
Page 29

Warranty
Page Title
Lorem ipsum dolor sit amet, consectetuer adipiscing elit. Nullam ac dui. Aliquam commodo adipiscing
lacus. Nunc eget erat. Sed consequat justo non leo. Integer id nisl vel nisi gravida iaculis. Proin vel sapien.
Suspendisse ut nunc. Aenean scelerisque consequat eros. Fusce suscipit. Praesent purus. Sed dictum mi
quis tellus laoreet suscipit. Nunc in turpis. Duis ac lacus. Fusce mattis scelerisque turpis. Mauris quis nisl
id metus consectetuer mattis. Morbi semper condimentum odio. Pellentesque vestibulum. Pellentesque
molestie lobortis pede.
Morbi nonummy. Donec ultrices enim eu orci. In id neque. Vivamus sodales diam consequat neque. Proin
venenatis lobortis ante. Cum sociis natoque penatibus et magnis dis parturient montes, nascetur ridiculus
mus. Praesent mollis risus vel lacus. Aliquam interdum nunc vitae enim. Donec semper. Maecenas sed
felis. Pellentesque purus libero, consequat eu, dapibus non, accumsan sed, libero. Aenean nec justo nec
urna egestas iaculis. Vivamus tincidunt facilisis ante.
Mauris ut enim. Suspendisse convallis nonummy lacus. Aenean eget purus at ipsum adipiscing iaculis.
Quisque convallis. Nam viverra. Nam scelerisque tincidunt tellus. Cras erat metus, convallis non, dignissim
eget, dignissim at, diam. Aliquam erat volutpat. Mauris rutrum arcu sit amet nulla. Vivamus lectus justo,
tempor a, feugiat eu, tincidunt eu, ipsum. Sed nulla est, pharetra ac, euismod a, semper vel, mauris. Duis
massa purus, sodales nec, vulputate dignissim, vulputate quis, libero. Mauris magna leo, euismod id,
ultrices ac, fermentum sit amet, eros. Praesent rutrum. Aenean tempor mi ut eros. Praesent odio urna,
posuere eu, sagittis non, congue ac, urna. Maecenas vestibulum ipsum et dui. Nullam massa lorem,
ornare id, elementum eu, condimentum vitae, felis.
Suspendisse quis nisi. Nulla eu lectus sit amet ligula bibendum molestie. Sed nisi neque, congue eget,
imperdiet a, gravida nec, eros. Curabitur nec mi. Maecenas purus. Phasellus nec velit et justo sollicitudin
iaculis. Duis quis magna. Pellentesque enim ligula, semper ut, lacinia eu, suscipit non, quam. Ut eros
quam, lobortis eu, sodales non, placerat ut, sapien. Nunc cursus ipsum in lacus. In hac habitasse platea
dictumst. Mauris eleifend nisl vitae mauris. Phasellus non lacus non sapien dictum auctor. Donec eget sem
ac eros mattis sodales.
Pellentesque et turpis at lacus aliquam cursus. Nulla tempus elementum ligula. Aenean lacinia nunc eu mi.
Fusce tempus nibh. Donec vel nibh. Quisque tortor. Fusce in nisi vel risus commodo posuere. Morbi
pulvinar. Donec dapibus varius diam. Cras sodales. Vivamus sit amet elit id orci lacinia ultrices. Etiam
vitae nisl. Vestibulum ante ipsum primis in faucibus orci luctus et ultrices posuere cubilia Curae;
SECTION X
Ordering Information for Cooper Wiring Devices
Lorem ipsum dolor sit amet, consectetuer adipiscing elit. Nullam ac dui. Aliquam commodo adipiscing
lacus. Nunc eget erat. Sed consequat justo non leo. Integer id nisl vel nisi gravida iaculis. Proin vel sapien.
Suspendisse ut nunc. Aenean scelerisque consequat eros. Fusce suscipit. Praesent purus. Sed dictum mi
quis tellus laoreet suscipit. Nunc in turpis. Duis ac lacus. Fusce mattis scelerisque turpis. Mauris quis nisl
id metus consectetuer mattis. Morbi semper condimentum odio. Pellentesque vestibulum. Pellentesque
molestie lobortis pede.
Morbi nonummy. Donec ultrices enim eu orci. In id neque. Vivamus sodales diam consequat neque. Proin
venenatis lobortis ante. Cum sociis natoque penatibus et magnis dis parturient montes, nascetur ridiculus
mus. Praesent mollis risus vel lacus. Aliquam interdum nunc vitae enim. Donec semper. Maecenas sed
felis. Pellentesque purus libero, consequat eu, dapibus non, accumsan sed, libero. Aenean nec justo nec
urna egestas iaculis. Vivamus tincidunt facilisis ante.
Mauris ut enim. Suspendisse convallis nonummy lacus. Aenean eget purus at ipsum adipiscing iaculis.
Quisque convallis. Nam viverra. Nam scelerisque tincidunt tellus. Cras erat metus, convallis non, dignissim
eget, dignissim at, diam. Aliquam erat volutpat. Mauris rutrum arcu sit amet nulla. Vivamus lectus justo,
tempor a, feugiat eu, tincidunt eu, ipsum. Sed nulla est, pharetra ac, euismod a, semper vel, mauris. Duis
massa purus, sodales nec, vulputate dignissim, vulputate quis, libero. Mauris magna leo, euismod id,
ultrices ac, fermentum sit amet, eros. Praesent rutrum. Aenean tempor mi ut eros. Praesent odio urna,
posuere eu, sagittis non, congue ac, urna. Maecenas vestibulum ipsum et dui. Nullam massa lorem,
ornare id, elementum eu, condimentum vitae, felis.
Suspendisse quis nisi. Nulla eu lectus sit amet ligula bibendum molestie. Sed nisi neque, congue eget,
imperdiet a, gravida nec, eros. Curabitur nec mi. Maecenas purus. Phasellus nec velit et justo sollicitudin
iaculis. Duis quis magna. Pellentesque enim ligula, semper ut, lacinia eu, suscipit non, quam. Ut eros
quam, lobortis eu, sodales non, placerat ut, sapien. Nunc cursus ipsum in lacus. In hac habitasse platea
dictumst. Mauris eleifend nisl vitae mauris. Phasellus non lacus non sapien dictum auctor. Donec eget sem
ac eros mattis sodales.
Pellentesque et turpis at lacus aliquam cursus. Nulla tempus elementum ligula. Aenean lacinia nunc eu mi.
Fusce tempus nibh. Donec vel nibh. Quisque tortor. Fusce in nisi vel risus commodo posuere. Morbi
pulvinar. Donec dapibus varius diam. Cras sodales. Vivamus sit amet elit id orci lacinia ultrices. Etiam
vitae nisl. Vestibulum ante ipsum primis in faucibus orci luctus et ultrices posuere cubilia Curae;
F
C
c
R
CUS
L
I
S
T
E
D
2
4
4
A
Page Title
SECTION XI
5756
Page 30

Page Title
5958
Lorem ipsum dolor sit amet, consectetuer adipiscing elit. Nullam ac dui. Aliquam commodo adipiscing
lacus. Nunc eget erat. Sed consequat justo non leo. Integer id nisl vel nisi gravida iaculis. Proin vel sapien.
Suspendisse ut nunc. Aenean scelerisque consequat eros. Fusce suscipit. Praesent purus. Sed dictum mi
quis tellus laoreet suscipit. Nunc in turpis. Duis ac lacus. Fusce mattis scelerisque turpis. Mauris quis nisl
id metus consectetuer mattis. Morbi semper condimentum odio. Pellentesque vestibulum. Pellentesque
molestie lobortis pede.
Morbi nonummy. Donec ultrices enim eu orci. In id neque. Vivamus sodales diam consequat neque. Proin
venenatis lobortis ante. Cum sociis natoque penatibus et magnis dis parturient montes, nascetur ridiculus
mus. Praesent mollis risus vel lacus. Aliquam interdum nunc vitae enim. Donec semper. Maecenas sed
felis. Pellentesque purus libero, consequat eu, dapibus non, accumsan sed, libero. Aenean nec justo nec
urna egestas iaculis. Vivamus tincidunt facilisis ante.
Mauris ut enim. Suspendisse convallis nonummy lacus. Aenean eget purus at ipsum adipiscing iaculis.
Quisque convallis. Nam viverra. Nam scelerisque tincidunt tellus. Cras erat metus, convallis non, dignissim
eget, dignissim at, diam. Aliquam erat volutpat. Mauris rutrum arcu sit amet nulla. Vivamus lectus justo,
tempor a, feugiat eu, tincidunt eu, ipsum. Sed nulla est, pharetra ac, euismod a, semper vel, mauris. Duis
massa purus, sodales nec, vulputate dignissim, vulputate quis, libero. Mauris magna leo, euismod id,
ultrices ac, fermentum sit amet, eros. Praesent rutrum. Aenean tempor mi ut eros. Praesent odio urna,
posuere eu, sagittis non, congue ac, urna. Maecenas vestibulum ipsum et dui. Nullam massa lorem,
ornare id, elementum eu, condimentum vitae, felis.
Suspendisse quis nisi. Nulla eu lectus sit amet ligula bibendum molestie. Sed nisi neque, congue eget,
imperdiet a, gravida nec, eros. Curabitur nec mi. Maecenas purus. Phasellus nec velit et justo sollicitudin
iaculis. Duis quis magna. Pellentesque enim ligula, semper ut, lacinia eu, suscipit non, quam. Ut eros
quam, lobortis eu, sodales non, placerat ut, sapien. Nunc cursus ipsum in lacus. In hac habitasse platea
dictumst. Mauris eleifend nisl vitae mauris. Phasellus non lacus non sapien dictum auctor. Donec eget sem
ac eros mattis sodales.
Pellentesque et turpis at lacus aliquam cursus. Nulla tempus elementum ligula. Aenean lacinia nunc eu mi.
Fusce tempus nibh. Donec vel nibh. Quisque tortor. Fusce in nisi vel risus commodo posuere. Morbi
pulvinar. Donec dapibus varius diam. Cras sodales. Vivamus sit amet elit id orci lacinia ultrices. Etiam
vitae nisl. Vestibulum ante ipsum primis in faucibus orci luctus et ultrices posuere cubilia Curae;
Ordering Information for Cooper Wiring Devices
SECTION XI
 Loading...