

Cooper Surgical LEEP PRECISION LP-20-120, LEEP PRECISION LP-20-220 Operating Manual
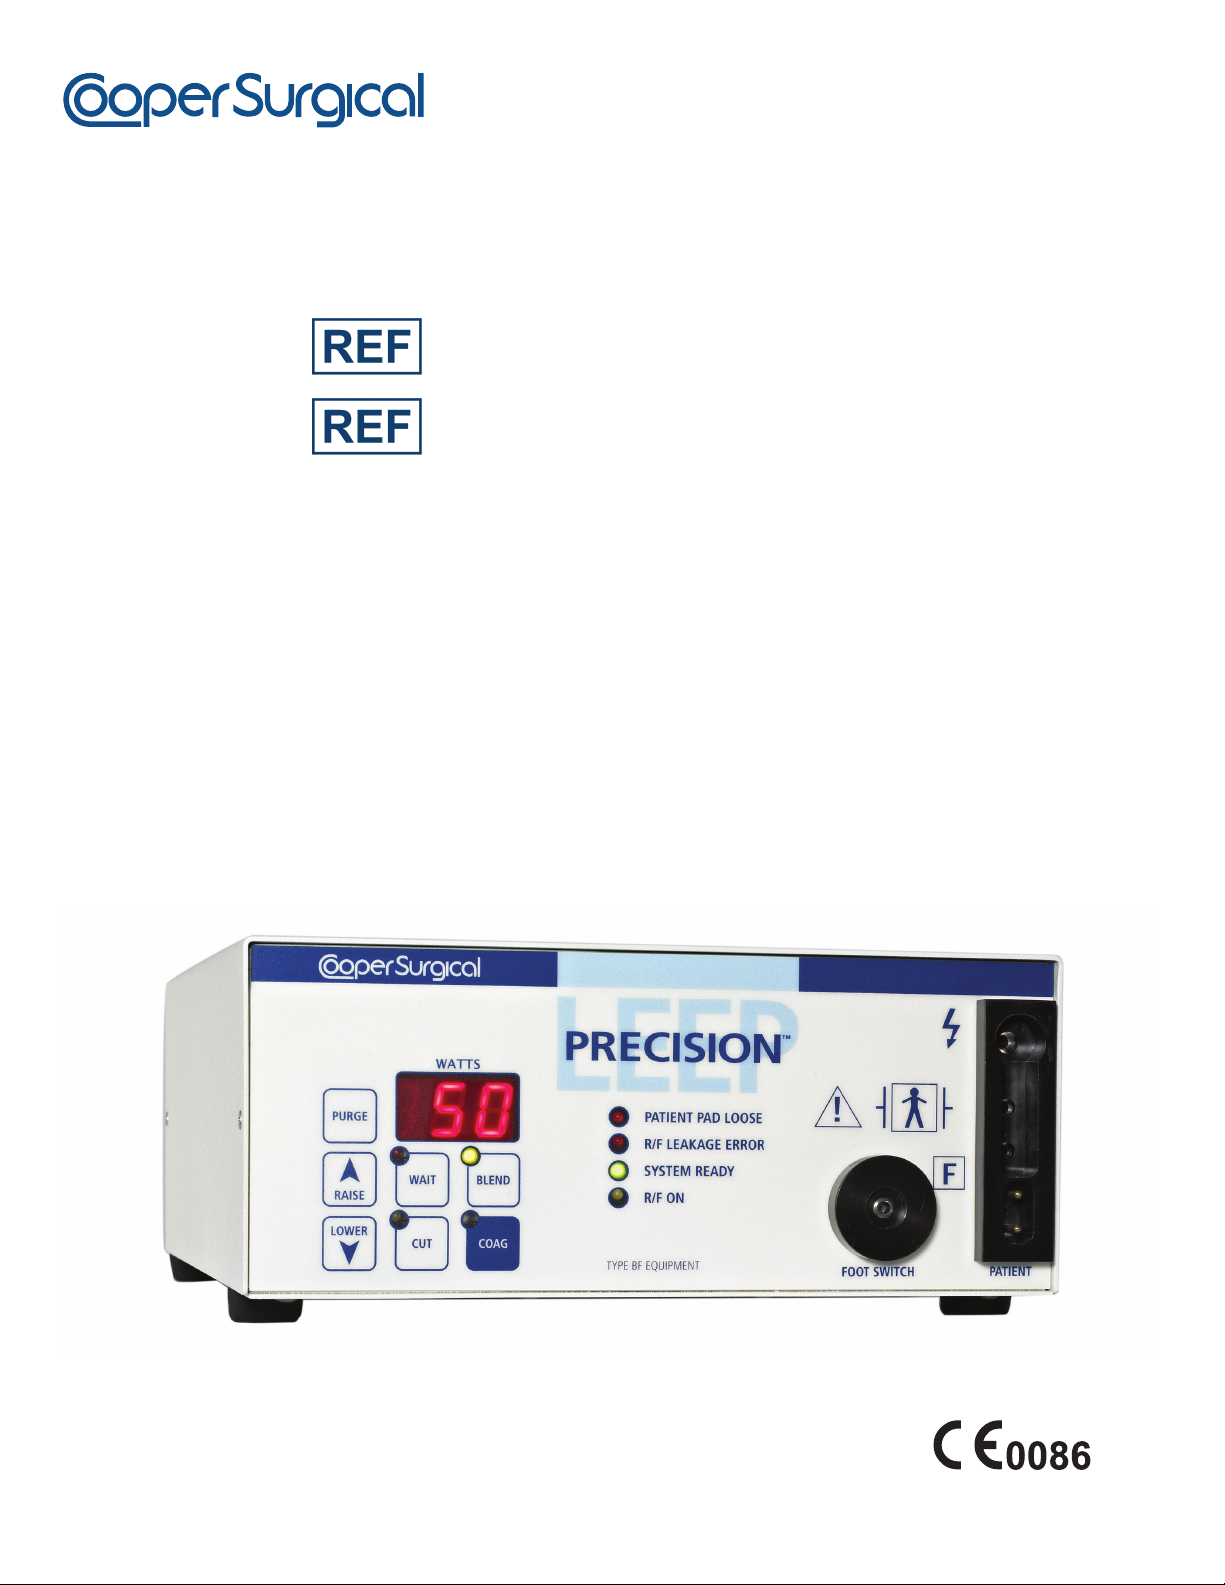
LEEP PRECISION
TM
Generator
120 VAC
230 VAC
Operating Manual (English)
Bedienungsanleitung (Deutsch / German)
Manual de funcionamiento (Español / Spanish)
Manuel d’utilisation (Français / French)
Manuale di funzionamento (Italiano / Italian)
Manual de funcionamento (Português / Portuguese)
操作手册 (简体中文 / Mandarin Chinese)
LP-20-120
LP-20-220

English .......................................................Page 3
Deutsch / German ............................................ Seite 31
Español / Spanish . . . . . . . . . . . . . . . . . . . . . . . . . . . . . . . . . . . . . . . . . . . .Página 59
Français / French ............................................. Page 87
Italiano / Italian ............................................ Pagina 115
Português / Portuguese ..................................... Página 143
简体中文 / Mandarin Chinese ....................................页码 171
95 Corporate Drive
Trumbull, CT 06611 USA
Phone: (800) 243-2974
Fax: (800) 262-0105
www.coopersurgical.com
International
Phone: (203) 601-9818
Fax: (203) 601-4747
EMERGO EUROPE
Prinsessegracht 20
2514 AP The Hague
The Netherlands
CooperSurgical, Inc.
95 Corporate Drive
Trumbull, CT 06611 USA

TABLE OF CONTENTS
Section Content Page
1. Introduction ...................................................................................................................................... 4
2. Special Features ............................................................................................................................. 4
3. Front and Rear Panels of the LEEP PRECISION Generator .......................................................... 5
3.1 Front Panel of the LEEP PRECISION Generator ........................................................................... 5
3.2 Rear Panel of the LEEP PRECISION Generator ............................................................................ 6
4. Assembly ......................................................................................................................................... 7
4.1 Installing the Foot Pedal Switch on the LEEP PRECISION Generator ........................................... 7
4.2 Installing the Active and Dispersive Electrodes .............................................................................. 7
5. Professional Use Guide ................................................................................................................ 10
5.1 Indications for OB/GYN Applications ............................................................................................ 10
5.2 Contraindications for OB/GYN Applications .................................................................................. 11
5.3 Electrosurgical Procedures ........................................................................................................... 11
6. Electrosurgical Precautions ........................................................................................................... 14
7. LEEP PRECISION Smoke Evacuator Operation .......................................................................... 14
7.1 Automatic Mode Option ................................................................................................................. 14
7.2 Purge Button ................................................................................................................................. 14
8. Setup and Operation of the LEEP PRECISION Generator ........................................................... 14
8.1 Practice ......................................................................................................................................... 14
8.2 The Power Setting ......................................................................................................................... 16
8.3 Cutting Techniques ....................................................................................................................... 17
8.4 Criteria of a Good Cutting Technique ............................................................................................ 17
8.5 Coagulating ................................................................................................................................... 17
8.6 Coagulating Technique ................................................................................................................. 18
8.7 Technique Guidance ..................................................................................................................... 18
9. LEEP PRECISION Patient Return Electrode ................................................................................. 19
10. Maintenance .................................................................................................................................. 19
11. Accessories ................................................................................................................................... 19
11.1 Disposable Hand Switch Pencils ................................................................................................... 20
12. Liability Statement ......................................................................................................................... 20
13. Warranty ........................................................................................................................................ 20
14. Service/Repair ............................................................................................................................... 21
15. Troubleshooting ............................................................................................................................ 22
16. Specifications ................................................................................................................................. 23
16.1 Power Output Characteristics . ...................................................................................................... 24
16.2 Power Output at Various Load Resistance ................................................................................... 25
17. EMC Compliance Information for the LEEP PRECISION Generator ............................................ 26
18. Guidance and Manufacturer’s Declaration – Electromagnetic Immunity ...................................... 27
19. Explanation of Symbols ................................................................................................................. 30
3

Section 1 Introduction
The LEEP PRECISIONTM Generator was designed for office use.
Read this manual carefully and follow the recommended program of practice. The manual covers applications
and techniques for use as well as setup and maintenance of your LEEP PRECISION Generator.
For any questions or problems, call the local CooperSurgical representative or write to:
CooperSurgical, Inc.
ATTN: Customer Service Department
95 Corporate Drive
Trumbull, CT 06611 USA
Phone: (800) 243-2974
Fax: (800) 262-0105
www.coopersurgical.com
International
Phone: (203) 601-9818
Fax: (203) 601-4747
Section 2 Special Features
• Electronic power level control
• Digitally derived waveforms
• Low inherent leakage rate
• Patient return monitor disables power automatically if Patient Return Electrode is loose
• Regulated system performance traceable to NIST Standards
• Automatic smoke evacuator signal function sends signal to detector for automatic smoke evacuator actuation
when generator is activated
• Self-monitors all detectors
4
(Colored, numbered boxes are
also located later in this manual)
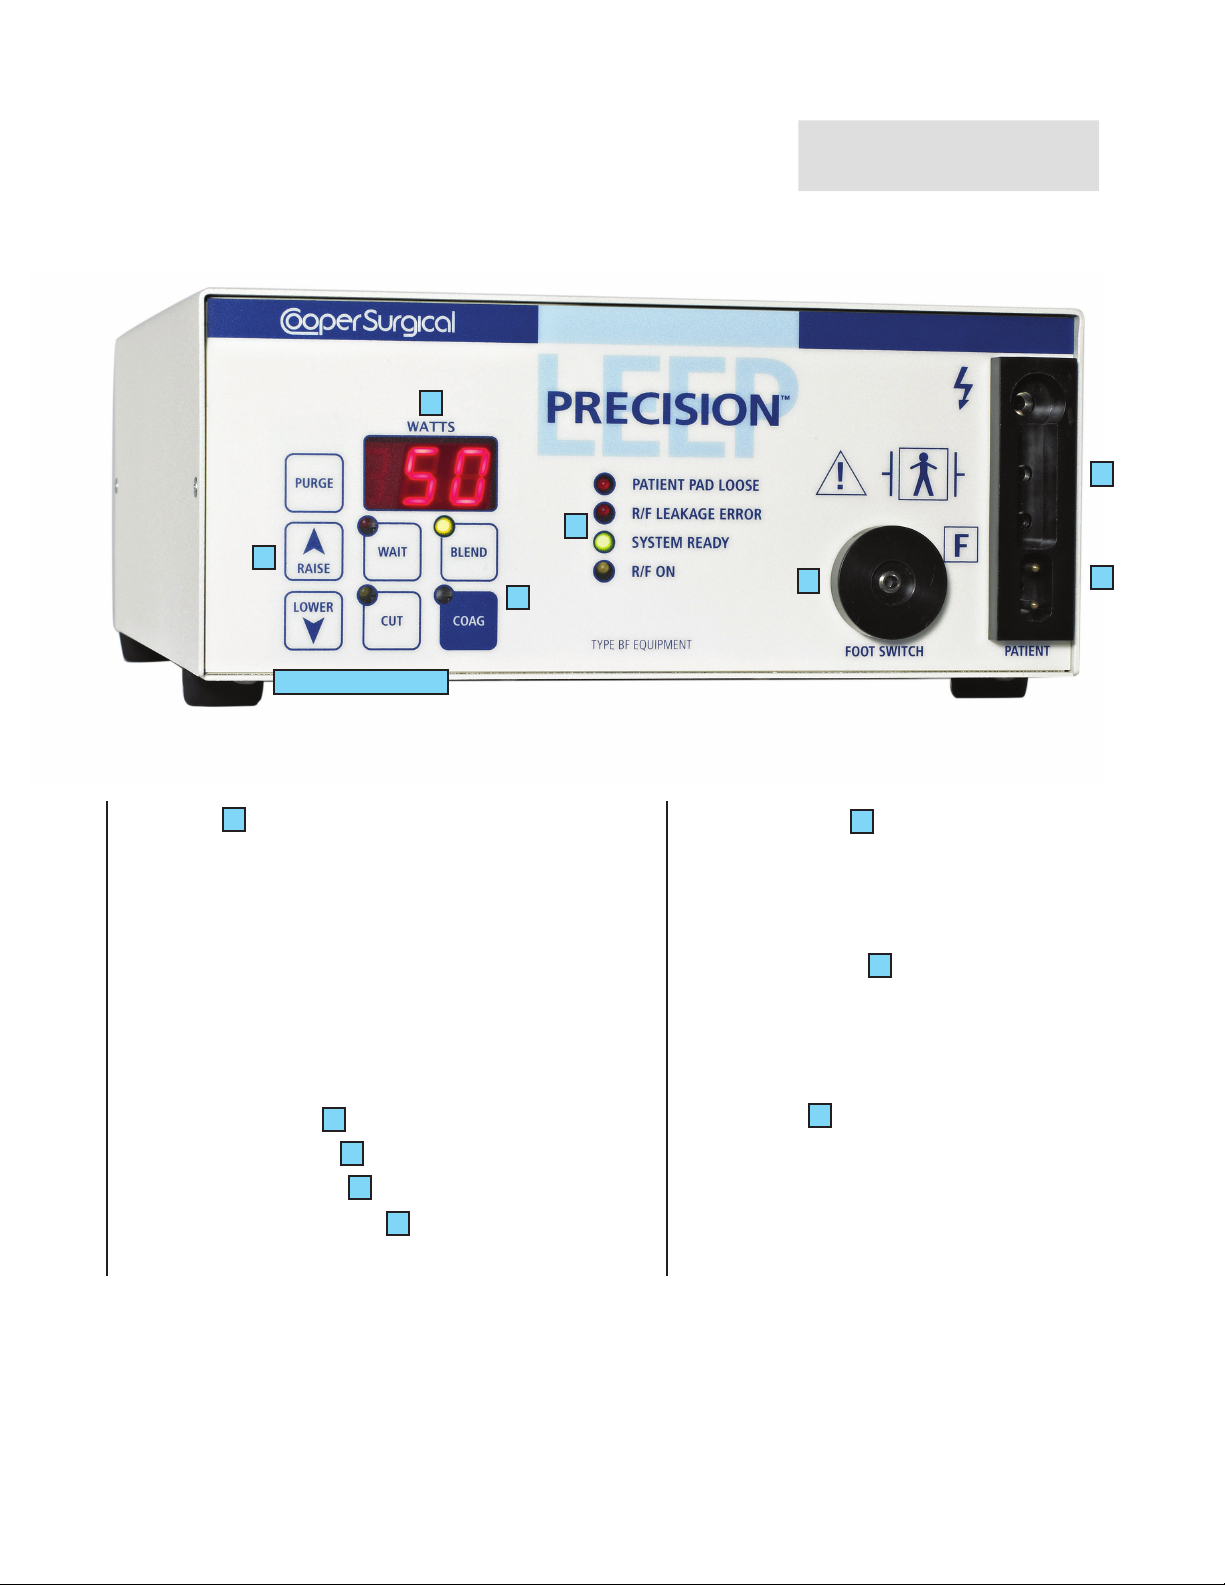
Section 3 Front and Rear Panels of the LEEP PRECISION Generator
3.1 Front Panel of the LEEP PRECISION Generator
3
4
1
2
1a - 1g
(Colored, numbered boxes are
also located later in this manual)
5
7
8
Controls
1
Operator Pushbuttons
a) PURGE Turns LEEP PRECISION Smoke
Evacuator on for 5 sec.
b) RAISE Increases Power Setting
c) LOWER Decreases Power Setting
d) WAIT Stand-by Mode
e) BLEND Cutting Mode Selection
f) CUT Cutting Mode Selection
g) COAG Cutting Mode Selection
Foot Switch Socket
A/C Power (rear panel)
Active Electrode Socket
Dispersive Electrode Socket
5
6
7
8
Remote Pencil Buttons (not shown)
Indicator Lights
2
WAIT = Red
CUT = Yellow
BLEND = Yellow
COAG = Blue
Power Indications
3
Digital LED Display
Acoustical
Piezo Annunciator
Pilot Lights
4
PATIENT PAD LOOSE
R/F LEAKAGE ERROR
SYSTEM READY
R/F ON
5

3.2 Rear Panel of the LEEP PRECISION Generator
9
10
11
Figure 2 (Rear Panel)
6
Rear Panel - LEEP PRECISION Generator
ON/OFF Switch
6
A/C Power Cord Connector
Fuse Holder
10
9
“Communication” Infrared LED between the LEEP PRECISION
Generator and LEEP PRECISION Integration Unit (ON/OFF)
Symbols on the LEEP PRECISION Generator
Classification I Type BF protected against defibrillator effects
11
Floating output circuit (Applied Part)
Cautions – consult this manual for safety precautions
Dangerous voltage
Equipotentiality Symbol (Ground)
IMPORTANT
The LEEP PRECISION Generator user must be thoroughly trained in the techniques of Loop Electrosurgical
Excision Procedures (LEEP). This system has been designed for use with only the CooperSurgical LEEP
PRECISION Electrosurgical Accessories. DO NOT use this equipment for any purpose other than that for
which it has been designed. See Warnings and Caution statements throughout this manual.
6

Section 4 Assembly
4.1 Installing the Foot Pedal Switch on the LEEP PRECISION Generator
Connect the Foot Pedal Switch to the socket shown in Figure 1 if foot control is desired.
5
4.2 Installing the Active and Dispersive Electrodes
4.2.1 Placement of the Active Electrode
Connect the Active Electrode to socket shown in Figure 1.
4.2.1.1 For Foot Switch-Operated Electrode Use (with Adapter)
A 4 mm Reusable Electrosurgical Adapter is supplied with the LEEP PRECISION
Generator (found in the LEEP PRECISION Generator box). Use the Foot
Switch-Operated Electrode with the Adapter. The Electrode is plugged into the
Adapter, which is then plugged into socket shown in Figure 1.
4.2.2 Placement of the Dispersive Electrode or Patient Return Electrode
When using an electrosurgical system, it is very important that all of the current delivered to the patient
returns correctly to the LEEP PRECISION Generator via the Patient Return Electrode only.
• Connect the Dispersive Electrode to socket . Refer to Figure 1.
• The patient must be positioned correctly on the operating table. The patient and operator must not
come in contact with any metal conductive surfaces.
• The Patient Return Electrode must securely contact a vascular area close to the operating site. For a
gynecology procedure, the preferred site is the patient’s thigh. The contact area must be clean, free of
body lotions, shaved, and massaged for good circulation. The Patient Return Electrode contact area
must be maximized and frequently checked for uniform contact during the procedure, especially
if the patient has moved or if liquids have come in contact with the Patient Return Electrode.
The Patient Return Electrode must NEVER be placed so as to allow the patient’s heart to be in the
pathway from the active electrode.
• Power delivery to the operative site may be decreased appreciably if alternate pathways exist; for
example, through the metal operating table, crossed Active Electrode/Patient Return Electrode
Cables, etc.
4.2.2.1 Patient Return Electrode Use
There are two varieties of Patient Return Electrodes that can be used with the LEEP PRECISION Generator:
7
7
8
1 2
Patient Return Electrode
With Connector
The Cable is built in
( ): If the Patient Return Electrode with the built-in cable is purchased, the Patient Return
Electrode Cable is plugged directly into socket .
( ): If the Patient Return Electrode and a separate Reusable Cable are purchased, the
Patient Return Electrode is connected to the Reusable Cable, which is then plugged
into socket .
1
2
8
Patient Return Electrode
Without Connector
Reusable Cable is purchased
separately from CooperSurgical
8
7

Figures 3 through 5 show the proper and improper ways of hooking up and using the various Active
Electrodes and Patient Return Electrodes on the patient.
PROPER
LEEP PRECISION
Generator
Grounded
Metal Case
IMPROPER
LEEP PRECISION Generator
Isolated
ESU
patient to Patient Return
Patient
Two-conductor patient
electrode continuity
RF current through
Electrode
monitor
Figure 3
Active Electrode
Patient Return Electrode
(Thigh)
Patient may be grounded
Burn occurs at small
grounded contact
EKG
RF
IMPROPER
LEEP PRECISION
Generator
grounded ESU
Isolated or
Surgeon touches electrode
to grounded object
Figure 4
RF current flows from
electrode
Patient Return Electrode
touches grounded table
Figure 5
RF current flows from ground
through EKG pad, through
patient to Patient Return Electrode
Burn occurs at small
grounded contact
RF
RF current returns to Patient Return
Electrode via ground path
EKG
8

WARNINGS
• THIS DEVICE IS A BF-TYPE DEVICE. BF-TYPE EQUIPMENT IS B-TYPE DEVICE WITH AN F-TYPE
APPLIED PART.
A B-Type device is piece of equipment providing a particular degree of protection against electric shock,
particularly regarding:
• Allowable leakage current
• Reliability of the protective earth connection.
• An F-Type isolated applied part. The applied part is isolated from all other parts of the equipment to
such a degree that the patient leakage current allowable in single fault condition is not exceeded
when a voltage equal to 1.1 times the highest rated mains voltage is applied between the applied
part and earth.
• AVOIDING PATIENT BURNS
1. Do not activate the electrode until all components are in place.
2. Be certain to have an unobstructed path and view.
3. Use only non-conductive ancillary instruments.
4. Remove patient jewelry, metal drape clips, (etc.) and needles.
5. A Patient Return Electrode must be used. The entire area of the Patient Return Electrode should
be reliability attached to the patient’s body and as close to the operating field as possible.
6. Place Foot Switch in safe position, out of traffic.
7. Turn console OFF or place in WAIT state when not in use.
8. Do not use unit on small appendages due to current density. Bipolar techniques may be desirable
for use on small appendages.
• THERMAL INJURY AND DEFECTS OF TISSUE TREATED WITH LOOP ELECTRODES
Possible injury to cervical tissue may include:
1. Thermal coagulation injury of the cervix, up to one-third the thickness of the normal cervical
epithelium,
2. Fragmentation of squamous cervical epithelium attributable to long exposure periods along the
excision site that allows heat to dissipate laterally, and
3. Partial coagulation of the endocervical epithelium because of lateral heat radiation. Loop
Electrosurgical Excision Procedures may also produce thermal defects at the periphery of the
excised tissue and may make histopathologic interpretation difficult or impossible, preventing
accurate diagnosis and evaluation of the need for further treatment.
• FLAMMABLE GASES/SOLUTIONS
1. When using a flammable preparatory solution, such as alcohol, be certain that the solution has
completely evaporated before using electrosurgery.
2. Electrosurgery should not be used in the presence of flammable or explosive gases.
3. It is recommended that only non-flammable agents be used for cleaning and disinfection.
SMOKE FROM PROCEDURES CONTAINS LIVE CELLS THAT MAY PRESENT BIOHAZARDS
(HIV, ETC.); USE A SMOKE EVACUATION DEVICE.
CONSULT THE PACEMAKER MANUFACTURER’S LITERATURE AND THE PATIENT’S PHYSICIAN
BEFORE USING THIS INSTRUMENT ON A PATIENT USING A PACEMAKER.
9

CAUTIONS
• U.S. Federal law restricts this device to sale by or on the order of a physician. This device SHOULD
NOT be used without proper training and preceptorship.
• For monopolar systems it is recommended to keep the voltage/power as low as possible to achieve the
desired end effect (due to the potential for capacitive coupling and inadvertent burning at high voltages).
• Adequate anesthesia is indicated for all electrosurgical procedures.
• Inspect loop and ball for adequate insulation.
• Avoid using an electric extension cord (danger of separation).
• Use a smoke evacuator with this device.
• This device generates high frequency energy that could, under some circumstances, cause interference
to other equipment.
• For situations where the MAXIMUM OUTPUT VOLTAGE is less than or equal to 1600V, ASSOCIATED
EQUIPMENT and ACTIVE ACCESSORIES should be selected that have a RATED ACCESSORY
VOLTAGE equal to or greater than the MAXIMUM OUTPUT VOLTAGE.
- ASSOCIATED EQUIPMENT and ACTIVE accessories should be selected with RATED
ACCESSORYVOLTAGE≥MAXIMUMOUTPUTVOLTAGEwhenthesmallerofvariabley
(seebelow)orthenumber6is≤CRESTFACTORforthatHFSURGICALMODE.
- When MAXIMUM OUTPUT VOLTAGE (Umax) is > 1600 V, and the CREST FACTOR is < the
variable y calculated below, indicating that any ASSOCIATED EQUIPMENT and ACTIVE
ACCESSORIES used in such mode or setting must be rated to withstand the combination of actual
voltage andm CREST FACTOR.
– 400 [Volts]
U
y =
max
600 [Volts]
• No modification of this equipment is allowed.
• No customer-serviceable parts.
• Only replacment of power cords or fuses can be done by the user. Only replace with these items with
the exact replacement part(s) available from CooperSurgical.
Warning: To avoid risk of Electrical Shock, this equipment must only be connected to a supply mains with
protected earth.
Section 5 Professional Use Guide
5.1 Indications for OB/GYN Applications
• Cervical conization
• External anogenital lesion
• Large vaginal intraepithelial neoplastic (VAIN) lesions
• Large Loop Excision of the Transformation Zone (LLETZ) in the diagnosis and treatment of some
cervical intraepithelial neoplasias (CIN) and dysplasias
10

5.2 Contraindications for OB/GYN Applications
• Pregnancy
• Known or suspected cervical changes secondary to DES (diethylbestrol) intrauterine exposure
• Acute or active inflammation of the cervix, endometrium, fallopian tube, ovary or
peritoneum (cervicitis, endometritis, tubo-ovarian inflammatory disease or pelvic
inflammatory disease)
• Invasive cancer that is visible on examination
5.3 Electrosurgical Procedures
This section provides only general information about the use of electrosurgical devices. Only the user
can evaluate the clinical factors involved with each patient and determine if the use of this equipment is
indicated. The user must then decide on the specific technique and procedure that will accomplish the
desired clinical effect.
WARNING
LEEP PRECISION Generators are designed to allow the controlled destruction of tissue and are inherently
dangerous if operated improperly. REPORTED PROBLEMS DUE TO IMPROPER OPERATION DURING
ELECTROSURGICAL PROCEDURES HAVE INCLUDED:
• Inadvertent activation with resultant tissue damage at the wrong site and/or equipment damage
• Alternate current pathways resulting in burns where the patient, physician, or assistant is in contact with
exposed metal
• Explosions caused by electrosurgical sparking in a flammable gas mixture (i.e., explosive anesthetic
gases and the inappropriate use of alcohol and other flammable liquids)
• Perforation and massive hemorrhage
A proper Patient Return Electrode pathway is extremely important during any monopolar electrosurgical
procedure. Every effort must be made to ensure that, throughout the electrosurgical procedure, an
adequate surface area is provided and remains in proper contact with the patient to reduce the current
density below a level that might cause inadvertent tissue damage where the Patient Return Electrode
has been applied.
5.3.1 Electrosurgical Tissue Effect
Delivery of continuous sinusoid waveform currents through a small electrode at appropriate power levels
can cause rapid heating of the intracellular fluids in the cells in close proximity to the electrode, turning these
fluids into steam. The significant increase in volume (approximately five times) causes cellular structure to
rupture, creating the clinical effect of CUT, with little or no hemostatic effort along the margin of the divided
tissue. Delivery of short duration pulses of R/F currents through a small electrode at appropriate power levels
can cause heating of intracellular fluids at a more gradual pace. This allows evaporation of these fluids
without rupturing the cellular structure, creating the clinical effect of desiccation or COAG with the division
of tissue.
By varying the pulse to an intermediate duration, it is possible to get a clinical effect to combine the clinical
characteristics of CUT and COAG, yielding the effect referred to as “blend,” in which tissue is divided with a
desirable amount of hemostasis along the margins of the divided tissue.
11

The LEEP PRECISION Generator has output load characteristics that cause the electrosurgical effects to
remain consistent throughout the procedure. However, under some circumstances, it may be necessary to
readjust the power settings during the procedure.
The electrosurgical effect may vary throughout the procedure, requiring the operator to adjust the LEEP
PRECISION Generator relative power settings.
5.3.2 Select the Output Mode (i.e., CUT, BLEND or COAG by Pushing the Corresponding Button
e, f, or g)
Output Mode Waveform Description General Effect
CUT Continuous 495 kHz sinusoid Cutting without Hemostatis
with minimal modulation
BLEND Interrupted 495 kHz sinusoid Cutting with minimal
intermediate-duty cycle Hemostatis
COAG Bursts of 495 kHz sinusoid Coagulation without Cutting
short-duty cycle
5.3.3 Set the Output Power Level [confirmed on the digital display ( b and c and )] by using
the Output Power selector buttons as desired
1
3
WARNING
The degree and speed of electrosurgical effect is largely dependent on Current Density at the point
of contact of the Active Electrode. Loop Electrosurgical Excision Procedure electrodes from other
manufacturers may vary in the diameter, thickness, size, and configuration of the cutting wire. This
may result in significant changes in the electrosurgical effect at a given output power level setting.
The use of CooperSurgical LEEP PRECISION Electrodes is recommended.
1
5.3.4 Attendant Risks of High Frequency Electrosurgery
Electrosurgery produces sparks that can ignite flammable materials. This includes solvents, adhesives,
gauze, cotton, and also liquids and gases.
‘
Further risks include:
• Pooling of flammable agents under the patient, in body depressions, or in body cavities
• Oxygen-saturated gauze and cotton wool
• Accumulated oxygen gas under covers, drapes, or clothing
• Ignition of endogenous gases in or near a body cavity or os
5.3.5 Electrosurgery
Electrosurgery is the use of energy created by a high frequency alternating current. The tissue’s resistance
to the passage of this current creates heat internally, as in diathermy. Monopolar electrosurgery involves the
use of two electrodes (an Active Electrode and a Dispersive Electrode) of greatly different sizes. This results
in greatly increased current density at the point of the smaller electrode. While the electrode itself remains
cold, the highly concentrated high frequency energy creates molecular heat inside each cell. By the choice of
electrodes and selection and adjustment of the current, the operator controls the effect of this energy on the
tissues to achieve the desired results.
CAUTION
FOR MONOPOLAR SYSTEMS IT IS RECOMMENDED TO KEEP THE VOLTAGE/POWER AS
LOW AS POSSIBLE TO ACHIEVE THE DESIRED END EFFECT (due to the potential for
capacitive coupling and inadvertent burning at high voltages).
12

With electronically generated electrosurgery current, it is necessary to convert the 50/60 Hz alternating
current available at the wall outlet to the high frequency current needed for electrosurgery. This conversion
is accomplished using a high frequency generator. The high frequency waveforms are precisely controlled
for the various modes of operation. The peak average and RMS values of the desired waveforms are
generated in accordance with scientifically and empirically derived standards which are known to result in
the desired effects.
5.3.6 Fundamentals of Electrosurgery
As with any technical instrumentation or equipment, there are some fundamental principles that should
be learned in order to use electrosurgery safely and effectively. These principles apply generally to all
procedures in which electrosurgery is used. Users should familiarize themselves with them.
5.3.7 The Active Electrodes
Be sure the electrodes are securely seated and firmly held in the handpiece so that the entire electrode
shank is covered.
In general, straight wire electrodes are used for incisions and for removing fine tissue. Loops are used for
removing heavier tissue, planing, and contouring. Ball Electrodes are used for coagulation.
Keep the electrode clean while operating. Tissue shreds and debris on the electrode reduce the
effectiveness of the current and, by impeding the passage of the electrode through the tissue, slows
down the stroke. This creates unnecessarily heavy coagulation, which can cause sloughing and
delay healing.
Inspect the electrodes for proper insulation.
THIS DEVICE SHOULD BE ONLY BE USED BY PHYSICIANS TRAINED IN ELECTROSURGERY.
The practitioner who lacks experience should not attempt the procedures described in the following pages
based solely on this information; instead, the skills required should be acquired in the time-honored
preceptor manner.
NOTE: The best initial effect is accomplished with the cutting wire in only light contact with tissue. Tight
pressure may cause desiccation of the tissue and will delay the start of the cutting effect.
5.3.8 Thermal Effects on Tissue Treated with Loop Electrodes
Thermal effects on tissue specimens may include:
• Thermal coagulation injury of the cervix, up to one-third the thickness of normal epithelium of
the cervix
• Fragmentation of squamous epithelium of the cervix attributable to long exposure periods along the
excision site, which allow heat to dissipate laterally
• Partial coagulation of the endocervical epithelium because of lateral heat radiation. The Loop
Electrosurgical Excision Procedure may produce thermal effects at the periphery of the excised
tissue and may make histopathologic interpretation difficult or impossible and, therefore, may not
allow accurate diagnosis and may obscure the need for further treatment.
13

Section 6 Electrosurgical Precautions
The safety and effectiveness of electrosurgery is dependent to a large degree upon the skill of the user/
operator. It is important that the user/operator read, understand, and follow these operating instructions
supplied with the CooperSurgical LEEP PRECISION Generator as well as thoroughly understand the
principles and use of electrosurgical systems.
WARNING
Electrosurgery uses radio-frequency energy to cut and coagulate tissue. Because of the sparking and heat
associated with electrosurgery, do not use with flammable anesthetics or other flammable gases, near
flammable fluids or objects, or with oxidizing agents.
• Skin-to-skin contact, for instance between the patient’s arm and body, should be avoided by the
placement of an appropriate separating device, such as two to three inches of dry gauze. This will reduce
the potential for alternate site burns.
• If monitoring, stimulation, imaging, or similar devices are used simultaneously with electrosurgery, the
monitoring electrodes must be placed as far as possible from the electrosurgery site and the Patient
Return Electrode. Position the Patient Return Electrode close to the electrosurgery site, for example, on
the thigh when treating the cervix. NOTE: Monitoring Needle Electrodes are not recommended.
Section 7 LEEP PRECISION Smoke Evacuator Operation
7.1 Automatic Mode Option
The CooperSurgical Smoke Evacuation System is set up to operate automatically from the LEEP PRECISION
Generator. This is accomplished by means of a special Infrared Light Emitting Diode (IR LED) in the Integration
Unit, which is mounted on the LEEP PRECISION Generator’s rear panel. When the R/F Output is activated by
the operator, the rear panel LED produces an output that is received by the interface module of the interface
assembly. The motor will come ON and stay ON for five (5) seconds after the energized output is terminated.
7.2 Purge Button
The LEEP PRECISION Smoke Evacuator may also be tested or used without the LEEP PRECISION Generator
output by pressing PURGE on the front panel. The motor will stay on for five (5) seconds after the button is
released. Most purge operations (removing excess smoke) take only a few seconds.
Section 8 Setup and Operation of the LEEP PRECISION Generator
8.1 Practice
Cutting and coagulating are described in the following section. First, practice methods are suggested, including
how to adjust the settings for optimal cutting and coagulating. Then general techniques are described, which
should help determine and develop the best specific techniques.
1. Place the console on a flat, stable surface near the Smoke Evacuator.
2. Connect the A/C power cord(s) accordingly. Plug the removable Foot Switch into the front panel if foot
control is desired. Set it up in a convenient low-traffic area.
3. Set the ON/OFF switch to OFF, and plug the console into a grounded 120 VAC or a grounded 230 VAC
electrical receptacle. This is an important safety feature.
4. Use only CooperSurgical-approved disposable accessories. See pages 18 and 19 for further information.
5. Remove the disposable Patient Return Electrode from its packaging and attach it to the patient in
accordance with the instructions. Be sure to follow all instructions regarding the location of the Patient
Return Electrode, to ensure that good contact is made with the patient.
6. Attach the Patient Return Electrode securely to the Dispersive Electrode Socket on the LEEP
PRECISION Generator’s front panel.
8
14

7. Insert the Active Electrode into the Active Electrode Socket on the top right side of the LEEP PRECISION
7
Generator’s front panel. Either the Hand Switch-Operated Electrode (Pencil) or the Foot Switch-Operated
Electrode (Pencil) may be used.
8. Insert the selected Electrode (Needle, Loop, Square or Ball) into the Active Electrode.
9. Set the ON/OFF switch to ON. A red indicator lamp on the console (R/F ON) will indicate that the hold
mode has been initialized. After Self-Check, the SYSTEM READY LED (green) will illuminate.
4
4
NOTES
If the LEEP PRECISION system does not cycle to the SYSTEM READY status and a series of prolonged
audible beeps are heard, turn the system off and check for faulty hand, foot, or panel switches. See the
TROUBLESHOOTING section (page 22, Section G) of this manual for additional information.
Do not be alarmed if the LEEP PRECISION Smoke Evacuator turns on at this point. This is the
unit cycling.
10. Ensure patient is connected securely to the Patient Return Electrode before beginning.
WARNING
POSITIVE CONTACT MUST BE COMPLETE BETWEEN THE PATIENT AND THE PATIENT RETURN
ELECTRODE. IF NOT, SEVERE BURNING OF TISSUE MAY RESULT. THE ENTIRE AREA OF THE
PATIENT RETURN ELECTRODE SHOULD BE RELIABILY ATTACHED TO THE PATIENT’S BODY
AND AS CLOSE TO THE OPERATING FIELD AS POSSIBLE.
11. The output is selected by the mode selector buttons. When a mode is selected, the intensity should be set
by depressing the RAISE ( b) or LOWER ( c) button. If either CUT (pure cut/blended cut) or COAG
1
1
mode is selected and the Foot Switch is depressed, the output will be active. When the Foot Switch or Active
Electrode is actuated, the R/F ON lamp will illuminate and the beeper will emit a pulsing tone.
12. The LEEP PRECISION Generator is ready for use and the SYSTEM READY LED (green) will illuminate.
4
4
If the operator feels the output of power is not sufficient, the Patient Return Electrode should be checked to
see that good contact is made with the patient before increasing the power setting.
13. CROSS CONTROL: The sequence of operation of the LEEP PRECISION Generator is nonpreferential; that
is, either the Foot Switch (pedal) or the Hand Switch will activate the output (providing all safety measures
are met). The Foot Switch and the Hand Switch cannot be operated simultaneously.
IMPORTANT
If using the Foot Switch, the button on the front panel must be used to control the OUTPUT mode. When
the COAG mode ( g) is selected on the front panel, the CUT or BLEND modes cannot be invoked by the
1
Hand Switch (yellow) Button. The CUT mode, if desired, must be selected on the front panel and then
invoked either by the Hand Switch- or the Foot Switch-operated pencil.
WARNING
Positive contact must be complete between the patient and the Patient Return Electrode. If a Split/Dual
Patient Return Electrode is not securely affixed to the patient, the PATIENT PAD LOOSE indicator LED (red)
will indicate an improper return path. The PATIENT PAD LOOSE safety circuitry disables the output when an
unsafe condition occurs in the Patient Return Electrode circuit. Poor connections or insufficient contact area can
cause R/F burns. The entire area of the Patient Return Electrode should be reliability attached to the patient’s
body and as close to the operating field as possible. Use only approved CooperSurgical LEEP PRECISION
Dual/Split Patient Return Electrodes. Do not use a single (not split) Patient Return Electrode as it may cause
severe tissue burns in the vicinity of the Patient Return Electrode.
4
15

14. CABLE PLACEMENT: High frequency cables should be routed clear of other instruments and arranged for
minimum length. Cables to surgical electrodes should be positioned to prevent contact with the patient or
other leads. Temporarily unused active electrodes should be stored in a location isolated from the patient.
15. R/F LEAKAGE: The LEEP PRECISION Generator has a sensitive error detection mode that disables the
output and indicates that an error condition exists by illuminating the front panel R/F LEAKAGE ERROR LED
4
(red). This LED will indicate that an undesirable path exists from the Patient Return Electrode or Active
Electrode to ground. In this context ground means any undesirable path or place. If such a path exists, the
patient should be inspected for any contact with metallic paths to tables, chairs, or other non-isolated objects.
The purpose of this feature is to prevent R/F current from flowing in undesirable places where it could either
cause burns or damage to ancillary equipment.
16. PATIENT CONTACT: Direct operator-to-patient skin-to-skin contact could create an undesired leakage path.
Avoid skin-to-skin contact by padding with dry gauze as necessary. The operator should wear electrically
insulating gloves. Unless absolutely necessary, the patient should not be touched when R/F power is
activated. Patient should not come into contact with grounded metal parts or parts with a higher capacitance
to ground (i.e., operating table supports). Use of anti-static sheeting is recommended for this purpose.
8.2 The Power Setting
Select the operating mode (CUT, BLEND, COAG, or WAIT) by using the mode selector buttons. When a mode is
selected, the intensity should be set by depressing the POWER RAISE ( b) or LOWER ( c) button that
controls the digital display. When a mode is selected, the corresponding LED illuminates in the corner of each
button to verify which mode is engaged.
To ensure correct operation of the instrument, the colors are correlated to International Standards:
WAIT = Red
BLEND = Yellow
CUT = Yellow
COAG = Blue
When the Foot Switch is depressed or the Hand Switch buttons are pressed, the R/F ON (yellow) will
illuminate. If either the CUT ( f) (pure or blend) or COAG ( g) mode is selected and the Foot Switch is
depressed, the output will be active. In the WAIT ( d) mode there will be no output. The PIezo Electric
1
1
1
Annunciator will indicate with an intermittent tone when the R/F Power is present at the output. Once contact is
made with the electrode to the tissue and a small current is flowing, the tone will become steady.
The ideal power setting is the minimum setting at which cutting and coagulating meet the criteria described on
pages 16 and 17. If the power is too high, the tissue will be discolored and there will be considerable sparking
when the electrode contacts the surface. If the power is too low, the electrode will drag through the tissue, tearing
and burning instead of cutting cleanly, and will pick up shredded and torn tissue.
Power requirements will vary with the type and size of the electrode, the area of electrode surface in contact with
the tissue, the nature of the tissue, whether cutting or coagulating, and the depth of the incision desired. Larger
electrodes, deeper incisions, and tough fibrotic tissue are some indications for higher power settings.
1
1
4
CAUTIONS
Do not use fine Needle Electrodes at high settings as they may be severely damaged by such use. When
practicing with these electrodes, work up gradually from a low setting. Generally, you should not exceed a
setting of 40 with fine Needle Electrodes.
Do not use monitoring Needle Electrodes during electrosurgery. If monitoring electrode cables are used, they
should be placed as far away from electrosurgical cables AS POSSIBLE. If it is absolutely necessary to cross
over any monitoring cable or patient-connected tubes, such as IV lines, the crossing should be at right angles.
Use of monitoring systems incorporating high frequency current limiting devices is recommended.
16

8.3 Cutting Techniques
When cutting, ALWAYS activate the electrode by stepping on the Foot Switch or pressing the yellow button on the
Active Electrode (Pencil) BEFORE making contact with the tissue.
Plan the stroke. Before activating the electrode, take one or two practice strokes to be sure you can complete the
planned stroke comfortably and correctly. At this time you can evaluate the size and shape of the electrode and
the speed and depth of the stroke.
When the practice stroke is comfortable, step on the Foot Switch or press the yellow button on the Active Electrode (Pencil) and make the planned cut.
Use a smooth brushing motion without pressure. The electrode should pass through the tissue, WITHOUT DRAGGING, at a deliberate but not slow speed.
Keep the electrode moving. Prolonged contact with any one part of the tissue can create excessive coagulation.
8.3.1 Cutting
Blend: Cutting is done not by the electrode, but by the high frequency energy concentrated at the electrode’s
tip. This high frequency energy generates molecular heat in each cell to the point at which the fluids in the cell
vaporize and the cell explodes. By applying this energy to individual cells in sequence, that is, by moving the
electrode continuously through the tissue, the line of destruction is limited and the cutting effect is realized. At
the same time, the capillaries are sealed, resulting in almost bloodless cutting, hence the term “blended cut.”
Pure cut: This is almost like using a cold scalpel with very little or no hemostasis.
8.4 Criteria of a Good Cutting Technique
There are three criteria of a good cutting technique:
1. The electrode should “float” through the tissue without dragging or resistance.
2. There should be only very slight, if any, change in the tissue color due to dehydration or charring.
3. No tissue shreds should adhere to the electrode.
8.5 Coagulating
The LEEP PRECISION Generator is designed for high fulguration so tissue bleeders can be sealed
without burning the uninvolved tissue. Coagulation takes place when the high frequency current is applied to the
tissue with a current density sufficiently concentrated to dehydrate the cells and coagulate their organic contents,
but without penetrating deeply into the tissue.
This procedure is almost self-limiting because the surface coagulation first created protects the underlying tissue
against excessive depth of coagulation.
Coagulation appears as a white spot on the surface of the tissue, emanating from the point of contact to the Ball
Electrode. The depth of coagulation is approximately equal to the lateral spread of coagulation.
In contrast to cutting, when coagulating, the Ball Electrode should make contact with the tissue before the
physician depresses the Foot Switch or Hand Switch.
Start with a LOW power setting (15), changing the mode button to COAG.
Make light contact the surface of the tissue with the Ball Electrode. Depress the Foot Switch or Hand Switch to
activate the current, coagulating the area for several seconds, then release the Foot Switch or Hand Switch and
remove the electrode from the tissue.
17

Note the appearance of the tissue, which should appear blanched. Turn the power intensity up step by step,
repeating the procedure. Observe the characteristics of the coagulated tissue with each setting. The degree of
coagulation obtained at a particular setting will vary with different tissue and different conditions. Determine which
setting is best for various procedures. When treating any condition, if proper coagulation is not apparent after one
application, immediately increase the intensity setting if the Patient Return Electrode is properly in place.
CAUTION
Never repeatedly apply the current to the same area; this may create heat and seriously damage underlying
tissues.
8.6 Coagulating Technique
The Ball Electrode is useful for controlling hemorrhage. When applied for a second or two, electronic
coagulation current will coagulate small capillaries easily. Larger vessels can be picked up with hemostats, which
in turn may be touched by the Ball Electrode using electronically generated current. This will seal all vessels that
are held in the tips of the forceps.
NOTE
Always make contact with the tissue before depressing the Foot Switch or Hand Switch when using the
coagulation current.
8.7 Technique Guidance
8.7.1 For OB/GYN Procedures
1. The endocervix may not be included in the loop excision, and the results of endocervical curettage
(ECC) may not be predictive of either residual or invasive disease after loop excision procedures. If the
ECC is positive for dysplasia, a standard cone biopsy should be considered.
2. Loop Electrosurgical Excision Procedures performed with small diameter wire Loop Electrodes produce
multiple small pieces of cervical tissue and may provide a less acceptable tissue specimen for
histopathologic analysis.
3. Larger lesions involving multiple quadrants of the cervix are more difficult to remove with Loop
Electrodes.
8.7.2 For Severed Vessels
1. Clamp the bleeder with a hemostat.
2. Using electronically generated current, touch a Ball Electrode to any part of the hemostat.
3. Depress the Foot Switch Pedal to activate the current for several seconds, then release the Pedal and
remove the electrode. Be sure the current is set as high as is necessary to achieve coagulation.
4. After the application of coagulating current, remove the hemostat. Bleeding should have stopped; if not,
repeat the procedure. Suture ligation may be required if R/F is unsuccessful.
5. When using electronically generated current, it is safe to hold the hemostat in a gloved hand while
holding the electrode handle in the other during this procedure.
8.7.3 For Anesthesia
Adequate anesthesia is indicated for all electrosurgical procedures. It is usually advisable to anesthetize
tissue adjacent to the intended operative site in the event it becomes necessary to extend the operative
area.
18

8.7.4 For Biopsy
The use of electrosurgery for cervical biopsy has advantages in that it seals the capillaries and lymphatics as
it cuts. Whenever possible, the specimen should include two to three millimeters of attached normal tissue.
Small (up to one half inch) masses should be removed in one piece. Using a cutting current at a relatively
high setting and a Needle Electrode, incise all around the mass in an elliptical pattern, including two to three
millimeters of attached normal tissue.
Small masses may also be removed by using a suitable Loop Electrode – large enough so that it can excise
the mass as well as two to three millimeters of attached normal tissue at the same time.
Specimens from larger masses should be taken in the form of wedges. Using a Needle Electrode and cutting
current, start at the apex of the wedge at the center of the suspicious mass. The base of the wedge should
include two to three millimeters of attached normal tissue.
Section 9 LEEP PRECISION Patient Return Electrode
A Patient Return Electrode must be used to operate the LEEP PRECISION Generator. The Patient Return
Electrode must be of the Split or Dual type for the safety features to prevent R/F burns due to poor adhesion.
NOTE
For optimum patient safety with the use of the LEEP PRECISION Generator, it is strongly recommended to
use only authorized and genuine CooperSurgical LEEP PRECISION Split/Dual Patient Return Electrodes.
No other Patient Return Electrode has been tested or verified to the level of safety and performance of an
authorized and genuine CooperSurgical LEEP PRECISION Split/Dual Patient Return Electrode.
WARNING
Do not use a single/not split Patient Return Electrode as it is not continuously monitored for
integrity. Patient injury may result.
Section 10 Maintenance
The LEEP PRECISION Generator must be cleaned and disinfected after each use. To sanitize the LEEP
PRECISION Generator, wipe down with a disinfectant. While the finish on the LEEP PRECISION Generator will
resist scuffing and the chemical attack of most acids and alkalies, any liquids spilled on the LEEP PRECISION
Generator should be wiped up immediately.
Section 11 Accessories
Use only CooperSurgical LEEP PRECISION accessories for optimal system performance and patient safety. The
list includes, but is not limited to:
- LEEP Loop Electrodes
- LEEP Square Electrodes
- LEEP Needle Electrodes
- LEEP Ball Electrodes
- Patient Return Electrodes
- Hand Switch-Operated Electrodes (Pencils)
- Foot Switch-Operated Electrodes (Pencils)
- 4 mm Reusable Electrosurgical Adapter (for Hand Switch-Operated Electrodes)
- Foot Pedal
The use of non-CooperSurgical-authorized and genuine accessories is not recommended as they have not been
tested for use with this system.
19

11.1 Disposable Hand Switch Pencils
All CooperSurgical Disposable Hand Switch pencils are sold sterile and are for single patient use only.
For the LEEP PRECISION Generator, use only CooperSurgical genuine Disposable Hand Switch Pencils
(activated accessory with Finger Switch), which comply with IEC 60601-2-2: 4th edition.
Genuine CooperSurgical Disposable Foot Switch-Operated Pencils and electrodes are available, sold
sterile, and are for single patient use only.
If you have any questions or require specific accessories, contact your CooperSurgical Representative. A variety
of genuine CooperSurgical disposable electrodes and accessories are available. Use only cables approved by
CooperSurgical. Regular inspection is required for accessories, including electrode cables, for damage to
the insulation. If damage is found, the accessory should be replaced to assure safe operation.
Only use accessories specifically made for the CooperSurgical LEEP PRECISION Generator that are spe-
cifically designed for the safe and proper operation of this unit. Use of alternate accessories or parts is
not recommended as they have not been tested and verified and use may result in unsafe operation of
this unit.
Section 12 Liability Statement
CooperSurgical guarantees the safety, reliability, and performance of the LEEP PRECISION Generator only if
the installation, recalibrations, and repairs are performed by personnel authorized by CooperSurgical and if it is
used in compliance with given instructions in an area that meets all applicable IEC requirements.
Section 13 Warranty
CooperSurgical, Inc., warrants that the LEEP PRECISION Generator (the “Product”) will be free from defects in
materials and workmanship for a period of one (1) year from the original date of purchase.
If the Product should become inoperable due to a defect in material or workmanship during this one year warranty period, CooperSurgical will, at its option, repair or replace the Product. This limited warranty does not
include replacement or service to repair damage resulting from improper installation, external electrical fault, accident, disaster, use for a purpose other than that for which originally designed or indicated in this manual, negligence, modification, service or repair by personnel not authorized by CooperSurgical, or normal wear and tear,
and also does not apply to disposable or single- or limited-use items or components. The sole and exclusive
remedy under this limited warranty shall be repair or replacement as provided herein.
The foregoing limited warranty states the sole warranty made by CooperSurgical with respect to the Product and
all parts thereof, and is in lieu of any other warranty by CooperSurgical with respect to Product.
COOPERSURGICAL NEITHER MAKES NOR GRANTS ANY OTHER WARRANTY, EITHER EXPRESSED OR
IMPLIED, WITH RESPECT TO THE PRODUCT, INCLUDING WITHOUT LIMITATION, WARRANTIES OF MERCHANTABILITY OR FITNESS FOR A PARTICULAR PURPOSE. IN NO EVENT WILL COOPERSURGICAL BE
LIABLE FOR ANY DAMAGES ARISING OUT OF THE LOSS OF USE OF THE PRODUCT, OR ANY OTHER
INCIDENTAL OR CONSEQUENTIAL DAMAGES, WHETHER OR NOT COOPERSURGICAL HAS ADVANCE
KNOWLEDGE OF THE POSSIBILITY OF SAME.
No person, agent, distributor, dealer, or company is authorized to change or modify the terms of this
Limited Warranty.
Only CooperSurgical is authorized to service or repair this unit. Do not disassemble the device. There
are no user-serviceable components within the housing.
20

Section 14 Service/Repair
Poor performance by the machine will prove to be defective cords and/or connections. Check all cords and all
connections periodically for signs of loose wires, worn insulation, or loose fit.
On all models, check the connection from cords to console. Broken wires and connections can be detected by
the use of a continuity meter.
Only CooperSurgical is authorized to service or repair the LEEP PRECISION Generator. If repair is attempted
outside the factory, the warranty will be considered void. CooperSurgical is not responsible for any injury
resulting from repairs made by other individuals or organizations not certified by CooperSurgical. If a repair is
needed, the equipment must be sanitized before it is returned to the factory and carefully packaged in a protective carton.
On the note inserted in the box, please provide the following information:
• Customer and contact information on the Repair Authorization Form (download from CooperSurgical
website) or on company letterhead
• Nature of the problem
• Description of the item returned
• Serial number (if applicable)
All shipments must be prepaid. COD packages will not be accepted. Return carton to:
CooperSurgical, Inc.
Attention: Repair Department
95 Corporate Drive
Trumbull, CT 06611 USA
Phone: (203) 601-5202 • (800) 444-8456
Fax: (203) 601-4743
21

Section 15 Troubleshooting
Problem Probable Cause Corrective Action
A
ON/OFF switch, when in position,
does not illuminate
1. Unit not plugged in
2. Blown fuse
1. Plug into wall outlet
2. Replace fuse
B
PATIENT PAD LOOSE,
intermittent power output, or
low power
C
R/F LEAKAGE ERROR
D
SYSTEM READY
light (green) not on
E
R/F ON doesn’t light up:
• No power when Foot Switch
is depressed
• No power when the switch
on the Active Electrode
(Pencil) is depressed
1. Faulty application or poor
contact
2. Improper placement
3. Worn insulation on
electrical leads
1. Electrode touching
grounding metal
2. Directly grounded
3. Insulation missing
1. Improper connection
2. One or more safety
problems as indicated
by other lamps or annunciator
3. Product failure
1. Electrical current not flowing
2. Defective Foot Switch
3. Defective Pencil
1. Check full contact to
patient
2. Place in accordance with
instructions
3. Replace
1. Remove from metal
2. Locate faulty insulation
between table/equipment
to patient
3. Locate faulty insulation
1. Connect correctly
2. Follow safety
instructions
3. Return to CooperSurgical
1. Check all connections
2. Replace
3. Replace
F
Digital readout does
not illuminate
G
System beeps long intervals
1. Unit not connected
2. Digital readout circuitry
failure
1. Stuck Panel Switch
2. Stuck Foot Switch
3. Stuck Hand Switch Button
4. A Foot Switch or Hand Switch
is active upon power up
22
1. Plug into wall outlet
2. Return to CooperSurgical
1. Turn unit off, press each
switch, and make sure they
depress freely

Section 16 Specifications
Size (W x D x H): ...........................9.38 inches x 11.63 inches x 4.25 inches (23.8 cm x 29.5 cm x 10.8 cm)
Weight: ..........................................10 pounds, 9 ounces (5.25 kg)
Electrical:
Input Voltage 120 VAC 230 VAC
Maximum Current 3.15 amps 1.55 amps
VA Ratings 132 VA 242 VA
Power Line Leakage Less than 50 micro-amps Less than 50 micro-amps
Fuses (5 x 20 mm) Two T 3.15A 250V, Slow-Blow, Two TT 2.5 A 250 V, Super Slow-Blow,
(Littelfuse® 02183.15 or Equivalent) (Bussmann® GMD-2.5 A or Equivalent)
High Frequency Output*:
Rated output power is 100 watts, 495 kHz ± 5% into 500 ohms, monopolar only.
Mode
CUT 10 to 100 watts 1.2 600
BLEND 10 to 100 watts 2.5 600
COAG 10 to 100 watts 6.5 4000
Minimum & Maximum
Power Settings
Crest
Factor
Maximum Open
Circuit Voltage
*Accuracy of output control setting:
For output powers in excess of 10 watts, the actual power as a function of the load resistance and output control
setting shall not deviate from that shown in the diagrams shown on pages 23 and 24 by more than ± 20 percent.
RF Leakage: 100 MA MAXIMUM AT MAXIMUM POWER SETTINGS
WEEE Directive:
In order to preserve, protect and improve the quality of the environment, protect human health and
utilize natural resources prudently and rationally – do not dispose of waste electrical or electronic
equipment (WEEE) as unsorted municipal waste. Contact local WEEE disposal sites.
Classification:
Model Safety Class Type
LEEP PRECISION Generator I BF
• Do not get fluid into the LEEP PRECISION Generator. Should any liquid or solid object fall into the unit, unplug
the unit and call Technical Support.
• The LEEP PRECISION Generator is suitable for intermittent operation with a two-minute ON and six-minute
OFF duty cycle.
• The LEEP PRECISION Generator is classified as normal equipment (IPX0) according to protection against
ingress of water.
Environment Conditions:
Use Shipping and Storage
Environmental Temperature between +10 °C and +40 °C between +10 °C and +40 °C
Relative Humidity between 10% and 90% between 10% and 90%
Air Pressure between 700 hPa and 1060 hPa between 700 hPa and 1060 hPa
23
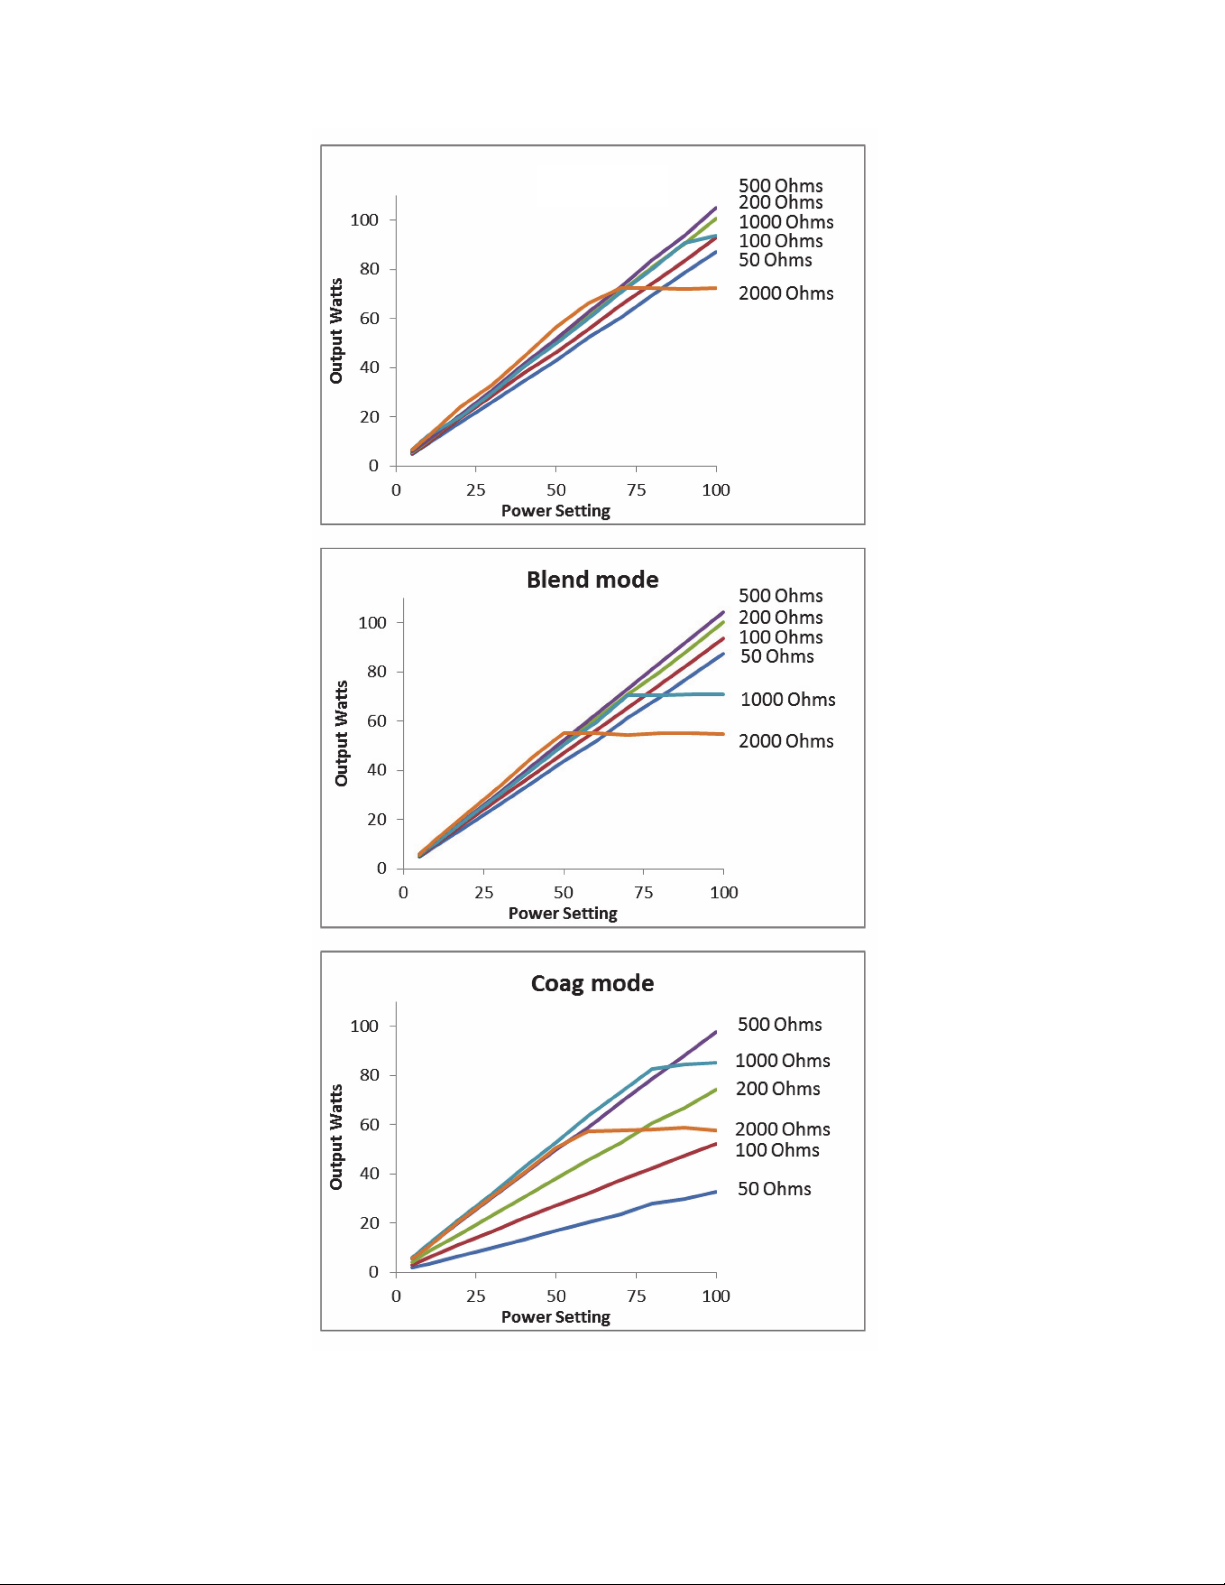
16.1 Power Output Characteristics
CUT mode
24

16.2 Power Output at Various Load Resistance
CUT mode
BLEND mode
COAG mode
25

Section 17 EMC Compliance Information for the LEEP PRECISION Generator
• Medical electrical equipment use requires special precautions regarding EMC and must to be installed and put
into service according to the EMC information provided in the Accompanying Documents.
• Portable and mobile RF communications equipment can affect medical electrical equipment.
GUIDANCE AND MANUFACTURER’S DECLARATION – ELECTROMAGNETIC EMISSIONS
The CooperSurgical LEEP PRECISION Generator is intended for use in the electromagnetic environment
specified below. The customer or the end user of the CooperSurgical LEEP PRECISION Generator should assure
that it is used in such an environment.
Emissions Test Compliance Electromagnetic Environment Guidance
RF Emissions
CISPR 11
RF Emissions
CISPR 11
Harmonic Emissions
IEC 61000-3-2
Voltage Fluctuations /
Flicker Emissions
IEC 61000-3-3
CooperSurgical LEEP PRECISION Integrated
Group 1
Class A CooperSurgical LEEP PRECISION Integrated
Class A
Complies
Systems use RF energy only for their internal
function. Therefore, RF emissions are very low and
are not likely to cause any interference in nearby
electronic equipment.
Systems are suitable for use in all establishments,
including domestic establishments and those
directly connected to the public low-voltage power
supply network that supplies buildings used for
domestic purposes.
26

Section 18 Guidance and Manufacturer’s Declaration – Electromagnetic Immunity
The CooperSurgical LEEP PRECISION Generators are intended for use in the electromagnetic environment specified below. The customer or the end user of the CooperSurgical LEEP PRECISION Generator should assure that it is
used in such an environment.
Immunity Test
Electromagnetic
discharge (ESD)
IEC 61000-4-2
Electrical fast transient/
burst
IEC 61000-4-4
Surge
IEC 61000-4-5
Voltage dips, short
interruptions, and
voltage variations on
power
supply input lines
IEC 61000-4-11
IEC 60601
Test Level Compliance Level
±6 kV contact
±8 kV air
±2 kV for power
supply lines
±1 kV for input/output
lines
±1 kV differential
mode
±2 kV common mode
<5% U
T
(>95% dip in UT)
for 0.5 cycle
40% U
T
(60% dip in UT)
for 5 cycles
70% U
T
(30% dip in UT)
for 25 cycles
<5% U
T
(>95% dip in UT)
for 5 sec
±6 kV contact
±8 kV air
±2 kV for power
supply lines
±1 kV for input/
output lines
±1 kV differential
mode
±2 kV common mode
<5% U
(>95% dip in UT)
for 0.5 cycle
40% U
(60% dip in UT)
for 5 cycles
70% U
(30% dip in UT)
for 25 cycles
<5% U
(>95% dip in UT)
for 5 sec
Electromagnetic
Environmental Guidance
Floors should be wood, concrete,
or ceramic tile. If floors are
covered with synthetic material,
the relative humidity should be at
least 30 percent.
Mains power quality should be
that of a typical commercial or
hospital environment.
Mains power quality should be
that of a typical commercial or
hospital environment.
T
Mains power quality should be
that of a typical commercial or
hospital environment.
T
If the user of the CooperSurgical
LEEP PRECISION Integrated
System requires continued
operation during power mains
T
interruptions, it is recommended
that the CooperSurgical
LEEP PRECISION Integrated
System be powered from an
T
uninterruptible power supply or
a battery.
Power frequency
(50/60 Hz)
magnetic field
IEC 61000-4-8
NOTE U
is the a.c. mains voltage prior to application of the test level; in this case, 230 V.
T
3 A/m 3 A/m Power frequency magnetic fields
should be at levels characteristic
of a typical location in a typical
commercial or hospital
environment.
27

Immunity Test
IEC 60601
Test Level
Compliance
Level
Electromagnetic
Environmental Guidance [Notes 1 & 2]
Conducted RF
IEC 61000-4-6
Radiated RF
IEC 61000-4-3
3 Vrms
150 kHz to 80 MHz
3 V/m
80 MHz to 2.5 GHz
3 V
3 V/m
Portable and mobile RF communications
equipment should be used no closer to any
part of the CooperSurgical LEEP PRECISION
Integrated System, including cables, than the
recommended separation distance calculated
from the equation applicable to the frequency
of the transmitter.
Recommended separation distance
d =
d =
d =
where P is the maximum output power rating
3.5
[
V
3.5
[
E
7
[
of the transmitter in watts (W) according to
the transmitter manufacturer and d is the
recommended separation distance in
meters (m).
P
]
√
1
80 MHz to 800 MHz
P
]
√
1
800 MHz to 2.5 GHz
P
]
√
E
1
Field strengths from fixed RF transmitters, as
determined by an electromagnetic site survey
should be less than the compliance level in
each frequency rangeb.
Interference may occur in the vicinity of
equipment marked with the following symbol:
NOTE 1: At 80 MHz and 800 MHz, the higher frequency range applies.
NOTE 2: These guidelines may not apply in all situations. Electromagnetic propagation is affected by
absorption and reflection from structures, objects, and people.
a Field strengths from fixed transmitters, such as base stations for radio (cellular/cordless) telephones
and land mobile radios, amateur radio, AM and FM radio broadcasts and TV broadcasts cannot be
predicted theoretically with accuracy. To assess the electromagnetic environment due to fixed RF
transmitters, an electromagnetic site survey should be considered. If the measured field strength in
the location in which the CooperSurgical LEEP PRECISION Integrated System is used exceeds the
applicable RF compliance level above, the CooperSurgical LEEP PRECISION Integrated System
should be observed to verify normal operation. If abnormal performance is observed, additional
measures may be necessary, such as reorienting or relocating the CooperSurgical LEEP PRECISION
Integrated System.
a
,
b
Over the frequency range 150 kHz to 80 MHz, field strengths should be less than 3 V/m.
28

Recommended Separation Distance
Recommended Separation Distance between portable and mobile RF communications equipment and the
CooperSurgical LEEP PRECISION Generator.
The CooperSurgical LEEP PRECISION Generators are intended for use in an electromagnetic environment in
which radiated RF disturbances are controlled. The customer or the user of the CooperSurgical LEEP PRECISION
Generators can help prevent electromagnetic interference by maintaining a minimum distance between portable
and mobile RF communications equipment (transmitters) and the CooperSurgical LEEP PRECISION Generators
as recommended below, according to the maximum output power of the communications equipment.
Rated maximum
output power of
transmitter
in watts
d=
0.01
0.1
1
10
100
For transmitters rated at a maximum output power not listed above, the recommended separation distance d in
meters (m) can be estimated using the equation applicable to the frequency of the transmitter, where P is the
maximum output rating of the transmitter in watts (W) according to the transmitter manufacturer.
For the CooperSurgical LEEP PRECISION Integrated System:
V1 = 3 Vrms
E1 = 3 V/m
Separation distance according to frequency of transmitter
(Meters) [Notes 1 & 2]
150 kHz to 80 MHz
3.5
[
V
P
]
√
1
0.1167 0.1167 0.2333
0.3689 0.3689 0.7379
1.1667 1.1667 2.3333
3.6894 3.6894 7.3789
11.667 11.667 23.333
80 MHz to 800 MHz
d=
3.5
[
E
P
]
√
1
800 MHz to 2.5 GHz
d=
7
[
E
P
]
√
1
NOTE 1: At 80 MHz and 800 MHz, the separation distance for the higher frequency range applies.
NOTE 2: These guidelines may not apply in all situations. Electromagnetic propagation is affected by
absorption and reflection from structures, objects, and people.
29

Section 19 Explanation of Symbols
6D33
SN
REF
x
Only
!
EC REP
NON
STERILE
Reorder number
Serial number
Consult instructions for use
Caution
Non-sterile
APPLIED PART SYMBOL = Electrode that
is connected to a patient’s body.
DEFIBRILLATOR PROOF SYMBOL =
indicates that the device will not be damaged
if the defibrillator is active.
BF-TYPE EQUIPMENT = Type of equipment
is a B-Type equipment with an F-Type
applied part.
B-Type equipment is a piece of equipment
providing a particular degree of protection
against electric shock, particularly regarding:
- Allowable leakage current
- Reliability; of the protective earth
connection.
F-Type = Isolated applied part. Applied part
isolated from all other parts of the equipment
to such a degree that the patient leakage
current allowable in single fault condition is not
exceeded when a voltage equals to 1.1 times
the highest rated mains voltage is applied
between the applied part and earth.
Earth (Ground)
Medical equipment with respect to
electrical shock, fire and mechanical hazard only in accordance with
UL60601-1 and CAN/CSA C22.2
No.601.1
Date of Manufacture
Manufacturer
Caution: U.S. Federal law restricts
this device to sale by or on the order
of a physician.
Product conforms to the Medical
Device Directive 93/42/EEC
Authorized Representative in
the European Community
This side up
Keep Dry
Fragile
Dangerous Voltage
Fuse, Replace only with Specified
Type and Ratings
Alternating Current
Equipotentiality Symbol (wires
carry the same voltage)
Littelfuse® is a registered trademark of Littelfuse, Inc.
Bussmann® is a registered trademark of Cooper Industries, Inc.
LEEP PRECISION™ is a trademark of CooperSurgical, Inc.
Made in the USA
© 2017 CooperSurgical, Inc.
In order to preserve, protect and
improve the quality of the
environment, protect human health
and utilize natural resources prudently
and rationally – do not dispose of
waste electrical or electronic
equipment (WEEE) as unsorted
municipal waste. Contact local WEEE
disposal sites.
30
 Loading...