

Page 1

1
720r
EN
NL
Fr
It
Dk
N
Sv
De
Es
Pt
Page 2

2
Part No. 497365 draft g
This product complies with the requirements of European Directive:
1995/5/EC (Radio
&Telecommunications Terminal Equipment Directive).
Dit product is conform de normen van de Europese Richtlijn 1995/5/EC (R&TTE Richtlijn)
Questo prodotto è conforme ai requisiti della Direttiva Europea:
1995/5/EC (Radio&Teleco
mmunications Terminal Equipment Directive).
Page 3

3
UK
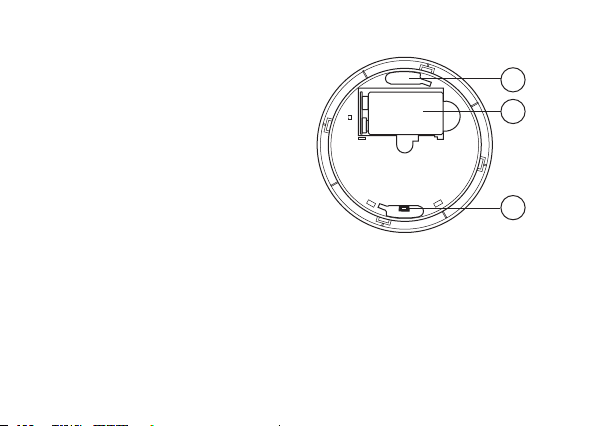
1. Test button and activity LED
It
1. Pulsante di test e LED di attività
Fig. 1
1
Page 4
4
UK
1. Hole for mounting flange
2. Battery
3. Learn LED
It
1. Foro per il montaggio della flangia
2. Batteria
3. LED di apprendimento
Fig. 2
1
2
3
Page 5

5
UK
1. Mounting flange
2. Fixing hole (two sizes)
It
1. Flangia
2. Fori di fissaggio
Fig. 3
2
2
1
Page 6

6
Page 7

7
EN
INTRODUCTION
The 720r Smoke Detector is designed to work with Scantronic 868MHz narrow band transmitters. The unit contains an integrated radio transmitter.
SPECIFICATION
Part No. 720rEUR-00
Power Supply 9vDC PP3 Alkaline battery
Low voltage alarm: 7.2V
RF Immunity: 10V/m
Dimensions: 105mm x 105mm x 34mm (HxWxD)
Operating Frequency: 868,6625 MHz
RF Transmitter Power 10mW
Specification subject to change without notice.
COMPATIBLE EQUIPMENT
7500rEUR Homelink 75
762r Two channel radio receiver
768r/769r Eight channel radio receiver and expander
9960 RFX 16 zone radio receiver
Page 8

8
9955 RFX 8 zone radio receiver
INSTALLATION
Insert Battery
Remove the mounting plate (if fitted) and connect a 9V (PP3) battery.
The activity LED flashes and the detector sounder gives a loud tone for one second. This
tone indicates that the detector is working.
Note: If the sounder clicks once a second then a fault has occurred or the battery is totally
exhausted. Replace the battery and check that the sounder gives a one second tone.
Learning
Put the receiver into learn mode (consult the relevant section in the receiver’s Installation
and Programming Guide.)
Radio Learning: Press and hold the test button for three seconds.
IR Learning: Hold the detector so that the IR learn LED points at the learn sensor
on the receiver. Make sure the learn LED on the detector is no more
than 25mm from the learn sensor on the receiver. Press and hold the
test button for three seconds.
While you are holding the test button down, after 3 seconds the detector gives five rapid
clicks as it transmits its identity.
Page 9

9
EN
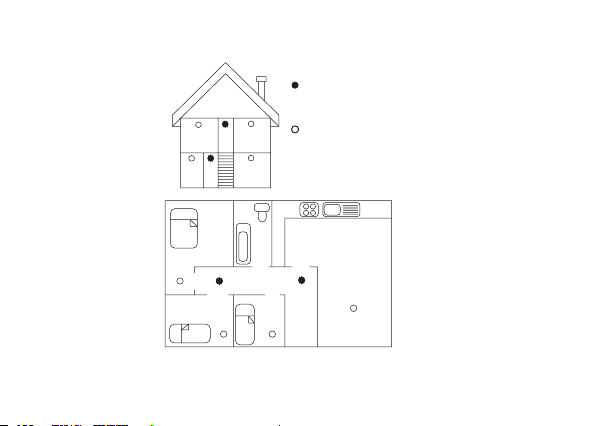
Siting
Best protection is obtained by installing a smoke alarm in the middle of a ceiling in every
room. However, there should be at least one alarm outside the bedrooms. If the bedrooms
are situated in different parts of the home, several alarms should be installed. In a house
with more than one floor, there should be at least one alarm on each floor.
Always check that the alarm can easily be heard from the bedrooms. If necessary, install
an alarm in the bedroom itself. The smoke alarm should be placed in the middle of the ceil
ing, at least 15 cm from a wall or a corner. If the alarm is installed on a wall, it should be 15
cm from the ceiling; for attics with a roof ridge, 90 cm from the centre.
To avoid false alarms, the alarm should not be installed where naturally combustible particles are found (for example: in garages, badly ventilated kitchens, beside open fireplaces).
Nor should it be placed near by fans or ventilators. Do not install smoke alarms in dusty or
dirty places, or near by fluorescent lighting. Temperature and humidity of the room should
be normal. The alarm must not be painted. Do not install smoke alarm in temperature be
-
low 0°C or more than 40°C or above 85% relative humidity.
Page 10
10
Bedroom
Bedroom
Bedroom
Kitchen
Dining room
Living room
Mimimum protection (every storey, every sleeping area)
Maximum protection (all rooms except kitchens
and bathrooms)
Page 11

11
EN
Do NOT mount the unit:
Over a radiator.
Near the floor.
Close to or on large metal structures.
Closer than one metre to mains wiring and metal water or gas pipes.
Inside steel enclosures.
Next to electronic equipment, particularly computers, photocopiers or other radio
equipment.
Closer than 2m to fluorescent light fixture.
Note: Radio conditions and interference can change over time, therefore no guarantee can
be given about a specific transmission range.
Physical Installation
Use the mounting plate as a template to mark and drill two screw holes in the position
where you wish to fit the detector. Fix the the mounting plate into position. Mount the detector on the mounting plate.
OPERATION
During normal operation the detector is silent.
If smoke is present in the atmosphere then the unit may take up to 9 seconds to detect
the smoke, go into alarm and operate its siren. The detector sends a radio signal to the
receiver every time it goes into alarm.
Page 12

12
If the unit’s internal circuits detect a fault (for example a low battery), then the sounder
gives five rapid beeps and the unit sends a radio signal to the receiver.
Silencing an Alarm
To silence the siren on the smoke detector press the Test button once briefly. The detector
stays silenced until it can no longer detect heat or smoke, and then returns to normal
mode.
Reducing Sensitivity
If you wish to reduce the sensitivity of the detector for a short time, for example when cooking may start a false alarm, then press the test button once briefly. If the detector is not
already in alarm then the sounder will give two short beeps to signal that it is in reduced
sensitivity. After 10 minutes the detector will set itself back to normal sensitivity.
If you wish to set the detector back to normal sensitivity then touch the Test button briefly
once more. The sounder gives three short beeps to signal normal sensitivity.
TESTING.
1. Put the control unit/receiver into walk test.
2. Press and hold the Test button for six seconds. The siren operates at the end of the six
seconds.
3. Make sure the panel receives the alarm.
4. Chose another site for the detector if the panel does not receive the signal.
5. Stop the walk test at the control unit/receiver.
Page 13

13
EN
MAINTENANCE
Test the smoke alarm every week, for example when doing the vacuuming, by pressing
the test button for at least 10 seconds. The alarm signal is a penetrating, rapidly pulsating
signal. The alarm sounds as long as the test button is pressed or there is smoke in the
detector. When the alarm goes off, always check carefully to see that there is no fire and
never remove the battery from the alarm except when changing it! Always test the alarm
immediately after returning from holiday or after a longer period of absence. Under the test
button, there is a red control lamp which twinkles once a minute. This shows that the bat
tery is correctly connected. If the alarm does not sound when testing, the battery must be
replaced. The alarm should be dusted and cleaned regularly with a slightly damp cloth. In
connection with annual battery change or when required, for example after a false alarm,
clean and vacuum the alarm carefully using a soft brush. The battery lasts approximately
one year. About a month before the battery is completely flat, the alarm emits a short signal once a minute. This is the signal that the battery needs changing. The alarm works as
normal during this time. The battery should be a 9 Volt batteries GP 1604P,S,A, Eveready
522, 216, Duracell MN1604. Always test the alarm after changing the battery.
Service
If the sounder gives burst of five clicks then a fault has occurred or the battery is totally exhausted. Replace the battery and check that the activity LED is working normally.
If the sounder still gives bursts of five clicks after inserting a good battery then the unit has
a fault. Return the unit to your supplier.
Page 14

14
© Cooper Security Limited 2005
Every effort has been made to ensure that the contents of this leaflet are correct . How
ever, neither the authors nor Cooper Security Limited accept any liability for loss or damage caused or alleged to be caused directly or indirectly by this leaflet. The contents of this
leaflet are subject to change without notice.
Printed and published in the U.K.
Product Support (UK) Tel: +44 (0)870 757 5400
Available between:
08:15 and 17:00 Monday to Thursday,
08:15 to 12:45 Friday,
Emergency service only 12:45 to 17:00 Friday
Product Support Fax: (01594) 545401
Page 15

15
NL
INTRODUCTIE
Rookdetector 720r is speciaal ontworpen voor de 868MHz smalband zenders van Scantronic.
De detector bevat een integrale draadloze zender.
SPECIFICATIES
Artikelnummer: 720rEUR-00
Voeding: 9vDC PP3 Alkaline batterij
Batterij-laag alarm: 7,2V
RF Immuniteit: 10V/m
Afmetingen: 105mm x 105mm x 34mm (HxBxD)
Werkfrequentie: 868,6625 MHz
De specificaties kunnen zonder voorafgaande aankondiging worden gewijzigd.
SYSTEEMMOGELIJKHEDEN
7500rEUR Homelink 75
762r Twee-kanaals draadloze ontvanger
768r/769r Acht-kanaals draadloze ontvanger en uitbreiding
9960 RFX draadloze ontvanger voor 16 zones
9955 RFX draadloze ontvanger voor 8 zones
Page 16

16
INSTALLATIE
Zo plaatst u de batterij
Verwijder de montageplaat (indien aanwezig) en sluit een 9V (PP3) batterij aan.
De activiteiten-LED knippert en de zoemer geeft gedurende een seconde een luid signaal.
Hiermee geeft de detector aan dat hij werkt.
Opm.: Als de detector eens per seconde klikt, wijst dat op een fout, of de batterij is leeg.
Vervang de batterij en controleer of de detector gedurende een seconde een signaal geeft.
Zo laat u de ontvanger leren
Zet de ontvanger in de leer-stand (raadpleeg het betreffende hoofdstuk in de Installatiehandleiding van de ontvanger).
Draadloos leren: Druk de testknop gedurende drie seconden in.
Infrarood leren: Richt de detector met de IR-LED op de leer-sensor van de ontvanger.
Let op dat de LED en de sensor niet meer dan 25mm van elkaar
verwijderd zijn. Druk de testknop gedurende drie seconden in.
Terwijl u de testknop ingedrukt houdt, geeft de detector na drie seconden vijf snelle klikjes
waarmee de identiteitscode wordt overgeseind.
Page 17

17
NL
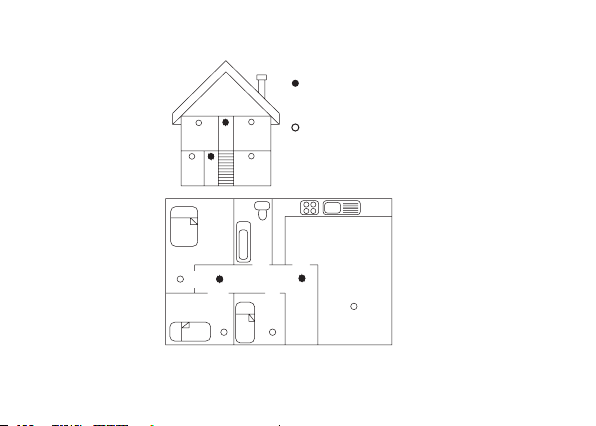
Zo projecteert u de detector
U krijgt het beste resultaat als u in iedere kamer een rookdetector in het midden van het
plafond plaatst. Echter, er behoort tenminste een detector buiten de slaapkamers geplaatst
te worden. Als de slaapkamers in verschillende delen van het huis zijn, dienen een aantal
detectoren te worden geplaatst. In een gebouw met meerdere verdiepingen dient minimaal
een detector op elke verdieping geïnstalleerd te worden.
Controleer altijd of de alarmmelding makkelijk gehoord kan worden vanuit de slaapkamers.
U plaatst de rookdetector in het midden van het plafond, in elk geval op 15 cm van een
muur of uit een hoek. Als u de detector op een muur monteert, moet u minimaal 15 cm
onder het plafond blijven. Voor zolders met een nokdak geldt 90 cm vanuit het midden.
Om onnodige alarmmeldingen te voorkomen kunt u de detector beter niet installeren in
ruimtes waar een enigszins vervuilde lucht kan voorkomen (bijvoorbeeld in garages, slecht
geventileerde keukens of naast een open haard). U mag hem ook niet vlakbij ventilatoren
plaatsen. Plaats geen rookdetector in stoffige of vuile ruimtes, of bij TL- of neon verlichting.
De temperatuur van de ruimte kan het best normaal zijn; Installeer daarom in ieder geval
geen detector in ruimtes met een temperatuur lager dan 0°C of hoger dan 40°C, of met
een relatieve luchtvochtigheid van meer dan 85% . De detector mag niet geschilderd of
gewit worden.
Page 18
18
Slaapkamer
Slaapkamer
Slaapkamer
Keuken
Eetkamer
Woonkamer
Mimimale beveiliging (elke verdieping, elke
slaapruime)
Maximale beveiliging (alle kamers behalve de
keuken en badkamer)
Page 19

19
NL
Monteer de detector NIET:
Boven een radiator.
Vlak boven de vloer.
Dichtbij of op grote metalen constructies.
Op minder dan een meter van hoofdleidingen voor gas, water of elektriciteit.
In stalen behuizingen.
Naast elektronische apparatuur speciaal computers, fotokopieerapparaten en draadloze
apparatuur.
Op minder dan 2m van TL- en/of neon verlichting.
Opm.: Draadloze signaaloverdracht is sterk afhankelijk van de lokale omstandigheden.
Daarom kan geen garantie worden gegeven voor een specifiek bereik.
Zo installeert u de rookdetector
Gebruik de montageplaat als mal om de twee schroefgaten op de gewenste plaats te
markeren en te boren. Monteer de montageplaat en monteer de detector op de montageplaat.
WERKING
Onder normale omstandigheden geeft de detector geen geluid.
Als er rook in de lucht is kan het 9 seconden voordat de detector de rook heeft gedetecteerd en een alarmmelding geeft. Elke keer als de detector in alarm gaat zendt hij een
signaal naar de ontvanger.
Page 20

20
Als het circuit van de detector een fout signaleert (bijvoorbeeld een zwakke batterij), dan
geeft de detector vijf snelle piepjes en zendt een signaal naar de ontvanger.
Zo zet u het alarm af
Om de sirene van de rookdetector af te zetten drukt u een keer kort op de testknop. De
sirene van de detector blijft uitgeschakeld totdat er geen hitte of rook meer wordt gede
tecteerd. Daarna schakelt hij automatisch over naar de normale werkstand, klaar voor een
volgende melding.
Zo beperkt u de gevoeligheid
Als u voor korte tijd de gevoeligheid van de detector wilt beperken, bijvoorbeeld tijdens het
koken, dan drukt u een keer kort op de testknop. Als de detector nog geen alarmmelding
geeft, dan zal de sirene als bevestiging van deze instelling twee korte piepjes geven. Na 10
minuten schakelt de detector automatisch weer terug naar de standaard gevoeligheid.
Als u de detector handmatig naar de standaard gevoeligheid wilt terugzetten, dan drukt u
eenmaal kort op de testknop. Als bevestiging geeft de detector drie korte piepjes.
TESTEN
1. Zet het controlepaneel of de ontvanger in de looptest.
2. Houdt de testknop zes seconden ingedrukt. Na zes seconden reageert de sirene.
3. Controleer of het controlepaneel de melding heeft ontvangen.
4. Kies een andere lokatie voor de detector als het paneel niet op de melding heeft gerea-
geerd.
5. Schakel de looptest uit op het controlepaneel of de ontvanger.
Page 21

21
NL
ONDERHOUD
Test de rookmelder elke week, bijvoorbeeld als u de kamers schoonmaakt, en houdt de
testknop tenminste tien seconden ingedrukt. Het alarmsignaal is een doordringend, snel
pulserend signaal. Het alarm duurt zo lang als u de knop ingedrukt houdt, of zo lang als
er rook in detector is. Als u een alarmmelding hoort, controleer dan altijd zorgvuldig of u
ergens vuur ziet. Haal NOOIT de batterij uit de detector behalve om te vervangen.
Test de melder onmiddellijk nadat u van vakantie bent teruggekeerd of als u lange tijd weg
bent geweest. Onder de testknop is een rood controlelampje dat eens per minuut oplicht.
Dit betekent dat de batterij goed is aangesloten. Als u geen alarmmelding hoort tijdens het
testen dient u de batterij te vervangen. De detector kunt u het beste regelmatig met een
beetje vochtige doek afnemen. Tijdens het jaarlijkse vervangen van de batterij, of na een
onnodige alarmmelding maakt u de detector zorgvuldig schoon met een zachte borstel.
De batterij gaat normaliter een jaar mee. Ongeveer een maand voordat de batterij leeg is
hoort u elke minuut en kort signaaltje. Dit geeft aan dat de batterij vervangen moet worden.
De detector blijft gedurende deze periode normaal functioneren. De batterij is een 9V GP
1604P,S,A, Eveready 522, 216, Duracell MN1604. Test de detector altijd nadat u de batterij
hebt vervangen.
Service
Als de sirene regelmatig vijf klikjes laat horen is er een defect in de detector, of de batterij
is helemaal leeg. Vervang de batterij en controleer of de LED normaal functioneert.
Als de detector ook na het plaatsen van een goede batterij nog steeds vijf klikjes geeft is
de detector waarschijnlijk defect en neemt u contact op met uw leverancier.
Page 22

22
© Cooper Security Limited 2005
Alles is in het werk gesteld om er voor te zorgen dat de inhoud van deze handleiding correct is, fouten en
weglatingen uitgezonderd. Echter, noch de samenstellers, noch Cooper Security zullen enige aansprakelijkheid
accepteren voor verlies of beschadiging, direct of indirect mogelijk door deze handleiding ontstaan. De inhoud van
deze handleiding kan zonder voorafgaande aankondiging aan de laatste stand van zaken worden aangepast.
Gedrukt en uitgegeven in het V.K.
Cooper Security Ltd.
Terheydenseweg 465
NL 4825 BK Breda
Nederland
Telefoon +31 76 572 99 44
Fax +31 76 572 99 49
e-mail contact@cooper-security.com
www.cooper-security.com
Page 23

23
It
INTRODUZIONE
Il Rilevatore di Fumo 720r è stato progettato per essere compatibile con tutti i ricevitori di
Scantronic in frequenza 868MHz, FM e Banda Stretta. L’unità contiene un trasmettitore
radio integrato.
SPECIFICHE
Codice :720rEUR-00
Alimentazione :Singola batteria alcalina 9V PP3
Allarme Batteria Bassa :7.2V
Immunità RF :10V/m
Dimensioni: :105mm x 34mm (DxP)
Frequenza :868,6625 MHz, FM e Banda Stretta 20 KHz
Potenza :10mW
Specifiche soggette a modifica senza obbligo di preavviso.
DISPOSITIVI COMPATIBILI
7500rEUR :Sistema radio Homelink 75
9960EUR-08 e -16 :Espansione radio 8 e 16 Zone per centrali 9x5x
762r :Ricevitore 2 Canali
768r/769r :Ricevitore 8 Canali (e relativa espansione)
Page 24

24
INSTALLAZIONE
Inserimento Batteria
Rimuovere la piastra di fissaggio (se inserita) e collegare la batteria 9V (PP3).
Il LED di attività lampeggia mentre il buzzer del sensore emette un tono basso per un sec
-
ondo. Questo indica che il sensore è correttamente funzionante.
Nota:Se il buzzer emette un “Click” ogni secondo la batteria è totalmente esausta. Sostituire la batteria e verificare che il buzzer emette il tono per un secondo.
Apprendimento
Posizionare il ricevitore/centrale in modalità di apprendimento (consultare il relativo manuale di installazione).
Apprendimento Radio: Premere e tenere premuto il pulsante di test per tre secondi.
Apprendimento IR: posizionare il rilevatore in modo che il LED sia allineato otticamente al
fototransistor del ricevitore ad una distanza non superiore a 5 centimetri. Premere e tenere
premuto il pulsante di test per tre secondi.
Mentre si tiene premuto il pulsante di test, dopo tre secondi il sensore emette cinque rapidi
“Click” ad indicare la trasmissione del proprio codice ID.
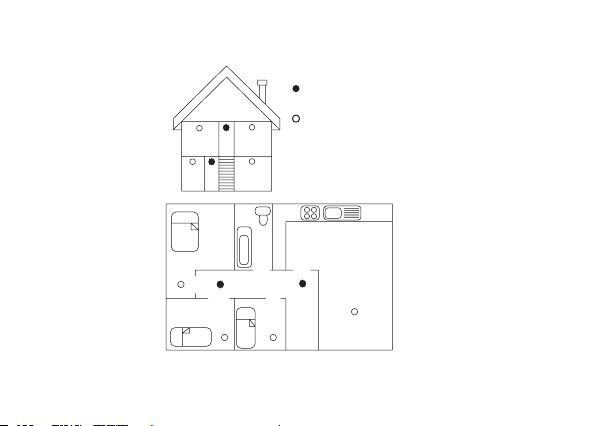
Posizionamento
La migliore protezione è ottenuta installando il rilevatore di fumo sul soffitto ed in mezzo ad
ogni stanza. Se il sito è composto da più piani, si consiglia di installare almeno un rileva
-
tore per ogni piano.
Page 25

25
It
Verificare che ogni allarme possa essere sentito in ogni stanza. Se necessario installare
un rilevatore in ogni stanza da letto. Il rilevatore dovrebbe essere installato sul soffitto almeno a 15 centimetri da una parete o da un angolo. Se il sensore è installato sulla parete,
assicurarsi che sia almeno a 15 centimetri dal soffitto.
Per evitare falsi allarmi, è preferibile non installare il rilevatore in ambienti polverosi come
garage, soffitte, locali non areati o particolarmente fumosi, nelle vicinanze di ventilatori,
bocchette di aerazione, dispositivi di illuminazione a fluorescenza.
Si consiglia di installare il rilevatore in ambienti dove la temperatura sia compresa tra 0°C e
40°C con umidità relativa inferiore all’85%. Non verniciare il contenitore.
NON installare l’unità:
Sopra radiatori.
Vicino al pavimento.
Vicino o sopra ampie superfici o strutture metalliche.
A meno di un metro da condutture metalliche, tubi, cavi di alta tensione.
All’interno di armadi di acciaio.
Vicino a dispositivi elettronici come computer, fotocopiatrici, fax o altri dispositivi radio.
A meno di 2 metri da fonti di luce fluorescente.
Nota: le condizioni ambientali e relative possibili interferenze radio possono cambiare nel
tempo, di conseguenza non è possibile fornire una costante copertura radio del trasmet
-
titore.
Page 26
26
Camera
Camera
Camera
Cucina
Sala da pranzo
Salotto
Protezione minima
Protezione massima (tutte le stanze eccetto
cucina e bagni)
Page 27

27
It
Installazione Fisica
Utilizzare la piastra di fissaggio come dima per marcare e forare la parete una volta scelta
la posizione desiderata per l’installazione del sensore. Fissare la piastra ed agganciare il
sensore.
FUNZIONAMENTO
Durante il normale funzionamento il rilevatore di fumo è silenzioso.
In caso di presenza di fumo nell’ambiente, il rilevatore può impiegare sino a 9 secondi per
rilevarlo ed andare in allarme attivando il buzzer. Il trasmettitore invia il segnale di allarme
alla centrale/ricevitore ogni volta che si ha una condizione di allarme.
Se l’unità rileva un guasto (es.:batteria bassa), il buzzer emette 5 rapidi toni ed invia un apposito segnale alla centrale/ricevitore.
Tacitazione Allarme
Per tacitare il buzzer del sensore premere il pulsante di Test una volta. Il rilevatore
torna nella normale modalità di funzionamento se non viene rilevato ulteriormente del
fumo nell’ambiente.
Riduzione Sensibilità
Se si desidera ridurre la sensibilità per un breve periodo di tempo per evitare falsi allarmi
(ad esempio mentre si cucina), premere il pulsante di Test un volta. Se il sensore non è già
in allarme, il buzzer emette due brevi “beep” per segnalare che la sensibilità è stata ridotta.
Dopo 10 minuti il rilevatore torna a funzionare con la normale sensibilità.
Page 28

28
Se si desidera riportare manualmente il rilevatore alla normale sensibilità, premere nuovamente il pulsante di Test una volta. Il buzzer emette 3 brevi “beep”.
TEST
1. Mettere la centrale/ricevitore in Test Copertura.
2. Premere e tenere premuto il pulsante di Test per 6 secondi. Il buzzer si attiva per 6
secondi.
3. Assicurarsi che la centrale/ricevitore riceva l’allarme.
4. In caso contrario, scegliere una posizione diversa per il rilevatore.
5. Terminare il Test di Copertura quando tutti i rilevatori sono stati provati.
MANUTENZIONE
Provare il rilevatore di fumo ogni settimana premendo il pulsante di Test per almeno 10
secondi. La condizione di allarme è indicata con rapidi e penetranti segnali acustici. La
segnalazione rimane attiva sino a che il pulsante di Test viene premuto (oppure è presente
del fumo nel sensore).
Ad allarme terminato, verificare attentamente che non via sia un incendio in atto. Non
rimuovere mai la batteria a meno che non sia da sostituire. Sotto il pulsante di test c’è un
LED rosso che si attiva una volta al minuto ad indicare il corretto stato di carica della batteria. Se, in caso di allarme, il buzzer non si attiva, la batteria deve essere sostituita.
La batteria ha durata di circa 12 mesi. Circa un mese prima dalla completa scarica, il
rilevatore emette un breve segnale acustico ogni minuto. La batteria deve essere una 9
Volt alkalina tipo PP3 (è consigliata una Duracell). Provare sempre il rilevatore una volta
sostituita la batteria.
Page 29

29
It
Servizio
Se il buzzer emette 5 “click” , la batteria deve essere sostituita. Sostituire la batteria e
verificare la normale operatività del rilevatore. Se l’unità emette nuovamente una serie di 5
“click”, ritornare il rilevatore al proprio fornitore per la sostituzione.
Page 30

30
© Cooper Security Ltd. 2005
Ogni sforzo è stato compiuto per garantire la correttezza dei contenuti del presente testo.
Tuttavia, gli autori e la Cooper Security Limited non accettano responsabilità per perdite o
danni causati o presumibilmente causati dal presente testo direttamente o indirettamente.
Il contenuto del testo è soggetto a modifiche senza preavviso.
Stampato e pubblicato nel Regno Unito.
Cooper Security Limited
Sede Legale :Corso Italia,8 – Milano
Sede Operativa :Via Meucci,10 - 20094 – Corsico - Milano
Tel: 02-45867396 – Fax : 02-4501509
www.coopersecurity.it
Page 31

31
It
 Loading...