

Page 1
049-244
TRIM
ASSEMBLY
HOUSING
INS #
Installation Instructions for the AUX Universal Edge Lit Exit –
AC Only
WARNING
Risk of Fire/Electric Shock
If not qualified, consult an electrician.
Risk of Electric Shock
Disconnect power at fuse or circuit breaker before
installing or servicing.
WARNING
Important Safeguards
WHEN USING ELECTRICAL EQUIPMENT, BASIC SAFETY PRECAUTIONS SHOULD ALWAYS BE OBSERVED
INCLUDING THE FOLLOWING.
1. READ AND FOLLOW ALL SAFETY INSTRUCTIONS
2. Dry location only. Do not use outdoors.
3. Do not use in hazardous locations, or near gas or electric heaters.
4. Do not let power supply cords touch hot surfaces.
5. Do not use this equipment for other than the intended use.
6. Installation is to be performed only by qualified personnel.
7. Install in accordance with National Electric Code and local regulatory agency requirements.
8. The use of accessory equipment not recommended by the manufacturer may cause an unsafe condition.
9. Equipment should be mounted in locations and at heights where it will not readily be subjected to tampering
by unauthorized personnel.
10. SAVE THESE INSTRUCTIONS
TRIM PLATE
For Recessed Installation
1. Turn off power supply.
2. Determine if the fixture will be mounted in the
ceiling or the wall.
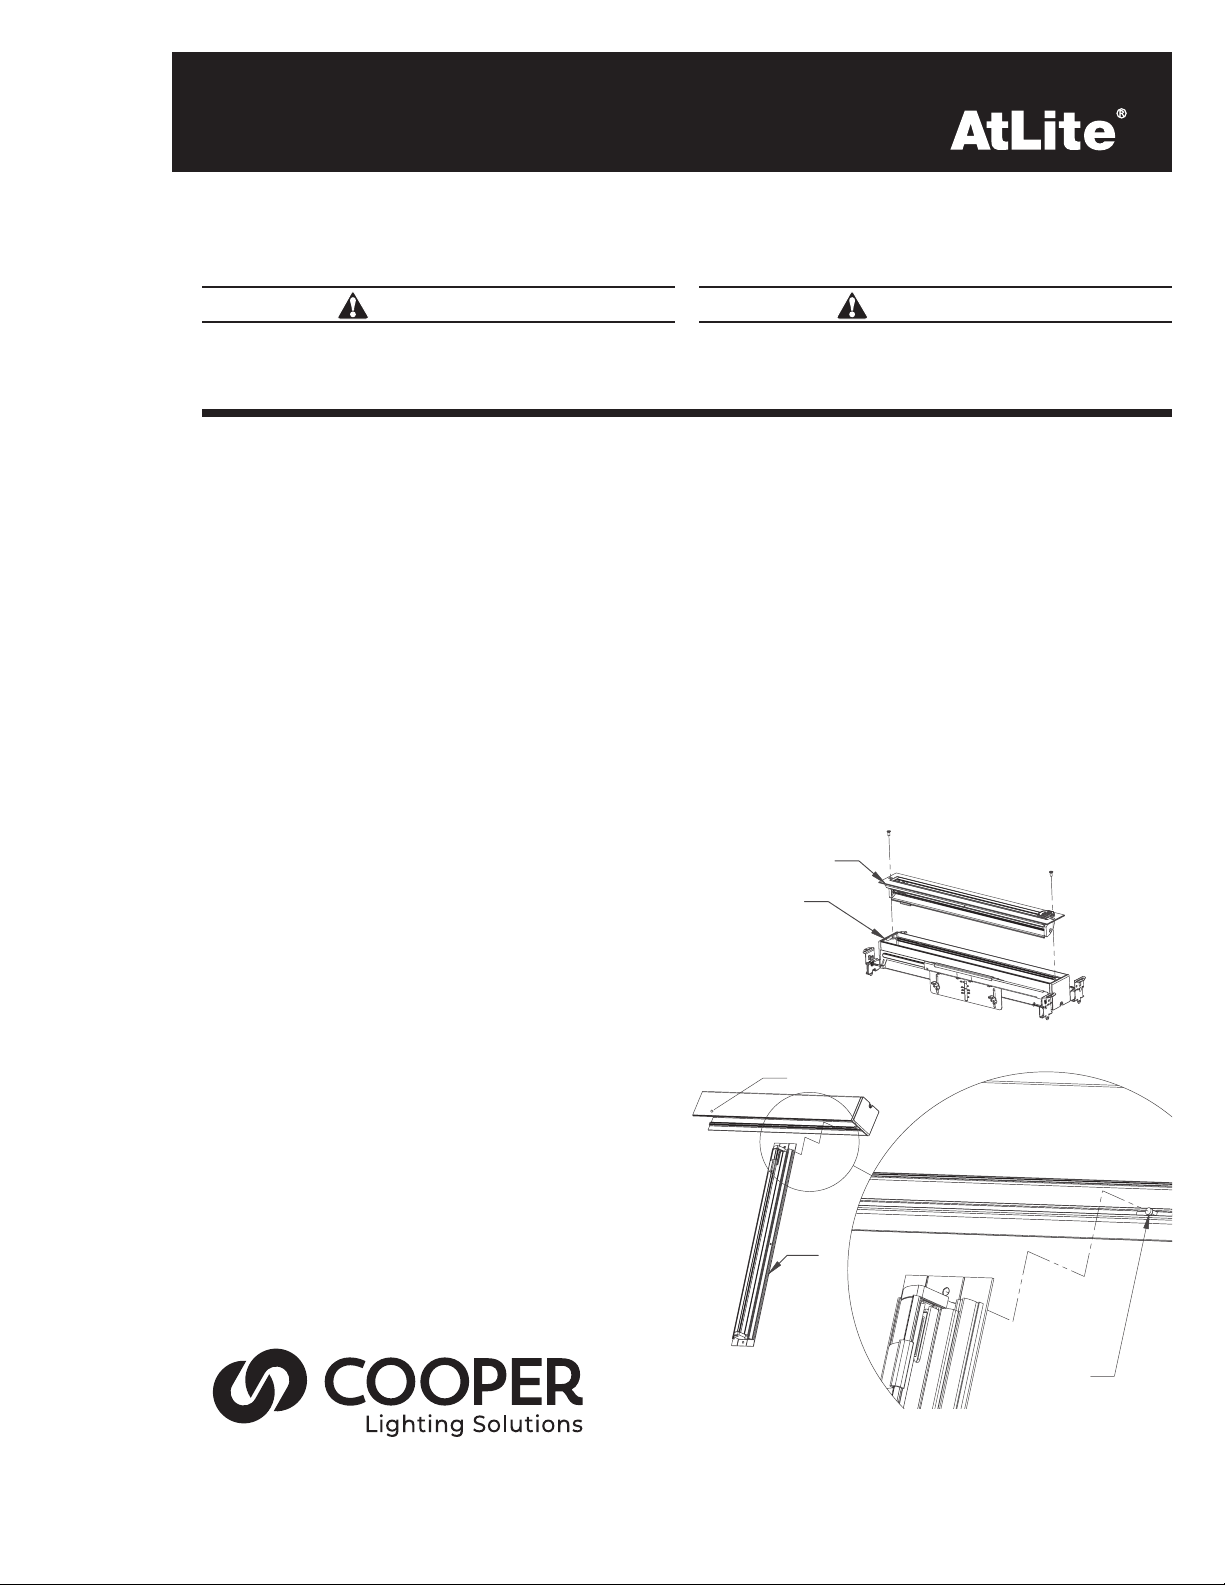
3. Remove the screws securing the trim plate to the
housing (See Figure 1). Place the trim assembly
and screws aside and save them for later
installation.It is not necessary to disconnect the
wire harness connecting the charger driver circuit
board to the LED board. Instead, the trim plate
can be hung from the sliding plastic installation
hook (see figure 2).
HOUSING
HOUSING
ASSEMBLY
FIGURE 2
TRIM
FIGURE 1
PLASTIC
INSTALLATION
HOOK
Page 2

4. Determine where supply wires will be brought into the fixture. There are knockouts in each endcap on the side
HANGER BARS
ADJUSTED FOR 5/8"
THICK DRYWALL
TRIM
ASSEMBLY
PLASTIC
INSTALLATION
HOOK
HOUSING
TRIM PLATE
FIGURE 1
HOUSING
FIGURE 2
TRIM
ASSEMBLY
PLASTIC
INSTALLATION
HOOK
HOUSING
FIGURE 2
HANGER
BAR
ASSEMBLY
COVER
PLATE
HANGER BARS
ADJUSTED FOR 5/8"
THICK DRYWALL
PIVOT
HOUSING
LOCKING
CLIP
TRIM
ASSEMBLY
PLASTIC
INSTALLATION
HOOK
HOUSING
TRIM PLATE
FIGURE 1
HOUSING
FIGURE 3
HOUSING
FIGURE 2
FIGURE 4
HANGER BARS
ADJUSTED FOR 5/8"
THICK DRYWALL
TRIM
PLASTIC
INSTALLATION
HOOK
FIGURE 4
of the housing, and a hole between the hanger bars. If the hole between the hanger bars is to be used, remove
the two screws holding the cover plate and the hanger bars, discard the plate, and then replace the screws and
hanger bars.
5. Install the housing using the hanger bars. The hanger bars can be extended up to 25.5”, and are designed to be
nailed or screwed to studs, clipped onto the T-grid of a suspended ceiling, or be suspended from wires. If the
hanger bars need to be configured perpendicular to the fixture, the hanger bar brackets can be attached at the
ends of the fixture using the screws provided (See Figure 3).
6. Adjust the fixture to accommodate the thickness of drywall, plaster, or ceiling tile to be used. The notches and
markings on the hanger bar holders correspond to the material thickness (See Figure 4).
COVER
HANGER
BAR
ASSEMBLY
PLATE
HANGER BARS
ADJUSTED FOR 5/8"
THICK DRYWALL
HOUSING
FIGURE 3
FIGURE 4
7. Connect power supply and ground in accordance with NEC and local codes. Wire connections are as follows:
Ground to Green Lead, Neutral to White Lead, 277V line to Orange Lead (if used), 120V line to Black Lead (if used).
Cap unused Line Lead. (See Schematic)
8. If the fixture is to be wall mounted, first, loosen the set screw on
the back of the pivot housing. Then remove the locking clip by
sliding it to the end of the pivot housing (See Figure 5). Rotate
the pivot housing 90 degrees, and then replace the locking clip.
Tighten the set screw.
9. Remove the trim assembly from the installation hook. Slide the
trim assembly through the trim cover so that it can be installed
between the trim assembly and the ceiling or wall.
10. Replace the screws holding the trim assembly to the housing.
11. Lens is provided in a separate box. Apply chevrons and
background as needed. Snap lens into place.
NOTE: If using the lens with the default transparent background
(instead of the provided white or mirror backgrounds) it
must be installed only where there is adequate color contrast
between the sign legend and the interior wall finish behind
the sign, to provide for sufficient visibility.
12. Turn on power to fixture
For Surface Installation:
1. Turn off power supply.
LOCKING
CLIP
FIGURE 5
WIRE IN WIRE TRAP
PIVOT
HOUSING
FIGURE 6
2. Remove the two screws securing the hanger bar brackets and hanger bars. Remove the hanger bar assemblies.
3. Determine if the fixture will be mounted on the ceiling, wall, or end mounted.
2 Installation Instructions for the AUX Universal Edge Lit Exit
Page 3

ADAPTER
PLATE
HANGER
BAR
ASSEMBLY
COVER
PLATE
HANGER BARS
ADJUSTED FOR 5/8"
THICK DRYWALL
PIVOT
HOUSING
LOCKING
CLIP
TRIM
ASSEMBLY
PLASTIC
INSTALLATION
HOOK
GUIDE
BRACKET
HOUSING
TRIM PLATE
FIGURE 1
HOUSING
FIGURE 3
FIGURE 6
HOUSING
FIGURE 2
HOUSING
COVER PLATE
CANOPY
FIGURE 4
FIGURE 5
WIRE IN WIRE TRAP
HANGER BARS
ADJUSTED FOR 5/8"
THICK DRYWALL
PIVOT
HOUSING
LOCKING
CLIP
PLASTIC
INSTALLATION
HOOK
FIGURE 6
FIGURE 4
• Forwallorceilingmount,attachthecanopyovertheholeinthe
center of the housing using the screws used to hold the hanger bar
brackets (See Figure 7).
ADAPTER
PLATE
• Forendmount,removetheendcaponthedesiredend,and
replace it with the canopy and guide bracket (See
Figure 8). Replace the cover plate over the hole in the center of the
CANOPY
housing.
4. Remove the screws securing the trim plate to the housing (See
Figure 1). Place the trim assembly and screws aside and save
them for later installation. It is not necessary to disconnect the
wire harness connecting the charger driver circuit board to the LED
board. Instead, the trim plate can be hung from the sliding plastic
installation hook (See Figure 2).
Secure the canopy to the junction box using the adapter plate and
screws provided (See Figure 7/8). The adapter plate is designed
to be connected to a NEMA standard 3.5” round, 4” round, 3.5”
FIGURE 7
HOUSING
COVER PLATE
octagon,4” octagon, or handy (single gang) box. However, it is
possible to connect the adapter plate to other electrical boxes with
some modification.
5. Connect power supply and ground in accordance with NEC and
local codes. Wire connections are as follows: Ground to Green
Lead, Neutral to White Lead, 277V line to Orange Lead (if used),
120V line to Black Lead (if used). Cap unused Line Lead. (See
Schematic)
6. If the fixture is to be wall mounted, first, loosen the set screw on
the back of the pivot housing. Then remove the locking clip by
sliding it to the end of the pivot housing (See Figure 6). Rotate the
ADAPTER
PLATE
FIGURE 8
GUIDE
BRACKET
CANOPY
pivot housing 90 degrees, and then replace the locking clip. Tighten the set screw.
7. Remove the trim assembly from the installation hook.
8. Replace the screws holding the trim assembly to the housing.
9. Lens is provided in a separate box. Apply chevrons and background as needed. Snap lens into place.
NOTE: If using the lens with the default transparent background (instead of the provided white or mirror
backgrounds) it must be installed only where there is adequate color contrast between the sign legend and the
interior wall finish behind the sign, to provide for sufficient visibility.
10. Turn on power to fixture.
MAINTENANCE: None required.
HOUSING
NOTE: Servicing of any parts should be performed by qualified personnel. Only use replacement
TROUBLE SHOOTING HINTS:
parts supplied by Cooper Lighting Solutions. Use of unauthorized parts may void the warranty
If LED display or charge indicator LED does not illuminate, check the following:
1. Check AC supply – verify that unit has 24 hour AC supply.
2. Unit is shorted.
3. If following the above trouble shooting hints does not solve your problem, contact your
local Cooper Lighting Solutions representative for assistance.
3Installation Instructions for the AUX Universal Edge Lit Exit
Page 4

SCHEMATIC:
ORANGE LEAD - TO 277V
BLACK LEAD - TO 120V
WHITE LEAD - TO NEUTRAL
c
+
CN1
C8
O
C12
B
+
W`
MOV1
C10
MOV2
L1
C1
C11
041-1389
JP2
JP5
JP1
JP3
JP4
CN2
ICSP
REMOTE
F1
+
JP7
C7
JP6
LED_Out
LED_In
DRIVER PCB
W8
W7
LED11
c
CN1
LED9
LED10
LED PCB
LED7
LED8
LED5
LED6
LED3
LED4
LED1
LED2
JK1
PS1
Voltages and wire colors may vary for international versions. Check wire tags.
DISCLAIMER OF WARRANTIES AND LIMITATION OF LIABILITY
The information, recommendations, descriptions and safety notations in this document are based on Cooper Lighting
Solutions' experience and judgment and may not cover all contingencies. If further information is required, a Cooper Lighting
Solutions sales office should be consulted. Sale of the product shown in this literature is subject to the terms and conditions
outlined in appropriate Cooper Lighting Solutions selling policies or other contractual agreement between Cooper Lighting
Solutions and the purchaser.
THERE ARE NO UNDERSTANDINGS, AGREEMENTS, WARRANTIES, EXPRESSED OR IMPLIED, INCLUDING WARRANTIES
OF FITNESS FOR A PARTICULAR PURPOSE OR MERCHANTABILITY, OTHER THAN THOSE SPECIFICALLY SET OUT IN
ANY EXISTING CONTRACT BETWEEN THE PARTIES. ANY SUCH CONTRACT STATES THE ENTIRE OBLIGATION OF
COOPER LIGHTING SOLUTIONS. THE CONTENTS OF THIS DOCUMENT SHALL NOT BECOME PART OF OR MODIFY ANY
CONTRACT BETWEEN THE PARTIES.
In no event will Cooper Lighting Solutions be responsible to the purchaser or user in contract, in tort (including negligence),
strict liability or other-wise for any special, indirect, incidental or consequential damage or loss whatsoever, including but not
limited to damage or loss of use of equipment, plant or power system, cost of capital, loss of power, additional expenses in
the use of existing power facilities, or claims against the purchaser or user by its customers resulting from the use of the
information, recom-mendations and descriptions contained herein. The information contained in this manual is subject to
change without notice.
Cooper Lighting Solutions
1121 Highway 74
Peachtree City, GA 30276
P:770-486-4800
www.cooperlighting.com
© 2020 Cooper Lighting Solutions
All Rights Reserved
Printed in USA
Publication No. ADA140171
South
Cooper Lighting Solutions is
registered trademark.
All trademarks are property
of their respective owners.
a
 Loading...