

Page 1
Questions?/ Des questions?/ ¿Preguntas? 1-800-334-6871 [email protected]
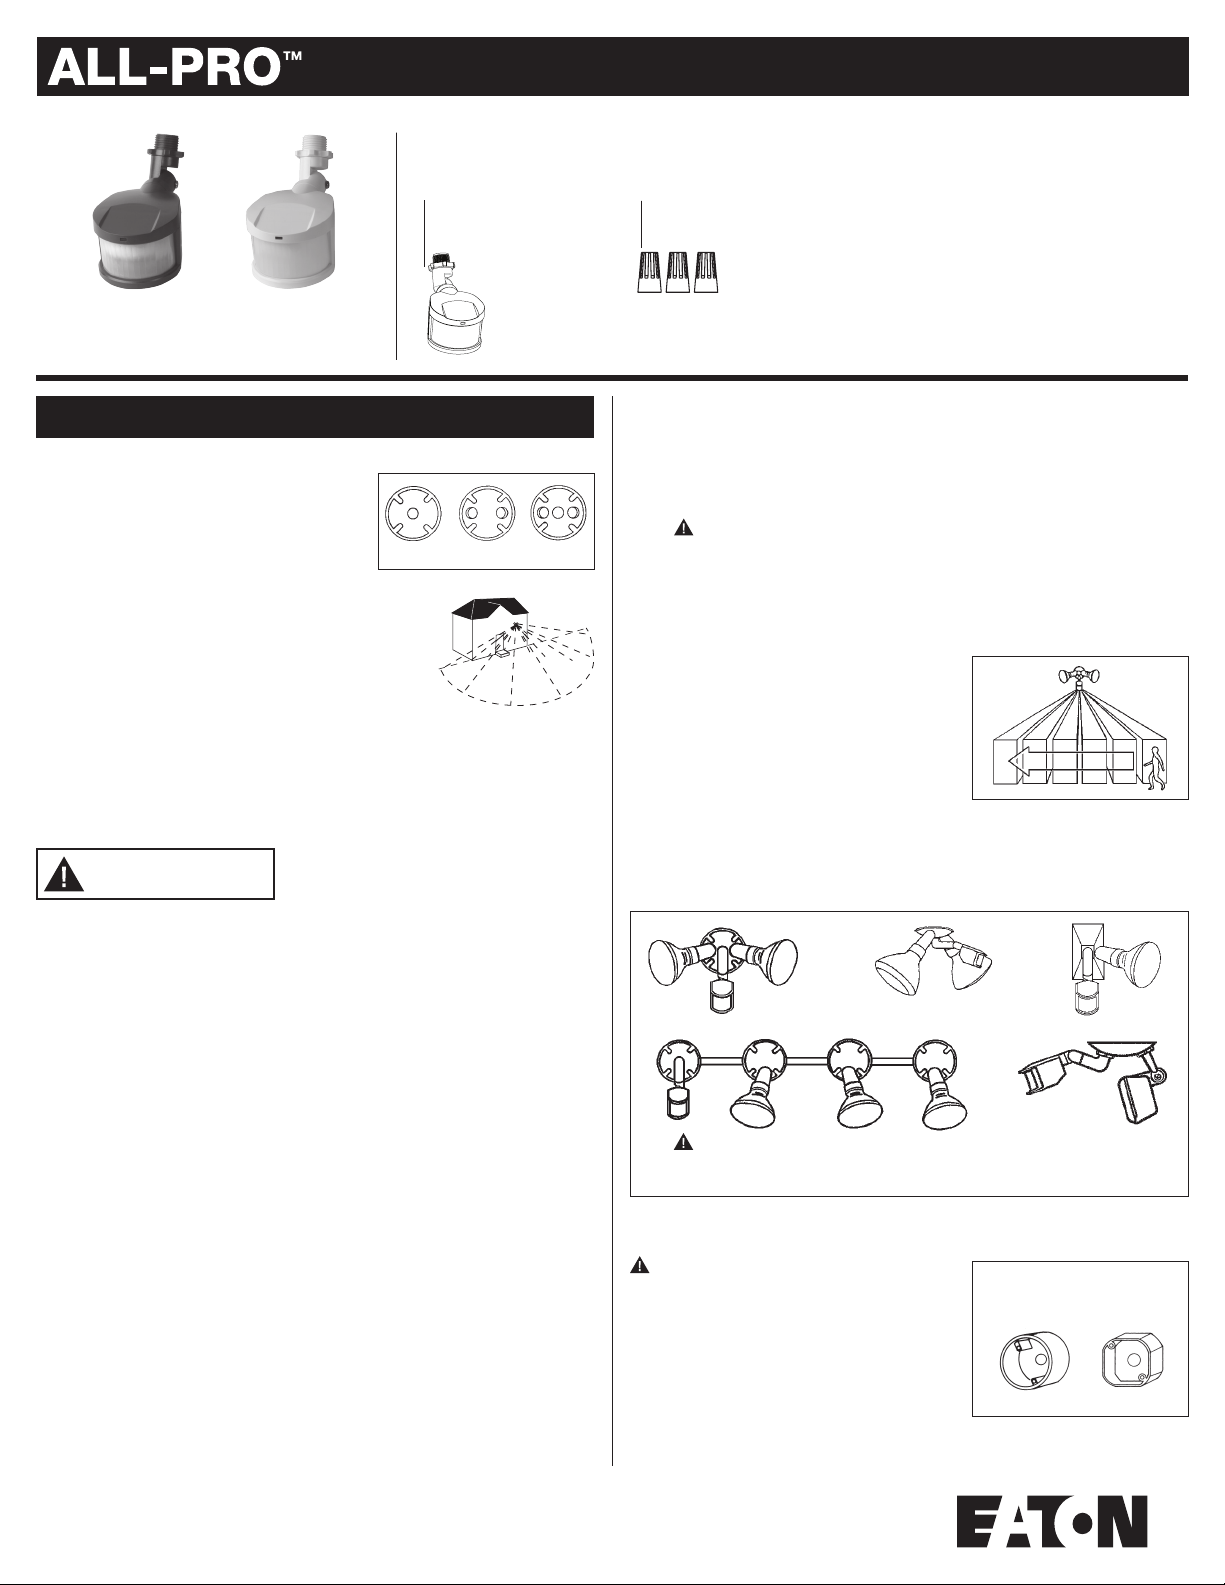
PACKAGING CONTENTS/ CONTENIDO DEL PAQUETE
A. Motion detector
Detector de
movimiento
MS180 (Bronze)
MS180W (White)
ENGLISH
ITEMS REQUIRED
(Purchase separately)
• Phillips screwdriver
• Outdoor weatherproof silicone caulking
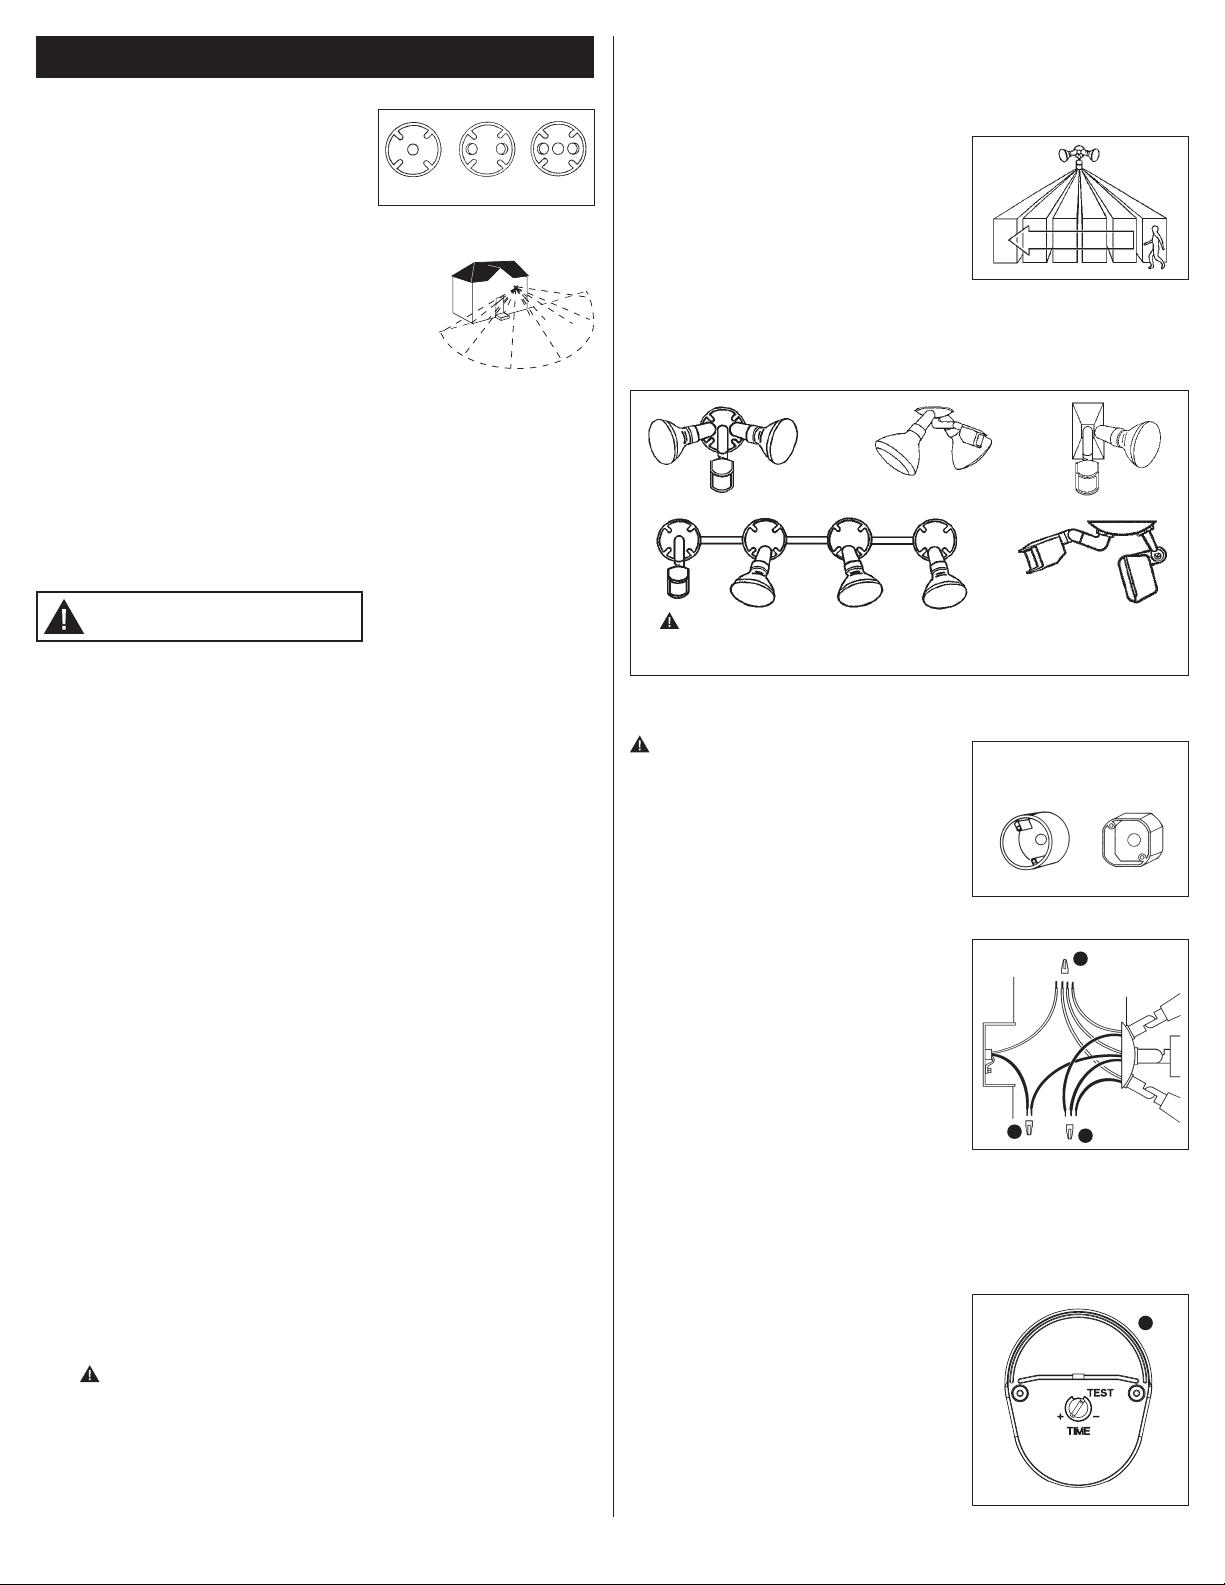
• 1-, 2- or 3-hole junction box coverplate (Fig. 1)
Compatible coverplates
HOW IT WORKS
Your motion activated floodlight senses heat images from
objects such as people, large animals and automobile engines.
When motion is detected, the lights will automatically turn
on. Once motion has stopped, the lights will turn off after a
preselected time delay. Your motion activated floodlight may
also be used as a standard floodlight.
IMPORTANT SAFETY INSTRUCTIONS
When using product, basic precautions should always be followed, including the following:
• Heed all warnings, including below warnings AND those included on product.
• For outdoor use only.
• cULus LISTED for wet location.
• Disassembling your fixture will void the warranty.
Fig. 1
Up to
70 feet
180 degrees
WARNING
• Read and follow these instructions.
• Total wattage of light bulbs connected to the motion detector cannot exceed
300 watts incandescent/tungsten /halogen.
CAUTION
• Connect fixture to a 120 volt, 60 Hz power source. Any other connection voids
the warranty.
• Fixture should be installed by persons with experience in household wiring or by a
qualified electrician. The electrical system, and the method of electrically connecting
the fixture to it, must be in accordance with the National Electrical Code and local
building codes.
• For proper operation and protection against damage, the motion sensor head
adjustment knobs must be facing the ground.
• MINIMUM 90° C SUPPLY CONDUCTORS.
• This device complies with Part 15 of the FCC Rules. Operation is subject to the
following two conditions: (1) This device may not cause harmful interference, and
(2) this device must accept any interference received, including interference that may
cause undesired operation. Under Part 15 of the FCC Rules, any changes or
modifications to the motion detector described in this instruction sheet that are
not expressly approved by Cooper Lighting, LLC could void the user’s authority to
operate the equipment.
NOTE: This equipment has been tested and found to comply with the limits for
a Class B digital device, pursuant to Part 15 of the FCC Rules. These limits are
designed to provide reasonable protection against harmful interference in a
residential installation. This equipment generates, uses and can radiate radio
frequency energy and if not installed and used in accordance with the instructions,
may cause harmful interference to radio communications. However, there is no
guarantee that interference will not occur in a particular installation. If this equipment
does cause harmful interference to radio or television reception, which can be
Instruction Manual / Manuel d’instructions/ Instrucciones
B. (3) Wire nuts
(3) Tuercas
para alambre
determined by turning the equipment off and on, the user is encouraged to try to
correct the interference by one or more of the following measures:
- Reorient or relocate the receiving antenna.
- Increase the separation between the equipment and receiver.
- Connect the equipment into an outlet on a circuit different from that to which the
receiver is connected.
- Consult the dealer or an experienced radio/TV technician for help.
WARNING: FCC Regulations state that any unauthorized changes or
modifications to this equipment not expressly approved by the manufacturer
could void the user’s authorization to operate this equipment.
SAVE THESE INSTRUCTIONS.
FOR BEST RESULTS
• Install your fixture 8-12 feet above the ground.
(Motion sensor is less sensitive above 12 feet.)
• Locate fixture so motion moves across
detection zone (Fig. 1).
• Locate sensor away from heat producing sources to
prevent false triggering. Also be very careful not to
include objects such as windows, white walls and
water in the detection zone.
• Locate sensor away from moving objects such as
trees, large shrubs and street traffic.
• Do not install more than one motion detector on one wall switch.
COMMON WALL AND EAVE
MOUNTING APPLICATIONS
WARNING: Total wattage of light bulbs
connected to motion detector cannot exceed
300 watts incandescent/tungsten/halogen.
ASSEMBLING AND WIRING YOUR
MOTION DETECTOR
WARNING: Risk of electric shock. Disconnect
power at fuse or circuit breaker before installing
or servicing.
1. Turn off the power at the main fuse/breaker box.
2. Screw motion detector arm into the desired hole on
junction box coverplate.
3. Attach all lampholders or light fixtures to the
coverplate as required by light fixture instructions.
standard junction boxes:
Fig. 1
Fig. 2
Your fixture mounts
to the following
Round Octagonal
1
Page 2
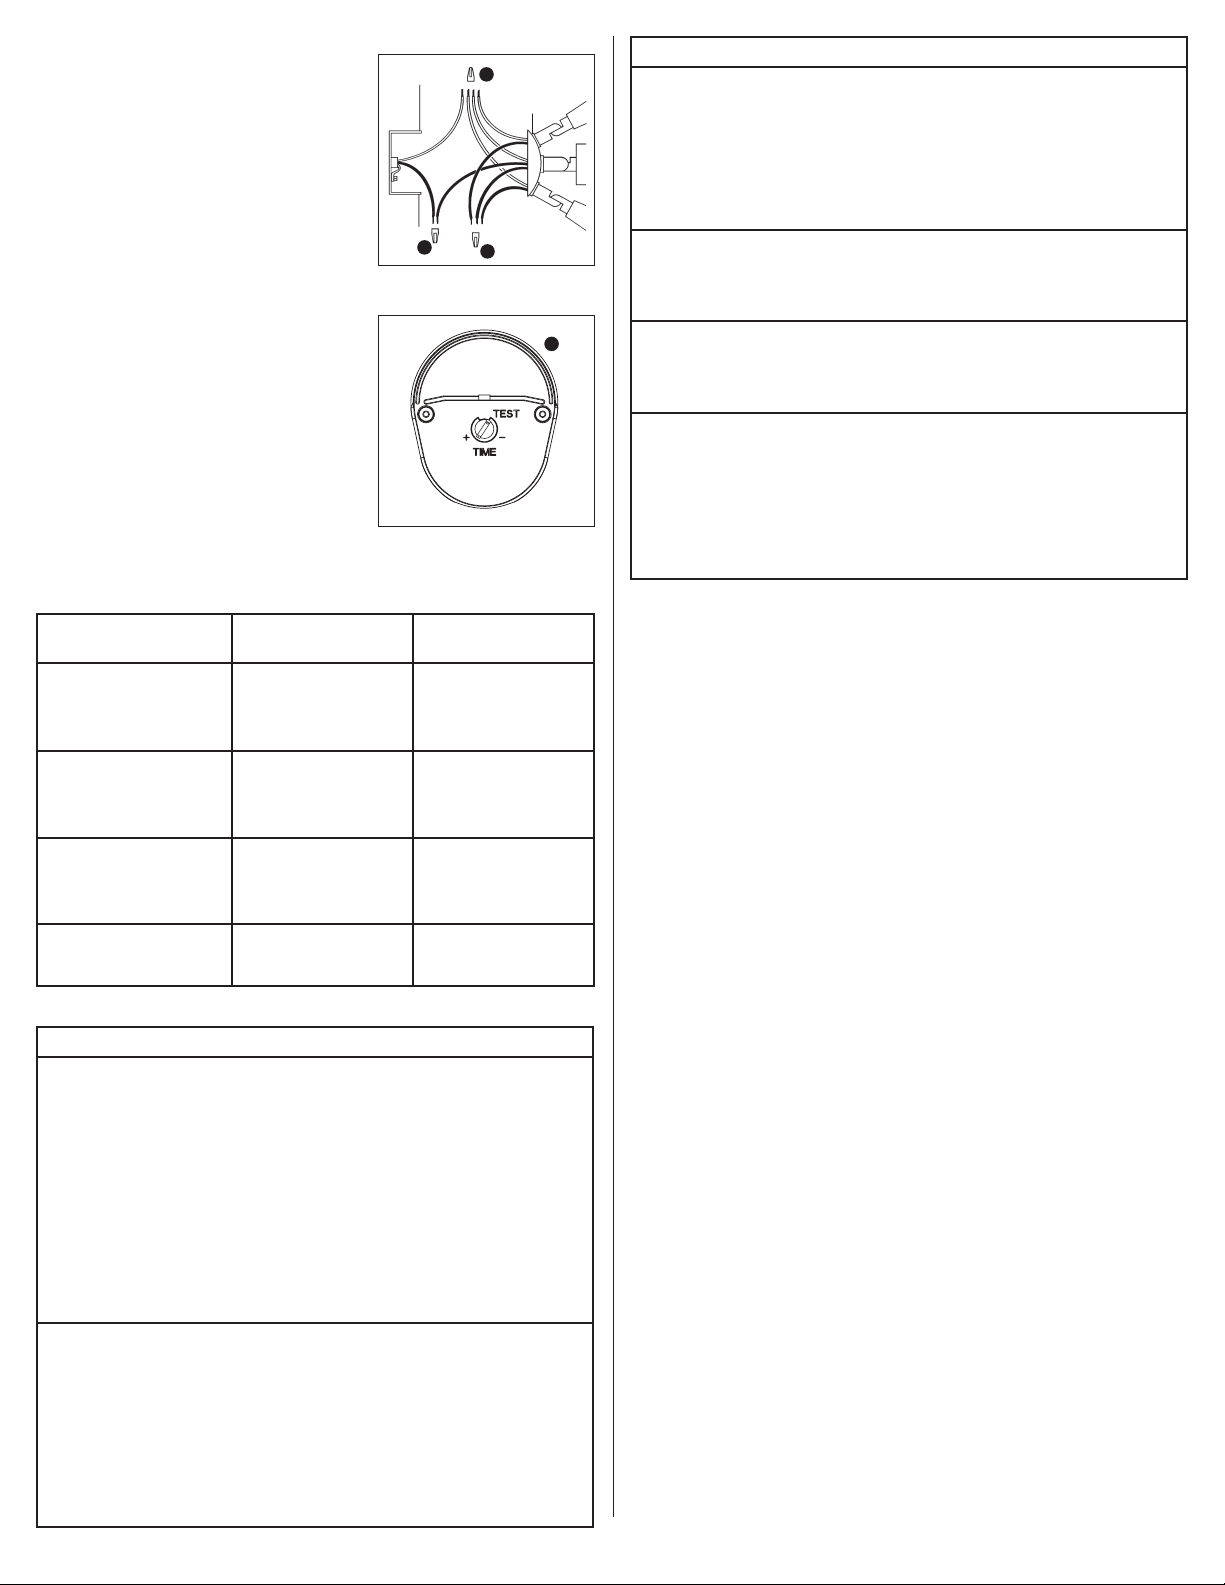
4. Connect the wires together. Connect all white
wires together (house wire, detector wire, and
lamp fixture white wires) using wire nuts provided.
Connect black lamp wires to red wire from the
detector. Connect black house wire to black wire
Junction
box
Fig. 3
B
Light
fixture
from the detector (Fig. 3).
5. Attach fixture to the junction box according to light
fixture instructions.
6. Apply silicone caulk around the edges of coverplate
and any open screw holes for a watertight seal.
7. Insert bulb(s) according to light fixture instructions.
8. Turn on power at main fuse/ breaker box.
B
B
OPERATING YOUR FIXTURE
1. Set dial to “TEST” (Fig. 4).
2. Turn on the power to fixture. Allow fixture to warm
up approximately 40 seconds before testing.
3. Aim sensor head toward desired detection area,
maintaining a 5° down angle to allow moisture
to drain.
NOTE: Maintain air spacing between lamps and sensor
head, at least 2 in. Make sure sensor head is positioned
with control switches facing towards the ground.
4. Walk across the detection zone at the farthest
distance you wish your detector to detect motion.
5. Adjust sensor head angle until you get desired
results.
6. Set dial to desired time setting. The higher the time setting, the longer the lamps will be
ON. (Maximum time is 12 minutes.)
Fig. 4
A
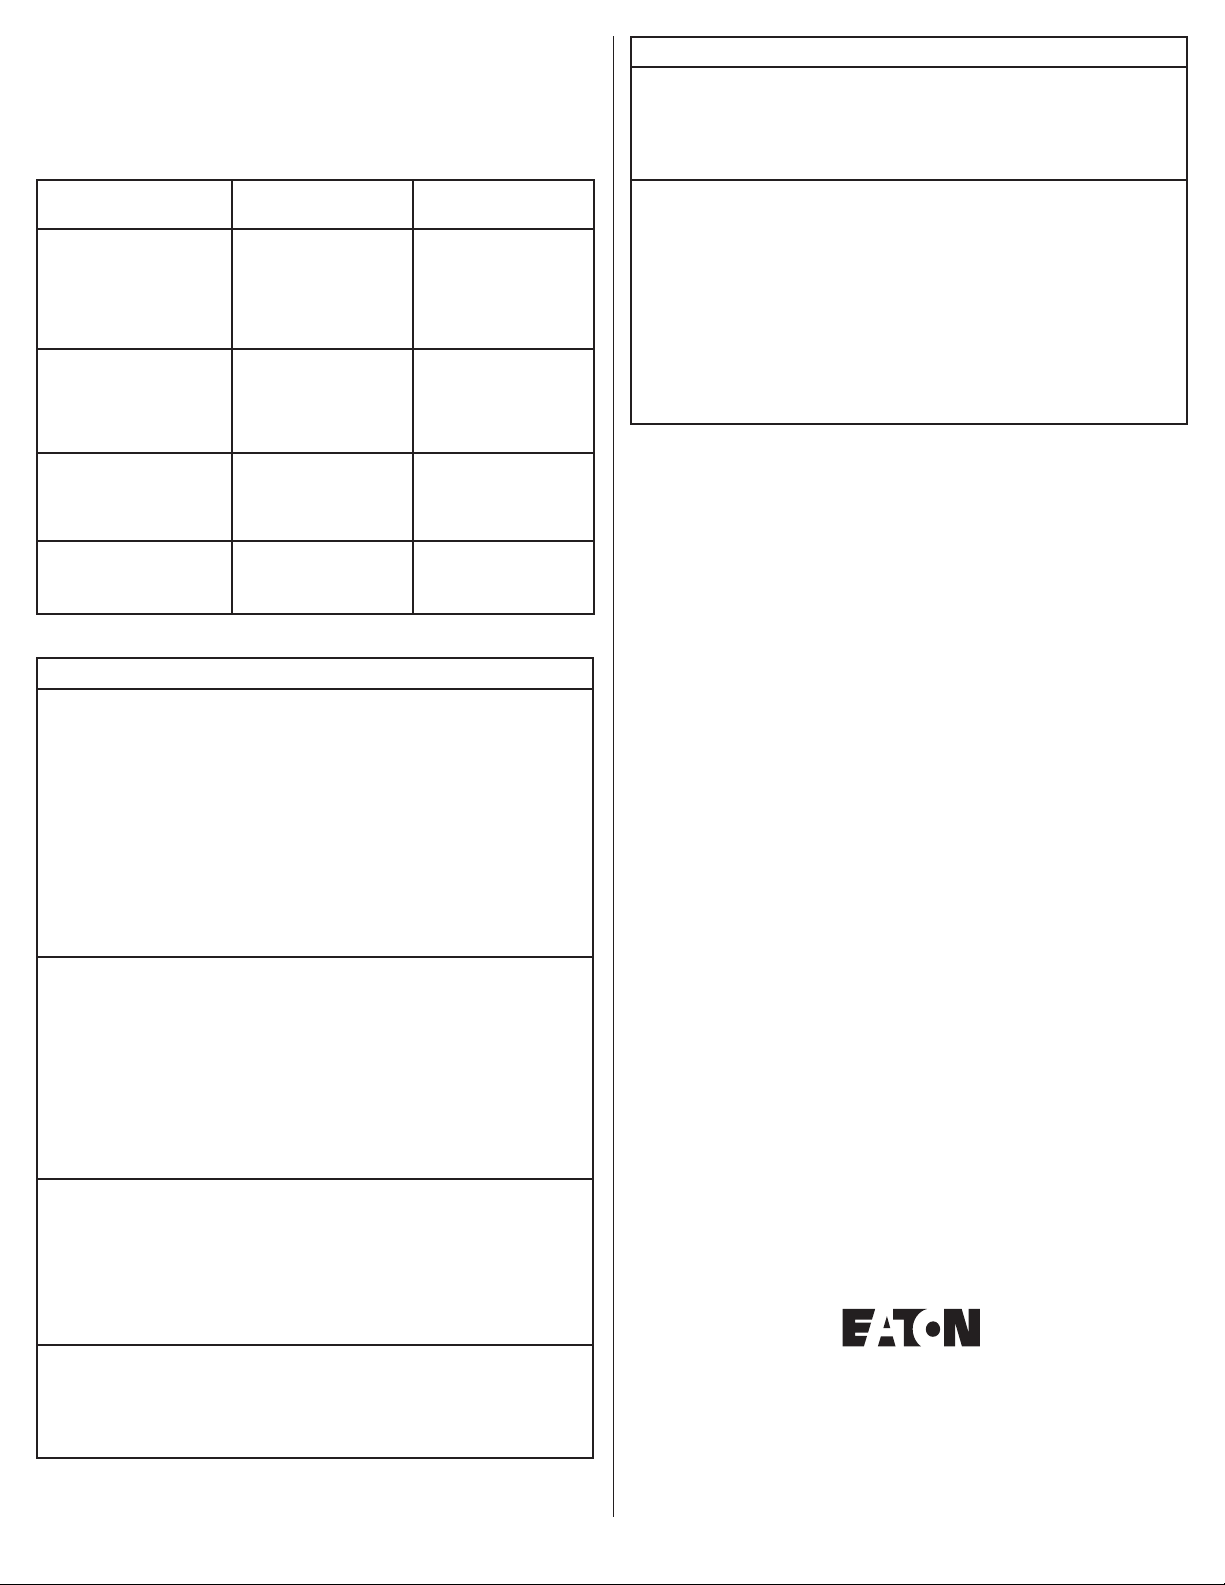
SELECTING YOUR DESIRED FEATURE
Mode of MODE Knob How to Set
Operation Adjustment Power Switch
Auto Setting (motion activated)
Lights should turn ON with
motion only at night and should
turn OFF according to the
TIME dial setting.
Dusk to Dawn Setting
(activated only at night)
Lights should turn ON for 6 hours
at dusk and then reset to the
auto setting mode.
Test Setting
Lights should turn ON with
motion both day and night.
Lights should turn OFF
after 4 seconds.
Return to Auto Setting
(motion activated)
From any of the above settings
Any setting other
than “TEST”
Any setting other
than “TEST”
TEST
Any setting other
than “TEST”
Turn the power
to the fixture ON.
Turn the power
OFF and ON twice
within 3 seconds.
Turn the power
to the fixture ON.
Turn the power OFF
for at least 40 seconds
and then back ON.
TROUBLESHOOTING
Problem Cause / Solution
Light does not
come ON with
motion at night.
Light comes ON
for no apparent
reason at night.
No power to the fixture.
• Check if circuit breaker tripped.
• Confirm wall switch is ON.
Bulb is faulty.
• Replace bulb.
Surrounding external ambient light is too bright. (If so, the unit may
think it is daytime.)
• Re-aim the head.
• Relocate or reposition the unit away from the light.
TURN OFF POWER BEFORE CONTINUING
Wiring to the unit is loose.
• Check wiring; reconnect if necessary using wire nuts
(B) provided.
There is motion in the detection zone.
• Make sure the sensor is not picking up moving objects such as
trees, traffic, etc.
TEST FOR YOURSELF.
• Cover the sensor lens with cardboard to prevent sensor from
detecting motion. If the light stays off, something in the detection
zone is triggering the sensor.
* If the light stays on with the sensor lens covered, contact
customer service.
• Reposition the sensor.
Problem Cause / Solution
Light stays ON at
night and does
not turn OFF.
Light
continuously
blinks ON and
OFF at night.
Light is ON
during the day.
Cannot activate
dusk to dawn
mode at night
(override)
There is motion in the detection zone.
• Make sure the sensor is not picking up moving objects such as
trees, traffic, etc.
• Reposition the sensor.
Unit is in override mode (if there is no motion).
• Turn the light switch to the OFF position for 40 seconds, and
then turn back to the ON position. This will send the unit back
into the “Auto” mode.
The light given from the unit’s own lamp is affecting the
motion sensor.
• Re-aim the lamp.
• Reposition motion sensor.
The controls on the bottom of the motion sensor are in “TEST” mode.
• Change dial setting (not “TEST” mode).
The motion detector is shadowed.
• Reposition motion sensor.
Surrounding external ambient light is too bright. (If so, the unit may
think it is daytime.)
• Re-aim the head.
• Relocate or reposition the unit away from the light.
Not enough time is allowed to enter the dusk to dawn mode.
• Turn power OFF and ON twice within 3 seconds.
There is more than one fixture on an indoor wall switch.
• If so, put them on separate switches.
2-YEAR LIMITED WARRANTY
THE FOLLOWING WARRANTY IS EXCLUSIVE AND IN LIEU OF ALL OTHER WARRANTIES,
WHETHER EXPRESS, IMPLIED OR STATUTORY INCLUDING, BUT NOT LIMITED TO, ANY
WARRANTY OF MERCHANTABILITY OR FITNESS FOR ANY PARTICULAR PURPOSE.
Cooper Lighting, LLC (“Cooper Lighting”) warrants to customers that, for a period of two years
from the date of purchase, Cooper Lighting’s products will be free from defects in materials
and workmanship. The obligation of Cooper Lighting under this warranty is expressly limited
to the provision of replacement products. This warranty is extended only to the original
purchaser of the product. A purchaser’s receipt or other proof of date of original purchase
acceptable to Cooper Lighting. This is required before warranty performance shall be rendered.
This warranty does not apply to Cooper Lighting products that have been altered or repaired
or that have been subjected to neglect, abuse, misuse or accident (including shipping damages).
This warranty does not apply to products not manufactured by Cooper Lighting which have been
supplied, installed, and/or used in conjunction with Cooper Lighting products. Damage to the
product caused by replacement bulbs or corrosion or discoloration of brass components are
not covered by this warranty.
LIMITATION OF LIABILITY:
IN NO EVENT SHALL COOPER LIGHTING BE LIABLE FOR SPECIAL, INDIRECT, INCIDENTAL, OR
CONSEQUENTIAL DAMAGES (REGARDLESS OF THE FORM OF ACTION, WHETHER IN CONTRACT,
STRICT LIABILITY, OR IN TORT INCLUDING NEGLIGENCE), NOR FOR LOST PROFITS; NOR SHALL
THE LIABILITY OF COOPER LIGHTING FOR ANY CLAIMS OR DAMAGE ARISING OUT OF OR
CONNECTED WITH THESE TERMS OR THE MANUFACTURE, SALE, DELIVERY, USE, MAINTENANCE,
REPAIR OR MODIFICATION OF COOPER LIGHTING PRODUCTS, OR SUPPLY OF ANY REPLACEMENT
PARTS THEREFORE, EXCEED THE PURCHASE PRICE OF COOPER LIGHTING PRODUCTS GIVING RISE
TO A CLAIM. NO LABOR CHARGES WILL BE ACCEPTED TO REMOVE OR INSTALL FIXTURES.
To obtain warranty service, please contact Cooper Lighting, LLC, at 1-800-334-6871, press
option 2 for Customer Service, or via e-mail [email protected] and
include the following information:
• Name, address and telephone number
• Date and place of purchase
• Catalog and quantity purchase
• Detailed description of problem
All returned products must be accompanied by a Return Goods Authorization Number issued
by the Company and must be returned freight prepaid. Any product received without a Return
Goods Authorization Number from the Company will be refused.
Cooper Lighting, LLC is not responsible for merchandise damaged in transit. Repaired or
replaced products shall be subject to the terms of this warranty and are inspected when
packed. Evident or concealed damage that is made in transit should be reported at once to
the carrier making the delivery and a claim filed with them.
Reproductions of this document without prior written approval of Cooper Lighting, LLC are strictly prohibited.
For assistance, call 1-800-334-6871 or e-mail us at [email protected].
Printed in China
2
Page 3
ESPAÑOL
ARTÍCULOS NECESARIOS
(se compran por separado)
• Destornillador en cruz (Phillips)
• Calafateo de silicona resistente a la intemperie
• Placa protectora para caja de empalmes con
1,2o3orificios (Fig. 1)
Placas protectoras compatibles
CÓMO FUNCIONA
Su detector activado por movimiento detecta imágenes térmicas
de tales objetos como personas, animales grandes y motores
de automóvil. Cuando se detecta movimiento, las lámparas
conectadas al detector se encenderán automáticamente. Una
vez que haya parado el movimiento, las lámparas se apagarán
automáticamente después de un retardo de tiempo
preseleccionado. Con su detector activado por movimiento
conectado, también puede controlar las lámparas manualmente
con el interruptor de pared.
INSTRUCCIONES IMPORTANTES DE SEGURIDAD
Al utilizar el producto, siempre se deben seguir las precauciones básicas,
incluído lo siguiente:
• Tenga en cuenta todas las advertencias, incluyendo las advertencias a continuación
Y aquellas incluidas en el producto.
• Sólo para uso en exteriores.
• cULus para ubicaciones mojadas.
• Desensamblar la lámpara anulará la garantía.
Fig. 1
180 grados
Hasta
70 pies
PARA OBTENER LOS MEJORES RESULTADOS
• Instale el accesorio a 2,45 –3,65 m (8 – 12 pies) de
altura sobre el suelo (por encima de 3,65 m/12 pies,
el sensor de movimiento es menos sensible).
• Coloque el accesorio que se mueva por toda la zona
de detección (Fig. 1).
• Coloque el sensor lejos de fuentes que produzcan
calor, a fin de evitar falsos disparos. Además, medida
de lo posible, tenga mucho cuidado de no incluir
objetos tales como ventanas, paredes blancas y
agua, en la zona de detección.
• Coloque el sensor lejos de objetos móviles, como por
ejemplo árboles, arbustos grandes y tráfico callejero.
• No instale más de un detector de movimiento en un
interruptor de pared o circuito.
APLICACIONES DE MONTAJE PARA
PAREDES Y ALEROS COMUNES
Fig. 1
Fig. 2
ADVERTENCIA
• Lea y siga estas instrucciones.
• El vatiaje total de los focos de luz conectadas al sensor de movimiento no puede
exceder una incandescencia/tungsteno /halógena de 300 watts.
PRECAUCION
• Conecte el portalámparas a una fuente de energía de 120 Voltios, 60 Hz. Cualquier
otro tipo de conexión anula la garantía.
• El portalámparas debe ser instalado por personas con experiencia en cableado
doméstico o por un electricista calificado. El sistema eléctricoy el método de conexión
eléctrica del portalámparas debe cumplir con el Código eléctrico nacional y los
códigos locales sobre edificios.
• Para el funcionamiento debido y protección contra daños, los pomos de ajuste de la
cabeza del detector de movimiento deben estar orientados hacia el suelo.
• UTILICE CONDUCTORES DE SUMINISTRO QUE SOPORTEN UN MÍNIMO DE 90°C.
• Este dispositivo cumple con la Parte 15 de las Reglas de la Comisión Federal de
Comunicaciones (FCC) de los E. U. de A. La operación está sujeta a las dos condiciones
siguientes: (1) Este dispositivo no puede causar interferencia dañina, y (2) este
dispositivo debe aceptar toda interferencia recibida, incluyendo la interferencia que
pueda causar un funcionamiento indeseado. Según la Parte 15 de las Reglas de la
FCC, todo cambio o modificación al detector de movimiento descripto en esta hoja
de instrucciones que no esté expresamente aprobado por Cooper Lighting, LLC podría
anular la autorización del usuario para operar el equipo.
NOTA: Este equipo ha sido probado, y se ha verificado que cumple con los límites de
un dispositivo digital Clase B, de acuerdo con la Parte 15 de las Reglas de la FCC.
Estos límitesestán diseñados a fin de proveer una protección razonable contra la
interferencia dañina en una instalación residencial. Este equipo genera, usa y puede
irradiar energía de radio frecuencia, y si no se instala y utiliza de acuerdo con las
instrucciones, puede causar interferencia dañina en las comunicaciones de radio.
Sin embargo, no se garantiza que no vaya a producirse interferencia en una
instalación en particular. Si este equipo efectivamente causa una interferencia
dañina en la recepción de radio o televisión, lo que puede determinarse apagándolo
y encendiéndolo, se recomienda al usuario que trate de corregir la interferencia por
medio de una o más de las siguientes medidas:
- Reoriente o cambie de lugar la antena receptora.
- Aumente la separación entre el equipo y el receptor.
- Conecte el equipo en un tomacorriente que esté en un circuito difer ente de aquél al
que se conecta el receptor.
- Consulte a su proveedor, o a un técnico de radio / TV experimenta do, para que
le ayuden.
ADVERTENCIA: Las Reglamentaciones de la FCC establecen que todo cambio
o modificación no autorizados en este equipo, que no estén aprobados
expresamente por el fabricante, podrían anular la autorización del usuario
para operar el equipo.
GUARDE ESTAS INSTRUCCIONES Y ADVERTENCIAS.
ADVERTENCIA: El vatiaje total de los focos de luz
conectadas al sensor de movimiento no puede exceder
una incandescencia/tungsteno /halógena de 300 watts.
ENSAMBLANDO Y CABLEANDO SU
DETECTOR DE MOVIMIENTO
ADVERTENCIA: Riesgo de choque eléctrico.
Antes de la instalación o reparación, desconecte
la alimentación eléctrica en el fusible o interrupto
automático.
1. Desconecte la fuente de alimentación en la caja
principal de fusibles/interruptor de circuito.
2. Atornille el brazo del detector de movimiento en
el agujero deseado en la placa de cierre de la caja
de conexiones.
3. Sujete todos los portalámparas a la placa de
cierre según sea requerido por las instrucciones
del portalámparas.
4. Conecte los cables juntos. Conecte todos los
cables blancos juntos (cable blanco de la casa,
cable blanco del detector y cable blanco del
portalámparas) usando las tuercas suministradas.
Conecte los cables negros de la lámpara al cable
rojo del detector. Conecte el cable negro de la casa
al cable negro del detector (Fig. 3).
5. Conecte el portalámparas a la caja de conexiones
de acuerdo con las instrucciones del portalámparas.
6. Aplique calafateo de silicona alrededor de los
bordes de la placa de la cubierta y en cualquier
agujero para tornillos que se encuentre abierto.
7. Introduzca el foco con las instruciones del portalámparas.
8. Active la fuente de alimentación en la caja de
fusibles/interruptor automático.
empalmes
OPERACIÓN DEL ACCESORIO
1. Lleve el selector a “TEST” (“PRUEBA”) (Fig. 4).
2. Active la energía del portalámparas. Deje que
el portalámparas se caliente aproximadamente
40 segundos antes de hacer las pruebas.
3. Dirija la cabeza del sensor hacia el área de
detección deseada, manteniendo un ángulo de 5°
hacia abajo, para permitir el drenaje de la humedad.
NOTA: Deje un espacio de aire de por lo menos
2 pulg. (5,1 cm) entre las lámparas y el sensor.
Asegúrese de que la cabeza del sensor esté colocada
con los interruptores de control en dirección al piso.
4. Camine a través de la zone de detección tan lejos
como desee que su detector registre movimiento.
Su portalámparas se
ajusta a estas cajas
de empalmes:
redonda octagonal
Fig. 3
Caja de
B
B
Portalámparas
B
Fig. 4
A
3
Page 4
5. Ajuste la cabeza del sensor hasta obtener los
resultados deseados.
6. Lleve el selector al ajuste de tiempo deseado.
Cuanto más elevado sea el ajuste de tiempo, más
largas las lámparas serán encendidas. (El tiempo
máximo es de 12minutos).
SELECCIONE LA FUNCIÓN DESEADA
Modo de Adjuste de la perilla Como adjustar
funcionamiento de MODO interruptor electrico
Ajuste Automático
(activado por movimiento)
Las luces se deben encender
al detectar movimiento solo por
las noches y se deben apagar de
acuerdo al ajuste del indicador
“TIME” (“HORA”).
Ajuste Amanecer-Atardecer
(activado sólo durante la noche)
La luz debe permanecer encendida
durante 6horas al anochecer
y luego restablecerse al modo
de ajuste automático.
Ajuste de Prueba
Las luces deben encenderse
por el movimiento tanto en el día
como en la noche. Las luces deben
apagarse después de 4 segundos.
Regrese al Ajuste Amanecer-
Atardecer (ajuste de
activación por movimiento)
desde cualquier posición.
Cualquier ajuste
que no se “TEST”
Cualquier ajuste
que no se “TEST”
TEST Mantenga la
Cualquier ajuste
que no se “TEST”
portalámparas activada.
Apague y encienda la
alimentación eléctrica
dos veces en un período
portalámparas activada.
APAGUE (OFF) la corriente por
al menos 40 segundos y luego
ENCIENDALA (ON) de nuevo.
Mantenga la
alimentación del
de 3 segundos.
alimentación del
DIAGNOSTICO Y SOLUCION DE PROBLEMAS
Problema Causa Posible/Acción Correctiva
La luz no se
enciende durante
la noche aunque
haya movimiento.
La luz se
enciende durante
la noche sin
motivo aparente.
La luz se
enciende durante
la noche y no se
apaga.
La luz se
enciende y
se apaga
continuamente
durante la noche.
No llega electricidad al bombilla.
• Revise si el interruptor de circuito ha saltado.
• Confirme que el interruptor de pared esté encendido.
La bombilla está defectuoso.
• Cambie la bombilla.
La luz ambiental exterior es demasiado brillante. (Sí es así, para la
unidad es de día).
• Redirija el cabezal.
• Reubique o reoriente el accesorio.
DESCONECTE LA ENERGÍA ANTES DE CONTINUAR.
El cableado hacia la unidad está flojo.
• Revise los cables y vuélvalos a conectar si fuera necesario
usando las tuercas (B) que se incluyen.
Hay movimiento en la zona de detección.
• Asegúrese de que el sensor no esté reaccionando a objetos
móviles tales como árboles, tráfico, etc.
COMPRUÉBELO USTED MISMO.
• Cubra la lente del sensor con un trozo de cartón para evitar
que detecte movimiento. Si las luces permanecen apa gadas,
hay algo en el área de detección que está activando el sensor.
* Si las luces permanecen encendidas con la lente del
sensor cubierta, póngase en contacto con el servicio de
asistencia al cliente.
• Reubique o reoriente el sensor.
Hay movimiento en la zona de detección.
• Asegúrese de que el sensor no esté reaccionando a objetos
móviles tales como árboles, tráfico, etc.
• Reubique o reoriente el sensor.
La unidad está en modo de anulación (si no hay movimiento).
• Ponga el interruptor de la luz en “OFF” durante 40 segundos
y vuel va a colocarlo en “ON”. Esto colocará de nuevo la unidad
en la modalidad “Auto” (automático).
La luz proveniente de la propia lámpara de la unidad está afectando
al sensor de movimiento.
• Redirija el cabezal.
• Reubique o reoriente el accesorio.
Problema Causa Posible / Acción Correctiva
La luz se
enciende
durante el dia.
No se puede
activar el
configuración
del reflector
estándar
(Conmutación a
control manual).
El interruptor que se encuentra en la parte inferior del sensor de
movimiento se encuentran en el modo de prueba.
• Cambie el ajuste del selector (que no esté en modo “TEST”).
Hay sombra sobre el detector de movimiento.
• Reubique o reoriente el sensor.
La luz ambiental exterior es demasiado brillante. (Sí es así, para la
unidad es de día).
• Redirija el cabezal.
• Cambie la ubicación de la unidad o diríjala en dirección
contraria a la luz.
No se dejó pasar suficiente tiempo para que el accesorio entrara en
el modo de amanecer-atardecer.
• Apague y encienda la alimentación eléctrica dos veces en un
período de 3 segundos.
Más de un accesorio está conectado en un interruptor de
pared interior.
• Si es así, conéctelos en interruptores diferentes.
GARANTIA LIMITADA DE 2 AÑOS
LA SIGUIENTE GARANTÍA ES EXCLUSIVA Y REEMPLAZA A TODAS LAS DEMÁS GARANTÍAS, YA
SEAN IMPLÍCITAS, EXPLÍCITAS O ESTATUTARIAS, INCLUIDAS, ENTRE OTRAS, LAS GARANTÍAS
DE COMERCIABILIDAD E IDONEIDAD PARA UN FIN PARTICULAR.
Cooper Lighting, LLC (“Cooper Lighting”) garantiza a sus clientes que los productos de Cooper
Lighting no presentarán defectos en los materiales y en la fabricación durante un período de
dos años desde la fecha de compra. La obligación de Cooper Lighting según esta garantía se
limita expresamente al suministro de los productos de reemplazo. Esta garantía se extiende
sólo para el comprador original del producto. Un recibo de compra u otra prueba de la fecha
de compra original aceptable para Cooper Lighting. Esto es necesario para la ejecución de
la garantía.
Esta garantía no se aplica a los productos de Cooper Lighting que hayan sido alterados o
reparados o que estuvieron sujetos a negligencia, abuso, mal uso o accidente (incluso los
daños durante el envío). Esta garantía no se aplica a los productos Cooper Lighting no
fabricados por Cooper Lighting que hayan sido suministrados, instalados o utilizados junto con
los productos Cooper Lighting. Los daños del producto causados por bombillas de reemplazo,
corrosión o decoloración de los componentes de latón no están cubiertos por esta garantía.
LIMITACIÓN DE RESPONSABILIDAD:
COOPER LIGHTING NO SERÁ RESPONSABLE LEGAL EN NINGÚN CASO DE DAÑOS INDIRECTOS,
ACCIDENTALES O RESULTANTES (SIN IMPORTAR LA ACCIÓN LEGAL, YA SEA POR CONTRATO,
RESPONSABILIDAD ESTRICTA O DE FORMA EXTRACONTRACTUAL INCLUYENDO LA
NEGLIGENCIA), NI POR TAMPOCO DE LA PÉRDIDA DE GANANCIAS; COOPER LIGHTING
TAMPOCO SE HACE RESPONSABLE POR DAÑOS QUE SURJAN O ESTÉN CONECTADOS CON ESTOS
TÉRMINOS O CON LA FABRICACIÓN, VENTA, ENTREGA, USO, MANTENIMIENTO, REPARACIÓN O
MODIFICACIÓN DE LOS PRODUCTOS DE COOPER LIGHTING O DEL SUMINISTRO DE CUALQUIER
PIEZA DE REPUESTO QUE EXCEDA EL PRECIO DE COMPRA DE LOS PRODUCTOS DE COOPER
LIGHTING QUE ORIGINAN UN RECLAMO. NO SE ACEPTARÁN CARGOS POR MANO DE OBRA
PARA QUITAR O INSTALAR LOS ACCESORIOS.
Para obtener el servicio de la garantía comuníquese con Cooper Lighting, LLC, al
1-800-334-6871, presione la opción 2 para el Servicio al Cliente, o por correo electrónico a
[email protected] e incluya la siguiente información:
• Nombre, dirección y número de teléfono
• Fecha y lugar de compra
• Catálogo y cantidad de la compra
• Descripción detallada del problema
Todos los productos devueltos deben estar acompañados por un Número de autorización
de productos devueltos emitido por la compañía y deben devolverse con flete prepagado.
Se rechazará todo producto recibido sin un Número de autorización de productos devueltos
desde la compañía.
Cooper Lighting, LLC no se hace responsable por la mercancía dañada durante el transporte.
Los productos reparados o reemplazados estarán sujetos a los términos de esta garantía y se
inspeccionan al ser empacados. El daño evidente y oculto que se provoque durante el
transporte se debe informar de inmediato al transportista que realiza la entrega y se debe
presentar un reclamo.
La reproducción de este documento sin la aprobación previa por escrito de Cooper Lighting, LLC está estrictamente prohibida.
Para solicitar ayuda, llame al 1-800-334-6871 o envíe un correo electrónico a [email protected].
Impreso en China
1121 Highway 74 South, Peachtree City, GA 30269
Customer First Center
www.cooperlighting.com
© 2012 Cooper Lighting, LLC
03/15
IL502005EN
4
 Loading...