

Page 1
ENGLISH
ESPAÑOL
FRANÇAIS
MQF150, CMQF150
MQF150W, CMQF150W
Instruction Manual
Instrucciones
Directives
MQF150_W 825-0143.qxd:MQF150 325-1524.qxd 5/15/08 9:20 AM Page 1
Page 2
MQF150, CMQF150 (Bronze)
MQF150W, CMQF150W (White)
ENGLISH
2
Call for customer service and/or missing or damaged parts (800-334-6871)
Congratulations! You have purchased a Cooper Lighting, LLC 150 watt
decorative halogen floodlight. This security lighting system is an attractive way
to provide years of trouble-free convenience and protection for your home and
family. This floodlight is perfect for illuminating walkway entrances, driveways,
yards, patios and recreational areas.
What you need
• Screwdriver
• Pliers
• Silicone caulking
• (3) Wire nuts
What’s included
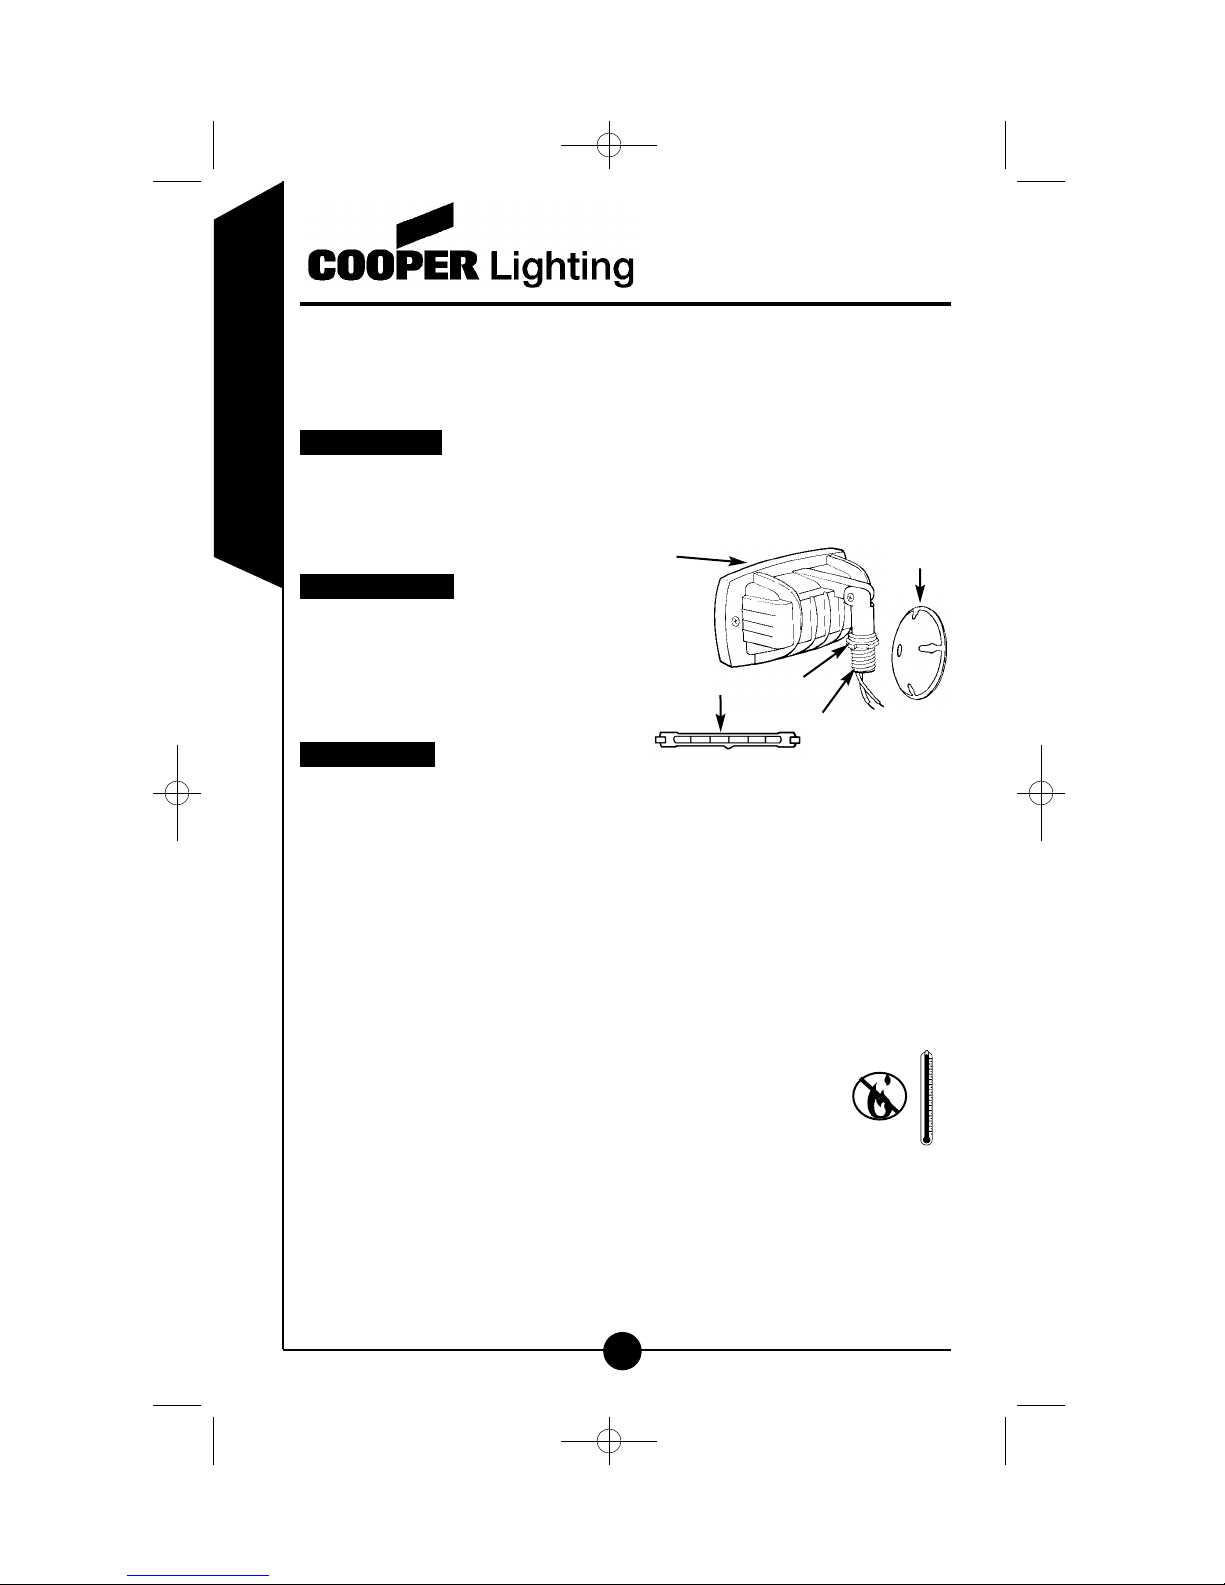
• Light fixture (A)
• Locknut (B)
• 150 watt T-3 halogen bulb (installed) (C)
• Mounting arm (D)
• Junction box coverplate (E)
What to know
PLEASE READ THESE IMPORTANT SAFETY INSTRUCTIONS.
• For outdoor use only.
• cULus Listed for wet location use.
• Fixture must be connected to a 120 volt, 60 Hz power source (any other
connection voids warranty).
• Fixture should be installed by a qualified electrician or by persons with
experience in household wiring. The electrical system, and the method of
electrically connecting this fixture to it, must be in accordance with the
National Electrical Code and local building codes.
• Fixture should be mounted to a grounded junction box marked for use in
wet locations.
• Suitable for wall mount or eave mount only. NOT suitable for
ground mount installation.
• Keep away from flammable objects. Do not position fixture
within one inch of any combustible materials.
• The bulb and fixture get extremely hot during use.
Allow fixture to cool completely before attempting to reposition fixture.
• Always replace bulb with the same wattage or lower wattage than
marked. Installing a bulb of a higher wattage could create a fire hazard.
Use of a higher wattage bulb will void the warranty.
• Your light fixture is prewired for easy installation.
A
B
D
C
E
MQF150_W 825-0143.qxd:MQF150 325-1524.qxd 5/15/08 9:20 AM Page 2
Page 3
ENGLISH
3
Call for customer service and/or missing or damaged parts (800-334-6871)
• Disassembly of your fixture will void the warranty
• For supply connections, use wire rated at least 90° C.
• In the event of glass breakage, the entire lens cover must be replaced per UL
requirements. Contact Customer Service for ordering assistance.
Assembling your fixture
Step 1: Loosen the swivel bolt (F) located on the back
of the fixture.
Step 2: Thread the junction box coverplate (E) onto the
mounting arm (D) and secure with the locknut
provided (B) using pliers to tighten.
Note: The locknut should be on the outside of the
junction coverplate.
Wiring your fixture
Note: This fixture should be mounted to a grounded junction box.
Step 1: Turn off the power at the main fuse/breaker box.
Step 2: Connect the white house supply wire to the white fixture wire using
a wire nut.
Note: Wire nuts not supplied. Connect the black house supply wire to the
black fixture wire using a wire nut. Connect the house supply ground wire to
the fixture ground wire using a wire nut.
Step 3: Attach fixture and coverplate to the junction box and fasten securely
with screws, making sure no wires are sticking out from underneath
the coverplate.
Step 4: Apply silicone caulk around the edges of the coverplate to provide a
watertight seal from rain and moisture.
Step 5: Turn on power at main fuse/breaker box.
Note: This fixture can be used with a dimmer switch to adjust light output. To
install a dimmer switch: Use a dimmer switch designed for incandescent lighting that has a rating of 150 watts or higher. Follow the installation instructions
included with the dimmer switch. Keeping the halogen bulb in a dim mode for
an extended period of time may shorten the life of the bulb. To achieve maximum bulb life, occasionally turn the switch to full brightness for a few hours.
Aiming your fixture
For optimum performance halogen fixtures must be mounted so that the bulb
is within 4 degrees of horizontal. Adjust fixture vertically to desired position and
tighten swivel bolt securely.
Servicing your fixture
CAUTION: When replacing bulb in the fixture, always replace with
the same wattage bulb or a lower wattage bulb. DO NOT replace with
a bulb of greater wattage than specified on the fixture. To do so could
create a fire hazard and or shorten the life of the bulb.
Note: If lens is replaced, use only tempered safety glass of equal thickness.
E
B
D
F
MQF150_W 825-0143.qxd:MQF150 325-1524.qxd 5/15/08 9:20 AM Page 3
Page 4
ENGLISH
4
Call for customer service and/or missing or damaged parts (800-334-6871)
How to replace bulb
Step 1: Remove glass lens cover by first removing the two (2) screws in the
back of the housing that hold glass lens cover in place.
Step 2: Using a clean cloth or gloves, remove bulb from package and
protective wrap.
Note: Never touch bulb with bare hands as oil from your skin can cause
premature failure.
Step 3: To install bulb, position bulb into spring loaded socket (indicated on
reflector) and push bulb toward socket until it depresses. Position
other end of bulb into stationary socket (opposite socket). Be sure
each end of bulb is securely positioned against socket.
Step 4: Replace glass lens cover. Insert and tighten the screws that secure
the glass lens cover.
What to do...
Two-year limited warranty
Cooper Lighting, LLC (“the Company”) warrants this product (“the product”)
against defects in material or workmanship for a period of two years from date
of original purchase, and agrees to repair or, at the Company’s option, replace a
defective product without charge for either replacement parts or labor during
such time. This does not include labor to remove or install fixtures.
This warranty is extended only to the original purchaser of the product.
A purchasers receipt or other proof of date of original purchase acceptable to
the Company is required before warranty performance shall be rendered.
This warranty only covers product failure due to defects in materials or
workmanship which occurs in normal use. It does not cover the bulb or failure
of the product caused by accident, misuse, abuse, lack of reasonable care,
alteration, or faulty installation, subjecting the product to any but the specified
electrical service or any other failure not resulting from defects in materials or
workmanship. Damage to the product caused by separately purchased, nonCompany brand replacement bulbs and corrosion or discoloration of brass
components are not covered by this warranty.
There are no express warranties except as described above.
THE COMPANY SHALL NOT BE LIABLE FOR INCIDENTAL, SPECIAL OR
CONSEQUENTIAL DAMAGES RESULTING FROM THE USE OF THE
PRODUCT OR ARISING OUT OF ANY BREACH OF THIS WARRANTY. ALL
IMPLIED WARRANTIES, IF ANY, INCLUDING IMPLIED WARRANTIES OF
MERCHANTABILITY AND FITNESS FOR A PARTICULAR PURPOSE, ARE
LIMITED IN DURATION TO THE DURATION OF THIS EXPRESS WARRANTY.
LIGHTS DO NOT COME ON
Is there power to the fixture?
• Has the house circuit breaker tripped?
• Is the wall switch on?
Is the bulb firmly seated? Is the bulb good?
TURN OFF POWER BEFORE CHECKING.
Is the wire to the unit loose?
MQF150_W 825-0143.qxd:MQF150 325-1524.qxd 5/15/08 9:20 AM Page 4
Page 5
ENGLISH
5
Some states do not allow the exclusion or limitation of incidental or consequential damages, or limitations on how long an implied warranty lasts, so the above
exclusions or limitations may not apply to you.
No other warranty, written or verbal, is authorized by the Company. This warranty gives you specific legal rights, and you may also have other rights which
vary from state to state.
To obtain warranty service, please write to: Cooper Lighting, LLC, 1121 Highway
74 South, Peachtree City, GA 30269. Enclose product model number and
problems you are experiencing, along with your address and telephone number.
You will then be contacted with a solution, or a Return Goods Authorization
number and full instructions for returning the product. All returned products
must be accompanied by a Return Goods Authorization Number issued by the
Company and must be returned freight prepaid. Any product received with-
out a Return Goods Authorization Number from the Company willbe
refused.
Cooper Lighting, LLC is not responsible for merchandise damaged in transit.
Repaired or replaced products shall be subject to the terms of this warranty and
are inspected when packed. Evident or concealed damage that is made in
transit should be reported at once to the carrier making the delivery and a claim
filed with them.
Customer First Center
1121 Highway 74 South, Peachtree City, GA 30269
www.cooperlighting.com
© 2008 Cooper Lighting, LLC
Reproductions of this document without prior written approval of Cooper Lighting, LLC
are strictly prohibited.
Call for customer service and/or missing or damaged parts (800-334-6871)
Printed in China
MQF150_W 825-0143.qxd:MQF150 325-1524.qxd 5/15/08 9:20 AM Page 5
Page 6

Llame para obtener servicio al cliente y/o piezas faltantes o dañadas (800-334-6871)
MQF150, CMQF150 (Bronce)
MQF150W, CMQF150W (Blanco)
ESPAÑOL
6
¡Felicitaciones! Acaba usted de adquirir una lámpara decorativa halógena de
alta intensidad Cooper Lighting, LLC. Este sistema de iluminación de seguridad es una opción decorativa que ofrece además de conveniencia, protección
para su familia y hogar. Esta lámpara es perfecta para iluminar las entradas de
la casa, garages, jardines, patios y áreas de recreo.
Qué se necesita
• Destornillador
• Alicates
• Calafateo de silicona
• (3) Tuerca para alambres
Qué se incluye
• Portalámparas (A)
• Contratuerca (B)
• Foco halógeno T-3 de 150 vatios (instalado) (C)
• Brazo de montaje (D)
Qué se necesita saber
IMPORTANTE: LEA ESTAS IMPORTANTES INSTRUCCIONES
DE SEGURIDAD.
• Sólo para uso en exteriores.
• Incluido en los listados cULus para usar en lugares húmedos.
• Debe conectar el artefacto a una fuente de alimentación de 120 V 60 Hz
(cualquier otra conexión anula la garantía).
• El artefacto debe ser instalado por un electricista competente o por personas
con experiencia en las conexiones de cables de la casa. El sistema eléctrico
y el método de conexión eléctrica del portalámparas debe cumplir con el
Código eléctrico nacional y los códigos locales sobre edificios.
• Debe montar el artefacto sobre una caja de conexiones con toma
de tierra marcada para usar en lugares húmedos.
• Adecuado para instalarse en l pared o en aleros solamente.
No es adecuado para instalarse montándolo en el suelo.
• Manténgalo alejado de objetos inflamables. No coloque el
artefacto en posición dentro de 1 pulgada (2,5 cm) de cualquier
material combustible.
• Las lámparas y el artefacto se calientan extremadamente durante
el uso. Antes de intentar reposicionar el artefacto, deje que se
enfríe totalmente.
A
B
D
C
E
MQF150_W 825-0143.qxd:MQF150 325-1524.qxd 5/15/08 9:20 AM Page 6
Page 7

Llame para obtener servicio al cliente y/o piezas faltantes o dañadas (800-334-6871)
ESPAÑOL
7
• Reemplace siempre la bombilla con una del mismo vatiaje o más bajo que
el marcado. Si instala lámparas de mayor potencia, puede crear riesgo de
incendio. Si usa lámparas de mayor potencia, se anula la garantía.
• La lámpara es percableada para facilitar la instalación.
• Si desarma el artefacto, se anula la garantía.
• Para las conexiones de suministro, use cables clasificados al menos
para 90° C.
• En el caso de que se rompa el cristal, se debe reemplazar toda la cubierta
del vidrio de acuerdo a los requisitos de UL. Póngase en contacto con el ser
vicio de asistencia al cliente si necesita ayuda con un pedido.
Ensamblaje del portalámparas
Paso 1: Suelte la tuerca giratoria (F) localizado
en la parte posterior del luminario.
Paso 2: Enrosque la placa de cierre de la caja de
conexiones (E) en el brazo de montaje (D) y
fíjela con la tuerca incluida (B), usando unos
alicates para apretarla.
Nota: La tuerca debe colocarse en la parte exterior de la placa
de cierre de la caja de conexión.
Cableado del portalámparas
Nota: El portalámparas debe conectarse a una caja de conexiones
con toma a tierra.
Paso 1: Apague la electricidad desde la caja de fusibles /
interruptores automáticos.
Paso 2: Conecte el cable de suministro blanco del edificio al cable blanco
del aparato usando una tuerca para cable.
Nota: No se incluyen las tuercas para cable. Conecte el cable de suministro
negro del edificio al cable negro del aparato usando una tuerca para cable.
Conecte el cable de toma a tierra del edificio al cable de toma a tierra del
aparato usando una tuerca para cable.
Paso 3: Conecte el aparato y la placa de cierre a la caja de conexiones y
fíjela con tornillos. Asegúrese de que no se sale ningún cable por
debajo de la placa de cierre.
Paso 4: Aplique calafateo de silicona alrededor de los bordes de la placa de
cierre para conseguir un sello impermeable a la lluvia
y la humedad.
Paso 5: Encienda la electricidad desde la caja de fusibles /
interruptores automáticos.
Nota: Este portalámparas se puede utilizar con un interruptor de
graduación de luz. Instalación de un interruptor de graduación de luz: Utilice un
interruptor de graduación de luz para iluminación incandescente con |una clasificación de 150 watts o más alta. Siga las instrucciones de instalación que se
incluyen con el interruptor de graduación de luz. Si mantiene el foco halógena
B
D
F
E
MQF150_W 825-0143.qxd:MQF150 325-1524.qxd 5/15/08 9:20 AM Page 7
Page 8

Llame para obtener servicio al cliente y/o piezas faltantes o dañadas (800-334-6871)
ESPAÑOL
8
en la modalidad más tenue durante un período largo de tiempo puede que se
acorte su duración. Para obtener la máxima duración, encienda el foco a su
máxima intensidad durante unas horas. Luminarios de halogeno debe estar
montado con el foco colocado a menos de 4 grados de la horizontal para óptima ejecución. Ajuste el luminario verticalmente a la posición deseada y apriete
la tuerca giratoria.
Orientación del aparato
Luminarios de halogeno debe estar montado con el foco colocado a menos
de 4 grados de la horizontal para óptima ejecución. Ajuste el luminario verticalmente a la posición deseada y apriete la tuerca giratoria.
Mantenimiento del aparato
CUIDADO: Siempre reemplace el foco con el mismo wattage o uno de
menos wattage. No instale el foco en el luminario con un wattage más
grande. Esto puede crear un peligro de fuego o disminuir la vida del foco.
Cómo reemplazar el foco
Paso 1: Retire la cubierta del vidrio quitando los dos (2) tornillos que se
encuentran en la parte posterior del alojamiento y que sujetan
la cubierta.
Paso 2: Usando un paño limpio o guantes, retire el foco de su paquete y del
envoltorio de protección.
Nota: Nunca toque el foco con las manos ya que el aceite de su piel puede
acortar su duración.
Paso 3: Para instalar el foco colóquelo en el casquillo con resorte (indicado
en el reflector) y empuje el foco contra el casquillo hasta que éste
ceda. Coloque el otro extremo de el foco en el casquillo fijo (el del
otro extremo). Asegúrese de que los dos extremos del foco estén
bien asegurados en sus casquillos respectivos.
Paso 4: Vuelva a colocar la cubierta del vidrio. Inserte y apriete los tornillos
que sujetan la cubierta.
Qué hacer si . . .
LA LÁMPARA NO
SE ENCIENDE
¿Está conectado el portalámparas a la fuente de energía?
• ¿Ha saltado uno de los interruptores automáticos de la casa?
• ¿Está encendido el interruptor de la pared?
¿Está el foco bien apretada? ¿Está en buen estado el foco?
APAGUE LA ENERGÍA ANTES DE EMPEZAR A REVISAR EL
PORTALÁMPARAS.
¿Se ha aflojado el cable que va a la unidad?
MQF150_W 825-0143.qxd:MQF150 325-1524.qxd 5/15/08 9:20 AM Page 8
Page 9

Llame para obtener servicio al cliente y/o piezas faltantes o dañadas (800-334-6871)
ESPAÑOL
9
Dos años de garantía limitada
Cooper Lighting, LLC (‘la Compañía’) garantiza este producto (‘el producto’)
contra defectos de material o fabricación, por un período de dos años a partir
de la fecha de la compra original, y acuerda reparar o, a opción de la
Compañía, reemplazar un producto defectuoso sin cargo, ya sea por las piezas
de reemplazo o la mano de obra correspondiente, durante dicho tiempo. Esto
no incluye la mano de obra necesaria para retirar o instalar artefactos.
Esta garantía se extiende únicamente al comprador original del producto.
Antes de efectivizar el cumplimiento de la garantía, se requiere del comprador
un recibo u otra prueba de la fecha de la compra original, que sea aceptable
para la Compañía.T
Esta garantía cubre únicamente las fallas del producto debidas a defectos en
sus materiales o fabricación, que ocurran durante su uso normal. No cubre la
lámpara, ni las fallas del producto causadas por accidente, mal uso, maltrato,
falta de cuidado razonable, alteración o instalación defectuosa, conexión del
producto a un suministro eléctrico distinto del especificado, o cualquier otra falla
que no sea consecuencia de defectos en los materiales o en la fabricación.
Los daños causados al producto por lámparas de repuesto adquiridas
separadamente, que no sean de la marca de la Compañía, y por corrosión o
decoloración de los componentes de latón, no están cubiertos por esta garatía.
No existen otras garantías expresas más que la descripta anteriormente.
LA COMPAÑIA NO SERA RESPONSABLE DE DAÑOS INCIDENTALES,
ESPECIALES O CONSIGUIENTES QUE RESULTEN DEL USO DEL PRODUCTO O SE ORIGINEN EN CUALQUIER INFRACCION A ESTA GARANTIA.
TODA GARANTIA IMPLICITA, SI LA HUBIERA, INCLUYENDO GARANTIAS
IMPLICITAS DE COMERCIABILIDAD Y ADECUACION PARA UN FIN
PARTICULAR, ESTAN LIMITADAS EN DURACION A LA DURACION DE ESTA
GARANTIA EXPRESA. Algunas jurisdicciones o estados no permiten la
exclusión o limitación de daños incidentales o consiguientes, o las limitaciones
sobre la duración de una garantía implícita, de modo que las exclusiones o
limitaciones indicadas pueden no ser aplicables a su caso.
La Compañía no autoriza ninguna otra garantía, ya sea escrita o verbal.
Esta garantía le otorga derechos legales específicos, y es posible que usted
tenga otros derechos, que pueden variar de una jurisdicción o estado, a otro.
Para obtener servicio en garantía escriba a Cooper Lighting, LLC, 1121 Highway
74 South, Peachtree City, GA 30269, Estados Unidos de América. Indique el
número de modelo del producto y los problemas que experimenta, además de
su dirección y número de teléfono. Será contactado entonces para obtener
unasolución, o un número de Autorización de Retorno de Mercancías (‘Return
Goods Authorization’) e instrucciones completas para regresar el producto.
Todos los productos que se regresen deben estar acompañados por el Número
de Autorización de Retorno de Mercancías emitido por la Compañía, y deben
regresarse con el flete previamente pagado. Todo producto que se reciba
sin el Número de Autorización de Retorno de Mercancías emitido por la
Compañía, será rechazado.
MQF150_W 825-0143.qxd:MQF150 325-1524.qxd 5/15/08 9:20 AM Page 9
Page 10

Customer First Center
1121 Highway 74 South, Peachtree City, GA 30269
www.cooperlighting.com
© 2008 Cooper Lighting, LLC
La reproducción de este documento sin la aprobación previa por escrito de
Cooper Lighting, LLC está estrictamente prohibida.
Llame para obtener servicio al cliente y/o piezas faltantes o dañadas (800-334-6871)
Impreso en China
ESPAÑOL
10
Cooper Lighting, LLC no se hace responsable por los daños que puedan
experimentar las mercancías en tránsito. Los productos reparados o reemplazados estarán sujetos a los términos de esta garantía, y se inspeccionan al
embalarlos. Ante cualquier daño evidente u oculto ocurrido en tránsito, debe
informarse enseguida al transportista que realiza la entrega, y presentarle el
correspondiente reclamo.
MQF150_W 825-0143.qxd:MQF150 325-1524.qxd 5/15/08 9:20 AM Page 10
Page 11

Pour le service à la clientèle et ou pour des pièces manquantes ou endommagées, appeler au 800-334-6871
MQF150, CMQF150 (Bronze)
MQF150W, CMQF150W (Blanc)
FRANÇAIS
11
Félicitations! Vous avez acheté un projecteur halogène décoratif Cooper
Lighting, LLC de 150 watt. Ce projecteur de sécurité est une façon décorative
de procurer à votre domicile et à votre famille des années de protection sans
contraintes. Le projecteur est idéal pour l’illumination des panneaux, allées,
pelouses, patios, et aires de récréation.
Ce dont vous avez besoin
• Tournevis
• Pince
• Produit de calfatage en silicone
• (3) Ecrous de grille
Ce qui est compris dans cet ensemble
• Pièce fixe du projecteur (A)
• Contre-écrou (B)
• Ampoule halogène T-3 de
150 W (installée) (C)
• Bras de montage (D)
• Le couvercle de la boîte
de jonction (E)
Ce qu’il faut savoir
VEUILLEZ LIRE CES INSTRUCTIONS DE SÉCURITÉ IMPORTANTES.
• Le luminaire est prévu pour une utilisation à l’extérieur uniquement.
• Le luminaire est listé cULus pour l’utilisation dans des lieux humides.
• L’appareil doit être relié à une source secteur de 120 volts à 60 Hz (toute
autre connexion annule la garantie).
• Le luminaire doit être installé par un électricien qualifié ou par des personnes
expérimentées en câblage ménager. Le système électrique et la méthode du
branchement du dispositif à cette installation électrique doivent respecter les
spécifications du Code électrique national ainsi que les réglementations
locales pour le bâtiment.
• L’appareil doit être monté sur une boîte de jonction reliée à la terre
marquée comme apte à une utilisation en lieux humides.
• Convient uniquement aux installations murales ou sur l’avant toit. Ne convient pas aux installations au sol.
• Gardez les objets inflammables à distance. Ne positionnez pas
le luminaire à moins de 2,5 cm de tous matériaux combustibles.
• L’ampoule et sa fixation deviennent extrêmement chauds pendant le
fonctionnement. Laissez l’ensemble refroidir complètement avant
d’essayer de changer sa position.
A
B
D
C
E
MQF150_W 825-0143.qxd:MQF150 325-1524.qxd 5/15/08 9:20 AM Page 11
Page 12

Pour le service à la clientèle et ou pour des pièces manquantes ou endommagées, appeler au 800-334-6871
FRANÇAIS
12
• Remplacez toujours l’ampoule par un modèle de puissance égale ou
inférieure à celle indiquée. La mise en place d’une ampoule plus forte peut
provoquer un danger d’incendie. L’utilisation d’une ampoule de puissance
plus élevée que la valeur nominale annule la garantie.
• Ne jamais toucher l’ampoule à mains nues pour éviter que de l’huile cor
porelle cause un grillage prématuré. Toujours manier l’ampoule avec des
gants ou une étoffe légère.
• Le démontage de votre dispositif annulera la garantie.
• Pour les branchements d’alimentation, utiliser un câble d’un taux d’au
moins 90° C.
• Dans le cas de la cassure du verre, le couvercle des lentilles doit être
remplacé dans sa totalité selon les normes UL. Contacter le service
après vente pour vous aider dans la commande.
Assemblage de votre dispositif
Étape 1 : Desserrer l’émerillon (F) au dos de l’appareil.
Étape 2 : Fileter le couvercle de la boîte de jonction
(E) sur le manche de montage (D) et
retenir avec le contre-écrou fourni (B)
à l’aide de pinces pour serrer.
Remarque : Le contre-écrou devrait être à l’extérieur
de la couverture de jonction.
Câblage de votre dispositif
Remarque : Le dispositif doit être monté à une boîte de connexion reliée
à la terre.
Étape 1 : Eteigner la principale boîte à fusibles.
Étape 2 : Connecter le fil blanc d’alimentation de maison au fil blanc du
dispositif, en utilisant un écrou métallique.
Remarque : Les écrous métalliques ne sont pas fournis. Connecter le fil
noir d’alimentation de maison au fil noir du dispositif en utilisant un écrou
métallique. Connecter le fil d’alimentation de terre de la maison au fil de terre
du dispositif à l’aide d’un écrou métallique.
Étape 3 : Attacher le dispositif et la couverture à la boîte de jonction et
attacher bien avec des vis, en vous assurant qu’il n’y a pas de fils
dépassant par dessous le couvercle de protection.
Étape 4 : Appliquer le produit de calfatage à la silicone autour des
bordures du couvercle de protection pour créer une protection contre
la pluie et la moisissure.
Étape 5 : Fixez solidement le dispositif et le couvercle de protection à la
boîte de connexion.
Remarque : Ce dispositif peut être utilisé avec un variateur de lumière
pour régler l’éclairage. Pour installer un variateur de lumière : Utilisez un variateur conçu pour un éclairage incandescent d’une valeur nominale égale ou
supérieure à 150 watts. Suivez les instructions d’installation comprises avec le
variateur de lumière. Si vous laissez une ampoule halogène en mode éclairage
B
D
F
E
MQF150_W 825-0143.qxd:MQF150 325-1524.qxd 5/15/08 9:20 AM Page 12
Page 13

Pour le service à la clientèle et ou pour des pièces manquantes ou endommagées, appeler au 800-334-6871
FRANÇAIS
13
faible pendant une période de temps prolongée, ceci peut réduire la durée de
vie de l’ampoule. Pour que l’ampoule dure le plus longtemps possible, allumez
de temps en temps la lumière à pleine puissance pendant quelques heures.
Viser votre dispositif
Pour un rendement optimal, les appareils comportant des lampes halogènes
doivent être installés de telle sorte que l’ampoule se situe en deçà de 4
degrés de l’horizontal. Ajuster l’appareil verticalement à la position désirée et
resserrer l’émerillon.
Réparer votre dispositif
PRÉCAUTION : Lorsque vous remplacez une ampoule, toujours
utiliser une ampoule de même puissance ou de puissance inférieure.
Ne pas utiliser une ampoule d’une puissance plus élevée que celle
recommandée pour l’appareil. Ceci pourrait occasionner un risque
d’incendie et/ou réduire la durée de l’ampoule.
Remarque : Si vous devez remplacer la lentille, n’utiliser que du verre
trempé de sécurité d’égale épaisseur.
Comment remplacer l’ampoule
Étape 1 : Retirer la couverture de lentille en verre en enlevant d’abord les
deux (2) vis au dos du boîtier qui tient la couverture de lentille en
verre en place.
Étape 2 : Enlever l’ampoule du paquet et de l’emballage avec un linge
propre ou des gants.
Remarque : Ne touchez jamais l’ampoule à mains nues car la peau grasse
de vos mains peut causer une défaillance prématurée.
Étape 3 : Pour installer l’ampoule, placez-la dans la douille à ressort
(indiqué sur le diffuseur) vers la douille jusqu’à ce qu’elle soit
enfoncée. Placer l’autre bout de l’ampoule dans la douille fixe
(côté opposé). S’assurer que chaque bout de l’ampoule est bien
placé contre la douille.
Étape 4 : Remettre la couverture de lentille en verre. Insérer et serrer les
vis qui retiennent la couverture de lentille en verre.
Que faire si . . .
LES LUMIERES NE
S’ALLUMENT PAS
Y a-t-il du courant électrique dans le dispositif?
• Est-ce que le disjoncteur du bâtiment s’est déclenché?
• Est-ce que l’interrupteur mural est allumé?
L’ampoule est-elle bien vissée? L’ampoule est-elle en bon état?
ETEIGNER AVANT DE VERIFIER.
Est-ce que le branchement de l’unité est mauvais?
MQF150_W 825-0143.qxd:MQF150 325-1524.qxd 5/15/08 9:20 AM Page 13
Page 14

Pour le service à la clientèle et ou pour des pièces manquantes ou endommagées, appeler au 800-334-6871
FRANÇAIS
14
Garantie limitée de deux ans
Cooper Lighting, LLC (« le constructeur ») garantit cet appareil (« le produit »)
contre des défauts dus aux matériaux ou à la main-d’œuvre pendant une
période de deux ans à partir de la date initiale d’achat, et s’engage à réparer,
ou à son choix, à remplacer un produit défectueux sans frais pour les pièces de
remplacement ou la main d’œuvre pendant cette période. Cela n’inclut pas la
main d’oeuvre relative au démontage ou au remontage de l’installation.
Cette garantie n’est accordée qu’à l’acheteur d’origine du produit. Une facture
ou une autre preuve acceptable de la date de l’achat original doit être fournie
au constructeur avant que le processus de garantie ne soit applicable.
Cette garantie ne couvre qu’une panne du produit résultant d’un défaut en
matériaux ou main-d’œuvre constatée en fonctionnement normal. Elle ne
couvre pas l’ampoule ou la panne du produit provoquée par accident, utilisation
impropre ou abusive, manque du minimum de soins, altération, installation
défectueuse, branchement électrique sur une source ne répondant pas aux
spécifications données, ou toute panne ne découlant pas d’un défaut du aux
matériaux ou à la main d’œuvre. Les dommages au produit résultant
d’ampoules achetées séparément et ne provenant pas du constructeur, et la
corrosion ou la décoloration des composants en laiton, ne sont pas couverts
par cette garantie.
Il n’y a pas de garanties exprimées autres que celle écrite plus haut.
La société ne sera pas tenue pour responsable de tous dommages accessoires, spéciaux ou consécutifs résultant de l’utilisation de ce produit, ou de
toute transgression aux conditions de cette garantie. Toutes les garanties
implicites, s’il y a lieu, y compris celles de valeur marchande ou d’adéquation à
une fonction spécifique, sont limitées en durée à celle de la garantie explicite.
Certains états/provinces ne permettent pas l’exclusion ou la limitation des
dommages accessoires ou consécutifs, ni les limitations de durée concernant
les garanties implicites, de ce fait les exclusions ou limitations listées plus haut
peuvent ne pas s’appliquer dans votre cas.
Aucune autre garantie, qu’elle soit écrite ou verbale, n’est autorisée par le
constructeur. Cette garantie vous octroie des droits légaux spécifiques, et vous
pouvez également posséder d’autres droits qui varient d’un état/province à
l’autre.
Pour faire jouer le service dans le cadre de la garantie, veuillez écrire à
Cooper Lighting, LLC, 1121 Highway 74 South, Peachtree City, GA 30269,
USA. Joignez le numéro de référence du produit et décrivez le problème rencontré, en n’oubliant pas de mentionner votre adresse et votre numéro de téléphone. Vous serez contacté avec une proposition de solution, ou un numéro
d’autorisation de retour de marchandises pour nous renvoyer le produit
défectueux. Tous les produits renvoyés doivent être accompagnés d’un tel
numéro d’autorisation de retour de marchandises fourni par le constructeur, et
l’envoi doit se faire en port payé à l’avance. Tout produit reçu sans ce
numéro d’autorisation de retour du constructeur sera refusé.
MQF150_W 825-0143.qxd:MQF150 325-1524.qxd 5/15/08 9:20 AM Page 14
Page 15

FRANÇAIS
15
Cooper Lighting, LLC n’est pas responsable d’éventuels dommages de marchandises subis durant le transport. Les produits réparés ou de remplacement
entrent dans le cadre de cette garantie et sont inspectés à leur expédition. Tout
dommage visible ou masqué résultant du transport doit être signalé au plus tôt
au transporteur qui a fait la livraison pour remplir une réclamation avec eux.
Pour le service à la clientèle et ou pour des pièces manquantes ou endommagées, appeler au 800-334-6871
MQF150_W 825-0143.qxd:MQF150 325-1524.qxd 5/15/08 9:20 AM Page 15
Page 16

FRANÇAIS
16
Customer First Center
1121 Highway 74 South, Peachtree City, GA 30269
www.cooperlighting.com
© 2008 Cooper Lighting, LLC
La reproduction de ce document est strictement interdite sans l'autorisation
préalable par écrit de Cooper Lighting, LLC.
Pour le service à la clientèle et ou pour des pièces manquantes ou endommagées,
appeler au 800-334-6871
05/08 825-0143
Imprime en Chine
MQF150_W 825-0143.qxd:MQF150 325-1524.qxd 5/15/08 9:20 AM Page 16
 Loading...