

Page 1

Installation Instructions
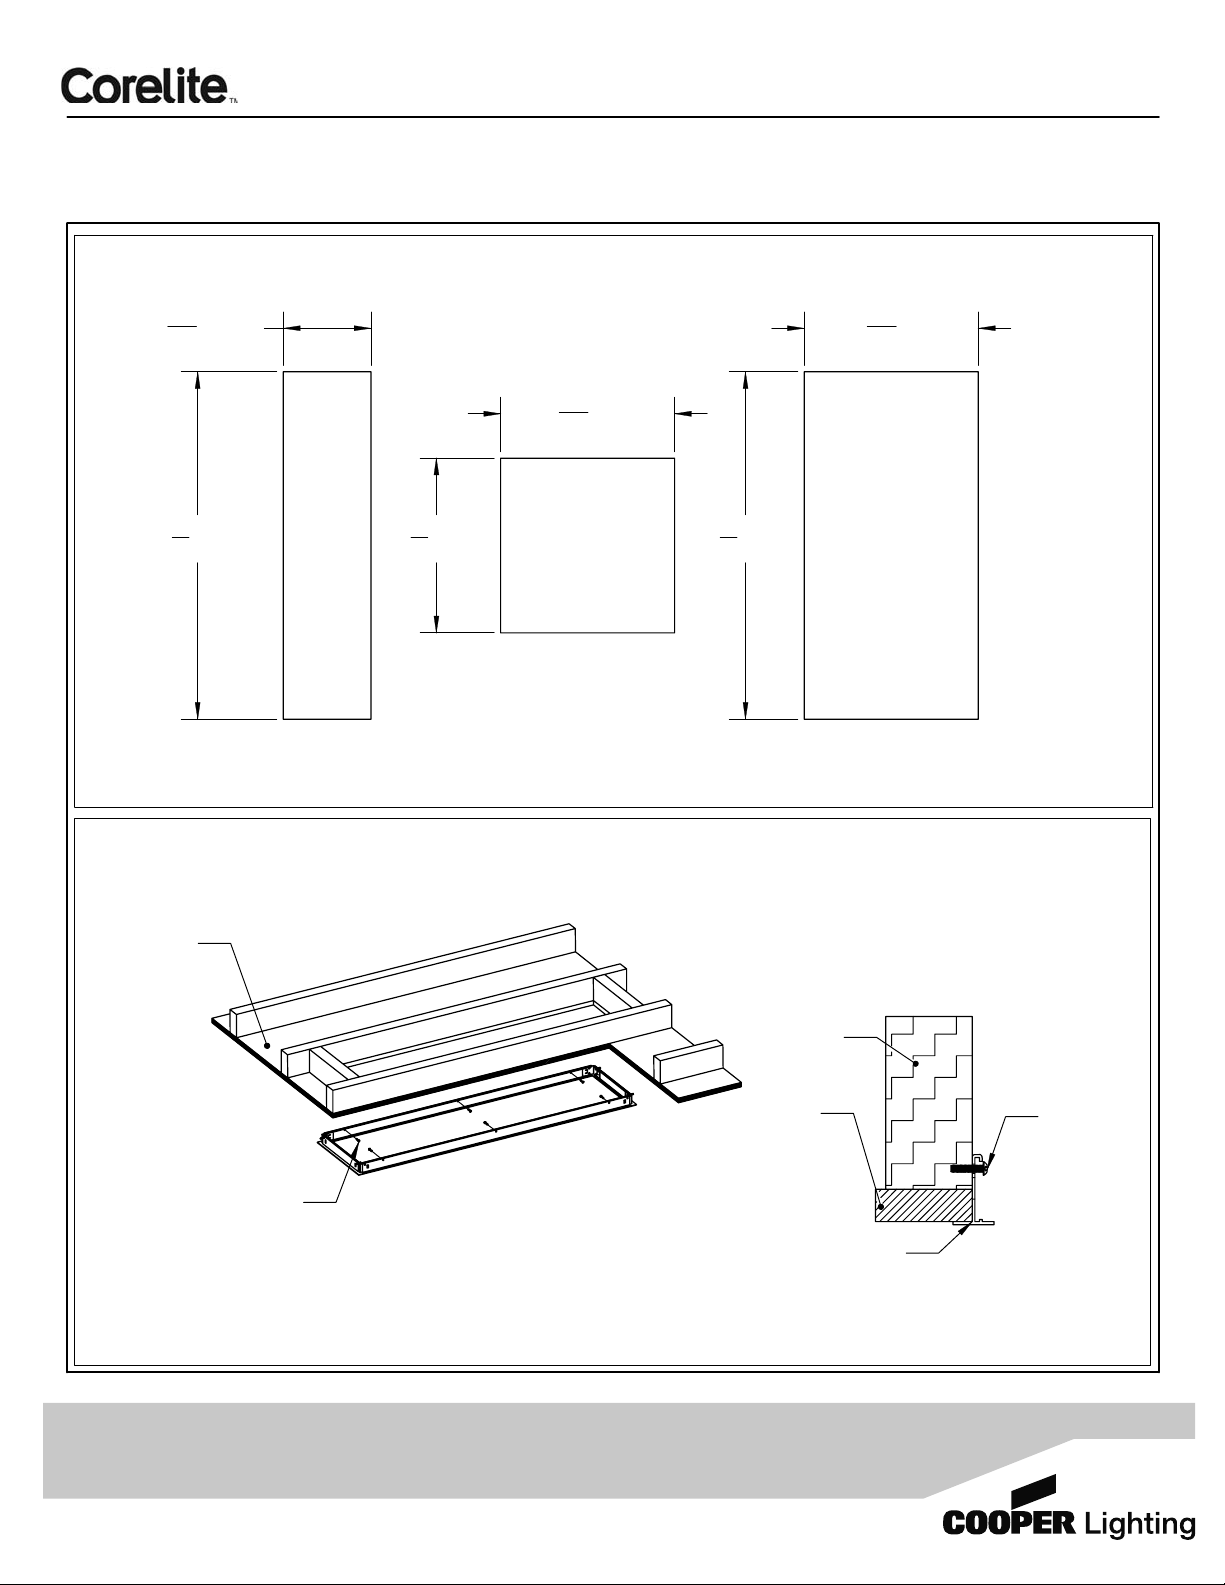
Sheet 1 of 4
R1 Ultra Shallow Recessed
Concealed Ceiling Installation Instructions
1' x 4', 2' x 2', 2' x 4'
Exploded View and Part call-out
Cut-out Dimensions
on Page 2
Corelite Ultra-shallow
recessed fixture
(R1 1' x 4' fixture shown)
Warning
all sources of power are turned off. All work must
meet local/national codes and be performed by a
certified electrician.
vertically.
: Before starting any work ensure that
Do not
mount fixtures
Ceiling bracing
(by others)
Sheet
rock
Metalux DF Series
Frame kit
Fixture Size
1x4
2x2
2x4
Frame Kit Part #
DF-14W-U
DF-22W-U
DF-24W-U
Assembling the Metalux
DF Series Frame Kit
TM
?
4ft. section
1x4 assembly shown.
2x4 and 2x2 assemble
in same manner.
1ft. section
Corner bracket
(x4)
?????????
???????????
1. To assemble Metalux DF series frame kit, firmly insert corner bracket into one side of long sectio n.
Ensure corner bracket it facing the inside to the extrusion sections as shown in detail A. Corne r bracket
will lock into place when fully positioned.
2. Firmly insert short section to other side of co rner bracket. Repeat until ceiling bracket is full y assembled.
Corelite
4675 Holly St
Denver, CO 80216
P: 303-393-1522
www.corelite.com
ADE080932 REV(A)
Cooper Lighting
1121 Highway 74 South
Peachtree City, GA 30269
P: 770-486-4800
www.cooperlighting.com
Page 2
Installation Instructions
Sheet 2 of 4
R1 Ultra Shallow Recessed
Concealed Ceiling Installation Instructions
1' x 4', 2' x 2', 2' x 4'
1' x 4'
3
16
1
4
1/8"+
"
0"-
1/8"+
"
0"-
24
1
"
4
12
48
Hole Cut-out dimensions
2' x 2'
3
16
1/8"+
"
0"-
24
1/8"+
0"-
48
1
4
+1/8"
"
-0"
Warning
all sources of power are turned off. All work must
meet local/national codes and be performed by a
certified electrician.
vertically.
: Before starting any work ensure that
Do not
mount fixtures
2' x 4'
3
+
1/8"
"
24
16
-0"
Cut-outs dimensions are exact. In order to maintai n the precision fit of the Metalux DF series frame kit,
bracing in ceiling
must precisely match
above dimensions. Shims may be used to maintain t olerances.
Securing Metalux DF Series Frame Kit to Structure i n Ceiling
Ceiling
Section view
Bracing
(by others)
Sheet rock
Appropriate fasteners
(x6)
Metalux DF series
frame kit
1. After appropriate cut-out is made in sheet rock , insert Metalux DF series frame kit into cut-out a nd
secure bracket to bracing using appropriate fa steners(by others). Use shims to prevent the brack et
joints from opening.
Screw
(by others)
Corelite
4675 Holly St
Denver, CO 80216
P: 303-393-1522
www.corelite.com
ADE080932 REV(A)
Cooper Lighting
1121 Highway 74 South
Peachtree City, GA 30269
P: 770-486-4800
www.cooperlighting.com
Page 3

Installation Instructions
Sheet 3 of 4
R1 Ultra Shallow Recessed
Concealed Ceiling Installation Instructions
1' x 4', 2' x 2', 2' x 4'
Warning
all sources of power are turned off. All work must
meet local/national codes and be performed by a
certified electrician.
vertically.
: Before starting any work ensure that
Do not
mount fixtures
Wiring the Fixture
Conduit from
power source
(by others*)
Conduit
(by others*)
Metalux DF series
Frame Kit
Ground screw
Electrical cover plate
1. Unless top access is available, fixture must be wired prior to installing fixture into Metalux DF series
frame kit
2. Remove electrical cover plate from fixture and attach conduit(*supplied by others unless pre-ordered with
6' or 12' whip) to cover plate.
3. Loosen ground screw and secure ground wire to cover plate. Attach appropriate wires ensuring all
connections are properly matched.
4. Secure cover plate to fixture.
Corelite R1
Ultra Shallow Fixture
Installing the Pre-wired Fixture
Side View
Bracing
Sheet rock
Acrylic
insert
1. After wiring fixture and checking all connectio ns, carefully rotate fixture and lift into into Met alux DF
series frame kit. Pre-installed acrylic inser ts will rest on inside edge of Metalux DF series fr ame kit.
Corelite
4675 Holly St
Denver, CO 80216
P: 303-393-1522
www.corelite.com
ADE080932 REV(A)
Cooper Lighting
1121 Highway 74 South
Peachtree City, GA 30269
P: 770-486-4800
www.cooperlighting.com
Fixture
assembly
Page 4

Installation Instructions
Sheet 4 of 4
R1 Ultra Shallow Recessed
Concealed Ceiling Installation Instructions
1' x 4', 2' x 2', 2' x 4'
Lamps
Lens
Installing Lamps into Fixture
Warning
all sources of power are turned off. All work must
meet local/national codes and be performed by a
certified electrician.
vertically.
: Before starting any work ensure that
Do not
mount fixtures
Metalux DF series
frame kit
Ceiling removed
for clarity
1.
Gently remove lens from fixture and store in a sa fe place.
2.
Slide lamp contacts into sockets at both ends of fixture and rotate lamp to secure in socket.
3.
Snap lens back into place around plastic end caps .
Slide lamp into socket
and rotate
Corelite
4675 Holly St
Denver, CO 80216
P: 303-393-1522
www.corelite.com
ADE080932 REV(A)
Cooper Lighting
1121 Highway 74 South
Peachtree City, GA 30269
P: 770-486-4800
www.cooperlighting.com
 Loading...