

Page 1
DPG 1600 DIGITAL PRESSURE GAUGE USER’S GUIDE
1.0 Specifications
Electrical Specifications
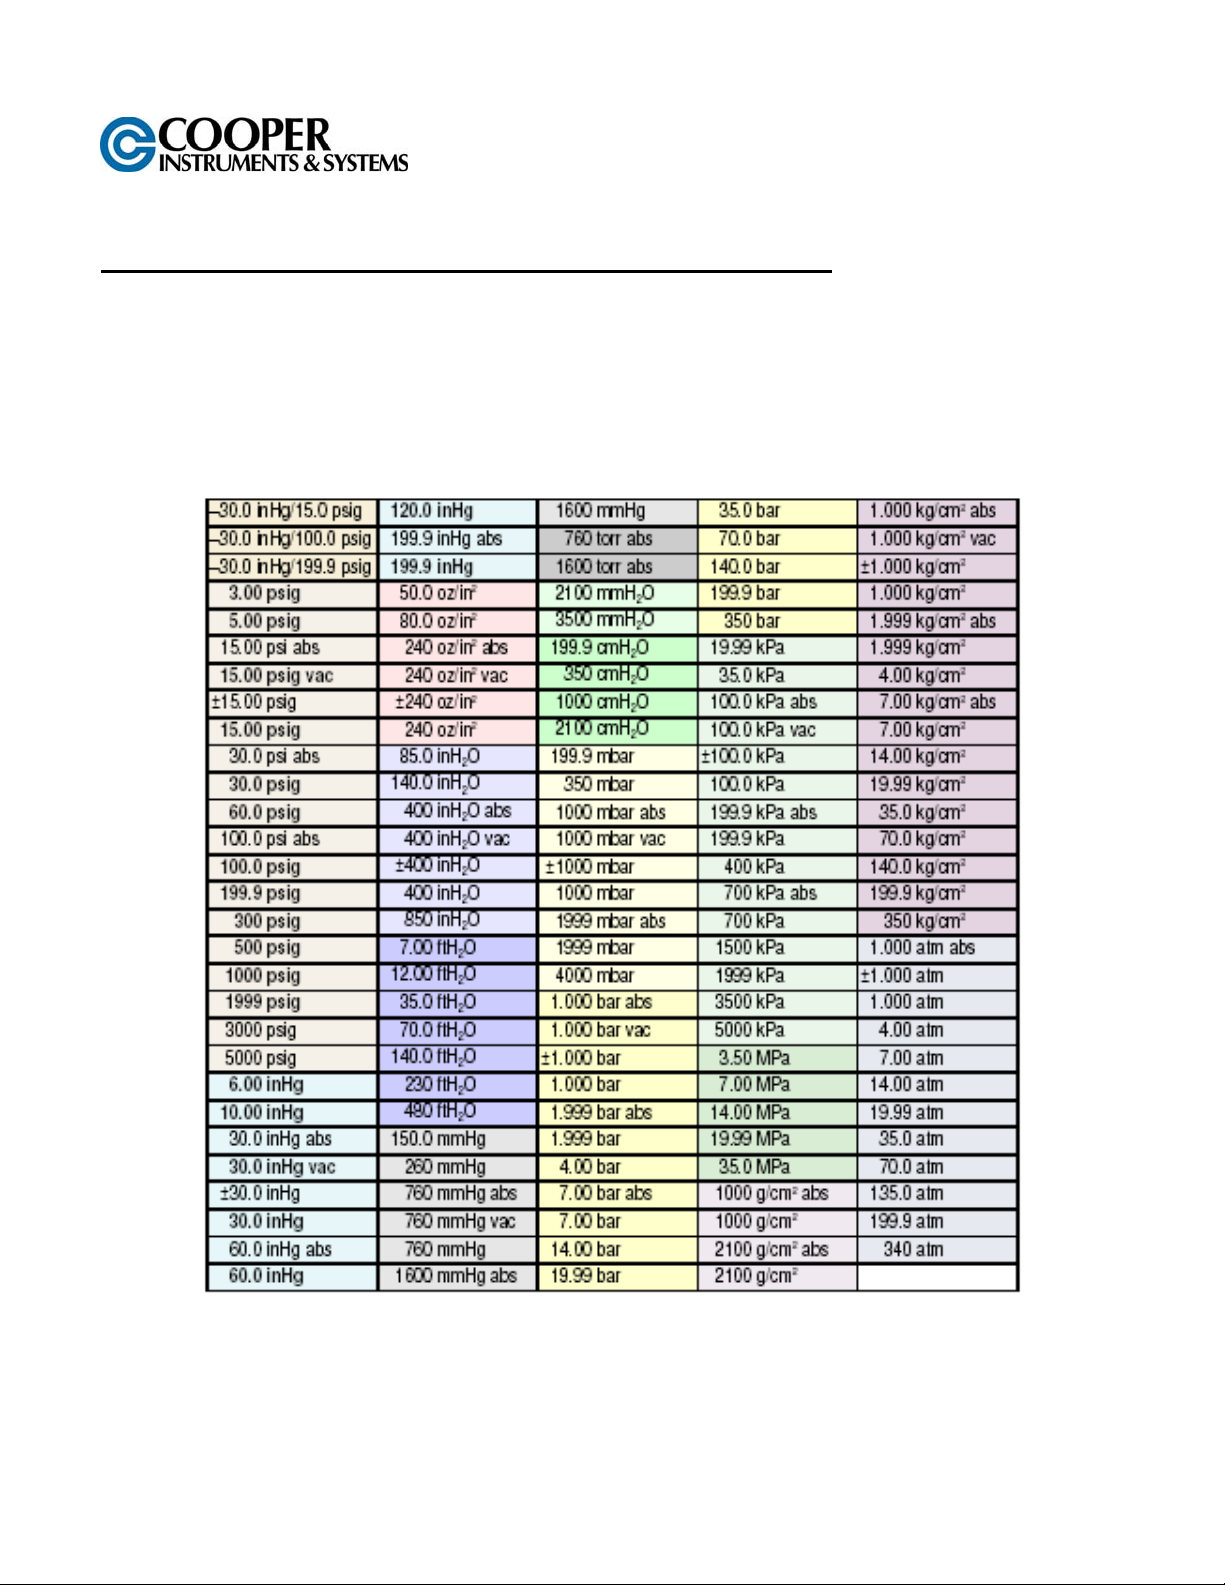
Ranges and Resolution
Bold: standard ranges, price adder for all others
abs: Absolute reference (atmospheric pressure to zero at full vacuum)
vac: Vacuum gauge, minus sign not used unless specified
Resolution is fixed as indicated in table below, contact Cooper for engineering units not listed.
Accuracy (linearity, hysteresis, repeatability)
Standard: ±0.25% of full scale ±1 least significant digit
Optional: -HA ±0.1% FS ±1LSD (most ranges)
-4A ±0.4% FS ±1LSD
CD Factory calibration data
NC NIST traceable test report and calibration data
CF 137 1 11/04
Page 2

Display (update rate, type, size)
3 readings per second nominal display update rate
41/2 digit LCD, 0.5" digit height, lower display for engineering units
BBL models: Red LED backlight
Controls & Functions
Front pushbutton turns gauge on or off and cycles through functions
BBL: Press pushbutton to activate 1 minute backlighting when gauge is on
Function Pushbutton Prompt (Release Button) Result
On Press 1 sec Gauge Range/Display Test Actual Pressure
One Touch Zero Press/hold oooo Zeroed Actual Pressure
Hi Reading Press/hold HI HI & max. reading
Lo Reading Press/hold Lo Lo & min. reading
Exit Hi/Lo Press/hold AP Actual Pressure
Clear Hi/Lo Press/hold
Clear Zero, Off Press/hold
HI / LO / AP " clr
HI / LO / AP "
clr "OFF
Actual Pressure
Clear Zero, Gauge Off
Calibration
Internal calibration pushbuttons, non-interactive zero, span, & linearity, ±10% range
Auto Shutoff
5 minutes standard (-5), factory settable to on/off (-ON) or specified custom time
Batteries, Battery Life, Low Battery Indication
B: 2 AA alkaline, approx. 2000 hours
BBL: 2 AA alkaline, approx. 150 to 1500 hrs depending on backlight usage
Low battery symbol on display when batteries must be replaced
Mechanical Specifications
Size
DPG 1600: 3.38" W x 2.88" H x 1.65" D housing
Add approximately 0.75" to height for pressure fitting
Weight (approximate)
Gauge: 9 ounces
Shipping weight: 1 pound
Material & Color
DPG 1600: Extruded aluminum case, light gray epoxy powder coated, black ABS/polycarbonate bez el (aluminum bezel
optional), front and rear gaskets, black/gold label
DPG 1600N: Light gray ABS/polycarbonate NEMA 4X case, rear gasket, black/gold label
Pressure/Vacuum Connection Size, Material, Media Compatibility
1/4" NPT male, all wetted parts are 316 SS, compatible with most liquids and gases
Overpressure
3000 psig range and metric equivalents: 5000 psig
5000 psig range and metric equivalents: 7500 psig
All others: 2 x sensor pressure
112.5% out-of-range display: i – – – or i –.–.–.– depending on model
Burst Pressure
4 times sensor pressure rating, or 10,000 psi, whichever is less
2.0 Installation and Precautions
• Install or remove gauge using wrench on hex fitting only. Do not attempt to tighten by turning housing or any
other part of the gauge.
CF 137 2 11/04
Page 3

• Use fittings appropriate for the pressure range of the gauge.
• Do not apply vacuum to gauges not designed for vacuum operation.
• Due to the hardness of 316 stainless steel, it is recommended that a thread sealant be used to ensure leak-
free operation.
NEVER insert objects into the gauge port or blow out with compressed air. Permanent damage not covered by
warranty will result to the sensor.
Power-Up
1. Press and hold the pushbutton for approximately 1 second.
2. The full-scale range is indicated and the display segments are tested.
3. The actual pressure is displayed.
Power-Up With One-Touch Zero (Gauge reference models only)
1. Be sure the gauge port is exposed to normal atmospheric pressure and no pressure is applied. The zeroing
function is only activated at each power-up and the stored zero correction is erased when the gauge is shut off.
2. Press and hold the pushbutton.
3. The full-scale range is indicated and the display segments are tested.
4. Continue to press the pushbutton until oooo is displayed. This indicates that the gauge has been zeroed.
5. The actual pressure is displayed.
Attempting to zero the gauge with pressure greater than approximately 3% of full-scale applied will result in an error
condition, and the display will alternately indicate E r r 0 and the actual measured pressure. The gauge must be
powered down to reset the error condition.
Absolute reference gauges do not use the zero feature since they read atmospheric pressure under normal
conditions.
Normal Operation
Following the start-up initialization, the display indicates the pressure reading updated approxi mately 3 times per
second. The auto shutoff timer starts when the gauge is powered up or whenever the button is pushed, unle ss the
gauge was ordered without an auto shutoff time (-ON option).
If excessive vacuum is applied to a pressure-only gauge, the display will indicate – E r r until the vacuum is
released. Applying vacuum to a gauge designed for pressure may damage the pressure sensor. If excessive
pressure is applied (112.5% over range), an out-of-range indication of | - - - or | -.-.-.- will be displayed depending
on model.
Minimum and Maximum Readings
Minimum and maximum readings are continuously stored and updated whenever gauge is on. The stored readings
can be manually cleared if desired. The HI and LO memory is also cleared whenever the gauge is off.
Press and hold the pushbutton for about 1 second until HI is displayed. The maximum sto red value is displayed.
After HI is displayed, press and hold the pushbutton again for about 1 second until LO is displayed. The minimum
stored value is displayed.
After LO is displayed, press and hold the pushbutton again for about 1 second until AP (Applied Pressure) is
displayed. The HI and LO memory is not erased and the gauge returns to normal operation with the display
indicating the current pressure.
Press and continue to hold the pushbutton until the display indicates clr HI/LO (about 3 seconds total) and then
release the pushbutton. Both HI and LO values are cleared and the gauge returns to the normal mode and displays
the current pressure.
CF 137 3 11/04
Page 4

Display Backlighting (BBL models only)
Display backlighting can be turned on by momentarily pressing the button whenever the gauge is on. The
backlighting will turn on for one minute and then automatically shut off. This also restarts the auto shutoff timer.
The display backlighting will not be apparent under bright lighting conditions.
Shut-Down
To shut off the gauge manually at any time, press and hold the pushbutton until the display indicates OFF (about 5
seconds) and then release.
For gauges with auto shutoff, the display indicates OFF five seconds prior to auto shutoff. The pushbutton can be
pressed to keep the gauge on. The auto shutoff and backlight (if equipped) timers are reset whenever the
pushbutton is pressed and released.
If the gauge was ordered without auto shutoff (-ON option) it will stay on until manually shut off or until the batteries
are depleted. Turn gauge off when not in use to conserve battery life.
3.0 Calibration
The DPG 1600 gauges use internal controls for calibration. Calibration procedure is available from Cooper
Instruments & Systems. Gauges can be recalibrated by any metrology lab with pressure calibration equipment at
least 4 times more accurate than the gauge. Gauges may also be returned for factory recalibration and
refurbishment. NIST traceability is available.
Battery Replacement
A low battery indication will be shown in the upper left-hand corner of the display when the battery voltage falls
sufficiently. The battery should be replaced soon after the LOBAT indicator comes on or unreliable readings may
result.
1. Remove the 6 Phillips head screws on the back of the unit.
2. Remove batteries by lifting up the positive end of the battery (opposite the spring) taking care not to bend the
battery holder spring.
3. Discard old batteries properly, DO NOT discard into fire, sources of extreme heat, or in any other hazardous
manner.
4. Always replace both batteries at the same time with high quality alkaline batteries.
5. Install batteries with correct orientation. The negative (flat) end of each battery should be inserted first facing
the battery holder spring.
6. Replace the back cover, including the rubber sealing gasket.
Battery Powered, Battery Powered Backlit Display
CF 137 4 11/04
Page 5

NEMA 4X, Battery Powered, NEMA 4X, Battery Powered Backlit Display
4.0 Warranty Repair Policy
Limited Warranty On Products
Any of our products which, normal operating conditions, proves defective in material or in workmanship within one
year from the date of shipment by Cooper, will be repaired or replaced free of charge provided that you obtain a
return material authorization from Cooper and send the defective product, transportation charges prepaid with
notice of the defect, and establish that the product has been properly installed, maintained, and operated within the
limits of rated and normal usage. Replacement or required product will be shipped F.O.B. our plant. The terms of
this warranty do not extend to any product or part thereof which, under normal usage, has an inherently shorter
useful life than one year. The replacement warranty detailed here is the buyer’s exclusive remedy, and will satisfy
all obligations of Cooper whether based on contract, negligence, or otherwise. Cooper is not responsible for any
incidental or consequential loss or damage which might result from a failure of any and all other warranties, express
or implied, including implied warranty of merchantability or fitness for particular purpose. Any unauthorized
disassembly or attempt to repair voids this warranty.
Obtaining Service Under Warranty
Advance authorization is required prior to the return to Cooper. Before returning the item, contact the Repair
Department c/o Cooper Instruments at (540) 349-4746 for a Return Material Authorization number. Shipment to
Cooper shall be at buyer’s expense and repaired or replacement items will be shipped F.O.B. our plant in
Warrenton, Virginia. Non-verified problems or defects may be subject to a $100 evaluation charge. Please return
the original calibration data with the unit.
Repair Warranty
All repairs of Cooper products are warranted for a period of 90 days from date of shipment. This warranty applies
only to those items that were found defective and repaired, it does not apply to products in which no defect was
found and returned as is or merely recalibrated. Out of warranty products may be capable of being returned to the
exact original specifications or dimensions.
* Technical description of the defect: In order to properly repair a product, it is absolutely necessary for Cooper to
receive information specifying the reason the product is being returned. Specific test data, written observations on
the failure and the specific corrective action you require are needed.
CF 137 5 11/04
 Loading...