

Cooper Atkins NotifEye User Manual

N TIF
EYE
POWERED BY TEMPTRAK
TM
NotifEye™ Wireless Sensors
and USB Gateway
Manual
Inside the Box
• (4) Temperature Sensors #15100
• (1) USB Gateway #15500
• (4) CR2032 Coin Cell Batteries
• (4) Loop & Lock Tape Strips
• (8) Mounting Screws
• Reference Guide
1
2
3
4
5
Contents
Creating An Account
• Creating An Account..........................................................2
Setting Up the Hardware
• Minimum System Requirements........................................3
• Downloading the USB Gateway Driver..............................4
• Downloading the USB Gateway Application...................4-5
• Updating the Device Driver.............................................5-6
• Using the USB Gateway Application..................................7
• Inserting Batteries..............................................................8
Setting Up the Online System
• Logging into the System ...................................................8
• Adding Sensors, Gateways & Networks.........................8-9
• Overview of the NotifEye System................................10-11
• Conguring Sensors................................................... 11-13
• Setting Notications....................................................13-15
• My Account Settings.........................................................15
Mounting Sensors
• Mounting Sensors............................................................16
Advanced
• Adding, Editing and Setting User Permissions...........16-17
• Sensor Maps....................................................................18
• Sensor History & Chart Views....................................18-19
• Viewing & Exporting Sensor Data...............................19-20
• System Reports................................................................20
User Information.....................................................21
Warranty Information..........................................21
instructional video available
Clicking on the video icon associated with a
topic will open an instructional video in a
browser window
This is an interactive pdf.
Go to specic points in the manual by:
• using the bookmarks link
in the left margin
• clicking on the sub-headings in the Contents pane.
2
Creating An Account
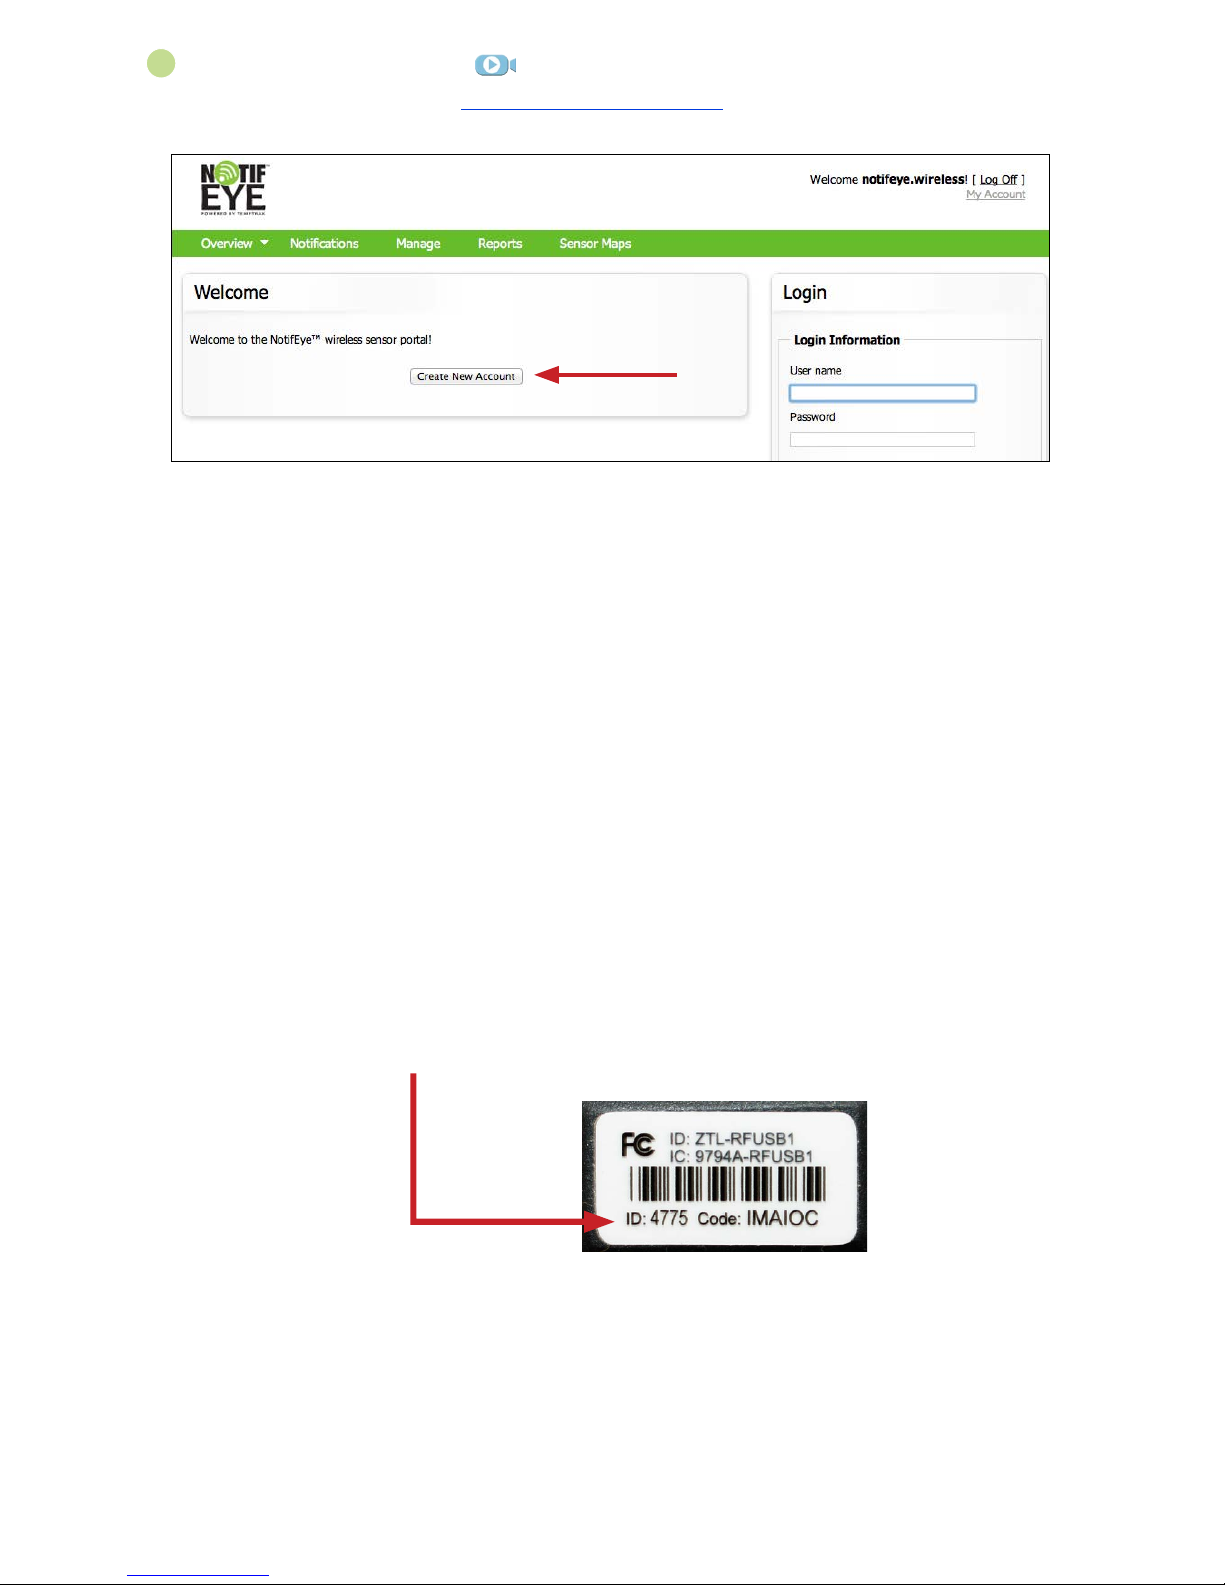
1. In a web browser, navigate to www.notifeyewireless.com
2. Click the “Create New Account” button. Please ensure all elds are completed.
3. Account Information section.
Key Fields:
• Time Zone - all data is recorded using Universal Coordinated Time (UTC) also known as
Greenwich Mean Time (GMT). To select a time zone, locate the city closest to you within your
time zone. This can be updated later if needed.
4. Primary Contact Information section.
Key Fields:
• User Name - this is automatically generated during the initial setup. It consists of the rst and
last name that is entered into the name elds separated by a period. This username will be set
as an administrator.
• Cell Phone and Cell Carrier - these are optional. Enter information if you would like to receive
text messages (SMS Notications).
• Password - must be at least 8 characters
Note: We recommend writing down your username and password on the reference guide that shipped with your kit
and keeping it in a secure location.
5. Sensor Network section.
Key Fields:
• Network Name - enter a name for your rst network (e.g., Main Kitchen).
• Gateway ID - numerical serial number located on the bottom of your gateway.
• Security Code - 6-digit code on gateway label, next to the serial number.
Note: Additional sensors, gateways and networks can be added to your account (see page 8).
6. Once all information has been entered, click the “Create Account” button.
Once you have successfully created an account, you will get a “congratulations” screen. Click on the
“Logon Now” button at the bottom of the screen to return to the NotifEye homepage.
At this point, we recommend you set up your hardware.
1
3
Setting Up the Hardware
Before inserting the USB gateway into your computer you will need to have created your NotifEye
account (see page 2) and assigned wireless sensors to your network (see page 8). Follow the steps
below to download and install the USB drivers and USB Gateway Application.
Minimum System Requirements
• An Available USB Port
• Windows 8,7 and Vista
• 10 MB Free Disk Space
• ASP.NET 3.5
Not Windows XP or MAC Compatible
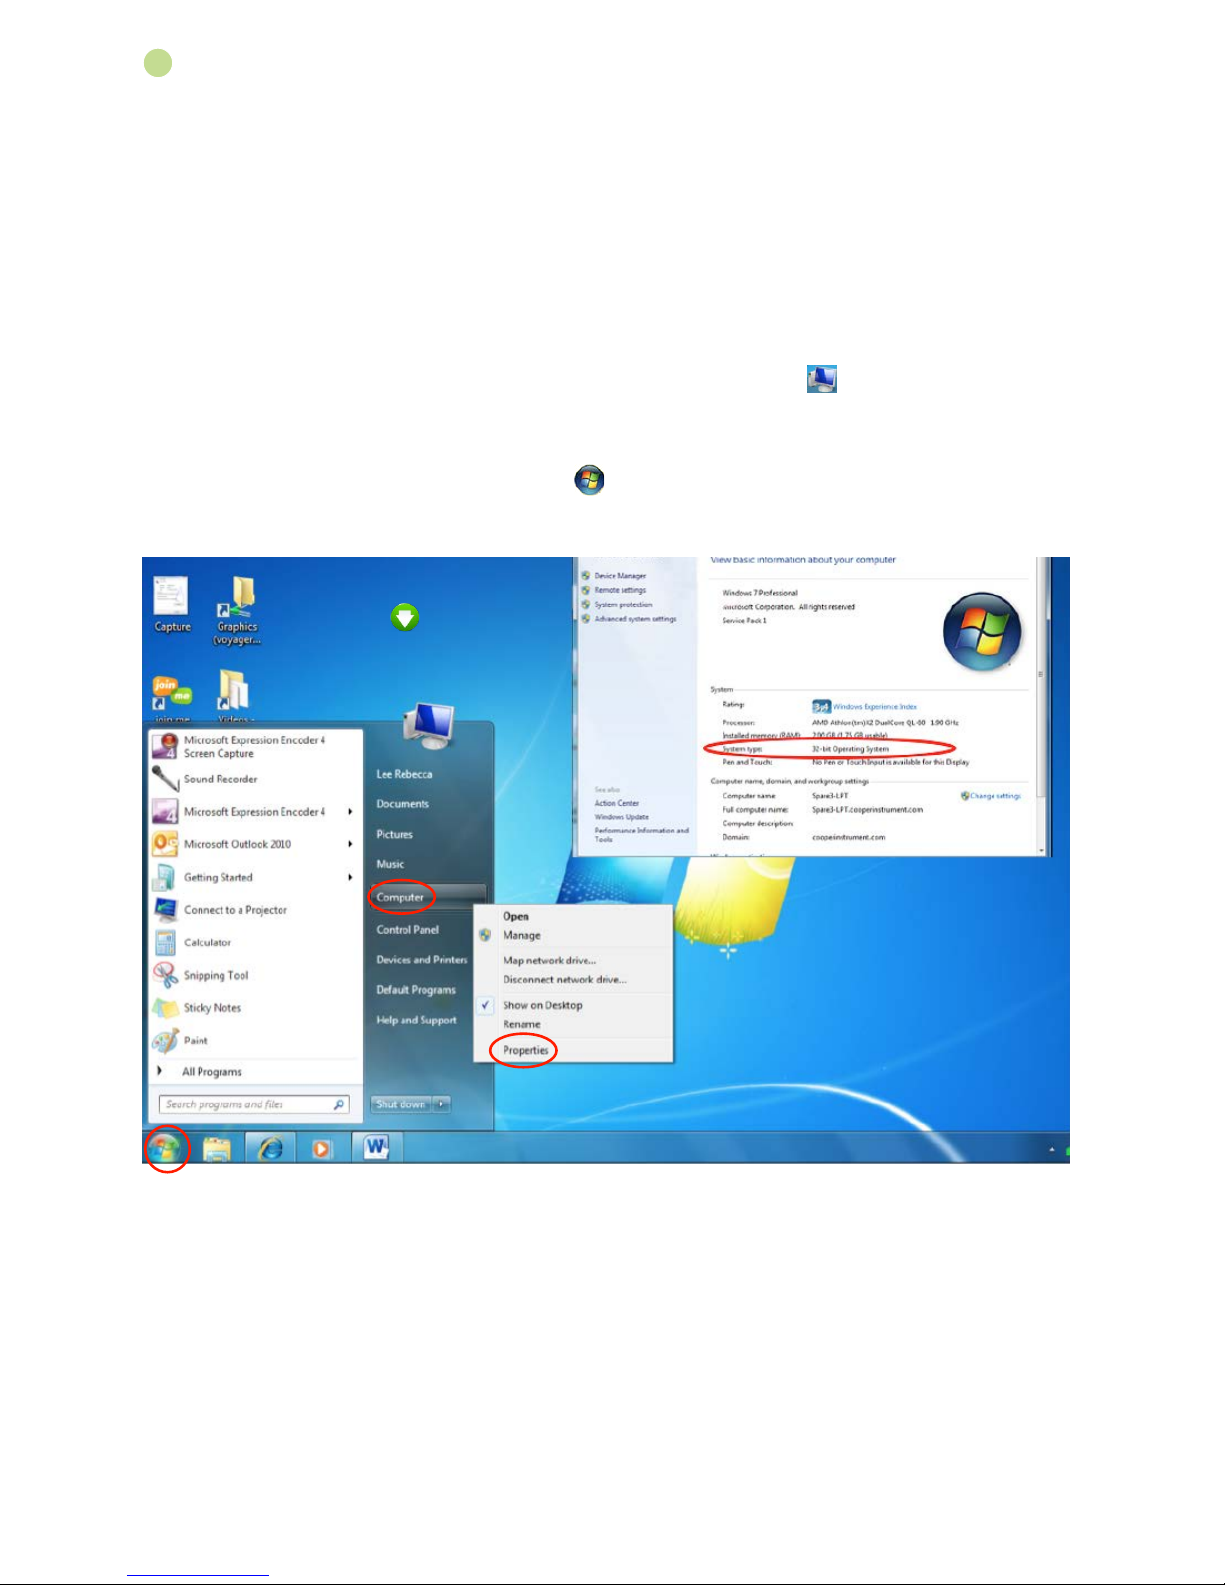
Before installing the driver you will need to know which operating system type you have (32-bit or 64bit). To conrm what operating system you are running, right-click on the icon from your computer’s
desktop and click on “Properties”.
If you do not see this icon on your desktop the same information can be accessed as shown below.
Navigate to and click on the “Start” menu” icon
at the bottom left of the screen. Then select and
right-click on the “Computer” tab. Click on “Properties”. Your system information will appear in the next
dialog window.
2
4
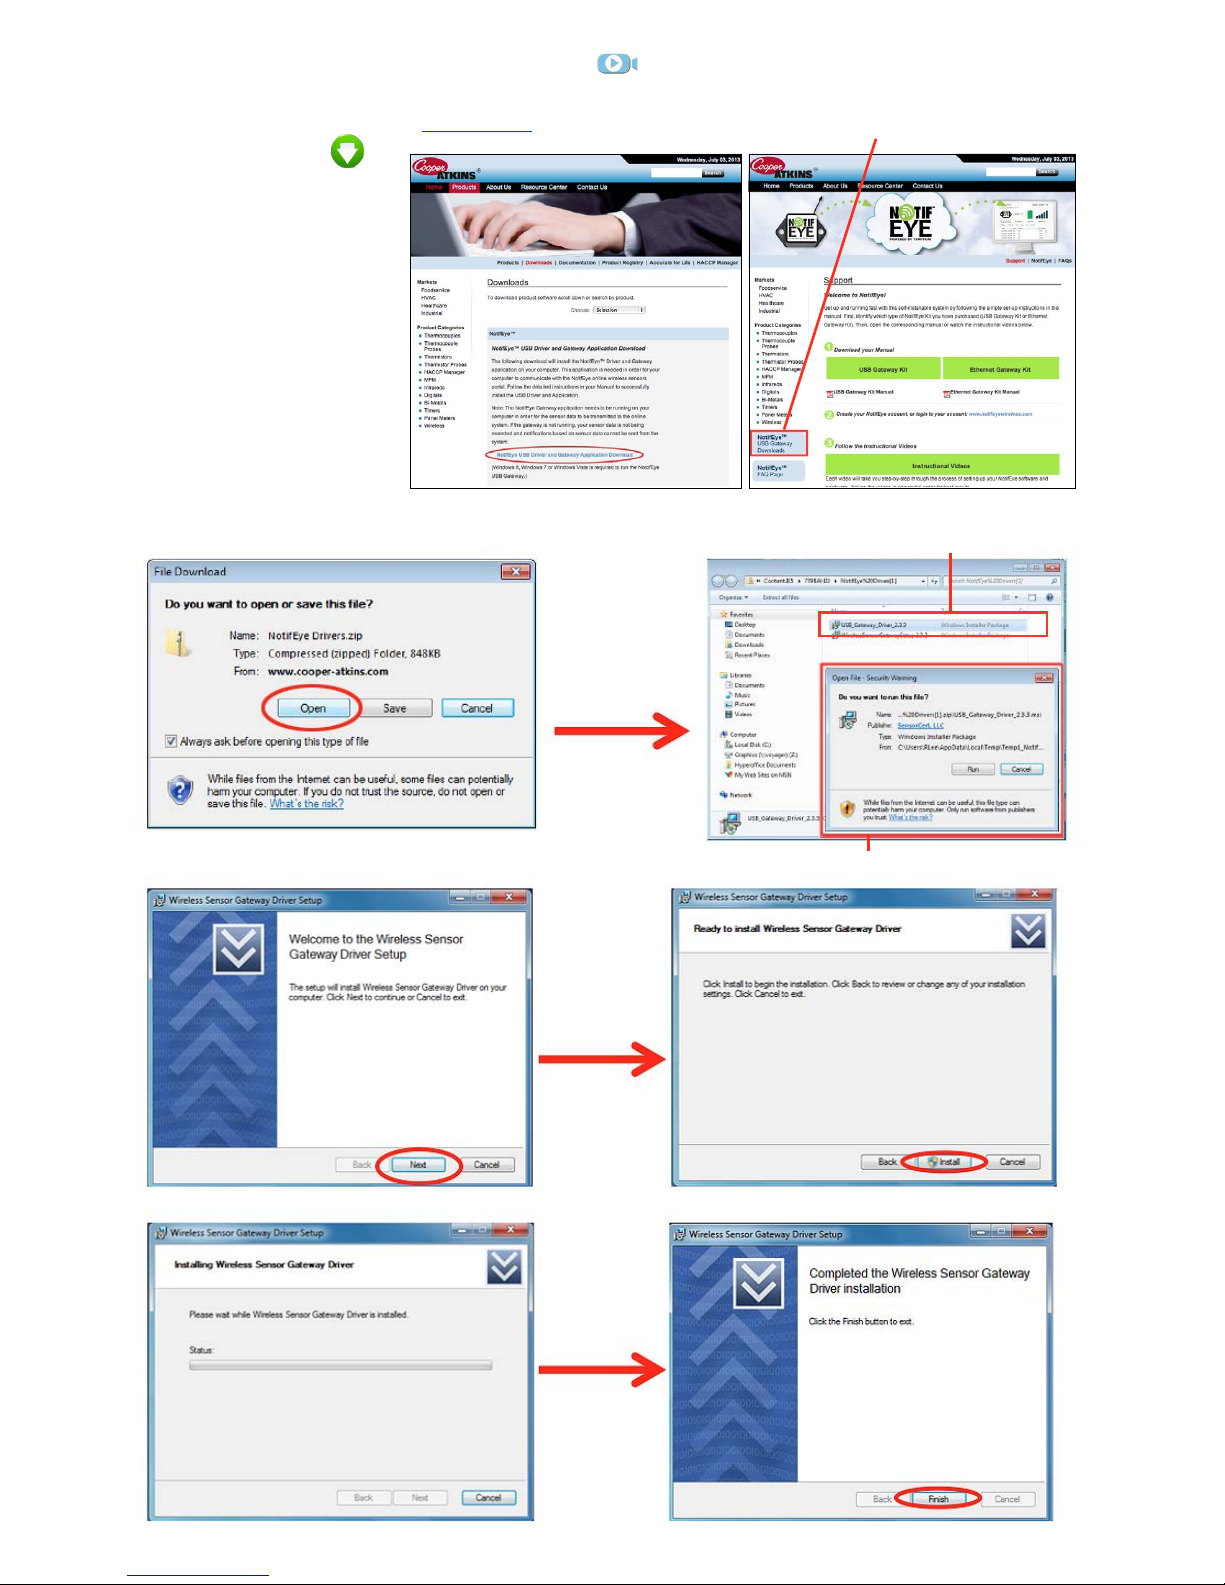
1. Downloading the USB Gateway Driver
The USB Driver allows your computer to recognize and use the USB gateway. Download the USB
driver from the Cooper-Atkins Downloads page (also accessible from the Notifeye support page) or
by clicking this icon
.
On the downloads page,
double-click on the
download link and follow
the system prompts below
to install the drivers.
When the driver is done
installing, you will see a
success screen.
Click “Finish” to exit the
installation program.
3. When the dialog box opens, click “Run”
Downloads Page Support Page
1. Click “Open” to view the drivers.
4. Click “Next”
2. Double-click the USB Gateway Driver.
5. Click “Install”
6. Click “Finish”

5
2. Downloading the USB Gateway Application
The NotifEye Gateway Application allows your hardware to communicate with the NotifEye online
monitoring system. Download the application from the Cooper-Atkins Downloads page (see page 4)
or by clicking this icon
.
To install the Gateway Application, click on the NotifEye Application Installer to launch the web installer
download. Follow the on-screen prompts to complete the installation. When the software is done
installing, you will see a success screen. Click “Finish” to exit the installation program.
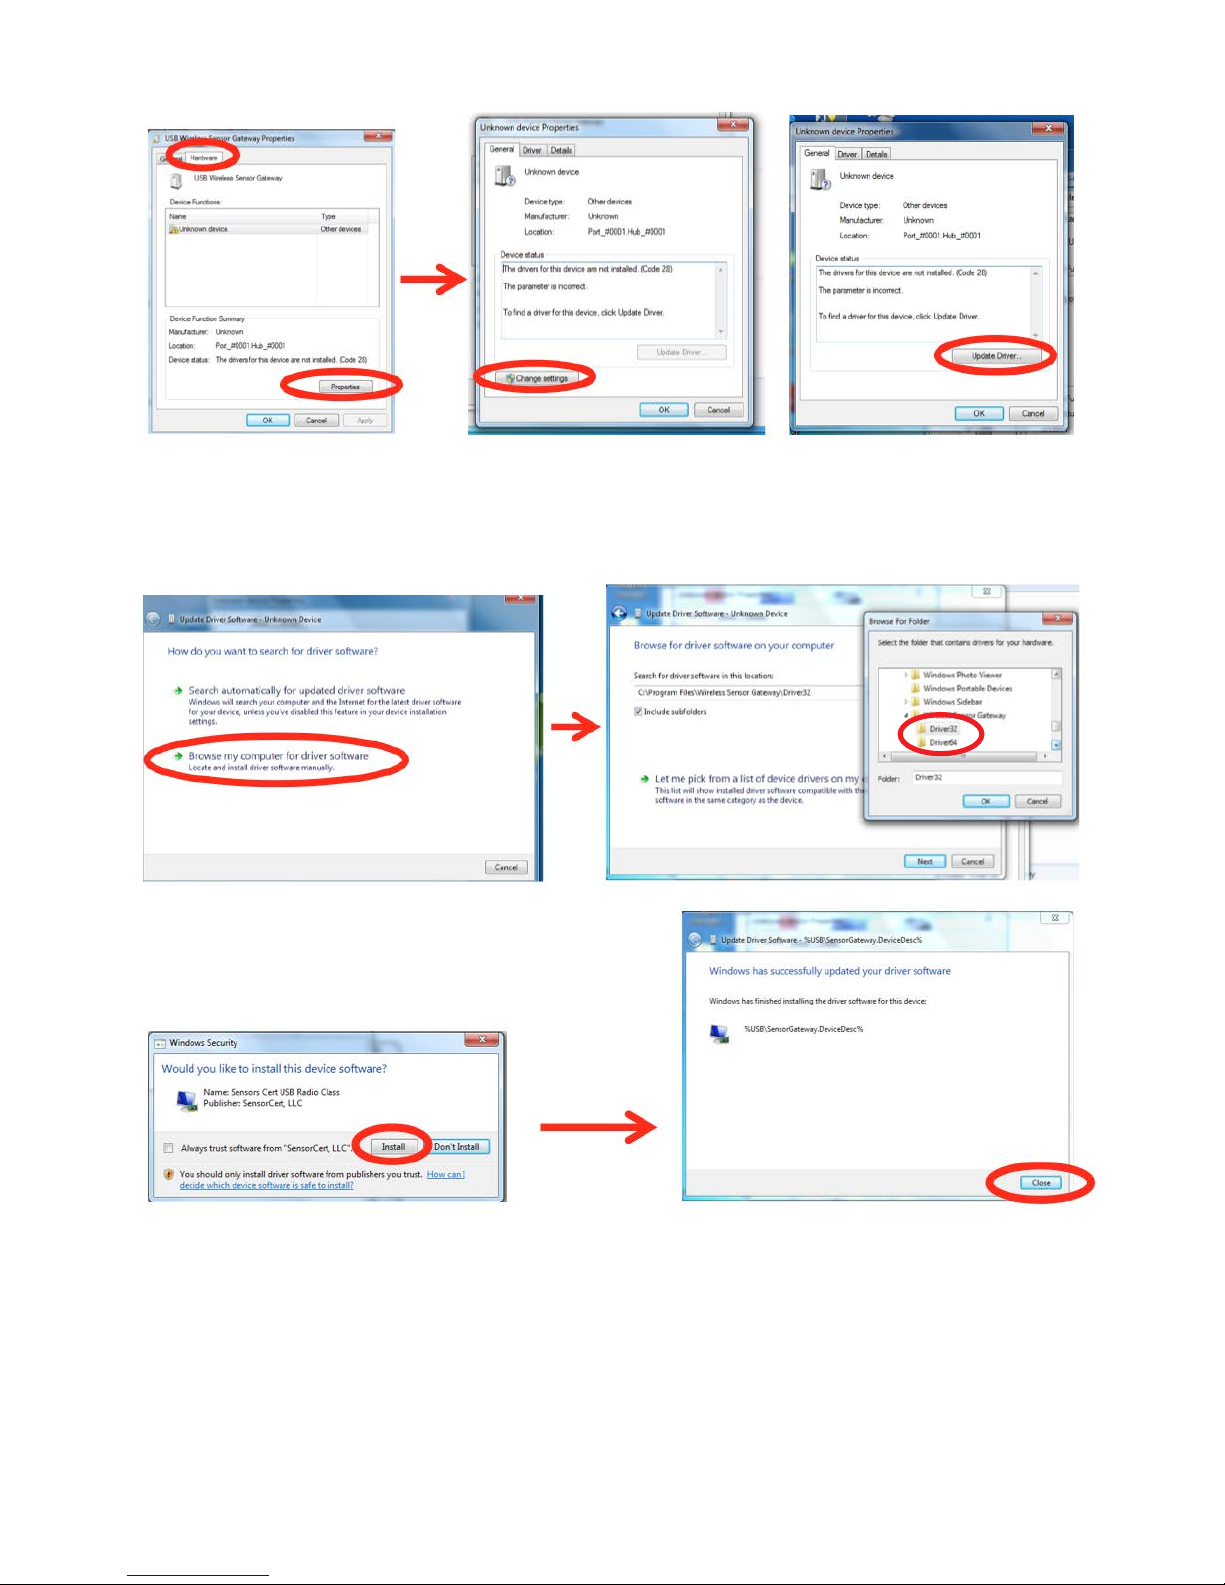
3. Updating the Device Driver
You will then need to manually update your USB drivers in order for your computer to recognize the
device. First, insert your USB into your PC, then open your “Device Manager” (Start Menu > Devices
and Printers). Double-click on the USB Wireless Sensor Gateway.
2. When the dialog box opens, click “Run”
4. Click “Next” 5. Click “Install”
3. Click “Next”1. Highlight and double-click the USB Gateway Driver.
6
From the “Hardware” tab, click on “Properties”. Then select “Change Settings”. From here, click on
“Update Driver”.
Select “Browse my computer for driver software” and then click on the “Browse” button.
Browse to: C:\ProgramFiles/Wireless Sensor Gateway. From here, you will need to select Driver32 if
you have a 32-bit operating system or Driver64 for a 64-bit operating system. Once you select your
driver, click “OK”.
Once you select your driver, click “Install”, then “Close”.
7
4. Using the USB Gateway Application
Do not select Start Service in the Gateway Application until you’ve updated your driver in the previous step!
To open your gateway application, either double-click on the Wireless Sensor Gateway icon
that was automatically created on your desktop after installation or, select the program from the
Windows “Start Menu,” (All Programs > Wireless Sensor Gateway).
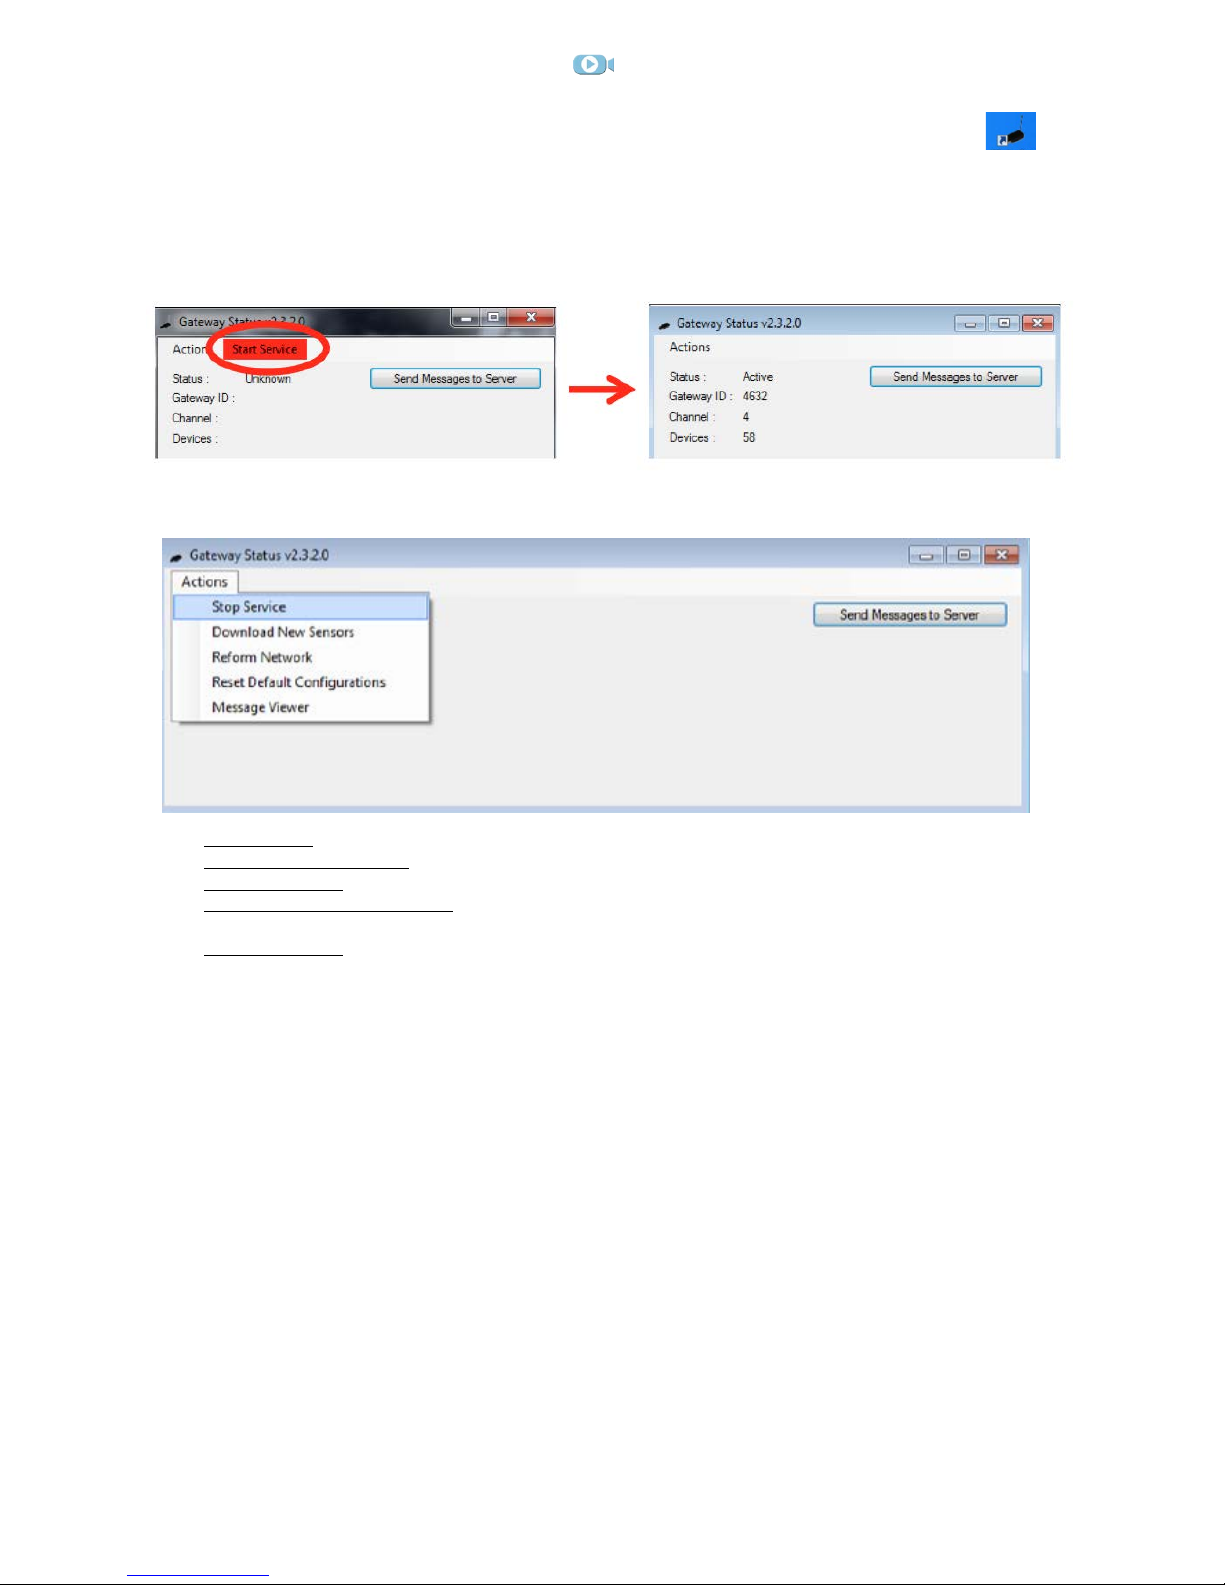
Once the gateway application is open, select “Start Service”. You will see the status change from
“Unknown” to “Active” and your system information will populate in the underlying elds.
When you click-on “Actions”, the following dropdown menu becomes visible.
• Stop Service: this action will deactivate your gateway.
• Download New Sensors: select this anytime after you add new sensors in the online system.
• Reform Network: assures system is operating on the most optimal RF frequency.
• Reset Default Configurations: resets the gateway to manufacturer defaults. This will only work if the
gateway is connecting with the system.
• Message Viewer: if there is an issue with your hardware, an error message will most likely show here.
Otherwise, this window will be blank.
•
It is important to note that in order for data to be received from the sensor the computer must be powered
on. However, if a computer enters power-saving/sleep mode due to inactivity, data will still be received.
 Loading...