

Page 1
Menu
Back
All ON
All OFF
1
All ON
Menu Back
All OFF
2
34
56
78
910
Devices
Mon 12:00 AM
Devices
Mon 12:00 AM
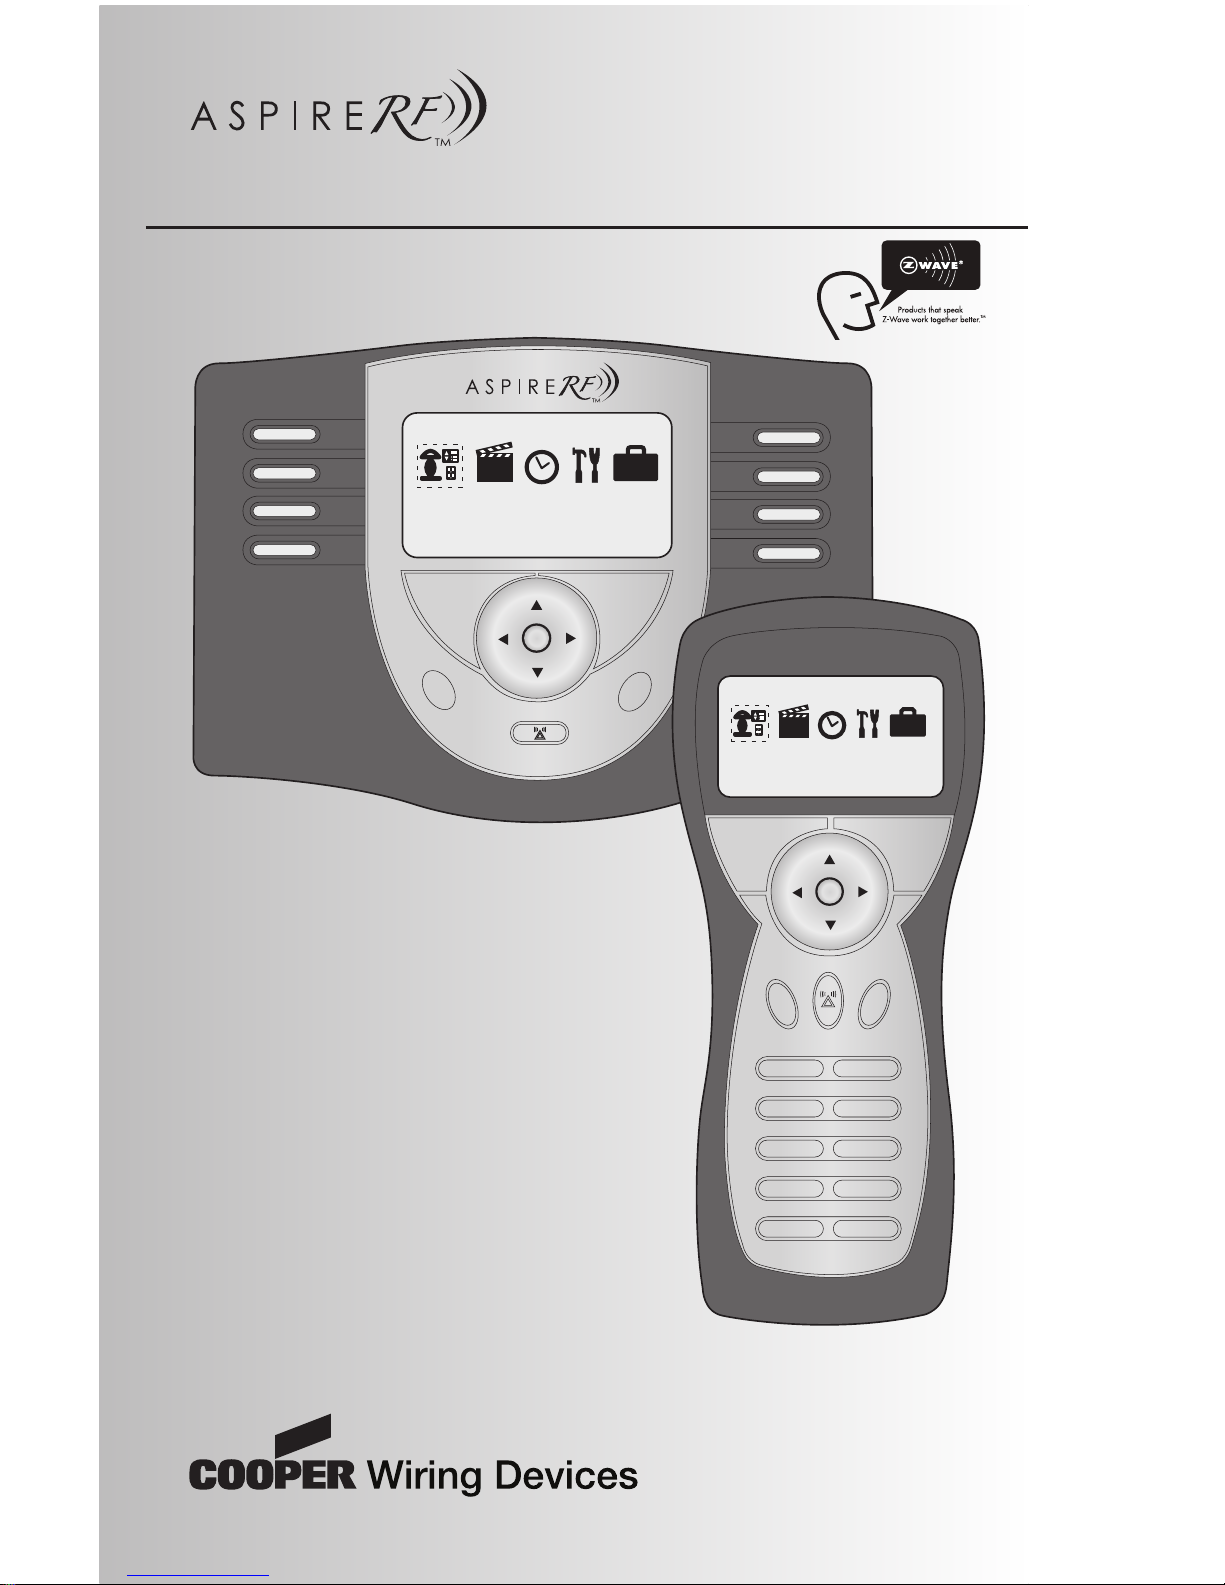
Wireless Control System
User Guide
A Step-by-Step Guide for
Planning, Installing, and
Operating a Complete Designer
Wireless Control System
http://waterheatertimer.org/How-to-wire-Intermatic-CA3750.html
___________________________________________________________________________
Page 2

2
(THIS PAGE INTENTIONALLY LEFT BLANK)
Page 3

Congratulations!
3
Congratulations on your Purchase of an
Wireless Control System!
Part of the next generation of convenient, dependable, and user-friendly wireless controls, your new system
allows you to create a wireless, two-way network within your family home, condo, or apartment. The network
puts you in command of a large number of compatible devices from a single, remote control. Some of the
benefits that you will enjoy with your new wireless control system include:
• Convenience and Versatility – use the centralized control system for home lighting controls, and appliances.
• Security – enjoy a safe arrival at night by coming home to a well-lit house by simply triggering your Z-Wave
enabled garage door opener
• Enhanced Home Experience – set the mood for entertainment, romance, or relaxation by setting all light
levels for any group of fixtures with the touch of a button
• Ease of Installation – benefit from the simple and practical set-up process with a quick and painless install
every time
• Time and Energy Savings – turn off groups of lights from any location in the home and reduce energy bills
with one-touch control
Page 4

Table of Contents
Using This Guide
We recommend that you carefully review the contents of this guide to get the most from your wireless
system. Although previous verions of the User Guide are mostly valid, Version B of the User Guide is best
suited for software version 1.1.2. If you have additional questions related to the installation or the operation
of your Aspire RF Wireless Control System, please call 1-866-853-4293 or go to
cooperwiringdevices.com/AspireRF.
Safety Information and FCC Information ........................................................................... 6
Introduction .......................................................................................................... 7
Important Notes ................................................................................................. 7
How the System Works ........................................................................................ 7
Quick Reference Guide ............................................................................................. 8
Optional Accessories ............................................................................................... 10
Get Started ........................................................................................................... 11
Navigate Menu Screens ........................................................................................ 11
Create Custom Names ......................................................................................... 12
Set Current Day and Time ...................................................................................... 13
Install and Control Devices ....................................................................................... 14
Install a Device .................................................................................................. 14
Configure a Device .............................................................................................. 15
Configure Off Delay ............................................................................................. 16
Configure ALL ON and ALL OFF Group ....................................................................... 16
Configure Panic On and Off Times ............................................................................ 18
Configure Power On State ...................................................................................... 19
Configure Ramp Time .......................................................................................... 20
Non-Cooper Parameters ........................................................................................ 21
Activate Individual Devices .................................................................................... 23
Check Device Status ............................................................................................ 24
Rename a Device ............................................................................................... 25
Change a Location of a Device ............................................................................... 26
Activate ALL ON and ALL OFF ................................................................................. 27
Activate Panic Mode ............................................................................................ 28
Customize Panic Group ........................................................................................ 29
Hide Devices ..................................................................................................... 29
Create and Control Scenes ........................................................................................ 31
Create a Scene .................................................................................................. 31
Activate a Scene ................................................................................................. 33
Create Favorite Scenes ......................................................................................... 34
Rename a Scene ................................................................................................ 35
Renumber a Scene .............................................................................................. 36
Delete a Scene .................................................................................................. 37
Edit a Scene ..................................................................................................... 38
Transfer a Scene to a Wall Mount Controller ................................................................ 39
Hide Scenes ..................................................................................................... 40
4
Devices
Scenes
Events
Settings
Away
Page 5

Table of Contents
5
Devices
Scenes
Events
Settings
Away
Create and Control Events ......................................................................................... 41
Create an Event .................................................................................................. 41
Activate or Deactivate an Event ................................................................................ 44
Activate or Deactivate All Events .............................................................................. 44
Rename an Event ............................................................................................... 45
Delete an Event .................................................................................................. 46
Edit an Event ..................................................................................................... 47
Edit and Control the Away Feature ............................................................................... 50
Edit the Away Feature ........................................................................................... 50
Activate or Deactivate the Away Feature ...................................................................... 54
Make Advanced Changes to Your System ....................................................................... 55
Create an Association Between Devices ...................................................................... 55
Replicate Handheld Information to a Second Controller .................................................... 56
Select a New Primary Controller ............................................................................... 58
Uninstall a Device ............................................................................................... 59
Activate Child Lockout .......................................................................................... 60
Reset the System ................................................................................................ 61
Scan for Devices ................................................................................................ 62
Troubleshooting Guide and Maintenance ....................................................................... 63
Retrieve Version Information about your System ............................................................ 63
Retrieve Version Information about Individual Devices ..................................................... 64
Retrieve Device Information (“Who Are You” feature) ....................................................... 65
Update Secondary Controller Device Information (“Get Name & Locn” feature) ......................... 65
Replace a Failed Device ........................................................................................ 66
Remove a Failed Device ........................................................................................ 67
Utilize Network Discovery ...................................................................................... 68
Ordering Information for Cooper Wiring Devices .............................................................. 69
Glossary .............................................................................................................. 71
Warranty .............................................................................................................. 73
Page 6

Safety Information & FCC Information
Safety First
6
WARNING
• Turn OFF circuit breaker or remove fuse(s) and test that power is off before wiring.
• Never wire any electrical device with power turned on. Wiring device (switch, dimmer, receptacle)
energized may cause permanent damage to device and void warranty.
• If you are not sure about any part of these instructions, please contact a licensed electrician.
CAUTION
• Use only with 120V AC 60Hz.
• Do not exceed maximum rating of the devices as indicated on the product.
• Must be installed and used in accordance with electrical codes.
• If a bare copper or green ground connection is not available in the wallbox, contact a licensed electrician
for installation.
• Use only #14 or #12 copper wire with these devices.
FCC INTERFERENCE STATEMENT
This device complies with Part 15 of the FCC Rules. Operation is subject to the following two
conditions:
1: This device may not cause harmful interference, and
2: This device must accept any interference received, including interference that may cause
undesired operation.
Note: This equipment has been tested and found to comply with the limits for a Class B digital device,
pursuant to Part 15 of the FCC Rules. These limits are designed to provide reasonable protection
against harmful interference in a residential installation. This equipment generates, uses and can
radiate radio frequency energy and, if not installed and used in accordance with the instructions, may
cause harmful interference to radio communications. However, there is no guarantee that interference
will not occur in a particular installation. If this equipment does cause harmful interference to radio or
television reception, which can be determined by turning the equipment off and on, the user is
encouraged to try to correct the interference by one or more of the following measures:
• Reorient or relocate the receiving antenna.
• Increase the separation between the equipment and receiver.
• Connect the equipment into an outlet on a circuit different from that to which the receiver is
connected.
• Consult the dealer or an experienced radio/TV technician for help.
FCC CAUTION:
Any changes or modifications not expressly approved by Cooper Wiring Devices could void the user’s
authority to operate the equipment.
Cooper Wiring Devices, 203 Cooper Circle, Peachtree City, GA 30269 • 866-853-4293
Page 7

Introduction
How the System Works
Batteries Required
In order to power on, the tabletop controller requires AA batteries or AC adapter and the handheld controller
requires AA batteries.
Powering On and Off the Controllers
Pressing any button will activate the controllers.
Timing Out
The display backlight will turn itself off after a period of
10 seconds of inactivity. After 60 seconds of inactivity,
the controller will automatically power off. This will cause
all unsaved data to be lost.
Your ASPIRE RF devices function as both receivers, allowing you to control the loads to which they are
attached, and as repeaters, extending and improving signals throughout your home. Rather than depending
on line-of-site communications like other technologies, Aspire RF employs Z-Wave technology that creates
a “mesh” network.
The controller is a portable device capable of both managing your Z-Wave network and controlling all of
the devices on your network.
In addition to your ASPIRE RF Wireless Control System, ASPIRE offers a fully integrated array of devices and
accessories, including smart dimmers, switches, duplex receptacles, and a wealth of accessories to link
your entire network.
This product works with other Z-Wave products from different vendors and product categories as part of the
same Z-Wave network.
Controller
Dimmer
switch
Switch Receptacle
Handheld controller
2 AA batteries
Tabletop controller
3 AA batteries
or AC adapter
Important Notes
7
Page 8

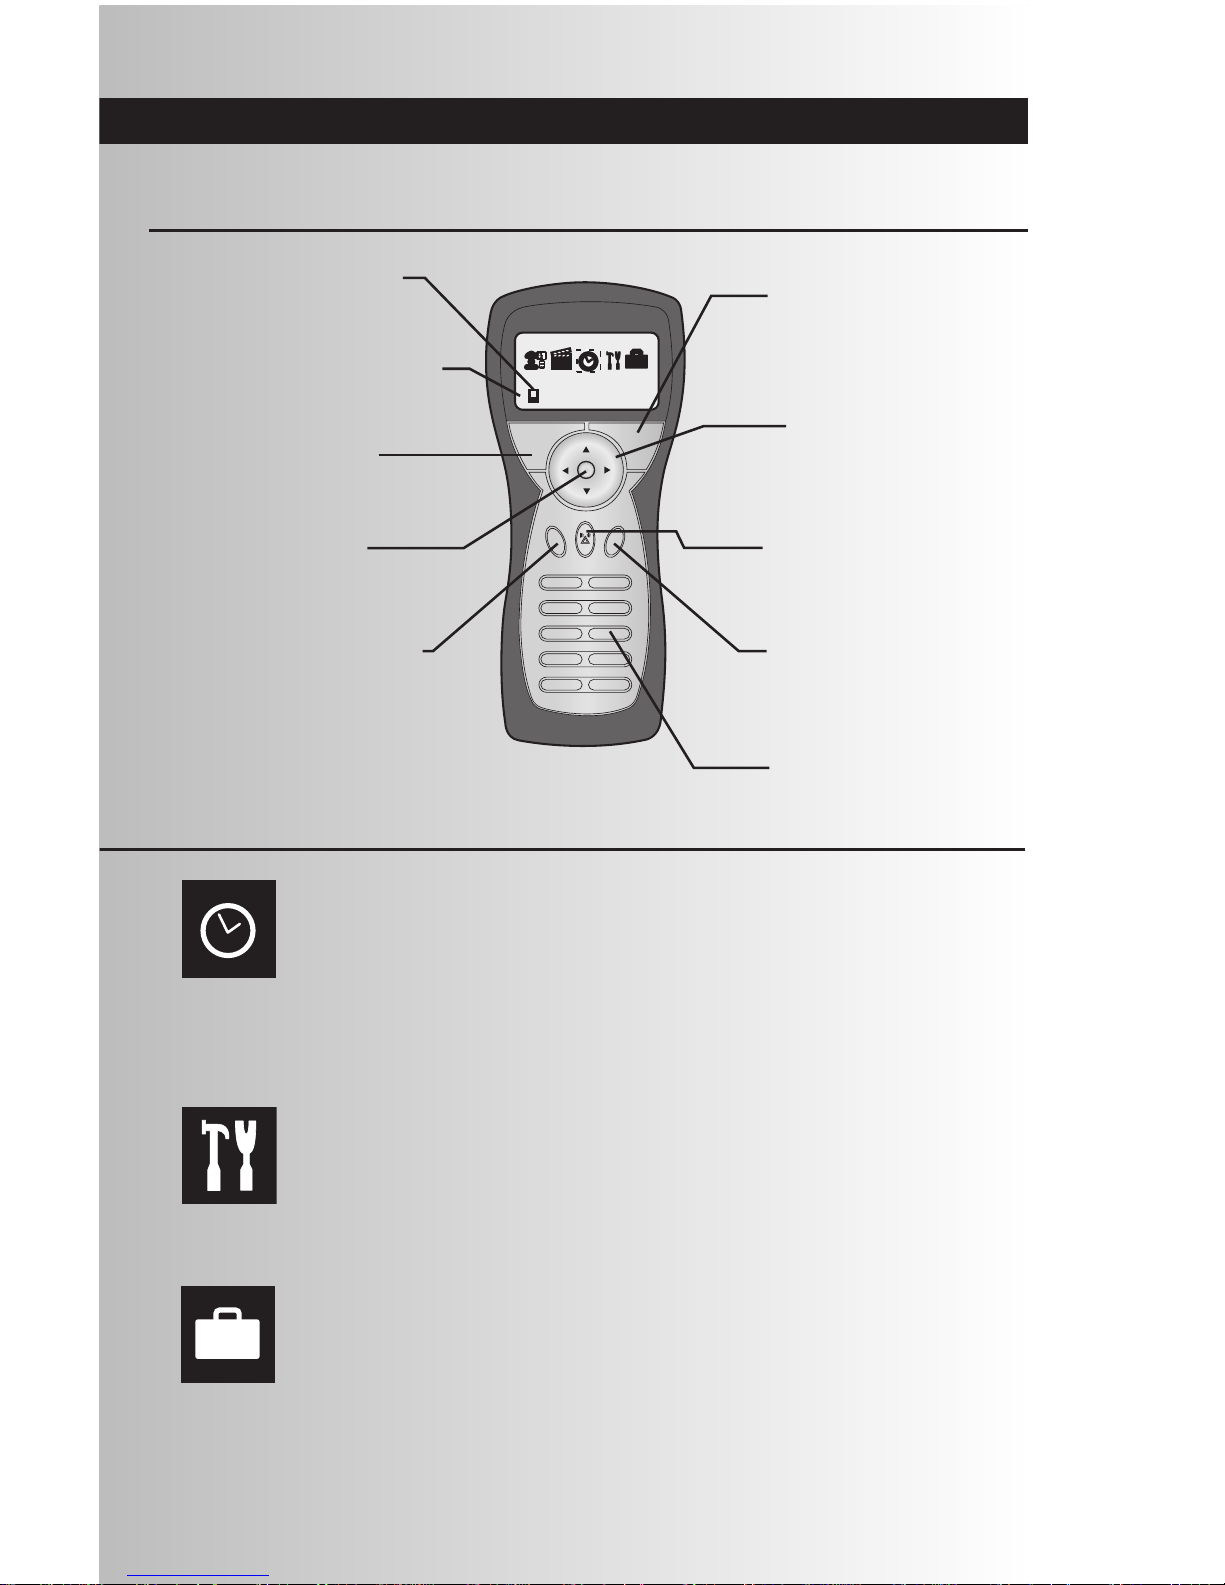
Quick Reference Guide
8
Menu
Back
ALL
ON
ALL
OFF
PP
AC adapter plug-in
OK button
Primary Controller
Callout
ALL OFF/Dim
button
Panic button
ALL ON/Brighten
button
Favorite Scene
buttons
Eight of your favorite scenes
can be accessed directly with
an easy one-touch control.
Use this button to select
settings in menus.
Indicates if it is the
primary controller.
Battery Status
Indicator
Appears when battery is low
on power.
Arrow pad
Navigate through menus and
screens, create custom names,
and change various settings.
Turn all devices in the ALL ON group on
at once. Brightens selected dimmer
switches.
Turn all devices in the ALL OFF group off
at once. Dims selected dimmer switches.
Trigger a group of devices to turn off and on
in a pattern that attracts attention.
Devices
Mon 12:00 AM
Menu/Save
button
Access the main menu
and save desired settings.
Back/Cancel
button
Exit a menu screen and return
to the previous menu.
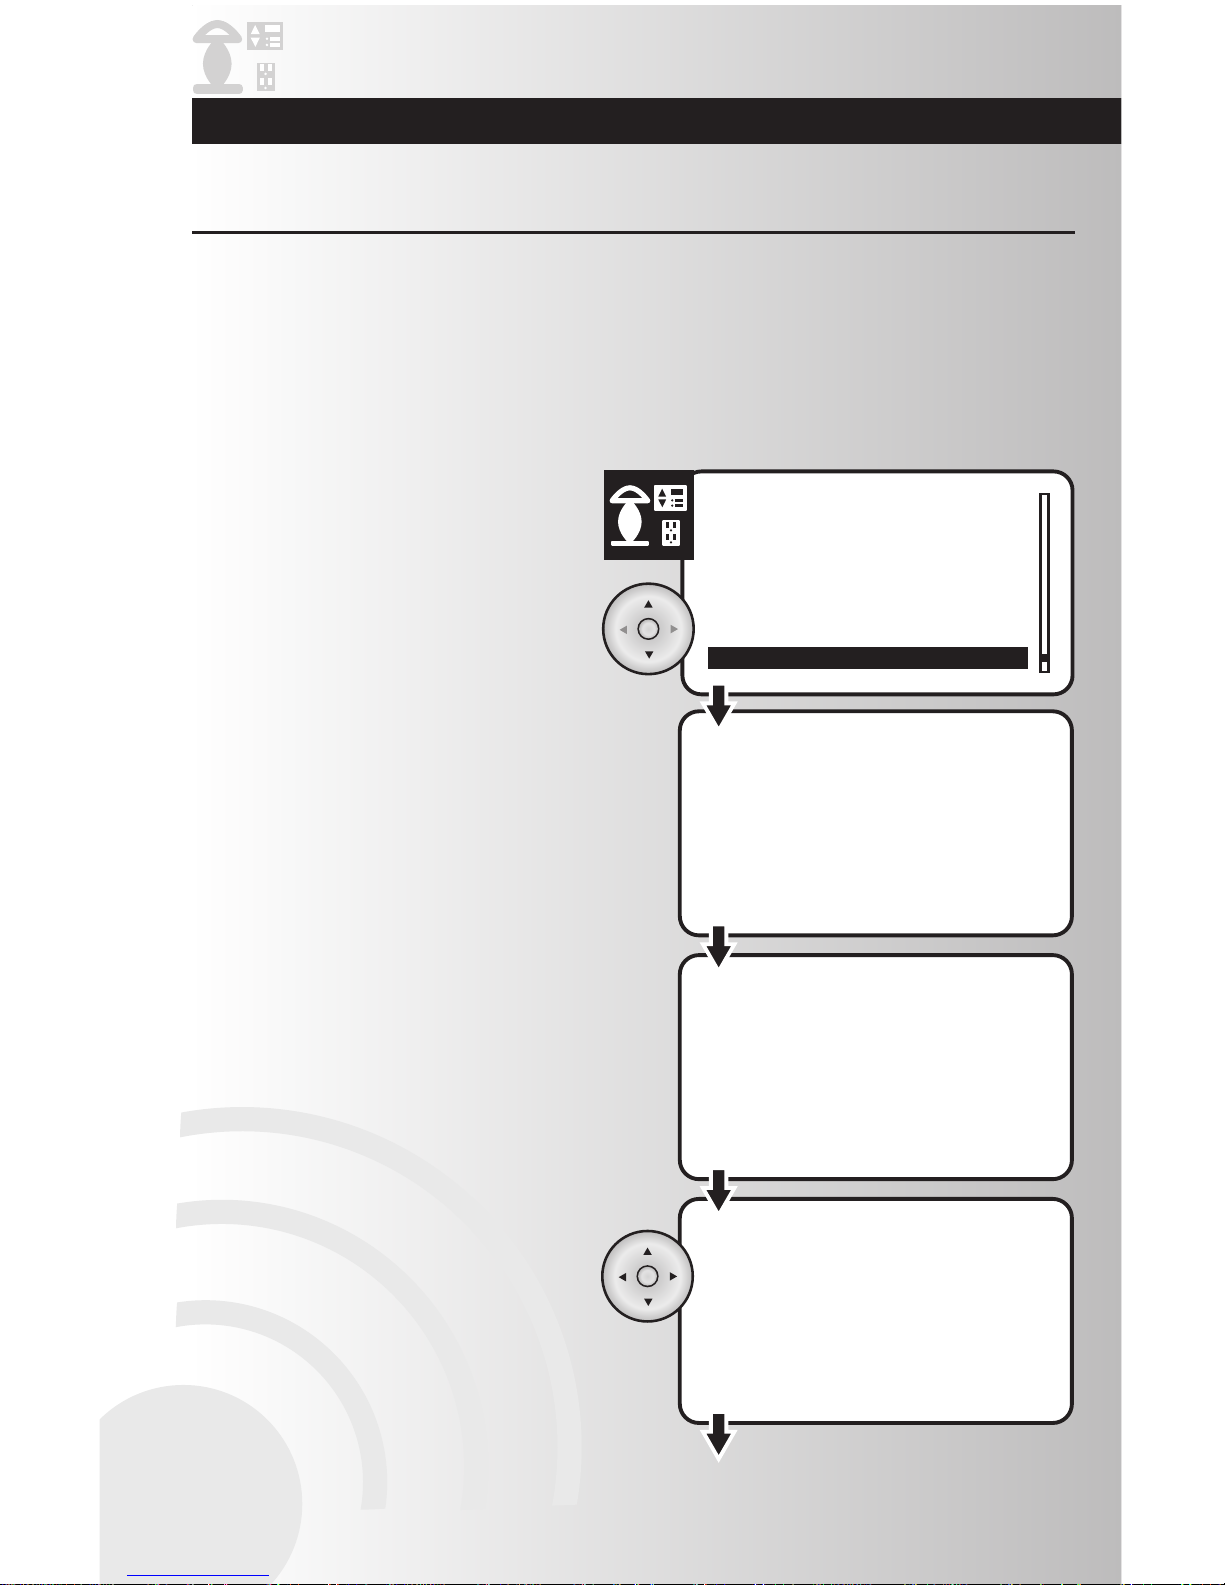
Devices Menu
A device can be a dimmer switch, a regular switch, or a receptacle. Use this menu to
install and configure each device. From this menu you can also activate individual
devices, check device status, rename a device, change the location of a device, and add a
device to the ALL ON / ALL OFF group. Some advanced functions in this menu include:
Creating an association between devices, activating child lockout, and uninstallation of a
device.
Scenes Menu
A scene is a combination of lighting or appliance devices selected by the user that can be
controlled as a group by the wireless system. Once you’ve installed devices into the
system, you can program your controllers to create and control up to 64 scenes in your
home. You can create a list of favorite scenes (such as Bedtime, Movie Time, or Dinner)
that can be accessed with an easy one-touch control. Use this menu to create a scene,
activate a scene, create favorite scenes, rename a scene, renumber a scene, edit a scene,
and delete a scene.
Example: For watching movies, you can create a Scene that dims the overhead
light and turns on accent lights. The scene can then be easily accessed with a
one-touch control.
Menus
Tabletop Controller
Page 9
Quick Reference Guide
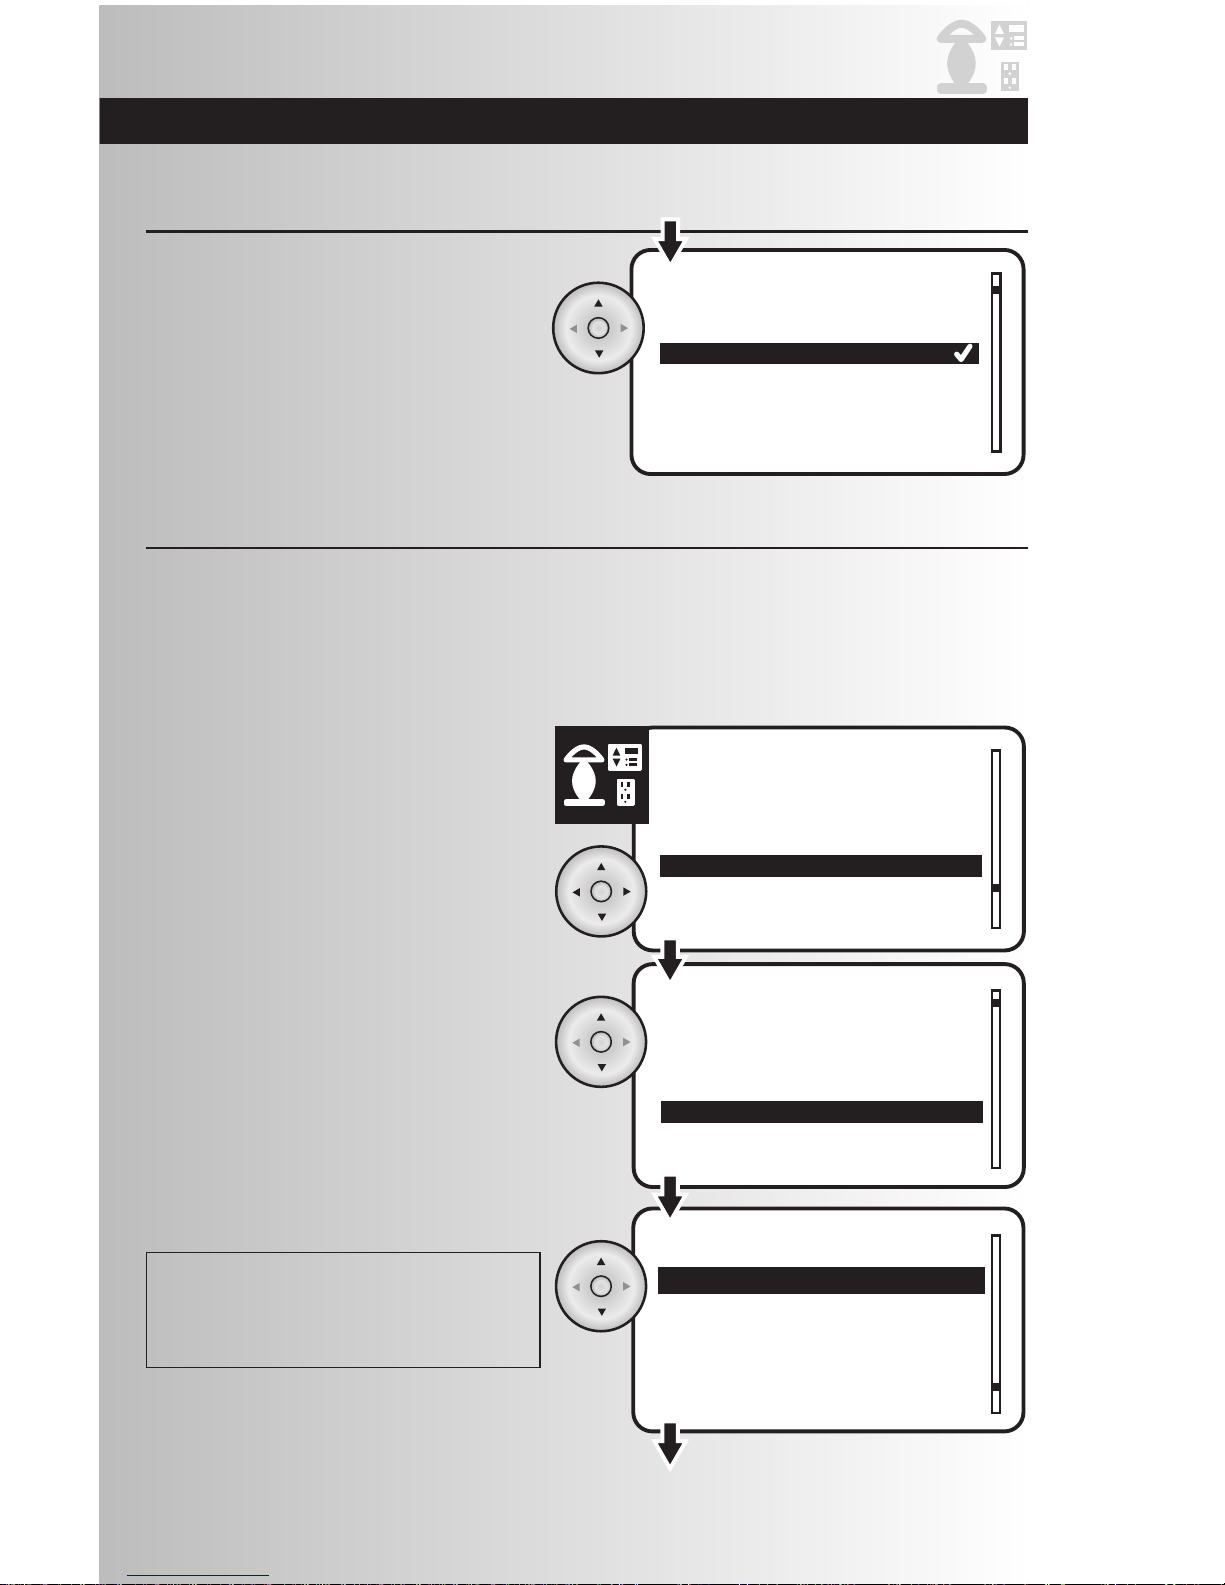
Events Menu
An event is a scheduled one-time or recurring program that launches a scene at a desired
time. You can program your controllers to create and control up to 32 events in your
home. Use this menu to schedule, create, name, edit, change, delete, activate and deactivate events.
Example: If you plan on a romantic dinner, you can schedule an event to
automatically start a scene which dims the lights for the dinner.
Settings Menu
Use this menu to customize your controller with your preferences for day/time, panic
mode settings, add a device to the Panic group, system information, replicating controller
information to a second controller, retrieving version information about your system, and
operating network discovery.
Away Menu
The Away feature allows you to edit and control functions that give the impression that
your house is occupied when you’re away for an extended period of time. Use this menu
to activate, de-activate, and edit the Away feature.
Example: If you’re going on vacation you can schedule certain lights to turn on
during evening hours and then turn off at daybreak.
9
1
ALL
ON
ALL
OFF
Menu Back
2
34
56
78
9 10
PP
Menu/Save
button
OK button
ALL ON/Brighten
button
Back/Cancel
button
Arrow pad
All OFF/Dim
button
Number pad
Access the main menu
and save desired settings.
Battery Status
Indicator
Appears when battery
power is low.
Use this button to select
settings in menus.
Panic button
Trigger a group of devices to
turn off and on in a pattern
that attracts attention.
Turn all devices in the ALL ON
group on at once. Brightens
selected dimmer switches.
Exit a menu screen
and return to the
previous menu.
Navigate through menus
and screens, create custom
names,and change
various settings.
Turn all devices in the
ALL OFF group off at once.
Dims selected dimmer
switches.
Select and activate scenes.
Enter numerical info.
Devices
Mon 12:00 AM
Primary Controller
Callout
Indicates if it is the
primary controller.
Handheld Controller
Page 10
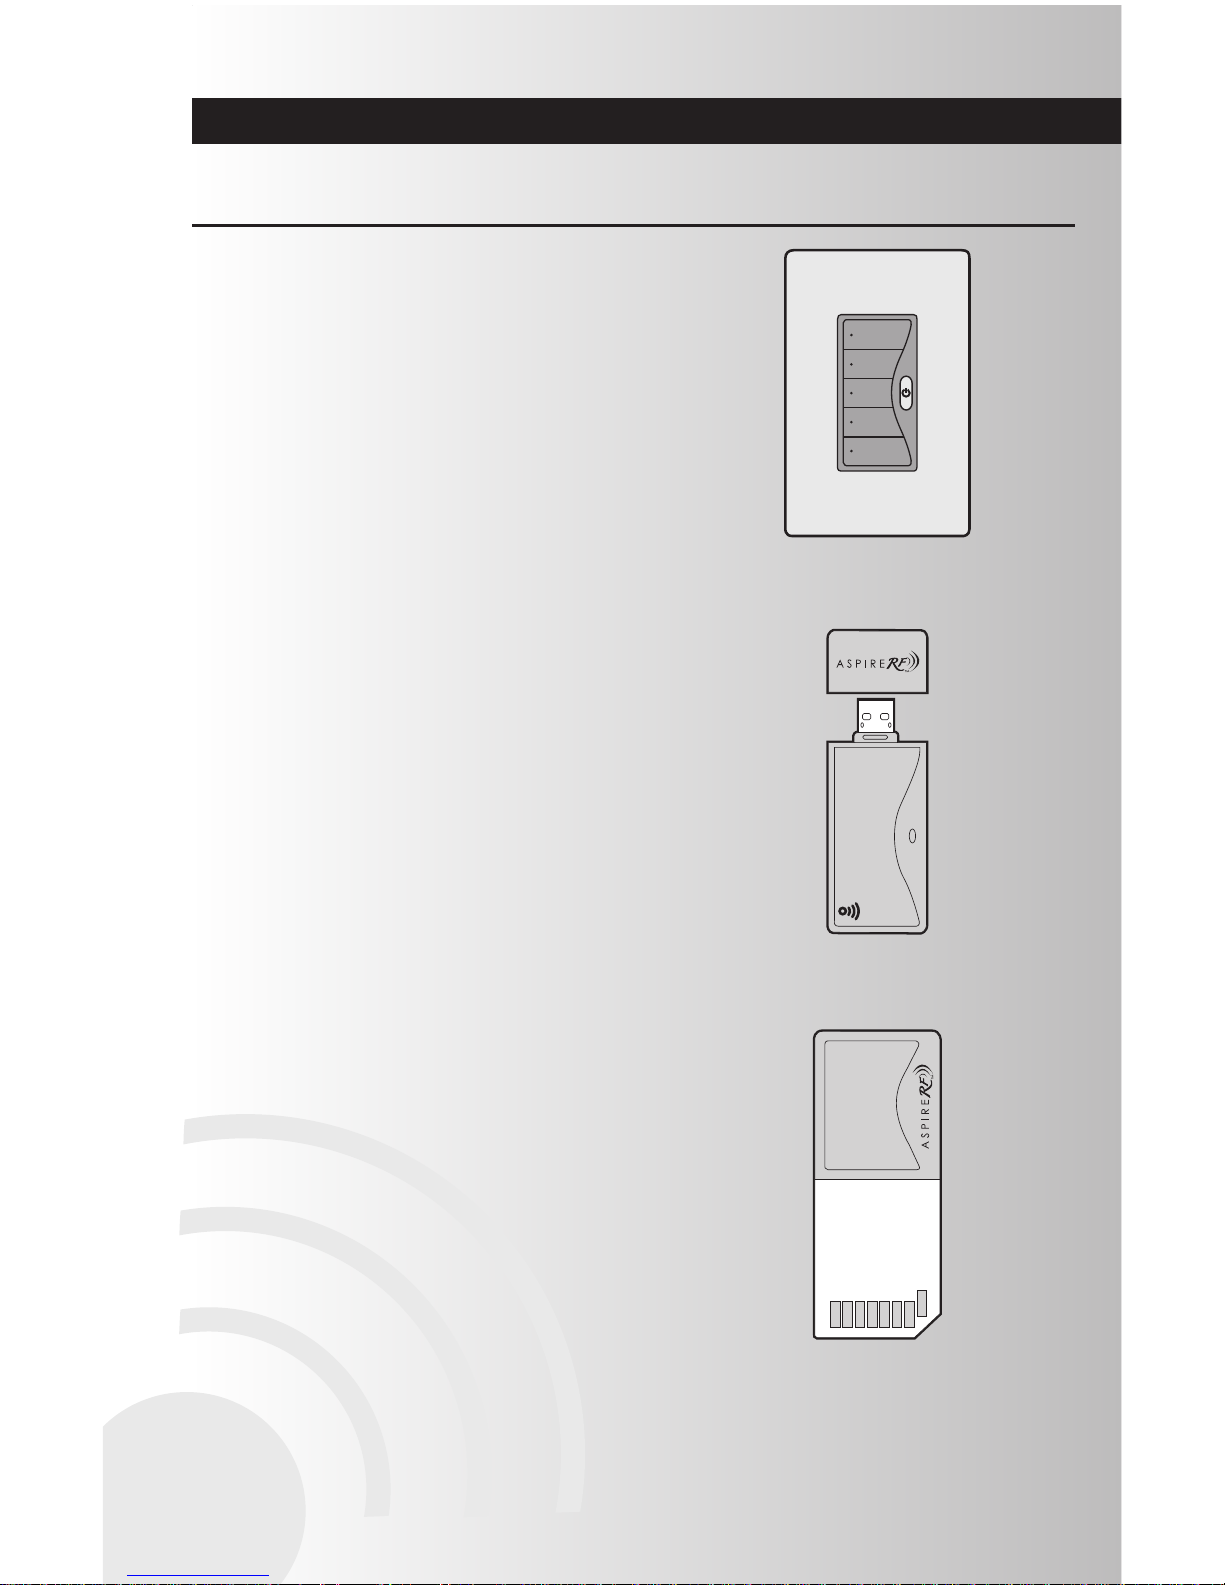
Optional Accessories
10
RFWDC – Wall-mount 5-button Scene Controller
This controller stores up to five scenes for easy onetouch activation and offers an ALL/OFF button for
turning all devices off controlled by this specific Scene
Controller. Mounts in any standard single-gang
wallbox and requires 120 VAC. A primary controller
(Handheld, Tabletop, USB, or SDIO card) must be
used to program this device.
Optional Controllers
RFUSB – USB Controller
RFUSB-PRO – USB Installer Controller
Allows for any PC or Laptop running Windows 2000
or newer to create, manage and control network
devices, scenes and events. Software and extension
cord is included with this controller and requires a USB
port. Can be set as a primary or secondary controller.
RFMCC – SDIO Card Controller
Allows for any PDA running Windows Mobile to create,
manage and control network devices, scenes and
events. Software is included with this controller and
requires a SD card slot. Can be set as a primary or
secondary controller.
Page 11
Get Started
Events
1 Movie
2 Dining
3 Bedtime
4 Entertain
Events
Activate
Deactivate
Edit
Create
Events
Activate
Deactivate
Edit
Create
Back
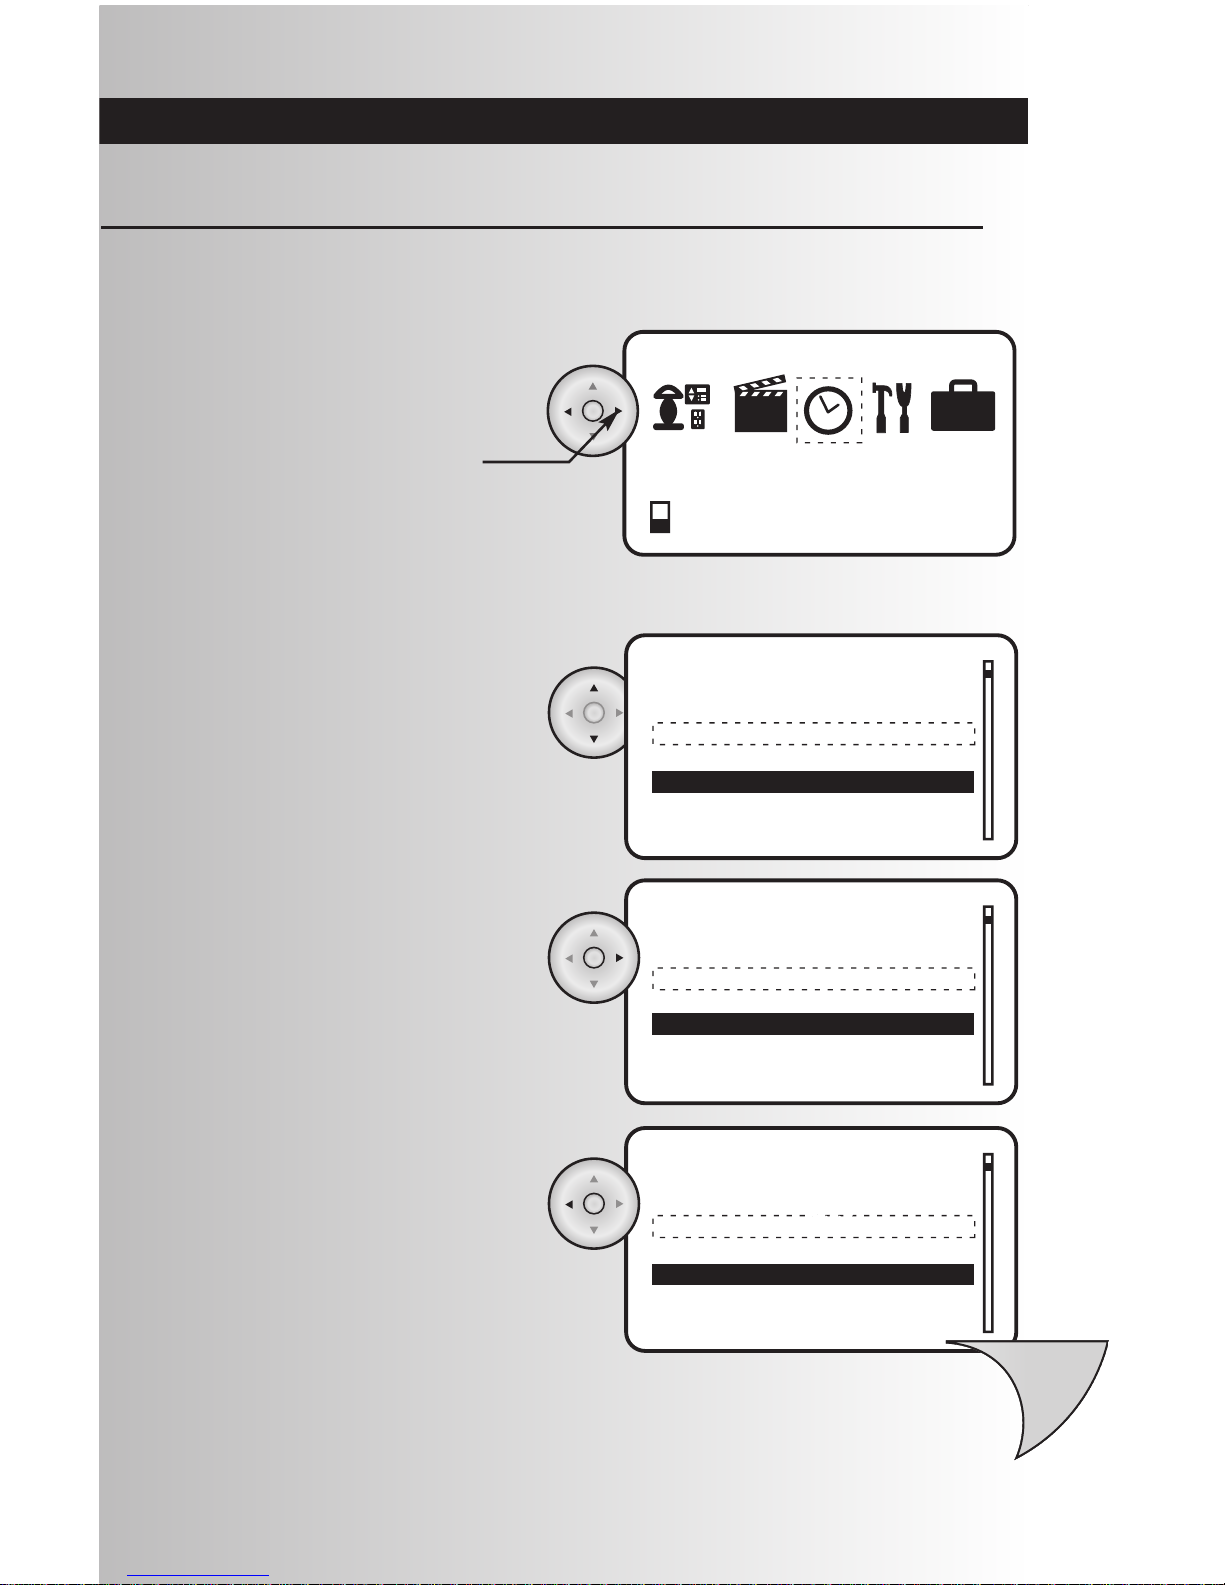
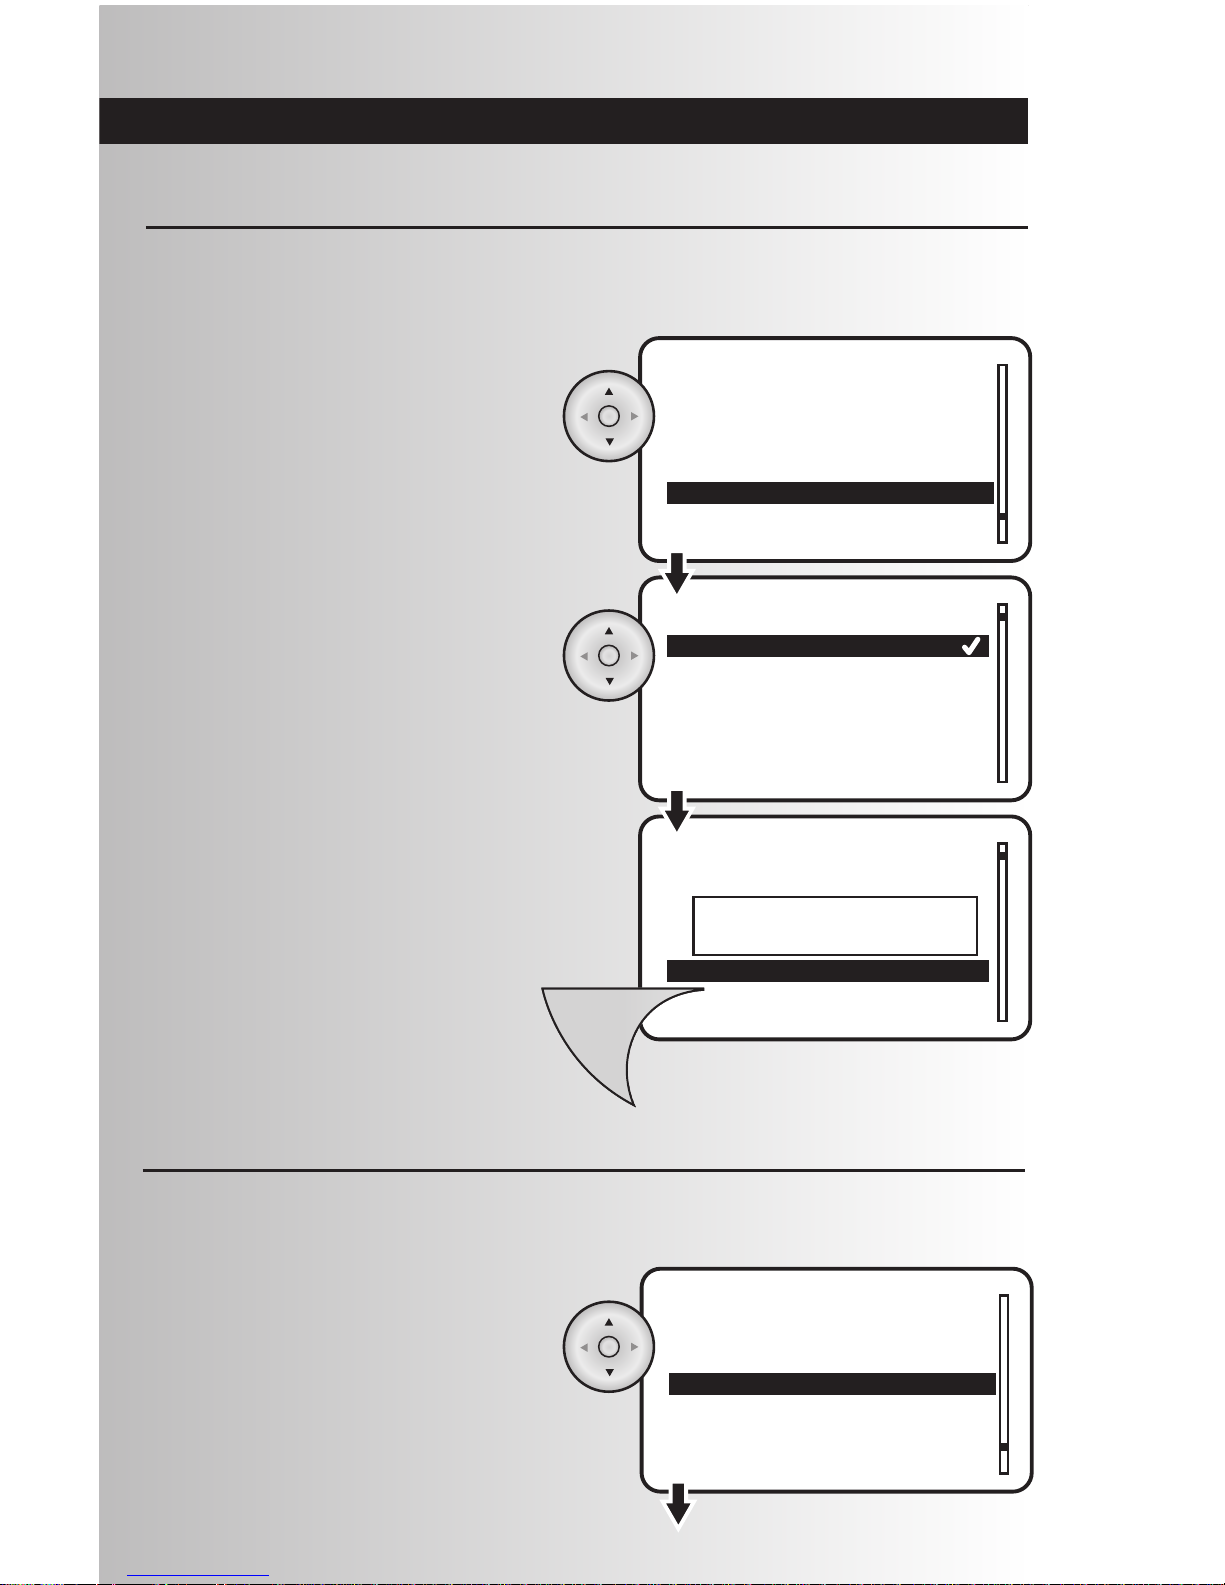
• To go to a menu item from a list, use the up
and down arrows to scroll and highlight your
choice. If you are at the top of a list, you can
use the up arrow to jump to the bottom of the
list.
Navigate Menu Screens
• To select the menu item you highlighted, go
to the menu item you selected, press the OK
button located at the center of the arrow pad
or press the right arrow.
• To exit to a menu screen and return to the
previous menu, press the Back button or
press the left arrow.
• To highlight a menu icon, use the left and
right arrows to highlight your choice.
• To select your entry, press the OK button
located at the center of the arrow pad.
You can easily navigate through the menu screens on your controllers. Here are some tips to help you
become familiar with the system. Note: Data will be lost for current operation if a button is not pressed on
the controller within 60 seconds.
Events
Mon 12:00 AM
11
Page 12

Get Started
12
B
Enter the event name
B_
Enter the event name
Bathroom 2
Enter the event name
Bathroom 2
Enter the event name
Bathroom
Enter the event name
A
12
34
56
78
910
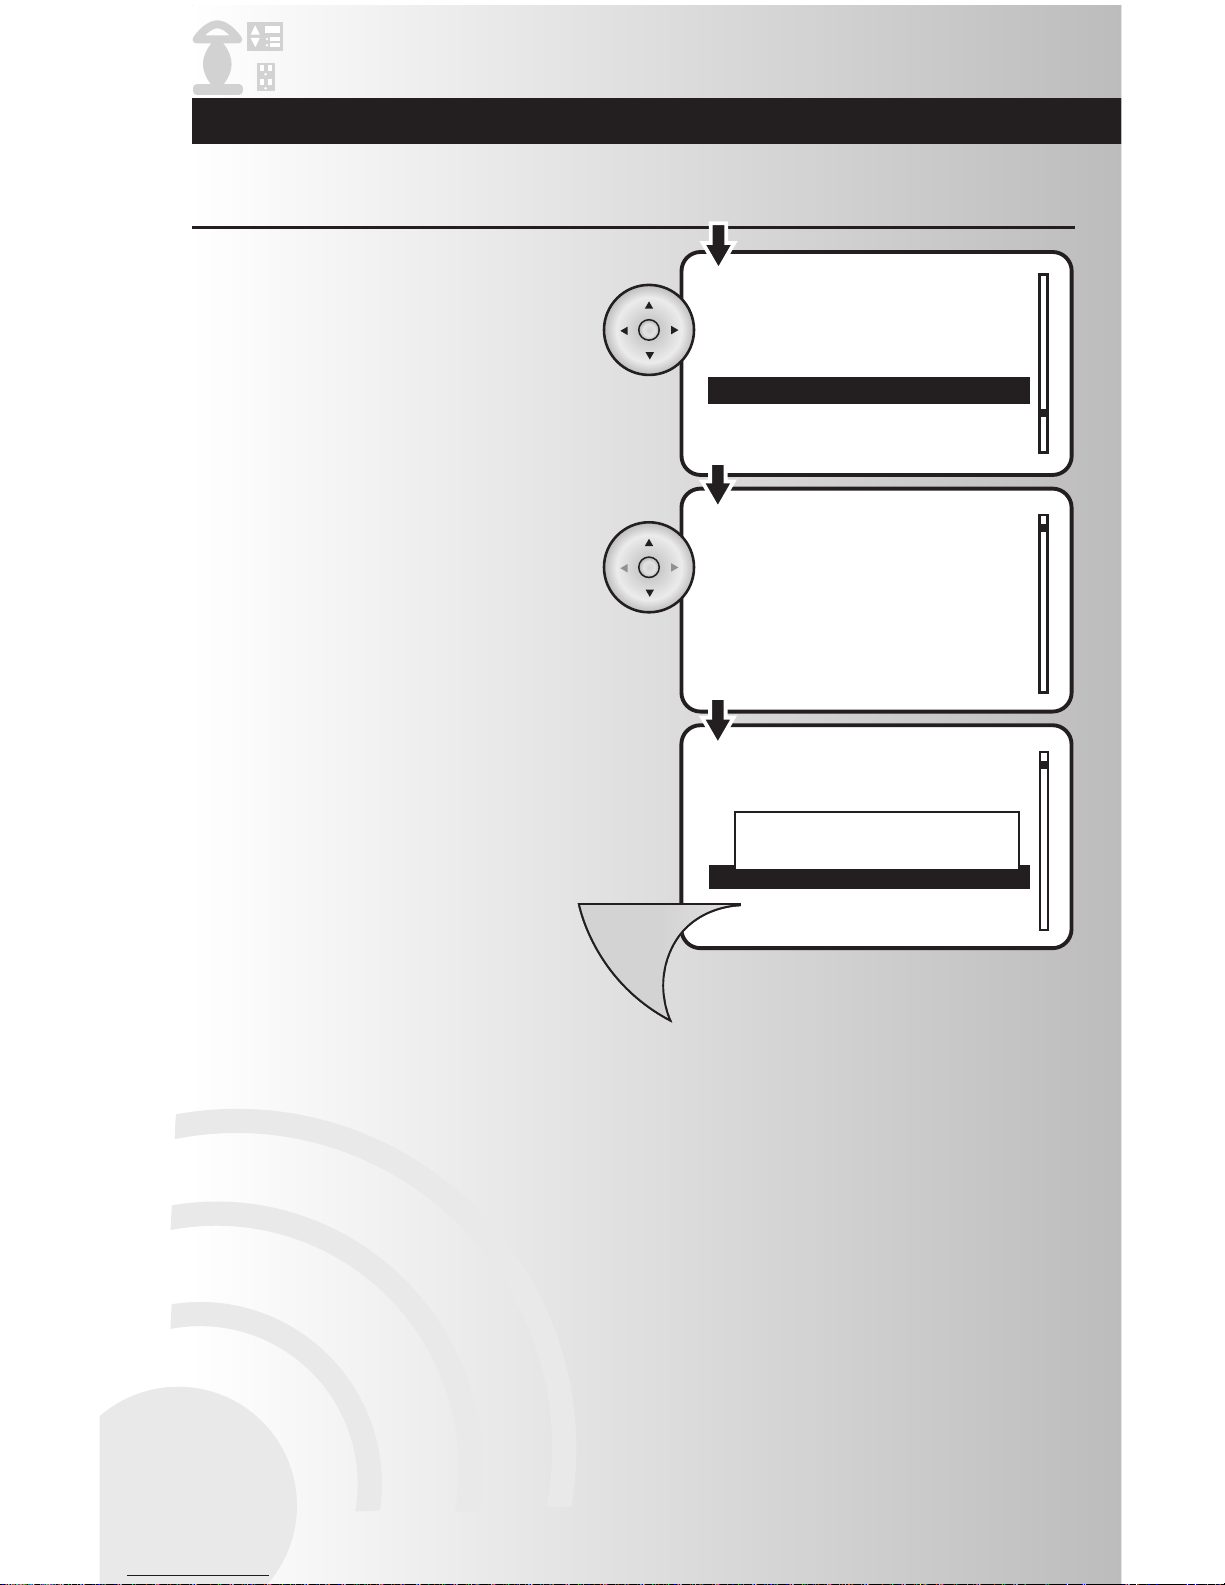
• To find a letter when entering a name,
use the up and down arrows to scroll through
a list containing the alphabet and a space
key. Up arrow starts with lower case letters
and down arrow starts with underscore,
space, then numbers (9-0) and the upper
case letters. You can hold the up or down
arrow and the letters will automatically
scroll. Let go when you get to the letter or
number you want.
Create Custom Names
• To go to next letter, press the right arrow
once. Use right arrow to move cursor one
space to the right.
• To enter a number instead of a letter
(handheld controller only), press the
number on the number pad.
• To enter a number instead
of a letter (table top
controller), use the up and
down arrows to scroll
through numbers.
• To erase the previous letter or number,
press the left arrow once.
• To save your entry, press the OK button
located at the center of the arrow pad.
Note: All Data will be lost for current
operation if a button is not pressed on the
controller within 60 seconds.
Several features of the wireless system give the option to create custom names. More detailed instructions
for each of these features is included in this manual. Here are some tips to introduce you to the process:
Page 13

13
Day/Time
Panic
Replicate
Network Discovery
Day/Time
Mon 12:00 AM
Settings
Day/Time
Thu 08:30 AM
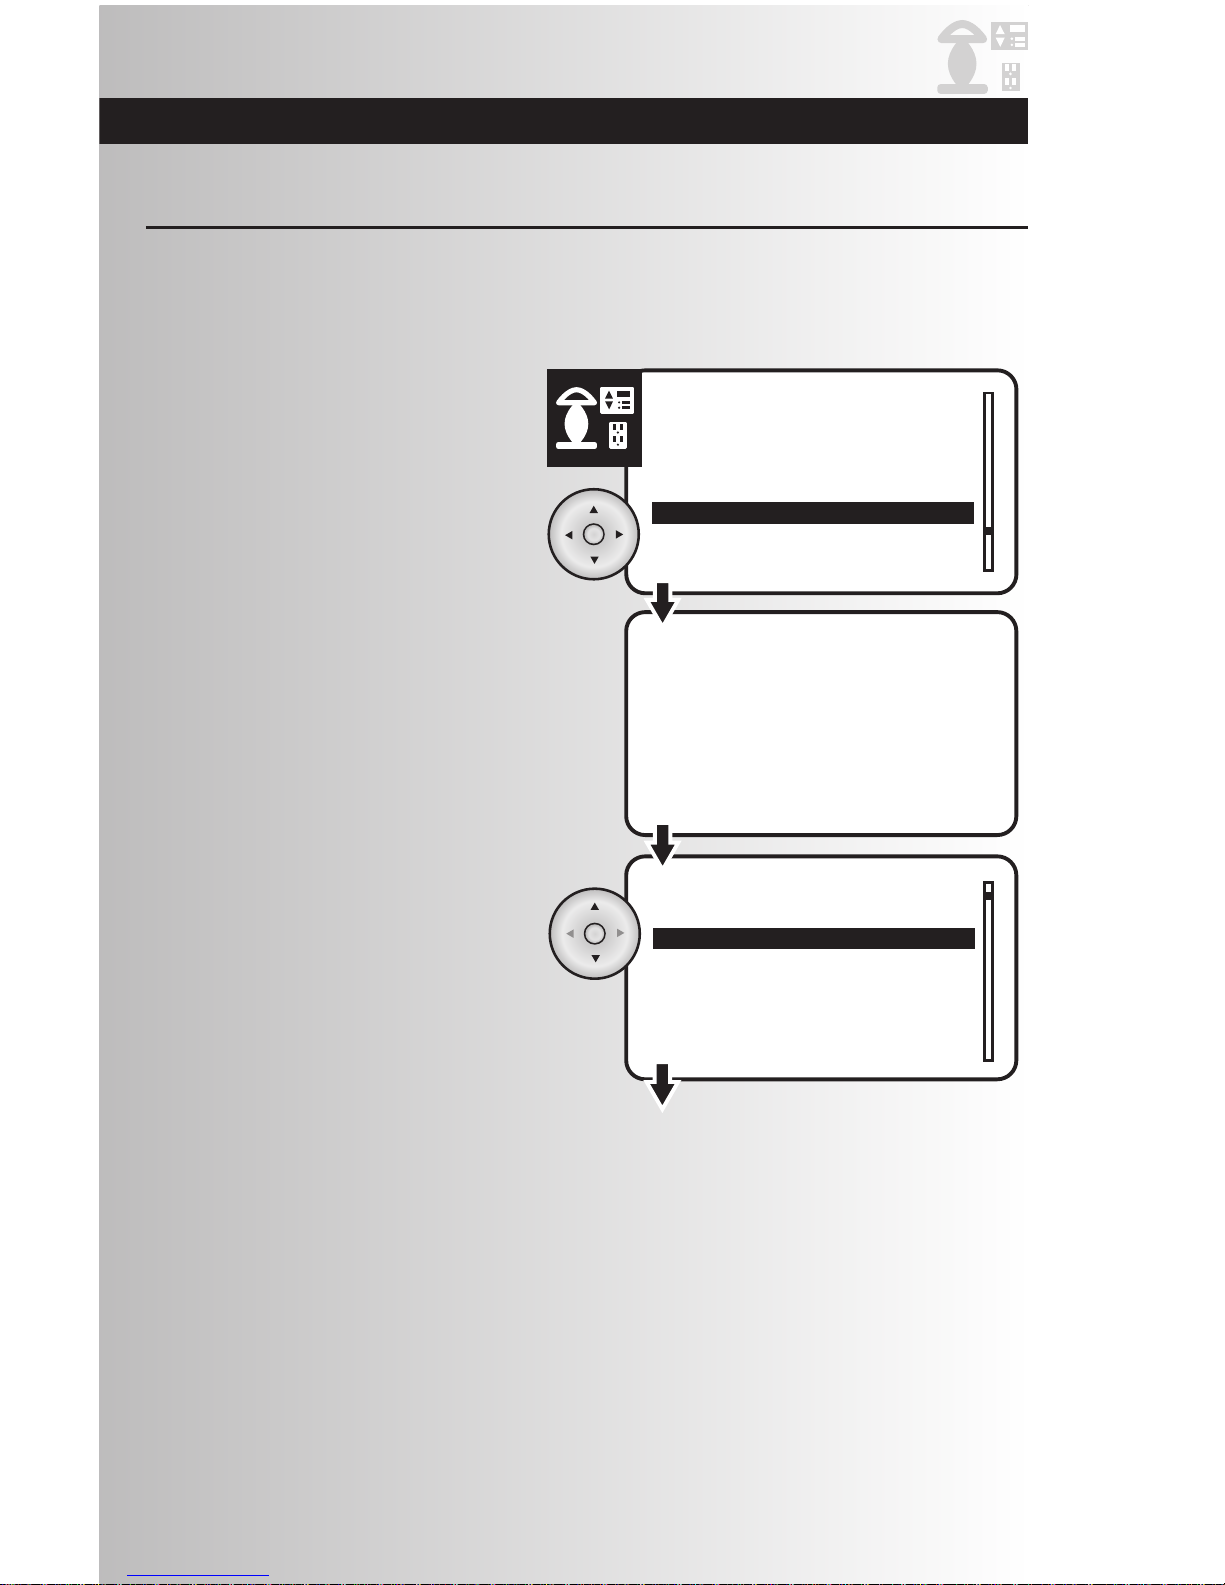
1. Select the “Day/Time” option from the
Settings menu. Press the OK button.
Set Current Day and Time
3. Once you are in the time, the hour number
will be flashing slowly. Use the up or down
arrows to select the correct hour, then use
the right arrow to proceed to the next hour,
then to minutes, then select AM or PM. Press
the OK button to save the current day and
time.
Note: To enter 8:30 AM the user must enter
08:30 AM.
2. Use the up and down arrows to change the
current day. When finished, press the right
arrow to highlight the time.
Get Started
Reminder: Reset Date and Time after replacing
controller batteries.
Page 14
Install and Control Devices
14
Dimmer_12
Rename Dimmer
Press the Install Button
on the Device
Added Dimmer_12
Install Device
Associate
Configure
Uninstall
Install
Devices
Press the Install Button
on the Device
Install Device
The wireless control system can be programmed to direct up to 232 individual devices (Handheld/Tabletop
is one of the 232 devices). After reviewing this section, you will be able to perform the following basic
functions:
1. Select the “Install” option from the Devices
menu. Press the OK button.
2. Press the Install button on the device (The
install button on switch and dimmer is the
paddle). The installation process will last
thirty seconds (in larger networks time may
be longer). If you want to end the installation
process, press the Back button on your
controller during the waiting period.
Note: Remote must be a maximum of 30’ in
direct line of sight from the device being installed.
3. When the installation process has completed,
the controller will assign a name and attach
the device node ID to the device name.
Devices manufactured by Cooper Wiring
Devices will automatically be named:
Examples: Switch_2, Dimmer_12,
Receptacle_10.
4. In this screen, you can rename the device if
desired. Use the left and right arrows to add
or remove characters. Use the up and down
arrows for character selection. Press the OK
button to save the new name. If you wish to
keep the original name, just press the OK
button.
• If the device is a Cooper Wiring product, the
name is read from the device. The switch,
dimmer, or receptacle will automatically be
added to the All Switch and Away groups of the
wireless system (See pages 17 and 50 to
learn more about these features).
• If the device is not a Cooper Wiring product,
the controller will assign
“Device xxx”to the device. The device may not
be assigned to the All Switch and Away groups
of the system.
Install a Device
• Install a Device
• Configure a Device
• Configure Off Delay
• Configure All Switch
• Configure Panic On and Off
Times
• Configure Power On State
• Configure Ramp Time
• Non-Cooper Parameters
• Activate Individual Devices
• Check Device Status
• Rename a Device
• Change a Location of a Device
• Activate ALL ON
• Activate All OFF
• Activate Panic Mode
• Customize Panic Group
• Hide Devices
Page 15
Install and Control Devices
15
Configure a Device (for compatible products only)
Who Are You
Associate
Configure
Uninstall
Location
1 Receptacle
2 Dimmer
Devices
Devices
Whole House
1st Floor
2nd Floor
3rd Floor
All Cooper Wiring devices share common configuration options. You can select your preferred configuration
for each device on your system. Note: It is recommended that you be in the same room as the device you
are configuring. If you are out of range, the device configuration may not get updated. The configuration
options available are as follows:
• Off Delay • Power On State
• All Switch On & Off • Ramp Time
• Panic On Time (Dimmer Only)
• Panic Off Time • Parameters
(Typically used for
non Cooper devices)
1. Scroll up or down and highlight the
“Configure” option from the Devices menu.
Press the OK button.
2. Scroll up or down to highlight the location of
the device that you would like to configure or
choose “Whole House.” Press the OK button.
3. Scroll up or down (or enter number for
handheld controller) to highlight the specific
device that you would like to configure.
Press the OK button.
! If you attempt to configure a device not
manufactured by Cooper Wiring, an error message
may appear. You can press the Back button to
return to the configuration menu.
None
1st Floor
2nd Floor
3rd Floor
Dimmer_12 Location
Install a Device (continued)
4. The controller will now prompt you to select
a location for the device. Use the up and
down arrows to scroll and highlight the
location of your device. Press the OK button
to save.
Note: Selecting None will put the device into
the default Location, which is Whole House.
Page 16
Install and Control Devices
16
Off Delay 00:20
All Switch All On & All Off
Panic On Time 00:01
Save
Off Delay
Receptacle
00:20
P
Configure Off Delay (for compatible products only)
1. Highlight “Off Delay” and press the OK
button to select it.
2. Using the arrow pad, highlight each number
and scroll up or down to select your off
delay time up to 04:14 seconds. Press the
OK button to select the time.
Configure ALL ON and ALL OFF group (for compatible products only)
This feature gives the user time to leave a room before the light turns off. To activate Off Delay, press and
hold the dimmer or switch. The LEDs on the device will flash for the programmed Off Delay time and then
go off.
Associate
Configure
Uninstall
Install
Location
Devices
Whole House
1st Floor
2nd Floor
3rd Floor
ALL
ON
ALL
OFF
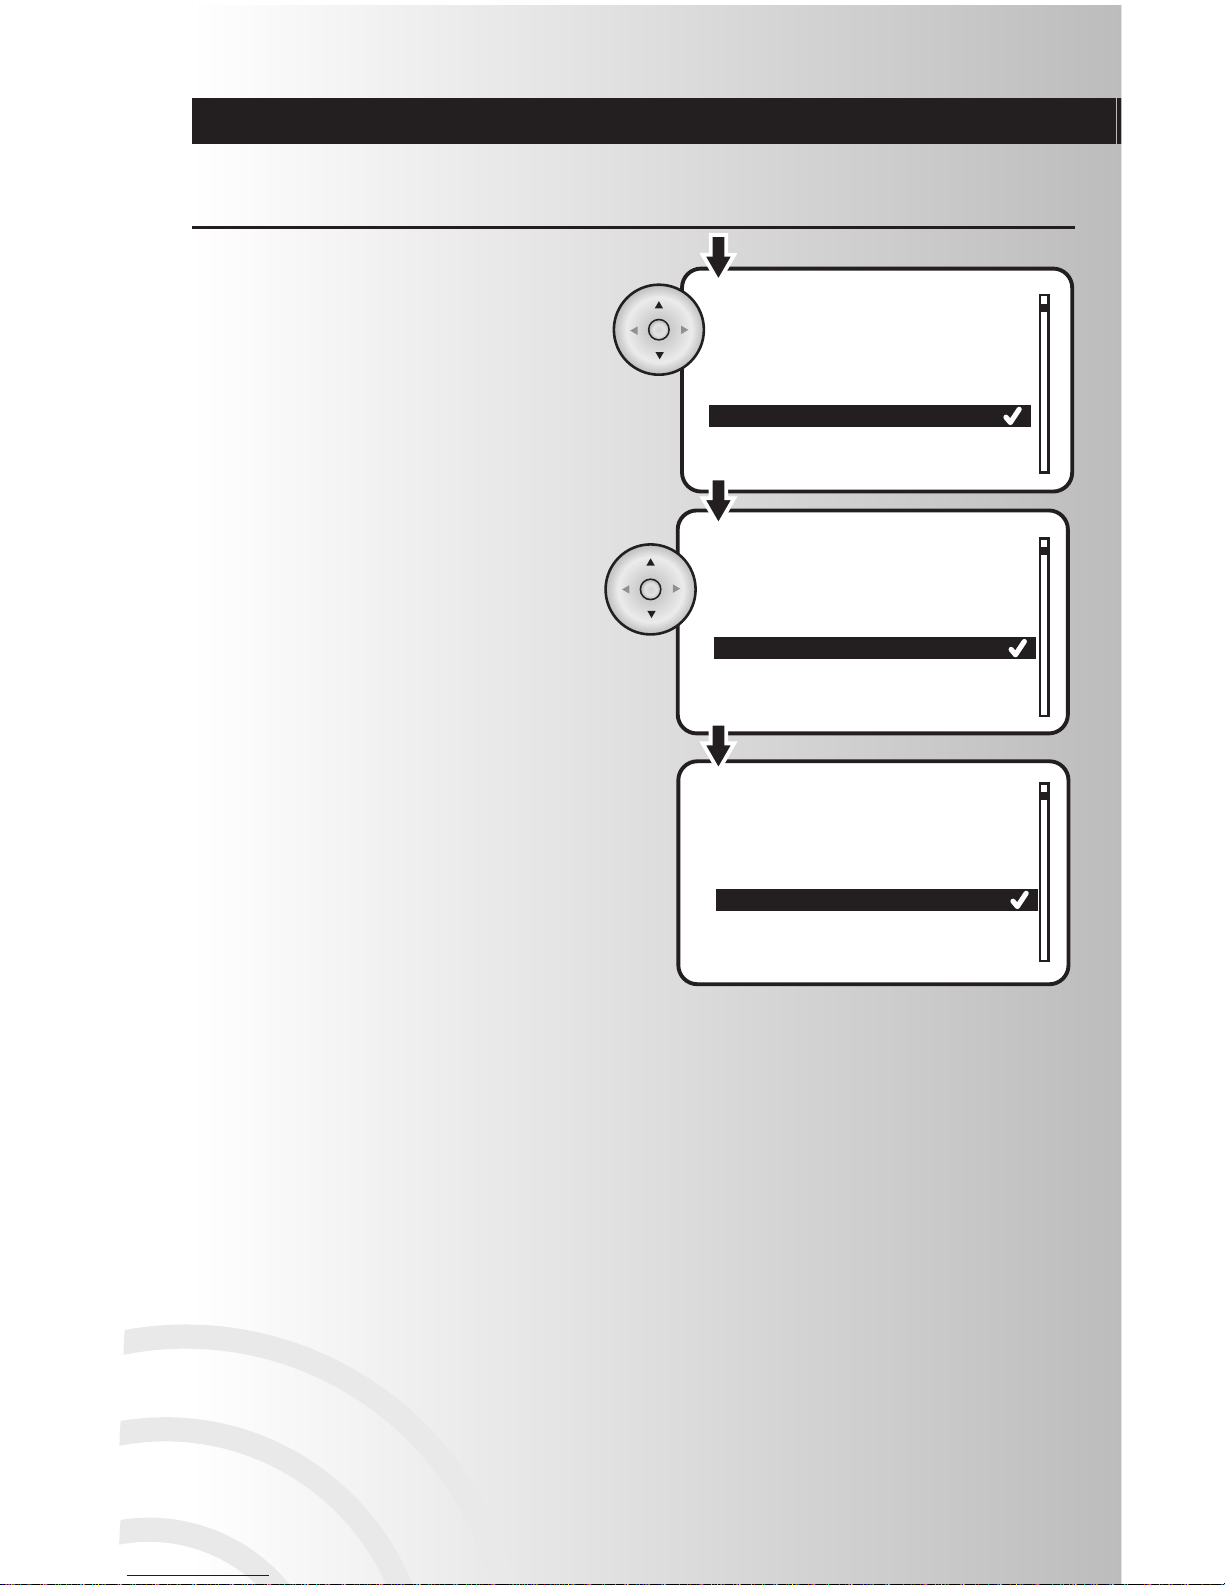
1. Select the “Configure” option from the
Devices menu. Press the OK button.
2. Highlight the location of the device that you
would like to customize or choose “Whole
House.” Press the OK button.
The All Switch feature determines how a device reacts when the user presses the ALL
ON and ALL OFF buttons. The available options are Disable, All On only and All On &
All Off,
Page 17
Install and Control Devices
17
Configure ALL ON and ALL OFF group (continued)
3. Highlight the specific device you would
like to customize. Press the OK button.
4. Use the up and down arrows to scroll
and highlight “All Switch All On & All
Off.” Press the OK button.
5. Checkmarks indicate the current all
switch settings. Using the arrow pad,
highlight your preferred level of
functionality. Press the OK button to
select or deselect the function. To save
the changes, press the Menu button.
6. Repeat Steps 2-4 to customize other
devices.
7. To save the changes, press the Menu
button.
All Switch
Not Include
All On Only
All Off Onlyy
All On & All Off
All Switch
Off Delay 00:20
All Switch All On & All Off
Panic On Time 00:01
Save
Menu
Device updated
Devices
Receptacle
1 Device 1
2 Receptacle
Off Delay 00:20
All Switch On & Off
Panic On Time 00:01
Save
Page 18

Install and Control Devices
Configure Panic On and Off Times
(for compatible products only)
18
Receptacle
Panic Off Time
Panic On Time 00:01
Panic Off Time 00:01
Power On State Last
Save
00:05
2. Using the arrow pad, highlight each number
and scroll up or down to select your panic
off time up to 04:14 seconds. Press the OK
button to select the time.
• After configuring the way a device’s Panic
On/Off timer, you must still include them in
the Panic Group. Refer to Page 28 for
instructions.
1. Highlight “Panic Off Time” or “Panic On
TIme” and press the OK button to select it.
Panic mode allows the user to trigger a group of devices to turn off and on in a pattern that attracts
attention. You can customize the devices you would like to come on as well as the time interval they turn
on and off. Example: You can program the overhead lights in your house to flash on for 2 seconds and off
for 1 second, attracting attention of neighbors or authorities.
Page 19
Install and Control Devices
Configure Power On State
(for compatible products only)
19
Configure Ramp Time (for dimmers only)
1 Device
2 Dimmer
Devices
1. Use the up and down arrows to scroll and
highlight the dimmer you would like to
configure.
Ramp Time refers to the time it takes to fully ramp up or down the brightness level of a dimmer switch.
Example: If you choose 00:10 seconds, it will take 10 seconds to ramp up from 0% brightness to 100%
brightness.
On
Off
Last
Power On State
Panic On Time 00:01
Panic Off Time 00:01
Power On State On
Save
Receptacle
Menu
Device updated
R
Panic On Time 00:01
Panic Off Time 00:05
Power On State Last
Save
Receptacle
2. Checkmark indicates the current power on
state. Using the arrow pad, highlight your
preferred power on state. Press the OK button
to select the desired power on state.
3. Press the Menu button to save the device
configuration. A window will display a
message saying “Device updated.”
1. Highlight “Power On State” and press the OK
button to select it.
The Power On state defines what state the device powers up into when power resumes after an outage.
After an outage, On will turn on the device, Off will leave the device off, and Last will return the device to its
state before the outage.
Page 20
20
Install and Control Devices
Panic Off Time 00:01
Power On State Last
Ramp Time 00:03
Save
Ramp Time
Dimmer
Dimmer
00:20
Panic Off Time 00:05
Power On State Last
Ramp Time 00:20
Save
Menu
Device updated
3. Using the arrow pad, highlight each number
and scroll up or down to select your ramp
time up to 4:14 seconds. Press the OK
button to select the time.
4. Press the Menu button to save the device
configuration. A window will display a
message saying “Device updated.”
Configure Ramp Time (for dimmers only) (continued)
2. Highlight “Ramp Time” and press the OK
button to select it.
Page 21
1. Switch
2. Dimmer
3. Motion 1
4. Receptacle
Press the Install Button
on the device
Configure
Devices
Parameters
Save
Motion 1
Install and Control Devices
Example of a non-Cooper device:
1. Highlight specific device for which you would like
to configure the parameters, and press the OK
button.
Non-Cooper Parameters
2. If the device is a battery operated device, like a
motion detector for example, you will be prompted
to press the install button on the device to wake it
up.
3. This screen will appear with the name of the
selected device at the top. Press the OK button.
21
This allows the user to configure the parameters for Cooper devices or non-Cooper devices. Normally this
option will NOT be used for Cooper devices since all the configurable items are already listed.
Note: Zen-Sys (Z-Wave) requires the configuration parameters to be published. Contact the device
manufacturer if these are not available in the documentation with the device.
Page 22
Parameter Number
0
1
2
3
Device Updated
18
19
20
21
Parameter Number 2
18
19
20
21
Parameter Number 2
Install and Control Devices
6. You will see a momentary indication that the device
has been updated. After this, the screen will go
back to the Parameter Number screeen as shown
in Step 4 so you may select additional Parameters
to change is desired.
Non-Cooper Parameters (continued)
22
4. When this screen appears, scroll to the Parameter
Number you wish to change. Press the OK button.
5. This screen is where you select the value for the
Parameter Number you are configuring. The value
currently in the device will be highlighted. Scroll to
the value you want and then press OK. The values
will range from 0 to 127 and then from -128 to -1.
Page 23

Install and Control Devices
Control
Device Status
Child Lockout
Rename
Whole House
1st Floor
2nd Floor
3rd Floor
Location
Devices
1 Device 1
2 Receptacle
Devices
Device 1 is ON
1 Device 1
2 Receptacle
Devices
Dim level at 30%
ALL
ON
ALL
OFF
Activate Individual Devices
2. Highlight the location of the device you want
to activate or choose “Whole House.” Press
the OK button.
3. To turn a device on or off, highlight the
device. On the handheld controller, you can
enter the number of the device you would
like to highlight. Press the OK button. This
can also be done by pressing the ALL ON
button to turn the device on and by pressing
the ALL OFF button to turn the device off
while the device is highlighted.
1. Select the “Control” option from the devices
menu. Press the OK button.
4. For dimmer control, highlight the device, then
use the ALL ON and ALL OFF buttons. A
window will display the dim level from 0%
to 100%.
• To increase the brightness level, press and
hold the ALL ON button on the controller.
Release the ALL ON button when desired dim
level is reached.
• To decrease the brightness level, press and
hold the ALL OFF button on the controller.
Release the ALL OFF button when desired
dim level is reached.
23
Page 24

24
Install and Control Devices
1. Select the “Device Status” option from the
devices menu. Press the OK button.
Check Device Status
2. Select the location of the device(s) that you
are checking or select Whole House. Press
the OK button.
Location
Devices
Living Room Light On
Hall Light Off
Bedroom Light 80% 1
Kitchen Light On
Device Status
Control
Device Status
Child Lockout
Rename
3. Scroll through the menu, allowing a few
seconds for the system to fetch the device
state for each device.
Page 25

Install and Control Devices
25
Whole House
1st Floor
2nd Floor
3rd Floor
Location
Devices
Devices
Device Status
Child Lockout
Rename
Location
Lamp 1
Lamp 2
Bathroom light
Bathroom Light
Vanity Light_
1. Select the “Rename” option from the devices
menu. Press the OK button.
Rename a Device
2. Using the up and down arrows scroll to
highlight the location of the device that you
would like to rename or select “Whole
House.” Press the OK button.
3. Highlight the specific device that you would
like to rename. Press the OK button.
4. Use the left arrow to scroll left and erase the
existing name (or portion of it) and then
scroll up/down to enter the new name. Press
OK to save the new name.
Page 26

Install and Control Devices
26
1. Select the “Location” option from the
devices menu. Press the OK button.
Child Lockout
Rename
Location
Version
Devices
Devices
1 Device
2 Dimmer
Dimmer Location
None
1st Floor
2nd Floor
3rd Floor
Change a Location of a Device
2. Using the up and down arrows to scroll and
highlight the device whose location you
would like to change. Press the OK button.
3. Using the up and down arrows to scroll and
highlight the new location of the device.
Press the OK button.
Page 27

Install and Control Devices
27
ALL
ON
Devices
All On Activated
Mon 12:00 AM
1. Press the ALL ON button on the controller. All
of the devices that are part of the ALL ON
group will turn on. Each device can be
programmed to be included with the
ALL ON command. Note: The ALL ON
command cannot be used in the Device
Control screen.The ALL ON command can be
used on all other screens.
Activate ALL ON
1. Press the ALL OFF button on the controller.
All of the devices that are part of the ALL OFF
group will turn off. Each device can be
programmed to be included with the
ALL OFF command. Note: The ALL OFF
command cannot be used in the Device
Control screen. The ALL OFF command can
be used on all other screens.
Activate ALL OFF
ALL
OFF
Devices
All Off Activated
Mon 12:00 AM
Page 28

Install and Control Devices
28
Panic mode allows the user to trigger a group of devices to turn off and on in a pattern that attracts
attention. These devices must be configured to respond to the Panic mode feature.
1. Press and hold the Panic button on the
handheld or tabletop controller for 2
seconds.
2. When ready to exit Panic mode, press the
Panic button again.
Note: Do not hold Panic button or Panic
mode will be re-activated.
Activate Panic Mode
Setting Panic
Mode On
Setting Panic
Mode Off
1. Select the “Panic” option from the Settings
menu. Press the OK button.
2. Checkmarks indicate the devices associated
with the panic group. Using the arrow pad,
highlight the device you would like to add or
remove.
Panic mode allows the user to trigger a group of devices to turn off and on in a pattern that attracts
attention. After devices have been configured for the Panic On/Off delays you must now select whether a
device will be included in the Panic Group.
Customize Panic Group
Day/Time
Panic
Language
Version
Device 1
Receptacle
Dimmer
Save
Panic
Settings
Page 29

Install and Control Devices
29
Customize Panic Group (continued)
Device 1
Receptacle
Dimmer
Save
Panic
Device 1
Receptacle
Dimmer
Save
Panic
Menu
3. To remove a device from the panic group,
highlight the device and press the OK button.
The checkmark will be removed.
• To add a device to the panic group, highlight
the device and press the OK button. A
checkmark will appear next to the device.
4. To save changes, press the Menu button.
Hide Devices
The “Hide” function allows a user to customize a particular Hand Held or Tabletop controller, such that
some devices included in the network are not displayed on the device list. The hiding of devices may be
preferred if control of those devices is not desired from that controller. The hiding of devices does not
remove them from the network, but rather only removes them from being visible on that controller.
1. Select “Hide” option from the Devices
menu. Press the OK button.
2. Select the location within the home that
you would like to hide devices.
Location
Devices
Configure
Hide
Unistall
Install
Whole House
1st Floor
Page 30

Install and Control Devices
30
Hide Devices (continued)
Device Hide
Device Hide
Hide All
Unhide All
Dimmer_1 H
Switch_2 H
Dimmer_4 H
Hide All
Unhide All
Dimmer_1 H
Switch_1
Hide All
Unhide All
Dimmer_1 H
Switch_1 H
Device Hide
Device Hide
Hide All
Unhide All
Dimmer_1 H
Switch_1 H
Menu
4. Repeat the process for all devices to be
hidden. After placing an “H” beside all
devices to be hidden, press the Menu button
to return to the main menu.
3. To hide a device, use the arrow pad to
highlight the desired device to be hidden,
and press OK. A letter “H” will appear
beside the device indicating that the device
will be hidden.
6. An “Unhide All” feature exists to allow you to
unhide all devices with one quick step. Use
the arrow pad to highlight “Unhide All” and
press OK. All devices wil be unhidden with
this single step.
5. Within the “Hide” feature you may also select
“Hide All.” Use the arrow pad to highlight
“Hide All,” and then press OK. This will place
an “H” beside all devices. You can then use
the arrow pad to move to only the devices
that you wish to unhide and press OK to
remove the “H.”
Page 31

Create and Control Scenes
Activate
Edit
Favorites
Create
Enter the scene name
Enter the scene name
A/V Room
Scenes
Scary movie
Create a Scene
1. Select the “Create” option from the Scenes
menu. Press the OK button.
2. Using the arrow pad, enter a name for the
scene.
• To use one of the system’s preprogrammed scene names, press the up
arrow and scroll through the options until
you find the desired name. You can also use
the right arrow to scroll to the end of the preprogrammed name and add additional
characters or remove part of the name. Press
the OK button to save.
A scene is a combination of lighting or appliance devices selected by the user that can be controlled as a
group by the wireless system. Now that you’ve installed devices into the system, you can program your
controllers to create and control up to 64 scenes in your home. Up to 32 devices can be included in one
scene. Example: When watching movies, you can create a Scene that dims the overhead light and turns
on accent lights.
After reviewing this section, you will be able to perform the following basic functions:
• Create a Scene • Renumber a Scene • Hide Scenes
• Activate a Scene • Delete a Scene
• Create Favorite Scenes • Edit a Scene
• Rename a Scene • Transfer a Scene to a Wall Mount Controller
• If you want another name, press the
down arrow once. Scroll through the
alphabet until you find the first letter of the
name. When the letter appears, press the
right arrow and continue the process until
the name is spelled out. Press the OK
button to save.
31
Page 32

Create and Control Scenes
32
Device On
Receptacle Not Used
Lamp 1 90%
Save
Scary movie Lamp 1
Scary movie Lamp 1
Not used
On
Off
10%
Scene Scary movie
Not used
On
Off
90%
Menu
Scene Scary movie
Device On
Receptacle Not Used
Lamp 1 Off
Save
Create a Scene (continued)
6. To save the scene, press the Menu button.
5. Repeat Steps 3-5 for all devices within the
scene.
• To select a specific light level, you can
select a percentage from 90% to 0%. On
will be 100% and Off will be 0%. Use the
up and down arrows to select desired light
level. Press the OK button when finished.
Note: If a device does not allow a specific
light level, you will not be given the option.
4. Highlight one of four setting options for the
device: Not used, On, Off, or a specific light
level (dimmers only). Press the OK button.
3. Highlight the first device that you would like
in the scene and press the OK button.
Page 33

Create and Control Scenes
33
Activate
Edit
Favorites
Create
1 Dining Room
2 Media Room
3 Bathroom
4 Bedroom
Scenes
Scenes
Scenes
1 Dining Room
2 Media Room
3 Bathroom
4 Bedroom
Activating
Bathroom
1. Select the “Activate” option from the Scenes
menu. Press the OK button.
Activate a Scene
2. Use the up or down arrows to highlight the
scene you want to activate. Press the OK
button.
3. When activation is complete you will return
to the Scenes menu.
1
AllON
Menu Back
AllOFF
2
34
56
78
910
Number Pad
4. When using the Handheld Controller, you
can activate a scene by pressing a number
or numbers then press the OK button.
Example: Pressing 1 will take you to Scene
1, and pressing a combination of 1 then 2
will take you to Scene 12.
Note: To quickly activate a scene, press and
hold the button for the desired scene number
on the handheld controller. For Scenes 1-9,
press and hold the desired scene button. For
Scenes 10-64, press and release the first
number and then press and hold the second
number to activate the scene.
Page 34

1. Select the “Favorites” option from the Scenes
menu. Press the OK button.
Activate
Edit
Favorites
Create
1 Not Used
2 Not Used
3 Not Used
4 Not Used
Scenes
Favorites
Not Used
Bathroom
Evening
Movies
Favorite 1
2. Use the up and down arrows to scroll and
highlight the number that you would like to
assign to your favorite scene. Press the OK
button.
3. Use the up and down arrows to scroll and
highlight your favorite scene. Press the
OK button.
Note: For the Table Top Controller it will
automatically be added to the favorites. The
user may change this using the above steps
to reverse the favorite display.
Menu
Back
All ON
All OFF
1 Not Used
2 Not Used
3 Not Used
4 Not Used
Favorites
Create Favorite Scenes (for Table Top Controller only)
The Table Top Controller’s main menu is a scene screen
where eight of your favorite scenes can be accessed
directly. You will have easy one-touch control.
Create and Control Scenes
34
Page 35

Create and Control Scenes
Favorites
Create
Rename
Renumber
1 Bathroom
2 Evening
3 Movies
4
Scenes
Scenes
Kids Bathroom_
Bathroom
1. Select the “Rename” option from the Scenes
menu. Press the OK button.
Rename a Scene
2. Use the up and down arrows to scroll and
highlight the scene to be renamed.
Press the OK button.
3. Use the left arrow to erase name and the up
and down arrows to input the new scene
name. Press the OK button.
35
Page 36

Create and Control Scenes
Renumber a Scene
2. Use the up or down arrows to scroll and
highlight the scene to be renumbered. Press
the OK button.
3. A check mark will appear next to the current
number of the scene. Using the arrow pad,
move the check mark next to the new
number for the scene. Press the OK button.
4. The Scenes menu will appear. To reorder
additional Scenes press the OK button.
Create
Rename
Renumber
Transfer to WDC
Scenes
Scenes
Renumber Bathroom
1
2
3
4
1 Bathroom
2 Evening
3 Movies
4
Scenes
Create
Rename
Renumber
Transfer to WDC
1. Select the “Renumber” option from the
Scenes menu. Press the OK button.
This feature allows the user to reorder the scenes displayed on the selection menu.
36
Page 37

Create and Control Scenes
37
1. Select the “Delete” option from the Scenes
menu. Press the OK button.
Delete a Scene
2. Use the up and down arrows to scroll and
highlight the scene to be deleted.
Press the OK button.
Rename
Renumber
Transfer to WDC
Delete
2 Media Room
3 Bathroom
4 Bedroom
5 Den
2 Media Room
3 Bathroom
4 Bedroom
5 Den
Scenes
Scenes
Scenes
Scene deleted
3. When the scene is deleted, a window will
display a message saying “Scene deleted.”
Page 38

Create and Control Scenes
1. Select the “Edit” option from the Scenes
menu. Press the OK button.
2. Use the up and down arrows to scroll and
highlight the scene to be edited. Press the
OK button.
Activate
Edit
Favorites
Create
Scenes
Scenes
1 Dining Room
2 Media Room
3 Bathroom
4 Bedroom
Lamp 1 Off
Overhead Off
Receptacle On
Save
Scene Media Room
Lamp 1 90%
Overhead Off
Receptacle On
Save
Scary movie Lamp 1
Scene Scary movie
Not used
On
Off
90%
Menu
Edit a Scene
3. You will go to a screen detailing the device
status for the selected scene. Use the up and
down arrows to scroll through the list to see
the status of the scene. To change the status
of a device, highlight the device and press
the OK button.
4. Highlight one of four setting options for the
device: Not used, On, Off, or a specific light
level. Press the OK button.
38
• To select a specific light level, you can
select a percentage from 90% to 0%. On
will be 100% and Off will be 0%. Use the
up and down arrows to select desired light
level. Press the OK button when finished.
Note: If a device does not allow a specific
light level, you will not be given the option.
5. Repeat Steps 3-5 for all devices within the
scene.
6. To save the scene, press the Menu button.
Page 39

Create and Control Scenes
Rename
Renumber
Transfer to WDC
Delete
2 Media Room
3 Bathroom
4 Bedroom
5 Den
Scenes
Scenes
Transfer Scene
Press and hold the desired
scene button on the device
Transfer Scene
Transfer Complete
1. Select the “Transfer to WDC” option from the
Scenes menu. Press the OK button.
Transfer a Scene to Wall Mount Controller
2. Use the up or down arrows and scroll to
highlight the scene to be transferred. Press
the OK button.
3. Press and hold the desired scene button on
the Cooper scene controller for approximately
5 seconds. A LED on the scene controller will
flash when it is receiving information.
Release the button.
4. A window will momentarily display a
message saying that the operation was
successful. The LED on the Scene controller
will also continue to blink for a few seconds.
When the LED stops blinking the process is
complete.
39
Wall Mount
Scene Controller
Page 40

Scene Hide
Scenes
Scene Hide
Hide All
Unhide All
Scene_1 H
Scene_2 H
Scene_3 H
Renumber
Transfer to WDC
Hide
Delete
Hide All
Unhide All
Scene_1 H
Scene_2 H
Hide All
Unhide All
Scene_1 H
Scene_2
Scene Hide
Scene Hide
Hide All
Unhide All
Scene_1
Scene_2
Menu
Create and Control Scenes
1. Select “Hide” from the Scenes menu. Press OK
button.
Hide Scenes
2. To hide a scene, use the arrow pad to highlight the
desired scene to be hidden, and press OK. A letter
“H” will appear beside the scene indicating that the
scene will be hidden.
3. Repeat the process for all scenes to be hidden.
After placing an “H” beside all scenes to be hidden,
press the Menu button to return to the main menu.
4. Within the “Hide” feature you may also select “Hide
All.” Use the arrow pad to highlight “Hide All,” then
press OK. This will place an “H” beside all scenes.
You can then use the arrow pad to move to only
the scenes that you wish to unhide, and press OK
to remove the “H.”
40
The “Hide” function allows a user to customize a particular Handheld or Table Top Controller, such that
some scenes that have been created are not displayed on the scene list. The hiding of some scenes may
be preferred if control of those scenes is not desired from that controller. The hiding of scenes does not
delete them, but rather only removes them from being visible on that controller.
5.
An “Unhide All” feature exists to allow you to
unhide all scenes with one quick step. Use the
arrow pad to highlight “Unhide All,” and press OK.
All scenes will be unhidden with this single step.
Page 41

Create and Control Events
41
Create an Event
An event is a scheduled one-time or recurring program that automatically controls a scene. You can
program your controllers to create and control up to 32 events in your home. Example: If you plan on
watching your favorite movie, an Event can be set to start a Scene you have created for watching
movies.
After reviewing this section, you will be able to perform the following basic functions:
• Create an Event • Rename an Event
• Activate and Deactivate an Event • Delete an Event
• Activate or Deactivate All Events • Edit an Event
Enter the event name
Dinner_
Deactivate
Edit
Create
Rename
Events
Enter the event name
Basement
1. Select the “Create” option from the Events
menu. Press the OK button.
2. Using the arrow pad, enter a name for the
event.
• To use one of the system’s preprogrammed event names, press the up
arrow and scroll through the options until
you find the desired name. You can also
use the right arrow to scroll to the end of
the pre-programmed name and add
additional characters or remove part of the
name. Press the OK button to save.
• If you want another name, press the down
arrow once. Scroll through the alphabet
until you find the first letter of the name.
When the letter appears, press the right
arrow and continue the process until the
name is spelled out. Press the OK button
to save.
Page 42

Create and Control Events
42
Thursday
Friday
Saturday
Sunday
Dinner Day
Time 8:30 pm
Day Saturday
Type 0ne time
Dinner
Event Time
8:30 pm
Time 12:00 Am
Day Saturday
Type One time
Save
Dinner
Time 12:00 Am
Day Saturday
Type One time
Dinner
• Once you are in the time settings, the
hour number will be flashing slowly. Use
the up and down arrows to select the
correct hour, then use the right arrow to
proceed to the next hour, then to minutes,
then select AM or PM. Press the OK
button to save. Note: To enter 8:30 PM
the user must enter 08:30 PM
Create an Event (continued)
• To select the day, highlight “Day” and
press the OK button.
• Use the up and down arrows to scroll and
highlight the day of the week, Everyday,
Weekdays, or Weekend and press the OK
button.
3. Scroll through the menu to view the setting
options for the event: Time, Day, Type,
Scene, and Active.
• To select the time, highlight “Time” and
press the OK button.
Page 43

Create and Control Events
• Using the arrow pad, highlight “One
Time” or “Recurring.” Press the OK
button to save.
Bedroom
Kitchen
Basement
Porch
Dinner
Dinner – Scene
Type One time
Scene Dining Room
Active No
Save
Day Friday
Type 0ne time
Scene Dining Room
Save
0ne Time
Recurring
Dinner – Type
Dinner
Type One time
Scene Dining Room
Active No
Save
Dinner
Menu
Event updated
• To select the scene, highlight “Scene”
and press the OK button.
• You will see a list of existing scenes in
your system. Using the arrow pad,
highlight the desired scene for the event.
Press the OK button to save.
4. To save the event, press the Menu button.
Note: To view and activate the event you’ve
created you can select “Active” and change
the setting to “Yes”.
Create an Event (continued)
• To create the type, highlight “Type” and
press the OK button. You can make your
event a one-time or recurring event with
this setting.
Page 44

Create and Control Events
44
Activate
Deactivate
Edit
Create
Events
Events
Events
1 Movies
2 Sports
3 Family Time
4 Dinner
1 Movies
2 Sports
3 Family Time
4 Dinner
Event Activated
1. Select the “Activate” or “Deactivate” option
from the Events menu. Press the OK button.
Activate or Deactivate an Event
2. Use the up or down arrows to scroll and
highlight the event to activate or deactivate.
Press the OK button.
3. When the activation or deactivation is
complete, a window will display a message
saying the operation was successful.
Events
Rename
Activate All
Deactivate All
Delete
Events
Rename
Activate All
Deactivate All
Delete
All Events Deactivated
Activate or Deactivate All Events
2. When the activation or deactivation is
complete, a window will display a message
saying the operation was successful.
1. Select the “Activate All” or “Deactivate All”
option from the Events menu. Press the OK
button.
Activating an event means the event will occur at the programmed time.
Page 45

Create and Control Events
45
Edit
Create
Rename
Activate All
Events
Events
1 Evening
2 Sports
3 Movies
4 Dinner
Movies Rename
Home Theater_
1. Select the “Rename” option from the Events
menu. Press the OK button.
Rename an Event
2. Use the up and down arrows to scroll and
highlight the event to be renamed.
Press the OK button.
3. Use the left arrow to erase name and the up
and down arrows to input the new event
name. Press the OK button to save.
Page 46

Create and Control Events
46
Rename
Activate All
Deactivate All
Delete
Events
Events
Events
1 Movies
2 Sports
3 Family Time
4 Dinner
1 Movies
2 Sports
3 Family Time
4 Romantic Dinner
Event deleted
1. Select the “Delete” option from the Events
menu. Press the OK button.
Delete an Event
2. Use the up and down arrows to scroll and
highlight the event to be deleted.
Press the OK button.
3. When the event is deleted, a window will
display a message saying “Event deleted.”
Page 47

Create and Control Events
47
Activate
Deactivate
Edit
Create
Events
Events
1 Movies
2 Sports
3 Family Time
4 Bed time
Sports
Time 7:30 PM
Day Saturday
Type One time
Save
Event Time
08:30 am
Sports
Time 7:30 PM
Day Saturday
Type One time
Save
1. Select the “Edit” option from the Events
menu. Press the OK button.
2. Use the up and down arrows and scroll to
highlight the event to be edited.
Press the OK button.
Edit an Event
• Once you are in the time settings, the
hour number will be flashing slowly. Use
the up or down arrows to select the
correct hour, then use the right arrow to
proceed to the next hour, then to minutes,
then select AM or PM. Press the OK
button to save. Note: To enter 8:30 AM
the user must enter 08:30 AM
3. Scroll through the menu to view the setting
options for the event: Time, Day, Type,
Scene, and Active.
• To edit the time, highlight “Time” and press
the OK button.
Page 48

Create and Control Events
48
Friday
Saturday
Sunday
EveryDay
Sports
Day Sunday
Type 0ne time
Scene Dining Room
Save
0ne Time
Recurring
Sports – Type
Sports
Time 08:30 Am
Day Saturday
Type 0ne time
Sports
• To create the day, highlight “Day” and
press the OK button.
Edit an Event (continued)
• Using the up and down arrows, highlight the
day of the week, Everyday, Weekdays, or
Weekend and press OK.
• To edit the type, highlight “Type” and press
the OK button. You can make your event a
one-time or recurring event with this setting.
• Using the arrow pad, highlight “One Time” or
“Recurring”. Press the OK button to save.
Page 49

Create and Control Events
Bedroom
Kitchen
Basement
Porch
Sports
Sports – Scene
Type One time
Scene Bedroom
Active No
Save
Romantic Dinner
Type One time
Scene Dining Room
Active No
Save
Menu
Event updated
• You will see a list of existing scenes in your
system. Using the arrow pad, highlight the
desired scene for the event. Press the OK
button to save.
Edit an Event (continued)
4. To save the event, press the Menu button.
• To select the scene, highlight “Scene” and
press the OK button.
49
Page 50

Edit and Control the Away Feature
50
Away
Activate
Deactivate
Edit
Interval 1
Interval 2
Interval 3
Interval 4
Away
Start 1:00 PM
Stop 1:00 AM
Devices
Save
Away Interval 1
Away Start Time
08:30 AM
1. Select the “Edit” option from the Away menu.
Press the OK button.
The away menu allows the user to edit and control a group of devices in set intervals that will be randomly
controlled. This gives the impression that the house is still occupied during the absence of its residents.
Each interval can set a specified start time, stop time, and which devices to be used. The Away Feature
supports up to 4 different sequential intervals.
After reviewing this section, you will be able to perform the following functions:
• Edit the Away Feature • Activate or Deactivate the Away Feature
2. Use the up and down arrows to scroll and
highlight desired interval. Press the OK
button.
3. Highlight the “Start” option to program the
time when the Away mode will begin. Press
the OK button.
4. Once you are in the away start time setting,
the hour number will be flashing slowly. Use
the up or down arrows to select the correct
hour, then use the right arrow to proceed to
the next hour, then to minutes, then select
AM or PM. Press the OK button to save.
Note: To enter 8:30 AM the user must enter
08:30 AM
Edit the Away Feature
Page 51

51
Edit and Control the Away Feature
Start 08:30 AM
Stop 08:00 PM
Devices
Enabled No
Away
1 Device
2 Lamp 1
3 Receptacle
4 Lamp 2
Away Stop Time
08:00 PM
Away Devices
Included No
On Time (mins) 1-30
Save
Away Receptacle
Start 08:30 AM
Stop 01:00 AM
Devices
Away
5. Highlight “Stop” to program the time when
the Away feature will be deactivated.
Press the OK button.
Edit the Away Feature (continued)
8. Use the up and down arrows to scroll
through the list of devices. Highlight and
press the OK button to select a device.
6. Once you are in the away stop time setting,
the hour number will be flashing slowly. Use
the up and down arrows to select the correct
hour, then use the right arrow to proceed to
the next hour, then to minutes, then select
AM or PM. Press the OK button to save.
Note: To enter 8:00 PM the user must enter
08:00 PM
7. Highlight the “Devices” option to select the
devices to be included in the away mode.
9. Highlight “Included” and press the OK
button.
Page 52

Edit and Control the Away Feature
52
10. Using the arrow pad, highlight “Yes” or
“No”. Press the OK button to save.
11. Highlight “On Time (mins)” and press the
OK button. This feature allows you to
select how long devices will turn on,
during this function.
12. Using the arrow pad, highlight the
desired on time. Press the OK button to
save.
1-30 mins
31-60 mins
61-120 mins
121-240 mins
Random on time
Included Yes
On Time (mins) 1-30
Save
Away Receptacle
Yes
No
Included
Enable
Away
Start 08:30 AM
Stop 08:00 PM
Devices
Enable No
Yes
No
13. Highlight “Enable” and press the OK button.
Note:
a. For the Away feature to function, the
selected interval must be enabled by
highlighting “yes.”
b. You must still activaate the Away function
for the Away feature to be turned on.
14. Using the arrow pad, highlight “Yes” or
“No”. Press the OK button to save.
Edit the Away Feature (continued)
Page 53

Edit and Control the Away Feature
53
Included Yes
On Time (mins) 31-60
Save
Away Receptacle
Menu
Start 5:00 PM
Stop 10:00 PM
Devices
Save
Away Receptacle
Menu
15. To save the away interval, press the Menu
button.
Edit the Away Feature (continued)
16. To save away features, press the Menu
button.
Page 54

Edit and Control the Away Feature
54
Devices
Activate
Deactivate
Edit
Away
Activate
Deactivate
Edit
Away
Activated Away
1. Select the “Activate” or “Deactivate” option
from the Away menu. Press the OK button.
Activate or Deactivate the Away Feature
2. When activation or deactivation is complete,
a window will display a message saying that
the operation was successful.
3. When the away feature is activated, the
away icon on the main menu will show a
checkmark inside the suitcase.
Page 55

Make Advanced Changes to Your System
Replace
Who Are You
Associate
Configure
Whole House
1st Floor
2nd Floor
3rd Floor
Location
1 Chandelier_01
2 Room lights_02
3 Bathroom_03
Devices
Devices
Room lights_02
Bathroom_03
Save
Associate Devices
Menu
1. Select the “Associate” option from the
Devices menu. Press the OK button.
Note: Associations only work from device
to device–Not from controllers.
Create an Association Between Devices
2. Use the up and down arrows and scroll to
highlight the location of the device that
you would like to associate and press the
OK button.
After learning about the basics of your wireless control system, you may want to make further changes to
the system. In this section, you will learn to perform these additional functions:
• Create an Association Between Devices • Uninstall a Device
• Replicate Handheld Information to a • Activate Child Lock Out
Second Controller • Reset the System
• Select a New Primary Controller • Scan for Devices
An association is a feature that you can program to allow a device in your system (source device) to
control another device (destination device). Source device can only be a dimmer or switch. Your Aspire RF
wireless system supports up to five associations for each source device. Example: By associating two
dimmer switches you can turn on both by only turning on one device.
3. Use the up and down arrows and scroll to
highlight the specific source device that you
would like to associate and press the OK
button.
4. Using the arrow pad, highlight the desired
destination device. A checkmark indicates
associated devices. Press the OK button to
Associate or Disassociate devices. To save the
association, press the Menu button. To create
additional associations, repeat steps 1-4.
Note: For multi-way associations,
destination devices can be associated
back to the source device-So devices
can be controlled from either location.
55
Page 56

Make Advanced Changes to Your System
Replicate Handheld Information to a Second Controller
56
Day
Time
Replicate
Network Discovery
Send
Receive
Replicate
Settings
Send
Receive
Replicate
1
AllON
Menu Back
AllOFF
2
3 4
5 6
78
910
1
AllON
Menu Back
AllOFF
2
34
56
78
910
1. On both controllers, select the “Replicate”
option from the Settings menu. Press the
OK button.
2. Prepare both controllers for the
replicate process.
• On the primary controller, use
the arrow pad to highlight “Send”.
Press the OK button.
• On the secondary controller, use
the arrow pad to highlight “Receive”.
Press the OK button.
Replication allows you to duplicate the information from one
controller (primary) to another controller (secondary). The
primary controller is the only controller capable of adding
devices to the network. The network can support only one
primary controller and multiple secondary controllers.
Replication includes device information and complete network
information (settings, events and scenes). Note: Replication
will work with any combination of Tabletop and Handheld
Controllers (favorite scenes cannot be transferred from a
tabletop to a handheld controller).
1
AllON
Menu Back
AllOFF
2
3 4
56
78
910
1
AllON
Menu Back
AllOFF
2
3 4
56
78
910
Secondary
Controller
Primary
Controller
Primary
Controller
Secondary
Controller
Page 57

Make Advanced Changes to Your System
57
To Cooper Controller
To Unknown Controller
1
AllON
Menu Back
AllOFF
2
34
56
78
910
1
AllON
Menu Back
AllOFF
2
34
56
78
910
1
AllON
Menu Back
AllOFF
2
34
56
7 8
9 10
Replicate Send
Remain Primary
Shift Primary
Replicate Send
From Cooper Controller
From Unknown Controller
Replicate Receive
Replication Complete
Replicate
Menu
3. Replication requires choosing
whether the controller is a Cooper
controller or an unknown controller.
• On the primary controller, choose
to send “To Cooper Controller or “To
Unknown Controller.”
Press the OK button.
Note: Replication to an
unknown controller may not
support inclusion of settings,
events and scenes.
Replicate Handheld Information to a Second Controller
• On the secondary controller, choose
to receive “From Cooper Controller
or “From Unknown Controller.”
Press the OK button.
4. The primary will then give you the
option to remain the primary
controller or shift the primary
controller to the secondary
controller. Select one and press
the OK button.
Primary
Controller
Secondary
Controller
Primary
Controller
5. When the replication is complete,
windows on both controllers will
display a message saying that the
operation was successful. To return
to the main menu press the Menu
button.
Page 58

Make Advanced Changes to Your System
Select a New Primary Controller
The replicate function allows you to shift primary control from one controller to another.
58
To Cooper Controller
To Unknown Controller
1
AllON
Menu Back
AllOFF
2
34
56
78
910
1
AllON
Menu Back
AllOFF
2
34
56
78
910
Replicate Send
From Cooper Controller
From Unknown Controller
Replicate Receive
Day
Time
Replicate
Network Discovery
Send
Receive
Replicate
Settings
Send
Receive
Replicate
1
All ON
Menu Back
All OFF
2
34
56
78
910
1
All ON
Menu Back
All OFF
2
34
56
78
910
1. On both controllers, select the “Replicate”
option from the Settings menu. Press the
OK button.
2. Prepare both controllers for the
replicate process.
• On the primary controller, use
the arrow pad to highlight “Send”.
Press the OK button.
• On the secondary controller, use
the arrow pad to highlight “Receive”.
Press the OK button.
Primary
Controller
Secondary
Controller
3. Replication requires choosing
whether the controller is a Cooper
controller or an unknown controller.
• On the primary controller, choose
to send “To Cooper Controller or “To
Unknown Controller.”
Press the OK button.
• On the secondary controller, choose
to receive “From Cooper Controller
or “From Unknown Controller.”
Press the OK button.
Primary
Controller
Secondary
Controller
Page 59

Make Advanced Changes to Your System
Associate
Configure
Uninstall
Install
Uninstall Device
Press the install button
on the device
Uninstall Device
Device Removed
Devices
2. Press the Install button on the device that you
want to uninstall.
• The process to uninstall the device will last
several seconds.
• If you don’t want to uninstall the device,
press the Back button on the controller during
the waiting period.
3. When the uninstall is complete, a window
will display a message saying that the
operation was successful.
• The LED on the device will blink when it has
been successfully uninstalled.
59
1
All ON
Menu Back
All OFF
2
34
56
78
910
Remain Primary
Shift Primary
Replicate Send
Replication Complete
Replicate
Menu
4. Use the down arrow to scroll and
highlight “Shift Primary.” Press the
OK button.
5. When the replication is complete,
windows on both controllers will
display a message saying that the
operation was successful. To return
to the main menu press the Menu
button.
Primary
Controller
1. Select the “UnInstall” option from the
Devices menu. Press the OK button.
Uninstall a Device
Before uninstalling a device, the device must be installed in the wireless system. If you receive an
“Unknown device” error message during this operation, the device is not installed in your system.
Select a New Primary Controller (continued)
Page 60

60
Control
Device Status
Child Lockout
Rename
Devices
Whole House
1st Floor
2nd Floor
3rd Floor
Location
Devices
1 Overhead lights
2 Light 2
Overhead lights Lockout
No Lockout
Sequence Control
Remote Ctrl Only
Overhead lights Lockout
No Lockout
Sequence Control
Remote Ctrl Only
Device updated
1. Select the “Child Lockout” option from the
Devices menu. Press the OK button.
Activate Child Lockout
2. Use the up and down arrows to scroll and
highlight the location of the device for child
protection. Press the OK button.
3. Use the up and down arrows to scroll and
highlight the specific device for child
protection. Press the OK button.
4. The current level of protection will be marked
with a checkmark. If you want a different
level, use the arrow pad to highlight one of
the three available protection levels.
Press the OK button.
• If you select “No Lockout”, the device will
not be protected.
• If you select “Sequence Control” for a
Cooper device, press the button on the
device three times in less than 2 seconds to
turn the device on or off.
• If you select Remote control only, the
device will only be controlled by the
handheld or table top controller.
5. To confirm changes press the OK button to
save the settings, wait for a pop-up window
to display “Device updated.”
This function allows you to protect children from electrical devices. You can choose from “No Lockout,”
which will offer no child protection, “Sequence Control,” which will allow the device to be controlled locally
by a key press sequence, or “Remote Control Only,” which will only allow a device to be controlled with a
wireless controller.
Make Advanced Changes to Your System
Page 61

61
Reset the System
Network Discovery
Language
Version
Reset
System Reset
Press 0K or Cancel to
exit without resetting
Press Reset to reset
Reset
Resetting
Please Wait
System Reset
Settings
Reset
Reset successful
System Reset
Menu
Menu
Reset
1. Select the “Reset” option from the Settings
menu. Press the OK button.
2. To reset the system, press the Menu button.
The process to reset the system will last
several seconds.
• If you don’t want to reset the system,
press the OK or Back button on the
controller.
3. When the system reset is complete, a
window will display a message saying that
the operation was successful. To return to the
main menu press the Menu button.
This function allows you to clear your handheld controller of all devices, scenes, and events.
Note: Resetting a Primary Controller will result in a loss of ALL pre-programmed scenes, events, and
all devices will be removed from the controllers memory.
Make Advanced Changes to Your System
Page 62

Replication Receive
Replication Receive
Settings
Scanning for new devices
1 device
not found
Version
Get Name & Locn
Scan for Devices
Reset
Version
Get Name & Locn
Scan for Devices
Reset
Settings
Settings
Version
Get Name & Locn
Scan for Devices
Reset
2 devices
not found
1 device
not found
Make Advanced Changes to Your System
1. During the replication process if any devices
are not found a message is momentarily
displayed that indicates the device is not
found.
Scan for Devices
2. In order to obtain the device information from
any devices not found during the initial
replication select “Scan for Devices” from the
Settings menu. Press the OK button. The
display will show a progress bar while
devices are being scanned..
3. At the completion of the scan, if any devices
cannot be reached, the display will provide a
prompt indicating how many devices were
not communicated with that location.
4. If any device cannot be reached during the
first scan, move to another area of the
house, and repeat the Scan. This process
should be repeated until there is no prompt
indicating devices were not found.
62
When copying (replicating) from a non-Cooper controller, some device information may not copy
completely. This includes Device Type, Device Name and Device Location. In the event that some device
information is not received, the “Scan for Devices” function allows the user to rescan in order to obtain the
missing device information.
Page 63

Troubleshooting Guide and Maintenance
63
Network Discovery
Language
Version
Reset
Node ID 1
Home ID 1E848A
Application 1.0.24
Protocol 2.09
Settings
Version
OROR
Back
Retrieve Version Information about your System
1. Select the “Version” option from the Settings
menu. Press the OK button.
2. View version information about the wireless
control system.
Note: The numbers shown here may be
different from your controller.
3. When finished, press the OK or Back button
to return to the main settings menu.
Note: “Range Test” and “Send Node Info”
functions, which are listed within this function
are for factory use only.
Use this section to learn about the following functions:
• Retrieve Version Information about your System
• Retrieve Version Information about Individual Devices
• Retrieve Device Information (“Who Are You” feature)
• Update Secondary Controller Device Information (“Get Name & Locn” feature)
• Remove a Failed Device
• Replace a Failed Device
• Utilize Network Discovery
Page 64

64
Rename
Location
Version
Remove
Location
Devices
1 Overhead light
2 Receptacle
3 Device 3
Devices
Node ID 2
Application 1.00
Protocol 2.09
Library Rout Slave
Receptacle version
Whole House
1st Floor
2nd Floor
3rd Floor
OROR
Back
1. Select the “Version” option from the Devices
menu. Press the OK button.
Retrieve Version Information about an Individual Device
2. Use the up and down arrows to scroll and
highlight the location of the device. Press the
OK button.
3. Use the up and down arrows to scroll and
highlight the specific device. Press the OK
button.
4. View version information about the device.
Note: The numbers shown here may be
different for each device.
5. When finished, press the OK or Back button
to return to the main settings menu.
Troubleshooting Guide and Maintenance
Page 65

65
Troubleshooting Guide and Maintenance
Remove
Replace
Who Are You
Associate
Node ID 6
Name Receptacle
Location 1st Floor
Who Are You
Devices
1. Select the “Who Are You” option from the
Devices menu. Press the OK button.
Who Are You Feature
This feature allows you to view the Node ID, Name, and Location of any installed device.
2. Press the install button on a device. The
screen will display Node ID, Name and
Location for the device.
Note: this information will go away after five
seconds or be replaced if you press another
device install button.
Get Name & Location Feature
This feature allows a Secondary Controller to update itself with the device naming information that is
contained within each device. The device information for “Name & Location” may be updated with a
PC-based Primary Controller, however, these updates would not be reflected in the Secondary Controller.
The Secondary Controller will request the name
& location of all network devices, and will
update this information inside the Secondary
Controller. During the update a progress bar
will provide indication of the status of this
request.
Note: Cooper controllers will truncate any
device names or locations to 16 alphanumeric
characters.
1. Select the “Get Name & Locn” option from
the Settings menu. Press the OK button.
Network Discovery
Language
Version
Get Name & Locn
Settings
Settings
Network Discovery
Language
Version
Get Name & Locn
Scanning Devices
Name & Location
Page 66

66
Use this function to replace a failed device. When you use the “Replace” function, the configuration of the
replaced device, device association, and Scene/Event information will no longer be available for the new
device. The user must reconfigure the device, reconfigure associations, as well as edit Scenes and Events
that use this device. Note: Scenes and Events names will still show in the Scene list and Event List. The
user must edit these functions and resave.
Devices
1 Receptacle
2 Bathroom Lights
1 Dining Room Dimmer
2 Bathroom Lights
3 Den Lights
4 Stereo Outlet
Devices
Version
Remove
Replace
Who Are You
Whole House
1st Floor
2nd Floor
3rd Floor
Location
Devices
Press the install button
on the new device
Device replaced
Replace Device
Testing
Bathroom Lights
1. Select the “Replace” option from the Devices
menu. Press the OK button.
Replace a Failed Device
2. Use the up and down arrows to scroll and
highlight the location of the device to be
replaced. Press the OK button.
3. Use the up and down arrows to scroll and
highlight the specific device to be replaced.
Press the OK button.
4. The controller will check the device. If the
device has failed, the controller will prompt
you to install a new device.
5. Press the install button on the new device.
The controller will generate new node
information for the system and complete the
replacement process. The installation process
may last thirty seconds (in larger networks
time may be longer). A message will confirm
that the device has been replaced.
Note: The new device will be installed at it’s
default settings.
Troubleshooting Guide and Maintenance
Page 67

67
Troubleshooting Guide and Maintenance
Note: Use this function to remove a failed device from the network that you do not want to replace.
Location
Versions
Remove
Replace
Whole House
1st Floor
2nd Floor 1
3rd Floor
Location
Devices
Devices
1 Receptacle
2 Bathroom Lights
Devices
1 Receptacle
2 Bathroom Lights
Devices
1 Receptacle
2 Bathroom Lights
Bathroom Lights removed
Testing
Bathroom Lights
1. Select the “Remove” option from the Devices
menu. Press the OK button.
Remove a Failed Device
2. Use the up and down arrows to scroll and
highlight the location of the device to be
removed. Press the OK button.
3. Use the up and down arrows to scroll and
highlight the specific device to be removed.
Press the OK button.
4. The controller will check the system to
confirm that the device has failed.
5. A message will confirm that the device has
been removed.
Page 68

68
Panic
Replicate
Network Discovery
Version
Settings
Settings
1 Receptacle
2 Bathroom Lights
Network Discover
Pass 1
Settings
1 Receptacle
2 Bathroom Lights
Network Discover
Pass 2
Settings
1 Receptacle
2 Bathroom Lights
Network Discover
Pass 3
Settings
1 Receptacle
2 Bathroom Lights
Network Discover
Pass 4
Utilize Network Discovery
1. Select the “Network Discovery” option from
the Settings menu. Press the OK button.
2. The discovery process will last several
seconds. This process occurs in 4 steps,
indicated by Pass 1, Pass 2, Pass 3 and
Pass 4. When the operation is completed
you will be taken back to the Settings menu.
Network discovery is a network management function that forces the controller to search for devices and
update the network routing tables contained in the devices and in the controllers. It is rarely used in the
day-to-day operation of the wireless system. Use this function to update the network when new devices or
settings have been added to the network. On large networks, this process may take several minutes.
Troubleshooting Guide and Maintenance
Page 69

69
Ordering Information
Ordering Information for Cooper Wiring Devices
Description Desert Sand Silver Granite White Sand
RF Dimmers - Wire Leads
600W Smart INC (no neutral) RF9534DS RF9534SG RF9534WS
600W Smart INC/MLV RF9534-NDS RF9534-NSG RF9534-NWS
600W Smart ELV RF9535-NDS RF9535-NSG RF9535-NWS
1000W Smart INC (no neutral) RF9536DS RF9536SG RF9536WS
1000W Smart INC/MLV RF9536-NDS RF9536-NSG RF9536-NWS
1000W Smart ELV RF9537-NDS RF9537-NSG RF9537-NWS
RF Accessory, compatible RF9542DS RF9542SG RF9542WS
only with no neutral RF dimmers
RF Accessory, compatible RF9542-ZDS RF9542-ZSG RF9542-ZWS
only with RF Smart Dimmer
RF Switches - Wire Leads
Rating
A V/AC
Single Pole 15 120 RF9501DS RF9501SG RF9501WS
Single Pole (no neutral) 8 120 RF9518DS RF9518SG RF9518WS
(call for availability)
RF Accessory, 120 RF9517DS RF9517SG RF9517WS
compatible only with
RF Switches
Universal Switch/Dimmer (uses two RF9500DS RF9500SG RF9500WS
CR2025 batteries), includes single gang
wallplate, use with RFBS22 for
multi-gangs
RF Receptacles - Wire Leads
Rating
A V/AC NEMA
Duplex 15 125 5-15R RF9505-TDS RF9505-TSG RF9505-TWS
(Split control only)
RF Controllers
Rating and/or
power source
Handheld Two AA Batteries — RFHDCSG —
Table Top AC Power Supply — RFTDCSG —
or Three AA Batteries
Wall Mount 120V/AC Wiring RFWDCDS RFWDCSG RFWDCWS
USB Controller, —— RFUSB —
includes software
USB Installer Controller, —— RFUSB-PRO —
includes software
SDIO Card Controller, — — RFMCC —
includes software
Page 70

70
Ordering Information
Ordering Information for Cooper Wiring Devices
RF Accessories
Type Description
Computer Network Internet Gateway RFBER
Accessories (call for availability)
Garage Door Plug-in Gateway Module RFBGD
Accessories Garage Door Opener Conversion Module RFUGR
Keychain Remote Control RFKGT
Wallmount Keypad RFWGT
Lighting Control 300W Plug-in Lamp Dimming Module RFLDM
Accessories (call for availability)
15A Plug-in Switch Appliance Module RFAPM
(call for availability)
Description Desert Sand Silver Granite White Sand
Aspire Mid-Size Wallplates
1-Gang 9521DS 9521SG 9521WS
2-Gang 9522DS 9522SG 9522WS
3-Gang 9523DS 9523SG 9523WS
4-Gang 9524DS 9524SG 9524WS
5-Gang 9525DS 9525SG 9525WS
6-Gang 9526DS 9526SG 9526WS
Inner Wallplate for RF9500 For all colors... RFBS22
(use in multigang applications)
Note: Features and specifications are subject to change.
Page 71

71
Glossary
Glossary of Terms
All Off – Turns OFF all controlled devices unless specifically changed in the All Switch section of the Devices menu.
All On – Turns ON all controlled devices unless specifically removed in the All Switch section of the Devices menu.
Association – A feature that you can program to allow a device in your system (source device) to control another
device (destination device). Your ASPIRE RF system supports up to 5 associations for each source device. You
can also create “2 way” associations so that both source and destination devices control each other.
Away Mode – This feature allows you to schedule certain devices to turn on for a period of time while you’re away
or on vacation.
Child Lockout – Your Aspire RF devices (dimmer, switch or receptacle) can have a Child Lockout feature activated. See
the advanced settings section of the manual to activate this feature. Options are – No Lockout (default for all Cooper
Aspire RF devices) devices may be turned on and off normally by pressing the paddle on a switch or dimmer; Sequence
Control – in this mode the paddle of the light switch or dimmer must be pressed three times in two seconds for the
device to turn on or off.; Remote Control Only – The device may only be turned on or off using remote controllers. The
device will not function if the paddle switch is pressed at the device.
Configure – The process of defining power on feature and functions for devices that are used selectable. Cooper
devices have defined parameters that are configurable.
Device Status – This feature allows the user to query the status of a device.
Event – A preset time, saved on the controller, for a scene to take place.
Favorites – A group of scenes that appear on the Tabletop Controller screen and enable convenient one button
control scene.
Get Name & Location– A function that allows a controller to update the devices name and location information.
Install (Also referred to as “Inclusion”) – Process used to include devices into the ZWave network. When a device
is installed into the network it is assigned a device ID and a Home ID automatically by the Primary Controller.
Network Discover – A feature that allows the network to be intreeogated in order to refresh the routing table. This
process is done when the RF network has changed and is no longer performing optimally.
Off Delay – Sets the time delay for a light to turn off after holding down the switch or dimmer paddle for 2
seconds – Local control only at the device. Off Delay will not work from the controller.
Panic – Flashes all controlled devices in the home unless some are specifically removed in the Panic section of
the Settings menu.
Panic Off Time – The period of time, in seconds, that a selected light will stay off for each flash during a Panic event.
Panic On Time – The period of time, in seconds, that a selected light will stay on for each flash during a Panic event.
Power On State – Determines whether a light will be on, off or in its last dim level when power resumes after a
power outage.
Primary Controller – Main controller of the ZWave network. The Primary Controller may control all Z-Wave
compatible devices. There may only be one Primary Controller in a network. The Primary Controller is the only
controller which may be used to install additional devices to the network.
Page 72

Glossary
72
Glossary of Terms (continued)
Ramp Time – The period of time it takes a dimmer to go from Off to fully bright (or its preset level), or from
fully bright (or its preset level) to off.
Replace– A function used for replacing a non-function device and keep the device in the RF network.
Replicate (Replication) – A function used to transfer the information stored in the Primary Controller to a
secondary controller (Table-Top to Hand Held or to USB stick for control of network by software).
Remove – A function used for removing a non-function device or a device that you want to remove from the
network.
Reset – A function for resetting the controller back to factory setting.
Scene – A group of lights set to react together to a single command. A scene might turn some devices on,
others off and still others may dim to a preset level.
Secondary Controller – Another controller to which all information has been transferred except the Primary
Controllers ID information. Secondary controllers are capable of all functions except adding devices to the network.
Transfer to WDC – A feature for transferring scenes from a primary controller to a 5 button Scene Controller
(RFWDC).
Version– Use for checking the Software revision, Node ID, Home ID and protocol of the controller or devices..
Uninstall (Also referred to as “Exclusion”) – Process used to remove (exclude) devices into the Z-Wave
network.
Who Are You – Function used to quickly identify what the Node ID of a device is, what its name is and what
location it is listed under in the controller.
Page 73

73
Cooper Wiring Devices warrants our products against defects in material or workmanship under
normal operating conditions during their initial installation for various periods of time,
depending on the item category as follows: Cooper Wiring Devices will replace or repair the
item provided that it has not been altered or subjected to abuse, accident, improper installation or
improper use, and is returned prepaid to Cooper Wiring Devices Quality Assurance Department
at the address shown below. If the product has been discontinued and replacement is deemed
necessary by Cooper, replacement will be made with the nearest available equivalent model.
This warranty does not cover consumables (such as fuses). Proof of purchase in the form of a
bill of sale or receipted invoice that shows that the item is within the applicable warranty period
must be presented to obtain the repair or replacement provided by the warranty. REPAIR OR
REPLACEMENT AS PROVIDED UNDER THIS WARRANTY IS THE EXCLUSIVE REMEDY OF THE
CUSTOMER. COOPER WIRING DEVICES SHALL NOT BE LIABLE FOR INJURY, PROPERTY
DAMAGE OR INCIDENTAL, SPECIAL OR CONSEQUENTIAL DAMAGES ARISING DIRECTLY OR
INDIRECTLY FROM THE USE OF ITS PRODUCTS, NOR LOST PROFITS, OR FOR BREACH OF ANY
EXPRESS OR IMPLIED WARRANTY ON ANY OF ITS PRODUCTS. THESE LIMITATIONS SHALL
APPLY REGARDLESS OF THE FORM OF ACTION, WHETHER IN CONTRACT OR IN TORT,
INCLUDING NEGLIGENCE. EXCEPT TO THE EXTENT LIMITED OR PROHIBITED BY APPLICABLE
LAW, ANY IMPLIED WARRANTY OF MERCHANTABILITY OR FITNESS FOR A PARTICULAR
PURPOSE ON THESE PRODUCTS IS LIMITED IN DURATION TO THE DURATION OF THIS
WARRANTY. Some states do not allow the exclusion or limitation of incidental, special or
consequential damages, or allow limitations on how long an implied warranty lasts, so the
above limitations may not apply to you. This warranty gives you specific legal rights and you
may also have other rights that vary from state to state.
Limited Warranty
F
C
c
Warranty
Category Warranty
Wireless Lighting Control Limited 5 Year
Wallplates Limited 2 Year
Page 74

Notes
74
Page 75

Notes
75
Page 76

RFHDCSGD (REV. B)
 Loading...