

Page 1
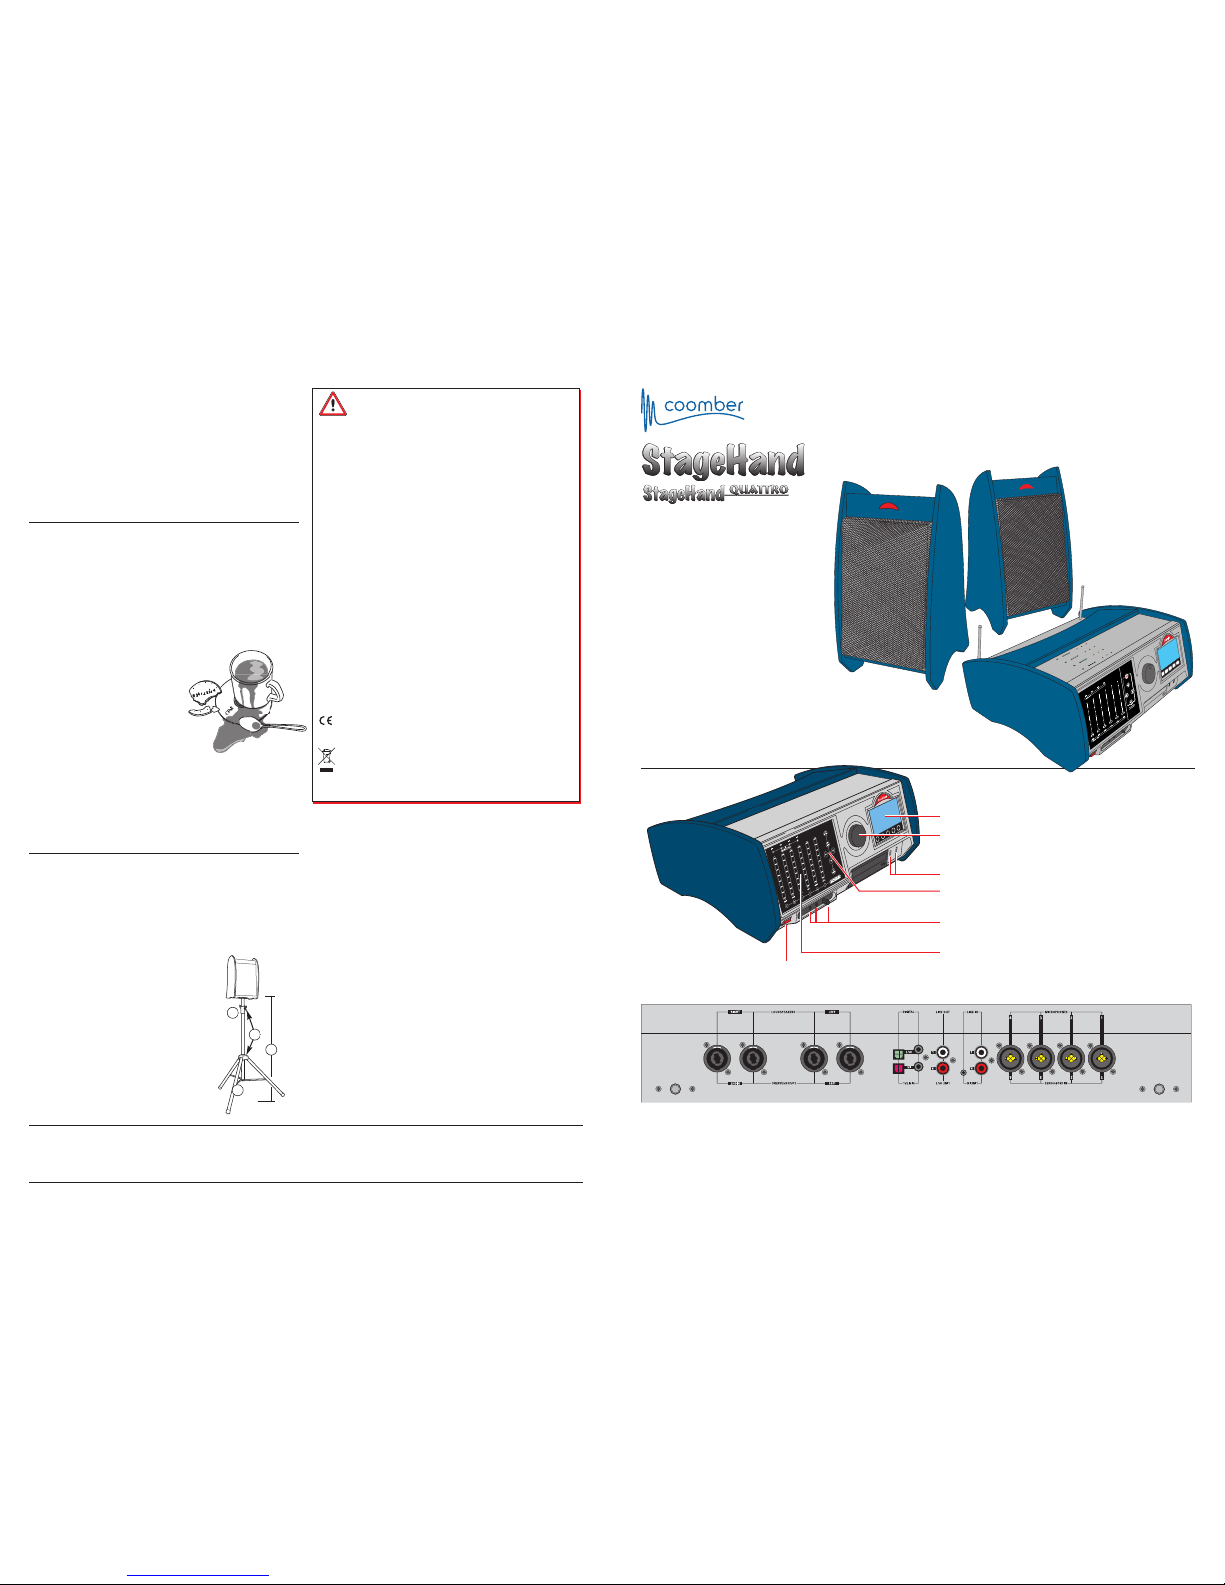
USING SPEAKER STANDS
Your StageHand speakers can be mounted onto our tripod
stand (part no. 1820). This can improve and enhance sound
performance due to the height of the loudspeakers.
For your safety:-
A
the security pin (attached to the main
body of the tripod above the extension
screw clamp) has been inserted and
secured with the split pin,
B that both screw clamps are fully tightened.
C the tripod is not extended to a height
greater than 1.5m,
D ensure that the feet are spaced to
their widest setting for security,
Coomber Electronic Equipment Ltd.
Brindley Road, Warndon, Worcester, WR4 9FB, U.K.
• All Coomber equipment is covered by a 12 months warranty against
defective components or faulty manufacture from date of dispatch.
•
Any modifications to or misuse of the equipment renders this warranty void.
• Equipment that is security marked or damaged cannot
under any circumstances be exchanged.
• Coomber reserve the right to change products and specifications without notice.
SAFETY & GENERAL
INFORMATION
Class 1 laser product:
Warning - This equipment is fitted with a LASER
diode which can harm the eyes. Do not
disassemble the casing or use any part of the
contents for any purpose other than its intended
use. This equipment is a CLASS 1 Laser Product presenting no danger if used as intended (i.e. to
play or record CDs).
Headphone Safety:
Always reduce volume and connect headphones
into the equipment before placing them over ears.
Environments:
This apparatus should not be exposed to dust,
moisture, water, chlorine and other corrosive
substances in normal use or during storage. It will
cause damage to this equipment.
Swimming pool atmospheres: are very hostile to
all electro-mechanical equipment (e.g. steel rusts
and rubber perishes).
Apparatus returned for repair showing evidence of
use in adverse environments may, at our discretion,
be charged for (even during the warranty period).
• If fitted, rechargeable batteries should be
replaced by a competent technician.
• Do not cover ventilation openings with any
items (e.g. newspaper, fabrics etc.)
• Naked flames, such as lighted candles, should
not be placed on or near the apparatus.
• Do not expose apparatus to dripping or
splashing. Objects filled with liquids, such as
vases, should not be placed on or near the
apparatus.
European Safety Standards:
Coomber equipment complies with EN60065. Any
local requirements for use of this equipment should
be taken into account.
EC Declaration Of Conformity: This
product has been tested and meets the
intent of the EMC Directive 86/336/EEC and of the
Low Voltage Directive 73/23/EEC.
Disposal and Recycling: Where possible
this unit has been constructed from
recyclable materials and may, at the end of
life, be returned to us for environmentally
acceptable disposal.
Batteries (inc. rechargeable) should be discarded in
accordance with local regulations.
Class I construction:
This equipment must be EARTHED.
Mains Voltage UK & EEC: nominal 230V 50Hz
USA:110-120V 60Hz
• Always isolate from mains supply when not in
use by removing the plug from the wall socket.
UK & EEC Mains Cord: Line=Brown,
Neutral=Blue, Earth=Yellow & Green.
USA Mains Cord: Line=Black, Neutral=White,
Earth=Green. Fitted with moulded USA plug.
Mains Plug: The mains cable is fitted with either a
UK 13Amp or Semko moulded plug. UK Mains Plug
fuse rating is 3Amp (to BS1362)
If another plug type is required, follow instructions
from the plug manufacturer, or seek advice from a
competent person. DISPOSE OF THE ORIGINAL
PLUG SAFELY, REMOVING ANY FUSES where
fitted. DO NOT RE-USE.
Connecting to the mains supply: The unit must be
connected to a socket outlet with a protective
earthing connection.
The mains plug must be accessible at all times.
Model type and rating information is located on a
label on the base of the product.
Additional Technical Information:
If you require any further help or information, or if
any point is not clear, please telephone 01905
342070 quoting your model number and serial
number (located on a label on the base of the
product). Our Technical Department will be pleased
to help you.
Note: This equipment contains no user serviceable
parts and should only be disassembled and
reassembled by competent qualified personnel.
Dismantling will render the warranty void.
Electrical Safety Testing:
Safety testing and servicing should only be carried
out by competent qualified personnel.
• When undertaking an earth bond safety test,
only use the externally exposed metalwork. Do
not test against internal metal components
found inside tape mechanisms or CD trays THIS WILL LEAD TO IRREPARABLE INTERNAL
DAMAGE NOT COVERED BY OUR WARRANTY.
• The supply cable is part of a special
assembly. If damaged the equipment should
be returned to Coomber Electronic Equipment
Limited or their agent for cable replacement.
GH INSTR StageHand v1.0 10/09/2010 © Coomber Electronic Equipment Ltd. 2010 v1.0 first published 2010
Operating Instructions
Introduction
Thank you for purchasing this
Coomber StageHand product.
This unit has been manufactured to
the highest specification, offering
clear and powerful performance.
We believe that it will offer many
years of reliable service, provided
that it is used in accordance with
these instructions.
We hope that you will enjoy using this product but, should
you have any concerns or experience any difficulties, please
feel free to contact us for support or advice at any time.
• Loudspeaker sockets (2 left / 2 right) -
for Coomber 418 or 419 bi-wired loudspeakers.
130w left 130w right (where pair of speakers are used),
65w + 65w left and 65w + 65w right (where four speakers are used),
• Digital input / output, coaxial and optical connections -
ideal for connection to digital recorder/playback device such as miniDisc.
• Stereo (left / right) phono line output -
provides line level signal output for recording devices, PA or mixer etc.
• Stereo 3.5mm line input -
connect MP3 player or laptop etc via headphone socket.
• Stereo (left / right) phono line input -
connect and amplify keyboard, MP3 player or laptop etc.
• 4x combination XLR/6.35mm jack microphone inputs -
48v phantom power for the XLR sockets
can be selected via the Touch Sensitive Mixer Desk.
• 2x USB flash drive ports
Mains switch
Main Features
Rear Panel
• LCD touch screen
• Rotary Controller
Volume, cue, speed, tone control.
The default setting is for volume.
• CD / USB / memory transport keys
Control playback of selected drive.
• Headphone Monitoring Sockets & Volume Control
Listen to any combination of channels from the mixer desk.
• Touch Sensitive Mixer Desk
Set individual volume levels of four microphones,
line input and CD (or internal memory or USB flash drives).
D
A
C
B
COPYRIGHT
This product has been designed for school use and it is
envisaged that recordings for copying will have been created
within the school environment. Remember that to copy a
CD or any portion of a CD requires the consent of the
copyright owner. Coomber does not endorse the illegal
copying of copyright material.
15
15
CARE OF CDs AND CD DRIVES
CD drives are delicate precision engineered assemblies
which should be handled with care. Ensure that during use
the equipment is operated or supervised by an adult.
Our warranty does not cover damage through misuse. This
includes forcing the drawer closed with a CD in the tray
after turning the mains power off!
We receive many units for repair that work
perfectly well. Often we find the CDs
to be dirty or scratched - problems
not covered by our warranty.
We reluctantly charge for
collecting and examining
equipment that is not faulty.
If a CD skips or will not play, please check
the following before contacting us for advice or repair:-
• that the CD is not scratched
• that the CD is not covered in finger prints, dust, hair or
greasy / sticky substances, or
• that the CD has not been inserted upside down.
16
16
17
17
Page 2
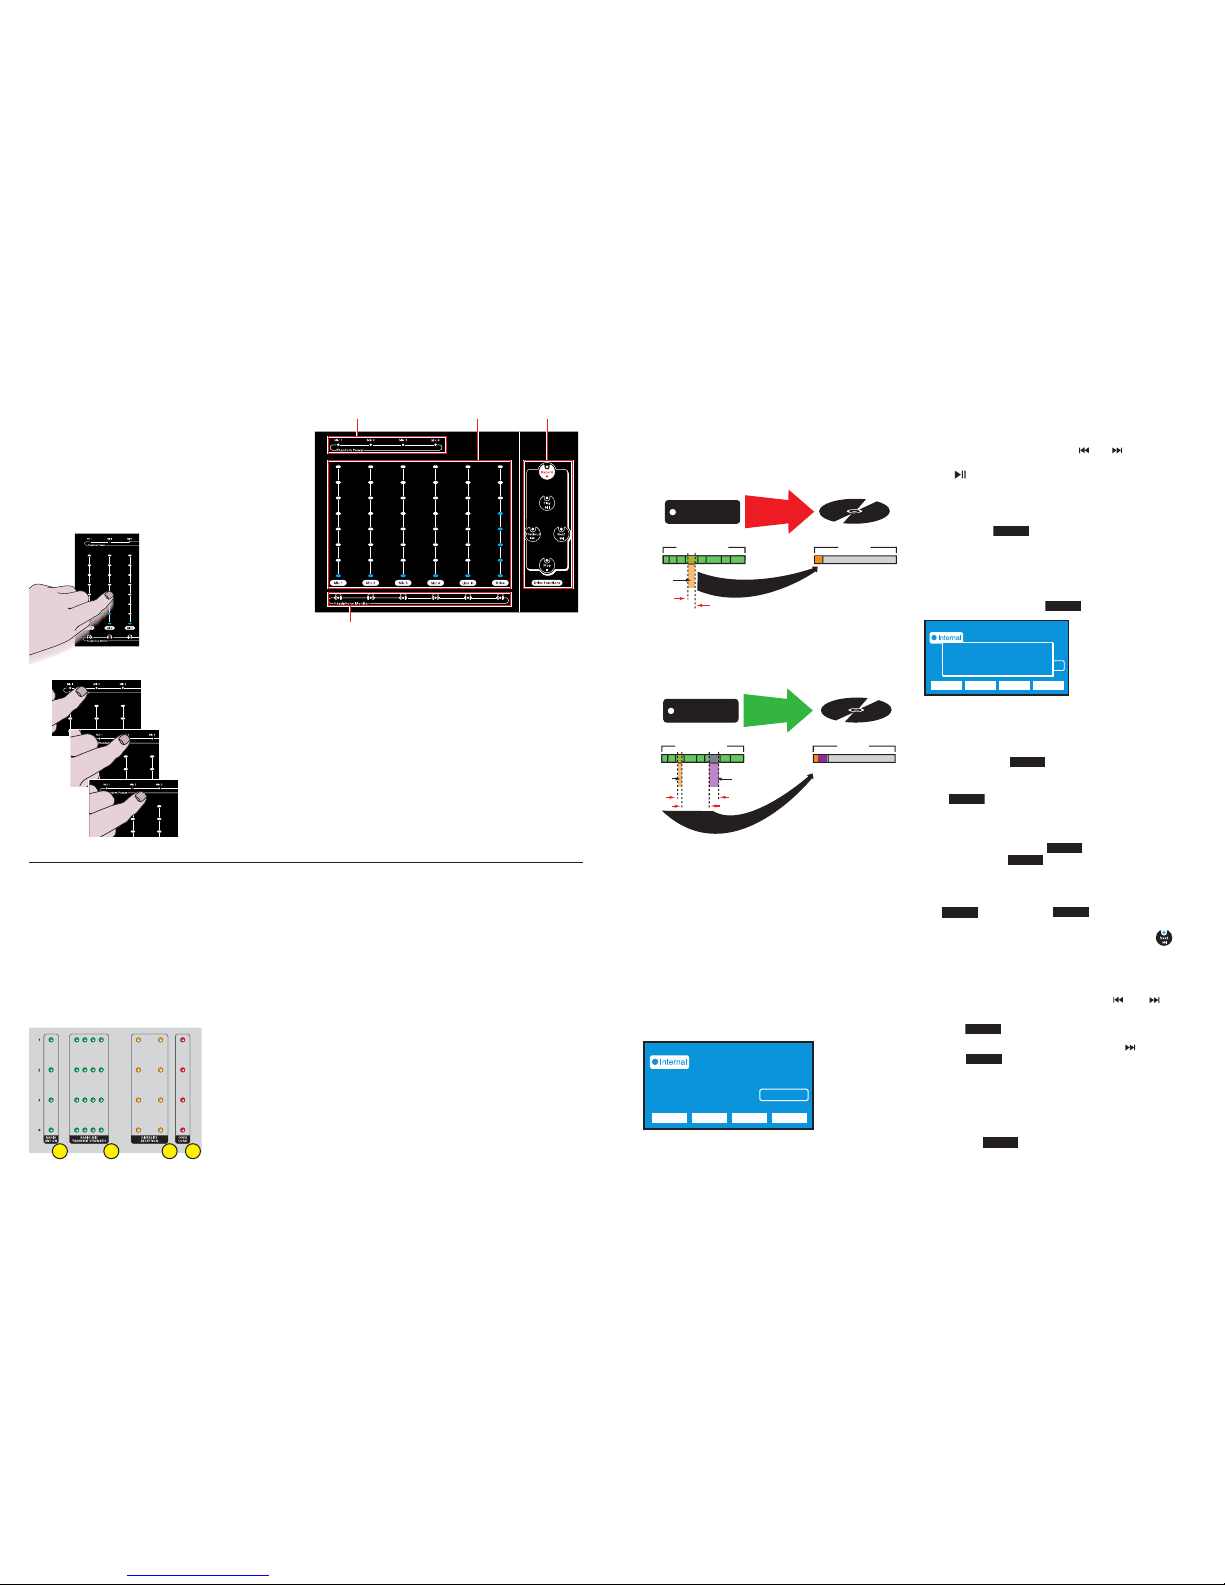
USE CUEING TO FIND
THE RIGHT BITS
Splicing audio segments together
“Use Cueing...” allows users to select any portion of an
audio track(s) and copy it from memory to CD or vice versa.
Here we show copying from memory to CD.
In this example, a
segment of Track 4 has been
copied to the memory (Drive B).
So, imagine you have a number of tracks on the memory
and that you want to extract a segment of track 4. You can
“mark” the beginning and end of the segment and copy it
to a CD-R (see example above).
You can select a segment greater than 4 seconds in total. It can start anywhere and
finish in the same track (or at any later point in the memory).
In this example, part of
Track 3 is spliced together
with part of Track 6 to make a
new track on the CD in Drive A.
You can also select two separate segments and join them
together. The two segments will play as one track - without
any apparent gap in the middle.
“Use Cueing...” offers users the opportunity to select the
best parts of a recording and copy them. It has great
potential for the preparation of assessments and lessons and
can also benefit drama departments in the compilation of
tracks for productions etc.
How to use the “Use Cueing...” facility
Start off by inserting a CD-R (or RW). To select “Use
Cueing...” from the menu, go to Erase & Copy functions >
Copy audio > Internal memory to CD > Part of th e
internal memory > Use cueing to find the right bits..
Eventually, this screen is
reached, allowing users to
begin the splicing process.
Information about the internal memory is displayed.
The memory is in PAUSE and CUEING mode.
Copying segments of a track
To copy a segment from the memory to CD, locate the
point from which you want to begin the segment.
Select the track required using the and keys.
Select to begin playing the track and listen for the
moment that you wish to select as a start point.
Tip: You can use the rotary control knob to move quickly backwards and forwards
through the track enabling you to pinpoint the location more quickly.
Now, press the key as the track is playing (at the
appropriate moment) to place the first (start) marker.
Alternatively, note the time where you want to set the
marker and press PAUSE. Using the rotary control you can
then wind back to the moment where you wish to place the
marker before pressing the key.
The display will indicate where “Mark
1” - the first (start) marker - has been
placed.
Next, you can select a finish point. This can be on the same
track, or on another track - but it must be after the start
point! You’ll notice that the key marked “1” now reads “2”.
Simply locate the moment where you want finish the
segment and press again.
Now that you have start and finish points selected you can
press to copy the selection to the other disc
Alternatively, you can set third and forth “Marks” and
“splice” two separate segments together into one track.
Tip: At any point before you press the key, you can look at your
selections by pressing the key. Each press of the key will scroll you
through the markers with their appropriate start and finish times shown in the
window. The key number changes to identify which marker you are looking at.
Edit any marker by selecting a new moment and pressing
the key. Then select to finish.
At any time you may cancel the actions by pressing .
Splicing tracks together
You might want to splice two tracks together to form one
track.
To do this, select the first track using the and keys
on the touch sensitive mixer panel (while in PAUSE mode).
Press the key.
Move to the start of the next track using the key and
press the key again.
These actions select the start and finish points of the first track.
Now select the second track using the same method.
“Mark 3” and “Mark 4” will become the start and end points of the second track.
Splice the two tracks together and copy them to the CD by
pressing the key.
1 2 3 4
WORKING WITH MICROPHONES
StageHand Quattro incorporates four radio receivers,
allowing four roving radio mics to be used together.
Each receiver has its own frequency. To avoid int erference,
they are switched off by default.
A radio receiver switches on when the matching radio mic is
detected. This happens when the radio mic or bodypack is
switched on within the vicinity of the StageHand unit.
Indicators on the top panel show which radio mics are
active.
1. Indicates that a radio mic
has been switched on.
2. Transmission strength from
the radio mic. If low,
check the radio mic or
bodypack battery.
3. Shows that either (or
both) aerials are receiving
a signal from the mic.
4. Warns that the signal
being received is too
powerful.
Our radio mics operate up to 50m away in good conditions;
provided there is a clear “line of sight” between the mic or
bodypack and the StageHand QUATTRO. Objects (especially
metal) placed between can cause a temporary loss of signal.
TIP: Always ensure that radio mics have good batteries installed.
Weak batteries will impede performance.
Wired Microphones (All StageHand models)
Four sockets located in the rear panel accept both 6.35mm
jack and XLR mic connectors.
Note: Switching on a radio mic (that matches the frequency of any of the onboard
radio mic receivers) within the vicinity of a StageHand Quattro will disable the wired
microphone socket.
Avoiding Feedback
Don’t turn up the microphone(s) so high as to allow them
to pick up sound from the speaker - it will cause screaming
feedback. If this happens turn off the mic, reduce the
volume level, turn the mic back on and adjust the volume.
Do not stand in front of the StageHand speakers while using
a microphone. Stand to one side, or behind it.
2
2
WORKING WITH THE
TOUCH PANEL MIXER
The StageHand features a unique touch sensitive
six channel mixer to be used in conjunction with the
(rotary) volume control immediately to the right of it. The
mixer allows you to blend together four microphones, line
input and either a CD player, audio from a USB flash drive
or audio recorded on the internal memory.
The panel is touch sensitive
Slide your finger up or down any
of the six “sliders” to increase or
decrease the level of each mic,
line input or the selected drive.
As you adjust the level, blue
indicators glow to show the level
selected.
Adjust the volume to suit.
48v Phantom power
Can be selected for any mic
channel (if using capacitor mics)
by pressing the graphic symbol.
Press once to select, press
again to deselect. An LED
indicator glows to show
that the item is
selected.
Headphone monitoring
Use the headphone monitor on/off selector keys to listen
to an any individual or selection of channels. Output from
the loudspeakers remain unaffected by your choice.
If you’ve never used a mixer before, please note...
Adjusting the large volume control on its own is not
enough to get sound out of the speakers - you must also
set the levels of the mixer inputs. If the mixer controls are
set to the lowest level, no sound will come out - however
much the volume is turned up.
All of the mixer levels are set to minimum except for the drive, so that any inserted
CD, USB flash drive, or internal memory audio tracks can be played without having
to adjust the mixer settings.
1
1
CD DRIVE A
INTERNAL MEMORY
DRIVE B
internal memory audio CD
COPY A SEGMENT
FROM DRIVE B
TO DRIVE A
Track No. 1 2 3 4 5 6 7 8
Segment
selected
Track No. 1
"Mark" 1
"Mark" 2
a
n
d
c
o
p
y
t
o
t
h
e
m
e
m
o
r
y
M
a
r
k
t
h
e
s
t
a
r
t
a
n
d
e
n
d
o
f
t
h
e
s
e
g
m
e
n
t
CD DRIVE A
SPLICE TWO
SEGMENTS AND COPY
ONTO DRIVE A
Segment
selected
"Mark" 1
"Mark" 3
B
o
t
h
s
e
g
m
e
n
t
s
s
p
l
i
c
e
d
t
o
g
e
t
h
e
r
t
o
f
o
r
m
o
n
e
T
r
a
c
k
2nd Segment
selected
"Mark" 4
Track No. 1 2 3 4 5 6 7 8
"Mark" 2
Track No. 1
INTERNAL MEMORY
DRIVE B
internal memory
audio CD
CD / USB / memory
transport keys
Mixer Panel
for mics, line & drive
Phantom Power
on/off selector keys
headphone Monitor
on/off selector keys
splicehelp
Splicing
Internal drive
01 00:00
is Paused
Remaining 04:33
set-> 1
cueing
2
7
14
14
set->
splicehelp
Splicing
Internal drive
01 00:00
is Paused
Remaining 04:33
set-> 2
cueing
Mark SET
Mark 1 set to
track 1 00:00.36
set->
set->
splice
1
set->
splice
splice
set->
set->
splice
Page 3
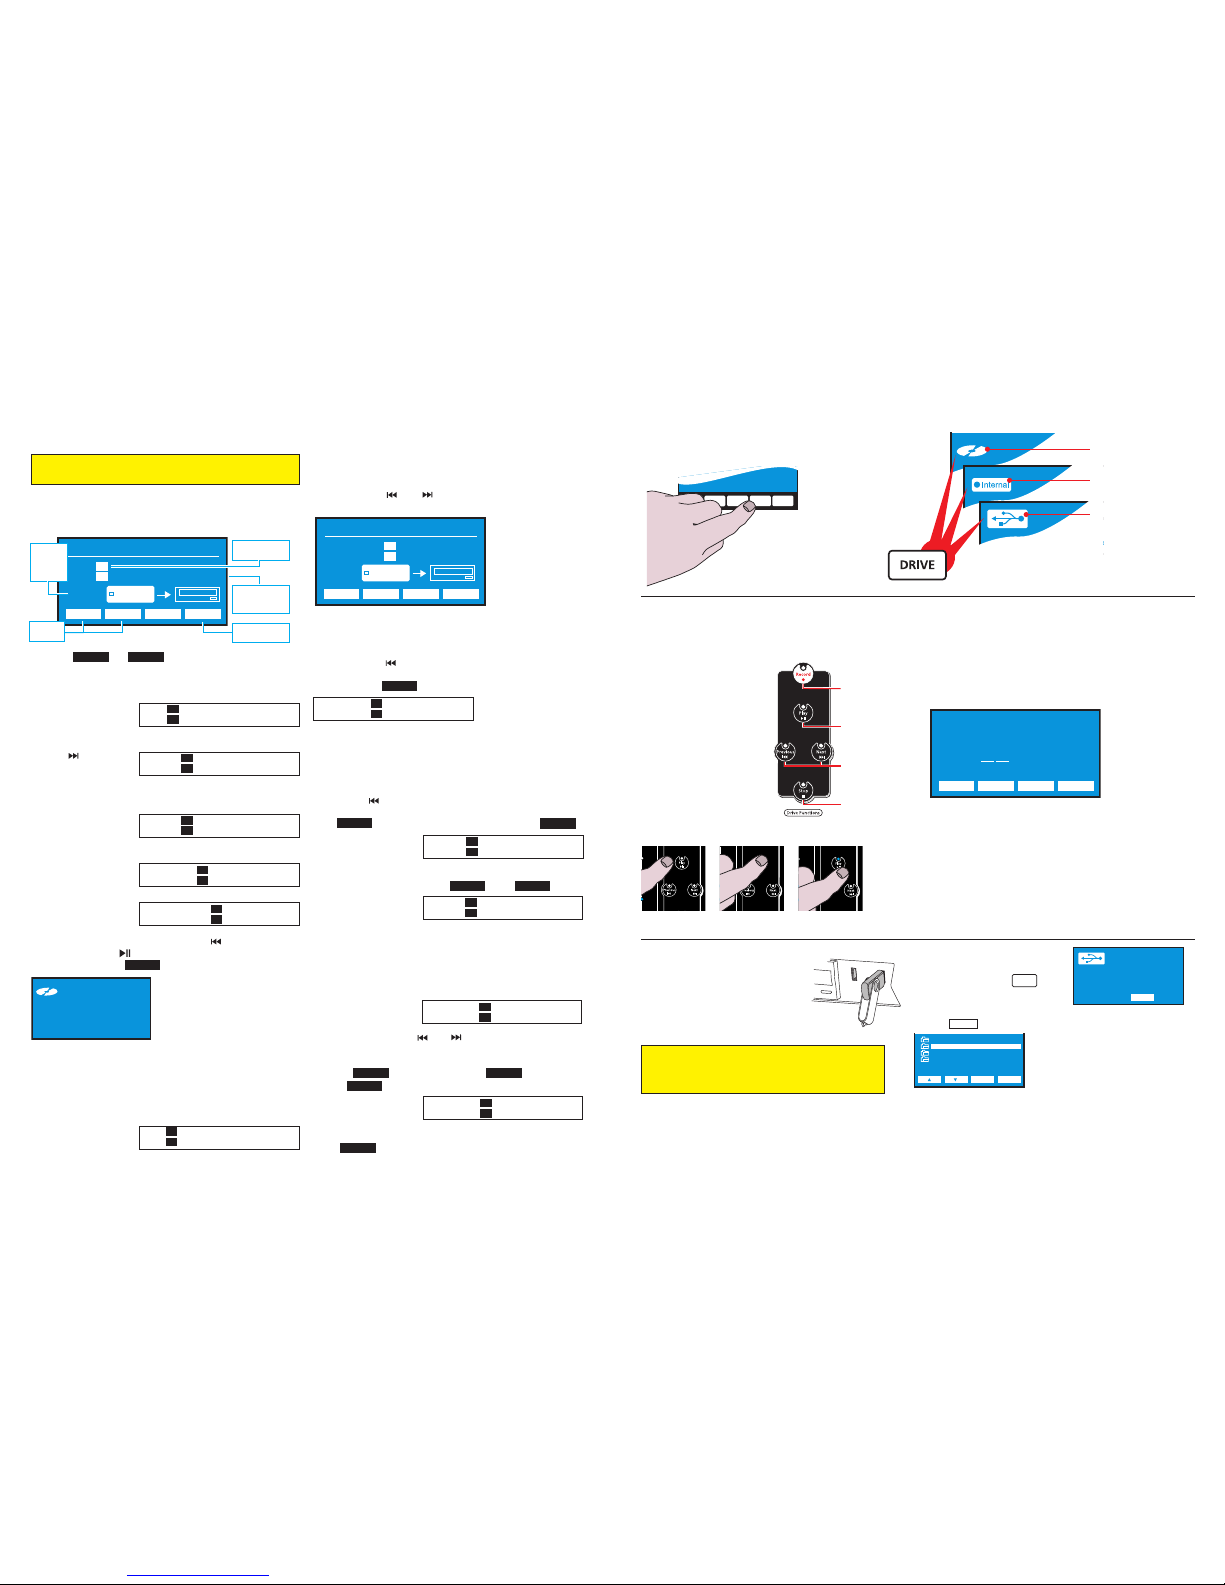
SELECT AN AUDIO RESOURCE
The StageHand can play audio from CDs,
USB flash drives or from its internal memory.
Up to 3 hours of material can be recorded (or copied) to
the internal memory - ideal for performance use.
The DRIVE button
Pressed repeatedly, the
drive button toggles
between internal memory, the
CD drive and USB flash drives.
An icon in the top left corner of
the menu screen displays which drive
has been selected for listening.
3
3
TONE
SPEED CUE DRIVE MENU
RW
31 45:53
Recordable & Erasable
Remaining 34:04
Drive A
03 02:2
Recordable & Erasable
Remaining 34:04
Drive B
in
Pen 1
files
CD-R or CD-RW
Option only appears if a CD
has been inserted
2GB Internal drive
USB flash drive
(max. 4GB)
Option appears only if a USB
flash drive has been connected.
PLAYING AUDIO
The StageHand range can play audio
from CDs, USB flash drives and internal memory.
Once you have selected the
drive - CD, USB or memory
- you can play audio.
The transport keys on the
touch panel allow you to
play tracks, pause them,
stop, go forward or
backward through tracks
and even record onto the
selected drive.
Simply touch the graphic
required to play or pause
music etc.
Playback options are available via the menu (see overleaf)
for a CD or internal memory.
Repeat options
No repeat: play a CD/memory contents once only (default).
Repeat track: select and continually play one track.
Repeat disc: play entire CD/memory contents continuously.
Programme
Choose the order of tracks playing from CD or internal memory.
On selection the
programme screen appears.
Use the “tens” or “units”
keys to select the number
of your first track.
Press NEXT to add the next track and so on.
When ready, press DONE.
Press PLAY to hear the selected programme.
Random mode
Plays all tracks on CD or in the memory in a random fashion.
Intro mode
Plays five seconds of each CD or memory track.
Note: All options can be cancelled via the menu.
Default settings are resumed on startup.
4
4
Record
Play/Pause
Track Back /
Track Forward
Stop
programme mode
track plays at
number position
tens units next done
01
6
3
PLAYING MP3 FILES
Play, select tracks,
stop and eject MP3 CDs
like an ordinary CD.
Play MP3 or audio from a USB flash drive by
locating and selecting the file to be played.
Insert the flash drive into the slot.
The drive should appear in the LCD
window. If not, press until
the display shows “Pen 1” and the
USB logo.
Select to show the contents of the flash drive.
Use the soft keys below the screen to navigate
through the folders and individual tracks.
Press folder to display the contents of the
highlighted item.
Press PLAY to listen to your selection.
Audio/MP3 files and folders play in order of placement on
a flash drive. A selected track (file) will play, followed by
the next in the list. When all files have been played the
next folder is opened and any tracks within it are played.
Pen 1
files
files
COOMBER
DANCE CLUB
HISTORY FOLK SONGS
WAKE AND SHAKE
back folder
5
5
DRIVE
CHOOSE SOME TRACKS
Copying to an empty internal memory or blank CD
Use the menu to select Erase & copy functions > Copy
audio > Part of the internal memory > Choose some
tracks. A box appears...
Press the or menu soft keys as required
to select a track for copying.
Imagine you want to copy tracks 3, 14, 9 and 11.
To select the first track
keep pressing the “+1”
key until track 3 appears.
Use the key to
move the cursor to
the next position...
...and select the second track by pressing the
“+10” and “+1”
keys until track 14
is selected.
Repeat the process to
select the third track...
...and again to select
the final track.
To hear and confirm your selections, press to return to the
first track, then press . The first six seconds of each track will
play. If satisfied, press . Copying begins immediately.
The finished CD is “unfixed” to allow further
copying if required.
Adding tracks at a later date or time
Copying to a partially completed “unfixed” CD? The only
difference is that when you select Choose tracks the
dialogue box looks slightly different.
In the example shown here an
unfixed CD-R has been inserted.
It already has seven tracks on it so the first available track for recording will be track eight!
Editing Selections
Once you have selected tracks for copying, you can delete,
insert or change selections before copying takes place.
You can use the and keys to move backwards and
forwards through the selected tracks.
In the example shown here
track 03 is to be deleted
and track 12 is to be inserted
between tracks 04 and 05.
Deleting Tracks
By pressing the key, the cursor moves back to track 03.
As this happens, the menu soft keys change. To remove
track 03, press . The track instantly disappears.
Inserting Tracks
Pressing the key again moves the cursor back to track 05.
Press to show new key options and select .
This will open a gap...
... to select track 12 using the and keys.
Changing Tracks
You can also change existing track selections.
In the example shown here track
05 is to be replaced by track 07.
Again, you can use the and keys to move backwards
and forwards through the selected tracks.
Press the key, followed by the key. Then
use the key to select track 07.
Select when editing is complete. Copying will begin
immediately.
13
13
+10 +1 help! go
Copy tracks from memory to CD
From 01
To 01 02 03 04 05 06 07 08 09
76:34
free
Internal
track 01 track 01
Track No. of
original CD
Press only when
ready to copy
Time
remaining
for
copying
Track
selection
Copy spaces
available on
CD/R or CD/RW
+10 +1
From 03
To 01 02 03 04 05 06 07 08 09
From 03 04
To 01 02 03 04 05 06 07 08 09
From 03 14
To 01 02 03 04 05 06 07 08 09
From 03 14 09 11
To 01 02 03 04 05 06 07 08 09
go
From 03 14 09
To 01 02 03 04 05 06 07 08 09
R
Drive A
04 18:30
Recordable
Remaining 61:27
From 01
To 08 09 10 11 12 13 14 15 16
In the examples shown here, we are copying tracks from the
internal memory to CD, but you can copy in either direction.
del edit help! go
Copy tracks from memory to CD
From 04 05 03 13
To 07 08 09 10 11 12 13 14 15
76:34
free
Internal
track 03 track 09
del
From 04 05 13
To 07 08 09 10 11 12 13 14 15
edit
ins
+10
+1
From 04 05 13
To 07 08 09 10 11 12 13 14 15
From 04 12 05 13
To 07 08 09 10 11 12 13 14 15
From 04 12 05 13
To 07 08 09 10 11 12 13 14 15
edit change
+1
From 04 12 07 13
To 07 08 09 10 11 12 13 14 15
go
Page 4
RECORD OPTIONS
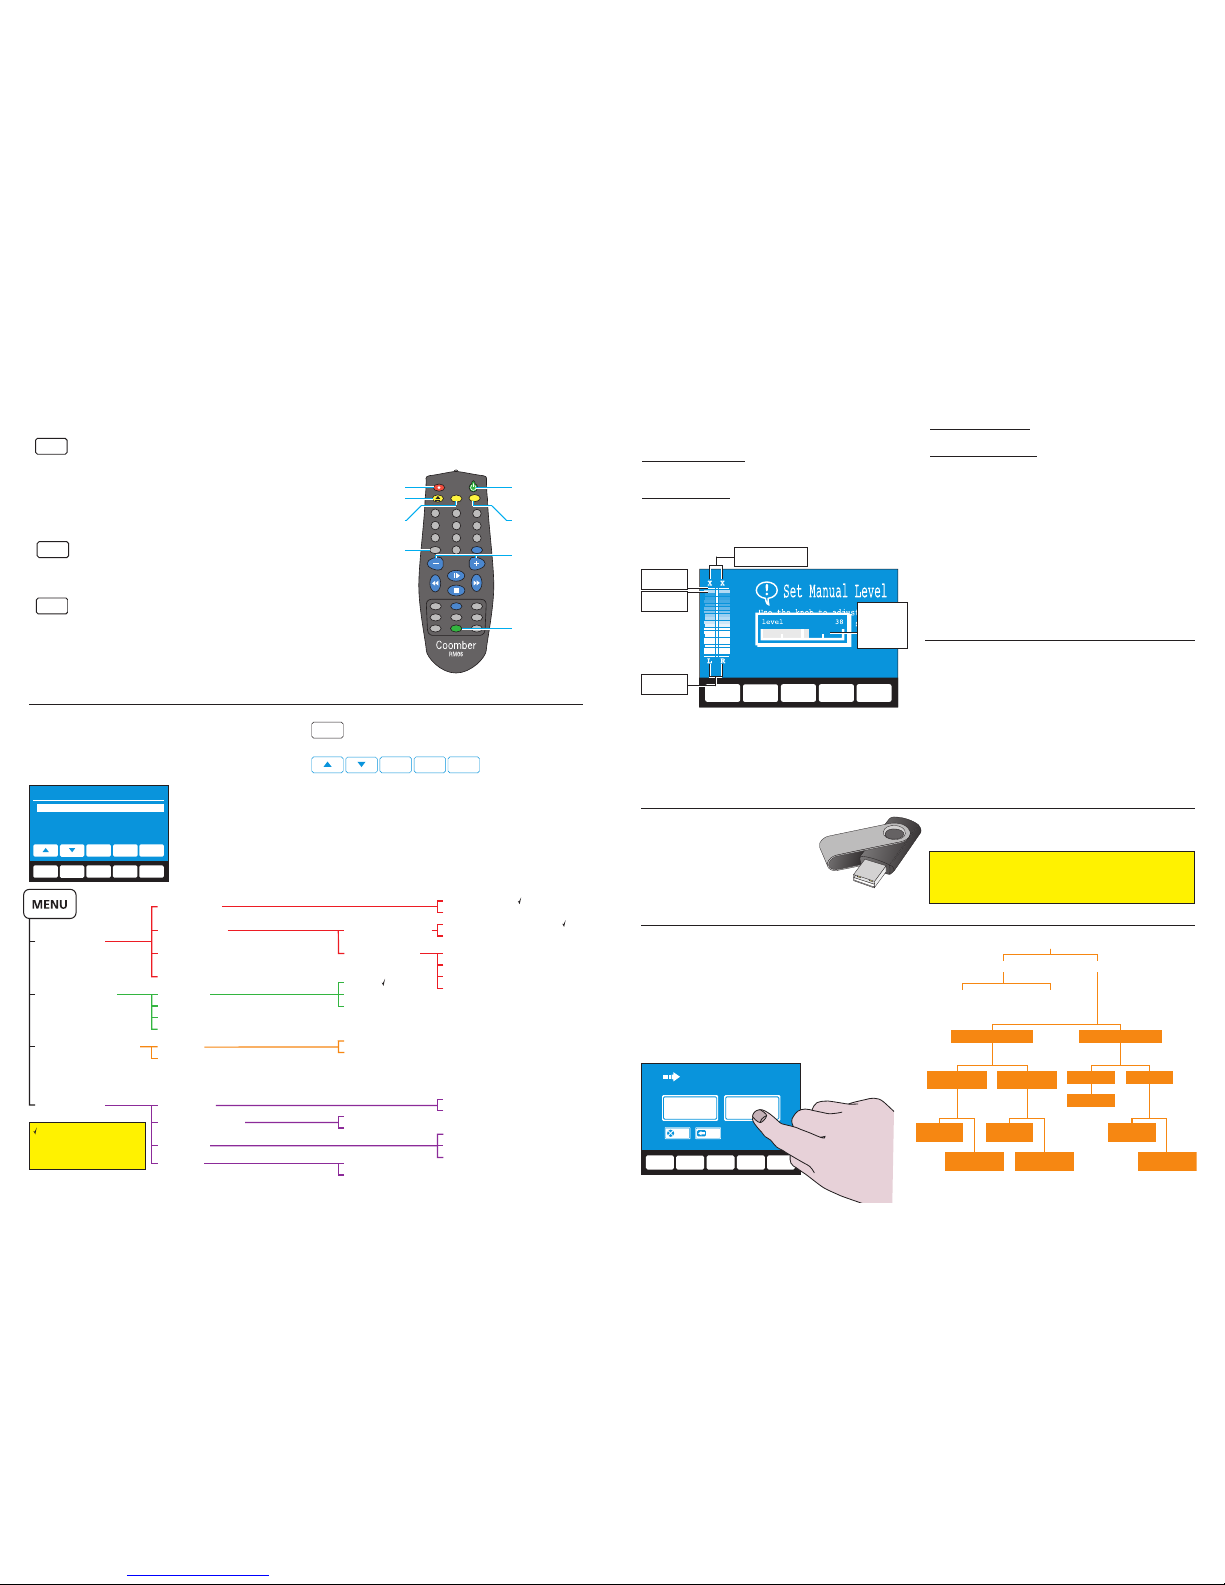
Record level mode
Automatic record level: Level is monitored and adjusted
automatically for a reasonable result. (Default setting.)
Manual record level:
User sets level for optimum result.
1. Select “Manual record level” from the menu.
2. Connect external mic(s) if required. Press RECORD.
3. The levels can be adjusted using the rotary control.
Note: speakers are switched off while a mic recording is in progress, but on when
line inputs are being used. The volume level adjusts with the record level.
4. Once set, press RECORD again and recording begins.
Note: Levels can be adjusted during recording by selecting the LEVEL menu soft
key and using the rotary controller.
Microphone Settings
Two microphone setup
2 mics are dual mono:
Recording will be in mono
regardless of whether one or two mics are being used.
2 mics are a stereo pair:
One mic records to the left channel,
the other to the right. (Default setting. )
Microphone Sensitivity
High sensitivity: Ideal for most conditions
including quiet recordings. (Default setting.)
Low sensitivity: Select if recordings
are overloaded or distorted.
Record from digital input
Available via the coaxial or optical digital connectors.
Option not visible in record mode.
Fade out recording
Selects a five second fade out when STOP is pressed.
Option only visible during recording.
ERASE OPTIONS
Erase disc / Erase internal drive
Erases the entire contents of a CD-RW or internal drive
(as selected). All information will be lost.
Option visible when a CD-RW is inserted or internal memory is installed.
Erase last track
Erases last track only on CD-RW or internal memory
(as selected).
Option visible when a CD-RW is inserted or internal memory is installed.
ABOUT USB
FLASH DRIVES
This equipment will work with USB flash
drives up to a maximum capacity of 4GB.
It is not possible to copy to or from a USB flash drive.
This is due to incompatibilities between the file structures of
the flash drives and the CD/internal memory format.
11
11
LCD DISPLAY & MENU
As well as providing track number and
track time elapsed information, the display also
provides access to the menu via touch sensitive keys.
Use the menu to adjust
microphone sensitivity,
control playback functions,
erase or copy tracks etc.
The menu tree (below) shows
the menu options.
“Playback options” only appear if a CD
has been inserted or tracks are recorded
onto the internal memory.
To enter the menu, press the “MENU” key.
The five “soft keys” which appear in the menu windows (as
shown above) are used to navigate through the menu and
make selections.
When the unit is switched off, all changes will be lost and
the unit will return to its default settings.
Main menu
Record options
Playback options
Erase & copy functions
Other settings
select
back
quit
TONE
SPEED CUE DRIVE MENU
Record options
Record level mode
Automatic record level
Manual record level
Playback options
options appear when an audio
CD has been inserted.
Repeat options
Programme Refer to Section 4
Intro
Random
no repeat
repeat track
repeat disc
Display options
Contrast Select to adjust with control knob.
Backlight Off Select to switch off or on.
Invert Invert from positive to negative.
Speaker options
Keypad & remote options
Disable keypad can only be deselected by restarting.
Service Info
Information about your StageHand Hall Audio System.
Erase & copy functions
erase functions are only visible when
a CD-RW with audio tracks has been
inserted or when there are tracks on
the internal memory.
Erase options
Fade out recording Option visible during recording.
Other settings
Disable keypad
Disable remote
Show build information
Show drive information
Default selection at startup.
All options can be cancelled
via the menu and default
settings are resumed on startup.
Copy audio
If selecting “Choose some tracks”, refer to Section 13
If selecting “Use cueing to find the right bits”, refer to Section 14
Mute speakers Select to mute / unmute speakers.
Set speakers to mono
Microphone settings
Stereo microphone setup
Adjacent channels form a stereo pair
Microphones are mono
Microphone sensitivity
MIC 1 gain HIGH/LOW (default is HIGH)
MIC 2 gain HIGH/LOW (default is HIGH)
Record from digital input / Record from input mixer
Default at startup allows recording from the input mixer.
MIC 3 gain HIGH/LOW (default is HIGH)
MIC 4 gain HIGH/LOW (default is HIGH)
Erase last CD / internal memory track
Erase whole CD / internal memory
MENU
select
back
quit
8
8
USB flash drives vary in quality. Many cheaper varieties are
not suitable for recording and may fail to record correctly,
It is worth making a “sample” recording of some length
before making important recordings!
4
5
10
10
9
9
CUE, SPEED & TONE
These options take control of the volume knob.
Press to locate any part of a CD track (or memory
/flash drive) while playing or paused. Turn the
knob to go backwards or forwards through a track. CUE
works across tracks as well as within them.
While playing you will hear extracts of the audio as you skim through. In pause
mode the time elapsed counter will show you what part of the CD has been reached.
CUE also operates with MP3 files on CD and USB flash drive.
To deselect CUE press the CUE button again, or press STOP.
Press and adjust CD playback by turning the knob
to increase (133%) or reduce (75%) speed.
The speed setting selected remains in force even if the CD itself is replaced and
remains so until you reset the speed, or when the unit is switched off at the mains.
Repeatedly depressing the TONE button toggles
between treble, bass and balance. Select as
required and adjust using the volume knob.
As with SPEED adjustment, your selection remains in force until you reset it, or the
unit is switched off at the mains.
CUE
6
6
SPEED
TONE
1
2
0
9
8
7
6
5
4
3
GOTO CUE
A/B
LEVEL
INTRO
SPEED
TREB
RAND
PROG
BASS
REP
MUTE
BAL
Function unavailable
Open / Close
Selects between
CD and USB
flash drives
Off (Stand-by)
unit can only be
switched on using
the keypad ON/OFF
key or at the mains
Up / Down
(as rota ry control )
GOTO
allows you to select
track numbers
greater than 9
Track 21 would be
reached by pressing
GOTO, 2 and 1
Function unavailable
Mute / Unmute speakers
and headphones
Features found
on the remote
are the same as
on the keypad or
the menu, except
for those differences
indicated here.
Battery Replacement
This remote control uses 2x AAA
batteries. Batteries (inc. rechargeable)
should be discarded in accordance
with local regulations.
THE REMOTE CONTROL UNIT
The remote control unit offers control of many
of the features found in the StageHand audio
system.
7
7
COPY FUNCTIONS
With this equipment you can copy audio from CD to
internal memory and vice versa. You can copy the contents
of a whole CD (or the whole memory) or individual tracks.
You can also splice sections of track(s) together.
A schematic of the available options are shown right.
Select your choices for copying using
the touch screen instructions.
12
12
Erase & copy functions
Erase options Copy audio
Erase last
CD / internal memory
track
Erase whole
CD / internal memory
Internal memory to CD CD to internal memory
A whole CD Part of a CD
All of the
internal memory
Part of the
internal memory
Do the copy
but don’t fix
Do the copy
and fix the disc
Choose
some tracks
Use cueing to
find the right bits
Do the copy
Choose
some tracks
Use cueing to
find the right bits
TONE
SPEED CUE DRIVE MENU
Level box
appears
when the
rotary control
is adjusted
Recording overload
warning indicators
Recent
Record level
Maximum
Record level
Left Right
level meters
TONE
SPEED CUE DRIVE MENU
Copying
Step 1. Where from, where to?
Internal memory to
CD
CD to internal
memory
Quit Back
 Loading...