

Operating Instructions: 2020, 2025, 2060
Coomber
PA Cassette Recorders
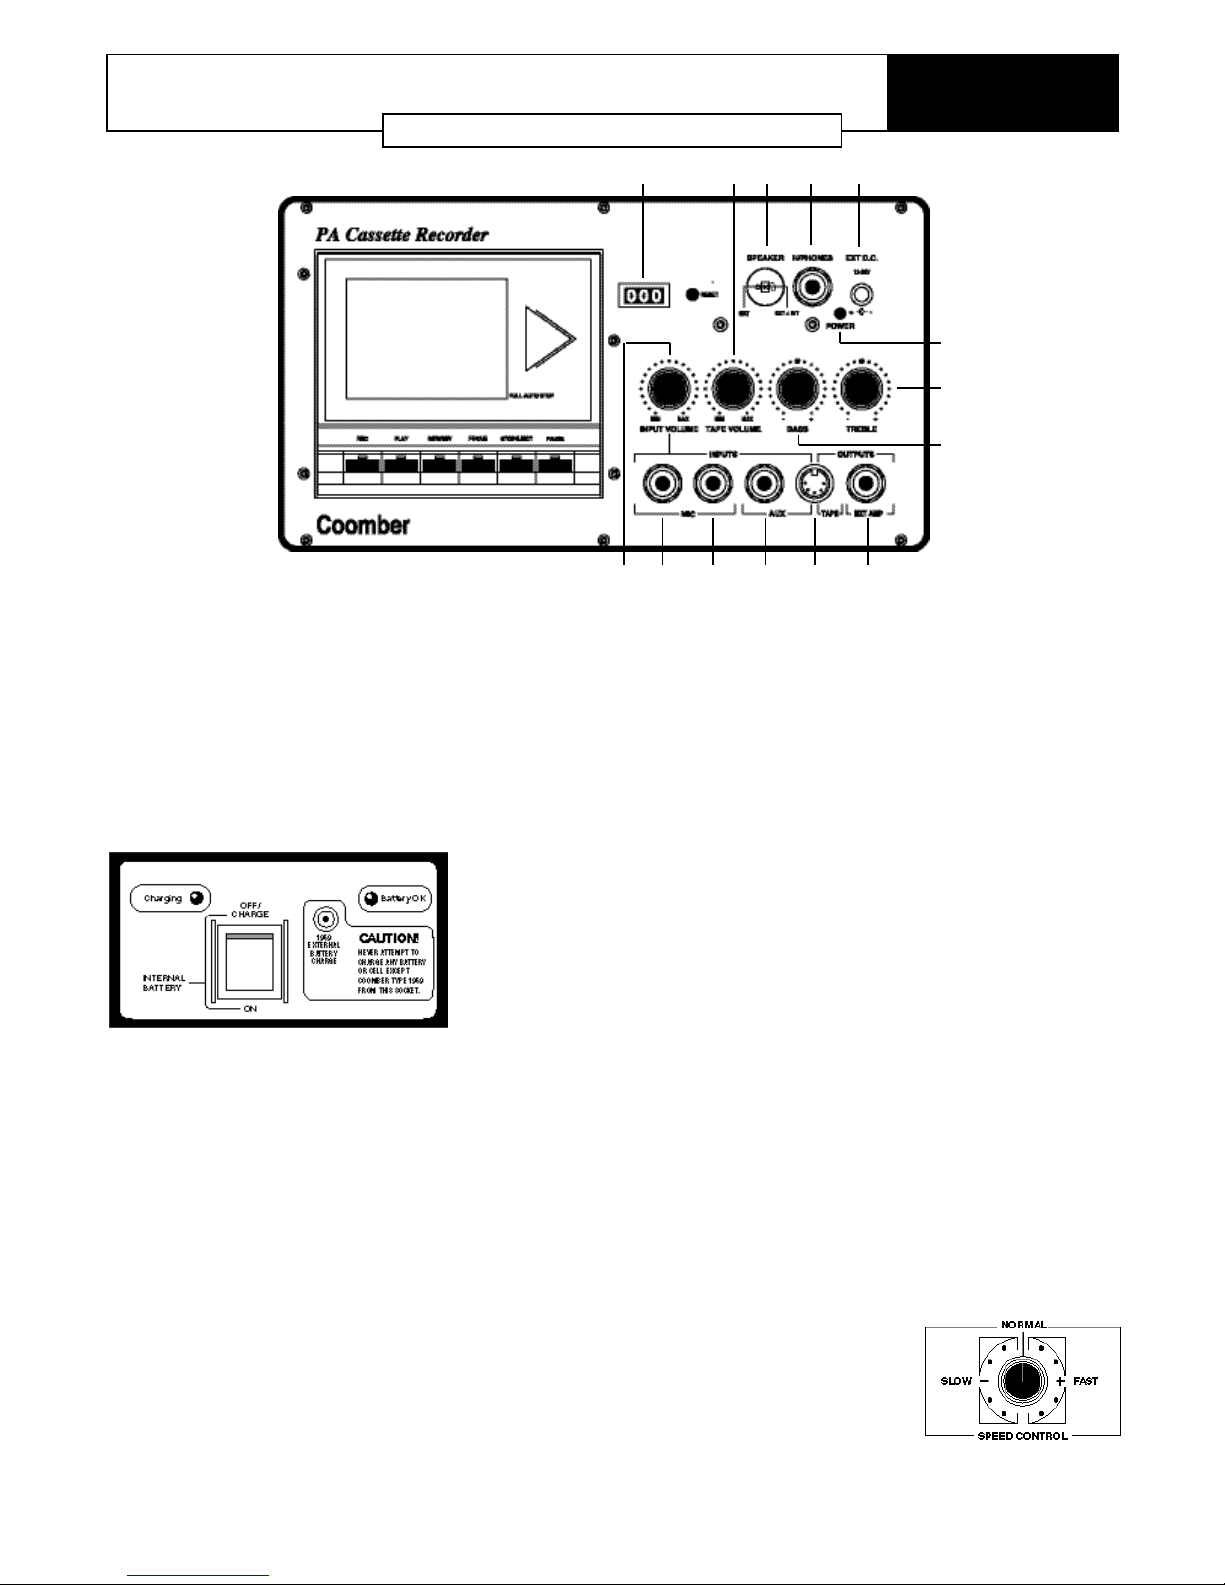
61 7 8 9 10
14
3
4
1312112
Power From Mains
A Mains ON/OFF switch is found on the side panel. A red power light
(14), on the top panel, will illuminate when the supply is switched on.
EXT D.C. Input Socket (13)
A standard Roka connector allows the equipment to operate from an
external DC supply of between 12 and 24 volts. The red "Power" light
(14) below the socket will illuminate if the polarity is correct. Always
disconnect the DC source when not in use.
The Coomber 1959 rechargeable battery, fitted with fused lead and
connector is suitable for use with this model. A battery charger,
Coomber 1958, should be used to recharge the battery as necessary.
Internal Rechargeable Battery (Optional - 2060/R models)
The 2060/R model incorporates a rechargeable battery and battery charger circuit allowing the 2060/R to be used away from a mains power
source. A panel located on the side of the unit controls battery use.
When fully charged, the Battery OK light will illuminate when the
INTERNAL BATTERY switch is switched on. When the Battery OK light
flashes, the battery requires charging.
To charge the battery, simply plug the 2060/R into the mains and
switch on the Mains switch - the POWER light (14) will illuminate on
the top panel. Ensure that the INTERNAL BATTERY switch is switched
to OFF/CHARGE. The Charging light will illuminate and remain on until
the battery is fully charged. The light will then extinguish.
To maximise battery life, never let the battery become fully discharged. Recharge it as soon as the Battery OK lamp begins flashing.
The battery panel also incorporates a Roka connector, allowing one
Coomber 1959 battery to be recharged at a time.
Cassette Mechanism
The tape deck has ‘one touch’ record, cue and review facilities, and full
Autostop. NOTE: It is important to keep the pinch wheel and heads
clean. If in doubt consult your audio visual advisor.
Recording
When recording, the record level is automatically set to give optimum
performance, whether from the AUX or MICROPHONE inputs. If the
RECORD key on the cassette mechanism cannot be depressed, check
that the left-hand safety tab on the top edge of your cassette has not
been removed to protect an original recording. If you wish to reuse the
cassette for recording, replace the removed tab with self adhesive
tape.
Useful Tips
a. You may find that a small amount of distortion is heard at the start
of a recording, especially if the signal to be recorded is strong
(loud). The automatic level control (ALC) attunes itself to the general
level of sound in a room - so for the best recordings, allow the ALC
to settle before recording commences. To do this, simply press the
PAUSE key followed by the RECORD key. The ALC will monitor the
sound levels and set itself. Release the PAUSE key to start the
recording.
b. Reset the turns counter (15) to zero whenever you wish to be able
to return to the start of a particular passage.
Playing a Pre-recorded Tape
Open the cassette door with the STOP/EJECT key and insert a prerecorded tape. Close the door and press the PLAY key. Adjust the TAPE
VOLUME (2), BASS (3) TREBLE (4), controls to suit. To pause the tape,
press the PAUSE key.
Input Sockets (6-7-8-9)
Public Address
One or two microphones can be connected to sockets (6) and/or (7).
Adjust INPUT VOLUME (1), BASS (3) and TREBLE (4) to suit.
Microphones may be used together effectively providing they have
similar characteristics.
Coomber 1902 or 1903 microphones are ideal for public address use.
Variable Speed
(Optional - 2020 & 2060 models)
A dial on the side panel varies the speed
of cassette playback from -25% to
+10%.
During recording, the speed control is
automatically overridden.
11

1902 High Quality
Dynamic Microphone
with 5 metre lead
1903 Professional Quality
Dynamic Microphone
with 5 metre lead
1904 Microphone
Connecting Box,
Connects up to six microphones
to your Coomber Recorder.
1905 Fully Extending Microphone Floor Stand. designed to
be extremely stable. For use with 1902/1903 microphones.
Now with FREE boom arm (Microphone not included).
1912 Microphone Desk Stand.
For use with 1902/1903
microphones.
(Microphone not included).
1929 600 ohm Standard
Quality Mono Headphones
1908 Headphone
Distribution Box
Connect up to six
headphones to your
Coomber Recorder.
Carry your 2060 anywhere with the
Coomber 1957 Carry Bag
Acoustic Feedback
Acoustic feedback will occur when the microphone picks up audio
from the loudspeaker. This is usually due to the Volume being too
high. and/or the microphone is to near to the equipment.
PREVENTING FEEDBACK
1. Make sure the microphone is switched off before switching the system on.
2. Ensure that the INPUT VOLUME (1) is turned down (anti-clockwise) to
its lowest position.
3. Switch on the microphone.
4. Gradually turn up the INPUT VOLUME (1) until feedback just starts to
occur (you should hear a whine noise) and then turn the volume
down a little until you can no longer hear the feedback. You might
have to experiment with the volume control to get optimum results.
Note: Some microphones are not designed for Public Address and
further advice may be needed.
To Amplify keyboards.
Connect the keyboard to AUX socket (8).
Both mic and aux inputs can be used at the same time allowing mixing
of live speech over the keyboard. Recordings may be made by pressing
the RECORD button.
The position of INPUT VOLUME (1), BASS (3) and TREBLE (4) controls
will not affect the recording - which is automatically set.
Using a portable CD player or MiniDisk
Connect a CD player/mini disc via the Input/Output Socket (9) using a
Coomber 1974 connecting lead.
This DIN socket can also provide a low level output for cassette playback only.
Output Socket (10)
This socket provides low level mixed output. Ideal for use with
Coomber booster speakers (2185 or 2186).
External Loudspeaker Socket (11)
a) For external and internal loudspeakers operating together - mini-
mum external impedance 8ohm.
b) For an external loudspeaker only - minimum external impedance
4ohm.
Headphone Socket (12)
Connecting Mono or Stereo headphone automatically disconnects the
internal loudspeaker. For safety you are advised to use only 600 ohm
headphones such as Coomber 1929,1906, 1907 headphones.
Power ratings Model 240v 12v 24v
2020 11w 3w 14w
2060 30w 10w 37w
Ratings quoted in Watts RMS using 4 ohm load.
Coomber Accessories
Coomber Electronic Equipment Ltd.
Brindley Road, Warndon, Worcester, WR4 9FB, U.K.
Tel: 0044 (0)1905 342070 e-mail: sales@coomber.co.uk
Fax: 0044 (0)1905 759170 web: www.coomber.co.uk
SAFETY & GENERAL INFORMATION
Headphones: For personal safety and comfort connect headphones into equipment, turn
volume down and then switch on before placing headphones over ears. For safety use only 600
ohm headphones (i.e Coomber type 1929).
Environments: The equipment should not be exposed to dust, moisture, water, chlorine and
other corrosive substances in normal use or during storage. It will cause damage to this equipment.
Swimming pool atmospheres: are very hostile to all electro-mechanical equipment (e.g. steel
rusts and rubber perishes). Equipment returned for repairs showing evidence of use in adverse
environments may, at our discretion, be charged for even during the 12 month warranty period.
• Rechargeable battery replacement must be carried out by a competent qualified technician.
• The disposal of batteries (rechargeable or otherwise) where used in Coomber equipment
should be discarded in accordance with local regulations.
• Do not cover the ventilation openings with any items (e.g. newspaper, fabrics etc.)
• Naked flames, such as lighted candles, should not be placed on or near the apparatus.
• The ap parat us should not be exposed to dripping or s plashing. No o bjects fil led with
liquids, such as vases, should be placed on or near the apparatus.
European Safety Standard: All Coomber equipment complies with EN60065. Any local
requirements for use of this equipment should be taken into account.
Class I construction: This equipment must be EARTHED.
Mains Voltage
UK & EEC: 220-240V 50Hz: Mains Cable: Line - Brown, Neutral - Blue, Earth - Yellow & Green
USA: 110-120V 60Hz: Mains Cable: Line - Black, Neutral - White, Earth - Green
Isolate from mains supply when not in use by removing the plug from the wall socket.
Mains Plug:
The mains cable fitted to this equipment is already provided with a moulded plug. If
another plug type is required, follow instructions from the plug manufacturer, or seek advice
from a qualified person. DISPOSE OF ORIGINAL PLUG SAFELY. DO NOT RE-USE.
Mains Plug fuse rating: 3Amp to BS1362 (applicable in UK)
Model type and rating information is located on a label on the rear of the product.
Additional Technical Information:
If you require any further help or information, or if
any point is not clear, then please telephone 01905 25168/9 quoting your model number and
serial number (located on a label on the rear of the product). Our Technical Department will
be pleased to help you.
Note: This equipment contains no user serviceable parts and should only be disassembled and
reassembled by competent qualified personnel. Dismantling will render the warranty void.
Electrical Safety Testing:
• Safety testing and servicing should only be carried out by competent qualified personnel.
• When undertaking an earth bond safety test, only use the externally exposed metalwork.
Do not test against internal metal compnents found inside tape mechanisms or CD trays THIS WILL LEAD TO IRREPARABLE INTERNAL DAMAGE.
• The supply cable is part of a special assembly. If damaged the equipment should be
returned to Coomber Electronic Equipment Limited or their agent for cable replacement.
2060 Instructions © Coomber Electronic Equipment Ltd. 2003 OPS 2060 R6 280103
• Coomber reserve the right to change
products and specifications without notice.
• All Coomber equipment is covered by a
12 months warranty against defecti ve
components or faulty manufacture from date
of dispatch. Any modifications to or misuse of
the equipment renders this warranty void.
• Equipment that is security mar ked or
damaged cannot under any circumstances
be exchanged.
 Loading...