

Page 1
UUSSEERR IINNSSTTRRUUCCTTIIOONNSS
Please read these instructions carefully before using this product and keep them safe for
future reference.
CZ51153
SLIMLINE DISHWASHER
Page 2

Page contents
Before use . . . . . . . . . . . . . . . . . . . . . . . . . . . . . . . . . . . . . . . . . . . . . . . . . . . . . . . . . . . . . . . . . . . . . .3
Do and don’t . . . . . . . . . . . . . . . . . . . . . . . . . . . . . . . . . . . . . . . . . . . . . . . . . . . . . . . . . . . . . . . . . . . .3
Parts identification . . . . . . . . . . . . . . . . . . . . . . . . . . . . . . . . . . . . . . . . . . . . . . . . . . . . . . . . . . . . . . . .3
Installation . . . . . . . . . . . . . . . . . . . . . . . . . . . . . . . . . . . . . . . . . . . . . . . . . . . . . . . . . . . . . . . . . . . . . .4
Salt . . . . . . . . . . . . . . . . . . . . . . . . . . . . . . . . . . . . . . . . . . . . . . . . . . . . . . . . . . . . . . . . . . . . . . . . . . . .5
Detergent and rinse aid . . . . . . . . . . . . . . . . . . . . . . . . . . . . . . . . . . . . . . . . . . . . . . . . . . . . . . . . . . . .6
Loading the dishwasher . . . . . . . . . . . . . . . . . . . . . . . . . . . . . . . . . . . . . . . . . . . . . . . . . . . . . . . . . . . .7
Control panel . . . . . . . . . . . . . . . . . . . . . . . . . . . . . . . . . . . . . . . . . . . . . . . . . . . . . . . . . . . . . . . . . . . .8
Starting the dishwasher . . . . . . . . . . . . . . . . . . . . . . . . . . . . . . . . . . . . . . . . . . . . . . . . . . . . . . . . . . . .8
Wash cycle table . . . . . . . . . . . . . . . . . . . . . . . . . . . . . . . . . . . . . . . . . . . . . . . . . . . . . . . . . . . . . . . . .9
Energy saving tips . . . . . . . . . . . . . . . . . . . . . . . . . . . . . . . . . . . . . . . . . . . . . . . . . . . . . . . . . . . . . . . .9
How to keep your dishwasher in shape . . . . . . . . . . . . . . . . . . . . . . . . . . . . . . . . . . . . . . . . . . . . . . .10
Cleaning and maintenance . . . . . . . . . . . . . . . . . . . . . . . . . . . . . . . . . . . . . . . . . . . . . . . . . . . . . . . .10
Troubleshooting . . . . . . . . . . . . . . . . . . . . . . . . . . . . . . . . . . . . . . . . . . . . . . . . . . . . . . . . . . . . . . . . .12
Error codes . . . . . . . . . . . . . . . . . . . . . . . . . . . . . . . . . . . . . . . . . . . . . . . . . . . . . . . . . . . . . . . . . . . .12
Fuse and mains plug replacement . . . . . . . . . . . . . . . . . . . . . . . . . . . . . . . . . . . . . . . . . . . . . . . . . .13
Specification . . . . . . . . . . . . . . . . . . . . . . . . . . . . . . . . . . . . . . . . . . . . . . . . . . . . . . . . . . . . . . . . . . . .14
Safety measures . . . . . . . . . . . . . . . . . . . . . . . . . . . . . . . . . . . . . . . . . . . . . . . . . . . . . . . . . . . . . . . .14
After sales service . . . . . . . . . . . . . . . . . . . . . . . . . . . . . . . . . . . . . . . . . . . . . . . . . . . . . . . . . . . . . . .14
Page 3
Page 3
Before use
Check the contents
To release the door, pull it open by gripping the
door handle recess.
Check the following contents are included with the
product and inspect the casing for any damage.If
necessary, contact your retailer from whom you
purchased the product.
• Mains lead and mains plug
• Water drain hose and guide
• 2 x wire baskets
• Powder scoop
• Water inlet connection hose
• Cutlery basket
• Funnel
• Rinse aid measure
Packaging
The packaging is recyclable so dispose of it
according to local regulations.
Keep the packaging materials out of reach of young
children.
Warning
The dishwasher is heavy and care is needed when
unpacking and moving it.
Get extra help and only hold it by the casing – not
the door or trim.
Do and don’t
Important
Make sure that the voltage marked on the rating
label on the product corresponds with the voltage
in your home.
This quality product has been tested and certified
to meet all applicable UK electrical and safety
standards.
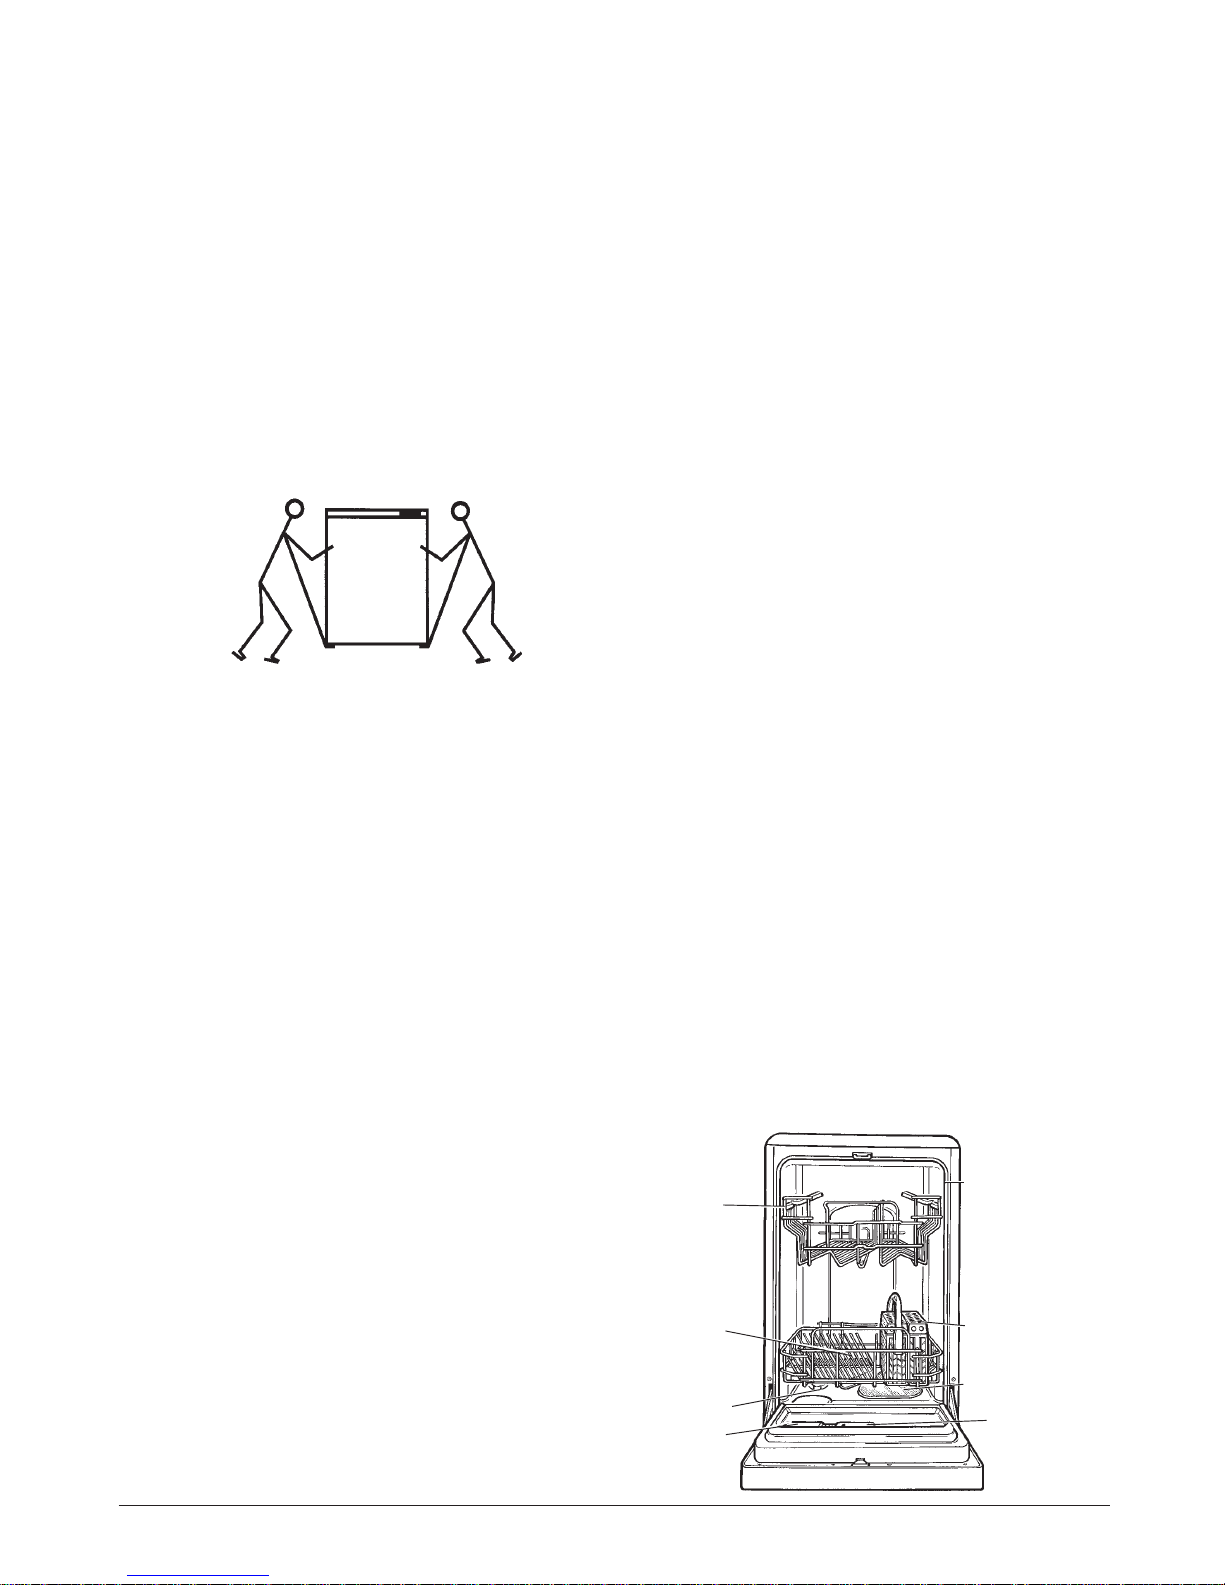
Parts identification
The parts are numbered below to help
identification. Ensure all the par ts are present and
that none are broken.
1. Bottom basket
2. Top basket
3. Door seal
4. Cutlery basket
5. Filters
6. Rinse aid
7. Detergent dispenser
8. Salt container
4
5
6
7
8
3
1
2
FIGURE 1
O Do install the appliance only in the vertical
position.
O Do unplug before cleaning and maintenance.
O Do turn off the water supply and disconnect the
electricity supply if the appliance malfunctions.
O Do only use this appliance in accordance with
the manufacturer’s instructions.
O Do make the appliance safe when disposing of it
by cutting the mains lead and removing the door
lock.
O Do keep detergents away from children.
O Do keep children away from the appliance when
it is open.
O Don’t attempt to repair the appliance yourself
(see Helpline information – page 14).
O Don't use this appliance when barefoot or with
wet hands.
O Don't use extension leads or multiple sockets.
O Don't open the door when the machine is
working.
Page 4
Page 4
Installation
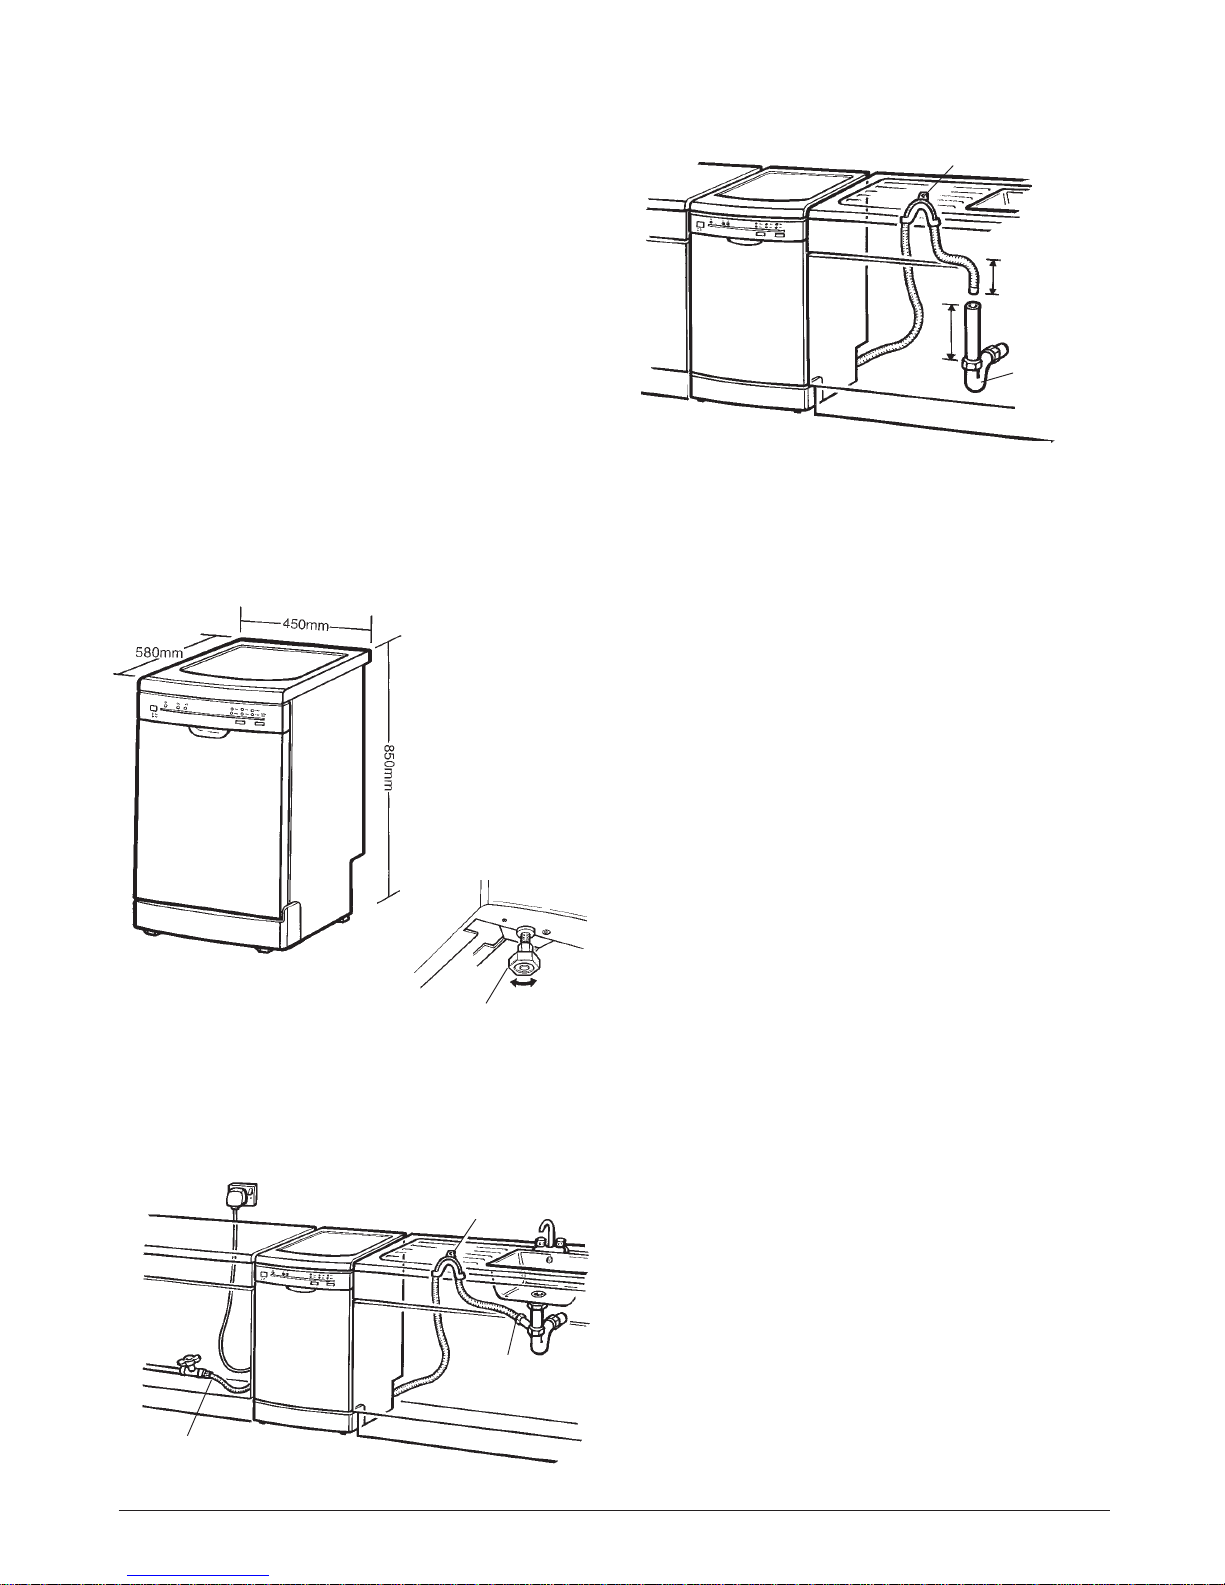
Drain hose connection
When routing the drain hose, avoid bending or
crimping it. Use the plastic hose guide that comes
with the appliance ensuring that it is securely
fastened to the wall.
You can either let the drain hose empty straight
into the sink, connect it to a stub from the sink
waste 'U' bend as shown in Figure 4, or to a new
drainpipe of at least 40mm diameter with a 'U'
bend as shown in Figure 5. If connecting to a new
drainpipe, please note that the free end of the
drain hose must be at a height of between
40–100cm and in a position where it is never
immersed in standing water (Figure 4).
Water supply hose connection
The dishwasher must connected to a water supply
where the water temperature does not exceed
60°C otherwise the crockery may be damaged.
The water supply pipe must be terminated to
enable you to connect the dishwasher water inlet
hose to it. If the pipe work is new, run water
through the pipes to flush out any impurities and
residues.Water inlet pressure must be above 0.4
bar (0.04MPa) but not exceeding 10 bar (1.0MPa).
Electrical connection
Connect the dishwasher to the electricity supply
via a suitable 3-pin outlet socket.The socket must
be earthed and have an On/Off switch (Figure 4).
Note: The socket and switch must be accessible
when the appliance is installed.
FIGURE 3
FIGURE 2
FIGURE 4
Connecting the drain hose to new drainpipe
ADJUSTABLE FOOT
FIGURE 5
120mm
280mm
HOSE GUIDE
‘U’ BEND IN
40mm DIA.
(MIN)
DRAINPIPE
Positioning the appliance
When deciding on a location for the appliance,
please bear the following points in mind:
• The depth of the unit from front to back is
roughly the same as the majority of work
surfaces.This means there is not enough room
for any pipes etc.to be positioned at the rear of
the unit.To facilitate this, the dishwasher is
designed with the water supply and drain hoses
positioned to the right and left for correct
installation.The back rests against the wall.
• The lower plinth for the kitchen base units will
need to be removed for installation.
• The minimum dimensions of the space required
for the appliance are shown in Figure 2.
• Level the appliance by the adjustable foot
(Figure 3).
Provision for the connections
The connections for the appliance are shown in
Figure 4 and Figure 5.
HOSE GUIDE
STUB IN 'U'
BEND
3-PIN SOCKET WITH SWITCH
WATER INLET HOSE CONNECTED
TO W ATER PIPE VIA TAP
Page 5
Page 5
Salt
The hardness of the water varies depending upon
where you live.If hard water is used in the
dishwasher, deposits will form on the dishes and
utensils.
This appliance is equipped with a special softener
that uses a salt specifically designed to eliminate
limescale and minerals from the water.
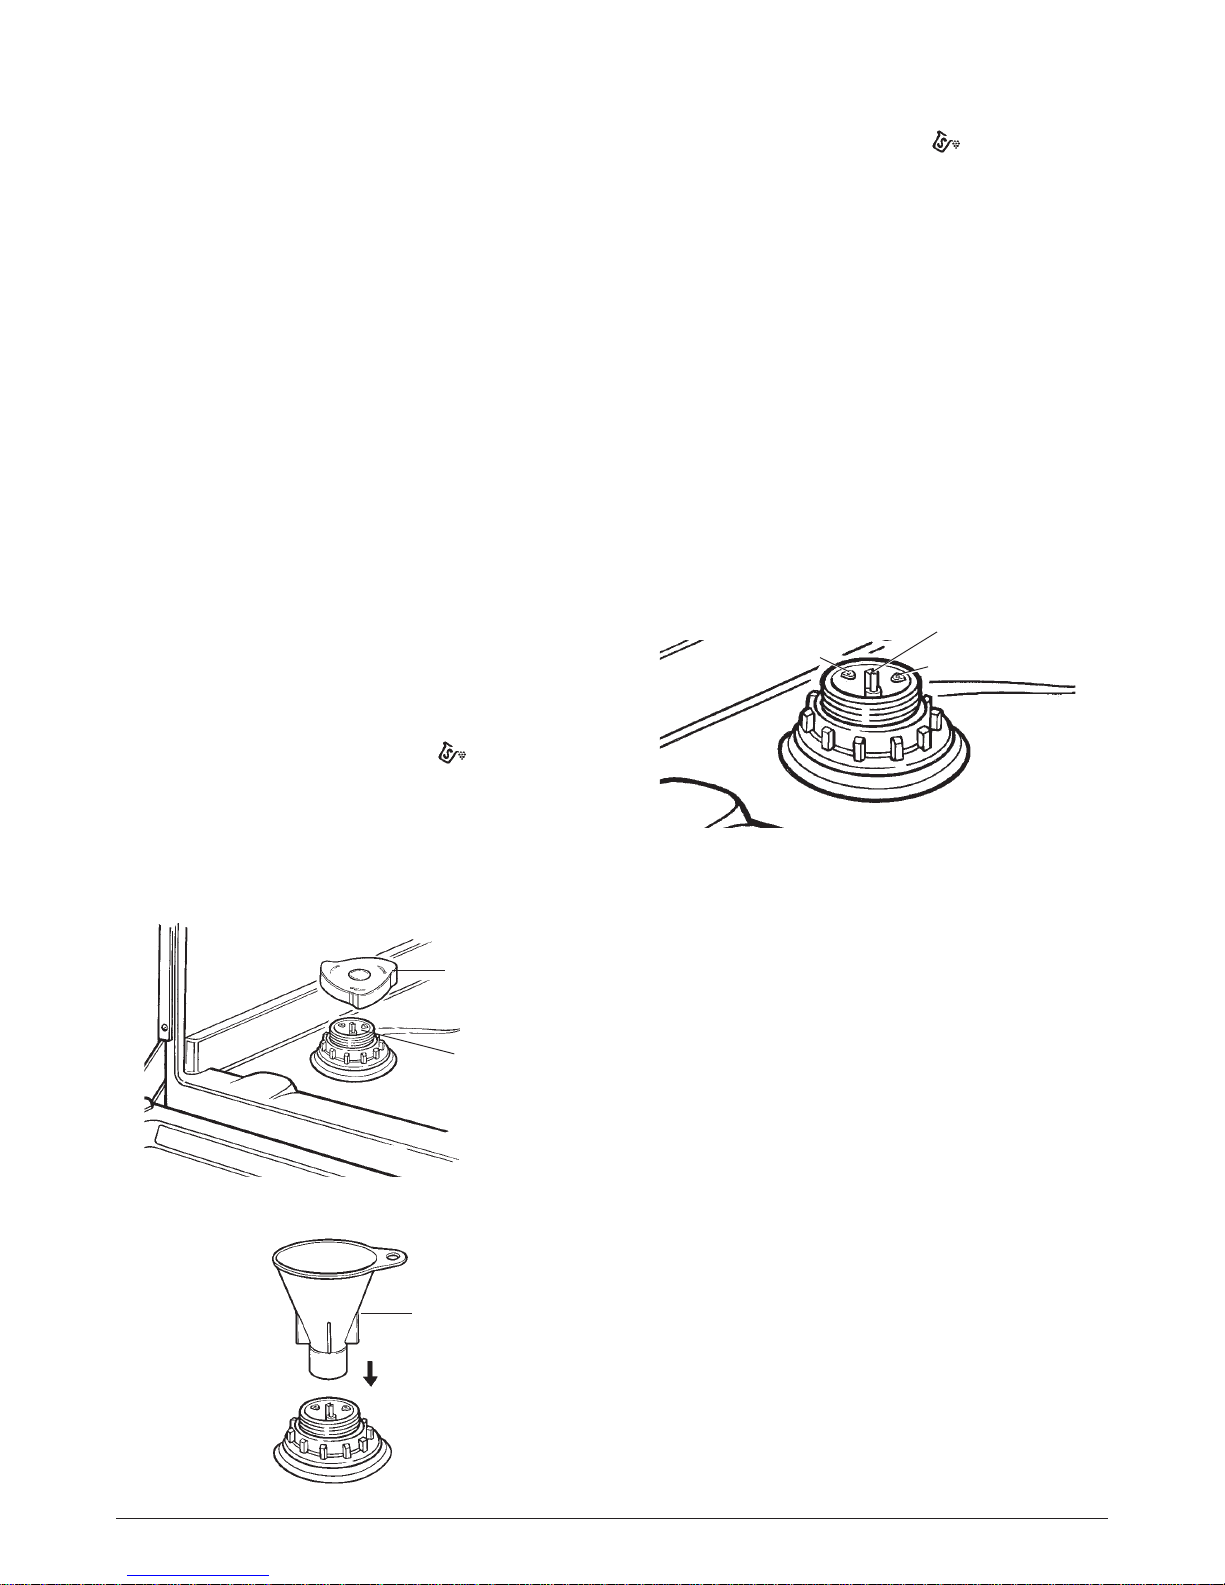
Loading the salt into the dishwasher
Always use salt intended for use with dishwashers.
The salt container is located beneath the lower
rack and should be filled as follows:
• Remove the lower rack and then unscrew and
remove the cap from the salt container
(Figure 6).
(If you are filling the container for the first time,
fill it with ½ litre of water before adding the salt.)
• Place the end of the funnel (supplied) into the
hole and introduce about 1.2kg of salt. It is
normal for a small amount of water to come out
of the salt container (Figure 7).
• Carefully screw the cap back on.
NOTE:The low salt indicator light on the
control panel may stay illuminated until the salt has
fully dissolved which may take between 2–6 days.
To prevent the formation of rust, load the salt
just before beginning a wash cycle.
Adjusting salt consumption
The dishwasher is designed to allow you to adjust
the amount of salt consumed, based on the
hardness of the water in your area.This is intended
to optimise and customise the level of salt
consumption so that it remains at a minimum.
To adjust salt consumption, proceed as follows:
• Unscrew the cap from the salt container.The salt
adjuster has an arrow on it (Figure 8).
• If necessary, rotate the salt adjuster in an anticlockwise direction from the '–' setting towards
the '+' sign, based on the hardness of the water
being used.
Initially set the salt adjuster to the lowest setting '–'.
If cutlery and glasses are smeary after a wash tur n
the adjuster towards '+' .
When the low salt indicator light
illuminates on
the control panel refill the salt container just before
the next wash programme. This is to avoid
undissolved salt from laying in the bottom of the
machine.
FIGURE 8
SALT ADJUSTER
+
–
FIGURE 6
SALT
CONTAINER
CAP
FIGURE 7
FUNNEL
Page 6
Page 6
Detergent and rinse aid
FIGURE 9
COVER
LATCH
CAP
DOSE
ADJUSTER
LEVEL
INDICATOR
PRE-WASH
COMPARTMENT
MAIN
COMPARTMENT
Detergent
Detergent specifically intended for use with
dishwashers must be used.The dispenser must be
filled before the start of each wash cycle following
the instructions provided in the "Wash Cycle Table"
(page 9).The detergent dispenser is located on the
inside panel of the door.
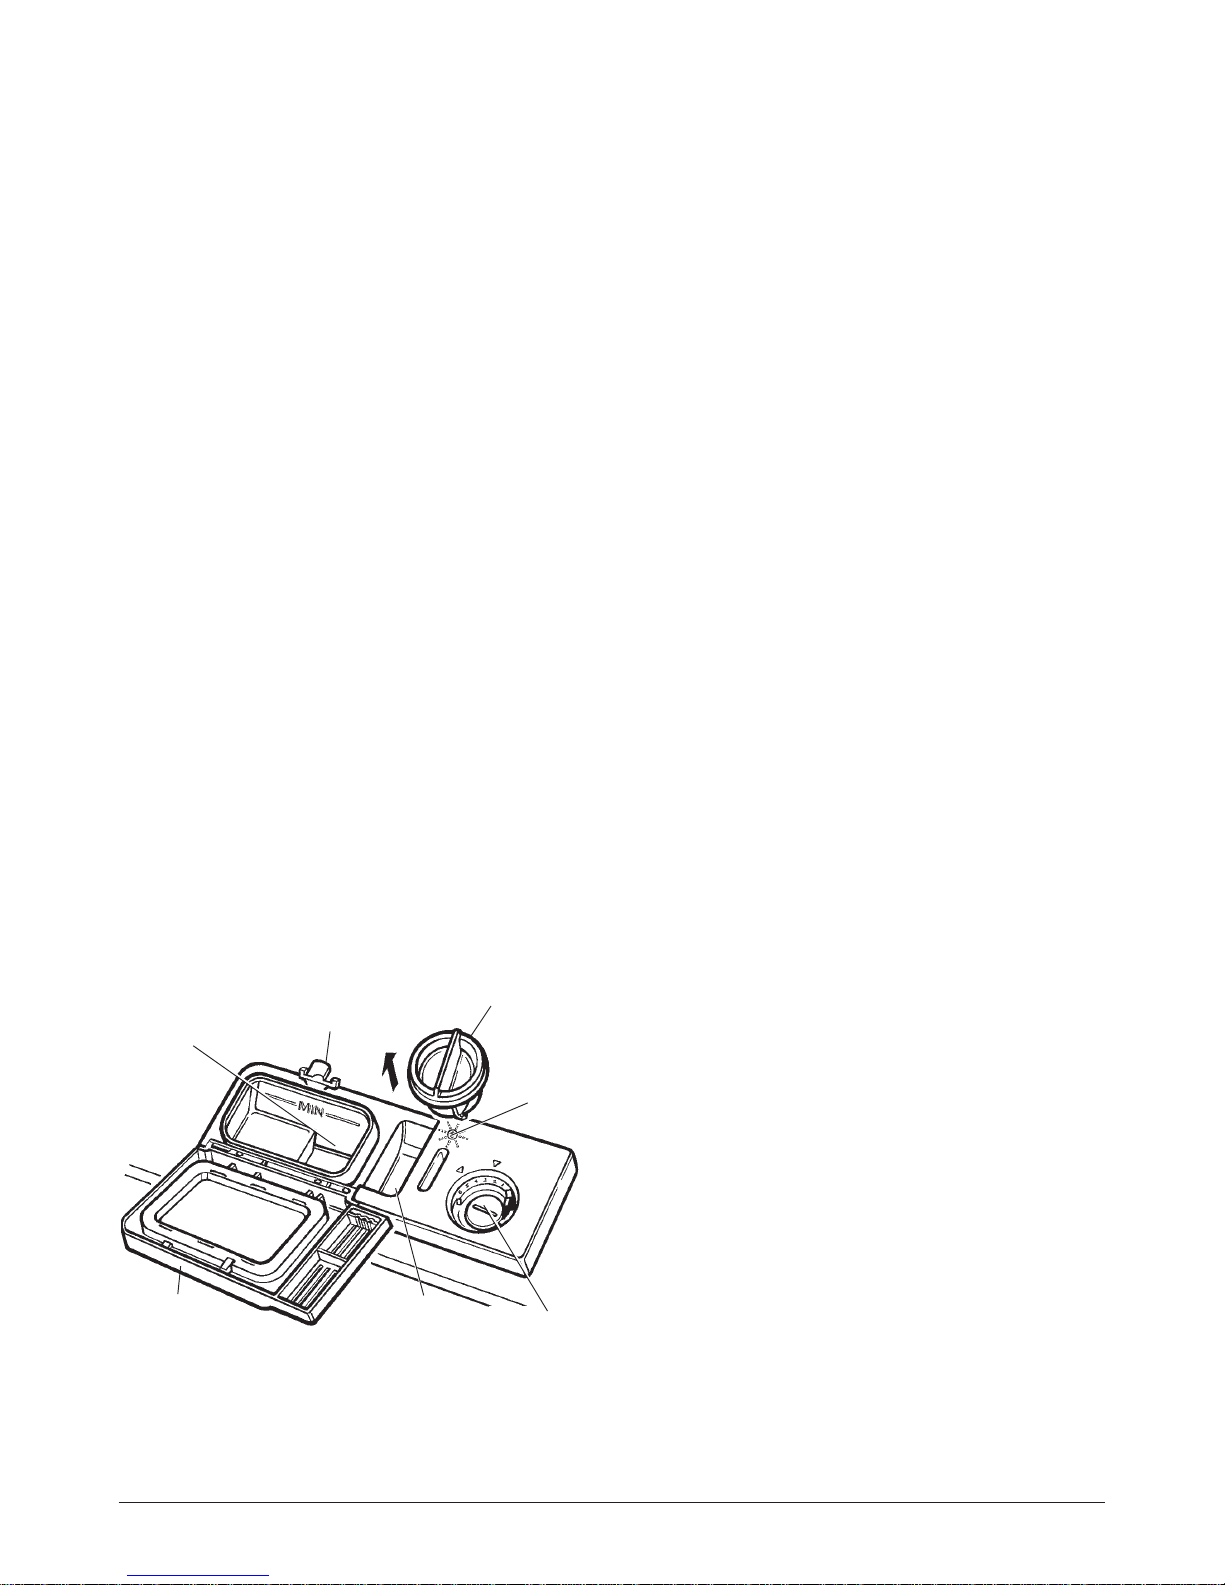
Loading the detergent
The detergent and rinse aid compartments are
located on the inside of the door.Press in the latch
to open the cover. The detergent for the Wash
Cycle should be placed in the main compartment.
Wash Programmes which include a pre-wash cycle
(refer to Wash Cycle Table – page 9) require
detergent to be placed in the pre-wash
compartment.
For information on the amount of detergent to be
placed in the main and pre-wash compartments
refer to the Wash Cycle Table.
Dishwasher tablets can be placed in the main
compartment but they are not recommended for the
shorter Wash Programmes when they may not
completely dissolve during the Wash Cycle.
For the Wash Cycle the amount of detergent varies
according to the programme selected (refer to
Wash Cycle Table).
After the detergent has been placed in the
dispenser, close the cover and press down until it
"clicks" in place.
Please note: Avoid getting any excess
detergent on the edges of the dispenser
compartment as this may foul the cover when
closing.
Rinse aid
This product makes dishes sparkle and helps them
to dry without spotting. The dispenser is located on
the inside panel of the door and should be filled
after every eighty wash cycles or when the low
rinse aid indicator light
6
comes on.
Loading the rinse aid
To open the dispenser, release the cap in an anticlockwise direction and then pour in the rinse aid
until the level indicator turns black (Figure 9). Avoid
overfilling.
The amount of rinse aid used for each cycle can be
regulated by turning the dose adjuster, located
beneath the cap, using a coin.There are 6 different
settings; the nor mal dosage setting is 3.
Important:
Proper dosage of the rinse aid improves drying.
If drops of water remain on the dishes or
spotting occurs, turn the dosage adjuster to a
higher setting.
Page 7
Page 7
Loading the dishwasher
FIGURE 11
Before placing the dishes in the dishwasher
remove the larger food debris.This prevents the
filter from becoming clogged which can result in
reduced performance.
If the pots and pans have baked-on food that is
extremely hard to remove, we recommend that they
be allowed to soak before they are washed.This
will eliminate the need for extra wash cycles.
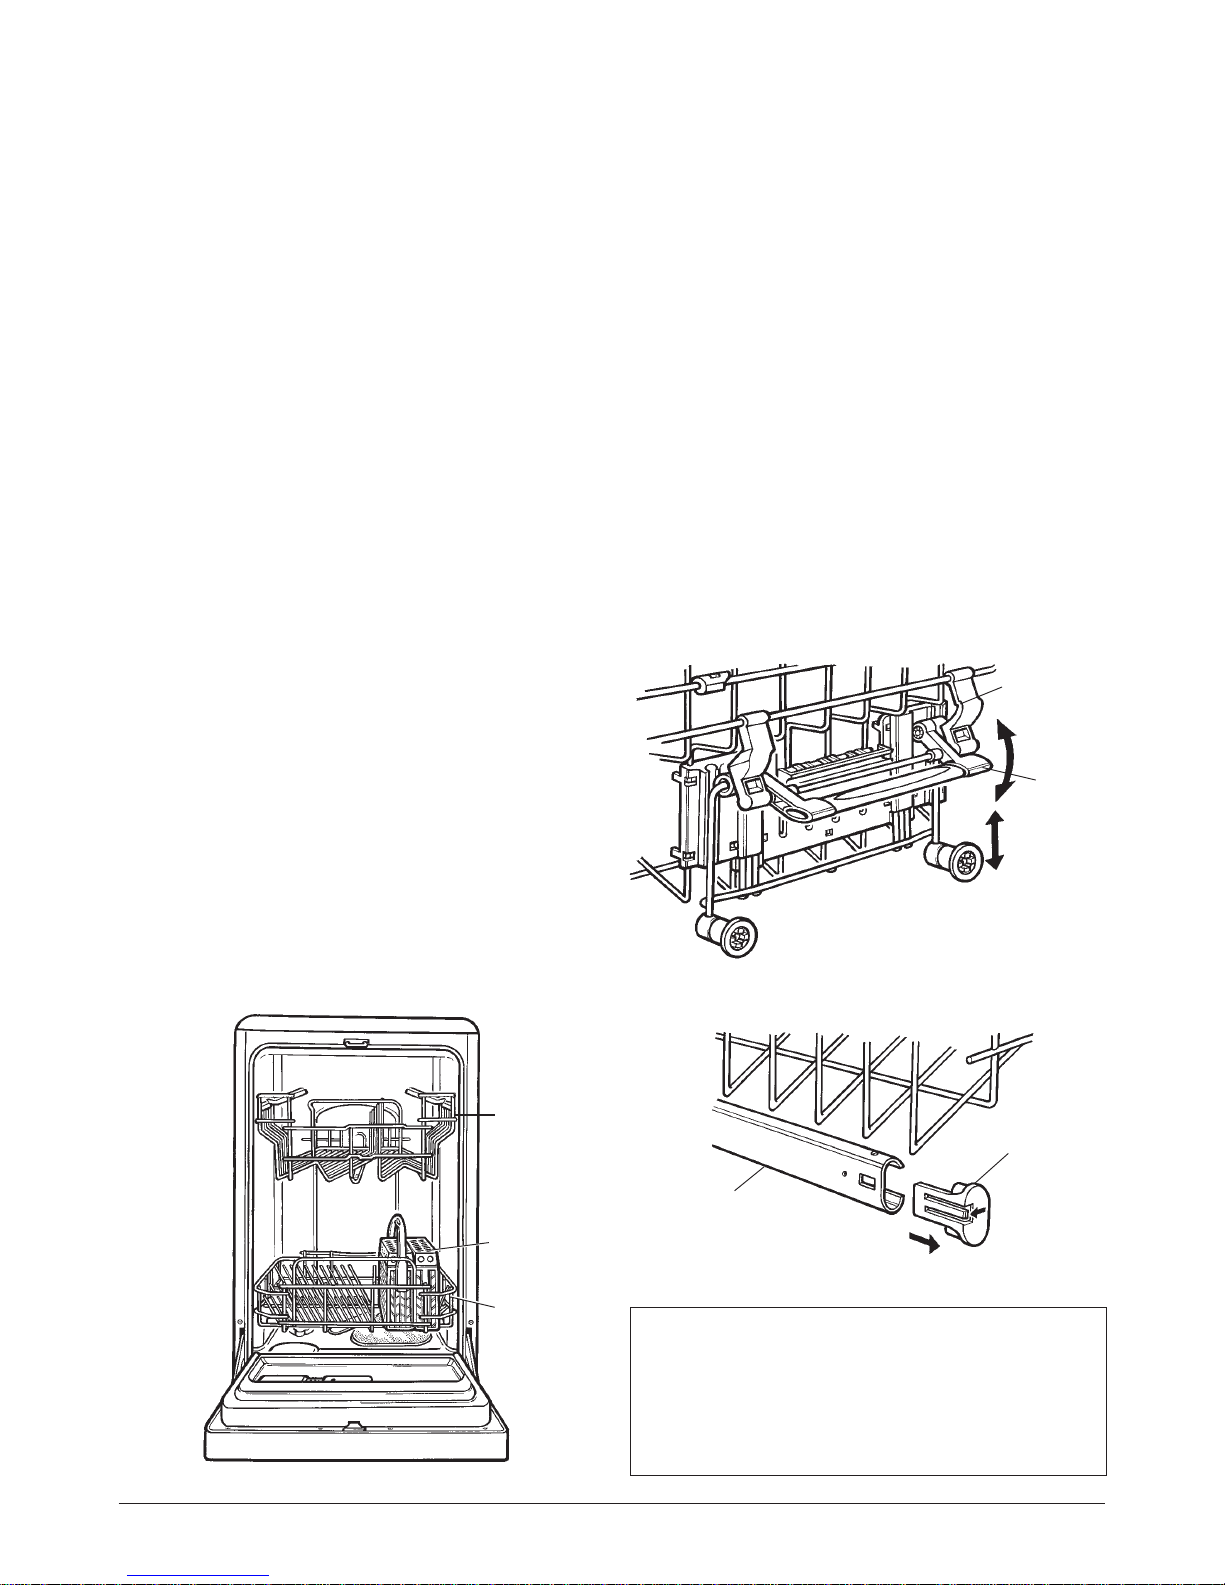
Pull out the rack to facilitate loading the dishwasher
(Figure 10).
How to use the lower rack
We recommend that you place the most difficult to
clean items on the lower rack;saucepans, for
example, lids, serving dishes and bowls.
It is preferable to place serving dishes and lids on
the sides of the racks in order to avoid blocking the
rotation of the top spray arm.
• Pots, serving bowls, etc. must always be placed
face down.
• Deep pots should be slanted to allow the water
to flow out.
• Cutlery should be placed in the cutlery basket
with the handles at the bottom. If the rack has
side baskets, the spoons should be placed
individually into the appropriate slots. Especially
long utensils and sharp knives should be placed
in the horizontal position at the front of the upper
rack.
Never allow forks or sharp utensils to protrude
through the bottom of the cutlery basket
obstructing the bottom spray arm.
How to use the upper rack
The upper rack is designed to hold delicate and
lighter dishware such as glasses, coffee and tea
cups and saucers, as well as plates, small bowls
and shallow pans (as long as they are not too
dirty).
Position the dishes and cookware so that they are
not in the way of the spray ar ms.
The upper rack can be raised for height by lifting
the mechanism on both sides of the upper rack by
the handles until it locks into place (Figure 11).
After adjustment the handles on the mechanism
must be pushed in to align with the rack.
To remove the upper rack, unclip the end stops on
the end of the runners and slide out the the rack
(Figure 12).
FIGURE 12
FIGURE 10
UPPER
RACK
CUTLERY
BASKET
HANDLE
LIFT
MECHANISM
LOWER
RACK
RUNNER
END
STOP
WARNING:
Not all glassware or porcelain is suitable for use in
dishwashers.
Check for dishwasher-proof markings on the base
of the porcelain or check with the manufacturer.
Page 8
Starting the dishwasher
Control panel
Setting and starting a wash cycle
Turn on the electricity and water supply to the
dishwasher .
Ensure the dishwasher has been replenished with
salt and rinse aid.
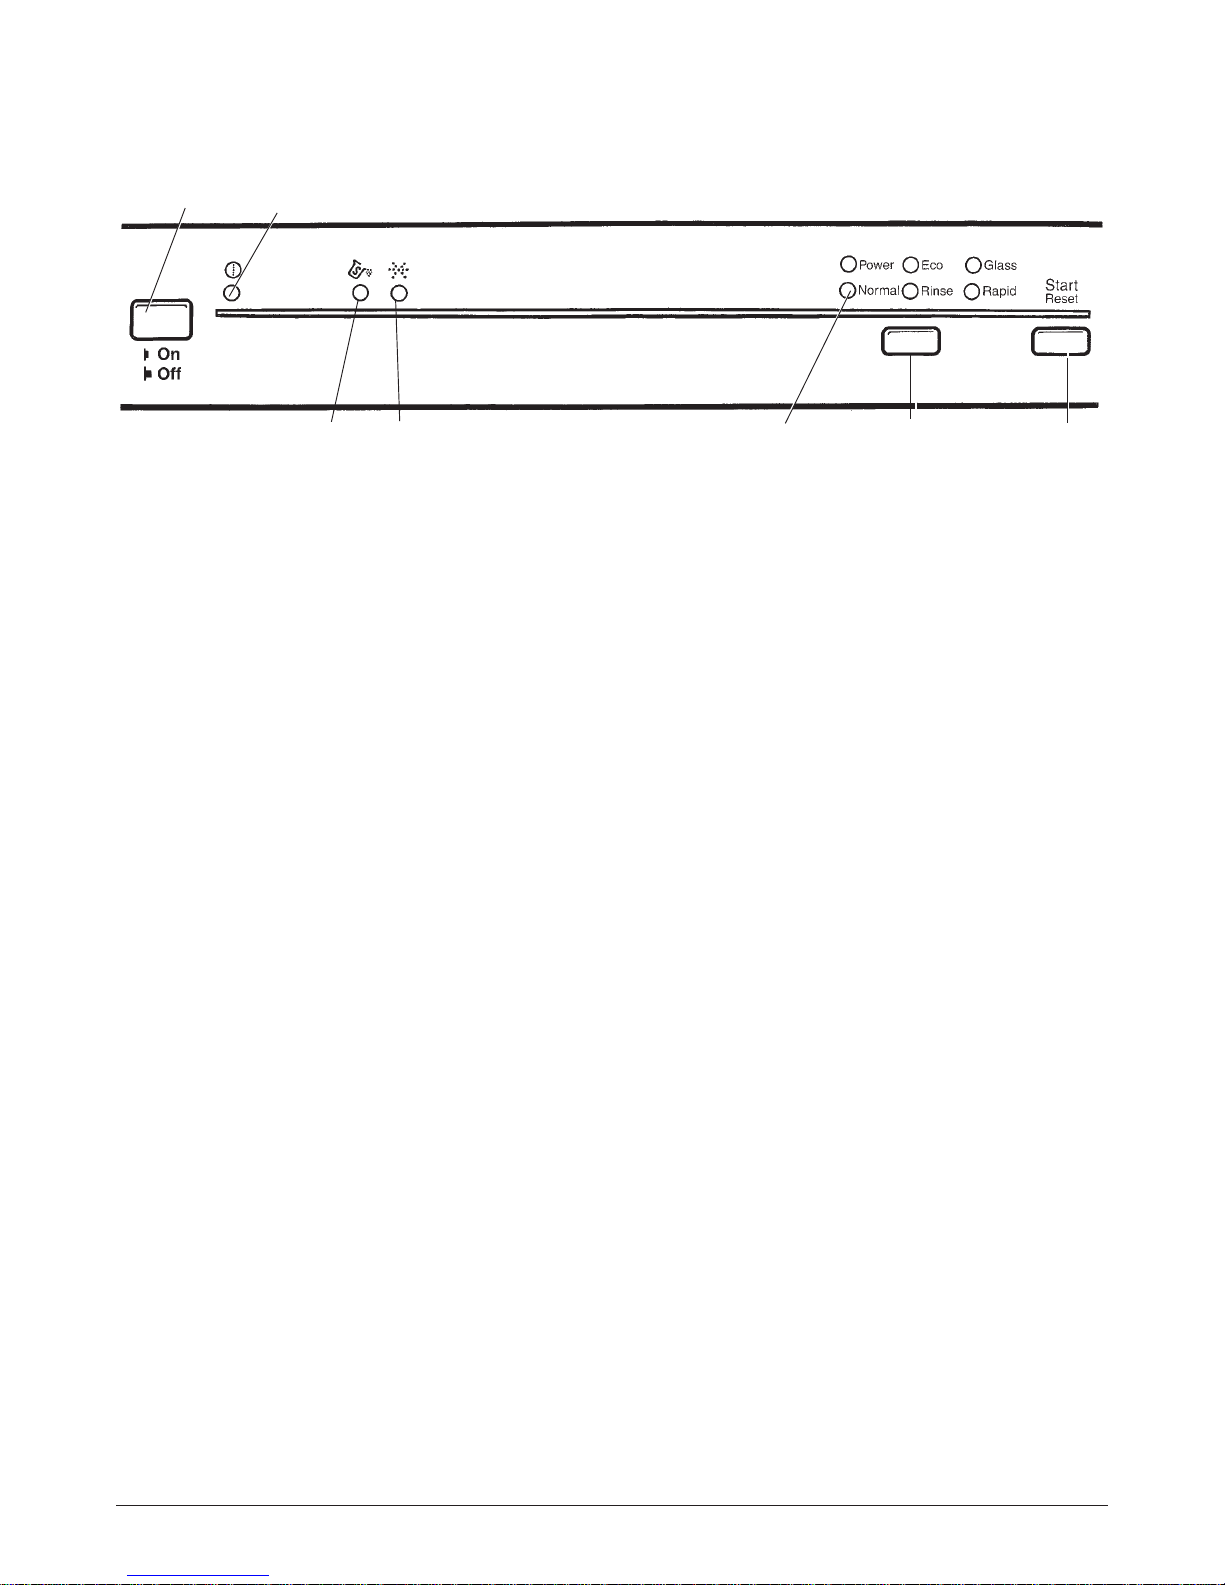
Press the On/Off button and the On/Off Indicator
will light.
Choose the wash cycle you feel is most appropriate
for the type of dishes that need washing (consult
the Wash Cycle Table – page 9) by pressing the
Programme Select button until the Programme
Indicator Light illuminates against the programme
you wish to select (Figure 13).
Close the door and press the Start/Reset button.
The indicator light will flash to show that the Wash
Cycle has started.
The machine fills with water and begins the wash
cycle.
Cancelling or modifying a cycle after
wash programme has started
If the wash programme is modified after it has
started the detergent may have already been
released. Press the Star t/Reset button for more
than 3 seconds to put the machine into standby
mode.The Programme Indicator Light will stop
blinking and the machine will emit a warning sound.
Reselect the desired cycle setting by pressing the
Programme Select Button. If the Wash Cycle has
already drained the machine you need to add more
detergent.
Press the Start/Reset button to recommence the
wash programme.
At the end of the wash cycle
At the end of the Wash Cycle the buzzer will sound
for 8 seconds and then stop.
Press the On/Off button to switch the machine OFF.
Wait a few minutes before removing the dishes so
as to avoid handling them while still hot and to get
better drying results.
Programme indicator lights
The Programme Indicator Lights show the status of
the machine:
Programme Lights – OFF: Standy mode
One Programme Light – ON: Pause mode (door
open)
Programme Light blinking: Programme running
Programme Light blinking fast: Error – page12
for Error Codes.
FIGURE 13
ON/OFF
INDICATOR LIGHT
ON/OFF
BUTTON
SALT
RINSE
AID
PROGRAMME
SELECT
BUTTON
PROGRAMME
INDICATOR
LIGHT
START/RESET
BUTTON
Page 8
Page 9

Page 9
Energy saving tips
• Run the dishwasher when it is fully loaded in order to save energy.
• Choose the right wash cycle.The choice of cycle depends on the type of dishware, cookware and
utensils being washed and how dirty they are.
• Use the right amount of detergent. Using more detergent than necessar y will not improve cleaning
performance.
Wash cycle table
Cycle
Cycle
Selection
Information
Description
of Cycle
Detergent
Pre/main
Wash
time (min)
Normally dir ty dishes,
pots and pans.
Standard daily cycle.
Heavily soiled dishes
and pans with dried on
food.
Lightly soiled dishes,
plates, glasses and
pans.
For dishes that need to
be rinsed and dried
only.
For lightly soiled loads
such as glass, crystal
and fine crystal.
Pre-wash
Wash 60°C
Rinse 70°
Drying.
Pre-wash
Wash 50°C
Rinse 65°
Drying.
Pre-wash
Wash 45°C
Rinse 60°
Drying.
Pre-wash
Wash 40°C
Rinse 70°
Drying.
Wash 45°C.
Rinse 70°C
Drying.
4/20g
160
155
105
85
110
30
20g
15g
POWER
ECO
4/20g
NORMAL
RINSE
GLASS
A short wash for lightly
soiled load that does
not require drying.
Wash 40°C
Rinse.
15g
RAPID
Page 10
Page 10
How to keep your dishwasher in shape
Cleaning and maintenance
Filter assembly
For best performance and results, the filters must
be frequently cleaned.
The filters efficiently remove food residue from the
wash water allowing it to be re-circulated during
the wash cycle. For this reason it is a good idea to
remove the larger food particles trapped in the
filters after each wash cycle.
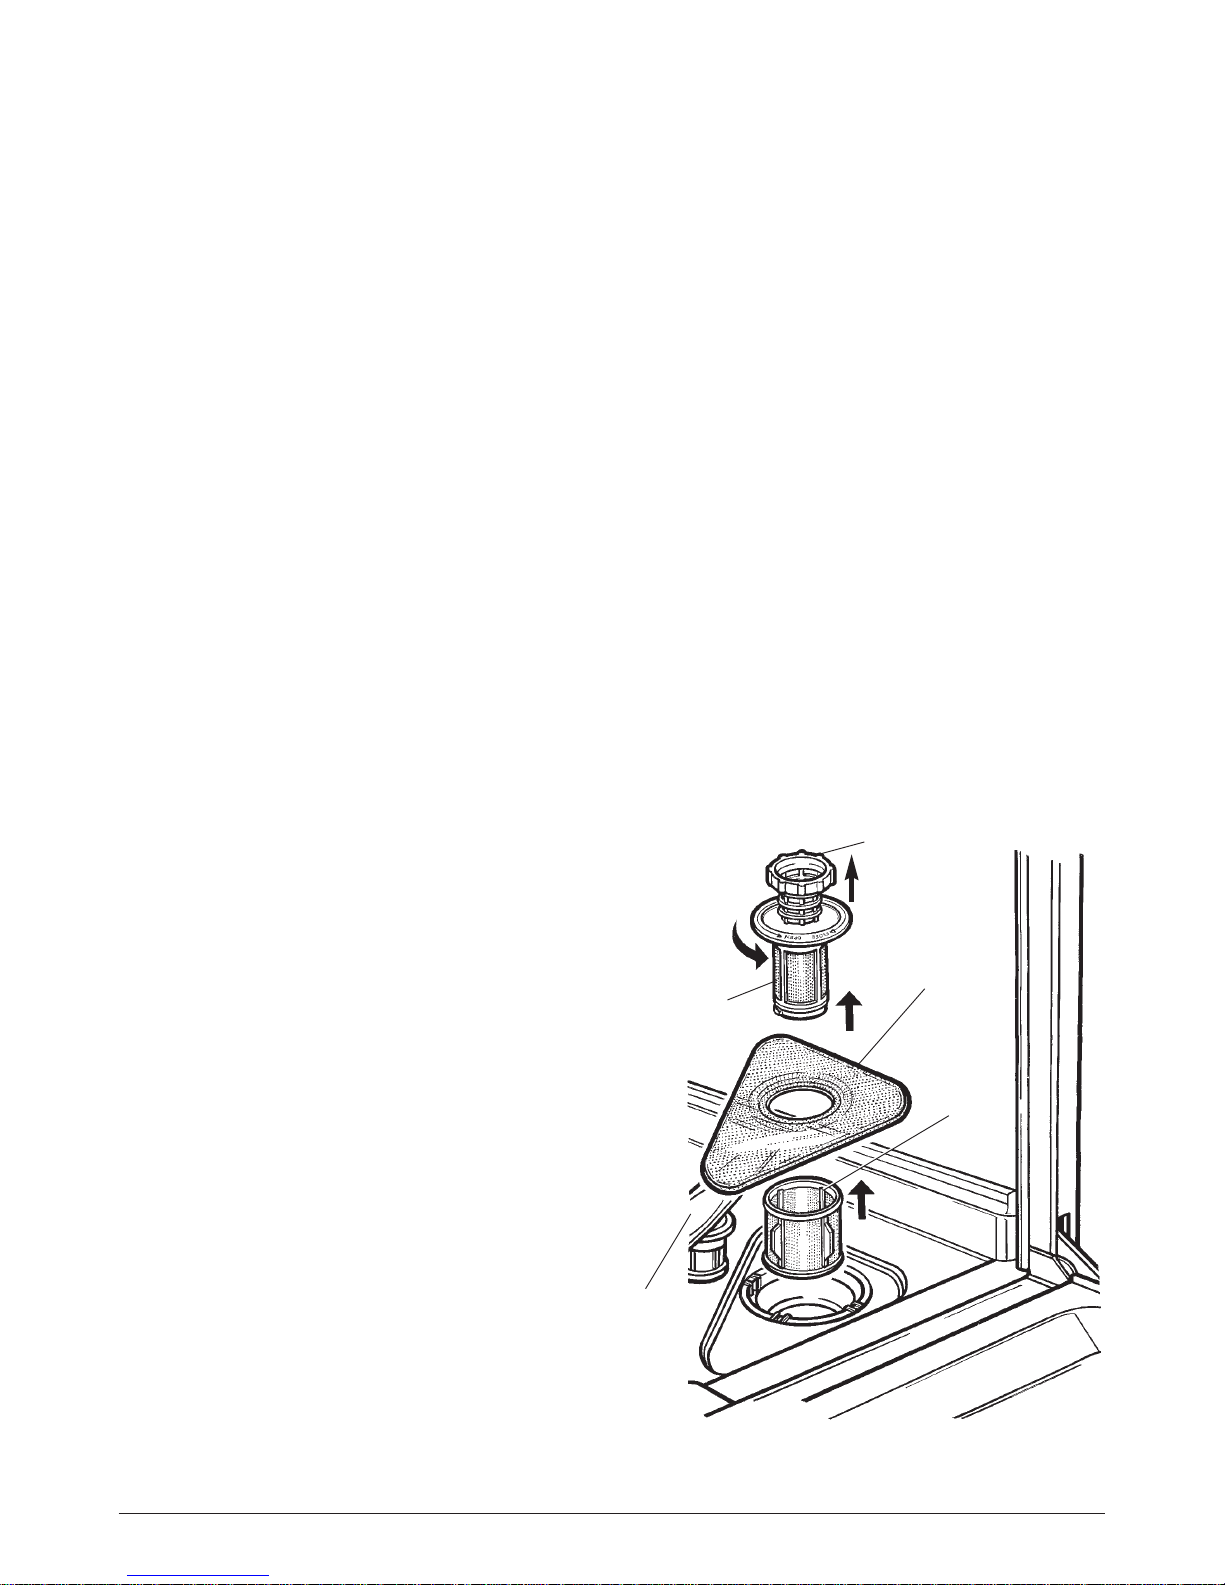
Release the coarse filter assembly from the main
filter by turning it anti-clockwise (OPEN) to lift out.
Separate the two parts of the coarse filter by
pulling them apart (Figure 14).
The main filter can then be lifted out and rinsed
under running water.
The fine filter can then be removed for cleaning.
After the filters have been cleaned under warm
running water replace them in the machine in
reverse order.
Finally, tur n the coarse filter clockwise (CLOSE)
until it locks.
Never use the appliance without the filters.
Improper placement of the filters may damage the
dishes and utensils etc.
After every wash
After every wash it is advisable to turn off the
water supply to the appliance and leave the door
slightly ajar so that moisture and odours are not
trapped inside.
Remove the mains plug
For your safety always remove the mains plug from
the mains outlet socket before cleaning or
performing any maintenance work on the
appliance. Do not take risks.
No solvents or abrasive cleaning
products
To clean the exterior and rubber parts of the
dishwasher do not use solvents or abrasive
cleaning products. Only use a clean cloth and
soapy water.
To remove spots or stains from the surface of the
interior use a cloth dampened with water and a
little white vinegar, or a cleaning product made
specifically for dishwashers.
When you go on holiday
When you go on holiday it is recommended that
you run a wash cycle with the dishwasher empty
and then remove the plug from the socket. Turn off
the water supply and leave the door of the
appliance slightly ajar.This will help the door seal
to last longer and prevent odours from for ming
within the appliance.
Moving the appliance
If the appliance has to be moved, keep it in a
vertical position.
Door seal
One of the causes of odours to form in the
dishwasher is food remains trapped in the door
seal. Periodic cleaning with a damp sponge will
help prevent this from occurring.
FIGURE 14
MAIN FILTER
FINE
FILTER
COURSE
FILTER
ASSEMBLY
(SEPARATE
BY PULLING
OUT OF
COARSE
FILTER)
SPRAY
ARM
Page 11
Page 11
When not in use
If the appliance is to be turned off for a long period of time it is advisable to:
O Disconnect the unit from the mains supply.
O Empty the dishwasher.
O Clean and dry the interior.
O Leave the door open.
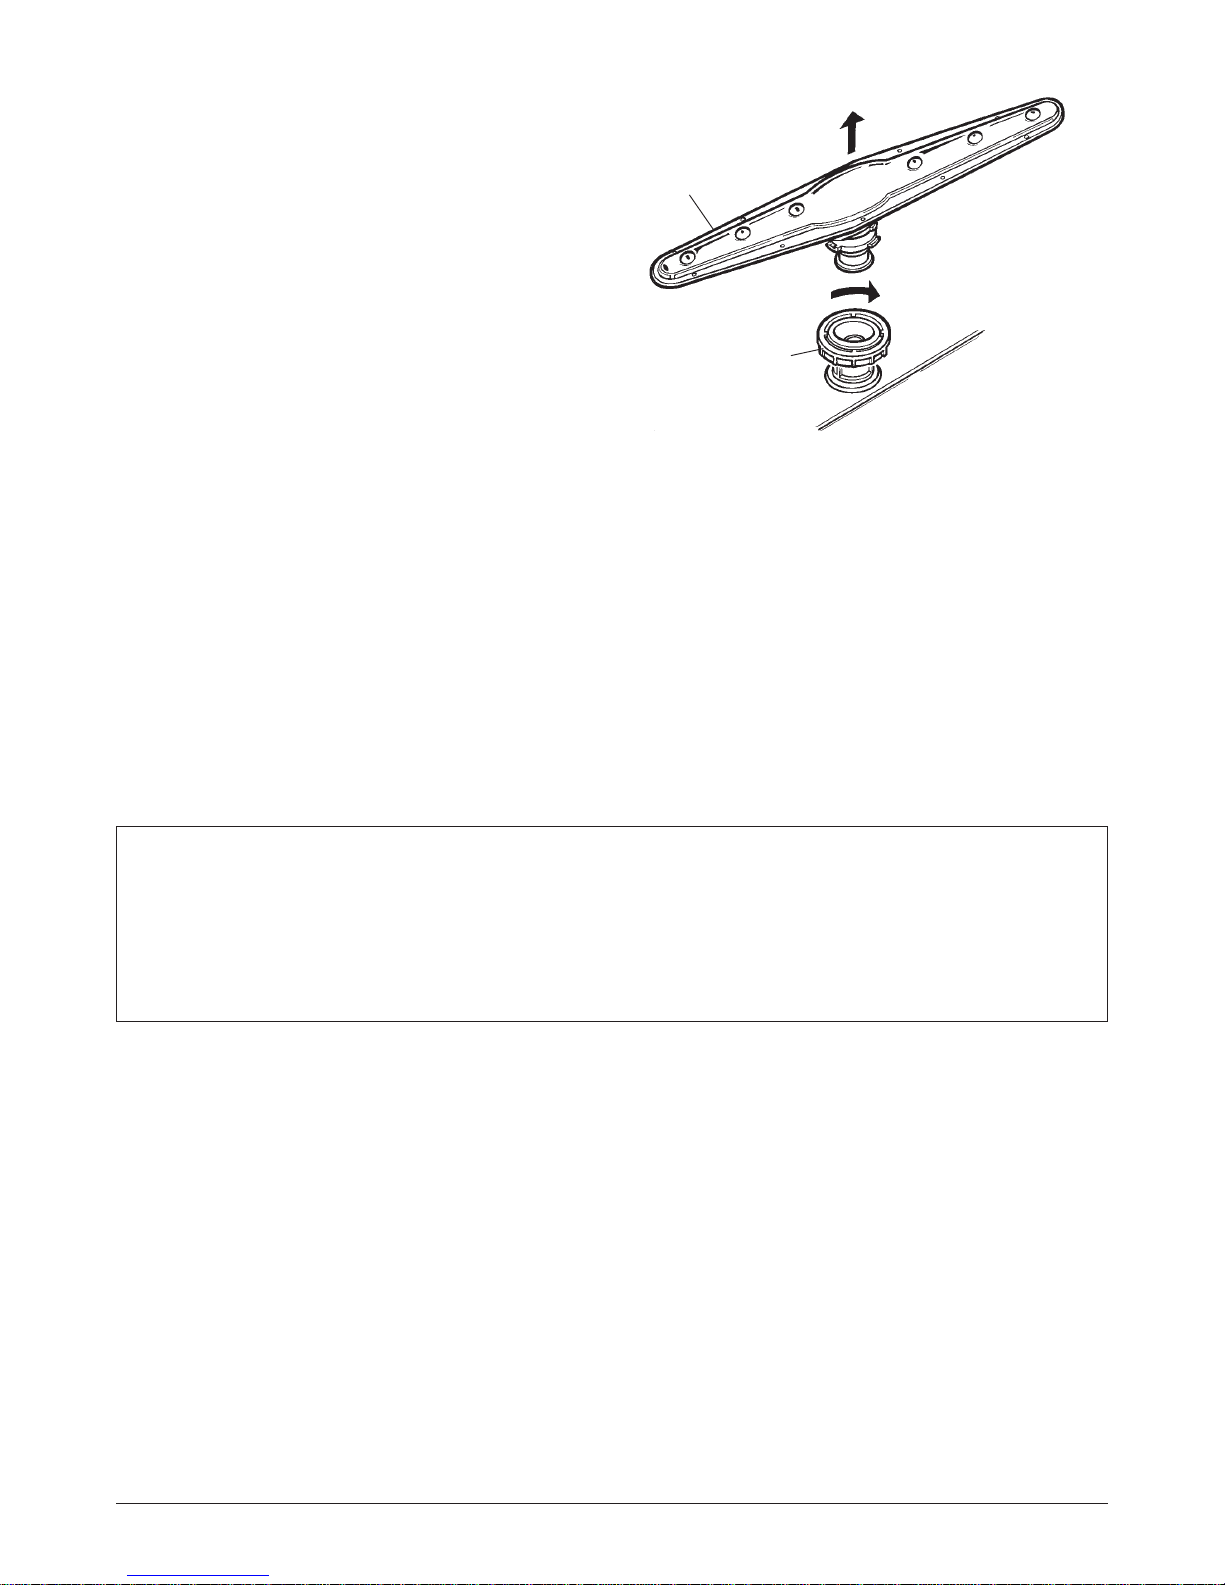
Cleaning the spray arms
It may happen that food particles become
encrusted on the spray arms and block the holes.
Check the spray arms periodically and clean them
when needed.To release the bottom spray arm
unscrew the nut clockwise.Lift off the arm. Clean
the spray arm in soapy water and remove any
debris from the holes with a soft brush. Replace
the spray arm and secure by turning the nut anticlockwise (Figure 15).
Cleaning the water inlet filter
Periodically clean the small water inlet filter located
in the supply hose connector.
After turning off the water tap, unscrew the end of
the water supply hose, remove the filter from the
connector and clean it carefully under running
water. Replace the filter and tighten the water
supply hose back into position.
FIGURE 15
SPRAY
ARM
NUT
Page 12
Page 12
Troubleshooting
Error codes
If the dishwasher is not functioning properly, before
calling the Helpline, please check the following:
The dishwasher does not start
Have you checked whether :
• The plug is pushed firmly into the outlet socket.
• The mains electrical supply is switched on.
• The door is properly closed.
• The On/Off button is in the OFF position.
• The water supply is turned on.
The dishwasher does not take in
water
Have you checked whether :
• The water to the appliance is turned on and the
hose is properly connected.
• The mains water supply is turned on and is of
sufficient pressure.
• The water supply hose is not crimped or bent.
• The water supply filter is not clogged (if fitted).
The dishes are not cleaned properly
Have you checked whether :
• The wrong programme has been selected.
• Dishwasher has not been loaded correctly.
• Spray arm is obstructed by utensils or dishes.
• Wrong quantity of detergent has been used.
• Rinse aid is empty.
The dishwasher does not drain
properly
Ensure that the drain hose is not crimped or bent.
Note: The dishwasher is designed to detect an
overflow. When this happens the circulation pump
turns off and the drain pumps takes over. If this
happens turn off the mains supply to the machine,
isolate it from the water supply and contact the
Helpline 0844 871 0011.
Limescale deposits or a white film
forms on the dishes
Have you checked whether :
• The lid to the salt container is closed properly.
• The rinse aid dosage is correct.
If, despite all these checks, the dishwasher still
does not function and/or the problem persists,
contact the Helpline 0844 871 0011 with the
following information:
• The nature of the problem.
• The model Type Number (Mod...) and the Serial
Number (S/N...).These are indicated on the data
plate located on the side of the inner part of the
door.
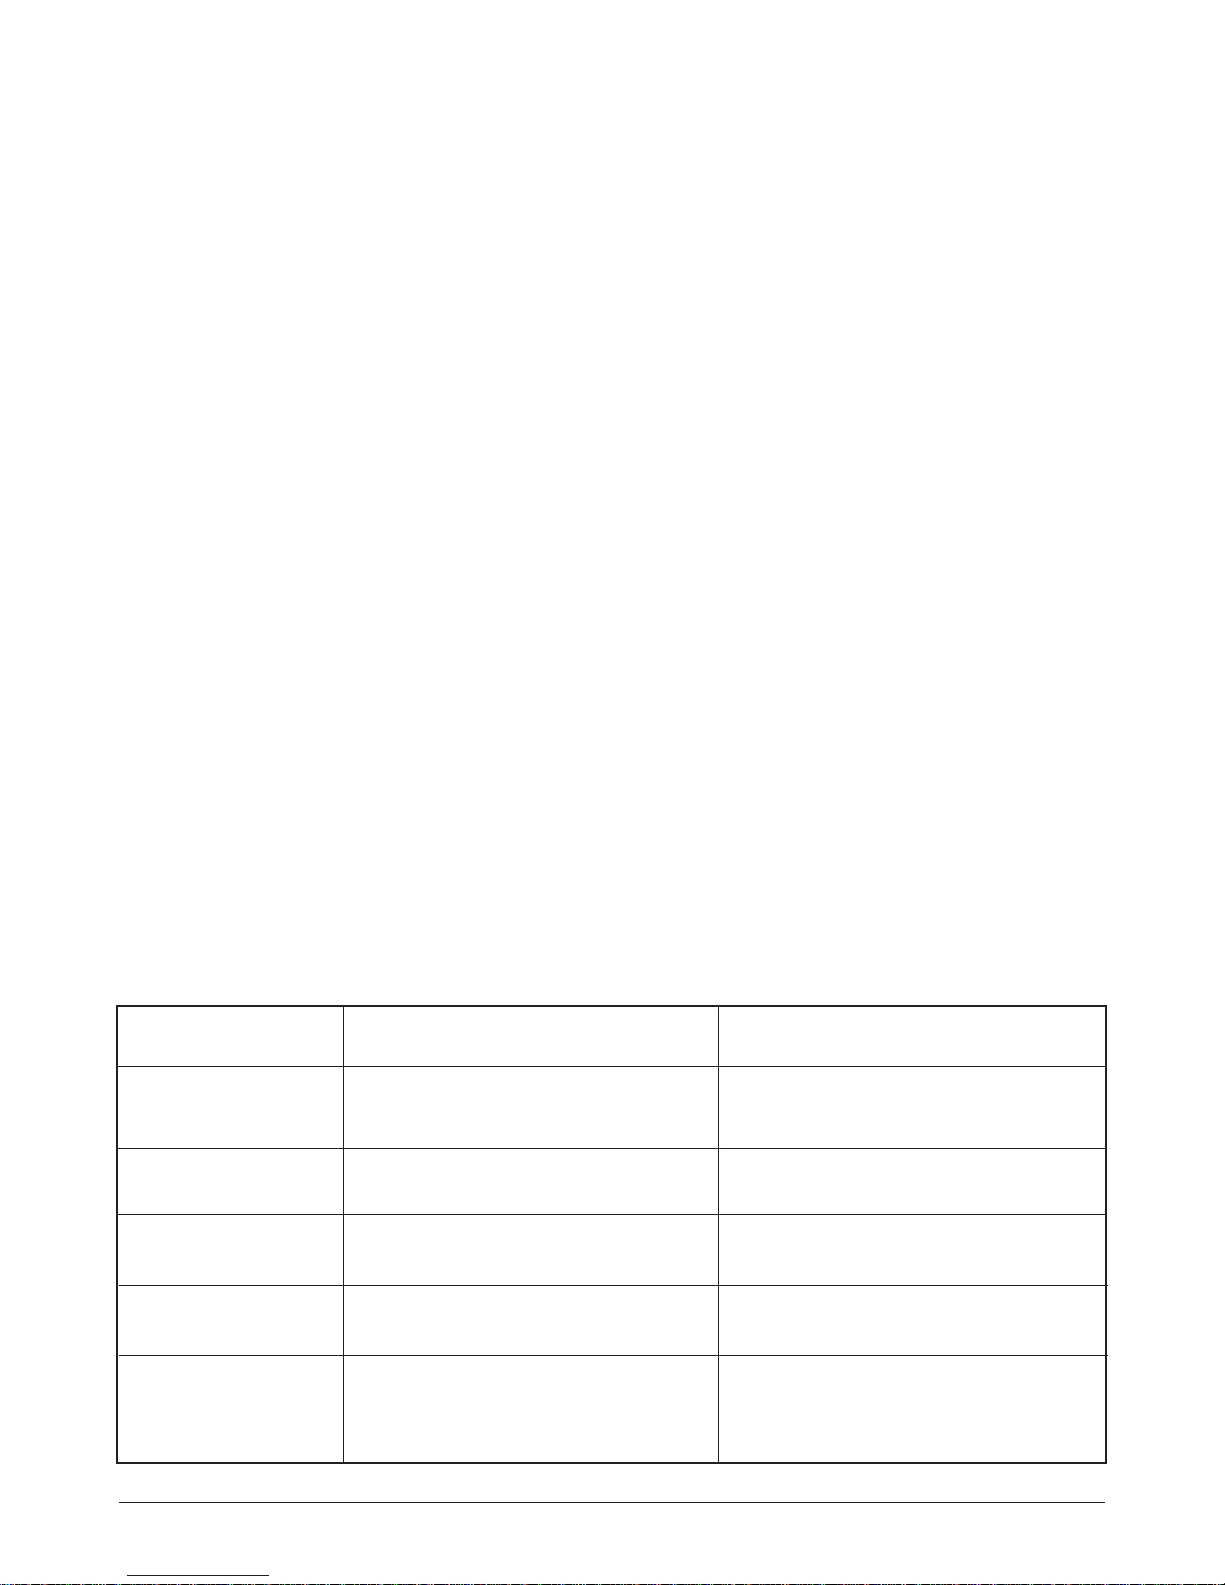
Codes
Symptoms
Possible causes
The ‘Glass’ indicator
flickers.
Machine taking a long time to fill with
water.
Blocked intake.
Low water pressure.
The ‘Eco’ indicator
flickers.
Machine taking a long time to heat
the water.
Faulty temperature sensor.
Faulty heating element.
The ‘Po wer’indicator
flickers.
Water leak.
Water connections not secure.
The ‘Po wer’and ‘Eco’
indicators flicker.
Failure of temperature sensor.
Open circuit or broken temperature
sensor.
The ‘Pow er’, ‘Eco’
and ‘Glass’ indicators
flicker.
Failure of temperature sensor.
Short circuit or broken temperature
sensor.
Page 13
Page 13
Fuse and mains plug replacement
This product is supplied with a fitted plug which
contains a 13A fuse. If you are simply replacing the
fuse, you must use a 13A fuse which has been
approved by ASTA to BS1362.
If the plug does not fit the socket or becomes
damaged, a new plug must be fitted. Replace the
original plug with the correct plug for your socket. If
this is a 3-pin (square pin) 13A (BS1363) plug, you
must make sure that it is fitted with an ASTA
approved 13A fuse.
If another type of plug is used, it must be protected
by a 15A fuse, either in the plug or at the
distribution board.
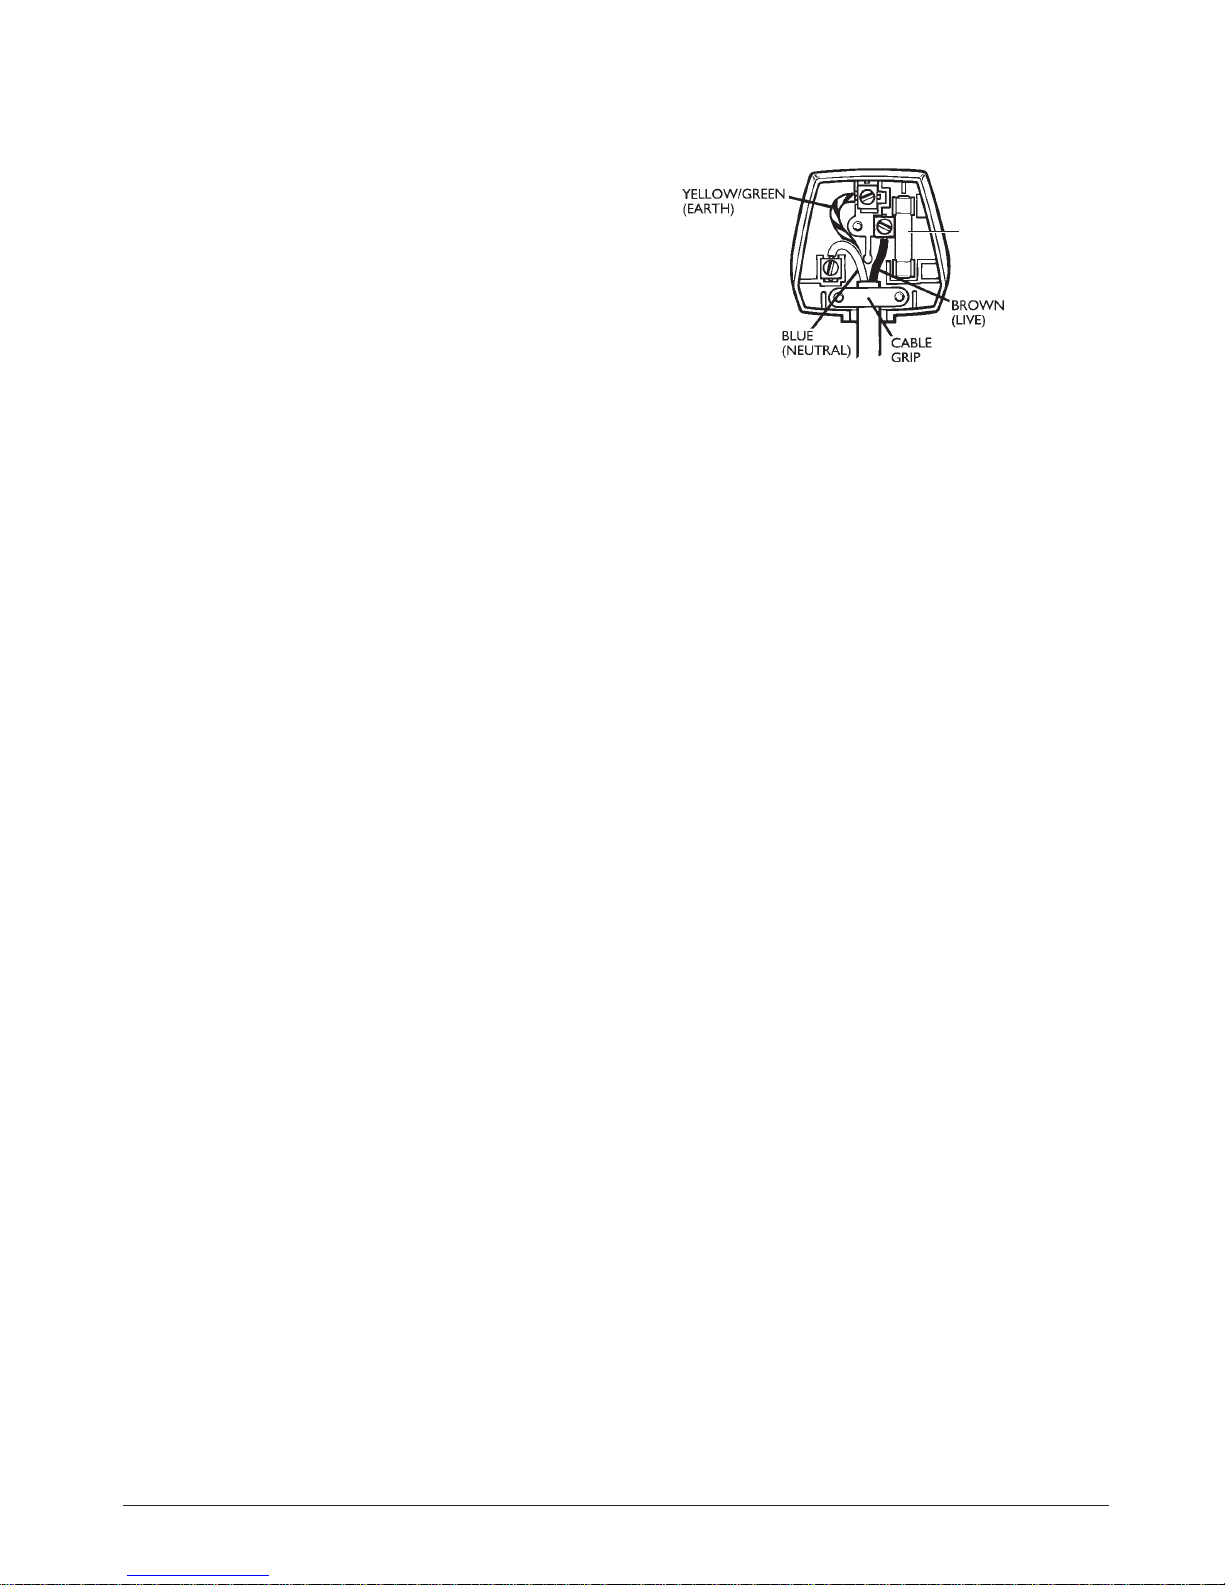
1. Cut off the existing fitted plug.
2. The wires in the mains lead supplied with this
appliance are coloured in accordance with the
following code (Figure 16):
GREEN/YELLOW = EARTH (E)
BLUE = NEUTRAL (N) BROWN = LIVE (L)
This product must be earthed
As the colours of the wires in the mains lead may
not correspond with the colour markings identifying
the terminals in your new plug, proceed as follows.
The wire which is coloured GREEN or
YELLOW/GREEN must be connected to the
terminal which is marked with the letter E or E
symbol or coloured GREEN or YELLOW/GREEN.
The wire which is coloured BLUE must be
connected to the terminal in the plug which is
marked with the letter N or coloured BLACK or
BLUE.
The wire which is coloured BROWN must be
connected to the terminal which is marked with the
letter L or coloured RED or BROWN.
3. Ensure that the connections are tight and that no
loose strands are left out of the terminals.
IF IN ANY DOUBT CONSULT A QUALIFIED
ELECTRICIAN.
If the mains lead becomes damaged consult a
qualified electrician.
FIGURE 16
FUSE
Page 14

Page 14
Specification
Safety measures
After sales service
Never try to repair the appliance or the electrical
parts yourself. Any repair carried out by an
unskilled person is dangerous and may affect the
guarantee. Contact the Helpline below for
assistance and advice.
Disposal of old dishwasher
Disposal of the appliance must conform with EU
environmental regulations.
Make the appliance not usable by cutting off the
mains lead and removing any door locks.
The appliance must be delivered to an authorised
collection centre.
Dimensions: HxWxD cm: 85 x 45 x 58
Capacity: 8 standard place settings
Mains water pressure: 0.04-1.0MPa
Power supply 230V ~ 50Hz
Total power 1930W
Energy efficiency A
Washing efficiency A
Drying efficiency A
Product specification may vary without prior notice.
This appliance is guaranteed for a period of 2 years
from the date of purchase. Keep your purchase
receipt with these instructions.
If the appliance fails to work properly during the
2 year period contact the:
Helpline on 0844 871 0011. The appliance will be
repaired (at the manufacturer’s discretion) at no
cost to you. If the guarantee has elapsed, you will
be given a quotation for any repairs or parts
required.
Page 15

Page 15
Page 16

We continuously try to improve our products for the benefit of our customers.
For this reason we reserve the right to make changes to any product at any time, without notice.
CZ26771/030108
This appliance/fitting is marked according to the European directive 2002/96/EC on Waste Electrical
and Electronic Equipment (WEEE). By ensuring this product is disposed of correctly, you will help
prevent potential negative consequences for the environment and human health, which could
otherwise be caused by inappropriate waste handling of this product.
The symbol on the product, or on the documents accompanying the product, the Crossed Out
Wheelie Bin symbol, indicates that this appliance/fitting may not be treated as household waste. Instead it
shall be handed over to the applicable collection point for the recycling of electrical and electronic
equipment. Disposal must be carried out in accordance with local environmental regulations for waste
disposal. For more detailed information about treatment, recovery and recycling of this product, please
contact your local authority, your household waste disposal service or the retailer where you purchased the
product.
 Loading...