

Page 1
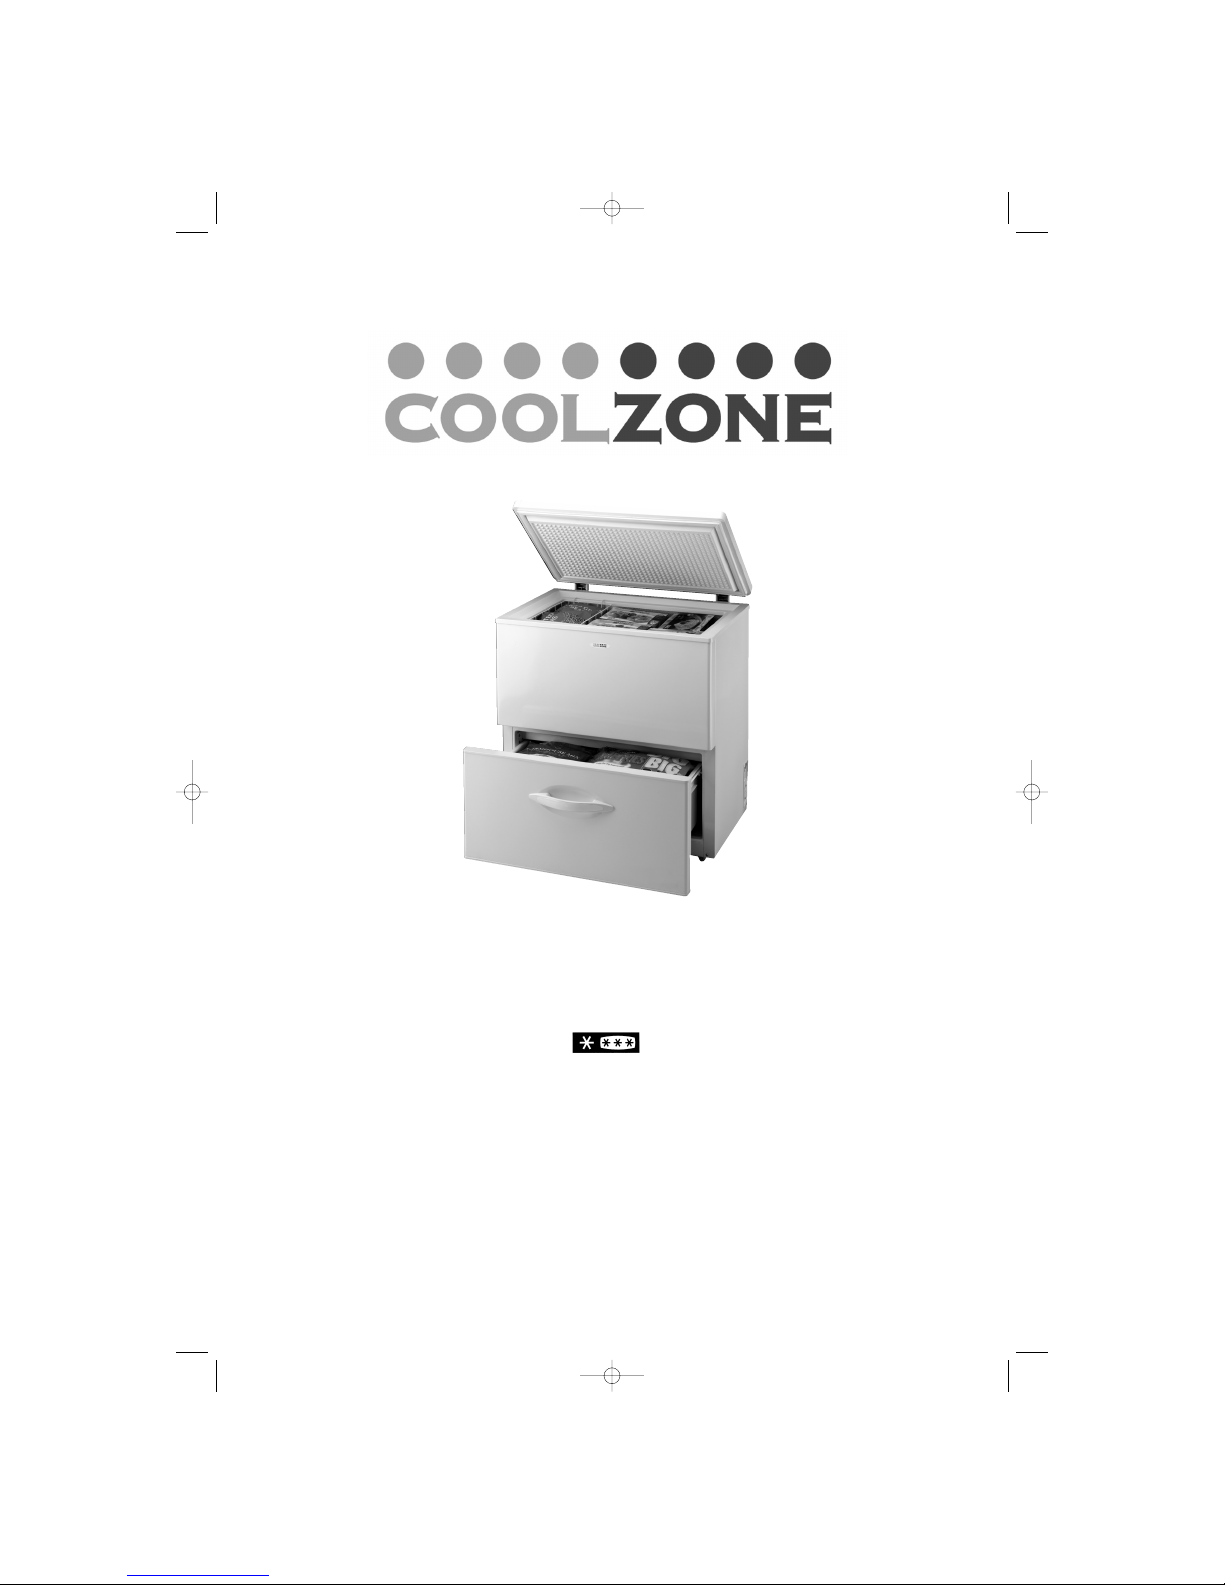
CZ51115
Chest freezer
UUSSEERR IINNSSTTRRUUCCTTIIOONNSS
Please read these instructions carefully before using this product
and keep them safe for future reference.
26343-17 1 7.qxp 1/ 3/2 7 15: 8 Page 1
Page 2
• internal wire bas ket
• frost s cra per
• 4 x ca s tors (self ass embly required)
Do rea d thes e instructions thoroughly before
using this a ppliance.
Do ins tall the appliance only in a vertical
position.
Do s tand appliance for 12 hours to allow the
cooling gas es to s tabilise if trans ported in a
horizontal pos ition.
Do a llow for a dequate ventilation around the
appliance.
Do unplug before clea ning a nd ma intena nce.
Do defros t regularly for maximum efficiency.
Don’t install the a ppliance in humid or extreme
conditions.
Don’t attempt to repa ir the appliance yourself
(s ee a fter s ales s ervice information – back
page).
Don’t us e a ny e lectrical devices s uch a s fans or
hea ters to defros t.
Don’t install near heaters or other heat s ources .
Don’t s tore goods containing inflammable or
other explosive ga s es.
Don’t leave lid clos ed if appliance is left switched
off for long periods.
Page 2
B e fo r e U s e
Do a n d Do n ’t
P a ge c o nt e nts
C hec k the c ontents
C heck the following contents are included with the product a nd ins pect the cas ing for any damage. If
neces s ary contact the retailer from whom you purchased the product.
Packaging
The packaging is recyclable s o dis pose of it according to local regulations. Keep the packa ging materials
out of reach of young children. Take particular ca re to remove any packing from the back of the freezer.
Warning
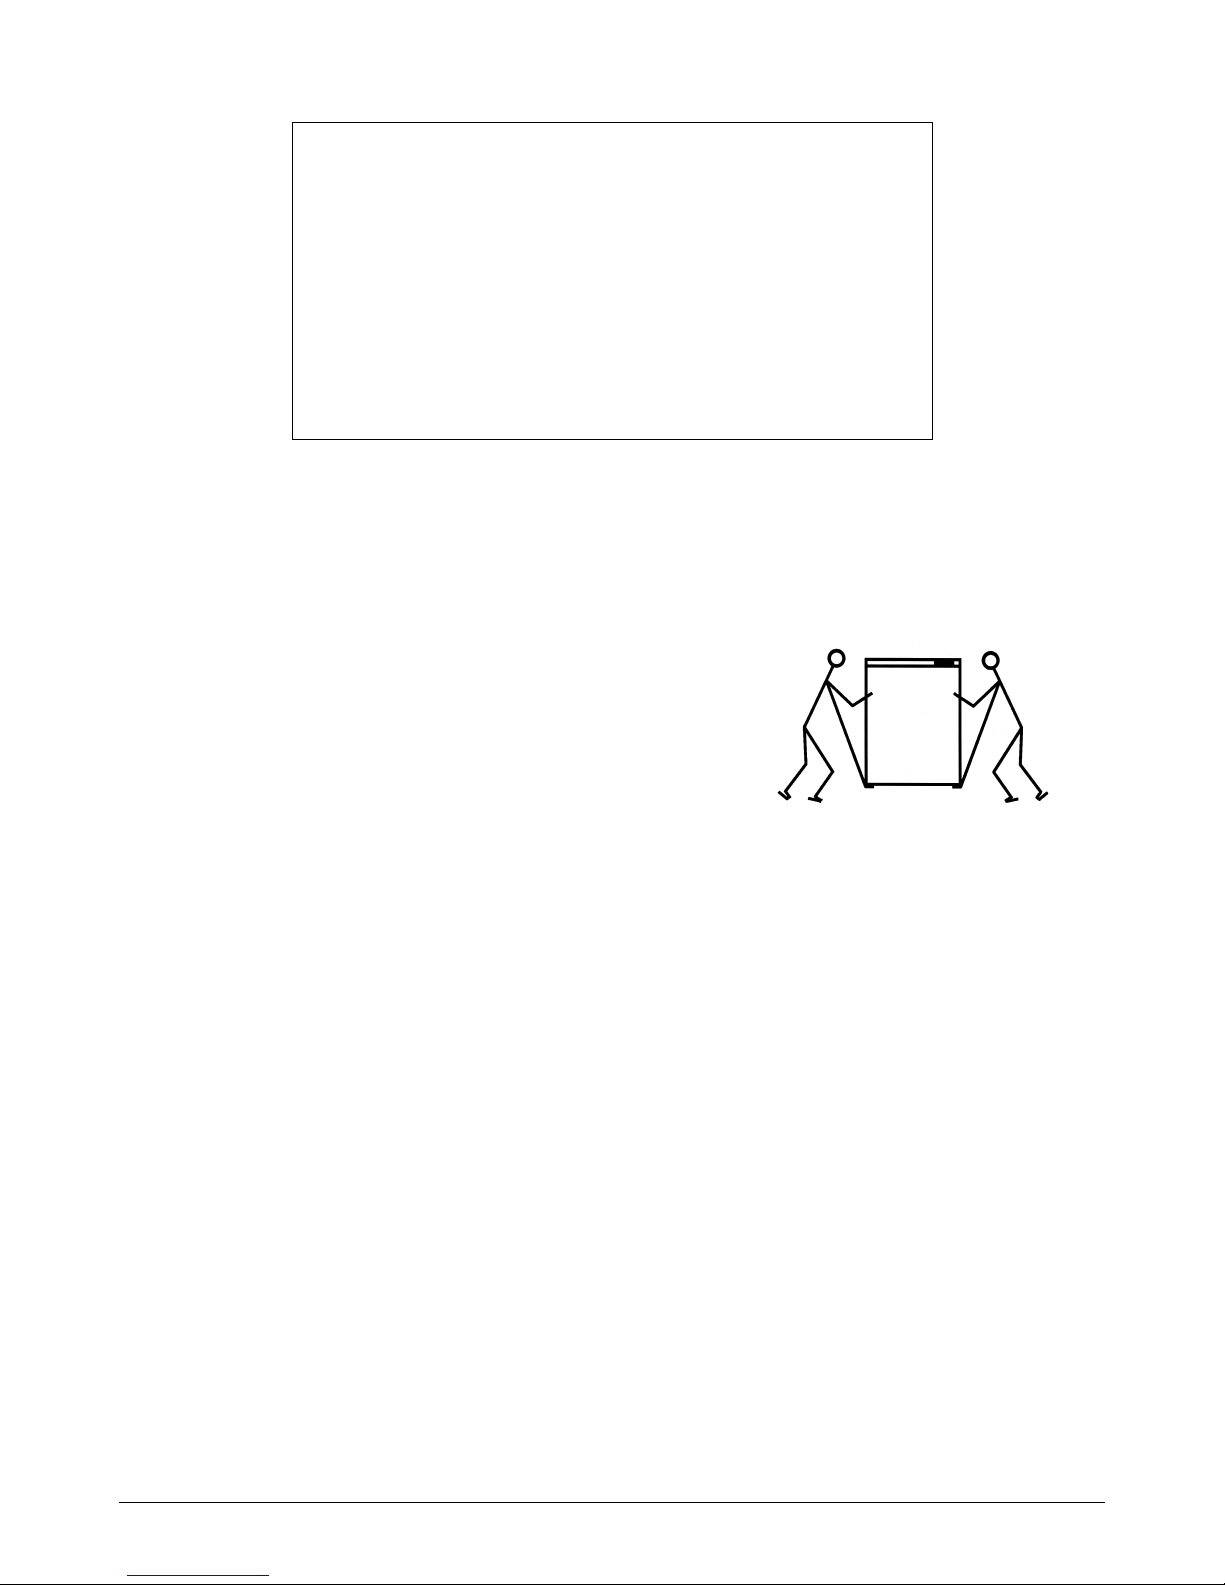
The freezer is heavy and ca re is nee ded when unpacking and
moving it. Get extra help and only hold it by the ca s ing – not the
door or trim.
B efore us e . . . . . . . . . . . . . . . . . . . . . . . . . . . . . . . . . . . . . . . . . . 2
Do and Don’t . . . . . . . . . . . . . . . . . . . . . . . . . . . . . . . . . . . . . . . . 2
Parts identification . . . . . . . . . . . . . . . . . . . . . . . . . . . . . . . . . . . .3
Ins tallation and controls . . . . . . . . . . . . . . . . . . . . . . . . . . . . . . 3, 4
Using the freezer . . . . . . . . . . . . . . . . . . . . . . . . . . . . . . . . . . . . . 5
Maintenance and cleaning . . . . . . . . . . . . . . . . . . . . . . . . . . . . .6
Troubles hooting . . . . . . . . . . . . . . . . . . . . . . . . . . . . . . . . . . . . . . 7
F us e and ma ins plug replace ment . . . . . . . . . . . . . . . . . . . . . . .7
S pecification . . . . . . . . . . . . . . . . . . . . . . . . . . . . . . . . . ba ck pa ge
S afety meas ures a nd dispos a l . . . . . . . . . . . . . . . . . . . back pa ge
After sales service . . . . . . . . . . . . . . . . . . . . . . . . . . . .back page
Page 3
Location
The appliance is designed to operate at normal
room temperatures up to a maximum of 32°C.
Position it away from any heat source such as a
boiler, oven or heater which will reduce the cooling
efficiency of the freezer. It is also not advisable to
install the appliance in unheated locations such as
garages or exposed outbuildings, as these will
impair the operation of the freezer in winter.
The freezer requires space around the casing for
efficient cooling and operation.
The freezer must be installed on a firm, flat and
level surface for it to work quietly and efficiently.
Keep the back of the appliance cabinet about
100mm clear of any rear wall or obstructions; also
provide a clear space of about 100mm around the
compressor vent at the back of the appliance.You
will also need clear access to the control panel on
the right-hand side at the back of the cabinet.
Fit wheels
The appliance must be tilted and supported in
order to carry this out; it is therefore advisable to
get an assistant to help during this procedure. Take
care when fitting and tightening screws.
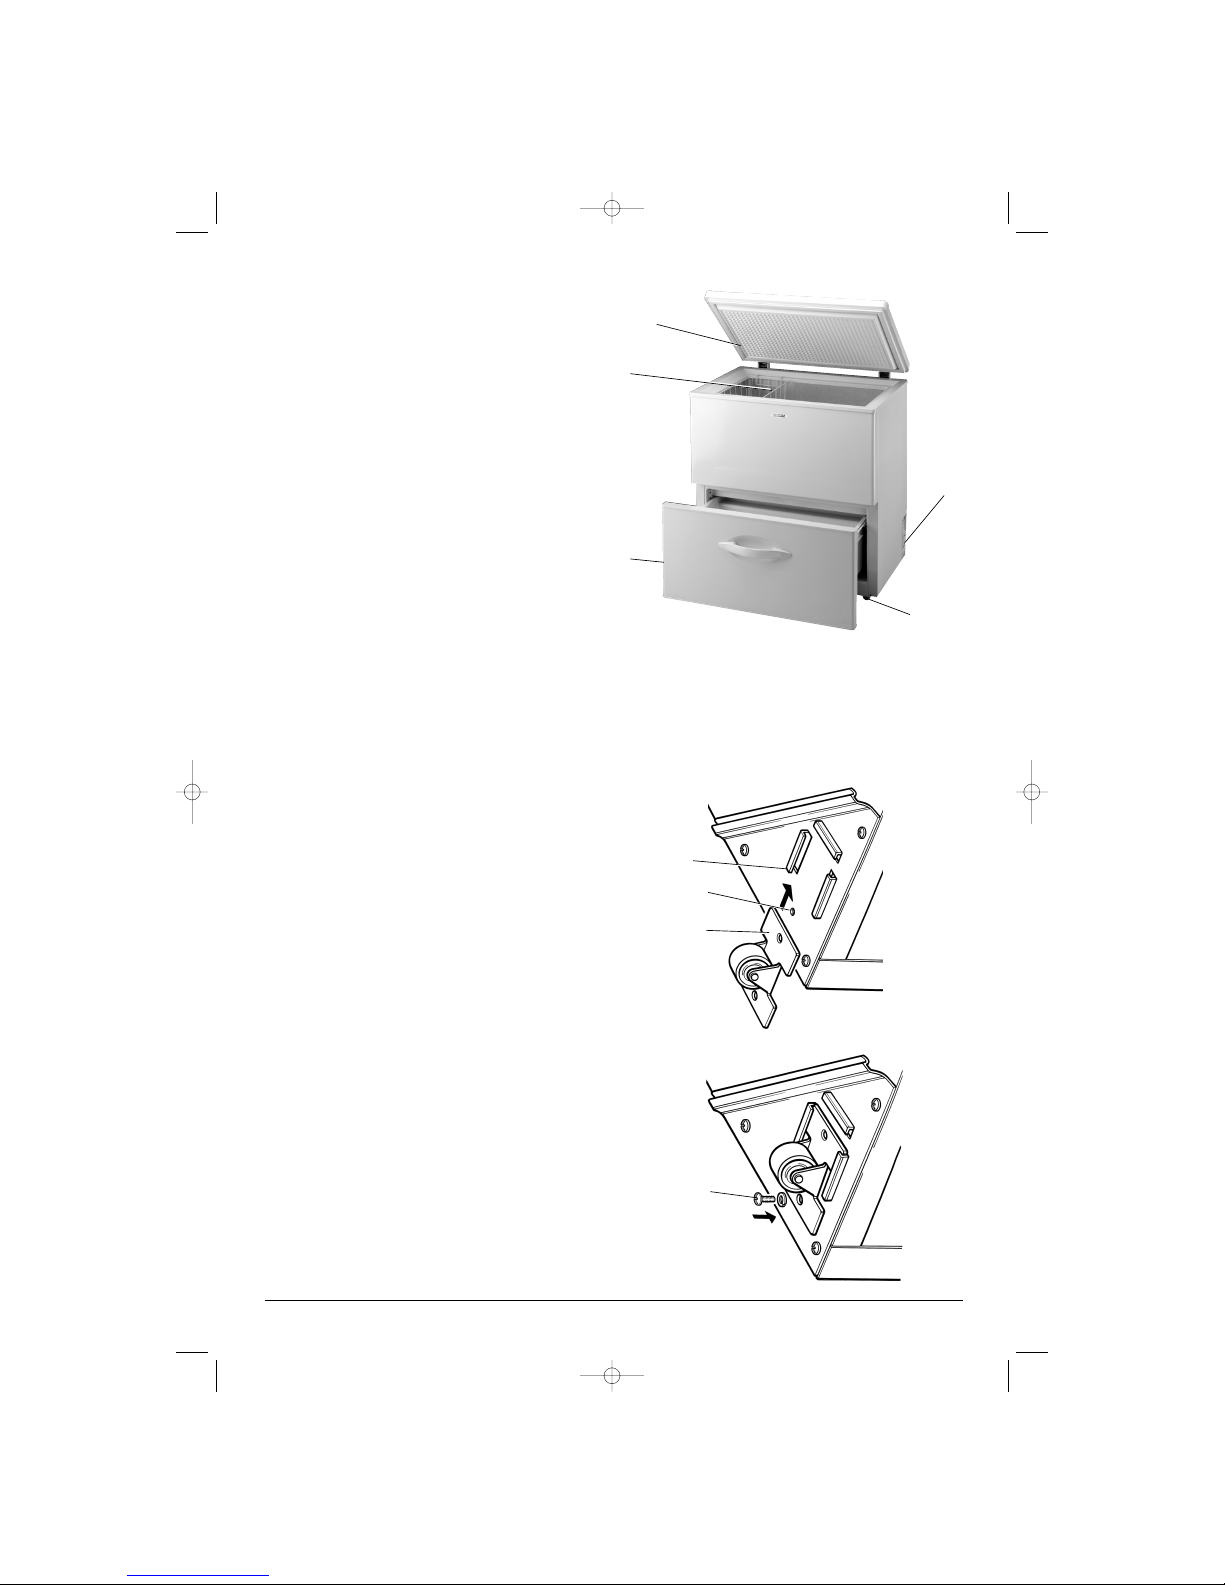
Tilt and support the appliance to allow access to
the corner plates under the cabinet (Figure 2).
Page 3
Installation and controls
Important
Make sure that the voltage marked on the rating label corresponds with the voltage in your home.
This quality product has been tested and certified to meet all applicable UK electrical and safety standards.
After unpacking, wipe the casing with a dry cloth, then clean the inside with a damp cloth ready for food
storage.
1. Chest lid
2. Wire basket
3. Bottom drawer
4. Temperature control
5. Castor
Parts identification
The parts are listed and numbered below to help
identification.
FIGURE 1
1
2
4
3
5
FIGURE 2
FIGURE 3
FORMED
SLOT
SCREW
HOLE
CASTOR
BASE
SCREW
26343-17 1 7.qxp 1/ 3/2 7 15: 8 Page 3
Page 4
Page 4
Installation and controls - continued
Fit wheels (continued)
Slide the first castor base between the formed slots
in one of the corner plates.
Line up the hole in the castor base with the screw
hole in the corner plate and fasten the castor in
place with a screw and spring washer (Figure 3).
Repeat for the other three corners.
Return the appliance to the upright position.
Switching on
It is advisable to allow the freezer to stand 12 hours
before switching on to allow the internal gases to
stabilise.
Plug the freezer into a nearby mains outlet socket
and switch on.
Set the temperature control to the middle of its
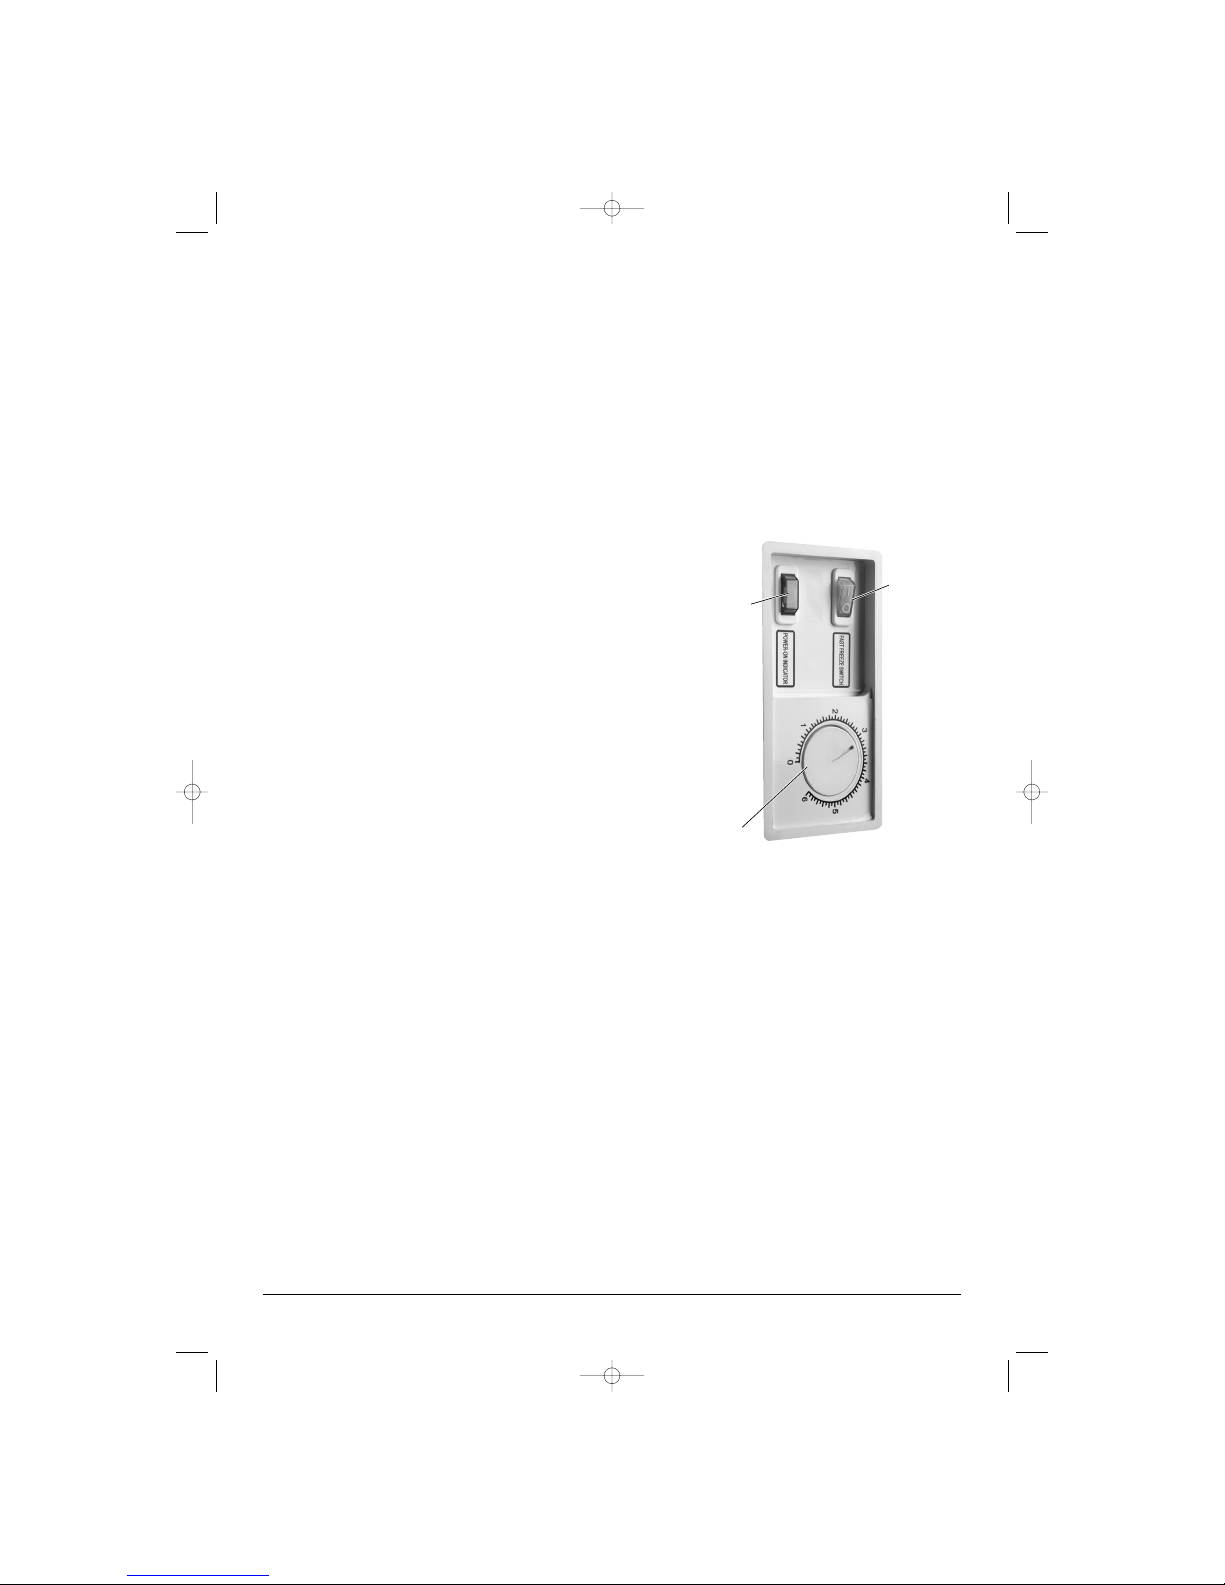
range then switch on FAST FREEZE (Figure 4) and
allow the freezer to run empty for about two hours
before filling with food.
Indicator lights
See Figure 4:
O Green – Power
Light stays ON as long as the freezer is plugged
in and switched on at the mains.
O Orange – Fast freeze
Light comes ON when the fast freeze function is
selected (see below).
Temperature control
The temperature control (Figure 4) switches the
appliance on and off and sets the cooling
temperature.
To switch the cooling cycle off, e.g. when defrosting,
turn the rotary knob fully anti-clockwise until it clicks
into the 0 position. The coldest setting is 6.
A setting of about 3 is usually adequate for general
domestic use.
It is advisable to place a freezer thermometer (not
supplied) inside the freezer to check that the
temperature is maintained at –18°C to –20°C.
Note: The setting on the thermostat control is
dependent on room temperature. If the temperature
inside the freezer is above –18°C to –20°C, adjust
the thermostat control towards its coldest setting.
Fast freeze
Use the fast freeze function when freezing bulk
quantities of fresh food. Switch on the fast freeze
function using the control switch (Figure 4).
When the switch is set to 1 (ON), the temperature
controller is bypassed and the compressor runs
continuously which cools the cabinet well below the
level set on the temperature control. There is
therefore no need to adjust the temperature setting
when using fast freeze.
When fast freeze is switched ON, the fast freeze
switch will be illuminated.
When fast freeze is no longer required switch it off
to minimise power consumption. The temperature
controller will then take over and regulate the
cabinet temperature as normal.
Notes on operation
During normal operation the following noises may
be heard:
O Stifled murmur from compressor when it is
working.
O Soft gurgling from the coolant flowing through the
cooling system.
O Click from the thermostat switching on and off.
TEMPERATURE
CONTROL
POWER
INDICATOR
FAST
FREEZE
SWITCH
FIGURE 4
26343-17 1 7.qxp 1/ 3/2 7 15: 8 Page 4
Page 5

Page 5
Using the freezer
Precautions
Frozen food storage
The freezer is capable of producing very cold
temperatures which may cause injury if safety
precautions are not observed:
Caution: To avoid ‘ice burns’ do not touch ice
with bare skin
O The freezer must only be used for the storing of
edible foodstuffs.
Allow cooked food to cool before placing it in the
freezer. Always store it away from food which is
already frozen. Food which has been purchased
frozen should be kept in its original packaging.
Maximum storage times and expiry dates are
usually given on the food packaging.
O Do not attempt to freeze carbonated drinks such
as fizzy pop, mineral water, champagne etc. as
the bottles may break when frozen. Drinks in
PEP plastic bottles must not be frozen.
O Frozen food that has thawed should not be
re-frozen.
IMPORTANT
Before cooking food you must ensure it has
thoroughly thawed, especially with poultry and
seafood.
Do not overload the freezer.
Almost all fresh products are suitable for freezing and storing in the freezer.
Label fresh products clearly so they are easily found.
Freezing fresh food
26343-17 1 7.qxp 1/ 3/2 7 15: 8 Page 5
Page 6

Page 6
Defrosting
We recommend to clean and wipe out the freezer
and drawer after any spillage inside or outside the
appliance.
Caution: Do not touch ice with bare skin as this
may cause ‘ice burns’.
Defrost the freezer if the ice build up exceeds
6mm, otherwise the efficiency of the freezer will
reduce and the electricity consumption will
increase.
Defrost the freezer when the stock of frozen
contents is low.
Unplug the freezer and empty the frozen food into
insulated bags or coolboxes.
Bowls of hot water may be placed in the freezer to
speed up defrosting.
Important
O Do not use electrical appliances such as
heaters or hair dryers to melt the ice.
O Do not use metal objects such as knives or
skewers to chip away the ice as these can
damage the freezer walls and cooling pipes.
When all traces of ice have been removed from the
interior of the freezer, use a teaspoonful of
bicarbonate of soda diluted in one pint of warm
water to wipe the internal surfaces and shelving.
This will remove food residues and odours.
Clean the door seals.
Leave to dry before reloading food.
Replace the plug in the mains socket and switch
the appliance on, then switch on FAST FREEZE to
chill the cabinet rapidly.
Replace the food when the inside temperature is
cold enough.
Only replace food which is still fully frozen. If any of
the food has started to thaw, do not re-freeze.
Maintenance and cleaning
Important
The freezer must be turned off at the mains before maintaining or cleaning.
External cleaning
Keep the compressor vent at the back of the
appliance housing free from dust to maintain
optimum efficiency. Use a soft brush or vacuum
cleaner for this purpose. The external casing can
be cleaned with warm soapy water and protected
by polish. Do not use scouring powders which can
scratch the surface.
When not in use
If the appliance is to be emptied and turned off for
a long period it is advisable to:
O Disconnect the unit from the mains supply.
O Empty the freezer of food and allow any ice that
has formed to melt (refer to defrosting
instructions).
O Clean and dry the interior.
O Leave the lid open – do not close.
26343-17 1 7.qxp 1/ 3/2 7 15: 8 Page 6
Page 7
Page 7
Problem Possible cause Remedy
Temperature in freezer is not cold No power Check fuse in plug and
enough mains supply
Lid or drawer are open for too long Do not open lid/drawer
needlessly
Temperature control set too low Turn control towards 6
Abnormal noise and vibration Freezer not level Adjust feet to level the unit
Cabinet touching adjacent Maintain gap between
wall cabinet and wall
Troubleshooting
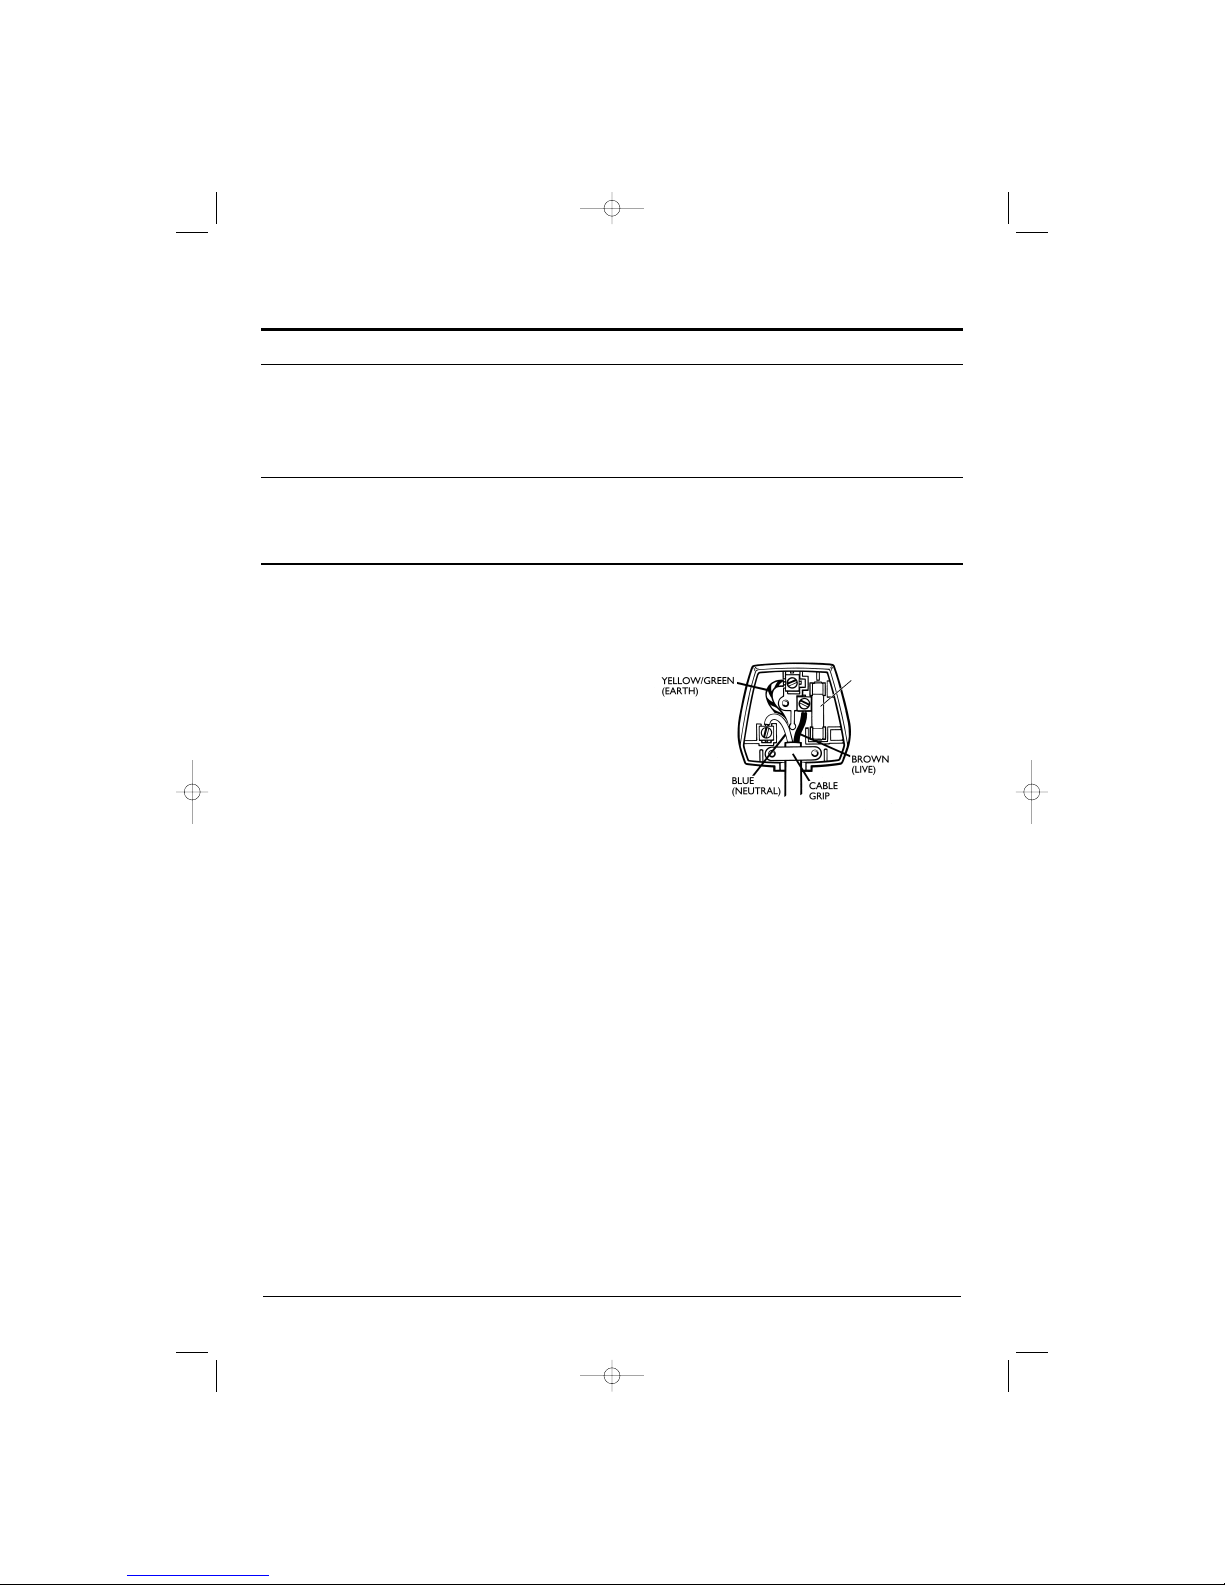
Fuse and mains plug replacement
This product is supplied with a fitted plug which
contains a 13A fuse. If you are simply replacing the
fuse, you must use a 13A fuse which has been
approved by ASTA to BS1362.
If the plug does not fit the socket or becomes
damaged, a new plug must be fitted. Replace the
original plug with the correct plug for your socket. If
this is a 3-pin (square pin) 13A (BS1363) plug, you
must make sure that it is fitted with an ASTA
approved 13A fuse.
If another type of plug is used, it must be protected
by a 15A fuse, either in the plug or at the
distribution board.
1. Cut off the existing fitted plug.
2. The wires in the mains lead supplied with this
appliance are coloured in accordance with the
following code (Figure 5):
GREEN/YELLOW = EARTH (E)
BLUE = NEUTRAL (N) BROWN = LIVE (L)
This product must be earthed.
As the colours of the wires in the mains lead may
not correspond with the colour markings identifying
the terminals in your new plug, proceed as follows.
The wire which is coloured YELLOW/GREEN or
GREEN must be connected to the terminal which is
marked with the letter E or E symbol or coloured
YELLOW/GREEN or GREEN.
The wire which is coloured BLUE must be
connected to the terminal in the plug which is
marked with the letter N or coloured BLUE or
BLACK.
The wire which is coloured BROWN must be
connected to the terminal which is marked with the
letter L or coloured BROWN or RED.
3. Ensure that the connections are tight and that
no loose strands are left out of the terminals.
IF IN ANY DOUBT CONSULT A QUALIFIED
ELECTRICIAN.
If the mains lead becomes damaged consult a
qualified electrician.
FIGURE 5
FUSE
26343-17 1 7.qxp 1/ 3/2 7 15: 8 Page 7
Page 8
MM26 343/1701 07
We continuously tr y to improve ou r products for the benefit of our cus tomers.
For this reas on we re serve the right to ma ke cha nges to any produc t a t any time, without notice.
S pe c if ic a tio n
This a ppara tus complies with E E C direc tives for radio interference. It a lso me ets the e s sential requirements
of E uropea n C ouncil directives : 73/23/E E C for low voltage and 89 /336/EE C for electromagnetic
compliance.
S a f e ty m e a s ur e s a nd d is po s a l
A f t e r s a l e s s e r v i c e
Neve r try to repa ir the a ppliance or the electrical parts yours elf. Any re pair c arried out by an uns killed
pers on is dangerous and may affec t the guara nte e. C ontact the H elpline below for as sis tanc e and a dvice.
If the freez er brea ks down or the power fails, do not open the door. De pending on conditions the frozen
food s hould not be affected for 24 hours .
Make the appliance unsuitable for further use by cutting off the mains lead a nd removing any door locks .
The appliance is gua ranteed for a pe riod of 2 yea rs
from the date of purcha se. K eep your purc has e
receipt with thes e ins tructions.
IF T HE A P PL IA NC E FA IL S TO WO RK P R OP E R LY
DU R ING TH E 2 Y E AR P E R IOD C ON TA C T T HE
HE L P LI NE O N 0870 241 3029.
The appliance will be repaired (at the
manufacturer’s discretion) a t no cos t to you. If the
guara ntee ha s e lapsed, you will be given a
quotation for a ny repairs or pa rts required.
This appli an ce/fitti ng i s ma rk ed ac cordi ng to the Eu ropean dir ec tive 2002 /96 /E C o n Was te E lec tric al
an d E lec troni c E quipm ent ( W E E E ). B y ens urin g thi s pro duc t i s dis pos ed of c orr ec tly, y ou will help
preven t p ote nti al neg ative c on se qu en c es fo r the enviro nmen t a nd huma n heal th, wh ich c ould
oth er wis e be ca us ed by inap propriate w as te hand ling o f this pro du c t.
The s ym bo l on th e produc t, or on the documen ts ac companyi ng th e produc t, the Cros se d Out W heelie B in
s ymbol, i nd ic ates that this appli anc e/fitting may not be treated a s ho us eh ol d wa ste . In s tead i t s ha ll be
ha nd ed o ve r to th e appl ic able c ollec tion poin t fo r the re c ycl in g of e lectri c al a nd e lec tronic e qu ipment.
Dis po s al mus t be car ried o ut in a cc orda nc e with loc al env iron me nta l re gula tio ns fo r wa ste d is pos al . F or mo re
detailed infor matio n abou t treatm en t, re cov er y a nd r ec yclin g of th is product, plea s e c onta c t y our loc al
au tho rity, yo ur h ous eho ld was te dis pos al s erv ice o r the r etail er whe re you purcha s ed the p ro du c t.
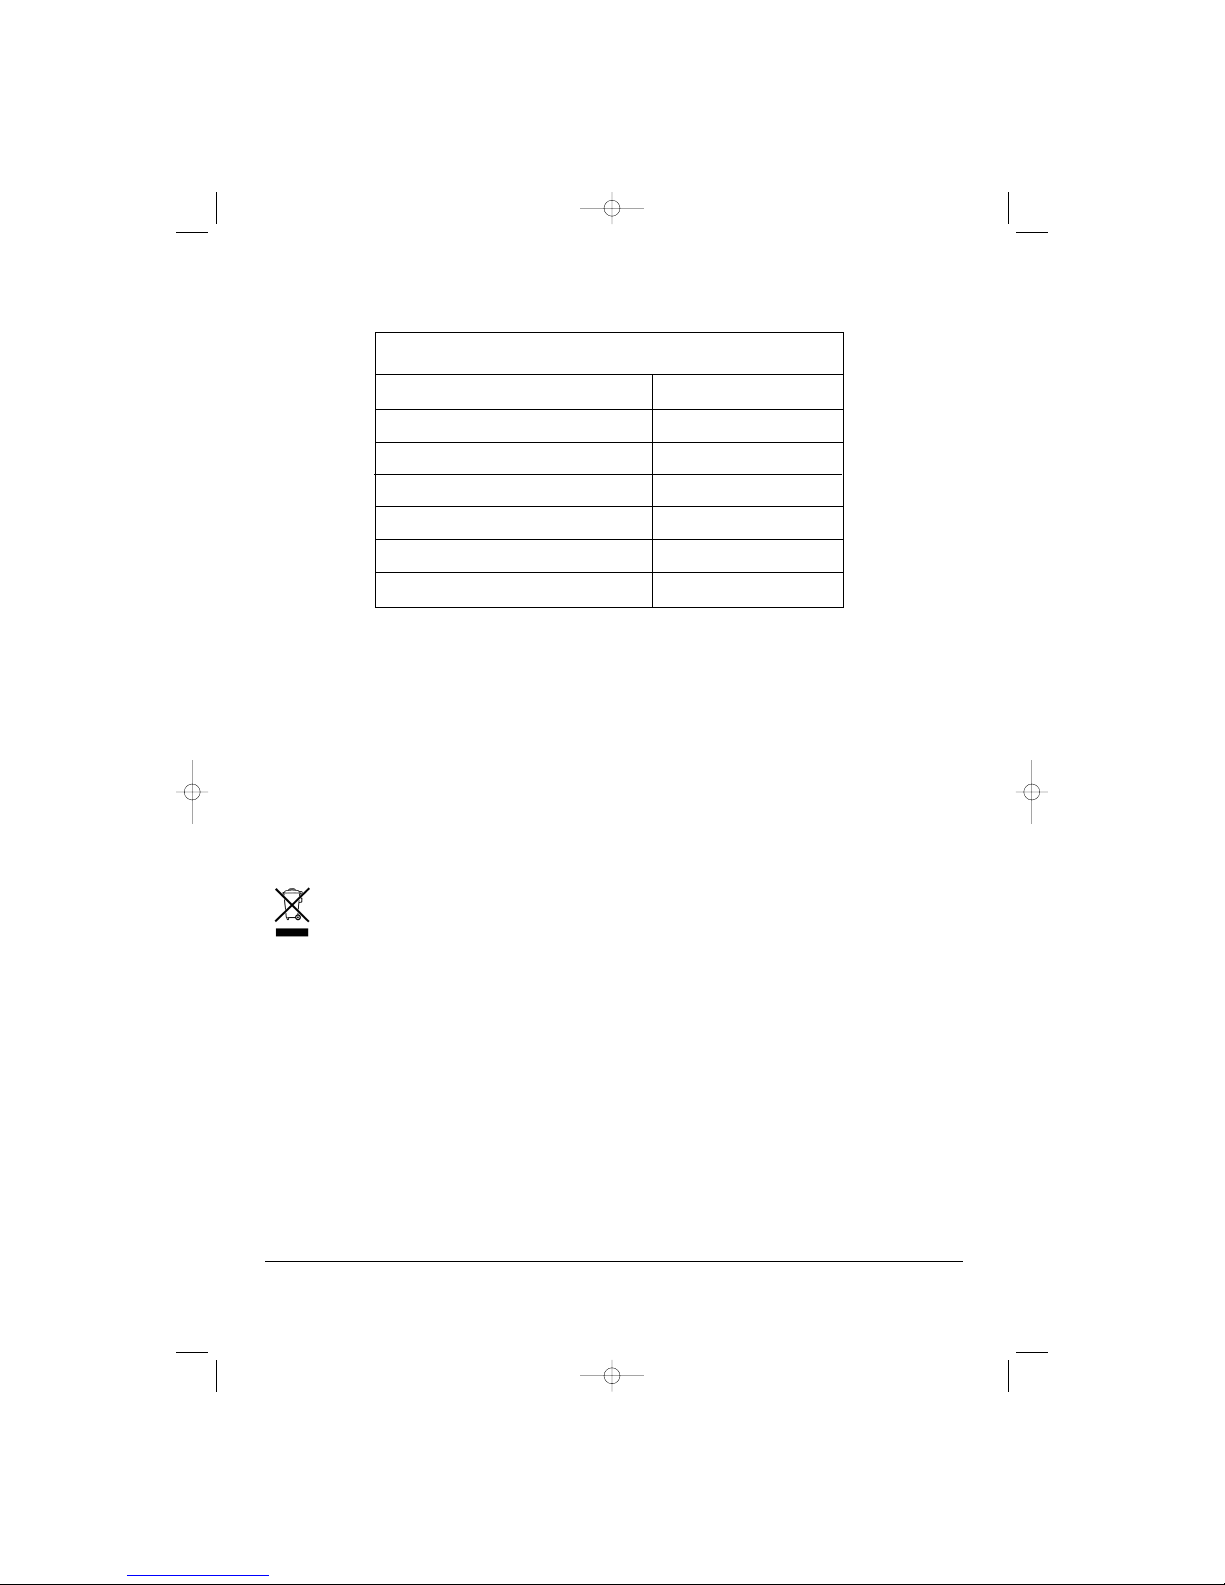
MO DE L NUMB E R
C Z51115
Total gros s ca pacity ( litres ) 150
Dimensions: HxW xD (mm) 860 x802x62 5
Power s upply 220 /240V ~50H z
Wa ttage (W ) 110
Nomina l da ily c ons umption (kW h/2 4h) 1.05
E nergy e fficiency clas s B
R efrigera nt R 134a
26343-17 1 7.qxp 1/ 3/2 7 15: 8 Page 8
 Loading...