


UUSSEERR IINNSSTTRRUUCCTTIIOONNSS
Please read these instructions carefully before using this product and keep them safe for
future reference.
CZ51065 T able T op Dishwasher

Page contents
Before use . . . . . . . . . . . . . . . . . . . . . . . . . . . . . . . . . . . . . . . . . . . . . . . . . . . . . . . . . . . . . . . . . . . . . .3
Do and don’t . . . . . . . . . . . . . . . . . . . . . . . . . . . . . . . . . . . . . . . . . . . . . . . . . . . . . . . . . . . . . . . . . . . .3
Parts identification . . . . . . . . . . . . . . . . . . . . . . . . . . . . . . . . . . . . . . . . . . . . . . . . . . . . . . . . . . . . . . . .4
Installation . . . . . . . . . . . . . . . . . . . . . . . . . . . . . . . . . . . . . . . . . . . . . . . . . . . . . . . . . . . . . . . . . . . . . .5
Loading the dishwasher . . . . . . . . . . . . . . . . . . . . . . . . . . . . . . . . . . . . . . . . . . . . . . . . . . . . . . . . . . . .6
Energy saving tips . . . . . . . . . . . . . . . . . . . . . . . . . . . . . . . . . . . . . . . . . . . . . . . . . . . . . . . . . . . . . . . .6
Using the dishwasher . . . . . . . . . . . . . . . . . . . . . . . . . . . . . . . . . . . . . . . . . . . . . . . . . . . . . . . . . . . . .7
Wash cycle table . . . . . . . . . . . . . . . . . . . . . . . . . . . . . . . . . . . . . . . . . . . . . . . . . . . . . . . . . . . . . . . . .8
How to keep your dishwasher in shape . . . . . . . . . . . . . . . . . . . . . . . . . . . . . . . . . . . . . . . . . . . . . . . .8
Cleaning and maintenance . . . . . . . . . . . . . . . . . . . . . . . . . . . . . . . . . . . . . . . . . . . . . . . . . . . . . . . . .9
Troubleshooting . . . . . . . . . . . . . . . . . . . . . . . . . . . . . . . . . . . . . . . . . . . . . . . . . . . . . . . . . . . . . . . . . .9
Fuse and mains plug replacement . . . . . . . . . . . . . . . . . . . . . . . . . . . . . . . . . . . . . . . . . . . . . . . . . .10
Specification . . . . . . . . . . . . . . . . . . . . . . . . . . . . . . . . . . . . . . . . . . . . . . . . . . . . . . . . . . . . . . . . . . . .11
Safety measures . . . . . . . . . . . . . . . . . . . . . . . . . . . . . . . . . . . . . . . . . . . . . . . . . . . . . . . . . . . . . . . .11
After sales service . . . . . . . . . . . . . . . . . . . . . . . . . . . . . . . . . . . . . . . . . . . . . . . . . . . . . . . . . . . . . . .11

• Mains lead and mains plug
• Water inlet connection hose complete with
sealing washers
• Water drain hose
• Wire washer basket
• Cutlery basket
• Drain hose clip
• Drain hose bracket
• Rinse agent measuring cup
• Detergent measuring scoop
O Do install the appliance only in the vertical
position.
O Do unplug before cleaning and maintenance.
O Do turn off the water supply and disconnect the
electricity supply if the appliance malfunctions.
O Do only use this appliance in accordance with
the manufacturer’s instructions.
O Do make the appliance safe when disposing of
it by cutting the power cord and removing the
door lock.
O Do keep detergents away from children.
O Do keep children away from the appliance when
it is open.
O Don't place anything heavy or water containers
on the top of the dishwasher.
O Don’t attempt to repair the appliance yourself
(see Helpline information – page 11).
O Don't use this appliance when barefoot or with
wet hands.
O Don't use extension cords or multiple sockets.
O Don't open the door when the machine is
working.
Page 3
Before use
Check the contents
Check the following contents are included with the product and inspect the casing for any damage.If
necessary contact your retailer from whom you purchased the product.
Packaging
Remove all transit packaging, protectors and securing tapes from inside and
outside the appliance.
The packaging is recyclable so dispose of it according to local regulations.
Keep the packaging materials out of reach of young children.
Warning
The dishwasher is heavy and care is needed when unpacking and moving it.
Get extra help and only hold it by the casing – not the door or trim.
Do and don’t
Important
Make sure that the voltage marked on the rating label on the product corresponds with the voltage in your
home.
This quality product has been tested and certified to meet all applicable UK electrical and safety standards.

Page 4
1. Catch
2. Rinse Aid Container
3. Detergent Recess
4. Filter
Parts identification
The parts are numbered below to help identification. Ensure all the par ts are present and that none are
broken.
2
1
FIGURE 1
3
4
5
6
7
8
5. Spray Arm
6. Wire Washer Basket
7. Cutlery Basket
8. Door Seal

Page 5
Installation
Positioning the appliance
When deciding on a location for the appliance
please bear the following points in mind:
• The appliance must be placed on a flat level
surface capable of supporting the weight of the
dishwasher when loaded with dishes and water.
• Ensure the drain hose is not kinked or positioned
horizontally as this will impede water draining out
of the machine.
• Allow a clearance between the back of the
appliance and wall to allow efficient ventilation.
• Do not install the appliance in a built-in
enclosure as it may overheat.
Drain hose connection
Connect the drain hose to the drain outlet and
secure with the hose clip (Figure 3).
When routing the drain hose avoid bending or
crimping it.
Let the drain hose empty straight into the sink or a
drainpipe of at least 40mm diameter with a 'U' bend
as shown in Figure 2. Use the drain hose bracket to
support the drain hose.
If connecting to a stand-pipe waste, please note
that the free end of the drain hose must be inserted
to a minimum depth of 20cm and in a position
where it is never immersed in standing water.
Water supply hose connection
For the appliance to work efficiently the water
pressure must be within 0.03–0.1Mpa.The
dishwasher is designed to work on a cold water
supply. (Connection to a hot supply is acceptable
but only if the hot supply is below 65°C.)
The water supply pipe must be terminated to
enable you to connect the dishwasher water inlet
hose to it (Figure 4). If the pipe work is new, run
water through the pipes to flush out any impurities
and residues.
Electrical connection
Connect the dishwasher to the electricity supply via
a suitable 3-pin outlet socket.The socket must be
earthed and have an ON/OFF switch (Figure 2).
Note: The socket and switch must be accessible
when the appliance is installed.
FIGURE 2
FIGURE 3
FIGURE 4
DRAIN
HOSE CLIP
DRAIN HOSE
WATER SUPPLY
DRAIN
OUTLET
‘U’ BEND
DRAIN HOSE
BRACKET
DRAIN
HOSE
COLD
WATER
SUPPLY
MAINS
OUTLET
SOCKET

Page 6
Loading the dishwasher
Release the catch and open the door.Before
loading the dishwasher scrape and wipe crockery
to remove larger particles of food, which can cause
the filter to become clogged. Also wipe away heavy
grease or fat deposits.
Hard dried or baked on food may require soaking
before machine washing.This will eliminate the
need for extra wash cycles.
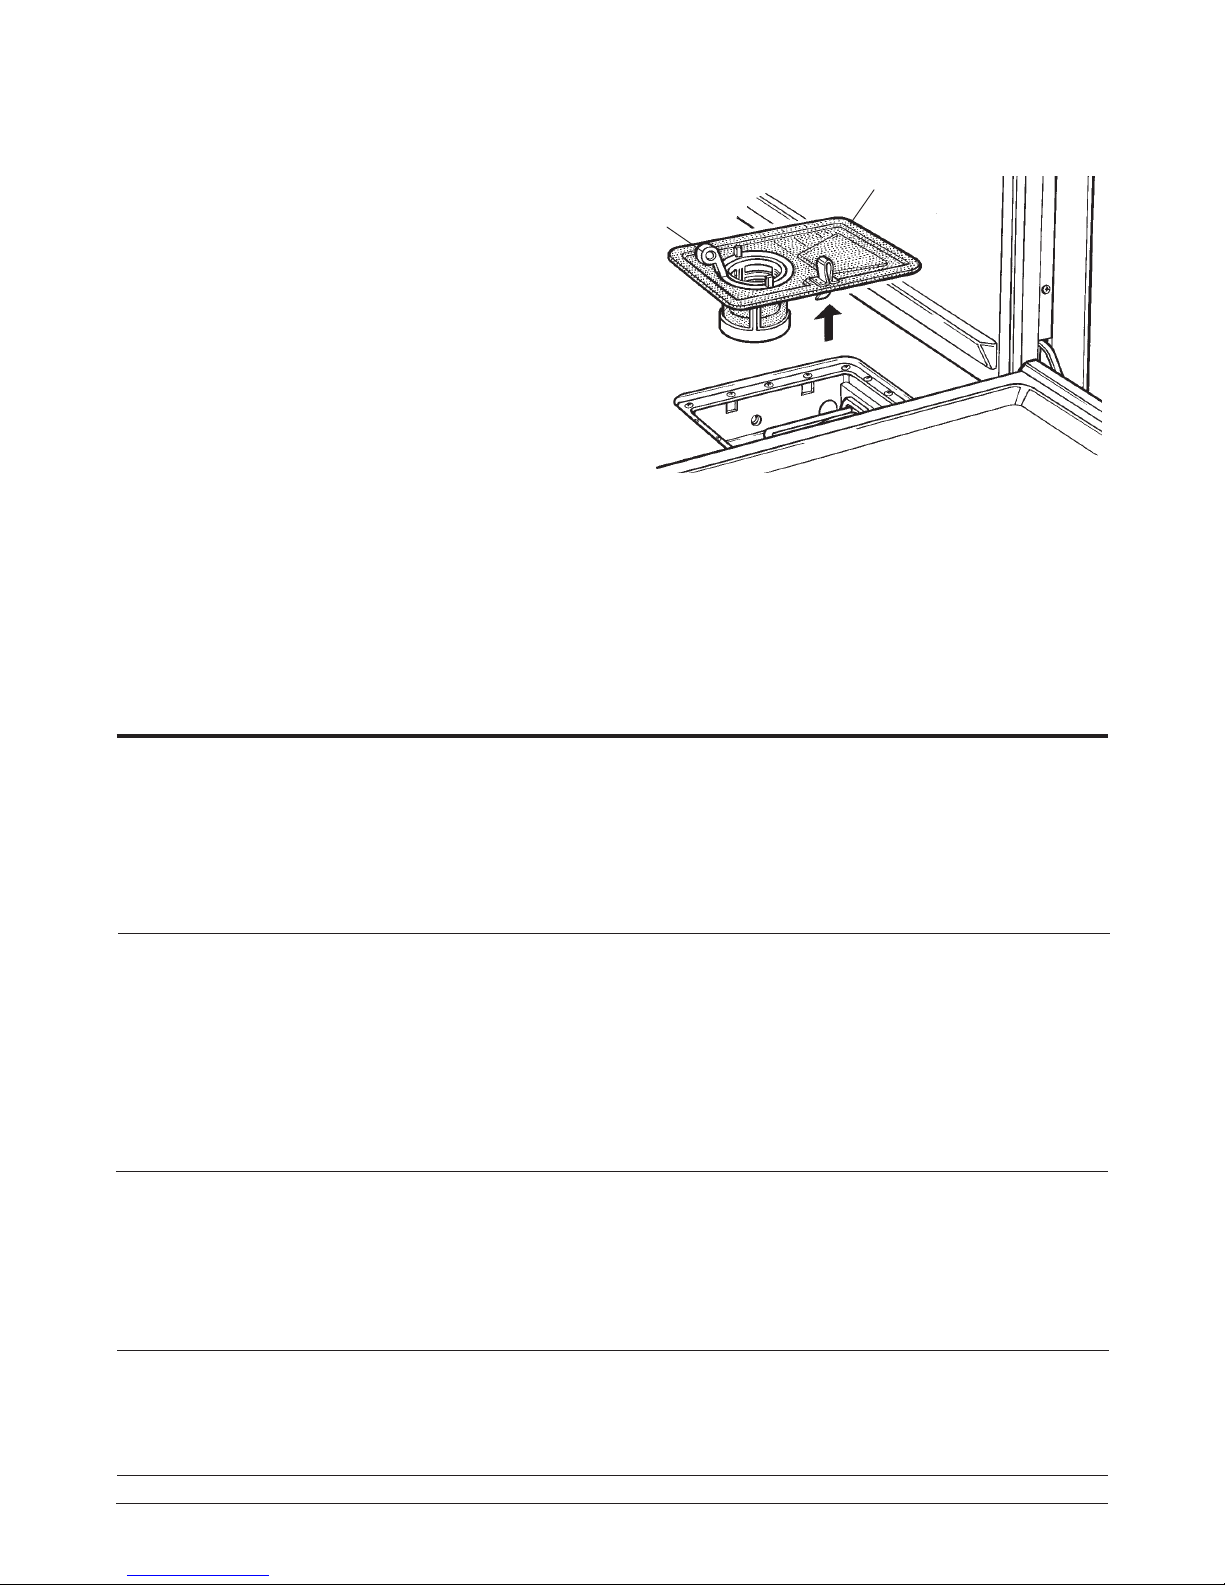
Make sure that the filter is properly located
inside the bottom of the dishwasher before
loading the basket – see Figure 7 on page 9.
Pull out the wire washer basket to load the
dishwasher .
Using the rack
The dishwasher is designed to hold four complete
place settings. If you choose to use it for other
difficult to clean items (e.g. saucepans and serving
dishes) place them face down on the bottom of the
rack where they are directly exposed to spray from
the rotating arm.
If you are in any doubt about machine washing
your crockery and utensils do not wash them in
the dishwasher.
Cutlery rack
When loading the cutlery rack keep knives and
other sharp utensils away from the door seals.It is
also wise to load carving knives etc with their
handles uppermost.
After loading the dishwasher check that the spray
arm turns freely.
Detergent
Use any standard dishwasher detergent in powder
or tablet form.
Rinse aid
Use any standard rinse aid. Unscrew the cap and
fill the container periodically using the measuring
cup provided.You can check the level of the rinse
aid using the sight glass (Figure 5). Do not overfill
the container.
FIGURE 5
CAP
SIGHT
GLASS
RINSE AID
CONTAINER
Energy saving tips
• Run the dishwasher when it is fully loaded in order to save energy.
• Choose the right wash cycle.The choice of cycle depends on the type of dishware, cookware and
utensils being washed and how dirty they are.

Page 7
Using the dishwasher
Setting and starting a wash cycle
Fill the recess in the door with detergent (between
5 and 20 grams) with the scoop supplied.The
amount of detergent depends upon the number of
soiled dishes loaded. A tablet may also be used.
Check to see if any rinse aid needs adding.
Close the door so it latches.
Turn on the electricity and water supply to the
dishwasher .
Push the POWER button to ON.The POWER
INDICATOR will light.
The dishwasher defaults to Norm wash programme
on switch on.
If you wish to select another wash programmme
press the PROG button.Each time it is pressed,
one of the programme indicators will light to show
which programme has been selected.
To help you choose the correct programme see the
Wash Cycle Table on page 8.
Press the PAUSE/RESUME button to start the
washing programme.While the programme is
running the programme indicator will flash. At the
end of the wash cycle the dishwasher will bleep
and the indicator light will stop flashing but stay
illuminated. After 10 minutes of inactivity the
indicator light will go out but the POWER
INDICATOR light will remain lit until the POWER
BUTTON is pressed to OFF.
If you wish to change the programme during
operation, press the PAUSE/RESUME button then
the PROG to the desired programme.Press the
PAUSE/RESUME key to start.
After the wash cycle has completed allow at least
15 minutes for the dishes to cool before handling. If
the dishwasher door is opened the dishes will cool
quicker.
After unloading the dishes clean the filter
(Figure 7).
ON/OFF
BUTTON
POWER
INDICATOR
PROGRAMME INDICATORS
TIME DELAY INDICATORS
FIGURE 6
Notes: The dishwasher is designed to stop if the
door is opened during operation.The door can be
allowed to open if the PAUSE/RESUME button is
pressed.
The dishwasher starts in ‘drain’cycle as the
dishwasher retains some water in the sump to
prime the pump. It is normal for a quantity of
water to be expelled from the drain hose on
start-up.
Time Delay
The start of the dishwasher can be delayed up to 8
hours.To take advantage of this feature the
machine needs to be loaded and filled with
detergent and rinse aid.
Select the programme you wish to use.
Press the DELAY button until the period of delay is
shown by the indicator light.
Press the PAUSE/RESUME button.The machine
will start at the delayed time.
The indicator light showing the period of delay will
flash when the dishwasher is in the delay
programme.

Page 8
How to keep your dishwasher in shape
Wash Cycle Table
After every wash
After every wash it is advisable to turn off the
water supply to the appliance and leave the door
slightly ajar so that moisture and odours are not
trapped inside.
Disconnect from mains
Before cleaning or performing any maintenance
work on the appliance, always remove the electric
plug from the mains outlet socket.
Do not use solvents or abrasive
cleaning products
Do not use any solvents or abrasive cleaning
products to clean the exterior and rubber parts of
the dishwasher. Only use a clean cloth and soapy
water.
To remove spots or stains from the surface of the
interior use a cloth dampened with water and a
little white vinegar, or a cleaning product made
specifically for dishwashers.
When you go on holiday
When you go on holiday it is recommended that
you run a wash cycle with the dishwasher empty
and then remove the plug from the socket, tur n off
the water supply and leave the door of the
appliance slightly ajar.This will help the seals last
longer and prevent odours from for ming within the
appliance.
Moving the appliance
If the appliance must be moved try to keep it in a
vertical position.
Door seal
One of the causes of odours forming in the
dishwasher is food that remains trapped in the
door seal. Periodic cleaning with a damp sponge
will help prevent this from occurring.
Ver y dirty dishes, pots
and pans (not to be
used with delicate
items)
Normally dir ty dishes,
pots and pans.
Standard daily cycle
Normally dir ty dishes,
pots and pans without
dried on residue
Economic, fast cycle to
be used on not very
dirty dishes
immediately after they
are used.
Rapid
Pre-Wash
Programmes
Inten
(intensive)
Norm
(normal)
Cycle Selection
Information
Description of Cycle (cycle times are
approx.)
Wash duration + heating time: 73 mins
Water temp: 78°C
Water consumption: 14 litres
Wash duration + heating time: 66 mins
Water temp: 78°C
Water consumption: 11 litres
Wash duration + heating time: 40 mins
Water temp: 78°C
Water consumption: 8.4 litres
Wash duration: 8 mins
Water temp: as water supply
Water consumption: 2.8 litres
Page 9
Troubleshooting
It may occur that the dishwasher does not work or does not function properly.
Before calling the Helpline on 0870 241 3029 please check the following:
Problem
Symptom
Remedy
Dishwasher will not start
• Power failure
• Fuse blown in plug
• Door not properly shut
• Water supply not turned to
ON.
• Check power supply
• Replace fuse
• Shut door and latch
• Check water supply
Dishes are not clean
Water does not drain out
Machine keeps draining water
• Improper loading
• Spray arm not rotating
freely
• Arrange dishes so spray
reaches all surfaces
• Do not overload the
dishwasher
• Remove obstruction
• Check if filter is out of its
seating and obstructing
the arm
• Draining hose kinked or
blocked
• Hose is above height of the
appliance
• Pump is blocked
• Water level is too high
• Clean filter and run a
normal wash cycle empty
• Faulty operation of inlet
valve
• Check hose
• Reposition the hose so
that water can drain
downhill from the lowest
point of the dishwasher
Filter
Wash the filter daily. Lift out by the handle and
remove any residues (Figure 7).There may be
water left in the bottom of the appliance under the
filter after a wash cycle – this is normal and not a
malfunction.
The filter efficiently removes food residue from
the wash water, allowing it to be re-circulated
during the cycle.
Never use the appliance without the filter fitted.
Spray arm
Make sure that there is nothing that will prevent
the spray arm from spinning freely.
Cleaning and maintenance
FIGURE 7
FILTER
HANDLE

Page 10
Fuse and mains plug replacement
This product is supplied with a fitted plug which
contains a 13A fuse. If you are simply replacing the
fuse, you must use a 13A fuse which has been
approved by ASTA to BS1362 (Figure 8).
If the plug does not fit the socket or becomes
damaged, a new plug must be fitted. Replace the
original plug with the correct plug for your socket. If
this is a 3-pin (square pin) 13A (BS1363) plug, you
must make sure that it is fitted with an ASTA
approved 13A fuse.
If another type of plug is used, it must be protected
by a 15A fuse, either in the plug or at the
distribution board.
1. Cut off the existing fitted plug.
2. The wires in the mains lead supplied with this
appliance are coloured in accordance with the
following code (Figure 8):
GREEN/YELLOW = EARTH (E)
BLUE = NEUTRAL (N) BROWN = LIVE (L)
This product must be earthed.
As the colours of the wires in the mains lead may
not correspond with the colour markings identifying
the terminals in your new plug, proceed as follows.
The wire which is coloured GREEN or
YELLOW/GREEN must be connected to the
terminal which is marked with the letter E or E
symbol or coloured GREEN or YELLOW/GREEN.
The wire which is coloured BLUE must be
connected to the terminal in the plug which is
marked with the letter N or coloured BLACK or
BLUE.
The wire which is coloured BROWN must be
connected to the terminal which is marked with the
letter L or coloured RED or BROWN.
3. Ensure that the connections are tight and that no
loose strands are left out of the terminals.
IF IN ANY DOUBT CONSULT A QUALIFIED
ELECTRICIAN.
If the mains lead becomes damaged consult a
qualified electrician.
FIGURE 8
When not in use
If the appliance is to be turned off for a long period of time it is advisable to:
O Disconnect the unit from the mains supply.
O Empty the dishwasher.
O Clean and dry the interior.
O Leave the door open.

Specification
Safety measures
After sales service
Never try to repair the appliance or the electrical
parts yourself. Any repair carried out by an
unskilled person is dangerous and may affect the
guarantee. Contact the Helpline below for
assistance and advice.
Disposal of old dishwasher
Disposal of the appliance must conform with EU
environmental regulations.
Make the appliance not usable by cutting off the
mains lead and removing any door locks.
The appliance must be delivered to an authorised
collection centre.
Dimensions: HxWxD cm: 44.5 x 48 x 48
Capacity: 4 standard place settings
Mains Water Pressure: 0.03-1.00MPa
Power supply 220/240V ~ 50Hz
Total Power 1280W
Product specification may vary without prior notice.
This appliance is guaranteed for a period of 2 years
from the date of purchase. Keep your purchase
receipt with these instructions.
If the appliance fails to work properly during the
2 year period contact the Helpline on
0844 871 0011.
The appliance will be repaired (at the
manufacturer’s discretion) at no cost to you. If the
guarantee has elapsed, you will be given a
quotation for any repairs or parts required.
This appliance/fitting is marked according to the European directive 2002/96/EC on Waste Electrical
and Electronic Equipment (WEEE). By ensuring this product is disposed of correctly, you will help
prevent potential negative consequences for the environment and human health, which could
otherwise be caused by inappropriate waste handling of this product.
The symbol on the product, or on the documents accompanying the product, the Crossed Out
Wheelie Bin symbol, indicates that this appliance/fitting may not be treated as household waste. Instead it
shall be handed over to the applicable collection point for the recycling of electrical and electronic
equipment. Disposal must be carried out in accordance with local environmental regulations for waste
disposal. For more detailed information about treatment, recovery and recycling of this product, please
contact your local authority, your household waste disposal service or the retailer where you purchased the
product.
Page 11

We continuously try to improve our products for the benefit of our customers.
For this reason we reserve the right to make changes to any product at any time, without notice.
CZ26142/200208
 Loading...