

Page 1
UUSSEERR IINNSSTTRRUUCCTTIIOONNSS
Please read these instructions carefully before using this product and keep the
instructions safe for future reference.
CZ51040IDW
Dishwasher
Page 2

Page contents
Before use . . . . . . . . . . . . . . . . . . . . . . . . . . . . . . . . . . . . . . . . . . . . . . . . . . . . . . . . . . . . . . . . . . . . . .3
Do and don’t . . . . . . . . . . . . . . . . . . . . . . . . . . . . . . . . . . . . . . . . . . . . . . . . . . . . . . . . . . . . . . . . . . . .3
Installation . . . . . . . . . . . . . . . . . . . . . . . . . . . . . . . . . . . . . . . . . . . . . . . . . . . . . . . . . . . . . . . . . . . . . .4
Parts identification . . . . . . . . . . . . . . . . . . . . . . . . . . . . . . . . . . . . . . . . . . . . . . . . . . . . . . . . . . . . . . . .6
Salt . . . . . . . . . . . . . . . . . . . . . . . . . . . . . . . . . . . . . . . . . . . . . . . . . . . . . . . . . . . . . . . . . . . . . . . . . . . .7
Detergent with rinse aid . . . . . . . . . . . . . . . . . . . . . . . . . . . . . . . . . . . . . . . . . . . . . . . . . . . . . . . . . . . .8
Loading the dishwasher . . . . . . . . . . . . . . . . . . . . . . . . . . . . . . . . . . . . . . . . . . . . . . . . . . . . . . . . . . . .9
Front control panel . . . . . . . . . . . . . . . . . . . . . . . . . . . . . . . . . . . . . . . . . . . . . . . . . . . . . . . . . . . . . . .10
Starting the dishwasher . . . . . . . . . . . . . . . . . . . . . . . . . . . . . . . . . . . . . . . . . . . . . . . . . . . . . . . . . . .10
Wash cycle table . . . . . . . . . . . . . . . . . . . . . . . . . . . . . . . . . . . . . . . . . . . . . . . . . . . . . . . . . . . . . . . .11
Energy saving tips . . . . . . . . . . . . . . . . . . . . . . . . . . . . . . . . . . . . . . . . . . . . . . . . . . . . . . . . . . . . . . .11
How to keep your dishwasher in shape . . . . . . . . . . . . . . . . . . . . . . . . . . . . . . . . . . . . . . . . . . . . . . .12
Cleaning and special maintenance . . . . . . . . . . . . . . . . . . . . . . . . . . . . . . . . . . . . . . . . . . . . . . . . . .12
Troubleshooting . . . . . . . . . . . . . . . . . . . . . . . . . . . . . . . . . . . . . . . . . . . . . . . . . . . . . . . . . . . . . . . . .13
Fuse and mains plug replacement . . . . . . . . . . . . . . . . . . . . . . . . . . . . . . . . . . . . . . . . . . . . . . . . . .14
Specification . . . . . . . . . . . . . . . . . . . . . . . . . . . . . . . . . . . . . . . . . . . . . . . . . . . . . . . . . . . . . . . . . . . .15
Safety measures . . . . . . . . . . . . . . . . . . . . . . . . . . . . . . . . . . . . . . . . . . . . . . . . . . . . . . . . . . . . . . . .15
After sales service . . . . . . . . . . . . . . . . . . . . . . . . . . . . . . . . . . . . . . . . . . . . . . . . . . . . . . . . . . . . . . .15
Page 3

• Dishwasher unit complete with shelves, hoses etc.
(Template attached to door)
• 1 metre grey hose with straight union and 90°
union
• 1 drain hose guide 180°
• 1 white plastic funnel for salt dispensation
• 1 peel off 'B' sticker
• 1 plastic adhesive backed strips
• 2 plastic capping strips
ACCESSORY BAG:
2 stamped steel brackets
2 white plastic blanking plugs
2 white plastic top hats
2 black rubber grommets
6 countersunk 15mm self-tapping screws
4 cheesehead 25mm self-tapping screws
2 flathead 18mm self-tapping screws
O Do install the appliance only in the vertical
position.
O Do unplug before cleaning and maintenance.
O Do tur n off the water supply and disconnect the
electricity supply if the appliance malfunctions.
O Do only use this appliance in accordance with the
manufacturer’s instructions.
O Do make the appliance safe when disposing of it
by cutting the power chord and removing the door
lock
O Do keep detergents away from children
O Do keep them away from the appliance when it is
open.
O Don’t attempt to repair the appliance yourself
(see Helpline information – back cover).
O Don't use this appliance when barefoot or with
wet hands.
O Don't use extension cords or multiple sockets.
O Don't lean or sit on the appliance door when it is
open.
Page 3
Before use
Check the contents
Check the following contents are included with the product and inspect the casing for any damage. If there
is any need, contact your retailer from whom you purchased the product.
Packaging
The packaging is recyclable so dispose of it according to local regulations.Keep the packaging materials
out of reach of young children.
Warning
The dishwasher is heavy and care is needed when unpacking and moving it.
Get extra help and only hold it by the casing – not the door or trim.
Do and don’t
Important
Make sure that the voltage marked on the rating label on the product corresponds with the voltage in your
home.
This quality product has been tested and certified to meet all applicable UK electrical and safety standards.
Page 4
Page 4
Installation
Positioning the appliance
When deciding on a location for the appliance, please
bear the following points in mind:
• The depth of the unit from front to back is roughly
the same as the majority of work surfaces.This
means there is not enough room for any pipes etc.to
be positioned at the rear of the unit.To facilitate this,
the dishwasher is designed with the water supply
and drain hoses positioned to the right and left for
correct installation.The back rests against the wall.
• The lower plinth for the kitchen base units will need
to be removed for installation.
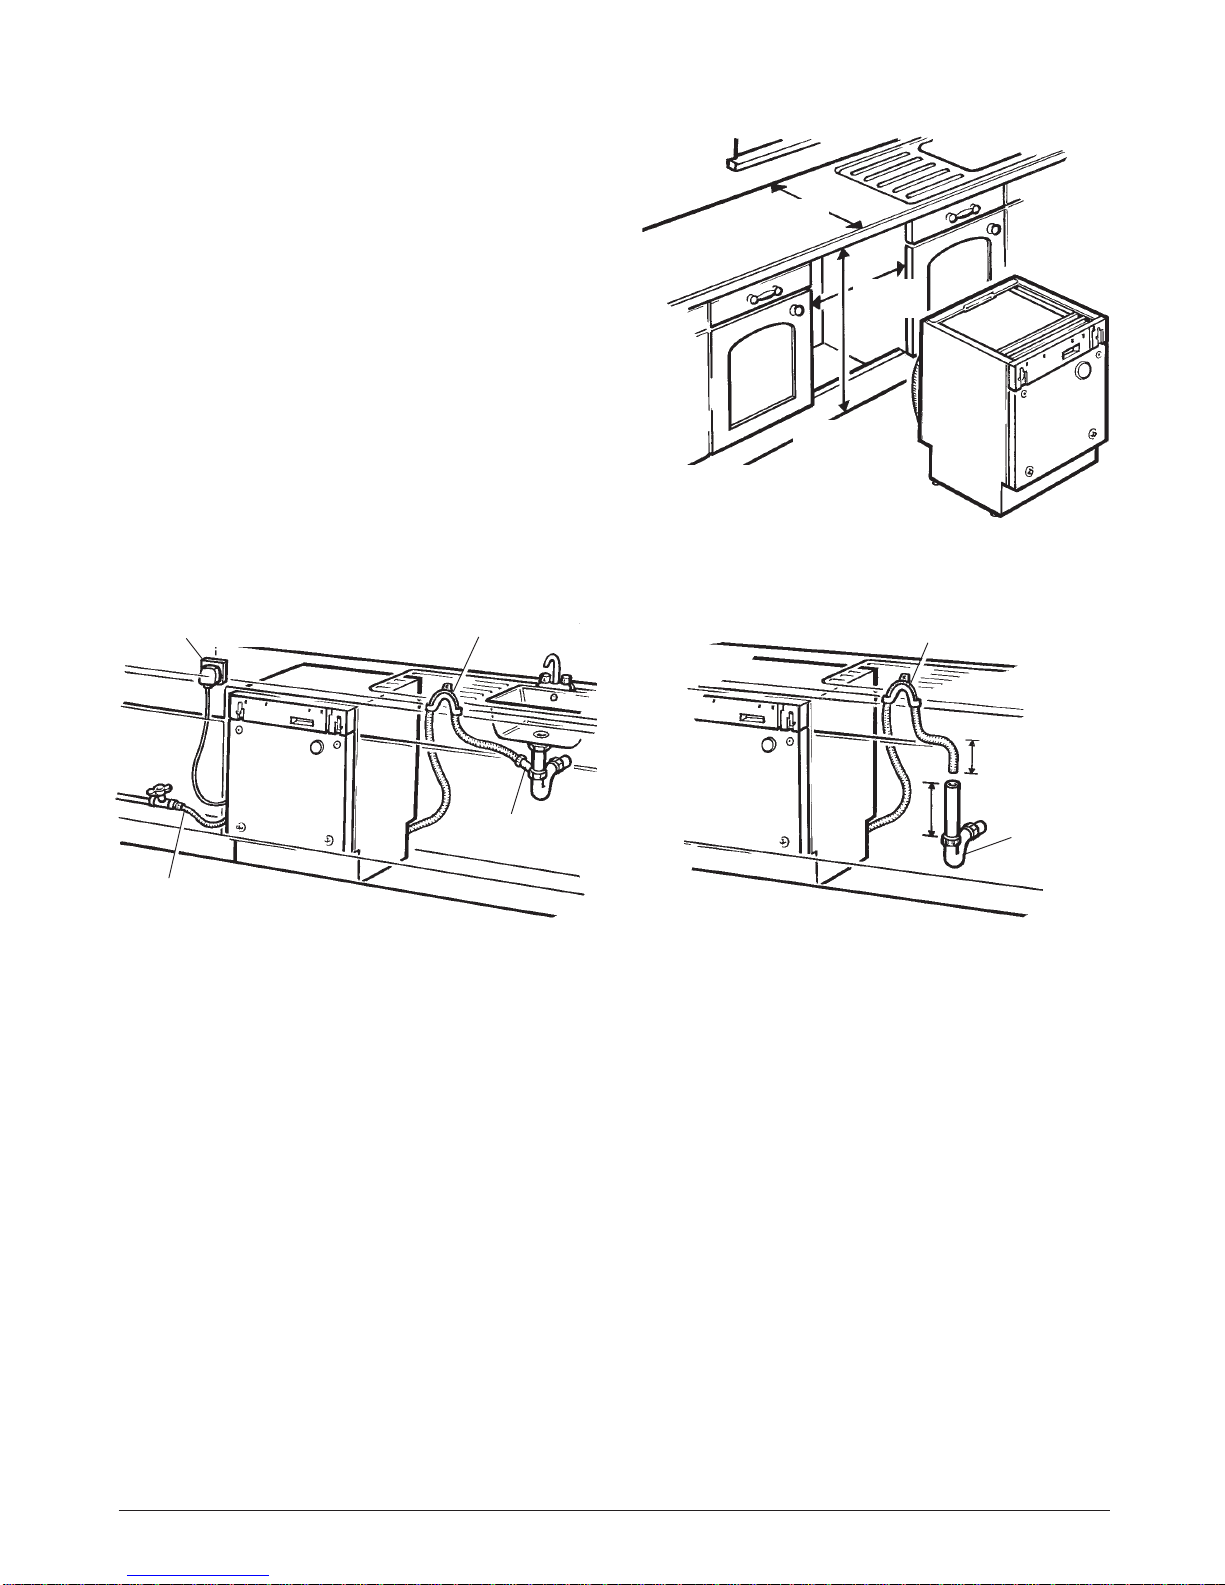
• The minimum dimensions of the space required for
the appliance are shown in Figure 1.
Provision for the connections
The connections for the appliance are shown in Figure 2 and Figure 3.
Drain hose connection
When routing the drain hose, avoid bending or cr imping it. Use the plastic hose guide that comes with the
appliance ensuring that it is securely fastened to the wall.
You can either let the drain hose empty straight into the sink, connect it to a stub from the sink waste 'U'
bend as shown in Figure 2, or to a new drainpipe of at least 40mm diameter with a 'U' bend as shown in
Figure 3. If connecting to a new drainpipe, please note that the free end of the drain hose must be at a
height of between 40-100cm and in a position where it is never immersed in standing water (Figure 3).
Water supply hose connection
The water supply pipe must be terminated to enable you to connect the dishwasher water inlet hose to it. If
the pipe work is new, run water through the pipes to flush out any impurities and residues. Alternatively, but
not ideally, the dishwasher can be connected to a hot water supply. If this option is chosen, the hot water
supply must never exceed 60°C otherwise the crockery may be damaged or the shortened wash cycle will
give inferior results.Before connecting to any water supply insert the small filter supplied in the dishwasher
connector before screwing it to the water supply (Figure 3, page 5).
Electrical connection
Connect the dishwasher to the electricity supply via a suitable 3-pin outlet socket.The socket must be
earthed and have an ON/OFF switch (Figure 2)
Note: The socket and switch must be accessible when the appliance is installed.
600MM
DEPTH
120MM
280MM
HOSE GUIDE
HOSE GUIDE
3-PIN SOCKET WITH SWITCH
WATER INLET HOSE
CONNECTED TO W ATER
PIPE VIA TAP
600MM
WIDE
810-830MM
HIGH (UNDER
TOP T O
FLOOR)
REMOVE
LOWER
PLINTH
'U' BEND IN
40MM DIA.
(MIN)
DRAINPIPE
STUB IN 'U'
BEND
FIGURE 1
FIGURE 2
Connecting the drain hose to new drainpipe
FIGURE 3
Page 5
Page 5
Installation
- continued
Fitting your decorative fascia door
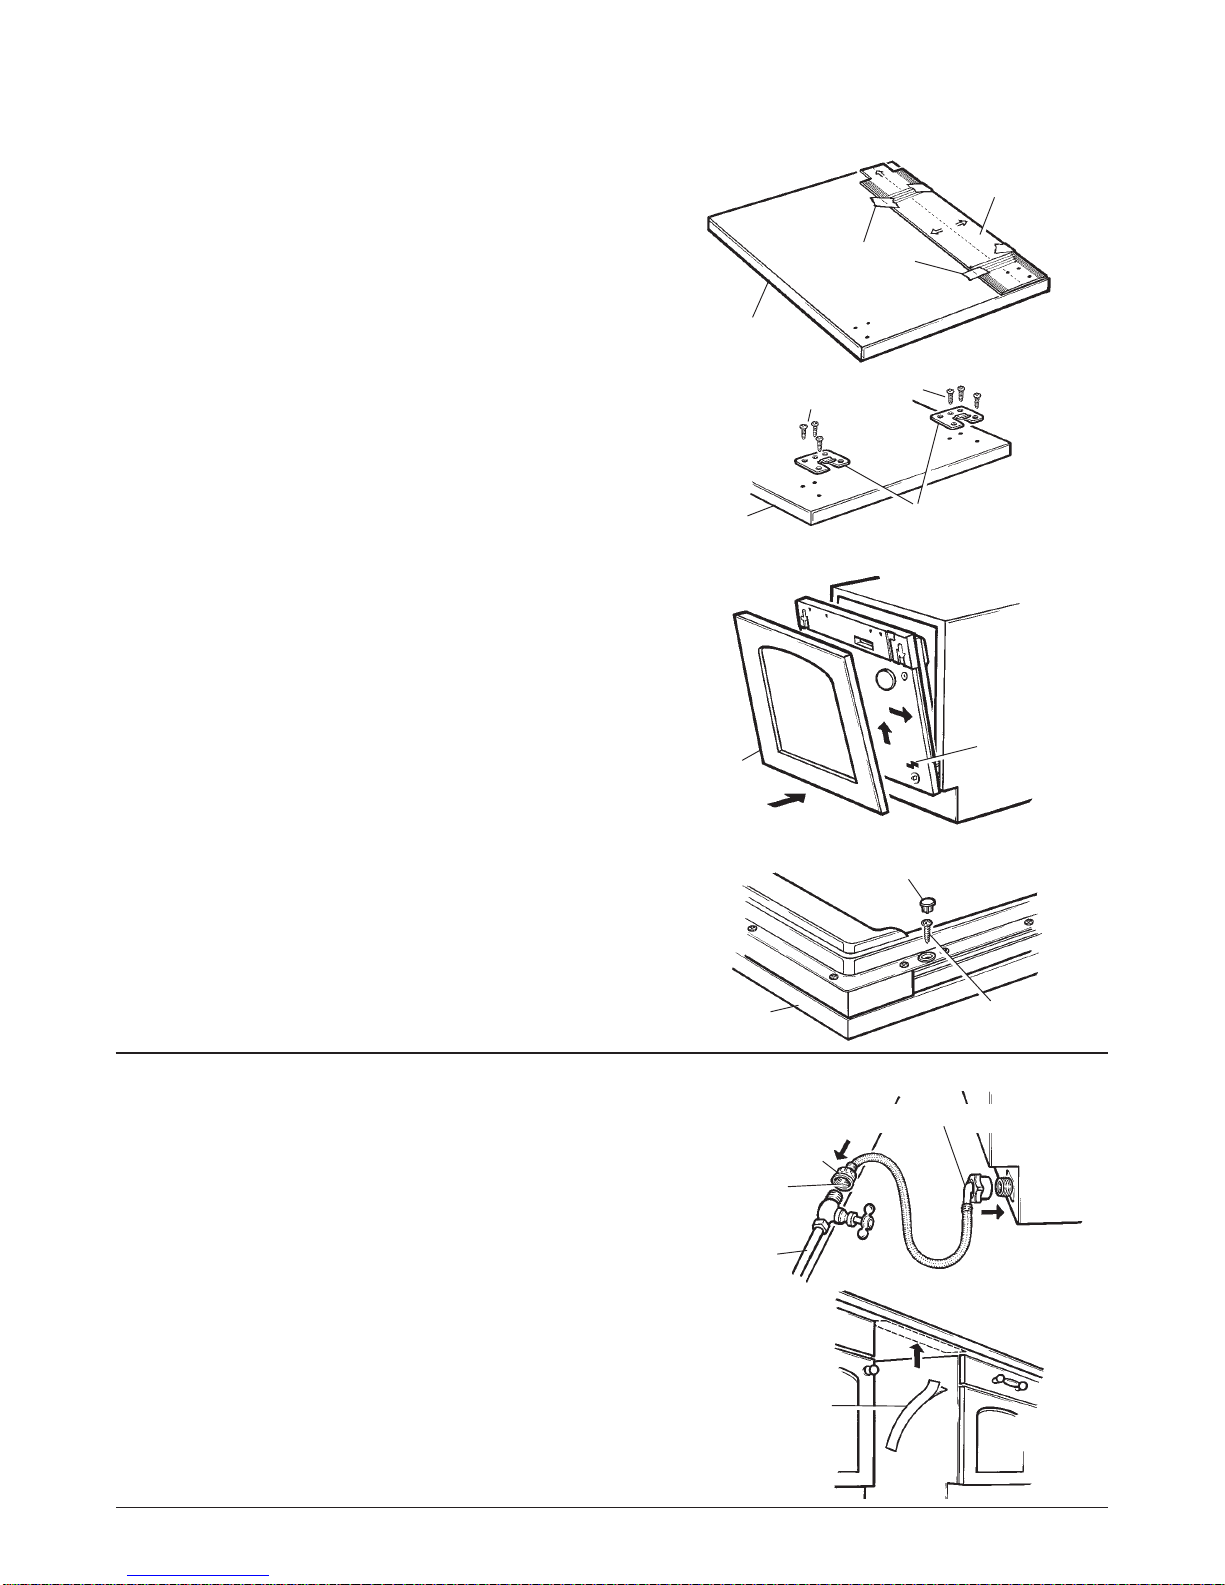
Provision is made on the dishwasher front panel for the
fitting of your own fascia door to match the rest of your
kitchen units. It is held in position by two clips at the
bottom and two screws at the top.A template is provided
to aid the positioning of the brackets and screws.
1.First check the width of your door is between 582mm
and 598mm.
2.Align the template with the top and the side of the door,
tape it in place and mark the position of the screw holes;
first one side and then the other (Figure 4).
3.Make pilot holes in the door and then, using the short
12mm self-tapping screws supplied, screw the two lower
brackets in position with the tabs pointing downwards
(Figure 5).
4.Locate the two lower tabs on the door brackets into the
slots in the dishwasher front panel. Lift the door up and
slide to the right (Figure 6).
5.Open the dishwasher panel right down and align the top
corners of the door with the top corners of the
dishwasher panel (Figure 7).
6.Attach the top of the door to the dishwasher front panel
with two of the self-tapping screws supplied and then fit
the two plugs onto the heads of the screws (Figure 7).
Fitting the dishwasher under the work
surface
1.Slide the dishwasher into the opening under the work
surface, just far enough to connect it to the water and
electric supplies and also the wastepipe (Figures 8
opposite and 2 and 3 on page 4).
Ensure the small filter is secure inside the hose
connector which connects to the water supply tap.Only
use the 90° connector to connect to the dishwasher.
2.Peel the backing paper off and stick the protective plastic
strip to the underside of the work surface.
FASCIA DOOR
FASCIA
DOOR
FASCIA
DOOR
FASCIA
DOOR
SLOT FOR
LOWER
BRACKET
LOWER BRACKETS
TEMPLATE
STICKY TAPE
BLANKING PLUG
APPLIANCE
INSERT SMALL
FILTER HERE
WATER
SUPPLY
PIPE
STRAIGHT
CONNECTOR
PROTECTIVE
PLASTIC
STRIPS
90º CONNECTOR
SELF-TAPPING
SCREW
SELF-TAPPING
SCREWS
FIGURE 4
FIGURE 5
FIGURE 6
FIGURE 9
FIGURE 8
FIGURE 7
Page 6
Page 6
Installation
- continued
3.Push the dishwasher back as far as it will go ensuring
that nothing is trapped between it and the wall.
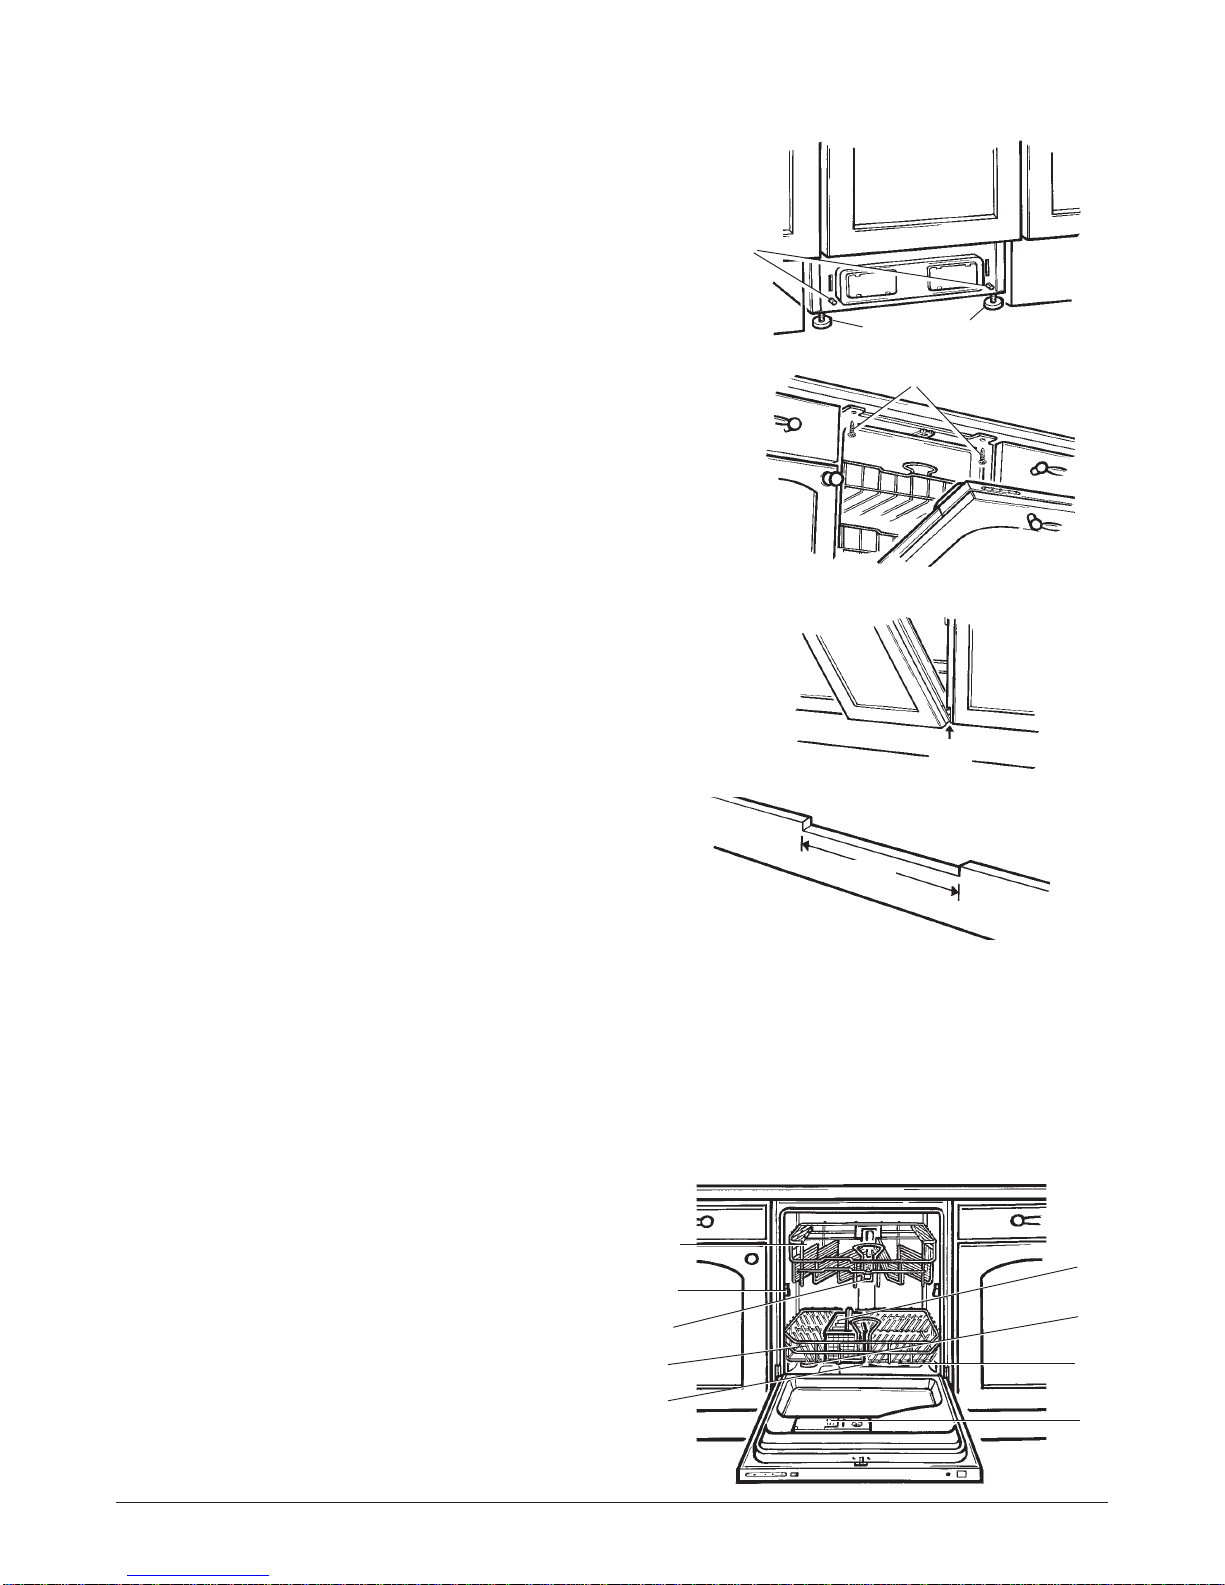
4.Adjust the rear feet of the dishwasher with a hex socket
by rotating the hexagonal studs on the plinth, either side,
at the base of the dishwasher. A screwdriver with a
suitable socket should be used for adjustment. Warning
- over tightening can damage the appliance. Adjust
the front feet after loosening (Figure 10).
5.Finally, adjust the position of the appliance until the
fascia door aligns exactly with the adjacent kitchen units
(Figure 3)
6.When satisfied with the position of the dishwasher in
relation to the other kitchen units, screw the top bracket
of the dishwasher to the underside of the work surface
with two of the larger 25mm self-tapping screws supplied
(Figure 11).
At this point you could attach the handle to your
dishwasher fascia door.
7.Temporarily refit the continuous lower plinth and carefully
open the dishwasher door a little to check if the door
clears the top of the plinth by at least 3mm (Figure 12).
8.If the door does not clear the plinth, remove the plinth
and recess it by as much as is required to give a 3mm
clearance, 600mm wide (Figure 13).
Once you are satisfied with the installation of the
dishwasher, you are ready to star t lear ning about its
features and operation and then how to use it for the best
results.
First remove all the polystyrene packing, sticky tape and tie-wraps from inside i.e. wash baskets etc.
and wipe the inside with a damp cloth ready for use. It is advisable to run the machine empty for one
wash cycle before loading with soiled crockery, etc to remove any residues from the manufacturing
process.
FIGURE 10
FIGURE 11
FIGURE 12
FIGURE 13
1. Upper Rack
2. Rack Height Adjustor
3. Top Spray Arm
4. Lower Rack
5. Bottom Spray Arm
6. Detergent and Rinse Aid Dispenser
7. Washer Filter
8. Salt Container Cap
9. Cutlery basket
Parts identification
The parts are numbered below to help identification. Ensure all the parts are present and that none are
broken.
1
2
3
4
5
7
6
8
9
HEX
ADJUSTERS
FOR REAR
FEET
FRONT FEET
SELF-TAPPING SCREWS
3MM
600MM
FIGURE 14
Page 7
Page 7
Salt
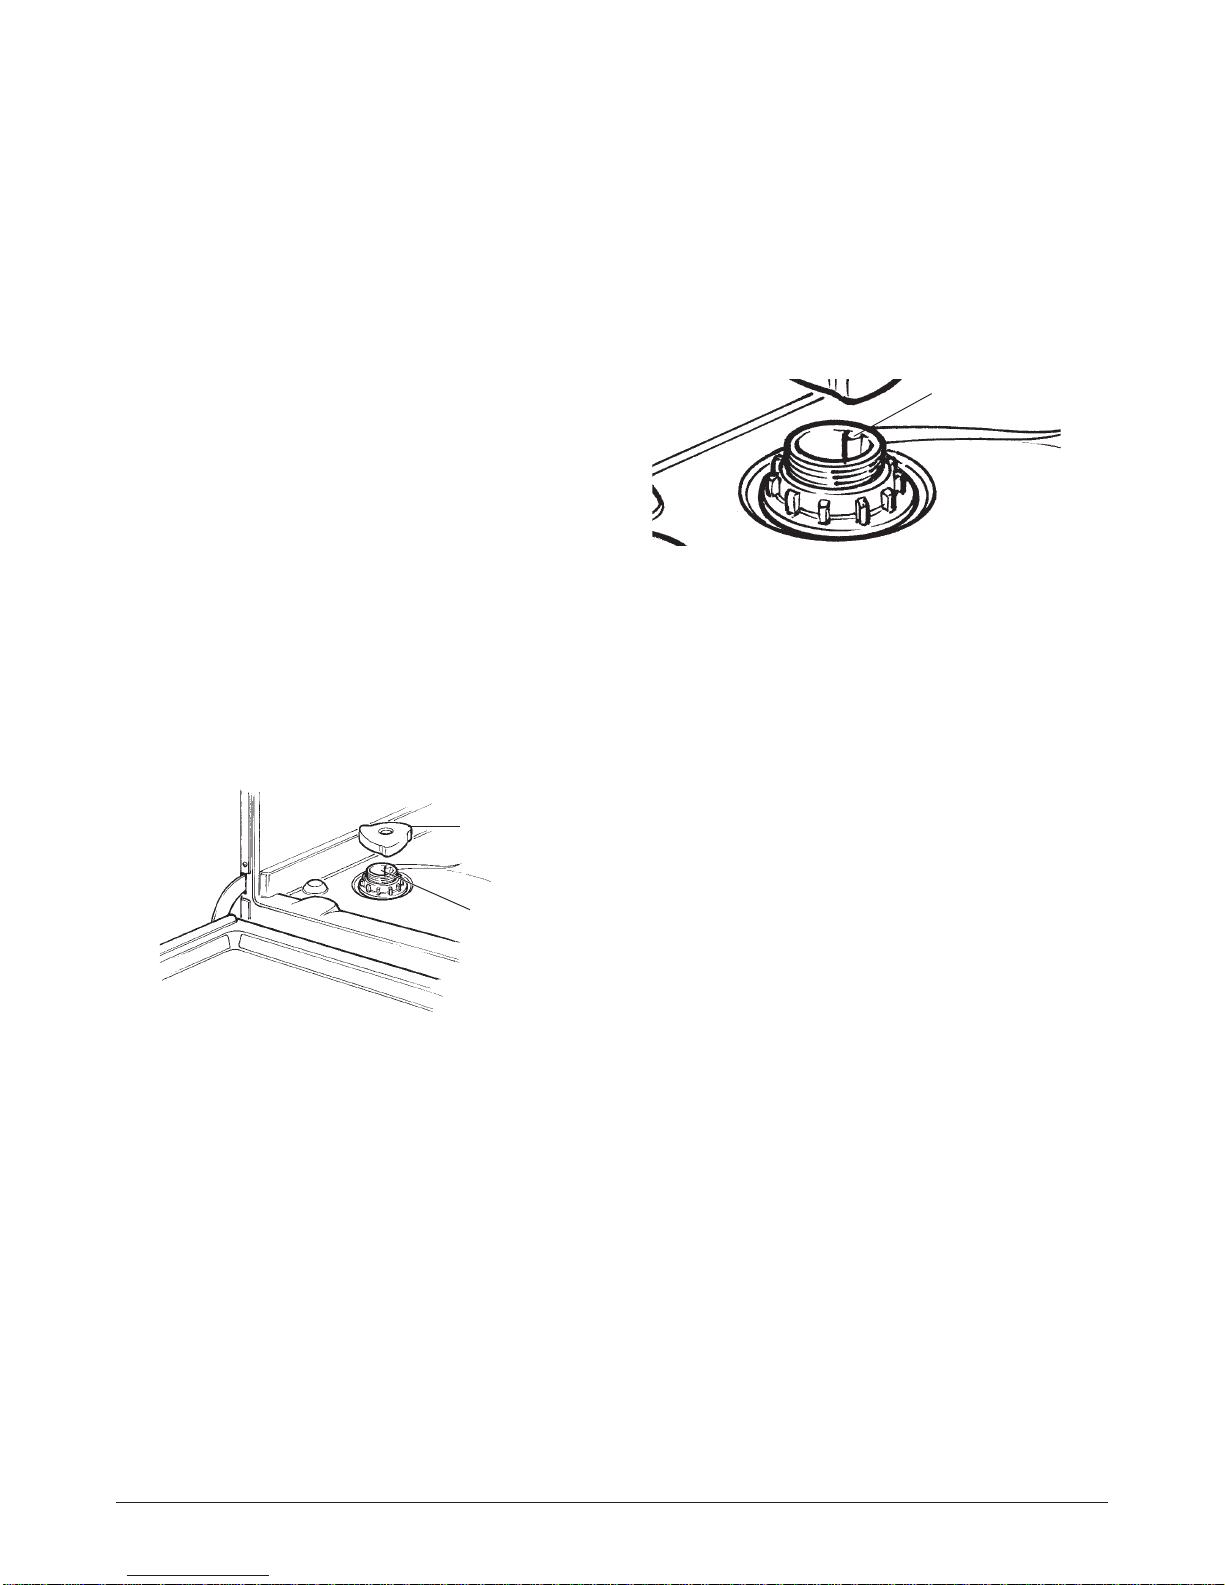
FIGURE 16
FIGURE 15
SALT ADJUSTMENT
SALT
CONTAINER
CAP
Salt
The hardness of the water varies depending upon
where you live.If hard water is used in the
dishwasher, deposits will form on the dishes and
utensils.
This appliance is equipped with a special softener
that uses a salt specifically designed to eliminate
limescale and minerals from the water.
Loading the salt into the softener
Always use salt intended for use with dishwashers.
The salt container is located beneath the lower
rack and should be filled as follows:
• Remove the lower rack and then unscrew and
remove the cap from the salt container.
(If you are filling the container for the first time,
fill it with water before adding the salt.)
• Place the end of the funnel (supplied) into the
hole and introduce about 2kg of salt. It is normal
for a small amount of water to come out of the
salt container.
• Carefully screw the cap back on.
To prevent the formation of rust, load the salt
just before beginning a wash cycle.
Adjusting salt consumption
The dishwasher is designed to allow you to adjust
the amount of salt consumed, based on the
hardness of the water in your area.This is intended
to optimise and customise the level of salt
consumption so that it remains at a minimum.
To adjust salt consumption, proceed as follows:
• Unscrew the cap from the salt container. The salt
adjuster has an arrow on it (Figure 16).
• Place a small screwdriver in the top of this arrow
and gently rotate clockwise (softer water) or anticlockwise (harder water) to the required position
depending upon water hardness.
It is advisable to top up the salt container monthly
and to fill until the salt reaches the top.
Page 8
Page 8
Detergent and rinse aid
Detergent
Detergent specifically intended for use with
dishwashers must be used.The dispenser must be
filled before the start of each wash cycle following
the instructions provided in the "Wash Cycle Table".
The detergent dispenser is located on the inside
panel of the door.
Loading the detergent
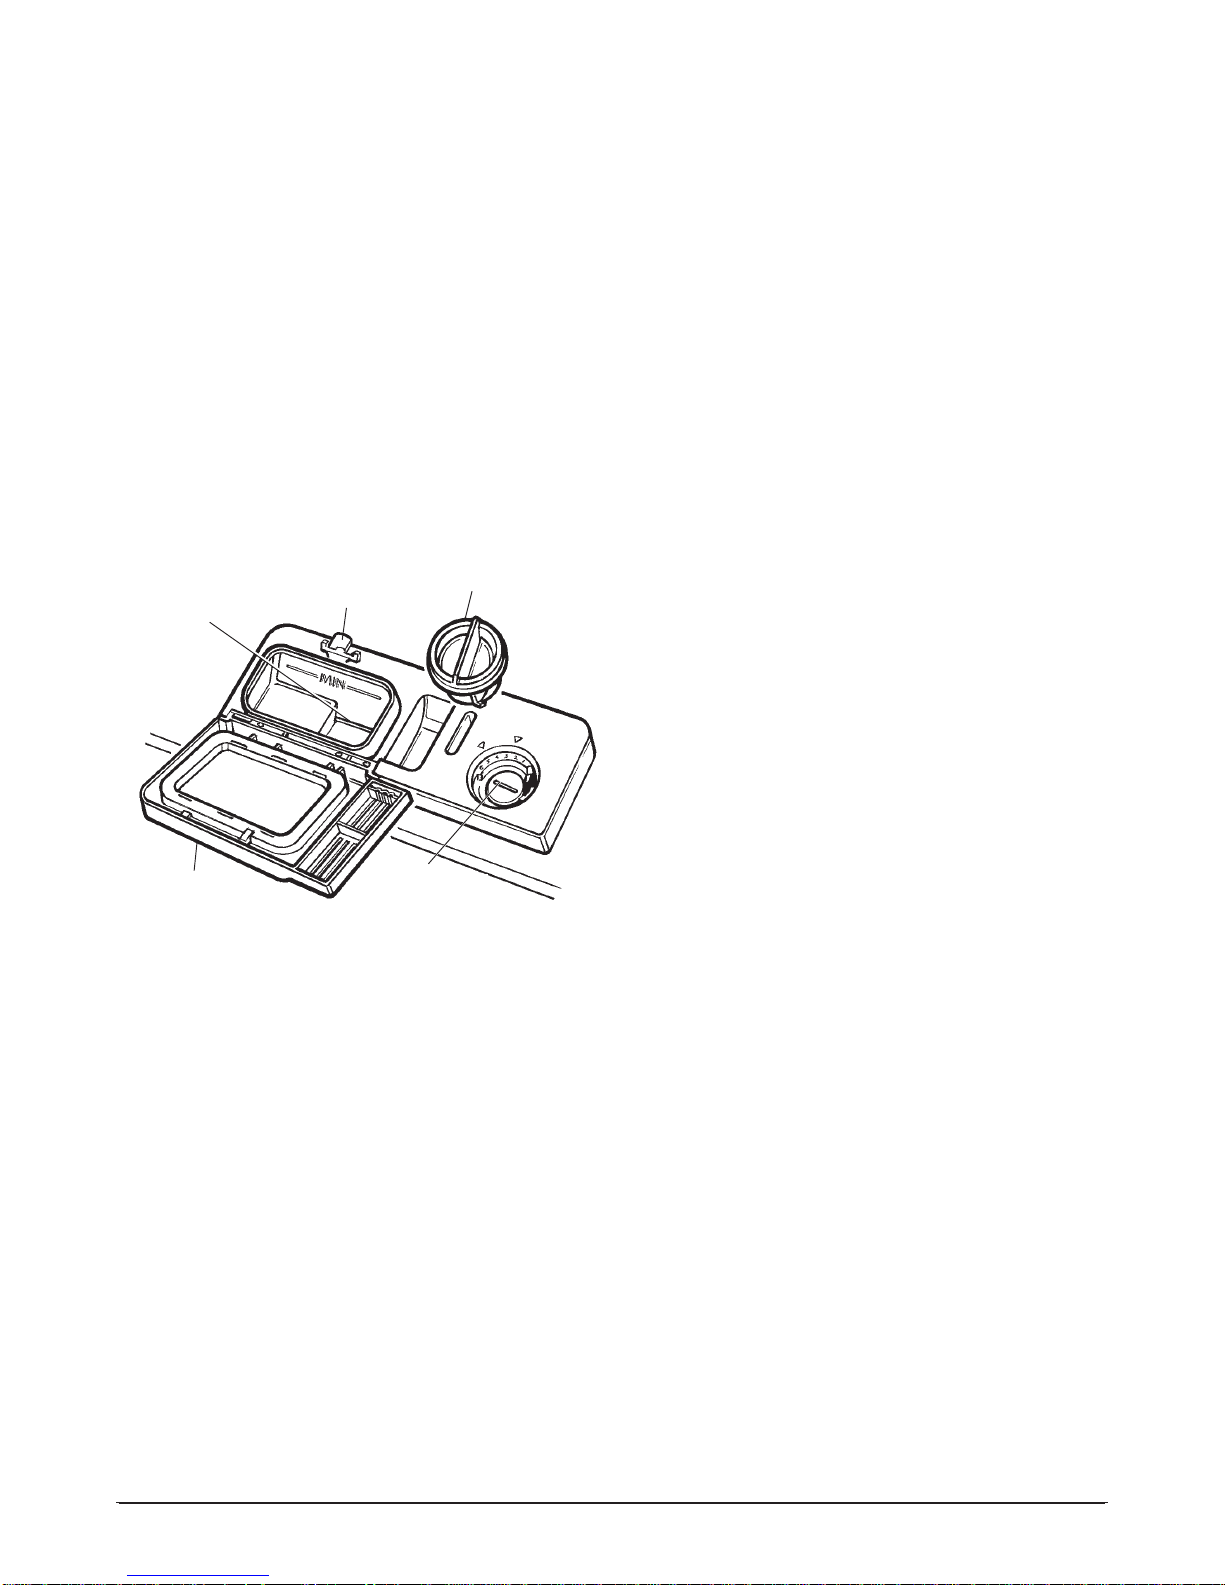
To open the cover on the dispenser, press the latch.
The detergent for the wash cycle should be placed
in the compartment.
After the detergent has been placed in the
dispenser, close the cover and press down until it
"clicks" in place
Please Note:To facilitate closing the cover,
remove any excess detergent on the edg es of
the dispenser.
Rinse aid
This product makes dishes sparkle and helps them
to dry without spotting. The dispenser is located on
the inside panel of the door and should be filled
after every eighty wash cycles (or when the "low
rinse aid" indicator light comes on for those models
with this feature).
Loading the rinse aid
Regardless of the type of detergent dispenser
installed on your appliance, you must proceed as
indicated below when loading the rinse aid.
To open the dispenser, release the cap in an anticlockwise direction and then pour in the rinse aid,
making sure not to overfill.
The amount of rinse aid used for each cycle can be
regulated by turning the dose adjuster, located
beneath the cap, with a screwdriver.There are 6
different settings; the normal dosage setting is 3.
Important:
Proper dosage of the rinse aid improves drying.
If drops of water remain on the dishes or
spotting occurs, turn the dosage adjuster to a
lower setting.
FIGURE 17
COVER
LATCH
CAP
DOSE
ADJUSTER
COMPARTMENT
Page 9
Page 9
Loading the dishwasher
Before placing the dishes in the dishwasher, remove
the larger food debris to prevent the filter from
becoming clogged, which results in reduced
performance.
If the pots and pans have baked-on food that is
extremely hard to remove, we recommend that they
be allowed to soak before they are washed. This will
eliminate the need for extra wash cycles.
Pull out the rack to facilitate loading the dishwasher.
How to use the lower rack
We recommend that you place the most difficult to
clean items on the lower rack;saucepans, for
example, lids, serving dishes and bowls.
It is preferable to place serving dishes and lids on
the sides of the racks in order to avoid blocking the
rotation of the top spray arm.
• Pots, ser ving bowls, etc. must always be placed
face down.
• Deep pots should be slanted to allow the water to
flow out.
• Cutlery should be placed in the cutlery basket
with the handles at the bottom. If the rack has
side baskets, the spoons should be placed
individually into the appropriate slots. Especially
long utensils and sharp knives should be placed
in the horizontal position at the front of the upper
rack.
How to use the upper rack
The upper rack is designed to hold delicate and
lighter dishware such as glasses, coffee and tea
cups and saucers, as well as plates, small bowls
and shallow pans (as long as they are not too dirty).
Position the dishes and cookware so that they are
not in the way of the spray arms.
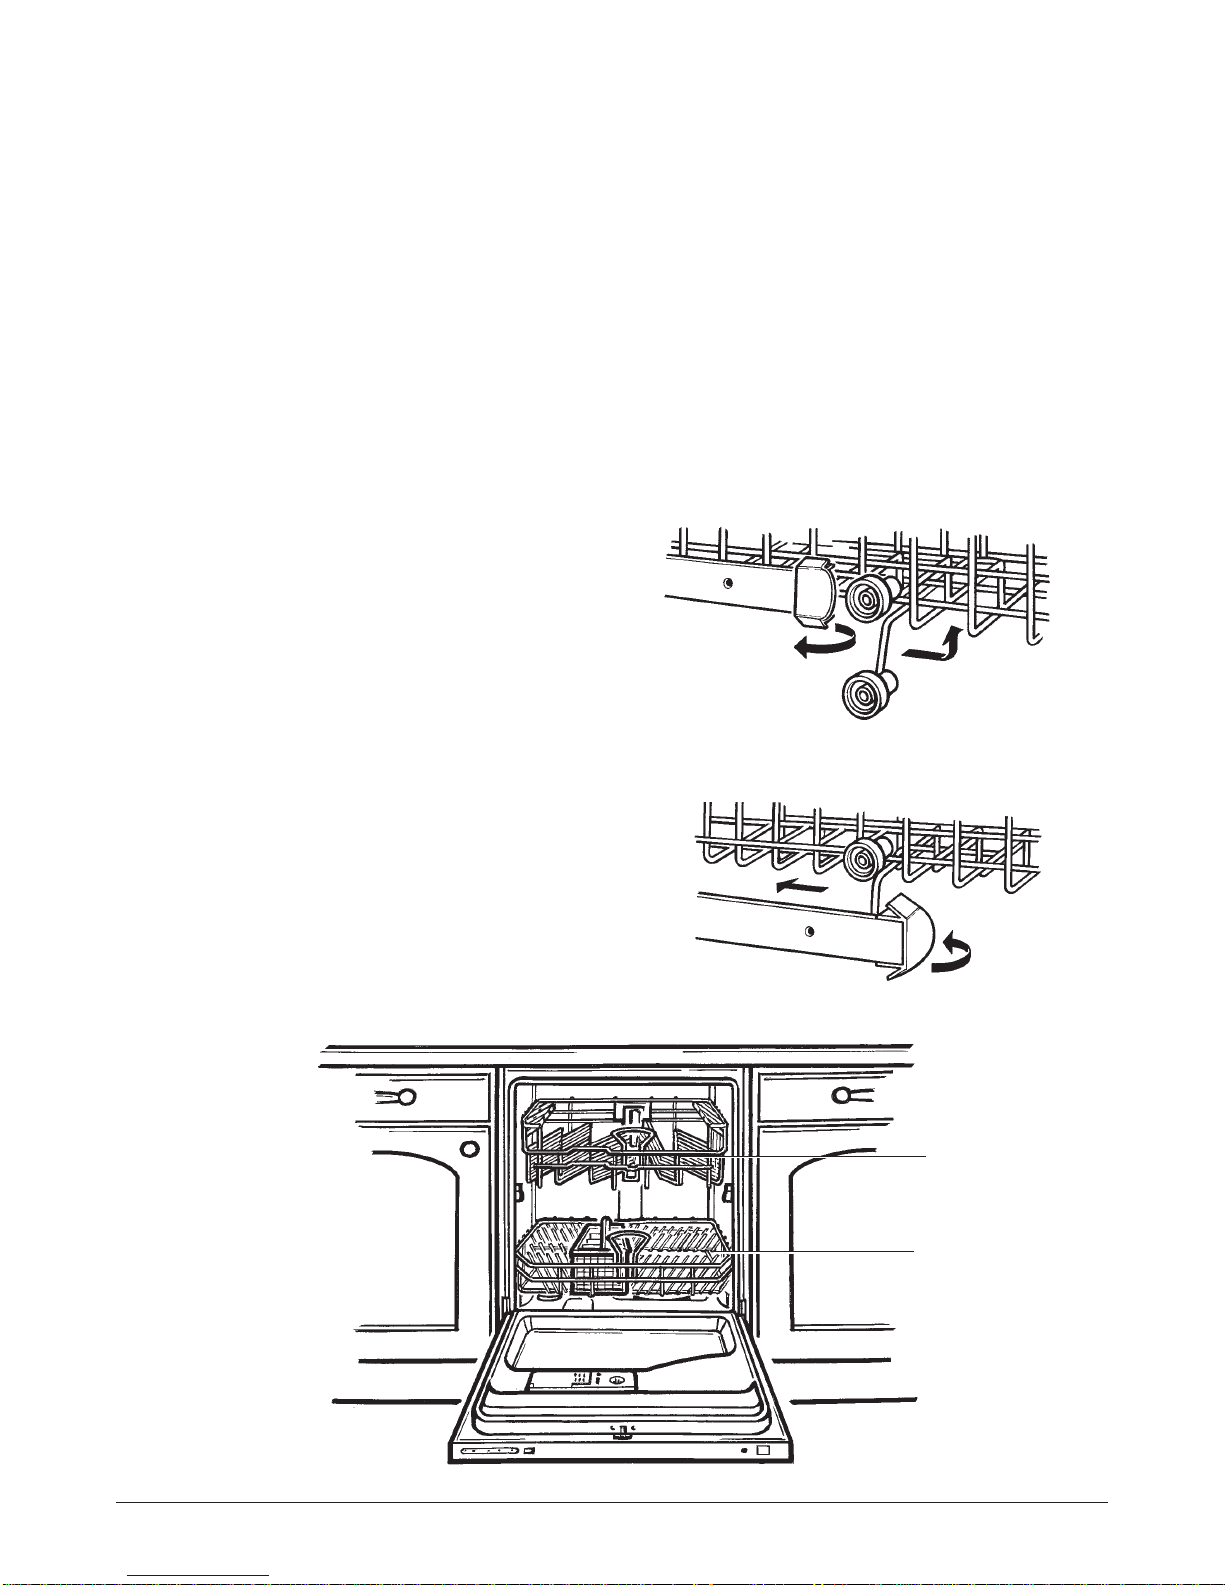
The upper rack can be adjusted for height by using
the knobs located on the sides of the rack itself
(Figures 18 and 19).
FIGURE 20
UPPER
RACK
LOWER
RACK
FIGURE 18
FIGURE 19
Page 10

Page 10
Starting the dishwasher
Starting a wash cycle
Turn on the electricity and water supply to the
dishwasher .
Partially open the door of the dishwasher, and press
the ON-OFF button "A" located on the control panel.
The "B" indicator light will come on.
At this point, the appliance is on and ready to be
programmed.
Setting and starting a wash cycle
Choose the desired cycle by pressing the cycle
selection button "P". Each time it is pressed, one of
the cycle indicator lights "D" will come on in
succession.
Choose the wash cycle you feel is most appropriate
for the type of dishes that need washing (consult
the wash cycle table (page 11), especially when first
using the appliance). Close the door and after a few
seconds, a short acoustic signal will sound
indicating that the wash cycle has begun and
cannot be modified, If necessary, read the
paragraph entitled, "Cancelling or modifying a cycle
while underway".The end of the cycle will be
signalled by a double acoustic sound, and the
indicator light "D" will begin to 'blink'.
Cancelling or modifying a cycle while
underway
Example: A cycle that is underway can only be
modified if it has only been running for a short time.
Otherwise, the detergent may have already been
used, and the appliance may have already drained
the wash water. If this is the case, the detergent
dispenser must be refilled (see the paragraph
entitled, "Loading the Detergent").
To change the cycle currently underway, open the
door, press the "P" cycle select button and hold it in
for about 5 seconds.Once the cycle has been
cancelled, the dishwasher will emit a short acoustic
sound and the respective indicator light will turn off.
To set a new wash cycle, follow the instructions
contained in the paragraph entitled, "Setting and
Starting a Wash Cycle".
If you forget to load some of the
dishes
The wash cycle can be interrupted by opening the
door carefully (in order to avoid being sprayed by
hot water).When the door is closed again, the cycle
will automatically restart at the point where it left off.
At the end of the wash cycle
The end of the cycle will be indicated by a double
acoustic signal and the 'blinking' of the "D" indicator
light. Open the door, turn off the appliance using the
ON/OFF switch and turn off the water supply to the
appliance.Wait a few minutes before removing the
dishes so as to avoid handling them while still hot
(when they are more susceptible to breakage) and
to get better drying results.
Front control panel
A
B
P
D
A. ON-OFF Button
B. ON-OFF Light
P. Cycle Select Button
D. Cycle Indicator Lights
FIGURE 21
Page 11
Page 11
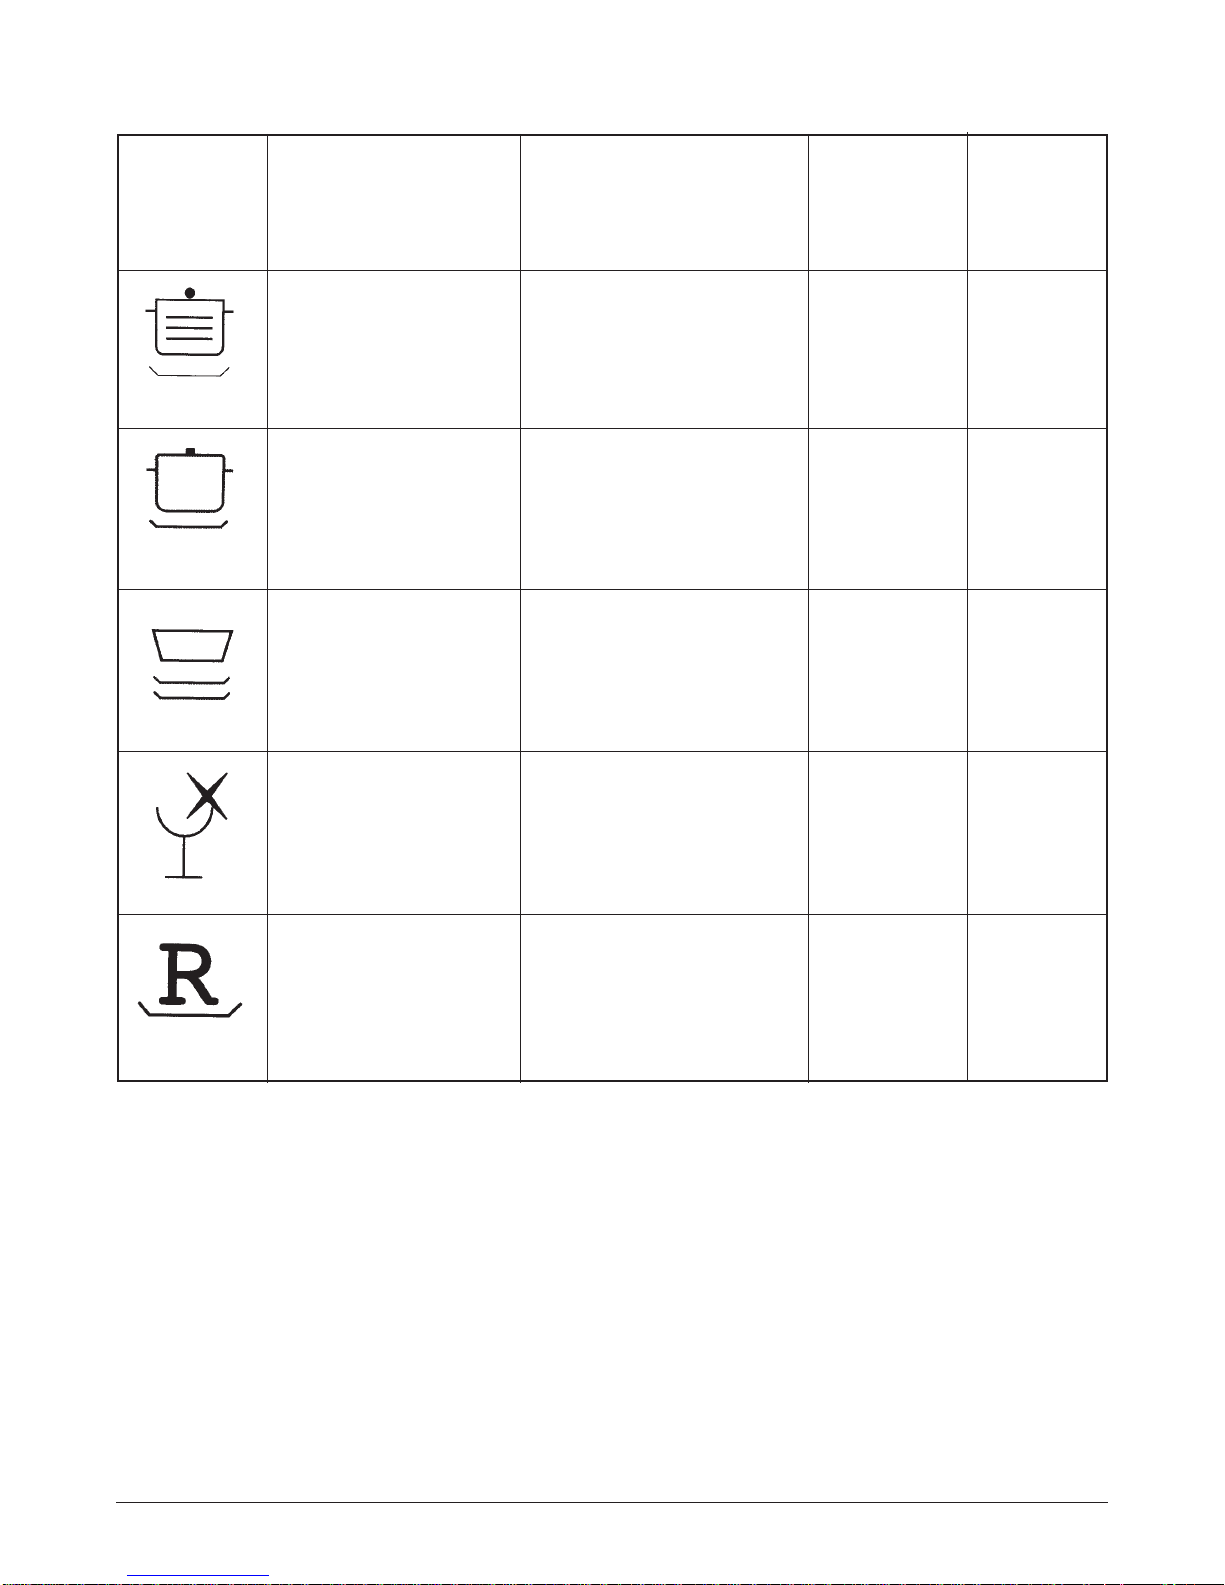
Wash cycle table
Cycle
Cycle
Selection
Information
Description
of Cycle
Detergent
Rinse Aid
Ver y dir ty dishes, pots
and pans (not to be
used with delicate
items).
Normally dir ty dishes,
pots and pans.
Standard daily cycle.
Normally dir ty dishes,
pots and pans without
dried on residue.
Economic, fast cycle to
be used for items
which are sensitive to
light. Run immediately
after dishes are used.
Economic, fast cycle to
be used on not very
dirty dishes right after
they are used. No
drying cycle.
Pre-wash with cold water.
Extended wash at 70ºC.
Rinse with cold water.
Rinse with hot water.
Drying.
The second pre-wash use
cold water.
Extended wash at 50ºC.
Rinse with cold water.
Rinse with hot water.
Drying.
Pre-wash with cold water.
Extended wash at 50ºC.
Rinse with cold water.
Rinse with hot water.
Drying.
Wash at 50ºC.
Rinse with warm water.
Hot rinse.
Drying.
Short wash at 40ºC.
Cold rinse.
30g
#
30g
#
30g
#
15g
#
15g
Heavy Duty
Normal wash
(IEC-EN50242)
Light Wash
Glassware
Rapid Wash
Energy saving tips
• Run the dishwasher when it is fully loaded in
order to save energy.
• Choose the right wash cycle.The choice of cycle
depends on the type of dishware, cookware and
utensils being washed and how dirty they are.
• Use the right amount of detergent. If you use too
much detergent, the result will not be cleaner
dishes, but a greater negative impact on the
environment.
• There is no advantage in rinsing dishes,
cookware and utensils before placing them in the
dishwasher .
Page 12
Page 12
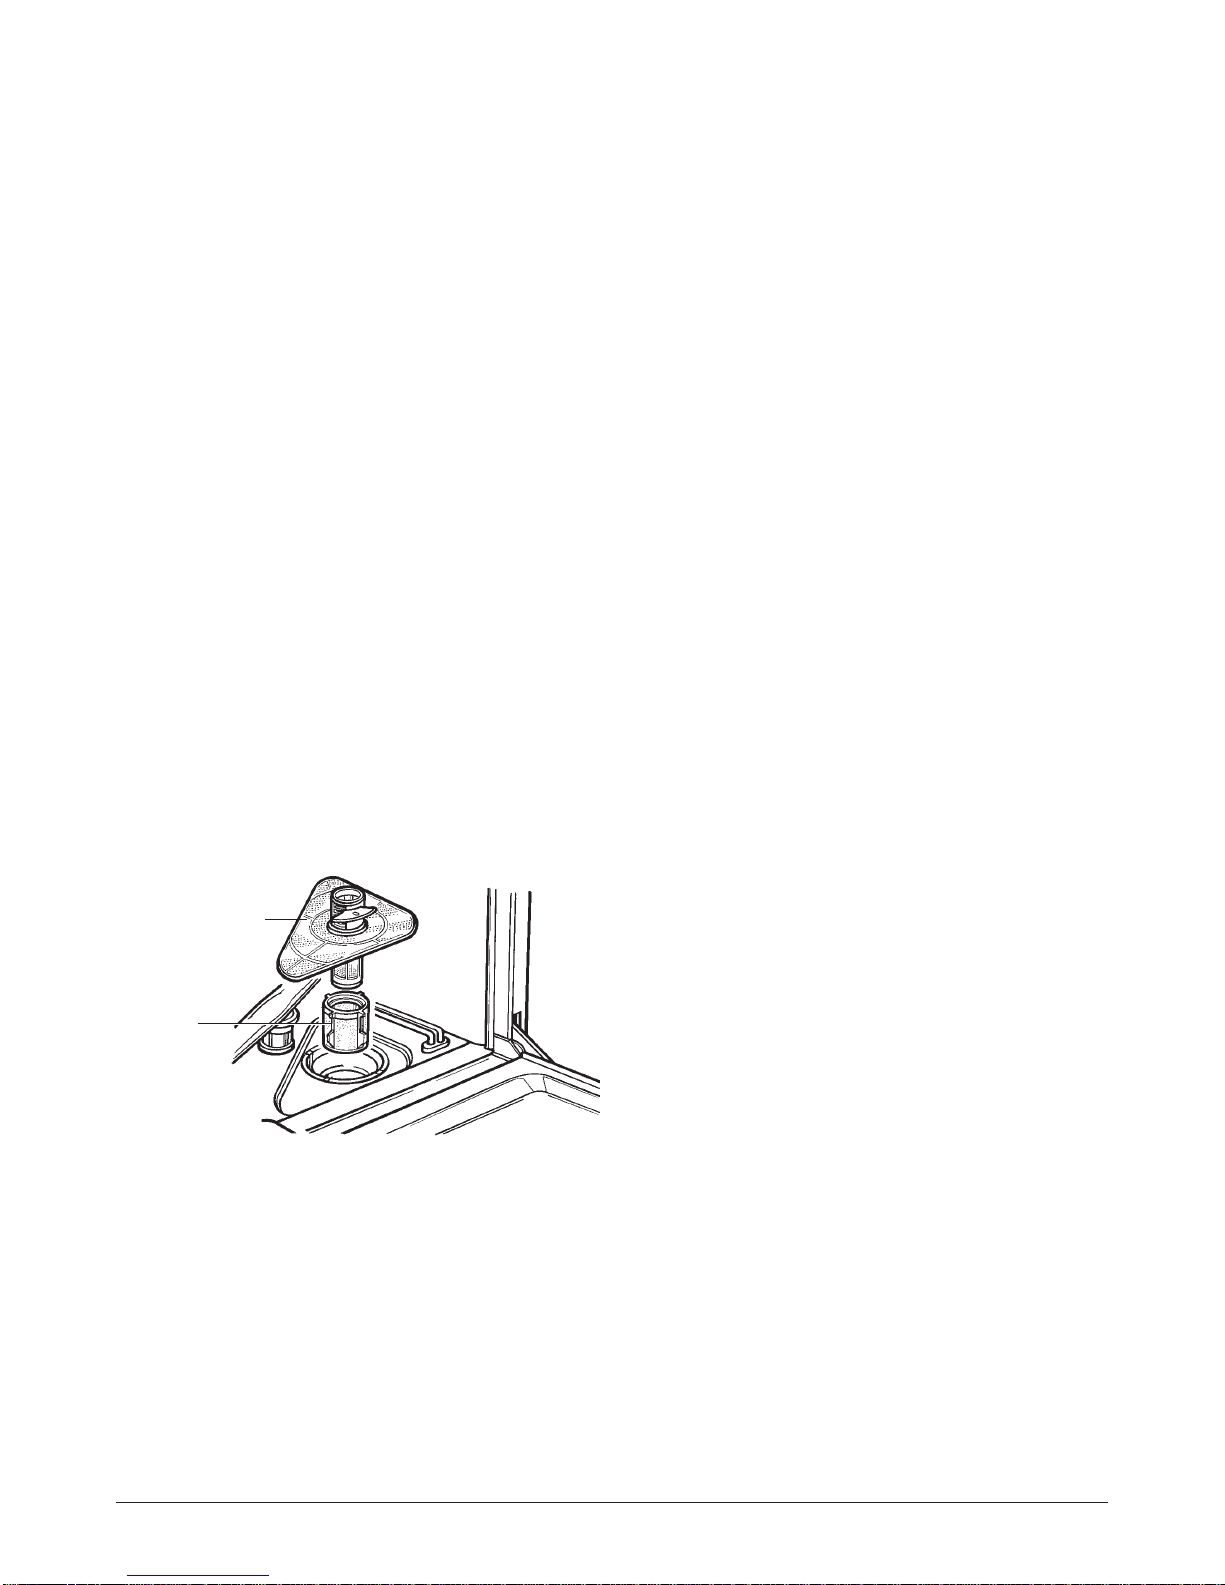
Filter assembly
For best performance and results, the filter
assembly must be frequently cleaned.
The filter efficiently removes food residue from the
wash water, allowing it to be re-circulated during the
cycle. For this reason, it is a good idea to remove
the larger food particles trapped in the filter after
each wash cycle by rinsing the semicircular filter
and cup under running water.To remove the filter
assembly, pull on the cup handle in an upward
direction.The entire filter assembly (made up of the
"semicircular filter and the fine filter) should be
cleaned at least once a week.
To clean the semicircular filter and the fine filter, use
a cleaning brush.Then, reassemble the filter par ts
as shown in the Figure 22. Re-insert the entire
assembly in the dishwasher, positioning in its seat
and pressing downwards.
Never use the appliance without the filters. Improper
placement of the filters may damage the dishes and
utensils etc.
Cleaning the spray arms
It may happen that food particles become encrusted
on the spray arms and block the holes. Check the
spray arms periodically and clean them when
needed.
Cleaning the water inlet filter
If fitted, periodically clean the small water inlet filter
located in the supply hose connector.
After turning off the water tap, unscrew the end of
the water supply hose, remove the filter and clean it
carefully under running water.Replace the filter and
tighten the water supply hose back into position.
How to keep your dishwasher in shape
Cleaning and special maintenance
After every wash
After every wash, it is advisable to turn off the water
supply to the appliance and leave the door slightly
ajar so that moisture and odours are not trapped
inside.
Remove the electric plug
Before cleaning or performing any maintenance
work on the appliance, always remove the electric
plug from the mains outlet socket.Do not r un risks.
No solvents or abrasive cleaning
products
To clean the exterior and rubber parts of the
dishwasher, do not use solvents or abrasive
cleaning products. Only use a clean cloth and soapy
water.
To remove spots or stains from the surface of the
interior, use a cloth dampened with water and a little
white vinegar, or a cleaning product made
specifically for dishwashers.
When you go on holiday
When you go on holiday, it is recommended that
you run a wash cycle with the dishwasher empty
and then remove the plug from the socket, tur n off
the water supply and leave the door of the
appliance slightly ajar.This will help the seals last
longer and prevent odours from forming within the
appliance.
Moving the appliance
If the appliance must be moved, try to keep it in a
vertical position. If absolutely necessar y, it can be
laid on its back.
Seals
One of the factors that can cause odours to form in
the dishwasher is food that remains trapped in the
seals. Periodic cleaning with a damp sponge will
help prevent this from occurring.
FIGURE 22
SEMICIRCULAR
FILTER
FINE
FILTER
Page 13

Page 13
It may occur that the dishwasher does not work or
does not function properly. Before calling the
Helpline, please check the following:
The dishwasher does not start
Have you checked whether:
• The plug is pushed firmly into the outlet socket.
• The mains electrical supply is switched on.
• The door is properly closed.
• The ON-OFF switch is in the ON position.
• The water supply is turned on.
The dishwasher does not take in
water
Have you checked whether:
• The water to the appliance is turned on and the
hose is properly connected.
• The mains water supply is turned on and is of
sufficient pressure.
• The water supply hose is not crimped or bent.
• The water supply filter is not clogged.
The dishes are not cleaned properly
Have you checked whether:
• The water to the appliance is turned on and the
hose is properly connected.
• The mains water supply is turned on as is of
sufficient pressure.
• The water supply hose is not crimped or bent.
• The water supply filter is not clogged.
The dishwasher does not drain
properly
Have you checked whether:
• The drain hose is not crimped or bent.
Limescale deposits or a white film
forms on the dishes
Have you checked whether:
• The lid to the salt container is closed properly.
• The rinse aid dosage is correct.
Error messages
The dishwasher is equipped with a safety system
that is able to detect operating problems and
malfunctions.These malfunctions are signalled by
the rapid 'blinking' of one of the "D" program LEDs.
Only in the case where the indicator light for the
soak cycle (see table of cycles) 'blinks' rapidly
should you cancel the cycle as described in the
section entitled, "Changing a Cycle while
Underway".Then check to make sure that there is
water in the mains and that the tap is turned on. If
the message continues, call the Helpline for
technical assistance, indicating which message
appears.
If any of the other indicator lights begin to 'blink'
rapidly, turn off the appliance and call the Helpline,
0844 871 0011 indicating which light began to
'blink'.
If, despite all these checks and after phoning the
Helpline, the dishwasher still does not function
and/or the problem persists, contact the nearest
authorised service centre and provide them with the
following infor mation:
• The nature of the problem.
• The model Type Number (Mod...) and the Serial
Number (S/N...), are indicated on a plate located
on the side of the inner part of the door.
Troubleshooting
Page 14
Fuse and mains plug replacement
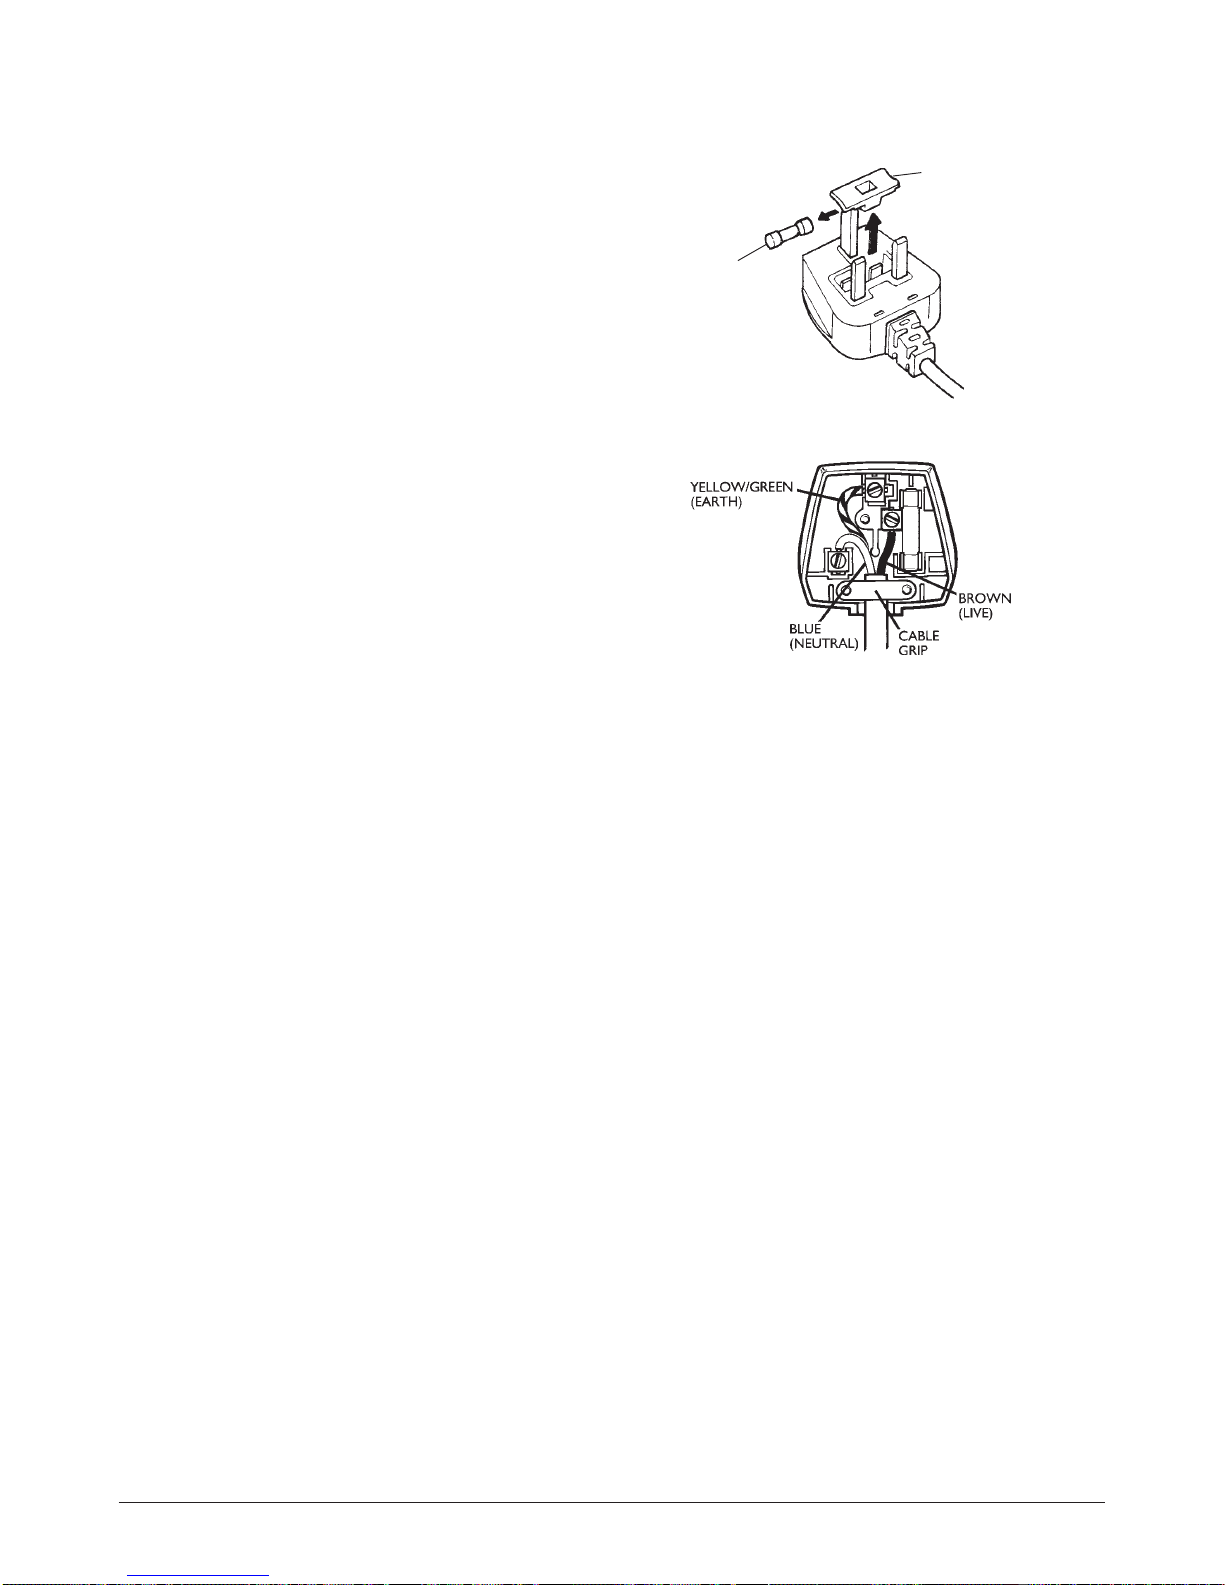
This product is supplied with a moulded plug
which contains a 13A fuse. If you are simply
replacing the fuse, you must use a 13A fuse which
has been approved by ASTA to BS1362
(Figure 23).
If the plug does not fit the socket or becomes
damaged, a new plug must be fitted. Replace the
original plug with the correct plug for your socket. If
this is a 3-pin (square pin) 13A (BS1363) plug, you
must make sure that it is fitted with an ASTA
approved 13A fuse.
Do not use with fuse cover not fitted.
If another type of plug is used, it must be protected
by a 15A fuse, either in the plug or at the
distribution board.
1. Cut off the existing fitted plug.
2. The wires in the mains lead supplied with this
appliance are coloured in accordance with the
following code (Figure 24):
GREEN/YELLOW = EARTH (E)
BLUE = NEUTRAL (N) BROWN = LIVE (L)
This product must be earthed
As the colours of the wires in the mains lead may
not correspond with the colour markings identifying
the terminals in your new plug, proceed as follows.
The wire which is coloured GREEN or
YELLOW/GREEN must be connected to the
terminal which is marked with the letter E or E
symbol or coloured GREEN or YELLOW/GREEN.
The wire which is coloured BLUE must be
connected to the terminal in the plug which is
marked with the letter N or coloured BLACK or
BLUE.
The wire which is coloured BROWN must be
connected to the terminal which is marked with the
letter L or coloured RED or BROWN.
3. Ensure that the connections are tight and that
no loose strands are left out of the terminals.
IF IN ANY DOUBT CONSULT A QUALIFIED
ELECTRICIAN.
If the mains lead becomes damaged consult a
qualified electrician.
FUSE
FUSE
COVER
FIGURE 23
FIGURE 24
Page 14
Page 15

Specification
Safety measures
After sales service
Never try to repair the appliance or the electrical
parts yourself. Any repair carried out by an
unskilled person is dangerous and may affect the
guarantee. Contact the Helpline below for
assistance and advice.
Disposal of old dishwasher
Disposal of the appliance must conform with EU
environmental regulations.
Make the appliance not usable by cutting off the
mains lead and removing any door locks.
The appliance must be delivered to an authorised
collection centre.
Dimensions: HxWxD cm: 82 x 60 x 55
Capacity: 12 standard place settings
Mains Water Pressure: 0.03-0.6MPa
Power supply 220/240V ~ 50Hz
Total Power 2100W
Energy efficiency B
Cleaning performance B
Drying performance B
Product specification may vary without prior notice.
This appliance is guaranteed for a period of 2 years
from the date of purchase. Keep your purchase
receipt with these instructions.
If the appliance fails to work properly during the
2 year period contact the:
Helpline on 0844 871 0011.
The appliance will be repaired (at the
manufacturer’s discretion) at no cost to you. If the
guarantee has elapsed, you will be given a
quotation for any repairs or parts required.
When not in use
If the appliance is to be turned off for a long period of time it is advisable to:
O Disconnect the unit from the mains supply.
O Empty the dishwasher.
O Clean and dr y the inter ior.
O Leave the door open.
Page 15
Page 16

CZ25740/210208
We continuously try to improve our products for the benefit of our customers.
For this reason we reserve the right to make changes to any product at any time, without notice.
 Loading...