

UUSSEERR IINNSSTTRRUUCCTTIIOONNSS
Please read these instructions carefully before using this product and keep them safe for
future reference.
CZ250
Freezer

Instruction booklet
2 x fast freeze compartments
4 x freezer drawers
Ice tray and ice bank
Page 2
Before Use
Page contents
After unpacking, wipe the casing with a dry cloth and clean the inside with a damp cloth ready for food
storage.
Packaging
The packaging is recyclable so dispose of it according to local regulations.Keep the packaging materials
out of reach of young children. Before installation, take care to remove all
cardboard or other packaging, including material from the condenser tubes and
any material surrounding the motor/compressor unit.
Warning
The freezer is heavy and care is needed when unpacking and moving it. Get
extra help and only hold it by the casing – not the door or trim.
Before use . . . . . . . . . . . . . . . . . . . . . . . . . . . . . . . . . . . . . . . . . . . . . . . . . . . . . . . . . . . . . . . . . . . . . . . . .2
Do and Don’t . . . . . . . . . . . . . . . . . . . . . . . . . . . . . . . . . . . . . . . . . . . . . . . . . . . . . . . . . . . . . . . . . . . . . . .2
Parts identification . . . . . . . . . . . . . . . . . . . . . . . . . . . . . . . . . . . . . . . . . . . . . . . . . . . . . . . . . . . . . . . . . . .3
Installation and controls . . . . . . . . . . . . . . . . . . . . . . . . . . . . . . . . . . . . . . . . . . . . . . . . . . . . . . . . . . . . .3, 4
Using the freezer . . . . . . . . . . . . . . . . . . . . . . . . . . . . . . . . . . . . . . . . . . . . . . . . . . . . . . . . . . . . . . . . . . . .5
Maintenance and cleaning . . . . . . . . . . . . . . . . . . . . . . . . . . . . . . . . . . . . . . . . . . . . . . . . . . . . . . . . . . . . .6
Troubleshooting . . . . . . . . . . . . . . . . . . . . . . . . . . . . . . . . . . . . . . . . . . . . . . . . . . . . . . . . . . . . . . . . . . . . .6
Fuse and mains plug replacement . . . . . . . . . . . . . . . . . . . . . . . . . . . . . . . . . . . . . . . . . . . . . . . . . . . . . . .7
Specification . . . . . . . . . . . . . . . . . . . . . . . . . . . . . . . . . . . . . . . . . . . . . . . . . . . . . . . . . . . . . . . .back cover
After sales service . . . . . . . . . . . . . . . . . . . . . . . . . . . . . . . . . . . . . . . . . . . . . . . . . . . . . . . . . . .back cover
Safety measures and disposal . . . . . . . . . . . . . . . . . . . . . . . . . . . . . . . . . . . . . . . . . . . . . . . . . .back cover
Do and Don’t
Check the contents
Check the following contents are included with the product and inspect the casing for any damage.If
necessary contact your retailer from whom you purchased the product.
O Do read these instructions thoroughly before
using this appliance.
O Do install the appliance only in a vertical
position.
O Do stand appliance for 12 hours to allow the
cooling gases to stabilise if transported in a
horizontal position.
O Do allow for adequate ventilation around the
appliance.
O Do unplug before cleaning and maintenance.
O Do defrost regularly for maximum efficiency.
O Don’t install the appliance in humid or extreme
conditions.
O Don’t attempt to repair the appliance yourself
(see After sales service information – back
cover).
O Don’t use any electrical devices such as fans or
heaters to defrost.
O Don’t install near heaters or other heat sources.
O Don’t store goods containing inflammable or
other explosive gases.
O Don’t leave door closed if appliance is left
switched off for long periods.
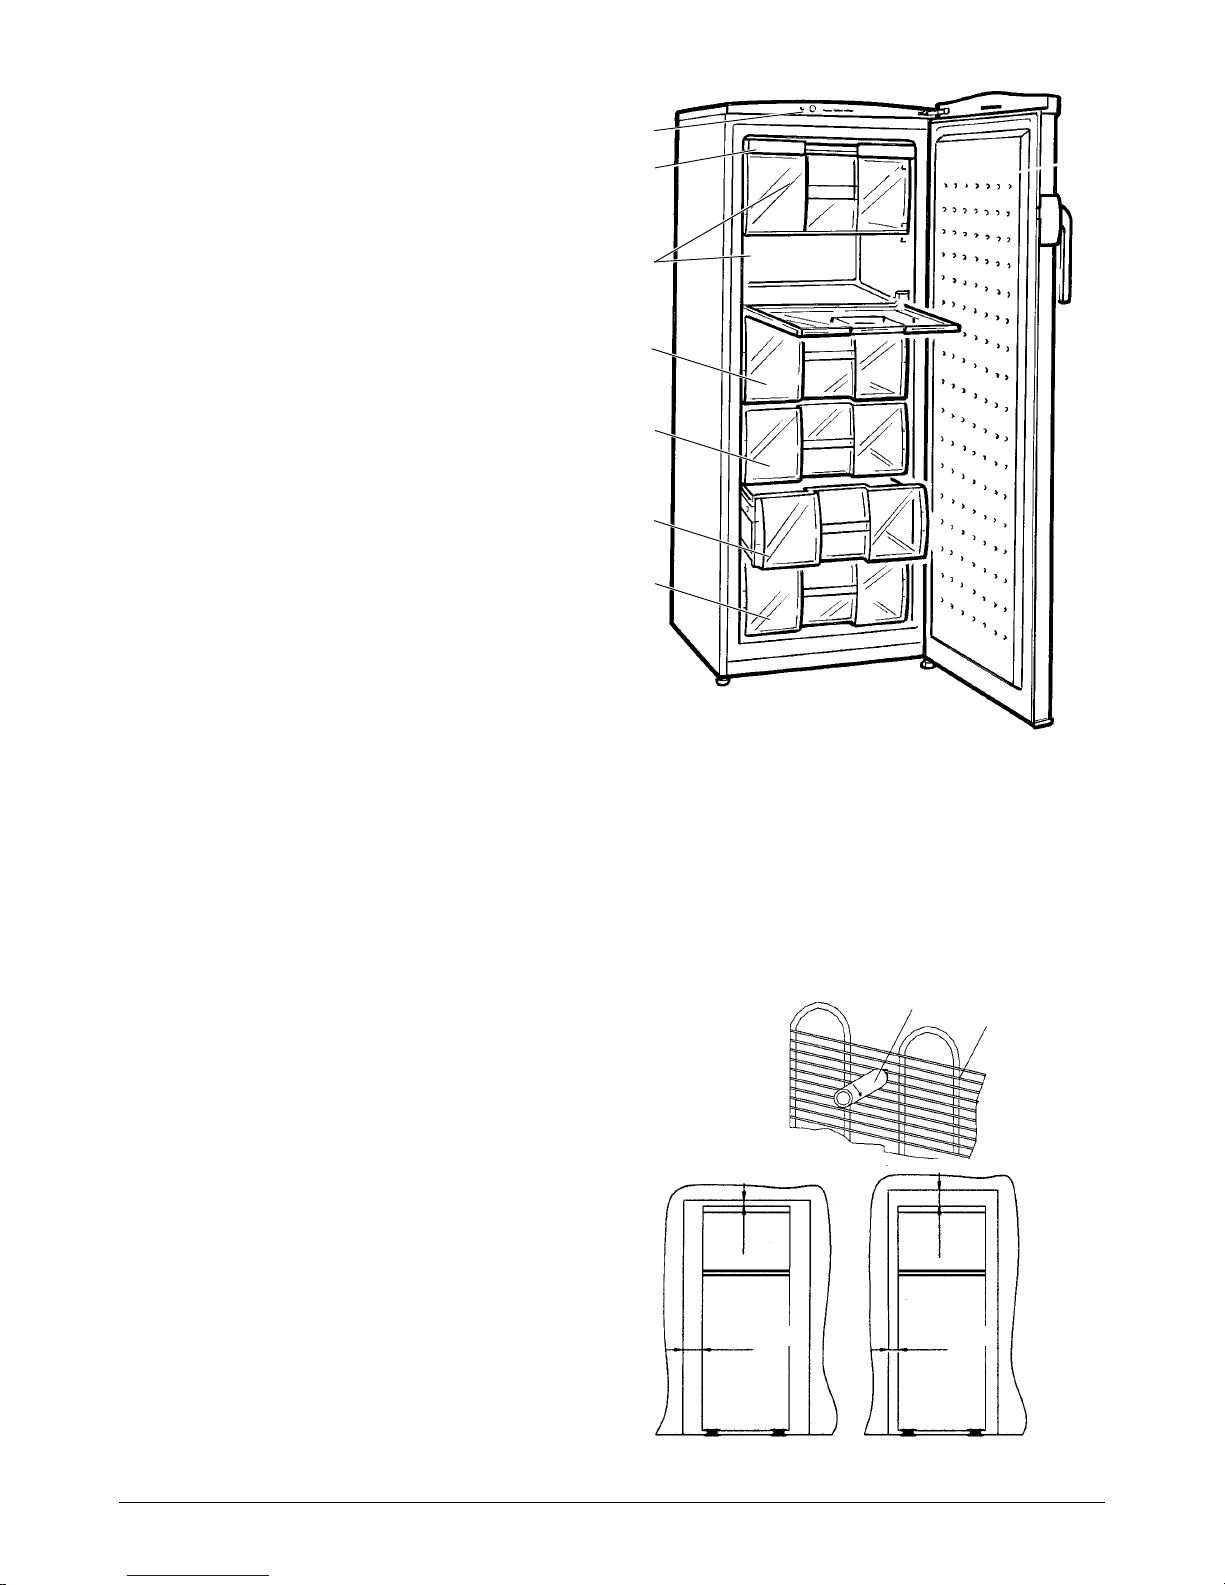
1. Thermostat and control panel
2. Ice cube tray and ice bank
3. Fast freeze compartments
4. Storage drawers
Page 3
Parts identification
The parts are listed and numbered below to help
identification.
FIGURE 1
1
3
4
2
4
4
4
Important
Make sure that the voltage marked on the rating label on the product corresponds with the voltage in your
home.
This quality product has been tested and certified to meet all applicable UK electrical and safety standards.
Installation and controls
FIGURE 2
SPACER
CONDENSER
The appliance is designed to work in room
temperatures between +16°C and +32°C.Do not
allow the room temperature to exceed +32°C
otherwise the temperature inside the freezer will
rise.
Fit the spacers onto the condenser tubes (Figure 2)
The freezer requires space around the casing for
efficient cooling and operation.The minimum
clearances are shown in Figure 3.
The freezer must be installed on a firm flat and
level surface for it to work quietly and efficiently.
Indicator lights
The indicator lights are on the front of the freezer
above the door. When they illuminate they indicate:
Yellow light Fast freeze on
Green light Power on
Red light Temperature warning light
FIGURE 3
Diagrams show alternative methods of providing correct air flow
around the appliance.
100 mm
25 mm
25 mm
100 mm

Page 4
Switching on
Plug the appliance into a nearby power socket and
switch on.The freezer control panel (Figure 4) is
positioned inside the door.It controls all the freezer
functions.
Use a coin to turn the temperature control to a halfway position on the dial and leave the appliance
running with the door closed for approximately two
hours.This will allow the inside temperature to
stabilise.The temperature warning light will stay
illuminated for some while after first switching on.
This is normal; the light will go out when the freezer
reaches its operating temperature.
Temperature control
The temperature scale runs from 1, the warmest
setting, to 5, the coldest. Use of a freezer
thermometer (not supplied) is recommended to
monitor conditions in the freezer.
Fast freeze function
Use the fast freeze function when freezing bulk
quantities of fresh food. Place the food in the upper
compartments marked
.
Switch on the fast
freeze function using the fast freeze button
(Figure 4).
When the button is pressed in (ON), the
temperature control is bypassed and the
compressor runs continuously which cools the
cabinet well below the level set on the temperature
control.There is therefore no need to adjust the
temperature setting when using fast freeze.
When you press the fast freeze button, there may
be a short delay before the compressor starts to
operate.This is normal and not a compressor fault.
When fast freeze is switched ON, the yellow light
will be illuminated.
FIGURE 4
Installation and controls (cont)
To cancel fast freeze, press the button and release
it.The yellow light will go out.
When fast freeze is no longer required switch it off
to minimise power consumption.The temperature
controller will then take over and regulate the
cabinet temperature as normal.
Temperature warning
If the temperature warning light comes on it
indicates that the temperature in the freezer cabinet
is warmer than the normal operating temperature. It
is usually a temporary condition; there could have
been a mains power failure for example. Do not
open the freezer door when the red light is on.
Depending on ambient conditions and time of year,
food will remain fully frozen for up to 20 hours in
this case. If the light remains on for longer than this
period contact the helpline number below.
Notes on operation
During normal operation the following noises may
be heard:
O Stifled murmur from compressor when it is
working.
O Soft gurgling from the refrigerant flowing
through the cooling system.
O Click from the thermostat switching on and off.
TEMPERATURE
CONTROL
FAST FREEZE
BUTTON
FAST FREEZE
INDICATOR
TEMPERATURE
WARNING LIGHT
POWER ON
INDICATOR

Using the freezer
Precautions
Frozen food storage
The freezer is capable of producing very cold temperatures which may cause injury if safety precautions
are not observed:
Caution: Do not touch ice with bare skin to avoid ‘ice burns’.
OO
Do not attempt to freeze carbonated drinks such as fizzy pop, mineral water, champagne, etc. as the
bottles may break when frozen.Drinks in PEP plastic bottles must not be frozen.
OO
The freezer must only be used for the storing of edible foodstuffs.
OO
Frozen food that has thawed should not be re-frozen.
Food which has been purchased frozen should be kept in its original packaging. Maximum storage times
and expiry dates are usually given on the food packaging.
IMPORTANT
Do not re-freeze food that has thawed or partially thawed.
When cooking food you must ensure it has thoroughly thawed, especially impor tant regarding poultry and
seafood.
Do not overload the food baskets and always allow space between the packages of food.This ensures that
cold air is free to circulate, preventing the food packages from sticking together.
When freezing fresh food do not freeze too much food at one time. Do not exceed 4kg in 24 hours.
When removing ice cubes from the tray, it may help to hold the tray under r unning water for a few seconds
in order to loosen the ice.
When freezing hot food allow it to cool before placing it in the freezer. Always store it away from food which
is already frozen.
If there is a power failure do not open the freezer door.Frozen food should not be affected if the failure
lasts less than 20 hours. If the failure continues for longer than 20 hours, check the contents of the freezer.
Do not re-freeze food that has thawed or partially thawed.
When not in use
If the appliance is to be emptied and turned off for a long period it is advisable to:
OO
Disconnect the unit from the mains supply.
OO
Empty the fridge or freezer of food and allow any ice that has for med to melt.
OO
Clean and dry the interior.
OO
Leave the door open.
In case of power failure
Page 5
Page 6
General cleaning
It is recommended to clean and wipe out the freezer regularly or after any spillage inside or outside the
appliance.
Use a teaspoonful of bicarbonate of soda diluted in a pint of warm water.Wipe the internal surfaces and
leave to dry before reloading food.
Wipe the outside casing from time to time in order to remove dirt and dust from ventilation vents etc.
Keep water away from the thermostat housing.
Clean the door seals.
Remove accumulated dirt from around the compressor motor taking care not to damage the pipes and the
wiring.
Maintenance and cleaning
Important
The freezer must be turned off at the mains before maintenance or cleaning.
Problem Possible cause Remedy
There is water at the bottom Drainage hole and/or pipe blocked Clean/unblock hole and
of the freezer pipe
The motor is on for long Door opened too often Do not open door
periods without switching off needlessly
The airflow around the unit Allow more free space
is inadequate around the unit
Fast freeze function left ON Switch fast freeze off
when not required
Motor not working No power to unit Check fuses, plug, and
power supply
Freezer is not cold enough Thermostat set too low Turn to higher setting
Temperature warning light is ON Appliance has just been switched on Wait for temperature to
stabilise (about two
hours)
Earlier mains power failure DO NOT OPEN
FREEZER DOOR
Wait two to three hours
while temperature
stabilises. If the fault
persists, contact the
helpline number below
Troubleshooting

Page 7
Fuse and mains plug replacement
This product is supplied with a moulded plug
which contains a 13A fuse. If you are simply
replacing the fuse, you must use a 13A fuse which
has been approved by ASTA to BS1362 (Figure 5).
If the plug does not fit the socket or becomes
damaged, a new plug must be fitted. Replace the
original plug with the correct plug for your socket. If
this is a 3-pin (square pin) 13A (BS1363) plug, you
must make sure that it is fitted with an ASTA
approved 13A fuse.
If another type of plug is used, it must be protected
by a 15A fuse, either in the plug or at the
distribution board.
1. Cut off the existing fitted plug.
2. The wires in the mains lead supplied with this
appliance are coloured in accordance with the
following code (Figure 6):
GREEN/YELLOW = EARTH (E)
BLUE = NEUTRAL (N) BROWN = LIVE (L)
This product must be earthed
As the colours of the wires in the mains lead may
not correspond with the colour markings identifying
the terminals in your new plug, proceed as follows.
The wire which is coloured GREEN or
YELLOW/GREEN must be connected to the
terminal which is marked with the letter E or E
symbol or coloured GREEN or YELLOW/GREEN.
The wire which is coloured BLUE must be
connected to the terminal in the plug which is
marked with the letter N or coloured BLACK.
The wire which is coloured BROWN must be
connected to the terminal which is marked with the
letter L or coloured RED.
3. Ensure that the connections are tight and that no
loose strands are left out of the terminals.
IF IN ANY DOUBT CONSULT A QUALIFIED
ELECTRICIAN.
If the mains lead becomes damaged consult a
qualified electrician.
FIGURE 5
FIGURE 6
FUSE
FUSE
COVER

CZ26109/050308
We continuously try to improve our products for the benefit of our customers.
For this reason we reserve the right to make changes to any product at any time, without notice.
Specification
Safety measures and disposal
After sales service
Never try to repair the appliance or the electrical
parts yourself. Any repair carried out by an
unskilled person is dangerous and may affect the
guarantee. Contact the Helpline for assistance and
advice.
Disposal of old fridge
Disposal of the appliance must conform with EU
environmental regulations.
Make the appliance not usable by cutting off the
mains lead and removing any door locks.
The appliance must be delivered to an authorised
collection centre.
Total gross volume (litres) 250
Dimensions: HxWxD mm 1510x595x600
Total net volume (litres) 190
Power supply 220/240V, 50Hz
Power consumption (Watts) 120
Nominal daily consumption (kWh) 0.98
Freezing capacity (kg/24h) 14
Energy efficiency class B
Refrigerant R600a
Product specification may vary without prior notice.
This appliance/fitting is marked according to the European directive 2002/96/EC on Waste
Electrical and Electronic Equipment (WEEE). By ensuring this product is disposed of
correctly, you will help prevent potential negative consequences for the environment and
human health, which could otherwise be caused by inappropriate waste handling of this
product.
The symbol on the product, or on the documents accompanying the product, the Crossed Out
Wheelie Bin symbol, indicates that this appliance/fitting may not be treated as household waste.
Instead it shall be handed over to the applicable collection point for the recycling of electrical and
electronic equipment. Disposal must be carried out in accordance with local environmental
regulations for waste disposal. For more detailed information about treatment, recovery and
recycling of this product, please contact your local authority, your household waste disposal
service or the retailer where you purchased the product.
This appliance is guaranteed for a period of two
years from date of purchase against defects in
materials and workmanship only, and provided that
all these user instructions have been strictly
complied with.The guarantee does not cover
incidental or consequential loss, such as loss of
consumables.
Where this guarantee applies, the appliance will be
repaired or replaced at the manufacturer's option
without charge. If the guarantee does not apply or
has expired, you will be given a quotation for cost
of repairs and any parts required.
Keep your purchase receipt with these instructions,
and in the event of breakdown contact the
HELPLINE on 0844 871 0011.
 Loading...