

Page 1
UUSSEERR IINNSSTTRRUUCCTTIIOONNSS
Please read these instructions carefully before using this product and keep them safe for
future reference.
CZ240T
Fridge freezer
Page 2
Instruction booklet
2 x wire shelves
1 x glass shelf over salad crisper with white plastic
edging
2 x door mounted balcony shelves
1 x door mounted bottle rack
2 x plastic salad crispers
3 x freezer compartments
Ice cube tray and ice bank
Egg tray
Condenser spacers
Door reversal kit
Drain channel cleaning tip
Page 2
Before Use
Page contents
After unpacking, wipe the casing with a dry cloth and clean the inside with a damp cloth ready for food
storage.
Packaging
The packaging is recyclable so dispose of it according to local regulations.Keep the packaging materials
out of reach of young children. Before installation, take care to remove all
cardboard, expanded polystyrene or other packaging, including material from the
condenser tubes and any material surrounding the motor/compressor unit.
Warning
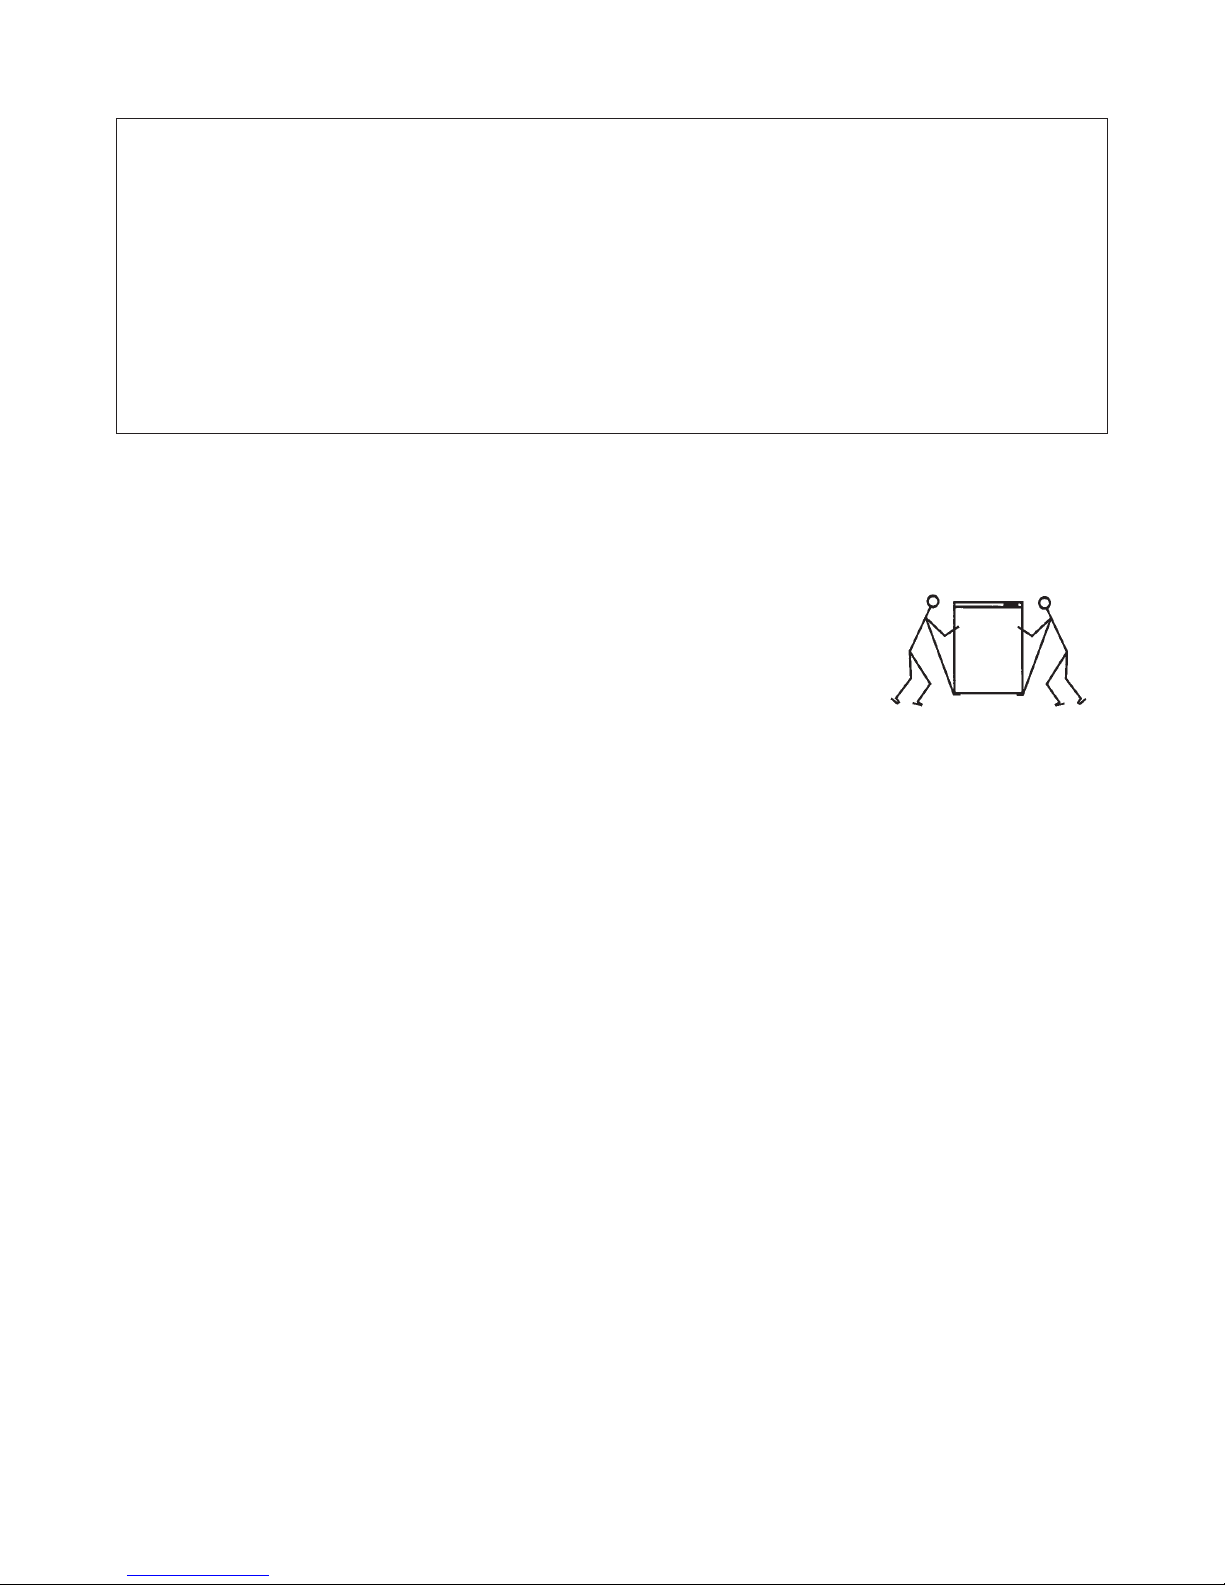
The fridge/freezer is heavy and care is needed when unpacking and moving it.
Get extra help and only hold it by the casing – not the door or trim.
Before use . . . . . . . . . . . . . . . . . . . . . . . . . . . . . . . . . . . . . . . . . . . . . . . . . . . . . . . . . . . . . . . . . . . . . . . . .2
Do and Don’t . . . . . . . . . . . . . . . . . . . . . . . . . . . . . . . . . . . . . . . . . . . . . . . . . . . . . . . . . . . . . . . . . . . . . . .2
Parts identification . . . . . . . . . . . . . . . . . . . . . . . . . . . . . . . . . . . . . . . . . . . . . . . . . . . . . . . . . . . . . . . . . . .3
Door reversal . . . . . . . . . . . . . . . . . . . . . . . . . . . . . . . . . . . . . . . . . . . . . . . . . . . . . . . . . . . . . . . . . . . . .3, 4
Installation and controls . . . . . . . . . . . . . . . . . . . . . . . . . . . . . . . . . . . . . . . . . . . . . . . . . . . . . . . . . . . . .4, 5
Using the freezer . . . . . . . . . . . . . . . . . . . . . . . . . . . . . . . . . . . . . . . . . . . . . . . . . . . . . . . . . . . . . . . . . . . .6
Maintenance and cleaning . . . . . . . . . . . . . . . . . . . . . . . . . . . . . . . . . . . . . . . . . . . . . . . . . . . . . . . . . . .6, 7
Troubleshooting . . . . . . . . . . . . . . . . . . . . . . . . . . . . . . . . . . . . . . . . . . . . . . . . . . . . . . . . . . . . . . . . . . . . .8
Fuse and mains plug replacement . . . . . . . . . . . . . . . . . . . . . . . . . . . . . . . . . . . . . . . . . . . . . . . . . . . . . . .8
Specification . . . . . . . . . . . . . . . . . . . . . . . . . . . . . . . . . . . . . . . . . . . . . . . . . . . . . . . . . . . . . . . . . . . . . . . .9
Safety measures and disposal . . . . . . . . . . . . . . . . . . . . . . . . . . . . . . . . . . . . . . . . . . . . . . . . . . . . . . . . . .9
After sales service . . . . . . . . . . . . . . . . . . . . . . . . . . . . . . . . . . . . . . . . . . . . . . . . . . . . . . . . . . . . . . . . . . .9
OO
Do read these instructions thoroughly before
using this appliance.
OO
Do install the appliance only in the vertical
position.
OO
Do let your refrigerator stand for 12 hours prior
to connection, to allow the cooling gases to
stabilise, if transported in a horizontal position.
OO
Do install to allow for adequate ventilation
around the appliance.
OO
Do not install near heaters or other heat
sources.
OO
Do unplug before cleaning and maintenance.
OO
Do defrost freezer for maximum efficiency.
OO
Don’t install the appliance in humid or extreme
conditions.
OO
Don’t attempt to repair the appliance yourself
(see Helpline information – page 9).
OO
This appliance is intended for domestic use only.
Only use it in accordance with the
manufacturer’s instructions.
OO
Don’t use any other electrical device inside the
appliance to defrost.
OO
Don’t store goods containing inflammable or
other explosive gases.
OO
Don’t leave door closed if appliance is left
switched off for long periods.
Do and Don’t
Check the contents
Check the following contents are included with the product and inspect the casing for any damage. If
necessary contact your retailer from whom you purchased the product.
Page 3
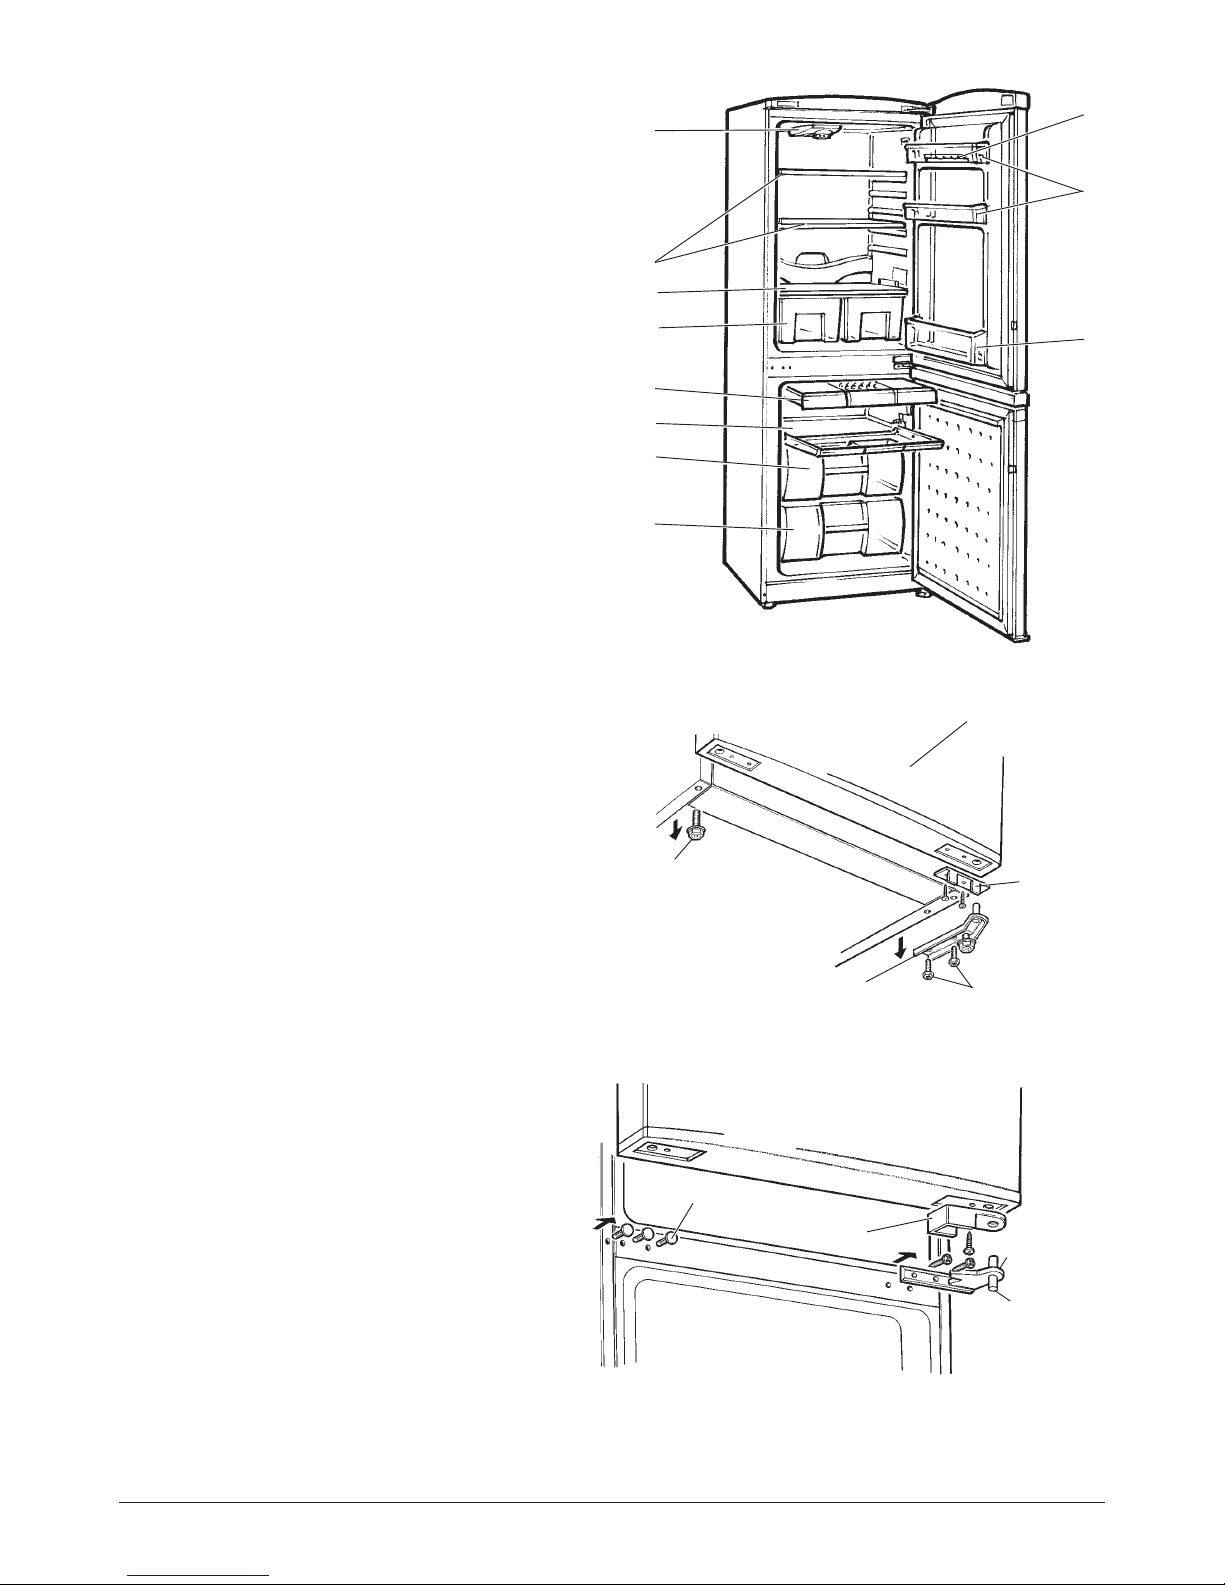
1. Thermostat and lamp housing
2. 2 x wire shelves
3. Glass shelf
4. Salad/vegetable crispers
5. Ice cube tray and ice bank
6. Top freezer compartment
7. Large capacity drawer
8. Freezer drawer
9. Bottle rack
10.Balcony shelves
11.Egg rack
Page 3
Parts identification
The parts are listed below to help identification.
Door reversal
FIGURE 1
1
2
3
4
5
7
8
9
10
11
6
Reversing the door may make installation
more convenient.The appliance must be
tilted and supported in order to carry this
out; it is therefore advisable to get an
assistant to help during this procedure.
Take care when fitting and tightening
screws.
Tilt and support the appliance, then unscrew
the hinge plate from the base of the
appliance housing (Figure 2). Also remove
the adjustable foot from the opposite corner
of the housing. Lift away the freezer
compartment door. Undo two screws and
remove the stop plate from the corner of the
door.
Turn the stop plate around and screw it to the
opposite corner of the door.
Support the fridge compartment door and
unscrew the centre hinge plate (Figure 3). Lift
away the door.Remove three blanking plugs
from the opposite side of the housing and fit
them to the holes that were uncovered when
the hinge was removed.Unscrew the stop
plate from the corner of the door, turn it
around and screw it to the opposite corner of
the door.
FIGURE 2
FIGURE 3
ADJUSTABLE
FOOT
FREEZER DOOR
STOP
PLATE
STOP
PLATE
HINGE PLATE
SCREWS
HINGE PLATE
PIVOT
PLUGS
Page 4
Page 4
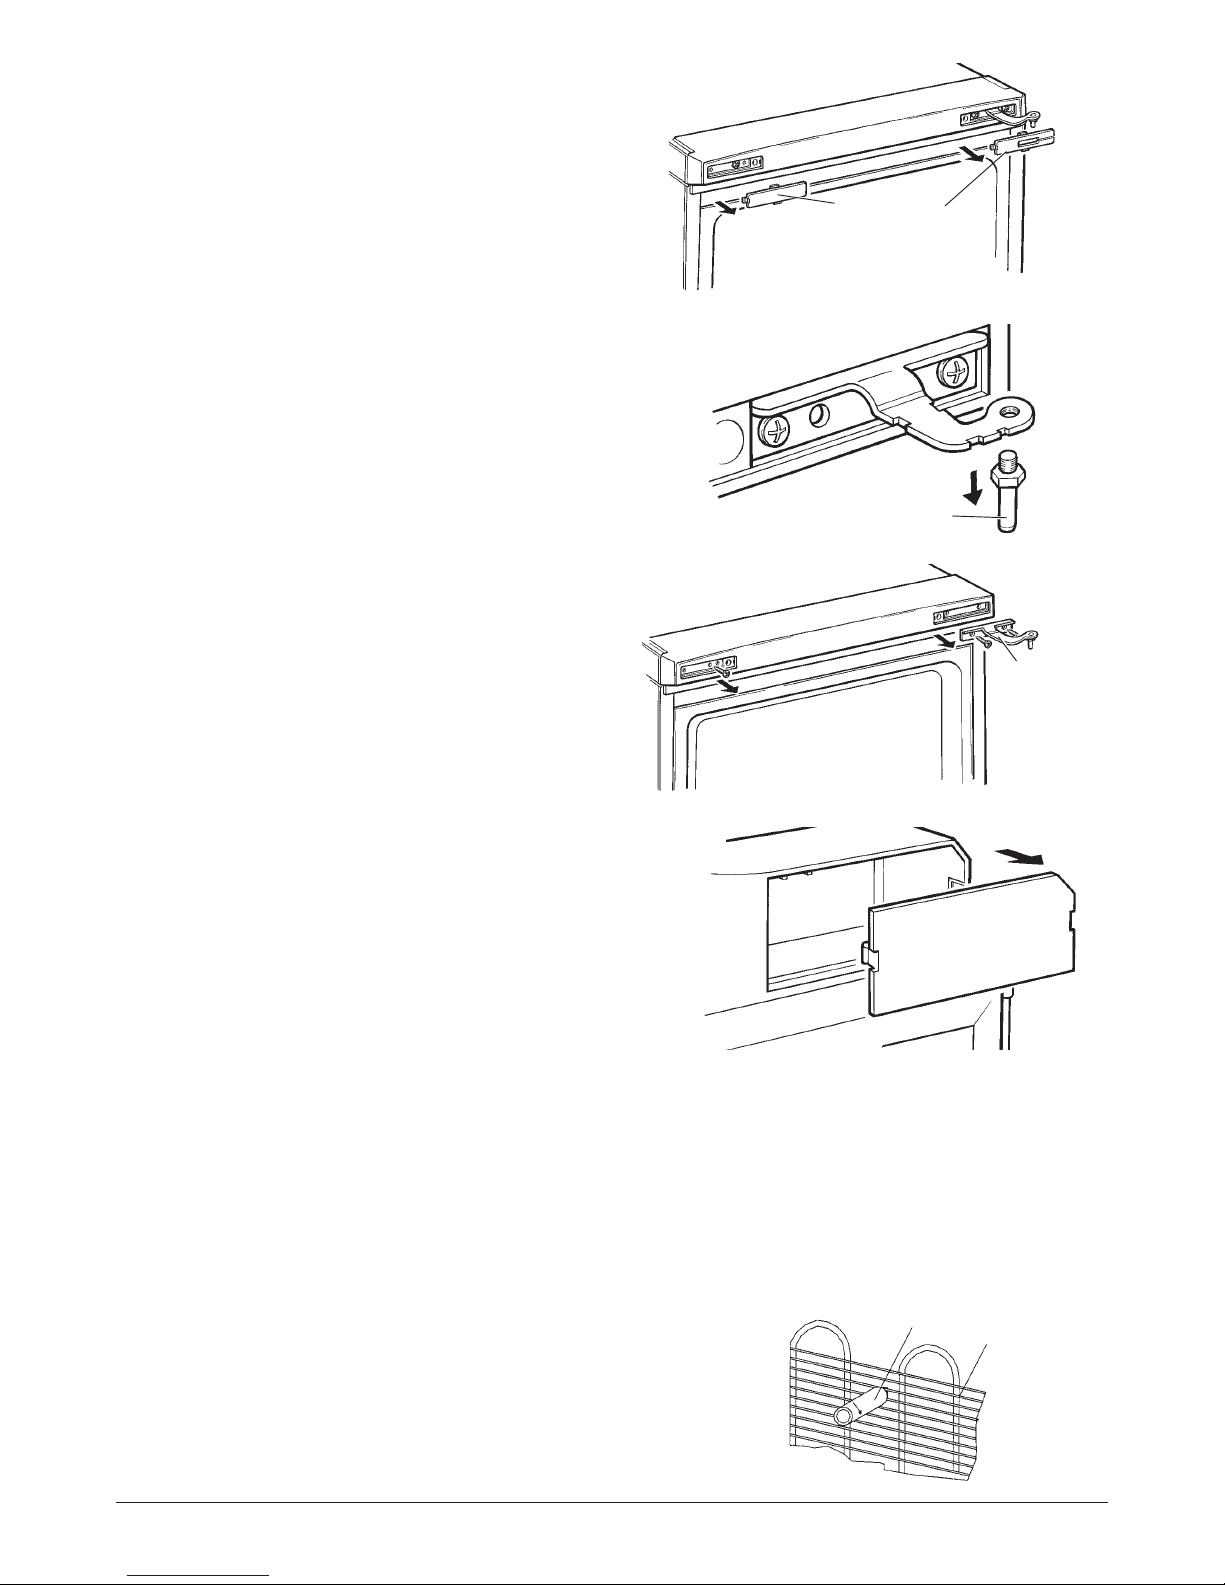
Gently lever the trim plates out of their
recesses in the appliance housing (Figure 4).
Unscrew the hinge pivot pin (Figure 5).
Unscrew the hinge from the housing (Figure
6), turn it round and using the same two
screws, refix it to the opposite corner of the
appliance. Screw the hinge pivot pin into the
hinge so that it points downwards, ready to
take the door. Refit the tr im plates to their
recesses.
Gently lever the trim plate out of the hinge
housing in the corner of the door.Take the
corresponding opposite trim plate from the
accessory bag and snap it into place in the
hinge housing (Figure 7).
Locate the door on the upper hinge pivot and
support the door. Screw the centre hinge
plate into position using screws removed
earlier.The door should swing freely on its
hinges.
Fit the freezer compartment door to its pivot
on the centre hinge plate. Suppor t the door
and take the hinge plate removed earlier from
the base of the appliance. Fasten this plate to
the opposite corner of the base using the two
screws.
Screw the adjustable foot into the threaded
hole in the opposite corner of the appliance
housing.
Return the appliance to the vertical position
and check that doors open and shut freely. If
necessary, level the unit using the adjustable
feet.
Important
Make sure that the voltage marked on the rating label on the product corresponds with the voltage in your
home.
This quality product has been tested and certified to meet all applicable UK electrical and safety standards.
Installation and controls
FIGURE 8
SPACER
CONDENSER
Door reversal (cont)
The appliance is designed to work in room
temperatures between +16°C and +32°C.Do not
allow the room temperature to exceed +32°C
otherwise the temperature inside the fridge/freezer
will rise.
Fit the spacers onto the condenser tubes (Figure
8) and put the cleaning tip in the drainage hole at
the back of the fridge compartment.
FIGURE 4
FIGURE 5
FIGURE 6
FIGURE 7
TRIM PLATES
PIVOT PIN
HINGE
TRIM PLATE
Page 5
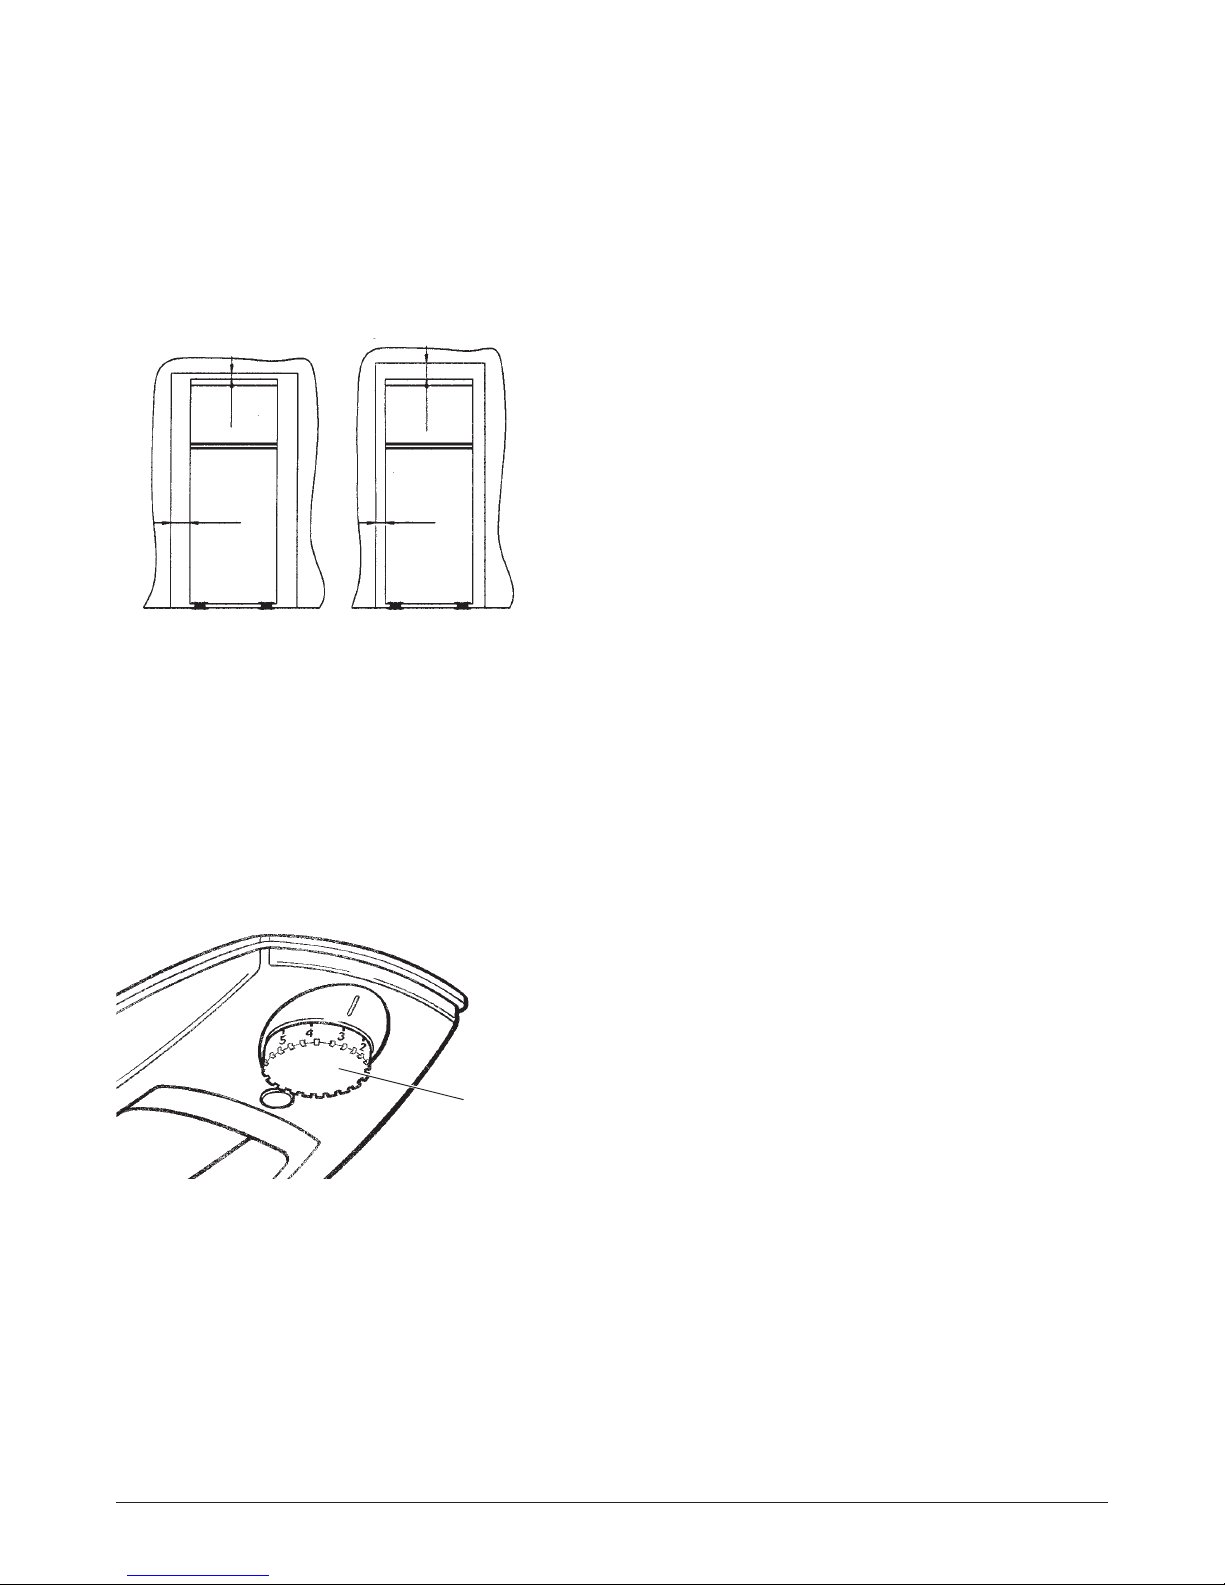
The freezer requires space around the casing for
efficient cooling and operation.The minimum
clearances are shown in Figure 9.
The freezer must be installed on a firm flat and
level surface for it to work quietly and efficiently.
If you wish to reverse the door refer to the section
above (pages 3 & 4).
Switching on
Plug the fridge/freezer into a nearby power socket
and switch on.The thermostat control (Figure 10) is
positioned inside the fridge by the light.Turn the
control to a half-way position on the dial and leave
the fridge/freezer running with the door closed for
approximately 2 hours.This will allow the inside
temperature to stabilise.
Temperature control – fridge
The temperature of the fridge is best maintained
around 0°C to + 5°C. Avoid setting the thermostat
too high otherwise this may reduce the temperature
to a point at which certain fresh foods may begin to
freeze.The temperature scale runs from 1, the
Page 5
FIGURE 9
FIGURE 10
Diagrams show alternative methods of providing correct air
flow around the appliance.
100 mm
25 mm
25 mm
100 mm
Installation and controls (cont)
warmest setting, to 5, the coldest.The 0 position is
an OFF setting which can be used when defrosting
the freezer.The fridge has an automatic defrost
cycle. Droplets of condensation or ice par ticles on
the back wall of the fridge are normal.
When storing food in the fridge keep food away
from the rear wall.To allow free circulation of cold
air don’t pack food too tightly on the shelves and
never put hot food in the fridge.
Temperature control – freezer
The thermostat position setting in the fridge
regulates the freezer temperature.The freezer
should be between –18°C and –28°C.
Leave the fridge/freezer to run for 12 hours before
freezing fresh food.
Notes on operation
During normal operation the following noises may
be heard:
OO
Stifled murmur from compressor when it is
working.
OO
Soft gurgling from the refrigerant flowing through
the cooling system.
OO
Click from the thermostat switching on and off.
TEMPERATURE
CONTROL
Page 6
Page 6
Using the freezer
Precautions
Frozen food storage
The freezer is capable of producing very cold
temperatures which may cause injury if safety
precautions are not observed:
Caution: Do not touch ice with bare skin to
avoid ‘ice burns’.
OO
Do not attempt to freeze carbonated drinks such
as ‘fizzy pop’, mineral water, champagne etc.as
Food which has been purchased frozen should be
kept in its original packaging. Maximum storage
times and expiry dates are usually given on the
food packaging.
IMPORTANT
Do not re-freeze food that has thawed or partially
thawed.
When cooking food you must ensure it has
thoroughly thawed, especially important regarding
poultry and seafood.
Do not overload the food baskets and always allow
space between the packages of food.This ensures
the bottles may break when frozen.Drinks in
PEP plastic bottles must not be frozen.
OO
The freezer must only be used for the storing of
edible foodstuffs.
OO
Frozen food that has thawed should not be refrozen.
that cold air is free to circulate preventing the food
packages from sticking together.
When freezing fresh food do not freeze too much
food at one time.Do not exceed 4kg in 24 hours.
When removing ice cubes from the tray, it may help
to hold the tray under running water for a few
seconds in order to loosen the ice.
When freezing hot food allow it to cool before
placing it in the freezer. Always store it away from
food which is already frozen.
When not in use
If the appliance is to be emptied and turned off for a long period it is advisable to:
OO
Disconnect the unit from the mains supply.
OO
Empty the fridge or freezer of food and allow any ice that has formed to melt.
OO
Clean and dry the interior.
OO
Leave the door open.
Maintenance and cleaning
Important
The fridge/freezer must be turned off at the mains before maintenance or cleaning.
General cleaning
It is recommended to clean and wipe out the fridge and freezer regularly or after any spillage inside or
outside the appliance.
Use a teaspoonful of bicarbonate of soda diluted in a pint of warm water.Wipe the internal surfaces and
shelving to remove food residues. Leave to dry before reloading food.
The fridge automatically defrosts by freezing and defrosting. Beware of the back wall as this may be cold to
the touch. Avoid wiping this until it has thoroughly defrosted.
Wipe the outside casing from time to time in order to remove dirt and dust from ventilation vents etc.
Keep water away from the thermostat housing.
Clean the door seals.
Remove accumulated dirt from around the compressor motor taking care not to damage the pipes and the
wiring.
Page 7
Drainage channel and drip tray
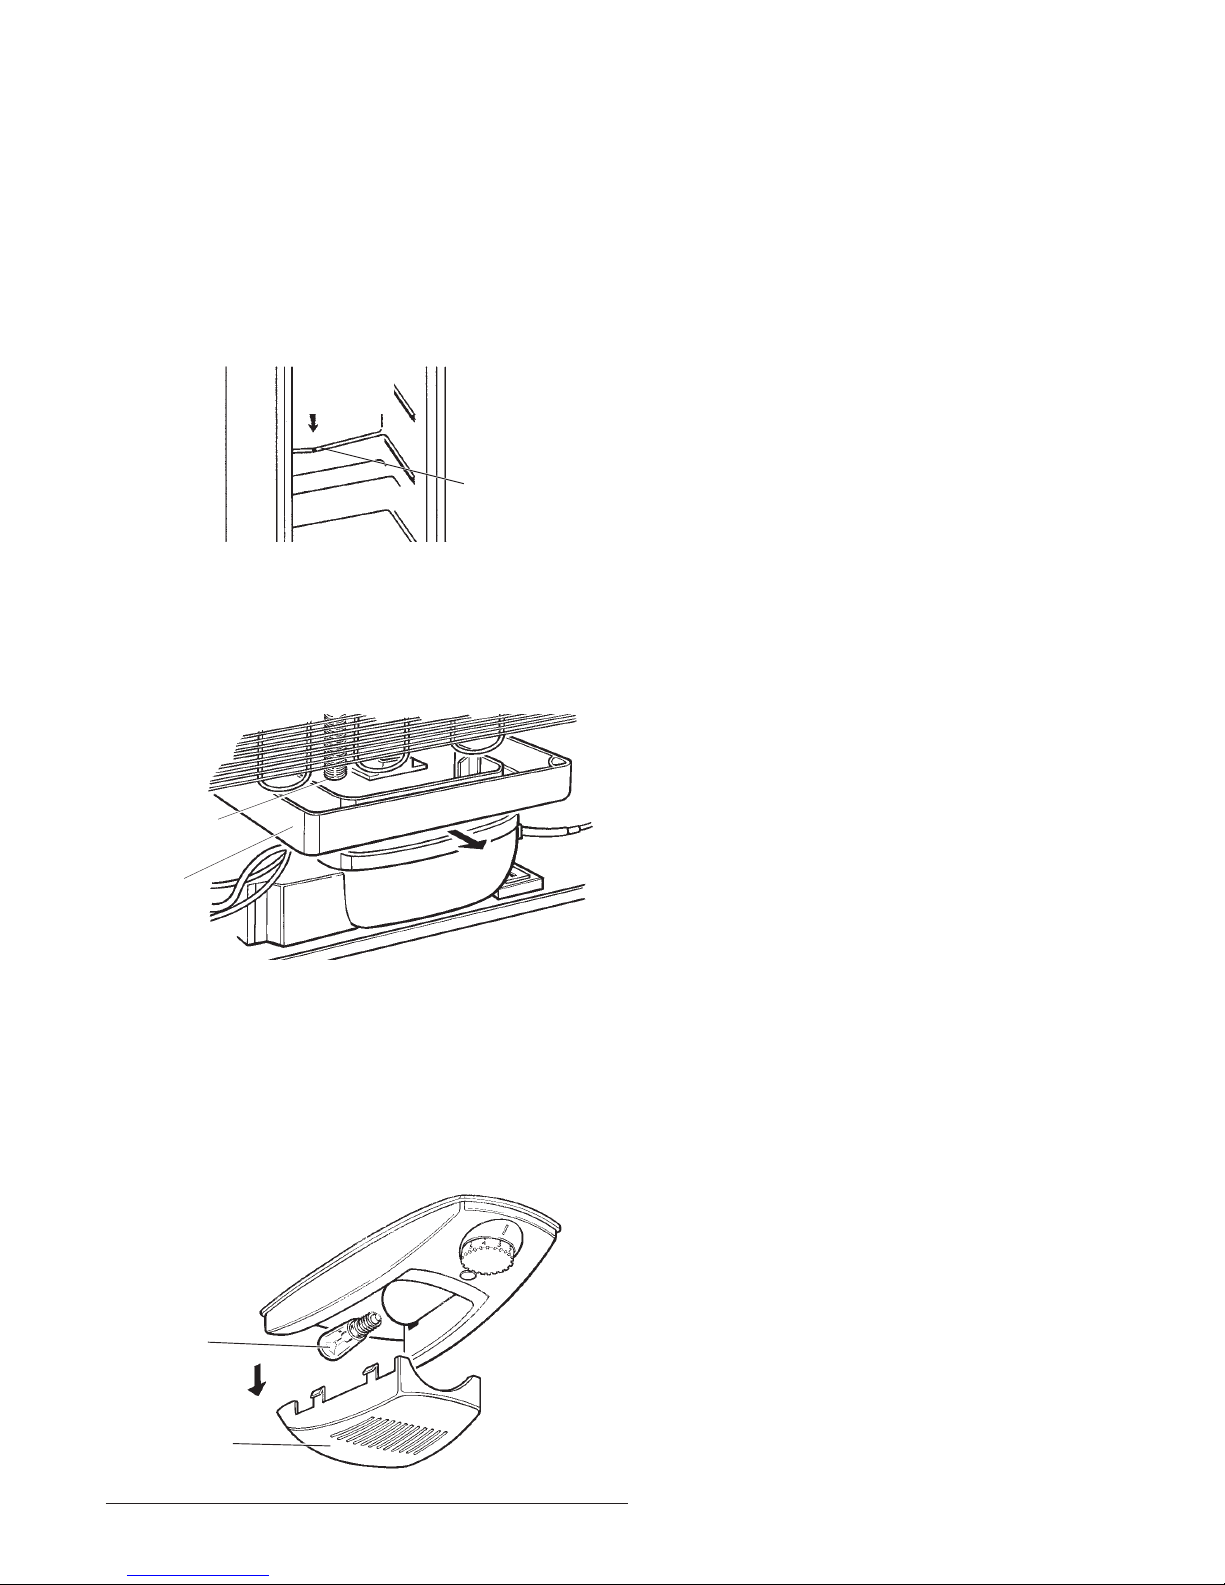
Condensation which forms on the back wall of the
fridge passes from the drainage channel to a drip
tray from which it evaporates (see Figure 11).The
drain and drip tray should be cleaned regularly to
avoid the build up of impurities.Wipe the channel
with a damp cloth and use the cleaning tip to clean
out any residue from the drainage hole.
Finally, unclip the dr ip tray from above the
compressor motor by pulling it firmly in the
direction of the arrow (see Figure 12).Wash it out
and clip it back into position. Place the end of the
drain hose back in the tray to catch drips.
Lamp replacement
To remove the lamp cover, squeeze the sides of
the light diffuser (Figure 13) and pull the diffuser
downwards.Unscrew the lamp and replace it with
one of the same type, (15 Watts SES E14).
Replace the cover by snapping it back into its
housing.
Page 7
FIGURE 11
DRAINAGE
HOLE
DRAINAGE
CHANNEL
Freezer - defrosting
Caution: Do not touch ice with bare skin to
avoid ‘ice burns’.
It is wise to defrost the freezer if the ice build up
exceeds 6mm, otherwise the efficiency of the
freezer will reduce and the electricity consumption
will increase.
Defrost the freezer when the stock of frozen
contents is low.
Unplug the freezer and empty the frozen food into
insulated bags or boxes.
Leave the door open and place bowls or any other
suitable container under each shelf to catch the
water from the melting ice.
Bowls of hot water may be placed in the freezer to
speed up defrosting.
Plastic scrapers can be used as an aid to
defrosting.
Important
OO
Do not use electrical appliances such as heaters
or hair dryers to melt the ice.
OO
Do not use metal objects such as knives or
skewers to chip away the ice as these can
damage the freezer walls and cooling pipes.
When all traces of ice have been removed from the
interior of the freezer, use a teaspoonful of
bicarbonate of soda diluted in a pint of warm water
to wipe the internal surfaces and shelving to
remove food residues and odours.
Clean the door seals.
Leave to dry before reloading food.
Replace the plug in the mains socket and switch
on.
Only replace food which is still fully frozen.If any of
the food has started to thaw throw it away.
FIGURE 12
Maintenance and cleaning (cont)
DRIP
TRAY
DRAIN
HOSE
FIGURE 13
LAMP
LIGHT
DIFFUSER
Page 8
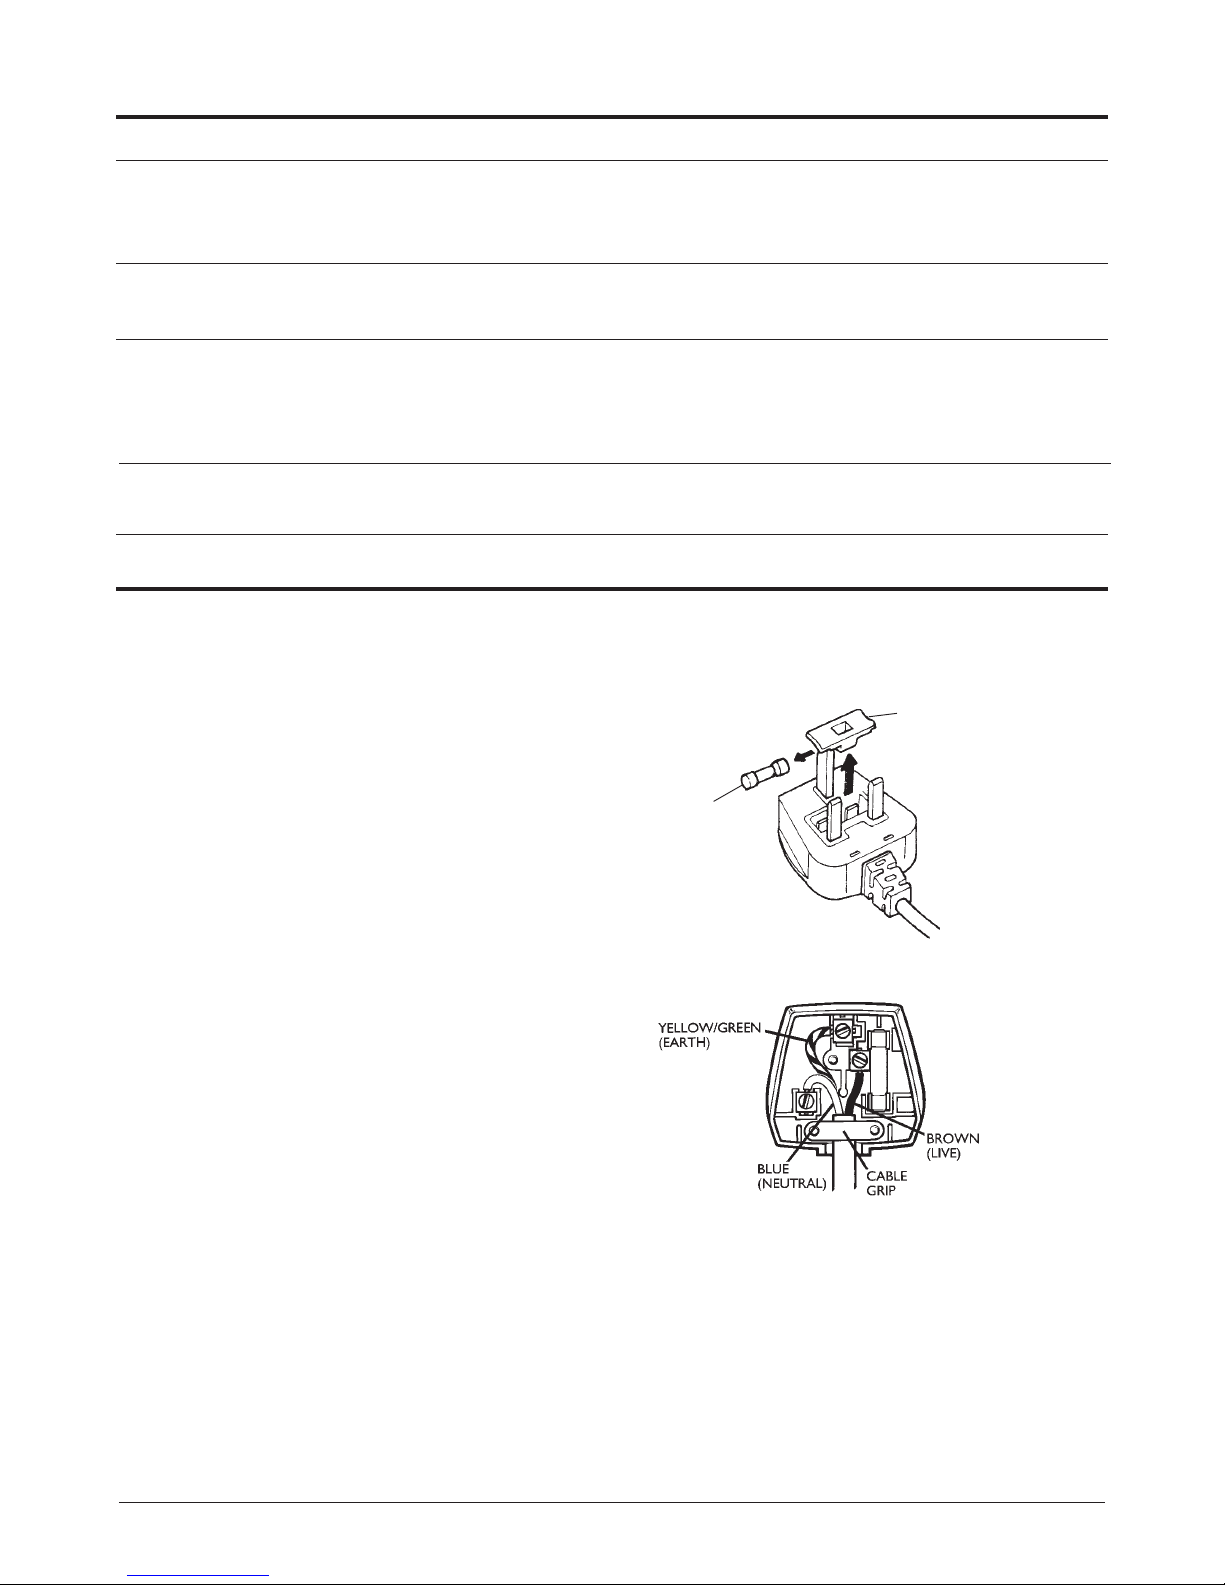
Problem Possible cause Remedy
The lamp does not light The lamp has blown Replace the lamp
with same type: 15W,
SES, E14
There is water at the bottom Drainage hole and/or pipe blocked Clean/unblock hole and
of the fridge pipe; empty drip tray.
The motor is on for long Door opened too often Do not open door
periods without switching off needlessly
The airflow around the unit Allow more free space
is inadequate around the unit
Motor not working No power to unit Check fuses, plug, and
power supply
Fridge/freezer is not cold enough Thermostat set too low Turn to higher setting
Page 8
Troubleshooting
Fuse and mains plug replacement
This product is supplied with a moulded plug
which contains a 13A fuse. If you are simply
replacing the fuse, you must use a 13A fuse which
has been approved by ASTA to BS1362
(Figure 14).
If the plug does not fit the socket or becomes
damaged, a new plug must be fitted. Replace the
original plug with the correct plug for your socket. If
this is a 3-pin (square pin) 13A (BS1363) plug, you
must make sure that it is fitted with an ASTA
approved 13A fuse.
If another type of plug is used, it must be protected
by a 15A fuse, either in the plug or at the
distribution board.
1. Cut off the existing fitted plug.
2. The wires in the mains lead supplied with this
appliance are coloured in accordance with the
following code (Figure 15):
GREEN/YELLOW = EARTH (E)
BLUE = NEUTRAL (N) BROWN = LIVE (L)
This product must be earthed
As the colours of the wires in the mains lead may
not correspond with the colour markings identifying
the terminals in your new plug, proceed as follows.
The wire which is coloured GREEN or
YELLOW/GREEN must be connected to the
terminal which is marked with the letter E or E
symbol or coloured GREEN or YELLOW/GREEN.
The wire which is coloured BLUE must be
connected to the terminal in the plug which is
marked with the letter N or coloured BLACK.
The wire which is coloured BROWN must be
connected to the terminal which is marked with the
letter L or coloured RED.
3. Ensure that the connections are tight and that no
loose strands are left out of the terminals.
IF IN ANY DOUBT CONSULT A QUALIFIED
ELECTRICIAN.
If the mains lead becomes damaged consult a
qualified electrician.
FIGURE 14
FIGURE 15
FUSE
FUSE
COVER
Page 9
Specification
Safety measures and disposal
After sales service
Never try to repair the appliance or the electrical
parts yourself. Any repair carried out by an
unskilled person is dangerous and may affect the
guarantee. Contact the Helpline below for
assistance and advice.
The appliance is guaranteed for a period of 2 years
from the date of purchase. Keep your purchase
receipt with these instructions.
If the appliance fails to work properly during the
2 year period contact the:
Helpline on 0870 241 3029
Disposal of old fridge or freezer
Disposal of the appliance must conform with EU
environmental regulations.
Make the appliance not usable by cutting off the
mains lead and removing any door locks.
The appliance must be delivered to an authorised
collection centre.
The appliance will be repaired (at the
manufacturer’s discretion) at no cost to you.If the
guarantee has elapsed, you will be given a
quotation for any repairs or parts required.
Total gross volume (litres) 240
Dimensions: HxWxD mm 1525x540x600
Freezer net volume (litres) 62
Refrigerator net volume (litres) 145
Power consumption (Watts) 85
Power supply 220/240V, 50Hz
Nominal daily consumption (k Wh) 0.78
Energy efficiency class A
Refrigerant R600a
This apparatus complies with EC directives for radio interference.It also meets the essential requirements
of European Council directives: 73/23/EEC for low voltage and 89/336/EEC for electromagnetic
compliance.
Product specification may vary without prior notice.
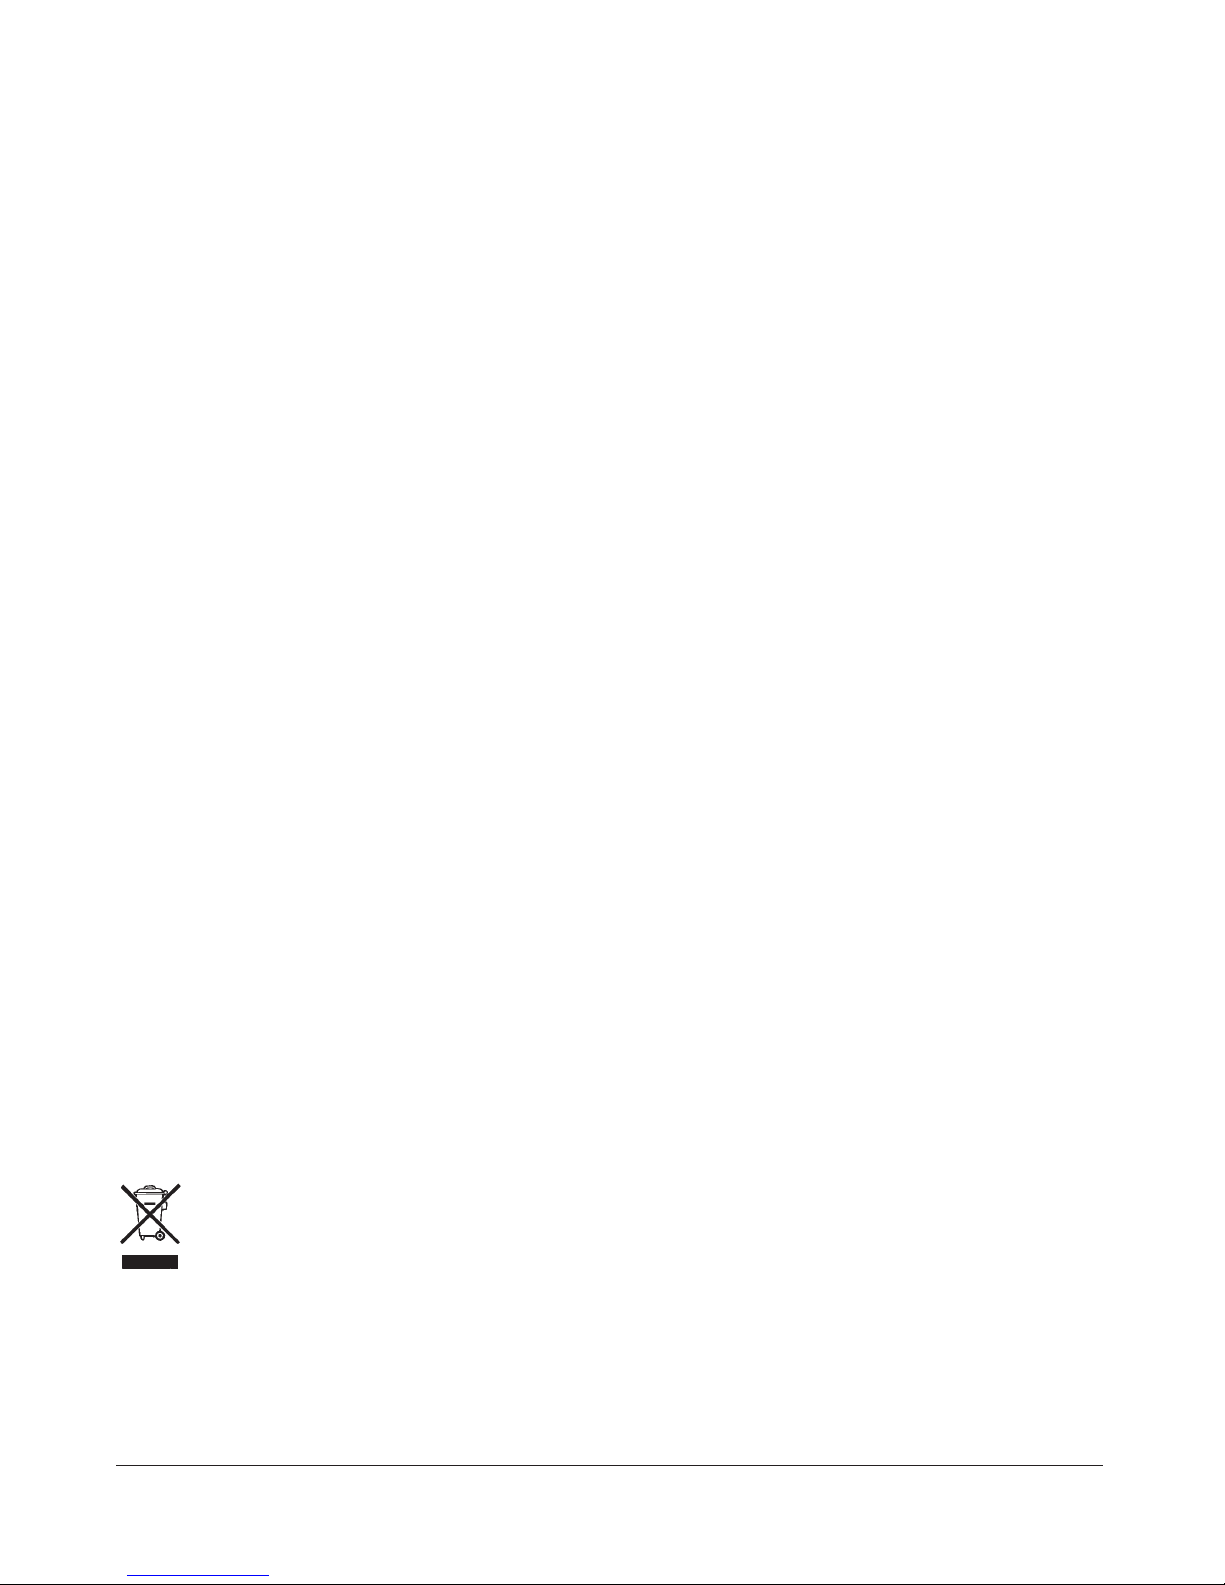
This appliance/fitting is marked according to the European directive 2002/96/EC on Waste
Electrical and Electronic Equipment (WEEE). By ensuring this product is disposed of
correctly, you will help prevent potential negative consequences for the environment and
human health, which could otherwise be caused by inappropriate waste handling of this
product.
The symbol on the product, or on the documents accompanying the product, the Crossed Out
Wheelie Bin symbol, indicates that this appliance/fitting may not be treated as household waste.
Instead it shall be handed over to the applicable collection point for the recycling of electrical and
electronic equipment. Disposal must be carried out in accordance with local environmental
regulations for waste disposal. For more detailed information about treatment, recovery and
recycling of this product, please contact your local authority, your household waste disposal
service or the retailer where you purchased the product.
Page 9
Page 10

MM26112/170506
We continuously try to improve our products for the benefit of our customers.
For this reason we reserve the right to make changes to any product at any time, without notice.
 Loading...