

Page 1
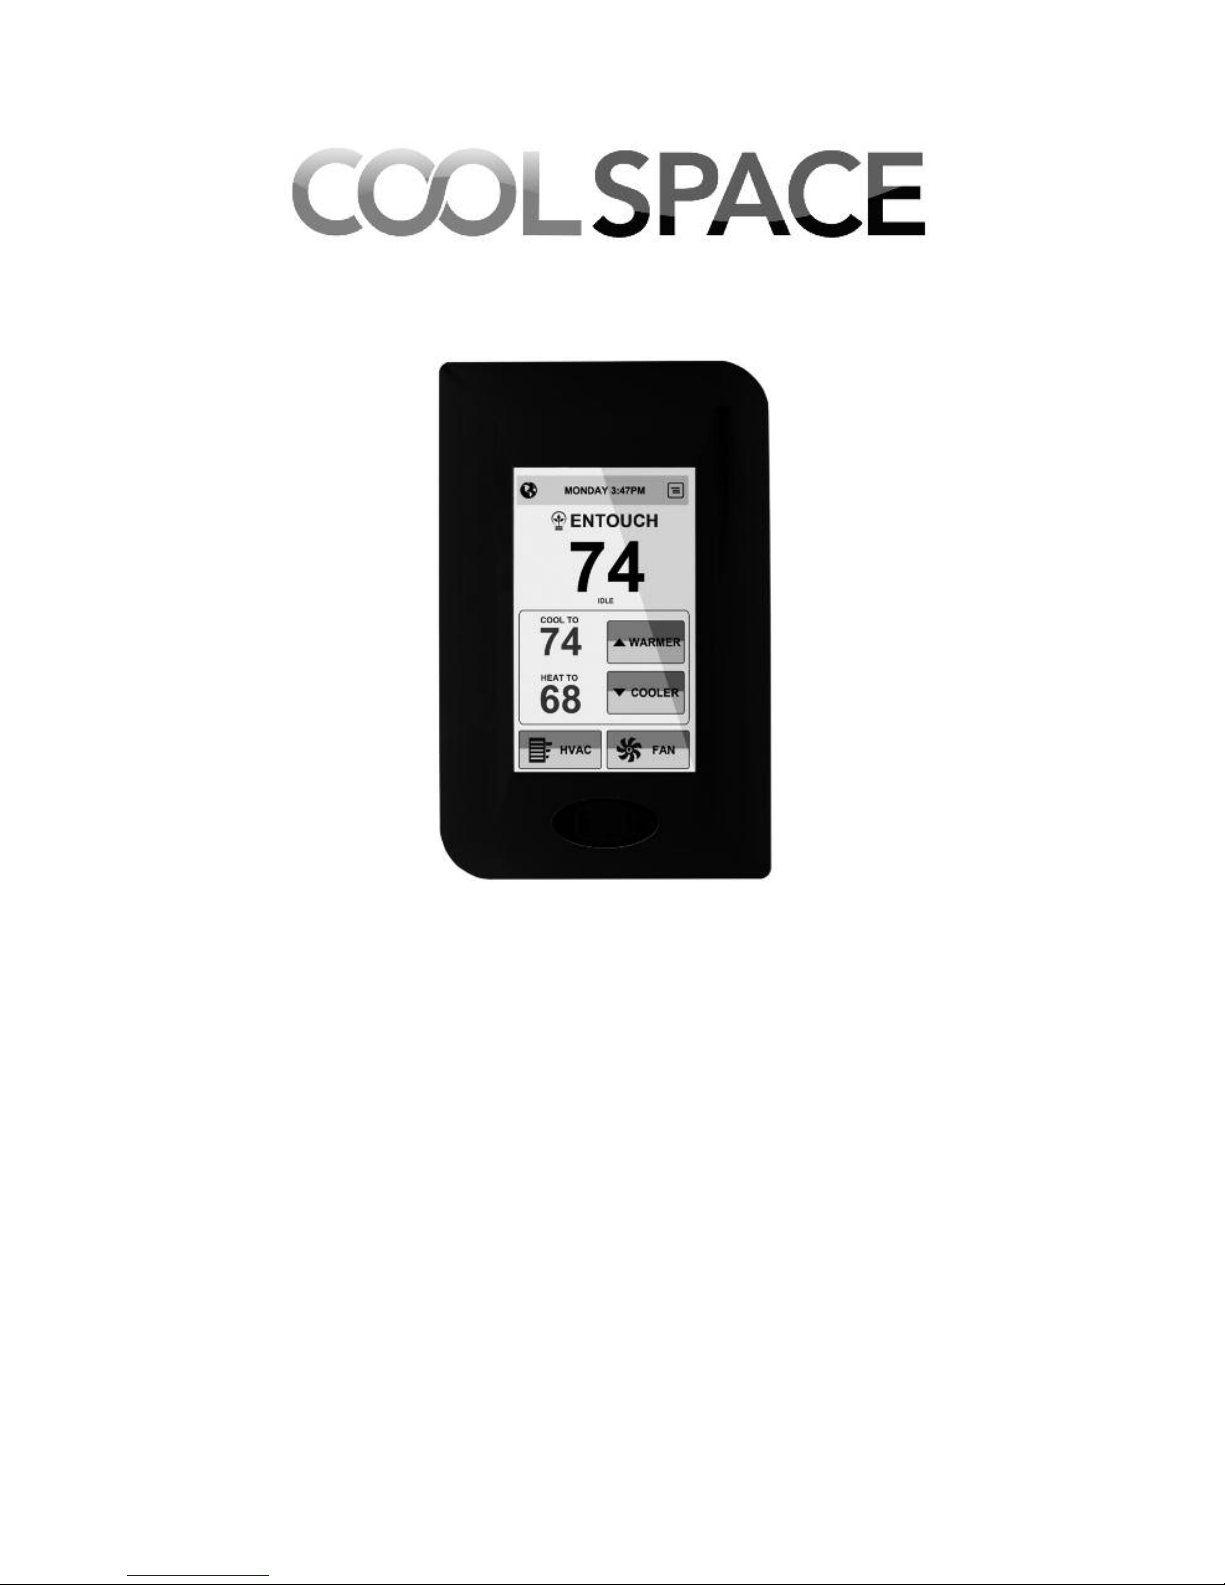
COOLSPACE/EnTouch Pro
WiFi Thermostat
User Guide
v1.0
HVAC Scheduling Integration
Page 2

Getting Started
Welcome
Welcome to the future of energy management. The
COOLSPACE/EnTouch Pro WiFi thermostat combines the
sophisticated controls needed for commercial applications
with occupancy detection and remote management. Easy
to use, automatic scheduling, and built in features to limit
unauthorized changes in commercial applications. This
manual will review common installation procedures and give
you a basic overview of the system.
COOLSPACE/EnTouch Pro WiFi Thermostat
Key Features
• Color touchscreen display
• Cloud based control via the portal or mobile app
• Automatic motion based scheduling
• Seven day scheduling, 4 events per day
• Multi-stage control
• Wizard for installation
• Security - partial lock and full lock
• Problem alerts
• Internal and external sensor inputs
2
eSPACE.com
Page 3
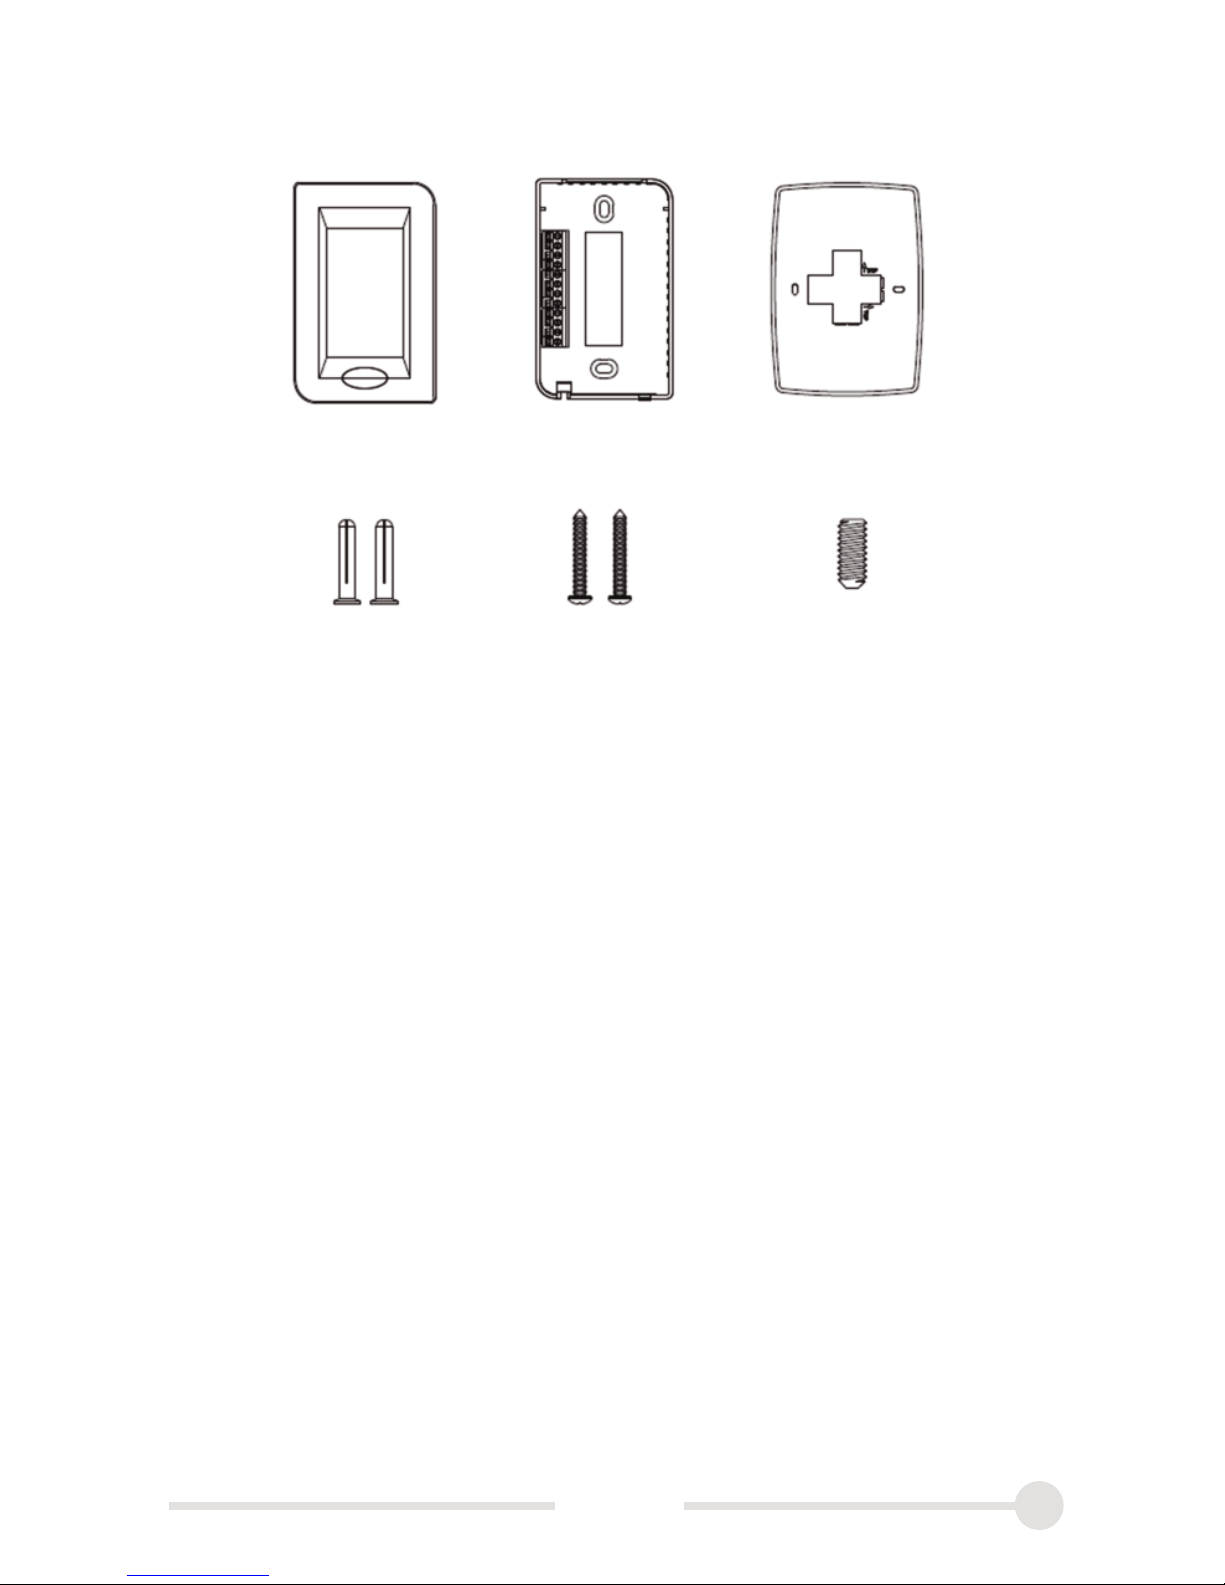
Contents of the Box
Compatibility
COOLSPACE/EnTouch works with over 99% of 24V heating
and cooling systems including gas, electric, oil, solar, hot
water, geothermal, forced air, heat pump and radiant.
It can control:
Heating: 1 and 2 stages (W/O/B, W2)
Cooling: 1 and 2 stages (Y1, Y2)
Heat pump: 2 stages with aux heat (Y1, Y2, W/O/B, W2)
Fan (G)
Power (C, Rc), common wire is required
3
eSPACE.com
Wall Anchors Screws Set Screw
Display Base Wall Plate
Page 4

Before You Get Started
• The controller works with low voltage HVAC controls.
It does not support high voltage systems.
• The controller requires both 24VAC and common wires
for power. You can use an add-a-wire converter for four
wire systems.
• If you are unsure about these items or have other
questions please contact technical support before you
get started installing the COOLSPACE/EnTouch Pro.
Technical Support
Our technical support team is available to answer your
questions and assist you with your installation.
During business hours: 1.888.448.5664
Online technical support: [email protected]
Call us if you have questions!
4
eSPACE.com
Page 5
5
eSPACE.com
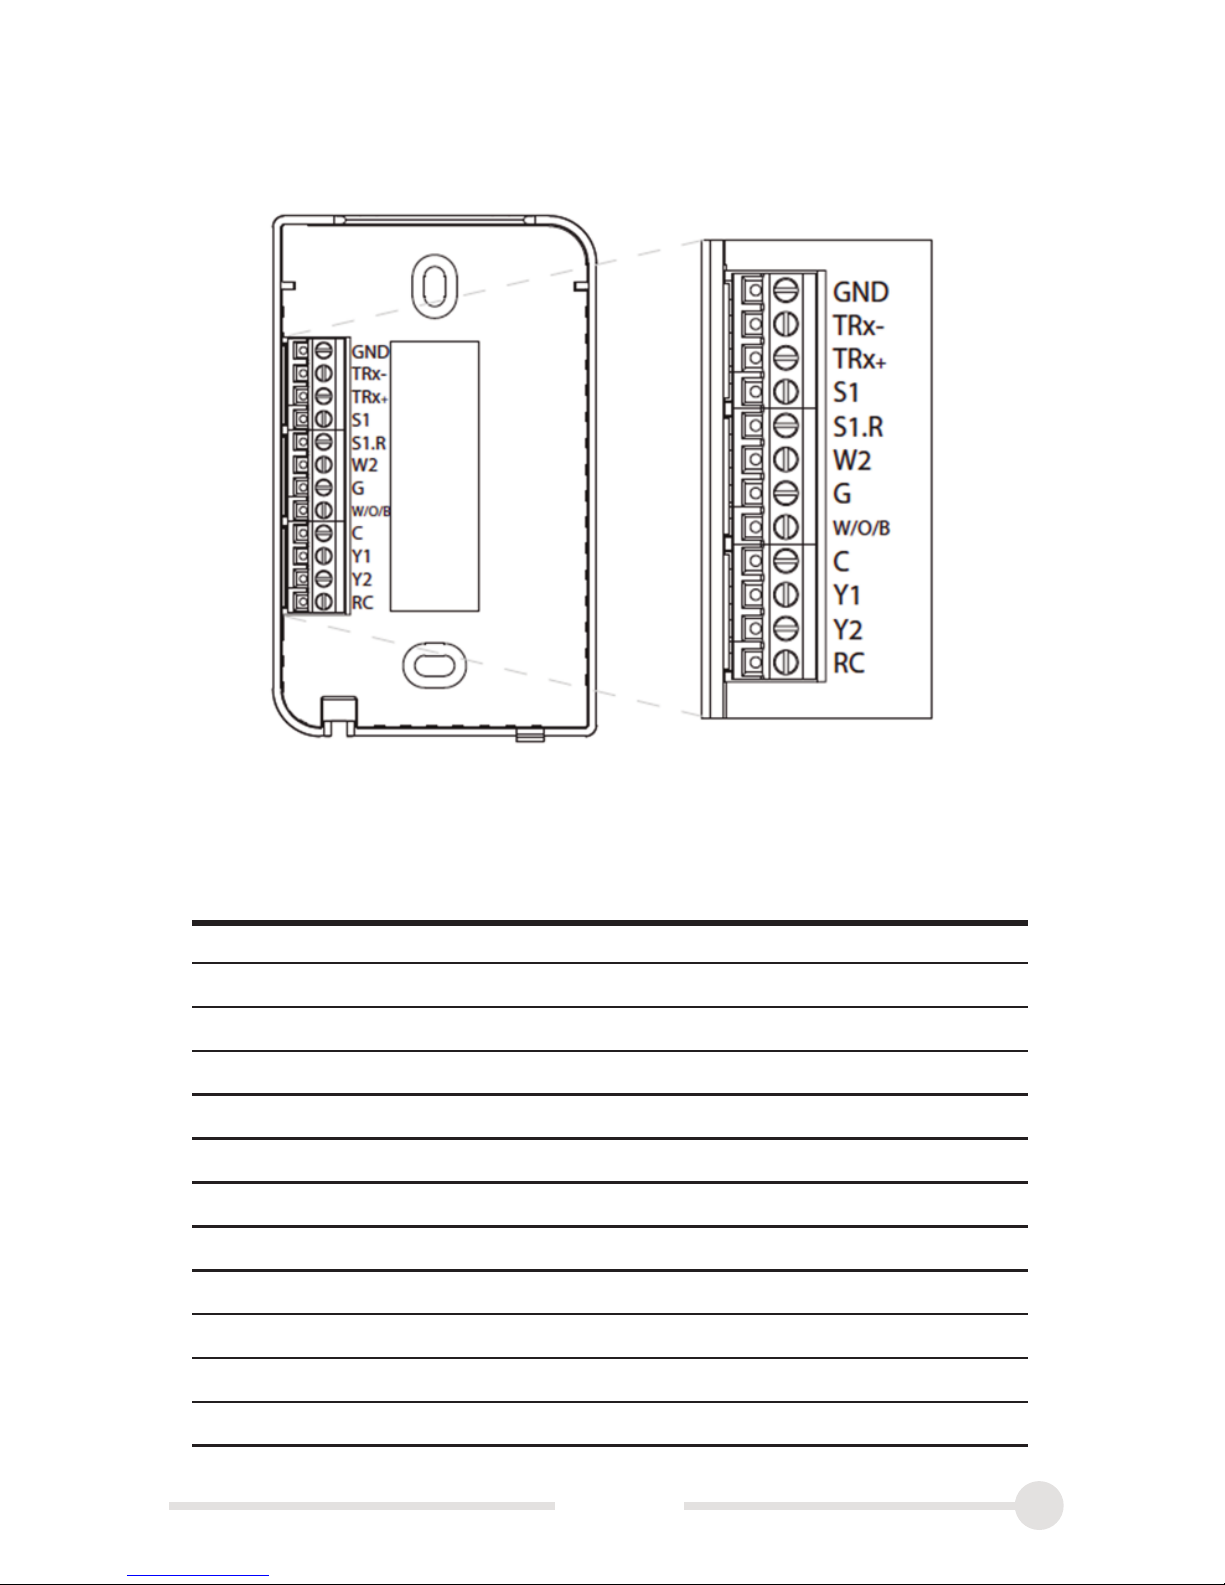
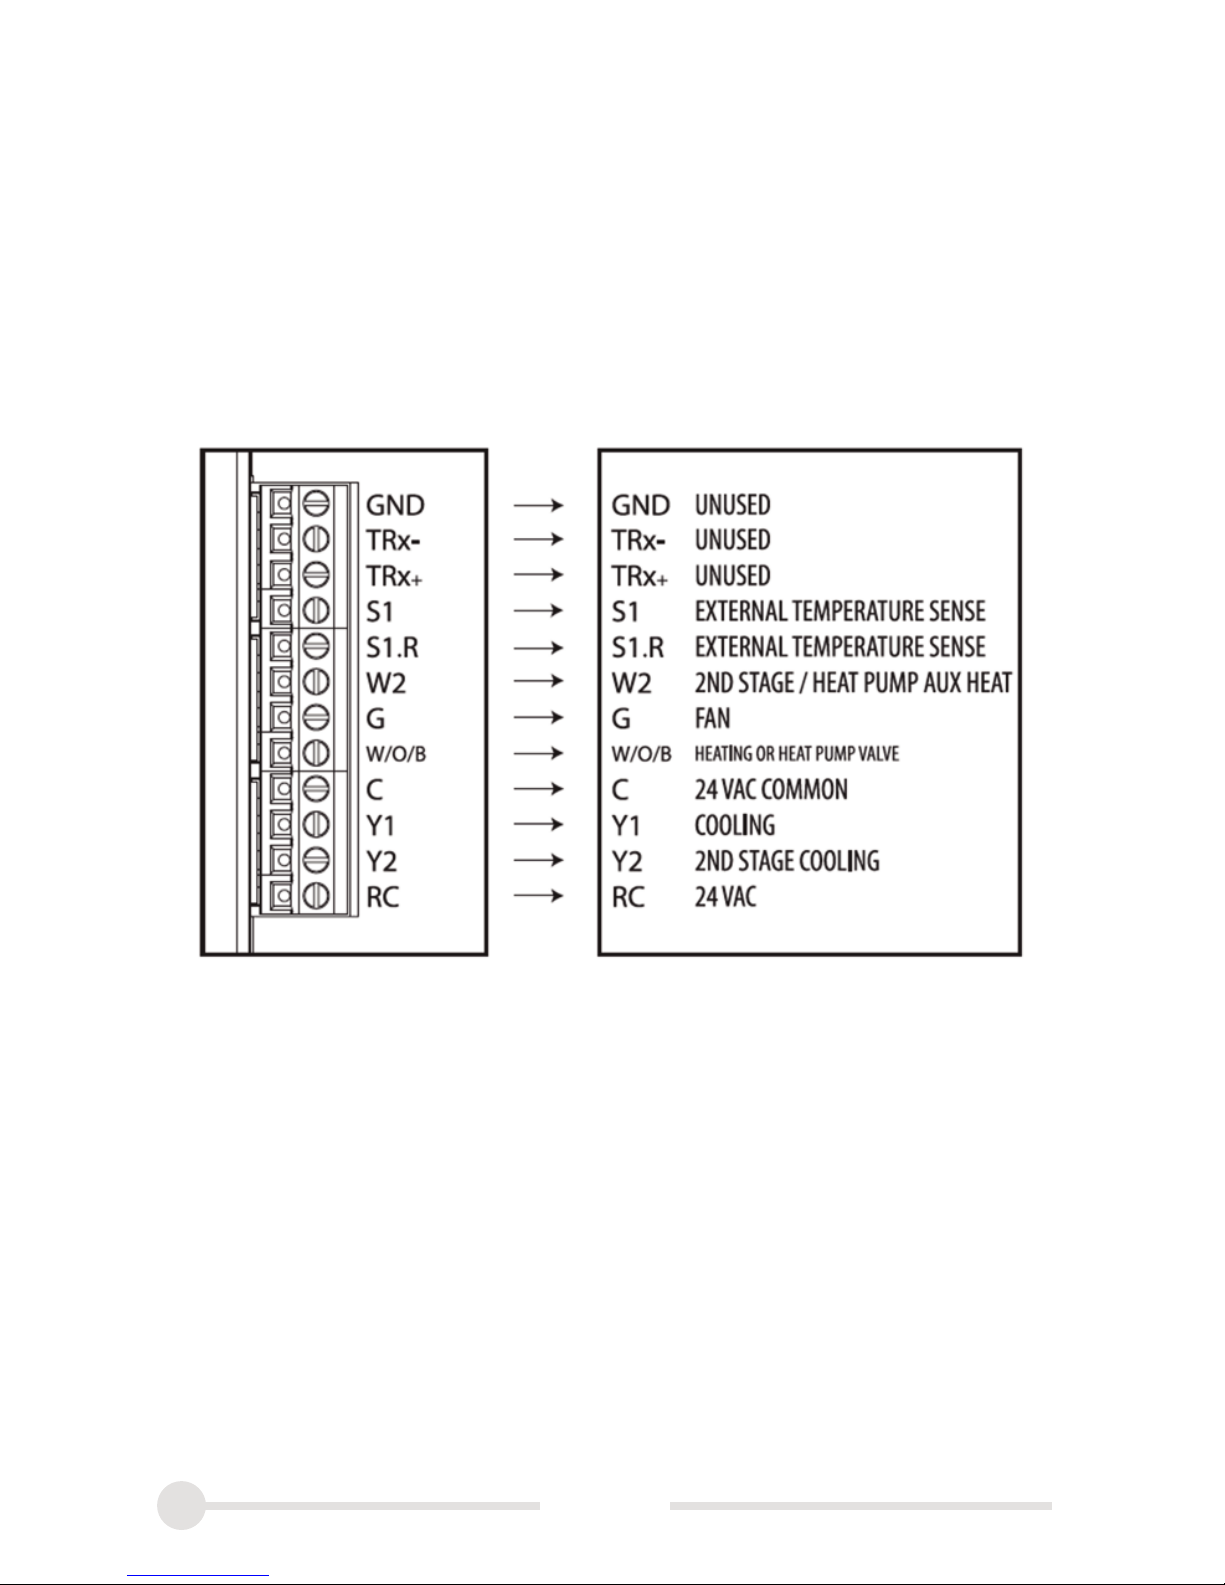
PIN DEFINITION
GND
TRxTRx+
S1 Remote Temperature Sensor
S1.R Remote Temperature Sensor Return
W2 Second Stage Heat (Configurable)
G Fan
W/O/B First Stage Heat or O/B Valve
C Common (Required)
Y1 Cool
Y2 Second Stage Cool (Configurable)
RC 24VAC Cooling (default jumper to RH)
Terminal Descriptions
Base Terminal Pins
Page 6

6
eSPACE.com
Installing Your
COOLSPACE/EnTouch Pro
Step 1. Remove the Existing Thermostat
First step is to power down your HVAC system. This can be
by opening the circuit breaker associated with the unit. Once
power is removed, carefully remove your existing thermostat
from the wall and disconnect the existing wiring. It is
recommended that you label the wires as you remove them
so you can properly attach them to the EnTouch Controller.
NOTE: Many times the colors represent the type of connection but this isn’t always reliable. Take the time to label the
wires, it will save you time in troubleshooting later!
Existing Wire Color ET
RR
YY
Y2 Y2
W W/O/B
O/B W/O/B
W2 /Aux W2
GG
C or X C
Page 7
7
eSPACE.com
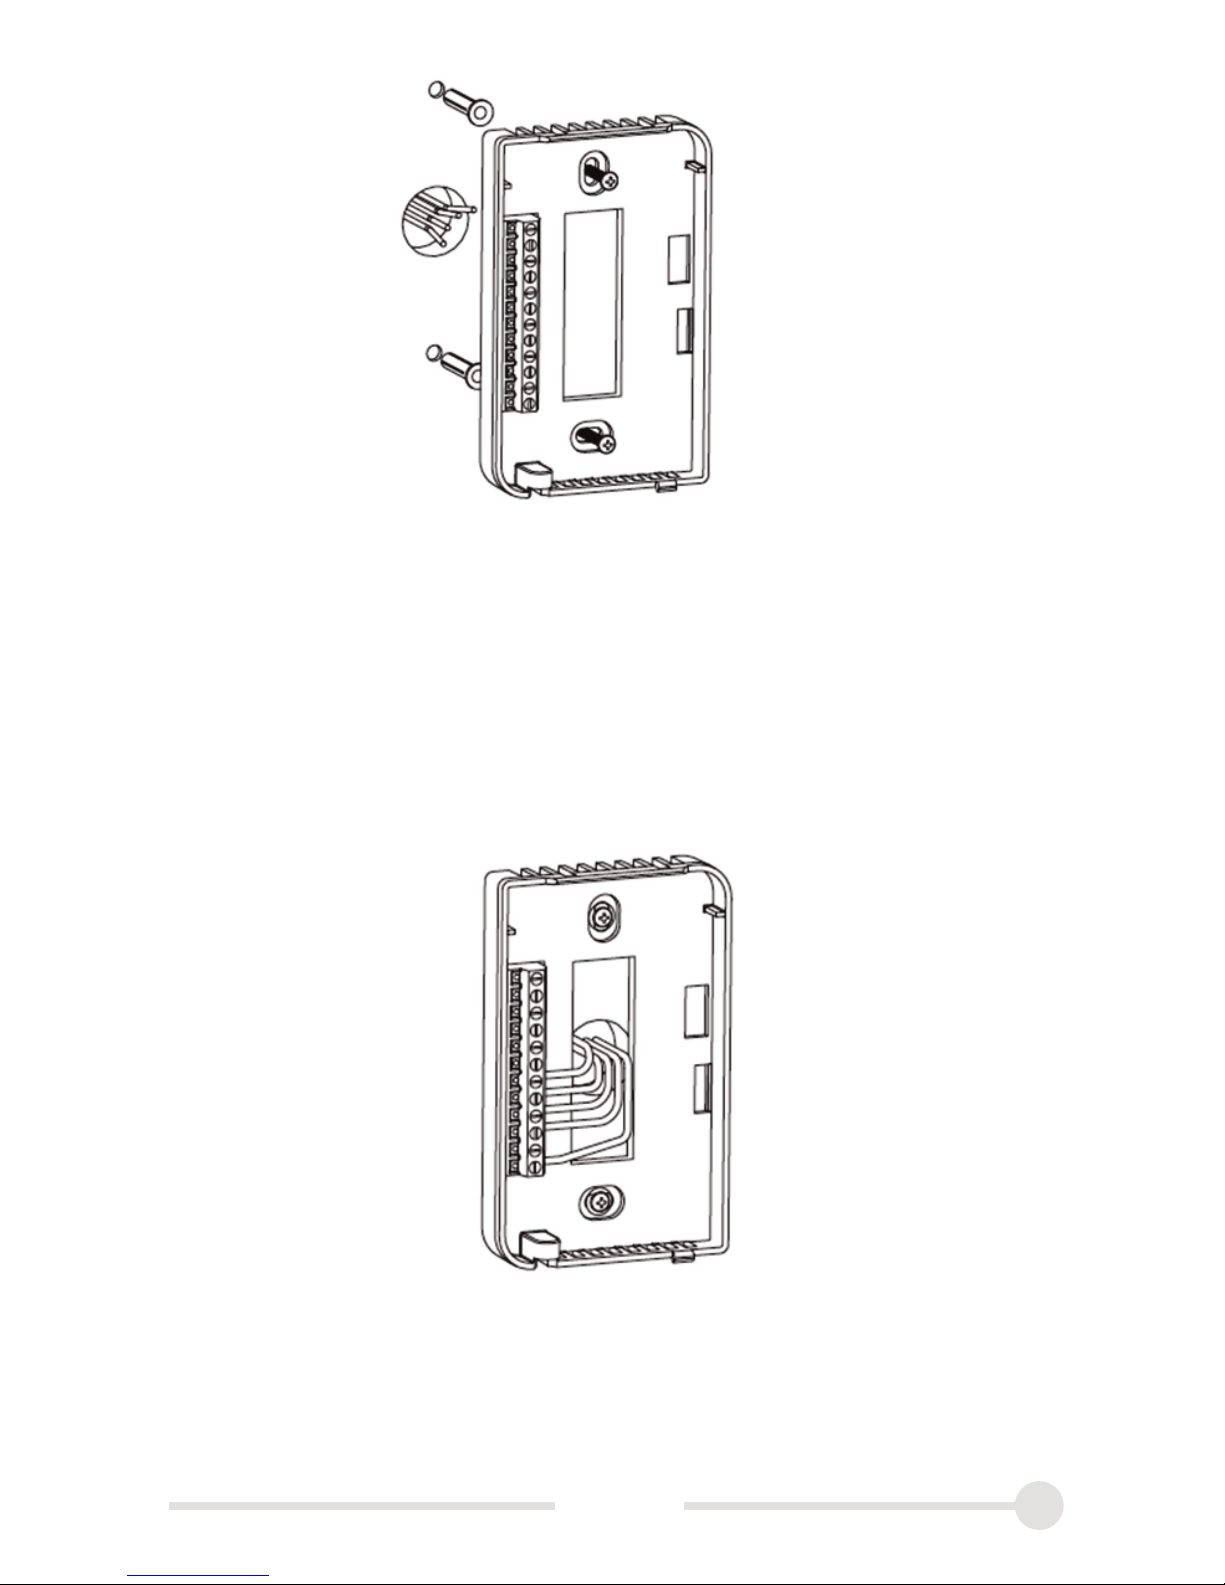
Step 2. Install the System Base
Using the supplied wall anchors and screws, attach the base
to the wall. The opening allows for cable routing. Note that
the alignment posts need to be towards the top of the base.
Optional – Place wall cover plate on the wall prior to base if
need to cover previous thermostat markings.
Step 3. Wire to the System
Follow the pinout description in the terminal description to
wire your system.
Page 8
8
eSPACE.com
Wiring Diagrams
The following are common wiring diagrams. If you have
questions about your system and how to install the
COOLSPACE/EnTouch system, please contact technical
support.
EnTouch BASE HVAC System
Page 9
9
eSPACE.com
Step 4. Place The Unit On The Base
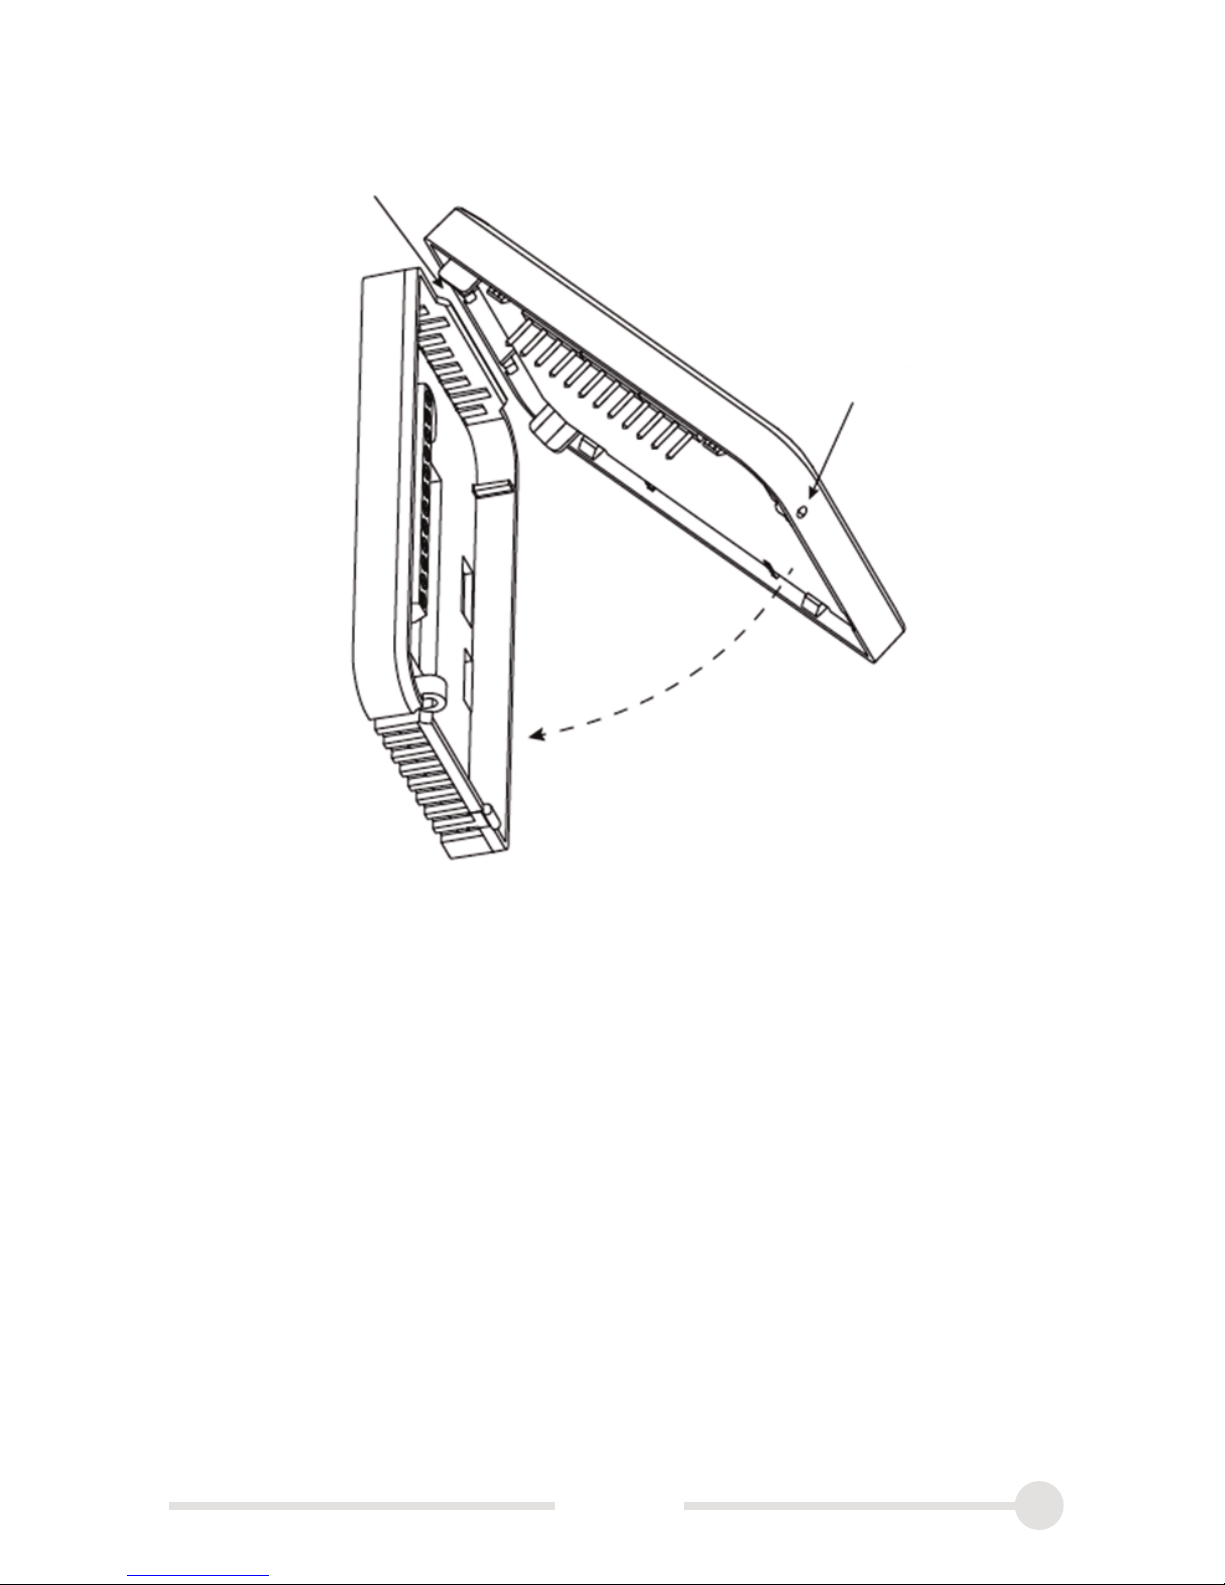
Align the rear posts and gently press the controller onto the
base. You can then power up your HVAC system and should
see the screen light up. If the screen remains black see the
troubleshooting section.
Locking Hooks
Set Screw Hole
Page 10

Setting Up Your
COOLSPACE/EnTouch Pro
Using the Setup Wizard
After successfully powering up the controller you will be
directed to the installation wizard to guide you through the
key programming steps. Simply follow the instructions on
the wizard by using the color touchscreen. Once the wizard
is completed, your COOLSPACE/EnTouch Pro is ready to
connect to the COOLSPACE portal.
NOTE: The wizard is only displayed once.
You can also access the wizard at a later date in the Advanced
Setup Menu under Menu > Setup > Advanced > Wizard.
1. Setting Date And Time
2. Choosing Your Equipment Type
3. Choosing Occupancy Detection Mode
4. Choosing A Preset Schedule
5. Choosing A Security Mode
6. Adding A Wireless Network
These are the basic items required to activate the
COOLSPACE/EnTouch Pro controller. Full configuration of
system operation is available in the Menu > Setup Menu.
10
eSPACE.com
Page 11
Connecting Your EnTouch Pro
to the COOLSPACE Portal
The power of your COOLSPACE/EnTouch Pro controller
will be fully realized when you connect to
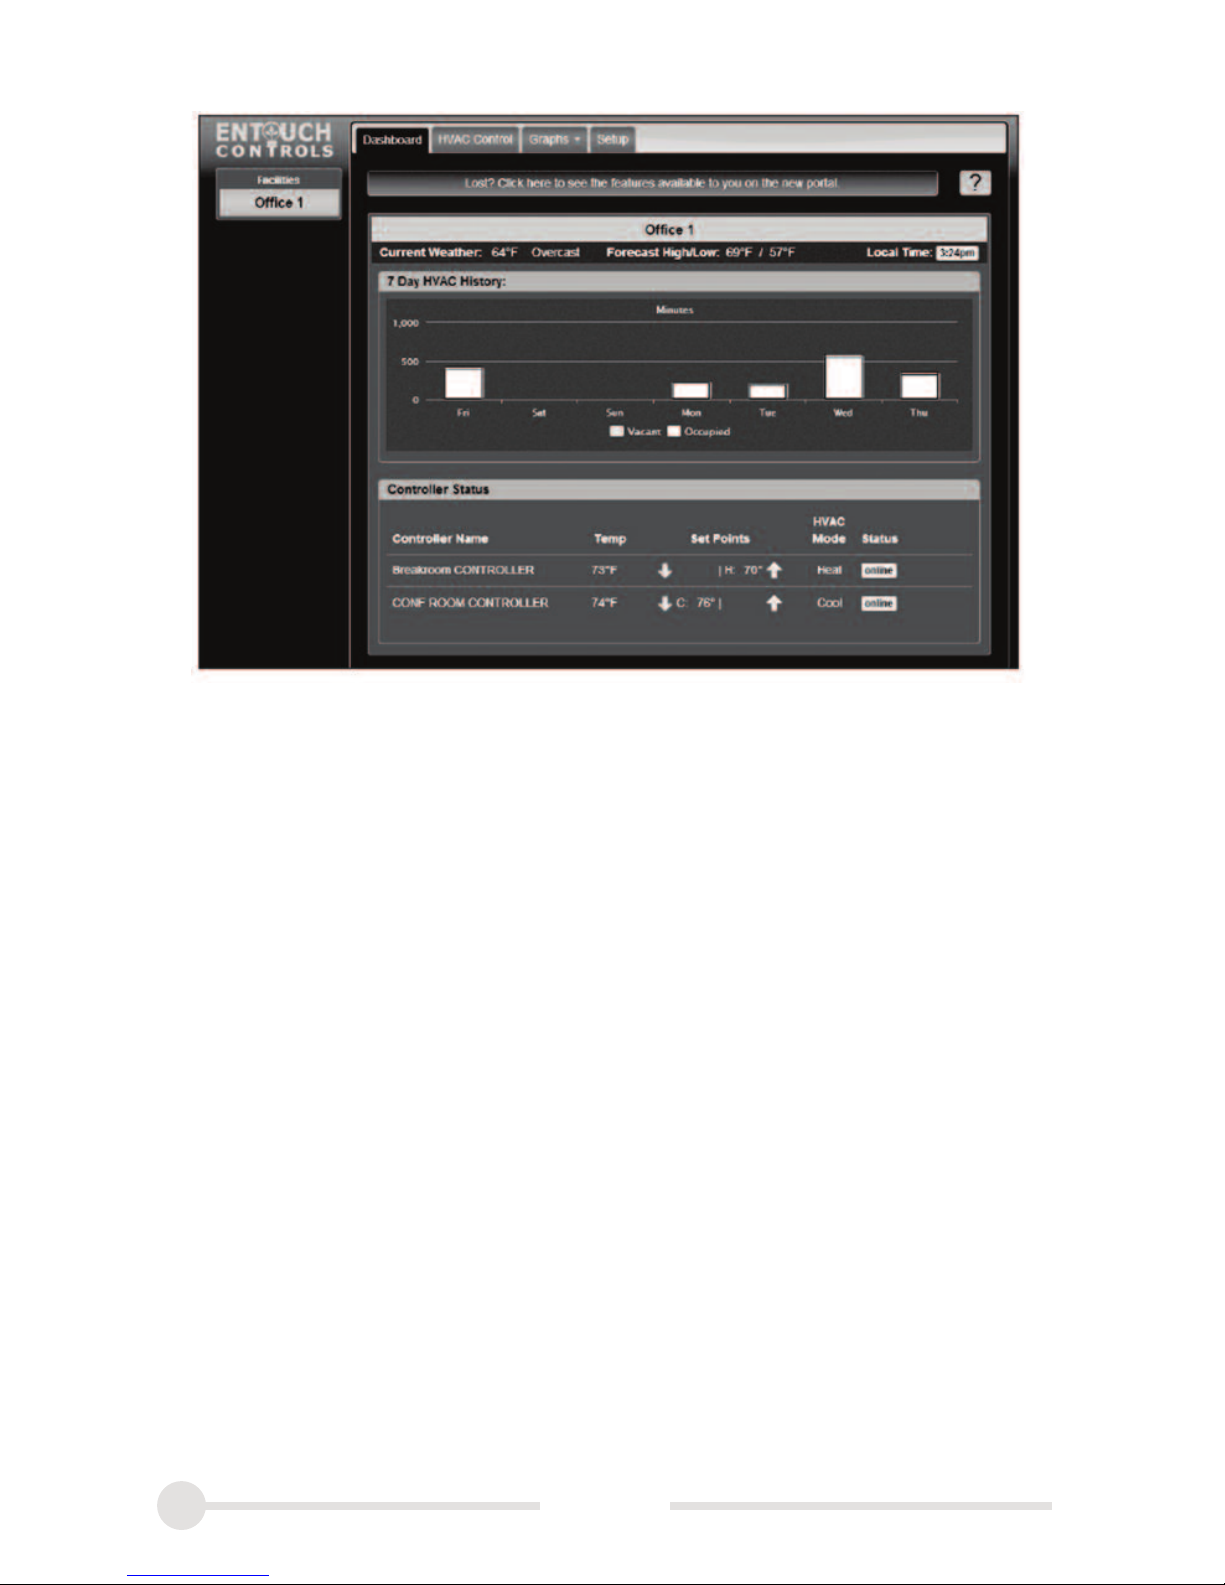
COOLSPACEPortal.eSPACE.cool. This portal is designed to
let you create facilities, manage them remotely, and quickly
react to problems. You can manage multiple facilities from
a simple dashboard, view HVAC system operation, view your
runtime and your energy usage details, and customize
reports. You can also set your schedules, events, and create
custom naming for your units.
Step 1. Getting Online
Using a computer or tablet device connect to
COOLSPACEPortal.eSPACE.cool
If you are a first-time user,
click on the Register link
to set up your account.
11
eSPACE.com
Page 12
12
eSPACE.com
Step 2 Create a Facility and Add Your Units
Adding a Facility
• Go to the Setup tab
• Click on Add a Facility
• Enter a facility and assign it a name
• Enter location information – zip code and time zone – for
proper time and weather information
• Enter contacts for the facility and set them up to receive
SMS or e-mail alerts
• Enter optional data on facility size, energy rate, type
of facility, and energy categories for custom energy
mapping
Page 13

Adding Controllers to Your Facilities
• Go to the Setup tab
• Click on Add a Controller
• Enter the online pass code for the controller. This
five-character code is found in Menu > Basic Info >
System Info Menu. character code is found in Menu >
Basic Info > System Info Menu
• Set preferences for the controller
Using the Web Management Portal
The portal allows you to:
• Adjust temperatures and HVAC status
• Lock/Unlock your COOLSPACE/EnTouch Pro
• Set schedules and add events
• Setup and manage facilities
• Change the controller names
• Get detailed information for diagnostics
• View HVAC runtime history
• Set up performance alerts
Additional instructions and help is available on the portal.
13
eSPACE.com
Page 14
14
eSPACE.com
Using Your EnTouch Pro
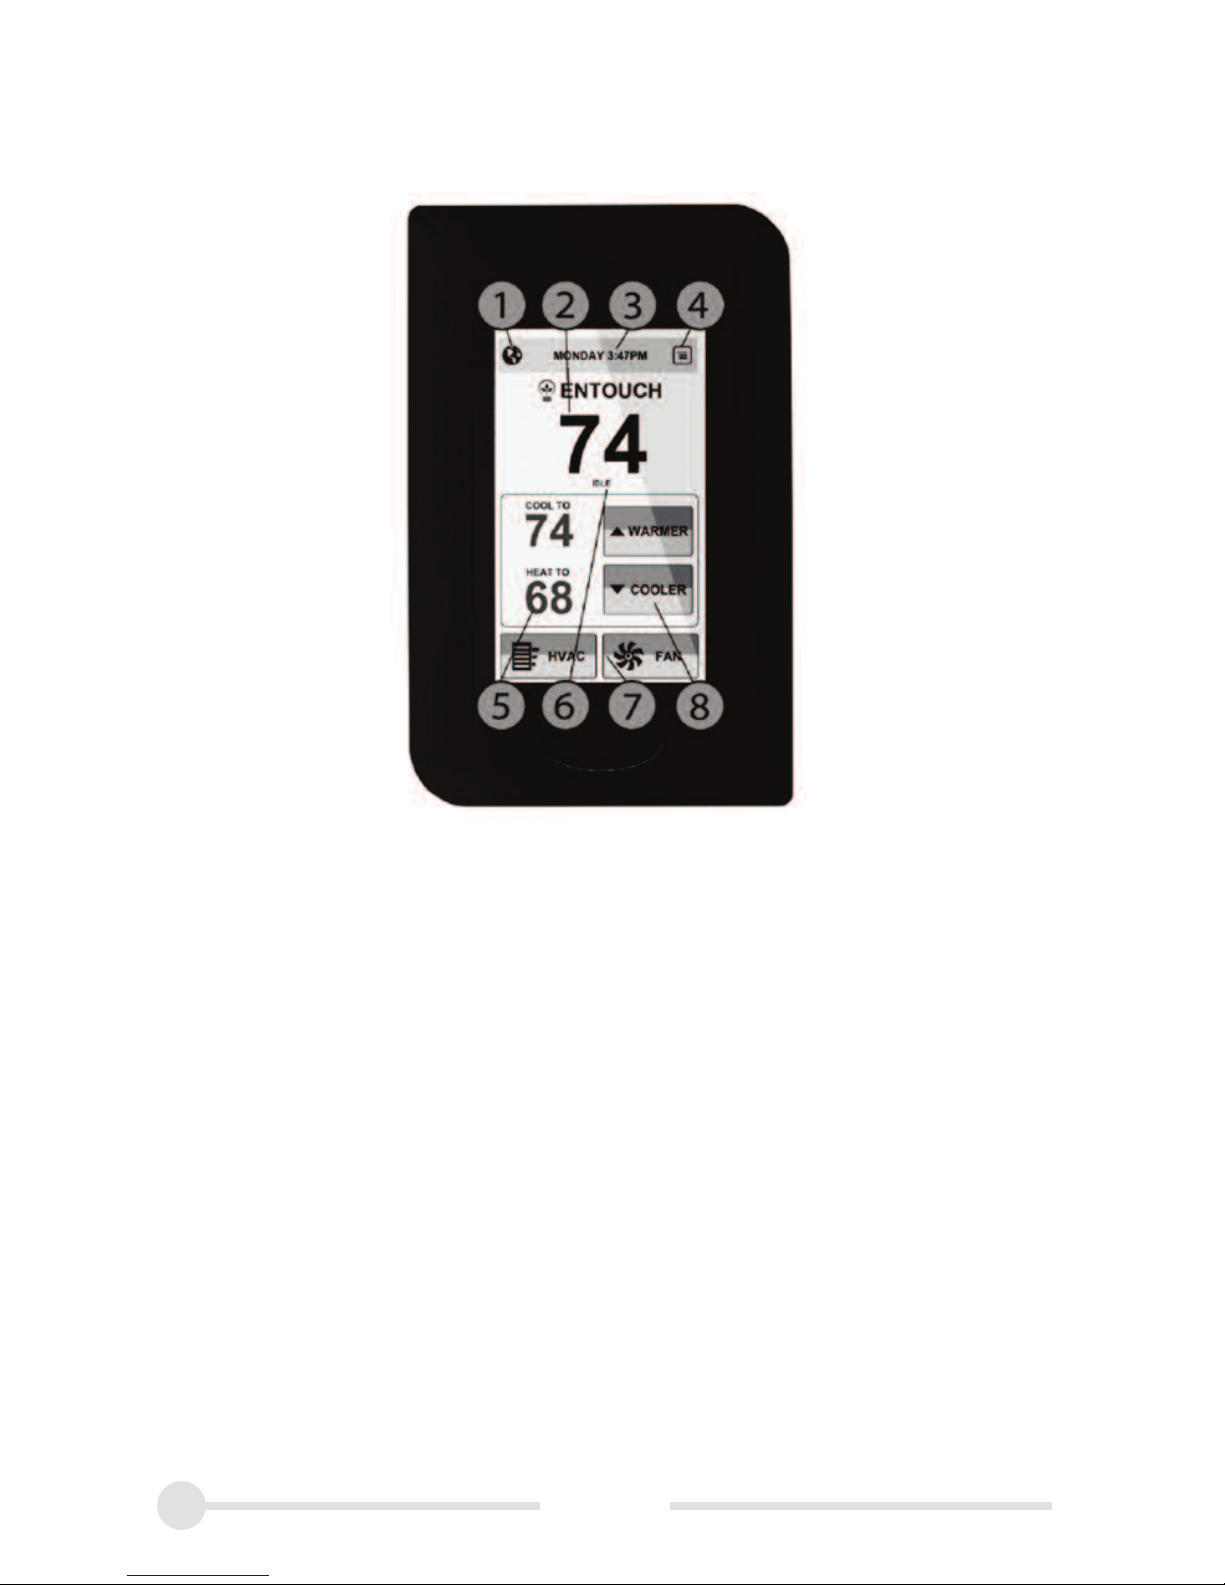
The Home Screen
The home screen shows basic information about the system.
1. Status
2. Temperature Display
3. Time and Day
4. System Menu*
5. Heat and Cool Setpoints*
6. HVAC Operation Status
7. HVAC and Fan Modes*
8. Up/Down Temperature Adjustment*
*Setting can be locked through security settings.
Page 15

15
eSPACE.com
Adjusting the Temperature When Unit is Unlocked
The Up/Down buttons are used to adjust the regulation
temperature. If the unit is unlocked the set points can be
adjusted between 40 and 99 deg F (4 to 37 deg C). If the
HVAC system is set to auto mode, both the heat and cool
set point are adjusted simultaneously.
Adjusting the Temperature When Unit is Locked
Units may be placed into locked mode from the Device
Preferences menu. When the unit is locked the temperature
adjustment range is limited to the security range as defined
in the Setup Menu. This range is adjustable from +/-1 to +/-5
degrees.
NOTE: If the unit is locked a code is required to make
adjustments. Refer to the Security Settings Menu to set your
access code.
Understanding Hold Duration
One of the energy saving features of the COOLSPACE/
EnTouch Pro is that there are no permanent holds from the
front panel. The system only allows temporary changes when
using the Up/Down arrows. Changes are cancelled after an
adjustable delay of 1 hour, 2 hours, or the next schedule
transition. All hold conditions cancel at midnight. The default
hold interval is configured in the Security Settings Menu
under the Setup Menu.
Note: If a user wants to set a permanent hold for a vacation
or other event they can set an event from
COOLSPACEPortal.eSPACE.cool.
Page 16

Status Icons
Two status icons in the top left of the display highlight server
connection status and security status. If the lock icon appears
the unit is locked. If a globe icon appears the unit is
connected to the servers. If a signal bar icon is displayed the
unit has connected to a local network but is not connected to
the servers. See troubleshooting menu for more information.
Temperature Display
The system displays the current sensed indoor temperature.
Occupied Mode
The unit displays the heat and cool set points when it is in
occupied mode. If the unit is in auto mode it will show both
set points. If it is in cool mode, only the cool set point is
displayed. If it is in heat mode, only the heat set point is
displayed. Pressing the Up/Down buttons will adjust the
temperature settings within the security limits.
Vacancy Mode
If the scheduled time period occupancy mode is set to
Vacant, the heat and cool set points are not displayed.
Pressing either the Up or Down button will force an override,
set the zone status to occupied, and show the occupancy set
point range.
16
eSPACE.com
Page 17

17
eSPACE.com
HVAC and Fan Mode Adjustment
HVAC Mode can be selected as:
• Auto (default) This system will heat or cool as necessary
to maintain optimal comfort.
• Cool Only
• Heat Only
• Off
Fan Mode can be selected as:
• Auto (default setting. Fan runs during heating
and cooling)
• On (fan always on)
• Circulate (fan runs during heating and cooling and
periodically activates based on fan circulation time
settings. Circulation is only active during occupied
schedule times)
NOTE: If the unit is locked a code is required to access this
menu. Refer to the Security Settings Menu to set your access
code.
Page 18

18
eSPACE.com
Features of the
COOLSPACE/EnTouch Pro
1. Scheduling
Use this menu to enter a custom seven day schedule with
four time periods per day. Each time period can have unique
heating and cooling settings. Each time period can also be
defined as ‘occupied’ or ‘vacant’. The schedule is configured
by accessing the following menu Main > Schedule. You can
also adjust your schedule or add events from
COOLSPACEPortal.eSPACE.cool.
2. Security
This menu sets up your security settings. Security is
configured by accessing the following menu Main > Setup >
Security. Use this menu to:
Hold Duration - Set the amount of time to hold temporary
changes to the temperature setting if a schedule is set.
Security Mode - Set the level of security to your control.
A four digit code is needed to make changes to settings while
in partially locked and locked modes.
• Unlocked - Changes to settings can be made at any time
by anyone.
• Partially Locked - Changes can be made to temperature
setpoints and HVAC mode and fan mode only.
• Locked - Changes can be made to temperature set
points only.
NOTE: To lock changes to temperature set points, refer to
the Security Range Menu.
Page 19

19
eSPACE.com
Security Code - Use this menu to set the four digit security
code that will allow access to the control’s settings when in
Partially Locked or Locked mode.
NOTE: Once the control is placed in Partially Locked or
Locked mode, the four digit code is needed to gain access
to the menu. The default code is set to 0000.
Security Range - This menu allows you to choose the type of
limits you want to place on your COOLSPACE/EnTouch Pro.
• Temperature Range - Allows the user to adjust the
temperature within a set range from the scheduled
temperature (default is +3/-3 degrees).
• Temperature Set Points - Allows a user to adjust the
temperature within a maximum heating set point and
a minimum cooling set point.
• No Adjustments - This setting restricts the user from
making any changes to the temperature.
Temperature Range - Use this menu to set the (+/-) range.
This menu will appear when you have selected Temperature
Range under Security Range.
Max Heat/Min Cool - Use this menu to set the maximum
heating and minimum cooling set points. This menu will
appear when you have selected Tempterature Set Points
under Security Range.
Page 20

20
eSPACE.com
3. Motion Detection
Another feature of the COOLSPACE/EnTouch Pro is
automatic occupance detection. This setting can be configured to switch to occupied mode based on movement in
the occupancy space. Motion detection is configured by
accessing the following menu Main > Setup > Installation >
Motion Detection.
Motion Sensor - Use this setting to enable or disable the
motion sensor function.
• Disable - Turns off the motion sensor function
• Enable - Turns on the motion sensor function. When
selected, additional setting options will appear in the
Motion Detection Menu. (Motion Timeout, Default
Setpoints)
• Test Mode - Select Start Test to begin testing the
motion sensor. This test will count the number of motion
occurrences while in test mode. Select Stop to exit this
mode.
NOTE: Test Mode will run as long as the screen is active. If
the control enters into the screen saver mode, Test Mode will
end. The dimming timeout setting can be configured in the
following menu, Main > Setup > Preferences > Dimming
Timeout.
4. Cloud-Based Control
The COOLSPACE/EnTouch Pro is a WiFi-enabled thermostat
that can be remotely managed from a computer, tablet or
smart phone via COOLSPACEPortal.eSPACE.cool.
Page 21

21
eSPACE.com
Typical Settings for Your Facility
Options for built-in motion detection further simplify scheduling and optimize comfort and cost. Rather than rely on fixed
schedules have your setbacks automatically kick in when
your facilities are vacant. Patent-pending features enable the
industry’s only combination of fixed schedule and variable
occupancy-based setback control. Security features make it
possible to limit or lock out adjustments at the thermostat
optimizing HVAC energy usage.
NOTE: Refer to the Using Your COOLSPACE/EnTouch Pro
section for specific instructions on setting scheduling, motion
and security.
Offices
An office is easily optimized by using motion-based
occupancy detection with scheduling. Most employees work
during set operating hours, but you may have employees
occasionally stay late or come in during the weekend for a
few hours.
Ideal settings for an office would be setting a schedule for
occupancy Monday - Friday 7:00 am - 6:00 pm (vacant
overnight and on weekends). Motion detection would be set
to condition the space upon detecting occupancy and hold
the occupied set points for two hours.
Settings for the suggested office profile:
• Set your schedule for regularly occupied times
• Enable Motion Detection, 2-hour timeout
• Set security to Partially Locked. Set Max Heat/Min Cool
Page 22

22
eSPACE.com
Schools
Schools can benefit greatly from the combination of fixed
scheduling, motion-based occupancy control and security.
Schools typically have a set occupied operation time (e.g.,
Monday - Friday 7:30 am - 4:00 pm) but they also have
various after hours events and meetings that may not be
regularly occurring events.
A great way for a school to optimize HVAC runtime is to set
a fixed schedule for regular operating hours Monday - Friday
7:00 am - 4:00 pm) vacant overnight and on weekends. Set up
automatic occupancy detection in each zone for events and
meetings that happen outside of normal hours.
Setting security will limit temperature changes to administrators and facilities management staff only. Changes can be
made at the control with the four digit pass code or by the
online management portal.
Settings for the suggested school profile:
• Set your schedule for regularly occupied times
• Enable Motion Detection, 2 hour timeout
• Set security to Fully Locked, No Adjustments
Page 23

23
eSPACE.com
Restaurant & Retail
Restaurant and retail facilities typically have a set operating
time but some nights, might need to stay open longer based
on demand. These facilities also struggle with unwanted
frequent changes to the temperature settings.
Ideal settings would be to set a schedule for normal operating
hours and also set motion detection for those times when
your facility needs to stay open later than normal. Security
should be set to limit any temperature change to +/- 3
degrees from the scheduled set point.
• Set your schedule for regularly occupied times
• Enable Motion Detection, 1 hour timeout
• Set security to Fully Locked, Temperature Range +3/-3
Page 24

24
eSPACE.com
Hotel Guest Rooms
Hotel guest rooms are an ideal application for automatic
occupancy detection based scheduling due to the ability to
remain in vacant mode until motion is detected in the room.
When the guest enters the room, the motion sensor will
condition the room to an occupied temperature range. The
occupied set point will then automatically change back to
vacant at check-out time. You may choose to have this set
back time scheduled to the next check-in time to allow for
cleaning crews/maintenance etc to complete any work.
Settings for the suggested hotel guest room profile:
• Set every day of your schedule to be vacant. Under the
first time slot, enter 3:00 pm (or your regular check-in
time)
NOTE: Set your vacant temperature range when setting the
vacant schedule.
• Enable Motion Detection Custom Timeout, Set Timeout
to 11:00 am (or your regular check-out time)
NOTE: Motion Detection set point is your occupied set point.
Page 25

25
eSPACE.com
Menu Item Description
BASIC INFO Info menu about your ET Pro
- System Info Specific info about your ET Pro
- Relay Status Status of your relays
- System Status Info about your HVAC system
- Network Status MAC address and WiFi status
- Network Utility RSSI, server and internet RTT
HVAC & FAN Setting menu for HVAC & fan modes
- HVAC Mode Set your HVAC to heat, cool or auto
Mode
- Fan Mode Set your fan to auto, on or circulate
SCHEDULE Scheduling menu
- Set Schedule Set 7 days, up to 4 events per day
DATE & TIME Set date & time
SETUP Setup Menu
- Security Set your security settings here
Hold Duration Time to hold temperature changes
Security Mode Set your level of security
Security Mode Set your 4 digit security code
Security Range Method of limiting control
Temp Range Range that temp. can be adjusted
- Preferences Thermostat preferences
Temperature Scale Fahrenheit or celsius
Temp Offset Offset temperature display
Page 26

26
eSPACE.com
Menu Item Description
Dimming Timeout When the control goes to sleep mode
- Installation Info about your installation
Equipment HVAC equipment settings
Equipment Type Conventional or heat pump
Heating Type Fuel source
Number of Stages Stages of heating and cooling
Energy Mgmt. Energy management options
Energy Mode Prioritize comfort or savings
Sequencer Enable or disable sequencer
Fan Circ. on Time Time fan will circulate after call
Smart Recovery Programmed temp is reached on time
Input S1 Configure remote sensor input
Motion Det. Set motion detection options
Motion Sensor Enable or disable
Motion Timeout Time to hold temp when motion
is sensed
Default Setpoints Set points for motion is detected
Outputs W2 & Y2 2nd stage heat & cool
- Network Info about your network
WiFi Network Enable or disable WiFi connection
Scan Network Choose a network to connect to
Advanced WiFi Info about your WiFi connection
Advanced IP Info about your IP address
Server Info about your server
- Advanced Factory reset, relay test & wizard
Page 27

27
eSPACE.com
Technical Support
Our technical support team is available to answer your
questions and assist you with your installation.
During business hours: 1.888.448.5664
Online technical support: [email protected]
Call us if you have questions!
Troubleshooting
The first item to verify is proper power to the controller. The
system requires a 16VAC to 30VAC from your HVAC system.
NOTE: The system requires a common connection!
If the display is black or the controller cycles on and off this is
usually a sign of improper power or a loose connection.
Step 1. Remove the controller from the backplate and
measure the voltage across RC/RH and C. If it is less than
16VAC please verify wiring and your HVAC system.
Step 2. Verify all wires are properly connected and screws
are tight.
Step 3. Verify the RC/RH jumper is installed and tightened.
Page 28

28
eSPACE.com
Troubleshooting Network Connection
During normal operation you should see a globe symbol in
the status section of the home screen. This icon indicates you
are properly connected to the network server. If you do not
see the globe symbol you are either not connected to the
Internet (a WiFi status bar symbol will be displayed) or ot
connected to a router (no WiFi or globe symbol is displayed).
SERVER CONNECTED
ROUTER CONNECTED
NO NETWORK
Troubleshooting information is located in the Menu > Basic
Info > Network Status menu and can help diagnose router
connection, Internet connection, or server connection issues.
This menu has five sections:
• WiFi MAC Address
• SSID Status
• Internet Network Status
• Network server status
• DNS Settings
Please contact COOLSPACE/EnTouch technical support or
your IT support for assistance.
Page 29

29
eSPACE.com
COOLSPACE/EnTouch Controls
Limited Warranty
No need to worry when purchasing the COOLSPACE/
EnTouch system. COOLSPACE/EnTouch Controls stands by
the system with a 3-year limited warranty.
COOLSPACE/EnTouch Controls warrants this product to
be free from defects in the workmanship or materials, under
normal use and service, for a period of three (3) years from
the date of purchase. If at any time during the warranty
period, the product is determined to be defective of
malfunction, COOLSPACE/EnTouch Controls shall repair or
replace it at COOLSPACE/EnTouch Controls’ option.
If the product is defective; (i) return it, with a bill of sale or
other dated proof of purchase, to the place from which you
888.448.5664. Customer care will make the determination
whether the product should be returned or whether a
replacement should be sent to you.
This warranty does not cover removal or reinstallation
costs. The warranty shall not apply if it is determined by
COOLSPACE/EnTouch Controls that the defect or
malfunction was caused by improper usage while the product
was in possession of the user.
COOLSPACE/EnTouch Controls’ sole responsibility shall be
to repair or replace this product within the terms stated
above. COOLSPACE/EnTouch Controls shall not be liable for
any loss or damage of any kind, including any incidental or
consequential damages resulting, directly or indirectly, from
any breach of any warranty, express or implied, or any other
failure of this product.
Page 30

30
eSPACE.com
This warranty is the only express warranty COOLSPACE/
EnTouch Controls makes on this product. The duration of any
implied warranties, including the warranties of merchantability
and fitness for a particular purpose, is hereby limited to the
duration of this warranty.
If you have any questions concerning this warranty, please
contact us at COOLSPACEPortal.eSPACE.cool.
Information From Your Installation
We recommend you capture the following information at time
of installation and retain for your records.
Unit Serial Number: ____________________________________
Unit Online Pass Code: __________________________________
Installer Name: ________________________________________
Installer Phone: ________________________________________
Installation Date: ________________________________________
Page 31

31
eSPACE.com
© 2016 Cool Solutions Group
Charlotte, NC 28270
Toll Free: 1-888.448.5664
Thank you for partnering with Cool Solutions Group
Learn more at:
COOLSPACEPortal.eSPACE.cool
 Loading...