

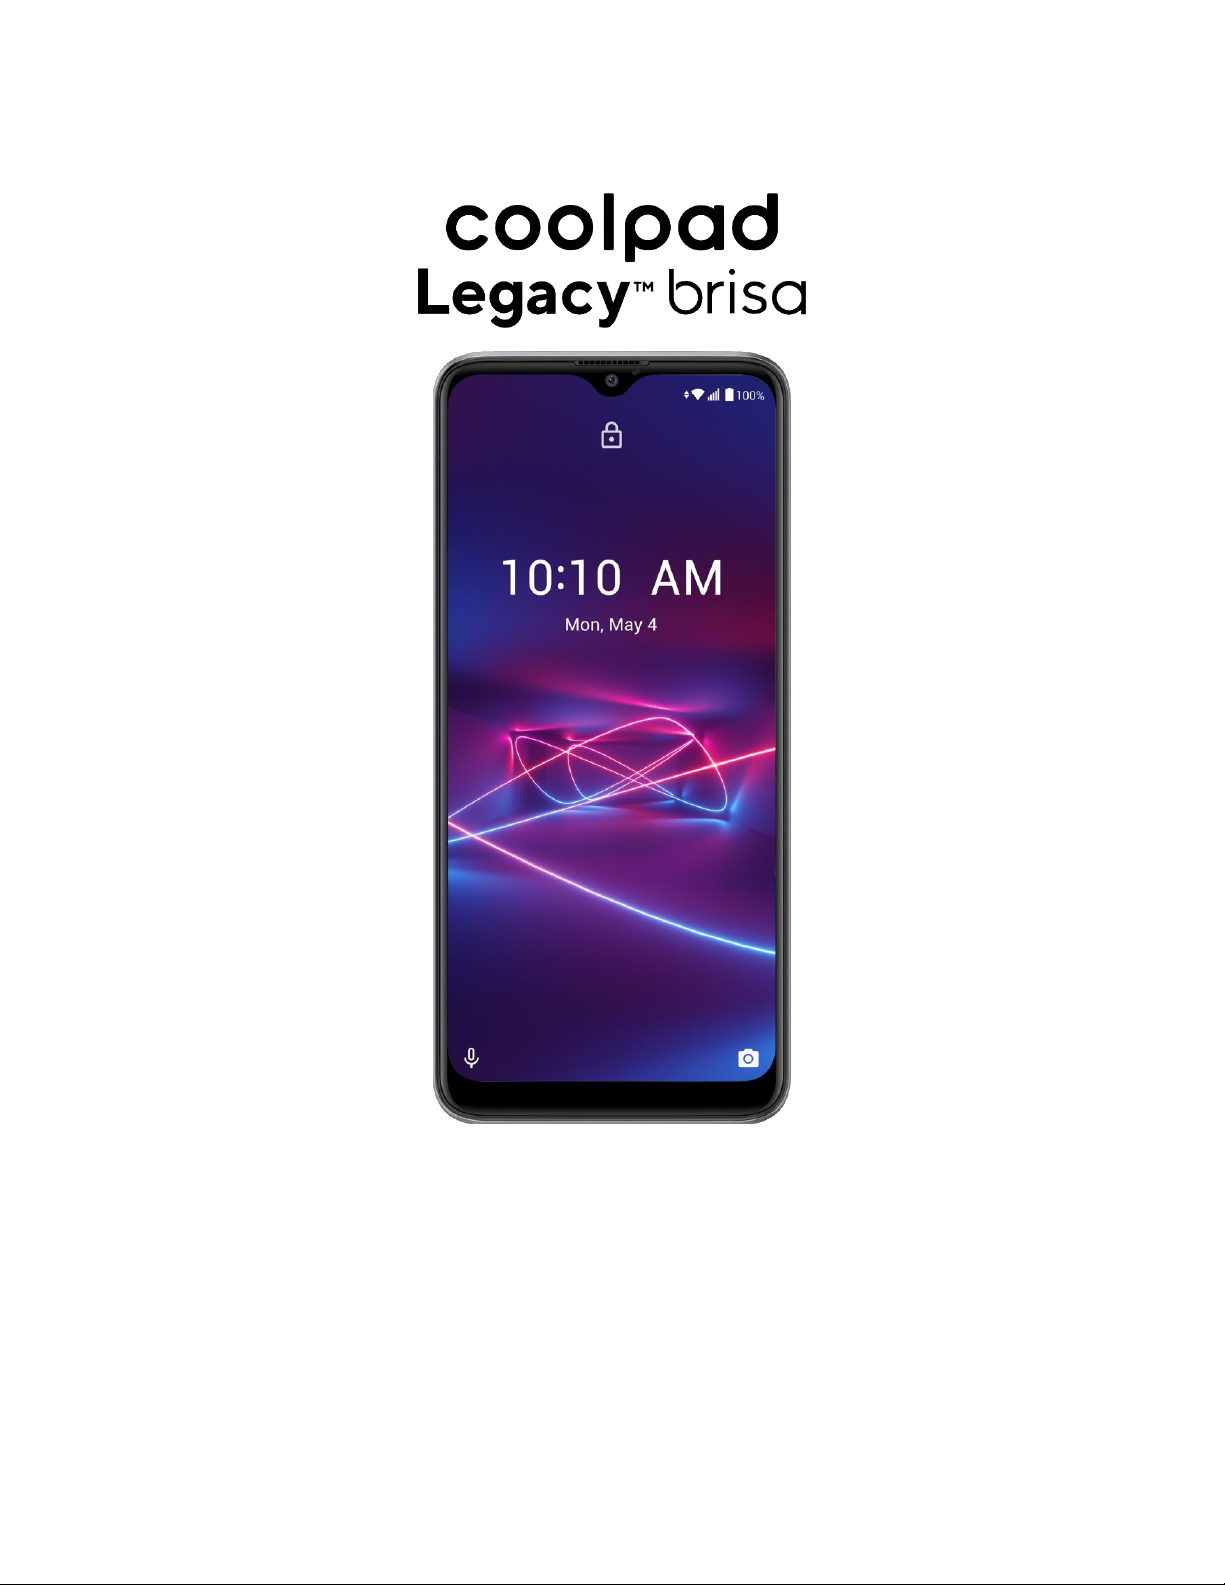
Coolpad Legacy Brisa User Manual
User Guide

TOC i
Table of Contents
Getting Started .............................................................................................................................................. 1
Introduction ........................................................................................................................................... 2
About the User Guide ................................................................................................................... 2
Set Up Your Phone ............................................................................................................................... 3
Parts and Functions ...................................................................................................................... 3
Battery Use ................................................................................................................................... 4
SIM Card ....................................................................................................................................... 6
SD Card ........................................................................................................................................ 7
Turn Your Phone On and Off ...................................................................................................... 10
Use the Touchscreen .................................................................................................................. 11
Boost Activation and Service ...................................................................................................... 13
Complete the Setup Screens ...................................................................................................... 14
Basic Operations ................................................................................................................................. 16
Basics .......................................................................................................................................... 16
Applications ................................................................................................................................. 18
Phone Number ............................................................................................................................ 20
Airplane Mode ............................................................................................................................. 21
Enter Text .................................................................................................................................... 22
Google Account .......................................................................................................................... 23
Google Play Store ....................................................................................................................... 25
Lock and Unlock Your Screen .................................................................................................... 29
Update Your Phone .................................................................................................................... 29
Your Phone's Home Screen ................................................................................................................ 33
Home Screen Basics .................................................................................................................. 33
Status Bar and Notification Panel ............................................................................................... 34
Customize the Home Screen ...................................................................................................... 37
Making Connections .................................................................................................................................... 41
Phone Calls and Voicemail ................................................................................................................. 42
Place and Answer Calls .............................................................................................................. 42
Voicemail ..................................................................................................................................... 50
Call Settings ................................................................................................................................ 52
Contacts .............................................................................................................................................. 56
Add a Contact ............................................................................................................................. 56

TOC ii
View Contacts ............................................................................................................................. 58
Contacts Screen Layout .............................................................................................................. 59
Edit a Contact.............................................................................................................................. 60
Delete a Contact ......................................................................................................................... 61
Share a Contact .......................................................................................................................... 61
Import Contacts ........................................................................................................................... 62
Export Contacts .......................................................................................................................... 63
Messages ............................................................................................................................................ 65
Text and Multimedia Messages .................................................................................................. 65
Gmail ........................................................................................................................................... 70
Internet and Social Networking ........................................................................................................... 76
Chrome Browser ......................................................................................................................... 76
Twitter ......................................................................................................................................... 76
Connectivity ......................................................................................................................................... 78
Transfer Files between Your Phone and a Computer ................................................................ 78
Wi-Fi ............................................................................................................................................ 79
Tethering & Mobile Hotspot ........................................................................................................ 82
Bluetooth ..................................................................................................................................... 84
Apps and Entertainment .............................................................................................................................. 90
Camera and Video .............................................................................................................................. 91
Camera Overview ....................................................................................................................... 91
Take Photos and Record Videos ................................................................................................ 93
View Photos and Videos Using Photos ...................................................................................... 95
Edit Photos .................................................................................................................................. 97
Share Photos and Videos ........................................................................................................... 99
Productivity ........................................................................................................................................ 103
Calendar .................................................................................................................................... 103
Navigation Apps ........................................................................................................................ 106
Google ....................................................................................................................................... 107
Calculator .................................................................................................................................. 107
Clock ......................................................................................................................................... 108
Entertainment and Activities ............................................................................................................. 113
YouTube Music ......................................................................................................................... 113
YouTube .................................................................................................................................... 115
Settings ..................................................................................................................................................... 117

TOC iii
Basic Settings ................................................................................................................................... 118
Basic Settings ........................................................................................................................... 118
Wi-Fi Settings ............................................................................................................................ 119
Data Usage Settings ................................................................................................................. 120
Tethering & Mobile Hotspot Settings ........................................................................................ 121
Bluetooth Settings ..................................................................................................................... 122
Apps & Notifications Settings .................................................................................................... 123
Battery Settings ......................................................................................................................... 124
Display Settings ........................................................................................................................ 124
Sound Settings .......................................................................................................................... 125
Storage Settings ....................................................................................................................... 127
Cool Clean Settings .................................................................................................................. 127
Privacy Settings ........................................................................................................................ 128
Location Settings ...................................................................................................................... 129
Security Settings ....................................................................................................................... 130
Accounts Settings ..................................................................................................................... 135
Accessibility Settings ................................................................................................................ 135
Digital Wellbeing & Parental Controls Settings ......................................................................... 136
Google Settings ........................................................................................................................ 137
Language and Input Settings .................................................................................................... 138
Date and Time Settings ............................................................................................................ 139
Reset Options ........................................................................................................................... 141
About Phone Settings ............................................................................................................... 142
Getting Help .............................................................................................................................................. 144
For Assistance .................................................................................................................................. 145
Troubleshooting ........................................................................................................................ 145
Specifications ............................................................................................................................ 146
Boost Account Information and Help ........................................................................................ 146
FCC Notice and Cautions ......................................................................................................... 148
Consumer Information on SAR ................................................................................................. 148
FCC Hearing-Aid Compatibility (HAC) Regulations for Wireless Devices ................................ 150
Copyright Information ................................................................................................................ 150

1
Getting Started
The following set of topics will introduce you to your phone, help you get set up with service, provide an
overview of the phone screen, and get you started with basic phone operations.

2
Introduction
The following topics describe the basics of using this guide and your new phone.
About the User Guide
Thank you for purchasing your new Coolpad LegacyTM Brisa. The following topics explain how best to use
this guide to get the most out of your phone.
Descriptions in the User Guide
Note that most descriptions in this guide are based on your phone's setup at the time of purchase. Unless
otherwise noted, instructions begin from the phone's home screen, which is displayed by pressing .
Some operation descriptions may be simplified.
Screenshots and Key Labels
Screenshots and other illustrations in this user guide may appear differently on your phone. Key labels in
the user guide are simplified for description purposes and differ from your phone's display.
Other Notations
In the user guide, the phone may be referred to either as "phone," "device," or "handset." A microSD™ or
microSDHC™ card is referred to as an "SD card" or a "memory card."
3
Set Up Your Phone
The following topics give you all the information you need to set up your phone and wireless service the
first time.
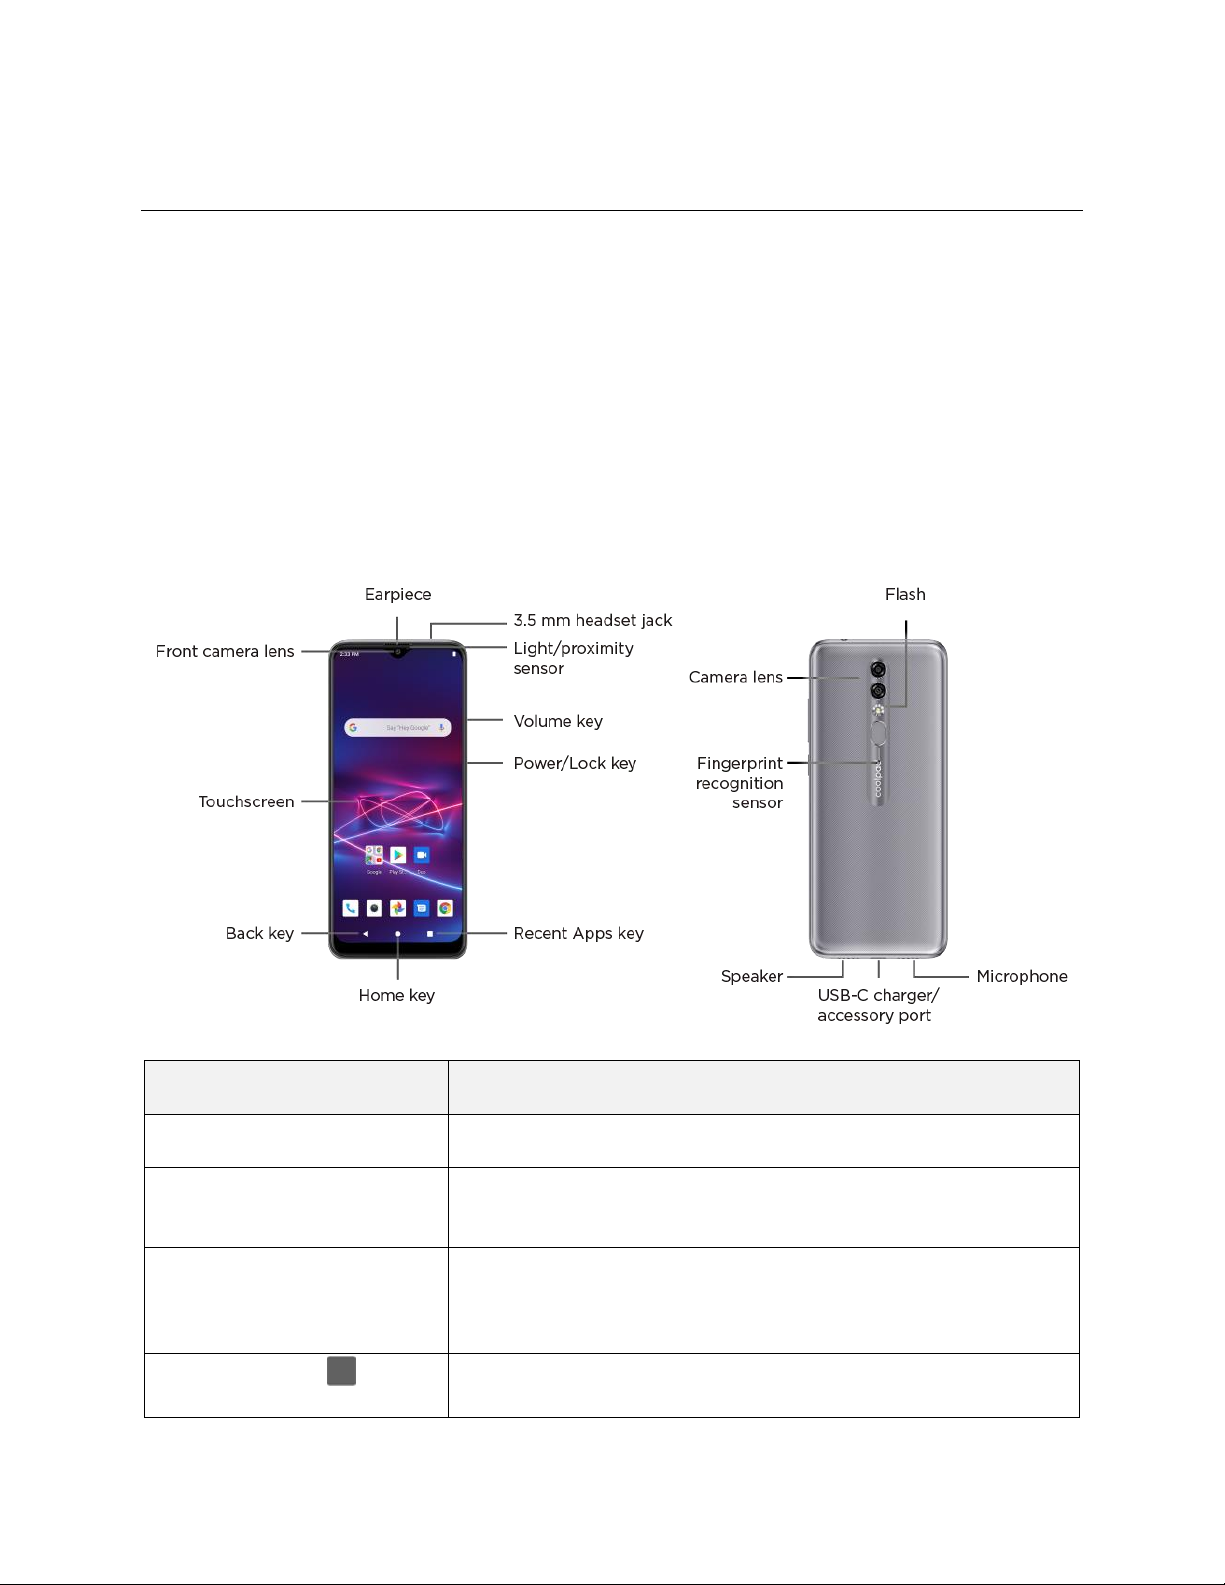
Parts and Functions
These topics illustrate your phone’s primary parts and key functions.
Note: Your phone's screens and app layouts are subject to change. This user guide uses sample images
only.
Phone Layout
The following illustration outlines your phone’s primary external features and keys.
Part
Description
Earpiece
Lets you hear the caller and automated prompts.
Front camera lens
Takes photos and records videos while facing the screen, and
allows you to video conference.
Touchscreen
Displays all the information needed to operate your phone, such as
the call status, and the date and time. Also provides one-tap access
to all of your features and applications.
Recent Apps key
Displays a list of recently used applications.
4
Home key
Returns you to the home screen.
Back key
Lets you return to the previous screen, or close a dialog box, options
menu, the notification panel, or onscreen keyboard.
Camera lens
Lets you take photos and videos.
Power/Lock key
Lets you turn the phone on or off or turn the screen on or off.
Speaker
Lets you hear the different ringtones and sounds. The speaker also
lets you hear the caller’s voice in speakerphone mode.
USB-C charger/accessory
port
Allows you to connect the phone charger or the USB cable
(included).
3.5 mm headset jack
Allows you to plug in either a stereo headset or an optional headset
for convenient, hands-free conversations.
Microphone
Transmits your voice for phone calls or records your voice or
ambient sounds for voice recordings and videos.
Volume keys
Allow you to adjust the ringtone or media volume or adjust the voice
volume during a call.
Flash
Helps illuminate subjects in low-light environments when the camera
is focusing and capturing a photo or video.
CAUTION! Inserting an accessory into the incorrect jack may damage the phone.
Battery Use
Your phone is equipped with a non-removable battery. To replace the battery, take your phone to an
authorized service center.
Battery Cautions
Storage: Avoid storing or leaving battery with no charge remaining. Saved information and settings
may become lost or changed, or battery may become unusable. Charge once every six months
before storing or leaving unused for a long period.
Bulges: Depending on use, bulges may appear near end of battery life. This does not affect safety.
Replacing Battery: The battery is a consumable item. It needs to be replaced if operating time
shortens noticeably. Take your phone to an authorized service center to replace the battery.

5
Charge the Battery
Follow these instructions to charge your phone’s battery using either the included AC adapter or via a
USB connection on your computer.
Charge Using the AC Adapter
1. Plug the USB-C connector into the charger/accessory jack on the bottom of your phone.
2. Plug the other end of the USB cable into the AC adapter.
3. Plug the AC adapter into an electrical outlet.
4. After charging, disconnect the phone from the charger.
Unplug the AC adapter from the outlet, and remove the USB cable from the phone and the
AC adapter.
Charge Using a PC Connection
Before using a PC connection to charge your phone, ensure that the computer is turned on. Depending
on the type of connection, your phone’s battery may not charge.
1. Insert the small end of the USB cord into the charger/accessory jack on the bottom of your phone.
2. Insert the large end of the USB cord into an external USB port on your computer.
3. After charging, remove the USB cable from both the phone and the computer.
Quick Charge Technology
Quick Charge is one of the most frequently used fast charging technologies. This technology is designed
to deliver lightning-fast charging in phones, much faster than conventional charging.
Your Coolpad LegacyTM Brisa supports Quick Charge 3.0. It will only take 2 and a half hours to fully
charge your phone. With the QC 3.0 technology, a 10 minute charge will give your device 2 hours of call
time.

6
SIM Card
The SIM card is an IC card containing phone number and other customer information. Your phone’s SIM
card is preinstalled and should only be accessed if directed by a customer service representative.
Handling a SIM Card
Keep the following in mind when handling a SIM card.
● You are responsible for any damage caused by inserting the SIM card in another-brand IC card
reader, etc. Your carrier is not responsible in such a case.
● Always keep the IC chip clean.
● Wipe clean with a dry, soft cloth.
● Avoid applying labels. May damage SIM card.
● See instructions included with SIM card for handling.
● The SIM card is the property of your carrier.
● The SIM card is replaceable (at cost) in case of loss/damage.
● Return the SIM card to your carrier when canceling subscription.
● Returned SIM cards are recycled for environmental purposes.
● Note that SIM card specifications and performance may change without notice.
● It is recommended that you keep a separate copy of information that is stored on SIM card. Your
carrier is not responsible for damages from stored information that is lost.
● Always follow emergency procedures to suspend service if your SIM card or phone (SIM card
inserted) is lost or stolen. For details, contact Customer Service.
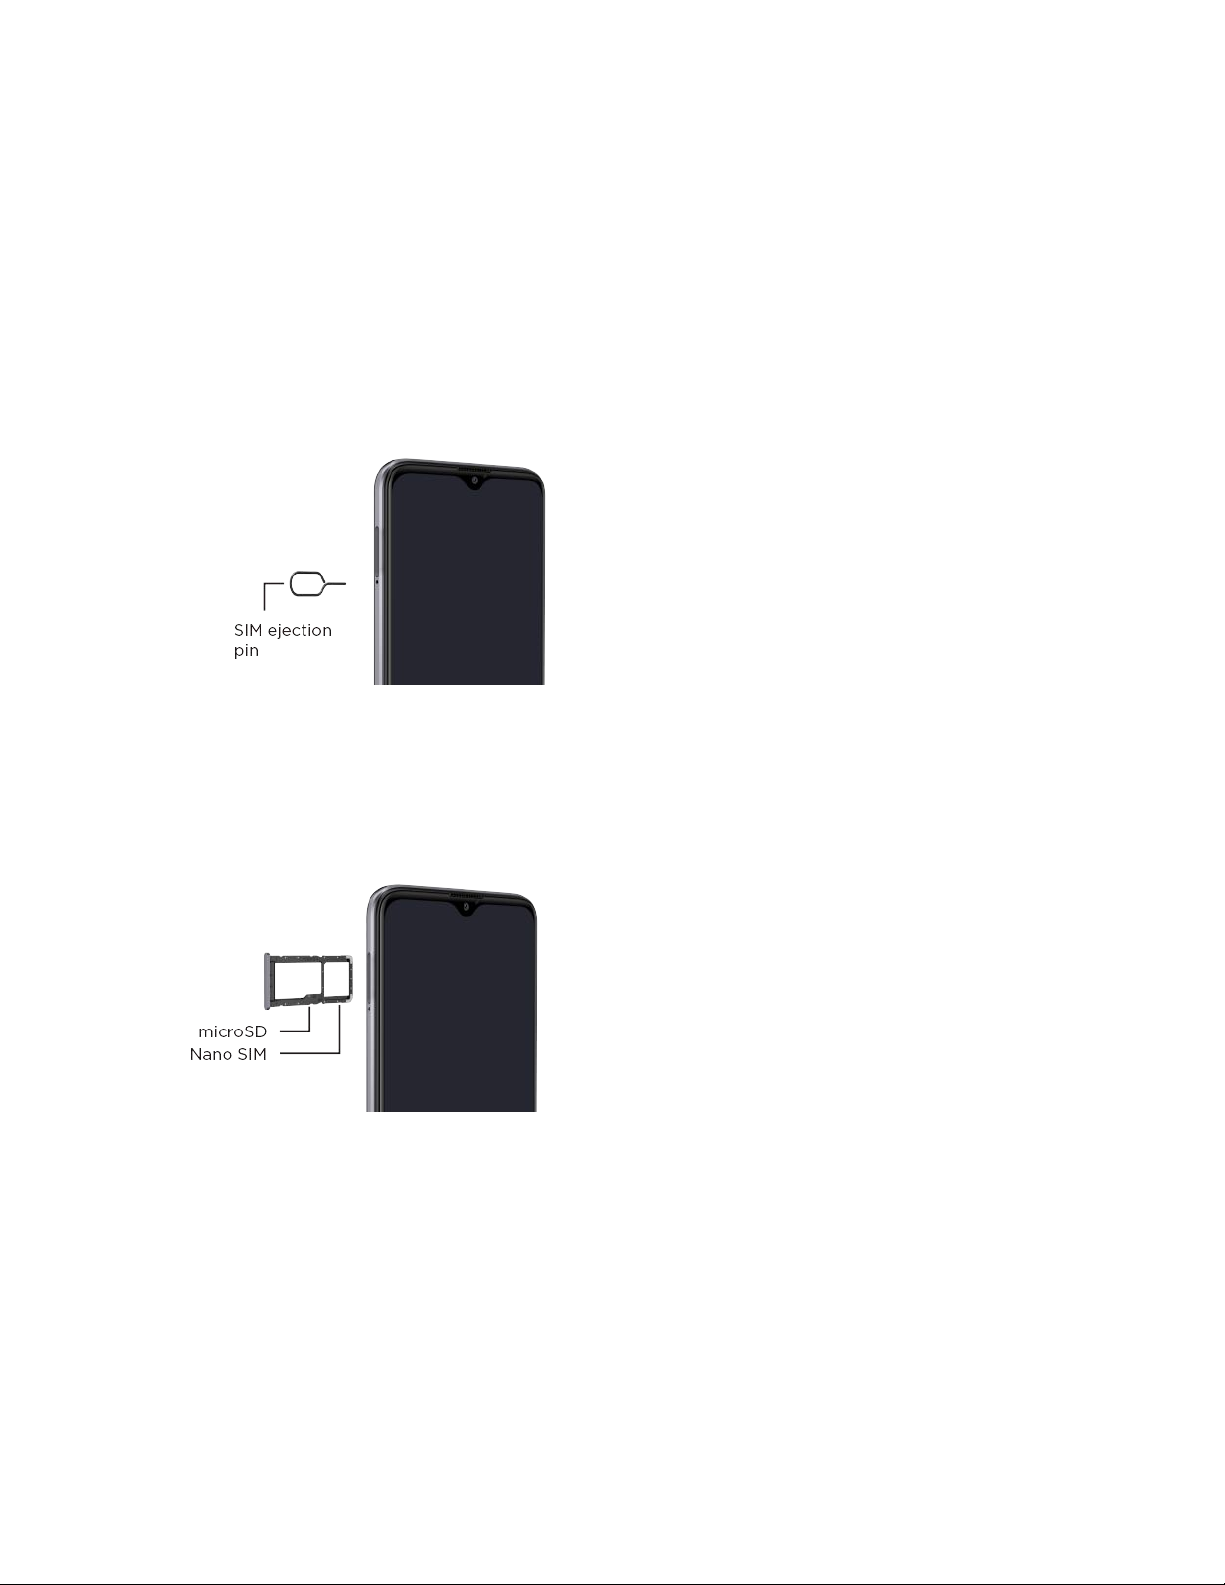
7
● Always power off the phone before inserting/removing the SIM card.
Insert SIM Card
Follow these instructions to insert a SIM card. Remember to power off your phone before inserting a SIM
card.
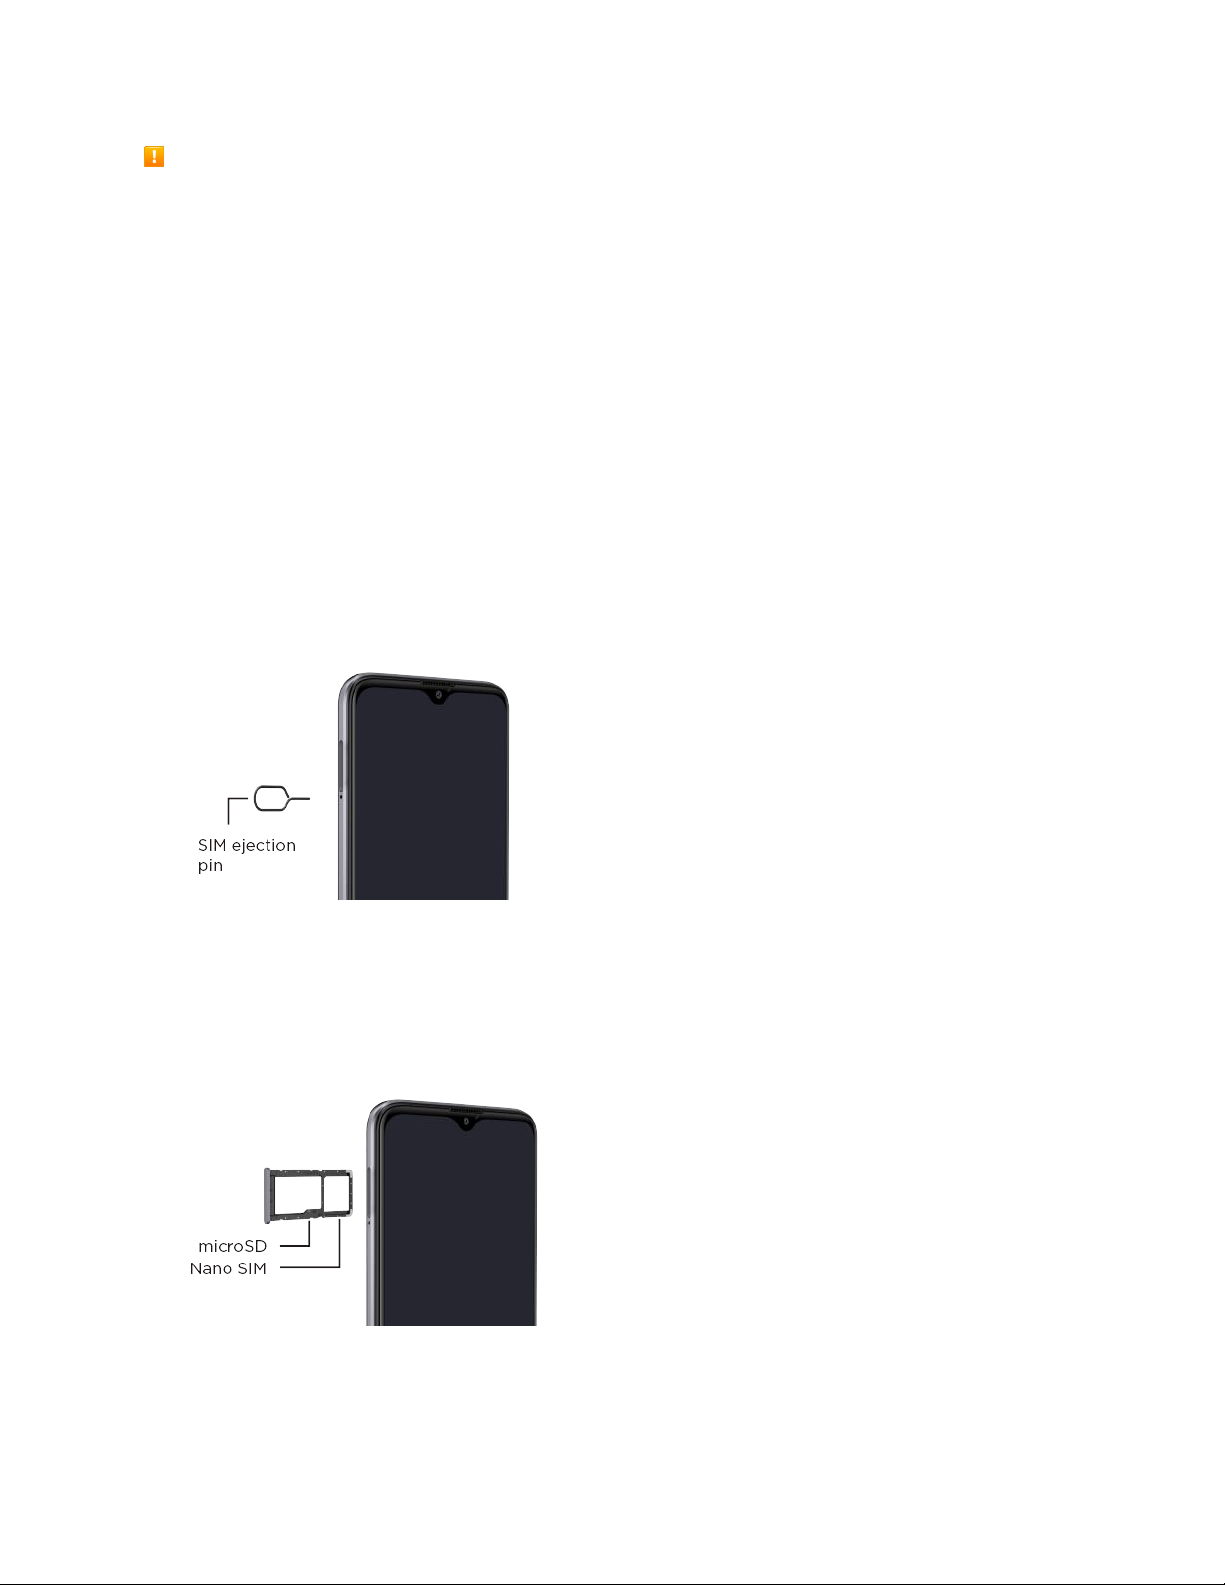
Note: Your phone’s SIM card is preinstalled. These instructions are for reference only.
1. Insert the SIM ejection pin into the hole to open the SIM card tray.
2. Gently pull out the SIM card tray.
3. Place the Nano SIM card in card slot 1.
Note: Please always use the SIM ejection pin to eject the SIM card to ensure the device is not damaged.
SD Card
Your phone supports the use of an optional SD card (not included) to expand its storage capacity. Some
cards may not operate properly with your phone.
8
SD Card Cautions
Data: Information stored on an SD card can become lost or changed accidently or as a result of
damage. It is recommended that you keep a separate copy of important data. Your carrier is not
responsible for damages from data that is lost or changed.
Reading/Writing Data: Never power off while reading or writing data.
Battery Level: A low battery charge may prevent reading/writing to an SD card.
Handling SD Card: Use/store SD cards away from the reach of infants. May cause choking if
swallowed.
Insert an SD Card
Follow these steps to insert an optional SD card (not included). Make sure to power your phone off before
inserting or removing an SD card.
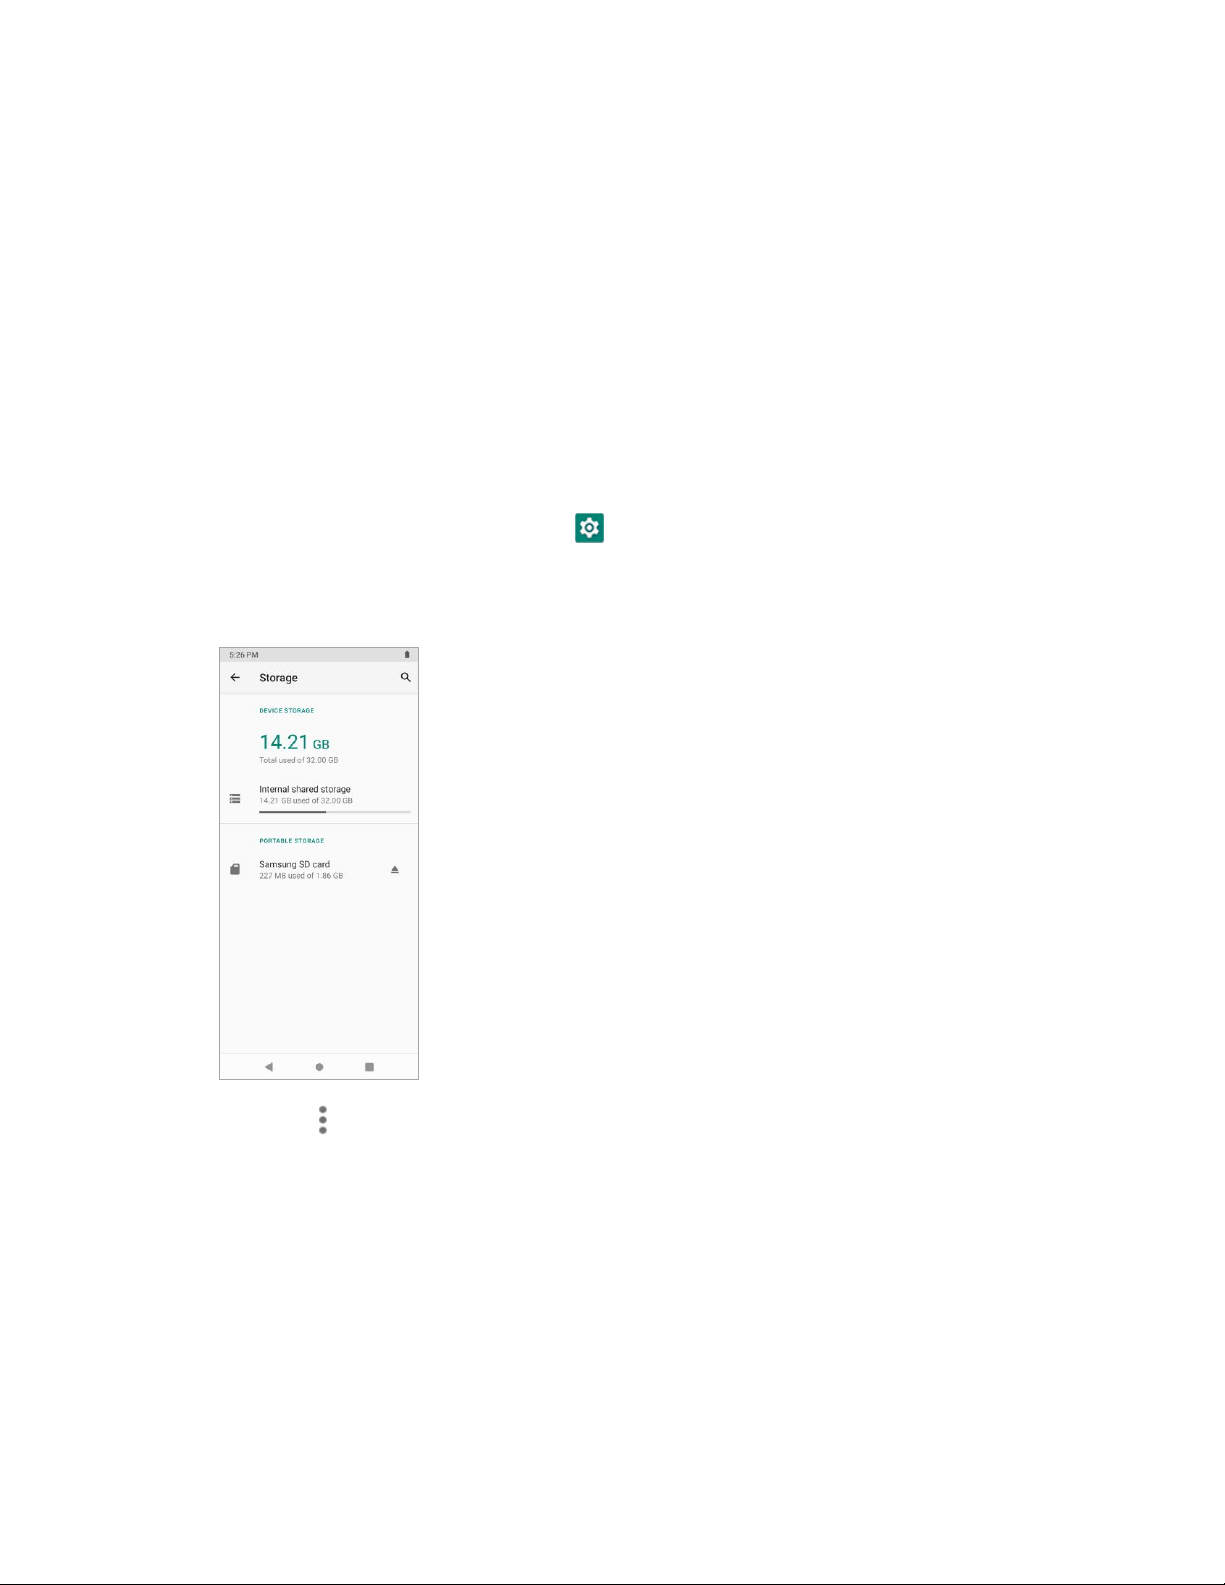
1. Insert the SIM ejection pin into the hole to open the SIM card tray.
2. Gently pull out the SIM card tray.
3. Place the SD card in card slot 2.
9
Remove an SD Card
Follow these instructions to remove an SD card. Always power the phone off before inserting or removing
an SD card.
1. Insert the SIM ejection pin into the hole to open the SIM card tray.
2. Gently pull out the SIM card tray.
3. Remove SD card.
Format an SD Card
When you insert an optional SD card for the first time, it is recommended that you format it on your
phone.
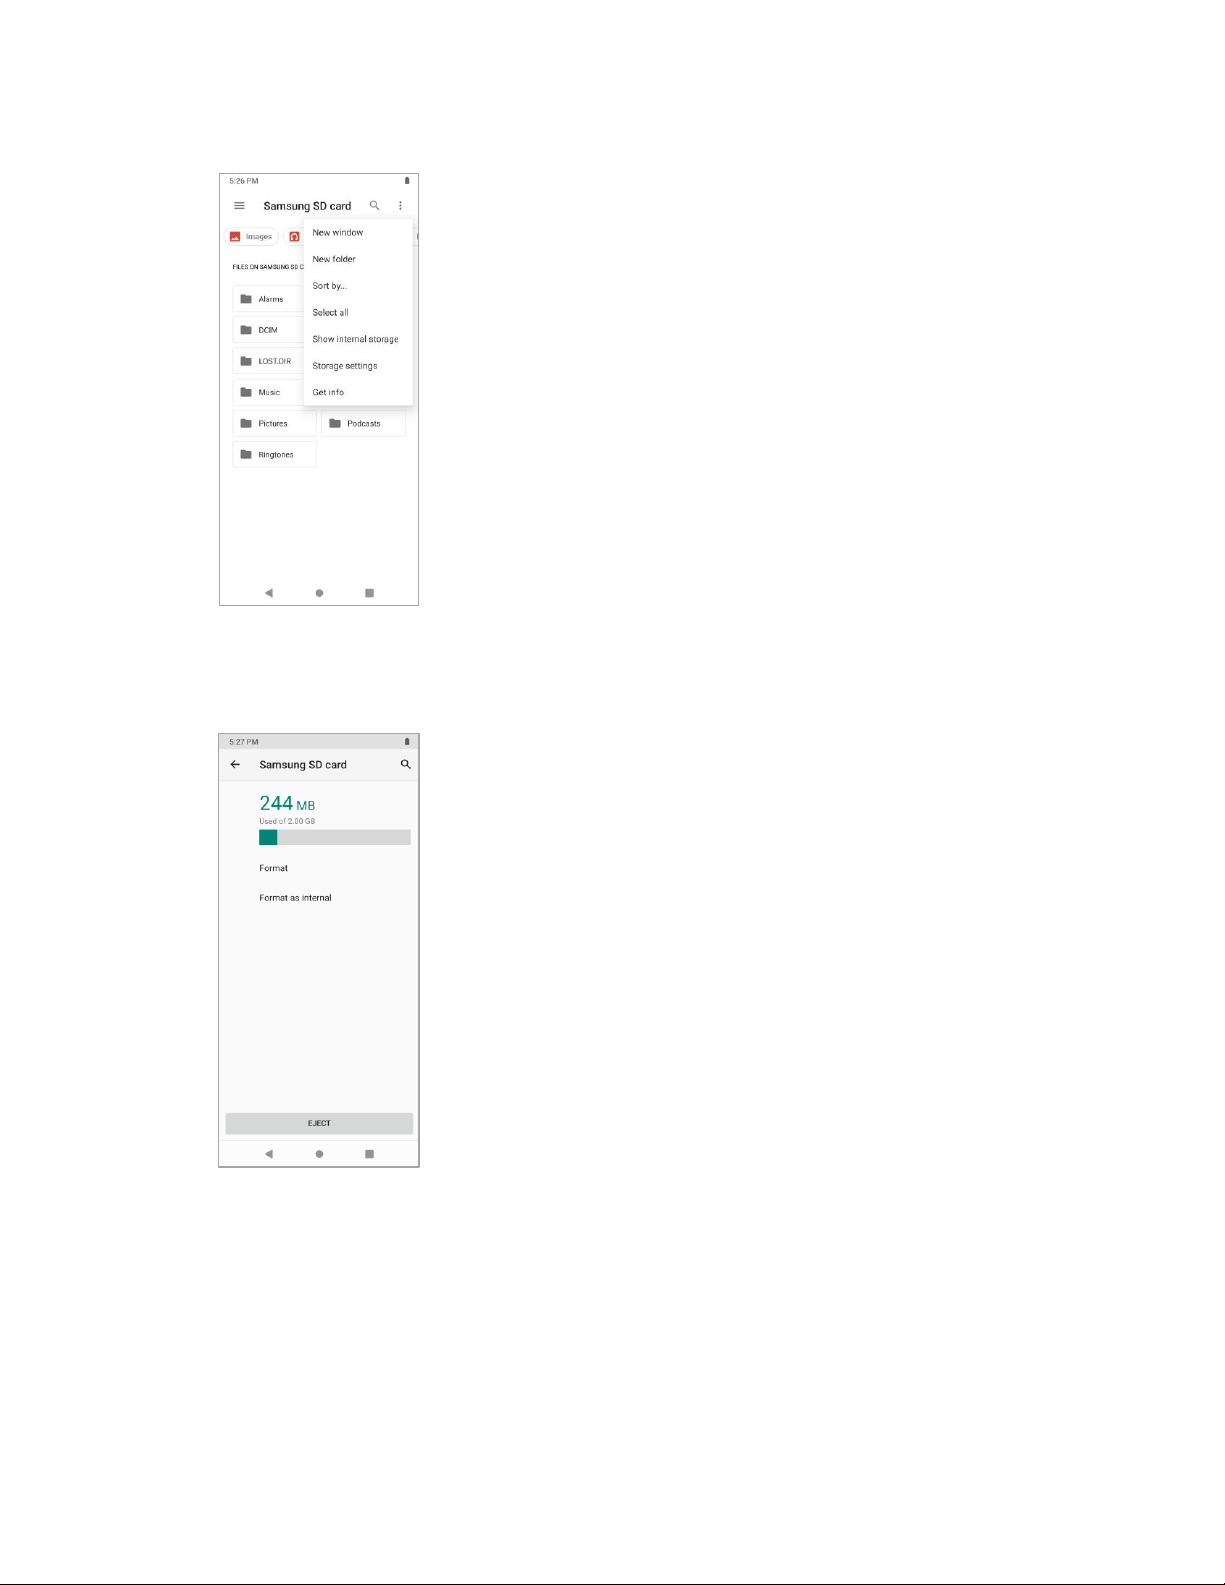
1. From home, swipe up and tap Settings .
2. Tap Storage > SD Card.
3. Tap Menu > Storage settings.
10
4. Tap Format or Format as internal, and then tap Format SD card to confirm.
All data on the SD card is erased, and the card is formatted for use on your phone.
Turn Your Phone On and Off
The instructions below explain how to turn your phone on and off.
Turn Your Phone On
■ Press and hold the Power/Lock key.
11
Your phone will power on. Depending on the settings, you may see the lock screen.
See Lock and Unlock Your Screen and Screen Lock for information about using the screen
lock.
The first time you turn the phone on, you will see the startup screens. See Complete the
Setup Screens for details.
If your phone is not yet activated, see Activate Your Phone for more information.
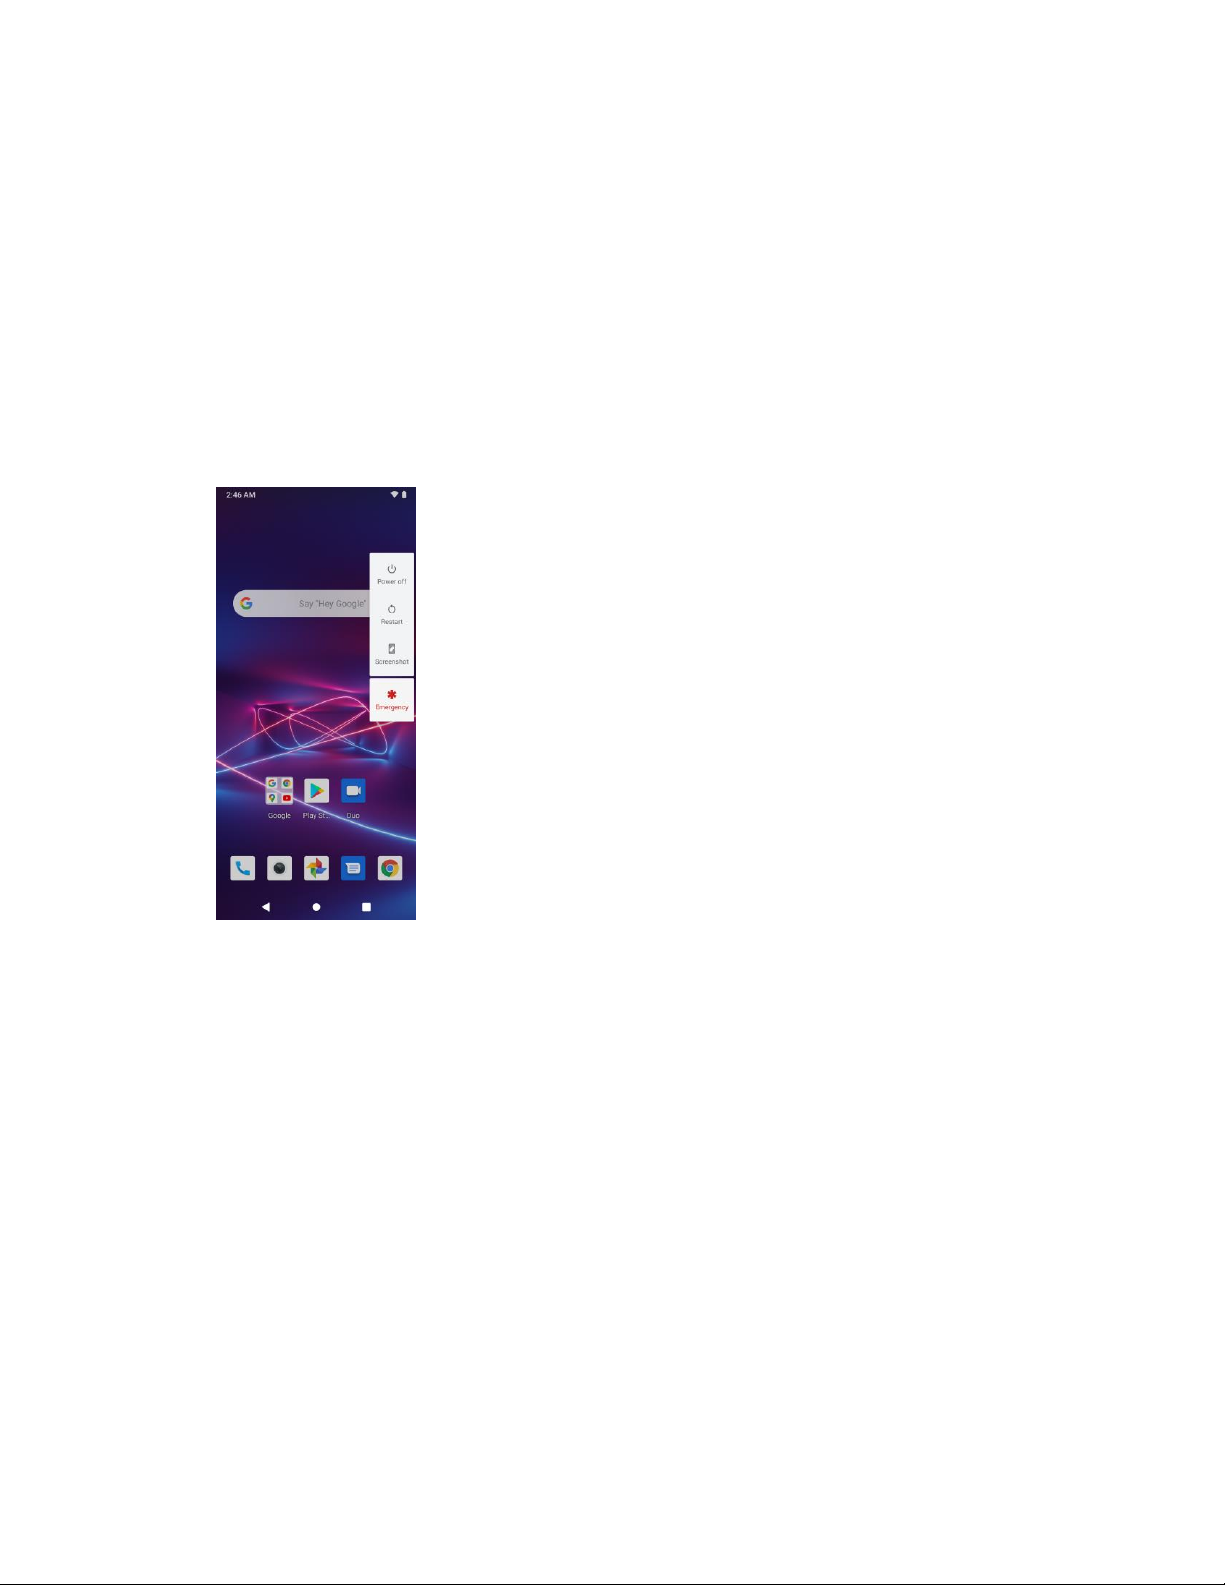
Turn Your Phone Off
1. Press and hold the Power/Lock key to display the device options menu.
2. Tap Power off to turn the phone off.
Your phone will power off.
Your screen remains blank while your phone is off (unless the battery is charging).
Use the Touchscreen
Your phone’s touchscreen lets you control actions through a variety of touch gestures.

12
Tap
When you want to type using the onscreen keyboard, select items onscreen such as application and
settings icons, or press onscreen buttons, simply tap or touch them with your finger.
Tap and Hold
To open the available options for an item (for example, a contact or link in a Web page), tap and hold the
item.
Swipe
To swipe means to quickly drag your finger vertically or horizontally across the screen.
Drag
To drag, press and hold your finger with some pressure before you start to move your finger. While
dragging, do not release your finger until you have reached the target position.

13
Double-tap
Double tap on an image to zoom in. Double tap again to return.
Pinch and Spread
“Pinch” the screen using your thumb and forefinger to zoom out or “spread” the screen to zoom in when
viewing a photo or a Web page. (Move fingers inward to zoom out and outward to zoom in.)
Boost Activation and Service
Before using your phone, you must set up your service with Boost Mobile. You will need your phone’s
serial number (MEID).
For more information about your Boost Mobile account, see Boost Account Information and Help.
Create Your Account and Pick Your Plan
Set up your Boost Mobile account.
1. From your computer, visit boostmobile.com and click Activate.
2. Choose an activation option and click Next.
3. When prompted, enter the serial number (MEID). This number can be found on your phone’s
package.
4. Follow the remaining instructions to choose your plan and select a payment method.
5. Follow the activation instructions below and you’ll be able to start using your phone.
Note: You can also activate by phone by calling 1-888-BOOST-4U (1-888-266-7848) from any other
phone.

14
Activate Your Phone
After setting up your account on boostmobile.com, simply turn your device on. Your device is designed to
activate automatically. If you are swapping from another Boost Mobile device to a new one, be sure to
turn off the old device before swapping the serial number (MEID). Once the MEID swap is complete, turn
on the new device and the programming information will be pushed to your device automatically.
Complete the Setup Screens
The setup screens help you set up certain features and preferences on your phone. Once your phone has
been turned on, you will see a Welcome message. You can then complete the setup process.
Note: You may be able to complete the setup screens before your phone has been activated on your
account.
1. From the Welcome screen, select a language and tap Start to get started.
To skip any section, tap Next or Skip.
Note: On the Welcome screen, there may also be a Vision Settings button. If you are visually impaired
or hard of hearing, tap Vision Settings to change the accessibility settings.
2. Follow the onscreen instructions to complete each section. For each topic, you will have the
option to skip it and continue to the next screen.
Wi-Fi – If prompted, follow the prompts to sign in to an available Wi-Fi network. For secured
Wi-Fi networks, you will need to enter a password. See Wi-Fi for more details.
Date & time – If a network is connected, your phone will automatically set up date and time.
Adjust date and time manually if needed.
Google services – Select your Google location and service options and then tap Accept.
Choose screen lock - Choose a screen lock method and follow the onscreen instructions.

15
Unlock with fingerprint - Enroll your fingerprint to unlock your phone or approve purchases.
Unlock with face - Enroll your face to unlock your phone or approve purchases. Face unlock
is less secure than other unlocking options.
3. Tap Next. Your setup is now complete. Follow the onscreen instructions to learn about basic tap
menu navigation, view tutorials, or just get started.
Your phone is now set up for use. If you skipped any part of the setup, you can access
additional options through the Apps screen or through Settings.
Note: You do not need to sign up for a Google Account to use your phone. However, to download apps
from Google Play, you must link your phone to a Google Account.

16
Basic Operations
The following topics outline basic features and operations of your phone.
Basics
The following topics offer an overview of your phone’s basic operations.
Home Screen and Applications (Apps) List
Most of your phone’s operations originate from the home screen or the apps list.
1. From any screen tap the Home key to display the home screen.
2. Swipe up to display the apps list.
For information about using the home screen, see Home Screen Basics.
Select Options and Navigate Screens
Tap icons, onscreen keys, and other items to open or activate the assigned function.
■ Tap Back to return to the previous screen.
Recent Applications
You can display a list of recently used applications using the Recent Apps key.

17
■ Tap Recent Apps to view a list of recently used applications.
Phone Settings Menu
You can customize your phone’s settings and options through the Settings menu.
■ From home, swipe up and tap Settings .
– or –
Pull down the status bar and tap Settings .
For more information, see Basic Settings.

18
Portrait and Landscape Screen Orientation
The default orientation for your phone’s screen is portrait (vertical), but many apps will change to
landscape orientation (widescreen) when you rotate the phone sideways.
Note: Not all screens will adjust for landscape orientation.
Turn Auto-rotate Screen On or Off
1. Pull down the status bar to display the quick settings menu.
2. Tap Auto-rotate to turn the option on or off.
You may need to scroll left or right to see the Auto-rotate option.
If the Auto-rotate option is not available, tap Edit to display the full options list.
Note: You can also set the Auto-rotate option from the main settings menu. From home, swipe up and tap
Settings > Display > Advanced > Auto-rotate screen.
Capture Screenshots
You can use your phone’s power key and lower part of volume key to capture screenshots.
■ Press and hold the Power/Lock key and lower part of Volume key at the same time to capture a
screenshot of the current screen.
The current screenshot will be captured and stored in the Screenshot album in the phone’s
Photos. From home, swipe up and tap Photos .
Applications
The following topics describe how to access the applications (apps) list and launch apps on your phone.

19
Launch Applications
All installed apps can be accessed and launched from the apps list.
1. From home, swipe up.
The apps list opens.
2. Tap and app icon to launch the corresponding application.
The application opens.
Apps List
The apps list expands to include any apps you download and install on your phone. The following table
outlines the primary apps that have been preinstalled on your phone.
App
Function/Service
Calculator
Perform basic and advanced mathematical calculations.
Calendar
Create and manage events, meetings, and appointments.
Gmail
Send, receive, and manage your Gmail messages.
Play Store
Find new Android apps, books, movies, and music for your phone.
Camera
Take photos and record videos.

20
Chrome
Access both mobile and traditional websites on the go.
Photos
View photos and watch videos.
YT Music
Browse, shop, and play back songs purchased as well as songs you have
loaded from your own music library.
Maps
View your location, get directions, browse local businesses and attractions,
and more.
Clock
Set alarms, view time zones around the world, access stopwatch and timer.
Contacts
Store and manage contacts.
Messages
Send and receive text messages and multimedia messages.
Phone
Place and receive calls, mute the ringer on incoming calls, reject incoming
calls, etc.
Settings
Access your phone's basic settings menu.
YouTube
View videos and upload your own videos to your YouTube account.
Phone Number
Follow the instructions below to display your phone’s wireless phone number.
1. From home, swipe up and tap Settings > About phone.

21
You will see the number listed under Phone number.
Airplane Mode
Airplane mode turns off all functions that emit or receive signals, while leaving your phone on so you can
use apps that don’t require a signal or data.
To turn on airplane mode:
1. Pull down the status bar.
2. Tap Airplane mode .
Your phone is now in airplane mode. You will see the airplane mode icon in the status bar.

22
To turn off airplane mode:
3. Pull down the status bar.
4. Tap Airplane mode .
Your phone’s wireless connection features are now restored.
Enter Text
You can type on your phone using one of the available touchscreen keyboards or Google voice typing.
Touchscreen Keyboards
Your phone offers you a touchscreen keyboard for entering text. The keyboard appear automatically
onscreen when you tap a text entry field, and it can be used in either portrait or landscape mode. You can
also use the Google Voice typing option to enter text using your voice (see Google Voice Typing for
details).
The method is:
● Gboard lets you use a traditional QWERTY setup to enter text. Additional options expand your
ability to enter text faster and more accurately. See Gboard for details.
Note: Keyboard layouts and options may change depending on where you’re using them. For example, if
you’re entering text to do a Web search, a search icon may be available instead of an enter key.
Gboard
The Gboard offers a traditional QWERTY keyboard setup for entering text by tapping keys (like on a
computer), along with enhancements and options that allow you to enter text faster and more accurately,
such as continuous key input, personalized usage dictionaries, and more.

23
Google Voice Typing
Google Voice typing uses Google voice recognition to convert speech to text.
Tips for Editing Text
Your phone gives you many options to make entering text easier, including copying, cutting, and pasting
text, using voice-to-text input, customizing the user dictionary, using predictive text, and more.
Next-word suggestions
1. Tap where you want to type next.
2. Begin typing a word. Choose one of the words displayed above the keyboard.
3. If you do not want to use those words, type the next word without using the space bar.
4. Your phone will continue to present word choices while you type.
Google Account
You will need a Google Account to access several phone features such as Gmail, Maps, Hangouts, and
the Google Play applications. Before you are able to access Google applications, you must enter your
account information. These applications sync between your phone and your online Google Account.
Google Account Cautions
Be sure not to forget your Google Account ID or password.
Create a Google Account
If you do not already have a Google Account, you can create one online or using your phone.
Note: You can also create and sign into your Google/Gmail account through your phone’s Setup
application.
Note: Although you need a Gmail account to use certain features of your phone, such as Google Play,
you do not need to use Gmail as the default account for your phone.
Create a Google Account Online
1. From a computer, launch a Web browser and navigate to google.com.
2. On the main page, click Sign-in > Create an account.
3. Follow the onscreen prompts to create your free account.
4. Look for an email from Google in the email box you provided, and respond to the email to confirm
and activate your new account.
Create a Google Account Using Your Phone
1. From home, swipe up and tap Settings > Accounts > Add account.

24
2. Tap Google and then tap Create account.
3. Follow the prompts to set up your account. Tap Next to proceed between steps, which may
include:
Enter your First name and Last name.
Enter your birthday and gender.
Pick a Gmail address or create your own.
Create a password.
4. Tap Agree.
You are signed in to your Google Account, and your phone will synchronize the selected items.
Sign In to Your Google Account
If you have a Google Account but have not yet signed in with your phone, follow these instructions to sign
in to your Google Account.
1. From home, swipe up and tap Settings > Accounts > Add account.

25
2. Tap Google, and then tap Email or phone.
3. Enter your Gmail address and password, and then tap Next.
4. Tap I agree.
You are signed in to your Google Account, and your phone will synchronize the selected items.
Google Play Store
Google Play™ is the place to go to find new Android apps, books, movies, and music for your phone.
Choose from a wide variety of free and paid content ranging from productivity apps and games to
bestselling books and blockbuster movies and music. When you find what you want, you can easily
download and install it on your phone.
To access the Google Play store app, you must first connect to the Internet using your phone’s Wi-Fi or
mobile data connection and sign in to your Google Account. See Browser and Sign In to Your Google
Account for details.
Installing Applications
Many different kinds of applications can be installed on your phone from Google Play (provided by
Google Inc.). Your carrier is not responsible in any way for user-installed applications (quality,
reliability, legality, fitness for a purpose, credibility, accuracy, etc.) or resulting malfunctions (viruses,
etc.).
Important: Our policies often do not apply to third-party applications. Third-party applications may access
your personal information or require us to disclose your customer information to the third-party application
provider. To find out how a third-party application will collect, access, use, or disclose your personal
information, check the application provider’s policies, which can usually be found on their website. If you
aren’t comfortable with the third-party application’s policies, don’t use the application.

26
Find and Install an App
When you install apps from Google Play app and use them on your phone, they may require access to
your personal information (such as your location, contact data, and more) or access to certain functions
or settings of your phone. Download and install only apps that you trust.
1. From home, swipe up and tap Play Store .
2. Browse through the categories (Games, Apps, Movies & TV, Books), find an item you're
interested in, and tap the name.
Browse through featured apps. Scroll through the list of featured apps when you open Google
Play.
Search for an app. Tap Search for apps & games on the top of the home screen, enter the
name or type of app you’re looking for, and then tap on the keyboard.
3. Tap an app to read a description about the app and user reviews.
4. Tap Install (for free applications) or the price (for paid applications).
Note: If you have not already done so, you will need to set up a payment method to purchase paid apps
from Google Play.
The selected app is downloaded and installed on your phone.
Warning: Read the notification carefully! Be especially cautious with applications that have access to
many functions or a significant amount of your data. Once you tap OK on this screen, you are responsible
for the results of using this item on your phone.
 Loading...