

Page 1

Coolpad E570
User Manual
Page 2

A MESSAGE FROM COOLPAD
Thank you for purchasing your Porto S E570 mobile phone!
Please follow these simple - but important - instructions for
optimal use of your new phone:
Before using your phone for the first time, please carefully read
this User Guide, especially the safety information.
Note: Products or services of the vendor or carrier are subject to
change within this User Guide without prior notice.
Application features and functions may vary among countries,
regions or hardware specifications, and any third-party
application malfunctions are the responsibility of those
manufacturers.
Exercise caution when editing User Registration Settings as this
may cause functional or compatibility problems for which Coolpad
will not be responsible.
Most of all, we want you to thoroughly enjoy your new Porto S
E570 phone and get the most out of all of its remarkable features!
Please note that high volume can damage your ears.
Please note that absence of WiFi will use your data which could
cost you amount of money according to your tariff with operator.
For more detailed information over features and safety
precautions, please refer to User guide in the operating system
and Safety and regulatory guide.
User guide app can be launched by tapping Porto S E570! icon
on the Home screen.
For more detailed information on safety precautions, please refer
to Safety and regulatory guide.
In the event of a problem, please use the included handbooks. If
the problem persists, contact the vendor or visit our website
www.coolpad.eu or contact us directly by email at
Europe@coolpad.com for our local technical support.
1
Page 3

TRADEMARKS AND COPYRIGHTS
Copyright © 2015 Coolpad Technologies Inc. All Rig hts R eserv ed.
All materials in this document including, without limitation, the
design, the text, and any and all marks (unless otherwise
indicated) are the property of Coolpad Technologies, Inc.
Coolpad and the Coolpad logo are registered trademarks of
Yulong Computer Telecommunication Scientific (Shenzhen) Co.,
Ltd. Google, Android, Gmail, Hangouts, Google Play, YouTube
and additional related marks are trademarks of Google Inc.
Note: Pictures shown are for illustration only and do not represent actual devices.
2
Page 4
GETTING STARTED
Get off to a running start with your new Coolpad E570!
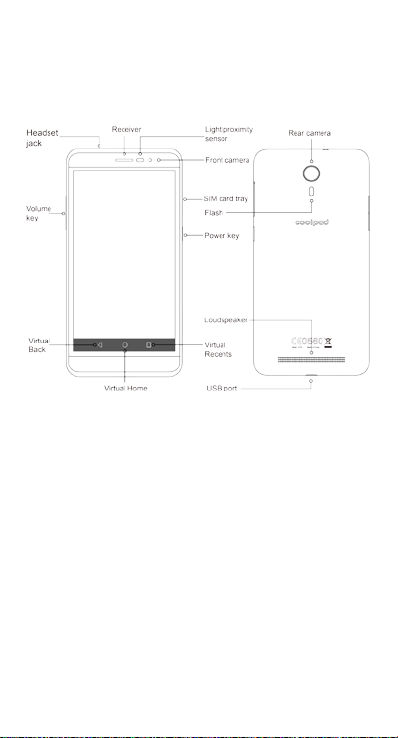
Device layout
3
Page 5
Main keys
Power
• Press and hold to turn your phone on or off.
• Press to turn on or lock the screen.
Recents
Home
Volume
Key Function
• Tap to open the list of recent apps.
• Tap to return to the Home screen.
• Tap to return to the previous screen.
Back
• Press to adjust the phone volume.
Charging the battery
1. Connect one end of the data cable to the USB port. This is
located at the bottom of the phone.
2. Connect the other end to the travel adapter.
3. Connect the travel adapter to an electrical outlet to fully
charge the phone.
Note:
• Use the travel adapter that comes with the phone; using
other adapters may damage your phone.
• Charging your phone through a USB cable that is attached
to a laptop takes more time than charging it with the travel
adapter.
• The phone will power off automatically when the battery is
too low. Charge the battery if this happens. When the
battery is critically low, the charging status may not be
displayed immediately (you must w ait be fore i t is di splay ed).
Using the phone to play games or perform other activities
during the charging process may cause the phone to power
off due to low battery.
• The battery will gradually discharge if it is left unused for
a long period of time. Before using the battery again, you
must recharge it in order to power on and use your phone
normally.
4
Page 6
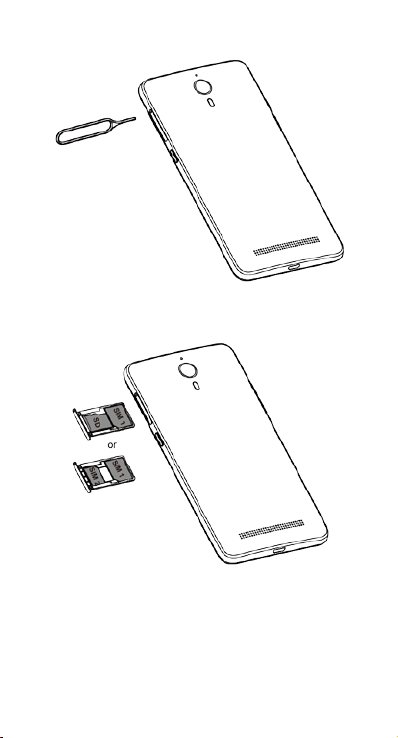
SIM card and Micro SD card
1. Insert the ejection pin into the hole to loosen the card tray.
2. Pull out the card tray gently. Place the Micro SIM card on
the card tray 1 and place Nano SIM card or Micro SD card
on the card tray 2.
5
Page 7
Power on/off, Restart and Aeroplane mode
The Power key is located on the upper, right-hand side of your
phone.
Power on: When the phone is off, press and hold the Power key
for a few seconds to turn on the phone.
Power off: When the phone is on, press and hold the Power key
until the options pop up. Select Power off to turn off the phone.
Restart: When the phone is on, press and hold the Power key
until the options pop up. Select Restart to restart the phone.
Airplane mode: When the phone is on, press and hold the
Power key until the options pop up. Select Airplane mode and the
phone will automatically disable all signal transmission.
Note: You can also tap on the Home screen and then tap
Wireless & networks > More > Airplane mode.
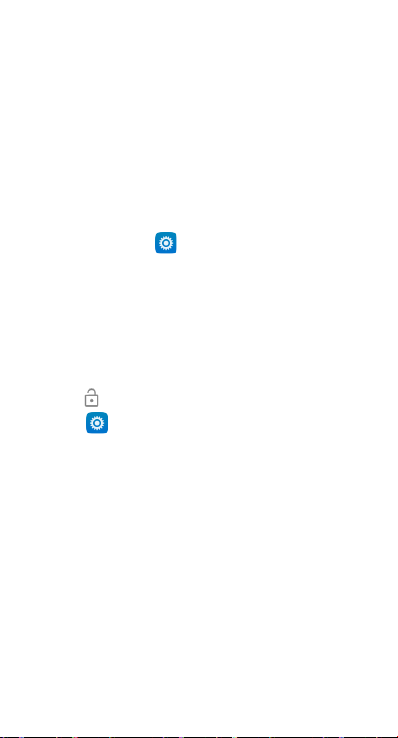
Locking/unlocking the screen
Locking the phone turns the screen off and prevents unintended
operations. To lock the screen while using the phone, simply
press the Power key. Also, if t he ph one is not used for a specified
period of time, the screen turns off and automatically locks.
To unlock the screen, press the Power key to turn on the screen
and slide up.
Note: Tap > Security > Screen lock > Pattern to set the
type of lock screen.
6
Page 8
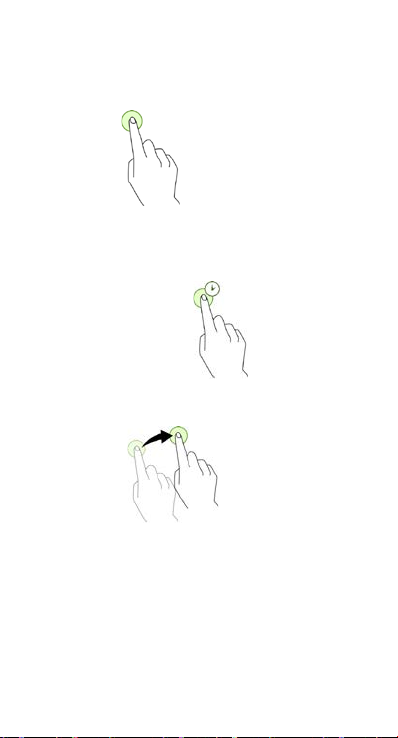
Touch screen
Tapping
To open an app or to launch other functions, tap it with your
finger.
Tapping and holding
Tap and hold an item or the screen for more than 2 seconds to
access available options.
Dragging
To move an item, tap and hold it and drag i t to the t arget position.
7
Page 9
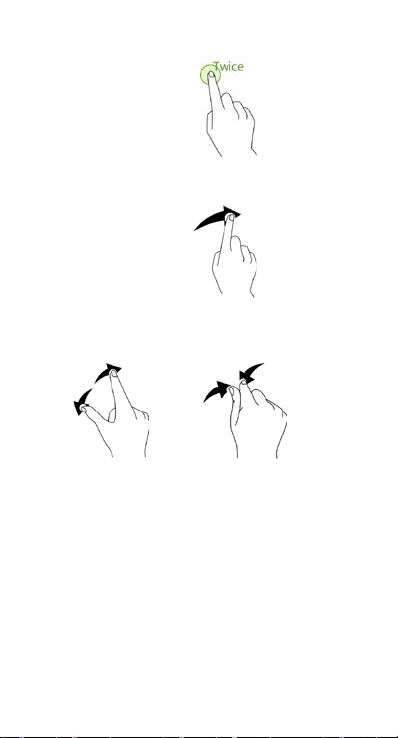
Double-tapping
Double tap on an image to zoom in. Double tap again to return.
Swiping
Swipe left or right on the Home screen to view other panels.
Spreading and pinching
Spread two fingers apart on a webpage or image to zoom in a
part. Pinch to zoom out.
8
Page 10

Home screen
Basic layout
Customizing your Home screen
The Home screen displays widgets, favorite apps, and more. To
view other panels, swipe left or right.
On the Home screen, tap and hold an empty area to access the
available options including changing wallpaper settings and add
widgets.
• To add widgets, tap and hold an empty area on the Home
screen, tap Widgets , tap and hold a widget, and then
drag it to the Home screen.
• To move an app, tap and hold an item on the H ome scr een,
and then drag it to a new location. To move the item to
another panel, drag it to the side of the screen.
• To remove an item, tap and hold the item. Then, drag it to
Uninstall at the top of the screen.
• To create a folder, tap and hold an app, and then drag it
over another app; drop the app when a folder frame
appears around the apps; a new folder containing the
selected apps will be created. To add more apps to the
folder, tap and hold another app, and then drag it to the
folder. To rename the folder, tap the folder and then tap the
folder name.
9
Page 11
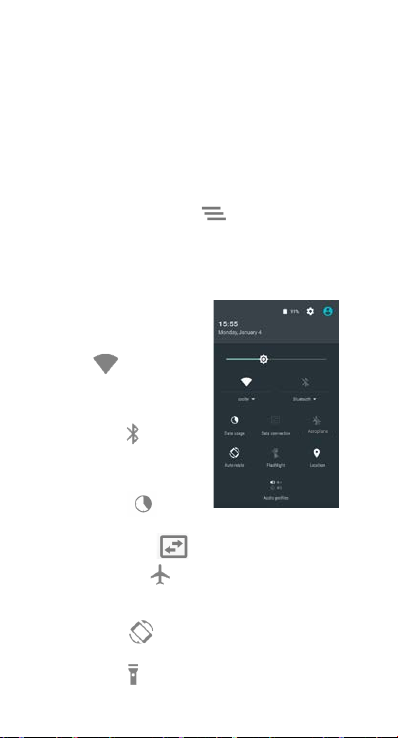
Notifications and Quick Settings panel
Notifications alert you to the arrival of new messages, calendar
events, and alarms, as well as ongoing events.
• When a notification arri ves, its icon appears at the top o f t he
screen. Icons for pending notifications appear on the left,
and system icons showing things like the Wi-Fi signal,
mobile carrier signal, or battery strength are on the right.
• Swipe down from the top of your phone screen to open the
notification panel and view details.
• When you’re finished with a notification, swipe it away. To
dismiss all notifications, tap at the bottom right of the
notifications list.
Use Quick Settings to easily get to frequently used settings, like
turning on aeroplane mode. To access the Quick Settings panel,
swipe down from the top of your phone screen twice with one
finger or once with two fingers.
To change a setting, just tap the
icon:
• Wi-Fi: Turn Wi-Fi on
or off. To open Wi-Fi
settings, tap the Wi-Fi
network name.
• Bluetooth: Turn
Bluetooth on or off. To
open Bluetooth settings,
tap the word “Bluetooth”.
• Data usage: See
cellular usage data
• Data connection: Turn on or off cellular data.
• Airplane mode: Turn airplane mode on or off.
airplane mode means your phone won’t connect to Wi-Fi or
a cell signal, even if one is available.
• Auto-rotate: Lock your device’s orientation in portrait
or landscape mode.
• Flashlight: Turn the torch on or off.
10
Page 12
• Location: Turn the location service on or off.
• Display brightness: Slide to lower or increase the
brightness of your screen.
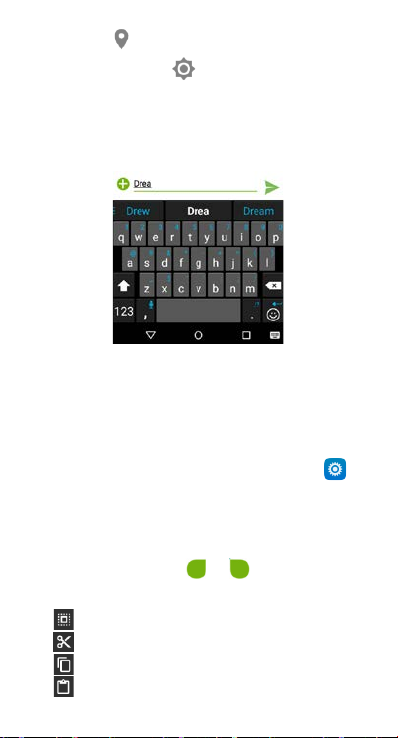
Entering text
Using the text input panel
The input panel can be used to enter text. Tap the Back key to
hide the input panel. Tap the text input area to open the input
panel.
Switching input methods
Your phone comes with multiple text-input methods. You can
choose one of them to input text.
1. To change your phone's default input method, tap on
the home screen.
2. Under Personal, tap Language & input > Current
keyboard, and then select an input method.
Editing text
Tap and hold over text. Drag or to select the desired
text. You can use the icons that appear on the top right of the
screen to quickly edit the text.
• : Select all text.
• : Cut selected text.
• : Copy selected text.
• : Replace text with the text you previously cut or copied.
11
Page 13

Taking screenshots
1. Focus on the image displayed on your phone screen.
2. Press the Power key and lower Volume key at the same
time.
3. The image will be auto-saved in Photos.
12
Page 14

APPS
Installing or uninstalling apps
To purchase and download apps, tap to enter the Play
Store.
Note: Apps can also be downloaded from web pages using the
phone browser or third-party app download software.
Installing apps
Browse apps by category or tap to search for a keyword.
Select an app to view information about it. To downl oad fre e apps ,
tap Install. To purchase and download apps where charges
apply, tap the price and follow the on-scr ee n i nst r ucti ons .
Uninstalling apps
On the home screen, tap and hold an app and then drag it to
Uninstall at the top of the screen.
Note: Some pre-installed apps can't be uninstalled.
Phone
You can place calls from the Phone app, the Contacts app, or
other apps or widgets that display contact information. Wherever
you see a phone number, you can usually tap it to dial.
Making a call
1. Tap on the Home screen.
2. Tap to open the keypad and enter a phone number.
3. Tap at the bottom of the screen to make a call.
Note: To avoid affecting the quality of the call, do not cover the
receiver or speaker when making or answering a call.
Making a call from contacts list
1. On the Phone screen, tap Contacts to open the contacts
list.
2. Tap a contact to make a call.
Making a call from recent calls
1. On the Phone screen, tap Recents to view recent calls.
2. Tap a call to make a call.
Speed dial
1. On the Phone screen, tap Speed dial.
13
Page 15

2. Tap > Settings > Speed dial.
3. Tap a number key and choose a contact from the list.
4. Tap the keypad, tap and hold the number key assigned to a
contact to quickly call the contact.
Note: The number key 1 is the default key for voicemail. It can't
be set as a speed-dial number.
Answering or rejecting a call
When a call comes in, there are various options available.
• To answer a call, slide towards on the right.
• To reject a call, slide towards on the left.
• To reject the call and send an SMS message to the caller,
slide towards
on the top.
Note: When a call comes
in, you can press the
volume button to mute the
ringtone. To create various
rejection messages, tap
> Settings >
General > Other > Quick
responses on the Phone screen to edit the messages.
During a call
During a call, you can do any of the following:
• Speaker: Activate the speakerphone to hear the caller on
the loudspeaker (so you don’t need to hold it to your ear).
• Mute: Turn off the microphone so that the other party
cannot hear you.
• Keypad: Open the keypad and enter another number.
• Hold: Put the current call on hold.
• Add call: Dial a second call.
• Start recording: Record during a call
• : End the current call.
Exploring recent calls
Recent calls contain your history of calls received, missed or
made. It's an easy way to redial a number, return a call or add a
number to your contacts.
1. Tap to enter the Phone screen.
14
Page 16

2. Tap Recents to view a list o f your most r ecen t inc oming an d
outgoing calls.
3. Tap and then choose Call history to see more calls.
Arrow icons beside a call indicate the type of call, and
multiple arrows indicate multiple calls:
• Missed call
• Incoming call
• Outgoing call
You have the following options for recent calls:
• Tap a number or contact, and then tap Details for more
information about the call.
• Tap Redial to dial the number.
• Under Details, tap to delete the call.
• Under Details, tap > Edit number before call, to
make changes to the call back number.
Contacts
The Contacts app easily saves all of your important contact
information including contact names, numbers and email
addresses.
Adding a contact
1. Tap on the Home screen.
2. Tap and enter the contact information.
3. Tap to save it.
Note: To add a phone number to the contacts list from the
keypad, enter the number and tap Add to contacts.
Managing contacts
Adding a contact to Favourites
1. On the Contacts screen, select the contact you want to add
to Favourites.
2. Tap at the top right of the contact name. The star will
fill colour ( ) to indicate that the contact has been added
to Favourites.
Searching for a contact
1. On the Contacts screen, tap .
2. Enter keywords in the search box. Search results will be
displayed below the search bar.
15
Page 17

Note: You can also slide the scroll bar at the right of Contacts to
quickly search for a contact.
Editing a contact
1. On the Contacts screen, select the contact you want to edit
and then tap .
2. Edit relevant information and then tap to save the
contact. Alternatively, tap > Discard changes to
cancel your changes.
Deleting a contact
1. On the Contacts screen, select the contact you want to
delete and then tap > Delete.
2. Tap OK to confirm that you want to delete the contact.
Importing contacts from SIM card/storage
1. On the Contacts screen, tap > Import/export, and
select the corresponding option.
2. Select one or multiple contacts and tap OK.
3. On the pop-up window, tap OK to finish copying the
contact(s).
Messaging
On the Home screen, tap to enter the Messaging screen.
Creating a message
1. On the Messaging screen, tap .
2. Enter the recipient's number or you can tap to select
contacts.
3. Add your message. Tap to attach media files such as
photo, audio and slides.
4. Tap to send the message.
Note: An SMS will be sent as an MMS when media files are
added.
Replying to a message
1. On the Messaging screen, select the message you want to
reply to.
2. Compose your message and tap to send it.
16
Page 18

Searching messages
1. On the Messaging screen, tap
2. Enter message content or keywords to quickly search for
the message you need.
Deleting a message
1. On the Messaging screen, tap and hold the message
conversation you want to delete.
2. Tap to delete the message conversation.
Customising message settings
On the Messaging screen, tap > Settings to configure SMS,
MMS, message notifications and other settings.
Setting up & using Gmail
The Gmail app allows you to read and compose emails.
On the Home screen, tap to enter the Gmail screen. Here
Gmail has various uses. For instance, utilize your Gmail account
for signing in to all Google apps & services including but not
limited to:
• Google Play Music
• Google Play Store
• Google Drive
Getting familiar with
your Email app
• On the Home screen, tap
to enter the Email
screen. When using it for
the first time, you need to
enter your email address
and password to configure
an account.
• After your email account
is configured, you can
archive, delete, label, or
perform other mail
operations.
• Tap the icon on the left of a mail thread to select it.
17
Page 19

• After opening a mail, swipe to the left or right to read earlier
or later mail conversations.
• Tap at the top of your phone screen to manage your
mails.
• On the Email screen, you can tap > Settings to add a
new email account.
• On the Email settings screen, tap an email account and
customize your Email settings.
Chrome
On the Home screen, tap to browse the Internet to search
for information and bookmark your favourite webpages to access
them conveniently.
Browsing web pages
1. Tap the address field
2. Enter the web address or a keyword to browse the web
page.
Managing bookmarks
Adding a bookmark
1. Open the web page you want to bookmark.
2. Tap > .
3. Enter the bookmark name and tap Save to add the
bookmark.
Opening a bookmark
1. On the Chrome screen, tap > Bookmarks.
2. Select the bookmark of the website you want to view.
Customising browser settings
1. On the Chrome screen, tap > Settings.
2. On the Settings list, you can select menus to customise the
browser.
18
Page 20

Calendar
On the Home screen, tap to enter the Calendar screen.
• If you have synced your Gmail account, the first time you
open the Calendar app on your phone; it will show your
current calendar events.
• To modify the Calendar
view, tap and
choose Schedule, Day,
3 Day, Week, or Month
from the top of the
Calendar screen.
• View or edit event
details by tapping an
Event.
Camera
You can use your phone to
shoot and share both photos
and videos.
Taking a photo
1. On the Home screen, tap to enter the Camera screen.
2. Focus on your subject by looking through your phone
screen.
3. Tap to take a photo.
Creating a video
1. On the Home screen, tap to enter the Camera screen.
2. Tap to start recording a video.
3. Tap to stop when you finish recording.
Sharing a video or photo
1. On the Home screen, tap to enter the Photos screen.
2. Select a video or photo and tap .
3. From the pop-up screen, select your desired sharing
method.
19
Page 21

Fotos
Find photos fast
When you open the Google Photos app, you'll see all the photos
and videos on your device and, if y ou turn ed on " back up & sy nc,"
anything else synced to your Google Photos library.
1. Open the Google Photos app .
2. At the top left, touch the menu ico > Photos.
3. You should see the photo you just took at the top. Try
scrolling down to see what else is there.
Edit photos with filters
Add a filter
1. Open the Google Photos app .
2. Touch the photo you want to edit > pencil icon .
3. At the bottom, touch the photo icon .
4. Scroll through the filters at the bottom. Select a few to see
how they look.
Tip: Adjust a filter's intensity by using the scale at the
bottom.
5. At the bottom right, touch the checkmark .
6. At the top right, touch SAVE.
Share your photo with someone
1. The photo you just edited should still be on your screen. At
the bottom left, touch the share icon .
2. Touch Get link.
3. Use a messaging or email app to send someone the link
you just copied.
20
Page 22

Clock
On the Home screen, tap to enter the Clock screen. You
can set alarms, check the current time in many cities around the
world, set a specific duration or time an event.
Operating the alarm
On the Clock screen, tap to switch to the Alarm tab.
1. Tap and the time displayed to set your alarm.
2. Once your alarm is set, you may add a label to it.
3. Tick the Vibrate check box and choose your ringtone from
the Cesium pop-up screen.
Calculator
On the Home screen, tap to enter the Calculator screen.
You can perform simple or complex calculations.
Swipe right or rotate the phone to la ndsca pe orient ati on to dis play
the scientific calculator.
Downloads
On the Home screen, tap to enter the Downloads screen.
You can download files from Gmail or other areas.
• On the Downloads screen, tap an item to open it.
• Tap and hold an item until appears, and then tap it to
share the item through one of the many sharing methods.
• Tap and hold an item until appears, and then tap it to
delete the item.
• Tap > By name, By date modified, or B y size to
sort the downloaded items.
21
Page 23

YouTube
On the Home screen, tap to enter the YouTube screen. You
can watch the world’s videos and keep up with your favorite
YouTube channels. Sign in to acc ess your subscriptions, playlists ,
uploads, purchases, history and more.
Sign in to YouTube
To sign in, go to > Sign in. Select an existing account on
your device, or go to Add Account to add a new account to your
device.
Switch channels
If you have multiple channels associated with the same account,
you can switch channels by signing out and signing in again. To
sign out, go to > Sign out.
Watch videos
Tap a thumbnail to begin playing a video. Tap in the video
player to access additional viewing options.
• Full screen: To play the video in full screen, tap the full
screen icon or rotate your device horizontally.
• Quality: To manually adjust the video quality,
tap > on a video.
• Captions: Enable captions on a video by
selecting > CC on a video. Not all videos may have
closed captioning available.
Watch videos while browsing
Minimize the video to navigate the app without missing a single
moment of the video you’re currently watching. This w ay, you can
browse suggestions, playlists, and more without pausing or
stopping the video.
• Minimize and maximize the player: Swipe down to
minimize the video player and continue navigating the app.
Swipe upwards on the minimiz ed v i deo to ma xi mize i t agai n.
• Dismiss the player: Swipe left to right if you no longer want
to view the minimized video
Playback settings
22
Page 24

Limit cellular data usage by going
to > Settings > General > Limit cellular dat a usage. When
enabled, HD video will only stream on a Wi-Fi connection.
Google apps
Google provides entertainment, soc ial medi a, and busin ess a pps .
Google Play Store is all-in-one entertainment point with music,
movies, books and apps on the web.
For more details, visit www.support.google.com/android.
SETTINGS
Wi-Fi
Connecting to a Wi-Fi network
1. On the Home screen, tap to enter the Settings screen.
Then, choose Wireless & networks > Wi-Fi to turn Wi-Fi
on/off.
2. Drag the slider to On enabling your phone to scan for
available Wi-Fi networks.
3. Tap the name of a desired network to connect, entering the
password if necessary.
Note: Previously connected and saved networks will be
automatically joined. A user can join a network and forget it, or
remove it from the known networks list.
Adding a network
1. Tap at the top right corner of the Wi-Fi screen. Then
23
Page 25

tap Add network in the pop-up window.
2. Enter the SSID network name and select the cor r ec t
security mode.
3. Tap Save.
Setting advanced Wi-Fi options
On Wi-Fi screen, tap > Advanced. You will be notified
whenever a public network is available. If you do not want to be
notified, drag the slider for Network notification to the left.
To save your phone’s data usage, your phone will remain
connected to Wi-Fi when your screen sleeps.
Bluetooth
Your phone supports Bluetooth, which allows you to create a
wireless connection with other compatible devices so that you
can share data. Use Bluetooth to maximize awesome phone
capabilities and functions.
Note: Bluetooth has a maximum reception distance of 10 metres.
Keep devices connected by Bluetooth within 10 metres of each
other. Obstacles like walls or other electronic equipment may
interfere with Bluetooth signals.
Turning Bluetooth on/ off
On the Home screen, tap to enter the Settings screen.
Then, choose Wireless & networks > Bluetooth to turn
Bluetooth on/off.
Changing your phone’s Bluetooth name
Your phone contains a random Bluetooth name which will be
visible to other Bluetooth devices during connection attempts.
You can change the random name to a more identifiable one.
1. On the Bluetooth screen, tap > Rename this device.
2. Enter a new name and tap Rename.
Note: You can also change the name of the Bl uetooth device as it
appears on your phone. Tap next to the connected
Bluetooth device, enter a new name and tap OK to change the
name.
Pairing your phone with other Bluetooth devices
You need to pair with a Bluetooth device before you can share
data with it. Once a device is paired with your phone, it will
24
Page 26

automatically connect to your phone whenever it is turned on.
1. Turn Bluetooth on and your phone will automatically scan
for nearby Bluetooth devices.
2. If your phone stops scanning before other Bluetooth device
is ready, tap > Refresh.
3. Within the list, tap the ID of the Bluetooth device so as to
pair with it.
4. Ensure that both devices show the same pairing code and
tap Pair.
Note: If you want to unpair it, tap next to the connected
Bluetooth device and tap Forget.
Sending files via Bluetooth
With Bluetooth, you can share pictures, videos or music files with
your family and friends.
1. In ES File Explorer application, tap and hold the file you
want to send.
2. After the file has been selected, tap > Share, on the
options menu that pops up, select Bluetooth.
3. The screen will list the Bluetooth devices that have been
found. Select the device you want to send the file to.
Data usage
On the Home screen, tap to enter the Settings screen.
Then, choose Wireless & networks > Data usage >CU.
• Cellular data: Set your phone to use data connections on
any cellular network
• Set cellular data limit: Set a limit for cellular data usage.
You may limit the cellular data usage by following steps:
1. Drag the slider for Set cellular data limit to the right.
2. Drag the limit adjustment bar upwards or downwards to set
the limit.
3. Drag the warning adjustment bar upwards or downwards to
set a data usage alert level. Your phone will alert you when
the warning level is reached.
Note: If you turn on Wi-Fi and the data service simultaneously,
the phone will automatically use the Wi-Fi connection. If Wi-Fi is
disconnected, the phone will use the data service to continue the
data connection. Please note that absence of Wi-Fi will use your
data which could cost you amount of money according to your
tariff with operator.
25
Page 27

Cellular networks
On the Home screen, tap to enter the Settings screen.
Under Wireless & networks, tap More > Cellular networks.
• Data roaming: Connect to data services when you are
roaming.
• Preferred network type: With 4G/3G/2G available.
• Access Point Names: Set up access poi nt names (APN s ).
Tethering & portable hotspot
Use the device as a mobile hotspot to share the device’s cellular
data connection with other devices when the network connection
is not available. Connections can be made via Wi-Fi, USB, or
Bluetooth.
1. Tap on the Home screen.
2. Under Wireless & networks, tap More > Tethering &
portable hotspot.
Note: Using this function may incur additional data charges,
depending on your data plan.
• USB tethering: Share your phone's cellular data connection
via USB with a computer and use the computer to connect
to the internet.
• Wi-Fi hotspot: Activate the Wi-Fi hotspot and share your
phone's cellular data connection.
• Bluetooth tethering: Sharing your phone's d ata c onnec ti on
via Bluetooth.
Note: You can tap Set up Wi-Fi hotspot to set the name,
security and password for the Wi-Fi hotspot. To protect your
network, it is recommended that you secure it using WPA2 PSK.
Display
On the Home screen, tap > Device > Display to change
the brightness or font size settings and customize the wallpaper
on your phone.
• Brightness level: Set the brightness of the display.
• Wallpaper: Change the background picture of the Home
screen.
• Screen timeout: Set the screen sle ep ti me. Y our s creen w ill
automatically turn off if no operations are performed within
26
Page 28

the time set.
• Daydream: When Daydream is on, your device displays
photos, colours, and more while i t is charg ing or dock ed. Set
the daydream type or when to daydr eam. Tap the day drea m
switch to turn off this function.
• Font size: Set the font size according to your preference.
Sound
On the Home screen, tap to enter the Settings screen.
Then, choose Device > Sound & notification. Tap to enter
the sound settings screen.
1. Drag the slider to adjust the Alarm volume, or Ring
volume. You can also adjust the Ring volume by pressing
the Volume key on the left side of your phone.
2. Tap Phone ringtone. Choose a desired ringtone for your
phone.
Note: Please note that high volume can damage your ears.
Battery
On the Home screen, tap to enter the Settings screen.
Then, choose Device > Battery. Here you may monitor how apps,
other data and your phone system all consume battery power.
• Tap Battery percentage, the battery percentage icon shall
appear on the status bar next to the battery level icon.
Note: The usage time left shows the time remaining before the
battery power runs out. Usage time left may vary depending on
your device settings and operating conditions.
• Prolong your phone ba tter y life by turning on Batt ery saver.
1. On the Battery screen, tap and then tap Battery saver.
2. Drag the slider to On.
Note: Battery saver turns off automatically when your phone is
charging.
Location
You can let your device access GPS, Wi-Fi networks, and
Cellular networks to estimate your location. Apps that have your
permission can use this information to deliver location-based
services, such as the ability to check in, view commute traffic, or
find nearby restaurants.
27
Page 29

To control what location information your device can use, tap
> Personal > Location.
When the Location switch is on, you can do any of the following:
• Change the Location mode between High accuracy,
Battery saving and Device only.
• View Recent location requests.
• Check the Location services.
Note: Using location access does make more demands on your
battery. If you need to save battery life then you can turn it off,
though when the switch is off, your device won’t be able to find
your precise location or share it with any apps.
Security
Setting a screen unlock pattern
You can set a screen unlock pattern. Once the screen has locked,
it needs to be drawn correctly in order to unlock the screen.
• Tap > Personal > Security > Screen lock > Pattern.
• Follow the onscreen instructions to dr aw the unlock pattern.
• Tap Continue.
• Draw the same unlock pattern again and tap Confirm.
Setting a screen unlock PIN
You can set a numeric PIN to unlock your phone. Once the
screen has locked, it needs to be entered correctly in order to
unlock the phone.
• Tap > Personal > Security > Screen lock > PIN.
• Enter at least four-digit numbers.
• Tap Continue.
• Enter the same number again and tap OK.
Setting a screen unlock password
You can set a screen unlock password to unlock your phone.
• Tap > Personal > Security > Screen lock >
Password.
• Enter a password containing at least four characters.
• Tap Continue.
• Enter the same number again and tap OK.
28
Page 30

Setting a screen unlock voice
You can set a screen unlock voice to unlock your phone.
• Tap > Personal > Security > Screen lock > Voice
unlock.
• Speak a command with 3-6 syllables, and then repeat 3-6
times.
• Tap Continue.
• Set a Pattern or Pin in case the v oice unl ock can’t recognize
you.
• Tap OK.
Accounts
Use the Accounts settings to add, remove, and manage your
accounts, such as Exchange, Facebook, Google, Twitter and
other supported accounts.
On the Home screen, tap to enter the Settings screen.
Then, choose Personal > Accounts. Under Accounts, you can
see the accounts you already added or manage your accounts.
Adding an account
1. Tap Add account.
2. Select the kind of account to add.
3. Follow the onscreen instructions to enter the required
information about the account.
4. Configure the account.
5. When you are finished, the account you configured is ad de d
to Accounts.
Backup & reset
On the Home screen, tap > Personal > Backup & reset .
• Back up my data: Back up app data, Wi-Fi passwords and
other settings to Google servers.
• Backup account: Set up or edit your Googl e back u p
account.
• Automatic restore: Set the device to automatically restore
settings and app data from the Google server when apps
are reinstalled.
• Factory data reset: Reset settings to the factory default
values and delete all data.
29
Page 31

Note: Before restoring factory setti ngs, it is v ital that y ou first b ack
up all important data on the phone; otherwise all data will be lost
after factory settings have been restored.
Date & time
On the Home screen, tap > System > Date & time.
Automatic date & time: Use network-provided time.
Automatic time zone: Use network-provided time zone.
Set date: adjust the date manually.
Set time: adjust the time manually.
Select time zone: select the desired time zone from the list.
Scroll the list to view more time zones.
Use 24-hour format: switch between 24-hour format and
12-hour format.
Note: When your phone is using date and time settings provided
automatically by the network, you cannot manually set the date,
time and time zone.
System update
On the Home screen, tap > System > About phone >
Wireless update.
Auto check for update: Your phone will search for the latest
software automatically once per 3 days. If you don’t want to check
for update automatically, please unc heck A uto check f or update.
Download package via Wi-Fi: Your phone will download
package automatically when Wi-Fi is available. Uncheck
Download package via Wi-Fi to cancel dow nl oad aut om ati c all y.
Note: Upgrading your phone software will not affect your mobile
phone data.
30
Page 32

Notice
The information in this manual is subject to change without notice.
Every effort has been made in the preparation of this manual to
ensure accuracy of the contents, but all statements, information,
and recommendations in this man ual do not constitute a warranty
of any kind, expressed or implied. Read the safety information
carefully to ensure that you use this wireless device in a correct
and safe manner.
Yulong Computer Telecommunication Scientific (Shenzhen) Co.,
Ltd.
Address:
Coolpad Information Harbor, 2nd Mengxi Road, Hi-Tech
Industrial Park (North), Nanshan District, Shenzhen, P.R.C
31
Page 33

TECHNICAL DATA
Specifications
Dimensions
143 × 72 × 7.6 mm
Form factor
Bar
Antenna
Built-in
SIM card
Micro SIM or Nano SIM
Screen Parameters
Type
Screen size
Resolution
IPS
5.0 inches
1280x720
Accessories
Lithium Ion Polymer
Battery
Nominal Voltage
3.8 V
Specs & hardware
Network
Camera Front 2MP + Rear 8MP
Headset jack Ф3.5mm CTIA standard
Battery
Note: The battery capacity is subject to update and change.
32
GSM (900/1800/1900MHz)
UMTS (900/2100MHz)
LTE (800/1800/2100/2600MHz)
Battery Type
Rated Capacity 2000 mAh
Rechargeable
Page 34

No.
Name
Quantity
1
Phone
1
2
Battery (built-in)
1
In-box contents
3 Travel Charger 1
4 USB Cable 1
5 Warranty Card 1
6 Quick Start Guide 1
7 Headphones 1
Note: The items supplied with the phone and any available
accessories may vary depending on the region or service
provider.
33
Page 35

Declaration of hazardous
Toxic or hazardous substances or
Poly
DE)
PCB
es
○: indicates that the content of the toxic or hazardous
the SJ/T11363-2006 standard.
×: indicates that the content of the toxic or hazardous
limit of the SJ/T11363-2006 standard.
The Environmentally Friendly Use Period of
User Guide.
substances
elements
Parts Name
Plu
mb
um
(Pb
)
Mer
cur
y
(Hg
)
Ca
dmi
um
(Cd
)
Chr
omi
um
VI
(Cr
(VI)
)
Pol
ybr
omi
nat
ed
Bip
hen
yls
(PB
B)
bro
min
ated
Dip
hen
yl
Eth
ers
(PB
Board and
Accessori
Plastics ○ ○ ○ ○ ○ ○
Metals ○ ○ ○ ○ ○ ○
Battery ○ ○ ○ ○ ○ ○
Other ○ ○ ○ ○ ○ ○
substance in all homogeneous materials is within the limit of
substance in some homogeneous materials exceeds the
34
○ ○ ○ ○ ○ ○
this product is 20 years, as shown by the
symbol on the left. The Environmentally
Friendly Use Period of replaceable parts, such
as battery, may be different from that of the
product. The Environmentally Friendly Use
Period is valid only when the product is
operated under the conditions defined in this
Page 36

Safety and
regulatory guide
EN
Page 37

Please read before proceeding
THE BATTERY IS NOT FULLY CHARGED WHEN YOU TAKE THE
DEVICE OUT OF THE BOX.
Important health information and safety precautions
When using this product, the safety precautions below must be
taken to avoid possible legal liabilities and damages.
Retain and follow all product safety and operating instructions.
Observe all warnings in the operating instructions on the product.
To reduce the risk of bodily injury, electric shock, re, and damage
to the equipment, observe the following precautions.
Electrical safety
This product is intended for use when supplied with power from
the designated battery or power supply unit. Other usage may be
dangerous and will invalidate any approval given to this product.
Safety precautions for proper grounding installation
CAUTION: Connecting to improperly grounded equipment can
result in an electric shock to your device.
This product is equipped with a USB Cable for connecting with
desktop or notebook computer. Be sure your computer is properly
grounded (earthed) before connecting this product to the computer.
The power supply cord of a desktop or notebook computer has
an equipment-grounding conductor and a grounding plug. The
plug must be plugged into an appropriate outlet which is properly
installed and grounded in accordance with all local codes and
ordinances.
Safety precautions for power supply unit
• Use the correct external power source
A product should be operated only from the type of power source
indicated on the electrical ratings label.
• Be careful when using batteries
This product contains a lithium-ion polymer or lithium-ion battery.
In the event of improper handling of the batteries, there is a risk
of a re or burns. Do not attempt to open or repair the batteries.
Do not disassemble, press, puncture, short circuit the batteries or
throw them into a re or water and do not expose the batteries to
temperatures exceeding 45 ˚C.
WARNING: If you wish to prevent a re or burns hazard,
do not disassemble, press, puncture or short circuit the
batteries or expose them to temperatures exceeding 45
°C or throw them into a re or water. Recycle or dispose
of used batteries in accordance with local directives or
the reference handbook provided with the product.
Page 38

• Keep the product dry and away from water or other liquids as this
could result in a short circuit.
• The phone should only be connected to products that bear the
USB-IF logo or have completed the USB-IF compliance program.
• If the battery leaks:
• Do not allow the leaking uid to come in contact with skin
or clothing. If already in contact, ush the affected area
immediately with clean water and seek medical advice.
• Do not allow the leaking uid to come in contact with eyes.
If already in contact, DO NOT rub; rinse with clean water
immediately and seek medical advice.
• Take extra precautions to keep a leaking battery away from re
as there is a danger of ignition or explosion.
• Recommended operating ambient temperature is between 0 °C
and 45 °C
• If dropped in water water, make sure to turn off the mobile and
send it to the local Certied Store/Repair centre immediately for
repair. Do not attempt to dry it by using any heating equipment
such as dryers, microwave ovens, etc.
• Prolonged phone calls, web surng sessions and gaming may
result in the phone warming up, especially when charging. This is
normal phenomenon among modern smartphones.
• When charging the phone, do not use the phone close to your
face when calling. Follow any other laws governing mobile phone
usage.
Safety precautions for direct sunlight
Keep this product away from excessive moisture and extreme
temperatures. Do not leave the product inside a vehicle or in places
where the temperature may exceed 60°C (140°F), such as on a car
dashboard, window sill, or behind a glass that is exposed to direct
sunlight or strong ultraviolet light for extended periods of time. This
may damage the product, overheat the battery, or pose a risk to
the vehicle.
Safety in aircraft
If you want to use this device when on board an aircraft, remember
to turn off your phone by switching to Airplane Mode.
Environment restrictions
Do not use this product in gas stations, fuel depots, chemical
plants or where blasting operations are in progress, or in potentially
explosive atmospheres. Please be aware that sparks in such areas
could cause an explosion or re resulting in bodily injury or even
death.
Interference with the function of medical devices
This product may cause the malfunction of medical devices.
Page 39

Hearing aids
Some digital wireless phones may interfere with some hearing aids.
In the event of such interference, you may want to consult your
service provider, or call the customer service line to discuss
alternatives.
Electrical safety
• Avoid using your phone near metal structures (for example, the
steel frame of a building).
• Avoid using your phone near strong electromagnetic sources,
such as microwave ovens, sound speakers, TV and radio.
• Use only approved accessories.
• Do not connect with incompatible products or accessories.
• Seek professional advice when connecting a phone interface to
the vehicle electrical system.
• Do not attempt to disassemble the phone or its accessory.
• Only qualied personnel must service or repair the phone or its
accessory.
Place all accessories (such as SIM or USIM card, power adapter,
etc.) out of children’s reach to avoid choking hazards.
General precautions
You alone are responsible for how you use your phone and any
consequences of its use. You must always switch off your phone
wherever the use of a phone is prohibited. Use of your phone is
subject to safety measures designed to protect users and their
environment.
• Avoid applying excessive pressure to the device
Do not apply excessive pressure on the screen and the device to
prevent damaging them and remove the device from your pants’
pocket before sitting down. It is also recommended that you store
the device in a protective case and only use the device stylus or
your nger when interacting with the touch screen.
Cracked display screens due to improper handling are not
covered by the warranty.
• Always treat your phone and its accessories with care and keep
them in a clean and dust-free place.
• Do not expose your phone or its accessories to open ames or lit
tobacco products.
• Do not drop, throw or try to bend your phone or its accessories.
• Store your phone or its accessories at temperatures between 0°
C to 45° C.
• Please check local regulations for disposal of electronic products.
Damage requiring service:
• The product has been exposed to rain or liquid, dropped, subject
to impact or damaged.
Page 40

• There are noticeable signs of overheating.
• The product does not operate normally when you follow the …
operating instructions.
• Avoid hot areas.
• Avoid wet areas.
• Avoid using your device after a dramatic change in temperature.
NOTICE: When taking the device from low-temperature
conditions into a warmer environment or from high-temperature
conditions into a cooler environment, allow the device to
acclimate to room temperature before turning on power.
• Never push objects of any kind into cabinet slots or other
openings in the product. Slots and openings are provided for
ventilation. These openings must not be blocked or covered.
• Turn down the volume before using headphones or other audio
devices.
Please note that high volume can damage your ears.
• Unplug the product from the wall outlet before cleaning. Do not
use liquid cleaners or aerosol cleaners. Use a damp cloth for
cleaning, but NEVER use water to clean the LCD screen.
• Do not leave your phone and its accessories within the reach
of small children or allow them to play with it. They could hurt
themselves or others, or could accidentally damage the phone.
• To minimise the risk of RSI, when Texting or playing games with
your phone:
• Do not grip the phone too tightly
• Press the buttons lightly
• Do not touch the SIM card’s metal connectors.
• This phone, like any wireless phone, operates using radio signals,
which cannot guarantee connection in all conditions. Therefore,
you must never rely solely on any wireless phone for emergency
communications.
• According to research, texting or talking on the phone while
driving signicantly increases the fatality risk
This product can be used in the following countries:
AT BE BG BIH CH CY CZ DE DK
EE ES FI FR GB GR HR HU IT
LT LU LV MT NL NO PL PT RO
RS SE SI SK
SAR
This mobile device meets international directives for exposure to
Page 41

radio waves.
The highest limit SAR has a value of 2.0 W/kg, the measured SAR
value for this device is 1.250 W/kg
* SAR values differ in various countries, regions and testing
conditions. Using accessories may result in different absorption
values.
Mobile security and backup:
This device supports internet connection. Similarly to computers,
it may be abused by viruses, damaging information or applications
or other damaging content. Please open messages, receive
connection requests, download content and accept requests for
installation only from reliable sources. Please, regularly backup
your information to prevent data loss; data may be lost during
servicing.
Pacemakers
Persons with pacemakers:
• Must ALWAYS keep the phone at least 15 cm away from their
pacemaker when the phone is turned on.
• Must not carry the phone in their breast pocket.
• Must use the ear farther away from the pacemaker to minimise
possible interference. If you have any reason to suspect that
interference is occurring, immediately turn off the phone.
WEEE notication
The WEEE logo (on the left) on the product or its
packaging means that it must not be disposed
of together with household waste. Electrical and
electronic waste must be disposed of by being taken
to a dened collection facility that manages the
RoHS compliance
This product meets Directive 2011/65/EU of the European
Parliament and Council from 08 July 2011 on the reduction of
hazardous substances in electrical and electronic equipment
(RoHS) and its amendments.
TCCM s.r.o. hereby declares that this product conforms to the
requirements and other relevant provisions of Directive
1999/5 EC. A copy of the Declaration of conformity is available at:
www.coolpad.eu/support
recycling of similar hazardous waste.
 Loading...