

Page 1

CoolingTech
1/45
CS01-200 Digital Microscope
User Manual
(English)
(中 文
)
P
repared by Coolingtech Digital Engineering Dept.
2010.3.25
Page 2

CoolingTech
返回首页
前 言
首先非常感謝貴司( 您)購買了CS01-200X數碼顯微鏡
數碼顯微鏡應用範圍非常廣泛,主要有以下方面.
1工業方面:
a 工業檢視,例如電路板、精密機械等
b 印刷檢視,SMT焊接檢查
c 紡織檢視
d IC表面檢查
……
2美容方面
a皮膚檢視
b發根檢視
C紅外理療(特定產品)
……
3生物應用
a微生物觀察
b動物切片觀察
……
4其他
a擴視器,協助視障人士閱讀
b寶石鑒定
……
CS02-500數碼顯微鏡使用簡單,只需要同電腦USB接口連接就可以使用,
本產品還配備測量軟體,可做簡單的量測,非常的方便。爲了更詳細的介紹
本產品,敬請耐心的閱讀產下麵的產品介紹,使用方法,注意事項。
2/45
Page 3

CoolingTech
3/45
目 錄
首頁··········································································································· 1
前言··········································································································· 2
目錄··········································································································· 3
各部位介紹 ······························································································ 4
產品規格···································································································· 4
安全警告及注意事項 ················································································ 5
配件說明 ·································································································6
安裝說明 ···································································································6
硬體需求 ·············································································· ····················6
安裝過程····································································································6
驅動的安裝說明 ·························································································7
量測軟體安裝與使用說明··········································································· 12
測量軟體使用說明······················································································ 15
工具欄上的各圖示說明··············································································· 16
標定的使用方法 ························································································ 19
Dotnetfx 安裝·····························································································23
Page 4
CoolingTech
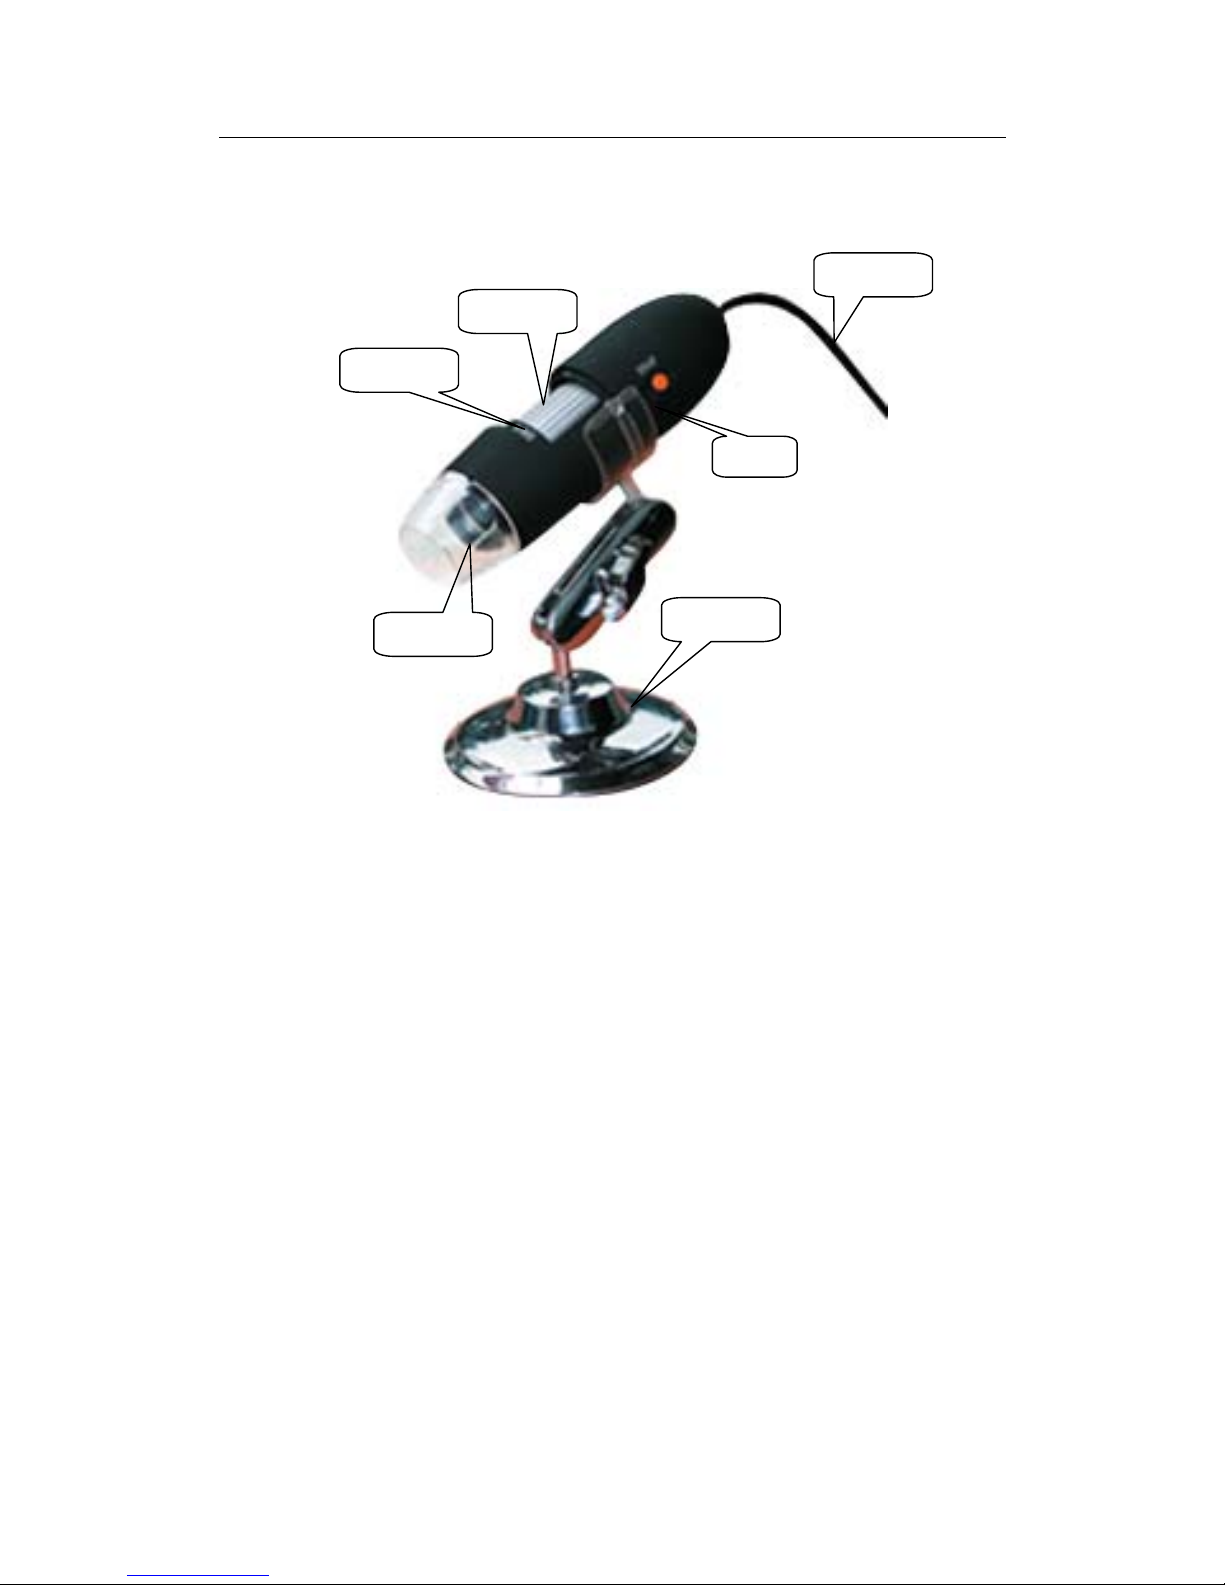
部位說明規格
USB 線
放大倍數
調焦滾輪
按鍵
LED 燈罩
金屬底座
規格:
傳 感 器 : 高性能感光芯片
主控芯片 : 專用主控16Bit DSP
放大倍率 : 25X ~ 200X
拍照/錄影: 內置
輔助光源 : 8顆白光LED燈
靜態解析度: 640x480,最高可達1600x1200(可按需定制)
數碼變焦 : 5段式
成像距離 : 手動調節15~40mm
影像解析度 :標準640*480
4/45
Page 5

CoolingTech
5/45
固定底座 : 萬向金屬底座
光 盤 : 內含驅動,測量軟體,說明書
支持系統 : WIN XP/VISTA;WIN 7 32位和64位
電 源 : USB(5V DC)
電腦界面 : USB 2.0 & USB 1.1 相容
動態幀數 : 30f/s Under 600 LUX Brightness
照度範圍 : 0 ~ 30000LUX線控可調
硬體需求 :奔騰 主頻700M Hz或以上;1G硬碟 CD ROM 光碟機;
64MB 內存
支持語言:中文(簡體),中文(繁體),英(其他語言需要定制)
產品顏色:磨砂黑色,其他顏色可定制
主體尺寸 112 mm ( 長 ) 33 mm ( 外徑 )
單機包裝重量 380g
安全警告及注意事項
1. 勿自行拆解本產品,以避免靜電擊穿精密晶片。
2. 勿用酒精等有機溶劑清潔產品。
3. 勿用手指觸摸鏡頭,以免表面造成刮痕和贓污。
4. 戶外使用時應避免高溫和高濕環境中,防電子器件短路。
本產品不具有防水功能,請應避免淋雨和進水。
5. 本產品的使用和存儲溫適度範圍:0°C ~ 40°C,相對濕度:45%RH ~
85%RH
6. 若不慎使異物或水份/液體 進入數產品內部,請先拔除USB 線。並
送至維修中心檢修,切勿自行處理。
7 设备測量精度僅供參照,由测量误差引起的糾紛与本產品無關。
Page 6
CoolingTech
配件說明
1. 數碼顯微鏡主體(1台)
2. USB 連接線 (1.5m)
3. 萬向底座(1個)
4. 光碟(驅動程式,測量軟體,安裝說明書)
硬體要求
Windows 2000、XP、VISTA、WIN 7 操作系統。奔騰 IV 1.5G, Celeron,
AMD 或以上的CPU。64MB 內存。150MB 以上之硬盤空間(安裝驅動
程式及應用軟體) 支援16-bit的顯示卡,CD-ROM 光機,USB2.0或
USB1.1
安裝說明
CS01數碼顯微鏡為無驅動產品,如果不需要一些特殊操作的話,在
windows2000以上版本可直接運行。
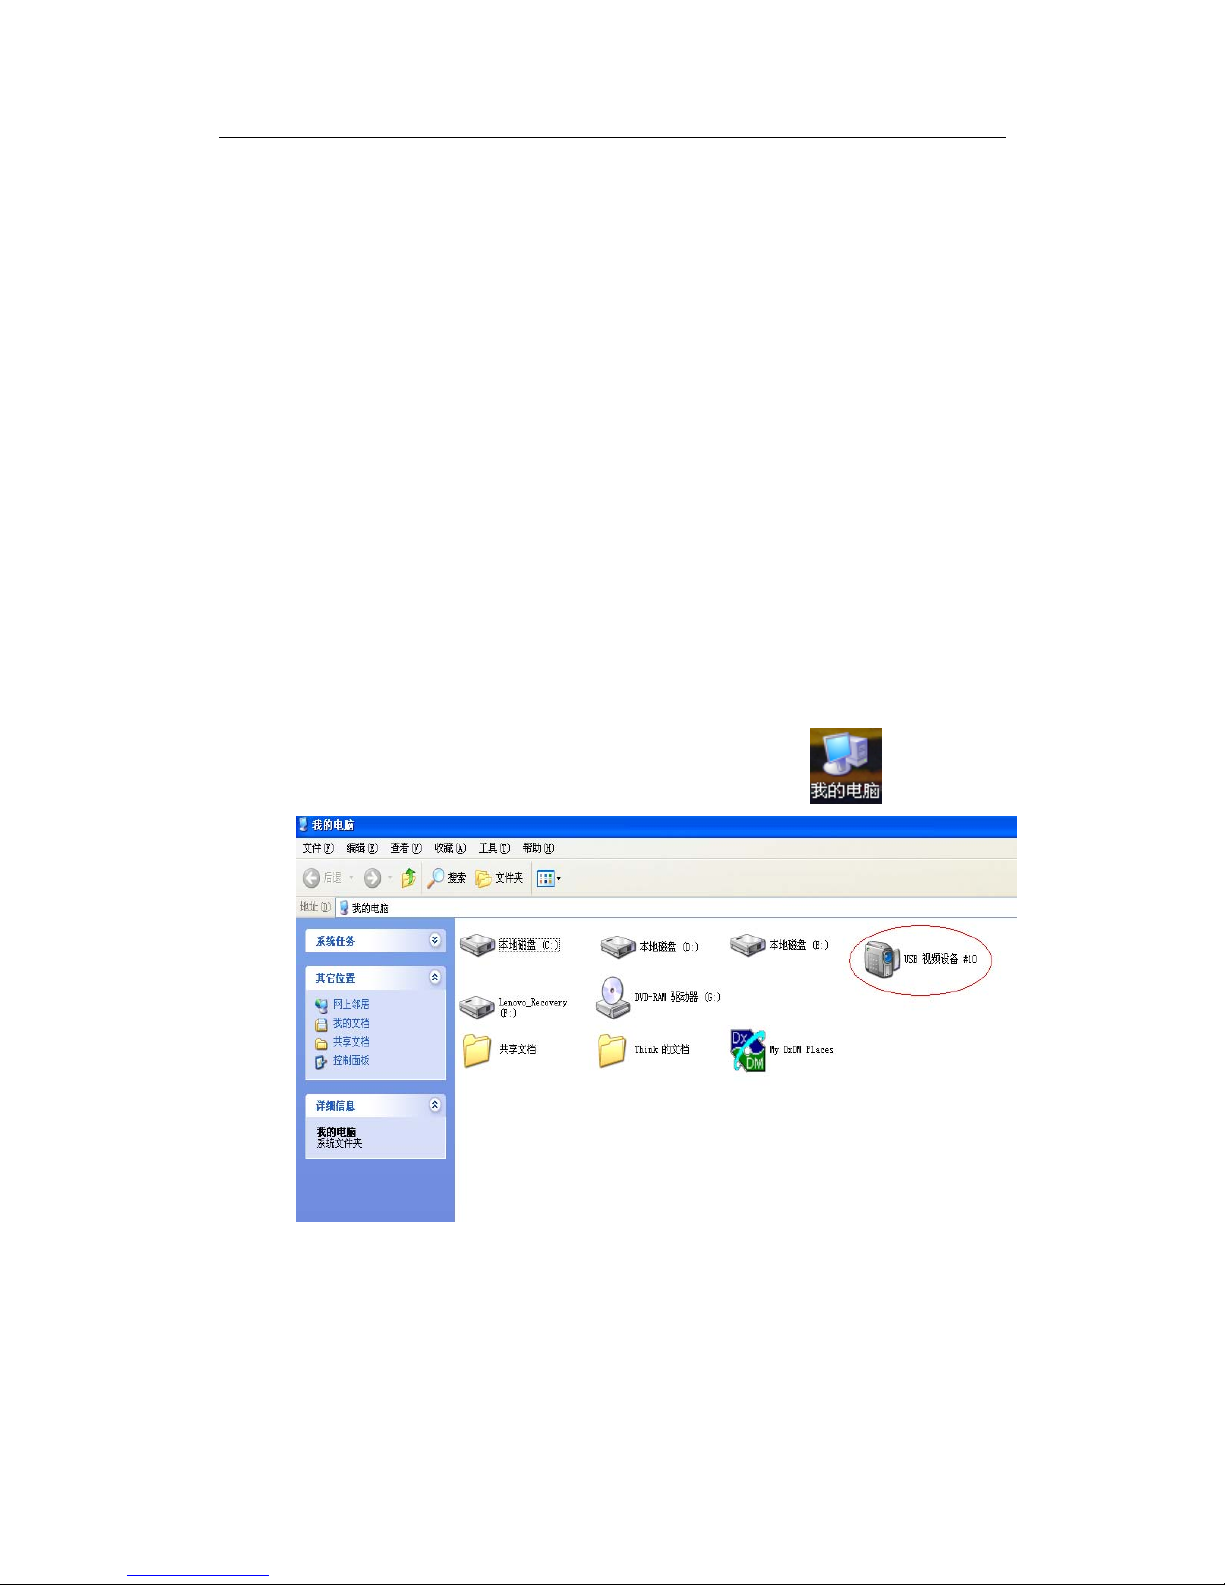
1直接將本產品同過USB線連接到電腦上,然後點擊
2雙擊紅色標示內的設備圖標就可以正常使用。
如需要特殊的操作,請參考本產品附送光碟,安裝步驟(以Win XP為例)
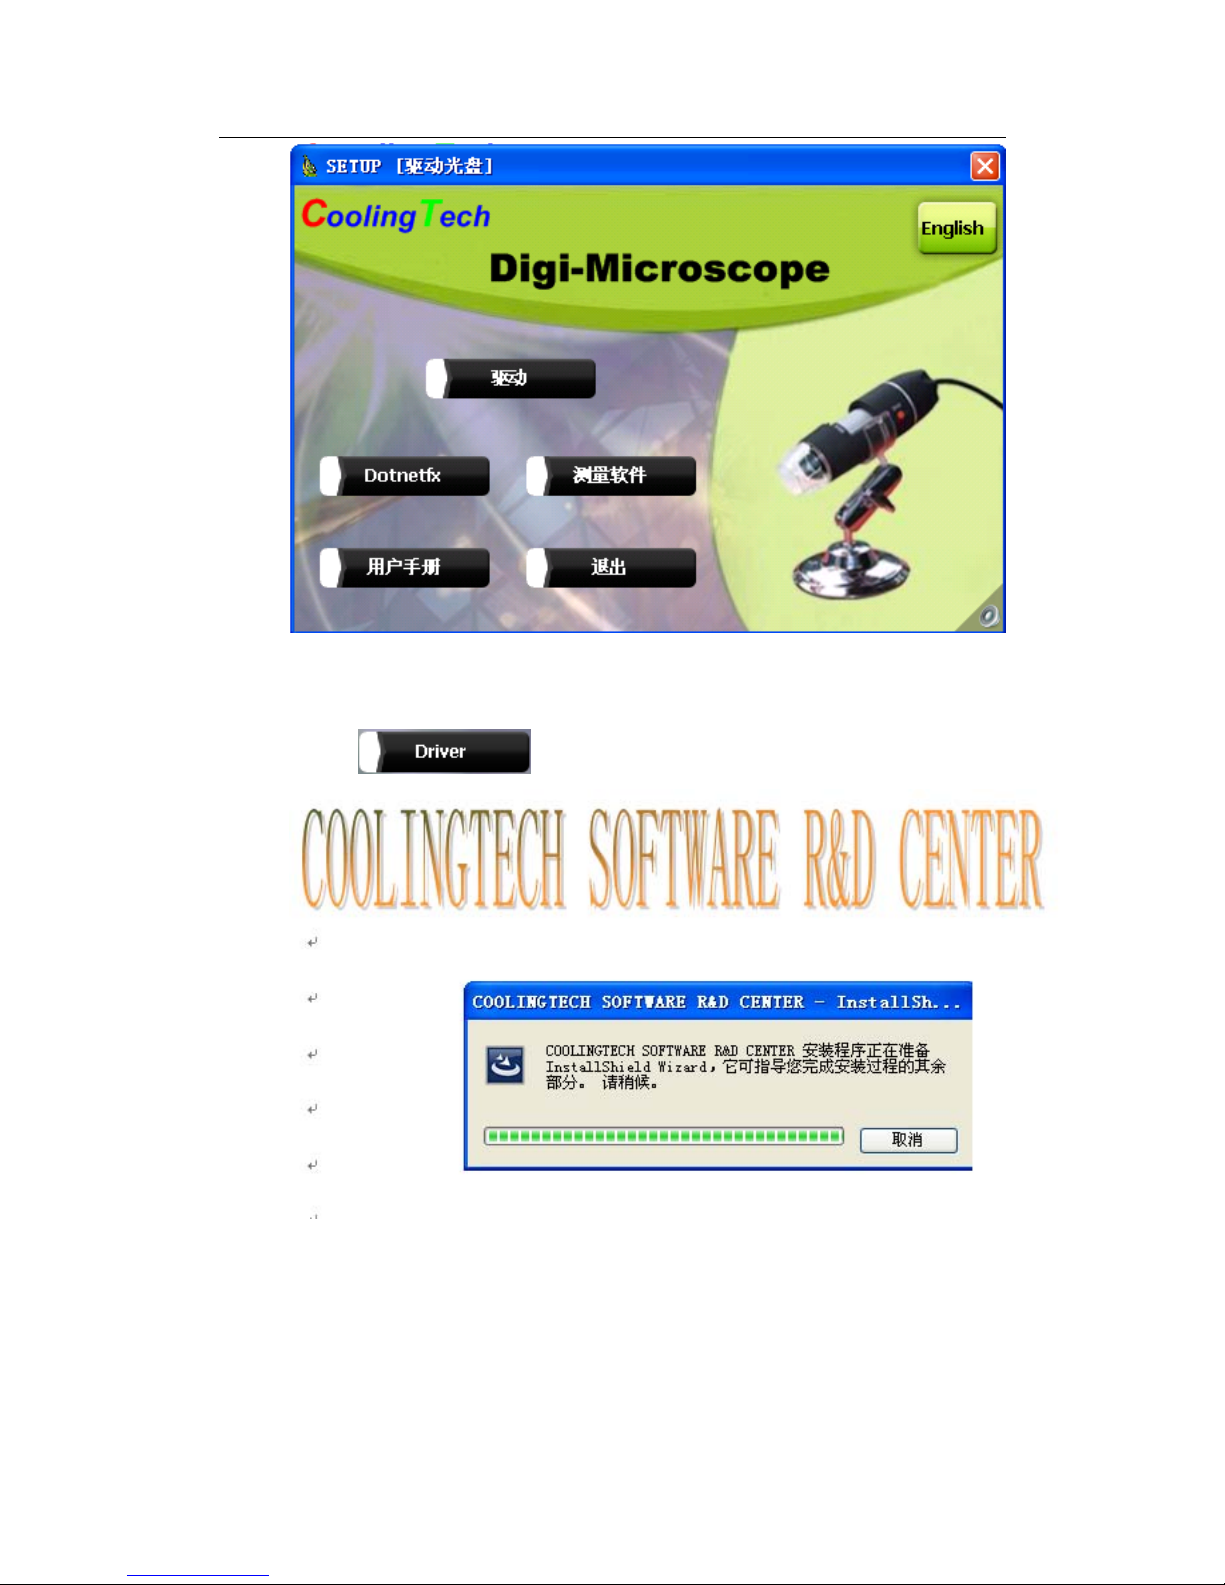
將安裝光盤放入光驅後,安裝程式將自動執行,出現如下畫面(如果無法
自動執行,可點擊光驅圖標手動操作)
6/45
Page 7
CoolingTech
7/45
1驅動安裝
1 點擊
幾秒鐘后
Page 8
CoolingTech
8/45
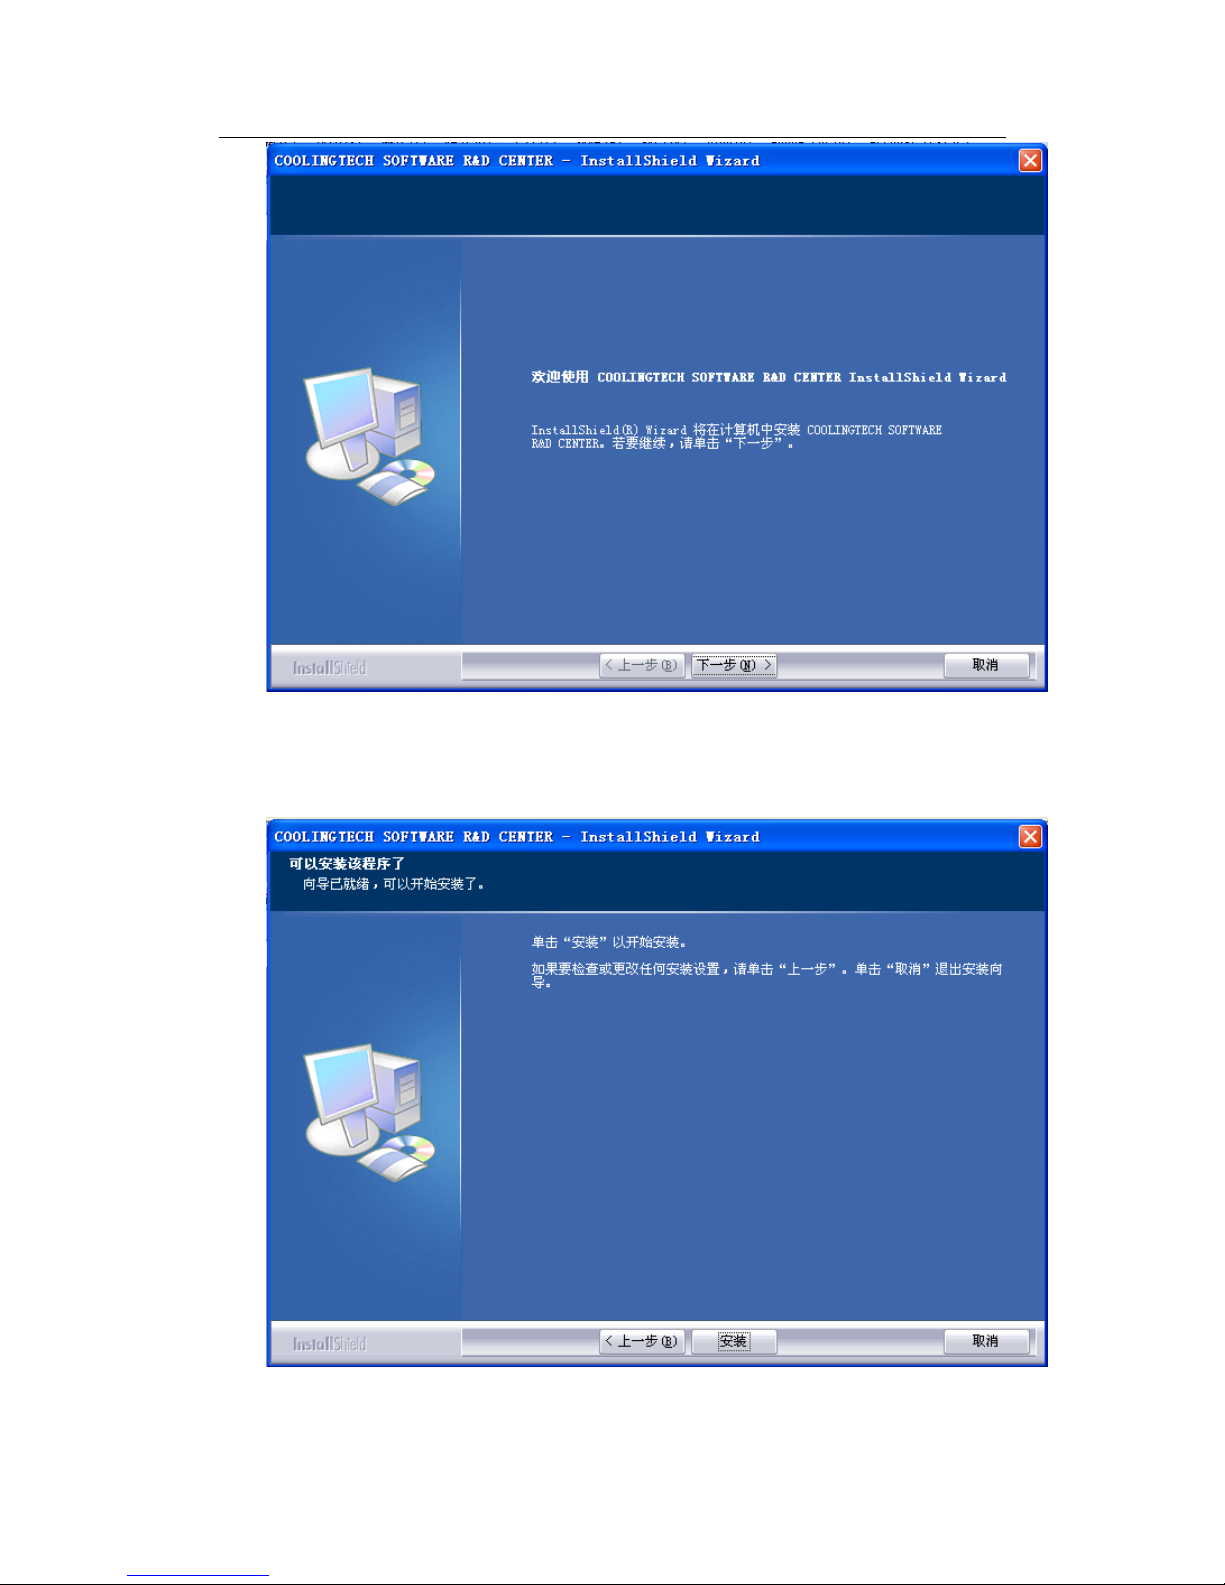
2选择’下一步’
Page 9
CoolingTech
3.选择’安装
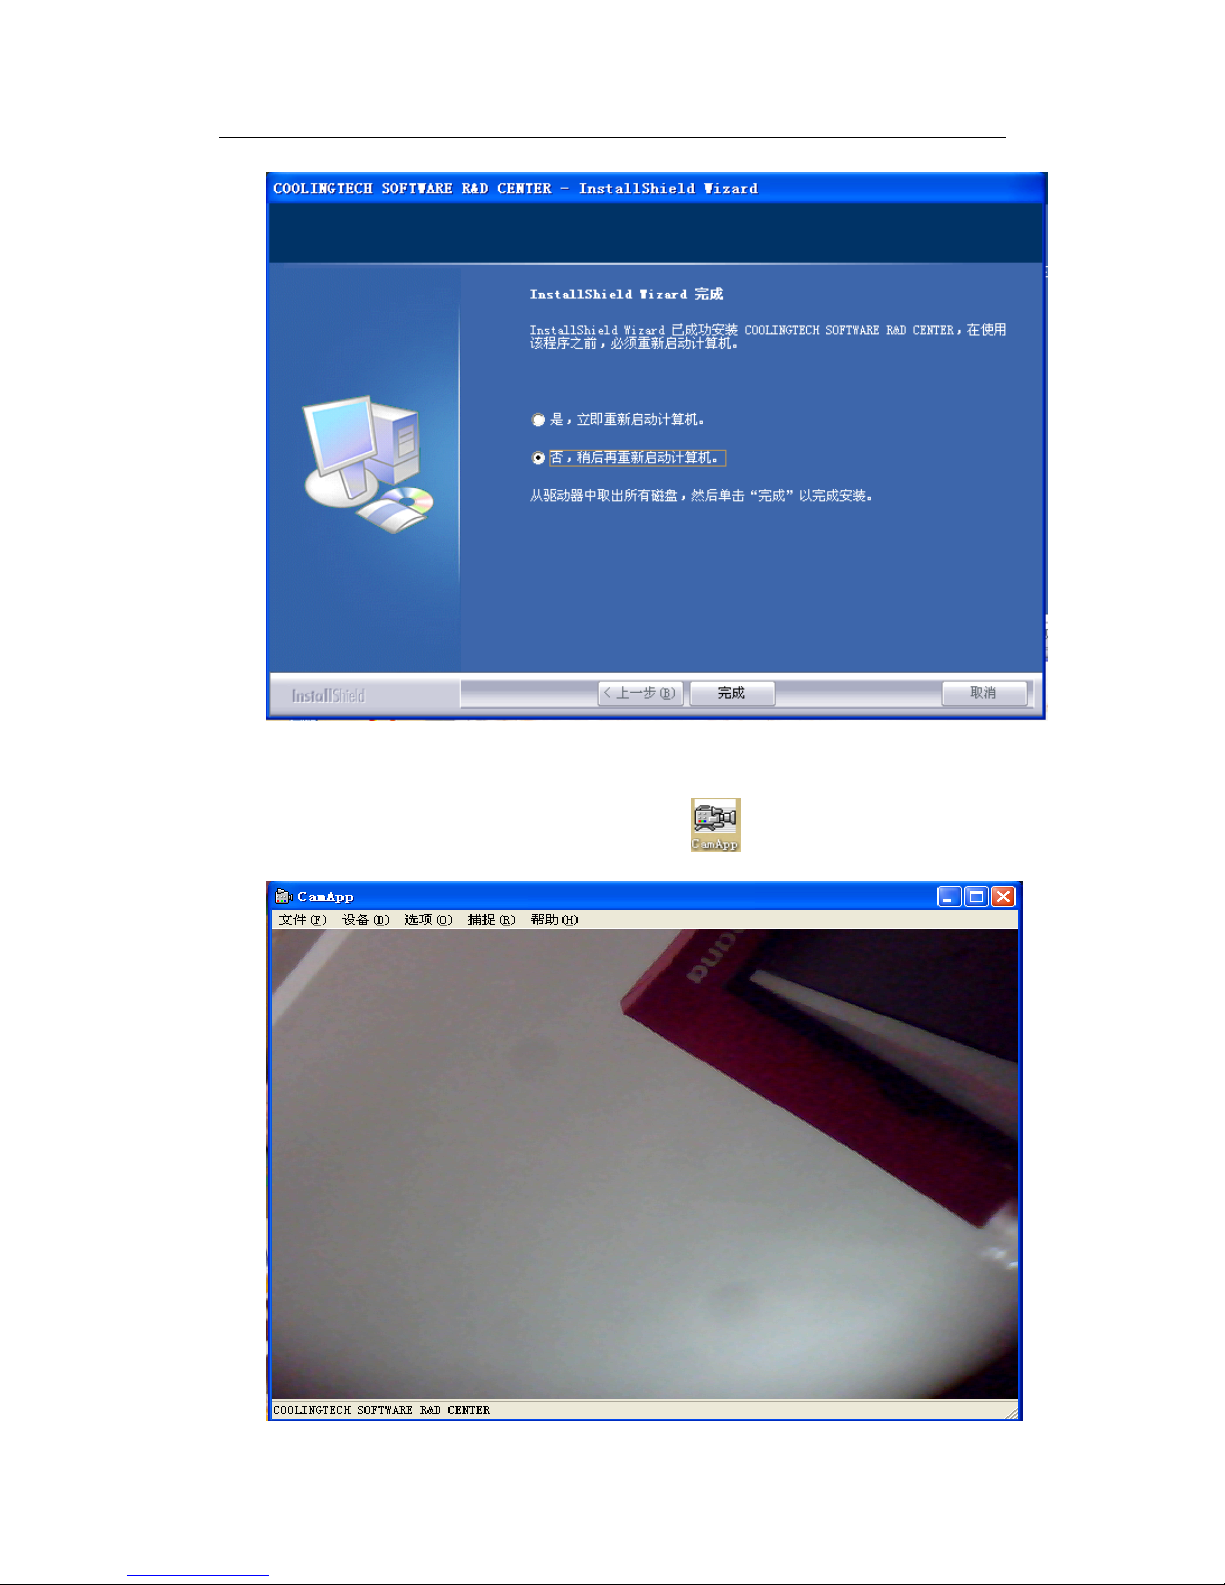
4,驅動“完成”,驅動安裝完成,如果是初次安裝,建議重啟電腦。若在驅動
安裝過程中出現警告資訊,請直接點選“仍然繼續”即可
5,驅動安裝完成後,桌面上會出現如下圖標 ,雙擊顯示
9/45
Page 10
CoolingTech
10/45
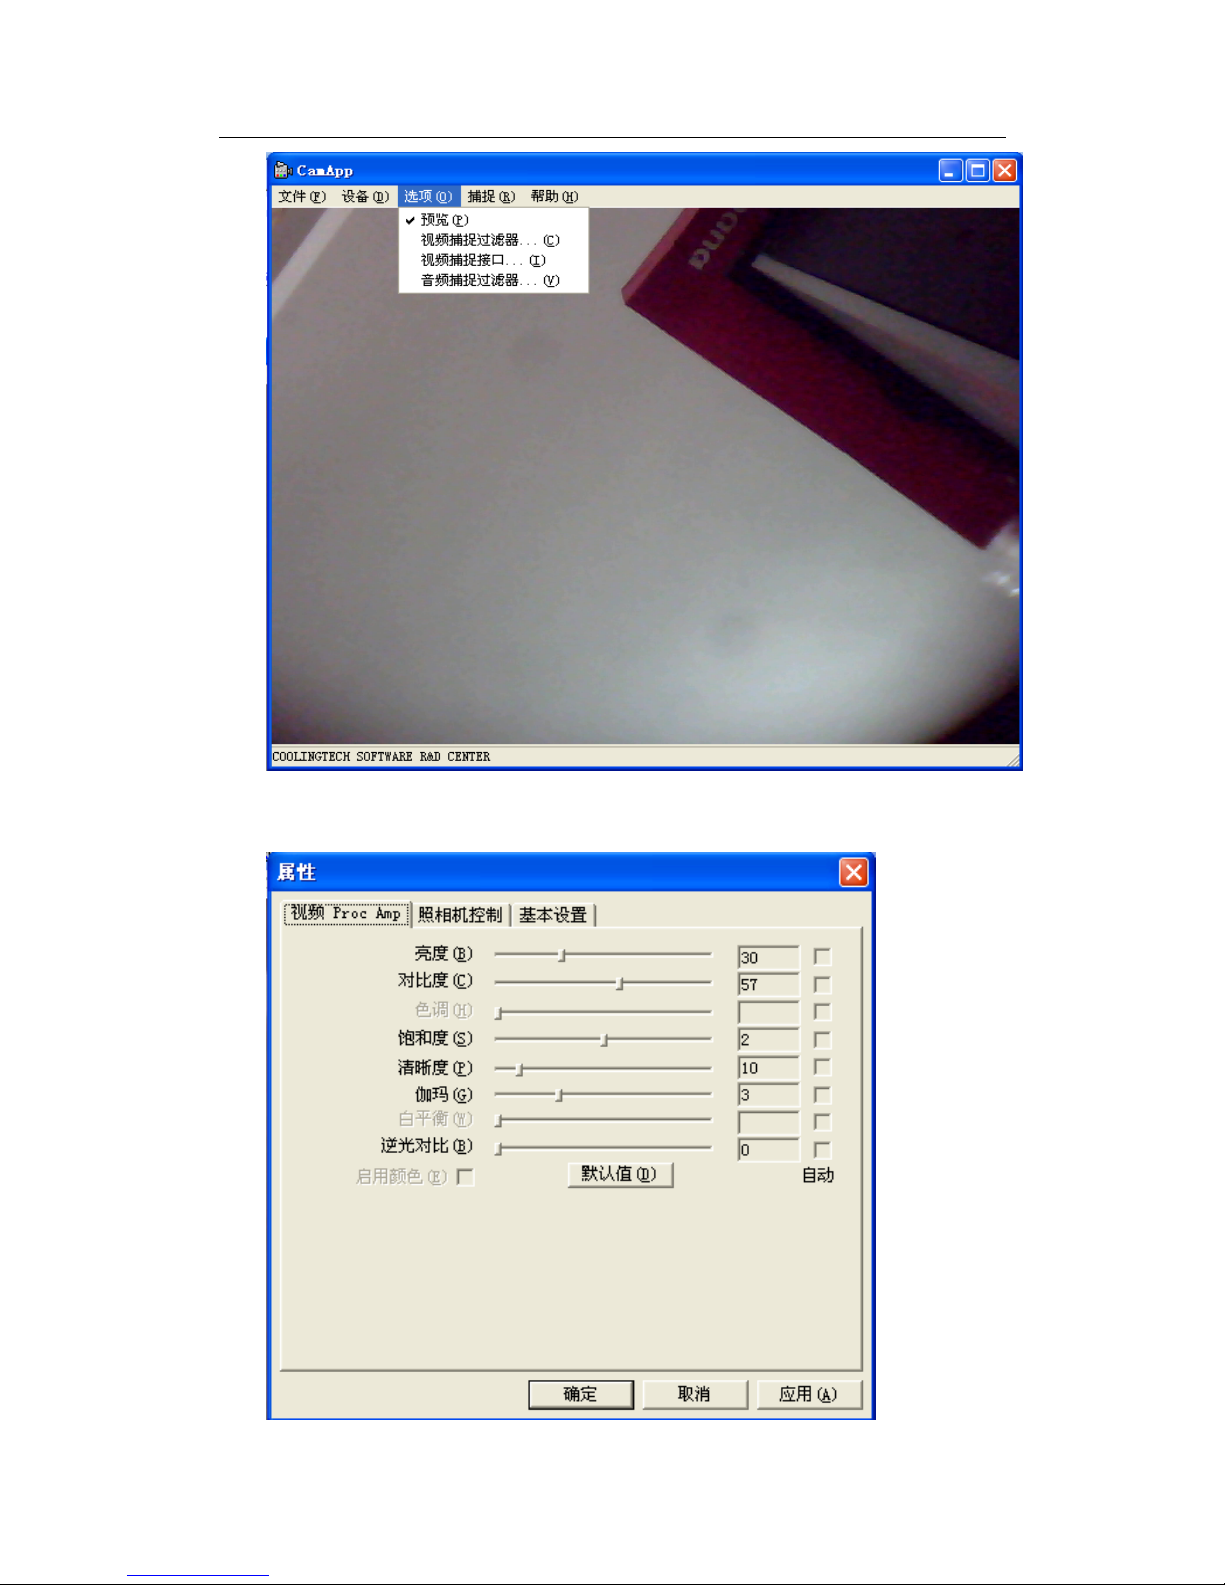
5. 菜單欄中的選項可根據自己的需求設定,例如點擊“選項”—“視頻捕捉篩
檢程式”,出現
Page 11
CoolingTech
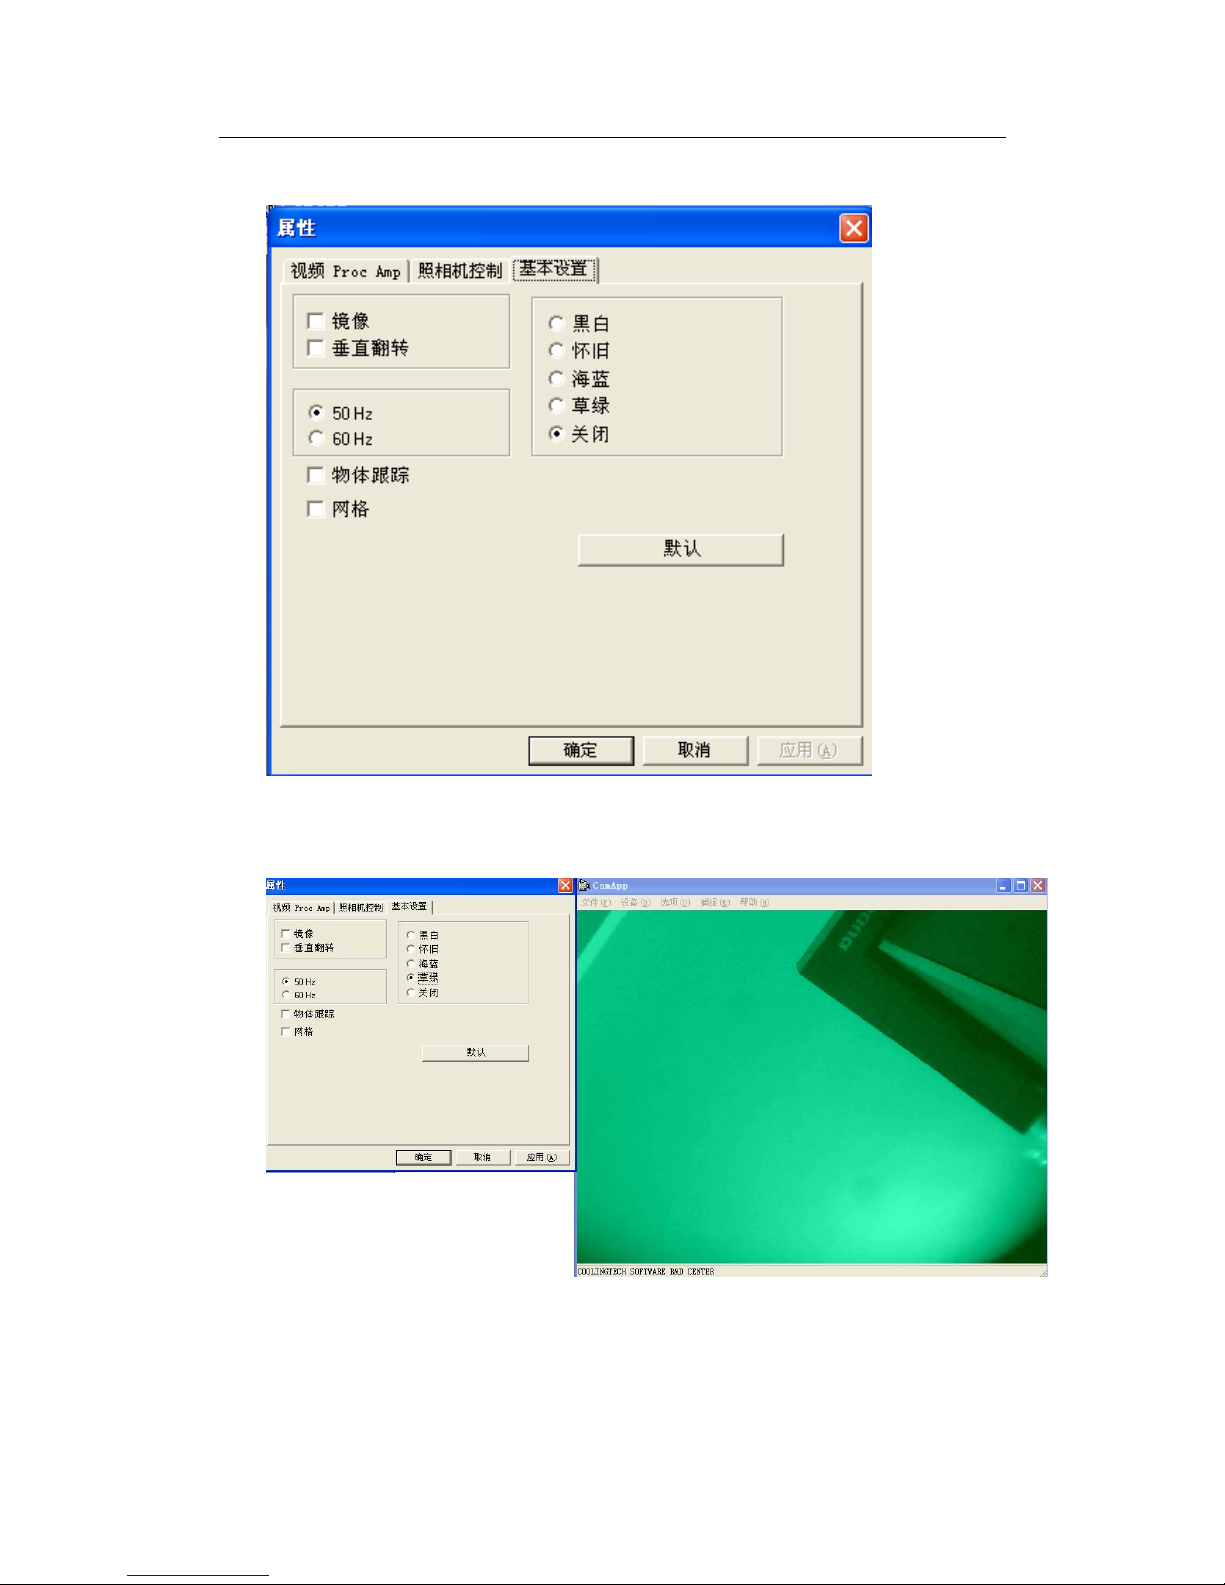
顯微鏡光學參數做些簡單的設置。點擊“基本設置”,出現:
根據需求,可對對圖形特效處理,如下
11/45
Page 12
CoolingTech
12/45
如需要回復到初始參數,請點擊“默認”。
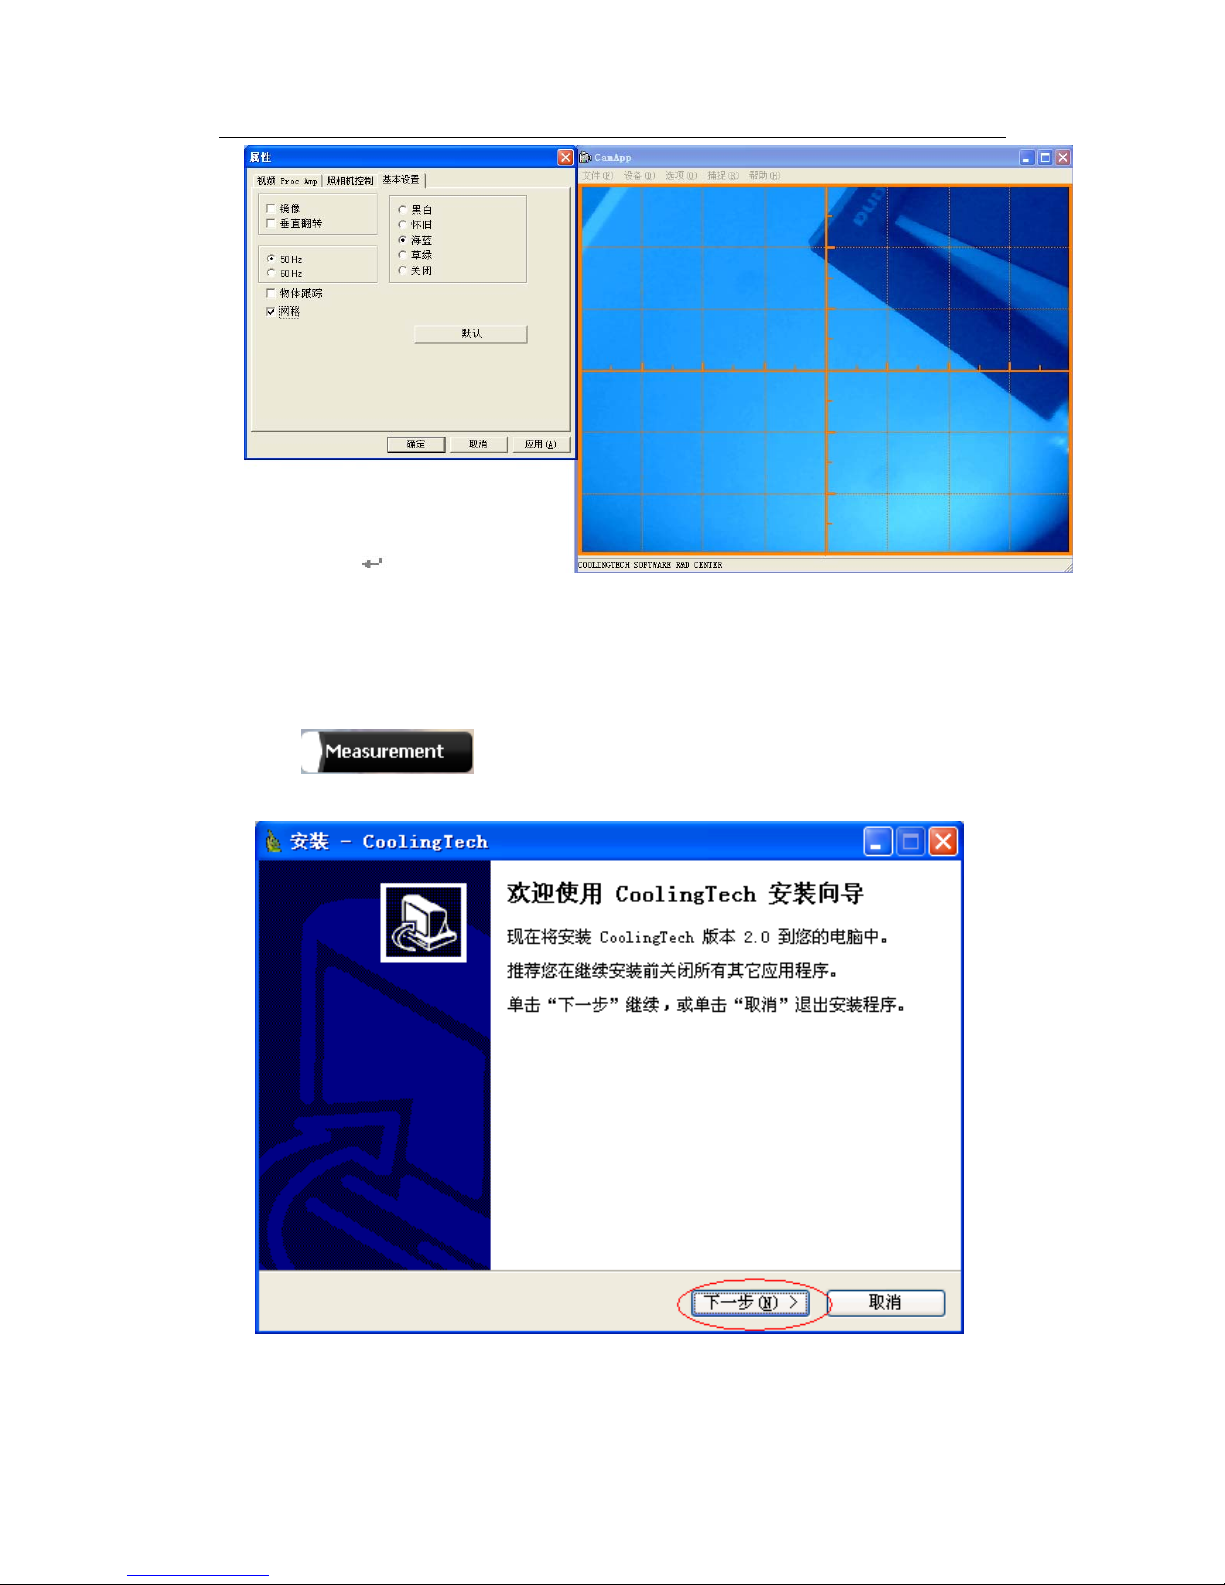
2測量軟體安裝
1 點擊 出現:
Page 13
CoolingTech
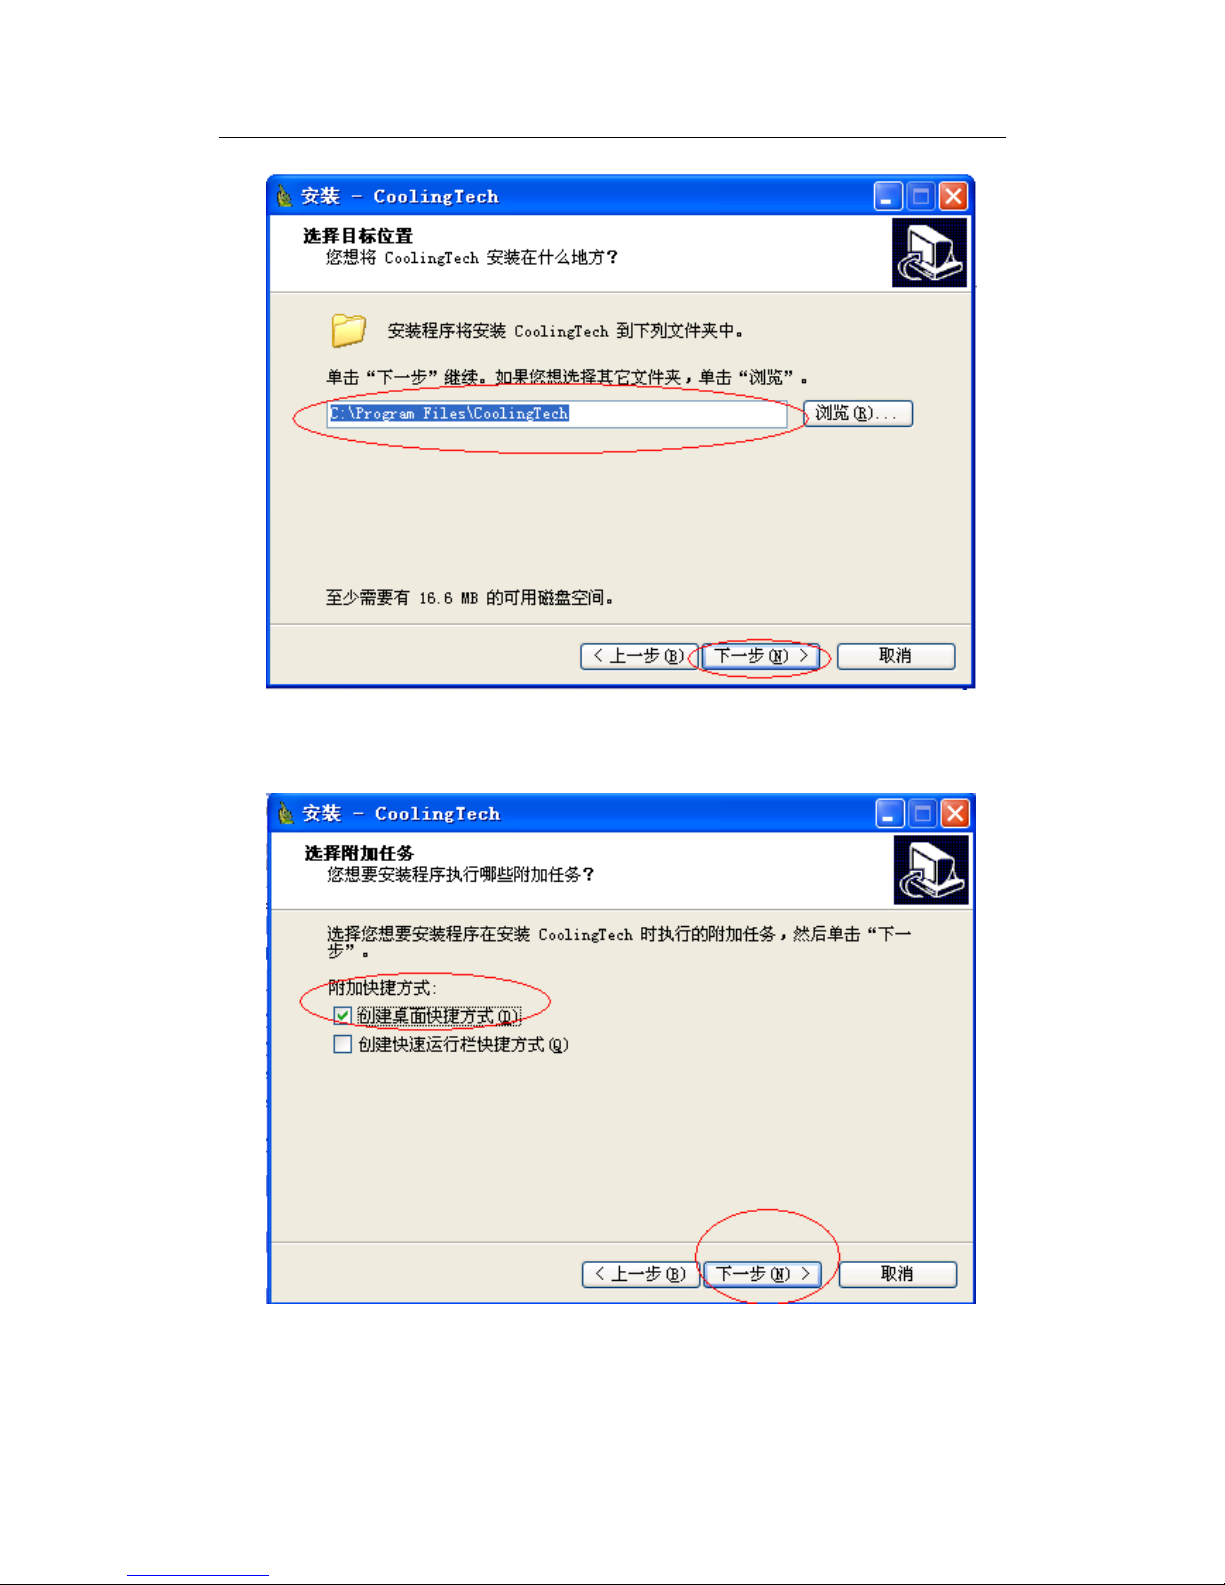
2 點擊“下一步”
3 選擇程序安裝路徑,點擊“下一步”
4 如果需要在桌面上創建快捷方式,相應框中打‘√’,點擊‘下一步’
13/45
Page 14
CoolingTech
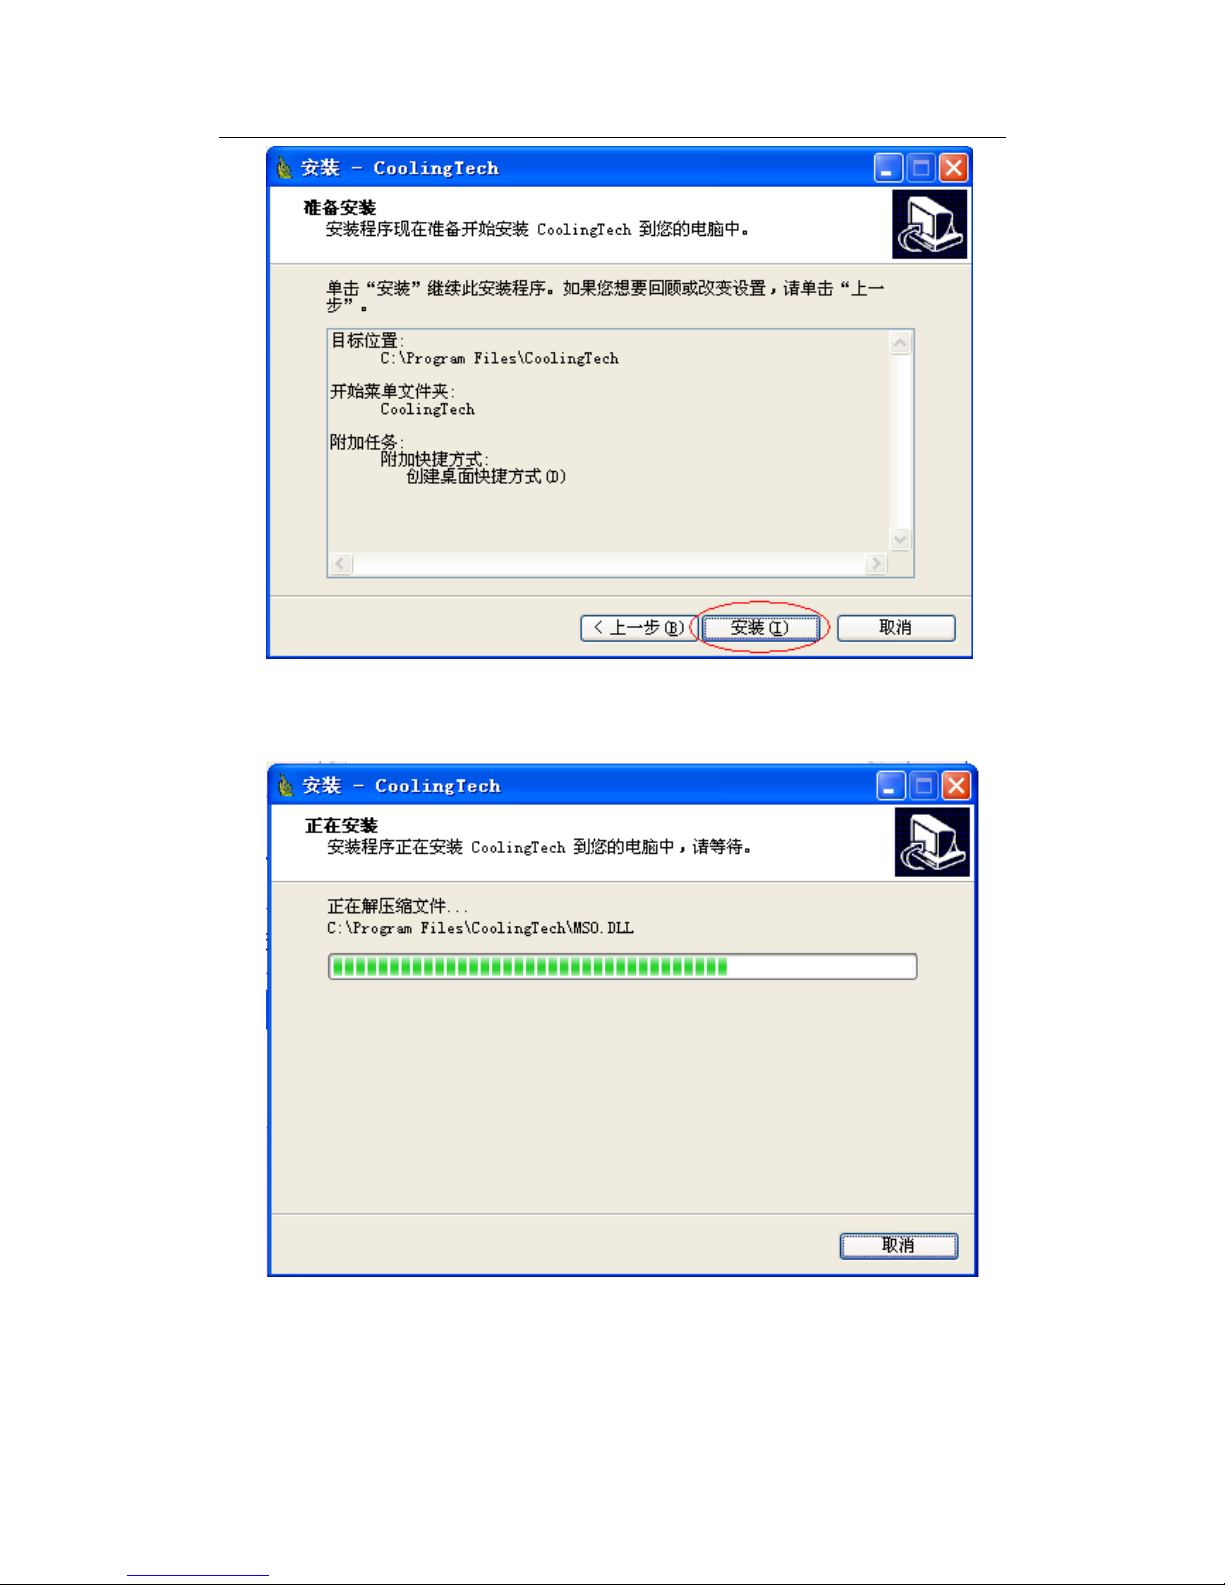
5 點擊‘安裝’,程序就進入安裝狀態
6 幾秒鐘后,程序安裝過程結束
14/45
Page 15

CoolingTech
7 點擊完成,程序就可以使用了。
8 程序安裝成功后,點擊桌面圖標 ,進入如下界面
9 按照提示,連接好設備,程序自動運行到主界面。
15/45
Page 16

CoolingTech
16/45
10 點擊
選擇視頻分辨率,視頻分辨率範圍320*240 ~1600*1200,分辨率默認值為
640*480.
Page 17

CoolingTech
11 點擊 ,採集圖片,可執行數據量測功能。由於動態影像不是很穩定,本
軟件將採用靜態模式下進行量測,測量精度會相應的提高
12 點擊 可以打開之前存儲的圖片;點擊 可以保存圖片到電腦指定文檔
17/45
Page 18

CoolingTech
13
視頻暫停和終止
14 點擊
15
圖像放大
16 點擊圖標 ,顯示如下帶標尺線界面
18/45
Page 19
CoolingTech
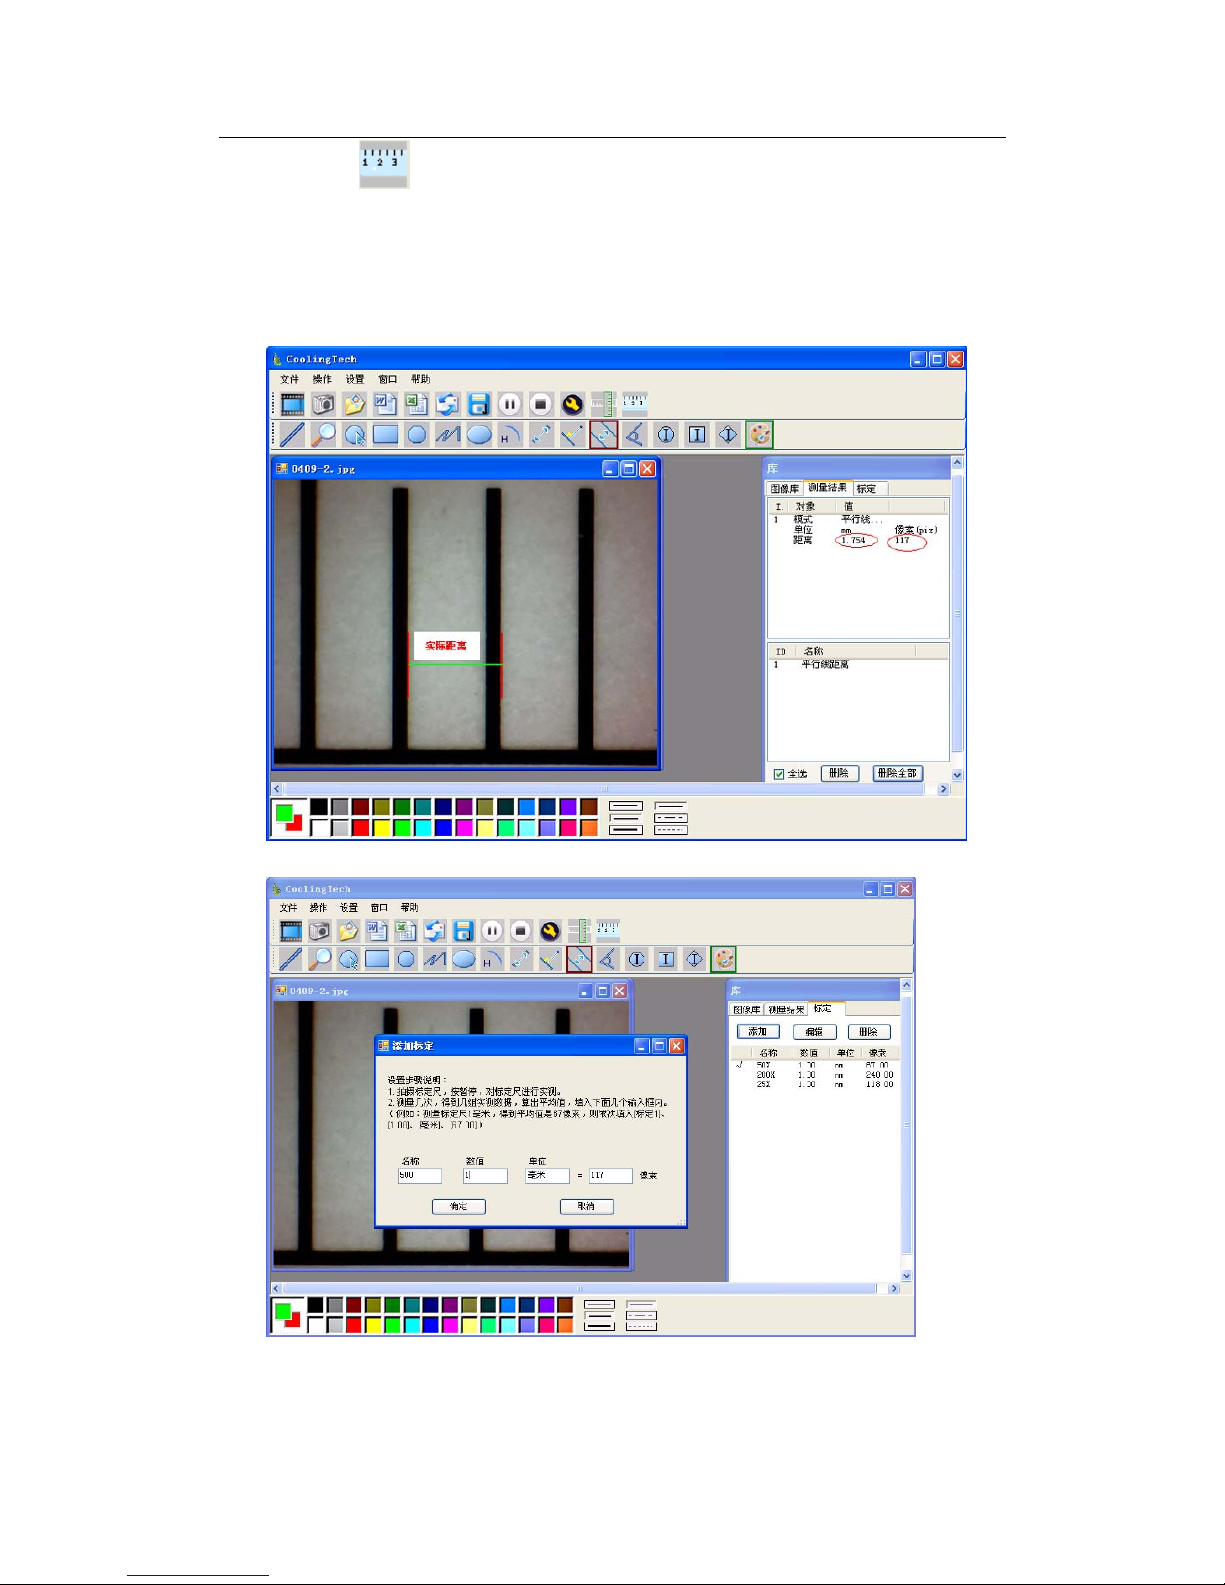
17 點擊圖標 ,進入測量精度校正功能
爲了提高測量精度,每次使用顯微鏡測量軟件前,倍率改變,校正也要改變,
測量精度就可以達到99%。當然校正后的校正值可以保存,下次如有同樣倍
率也可以使用,測量誤差相對較高。精度校正時,建議對同一個實際值進行
多次測量取平均值的方式進行。另外本產品還配備專用校正尺,請不要使用
其他標尺校正,以免影像測量精度。
輸入測量值,和相應的單位
校正就完成了,在這個倍率下就可以做量測了。
注意:
放大倍率改變,必須重新校正。
19/45
Page 20
CoolingTech
18 ,標注方式和顏色選擇
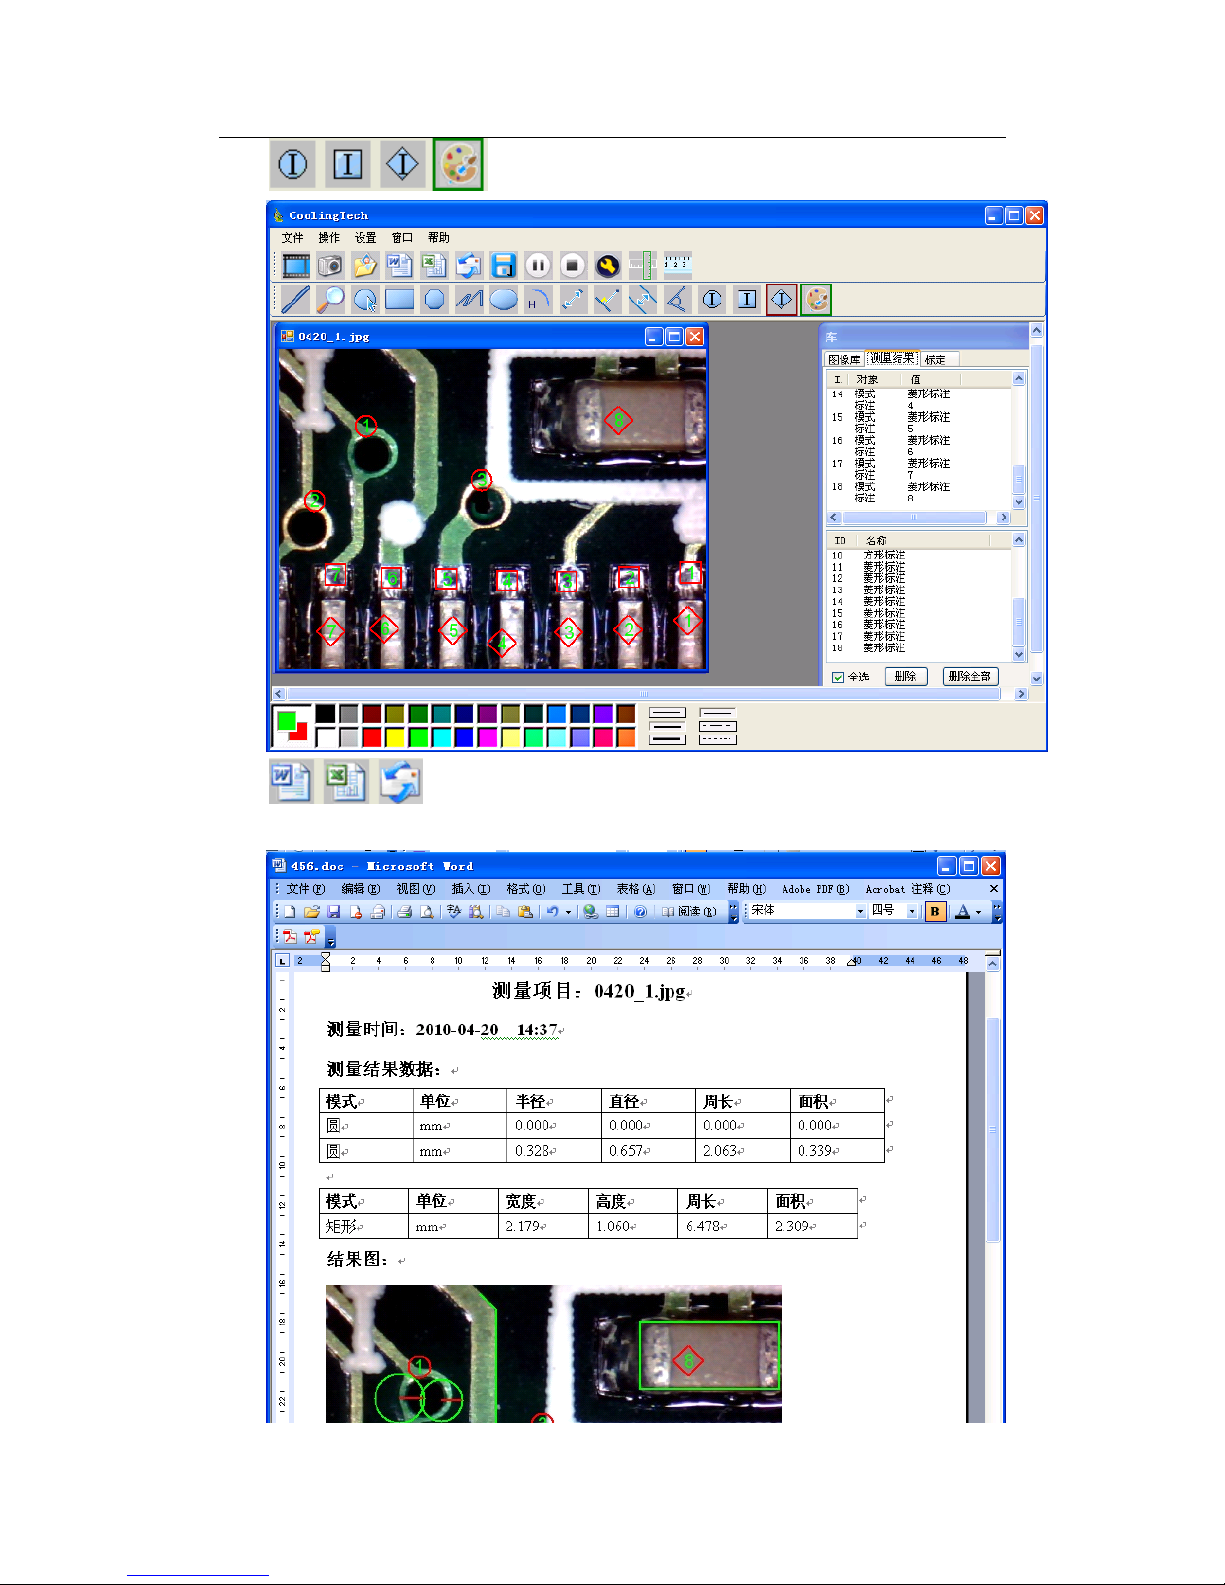
19 ,測量的結果可以以Word,Excel,或郵件格式輸出。
下麵是一個測量結果Word的輸出範例
20/45
Page 21

CoolingTech
20
從左到右:
直線測量,圓測量。矩形測量,多邊形測量,折綫測量,橢圓測量
圓弧測量,點對點測量,點到線測量,平行線測量,角度測量。
如下圖:
範例1:平行線測量
21/45
Page 22

CoolingTech
範例2:矩形測量
範例3,圓測量
22/45
Page 23

CoolingTech
3在安裝驅動時如提示需要安裝Net Framework 2.0,請點
擊
按照提示,繼續下去就可以了
23/45
Page 24

CoolingTech
返回首页
Thank you for purchasing our CS01-200 Digital Microscope,
it is a slim type tool and can be easily used in different fields
including:
1. Textile industrial for textile inspection
2. Printing inspection
3. Industrial inspection: PCB, Precision machinery…
4. Educational purpose
5. Hair examination
6. Skin examination
7. Microbiological observation
8. Jewelry & coin (Collections) inspection
9. Visual Assistance
10. Others
Currently we have two models of Digital Microscope: USB port and TV port
formats.
The USB microscope must be connected to the computer and TV microscope
be connected to visual device (N/P). User interface is very friendly and you can
do the Measure work easily.
You can find more information of the product on this manual.
CONTENTS
Introduction ································································································27
Parts of Microscope ···················································································28
Specification ·······························································································28
Notes before use ························································································29
Product Outlook & Standard parts ······························································30
Hardware and system requirements ···························································30
How to install the Driver software ·······························································31
How to install the measurement software ····················································35
24/45
Page 25

CoolingTech
Function options ·························································································45
How to do the calibration ······················································································47
Parts of Microscope
Magnification
Ratio
Focus roller
USB Line
Sna
p
LED Light
Metal Fixed
Stand
Specification
Image CMOS Sensor
Controller High Speed DSP (Driver Free available)
Focus Range 15mm ~ 40mm
Snap Shot Software and Hardware
Video Capture Resolution 0.3M.
Built-in 8 White-light LED and adjustable illumination ensure the
magnified images are clear and bright
Still Image Capture Resolution 640*480
Frame Rate 30 f/s under 600 LUX Brightness
Digital Zoom 5X Sequence Mode
25/45
Page 26

CoolingTech
26/45
Brightness Control Manual adjustment
Magnification Range 25 X ~ 200X (Manually)
Power Supply USB Port ( 5V DC )
USB 2.0 & USB 1.1 Compatible
Operation System Windows XP, Vista, Win 7 32 bit and 64 bit.
Language: English, Chinese and other language by selection
System Requirement: Pentium Computer with 700M Hz & above,
20M HD Space CD ROM Driver, 64MB RAM, Direct X VGA Card
CD disk Driver and Micro-Measurement Tool
Product dimension 112 mm ( L ) X 33 mm ( R )
Product net weight: 380g
Available color: Matting black, UV black; and other colors.
Notes before use
1. Don’t dissemble the digital Microscope or change the interior parts,
it can cause damage.
2. Don’t clean the Microscope with alcohol organic solvents
3. Don’t touch the lens with your fingers.
4. Avoid outdoor use if possible.
5. Storage temperature , 0°C ~ 40°C,Humidity:45%RH ~ 85RH%.
6. In case the product gets wet, leave PC connection immediately.
And do not dissemble or dry by hair dryer. Send to repair center if
the digit microscope was effected by liquid or other elements.
7. Measurement Data only for reference.
Product Outlook & Standard parts
Page 27

CoolingTech
1. Digital Microscope (1pcs)
2. USB 2.0 cable
3. Metal fixed Stand (1pcs)
4. CD ROM (Driver, Measurement software, User Manual)
Hardware system requirements
Windows 2000、XP、VISTA、WIN7 Pentium 1G, Celeron, AMD 1G &
above, 128MB Memory, 150MB Hard Disc memory space,16-bit &
above VGA ,CD-ROM, USB2.0 or USB1.1.
How to install the Driver
CS01-200 Digital Microscope is a free Driver Product,it can be worked
immediately after connected to the computer with operation system above
win2000 version.
1. Connect the Portable digital microscope by USB2.0 cable to your
computer, double click ‘my computer’ icon on your computer desktop,
below interface will be shown up.
2. Double click the Video device icon as above red marked in your
computer. Now it is ready to use.
If you can’t find the Video device, or if your computer can’t recognize it,
please follow below steps to install the driver.
Insert the attached CD, system will auto run to the interface as below and
follow the steps to complete the installation:
(NOTE:If the computer can’t auto run the disc, you need to operate
27/45
Page 28
CoolingTech
manually by click “My Computer” → ”DVD/CD Driver” →
run”AUTORUN.EXE”)
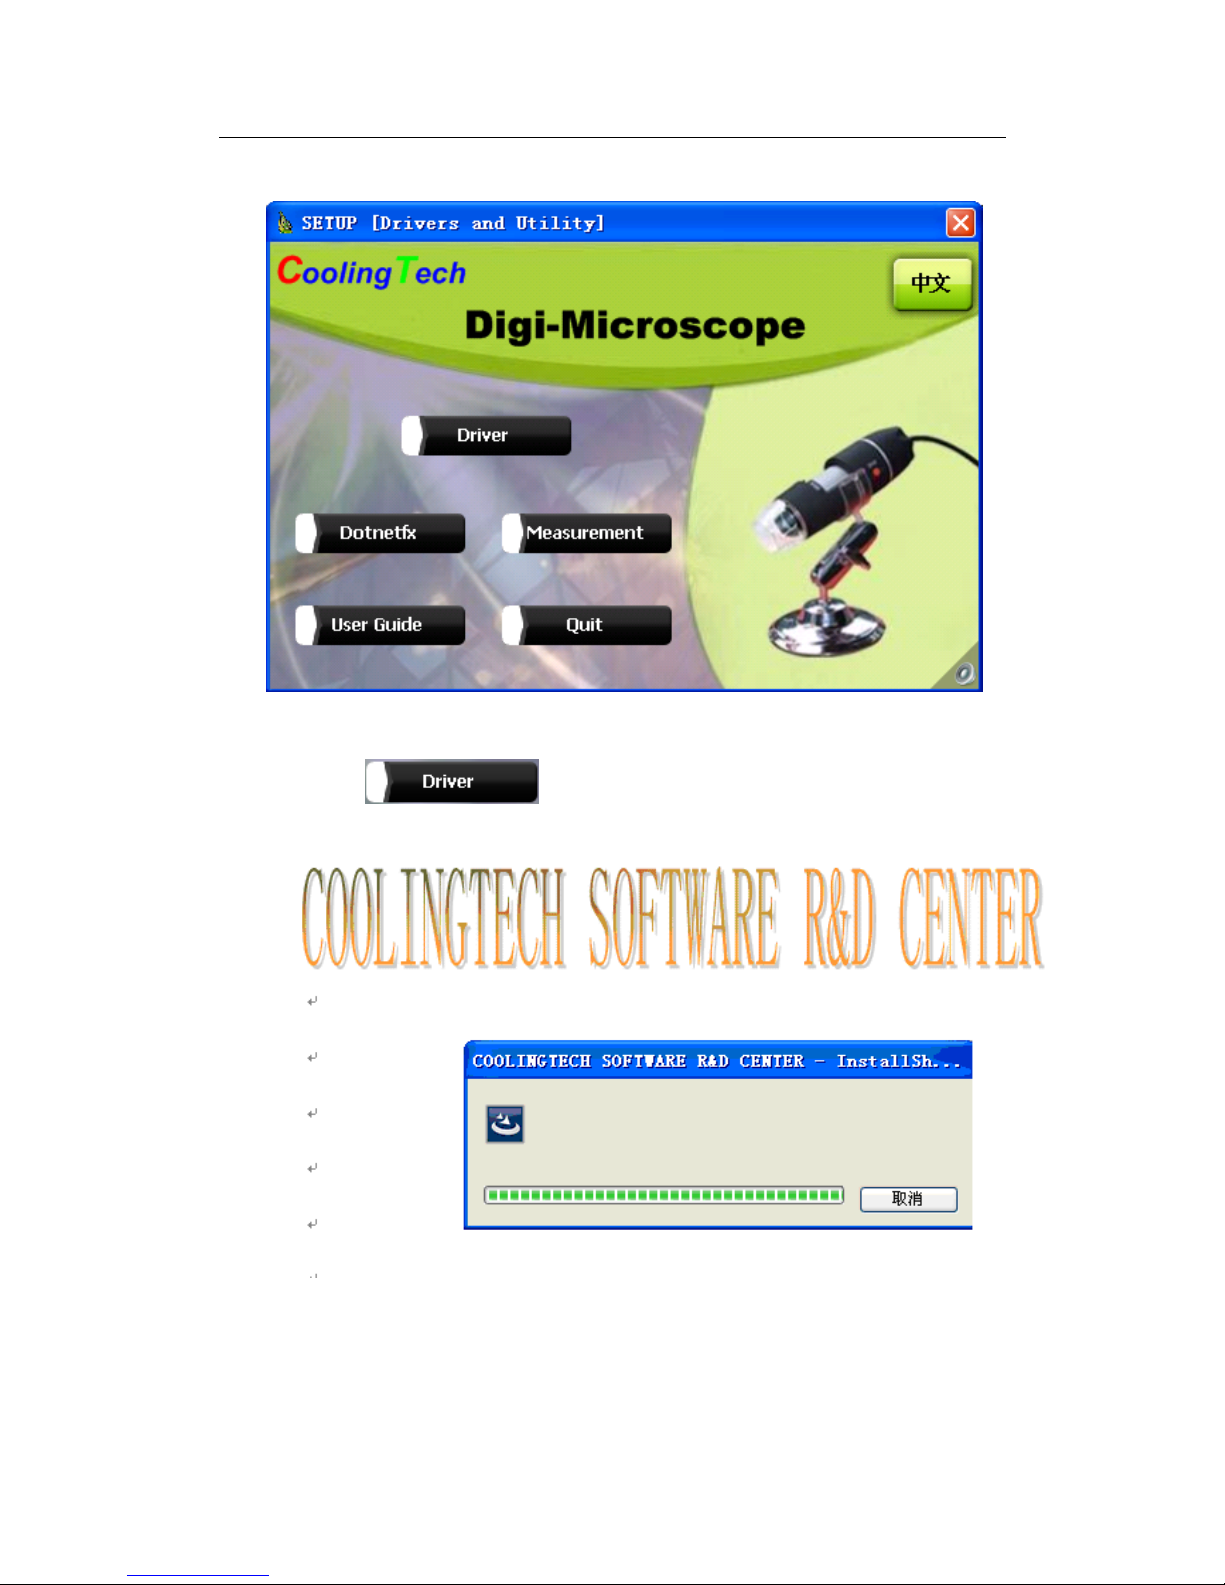
1. Driver installation
1Click to continue, the screen will show the
installation progress.
28/45
Page 29

CoolingTech
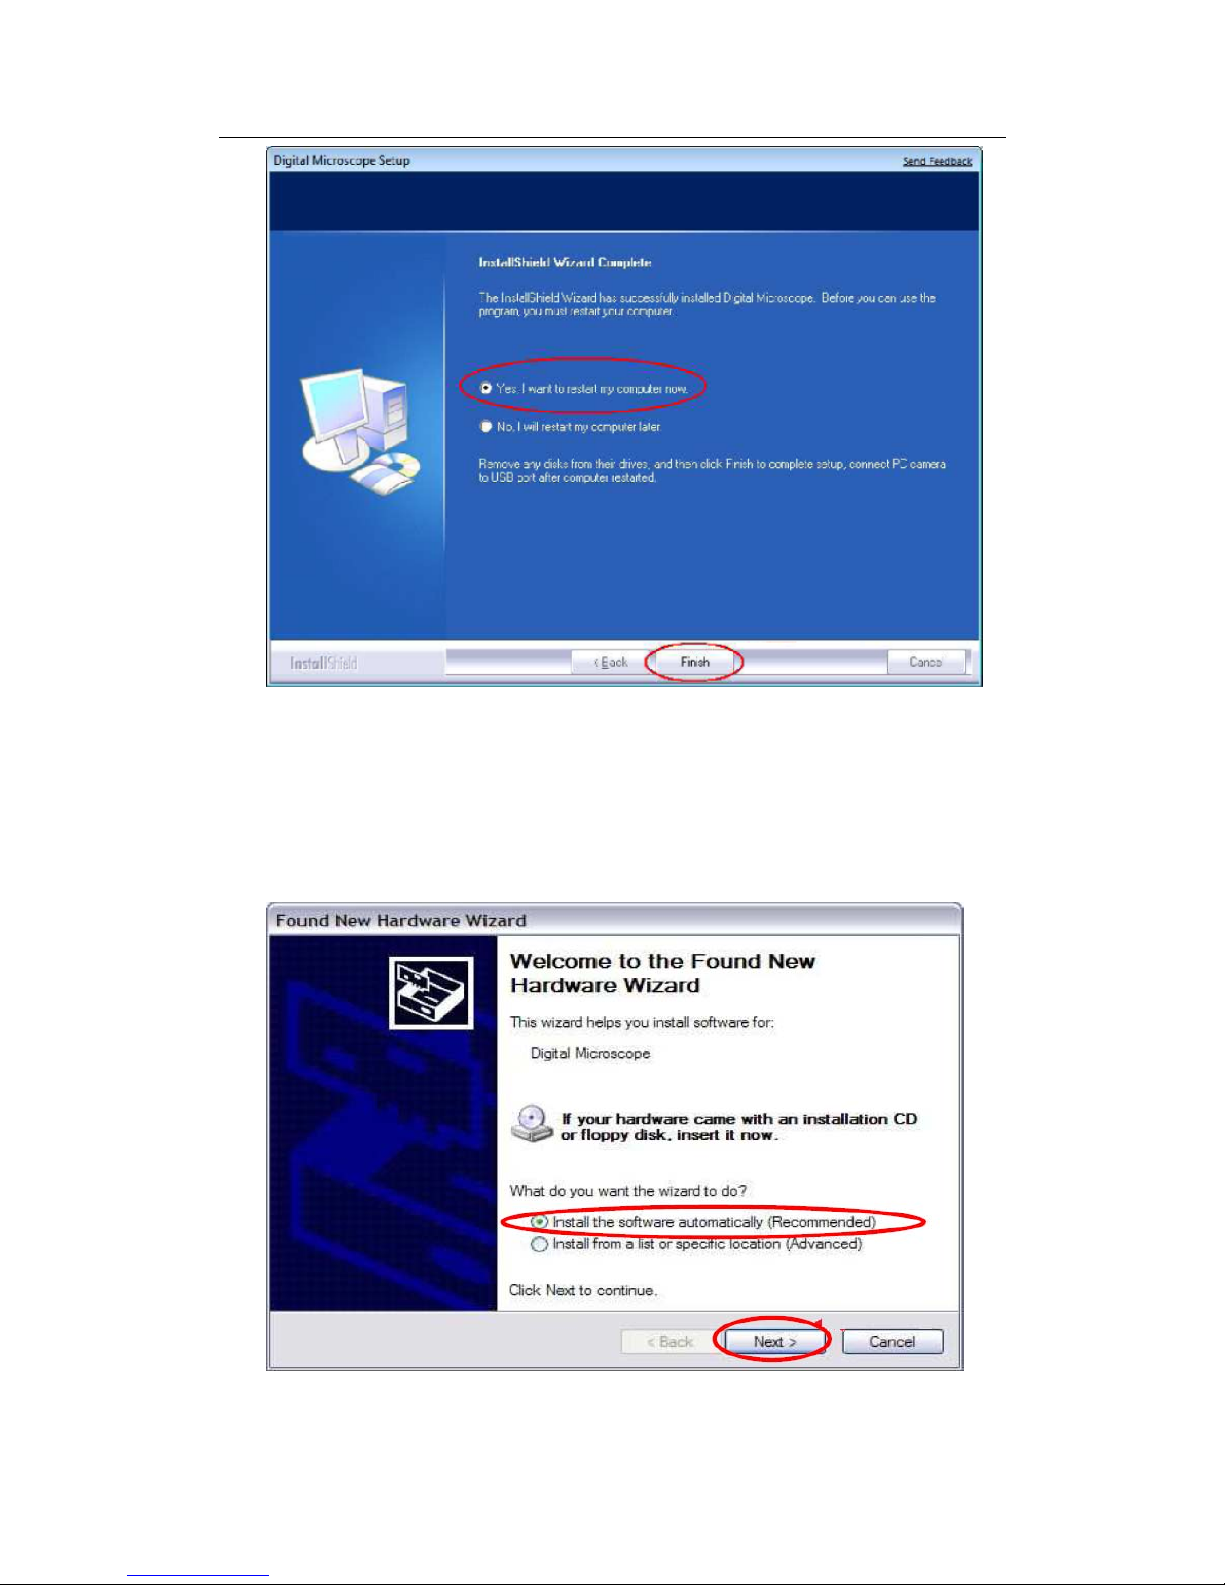
Click“next”to continue,as followings:
Click“next”to continue,as followings:
29/45
Page 30

CoolingTech
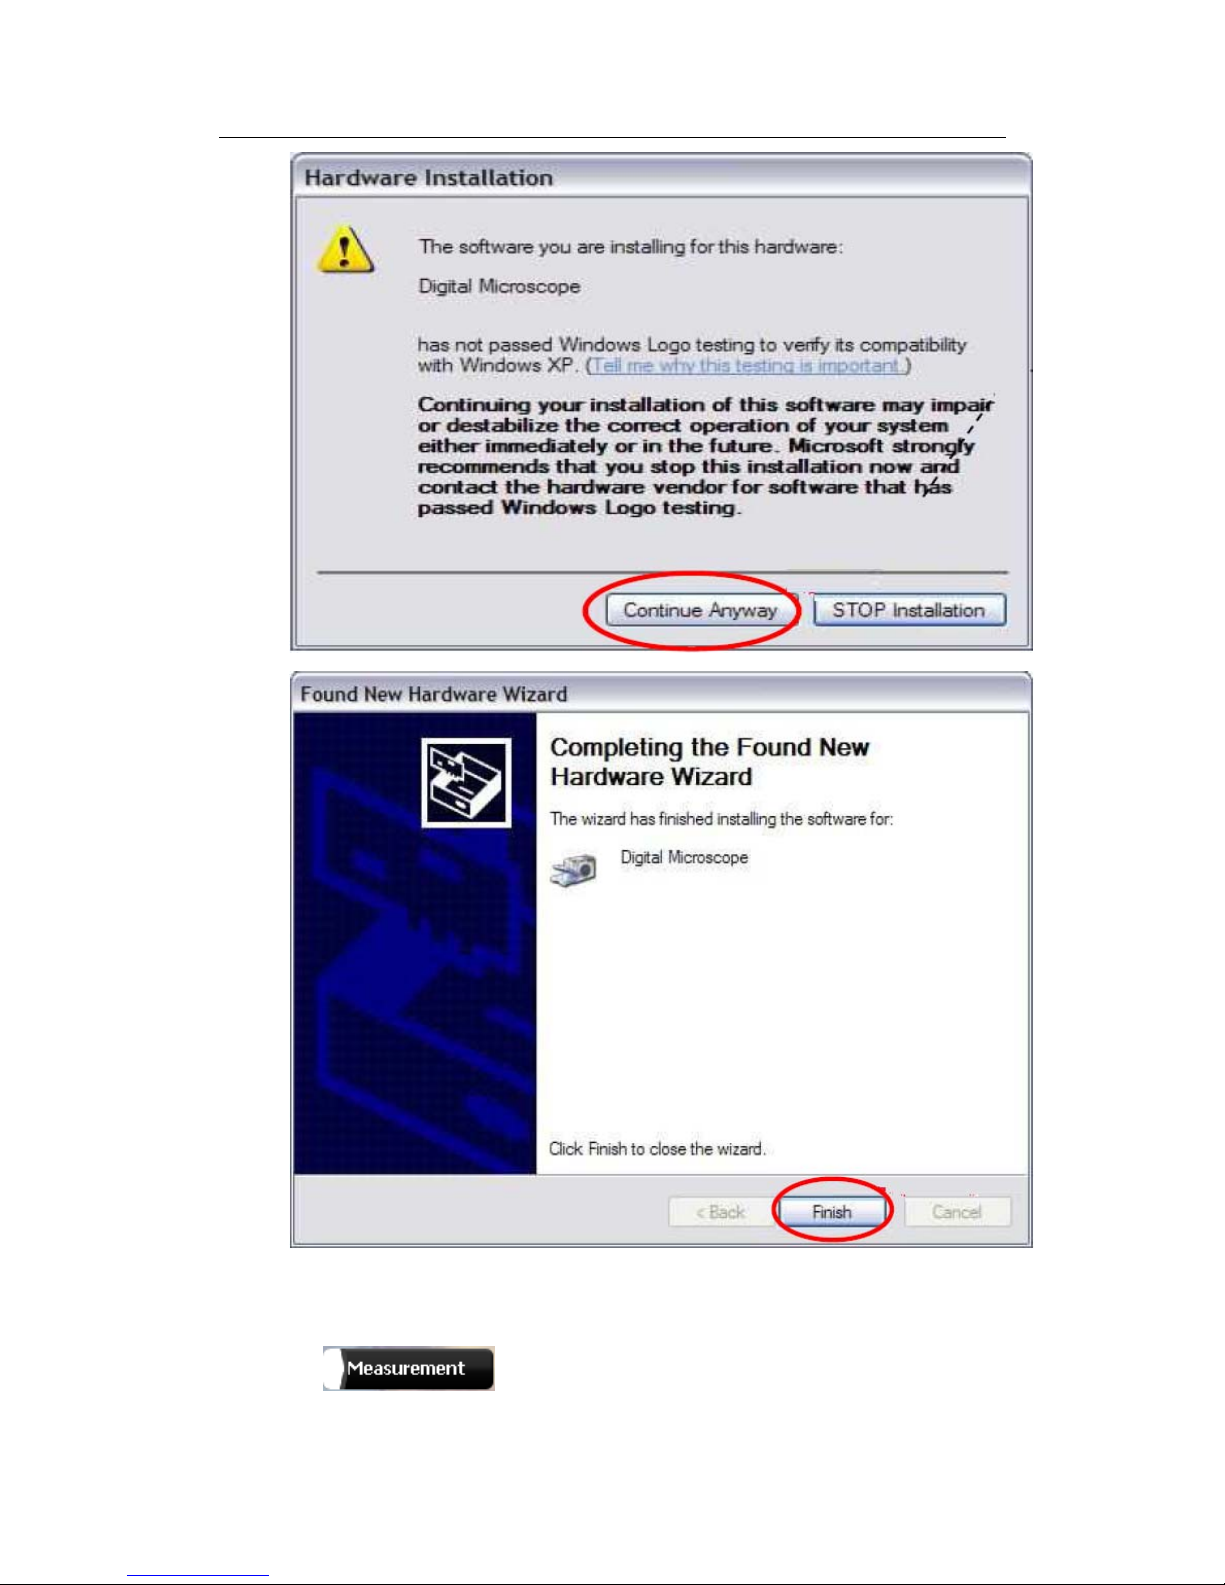
Click “continue Anyway”,as followings:
Click“Finish”to continue,as followings
30/45
Page 31
CoolingTech
Select ’Yes, I want to restart my computer now’, and click “finish”.
After restart your computer, Plug-in the USB port of Digital Microscope
into Computer USB port. Following the user guide by steps and complete
by click “Next” -> “Continue anyway” -> “Finish”.
31/45
Page 32
CoolingTech
32/45
2 Measurement installations:
1 Click to continue, as followings
Page 33

CoolingTech
33/45
2 Click “next” to continue, as followings
3. Click “next” to continue, as followings
Page 34

CoolingTech
34/45
4. Click “next” to continue, as followings
5. Click “next” to continue, as followings
Page 35

CoolingTech
35/45
6 Click “Install” to continue, as followings
Wait a few seconds while the installation taking place.
Page 36

CoolingTech
36/45
7.Click “Finish” and the installation completes.
8.After the installation completes, double click at computer desktop to
start using the software.
Plug-in the devices, Display in operation window
Page 37

CoolingTech
37/45
9 Click ,open the operation system
Choose the Image resolution from 320*240 to 1600*1200, default at VGA
Mode640*480
10 Click to use measurement function.
Page 38

CoolingTech
38/45
11 Click to open pictures, and click to save pictures
12
Video PLAY(Pause) ,STOP
Page 39

CoolingTech
13 Image Parameter including Image setting and special effects
15
Magnifier
16 Click
Ruller, as followings
39/45
Page 40

CoolingTech
40/45
17 Click , start calibration make sure certain accuracy.
Our experience told us that measurement could be controlled at 99% high
precision. Measure tolerance could be caused from human eye distortion
and defocus. More practice is helpful to measurements.
18 Key in the Measure data(Pixel),Unit, and Click’ OK’
Page 41

CoolingTech
Warning:
Please do calibration again once Magnification Ratio changed.
19 Color setting of display character
20 Click to export word or excel format.
41/45
Page 42

CoolingTech
Example: Measure data under word file
From Left to right:
Line ring Square Polygon Set-line Length
Oval Arc Point to Point distance Point to Line distance
Parallel line Angle
(as below show)
42/45
Page 43

CoolingTech
43/45
For example 1
Line measurement:
For example 2
Page 44
CoolingTech
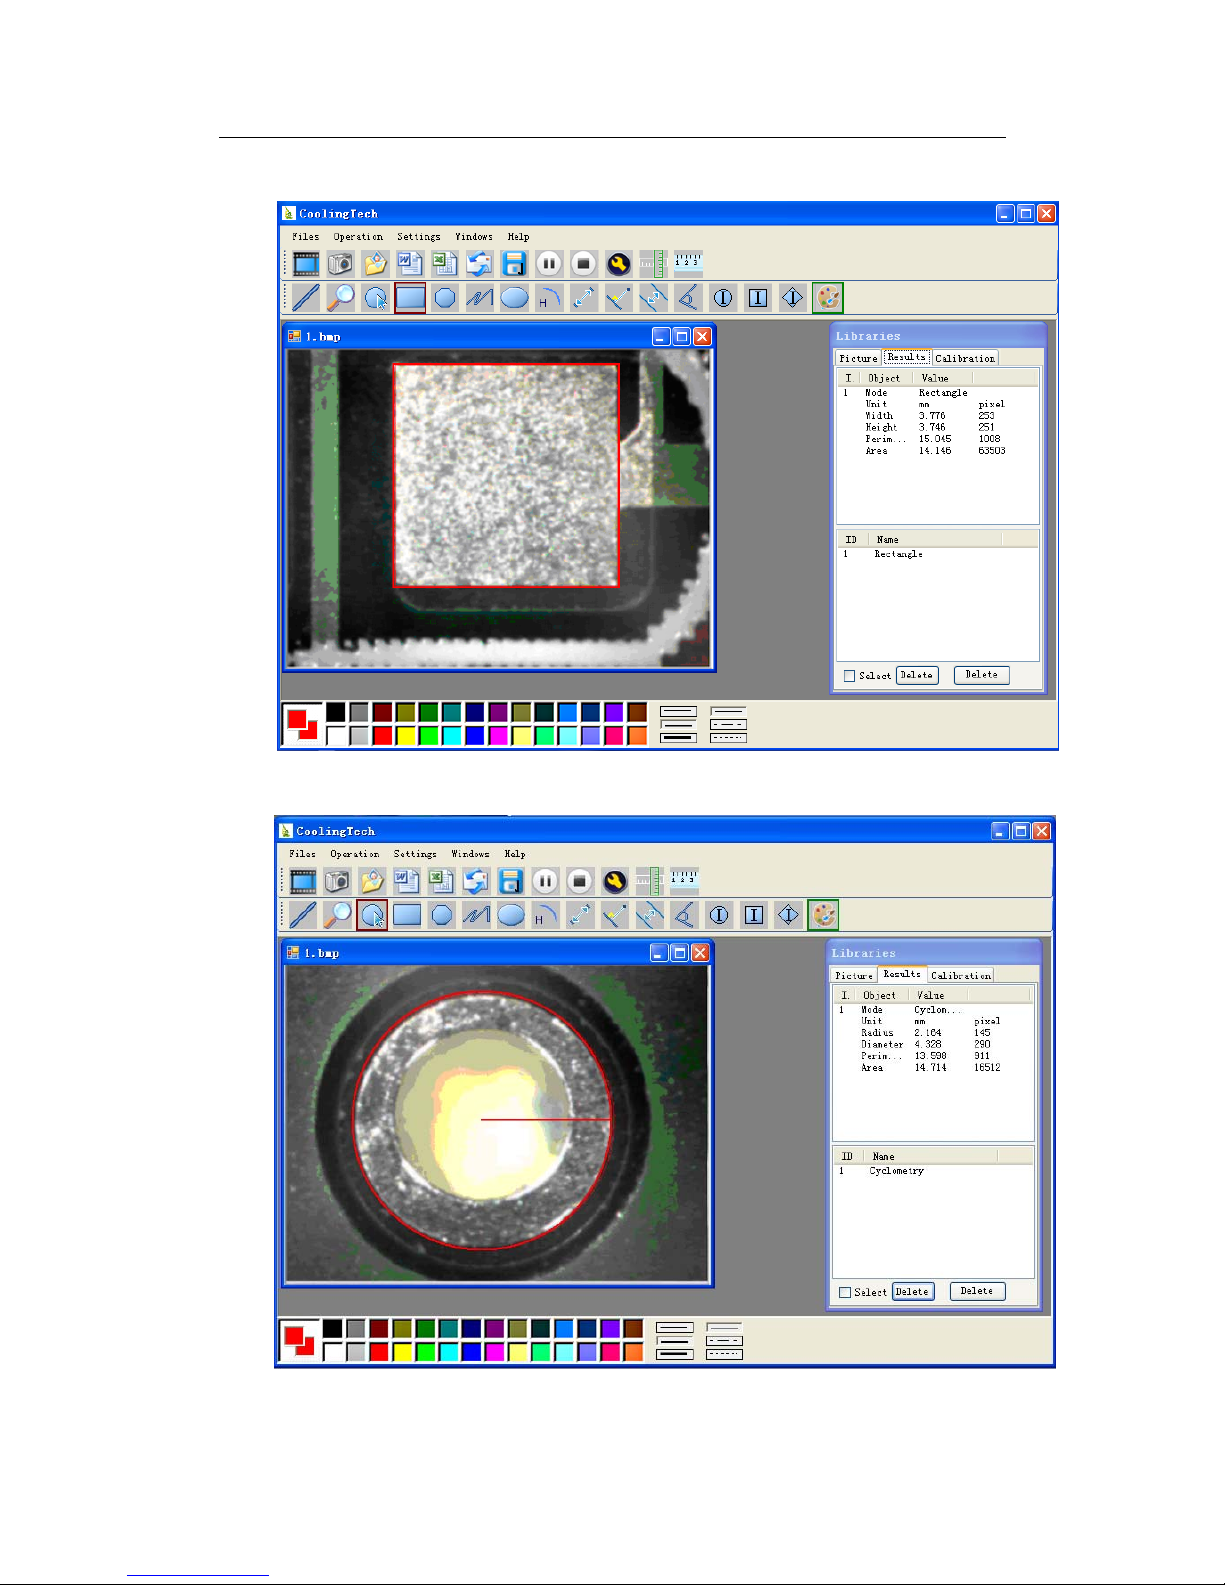
Rectangular measurements:
For example3
Ring measurements:
For example 4
Arc measurements:
44/45
Page 45

CoolingTech
45/45
3Please click
to Continue when the NET
Framework2.0 is necessary
 Loading...