

Cool-Icam CIC-300, Movi User Manual
TM
User’s Manual
Movi
M
2
Product Overview
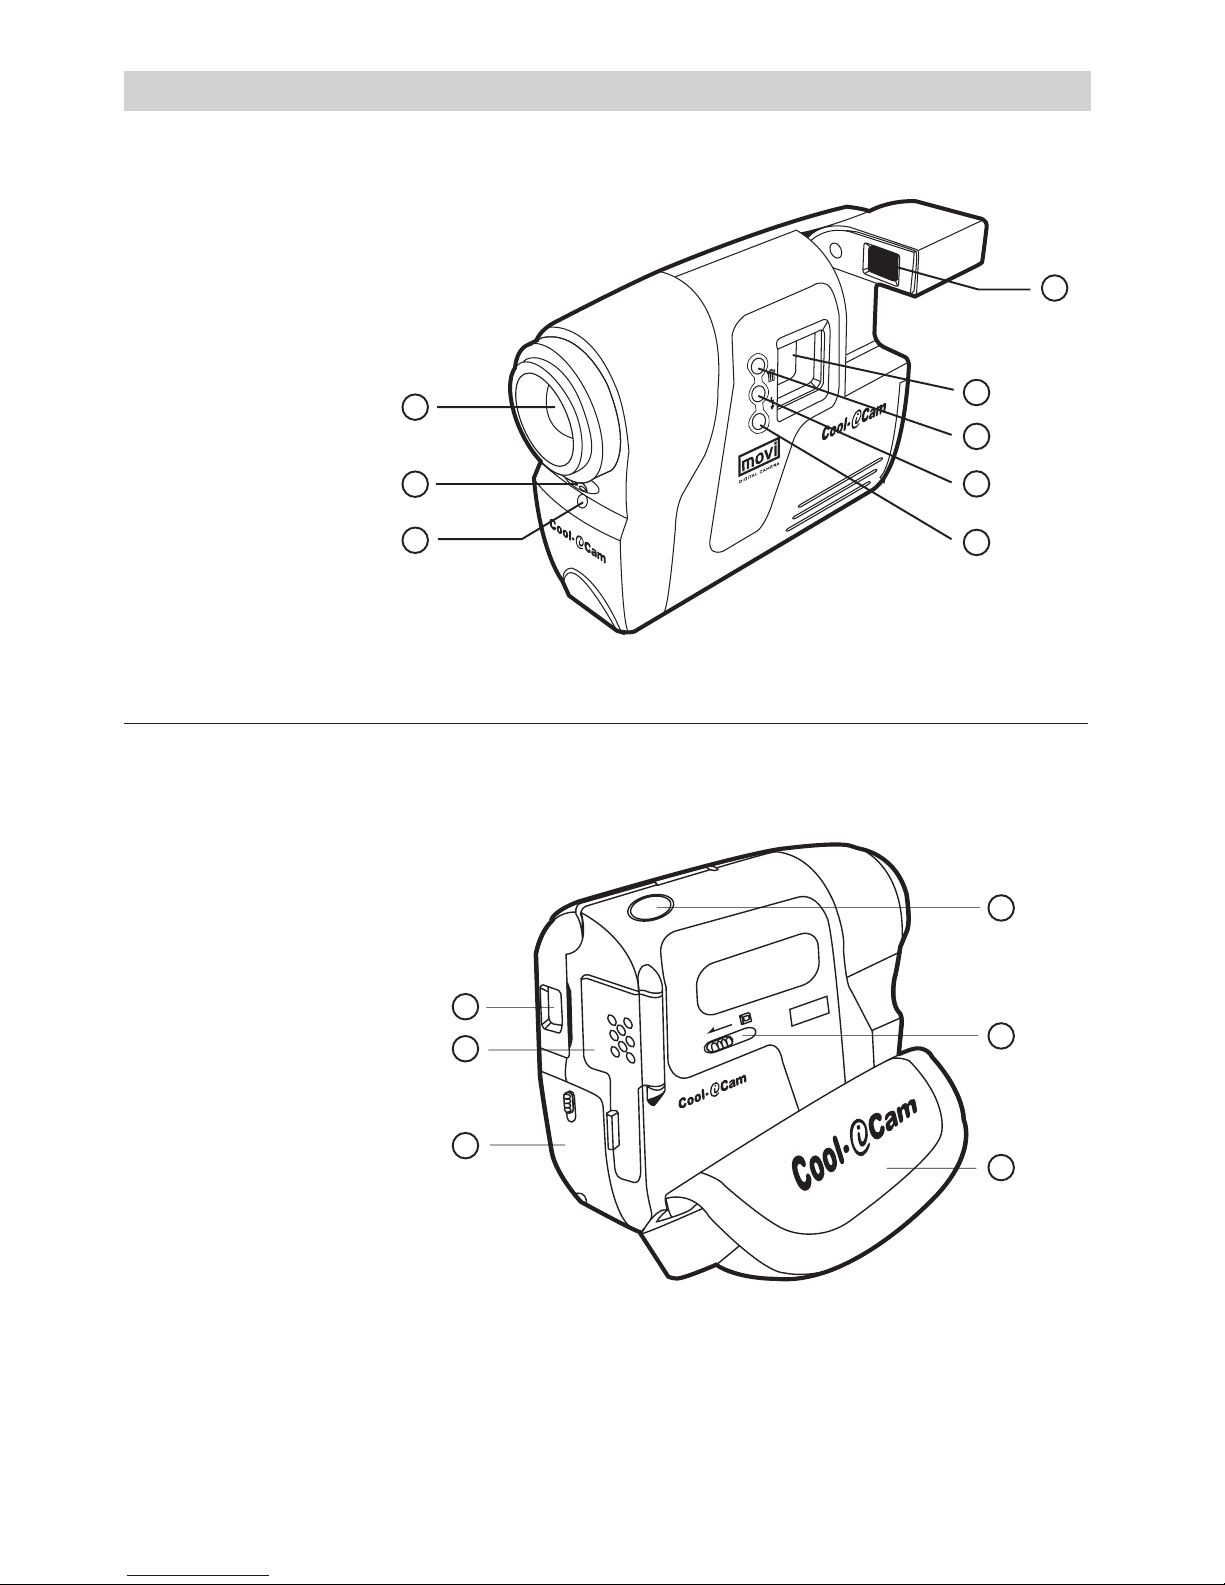
1. Lens
2. Microphone
3. Power LED
4. Viewfinder(open position)
5. LCD Display
6. Mode Button
7. Delete Button
8. Flash Button
1. Viewfinder(closed position)
2. USB & SmartMedia™ Card Door
3. Battery Door
4. Shutter Button
5. SmartMedia™ Card Release Button
6. Hand Strap
D
I
G
I
T
A
L
C
A
M
E
R
A
movi
1
2
3
4
5
6
2
1
3
4
M
5
6
7
8

3
Table of Contents
1 Getting Started ..............................................................................................................4
• What Can I do with my Camera?..................................................................................4
• What can I do with my Digital Pictures? ........................................................................4
• What can I do with my movie clips and audio?...............................................................4
• Camera Package Contents...........................................................................................4
• Installing the batteries ...............................................................................................5
• Installing the SmartMedia™ Memory Card.....................................................................5
• Turning the Camera On and Off ...................................................................................5
• Checking the battery level ..........................................................................................5
• Automatic power off saves batteries .............................................................................6
• Checking Camera Status.............................................................................................6
2 Taking Pictures ...............................................................................................................6
• Taking a Picture.........................................................................................................6
• Other Picture Taking settings.......................................................................................6
• Setting the picture quality...........................................................................................7
• Self Timer ................................................................................................................7
3 Taking Movies and Recording Audio Clips............................................................................7
• Recording a Movie ....................................................................................................7
• Recording Audio clips .................................................................................................7
• Deleting Pictures, Movies and Audio from the camera. ...................................................8
4 Using the Flashlight........................................................................................................8
• Installing the batteries ...............................................................................................8
• Connecting the flashlight to the camera ........................................................................8
• Setting the flash mode ...............................................................................................8
• Using the test button .................................................................................................9
5 Installing the Software onto a Computer ............................................................................9
• Window® 98SE users .................................................................................................9
• Install the software ....................................................................................................9
• Software included with your camera.............................................................................9
• Computer system requirements ...................................................................................13
6 Transferring Pictures, Movie Clips & Audio To Your Computer.................................................14
• Before you transfer pictures ........................................................................................14
• Connecting to your computer ......................................................................................14
• Transferring & viewing the Pictures on a computer ........................................................14
• Transferring & playing Movies on a computer...............................................................14
• Transferring & listening to Audio on a computer .............................................................15
• Taking pictures from live video ....................................................................................15
7 Using your camera as a Web Cam .....................................................................................15
• Setting up ................................................................................................................15
• Making a call.............................................................................................................15
8 Troubleshooting Problems ................................................................................................16
• Troubleshooting ........................................................................................................16
9 Getting Help...................................................................................................................17
• Software Help ...........................................................................................................17
• Cool-iCam Online Services ..........................................................................................17
• Customer Support .....................................................................................................17
10 Appendix .....................................................................................................................18
• Technical Specifications ..............................................................................................18
• What is SmartMedia™ Card - a brief explanation ..........................................................18
• Using your batteries...................................................................................................19
• Tips, Your Safety & Maintenance..................................................................................19
• Uninstalling the camera driver .....................................................................................20
• Regulatory Information...............................................................................................20
4
1 Getting Started
• What Can I do with my Camera?
Capture
Enjoy point & shoot operation. Store pictures, movie clips and Audio on the
Camera’s SmartMedia™ Card memory.
Set Up
Select various Camera, Video and Audio recording settings.
Communicate
Use the camera as a Web Camera.
• What can I do with my Digital Pictures?
View
Pictures on a Computer using the Arcsoft Software supplied
Save
Pictures to the computer memory
Communicate
Send the pictures over the internet to family and friends.
• What can I do with my Movie clips & Audio?
Playback
Movie clips on a Computer using the Arcsoft® Software supplied
Replay
Audio clips
Save
Movie clips and Audio to the computer memory
Communicate
Send the movie and audio over the internet to family and friends.
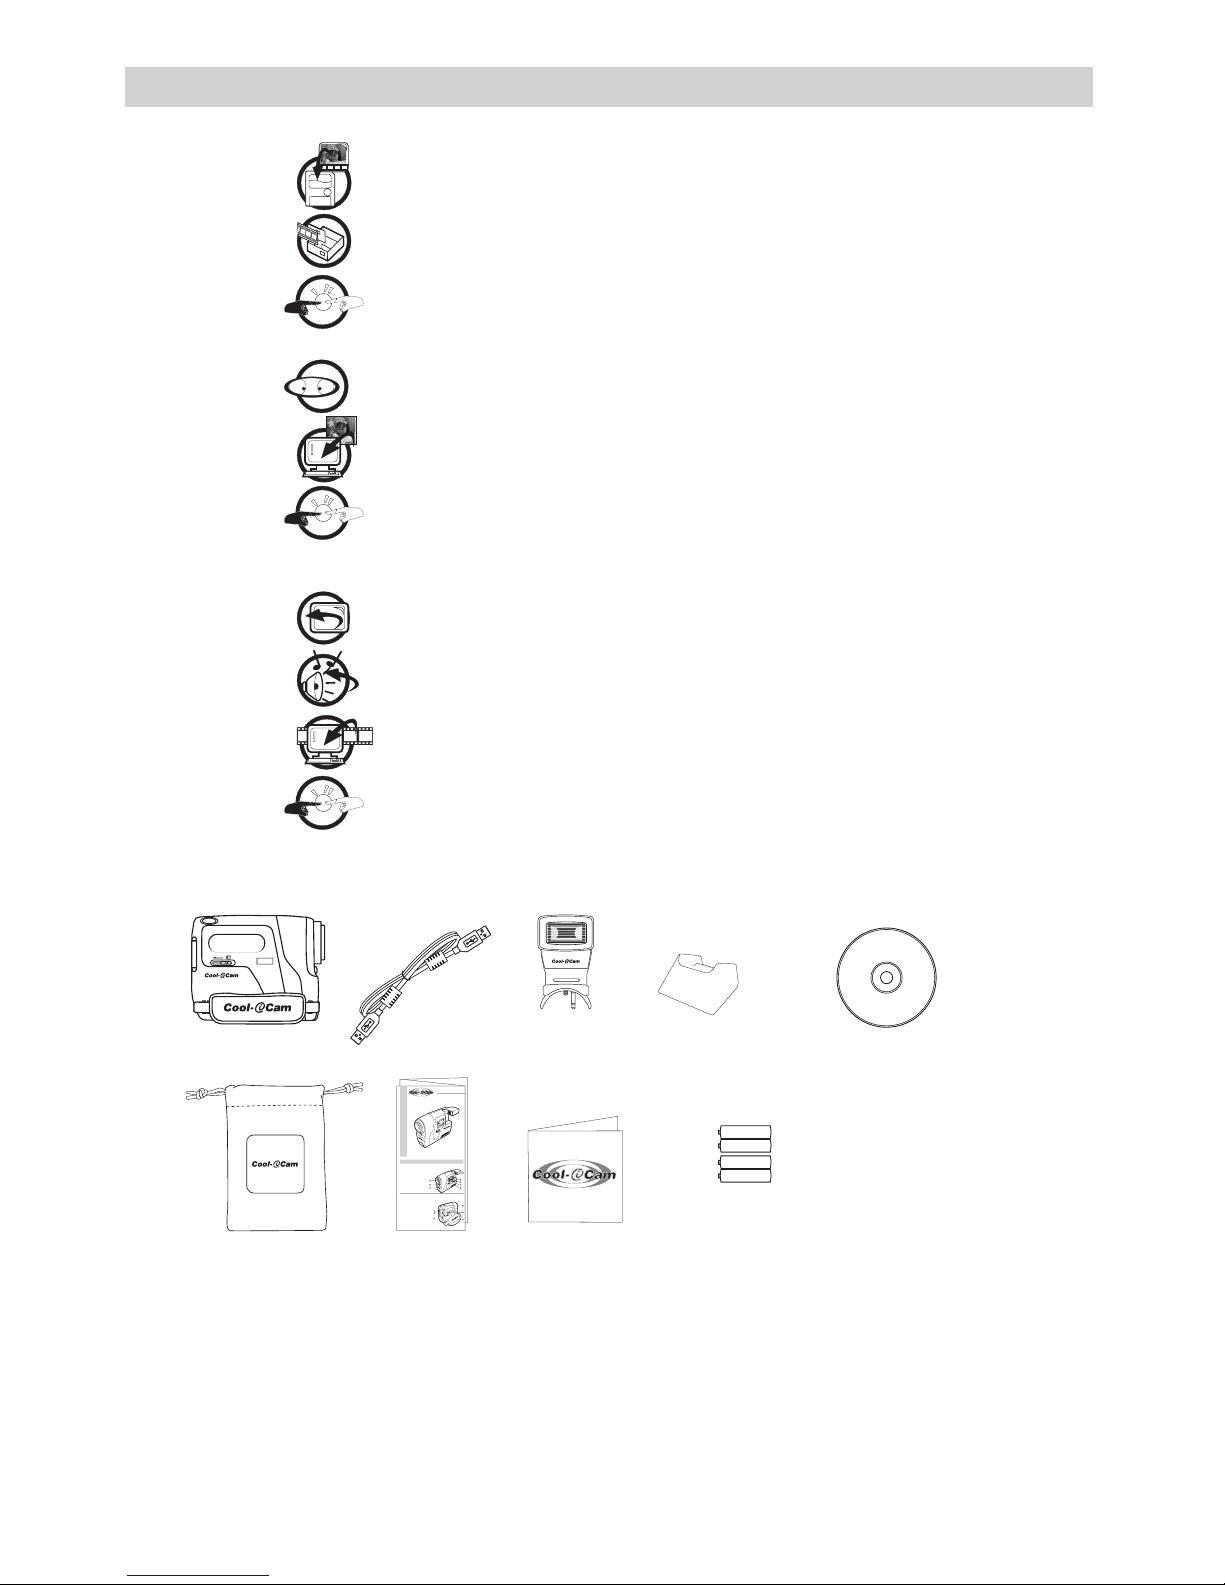
• Camera Package Contents
DIGITAL CAMERA
movi
Movi
USB Cable
Camera Stand
4 x AAA Alkaline
Batteries (2 for camera and
2 for ash unit optional)
My Camera CD-ROM includes
PhotoStudio® 4.0 (PC),
ArcSoft™ Funhouse™ 1.0 (PC),
ArcSoft PhotoPrinter® 2000 (PC),
ArcSoft VideoImpression™ 1.6 (PC),
Microsoft® NetMeeting™ (PC),
Adobe® Acrobat® Reader (PC).
User’s Manual
Flash Light
(Optional)
Pouch
P
l
e
a
s
e
t
a
k
e
a
m
o
m
e
n
t
t
o
f
i
l
l
o
u
t
a
n
d
r
e
t
u
r
n
t
h
i
s
R
e
g
i
s
t
r
a
t
i
o
n
C
a
r
d
.
Y
o
u
r
v
a
l
u
a
b
l
e
i
n
p
u
t
w
i
l
l
h
e
l
p
u
s
t
o
s
e
r
v
e
y
o
u
b
e
t
t
e
r
.
P
r
o
d
u
c
t
R
e
g
is
t
r
a
t
io
n
C
a
r
d
3
F
i
r
s
t
N
a
m
e
M
r
.
M
i
d
d
l
e
I
n
i
t
i
a
l
L
a
s
t
N
a
m
e
A
d
d
r
e
s
s
M
s
.
M
r
s
.
M
i
s
s
P
l
e
a
s
e
p
r
o
v
i
d
e
a
n
y
c
o
m
m
e
n
t
s
y
o
u
h
a
v
e
r
e
g
a
r
d
i
n
g
t
h
i
s
p
r
o
d
u
c
t
.
R
e
g
i
s
t
r
a
t
i
o
n
C
a
r
d
N
o
.
:
T
o
w
n
C
o
u
n
t
y
P
o
s
t
C
o
d
e
T
e
l
e
p
h
o
n
e
N
o
.
E
-
m
a
i
l
A
d
d
r
e
s
s
D
a
t
e
o
f
p
u
r
c
h
a
s
e
D
a
y
M
o
n
t
h
Y
e
a
r
5
A
g
e
o
f
u
s
e
r
5
-
7
8
-
1
0
1
0
-
1
5
1
6
-
2
0
2
1
+
7
R
e
t
a
i
l
S
h
o
p
C
a
t
a
l
o
g
u
e
O
t
h
e
r
s
:
(
P
l
e
a
s
e
s
p
e
c
i
f
y
)
M
a
g
a
z
i
n
e
C
a
t
a
l
o
g
u
e
B
r
o
c
h
u
r
e
I
n
t
e
r
n
e
t
F
r
i
e
n
d
s
W
h
e
r
e
d
i
d
y
o
u
p
u
r
c
h
a
s
e
t
h
i
s
p
r
o
d
u
c
t
?
W
h
e
r
e
d
i
d
y
o
u
f
i
r
s
t
s
e
e
t
h
i
s
p
r
o
d
u
c
t
?
O
t
h
e
r
s
:
(
P
l
e
a
s
e
s
p
e
c
i
f
y
)
I
n
t
e
r
n
e
t
T
V
P
le
a
s
e
c
h
e
c
k
h
e
re
if y
o
u
a
re
n
o
t in
te
re
s
te
d
in
r
e
c
e
iv
in
g
in
fo
rm
a
tio
n
fr
o
m
C
h
a
ra
c
te
r
O
p
tio
n
s
L
td
. a
b
o
u
t c
u
rre
n
t
a
n
d
fu
tu
re
p
ro
d
u
c
ts
.
C
h
a
ra
c
te
r
O
p
ti
o
n
s
L
td
.
C
u
s
to
m
e
r S
e
rv
ic
e
s
D
e
p
a
rt
m
e
n
t.
H
e
lp
lin
e
T
e
l
: 0
1
6
1
6
3
3
9
8
0
8
E
-m
a
il: s
u
p
p
o
rt@
c
o
o
l-ic
a
m
.c
o
.u
k
T
M
Registration Card
TM
Movi
Quick Start Guide
Product Overview
1. Lens
2. Microphone
3. Power LED
4. Viewfinder(open position)
5. LCD Display
6. Mode Button
7. Delete Button
8. Flash Button
2
1
3
4
M
5
6
7
8
1. Viewfinder(closed position)
2. USB & SmartMedia™ Card Door
3. Battery Door
4. Shutter Button
5. SmartMedia™ Card Release Button
6. Hand Strap
D
I
G
I
T
A
L
C
A
M
E
R
A
movi
1
2
3
4
5
6
M
Quick Guide
5
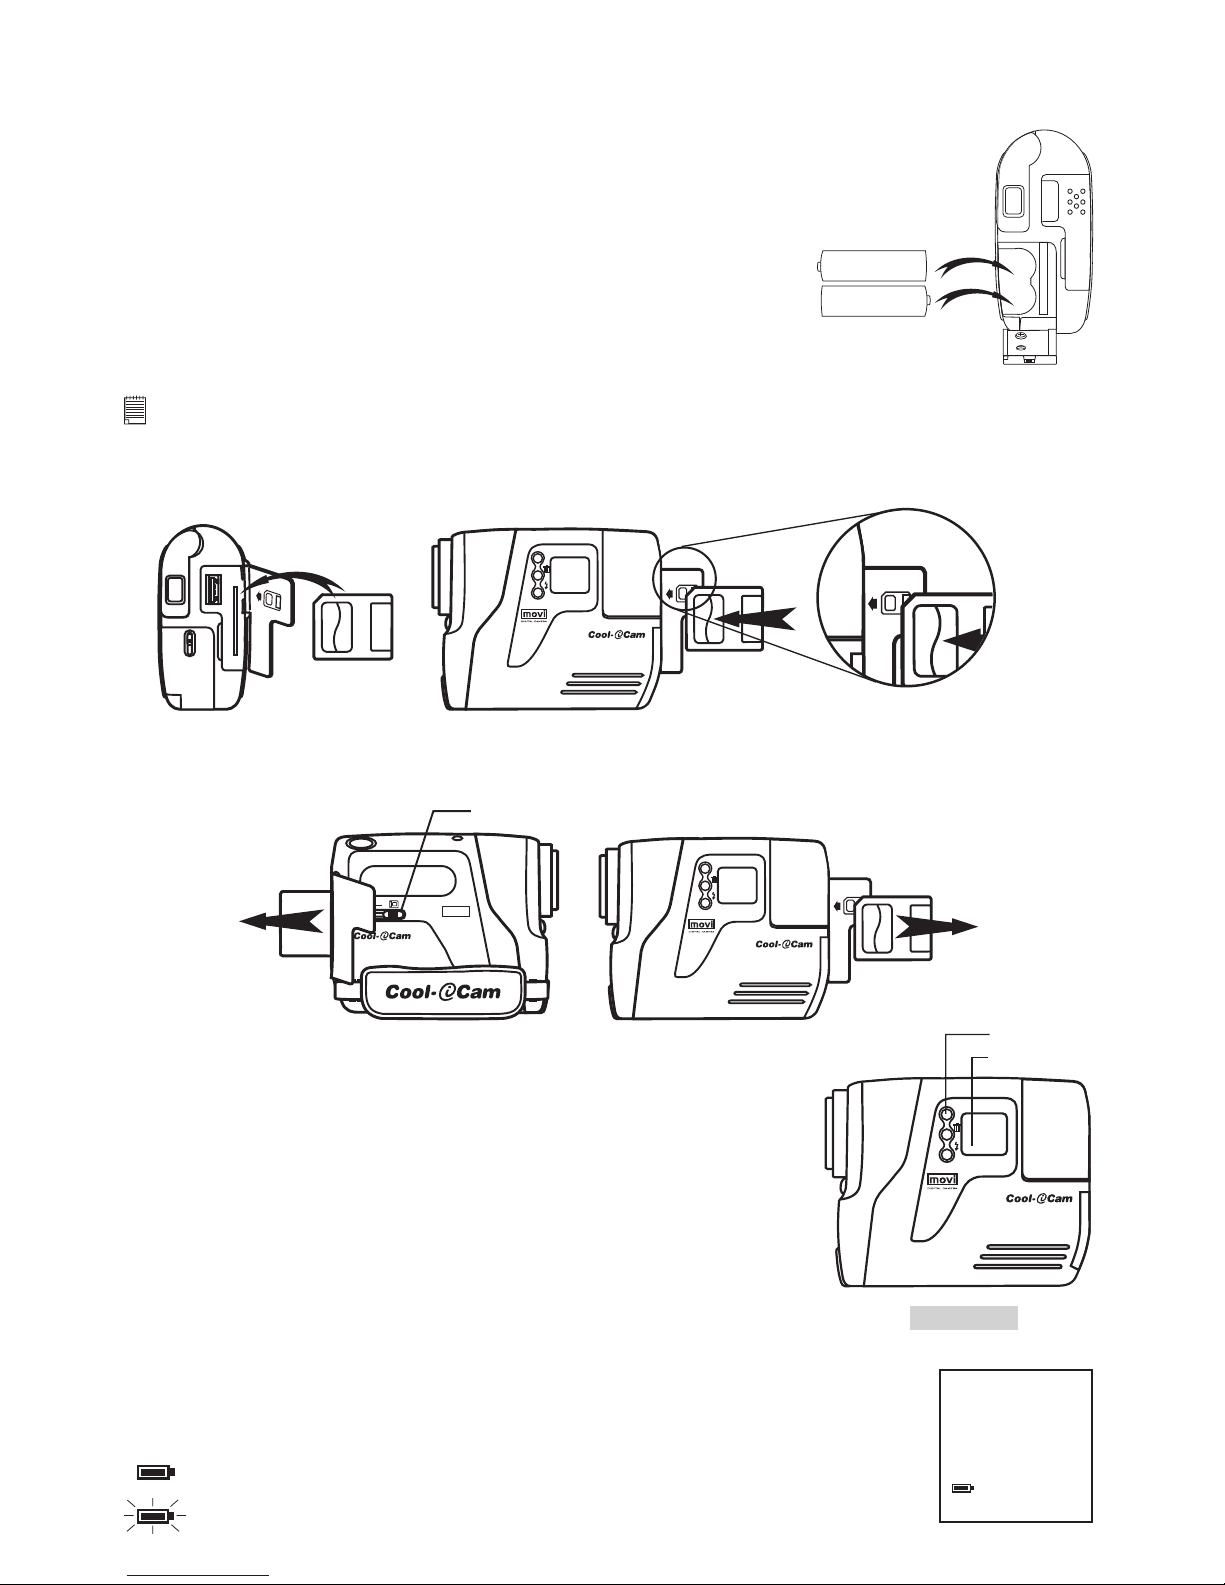
• Installing the batteries
4 x AAA Alkaline batteries are supplied with the product (2 for the camera and 2 for the flashlight) The
flashlight is covered in a future section.
1. Open the camera battery door by sliding the lock downwards.
2. Insert the batteries as shown, ensuring you follow the +/- signs correctly.
3. Close the battery door.
AAA
+
-
AAA
+
-
• Installing the SmartMedia™ memory card
IMPORTANT! The SmartMedia™ Card (SMC) holds all the Pictures, Video and Audio you take in its memory. You will not be able to
take any Pictures, Video or Audio without the SMC being properly installed into the camera.
1. Open the flap on the rear of the camera as illustrated.
2. Insert the SMC ensuring the card is inserted the correct way round as illustrated below.
M
3. To remove the SMC open the flap on the rear of the camera and gently slide the release button in the
direction of the arrow as illustrated.
M
DIGIT AL CA ME RA
movi
SmartMedia™ Card
Release Button
• Turning the Camera On and Off
To turn the camera on, firmly press the Mode button M. The LCD display
will come on after a few moments. To turn the camera off, press and hold
down the Mode button. The camera will bleep and the LCD display will
switch off.
Right View
M
Mode Button
LCD Display
• Checking the battery level
Check the battery power level before taking pictures. For guidelines on battery usage, see Using Your
Batteries.
HIGH
1. Turn the camera on.
2. Check the battery status level that appears on the camera LCD screen
batteries have adequate power.
batteries need to be replaced.
6
• Automatic power off saves batteries
Your Camera is designed to switch off automatically and save battery life without losing the pictures taken
after 60 seconds of non use. Press the Mode button to reactivate the camera.
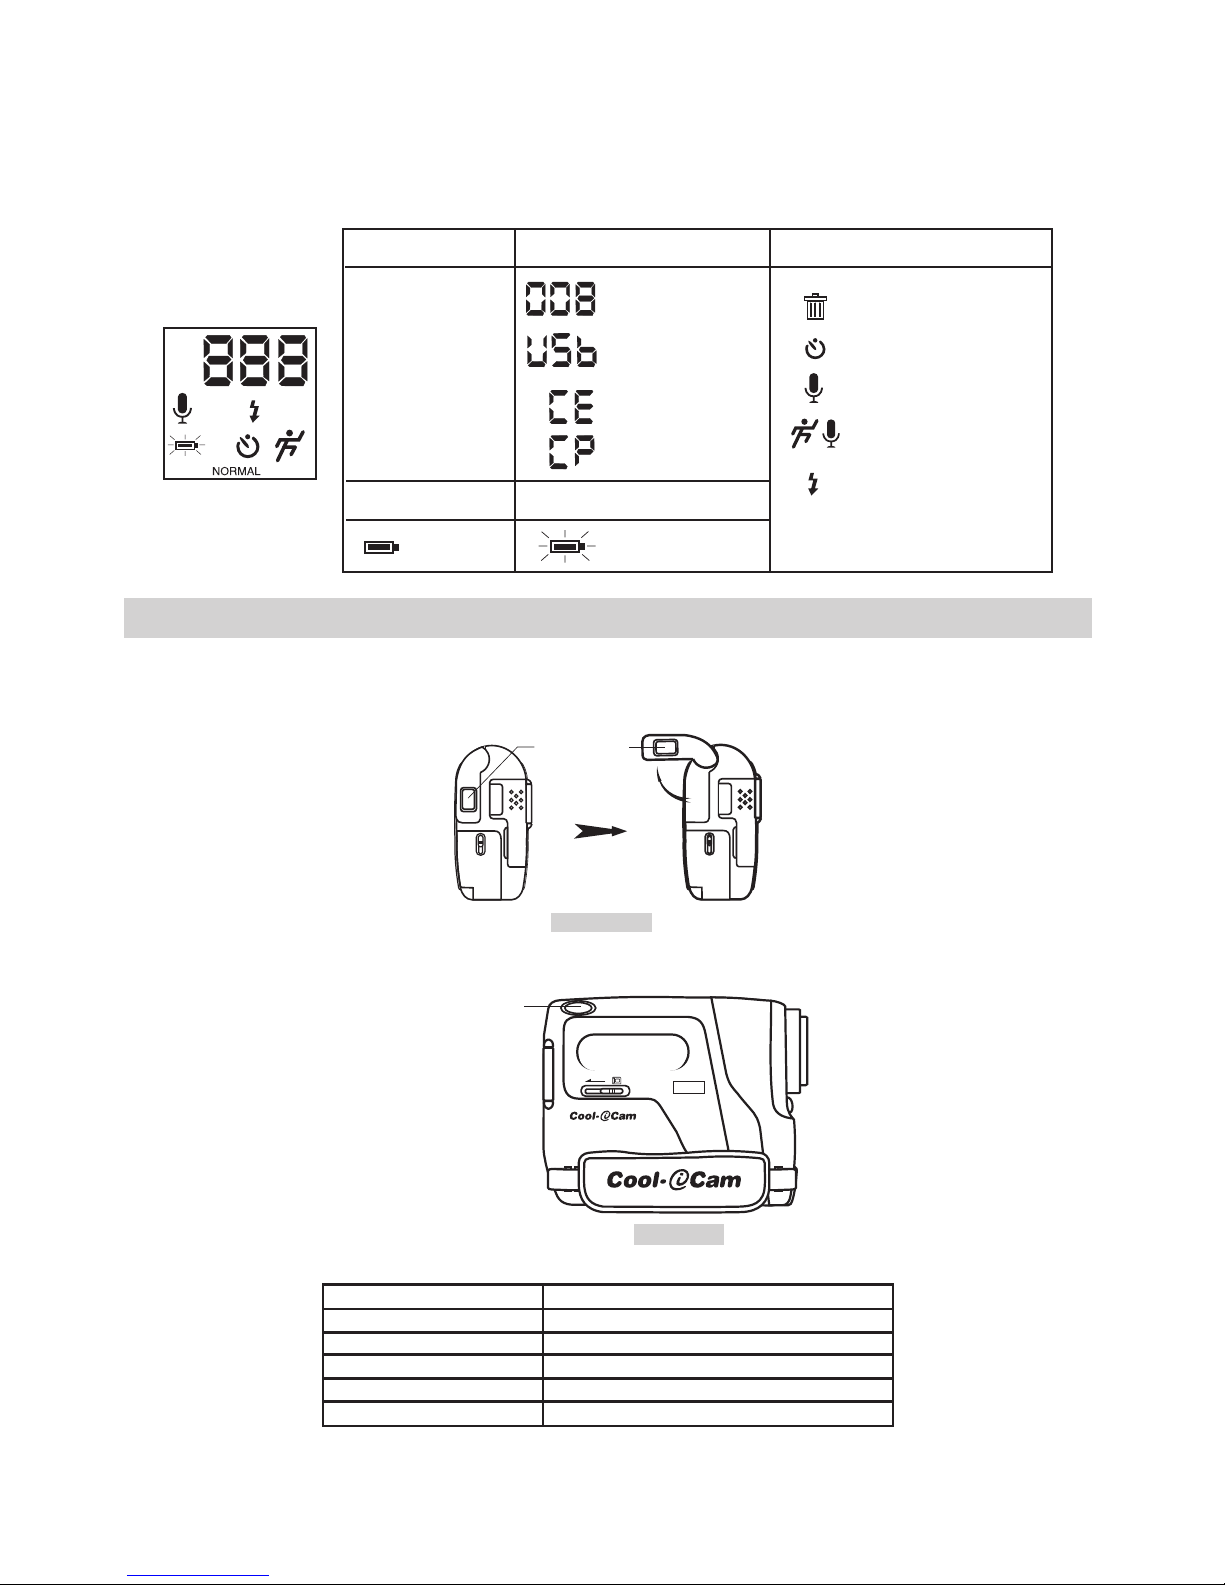
• Checking Camera Status
Switch the Camera on, view the camera LCD screen to check which camera settings are active. If Feature
icon is not displayed, that particular feature is not activated.
HIGH LOW
sec
min
AUTO
sec
min
AUTO
HIGH
NORMAL
LOW
Best
Pictures taken
Better
Good
USB connected
Picture Quality Camera Status
Full Battery Low Battery
Delete all pictures
Other Features
Audio Recording Mode
Self-Timer Mode
Movie Mode
Auto Flash Mode On
“Minutes” Display
“Second” Display
SMC not inserted
SMC write protected
2 Taking Pictures
• Taking a Picture
1. Switch the camera ON. The camera LCD will be set to take Normal resolution pictures
2. Rotate the viewfinder out and upwards
Back View
Viewnder
3. Frame your subject using the camera viewfinder.
4. Press the Shutter button to take an picture. Hold the camera steady. A bleep sound is made when the
picture has been taken.
Shutter Button
Left View
DIGITAL CAMERA
movi
• Other Picture Taking settings
Setting Section
Set Picture Quality Setting the Picture Quality
Using the flash mode Setting the flash mode
Self Timer Setting the self timer
Set Movie Mode Setting camera to make a Movie
Deleting Pictures Deleting Pictures from the camera
 Loading...