

1
Digital Audio System
User’s Manual
TM
Digi-MP3
PLAY
MP3
VOL
sleep
SET
alarm
MP3
AUX
radio
band
DIGITAL AUDIO SYSTEM

2
1. Introduction
Congratulations on purchasing your Digital Audio System. Using the latest innovations in technology the
Digital Audio System offers fun, affordable and easy to use digital audio. The Digital Audio System has
the following features:
• AM/FM Radio
10 preset stations for each band
Manual/Auto station search
• Dual Clock
• Alarm Timer
• Sleep Timer
• Digi-MP3 Player (detachable)
• AUX(Audio)
• Left/Right adjustable Speakers
Although you probably want to get started right away, please take a few minutes to read this user manual
and familiarise with your Digital Audio System/Digi-MP3 Player.
What is MP3?
MP3 is an audio le format. Audio les can be quite large, which is why historically, it hasn’t been practical
to store music on computers. An MP3 le is an audio that has been compressed (anywhere from 1/5th to
1/17th of its original size) without any noticeable loss of sound quality. That means great sounding music, in
a package that can easily be downloaded and stored on your computer or downloaded onto your Digi-MP3
Player.
Your Digi-MP3 Player has the ability to store audio les which are downloaded to your Digi-MP3 Player
from your computer. Your Digi-MP3 Player could then be connected to your Digital Audio System and
played in an open area where all people around you could enjoy the music together.
Please note that your Digi-MP3 Player requires a SmartMedia Card™ (included) to act as the memory for
your Digi-MP3 Player. The larger the memory of the SmartMedia™ Card the more music can be stored, and
travel with you wherever you go. These can be purchased from any good computer retailer. Your Digi-MP3
Player can use SmartMedia™ cards ranging from 8MB - 128MB. Please note that MP3 les will vary in size
depending on track length.

3
2. Table of Contents
1. Introduction.............................................................................................................. 2
2. Table of Contents ...................................................................................................... 3
3. System Requirements ................................................................................................ 4
4. Package Contents ...................................................................................................... 4
5. Software Installation .................................................................................................. 4
5.1 How to install the Digi-MP3 Manager Software .................................................... 4
5.2 How to install RealJukebox™ Basic ...................................................................... 5
5.3 How to install Adobe® Acrobat® Reader.............................................................. 6
6. Battery Installation .................................................................................................... 6
7. SmartMedia™ Card .................................................................................................... 6
7.1 What is a SmartMedia™ Card - a brief explanation ................................................ 6
7.2 Non-Volatile Memory ......................................................................................... 7
7.3 Using a SmartMedia™ Card ................................................................................ 7
8. Connecting your Digi-MP3 Player to your Computer ...................................................... 7
9. Realjukebox Setup..................................................................................................... 8
10. Downloading MP3 Files to your Digi-MP3 Player............................................................ 8
10.1 Downloading MP3 Files to your Digi-MP3 Player ................................................... 8
10.2 Creating a New Folder in your Digi-MP3 Manager................................................. 9
10.3 Renaming Files ................................................................................................. 9
10.4 Formatting a SmartMedia™ Card......................................................................... 9
10.5 Changing ID3 Information in your Digi-MP3 Manager ........................................... 9
10.6 Deleting Files from Your Digi-MP3 Player ............................................................ 9
10.7 Quick Reference of your Digi-MP3 Manager......................................................... 10
11. Battery Installation for Digital Audio System ............................................................... 10
12. Getting to Know Your Digital Audio System ................................................................ 11
12.1 LCD Display/Function Buttons............................................................................. 11
12.2 Standby Mode .................................................................................................. 12
12.3 Power on Mode ................................................................................................. 12
12.4 Radio Playing ................................................................................................... 12
12.5 Radio Station Preset.......................................................................................... 12
12.6 Alarm Timer Preset .......................................................................................... 12
12.7 Sleep Timer Setting........................................................................................... 12
12.8 Clock Preset ..................................................................................................... 12
12.9 Playing Digi-MP3 Player or AUX audio ................................................................ 12
13. Other Features in your Digital Audio System ............................................................... 13
14. Using a Mains Power Adapter ...................................................................................... 14
15. Attaching Digi-MP3 Player to your Digital Audio System .............................................. 14
16. Getting to Know Your Digi-MP3 Player......................................................................... 15
16.1 LCD Display ..................................................................................................... 15
16.2 Play Button ...................................................................................................... 15
16.3 Next Track Button ............................................................................................. 16
16.4 Last Track Button.............................................................................................. 16
16.5 Earphone Port .................................................................................................. 16
16.6 Case Release Catch ........................................................................................... 16
16.7 Hold Button...................................................................................................... 16
16.8 Menu Button .................................................................................................... 16
16.9 Volume Control Buttons ..................................................................................... 16
17. How to Use Adobe® Acrobat® Reader.......................................................................... 17
18. Customer Support ..................................................................................................... 17
19. Troubleshooting......................................................................................................... 17
20. Battery Guidance ....................................................................................................... 19
21. Technical Specications .............................................................................................. 19
22. FCC Notice................................................................................................................ 20
23. Legal Notice .............................................................................................................. 20

4
3. System Requirements
• Compatible with Microsoft® Windows® 98SE, Me, 2000 or XP
• Pentium® 333MHz or Pentium® compatible processor
• 128MB RAM or higher
• USB Port
• 200MB free disk space
• CD-ROM Drive
• Colour monitor with high colour (16-bit) graphic capability or higher
• Standard mouse and keyboard
SmartMedia™ Card
• minimum of 8MB of memory (not included)
4. Package Contents
Digi-MP3
PLAY
MP3
VOL
sleep
SET
alarm
MP3
AUX
radio
band
DIGITAL AUDIO SYSTEM
P
l
e
a
s
e
t
a
k
e
a
m
o
m
e
n
t
t
o
f
i
l
l
o
u
t
a
n
d
r
e
t
u
r
n
t
h
i
s
R
e
g
i
s
t
r
a
t
i
o
n
C
a
r
d
.
Y
o
u
r
v
a
l
u
a
b
l
e
i
n
p
u
t
w
i
l
l
h
e
l
p
u
s
t
o
s
e
r
v
e
y
o
u
b
e
t
t
e
r
.
P
r
o
d
u
c
t
R
e
g
is
t
r
a
t
io
n
C
a
r
d
l
M
Digital Audio System
User’s Manual
Digi-MP3
PLAY
MP3
VOL
sleep
SET
alarm
MP3
AUX
radio
band
DIGITAL AUDIO SYSTEM
TM
Digital Audio System
(Digi-MP3 Player inclusive)
3 Interchangeable
coloured case
USB Cable
Stereo Earphone
Hanging Ring
Digi-MP3 Software CD-ROM
(includes Digi-MP3 Manager,
Realjukebox™ Basic,
Adobe® Acrobat® Reader)
AAA
AAA
2 x AAA Batteries
User’s Manual Registration Card
TM
Digital Audio System
Quick Start Guide
Product Overview
1. Lens
2. Microphone
3. Power LED
4. Viewnder(open position)
5. LCD Display
6. Mode Button
7. Delete Button
8. Flash Button
1. Viewnder(closed position)
2. USB & SmartMedia™ Card Door
3. Battery Door
4. Shutter Button
5. SmartMedia™ Card Release Button
6. Hand Strap
Quick Guide
Digi-MP3
PLAY
MP3
VOL
sleep
SET
alarm
MP3
AUX
radio
band
DIGITAL AUDIO SYSTEM
Side view
Back view
3
Digi-MP3
PLAY
MP3
VOL
sleep
SET
alarm
MP3
AUX
radio
band
DIGITAL AUDIO SYSTEM
Front view
3
3
3
3
3
3
3
3
3
3
3
3
3
3
3
5. Software Installation
5.1 How to Install Digi-MP3 Manager Software
5.1.1 How to Install Digi-MP3 Manager Software
Open & Close
Your Digi-MP3 Manager should be installed rst.
1. Insert the CD-ROM disc into the CD-ROM drive and close the
CD-ROM drawer.
2. An installation wizard will automatically launch.
3. Click “Digi-MP3 Manager” icon.
4. Follow the instructions presented on the screen to complete the
installation.
5. Click “OK” to restart your computer and wait for your PC to restart
automatically.
6. Now go to Section 5.2
Notes:
If the setup screen doesn’t appear after loading the CD, then you can manually
start it by double-clicking the “My Computer” Icon on your desktop, then
double-clicking the icon for the CD-ROM drive. When the CD-ROM window
opens, double-click the “Digi-MP3” icon.
Note:
Make sure you inatall the Digi-MP3 Manager software before connecting the
MP3 Player to your computer.
5
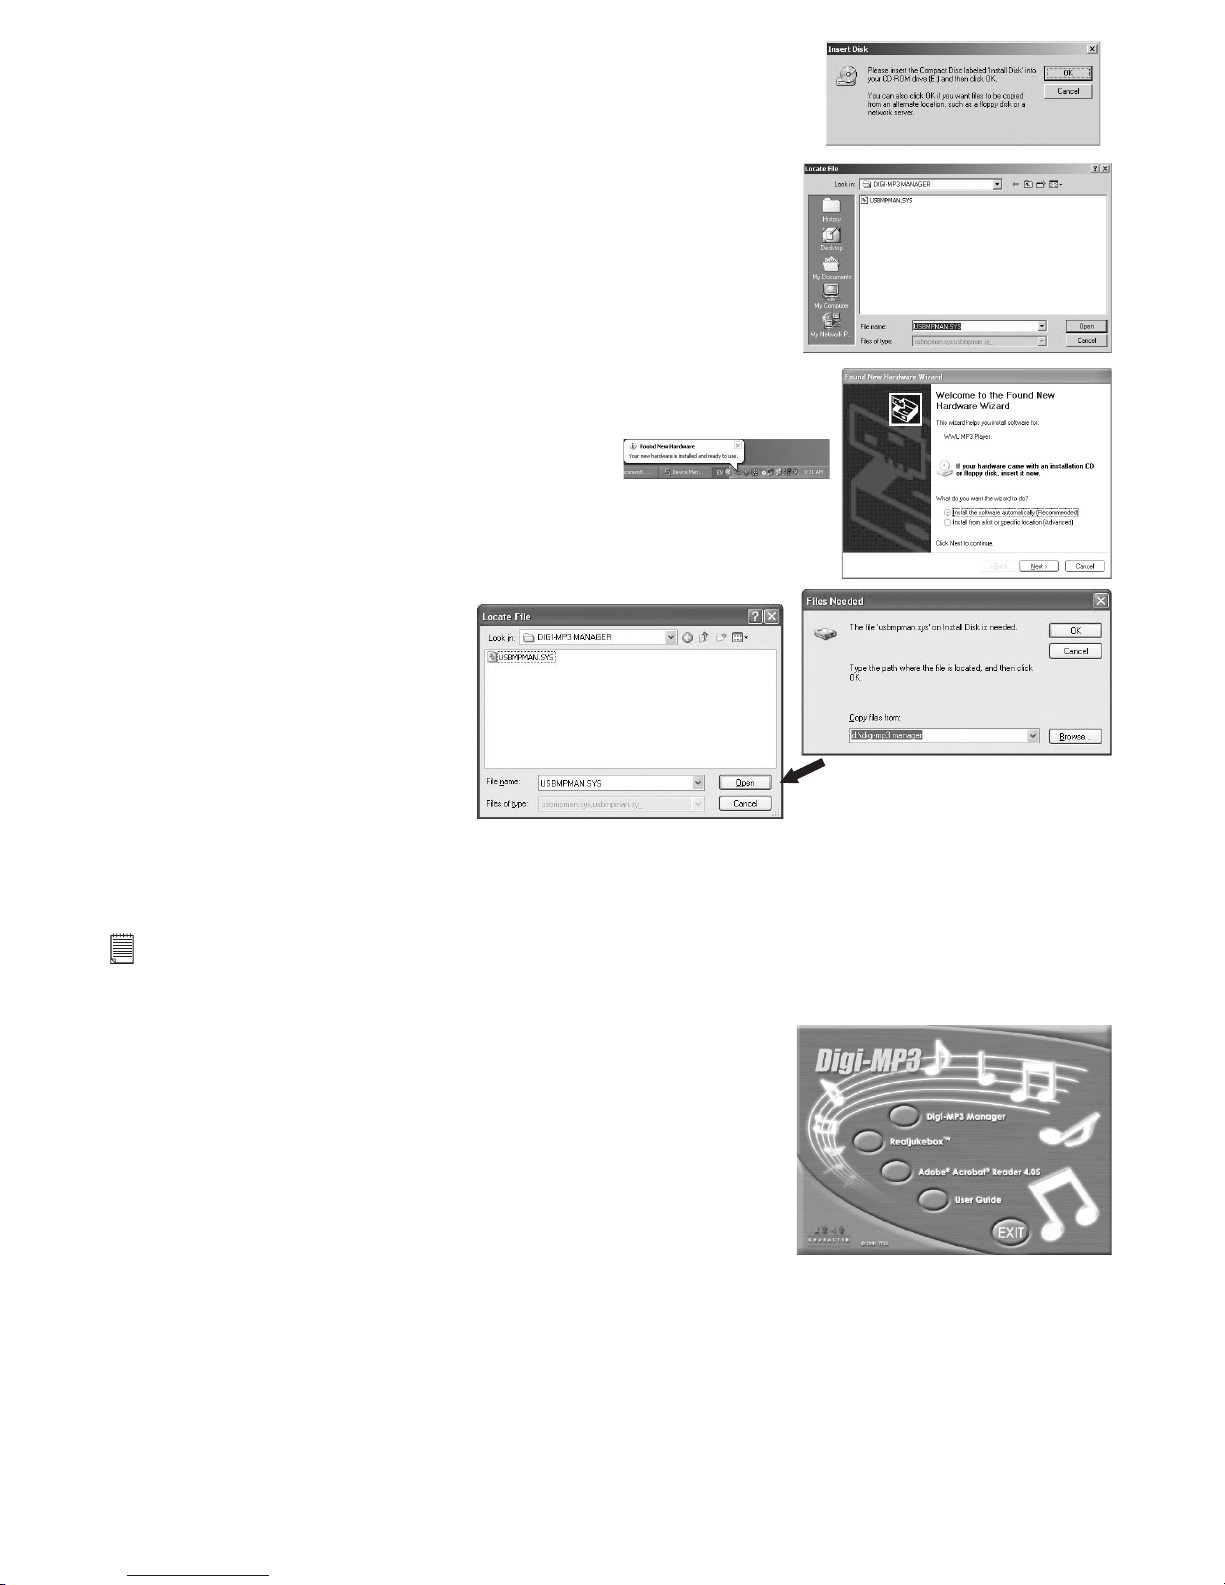
For Windows® 2000 users:
1. To install the Digi-MP3 Manager from your CD-ROM disc.
2. Follow the onscreen prompt to complete the installation of Digi-MP3
Manager.
3. Plug-in the Digi-MP3 Player.
4. It will shown that it have found the New hardware.
6. Message box prompt out. Click “OK”
6. Search for the le in the CD-ROM.
7. A Message will prompt you to state the installation is nished.
For Windows® XP users:
1. To install the Digi-MP3 Manager from your CD-ROM disc.
2. Follow the onscreen prompt to complete the installation of Digi-MP3
Manager.
3. Plug-in the Digi-MP3 Player.
4. It will shown that it have found the New hardware.
5. Choose “Install Software automatically”.
6. “File Needed” message box prompt out.
7. Search for the le in the CD-ROM under the directory Digi-MP3
Manager.
8. A Message will prompt you to state the installation is nished.
5.1.2 Uninstalling your Digi-MP3 Manager
To uninstall Digi-MP3 Manager, click the “Start Menu” on Windows® desktop, choose Digi-MP3 Manager
folder under Program and choose “Uninstall Digi-MP3 Manager”. Follow the onscreen instructions.
Notes:
Uninstalling your Digi-MP3 Manager does not delete your folders and therefore all MP3 les transferred into your default
or created folders will be preserved. You will be able to access these folders on your system desktop.
5.2 How to Install Realjukebox™ Basic
Visit http://www.real.com for all your FAQ’s, tips and technical support.
1. Reinsert the CD-ROM disc into the CD-ROM drive and close the
CD-ROM drawer.
2. An installation wizard will automatically launch.
3. Click the “Realjukebox™” icon.
4. Select the language for the installation and click “OK”
5. Follow the instructions presented on the screen to complete the
installation.
MP3 Legal Notice
This product is designed to assist you in reproducing material for which you own the copyright or are
authorised to copy by the copyright owner or by exemption in applicable law. Unless you own the copyright
or have such authorisation, you may be violating copyright law and may be subject to payment of damages
and other remedies. If you are uncertain about your rights, you should contact your legal advisor.
6
5.3 How to install Adobe® Acrobat® Reader
Adobe® Acrobat® Reader lets you view and print Adobe Portable Document format (PDF) les on all major
computer platforms, as well as ll in an submit Adobe PDF forms online.
To install the Adobe® Acrobat® Reader:
1. Reinsert the CD-ROM disc into the CD-ROM drive and close the
CD-ROM drawer.
2. An installation wizard will automatically launch.
3. Click the “Adobe® Acrobat® reader 4.05” icon.
4. Follow the instructions presented on the screen to complete the
installation.
5. Visit http://www.adobe.com/for all your FAQ’s, tips and technical
support.
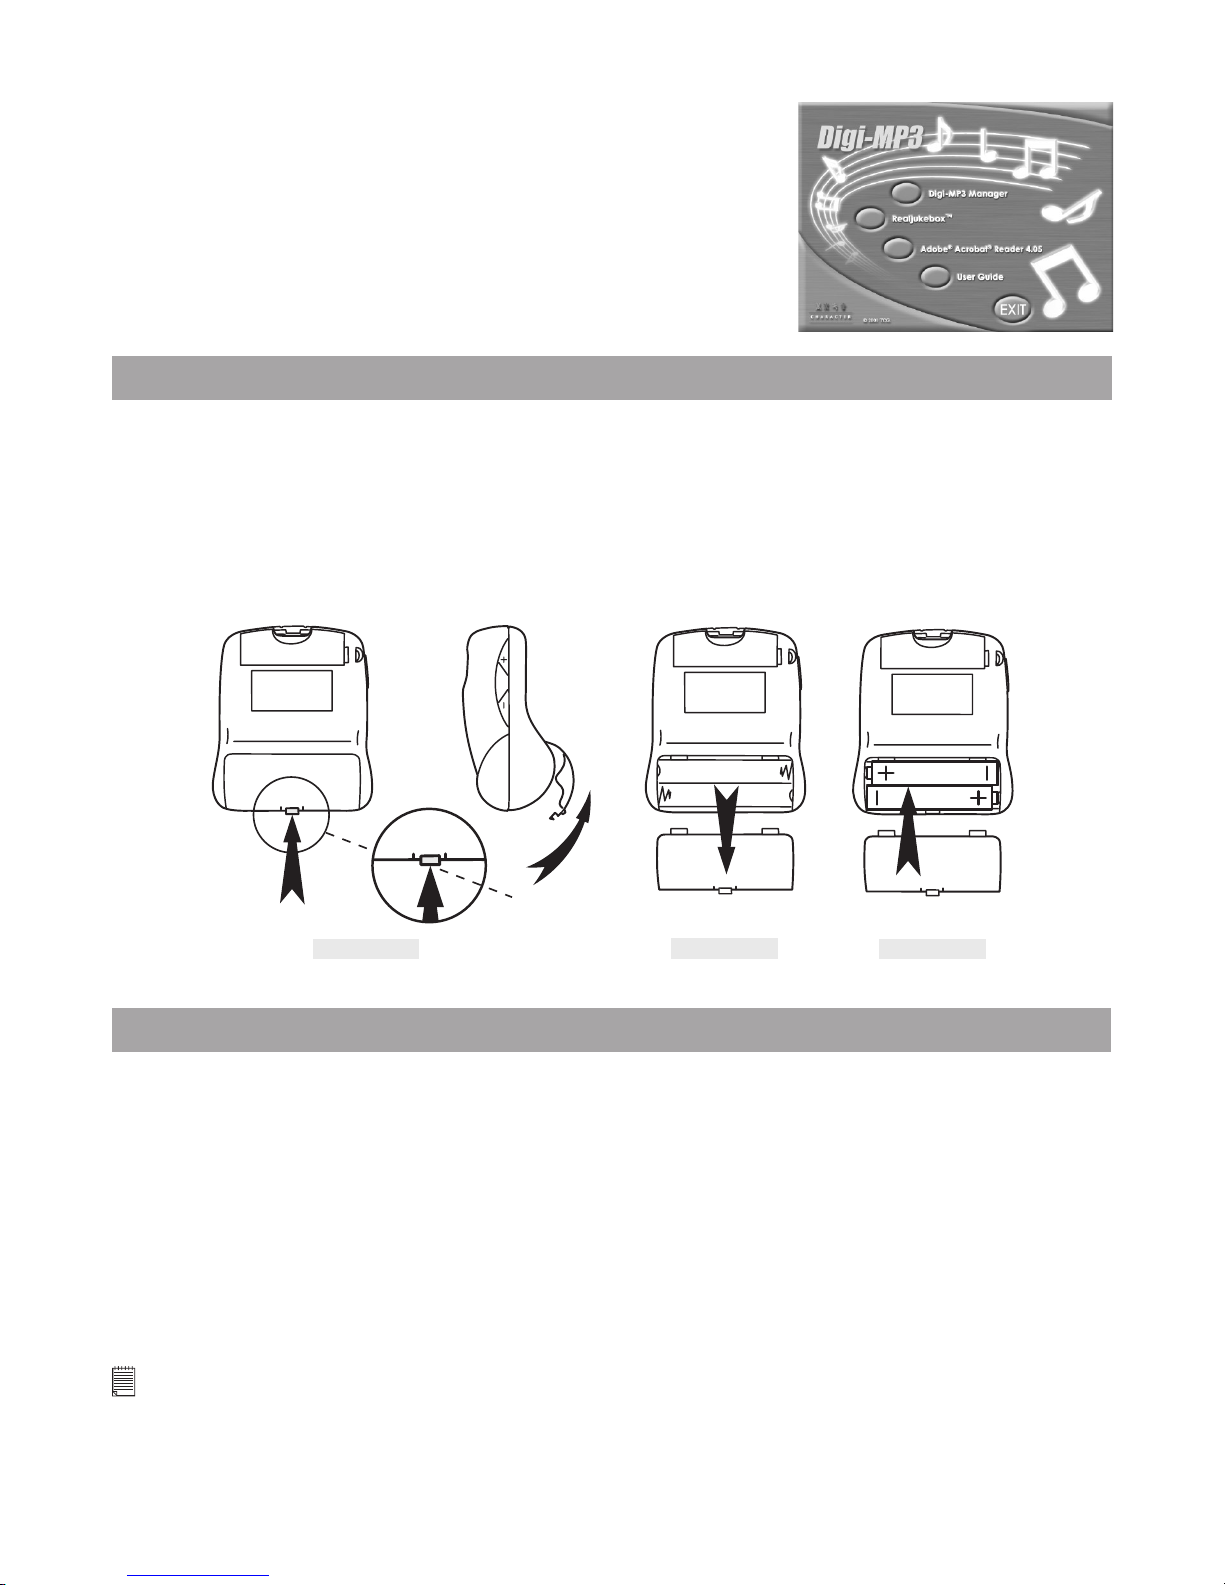
6. Battery Installation
The battery compartment is located on the reverse of the Digi-MP3 Player. Digi-MP3 Player requires 2 x
AAA alkaline batteries (supplied).
To install the batteries:
1. Press the catch inwards, lift it upwards and remove as on Diagram A and B.
2. Insert the 2 X AAA batteries. When inserting, make sure that you follow the polarity directions (+) (-)
which are indicated on the inside the battery cover as shown in Diagram C.
3. Reinsert the battery cover, close and lock the battery door.
AAA
AAA
MENU
catch
Diagram A
Diagram B
Diagram C
7. SmartMedia™ Card
Your Digi-MP3 player uses a SmartMedia™ Card for the memory. Cards range from 8MB - 128MB in
memory size. They are available from all good computer and camera retailers.
7.1 What is a SmartMedia™ Card - a brief explanation
SmartMedia™ memory cards have the ability to store music, images, voice and text for various such as
digital cameras, MP3 Players, voice recorders and digital camcorders.
SmartMedia™ card can be reused. Simply erase the data that is not needed and the SmartMedia™ Card is
ready for reuse.
SmartMedia™ card can de removed from your Digi-MP3 Player without fear of losing the music les you
have stored, and additional cards can be then be inserted.
Important Notes - Purchasing Additional SmartMedia™ card:
• Before deciding the size of the SmartMedia™ card you may want to purchase, it is advisable to understand the memory
capacity of each size of SmartMedia™ card and how that equates to the number of MP3 les each SmartMedia™ card
can hold.
• By looking at the size of your MP3 les in your Digi-MP3 Manager your can estimate how many MP3 les each card
size can hold. MP3 les are normally expressed in kb (Kilobytes): 1000kb = 1MB.

7
7.2 Non-Volatile Memory
SmartMedia™ Cards have non-volatile memory which means that any audio les you have saved on your
Digi-MP3 Player can only be erased when following the le deletion instructions.
7.3 Using a SmartMedia™ Card
Notes:
Remember to switch off your Digi-MP3 Player before inserting or ejecting a SmartMedia™ Card.
Diagram A
Diagram B
To Insert a SmartMedia™ Memory Card:
Push the memory card all the way into the card slot. (Diagram A) SmartMedia™ card will only t into the Digi-MP3 Player
in one direction (see Diagram A).
To Remove a SmartMedia™ memory Card:
To Remove a SmartMedia™ memory Card, simply pull it out carefully. (Diagram B)
8. Connecting your Digi-MP3 Player to your Computer
The USB cable allows you to download MP3 les to your Digi-MP3 Player from your PC. One end of the
cable connects to the USB to the side of the Digi-MP3 Player and the other end connects to your PC’s USB
port. When your Digi-MP3 Player is connected to your PC, it will draw from the PC in order to preserve
your battery life.
The USB port can be found on the front or back panel of your PC. Look for this symbol next to the
connection port. (Also see your PC operating manual for the location of your USB connection port.)
When your Digi-MP3 is properly connected, the “-USB-” will display on the LCD display of your Digi-MP3
Player.
USB Series “A” Plug connect
to your PC
USB Adaptor Plug connect
to your Digi-MP3 Player
HOLD
HOLD
Connecting your Digi-MP3 in Window® 2000
Connect your Digi-MP3 Player to the computer, the system will detect a new
“external device” which is displayed on the bottom right hand corner of your
desktop.
Important Note:
Before disconnecting your Digi-MP3 Player, make sure you stop the “MP3 Player
manager” by right clicking the icon . Click “Unplug or eject hardware”
and follow the procedure to unplug or eject hardware. Otherwise, a
warning message will prompt the user if it is not done.

8
9. Realjukebox Setup
1. Open the Real jukebox program.
2. Go to “Tools” > “Preferences”.
3. Click on “Auto Restore Settings...” and the “Preferences - Advanced” menu will pop up. Make sure you
tick both CD Audio and MP3 Audio which enables CD burning in MP3 format. Click “OK” to return to the
“Preferences” menu.
4. Click on “Audio Quality” and make sure that “MP3 Audio” is highlighted. Be sure that “Secure my Music
Files when encoding” is NOT ticked.
5. Press “OK” to nish.
10. Downloading MP3 Files to Your Digi-MP3 Player
10.1 Downloading MP3 Files to your Digi-MP3 Player
Double click on the Digi-MP3 Player icon on your desktop. Alternatively you can access the program by
selecting from “Start” -> “Programs” -> “Digi-MP3 Manager” -> “Digi-MP3 Manager”. Your Digi-MP3
Manager will appear on your desktop.Ensure your Digi-MP3 Player is properly connected to your computer
via the USB cable, and a SmartMedia™ Card is installed in your Digi-MP3 Player.
1. Click on “Open Device” icon.
2. Click on “Format SmartMedia™ Card” icon.
3. Double click on “C:” on the left panel of your Digi-MP3 Manager.
4. Double click on Folder named “My Music”. Any music les you have downloaded and appeared under the
section named “My Computer”.
2. Format SmartMedia™ Card
1. Open Device
4. Double Click
“My Music”
3. Double click “c:”
Important Note:
Only les called .MP3 can be downloaded to your Digi-MP3 Player from your computer les.
5. Click on the music le(s) you wish to download from your computer and select the “Downloading MP3
les to my Digi-MP3 Player” icon.
6. To empty your Digi-MP3 Player click on the “Upload le to My Computer” icon. The .MP3 les you
have uploaded will be kept under the “My Computer” listings.
Important Note:
If your Digi-MP3 Player is full, MP3 les will not be transferred and display the “Overmemory card capacity”.

9
10.2 Creating a New Folder in Your Digi-MP3 Manager
1. Click on “Create New Folder” icon.
2. A new folder appear on the “My Computer” side.
3. Name the new folder and you can double click on it to go into the folder.
4. Click the “Return to Upper Level Directory” icon to return to the main directory.
4. Return to Upper Level
Directory
2. New Folder appears
1. Create new folder
10.3 Renaming Files
To rename the les, simply click on the le name once and you can type in the le name you want when
the le name is highlighted. Remember to put .MP3 at the back of the le name.
10.4 Formatting A SmartMedia™ Card
If your SmartMedia™ Card is new or has been used for other devices, please format the SmartMedia™ Card
rst.
To format a SmartMedia¡ card :-
1. Click to conrm the Digi-MP3 Player is properly connected to your PC.
2. Click to start formatting your SmartMedia™ card.
3. Follow the step prompt on your PC.
10.5 Changing ID3 Information in Your Digi-MP3 Manager
1. If the MP3 le has ID3 information, the “Title” will be shown on the LCD display.
2. If the MP3 le has no ID3 information, the le name will be shown on the LCD display.
If you want to change the ID3 Title or other information of a particular MP3 le, simply highlight the le
and right click. The ID3 Tag Editor will appear. (As shown below) Type in the Title and information you
want and click “Save”.
10.6 Deleting Files From Your Digi-MP3 Player
To delete les from Your Digi-MP3 Player:
1. Connect your Digi-MP3 Player to the USB Cable.
2. Select “Open Device” icon.
3. Select “File List for my Digi-MP3 Player” icon. Select the le(s), listed under “My Digi-MP3 Player”,
you wish to delete and select “Delete le from my Digi-MP3 Player” icon. The Digi-MP3 Manager
will delete the le(s) from your Digi-MP3 Player.

10
10.7 Quick Reference of the Digi-MP3 Manager
MP3 Legal Notice
This product is designed to assist you in reproducing material for which you own the copyright or are
authorised to copy by the copyright owner or by exemption in applicable law. Unless you own the copyright
or have such authorisation, you may be violating copyright law and may be subject to payment of damages
and other remedies. If you are uncertain about your rights, you should contact your legal advisor.
Download MP3 le(s)
Upload MP3 le(s)
About
Create New Folder
Rename File
Delete File(s) from
SmartMedia™ card
Format SmartMedia™
Card
Card File List
Return to Upper
Level Directory
11. Battery Installation for Digital Audio System
The battery compartment is located on the reverse of the Digital Audio System. Digital Audio System
requires 4 x C alkaline batteries (not supplied).
To install the batteries:
1. Press the catch, lift the battery door upwards and remove as on the diagram.
2. Insert the 4 X C batteries. When inserting, make sure that you follow the polarity directions (+) (-) which
are indicated on the inside the battery cover as shown in the diagram.
3. Reinsert the battery cover.
Back View
1
2
3

11
12. Getting to Know Your Digital Audio System
Refer to the pictures below for a quick overview for your Digital Audio System.
Digi-MP3
PLAY
MP3
VOL
sleep
SET
alarm
MP3
AUX
radio
band
DIGITAL AUDIO SYSTEM
Handle
Up/Down
Button
Set Button
Sleep Button
Alarm Button
Volume Control
Button
Digi-MP3 Release
Lock Switch
AUX IN plug
Digi-MP3 Holder
Power ON/OFF
Button
Band Button
Mode Switch
LCD Display
Speaker
Speaker
Front view
DC IN port
Side view
Antenna
Battery
Compartment
Back view
12.1 LCD Display/Function Buttons
Alarm
Indicator
Band
Indicator
Sleep
Indicator
Channel
Indicator
Clock/Timer/Radio
Channel Indicator
Stereo
Indicator
Frequency
Indicator
Memory Indicator
Channel Indicator (+5)
Clock
AM/PM
Indicator
sleep
SET
band
M 2
M 3 M 4
M 5
+ 5
M 1
Up/Down
Button
Power ON/OFF
Button
Band Button
Sleep Button
Alarm Button
Set Button
Preset Buttons
Power LED
indicator

12
12.2 Standby Mode
Press the Power ON/OFF button to switch the Digital Audio System between standby mode and power on
mode. At the standby mode, the power indicator is OFF and the LCD displays the clock.
12.3 Power On Mode
Press the Power ON/OFF button to turn on the Digital Audio System. The Power LED Indicator is ON when
power on. The Mode Switch select the audio source. When the Switch is positioned to Radio, the LCD
display the radio channel and frequency. When the Mode Switch is positioned to Digi-MP3 Player or AUX.
Audio signal from the Digi-MP3 Player or the AUX input is played.
12.4 Radio Playing
Put the Mode Switch to Radio at Power ON mode, the radio is turned on. Press the Band Button to switch
between AM and FM band. Press the station button 1-5 to select preset station 1-5. To select channel 6 to
10, press the +5 button, a +5 sign is blinking on the LCD, then press the 1-5 button to select corresponding
6-10 channel. Press the Up or Down button momentarily to step the frequency Up or Down. To auto search
a station, press on the Up or Down button for one second.
12.5 Radio Station Preset
After a station is searched, press the set button, a sign on the LCD is blinking, press the station button
in the same way as selecting a station in playing mode to select the station number. Press set button again
to conrm the memory storing.
12.6 Alarm Timer Preset
Alarm Timer can be preset at Standby mode. To set the Alarm, press the Alarm button, the Alarm/Clock will
ash on the LCD Display. Press the Up button to set the hour and press the Down button to set the minute.
Then, wait for two seconds for it to stop blinking and it should then return to clock display.
The Digital Audio System will sound Alarm sound at the Alarm time. If the Digital Audio System is
turned on, the speakers will sound both alarm sound and music. To turn off the alarm, press the alarm
button. To cancel the Alarm Timer, press the Alarm button once more after entering this mode. The Alarm
sign will turn off.
12.7 Sleep Timer Setting(for radio only)
A Sleep Timer of maximum 90 minutes can be set. The Sleep Timer can be activated at either Radio mode
or Standby mode with the function switch positioned at Radio. Press the Sleep button to activate the Sleep
mode. 90 will be displayed on the LCD to indicate a 90 minute timer is set. Press the Sleep button again
to reduce the timer by 10 minutes. The Timer can be deactivated by reducing the timer to 0. A Sleep sign
on the LCD is displayed if the Sleep Timer is activated. The radio will be turned off and the Digital Audio
System returns to Standby mode when the Sleep Timer countdown is over.
12.8 Clock Preset:
Preset the clock by pressing the Set Button at Standby mode, the clock is ashing, press the Up button to
set hour and press the Down button to set minute. Then, wait for two seconds, the Digital Audio System
will return to Standby mode. Press the Band button to toggle the clock to be displayed.
12.9 Playing Digi-MP3 Player or AUX audio:
Slide the function switch to either Digi-MP3 Player or AUX for playing either music source. The Power LED
indicator is ON and LCD displays the clock.

13
13. Other Features in your Digital Audio System
Speakers able to ip out as illustrated below.
M 2
M 3 M 4
M 5
+ 5
M 1
M 2
M 3 M 4
M 5
+ 5
M 1
Top view
Your Digital Audio System is easy to carry by lifting the handle up as shown in the diagram below.
M
E
N
U
M
E
N
U
Side view
To receive clearer signals from your radio, pull out your antenna at the back of your
Digital Audio System.
M
E
N
U
M
E
N
U
Side view

14
14. Using a Mains Power Adapter(not supplied)
If you prefer, you can also operate the Digital Audio System via 6.0V/500mA(inner diameter = 2.1mm)
power adapter. Simply connect the power adapter into the “DC IN” port on your Digital Audio System,
and then plug the power adapter plug into a wall socket and switch on at the mains.
Please note you will still require to install 2 x AAA batteries in the Digi-MP3 player for correct function of
the Digi-MP3 player.
Power Supply
Warning:
• Grasp the power adapter, not the cord, when unplugging it from a wall socket.
• Regularly examine the mains power adapter for damage. NEVER ATTEMPT TO REPAIR OR OPEN.
• Swich off and disconnect the AC adapter from your Digital Audio System before unplugging it from the
wall socket.
15. Attaching Digi-MP3 Player to your Digital Audio System
To attach your Digi-MP3 Player to your Digital Audio System:
1. Pull out the Digi-MP3 Player holder as illustrated in the diagram. Insert the Digi-MP3 Player into the
holder.
2. Push the Digi-MP3 Player holder along with the Digi-MP3 Player back into position.
3. Lock the Digi-MP3 Player in position by pressing down the switch to “MP3”
M
P
3
V
O
L
S
L
E
E
P
S
E
T
A
L
A
R
M
M
P
3
A
U
X
r
a
d
i
o
D
I
G
I
T
A
L
A
U
D
I
O
S
Y
S
T
E
M
D
IG
i-
M
P
3
M
E
N
U
1
2
M
E
N
U
D
i
g
i
-
M
P
3
M
P
3
V
O
L
S
L
E
E
P
S
E
T
A
L
A
R
M
M
P
3
A
U
X
r
a
d
i
o
D
I
G
I
T
A
L
A
U
D
I
O
S
Y
S
T
E
M
P
L
A
Y
3
Press Down
M
E
N
U
D
i
g
i
-
M
P
3
M
P
3
V
O
L
S
L
E
E
P
S
E
T
A
L
A
R
M
M
P
3
A
U
X
r
a
d
io
D
I
G
I
T
A
L
A
U
D
I
O
S
Y
S
T
E
M
P
L
A
Y
Digi-MP3 Player
locked in position

15
16. Getting to Know Your Digi-MP3 Player
Refer to the picture below for a quick overview for your Digi-MP3 Player.
Interchangeable case
Earphone Port
LCD Display
Last Track
Reverse Button
Play /Pause /
OFF Button
Next Track /
Forward Button
Volume Control
Button
Case release catch
Battery Cover
USB Port
Hold Button
Hanging Ring slot
DIGi-MP3
MENU
HOLD
Menu Button
SmartMedia™ Card slot
Side View
Side view
Front view
Back view
Side view
16.1 LCD Display
The LCD Display displays the information about the audio le(s) you have downloaded to your Digi-MP3
Player.
The LCD will not display unless a SmartMedia™ Card is inserted and 2xAAA batteries are installed.
Equaliser setting indicator
Hold
Battery indicator
Elapse time
Volume indicator
MP3 le name /
Song title
Playing track /
Total no. of tracks
Repeat Mode
Pause
Playing animation
JAZZ ROCK NORMAL CLASSIC
16.2 Play Button
The Play Button has 5 important functions:-
Switching On
Pressing once, switches the Digi-MP3 Player ON and the LCD displays the rst track you have
downloaded.
Play
Pressing again will start to Play the listed track.
Pause
Press again to Pause the track. Leaving in Pause Mode for 60 seconds and the Digi-MP3 Player will switch
OFF.
Resuming Play
Pressing once again will resume Play.
Switching OFF
Pressing and holding down play button will turn OFF your Digi-MP3 Player.

16
16.3 Next Track Button
Pressing the Next Track Button once to advance to the next track. Pressing this button whilst on the last
track will not function.
Pressing and holding the button down will fast forward through the track. The LCD will count the time
through the track until the button is released.
16.4 Last Track Button
Pressing the Last Track Button once will revert to the previous track. Pressing this Button whilst in the rst
track will revert to the beginning of the rst track.
Pressing and holding the button down whilst in Play Mode will fast reverse through the track. The LCD will
count the time backwards through the track until the button is released.
16.5 Earphone Port
Used to connect your headphones to the Digi-MP3 Player.
16.6 Case Release Catch
Lift the release catch upwards to release and change the coloured case fronts.
DIGi-MP3
DIGi-MP3
HOLD
16.7 Hold Button
HOLD
Slide the hold Button upwards to lock the settings of all the function buttons whilst on. A key icon will
be displayed on the LCD Show key icon . Slide downwards to unlock the hold settings.
16.8 Menu Button
Repeat 1, Repeat All, Shufe & Play Modes
Using the Menu Button in conjunction with the Volume Controls Button
MENU
will access the
following functions:
Repeat mode:-
Pressing the Menu Button will access the repeat functions. Pressing the + & - Control Buttons will enable
you to scroll through & select the following;
Repeat 1:
Repeat the current track playing
Repeat All Mode:-
Repeat and play all tracks continuously in a loop and in the order they were downloaded to your Digi-MP3
Player.
Shufe Mode:-
Play each track but in random order.
Normal Play Mode:-
Play rst to last track and then stop.
Jazz, Rock, Classic & Normal Settings
Depressing the Menu Button for a second time will access the Equaliser Mode. Using the + & - Volume
Buttons will allow you to select the Equaliser Settings.
Depressing the Menu Button once again will revert your Digi-MP3 Player back to Normal Play Mode.
16.9 Volume Control Buttons
Press the + or - control buttons to adjust the volume.

17
17. How to use Adobe® Acrobat® Reader
Adobe® Acrobat® enables you to view document in .PDf format
For more details go to www.adobe.com/acrobat
18. Customer Support
19. Troubleshooting
The troubleshooting guide is designed to help you. If problems continue, please contact your local customer
support hot-line. See your registration card for helpline contact details.
Digi-MP3 Player
Symptom Problem Solution
My music les will not
download to my
Digi-MP3 Player.
The USB is not connected
or
The SmartMedia™ card has not been
formatted or installed correctly
or
SmartMedia™ Card fail
or
The Music le is not in MP3 format.
Ensure the USB is connected properly
or
Format the SmartMedia™ card, and ensure
the card is installed correctly. All new
SmartMedia™ card reqire formating before
use
or
Try another SmartMedia™ card
or
Ensure Real Jukebox Basic is set to record in
MP3 format > Tools > Preference > Audio >
MP3 Audio.
My Digi-MP3 Player will
not playback music.
The earphone may be faulty
or
Ensure the volume setting is not set to the
minimum setting
or
Ensure there are MP3 les in the Digi-MP3
Player.
Try another set of earphones
or
Adjust the (+) volume control
or
Download .MP3 music les.
My Digi-MP3 Player
display is blank.
The batteries may be dead or wrongly
installed
or
The Digi-MP3 Player is in auto power off
mode
or
The SmartMedia™ card is not formatted or
installed properly.
Check the batteries power level, or correct
polarity installation.
or
Switch your Digi-MP3 Player on.
This should not happen when connected to
your computer via the USB cable. Check the
cable connections
or
Format the SmartMedia™ card and ensure
the card is installed correctly.
My Digi-MP3 Player
display is frozen.
If your Digi-MP3 Player ‘s memory may
be full.
Turn off your Digi-MP3 Player and restart
your Digi-MP3 Player Manager. Switch the
Digi-MP3 Player to ON and upload your
music les back to the computer or delete the
music les.
My music les is not a
true MP3 le.
I cannot upload the music les to my
Digi-MP3 Player.
Right click on the music le and click properties
to check le type. ensure it is a .MP3 le.
There is a dialog box
displayed on the screen
“Open Device Failure”.
The user have connected the Digi-MP3
Player before the installation of the
Digi-MP3 Manager.
or
The user may use the USB hub to
connect more then one USB device. Since
some USB hubs do not have the power
amplication function, so the power may
not be enough for the Digi-MP3 Player to
function.
Installation of the Digi-MP3 Manager before
connecting your Digi-MP3 Player to your
computer.
or
We recommend that the user connects the
Digi-MP3 Player directly to your PC.

18
Digi-MP3 Player (cont.)
Symptom
Problem
Solution
My Digi-MP3 Manager says “open
device failed” when trying to open
device.
The Battery connection may have
been intermittent.
1. Go to “My Computer” icon on your
desktop and right click your mouse.
2. Go to “Properties” and click onto Device
Manager.
3. Search if Digi-MP3 Player is listed under
USB.
4. Remove Digi-MP3 Player in your system
by highlighting the menu and press
“Remove”. A message box will prompt
you to ensure you want to remove the
device, click “Yes” to continue.
5. Disconnect the Digi-MP3 Player from your
computer.
6. Remove and replace the batteries from the
Digi-MP3 Player and check the polarities
are meeting correctly.
7. Turn on the Digi-MP3 Player to check if
this is working.
8. Switch off Digi-MP3 Player.
9. Reconnect your Digi-MP3 Player to the
USB lead.
10. The computer will prompt you that new
hardware has been detected and you
need to install a new driver. Continue
pressing next until the instillation wizard
has nished.
11. Now come out of the Device Manager and
go into your Digi-MP3 Manager. Click on
“Open Device”.
12. If the Device still hasn’t opened then you
will need to locate your Driver. To do this
you will need to browse manually for your
driver on your CD-ROM in the Digi-MP3
Folder.
Digital Audio System
Symptom
Problem
Solution
The Digital Audio System has no
response on the LCD display when
battaries has been inserted.
The batteries may be dead or
positioned incorrecly
or
The power adaptor voltage output
or socket is not correct.
Check the batteries level or correct polarity
installation
or
Use a correct power adaptor.
The Digital Audio System cannot
play the music playback.
The MP3 release switch is not
positioned in MP3 LOCK. Digi-MP3
player is not connected
or
The phone jack on the MP3 release
button is very dirty.
Slide by pressing down the MP3 release
switch and try again
or
Clear the phone jack of the MP3 release
button.
Please also refer to the help les & User Guides that accompany the enclosed applications.
For further information and support, please visit our website: http://www.cool-icam.com

19
20. Battery Guidance
AAA
AAA
Important Note:
We strongly recommend that you do not use rechargeable batteries as this will affect the performance of your
Digi-MP3 Player.
WARNINGS!
• Batteries should be replaced by an adult.
• Non-rechargeable batteries are not to be recharged.
• Rechargeable batteries are to be removed from the MP3 Player before being charged (if removable).
• Rechargeable batteries are only to be charged under adult supervision (if removable).
• Different types of batteries or new and used batteries are not to be mixed.
• Only batteries of the same or equivalent type as recommended are to be used.
• Batteries are to be insert with the correct polarity.
• Exhausted batteries are to be removed from the MP3 Player.
• The supply terminals are not to be short-circuited.
• Do not mix alkaline, standard (carbon-zinc), or rechargeable (nickel-cadmium) batteries.
• Do not dispose the batteries in re.
• Batteries are to be removed from the MP3 Player when not in use.
• Do not use rechargeable batteries.
• These instructions should be retained for future reference.
21. Technical Specications
Specications for Digital Audio System
• MP3 Player Plug-in Slot
• Radio Digital tuning clock radio
• Display 4 digit LCD with V.A. 15 x 33mm
• External Input AUX
• Frequency Ranges FM 87.5 - 108 MHz (50 KHz)
AM 520 - 1710 KHz (10 KHz each step for US/Canada)
AM 531 - 1611 KHz (9 KHz each step for Europe)
• Antenna Telescopic antenna for FM reception
Ferroceptor for AM rece[topm
• Sleep Timer 10, 20, 30, 40, 50, 60, 70, 80 or 90 min.
• Alarm Single alarm
• Alarm Sounds Tone alarm
• Buttons Power ON/OFF, Band, Set, Sleep, Alarm, Volume, Up, Down & 6-Memory Preset
Buttons
• Switches Radio, MP3 and AUX
• Speakers 2 x 2” 8ohm, 2W (internal)
• Battery 4 x C Batteries (not included)
• Battery Life Approximately 12 hours
• AC - DC Adaptor DC 6V 500mA (Inner diameter = 2.1mm) (not inlcuded)
• Dimension 143(H) x 150(W) x 115(D)mm
• Weight 567g (not including Digi-MP3 Player & batteries)
• Memory channel 10 channels

20
Specications for Digi-MP3 Player
• Internal Memory: Not available
• External Memory: Supports SmartMedia™ Card 8 - 128MB (not included)
• Download speed: 250KB per second (approx.)
• Effects and Control: 3-Band equalizer, Volume Control, Hold settings,
Repeat/Shufe/Continuous Mode, next Track, Previous Track.
• Battery Life: 5 hours (approx.)
• File Format: MPEG I layer III
• Delete File Method: used the Digi-MP3 Manager to delete le(s)
• Operating System: Microsoft® Windows® 98SE, 2000, Me or XP
• External Connector: USB
• Auto Power Off: After 60 seconds of inactivity
• Power Supply: 2 x AAA Alkaline batteries (included)
• Dimension: 70(H) x 59(W) x 30.5(D)mm
• Weight: 56g (not including batteries)
Cautions
• Never immerse any part of the Digi-MP3 Player or its components into any uid or liquid.
• Disconnect the Digi-MP3 Player from your PC before cleaning it.
• Remove dust or strains with a soft cloth dampened with water or neutral detergent.
• Do not place hot items on the surface of the Digi-MP3 Player.
• Do not attempt to open or disassemble the Digi-MP3 Player. This will affect any warranty claim.
22. FCC Notice
This device complies with Part 15 of FCC Rules. Operation is subject to the following two conditions: (1)
This device may not cause harmful interference, and (2) This device must accept any interference received,
including interference that may cause undesired operation.
Warning: Changes or modications to this unit not expressly approved by the responsible for
compliance could void the user’s authority to operate the equipment.
NOTE: This equipment has been tested and found to comply with the limits for Class B digital device,
pursuant to Part 15 of the FCC Rules. These limits are designed to provide reasonable protection against
harmful interference in a resident installation. This equipment generates, uses and can radiate radio
frequency energy and, if not installed and used in accordance with the instructions, may cause harmful
interference to radio communications.
However, there is no guarantee that interference will not occur in a particular installation. if this
equipment does cause harmful interference to radio or television reception, which can be determined by
turning the equipment off and on, the user is encouraged to try to correct the interference by one or more
of the following measures:
• Reorient or relocate the receiving antenna.
• Increase the separation between the equipment and receiver.
• Connect the equipment into an outlet on a circuit different from that to which the receiver is needed.
• Consult the dealer or experienced radio/TV technician for help.
Shielded cable must be used with this unit to ensure compliance with the Class B FCC limits.
Under the environment with electrostatic discharge, the product may malfunction and require user to
reset the product.
23. MP3 Legal Notice
This product is designed to assist you in reproducing material for which you own the copyright or are
authorised to copy by the copyright owner or by exemption in applicable law. Unless you own the copyright
or have such authorisation, you may be violating copyright law and may be subject to payment of damages
and other remedies. If you are uncertain about your rights, you should contact your legal advisor.
EN 0102
© 2002 TCG. Part No.: OM837196 R1
 Loading...