

Page 1
TM
User’s Manual
Storm C@m
STORMCAM
Page 2

2
1. Introduction
Congratulations on purchasing the Storm C@m. Using the latest innovations in technology
the Storm C@m offers fun, affordable and easy to use digital imaging.
Although you probably want to get started right away, please take a few minutes to read
this guide and familiarise yourself with your new Storm C@m. Your new Storm C@m will
take 20 High Resolution or 80 Low Resolution (for CIF camera version) / 24 High Resolution
or 99 Low Resolution (for VGA camera version), which you upload to your PC (Personal
Computer) running Windows® 98SE, Windows® Me, Window® 2000, XP or Macintosh®
running OS 8.6 - 9.2 via the USB (Universal Serial Bus) port.
You can also use your Storm C@m to capture not only snaps of your family and friends,
but also video clips of them in action.
Your Storm C@m can also be used as a Web Cam. If you have an internet connection
and microphone (not supplied) you can chat face-to-face with friends and colleagues,
conferencing in real time.
Please note that your images are stored on your Storm C@m’s internal memory. When you
have taken your images, the Storm C@m will wait for 30 seconds and then automatically
switch to Stand-by mode, which draws a constant trickle of power from the battery. When
the LCD display blinks, all stored images must have been uploaded and saved as otherwise
they will be lost.
Page 3

3
2. Table of Contents
1. Introduction 2
2. Table of Contents 3
3. System Requirements 5
4. Package Contents 5
5. Software Installation 6
For Windows® Users:
PC
5.1 How to install the Digital Camera Manager Software 6
5.2 How to install ArcSoft® Software 7
5.3 How to install Microsoft® NetMeeting™ 8
5.4 How to install Adobe® Acrobat® Reader 9
For Macintosh® Users:
MAC
5.5 How to install the Digital Camera Driver Software 9
5.6 How to install ArcSoft® Software 11
5.7 How to install Cu-SeeMe™ 12
5.8 How to install Adobe® Acrobat® Reader 13
6. Battery Installation 13
7. Getting to Know Your Storm C@m 14
7.1 Shutter Button 14
7.2 Viewnder 14
7.3 LCD Display 15
7.4 Mode Button 15
7.5 Shutter Lock 15
7.6 Power 15
7.7 Storm C@m Cradle 16
8. Getting Started 17
8.1 Switching the Storm C@m On 17
8.2 Sliding the Lens Cover 17
8.3 Taking an Image 17
8.4 Continuous Mode 17
8.5 Self-Timer Mode 18
8.6 Clearing the Stored Images 18
8.7 Changing the Image Resolution 18
Page 4

4
9. Connecting your Storm C@m to your Computer 19
10. Uploading Images to Your Computer 20
For Windows® Users:
PC
10.1 Running the Digital Camera Manager 20
10.2 Quick Reference 20
10.3 Uploading Images 21
10.4 Creating & Uploading Movie Clips 22
10.5 Creating Live Movie Clips 23
For Macintosh® Users:
MAC
10.6 Uploading Images and Movie Clips 25
11. How to Use Other Software 26
For Windows® Users:
PC
11.1 How to use PhotoStudio® 2000 26
11.2 How to use ArcSoft Funhouse™ 1.0 26
11.3 How to use ArcSoft PhotoPrinter® 2000 28
11.4 How to use ArcSoft VideoImpression™ 1.6 29
11.5 How to use Microsoft™ NetMeeting® 30
11.6 How to use Adobe® Acrobat® Reader 30
For Macintosh® Users:
MAC
11.7 How to use PhotoStudio® 2000 31
11.8 How to use ArcSoft Funhouse™ 1.0 31
11.9 How to use ArcSoft PhotoPrinter® 2000 32
11.10 How to use ArcSoft VideoImpression™ 1.5 33
11.11 How to use Cu-SeeMe™ 34
11.12 How to use Adobe® Acrobat® Reader 34
12. Customer Support 35
13. ArcSoft WorldWide Customer Support 35
14. Troubleshooting 36
15. Battery Guidance 38
16. Technical Specications 39
17. FCC Notice 40
Page 5
5
3. System Requirements
For Windows® Users
PC
• Compatible with Microsoft® Windows® 98SE, Me, 2000 or XP
• Pentium® II 333MHz or equivalent processor
• USB Port
• 128MB RAM or higher
• 200MB free disk space
• CD-ROM Drive
• Color Monitor with High Color (16-bit) graphic capability or higher
• Standard mouse and keyboard
For Macintosh® Users
MAC
• PowerPC® Processor
• Mac® OS Version 8.6 ~ 9.2
• USB Port
• 32MB RAM
• 150MB Free disk space
• CD-ROM Drive
• Color Monitor with High Color (16-bit) graphic capability or higher
• Standard mouse and keyboard
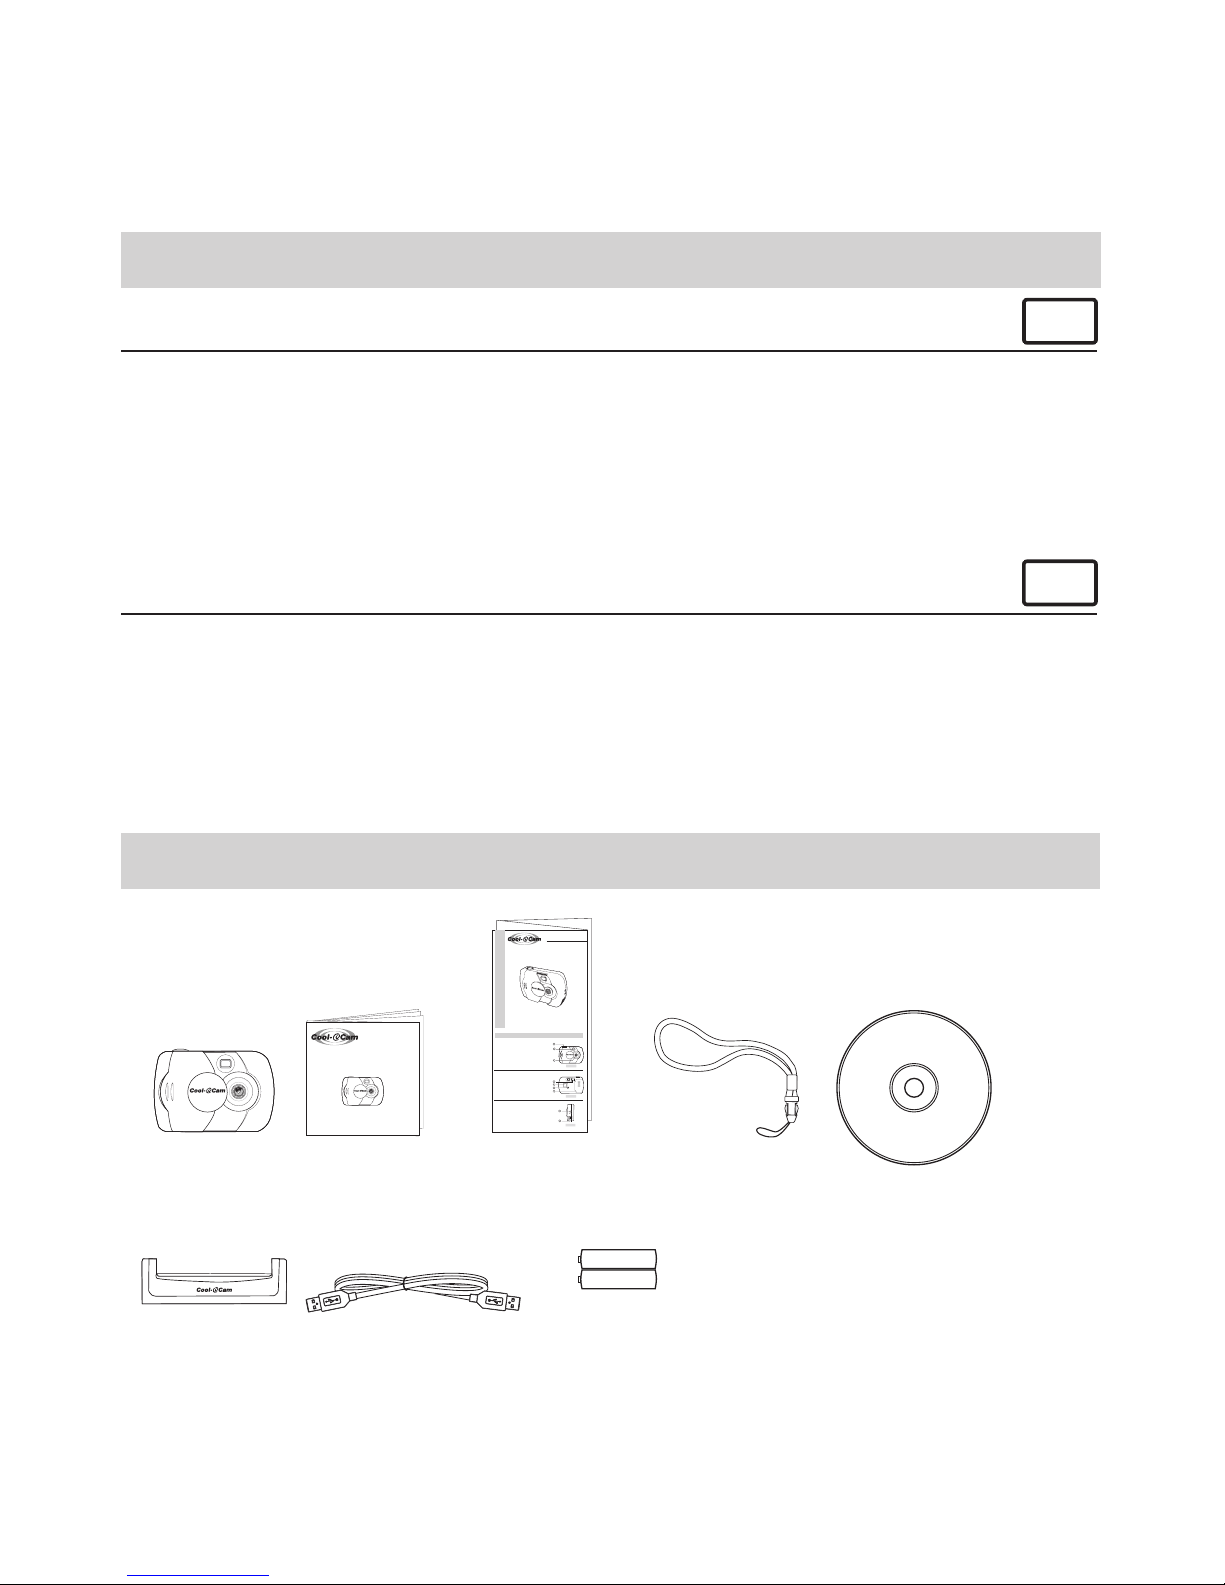
4. Package Contents
STORMCAM
User’s Manual
Storm C@m Stand
Storm C@m
USB Cable
2 x AAA Batteries
Storm C@m CD-ROM includes
Digital Camera Manager,
PhotoStudio® 2000 (PC & Mac),
ArcSoft Funhouse™ 1.0 (PC & Mac),
ArcSoft PhotoPrinter® 2000 (PC & Mac),
ArcSoft VideoImpression™ 1.6 (PC) & 1.5 (Mac),
Microsoft® NetMeeting™ (PC), Cu-SeeMe™ (Mac),
Adobe® Acrobat® Reader (PC & Mac)).
Wrist Strap
TM
Users’s Manual
Storm C@m
STORMCAM
Quick Guide
TM
Storm C@m
Quick Start Guide
Product Overview
1. Shutter Button
2. Viewnder
3. Lens
1
2
ST
ORMCAM
Front View
3
1. Shutter Lock
2. LCD Display
3. Mode Button
4. Battery Door
Back View
M
2
1
3
4
1. Strap Holder
2. USB Cable Port
2
1
Side View
S
T
O
R
M
C
A
M
Page 6
6
5. Software Installation
For Windows® Users:
PC
5.1 How to Install Digital Camera Manager
Open & Close
5.1.1 How to Install Digital Camera Manager
“Digital Camera Manager” should be installed rst.
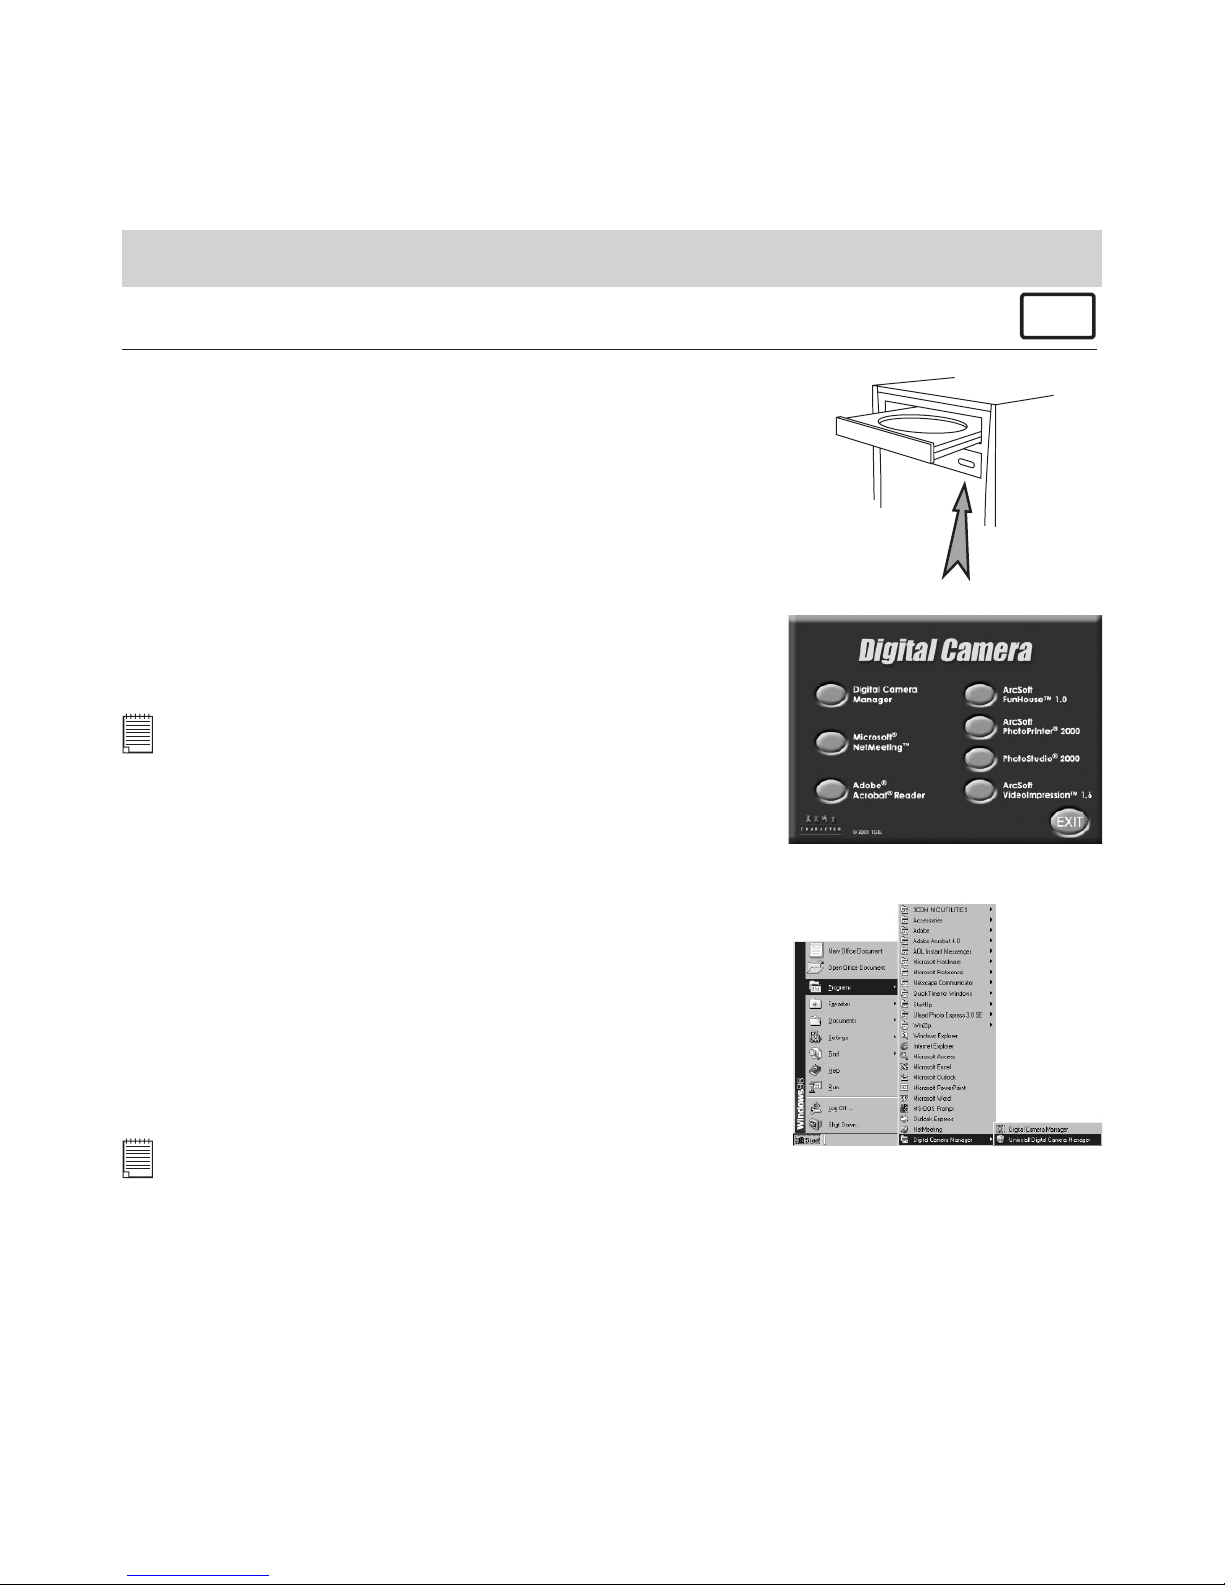
1. Insert the CD-ROM disc into the CD-ROM drive and close
the CD-ROM drawer.
2. An installation wizard will automatically launch.
3. Click “Digital Camera Manager” icon.
4. Follow the instructions presented on the screen to complete
the installation.
5. Click “OK” to restart your computer and wait for your PC
to restart automatically.
Notes:
If the setup screen doesn’t appear after loading the CD, then
you can manually start it by double-clicking the “My Computer”
icon on your desktop, then right click your mouse on the icon
to open the CD-ROM drive. When the CD-ROM window opens,
double-click the “Install-E.EXE” le.
5.1.2 How to Uninstall Digital Camera Driver
To uninstall Digital Camera Manager, click the “Start
Menu” on your Windows® desktop, choose Digital
Camera Manager folder under Program and choose
“Uninstall Digital Camera Manager”. Follow the
onscreen instructions.
Notes:
Uninstalling your Digital Camera Manager does not delete your album folders and therefore all
images transferred into your default or created albums will be preserved. You will be able to access
these folders on your system desktop.
Page 7

7
5.2 How to Install ArcSoft® Software
Introduction to the Software
PC
PhotoStudio® 2000
PhotoStudio® 2000 is a full-featured, easy-to-use digital image-editing program that
provides a complete set of photo editing and retouching tools, plus a wide selection of
special effects and enhancements. Its powerful features include a wide variety of input
and output options, layers, multiple undo and redo functions, image management tools,
editable text, multiple le format support and a lot more.
ArcSoft Funhouse™ 1.0
ArcSoft Funhouse™ is an image entertainment application that enables users to create “fun
photo” by combining their personal photos with a wide variety of mask templates. Users
can get their own images from digital cameras, scanners, disk drives and Photo CDs, and
seamlessly combine them with just a few clicks of the mouse. Photo mask includes sports,
role play, time warp, trading cards, in print, cartoon and surreal.
ArcSoft PhotoPrinter® 2000
ArcSoft PhotoPrinter® is an easy-to-use printing utility that enables the user to layout
and print multiple images in different sizes quickly and easily on a single sheet of
paper. The program offers a large selection of printing templates, including Kodak Digital
Science Inkjet Photo Paper Templates and Avery-brand paper products. It also includes
commonly used image-editing tools and a wide selection of templates for frames, edges
and backgrounds for enhancing images.
ArcSoft VideoImpression™ 1.6
ArcSoft VideoImpression™ is an easy-to-use video and image editing software program.
The program enables users to create and edit new videos using existing video and image
les - making desktop video presentations for home, business, and the Web.
Visit http://www.arcsoft.com for all your FAQ’s, tips and technical support see Section 13
for more details.
Page 8
8
5.2.1 How to Install ArcSoft® Software
PC
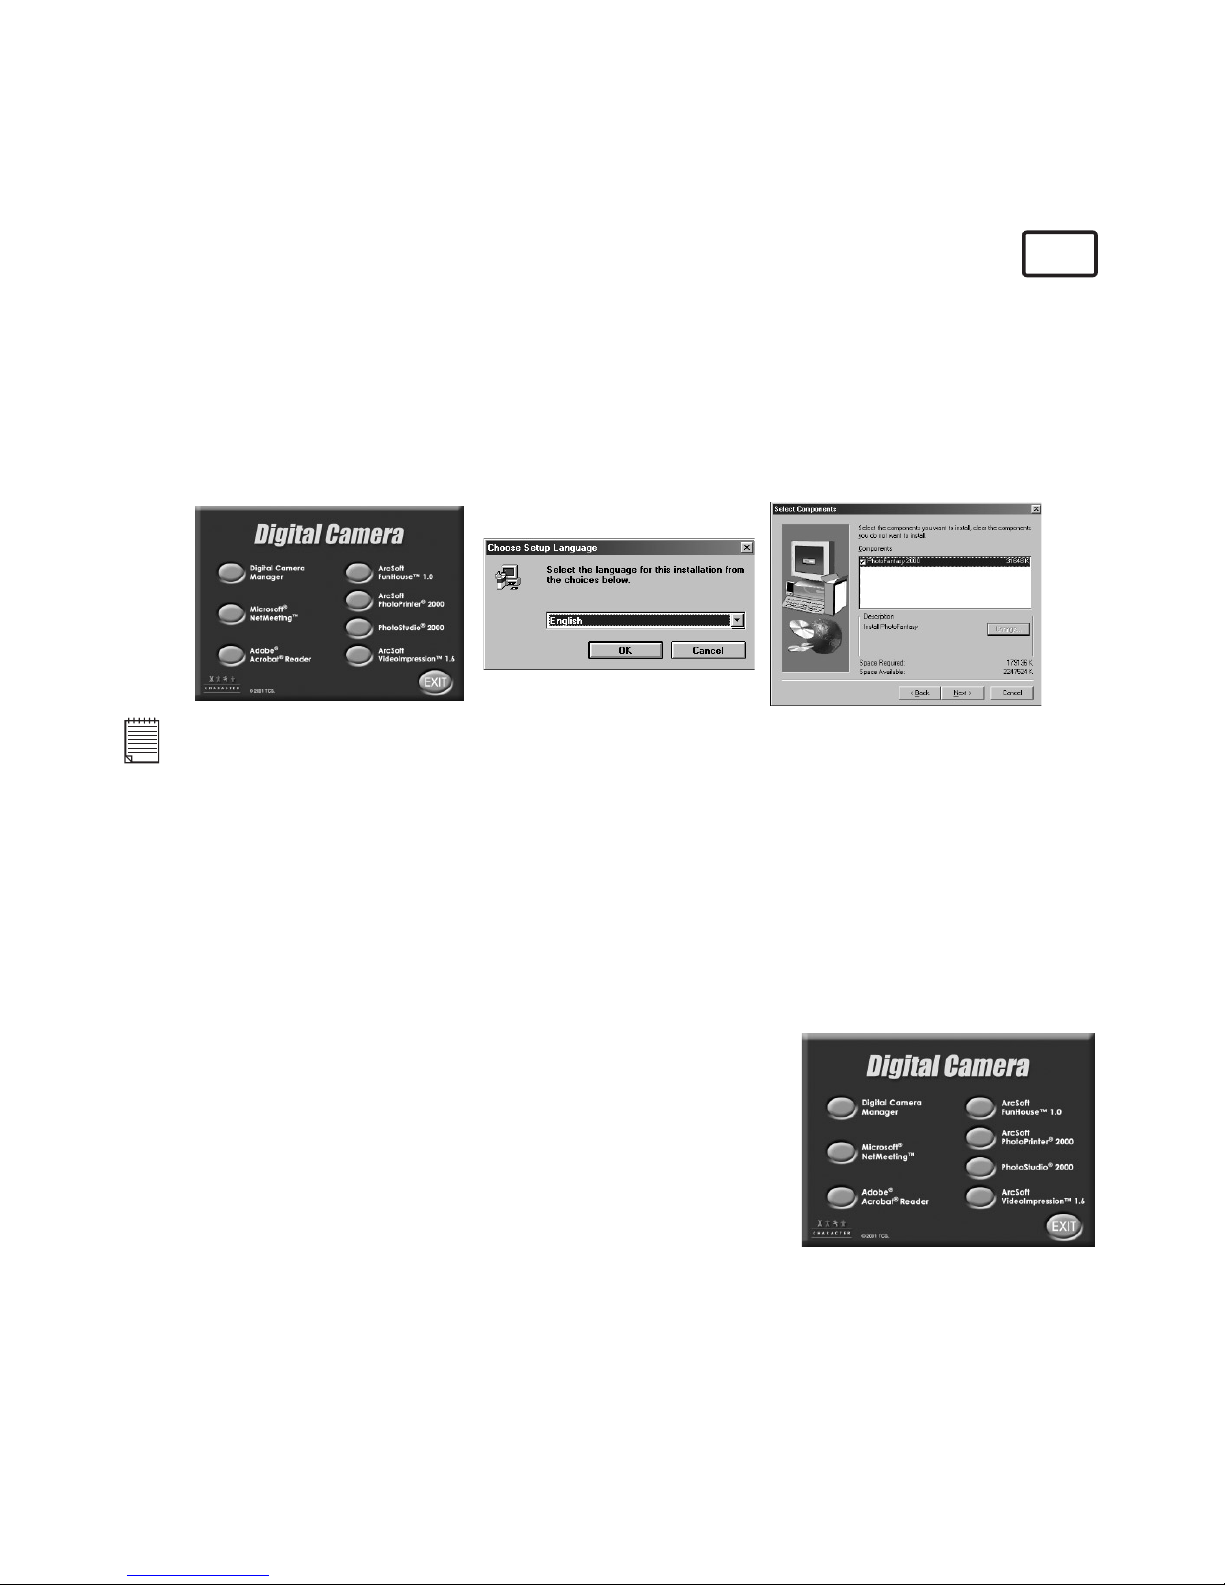
1. Re-insert the CD-ROM disc into the CD-ROM drive and close the CD-ROM drawer.
2. An installation wizard will automatically launch.
3. Click the “ArcSoft® Software” icon.
4. Select the language for the installation and click “OK”.
5. Follow the on-screen prompts.
6. Select the software you want or you do not want installed by clicking on the tick boxes
next to the software title. Click “Next >” to continue.
7. Follow the instructions presented on the screen to complete the installation.
Note:
Don’t worry if you made a mistake and want to add in ArcSoft® titles you did not tick.
Re-insert the CD-ROM and follow steps 1 - 6 ticking only the software you want to add.
5.3 How to install Microsoft® NetMeeting™
NetMeeting™ provides the most complete conferencing solution for the Internet and
corporate intranet. Powerful features let you communicate with both audio and video,
collaborate on virtually any Windows-based application, exchange graphics on an electronic
whiteboard, transfer les, use the text-based chat program, and much more. Using your
PC and the Internet, you can now hold face-to-face conversations with friends and family
around the world.
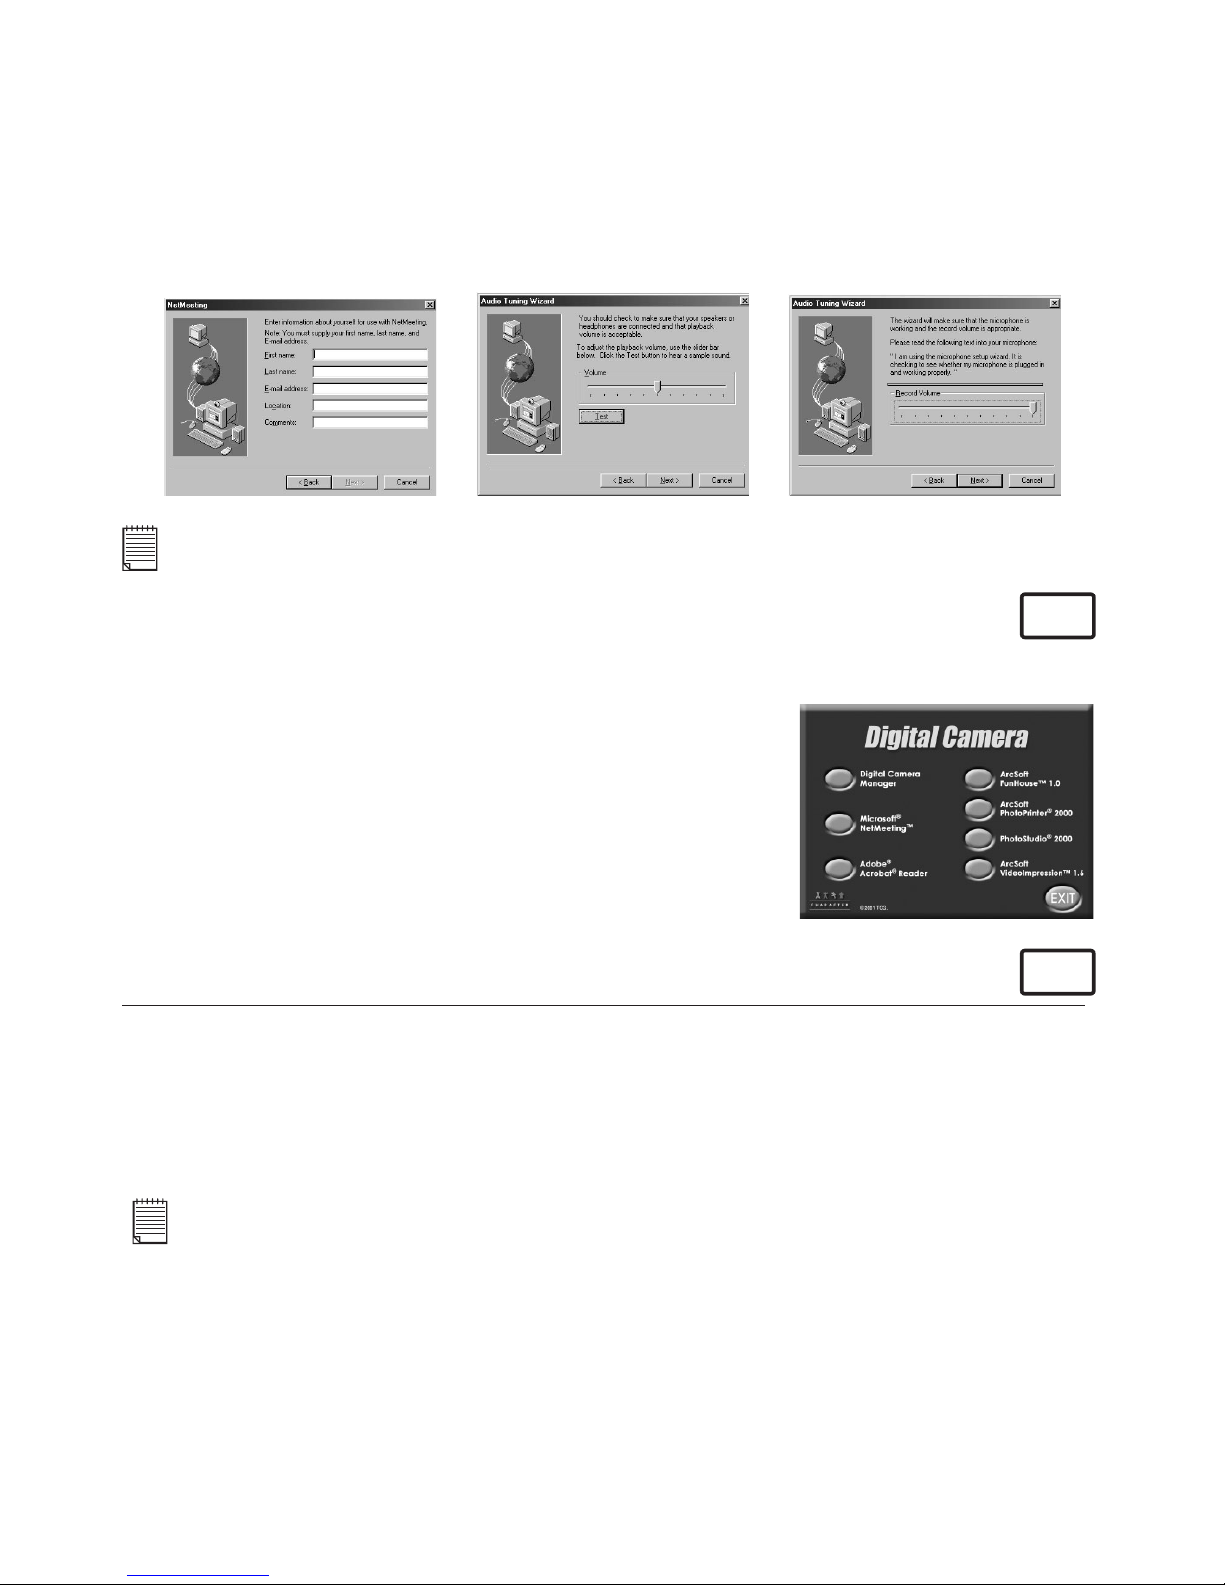
To install the Microsoft® NetMeeting™:
1. Insert the CD-ROM disc into the CD-ROM drive and close
the CD-ROM drawer.
2. An installation wizard will automatically launch.
3. Click the “Microsoft® NetMeeting™” icon.
4. Follow the instructions presented on the screen to
complete the installation.
5. You will have a choice during installation to place a desktop
icon on your desktop for easy access directly to the
software.
Page 9
9
6. For further installation details, please visit the following website:
http://www.microsoft.com/windows/netmeeting
Note:
• You need to enter your name, your e-mail address and country details during installation.
• You need to adjust the playback volume and your record volume.
5.4 How to install Adobe® Acrobat® Reader
PC
Adobe® Acrobat® Reader lets you view and print Adobe Portable Document format (PDF)
les on all major computer platforms, as well as ll in an submit Adobe PDF forms online.
To install the Adobe® Acrobat® Reader:
1. Re-insert the CD-ROM disc into the CD-ROM drive and
close the CD ROM drawer.
2. An installation wizard will automatically launch.
3. Click the “Adobe® Acrobat® Reader 4.05” icon.
4. Follow the instructions presented on the screen to
complete the installation.
Visit http://www.adobe.com/ for all your FAQ’s, tips and
technical support.
For Macintosh® Users:
MAC
You are now able to enhance the resolution of your taken images by using the Digital
Camera Driver. The images can be converted to higher resolution automatically by using
a driver named “WWL Mac Installer”. Or you can use the “Digital Camera Driver” if you
want the resolution remain unchanged.
5.5 How to Install Digital Camera Driver Software
Note:
Macintosh® users may only choose one type of driver at a time to install (Digital Camera Driver
without enhancement or with enhancement). The driver cannot run properly if both drivers are
installed.
Page 10

10
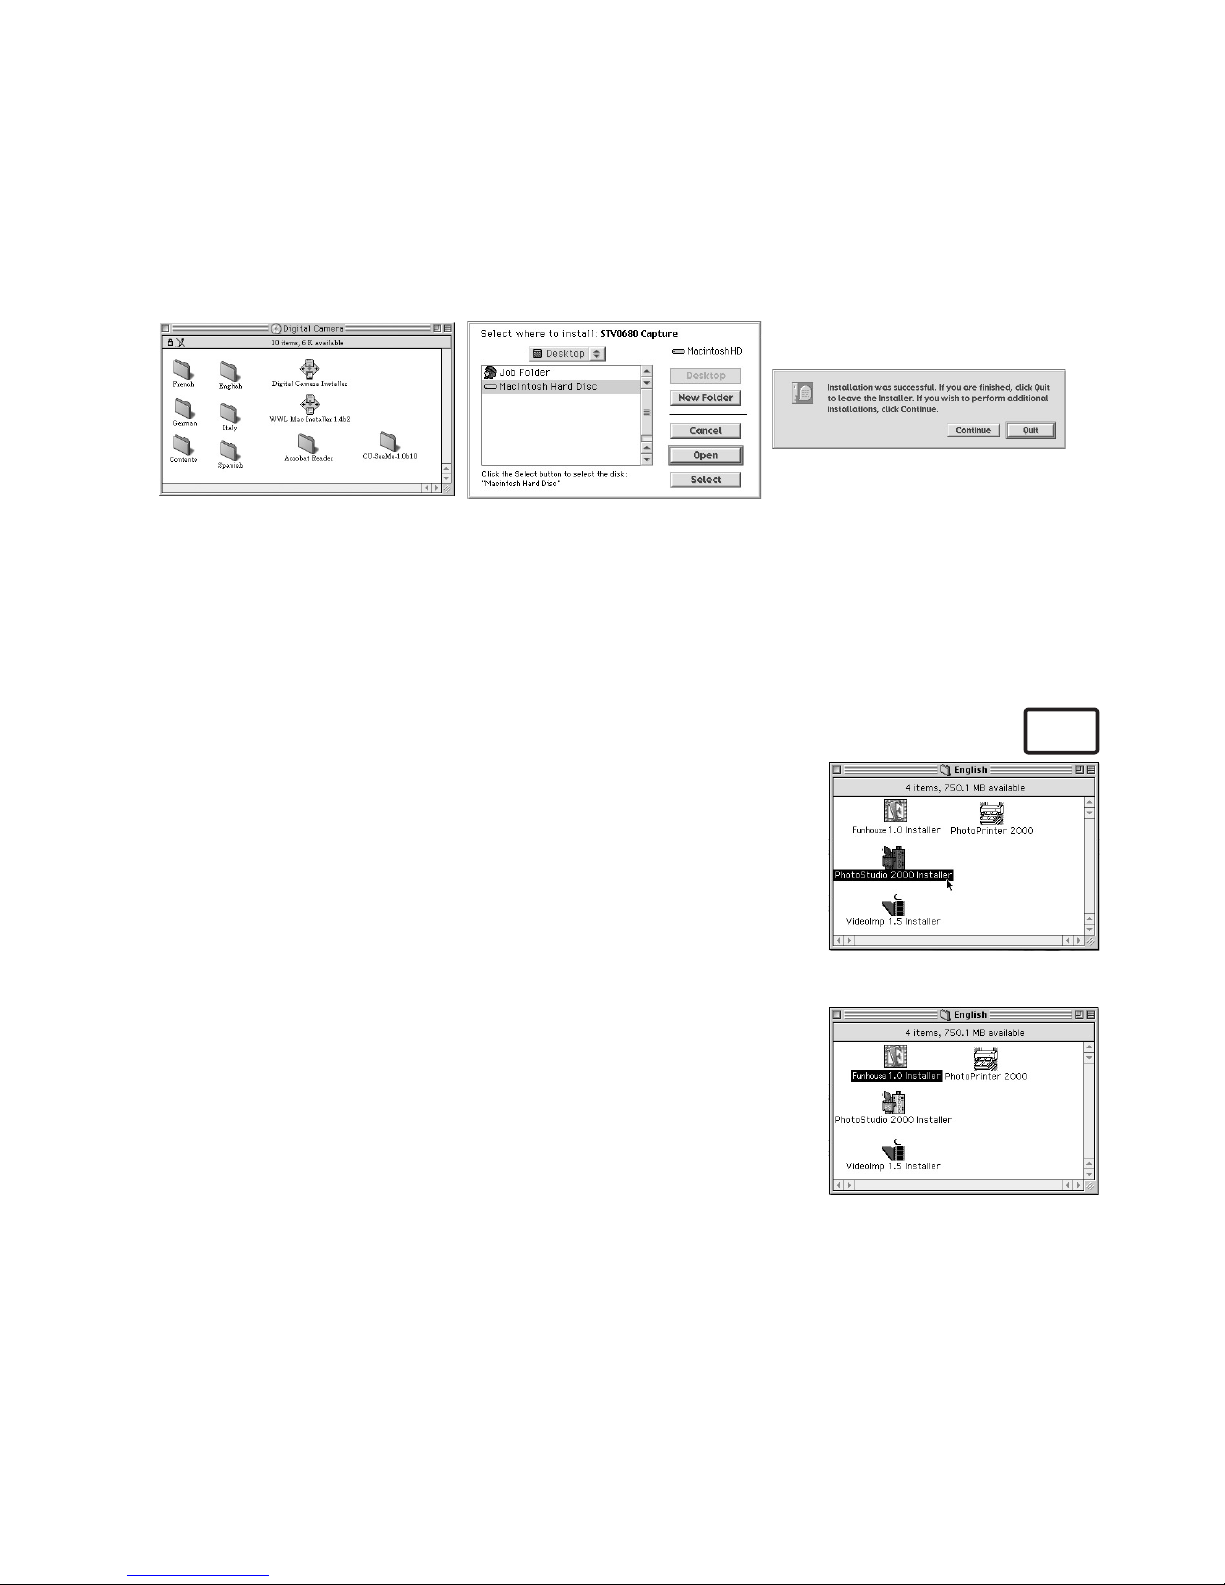
5.5.1 How to Install Digital Camera Driver (without enhancement):
MAC
1. Insert the CD-ROM disc into the CD-ROM drive and close the CD-ROM drawer.
2. Double click the CD-ROM icon “Digital Camera”.
3. Double click the “Digital Camera Installer” icon.
4. Click “Continue”.
5. Please disconnect all USB camera before continuing.
6. Choose a folder to install “STV0680 Capture” Plug-in le and click “Choose” to conrm.
Locate the “STV0680 Capture” Plug-ins le in Hard Disk if you have not install any
Photo-retouching software.
7. If you already installed PhotoStudio® 2000 and you want to use it as a default software
to retrieve the images from Storm C@m, go to “Plug-ins” folder in the “PhotoStudio®
2000” folder and click “Select”.
8. Click “Quit” to nish the installation.
9. A folder named “STV0680 Camera Snapshots” will appear in your Hard Disk after your
Storm C@m is connected to your Mac via the USB cable for collecting images and
movies.
5.5.2 How to Uninstall Digital Camera Driver (without enhancement):
To uninstall the Digital Camera Driver (without enhancement), you have to remove 3
les located in different folders and restart your Mac. The 3 les are listed below.
“STV0680 Camera” in Control Panel Folder
“STV0680 Downloader” in Extensions Folder in System Folder
“STV0680 Capture” in Plug-ins Folder in the PhotoStudio® 2000
5.5.3 How to install Digital Camera Driver (with enhancement; for CIF
Camera Version only):
1. Insert the CD-ROM disc into the CD-ROM drive and close the CD-ROM drawer.
2. Double click the CD-ROM icon “Digital Camera”.
3. Double click the “WWL Mac Installer 1.4b2” icon.
4. Click “Continue”.
5. Choose a folder to install “WWL Mac Import” Plug-in le and click “Choose” to conrm.
Locate the “WWL Mac Import” Plug-ins le in Hard Disk if you have not install any Photoretouching software.
6. If you already installed PhotoStudio® 2000 and you want to use it as a default software
to retrieve the images from Storm C@m, go to “Plug-ins” folder in the “PhotoStudio®
2000” folder and click “Select”.
Page 11
11
7. Click “Quit” to nish the installation.
8. A folder named “WWL Mac Snapshots” will appear in your Hard Disk after your Storm
C@m is connected to your Mac via the USB cable for collecting images and movies.
5.5.4 How to Uninstall Digital Camera Driver (with enhancement):
To uninstall the Digital Camera Driver (with enhancement), you have to remove 3 les
located in different folders and restart your Mac. The 3 les are listed below.
“WWL Mac” in Control Panel Folder
“WWL Mac” in Extensions Folder in System Folder
“WWL Mac Import” in Plug-ins Folder in the PhotoStudio® 2000
5.6 How to Install ArcSoft® Software
MAC
5.6.1 How to Install PhotoStudio® 2000
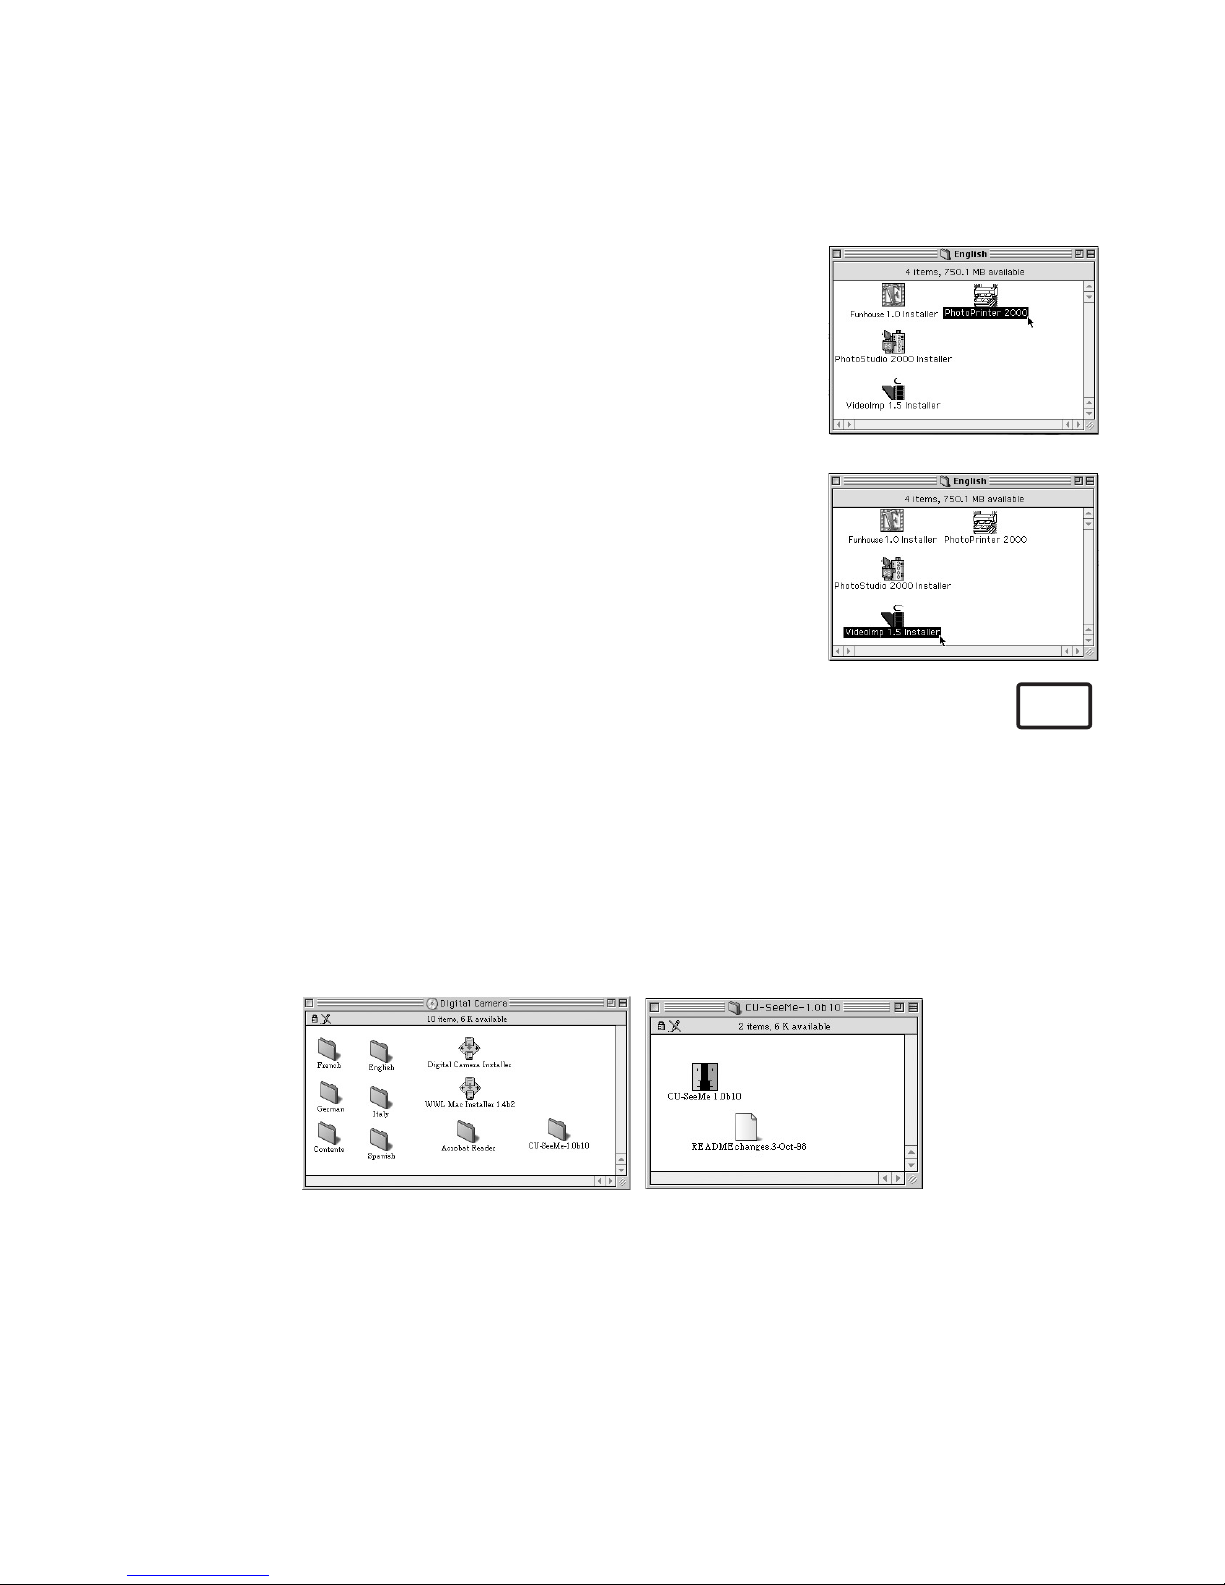
1. Insert the CD-ROM disc into the CD-ROM drive and close the
CD ROM drawer.
2. Double click the CD-ROM icon “Digital Camera”.
3. Double click the “PhotoStudio® 2000 Installer” icon in
English folder.
4. Follow the instructions presented on the screen to complete
the installation.
5.6.2 How to Install ArcSoft Funhouse™ 1.0
1. Insert the CD-ROM disc into the CD-ROM drive and close the
CD-ROM drawer.
2. Double click the CD-ROM icon “Digital Camera”.
3. Double click the “Funhouse™ 1.0” icon in English
folder.
4. Follow the instructions presented on the screen to complete
the installation.
Page 12
12
5.6.3 How to Install ArcSoft PhotoPrinter® 2000
1. Insert the CD-ROM disc into the CD-ROM drive and close the
CD ROM drawer.
2. Double click the CD-ROM icon “Digital Camera”.
3. Double click the “PhotoPrinter® 2000” icon in English
folder.
4. Follow the instructions presented on the screen to complete
the installation.
5.6.4 How to Install ArcSoft VideoImpression™ 1.5
1. Insert the CD-ROM disc into the CD-ROM drive and close the
CD ROM drawer.
2. Double click the CD-ROM icon “Digital Camera”.
3. Double click the “VideoImp™ 1.5 installer” icon in English
folder.
4. Follow the instructions presented on the screen to complete
the installation.
5.7 How to Install Cu-SeeMe™
MAC
Cu-SeeMe™ started the craze for videochat on the Internet and it’s still the most popular,
full-featured software for seeing, hearing and sharing. It can be used over the Internet
or any TCP/IP network. With Cu-SeeMe™, you can make new friends, expand your
professional and social networks, nd people with similar interests, watch informative and
entertaining cybercast events, and much more.
1. Insert the CD-ROM disc into the CD-ROM drive and close the CD-ROM drawer.
2. Double click the CD-ROM icon “Digital Camera”.
3. Double click the “Cu-SeeMe™1.0b10” folder, followed by the “Cu-SeeMe™1.0b10” icon.
4. Follow the instructions presented on the screen to complete the installation.
Page 13
13
5.8 How to Install Adobe® Acrobat® Reader
MAC
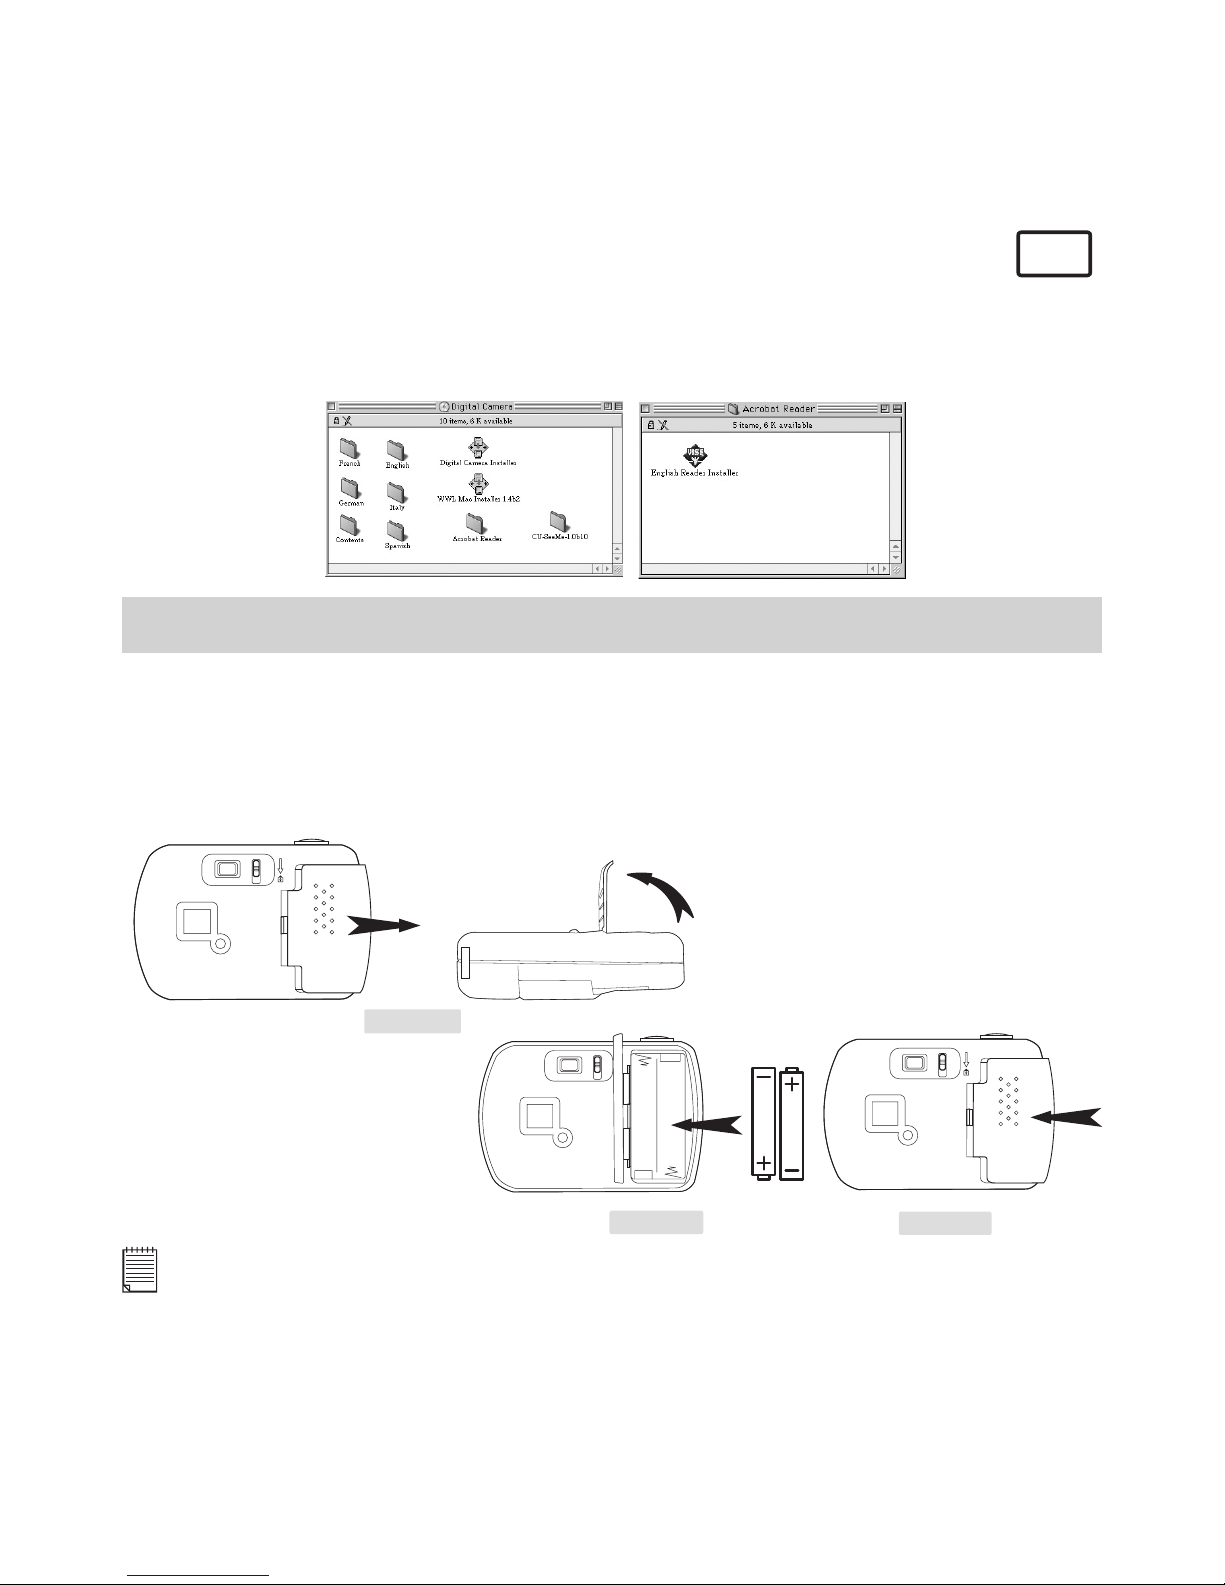
1. Insert the CD-ROM disc into the CD-ROM drive and close the CD-ROM drawer.
2. Double click the CD-ROM icon “Digital Camera”.
3. Double click the “Acrobat® Reader” folder and “English Reader Installer” icon.
4. Follow the instructions presented on the screen to complete the installation.
6. Battery Installation
1. Slide right and then lift the battery door upwards (as shown on Diagram A). Insert the
two new AAA alkaline batteries into the battery compartment (as shown on Diagram B).
Make sure you follow the correct polarity (+) (-) as indicated.
2. Put the battery door on correct position and slide left to close the battery door (as shown
on Diagram C).
M
Diagram A
Diagram B
M
M
Diagram C
Important Note:
To avoid lost images when changing batteries, please make sure your images are uploaded to your PC
or Mac before changing batteries.
Make sure the Storm C@m is connected to your PC or Mac via the USB cable with your PC or Mac is
switched on.
Page 14
14
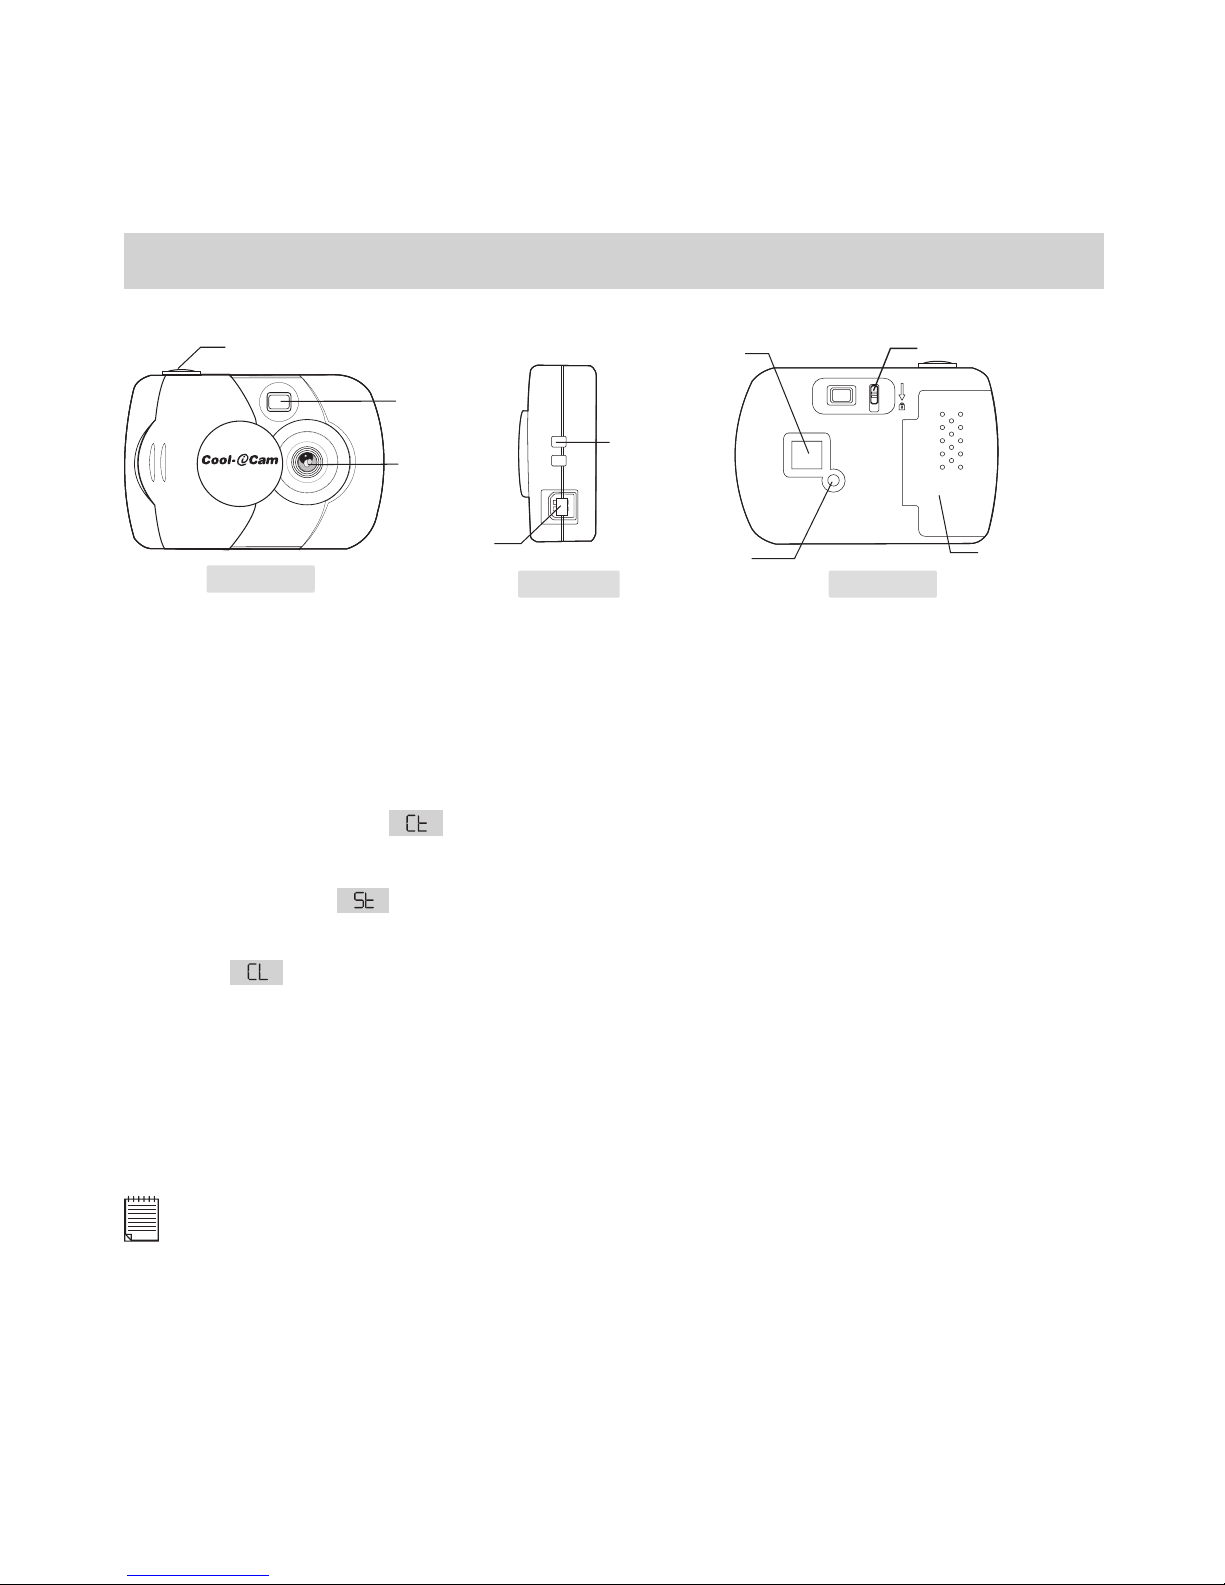
7. Getting to Know Your Storm C@m
Refer to the picture below for a quick overview for your Storm C@m.
Viewnder
Lens
Strap
Holder
USB Cable
Port
LCD Display
Mode Button
Battery
Door
Front View
Back View
Side View
M
ST
ORMCAM
Shutter Lock
Shutter Button
7.1 Shutter Button
The Shutter Button has 5 functions. Although these are covered in more detail later in this
manual, please nd below a brief description.
7.1.1 Still Image
To take an image, aim the Storm C@m by looking through the viewnder and press the
Shutter Button once. A beep means you have taken an image. (see page 17)
7.1.2 Movie Clip
To take a movie clip, press and hold the Shutter Button to start taking continuous images
when in the Continuous
Mode. (see page 17)
7.1.3 Self-Timer
To start the 10 second Self-Timer, simply press the Shutter Button when the Storm C@m
is in the Self-Timer
Mode. (see page 18)
7.1.4 Clear Memory
To clear all images that you have taken, simply press the Shutter Button when you are in
the Clear
mode. (see page 18)
7.1.5 Change Resolution
The Shutter Button can be used to switch between Hi-Res and Low-Res settings. To do
this, the memory must rst be cleared, and the resolution option selected. (see page 18)
7.2 Viewnder
The viewnder is the window you look through when you aim the Storm C@m. Make sure
you center the subject in the viewnder before taking an image.
Important Note:
Due to the very small size of the viewnder, ensure your Storm C@m is perfectly parallel to the subject
you wish to take an images of. We recommended images are taken at a minimum distance of 2 metres
from the subject.
Page 15
15
7.3 LCD Display
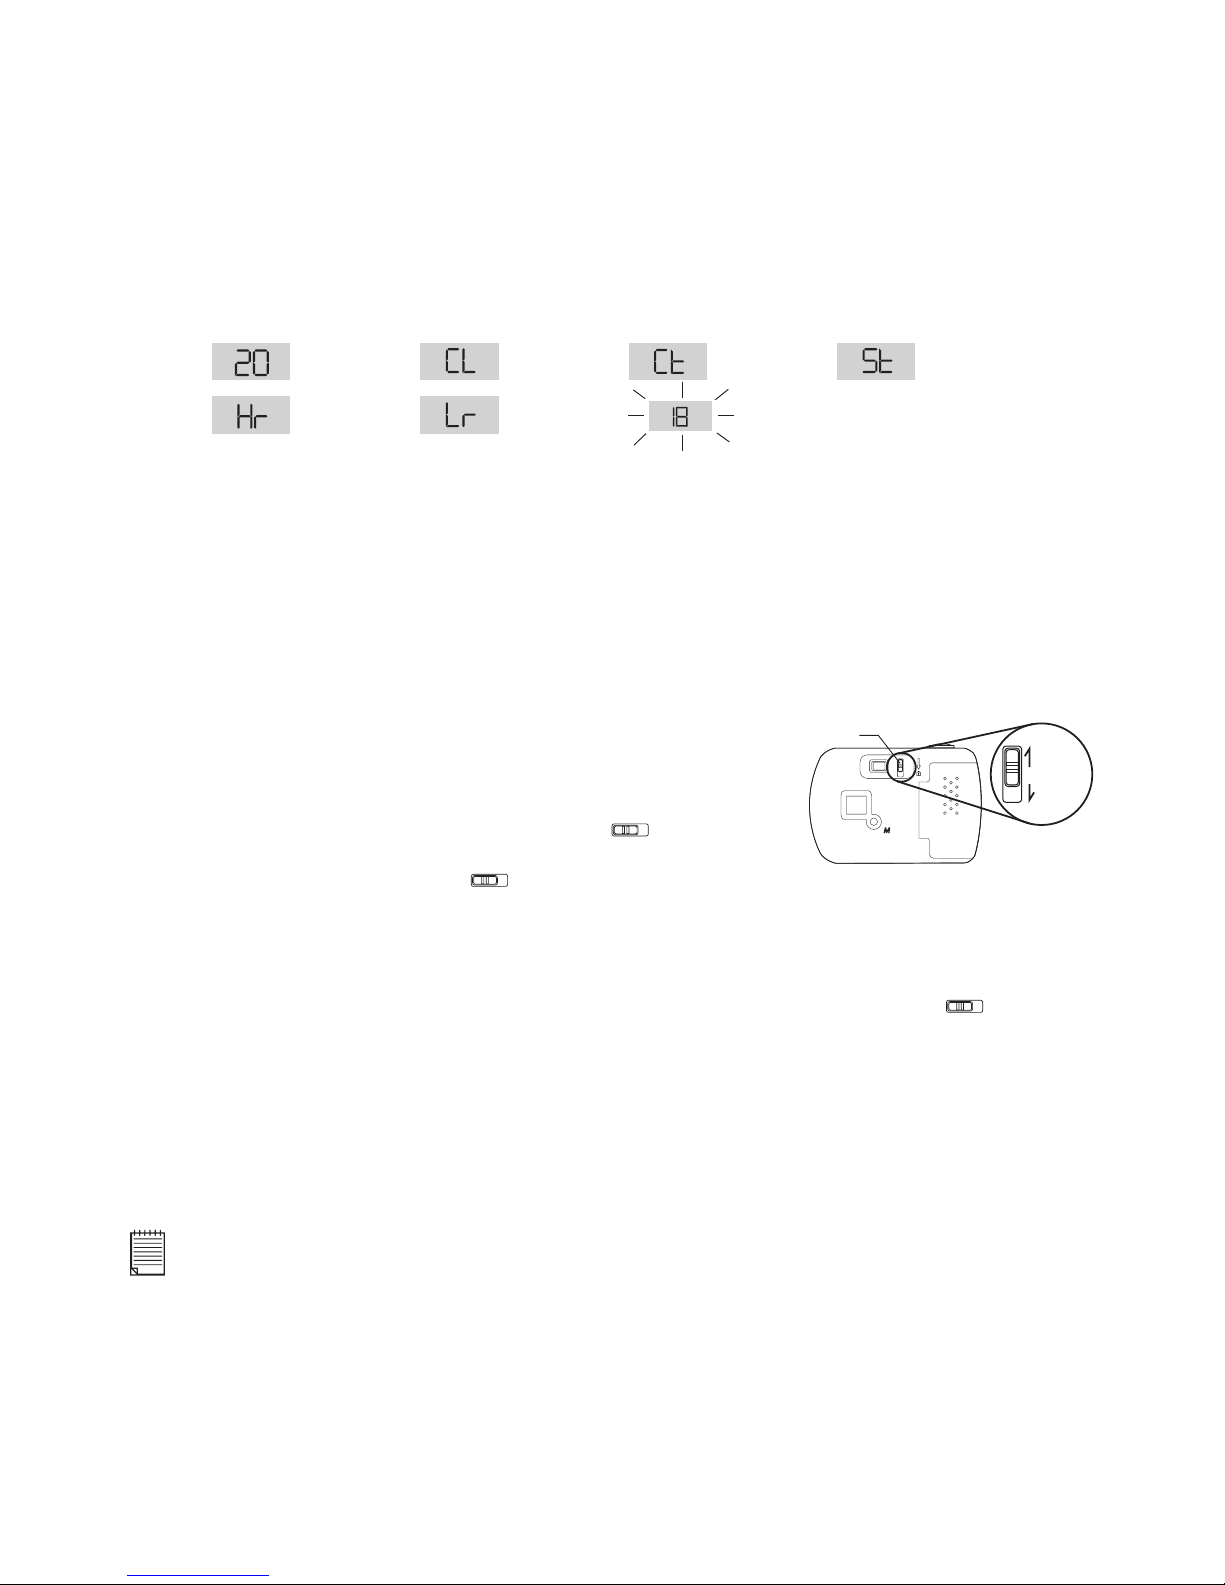
By default, the 2 digit LCD screen displays the number of images remaining that can be
taken before the Storm C@m’s memory is lled. It is also used in conjunction with the Mode
Button to access and display the Storm C@m settings.
Images
Remaining
High Resolution
(Hi-Res) Mode
Low Resolution
(Low-Res) Mode
Clear Memory
Mode
Continuous
Mode
Low Battery Warning
(LCD will blink)
Self-timer
Mode
7.4 Mode Button
The Mode Button has 2 primary functions:
7.4.1 Turning your Storm C@m On from the Stand-by Mode
When your Storm C@m is in Stand-by Mode, press the Mode button to reactivate.
7.4.2 Cycling Through the Operating Modes
You can also use the Mode Button to cycle through the operating modes of your Storm
C@m. (For more details, see 8.2 Getting Started)
7.5 Shutter Lock
unlock
lock
M
Shutter Lock
Shutter lock is designed to protect the settings of your
camera. Therefore, when you have taken some pictures
and want to protect them from being accidentally deleted
switch the shutter lock switch to lock setting
.
When the shutter lock is set to
you will be able to scroll the mode settings using the
mode button, but the shutter button will be non functional.
To release the lock, simply move the shutter lock upwards.
Images can be uploaded to your computer whilst the shutter lock is set to
. The auto
power will still function when the shutter lock is ON.
7.6 Power
7.6.1 Stand-by Mode
After a period of 30 seconds inactivity, the Storm C@m will switch to Stand-by Mode
automatically and the LCD will go blank. All images taken will not be lost as they are
stored in the Storm C@m’s memory.
Important Note:
It is important to note that any images stored in your Storm C@m’s memory will be lost if the battery
is totally drained or removed (and the USB cable is not connected to your Storm C@m to your powered
on PC or Mac). Please make sure your wanted images are uploaded to your PC or Mac via the USB cable
before changing or installing batteries.
Page 16
16
7.6.2 Low Battery
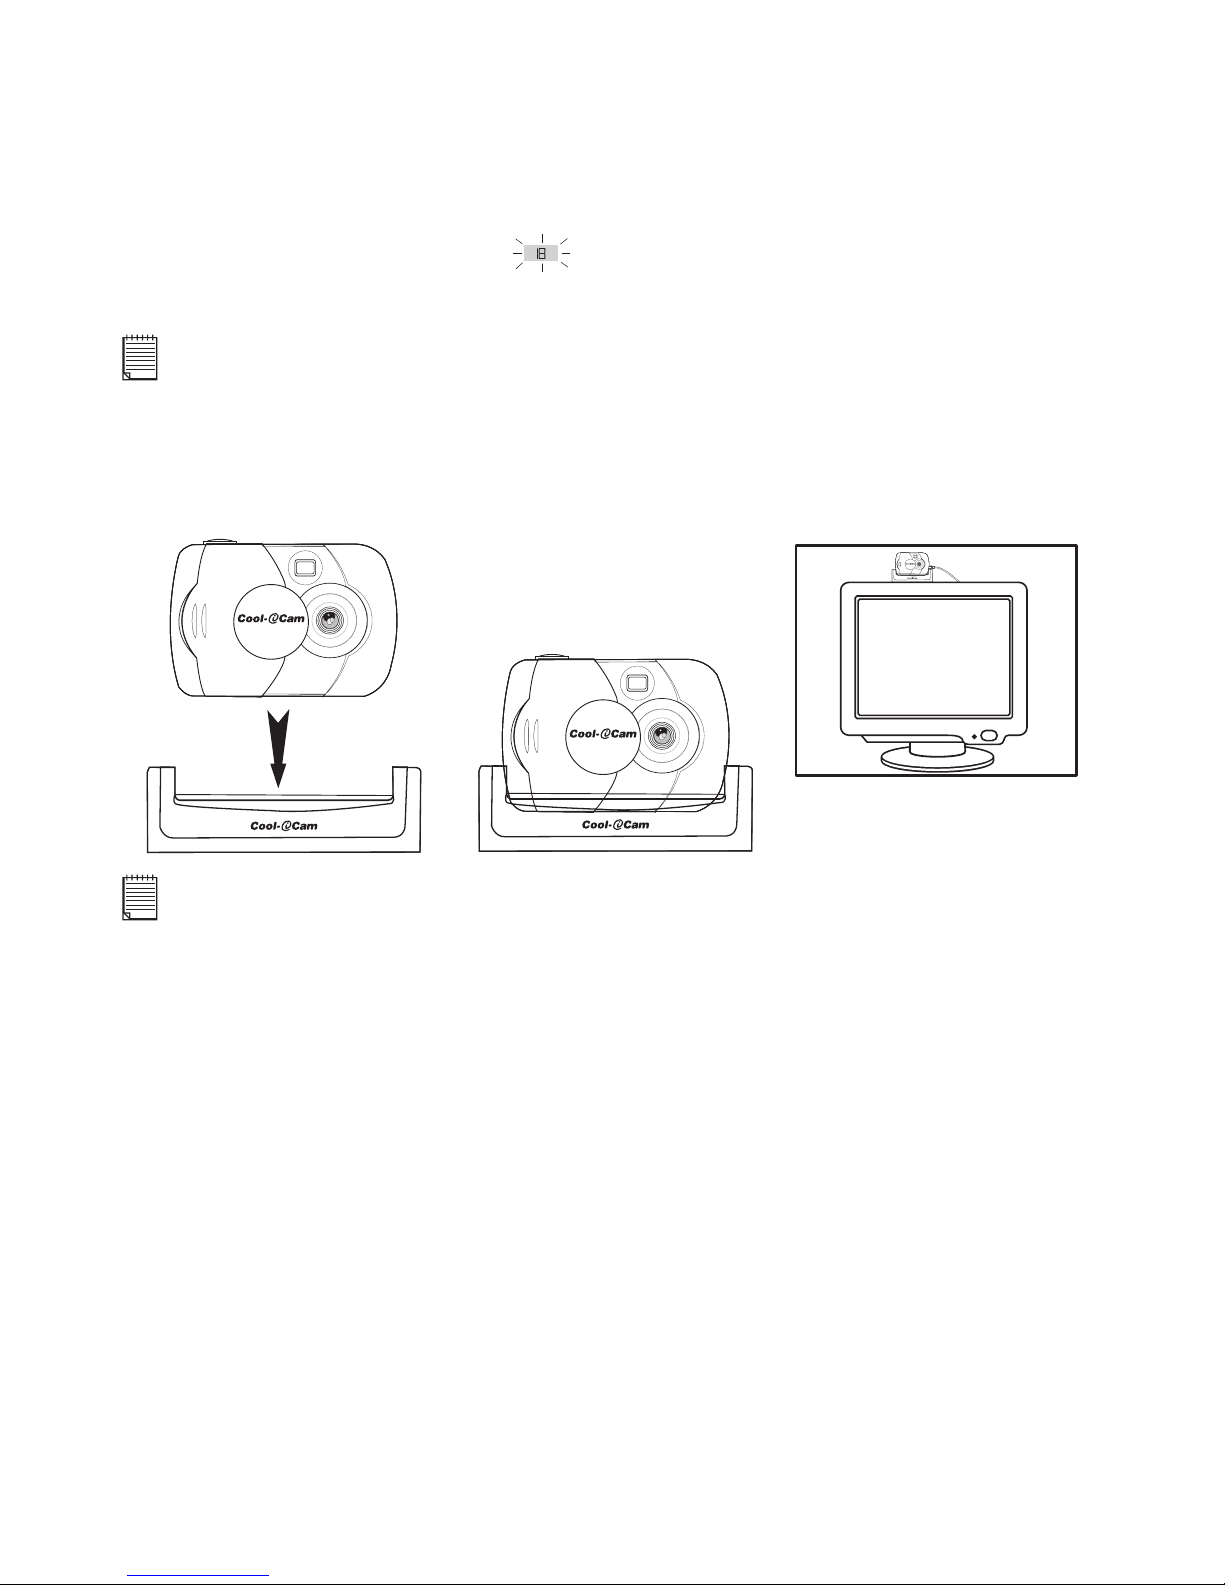
If the LCD display begins to blink or
is displayed, these are warnings that there is not
enough power left in your battery to fully operate your Storm C@m.
Important Note:
You must upload any stored images as soon as possible. Do not replace your battery before you have
downloaded or saved your images to your PC or Mac.
7.7 Storm C@m Cradle
When you want to use your Storm C@m as a web-cam, use the enclosed cradle and
position suitably, e.g. on top of your monitor. Alternatively, the cradle might be useful for
taking images in Self-timer mode. See Section 8.5 Self-Timer Mode.
Place the Storm C@m on
your monitor.
STORMCAM
STORMCAM
STORMCAM
Important Note:
To use as a web-cam, you will require Internet access. To talk and listen, your computer will require a
sound card, speakers and microphone (not supplied).
Page 17

17
8. Getting Started
8.1 Switching the Storm C@m On
Your Storm C@m will automatically switch on when you insert new batteries or connect
your Storm C@m to your PC or Mac via USB port. Press the Mode Button to turn on your
Storm C@m when your Storm C@m is in Stand-by Mode. The LCD will indicate the
mode for high resolution and it will also display the number of images which may be taken.
Ensure the shutter lock switch is in the unlocked
position.
8.2 Sliding the Lens Cover
Before taking an image, remember to slide the lens cover outward.
For maximum protection of the lens, remember to slide the lens cover inward after taking
image.
8.3 Taking an Image
Press the Shutter Button to take an image. The Storm C@m will beep. A high pitched
beep indicates that the image was taken successfully and the counter will count down. The
LCD screen displays the number of available images remaining.
• A low beep indicates insufcient light to take an image or the lens cover has not been
slide opened.
• A series of beeps indicates that the Storm C@m is full.
By pressing the Mode Button you can cycle through additional features as displayed on
the LCD. When a given mode is displayed it can be accessed by pressing the Shutter
Button (see section 7.1). If an option is not conrmed within 5 seconds the display will
revert to show the number of available images that can be taken.
or
8.4 Continuous Mode
(see 10.4 Creating and Uploading Movie Clips)
To create a movie clip:
1. Press the Mode Button until the
appears on the LCD.
2. Press and hold the Shutter Button within 5 seconds to start taking continuous images.
When you are in Low-Res mode, the Storm C@m will allow you to take 80 images. In
Continuous Mode, the counter will rapidly decrease accompanied by a series of rapid
beeps as each image is taken. If the Shutter Button is not pressed within 5 seconds the
Storm C@m will revert to the normal image taking mode.
Important Note:
During the Continuous Mode the Storm C@m will allow images to be taken with insufcient light.
Page 18

18
8.5 Self-Timer Mode
To use the self-timer feature, press the Mode Button until
appears in the LCD then
press the Shutter Button to start a 10 second self-timer. The Storm C@m will issue a short
beep every second and then a long beep just prior to a further short beep which indicates
that the image has been successfully taken. It is a good idea to use the cradle for this.
Important Note:
The Self-Timer Mode cannot be selected when the Storm C@m is full.
8.6 Clearing the Stored Images
When you wish to clear the memory of your Storm C@m, press the Mode Button until
appears on the LCD. Pressing the Shutter Button once will cause the Storm C@m to beep
and the
start ashing. Pressing the Shutter Button again within 5 seconds will clear
all the images stored and reset the image counter.
Important Note:
• Individual images cannot be cleared
• All images will be lost when the memory is cleared. Please make sure you upload your wanted images
before clearing your Storm C@m’s memory.
8.7 Changing the Image Resolution
Image resolution can be changed whenever you need.
1. Cycle through the Mode options by pressing the Mode Button.
2. Press the Shutter Button once to change to the alternative resolution.
For Example:
Changing from Hi-Res Mode to Low-Res Mode:-
Press the Shutter Button to Conrm
Changing from Low-Res Mode to Hi-Res Mode:-
Press the Shutter Button to Conrm
Page 19
19
9. Connecting your Storm C@m to Your Computer
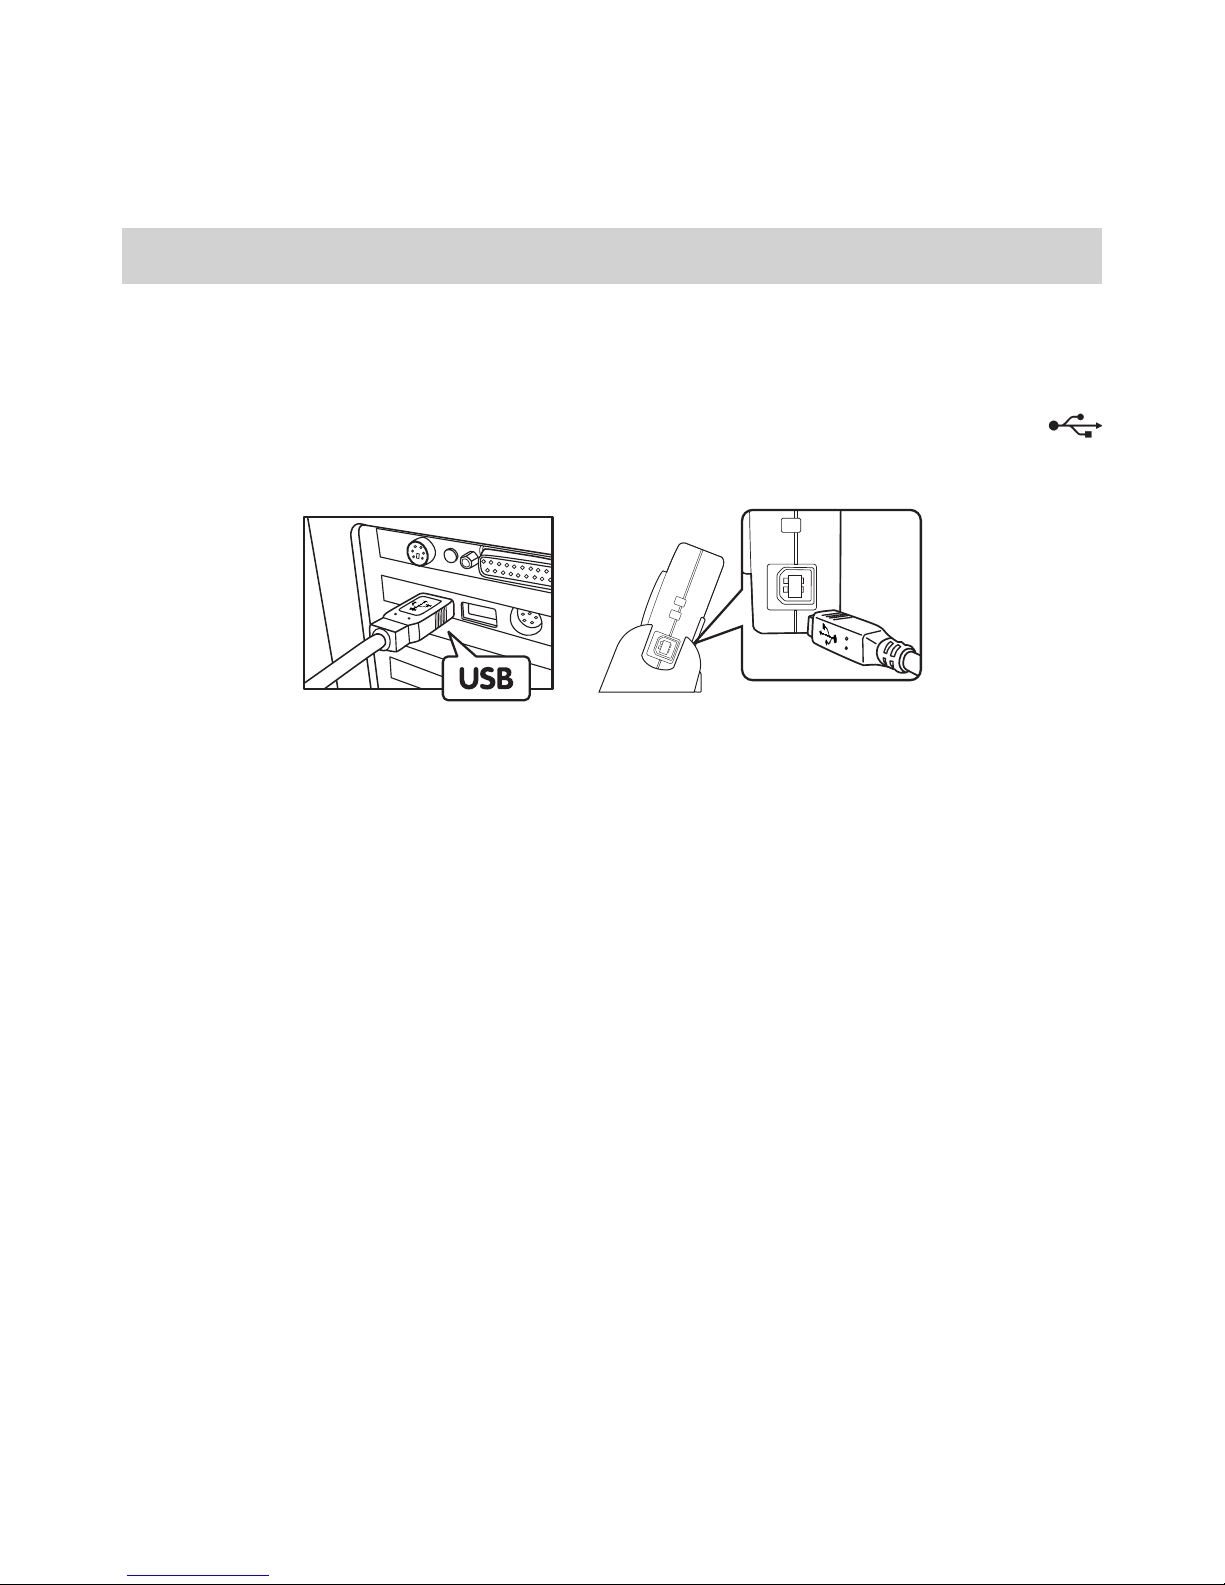
The USB cable allows you to upload images from the Storm C@m to your PC or Mac. One
end of the cable connects to the USB port on the side of the Storm C@m and the other end
connects to your PC’s or Mac’s USB port. When your Storm C@m is connected to your PC
or Mac, it will draw power from the PC in order to preserve your battery life.
The USB port can be found on the front or back panel of your PC or Mac. Look for this
symbol next to the connection port. (Also see your PC or Mac operating manual for the
location of your USB connection port.)
USB Series “A” Plug connects to your PC or Mac
USB Series “B” Plug connects
to your Storm C@m
When you rst connect your Storm C@m to your PC, a message appears on screen saying
“New Hardware Found” and “Building Driver Information Database”. After this, you can
start to upload images!
Page 20
20
10. Uploading Images to Your Computer
For Windows® Users:
PC
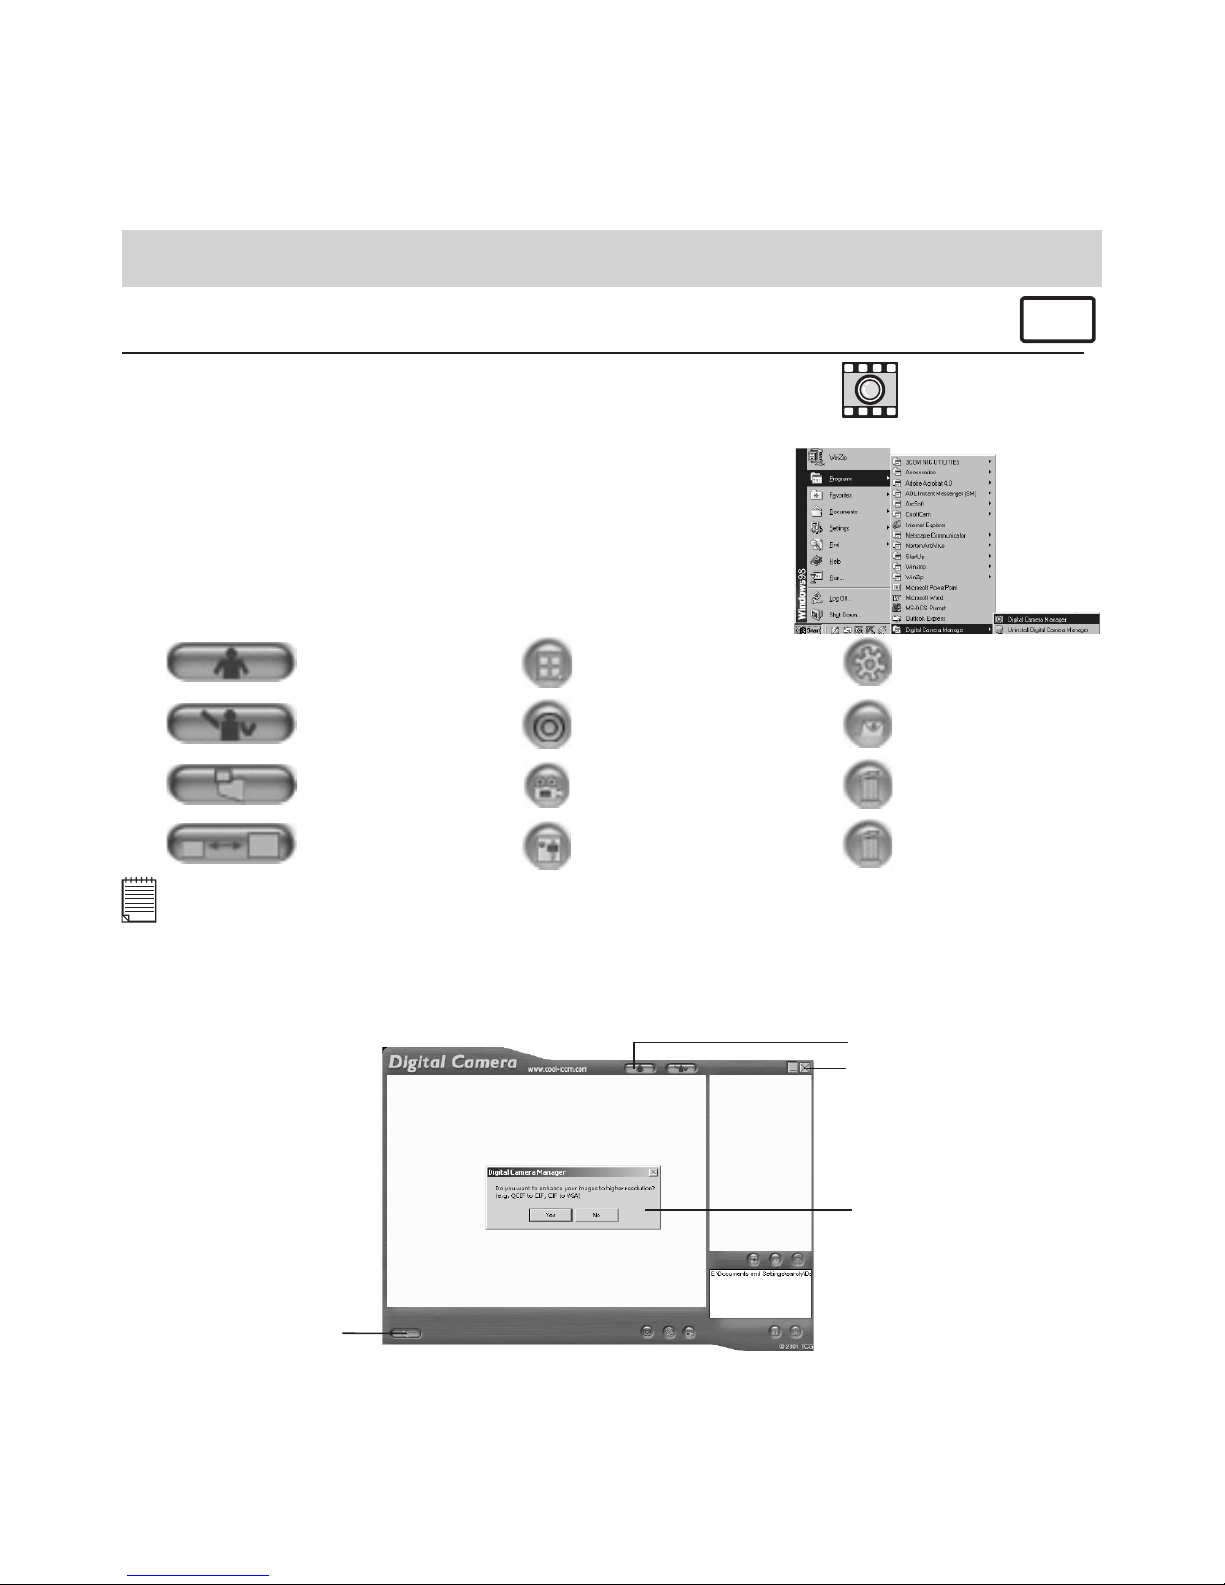
10.1 Running the Digital Camera Manager
Digital Camera Manager
shortcut icon
on desktop
• Select the Digital Camera Manager icon from the
Digital Camera Manager program group on the Windows
Start Menu or double-click the Digital Camera Manager
short-cut icon on the desktop.
• You can now start to upload your images from your
Storm C@m by following the steps in Section 10.3:
10.2 Quick Reference
DSC Mode
(Digital Still Camera)
Capture Still Image(s)
(In DSC Mode)
Live Video Mode
Adjust Resolution
(In Live Video Mode)
Create New Folder
Save Still Image(s)/
Capture snap shot
(In Live Video Mode)
Save Video/
Start or Stop Recording (In
Live Video Mode)
Adjust Color
Delete Album
Send E-mail
Adjust Frame Rate
Delete Image(s)/
Movie Clips(s)
Important Notes:
You can use the Digital Camera Manager to upload images taken by your Storm C@m at any time
whether or not the Storm C@m is full. Connect your Storm C@m to your PC via the USB cable. Plugging
the USB connector into the Storm C@m will cause it to reset and issue a double beep but all stored
images will remain.
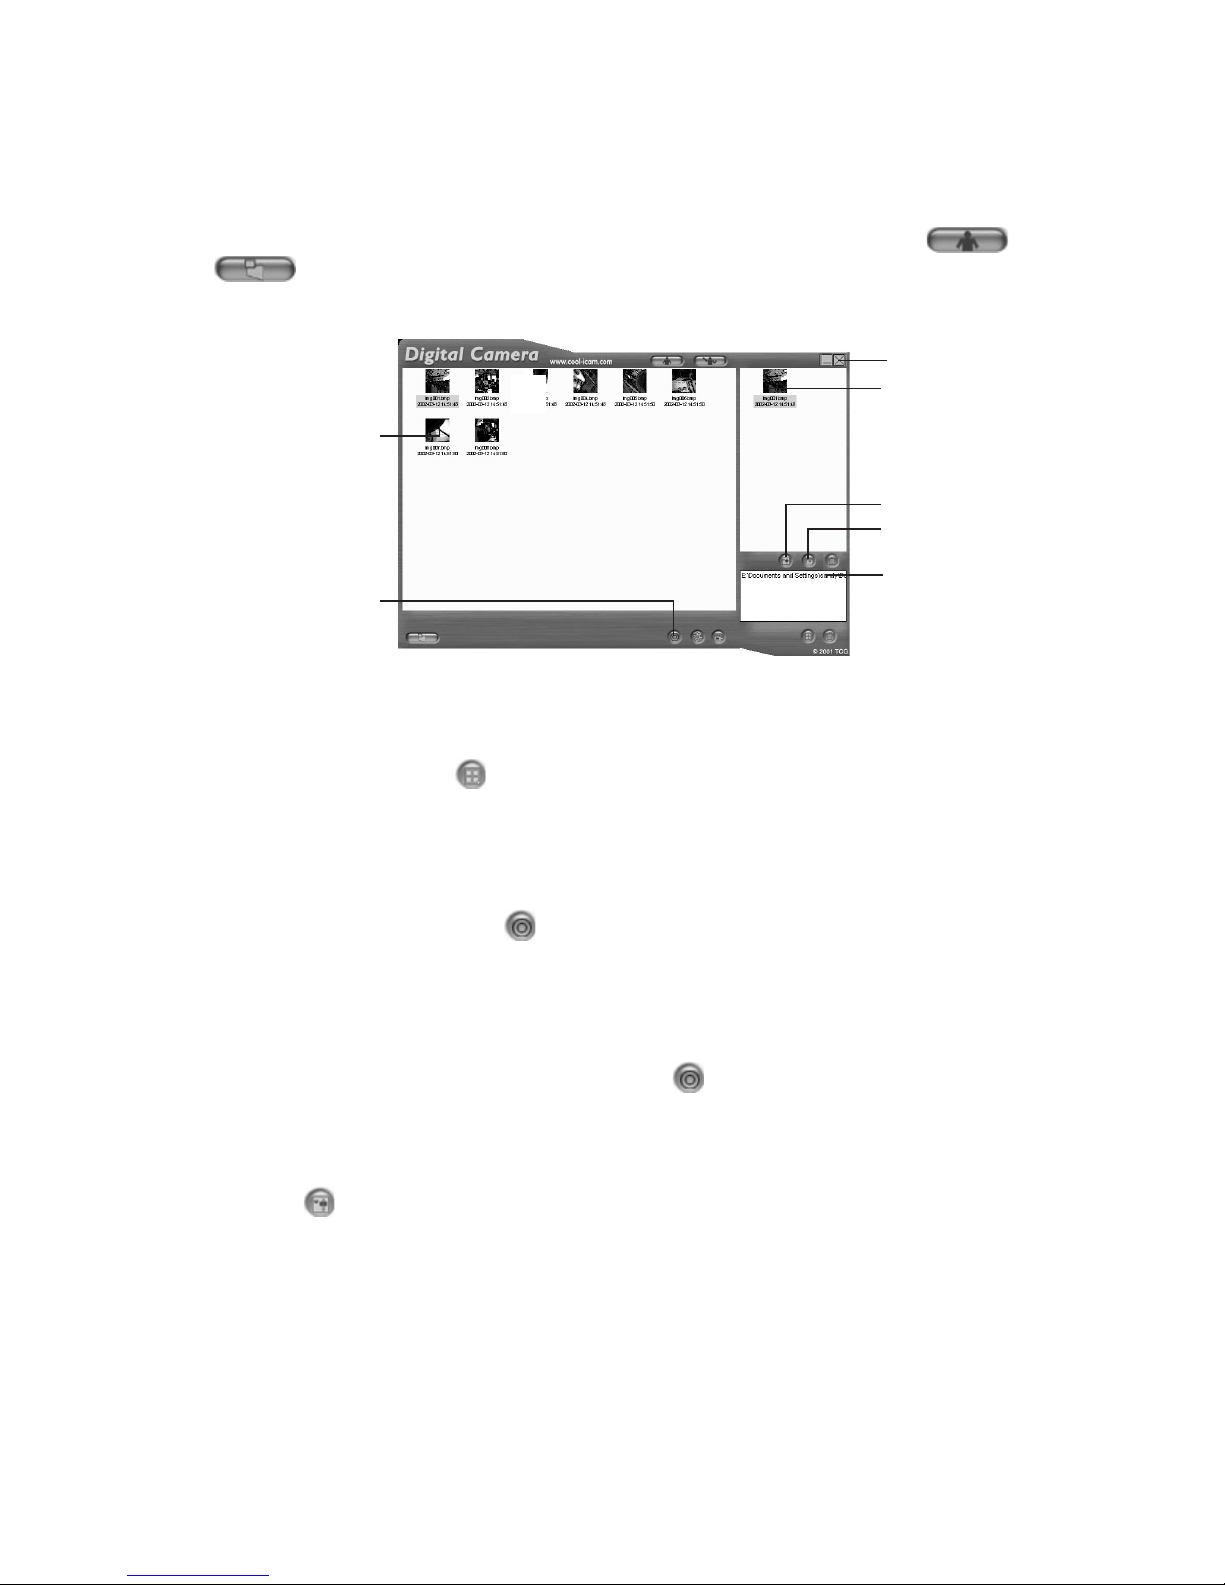
10.3 Uploading Images
1. Switch to DSC Mode
Close
2a. Enchance resolution
2b. Capture all stored images
Page 21
21
1. Switch the interface to DSC (Digital Still Camera) Mode by clicking the button.
2. Click
to capture all images stored in your Storm C@m. A window will appear
and ask if you want to convert all stored images to higher resolution. (for images only)
Select “Yes” or “No”.
Close
Saved images(s)
Adjust image
“Album”
4. Create New Album
3. Select wanted image(s)
6&7. Save the selected
image(s) into the album
3. All uploaded images will be shown on the left panel.
4. During your Digital Camera Manager installation a folder called “Album” has been
automatically created in the bottom right section of the Digital Camera Manager.
Highlight the le called “C:/Windows/Desktop/Album” in the bottom right hand corner.
You can alternatively click to create a new album to hold your images.Name the
album folder and save it to wherever you want in your PC.
5. If you have already created an album folder and you want to save image(s) in, click on
the album.
6. TO SAVE ONE IMAGE
• To save 1 particular image and put in the selected album, select the image by clicking
the image once and click the Save Image Button.
• The selected image will appear on the right panel and it will be saved to the album
you created and or highlighted.
7. TO SAVE ALL IMAGES
• To save all images taken and put in the album, select all the images by holding the
CTRL button down on keyboard with
the mouse click on each image and click the button.
• All the selected images will appear on the right panel and they will be saved to the
album you created and highlighted.
8. To Adjust an Image
You can adjust an image (brightness, contrast, etc.) by highlighting the image and
clicking the
button.
9. To retrieve images saved in an album, simply double-click the album and the images
stored in the album will be shown on the top right panel.
10. Double click on the image you want to view to bring it up full size on screen.
Page 22
22
10.4 Creating and Uploading Movie Clips
Create your very own digital movies using Digital Camera Manager.
• When the Storm C@m is full, attach it to your PC via USB and run the Digital Camera
Manager.
• You can now start to create your own movie clips by following these steps:
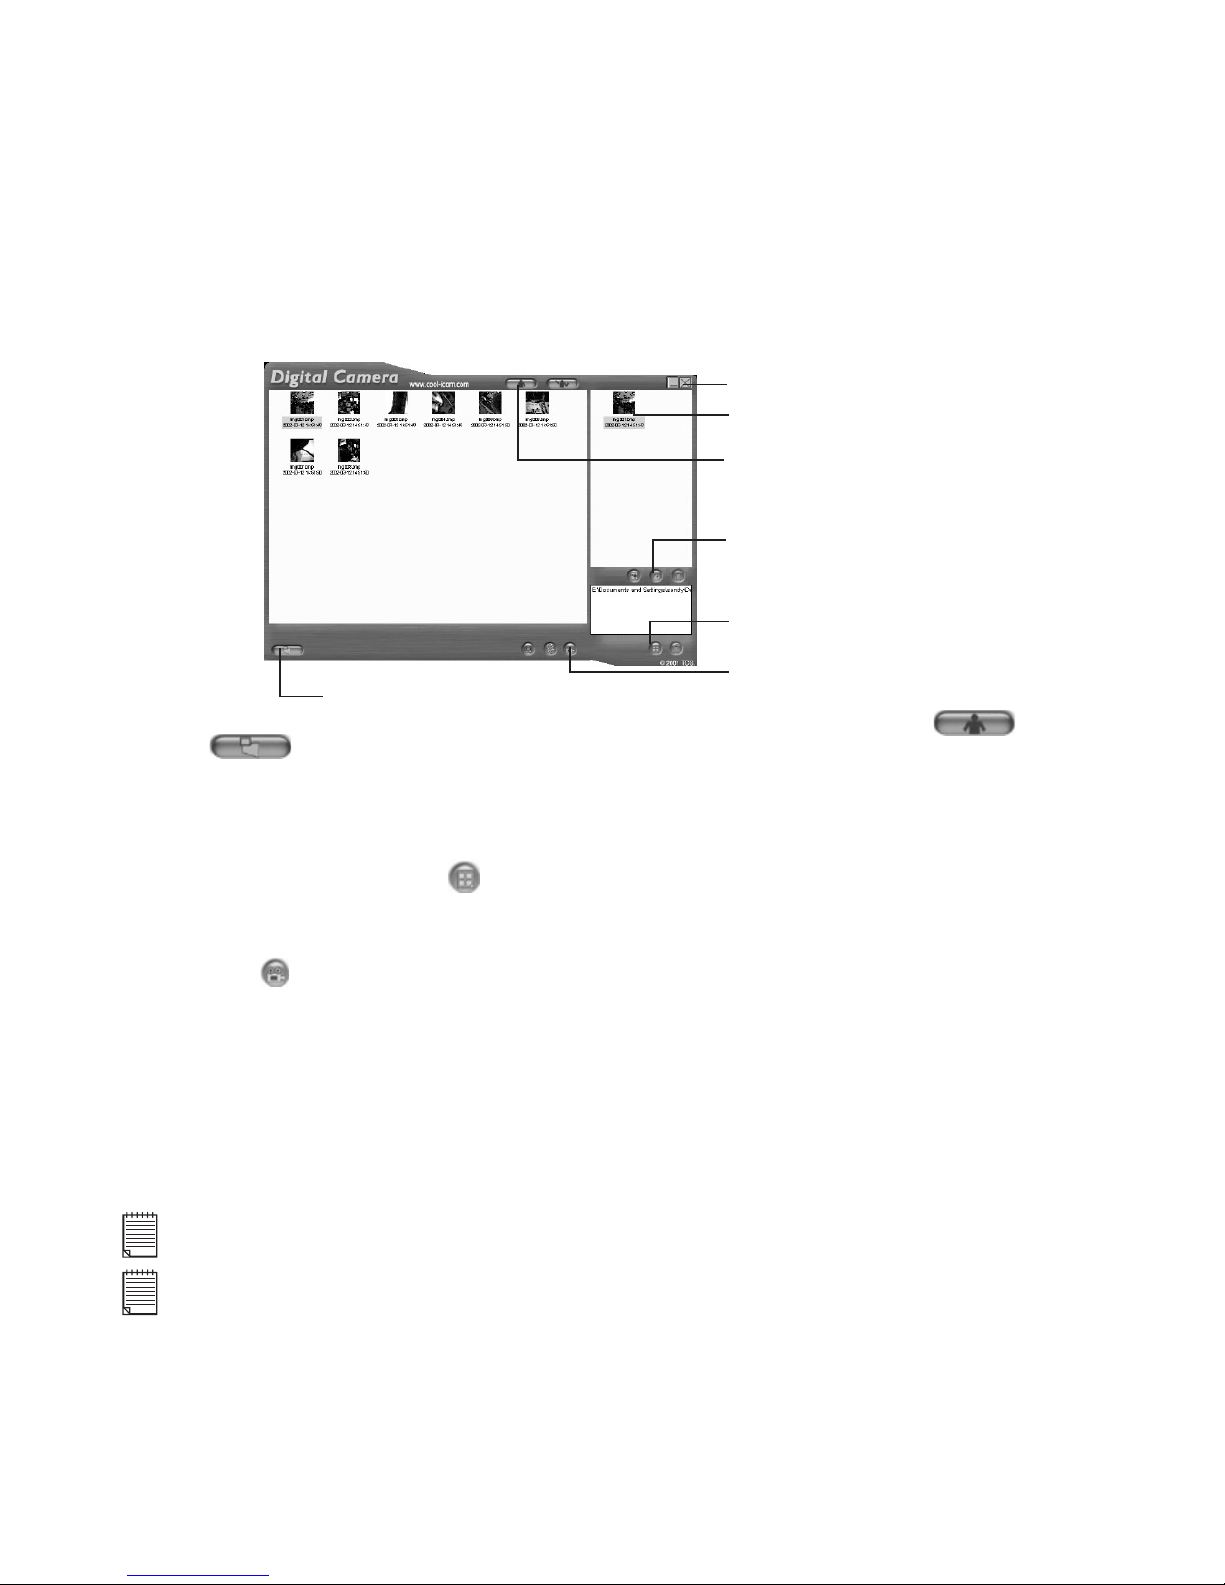
1a. Switch to DSC Mode
Close
saved .avi le
E-mail saved .avi le
2. Create New Album
3. Create movie clip
2. Capture all stored images
1. Switch the interface to DSC (Digital Still Camera) Mode by clicking the button.
Click to capture all images stored in your Storm C@m. All uploaded images will
be shown on the left panel.
2. During your Digital Camera Manager installation a folder called “Album” has been
automatically created in the bottom right section of the Digital Camera Manager.
Highlight the le called “C:/Windows/Desktop/Album” in the bottom right hand corner.
You can alternatively click
to create a new album to hold your images. Name the
album folder and save it to wherever you want in your PC.
3. If you have already created an album folder and you want to save image(s) in, double
click the album.
4. Click the button to create a movie clip (.avi le) with all the selected images by
holding the CTRL key on your keyboard with the mouse click on each image.
5. Select the video compression format. “Full Frames (Uncompressed)” format is
recommended.
6. The movie clip created will appear on the right panel and it will be saved to the album
you created and highlighted.
7. To retrieve movie clips saved in an album, simply double-click the album and the movie
clips stored in the album will be shown on the top right panel.
8. Double click on the movie clip(.avi le) to open and watch your movie clip. Your movie
clip will play back in Windows® Media Player.
Important Notes:
Your images are also retrievable from your desktop by clicking on the folder called “Album”.
Tip:
To quickly highlight all images hold down the CTRL and SHIFT key together and with the mouse click on
the end images of every row of images. This will quickly highlight every image in every row. Creating
movie clip with both low and high resolution will cause error.
Page 23
23
10.5 Creating Live Movie Clips
You can now create live digital movies using Digital Camera Manager.
• Make sure your Storm C@m is connected to your PC via USB and run the Digital
Camera Manager.
• Warning! Live Video Mode will erase all images stored in your Storm C@m.
Make sure you upload all wanted images before you switch the Digital Camera
Manager to Live Video Mode.
• You can now start to create your live movie clips by following these steps:
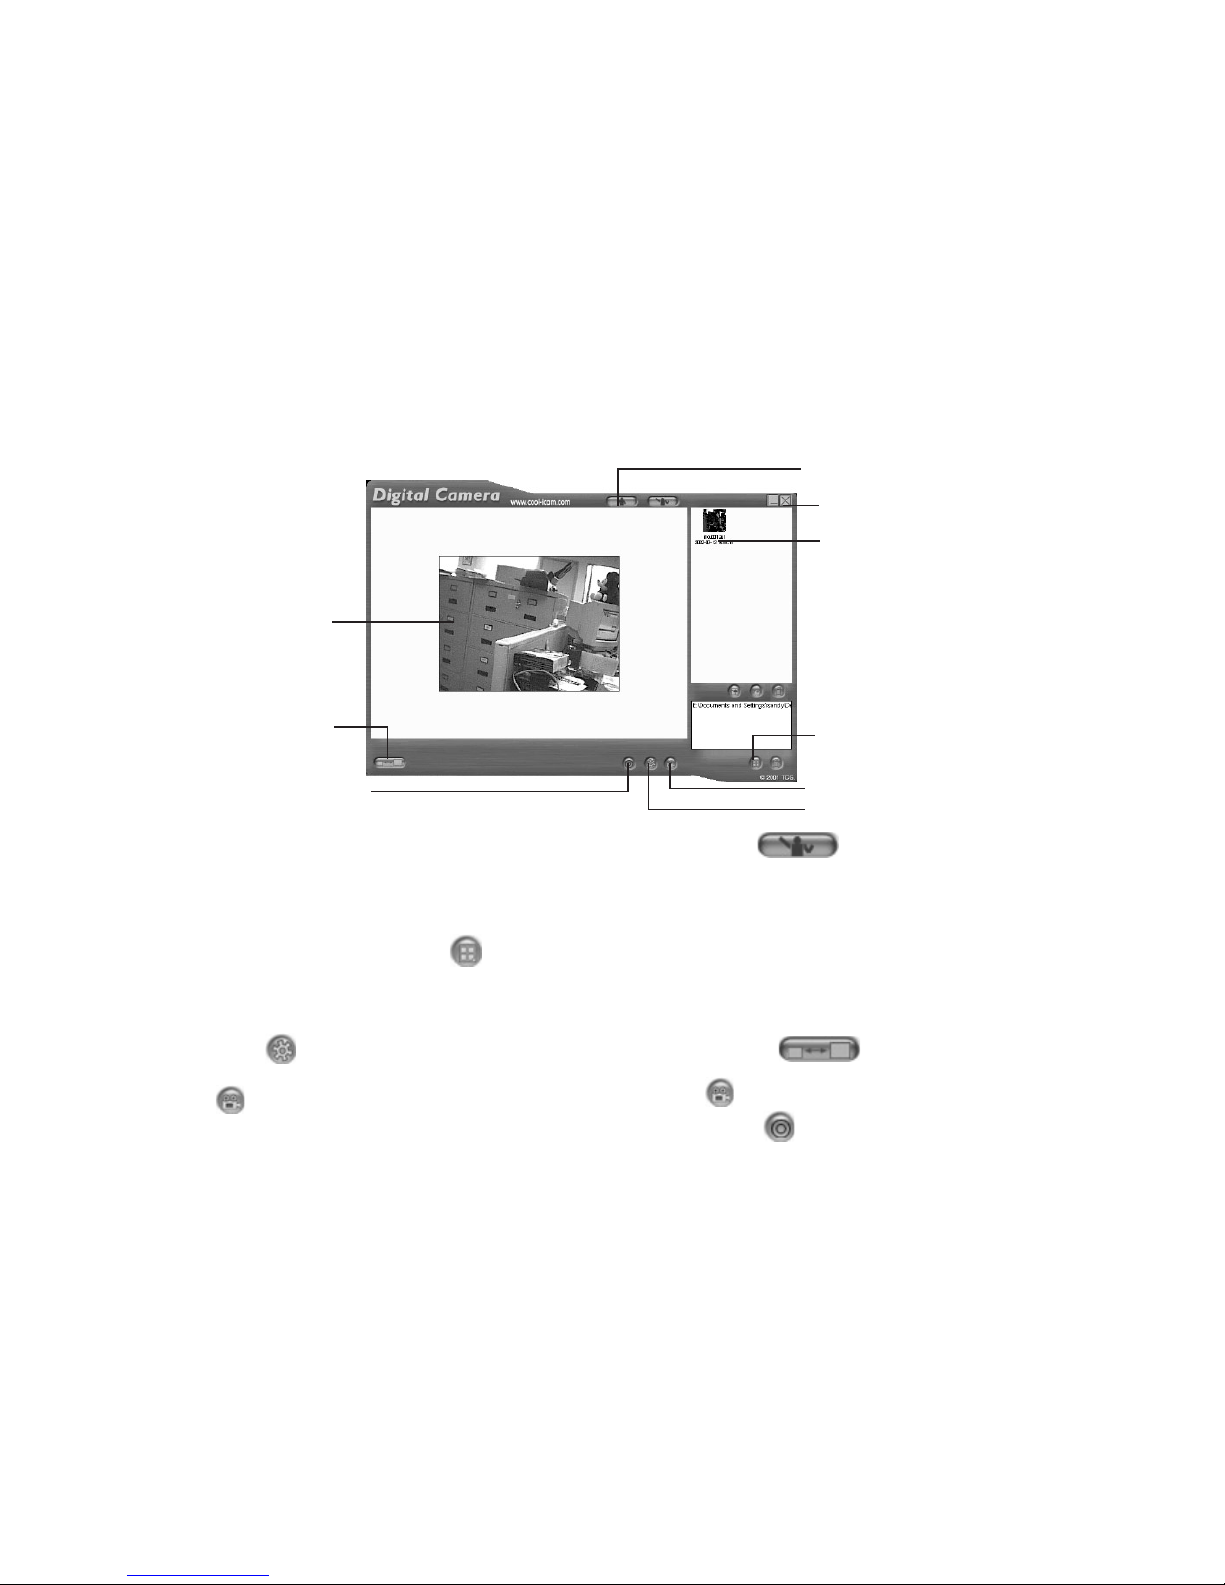
1. Switch to Live
Video Mode
Close
Saved .avi le
5. Start/Stop recording live movie
2. Create New Album
4. Adjust frame rate
Live Image
Adjust Resolution
5. Take snap shot
during recording
1. Switch the interface to Live Video Mode by clicking the button.
2. During your Digital Camera Manager installation a folder called “Album” has been
automatically created in the bottom right section of the Digital Camera Manager.
Highlight the le called “C:/Windows/Desktop/Album” in the bottom right hand corner.
You can alternatively click
to create a new album to hold your images. Name the
album and save it to wherever you want in your PC.
3. If you have already created an album and you want to save image(s) in, double click
the album.
4. Click the button to adjust the frame rate and the button to adjust the
resolution (size) of the movie clip.
5. Click to start record the live images and click again to stop recording. You can
also take a snap shot during recording by clicking the button. The movie clip and
snap shot created will appear on the right panel and it will be saved to the album you
created.
Page 24
24
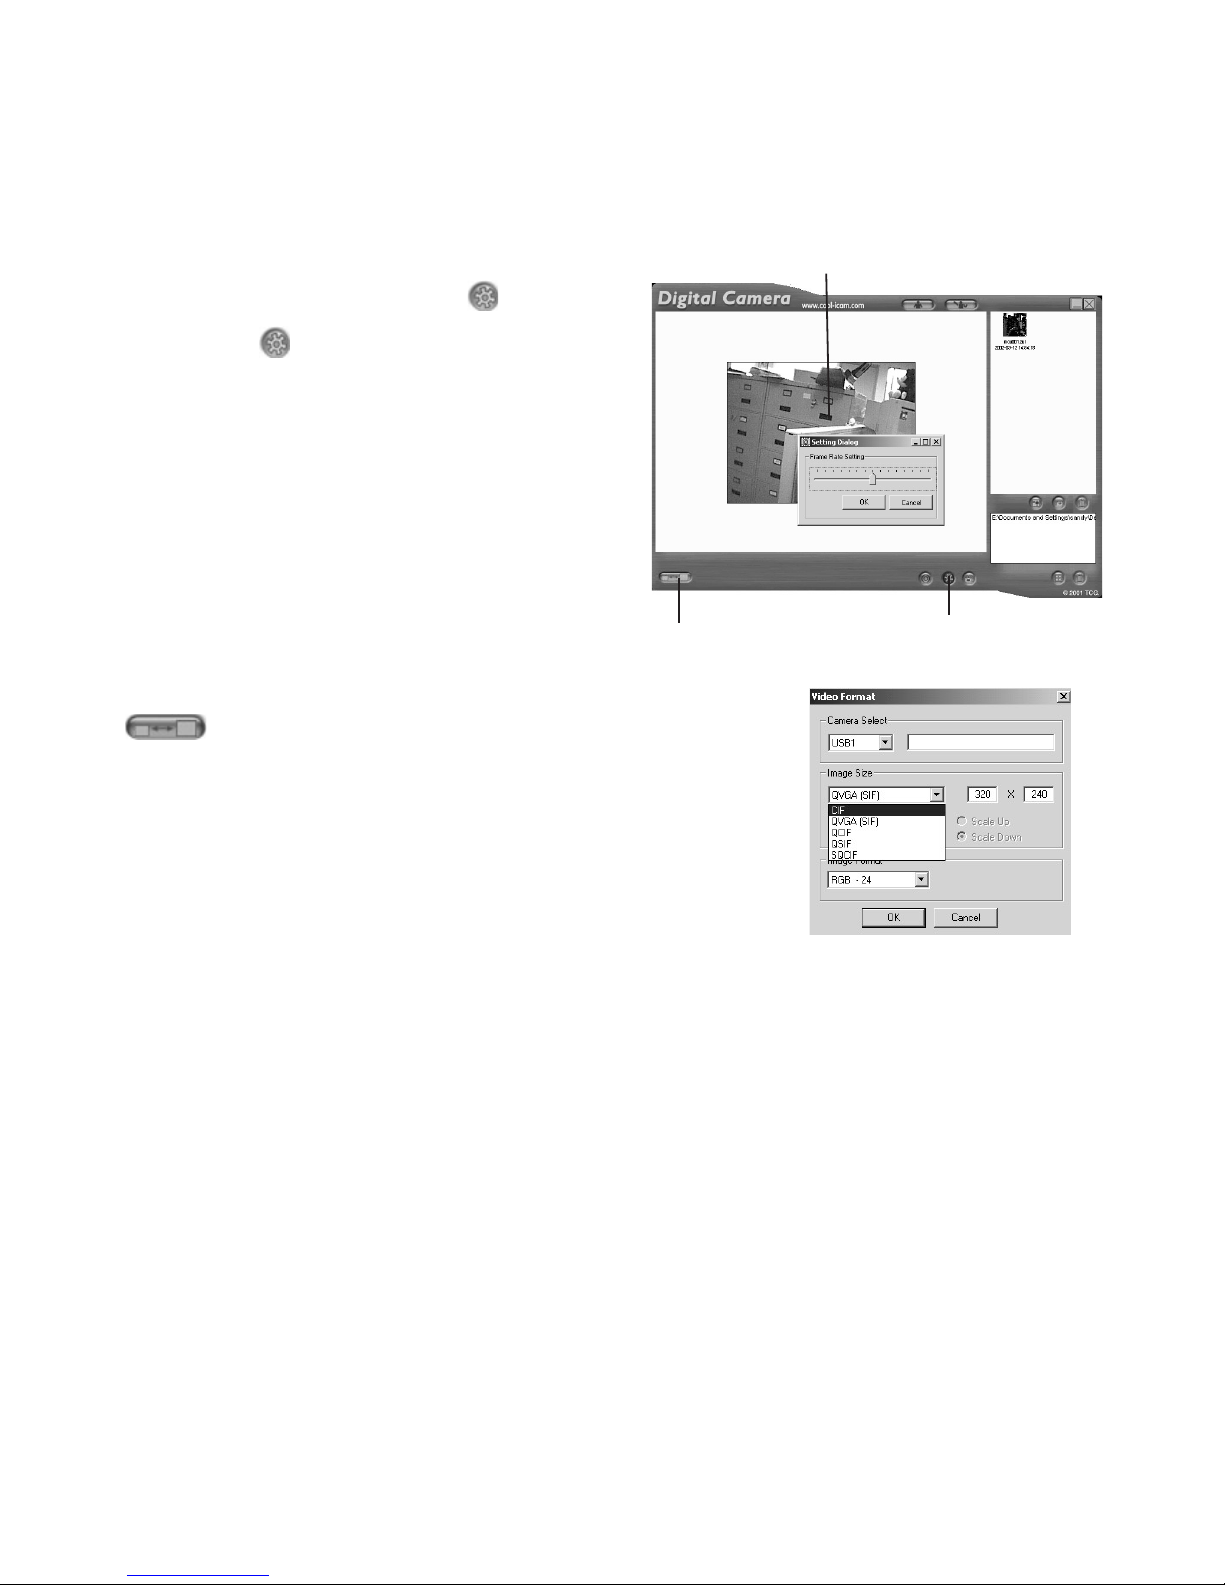
To adjust frame rate:
You can adjust the frame rate (number of frame
per second) by pressing the
Frame Rate
Button.
1. Click the
button.
2. Enter the frame rate you want for your movie
clip.
For example:-
• 80 frames at 10 frames per second = 8 sec.
movie clip
• 80 frames at 5 frames per second = 16 sec.
movie clip
Adjust the frame rate
Adjust resolution
Enter the number of seconds you want for
the video clip to run at. (frames per second)
To adjust resolution:
You can adjust resolution for the movie clip by pressing the
Adjust Resolution Button.
Page 25
25
For Macintosh® Users:
MAC
10.6 Uploading Images and Video Clips
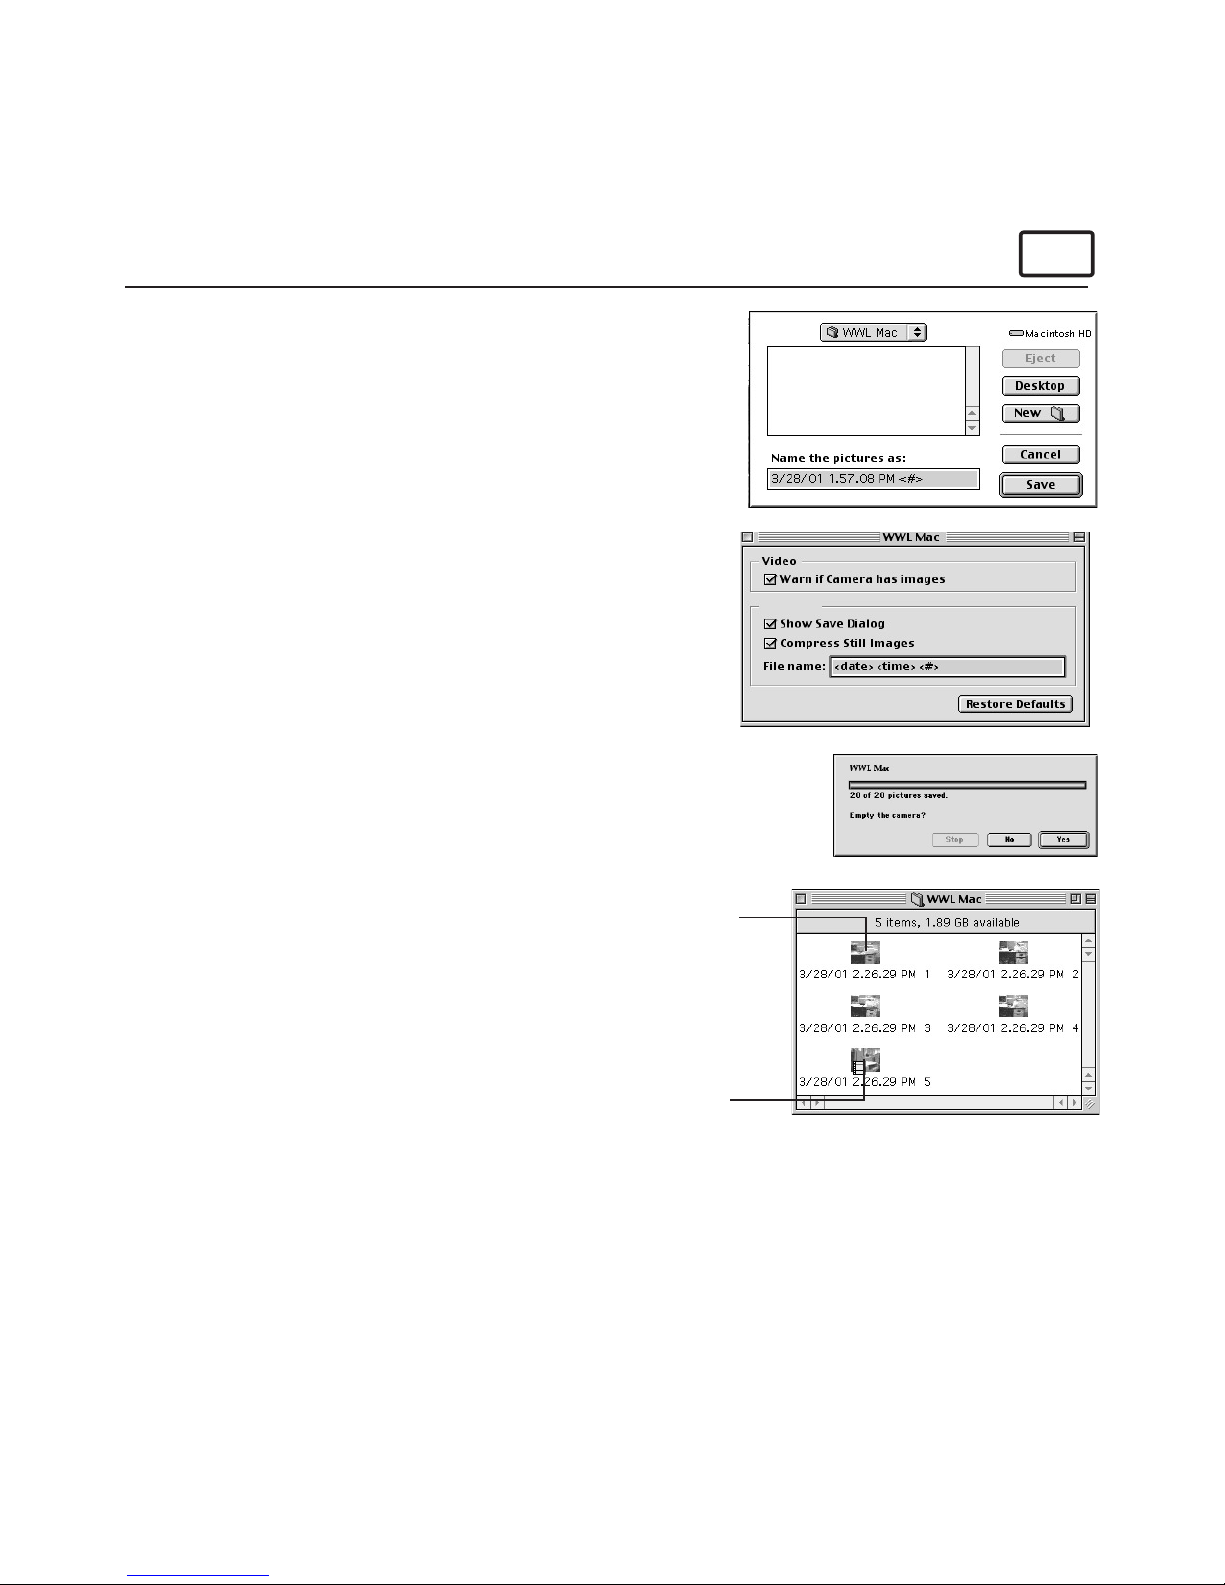
1. Connect your Storm C@m to your Mac via USB
cable.
2. A window will pop up and ask you to name the
pictures (images). File name format is default
as <Date> <Time> <No. of image>. You can
change the name by going to double clicking the
“STV0680 Camera” or “WWL Mac” icon in the
Control Panel.
3. Click “Save”
4. Your Mac will ask you if you want to empty your
Storm C@m.
• If you click “Yes”, images stored in your Storm
C@m will be deleted.
• If you click “No”, images stored in your Storm
C@m will be retained.
5. Individual images and video clips will be uploaded
to your “STV0680 Camera Snapshots” or “WWL
Mac Snapshots” folder.
Uploaded images
Uploaded movie clip
Page 26
26
11. How to Use Other Software
For Windows® Users:
PC
Alternatively you can upload your images directly from your Storm C@m into Adobe®
ActiveShare 1.5. Images can also be retrieved previously saved in your computer les.
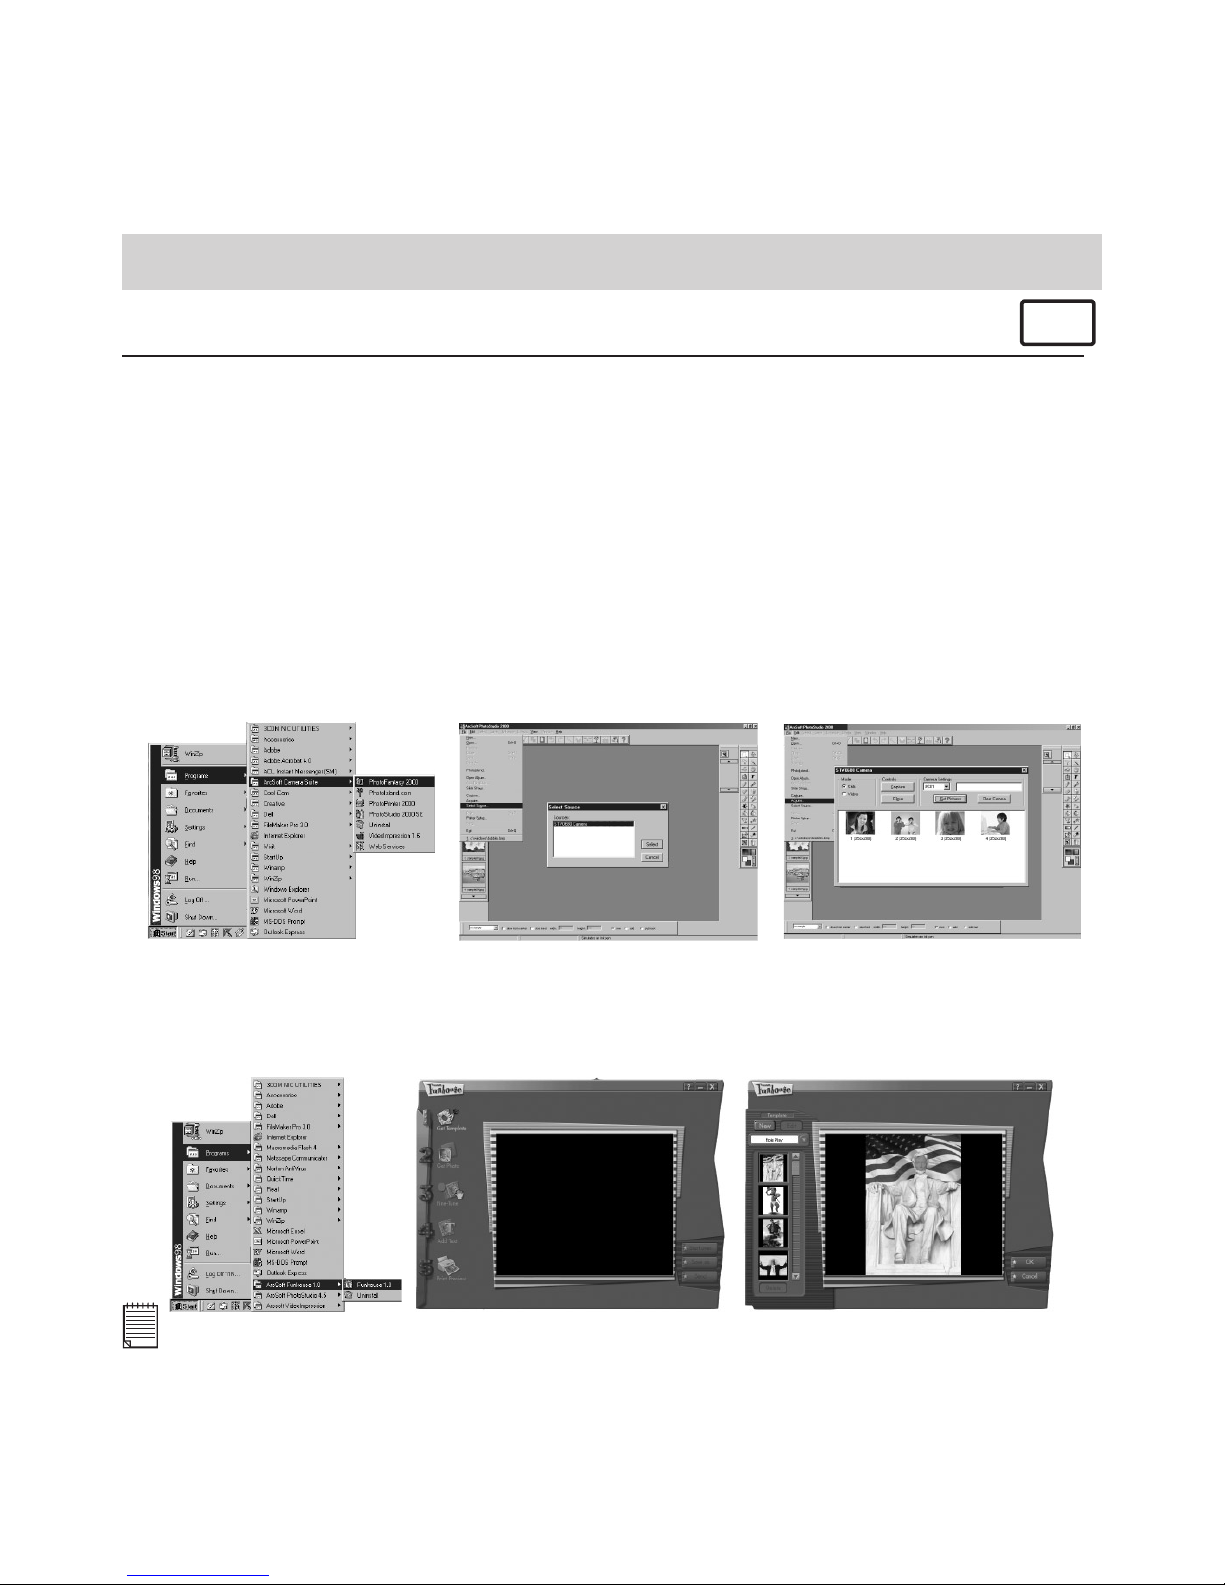
11.1 How to use PhotoStudio® 2000
1. Select the “PhotoStudio® 2000” icon from the “ArcSoft Camera Suite” program group
on the Windows® Start Menu.
You can now start to download your stored images from your Storm C@m by the
following steps:
2. Go to “File” and select “Select Source”. Select “STV0680 Camera” as source.
3. Go to “File” and select “Acquire”. The capture interface will show up. To capture
image(s), highlight the wanted image(s) and click “Capture”.
4. For further help on how to use PhotoStudio® 2000, go to “Help” to access the Help Topics.
Visit http://www.arcsoft.com for all your FAQ’s, tips and technical support. See Section
13 for more details.
11.2 How to use ArcSoft Funhouse™ 1.0
1. Click Start > Programs > ArcSoft Funhouse 1.0 > Funhouse 1.0.
2. Click “1. Get Template” to select the template in the different type of category and then
click “OK” to conrm.
Important! Make sure the “Digital Camera” CD-ROM is in the CD-ROM Drive.
Page 27
27
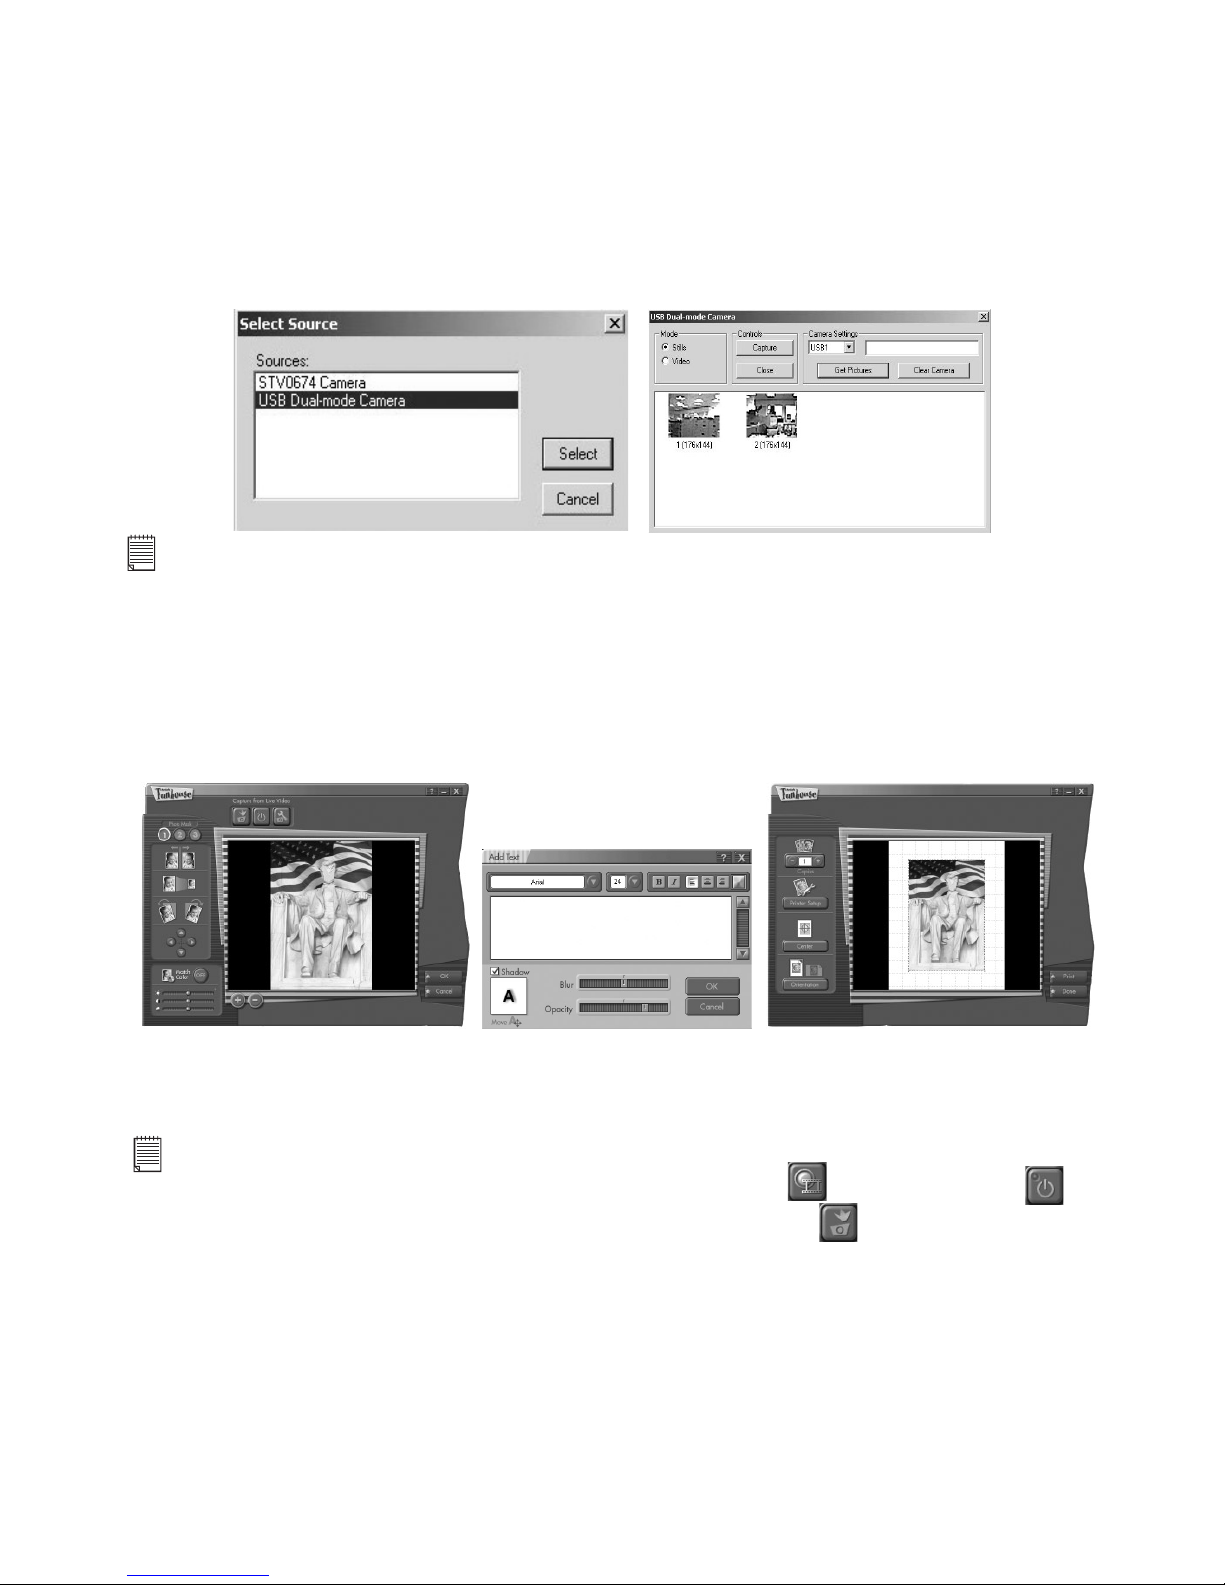
Using the images stored in your Digital Camera:-
3. Double click on “2. Get Photo” and click “Acquire”. Select “USB Dual-mode Camera” as
the source. The capture interface will show up.
Important! Make sure your Digital Camera is connected to your computer.
4. The image(s) stored in your Digital Camera will be shown in the window. To capture
image(s), highlight the wanted image(s) and click “Capture”.
5. The selected image will shown within the “mask” on the selected template. You can
play with the image by clicking on “3. Fine-Tune” to resize, rotate or reposition the
images by reposition the image using your mouse and dragging the image. Press “OK”
to conrm.
6. Click “4. Add Text”. Type in the text your want to write and then press “OK” to conrm.
7. Click “5. Print Preview” to print a hardcopy.
Using live images:-
8. You can also capture a live shot when your Digital Camera is connected to your PC by
the following steps:
9. Go to “1. Get Template” to select the template and then press “OK” to conrm.
Important! Make sure the “Digital Camera” CD-ROM is in the CD-ROM Drive.
10. Go to “2. Get Photo” and then click the “Live Video Mode” icon and the “Live” icon will
ash to indicate that it is in live mode. Click the “Capture” icon to take a live snapshot.
Press “OK” to conrm.
11. For further help on how to use ArcSoft Funhouse™ 1.0, go to “Help” to access the Help
Topics.
Visit http://www.arcsoft.com for all your FAQ’s, tips and technical support. See Section 13 for
more details.
Page 28
28
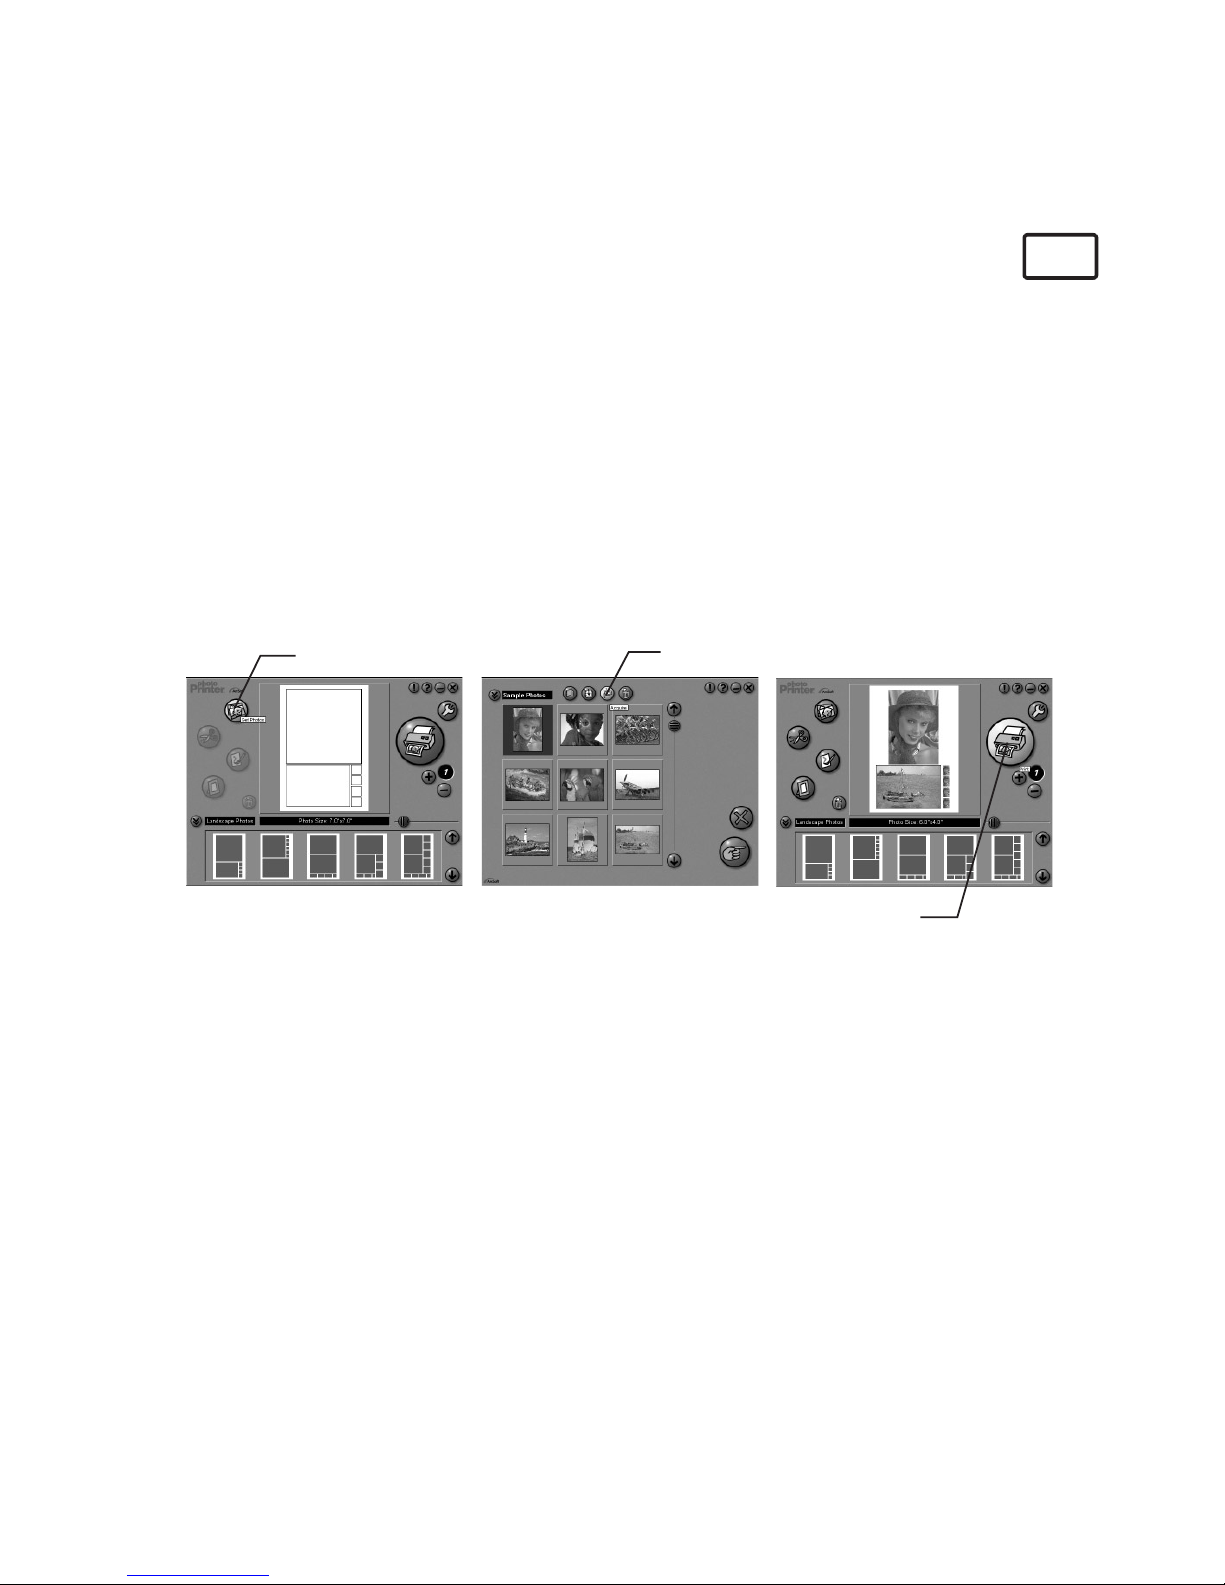
11.3 How to use ArcSoft PhotoPrinter® 2000
PC
1. Select the “PhotoPrinter® 2000” icon from the “ArcSoft Camera Suite” program group
on the Windows® Start Menu.
2. Choose the “Page Layout”. The selected page layout will on shown.
3. Click “Get Photo” and then “Acquire”. Select “STV0680 Camera” as source. The capture
interface will show up. To capture 1 image, select the wanted image and click “Cap
ture”.
4. The captured images will be shown on the photo library panel. Select the image you
want and click “OK”.
5. The selected image will be shown on the chosen template. Click “Print” when nish
placing the images.
6. For further help on how to use ArcSoft PhotoPrinter® 2000, click the “?” on the top right
hand corner to access the Help Topics.
Visit http://www.arcsoft.com for all your FAQ’s, tips and technical support. See Section
13 for more details.
Get Photo
Acquire
Print
Page 29
29
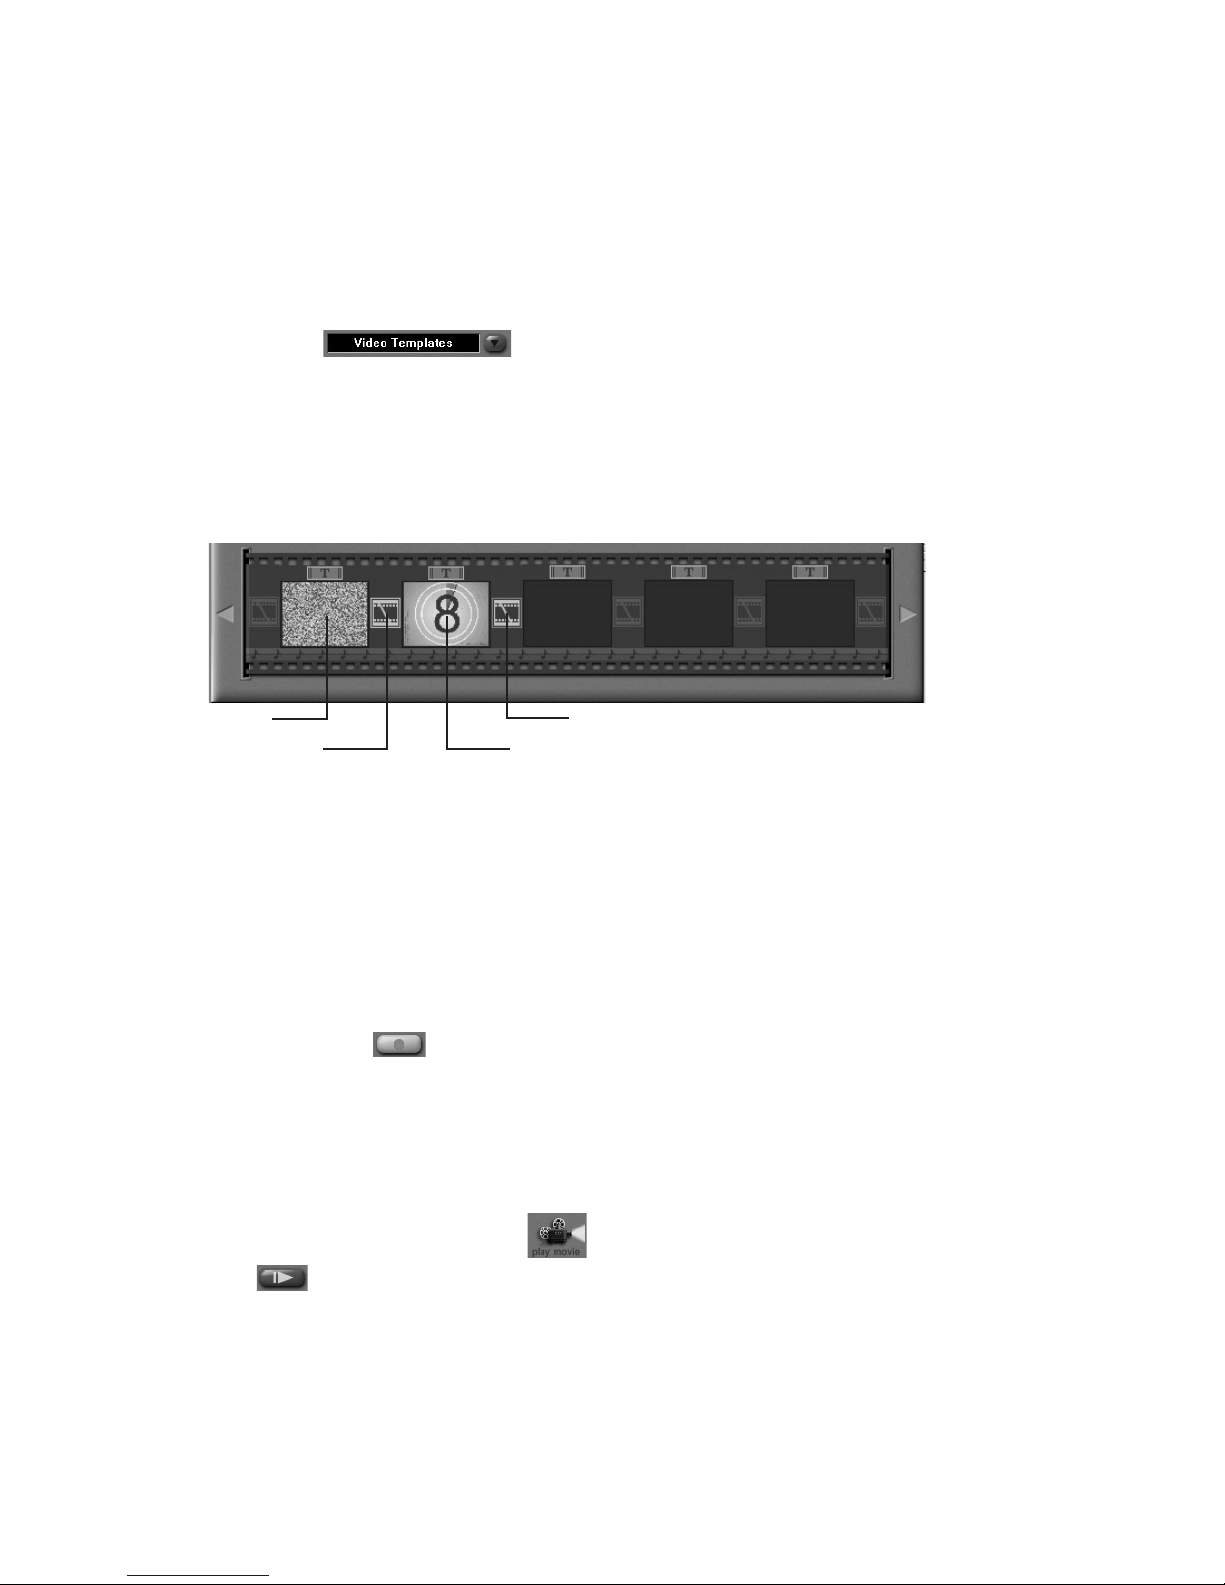
11.4 How to use ArcSoft VideoImpression™ 1.6
Lets make a video!
Follow these basic steps to make your rst video.
Step 1 Click on new Icon.
Step 2 Using the selector button select video templates.
Step 3 Double click on the Static.avi screen in the video template selection and a copy
will appear in the rst large frame on the storyboard on the bottom.
Step 4 Double click on the small frame directly right of the large frame. A new template
will appear at the top called “special effects” Double click on the “1. Fire” special
effect which will now drop into the special effect frame you highlighted.
Step 5 Double click on the next right large frame and repeat step 3 using a video template
and double click template 5. Countdown.avi. Repeat step 4.
1. Fire
1. Fire Countdown.avi
Static.avi
Storyboard
Adding an existing video.
Step 6 To add a video you have already made double click on the next large frame in the
story board to the right. Click on the “Get” icon and select a video you had made
and led in the folder called “album” click on Get, with the selector click on the
down arrow and select desktop and then double click on “Album” folder and select
a le ending with mov (video le) the video will appear in the video templates.
Double click on the video and it will appear just like other video templates in the
storyboard. Now go to step 10.
Alternatively you can produce a live video.
Ensure your Storm C@m is connected to the computer via the USB cable. Click on
the capture icon.
Step 7 And press the record icon. Wait for the video link to go live and now you’re
recording, press the ESC key on your keyboard to end the video.
Step 8 Press the “Save” icon and name your le, and then press “save”. Video impression
will ask you where you want to place your video. Select “video template”.
Step 9 Select the “album” icon and your video clip you have just produced will appear
in the video templates. Double click on your video, your video will now drop into
the storyboard.
Running the video.
Step 10 Select the “play movie” icon which will assemble your video together. Press
the play icon to watch your completed video. Watch to see how the special
effects merge between the frames on the story board. Now you try to make your
own and also try the audio template.
Page 30
30
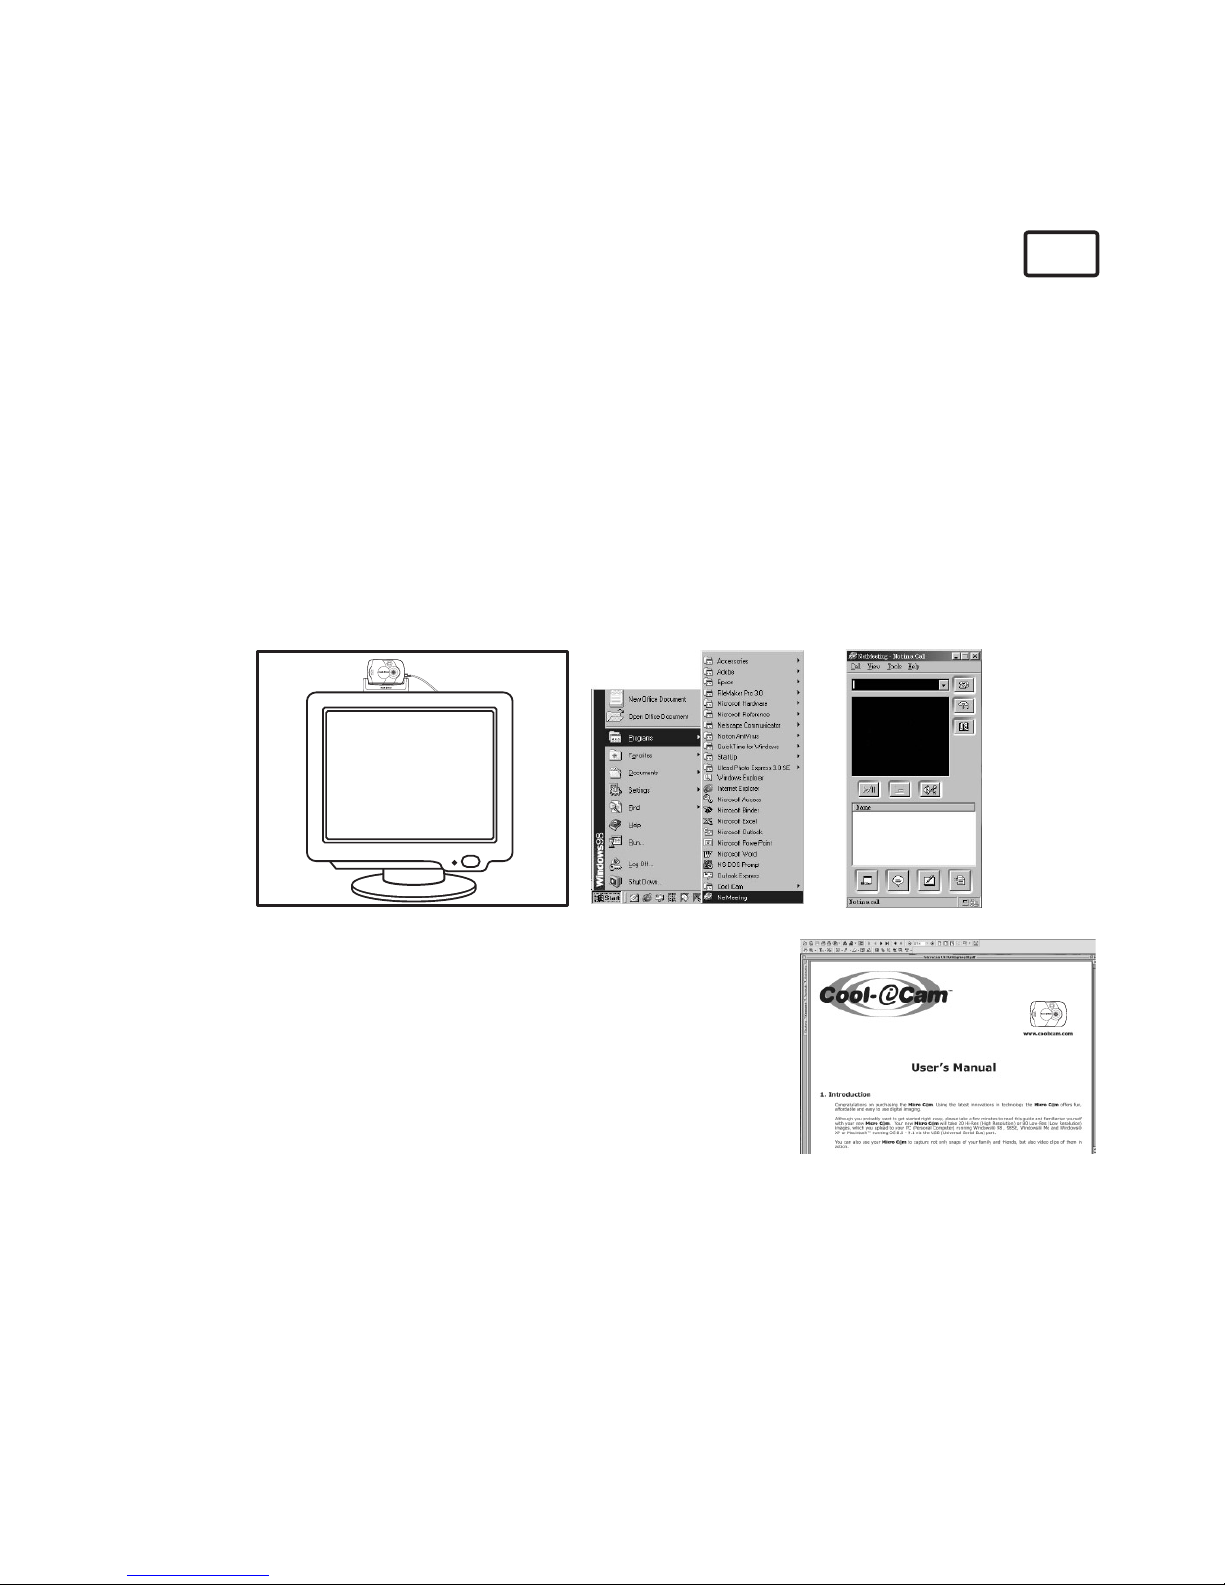
11.5 How to use Microsoft® NetMeeting™
PC
1. Connect your Storm C@m to the USB cable on one end.
2. Connect your USB cable to an available USB port on your PC on the other end.
3. Put your Storm C@m on top of your PC monitor or another at surface.
4. Connect your microphone (not included) to your audio card’s external microphone
connector.
5. Double click the “NetMeeting” icon on the desktop or select the “NetMeeting” icon from
the Windows Start Menu.
6. Type in the IP address, computer name or telephone number for the person you want
to call and press the “Place Call” button.
To nd your own IP address, go to “Start” and click “Run”. Type in “winipcfg” and click
“OK”, IP conguration window will appear and you can see your IP address.
7. If you need further help on how to use Microsoft® NetMeeting™, select the “Help” under
the manual bar and choose the topic you need. Or you can visit the following website:
http://www.microsoft.com/windows/netmeeting
STORMCAM
11.6 How to use Adobe® Acrobat® Reader
Adobe® Acrobat® Reader enables you to view document in
.pdf format.
For more details go to www.adobe.com/acrobat.
STORMCAM
Page 31
31
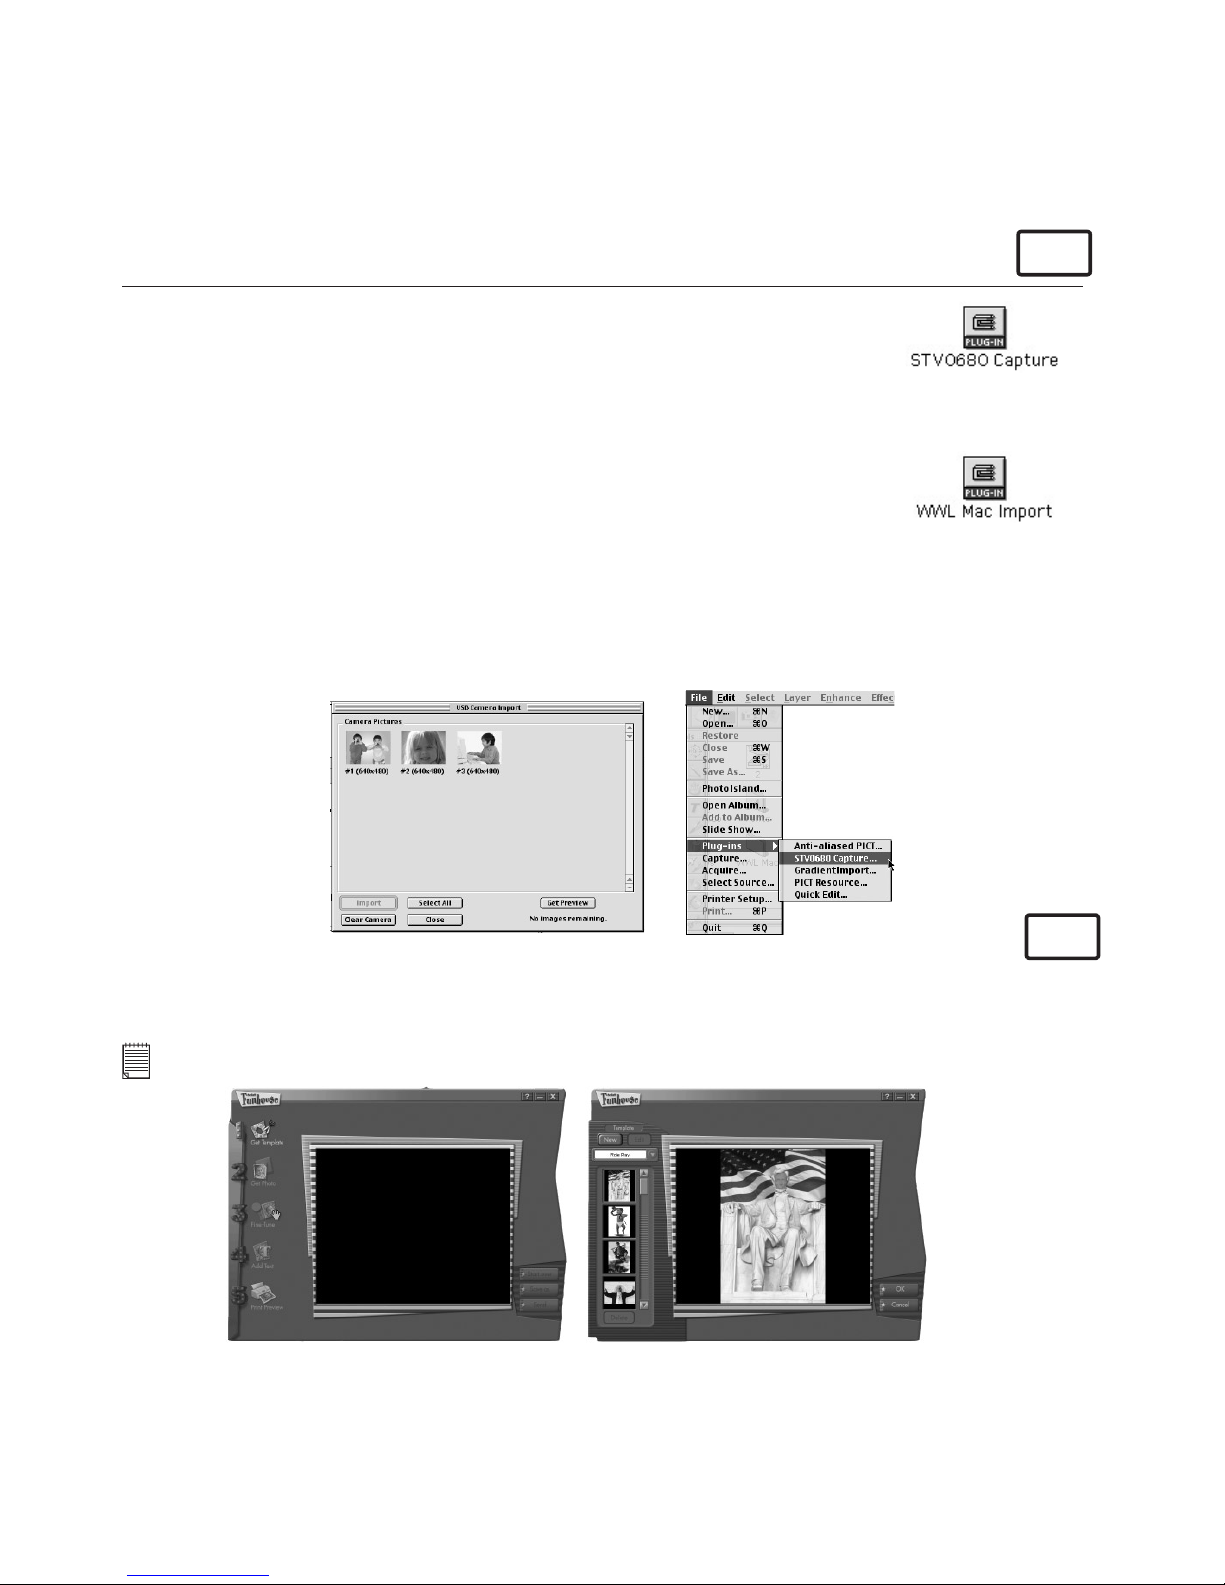
11.7 How to use PhotoStudio® 2000
For Macintosh® Users
MAC
1. Before you use PhotoStudio® 2000, make sure the “STV0680
Capture”/”WWL Mac Import” is placed in the Plug-ins folder in
the PhotoStudio folder.
2. Double click the “PhotoStudio®” icon from the PhotoStudio®.
You can now start to download your stored images from your
Storm C@m by the following steps:
3. Go to “File” and then select “STV0680 Capture”/”USB Camera
Import”. The capture interface will show up.
• To capture 1 image, select the wanted image and click
“Import”. Click “Close” to leave the capture interface.
• To capture all images, click “Select All” and then click “Import”.
Click “Close” to leave the capture interface.
You can now edit your image(s) with PhotoStudio’s features.
4. For further help on how to use PhotoStudio® 2000, go to “Help” to access the Help Topics.
Visit http://www.arcsoft.com for all your FAQ’s, tips and technical support. See Section
13 for more details.
MAC
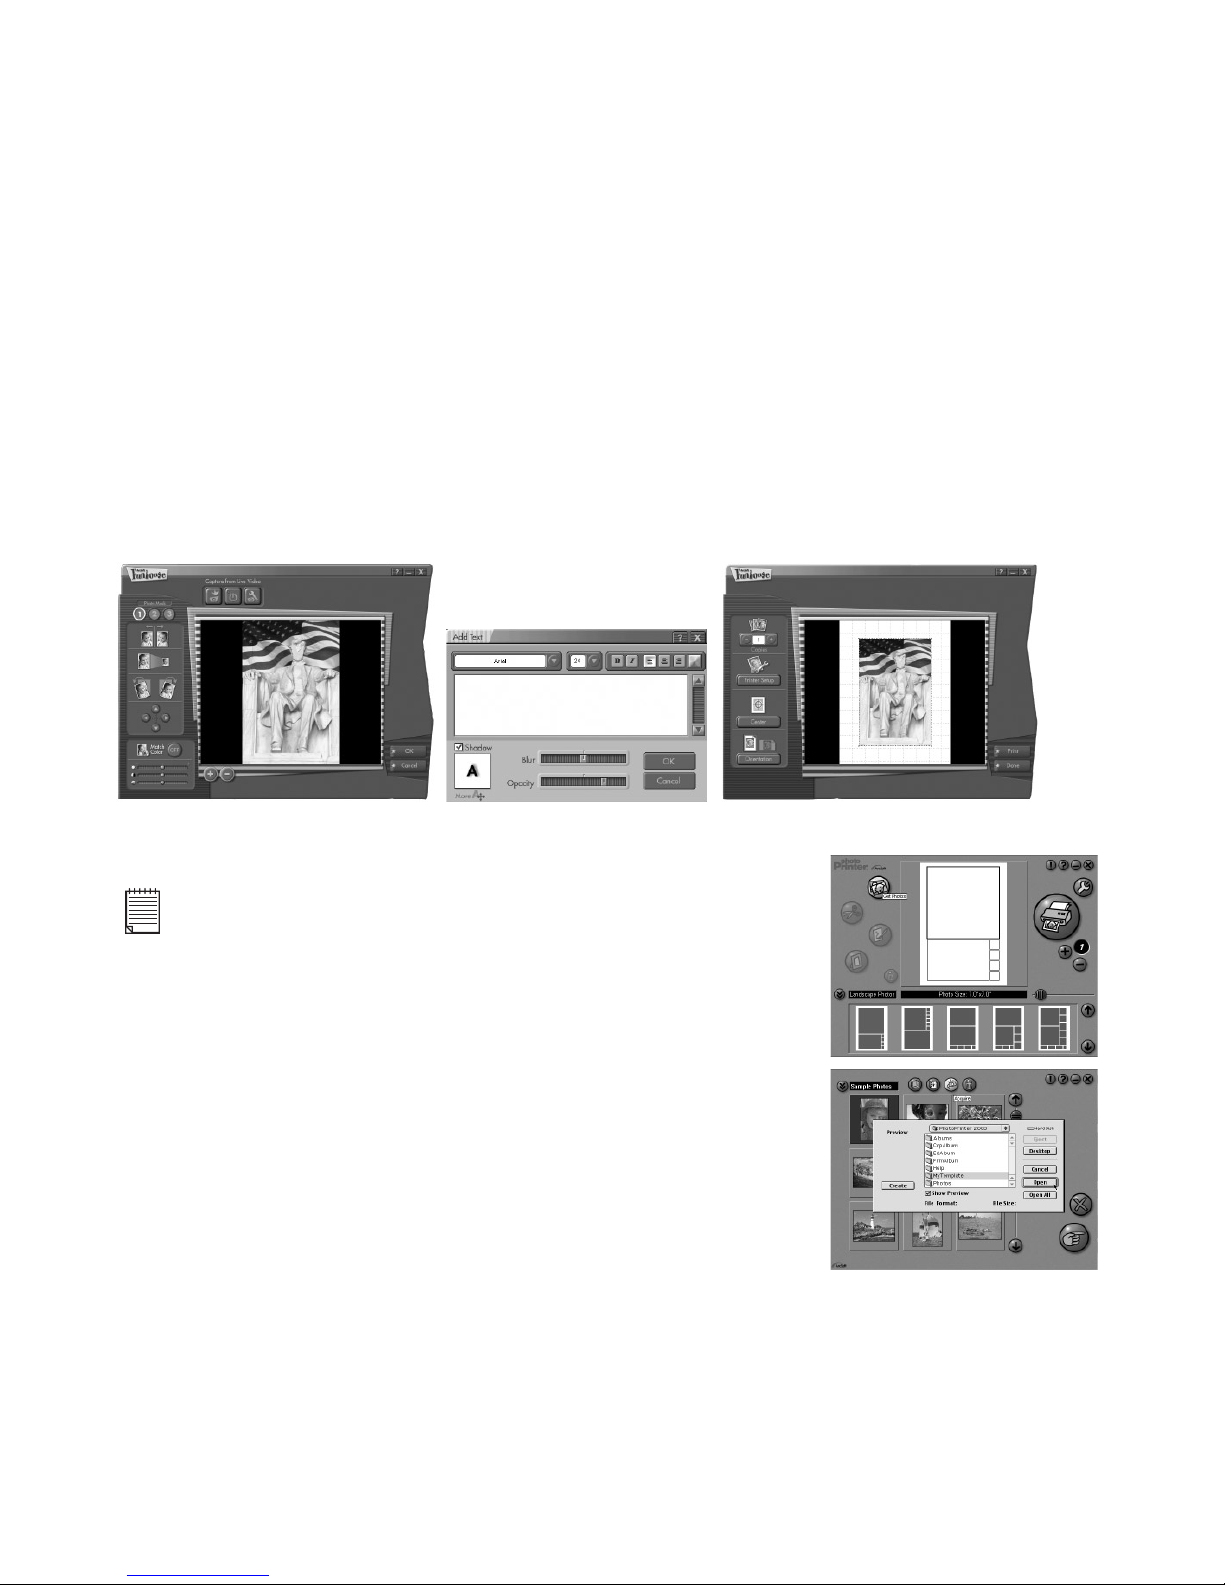
11.8 How to use ArcSoft Funhouse™ 1.0
1. Double click the “Funhouse 1.0” icon from the Funhouse™.
2. Click “1. Get Template” to select the template from the category and then click “OK” to
conrm.
Important! Make sure the “Digital Camera” CD-ROM is in the CD-ROM Drive.
Import le with
enhancement
Import le without
enhancement
Page 32
32
Using the images stored in your Digital Camera:-
3. Double click on “2. Get Photo” and click “Acquire”. Select “STV0680 Capture”/”WWL
Mac Import” as the source. The capture interface will show up.
4. The image(s) stored in your Digital Camera will be shown in the window. To capture
image(s), highlight the wanted image(s) and click “Capture”.
5. The selected image will shown within the “mask” on the selected template. You can
play with the image by clicking on “3. Fine-Tune” to resize, rotate or reposition the
images by reposition the image using your mouse and dragging the image. Press “OK”
to conrm.
6. Click “4. Add Text”. Type in the text your want to write and then press “OK” to
conrm.
7. Click “5. Print Preview” to print a hardcopy.
11.9 How to use ArcSoft PhotoPrinter® 2000
1. Double click the “PhotoPrinter” icon from the PhotoPrinter.
Important! Make sure the “Digital Camera” CD-ROM is in the
CD-ROM Drive.
2. Choose the “Page Layout”. The selected page layout will on
shown on the right panel.
3. Click “Get Photo” and then “add photo”. Find the image you
want which you have already saved in your hard disk and
click “Open”.
4. The selected images will be shown on the photo library
panel. Select the image you want and click “OK”.
5. The selected image will be shown on the chosen template.
Click “Print” when nish placing the images.
6. For further help on how to use ArcSoft PhotoPrinter® 2000,
click the “?” on the top right hand corner to access the Help
Topics.
Visit http://www.arcsoft.com for all your FAQ’s, tips and
technical support. See Section 13 for more details.
Page 33
33
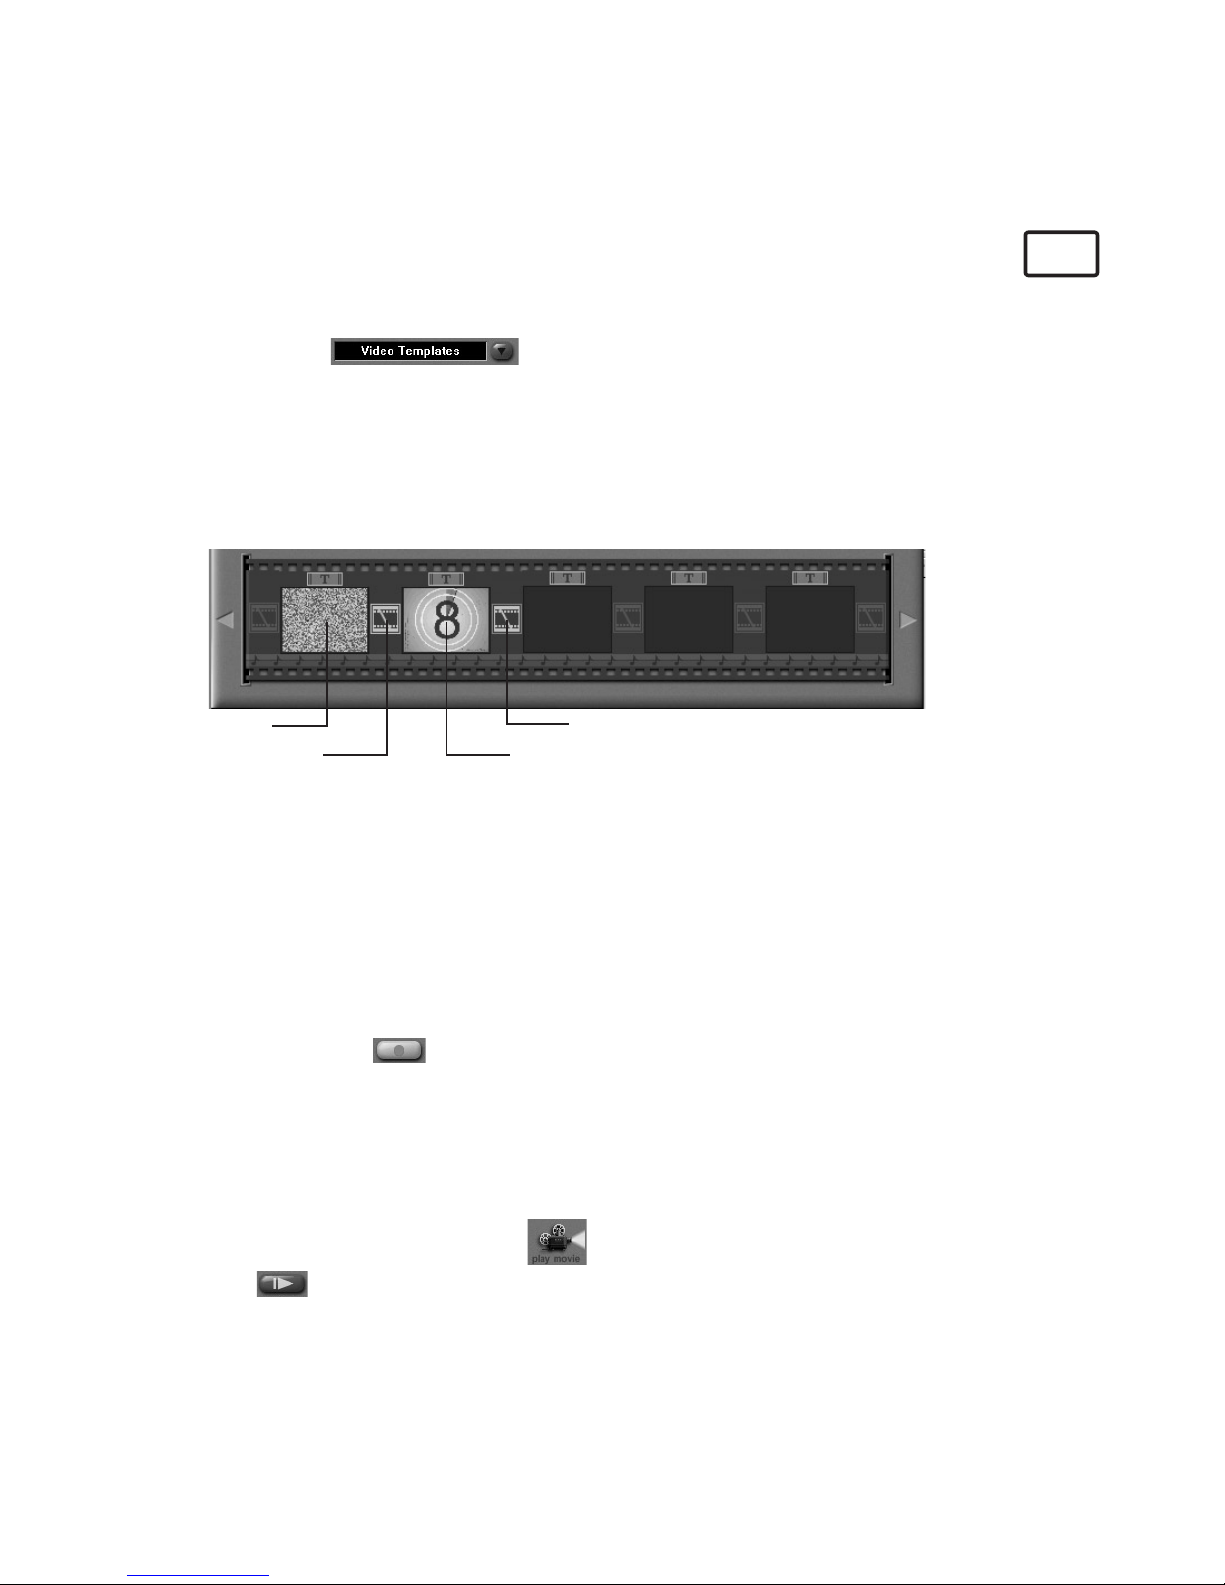
11.10 How to use ArcSoft VideoImpression™ 1.5
MAC
Lets make a video!
Follow these basic steps to make your rst video.
Step 1 Click on new Icon.
Step 2 Using the selector button select video templates.
Step 3 Double click on the Static.avi screen in the video template selection and a copy
will appear in the rst large frame on the storyboard on the bottom.
Step 4 Double click on the small frame directly right of the large frame. A new template
will appear at the top called “special effects” Double click on the “1. Fire” special
effect which will now drop into the special effect frame you highlighted.
Step 5 Double click on the next right large frame and repeat step 3 using a video template
and double click template 5. Countdown.avi. Repeat step 4.
1. Fire
1. Fire Countdown.avi
Static.avi
Storyboard
Adding an existing video.
Step 6 To add a video you have already made double click on the next large frame in the
story board to the right. Click on the “Get” icon and select a video you had made
and led in the folder called “album” click on Get, with the selector click on the
down arrow and select desktop and then double click on “Album” folder and select
a le ending with mov (video le) the video will appear in the video templates.
Double click on the video and it will appear just like other video templates in the
storyboard. Now go to step 10.
Alternatively you can produce a live video.
Ensure your Storm C@m is connected to the computer via the USB cable. Click on
the capture icon.
Step 7 And press the record icon. Wait for the video link to go live and now you’re
recording, press the ESC key on your keyboard to end the video.
Step 8 Press the “Save” icon and name your le, and then press “save”. Video impression
will ask you where you want to place your video. Select “video template”.
Step 9 Select the “album” icon and your video clip you have just produced will appear in
the video templates. Double click on your video, your video will now drop into the
storyboard.
Running the video.
Step 10 Select the “play movie” icon which will assemble your video together. Press
the play icon to watch your completed video. Watch to see how the special
effects merge between the frames on the story board. Now you try to make your
own and also try the audio template.
Page 34
34
11.11 How to use CU-SeeMe™
MAC
Warning! Using CU-SeeMe™ will erase all images stored in your Storm C@m. Make sure you upload
all wanted images before using CU-SeeMe™.
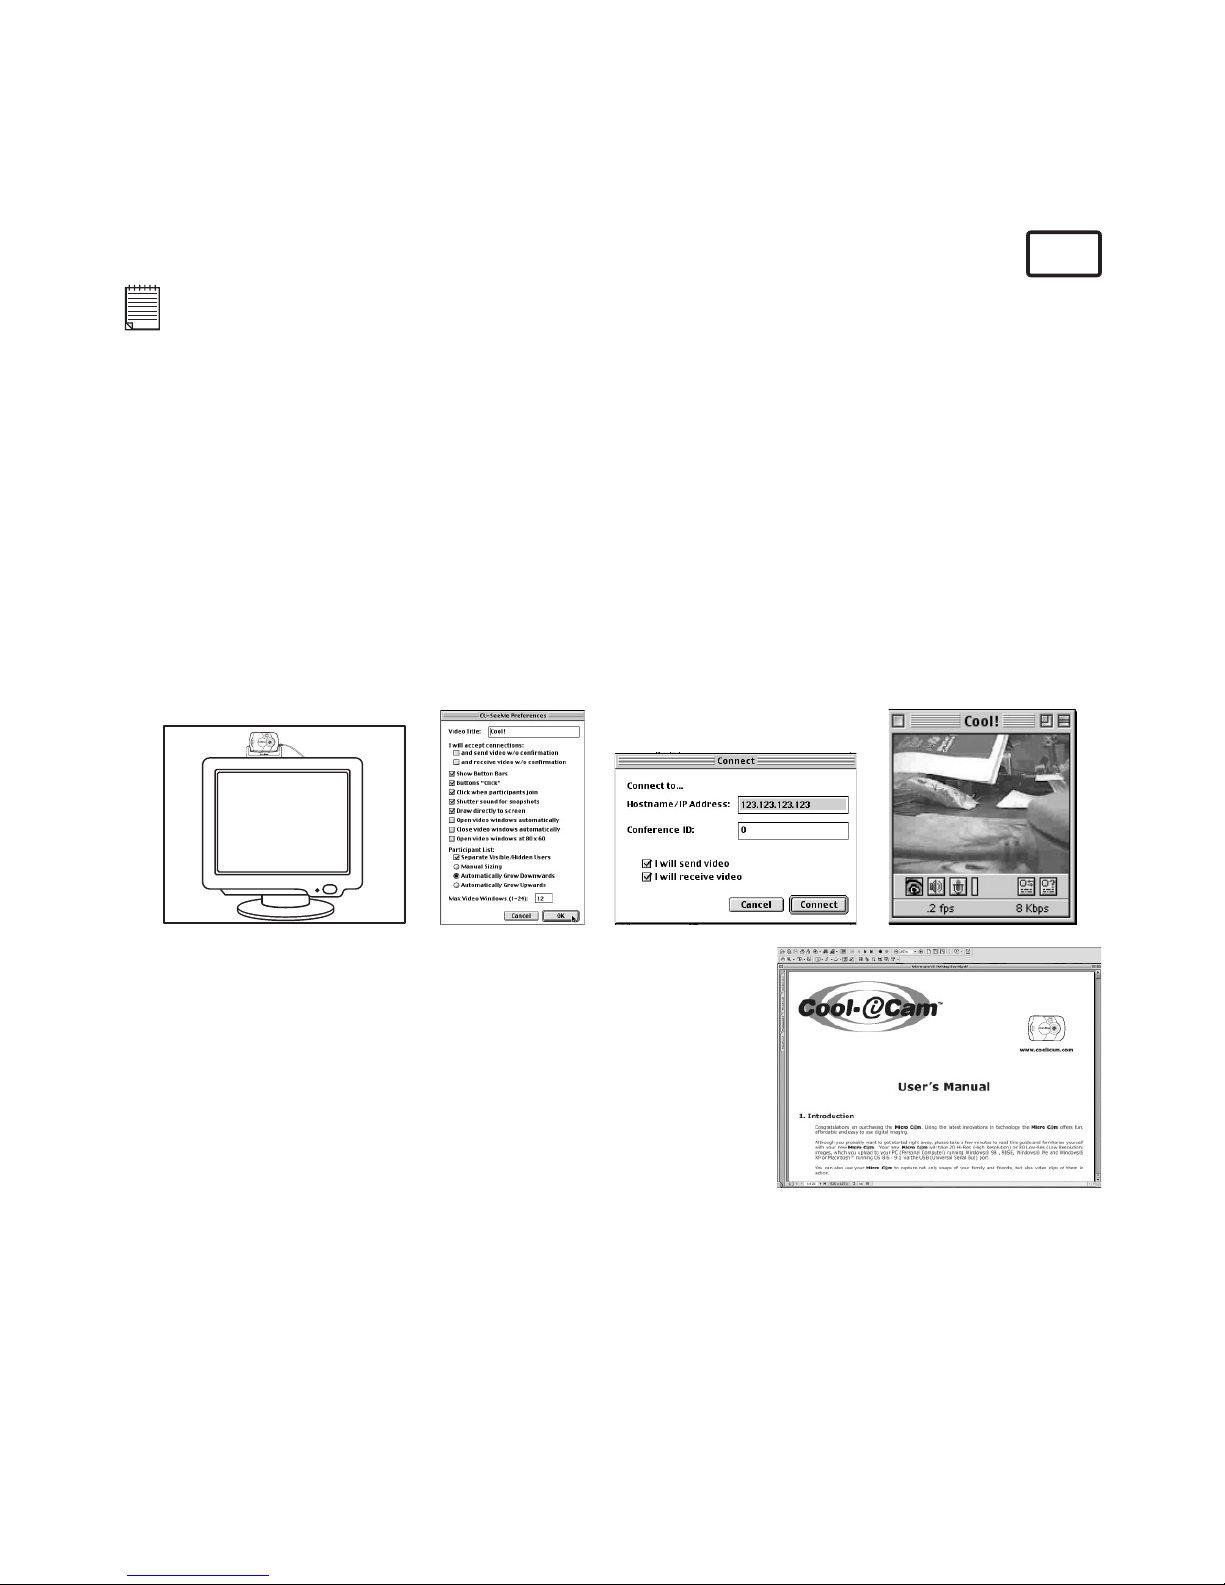
1. Connect your Storm C@m to the USB cable on one end.
2. Connect your USB cable to an available USB port on your Mac on the other end.
3. Put your Storm C@m next to your Mac monitor or another at surface.
4. Connect your microphone (not included) to your audio card’s external microphone
connector.
5. Double click the “CU-SeeMe™” icon from the CU-SeeMe™ folder.
6. Go to “Edit” and then “Preference”. Edit your settings, e.g. video title, connection
settings, etc.
7. Go to “Conference” and click “Connect”. Type in the Hostname and IP address for the
person you want to call and press “Connect”.
8. To nd your own IP address, go to “Control Panel” and then “File Sharing”. You will be
able to see your IP address under the “Start/Stop” partition.
9. For further help on how to use CU-SeeMe™, you can visit the following website:
http://www.cuseeme.com
STORMCAM
11.12 How to use Adobe® Acrobat® Reader
Adobe® Acrobat® Reader enables you to view document
in.pdf format.
For more details go to www.adobe.com/acrobat.
STORMCAM
Page 35

35
12. Customer Support
13. ArcSoft WorldWide Customer Support
For Japan For North America
ArcSoft Japan Support Center (Tokyo) ArcSoft HQ Support Center
Tel: +81-03-3834-5256 (Fremont California, CA)
Fax: +81-03-5816-4730 Tel: 1-800-762-8657 (toll free number)
Web: http://www.mds2000.co.jp/arcsoft Fax: 1-510-440-1270
E-mail: [email protected] and E-mail: [email protected]
[email protected]
For China For North America
ArcSoft China Support Center (Beijing) ArcSoft HQ Support Center
Tel: 8610-6849-1368 (Fremont California, CA)
Fax: 8610-6849-1367 Tel: 1-800-762-8657 (toll free number)
E-mail: [email protected] Fax: 1-510-440-1270
E-mail: [email protected]
For Oceania For Europe/Middle East/Africa & Rest
ArcSoft Australian Support Center of the World
(Baulkham Hills, New South Wales) ArcSoft Europe Support Center (Ireland)
Tel: 61 (2) 9899-5888 Tel: +353-(0) 61-702087
Fax: 61 (2) 9899-5728 Fax: +353-(0) 61-702001
E-mail: [email protected] E-mail: [email protected]
Visit www.arcsoft.com or go to Start -> Programs -> ArcSoft Camera Suite -> Web
Services for tips, technical support and frequently asked questions (FAQ’s).
Page 36
36
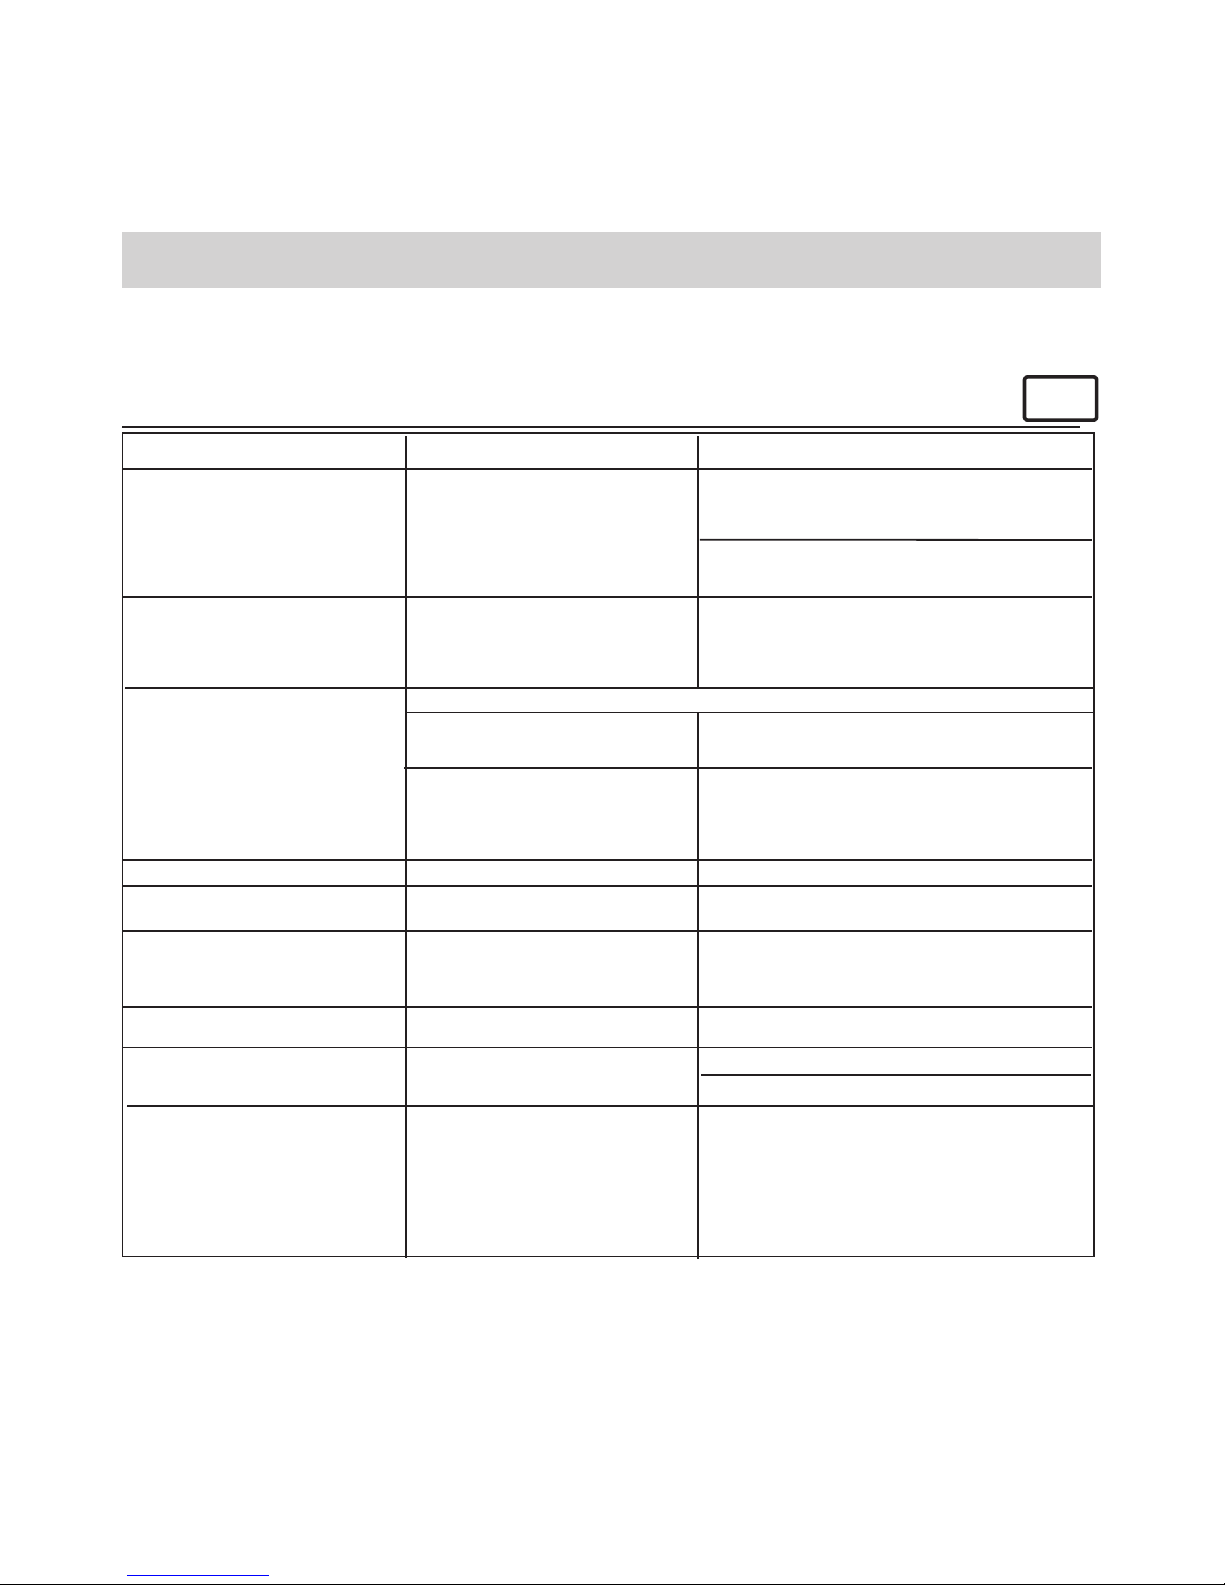
14. Troubleshooting
The troubleshooting guide is designed to help you. If problems continue, please contact
your local customer support hot-line. See your registration card for helpline contact
details.
For Windows® Users:
PC
My CD Installation wizard does not
work.
Symptom
Problem
Solution
I receive an error message when I
am installing the Digital Camera
Manager.
Digital Camera Manager folder is
not found in the Programs menu
after I have installed the driver.
All the images I have taken do not
appear on the Storm C@m.
LCD display is ashing.
I cannot run the Digital Camera
Manager.
I hear a low “beep” when trying to
take an image.
Shut down all other applications and attempt to
re-install the driver, or download the updated driver
from www.cool-icam.com and install the updated
driver.
Check the USB controller in your BIOS if they are
activated. If these does not work contact your
national Customer Support representative.
Install the software, restart your PC, and nally,
connect the Storm C@m to the PC via the USB port,
then the software folder will appear in the Program
menu.
Upload all images to your PC as soon as possible.
(please refer to Battery Guidance section in User’s
Manual.)
If you need to change batteries, and retain the
images in your Storm C@m’s memory, ensure you
are connected to a PC which is turned on via the USB
cable, which will then draw power from the PC whilst
you insert fresh batteries.
Check all cables connections are secured.
Upload saved images immediately, then replace
battery.
Take your images in better light condition.
Check your lens cover is open.
If you have any other camera installed on your
computer, remove the camera and it’s driver
completely from your system to avoid conict with
another camera or capture device.
Digital Camera Manager does not
load.
You have lost power to your Storm C@m by either:
The installer for the Digital Camera
Manager requires the Storm C@m
be connected to the PC (via the USB)
after the software has been installed
& the PC restarted.
Insufcient battery power
Battery power is too low to continue
taking images.
Connection failure
Removing the battery without being
connected to your PC (turned on) via
the USB cable.
Conict with another camera driver
capture device.
Insufcient light.
The auto installation le is switched to
off.
or
The CD ROM is disconnected.
Make sure you slide the lens cover to the desired
position.
Lost corner of images.Black corner appears on the images
taken.
Go to the computer desktop. Right click on “My
Computer”. Click “Properties”. Select “Device
Manager”. Double click on “CD-ROM”, double click on
“CD-R” (normally the manufacturer’s name). Click
on “Settings”. Ensure “Auto insert notication” is
ticked and the “disconnect” is ticked. If you change
the settings the computer will ask you to restart
your PC. Click “Yes”.
I cannot upload images to the PC
Please also refer to the help les & User Guides that accompany the enclosed applications.
For further information and support, please visit our website: http://www.cool-icam.com
Page 37

37
For Macintosh® Users:
MAC
Symptom
Problem
Solution
I receive an error message when I
am installing the Digital Camera
Manager.
“STV0680 Capture”/”WWL Mac
Import” plug-in le and sTV0680
Camera Snapshots”/”WWL Mac”
folder is not found in the Programs
menu after I have installed the
driver.
All the images I have taken do not
appear on the Storm C@m.
LCD display is ashing.
I cannot run the Digital Camera
Manager.
I hear a low “beep” when trying to
take an image.
Shut down all other applications and attempt to
re-install the driver, or download the updated driver
from www.cool-icam.com and install the updated
driver.
Install the software, restart your Mac, and nally,
connect the Storm C@m to the Mac via the USB
port, then the plug-in le and folder will appear in
the Hard disk.
Upload all images to your Mac as soon as possible.
(please refer to Battery Guidance section in User’s
Manual.)
If you need to change batteries, and retain the
images in your Storm C@m’s memory, ensure you
are connected to a Mac which is turned on via the
USB cable, which will then draw power from the Mac
whilst you insert fresh batteries.
Check all cables connections are secured.
Upload saved images immediately, then replace
battery.
Take your images in better light condition.
Check your lens cover is open.
If you have any other camera installed on your
computer, remove the camera and it’s driver
completely from your system to avoid conict with
another camera or capture device.
Digital Camera Manager does not
load.
You have lost power to your Storm C@m by either:
The installer for the Digital Camera
Manager requires the Storm C@m
be connected to the Mac (via the
USB) after the software has been
installed & the Mac restarted.
Insufcient battery power
Battery power is too low to continue
taking images.
Connection failure
Removing the battery without being
connected to your Mac (turned on)
via the USB cable.
Conict with another camera driver
capture device.
Insufcient light.
Make sure you slide the lens cover to the desired
position.
Lost corner of images.
Black corner appears on the images
taken.
I cannot upload images to the Mac
Please also refer to the help les & User Guides that accompany the enclosed applications.
For further information and support, please visit our website: http://www.cool-icam.com
Page 38
38
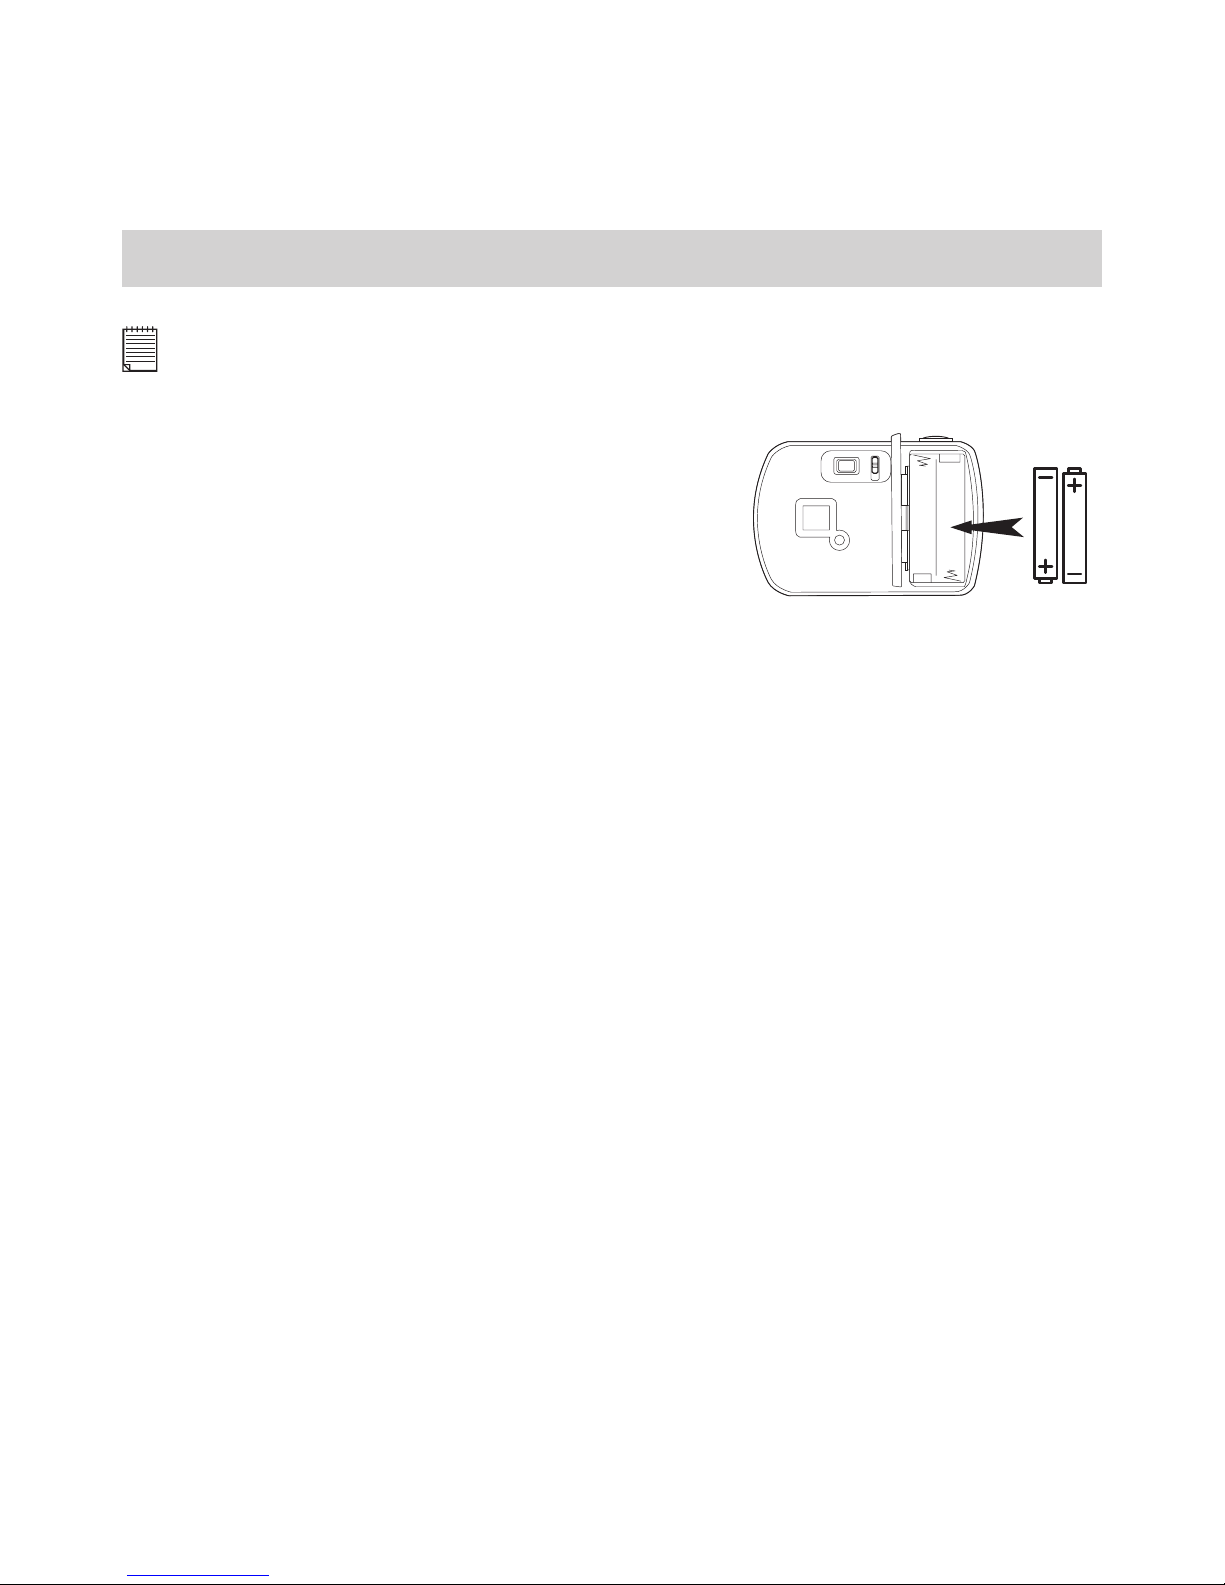
15. Battery Guidance
Important Note:
We strongly recommend that you do not use rechargeable batteries as this will affect the performance
of your Storm C@m.
WARNINGS!
M
• Batteries should be replaced by an adult.
• Non-rechargeable batteries are not to be recharged.
• Only batteries of the same or equivalent type as
recommended are to be used.
• Batteries are to be inserted with the correct polarity.
• Exhausted batteries are to be removed from the
camera.
• The supply terminals are not to be short-circuited.
• Do not mix alkaline, standard (carbon-zinc), or rechargeable (nickel-cadmium)
batteries.
• Do not dispose the batteries in re.
• Batteries are to be removed from the camera when not in use.
• Do not use rechargeable batteries.
• These instructions should be retained for future reference.
Page 39

39
16. Technical Specications
CIF Camera Version
VGA Camera Version
Memory
Image
Performance
for Video on
Web-cam
Still Image
Sto rabl e
Images
2 Mbyte SDRAM 8 Mbyte SDRAM
QCIF - 24 fps QVGA - 13 fps
High Resolution - 352 x 288 pixel
(Software enhanced to 640 x 480 pixel)
Low Resolution - 176 x 144 pixel
(Software enhanced to 352 x 288 pixel)
High Resolution - 640 x 480 pixel
(Software enhanced to 1.3 Megapixel for
PC only)
Low Resolution - 320 x 240 pixel
(Software enhanced to 640 x 480 pixel
for PC only)
High Resolution - 20 images
Low Resolution - 80 images
High Resolution - 24 images
Low Resolution - 99 images
• Video Clip: unlimited when connected to the computer via video capture software
• File Format: For Windows® Users (Still/Video Image - BMP/AVI format)
For Macintosh® Users (Still/Video Image - BMP or PICT/AVI or MOV
format)
• Interface: USB
• External Connector: USB
• Auto Power Off: after 30 seconds inactivity
• Power Supply: USB Port, 2 x AAA Batteries (included)
• Operating System: For Windows® Users: Microsoft® Windows® 98SE, Me, 2000 or XP
For Macintosh® Users: Mac® OS Version 8.6 ~ 9.2
This Storm C@m should only be operated within the following environmental conditions:
• 41-104º Fahrenheit; 5-40º Celsius
• 20% - 85% relative humidity, non-condensing
Camera Cautions
• Never immerse any part of the Storm C@m or its components into any uid or liquid.
• Disconnect the Storm C@m from your PC or Mac before cleaning it.
• Remove dust or stains with a soft cloth dampened with water or neutral detergent.
• Do not place hot items on the surface of the Storm C@m.
• Do not attempt to open or disassemble the Storm C@m. This will affect any warranty
claim.
Page 40

40
17. FCC Notice
This device complies with Part 15 of FCC Rules. Operation is subject to the following
two conditions: (1) This device may not cause harmful interference, and (2) This device
must accept any interference received, including interference that may cause undesired
operation.
Warning: Changes or modications to this unit not expressly approved by the party
responsible for compliance could void the user’s authority to operate the equipment.
NOTE: This equipment has been tested and found to comply with the limits for Class B
digital device, pursuant to Part 15 of the FCC Rules. These limits are designed to provide
reasonable protection against harmful interference in a residential installation. This
equipment generates, uses and can radiate radio frequency energy and, if not installed
and used in accordance with the instructions, may cause harmful interference to radio
communications.
However, there is no guarantee that interference will not occur in a particular installation.
If this equipment does cause harmful interference to radio or television reception, which
can be determined by turning the equipment off and on, the user is encouraged to try to
correct the interference by one or more of the following measures:
• Reorient or relocate the receiving antenna.
• Increase the separation between the equipment and receiver.
• Connect the equipment into an outlet on a circuit different from that to which the receiver
is needed.
• Consult the dealer or an experienced radio/TV technician for help.
Shielded cable must be used with this unit to ensure compliance with the Class B FCC
limits.
EN 0202
© 2002 TCG. Part no.: OM837168 R2
Printed in China
 Loading...