

Cool-Icam CIC-390, TV C@m User Manual
TM
User’s Manual
TV C@m


3
• Product Overview
1. Viewnder
2. LCD Screen
Back View
1
2
1. Shutter button
2. Feature change button
3. Feature button
4. Power on/off button
5. USB port
6. Lens
7. Viewnder
8. Battery door
2
1
3
4
8
7
6
5
1. Docking station connector door
2. Tripod mount socket
Bottom View
2
1
1. Digital Camera Connector
2. Floppy Diskette Slot
3. Eject Button
4. Power Supply Port
5. Video Out Port
6. Menu Display Button
7. Scroll (Left) Button
8. Select Button
9. Power LED
10. Scroll (Right) Button
1
DC IN 9V
TV OUT
9
10
7
6
8
2
3
5
4

4
Table of Contents
1 Getting Started ............................................................................................6
• What Can I do with my Camera? .................................................................6
• What can I do with my Digital Pictures?........................................................6
• Camera Package Contents ..........................................................................6
• Attaching the wrist strap ............................................................................7
• Installing the batteries ...............................................................................7
• Turning the Camera On and Off ...................................................................7
• Checking the battery level ..........................................................................8
• Automatic power off saves batteries.............................................................8
• Checking Camera Status ............................................................................8
2 Taking Pictures .............................................................................................9
• Taking a Picture ........................................................................................9
• Other Picture Taking settings.......................................................................9
• Setting the picture quality ..........................................................................9
• Setting the 2X digital zoom.........................................................................10
• Self Timer ................................................................................................10
• Re-formatting the camera...........................................................................10
3 Viewing your Pictures on your TV Screen .........................................................11
• TV C@m TV Docking Station .......................................................................11
• Connecting the Docking Station to the TV .....................................................11
• Docking the Camera ..................................................................................12
• Using the TV menu bar...............................................................................13
• Here’s how to view the pictures...................................................................14
• Basic functions..........................................................................................15
• Other important information displayed on the TV menu bar.............................16
4 Loading a Floppy Disk ...................................................................................17
• Loading a Floppy Disk ................................................................................17
• Removing a Floppy Disk from the docking station ..........................................17
• Transferring your images from disk to a computer..........................................17

5
5 Installing your Software onto a Computer(for computer users only) ................................18
• Install the software....................................................................................18
• Software included with your camera.............................................................18
• How to Install ArcSoft® Software
PC
MAC
.........................................20
• How to Install Microsoft® Netmeeting™
PC
..............................................20
• How to install Adobe® Acrobat® Reader
PC
MAC
.........................................21
• Computer system requirements
PC
MAC
.........................................22
• Uninstalling the Camera Driver
PC
MAC
.........................................22
6 Transferring Pictures To Your Computer(for computer users only) ....................................23
• Before you transfer pictures........................................................................23
• Connecting to your computer
PC
MAC
.........................................23
• Transferring the Pictures
PC
MAC
.........................................23
• How to use other Softwares ........................................................................24
• How to use PhotoStudio® 4.0
PC
MAC
.........................................24
• How to use Arcsoft Funhouse™ 1.0
PC
MAC
.........................................25
• How to use Arcsoft PhotoPrinter® 2000
PC
MAC
.........................................26
• How to use Arcsoft VideoImpression™ 1.6
PC
MAC
.........................................27
7 Using your camera as a Web Cam(for computer users only) ..........................................28
• Setting up
PC
...................................................................................28
• Making a call
PC
...................................................................................28
8 Troubleshooting Problems ..............................................................................29
• Troubleshooting - Camera
PC
MAC
.........................................29
• Troubleshooting - Docking Station ...............................................................30
9 Getting Help ................................................................................................31
• Software Help ...........................................................................................31
• Cool-iCam Online Services ..........................................................................31
• Customer Support .....................................................................................31
10 Appendix.....................................................................................................32
• Camera Specications ................................................................................32
• TV Docking Station specications.................................................................32
• Using your batteries ..................................................................................33
• Tips, Your Safety & Maintenance..................................................................33
• Picture Storage Capacities & Picture File Name Conventions ............................34
• Regulatory Information ..............................................................................34
• PAL/NTSC International TV settings .............................................................35
6
1 Getting Started
• What Can I do with my Camera?
Capture Enjoy point & shoot operation. Store pictures in the Cameras 4MB
internal memory.
Set Up Select various Camera settings
Communicate Use the camera as a Web Camera
• What can I do with my Digital Pictures?
View Pictures either on a TV screen or Computer
Save Pictures to a oppy disk or a computer memory
Communicate Send the pictures over the internet to family and friends.
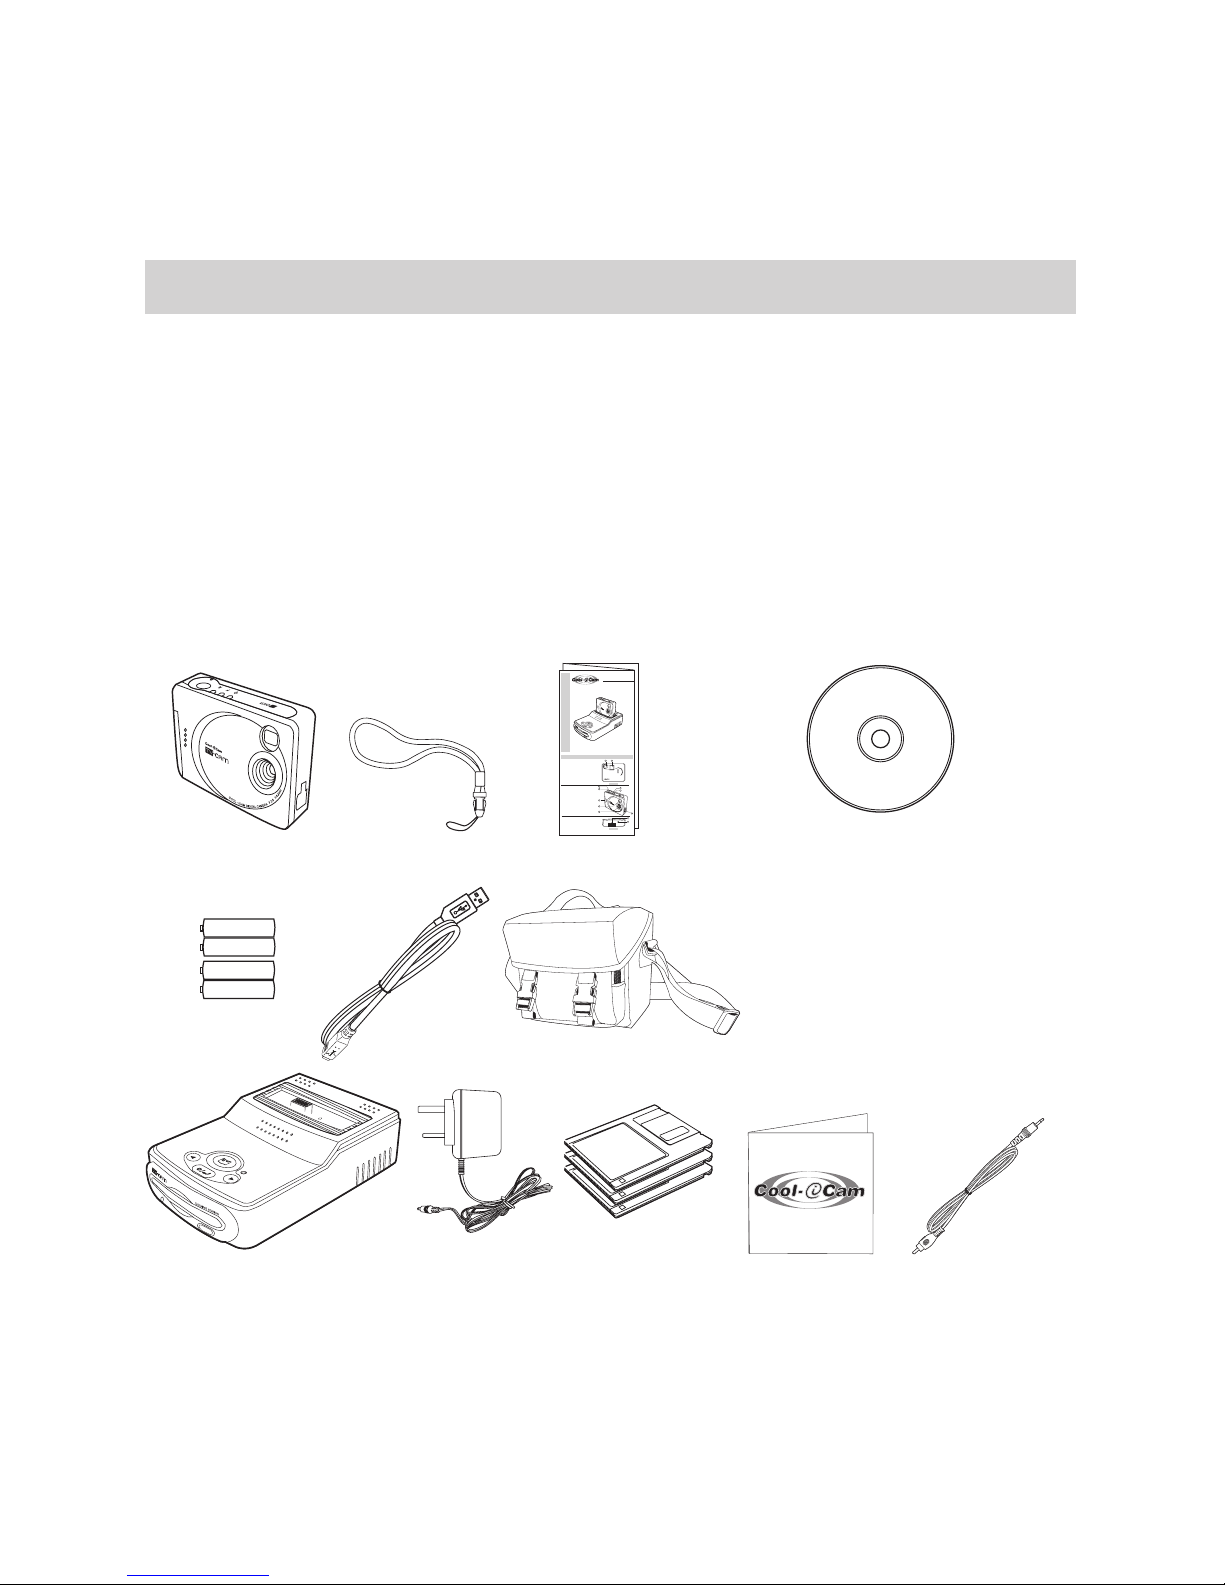
• Camera Package Contents
TM
TV Cam
Quick Start Guide
Product Overview
1. Viewnder
2. LCD Screen
Back View
1
2
1. Shutter button
2. Feature change button
3. Feature button
4. Power on/off button
5. USB port
6. Lens
7. Viewnder
8. Battery door
2
1
3
4
8
7
6
5
1. Docking station connector door
2. Tripod mount socket
Bottom View
2
1
TV C@M
USB Cable
4 x AAA
Batteries
CD-ROM includes “My Digital Camera” Manager
ArcSoft® Software Suite (PC & Mac),
Microsoft® NetMeeting™ (PC) &
Adobe® Acrobat® Reader (PC & Mac),
User’s Manual.
Wrist Strap
Camera Bag
Quick Guide
TV Docking Station
Mains Adaptor
3 x Formatted
Floppy Diskettes
P
l
e
a
s
e
t
a
k
e
a
m
o
m
e
n
t
t
o
f
i
l
l
o
u
t
a
n
d
r
e
t
u
r
n
t
h
i
s
R
e
g
i
s
t
r
a
t
i
o
n
C
a
r
d
.
Y
o
u
r
v
a
l
u
a
b
l
e
i
n
p
u
t
w
i
l
l
h
e
l
p
u
s
t
o
s
e
r
v
e
y
o
u
b
e
t
t
e
r
.
P
r
o
d
u
c
t
R
e
g
is
t
r
a
t
io
n
C
a
r
d
3
F
i
r
s
t
N
a
m
e
M
r
.
M
i
d
d
l
e
I
n
i
t
i
a
l
L
a
s
t
N
a
m
e
A
d
d
r
e
s
s
M
s
.
M
r
s
.
M
i
s
s
P
l
e
a
s
e
p
r
o
v
i
d
e
a
n
y
c
o
m
m
e
n
t
s
y
o
u
h
a
v
e
r
e
g
a
r
d
i
n
g
t
h
i
s
p
r
o
d
u
c
t
.
R
e
g
i
s
t
r
a
t
i
o
n
C
a
r
d
N
o
.
:
T
o
w
n
C
o
u
n
t
y
P
o
s
t
C
o
d
e
T
e
l
e
p
h
o
n
e
N
o
.
E
-
m
a
i
l
A
d
d
r
e
s
s
D
a
t
e
o
f
p
u
r
c
h
a
s
e
D
a
y
M
o
n
t
h
Y
e
a
r
5
A
g
e
o
f
u
s
e
r
5
-
7
8
-
1
0
1
0
-
1
5
1
6
-
2
0
2
1
+
7
R
e
t
a
i
l
S
h
o
p
C
a
t
a
l
o
g
u
e
O
t
h
e
r
s
:
(
P
l
e
a
s
e
s
p
e
c
i
f
y
)
M
a
g
a
z
i
n
e
C
a
t
a
l
o
g
u
e
B
r
o
c
h
u
r
e
I
n
t
e
r
n
e
t
F
r
i
e
n
d
s
W
h
e
r
e
d
i
d
y
o
u
p
u
r
c
h
a
s
e
t
h
i
s
p
r
o
d
u
c
t
?
W
h
e
r
e
d
i
d
y
o
u
f
i
r
s
t
s
e
e
t
h
i
s
p
r
o
d
u
c
t
?
O
t
h
e
r
s
:
(
P
l
e
a
s
e
s
p
e
c
i
f
y
)
I
n
t
e
r
n
e
t
T
V
P
le
a
s
e
c
h
e
c
k
h
e
re
if y
o
u
a
re
n
o
t in
te
re
s
te
d
in
r
e
c
e
iv
in
g
in
fo
rm
a
tio
n
fr
o
m
C
h
a
ra
c
te
r
O
p
tio
n
s
L
td
. a
b
o
u
t c
u
rre
n
t
a
n
d
fu
tu
re
p
ro
d
u
c
ts
.
C
h
a
ra
c
te
r
O
p
ti
o
n
s
L
td
.
C
u
s
to
m
e
r S
e
rv
ic
e
s
D
e
p
a
rt
m
e
n
t.
H
e
lp
lin
e
T
e
l
: 0
1
6
1
6
3
3
9
8
0
8
E
-m
a
il: s
u
p
p
o
rt@
c
o
o
l-ic
a
m
.c
o
.u
k
T
M
Registration Card
Video out Cable
7
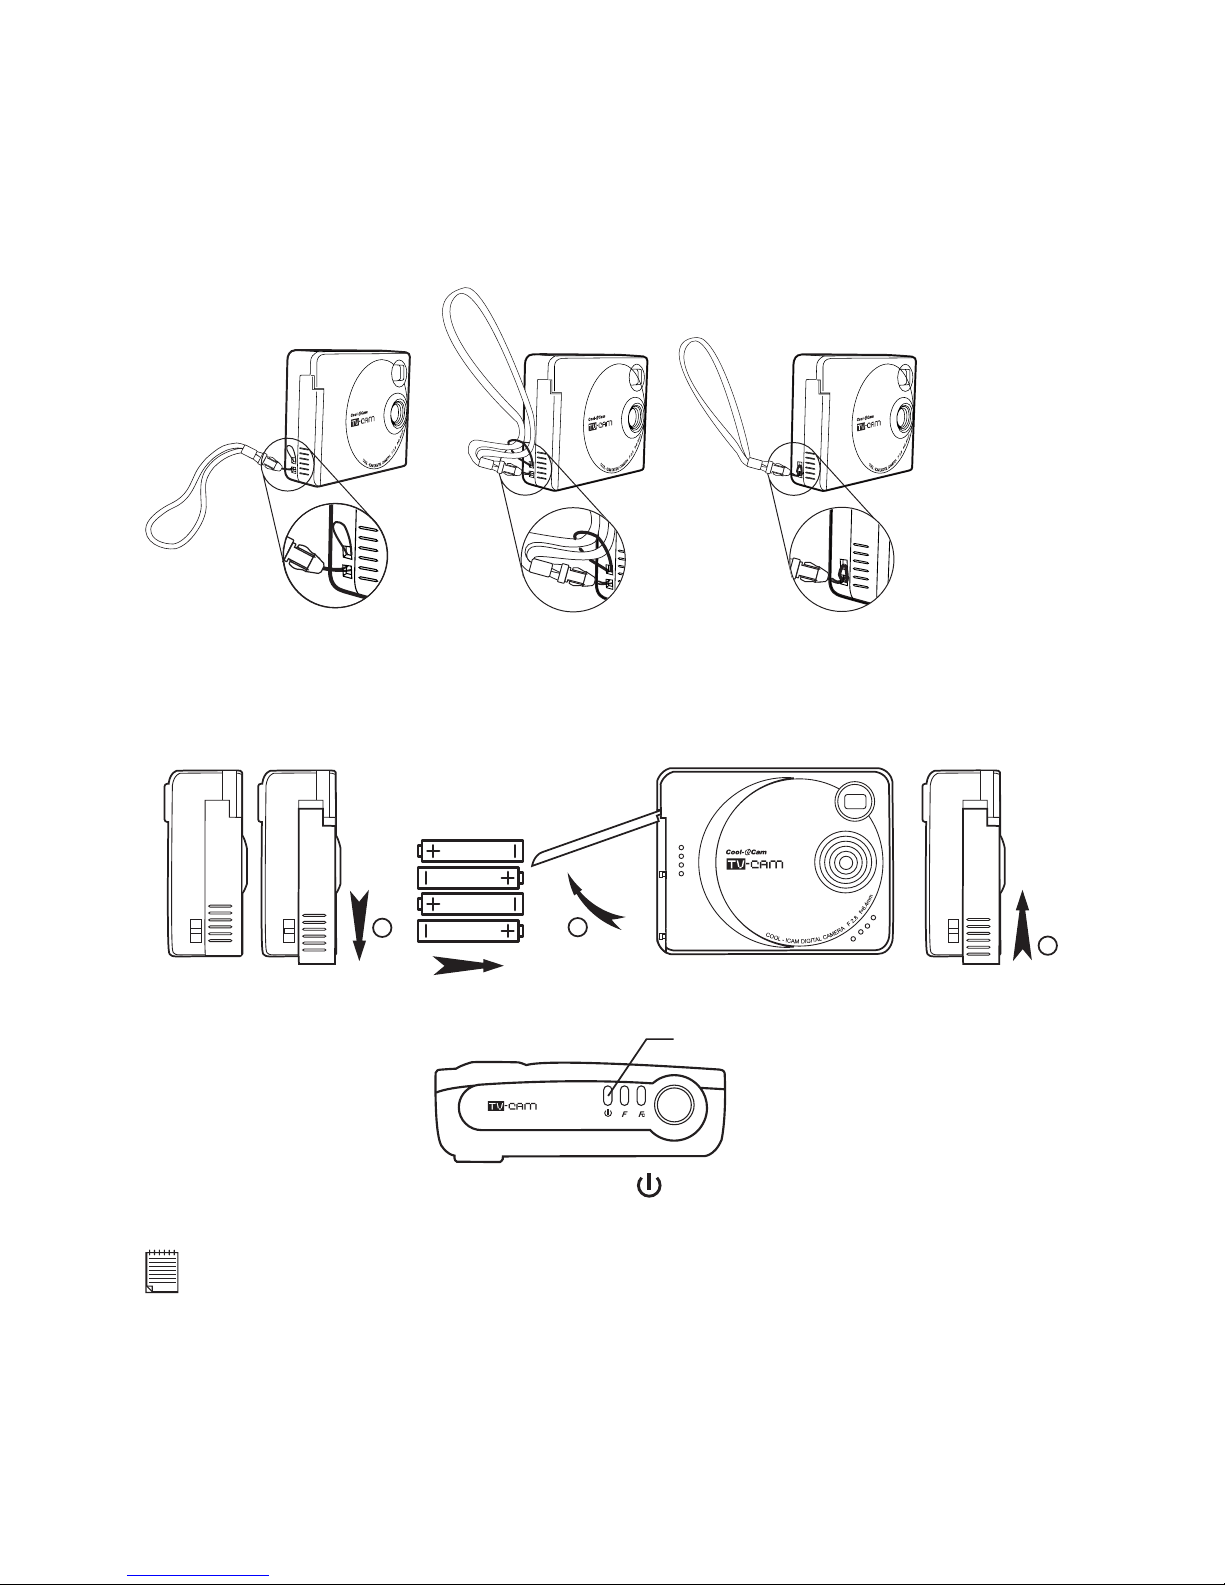
• Attaching the wrist strap
• Installing the batteries
4 x AAA Alkaline batteries are supplied with the product
1. Open the battery door.
2. Insert the batteries as shown, ensuring you follow the +/- signs correctly.
3. Close the battery door.
1
2
3
• Turning the Camera On and Off
ON/OFF Button
To turn the camera on, press the power button until the LCD display comes on. To turn
the camera off, press the power button again. The LCD display will switch off.
Note:
Whenever the camera is not in use, please return it to the docking station, or remove the batteries from
the camera in order to extend the battery life.
8
• Checking the battery level
Check the battery power level before taking pictures. For guidelines on
battery usage, see Using Your Batteries
1. Turn the camera on.
2. Check the battery status level that appears on the camera LCD
screen
batteries have adequate power
batteries need to be replaced
• Automatic power off saves batteries
Your Camera is designed to switch off and save battery life after 60 seconds of non use.
Press the ON/OFF button to reactivate the camera.
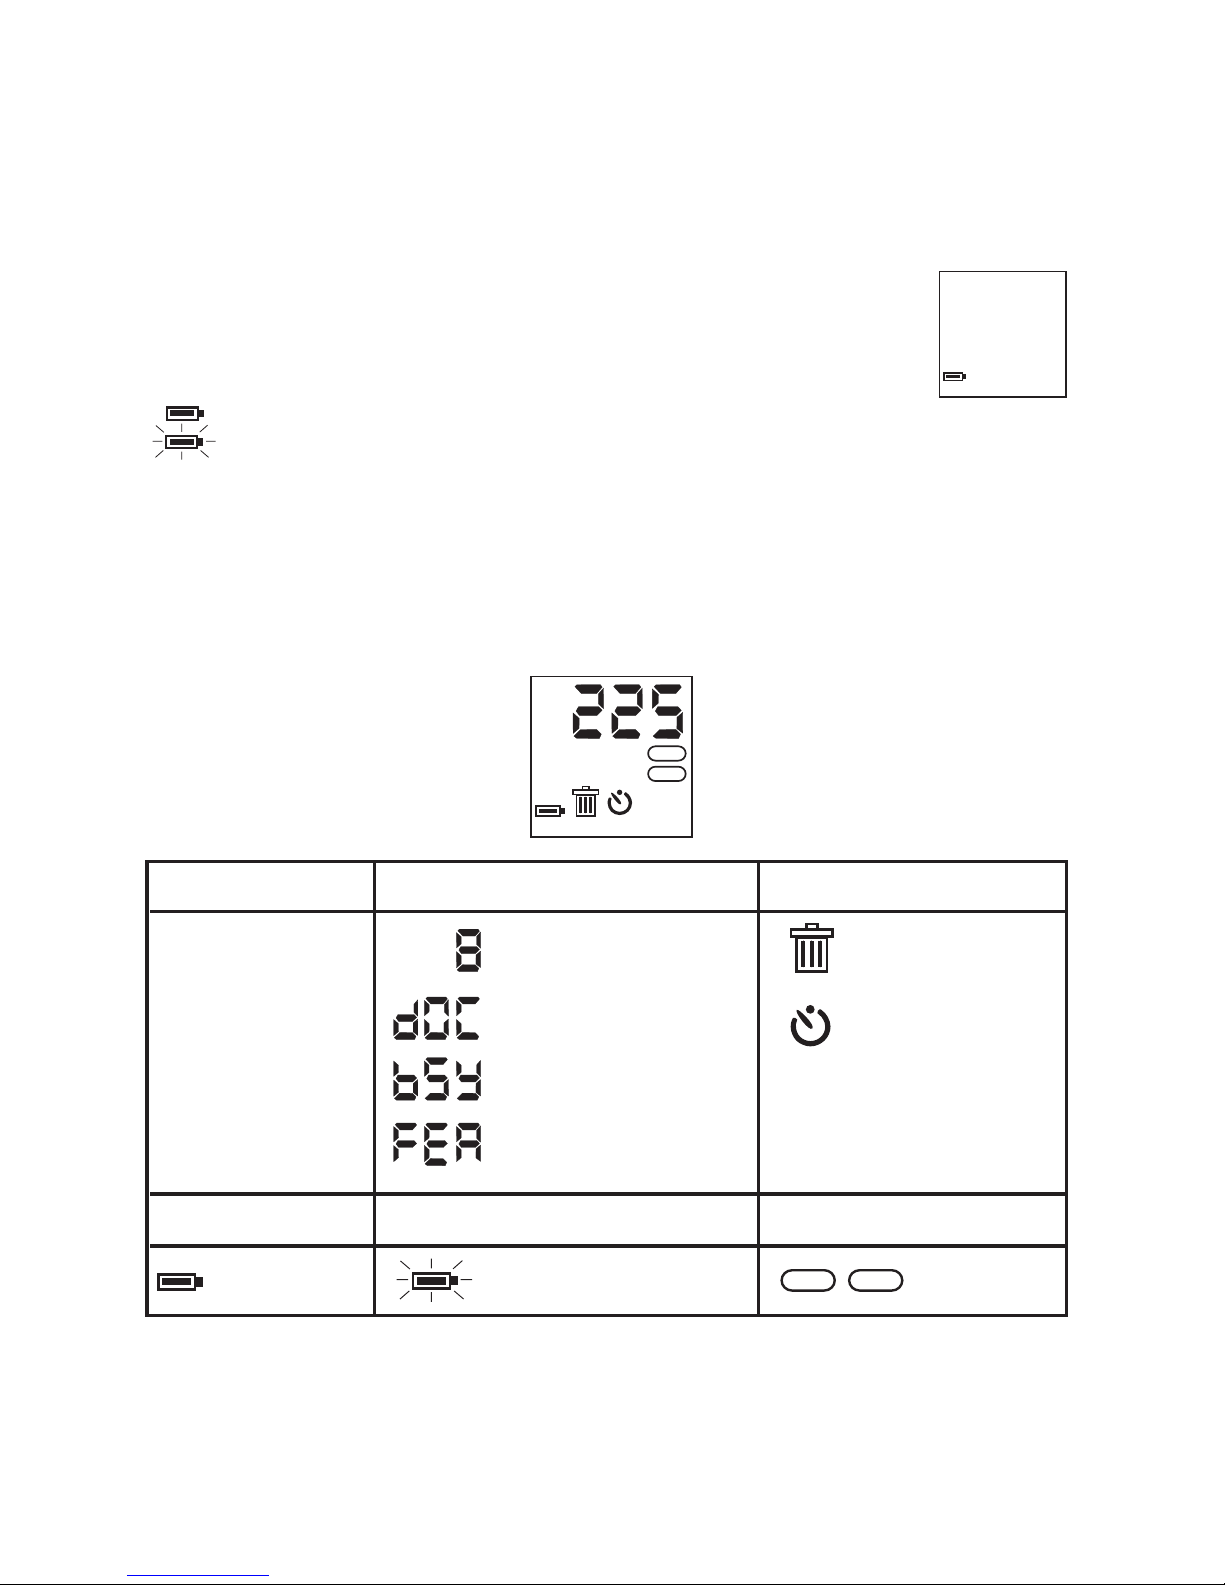
• Checking Camera Status
Switch the Camera on, view the camera LCD screen to check which camera settings are
active. If an icon is not displayed, that camera feature is not activated.
Status Bar Icons
HIGH NORMAL LOW
PAL
NTSC
2X
HIGH
NORMAL
LOW
Best
Pictures taken
Better
Good
Docking station connected
Camera busy
Feature button selected
Picture Quality Camera Status
2X
Full Battery Low Battery
Delete all pictures
Other Features
Self-Timer Mode
2X Digital Zoom Mode
TV Settings
PAL
NTSC

9
2 Taking Pictures
• Taking a Picture
ON/OFF Button
1. Press the ON/OFF button once to switch the camera ON.
2. Frame your subject using the camera viewnder.
3. Hold the camera steadily. Press the Shutter button completely down to take an image.
A beep sound is made when the picture has been taken and the counter will increase by
one. The counter will stop bilnking when the picture exposure has been completed.
4. Under some lighting conditions there may be a delay before image is captured,
After pressing the shutter button, hold the camera steady until you hear a
beep. The beep singals exposure is complete. Moving the camera before the
beep may result in a blurry image.
Shutter Button
Note:
Whenever the camera is not in use, please return it to the docking station, or remove the batteries from
the camera in order to extend the battery life.
• Other Picture Taking settings
Setting Section
Set Picture Quality Setting the Picture Quality
Set 2 x Digital Zoom Setting the 2 x Digital Zoom
Self Timer Setting the self timer
Deleting Pictures Deleting Pictures from the camera
• Setting the Picture Quality
1. Press the Feature button,
will appear and then press the Feature Change button
to select between High, Normal or Low economy pictures.
2. The camera will wait a few moments and then set the Picture quality selected.
• High
HIGH
(640 x 480) with high compression for detailed images, large le size and
prints pictures up to 2.13” x 1.6” (54.2mm x 40.6mm)
• Normal
NORMAL
(640 x 480) with low compression for normal images, large le size
and prints pictures up to 2.13” x 1.6” (54.2mm x 40.6mm)
• Low Economy
LOW
(320 x 240) for small print sizes, e-mailing or screen display. Small
le size and prints pictures up to 1.06” x 0.8” (27.1mm x 20.3mm)
3. Take the picture.

10
• Setting the 2X Digital Zoom
1. Press the Feature button and then press the Feature Change button to select 2X
Digital Zoom 2X setting.
2. The camera will wait a few moments and then set the 2X Digital Zoom mode.
3. Take the Picture.
• Picture resolution in 2 x Digital Zoom mode is 320 x 240. You may notice a decrease in
picture quality when using digital zoom mode.
• Self Timer
You camera is designed with a self timer function which will allow you to take pictures with
10 seconds timer built in. Frame our subject and use a stand (not supplied) to position
your camera.
1. Switch the camera on.
2. Use the Feature button to select the self timer mode
. Press Feature Change
button to conrm. The self timer icon will ash until set.
3. Frame your subject.
4. Press the shutter button, the camera counter will automatically count 10 seconds before
taking a picture.
• Re-formatting the camera
PLEASE NOTE! ALL PICTURES WILL BE DELETED WHEN RE-FORMATTED
1. Press the Feature button until the
icon appears. Press the Feature Change
button to conrm.
2. The camera will wait up to 40 seconds for the formatting to be completed. The
icon
will be displayed during this time.
11
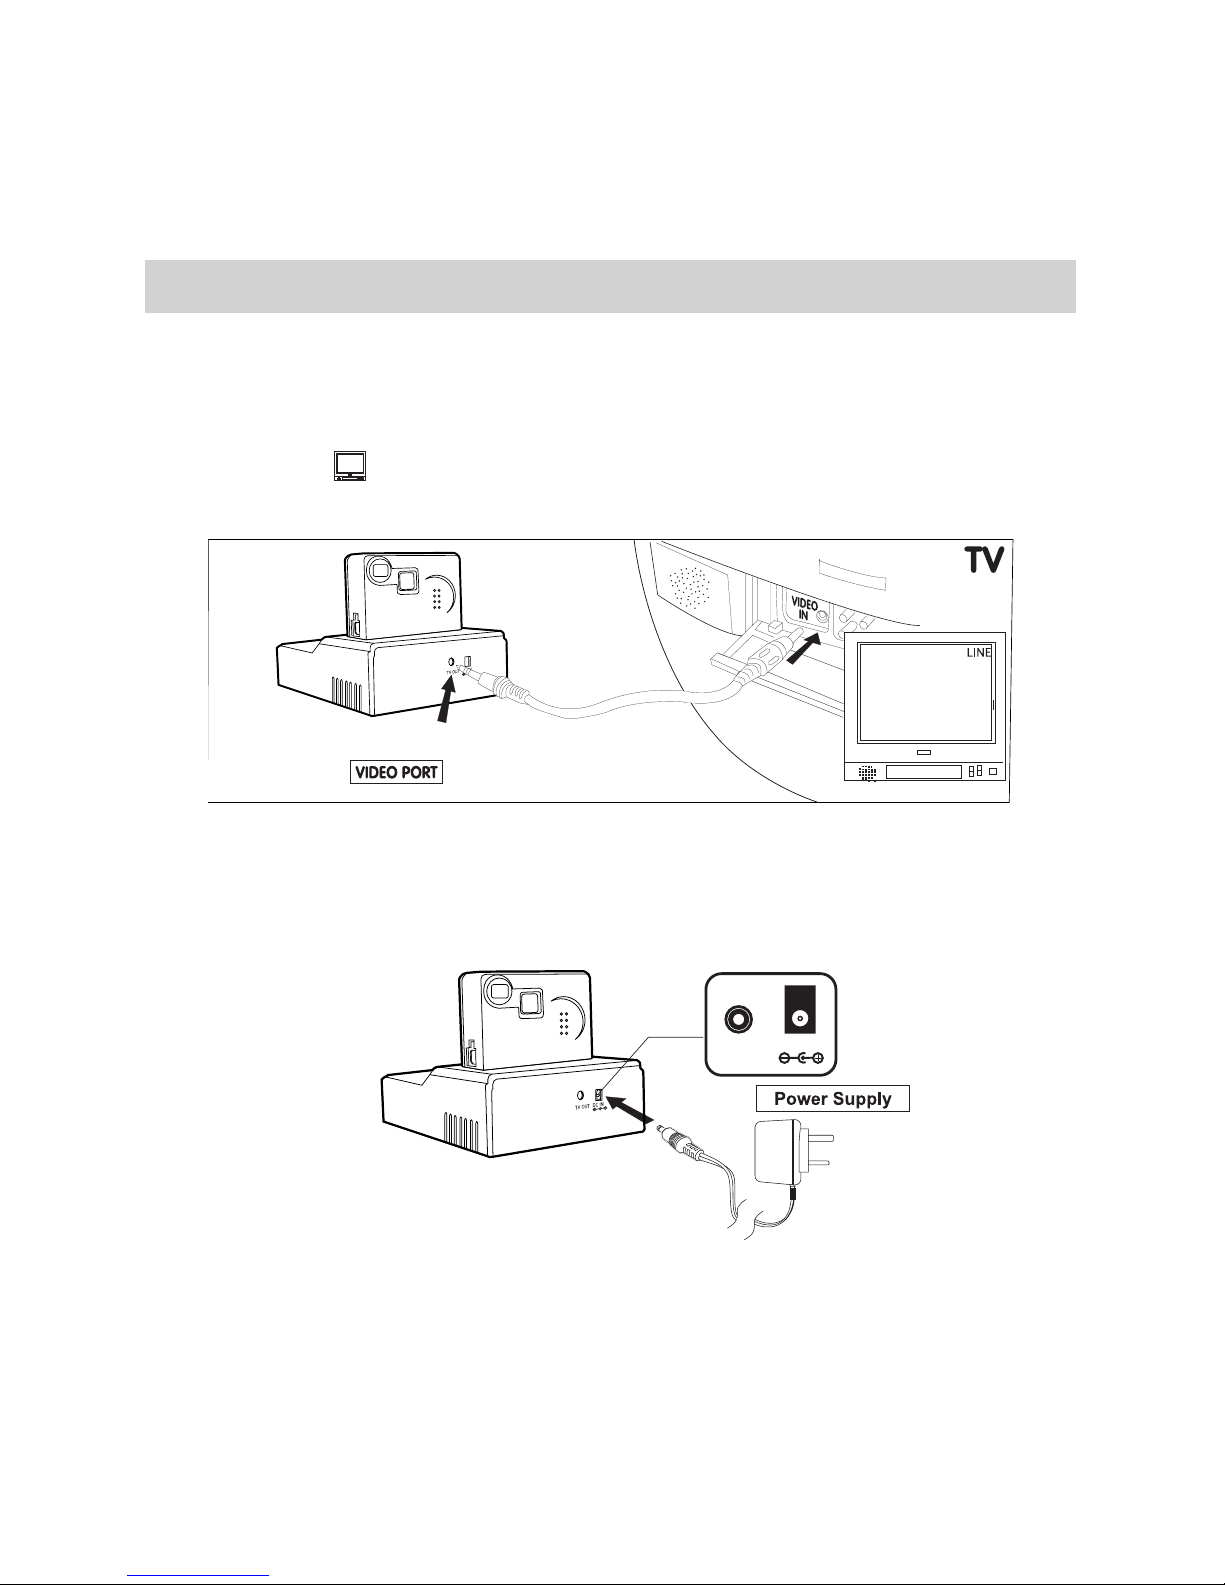
3 Viewing your Pictures on your TV Screen
• Docking Station
The Docking Station makes it easy to view your Pictures on the TV.
• Connecting the Docking Station to a TV
1. FOR TV USERS
LINE
Connect the TV Out Cable between the rear of the Docking
Station and the Line In “Video” or “Video In” socket on the TV.
2. Switch the TV ON.
3. If you are using a video player, connect the TV Out Cable to the “Video In” socket on the
rear of the Video player, and switch the TV ON.
4. Now connect the 9 volt main adaptor supplied to the rear of the Docking Station and
then connect the plug to the socket and switch the mains ON.
TV OUT
DC IN 9V
12
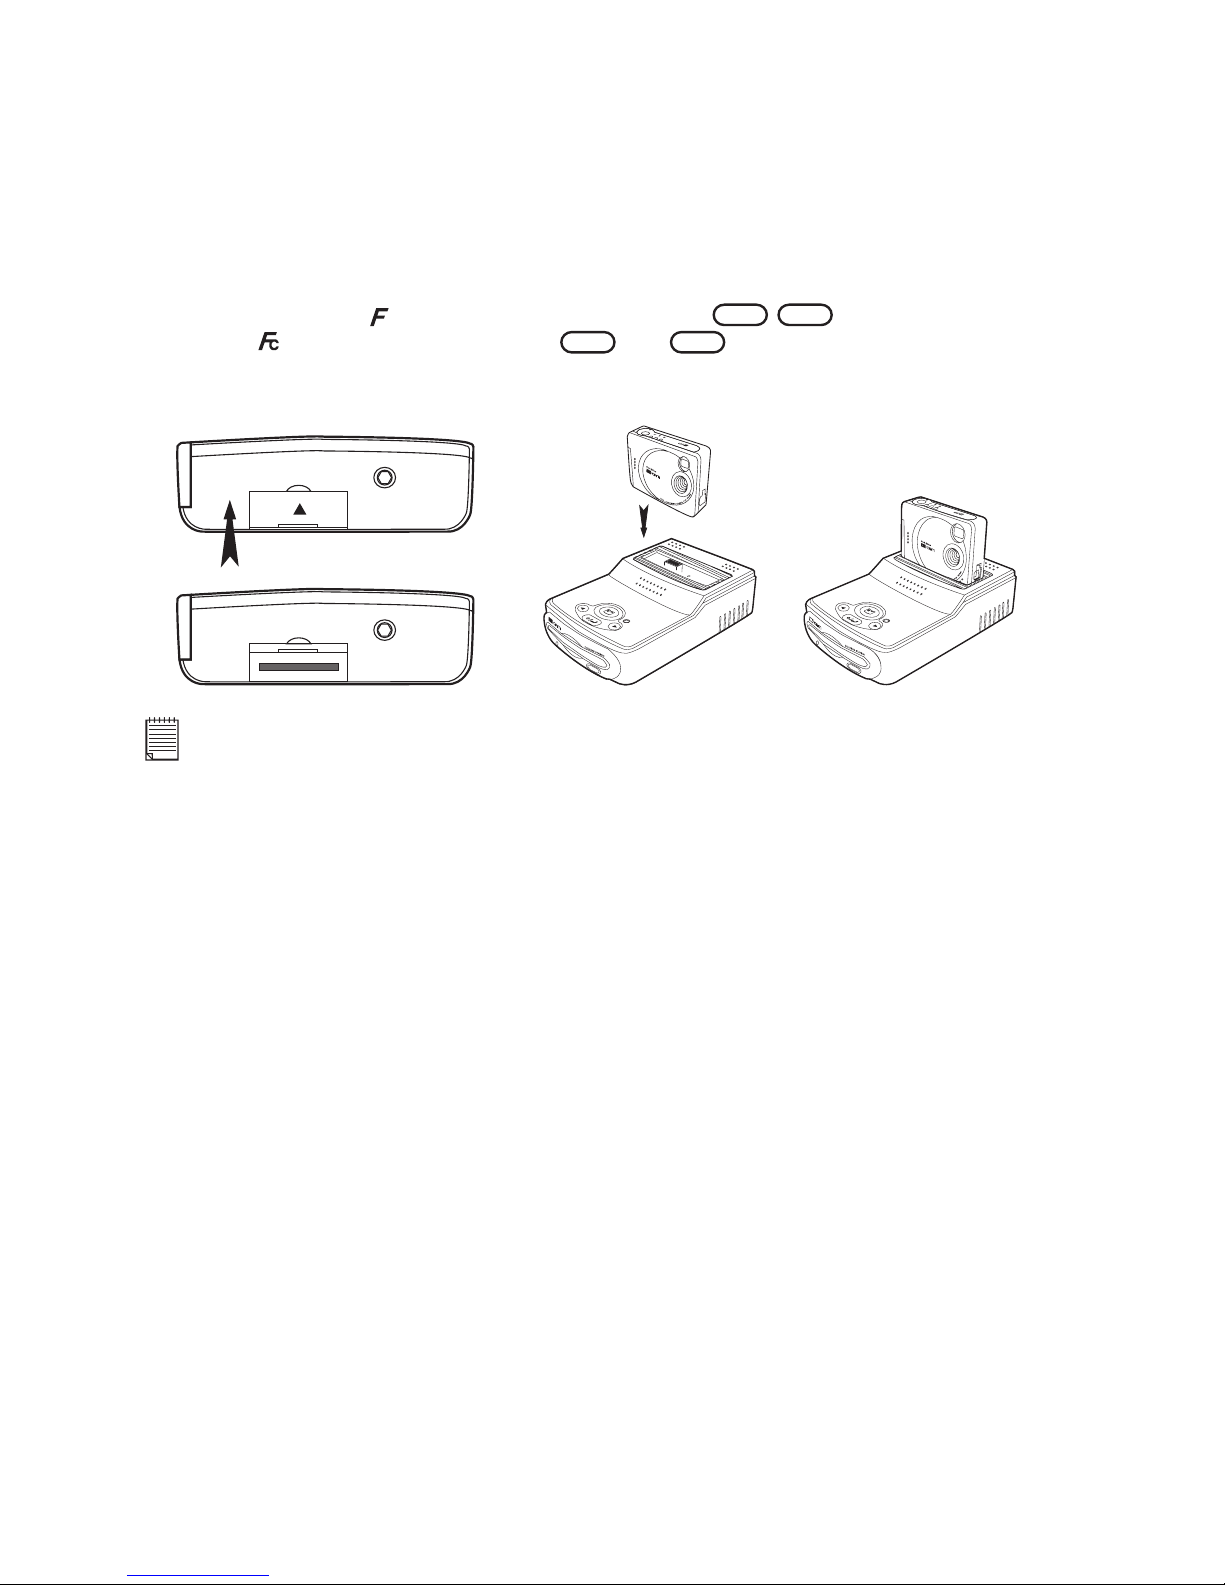
• Docking the Camera
1. Switch the camera on.
2. Using the Feature Button, scroll through to nd
PAL
/
NTSC
icon. Use the Feature
Change Button to switch between
PAL
and
NTSC
setting. See the section on PAL/
NTSC International TV Settings.
3. Slide the camera connection cover open as illustrated below.
4. Connect the camera into the docking station.
Note:
Make sure your camera is switched on before connecting to your docking station.
 Loading...