

Cool-Icam CIC-280, G2 User Manual

1
TM
User’s Manual
1. Introduction
Congratulations on purchasing the G2. Using the latest innovations in technology the G2 offers fun, affordable and easy to
use digital imaging.
Although you probably want to get started right away, please take a few minutes to read this guide and familiarise yourself
with your new G2. Your new G2 will take 25 Hi-Res (High Resolution), 80 Normal-Res (Normal Resolution) or 160 Low-Res
(Low Resolution) images, which you upload to your PC (Personal Computer) running Windows®98SE, Windows® Me, 2000,
XP or Macintosh® running versions OS 8.6 - 9.2.
You can also use your G2 to capture not only snaps of your family and friends, but also video clips of them in action. Your
digital images and video clips can also be played back on your TV.
Your G2 can also be used as a Web Cam. If you have an internet connection and microphone (not supplied) you can chat
face-to-face with friends and colleagues, conferencing in real time.
Your G2 is equipped with 8MB of internal memory, additional memory for storing digital images and video clips can be added
by inserting a SmartMedia™ Card (SMC) (sold separately) in the G2 memory card slot provided. When you have taken your
images, the G2 will wait for 60 seconds and then automatically switch to Stand-by mode to preserve battery life.
www.cool-icam.com

2
2. Table of Contents
1. Introduction ................................................................................................................................................ 1
2. Table of Contents ........................................................................................................................................ 2
3. System Requirements................................................................................................................................... 3
4. Package Contents......................................................................................................................................... 3
5. Software Installation .................................................................................................................................... 3
For Windows® Users:
PC
5.1 How to install the My Digital Camera Software ..........................................................................................3
5.2 How to use ArcSoft® Software .................................................................................................................4
5.3 How to install Microsoft® NetMeeting™ ......................................................................................................4
5.4 How to install Adobe® Acrobat® Reader.....................................................................................................4
5.5 How to install QuickTime™........................................................................................................................5
For Macintosh® Users:
MAC
5.6 How to install the My Camera Software .....................................................................................................5
5.7 How to install ArcSoft® Software ..............................................................................................................5
5.8 How to install Adobe® Acrobat® Reader.....................................................................................................5
5.9 How to install QuickTime™........................................................................................................................5
6. Battery Installation........................................................................................................................................6
7. Getting to Know Your G2................................................................................................................................6
7.1 LCD Display ............................................................................................................................................6
7.2 Power ....................................................................................................................................................6
7.3 SmartMedia™ Card Slot............................................................................................................................7
8. Getting Started.............................................................................................................................................8
8.1 Switching the G2 On ...............................................................................................................................8
8.2 G2 Controls ............................................................................................................................................8
8.3 Taking an Image......................................................................................................................................9
8.4 Taking a Movie Clip ..................................................................................................................................9
8.5 Erasing Contents from your G2..................................................................................................................9
9. Connecting your G2 to your Computer .............................................................................................................9
10. Uploading Images to Your Computer.............................................................................................................. 10
For Windows® Users:
PC
10.1 Uploading Images and Movie Clips to your Computer ................................................................................ 10
For Macintosh® Users:
MAC
10.2 Uploading Images and Movie Clips to your Computer ................................................................................ 10
10.3 Viewing Images Using TV Output ........................................................................................................... 10
10.4 LCD Display Quick Reference Guide ........................................................................................................ 12
11. How to Use Other Softwares ......................................................................................................................... 12
For Windows® Users:
PC
11.1 How to use PhotoStudio® 4.0................................................................................................................ 12
11.2 How to use ArcSoft Funhouse™ 1.0 ........................................................................................................ 13
11.3 How to use ArcSoft PhotoPrinter® 2000.................................................................................................. 13
11.4 How to use ArcSoft VideoImpression™ 1.6 .............................................................................................. 14
11.5 How to use Microsoft® NetMeeting®...................................................................................................... 14
11.6 How to use Adobe® Acrobat® Reader ....................................................................................................15
11.7 How to use QuickTime™ ....................................................................................................................... 15
For Macintosh® Users:
MAC
11.8 How to use PhotoStudio® 4.0................................................................................................................ 15
11.9 How to use ArcSoft Funhouse™ 1.0 ........................................................................................................ 15
11.10 How to use ArcSoft PhotoPrinter® 2000 ................................................................................................ 16
11.11 How to use Adobe® Acrobat® Reader ..................................................................................................16
11.12 How to use QuickTime™...................................................................................................................... 16
12. ArcSoft WorldWide Customer Support ............................................................................................................ 17
13. Troubleshooting ......................................................................................................................................... 18
14. Battery Guidance ........................................................................................................................................ 20
15. Technical Specications................................................................................................................................ 21
16. FCC Notice .................................................................................................................................................22
17. PAL/NTSC Table - TV Video Settings...............................................................................................................23
3
3. System Requirements
For Windows® Users
PC
For Macintosh® Users
MAC
• PowerPC® Processor
• Mac® OS version 8.6 - 9.2
• USB port
• 128MB RAM
• 150MB Free disk space
• Color Monitor with High Color (16-bit) graphic capability
or higher
• CD-ROM Drive
• Standard mouse and keyboard
• Compatible with Microsoft® Windows® 98SE and Me, XP
• Pentium® 200MHz or higher recommended
• 128MB RAM or higher
• USB Port
• 200MB free disk space
• CD-ROM Drive
• Color Monitor with High Color 16-bit graphics capability or
higher
• Standard mouse and keyboard
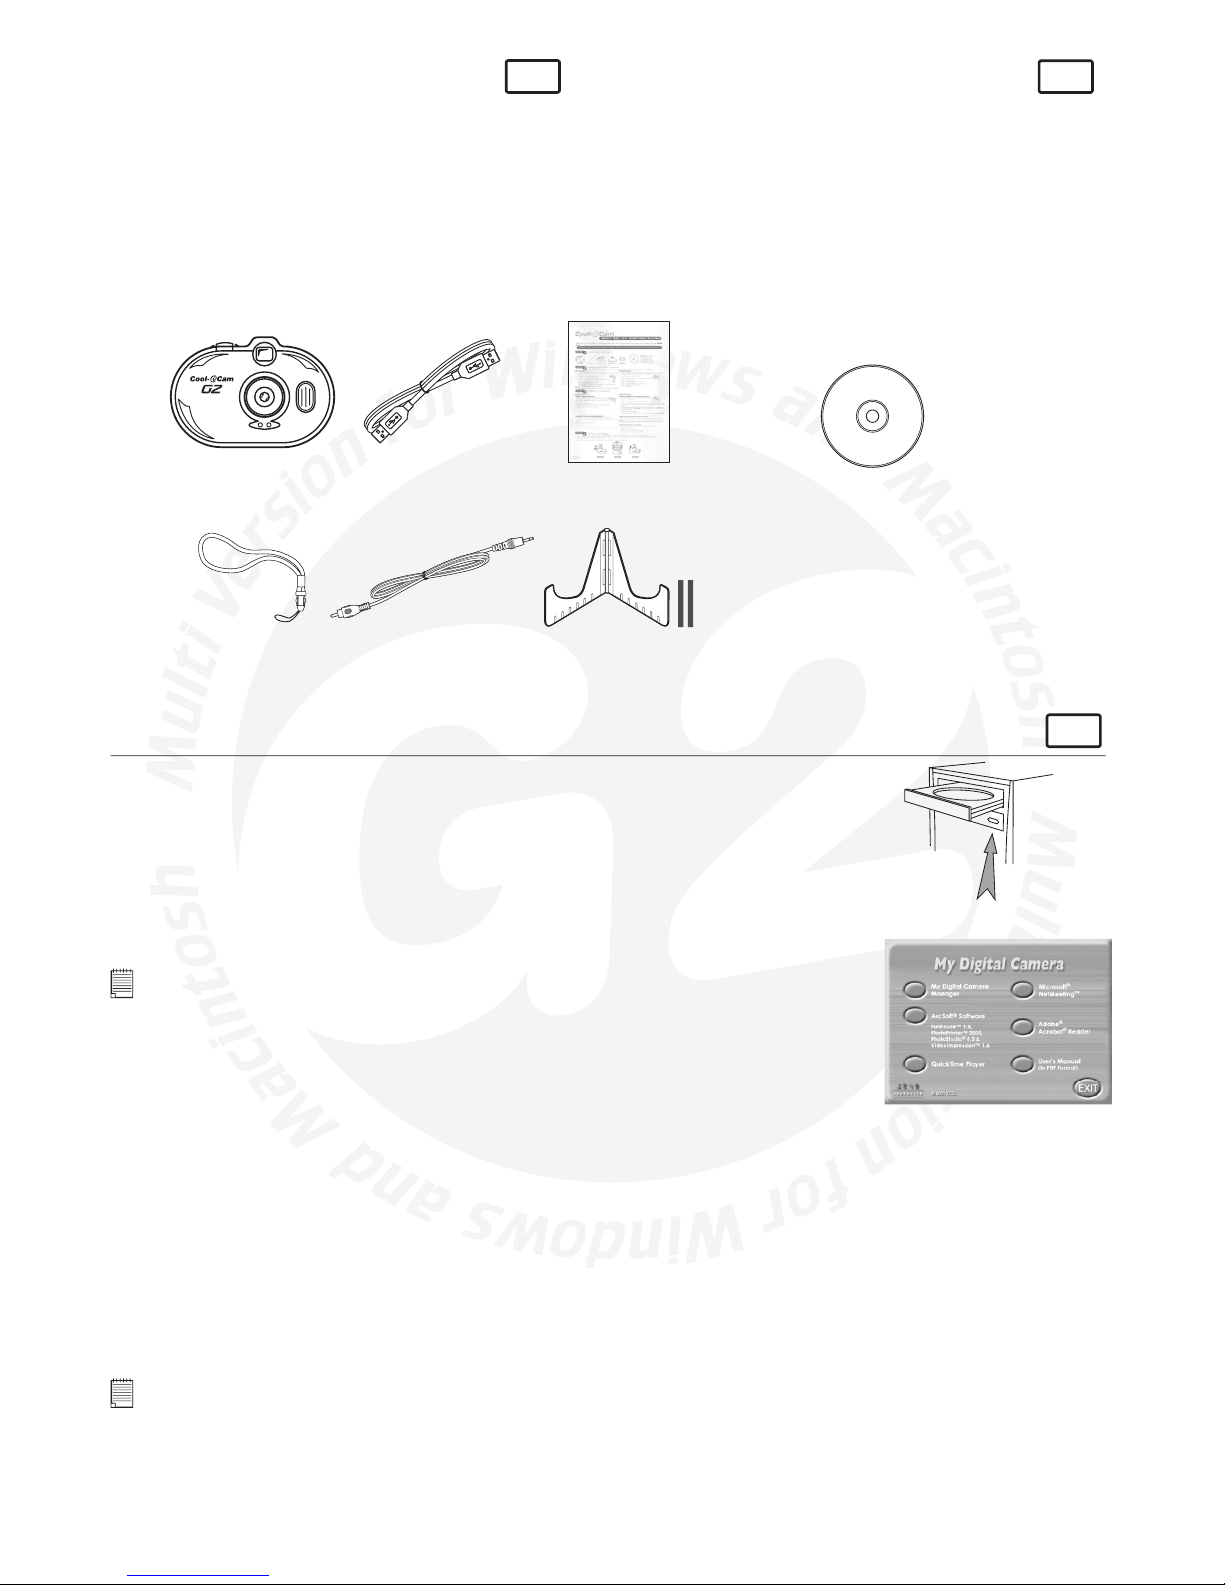
4. Package Contents
USB Cable
Wrist Strap
with Clip
G2 Stand
(plus rubber stickers x 2)
(for customer assembly to
prevent slipping of G2)
G2 Software CD-ROM
(includes My Digital Camera,
PhotoStudio® 4.0 (PC & Mac),
ArcSoft Funhouse™ 1.0 (PC & Mac),
ArcSoft PhotoPrinter® 2000 (PC & Mac),
ArcSoft VideoImpression™ 1.6 (PC),
Microsoft® NetMeeting™ (PC),
Adobe® Acrobat® Reader (PC & Mac),
QuickTime™ 4 (PC & Mac),
User’s Manual (PC & Mac)).
,
G2
Quick Setup
Instructions
Video Out Cable
5. Software Installation
For Windows® Users:
PC
5.1 How to Install My Camera Software
Open & Close
5.1.1 How to Install My Camera Software
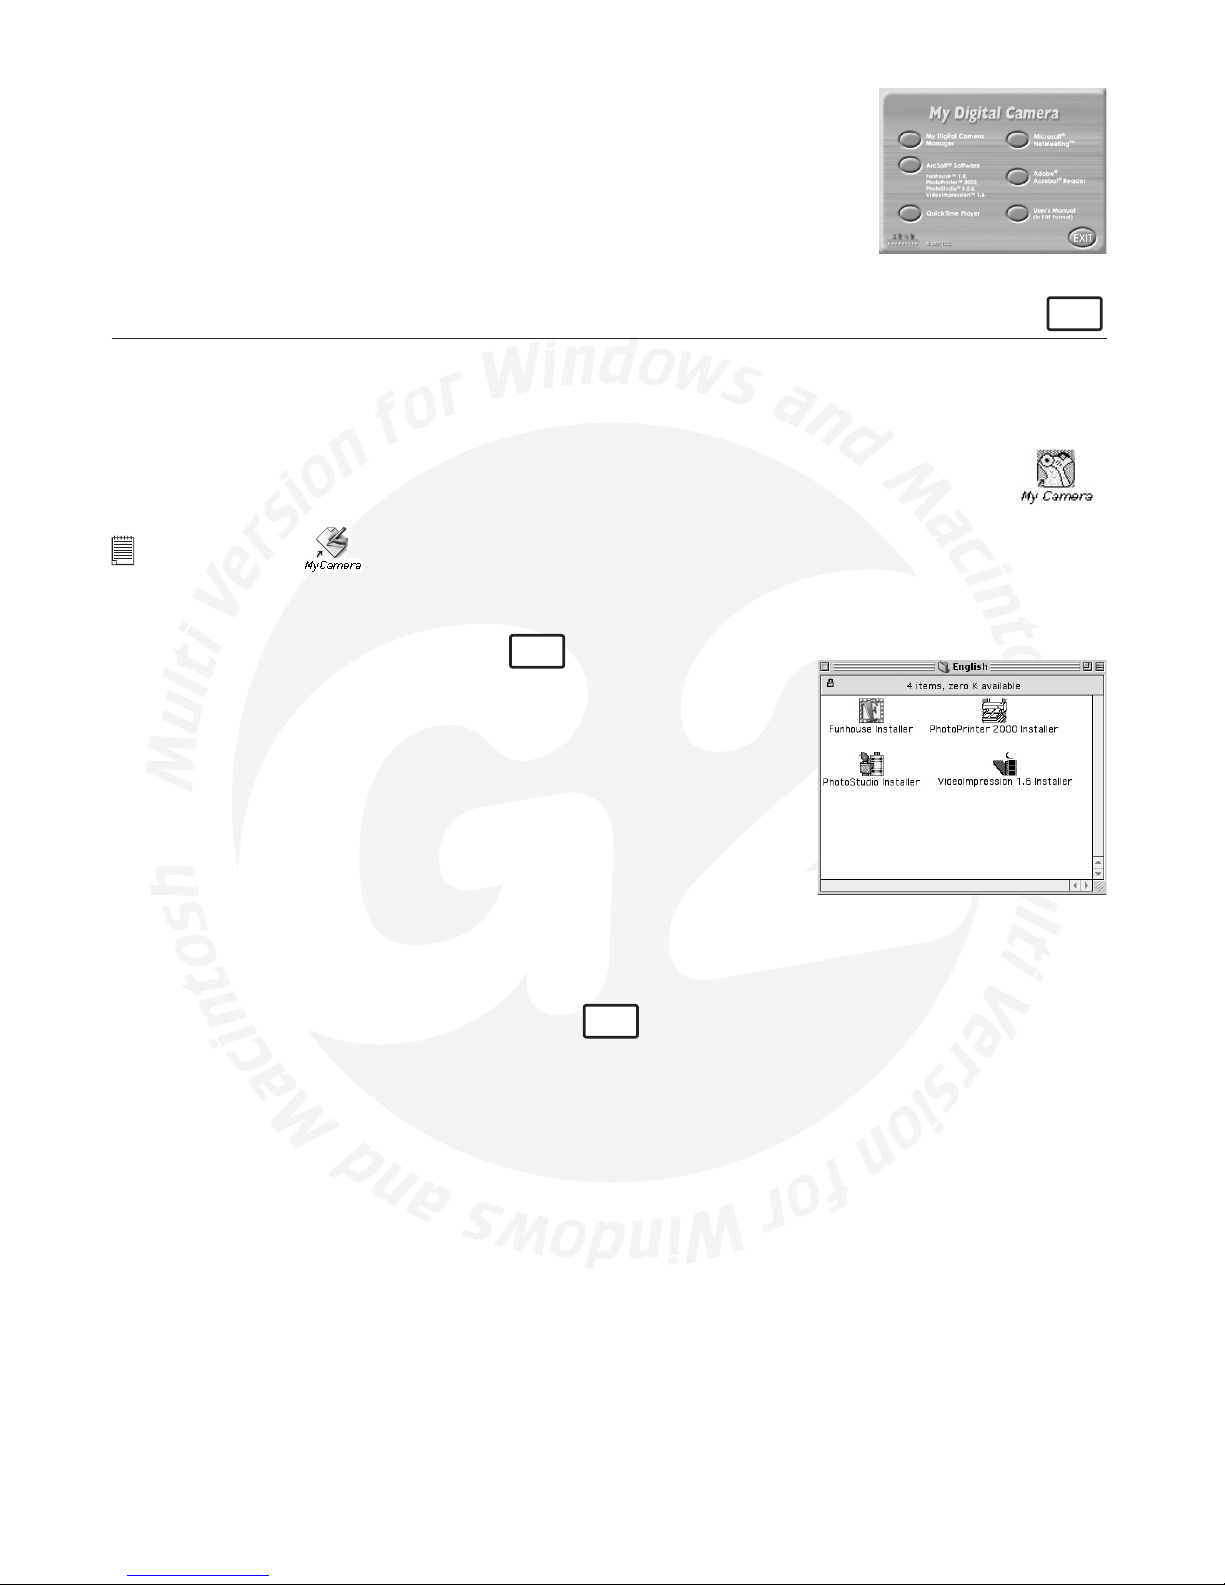
Your “My Digital Camera” should be installed rst.
1. Insert the CD-ROM disc into the CD-ROM drive and close the CD-ROM drawer.
2. An installation wizard will automatically launch.
3. Click “My Digital Camera” icon.
4. Follow the instructions presented on the screen to complete the installation.
5. You will be asked to select between 50hz/60hz lighting frequency settings. Refer to the
note below and the troubleshooting guide.
6. Click “OK” to restart your computer and wait for your PC to restart automatically.
Notes:
If the setup screen doesn’t appear after loading the CD, then you can manually start it by double-clicking
the “My Computer” Icon on your desktop, then double-clicking the icon for the CD-ROM drive. When the
CD-ROM window opens, double-click the “digital camera” icon.
Frequency settings differ from country to country and some countries utilise both 50hz and 60hz. Note
for country with both settings test both settings. Follow 5.1.2 and 5.1.1 to uninstall and reinstall your My
Digital Camera software.
5.1.2 Creating a Desktop Icon
Double click on “My Computer” on your computer desktop. Right click on the icon “My Camera” and select “create shortcut”.
Select “Yes” and this will place “My Camera” icon on your computer desktop.
5.1.3 Creating a Desktop Folder to Hold your Images in
Right click on your computer desktop, select “New”. Select “Folder” and a new folder will appear on your computer desktop
and it will be waiting for you to name it by ashing. Call it “My Images”.
Now go to Section 5.2.
5.1.4 Uninstalling your My Digital Camera
To uninstall My Digital Camera, click the “Start Menu” -> “Settings” -> “Control Panels” -> “Add/Remove Programs”. Select
“My Camera” and click the “Add/Remove” button.
Notes:
Uninstalling your My Digital Camera does not delete your album folders and therefore all images transferred into your default or created albums
will be preserved. You will be able to access these folders on your system desktop.

4
5.2 How to Install ArcSoft® Software
PC
Introduction to the Software
PhotoStudio® 4.0
PhotoStudio® 4.0 is a full-featured, easy-to-use digital image-editing program that provides a complete set of photo editing
and retouching tools, plus a wide selection of special effects and enhancements. Its powerful features include a wide variety
of input and output options, layers, multiple undo and redo functions, image management tools, editable text, multiple le
format support and a lot more.
ArcSoft Funhouse™ 1.0
ArcSoft Funhouse™ is an image entertainment application that enables users to create “fun photo” by combining their
personal photos with a wide variety of mask templates. Users can get their own images from digital cameras, scanners, disk
drives and Photo CDs, and seamlessly combine them with just a few clicks of the mouse. Photo mask includes sports, role
play, time warp, trading cards, in print, cartoon and surreal.
ArcSoft PhotoPrinter® 2000
ArcSoft PhotoPrinter® is an easy-to-use printing utility that enables the user to layout and print multiple images in different
sizes quickly and easily on a single sheet of paper. The program offers a large selection of printing templates, including Kodak
Digital Science Inkjet Photo Paper Templates and Avery-brand paper products. It also includes commonly used image-editing
tools and a wide selection of templates for frames, edges and backgrounds for enhancing images.
ArcSoft VideoImpression™ 1.6
ArcSoft VideoImpression™ is an easy-to-use video and image editing software program. The program enables users to create
and edit new videos using existing video and image les - making desktop video presentations for home, business, and the
Web.
Visit http://www.arcsoft.com for all your FAQ’s, tips and technical support see Section 12 for more details.
5.2.1 How to Install ArcSoft® Software
1. Reinsert the CD-ROM disc into the CD-ROM drive and close the CD ROM draw.
2. An installation wizard will automatically launch.
3. Click the “ArcSoft® Software” icon.
4. Select the language for the installation and click “OK”.
5. Follow the on-screen prompts.
6. Select the software you want or you do not want installed by clicking on the tick boxes
next to the software title. Click “Next >” to continue.
7. Follow the instructions presented on the screen to complete the installation.
Notes:
Don’t worry if you made a mistake and want to add in ArcSoft®
titles you did not tick. Reinsert the CD-ROM and follow steps 1 6 ticking only the software you want to add.
Please note that images saved in your computer memory
are able to be accessed via the ArcSoft® Suite software.
To access images in ArcSoft® from your G2 you must upload your images to your computer
as described in Section 10.1 for PC and 10.2 for Mac. See Section 11 for how to use
ArcSoft® software.
5.3 How to install Microsoft® NetMeeting™
PC
NetMeeting™ provides the most complete conferencing solution for the Internet and corporate intranet. Powerful features let
you communicate with both audio and video, collaborate on virtually any Windows-based application, exchange graphics on
an electronic whiteboard, transfer les, use the text-based chat program, and much more. Using your PC and the Internet,
you can now hold face-to-face conversations with friends and family around the world.
To install the Microsoft® NetMeeting™:
1. Insert the CD-ROM disc into the CD-ROM drive and close the CD ROM draw.
2. An installation wizard will automatically launch.
3. Click the “Microsoft® NetMeeting™” icon.
4. Follow the instructions presented on the screen to complete the installation.
5. You will have a choice during installation to place a desktop icon on your desktop for easy
access directly to the software.
6. For further installation details, please visit the following website:
http://www.microsoft.com/windows/netmeeting
Notes:
• You need to enter your name, your e-mail address and country details during installation.
• You need to adjust the playback volume and your record volume.
5.4 How to install Adobe® Acrobat® Reader
Adobe® Acrobat® Reader lets you view and print Adobe Portable Document format (PDF)
les on all major computer platforms, as well as ll in an submit Adobe PDF forms online.
To install the Adobe® Acrobat® Reader:
1. Reinsert the CD-ROM disc into the CD-ROM drive and close the CD ROM draw.
2. An installation wizard will automatically launch.
3. Click the “Adobe® Acrobat® Reader 4.05” icon.
4. Follow the instructions presented on the screen to complete the installation.
Visit http://www.adobe.com/ for all your FAQ’s, tips and technical support.
5
5.5 How to install QuickTime™ 4 Software
QuickTime™ 4 enables your computer to handle video, graphics, music, sound, sprites, text, animation and content streamed
over the internet.
To install the QuickTime™ Software:
1. Reinsert the CD-ROM disc into the CD-ROM drive and close the CD ROM draw.
2. An installation wizard will automatically launch.
3. Click the “QuickTime™” icon.
4. Follow the instructions presented on the screen.
5. Refer to your PC manual or separate modem manual for speed of your modem.
6. QuickTime will ask you to enter your name, organization and then click “Next”. No need
to enter registration number as this is a Basic version.
7. Double click on “QuickTime Player” icon to nish installation.
8. Visit http://www.apple.com/quicktime for all your FAQ’s, tips and technical support.
For Macintosh® Users:
MAC
5.6 How to Install My Camera Software
5.6.1 How to Install My Camera:
1. Insert the CD-ROM disc into the CD-ROM drive and close the CD ROM draw.
2. Double click the CD-ROM icon “My Digital Camera”.
3. Double click the “My Camera.1” icon.
4. Click “Continue”.
5. Click “Quit” to nish the installation.
6. A folder named “My Camera” will appear in your Hard Disk after installation and a short-cut icon “My
Camera” will appear on your desktop.
Notes:
Do not select this icon as this is obsolete for this version of the camera.
5.6.2 How to Uninstall My Camera:
To uninstall the My Camera, simply remove the “My Camera” folder and the short-cut icon on the desktop.
5.7 How to Install ArcSoft® Software
MAC
5.7.1 How to Install PhotoStudio® 4.0
1. Insert the CD-ROM disc into the CD-ROM drive and close the CD-ROM drawer.
2. Double click the CD-ROM icon “Digital Camera”.
3. Double click the “PhotoStudio® Installer” icon in English folder.
4. Follow the instructions presented on the screen to complete the installation.
5.7.2 How to Install ArcSoft Funhouse™ 1.0
1. Insert the CD-ROM disc into the CD-ROM drive and close the CD-ROM drawer.
2. Double click the CD-ROM icon “Digital Camera”.
3. Double click the “Funhouse™ installer” icon in English folder.
4. Follow the instructions presented on the screen to complete the installation.
5.7.3 How to Install ArcSoft PhotoPrinter® 2000
1. Insert the CD-ROM disc into the CD-ROM drive and close the CD-ROM drawer.
2. Double click the CD-ROM icon “My Digital Camera”.
3. Double click the “PhotoPrinter® 2000” icon in English folder.
4. Follow the instructions presented on the screen to complete the installation.
5.8 How to Install Adobe® Acrobat® Reader
MAC
1. Insert the CD-ROM disc into the CD-ROM drive and close the CD ROM draw.
2. Double click the CD-ROM icon “My Digital Camera”.
3. Double click the “Acrobat® Reader” icon in English folder.
4. Follow the instructions presented on the screen to complete the installation.
5.9 How to Install QuickTime™
1. Insert the CD-ROM disc into the CD-ROM drive and close the CD ROM draw.
2. Double click the CD-ROM icon “My Digital Camera”.
3. Double click the “QuickTime™” icon in English folder.
4. Follow the instructions presented on the screen to complete the installation.
5. QuickTime will ask you to enter your name, organization and then click “Next”. No need to enter registration number as
this is a Basic version.
6
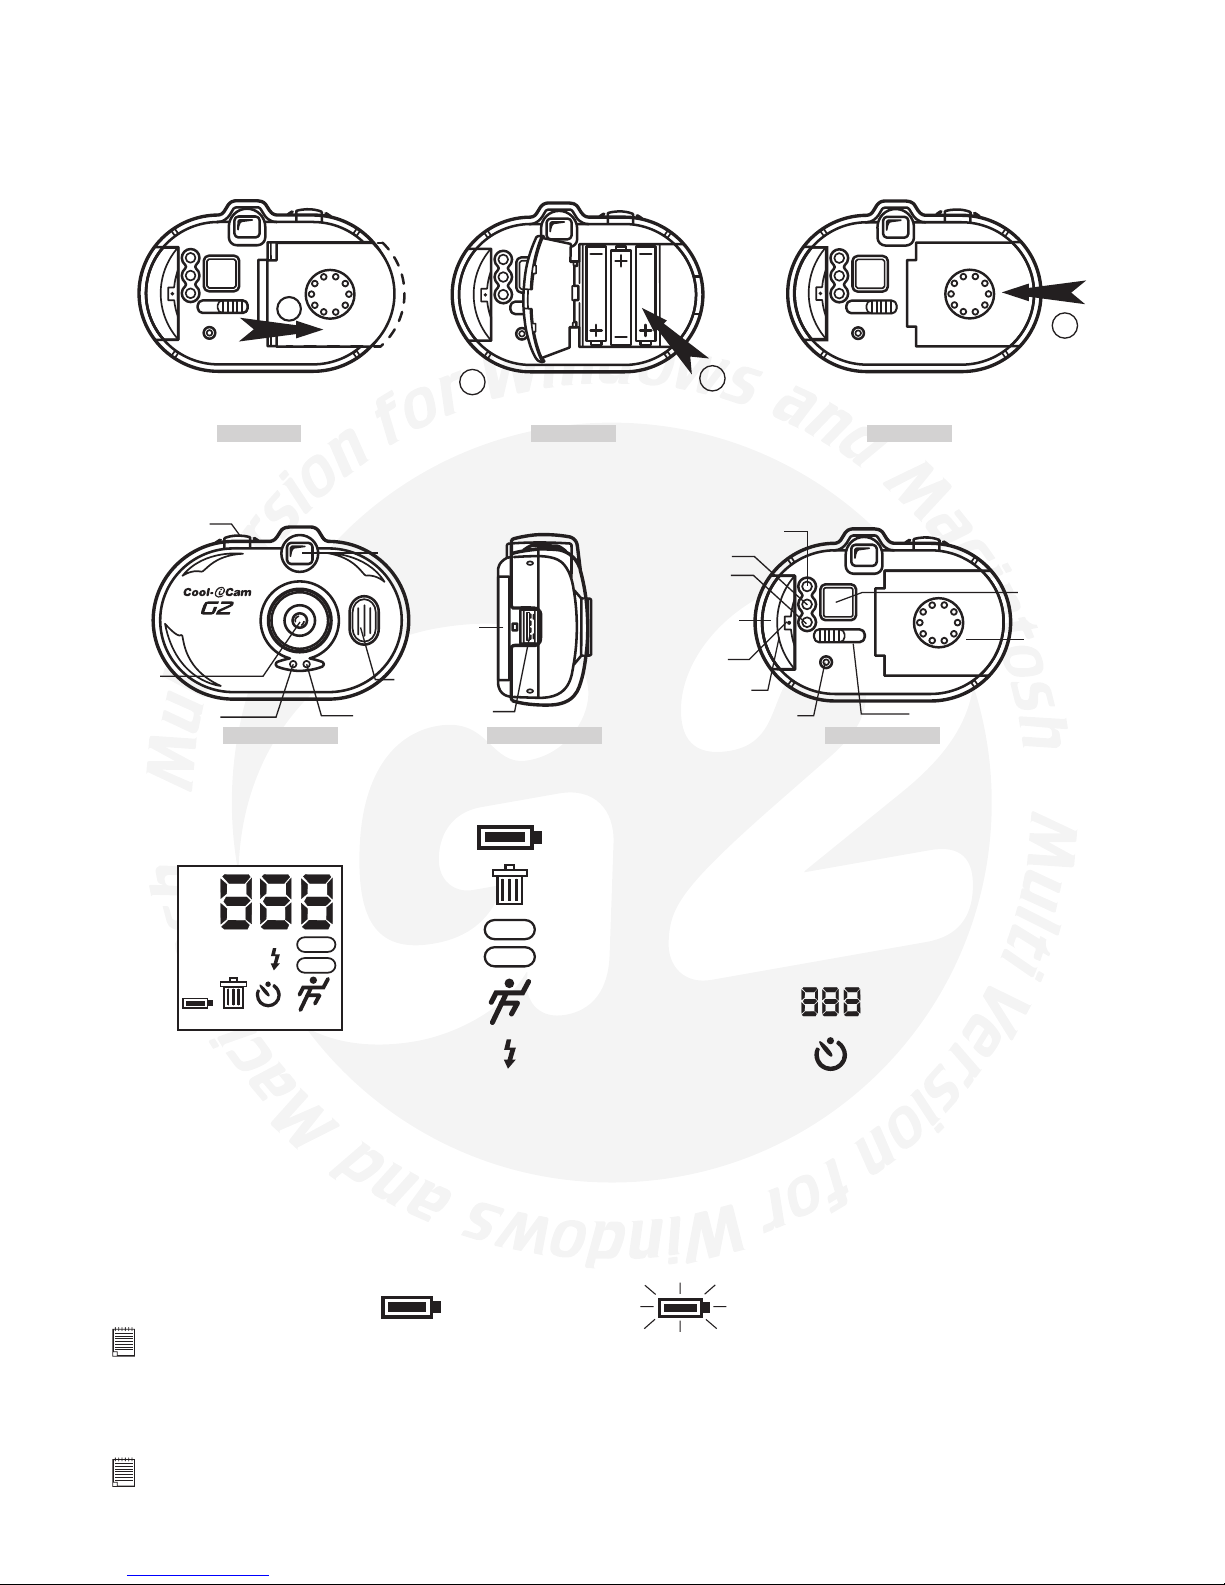
6. Battery Installation
The battery compartment is located on the reverse side of the G2. G2 requires 3 x AAA alkaline batteries (supplied).
To install the batteries:
1. Slide the battery cover outward and lift it upwards as shown on Diagram A and B.
2. Insert the 3 x AAA batteries. When inserting, make sure that you follow the polarity directions (+) (-) which are indicated
on the inside the battery cover and Diagram B.
3. Close and slide the battery cover inward to lock the battery door as shown on Diagram C.
1
Diagram A
Diagram B
Diagram C
slide the battery cover outward
lift battery cover up
insert batteries
1
2
close and slide the
cover inward
3
7. Getting to Know Your G2
Refer to the picture below for a quick overview for your G2.
Side View
Hole for
Wrist Strap
USB Cable
Port
Back View
Feature Button
Timer ON/OFF or
Feature Changing Button
Power ON/OFF
Smart Media Card Slot
Smart Media Card
Isolation Button
SmartMedia Card
Slot Cover
Video Out Port
LCD Display
Battery Cover
Smart Media Card Eject Button
Front View
Shutter Button
Viewnder
Lens
Flash LED
(Green)
Flash
Power LED
(Red)
7.1 LCD Display
By default, the 3 digit LCD screen displays the number of images taken. It is also used in conjunction with the Feature Button
and Feature Changing Button to access and display the G2 settings.
2X
HIGH NORMAL LOW
PAL
NTSC
PAL
NTSC
HIGH
NORMAL
LOW
2X
Battery Indicator
Delete All
TV Mode
Movie
Auto Flash On
Self-Timer
No. of images remaining /
LCD Messages
(details will be available under
separate sections.)
2X digital
Low Resolution
Normal Resolution
High Resolution
See Section 10.3 for LCD display quick reference guide.
7.2 Power
7.2.1 Stand-by Mode
After a period of 60 seconds inactivity, the G2 will switch to Stand-by Mode automatically and the LCD will go blank. All
images taken will not be lost as they are stored in the G2’s memory. This is a preferable way of switching your G2 off.
Waiting for the 60 seconds ensures all image processing has been completed correctly before switching off.
7.2.2 Low Battery
When your G2 has full power, the Battery indicator on the LCD display will be fully shown. When power is low, the icon will
ash. This indicates that the batteries are weak and need to be replaced.
Full Battery Power
Low Battery Power
Important Notes:
Do not remove battteries from the battery compartment when G2 is switched on.
7.2.3 SmartMedia™ Card Isolation Button
The SmartMedia™ Card Isolation Button powers down the G2 when the SmartMedia™ Card cover is opened. This is designed
to protect your G2 and SmartMedia™ card’s internal memory during insertion of your SmartMedia™ card or you can insert
another SmartMedia™ card for storage images.
Important Notes:
• Do not leave the SmartMedia™ card cover open and make sure it is closed properly otherwise G2 cannot be switched on.
• Your G2 will go to Standby Mode during insertion of your SmartMedia™ card and images taken will not be lost.

7
7.3 SmartMedia™ Card
Your G2 already comes with 8MB internal memory for storing images. If this is not enough memory for you, you can extend
your G2’s storage capacity up to 64MB by inserting a SmartMedia™ memory card (not included). They are available from all
good computer and camera retailers.
7.3.1 What is a SmartMedia™ Card - a brief explanation
SmartMedia™ memory cards expand your ability to store more images.
SmartMedia™ memory cards can be reused. Simply erase the data that is not needed and the SmartMedia™ card is ready
for reuse.
The SmartMedia™ card can be removed from your G2 without fear of losing the data you have stored, and additional cards
can be then be inserted. This is especially advantageous when you are away from your PC for prolonged periods of time (like
holidays) where you don’t have the facility to upload the images daily to your computer.
When a SmartMedia™ memory card is installed in the slot, the camera uses the SmartMedia™ card for all image le storage.
If images are already in the internal memory, those images will not be visible to the le system while the SmartMedia™ card
is installed. When the SmartMedia™ card is removed, images stored in the internal memory will again become accessible.
Your G2 can use SmartMedia™ Card of 16, 32 and 64MB memory sizes.
Important Notes:
• Before deciding the size of the SmartMedia™ memory card you may want to purchase, it is
advisable to understand the memory capacity of each size of SmartMedia™ card and how that
equates to the number of images each SmartMedia™ card can hold.
• Your G2 can use SmartMedia Card of 16, 32 and 64 MB memory sizes.
• Images stored on your SmartMedia™ card are an approximate calculation. Depending on the
content of the image may vary the image le size.
No. of Images for SmartMedia™
Resolution 16MB 32MB 64MB
FINE
NORMAL
ECONOMY
2X
80 160 320
1066
2134
2134
267
533
533 1067
1067
533
7.3.2 Volatile & Non-Volatile Memory
Your G2 comes xed with 8MB SDRam of memory (see notes below on volatile memory).
Notes:
5.5MB for image le storage only.
If your G2 has a SmartMedia™ card installed (see notes below on non-volatile memory).
Volatile Memory
Volatile memory means that the memory will be lost from your G2 if the battery runs too low, dead or if the battery is
removed. In the event that the batteries become low we recommend that you immediately upload your images to your My
Digital Camera via the USB cable (with your G2 turned on) (Also see 7.2.2).
Non-Volatile Memory
Your G2 may have a SmartMedia™ card installed. SmartMedia™ Card is a non-volatile memory which means the memory
can only be erased when following the le deletion instructions.
7.3.3 Using a SmartMedia Card (not supplied)
Notes:
Remember to switch off your G2 before inserting or ejecting a SmartMedia™ Card.
After you insert/eject a SmartMedia™ Card, ensure the card slot is closed properly. Otherwise, your G2 cannot be switched on. The card will
only enter the G2 one way.
To Insert a SmartMedia™ Memory Card:
1. Open the card slot located at the side of your G2. (Diagram A)
2. Push the memory card all the way into the card slot. (Diagram B & C) The card is designed only to t in the G2 one
way.
3. Close the card slot cover. (Diagram C) Ensuring the card cover is pushed rmly closed.
To Eject a SmartMedia™ Memory Card:
To remove the SmartMedia™ memory card, lift up the card slot cover and push the Eject Button to eject the SmartMedia™
card and then pull it out carefully. (Diagram D)
Once your G2’s memory or the inserted SmartMedia™ Card is full, upload the images to your computer and then you can
erase the images and take more images.
Diagram A
Diagram B
Lift up the card
slot cover
Push the Memory Card in
Correct insertion
Diagram C
Diagram D
Pull the card out carefully
Eject Button
8
8. Getting Started
8.1 Switching the G2 On
To switch your G2 on by pressing the Power ON/OFF button, which is located at the back of your G2, and 2 “beep” sounds
will be heard. Power will automatically be turned off if there are no user actions for 60 seconds. Alternatively, the power
can be turned off manually by pressing the Power ON/OFF button again. Ensure all images have been process correctly
before switching off.
When you turn the power on, the Red LED will light when your G2 is ready to take an image. If the memory is full, the Red
LED will remain on even though the Status LCD will indicate that the power is on. The LCD will display the number of images
that have been taken.
8.2 G2 Controls
Your G2 contains 4 buttons and a LCD display.
Back View
Shutter Button
Feature Button
Power ON/OFF
Feature Change &
Self-timer ON/OFF Button
HIGH
• Feature Button
Pressing the Feature Button will enter the Feature
Setting Mode and will cause only one of the LCD
Feature icons to be displayed. Pressing the Feature
Button cycles through which Feature is currently
selected. Pressing the Feature Change Button (same
as Self-Timer ON/OFF) changes the setting of the
selected feature. While in the Feature Setting Mode,
will appear on the LCD.
Pressing the Feature Button moves through the features in this sequence:
Image Setting Auto-Flash TV Format Delete All Images
Feature Mode can be exited by any of these methods:
• pressing the Feature Button again after the last feature in the sequence.
• a 10 second period with no button presses
After Feature Mode is exited, your G2 will be ready for image taking.
• Status LCD
The Status LCD contains several useful items of information. It can be used to monitor the status of
your G2 or it can be used to change your G2’s settings through use of the Feature Button.
2X
HIGH NORMAL LOW
PAL
NTSC
Using the Feature and Feature Change Button:The rst feature is the Image Setting. After pressing the Feature Button, depending upon the current G2 setting, either HIGH
/ NORMAL / LOW, 2X (Digital Zoom), or
icon will be displayed. Pressing the Feature Change Button will rotate between
the various settings for the Image Quality Feature.
The HIGH / NORMAL / LOW and 2X settings are all used for capturing still images. The
icon setting is used for captur-
ing QuickTime motion movie clips.
2X
HIGH NORMAL LOW
NTSC
Resolution
Digital Zoom
Normal
High
JEPG 70
Low
2X Diigtal Zoom
Movie
JEPG 90
JEPG 90
Sequential 90
1280 x 960
(software enhanced)
640 x 480
320 x 240
160 x 120
640 x 480
Image Setting
Compression
Resolution (Pixels)
In Low Resolution settings, the entire image is sub-sampled down to the indicated resolution. In the 2X Digital Zoom setting
the central portion is cropped from the image, to simulate zooming in with a lens of twice the focal length.
When the Movie setting
is active, G2 will capture motion movie clips at 160 x 120 resolution, in the form of .MOV les.
Once Image Setting is at the desired choice, press the Feature Button to move to the next feature or press the Feature Button
again after the last in sequence or wait 10 seconds with no button presses for the G2 to set to image taking mode.
• Self-Timer
After exiting the Feature Setting Mode press the Feature Change/Self-Timer Button to switch between Self-Timer On or SelfTimer Off.
To capture an image using the self-timer, press the Shutter Button to initiate the countdown. The 12-second delay is
indicated by the Power On LED (Red) ashing.
The Self-timer is automatically reset to Off after each image capture. You need to set the Self-timer on each time you want
to use it.
• Flash Mode
• Flash Off -- The Flash is disabled no matter what the ambient brightness of the surroundings are.
• Auto Flash -- Your G2 res the ash when insufcient light is measured when the shutter button is pressed.
For automatic ash, press the Feature Button twice then Feature Change Button to turn on the Auto-Flash icon on the LCD
display.
While the ash is charging, the Green LED is off. When the Green LED is permanently on, the ash is ready to re.
When the ash is turned on and the Shutter Button is pressed, the sensor reads the level of available light, and the ash is
automatically red only if there is insufcient light for good exposure without it.
When the automatic ash is turned on, it will be enabled for all subsequent images until one of the following occurs:
• Press the Shutter Button again in a light area, then the ash would not be activated.
• G2 Feature Settings are changed to capture movie clips instead of still images.
• G2 power is turned off.
 Loading...