

Cool-Icam CIC-220, AQUA-CAM User Manual

TM
AQUA-CAM
M
o
d
e
/
O
n
S
h
u
t
e
r
/
S
e
l
e
c
t
User’s Manual
2
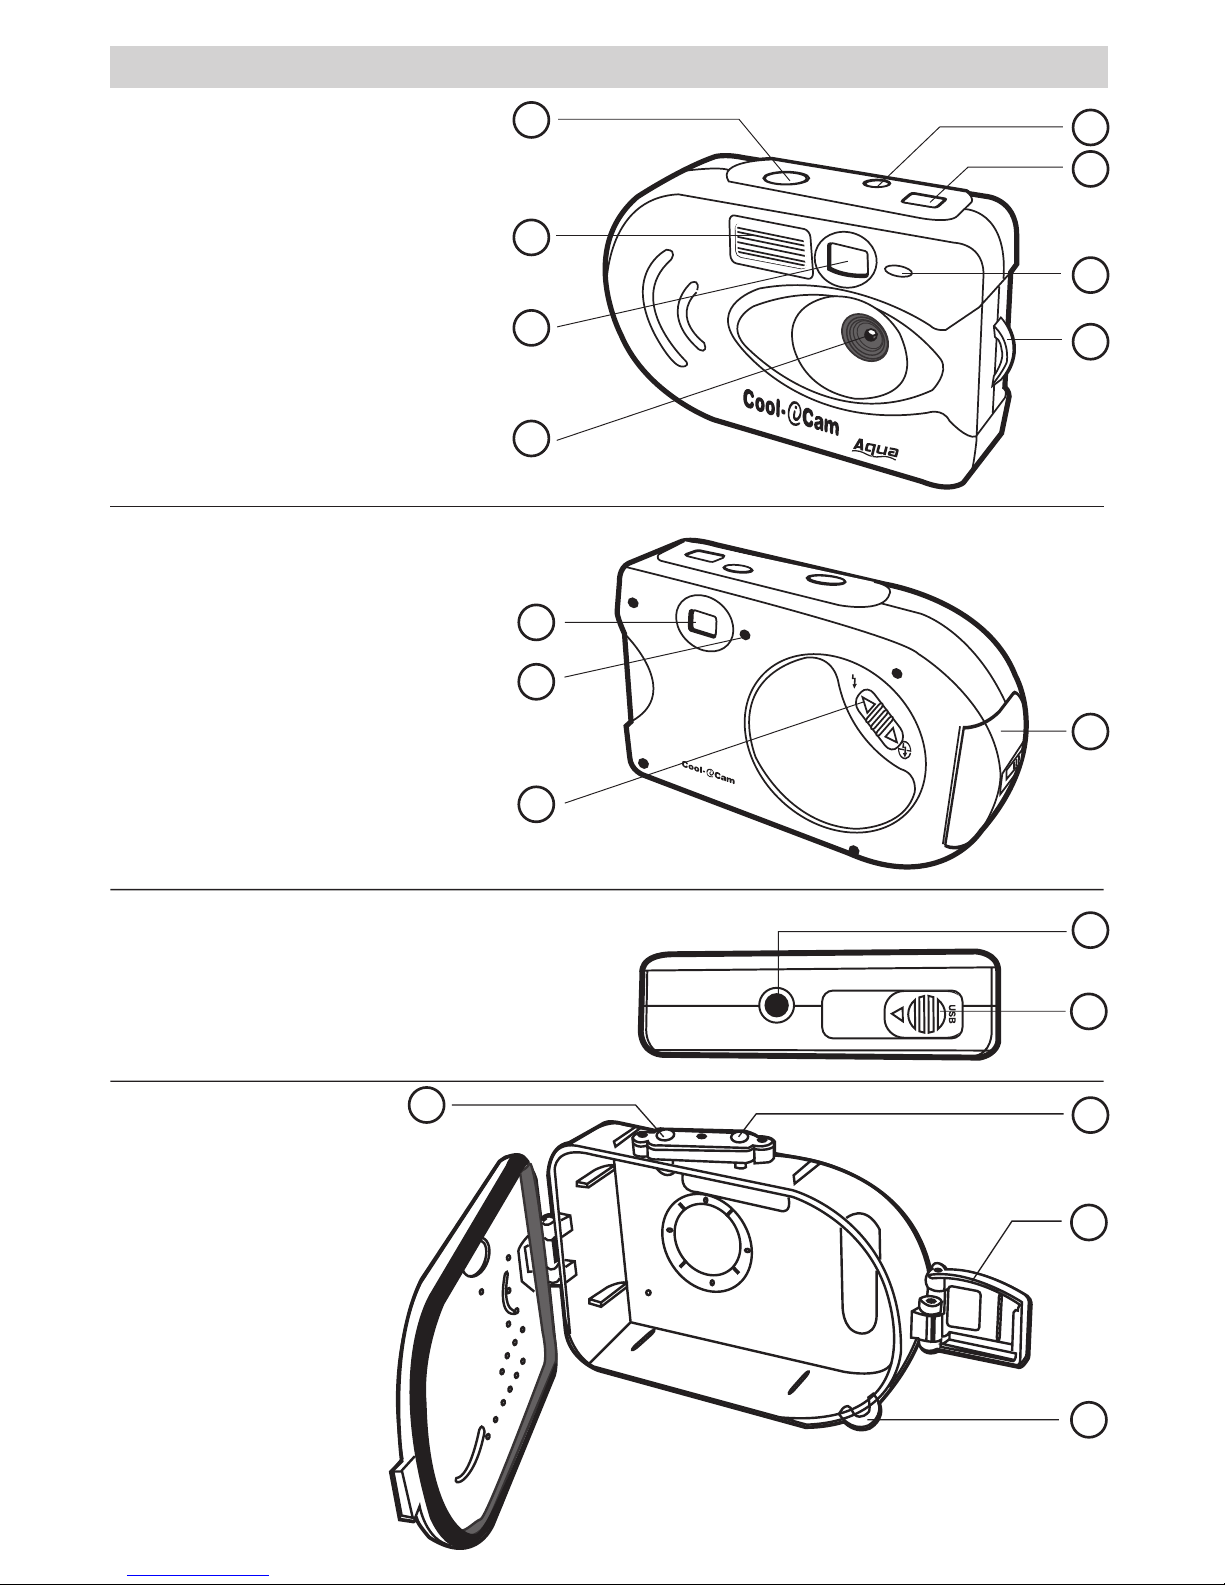
Product Overview
Camera
1. Shutter/Select Button
2. Flash Light
3. Viewfinder
4. Lens
5. Mode/ON Button
6. LCD Display
7. Power Indicator
8. Hand Strap Holder
(Hand strap not included)
2
3
1
5
6
4
7
8
M
o
d
e
/
O
n
S
h
u
t
e
r
/
S
e
l
e
c
t
1. Viewfinder
2. Flash Light Indicator
3. Flash ON/OFF Button
4. Battery door
2
3
1
M
o
d
e
/
O
N
S
h
u
t
t
e
r
/
S
e
l
e
c
t
4
1. Tripod Socket
2. USB Cover
1
2
Waterproof Case
1. Mode/ON Button
2. Shutter/Select Button
3. Hinge Lock
4. Hand Strap Holder
(Hand strap included)
2
3
1
4

3
Table of Contents
1 Getting Started ........................................................................................................................ 4
• What Can I do with my Camera?............................................................................................ 4
• What can I do with my Digital Pictures? .................................................................................. 4
• What can I do with my Continuous Images? ............................................................................ 4
• Camera Package Contents..................................................................................................... 4
• Installing the batteries ......................................................................................................... 5
• Checking the battery level .................................................................................................... 5
• Automatic power off saves batteries ....................................................................................... 5
• Checking Camera Status....................................................................................................... 5
2 Taking Pictures ......................................................................................................................... 5
• Taking a Picture ................................................................................................................... 5
• Other Picture Taking settings ................................................................................................. 6
• Setting the picture quality..................................................................................................... 6
• Flash Mode.......................................................................................................................... 6
• Self Timer Mode .................................................................................................................. 6
• Continuous Mode ................................................................................................................. 6
• Clear Memory Mode ............................................................................................................. 6
• Taking a Picture under water ................................................................................................. 7
3 Installing the Software onto a Computer ...................................................................................... 7
• Install the software ...............................
MAC
PC
.................................................................. 7
• Software included with your camera.........
MAC
PC
................................................................ 10
• Computer system requirements ...............
MAC
PC
................................................................ 15
4 Transferring Pictures, Video Clips to your Computer ..................................................................... 16
• Before you transfer pictures ................................................................................................ 16
• Connecting to your computer .............................................................................................. 16
• Transferring your pictures ......................
MAC
PC
................................................................ 16
5 Using your camera as a Web Cam ............................................................................................. 19
• Web Cam Connection .............................
MAC
PC
................................................................ 19
6 Troubleshooting Problems ........................................................................................................ 20
• Troubleshooting ...................................
MAC
PC
................................................................ 20
7 Getting Help........................................................................................................................... 21
• Software Help ................................................................................................................... 21
• Cool-iCam Online Services .................................................................................................. 22
• Customer Support ............................................................................................................. 22
8 Appendix ............................................................................................................................... 22
• Technical Specifications ...................................................................................................... 22
• Using your batteries........................................................................................................... 22
• Tips, Your Safety & Maintenance.......................................................................................... 23
• Regulatory Information....................................................................................................... 24
4
1 Getting Started
• What Can I do with my Camera?
Capture
Enjoy point & shoot operation. Take pictures under water with a waterproof
case
Set Up
Select various camera and video settings
Communicate
Use the camera as a web camera
• What can I do with my Digital Pictures?
View
View pictures on a computer using the Arcsoft® Software supplied
Save
Save pictures to the computer memory
Communicate
Send the pictures over the internet to family and friends.
• What can I do with my Continuous Images?
Save
Save your continuous images into video clip on a computer using the
Arcsoft® Software supplied
Playback
Playback video clip on a computer using the Arcsoft® software supplied
Communicate
Send the video clip over the internet to family and friends.
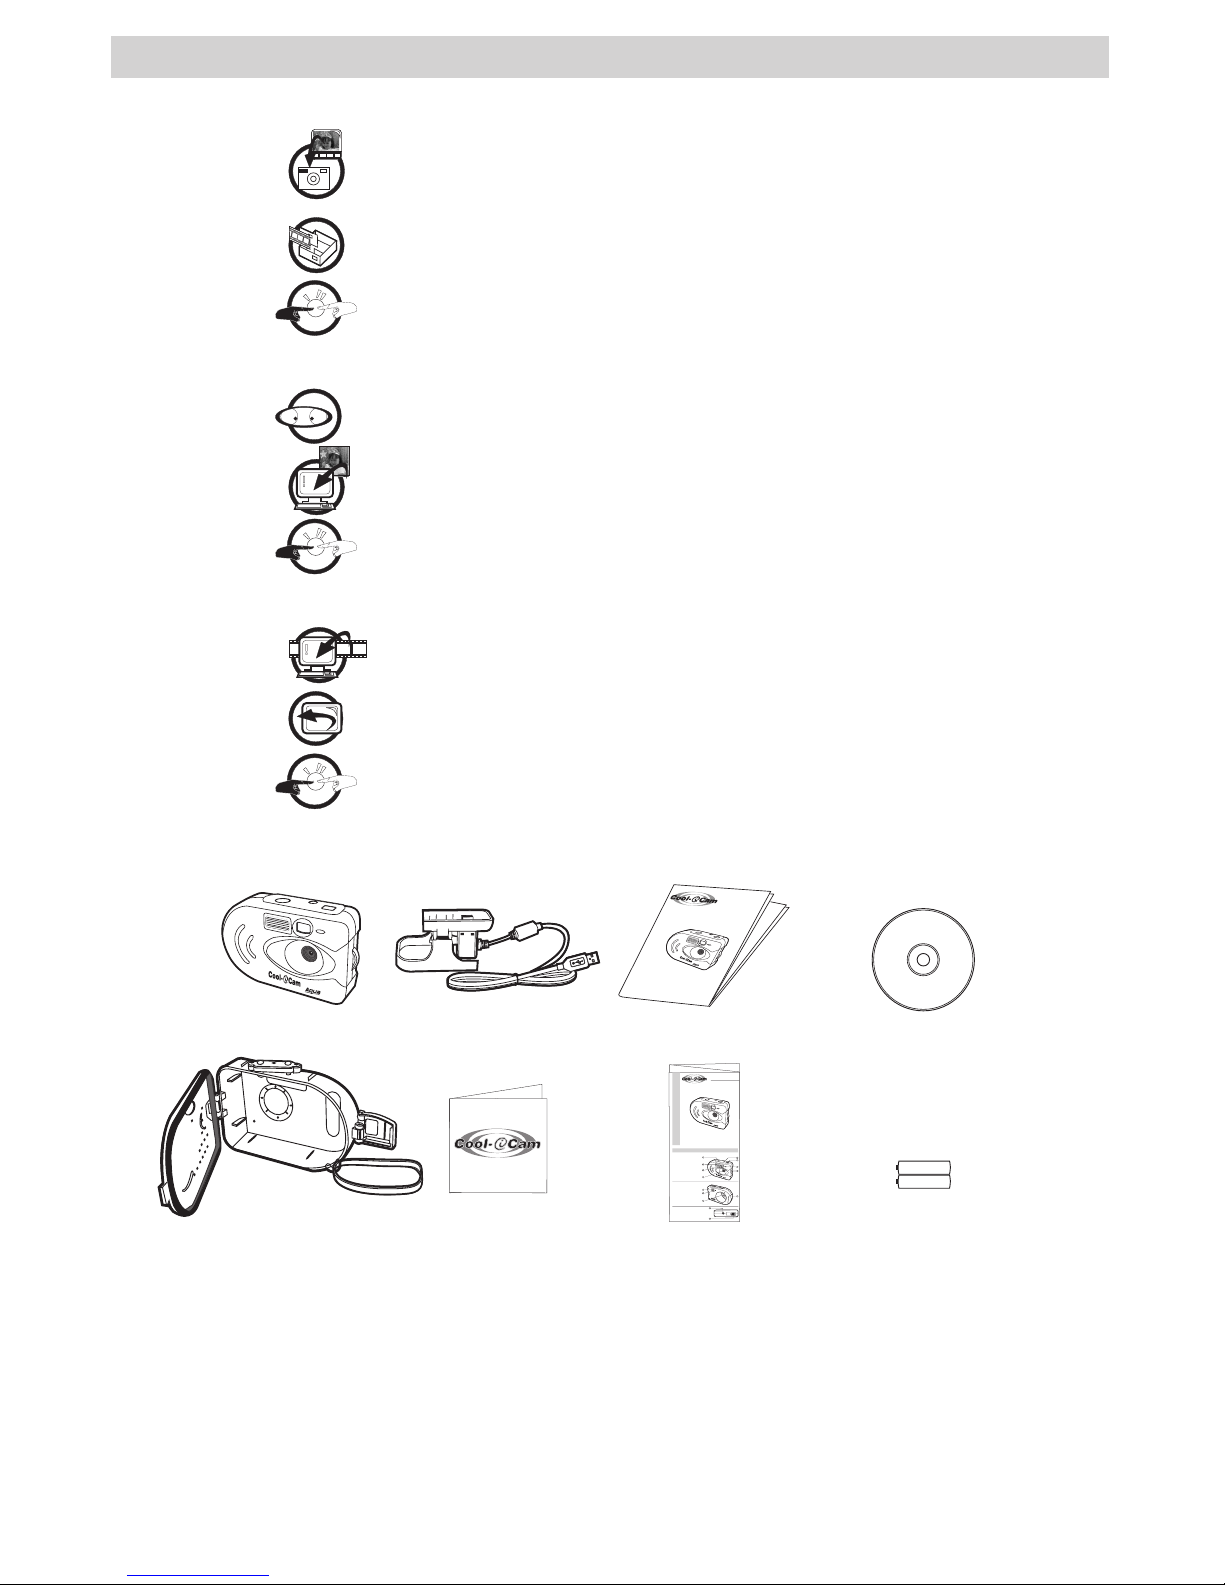
• Camera Package Contents
AQUA-CAM
Waterproof Case with
Hand Strap attached
(For Waterproof Case only)
2 x AA (UM-3)
Alkaline Batteries
CD-ROM includes
Digital Camera Manager Software (PC),
Digital Camera Driver (Mac),
PhotoStudio® 4.0 (PC & Mac),
ArcSoft Funhouse™ 1.0 (PC & Mac),
ArcSoft PhotoPrinter® 2000 (PC & Mac),
ArcSoft VideoImpression™ 1.6 (PC & Mac),
Microsoft® NetMeeting™ (PC), CU-SeeMe™ (Mac)
Adobe® Acrobat® Reader (PC & Mac).
User’s Manual
P
l
e
a
s
e
t
a
k
e
a
m
o
m
e
n
t
t
o
f
i
l
l
o
u
t
a
n
d
r
e
t
u
r
n
t
h
i
s
R
e
g
i
s
t
r
a
t
i
o
n
C
a
r
d
.
Y
o
u
r
v
a
l
u
a
b
l
e
i
n
p
u
t
w
i
l
l
h
e
l
p
u
s
t
o
s
e
r
v
e
y
o
u
b
e
t
t
e
r
.
P
r
o
d
u
c
t
R
e
g
is
t
r
a
t
io
n
C
a
r
d
T
M
Registration Card
M
o
d
e
/
O
n
S
h
u
t
e
r
/
S
e
l
e
c
t
TM
AQUA-CAM
M
o
d
e
/
O
n
S
h
u
t
e
r
/
S
e
l
e
c
t
User’s Manual
Quick Guide
TM
AQUA-CAM
Quick Start Guide
Product Overview
1. Lens
2. Microphone
3. Power LED
4. Viewfinder(open position)
5. LCD Display
6. Mode Button
7. Delete Button
8. Flash Button
2
3
1
5
6
4
7
8
M
o
d
e
/
O
n
S
h
u
t
e
r
/
S
e
l
e
c
t
1. Viewfinder(closed position)
2. USB & SmartMedia™ Card Door
3. Battery Door
4. Shutter Button
2
3
1
M
o
d
e
/
O
N
S
h
u
t
t
e
r
/
S
e
l
e
c
t
4
1. Viewfinder(closed position)
2. USB & SmartMedia™ Card Door
1
2
M
o
d
e
/
O
n
S
h
u
t
e
r
/
S
e
l
e
c
t
Camera Stand
with USB Cable
5
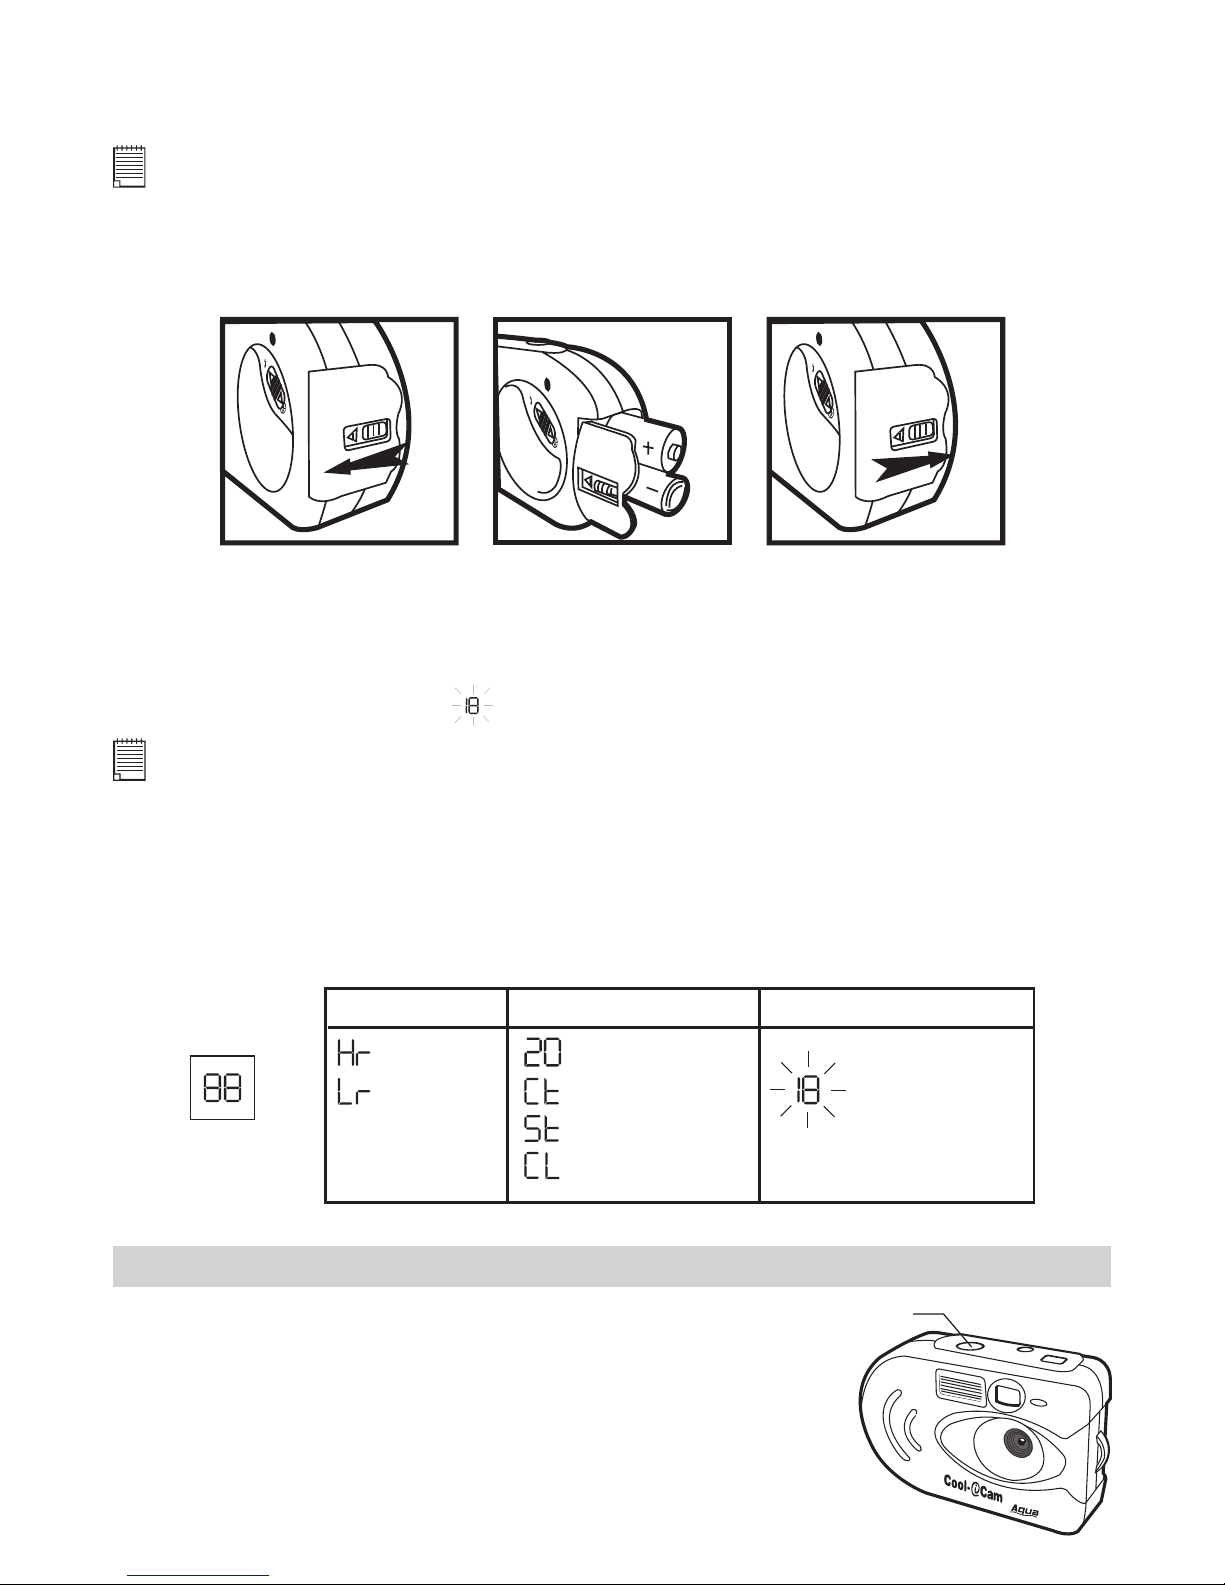
• Installing the batteries
2 x AA (UM-3) Alkaline batteries are supplied with the product. Follow the procedure below for installing
batteries. Make sure the batteries are placed correctly in their positive (+/-) negative position. See inside
marking on battery door cover.
Note:
Before opening the battery door and inserting the batteries, you must download all the pictures in the camera to a
computer rst, otherwise pictures will be lost once battery power has been cut off.
1. Open the camera battery door by sliding the lock to the left.
2. Insert the batteries as shown, ensuring you follow the +/- polarity correctly.
3. Close the camera battery door by sliding the lock back to the right.
• Checking the battery level
Check the battery power level before taking pictures. For guidelines on battery usage, see Using Your
Batteries.
1. Turn the camera on.
2. Check the battery status level that appears on the camera LCD screen. When batteries voltage are too
low to operate. The LCD Display
will blink continuously.
Note:
Remember to upload your pictures before changing the batteries.
• Automatic power off saves batteries
Your Camera is designed to switch off automatically and save battery life without losing the pictures taken
after 30 seconds of non use. The Power Indicator LED will go off automatically when the camera is in stand
by mode. Press the Mode/On Button to reactivate the camera. The camera will sound a high beep and the
LED/LCD indicator will come back on to indicate that the camera is ready and in operation.
• Checking Camera Status
Switch the Camera on, view the camera LCD screen to check which camera settings are active.
High Resolution
Images Remaining
Picture Quality
Camera Status
Low Battery
Low Resolution
Clear Memory Mode
Self-Timer Mode
Continuous Mode
Low Battery Warning
(LCD will blink)
2 Taking Pictures
• Taking a Picture
1. Switch the camera ON. The Red Power Indicator Light in front of the camera
lights up.
3. Frame your subject using the camera viewfinder.
4. Press the Shutter/Select Button to take an picture. Hold the camera steady.
A high pitched beep sound is emitted when the picture has been taken. The
LCD will show a number, indicating the number of pictures remaining in the
camera.
Shutter Button
M
o
d
e
/
O
n
S
h
u
t
e
r
/
S
e
l
e
c
t

6
• Other Picture Taking settings
Setting Section
Set Picture Quality Setting the Picture Quality
Using the flash mode Setting the flash mode
Self Timer Setting the self timer
Set Continuous Mode Setting camera to make a series of images
Deleting Pictures Deleting Pictures from the camera
• Setting the Picture Quality
1. Pressing the Mode/On button will alter the camera settings – in order
Images Remaining
Continuous Mode
Self-Timer Mode
Clear Memory Mode
High Resolution
Low Resolution
2. The picture quality settings are described below
• High resolution
(640 x 480) detailed images, large file size and prints.
• Low resolution
(320 x 240 ) economy images, small file size which is ideal for e-mailing.
3. Take the picture using the Shutter/Select Button.
• Flash Mode
If you are in a dull atmosphere when taking a picture. The camera will sound a low beep to indicate flash
is needed. You must slide the Flash On/Off switch to ON position and wait for the flash light indicator to
turn on fully.
1. Switch the camera on.
2. Switch the Flash on by sliding the switch to ON position and wait for the flash to charge up. The
flashlight indicator will start to glow until it is fully red. You are now ready to use the flash.
3. Frame your subject.
4. Press the Shutter/Select Button to take a picture.
Note:
• Do not turn the ash ON when connected to the computer. This may damage the camera.
• To achieve the best result for the use of Flash, the recommended distance is between 1 - 2.5m.
• Please do not press the shutter button until the ash light indicator is fully red since the image quality taken without
ash light will affect the image.
• Self timer Mode
Your Camera is designed with a self timer function which will allow you to take pictures with a 9 beep sound
timer built in. Frame your subject and use the stand provided to position your camera.
1. Switch the camera on.
2. Use the Mode/On Button to select the Self timer mode.
3. Frame your subject.
4. Press the Shutter/Select Button, the camera counter will automatically count 9 beep sound then a long
beep sound which indicates a picture has been taken.
• Continuous Mode
Important Note:
Make sure your Flash is positioned OFF. During the Continuous Mode the camera will allow images to be taken with
insufcient light.
To create a Video Clip:
1. Press the Mode/On Button until the
appears on the LCD.
2. Press and hold the Shutter/Select Button down to start taking continuous images. It can take pictures
continuously with 10 pictures per second. In Continuous Mode, the counter will rapidly decrease
accompanied by a series of rapid beeps as each image is taken. If the Shutter Button is not pressed
within 5 seconds the camera will revert to the normal image taking mode.
• Clear Memory Mode
1. Press the Mode/On Button until the
appears on the LCD.
2. Press the Shutter/Select Button once and the LCD Display will start to blink. Press the Shutter/Select
Button again to confirm. All the pictures in the camera will be deleted.
7
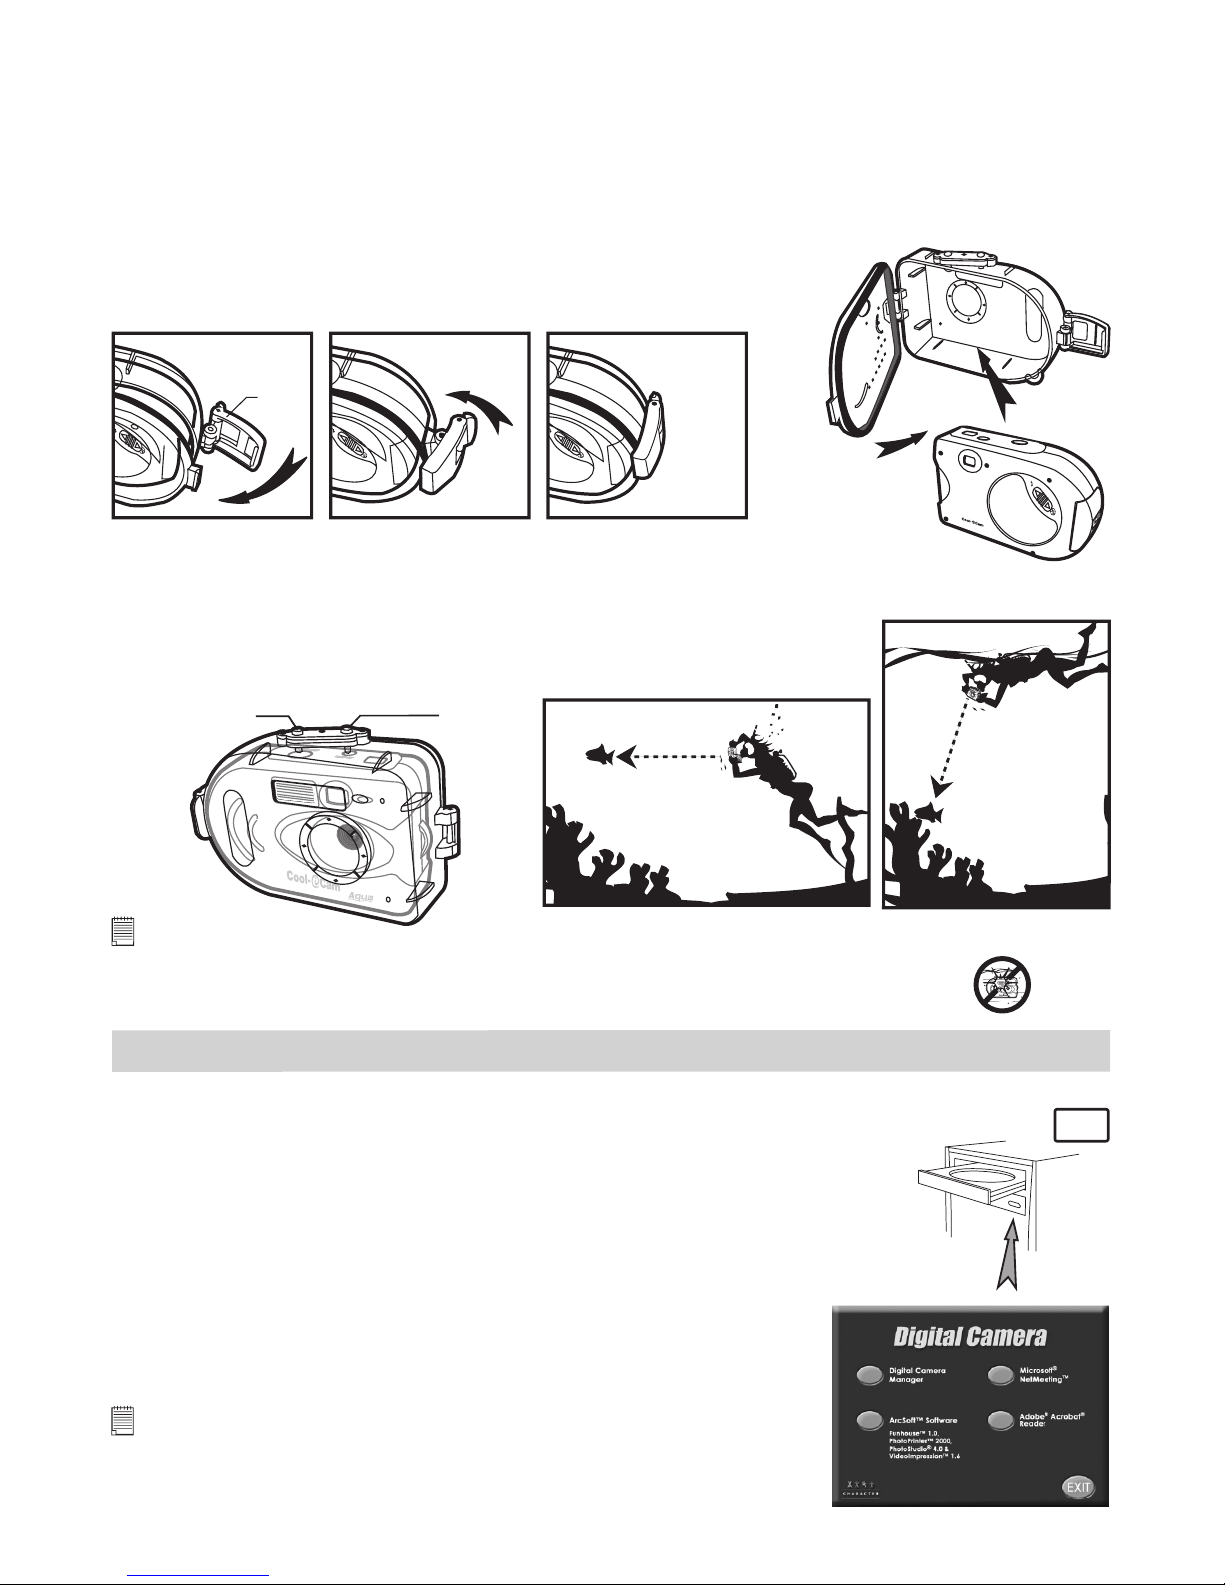
• Taking a Picture under water
The waterproof case will allow you to use your AQUA-CAM in the rain, at the beach or on the ski slopes.
You can also use it underwater at depths down to 10 meters and in wet or dusty environments. Before you
use the waterproof case, please make sure the case is functioning correctly and does not leak. Close the
waterproof case before installing the camera and hold it underwater at an approximate depth of 15cm for
several minutes to check for leaks. If it leaks, contact your customer support.
For Safety/Handling Precautions for the waterproof case, please refer to section Tips, Your
Safety & Maintenance.
1. Switch the AQUA-CAM off. Place the AQUA-CAM into the waterproof
case as illustrated in Diagram 1.
2. Secure lock as seen on Diagram 2.
Diagram 1
M
o
d
e
/
O
N
S
h
u
t
t
e
r
/
S
e
l
e
c
t
Lock
Diagram 2
Push
to lock
3. Switch the camera ON. The Red Power Indicator Light in front of the camera lights up.
4. Frame your subject using the camera viewfinder.
5. Press the Shutter/Select Button to take an picture. Hold the camera steady.
A high pitched beep sound is made when the picture has been taken. The
LCD will show a number, indicating the number of pictures remaining in the
camera.
Shutter/Select
Button
M
o
d
e
/
O
n
S
h
u
t
e
r
/
S
e
l
e
c
t
Mode/On
Button
Clear water: 3 meters
Cloudy water: 0.6 meter
Clear water: 3 meters
Cloudy water: 0.6 meter
Notes:
• If images are taken underwater in a dark environment, an external power supply light gun (not supplied) is preferable
to be used instead of the built-in ash light.
• Built-in ash light is not recommended to be used under water since it will affect the image quality.
3 Installing your Software onto a Computer
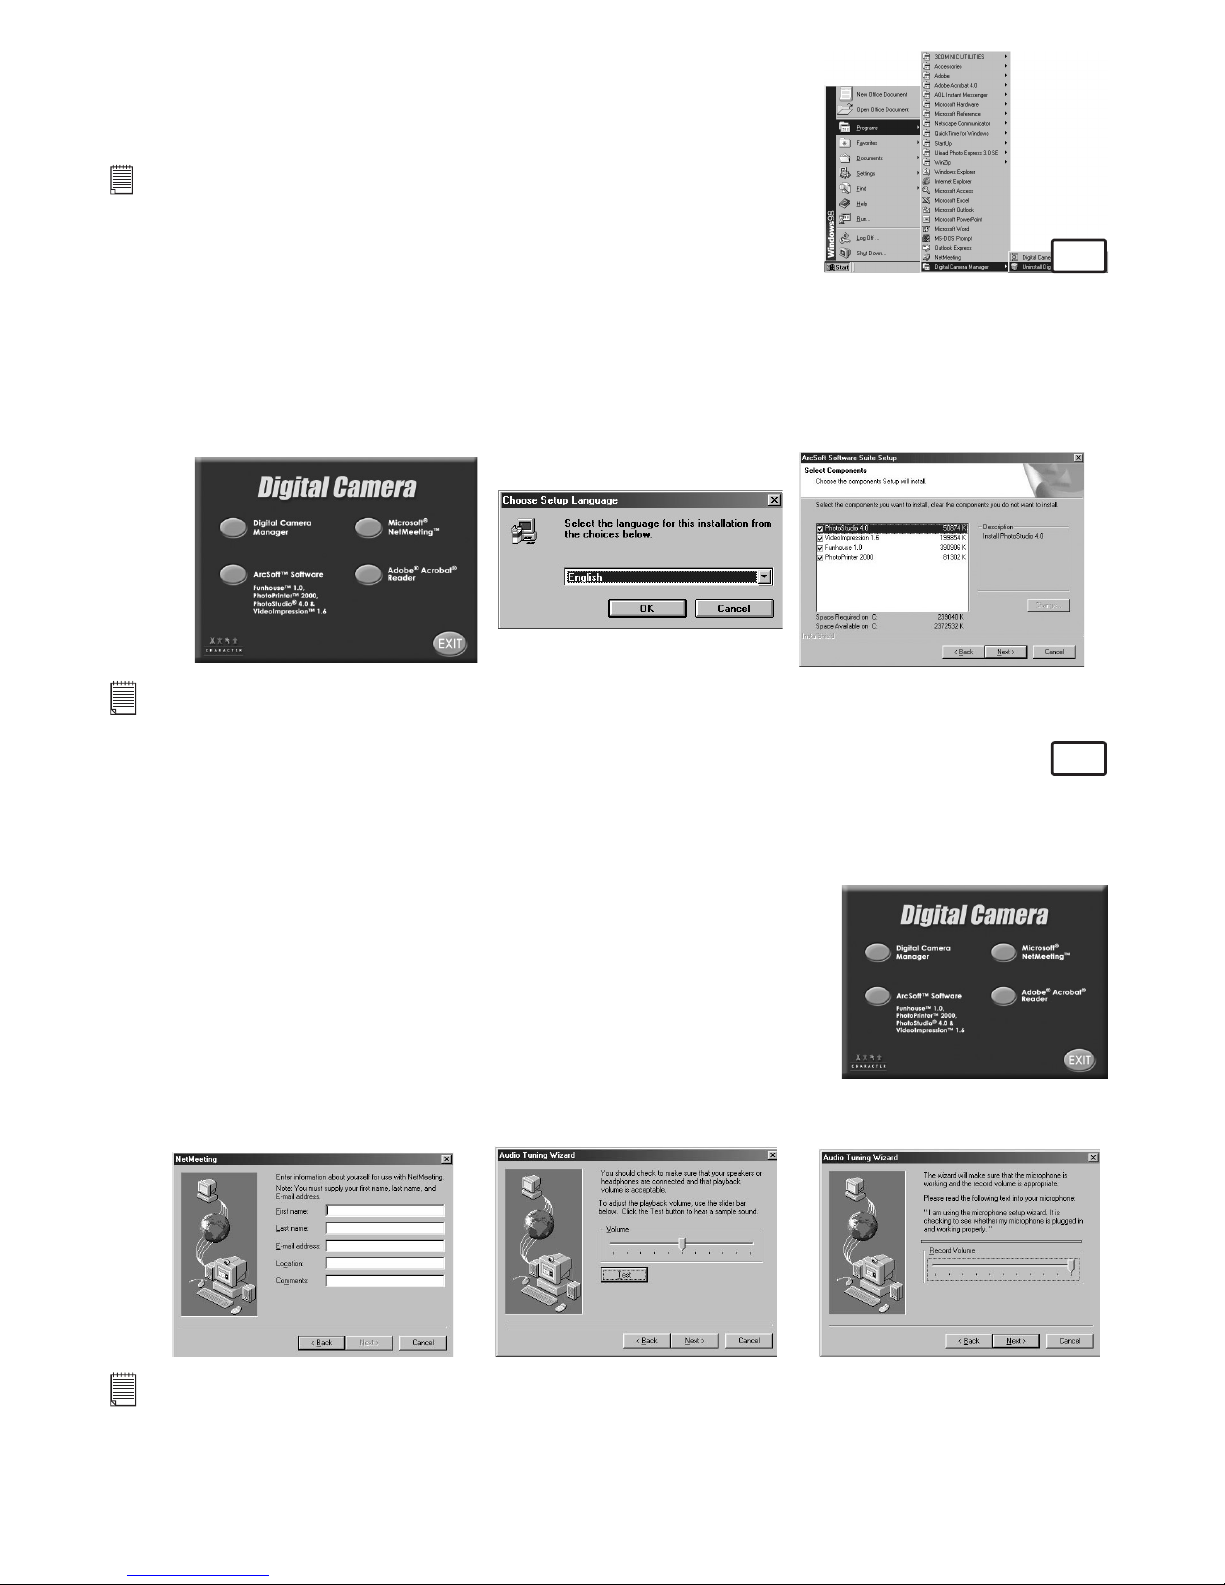
• Install the software
How to Install Digital Camera Manager
PC
“Digital Camera Manager” should be installed first.
1. Insert the CD-ROM disc into the CD-ROM drive and close the CD-ROM drawer.
2. An installation wizard will automatically launch.
3. Click “Digital Camera Manager” icon.
4. Follow the instructions presented on the screen to complete the installation.
5. Click “OK” to restart your computer and wait for your PC to restart automatically.
Open & Close
Notes:
If the setup screen doesn’t appear after loading the CD, then you can manually
start it by double-clicking the “My Computer” icon on your desktop, then double
click your mouse on the icon to open the CD-ROM drive. When the CD-ROM window
opens, double-click the “INSTALL-E.EXE” le.
8
How to Uninstall Digital Camera Driver
To uninstall Digital Camera Manager, click the “Start Menu” on your
Windows® desktop, choose Digital Camera Manager folder under
Program and choose “Uninstall Digital Camera Manager”. Follow the
onscreen instructions.
Notes:
Uninstalling your Digital Camera Manager does not delete your album folders
and therefore all images transferred into your default or created albums will be
preserved. You will be able to access these folders on your system desktop.
How to Install ArcSoft® Software
PC
1. Re-insert the CD-ROM disc into the CD-ROM drive and close the CD-ROM drawer.
2. An installation wizard will automatically launch.
3. Click the “ArcSoft® Software” icon.
4. Select the language for the installation and click “OK”.
5. Follow the on-screen prompts.
6. Select the software you want or you do not want installed by clicking on the tick boxes next to the
software title. Click “Next >” to continue.
7. Follow the instructions presented on the screen to complete the installation.
Note:
Don’t worry if you made a mistake and want to add in ArcSoft® titles you did not tick.
Re-insert the CD-ROM and follow steps 1 - 6 ticking only the software you want to add.
How to install Microsoft® NetMeeting™
PC
NetMeeting™ provides the most complete conferencing solution for the Internet and corporate intranet.
Powerful features let you communicate with both audio and video, collaborate on virtually any Windowsbased application, exchange graphics on an electronic whiteboard, transfer files, use the text-based chat
program, and much more. Using your PC and the Internet, you can now hold face-to-face conversations
with friends and family around the world.
1. Insert the CD-ROM disc into the CD-ROM drive and close the CD-ROM
drawer.
2. An installation wizard will automatically launch.
3. Click the “Microsoft® NetMeeting™” icon.
4. Follow the instructions presented on the screen to complete the
installation.
5. You will have a choice during installation to place a desktop icon on your
desktop for easy access directly to the software.
6. For further installation details, please visit the following website:
http://www.microsoft.com/windows/netmeeting
Note:
• You need to enter your name, your e-mail address and country details during installation.
• You need to adjust the playback volume and your record volume.
• Mircosoft® Netmeeting™ already bundled into Windows® 2000 and XP OS. Users using Windows® 2000 or XP do not
need to install this software from the CD-ROM.
 Loading...