

Cool-Icam CIC-221, AQUA 1300 User Manual
TM
CIC-221
AQUA 1300
User’s Manual
2
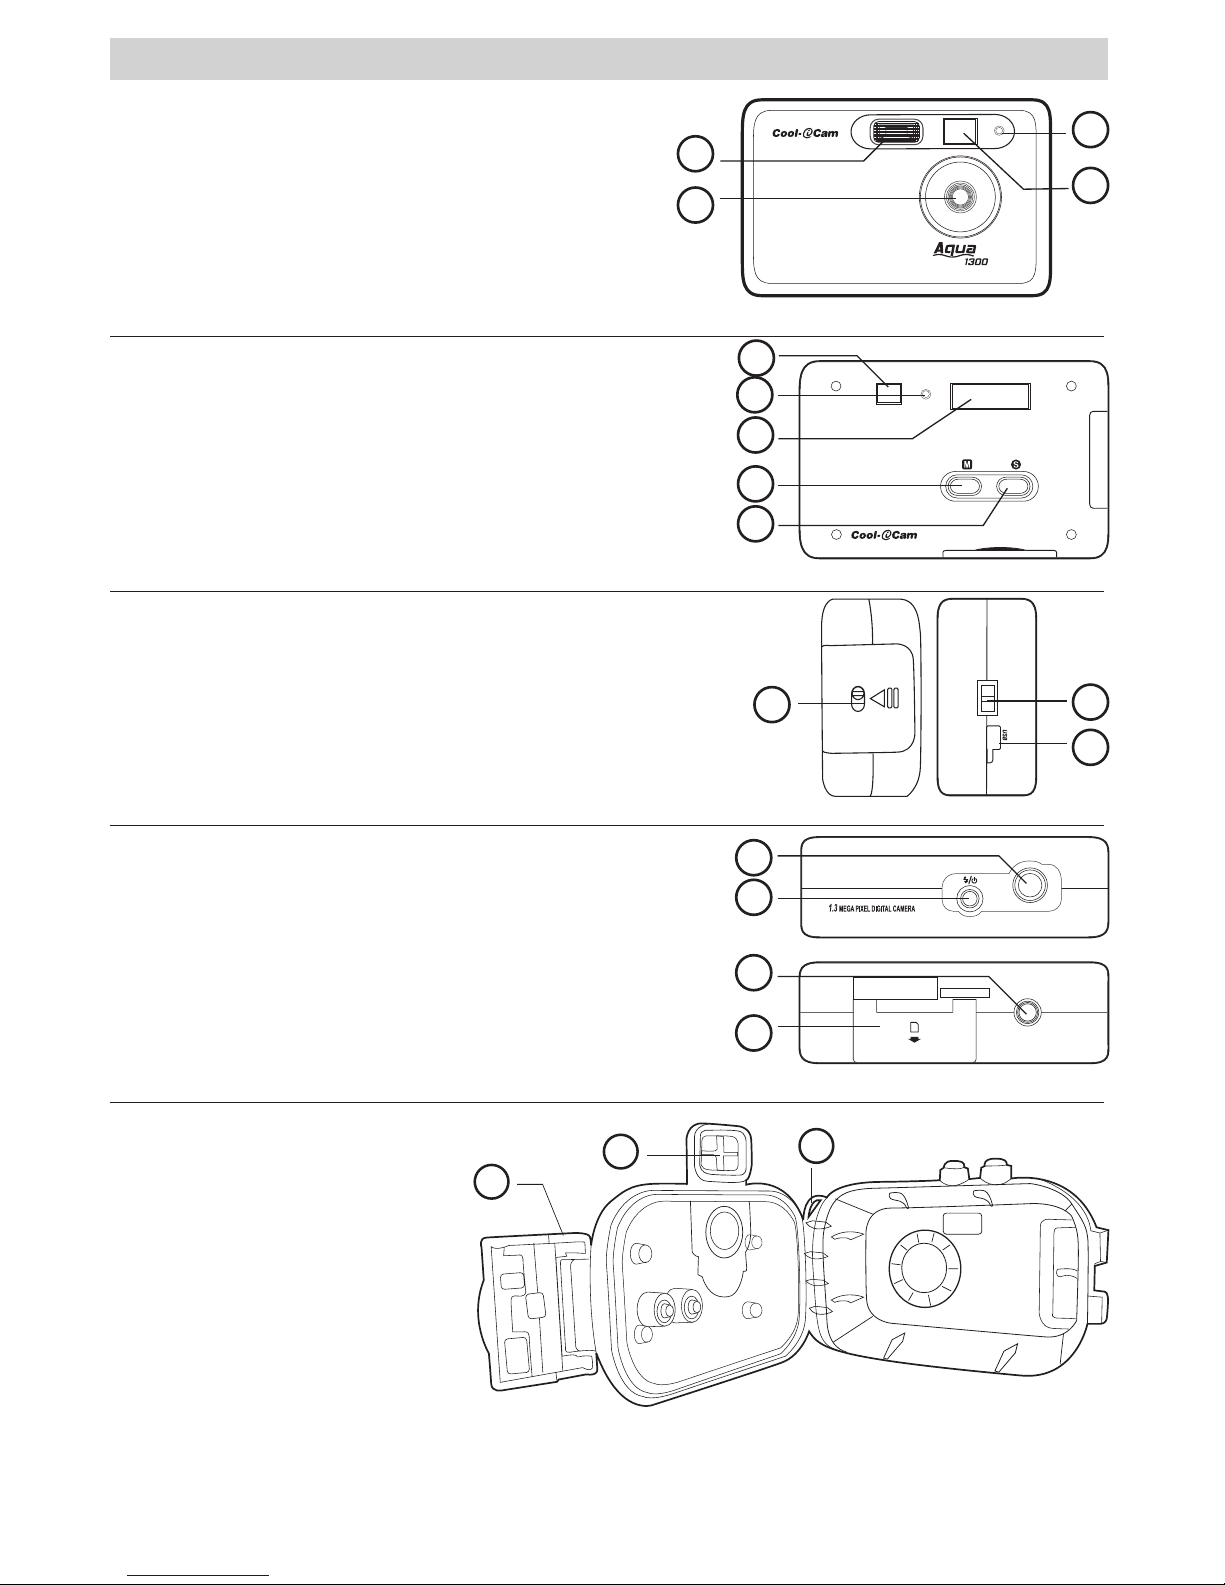
Product Overview
1. Flash Light
2. Lens
3. Self-timer LED
4. Viewfinder
2
1
3
4
Camera Front View
1. Viewfinder
2. Operation LED
3. Status LCD
4. Menu button
5. Select button
3
4
5
1
2
Camera Back View
1. Battery door
2. Hand Strap Holder
3. USB Cover
3
1
2
Camera Sides View
1. Shutter button
2. Power button/Flash button
3. Tripod Socket
4. SMC card door
Camera Top/Bottom View
2
3
1
4
1. Hand Strap Holder
2. Underwater viewfinder
3. Hinge Lock
3
2
1
Waterproof Case

3
Table of Contents
1 Getting Started ........................................................................................................................ 4
• What can I do with my Camera? ............................................................................................ 4
• What can I do with my Digital Pictures? .................................................................................. 4
• What can I do with my Continuous Images? ............................................................................ 4
• Camera Package Contents..................................................................................................... 4
• Attaching the Rubber Strap ................................................................................................... 5
• Battery Guidelines ............................................................................................................... 5
• Installing the Batteries ......................................................................................................... 5
• Turning the Camera On and Off.............................................................................................. 5
2 Camera Setting ........................................................................................................................ 6
• Checking Camera Status....................................................................................................... 6
• Checking the Battery Level ................................................................................................... 6
• Low Battery ........................................................................................................................ 6
• Automatic Power Off Saves Batteries...................................................................................... 6
3 Taking and Managing the Pictures ............................................................................................... 7
• Taking a Picture ................................................................................................................... 7
• Set Flash Mode.................................................................................................................... 7
• Setting Picture Quality.......................................................................................................... 7
• Setting Self-timer ................................................................................................................ 8
• Setting Frequency................................................................................................................ 8
4 Recording Audio and Video Clip................................................................................................... 8
• Recording Video Clip without Audio ........................................................................................ 8
• Recording Video Clip with Audio............................................................................................. 8
• Recording Audio Clip ............................................................................................................ 8
5 Managing Pictures, Audio and Video Clip ...................................................................................... 9
• Deleting last Picture, Audio or Video Clip................................................................................. 9
• Deleting All Pictures, Audio and Video Clips ............................................................................. 9
6 Using the Camera under Water................................................................................................... 9
• Taking a Picture underwater .................................................................................................. 9
• Using the Rubber Ring........................................................................................................ 10
• Assemble Waterproof Case.................................................................................................. 10
7 Using SMC Card...................................................................................................................... 11
• Using the SMC Card (SmartMedia™ Card) ............................................................................. 11
8 Installing the Software onto a Computer .................................................................................... 12
• Installing the Software ...................................................................................................... 12
• Software Included with Your Camera .................................................................................... 12
• Computer System Requirements.......................................................................................... 13
9 Transferring Pictures, Audio & Video Clips to your Computer ......................................................... 13
• Before you transfer Pictures, Video & Audio clips.................................................................... 13
• Connecting to Your Computer.............................................................................................. 13
• Transferring and Viewing the Pictures, Audio and Video clips .................................................... 14
10 Using your camera as a Web Cam ........................................................................................... 15
• Setting up NetMeeting™ ..................................................................................................... 15
• Setting up CU-SeeMe™......................................................................................................15
11 Troubleshooting Problems ...................................................................................................... 16
• Troubleshooting ............................................................................................................... 16
12 Getting Help......................................................................................................................... 18
• Cool-iCam Online Services .................................................................................................. 18
• Customer Support ............................................................................................................. 18
• ArcSoft Software Help ........................................................................................................ 18
13 Appendix ............................................................................................................................. 18
• Technical Specifications ...................................................................................................... 18
• Using Your Batteries........................................................................................................... 19
• Tips, Your Safety & Maintenance.......................................................................................... 19
• Regulatory Information....................................................................................................... 20
4
1 Getting Started
• What Can I do with my Camera?
Capture
Enjoy point & shoot operation. Take pictures underwater with a waterproof
case.
Set Up
Select various camera and video settings.
Communicate
Use the camera as a web camera.
• What can I do with my Digital Pictures?
View
View pictures on a computer using the Arcsoft® Software supplied.
Save
Save pictures to the computer memory.
Communicate
Send the pictures over the Internet to family and friends.
• What can I do with my audio and video clips?
Playback
Playback of video clips on a computer using the Windows® Media Player or
other Media software supplied.
Save
Save video clips to the computer memory.
Communicate
Send the audio & video clips over the Internet to family and friends.
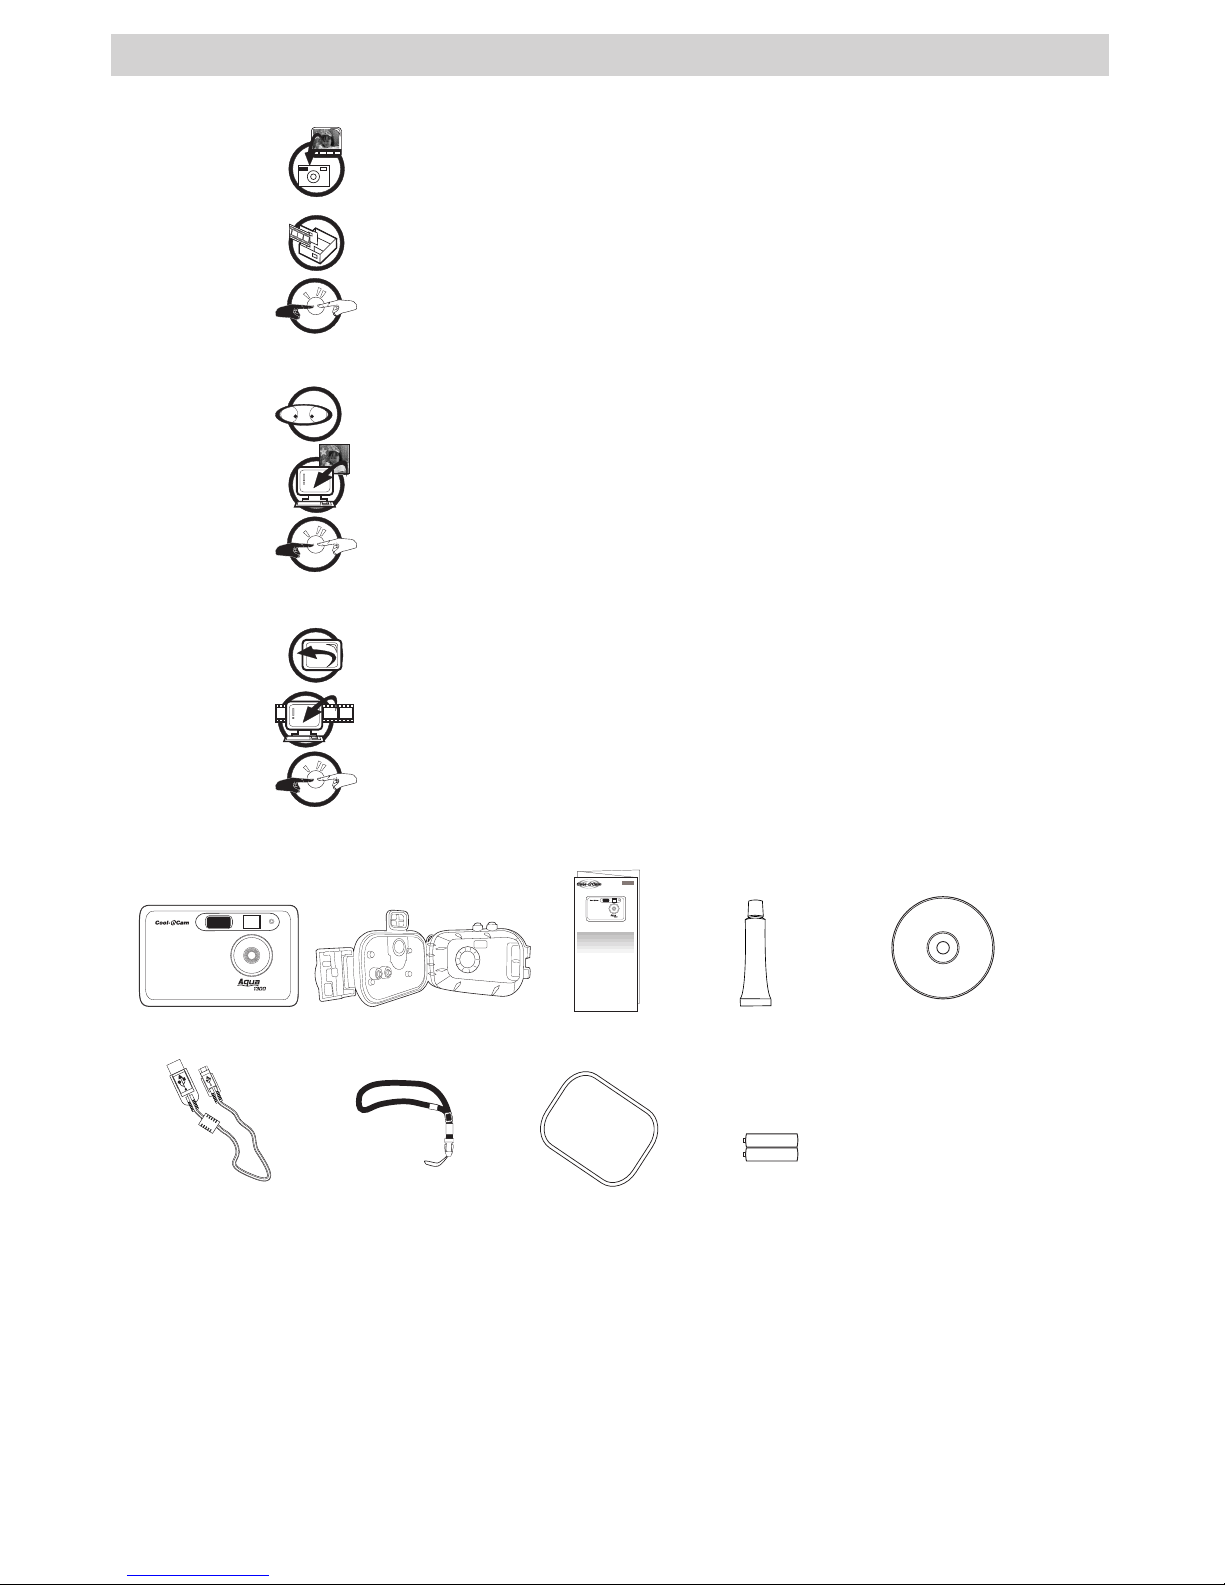
• Camera Package Contents
Quick Guide
Rubber Ring
Rubber Strap
(for waterproof case)
Coating Grease
2 x AA (UM-3)
Alkaline Batteries
CD-ROM includes
Digital Cam Driver (PC & Mac),
ArcSoft Sofeware Suite (PC & Mac),
Microsoft® NetMeeting™ (PC), CU-SeeMe™ (Mac)
Adobe® Acrobat® Reader (PC & Mac),
User’s Manual in PDF Format.
AQ 1300
USB Cable
Waterproof Case
AQ 1300
Quick Start Guide
Guide de Démarrage rapide
Guida Rapida
Guía Rápida de Inicio
Guia de Início Rápido
ML 0403
Part no.: OM837657 R1
Printed in China
Schnellanleitung
TM
5
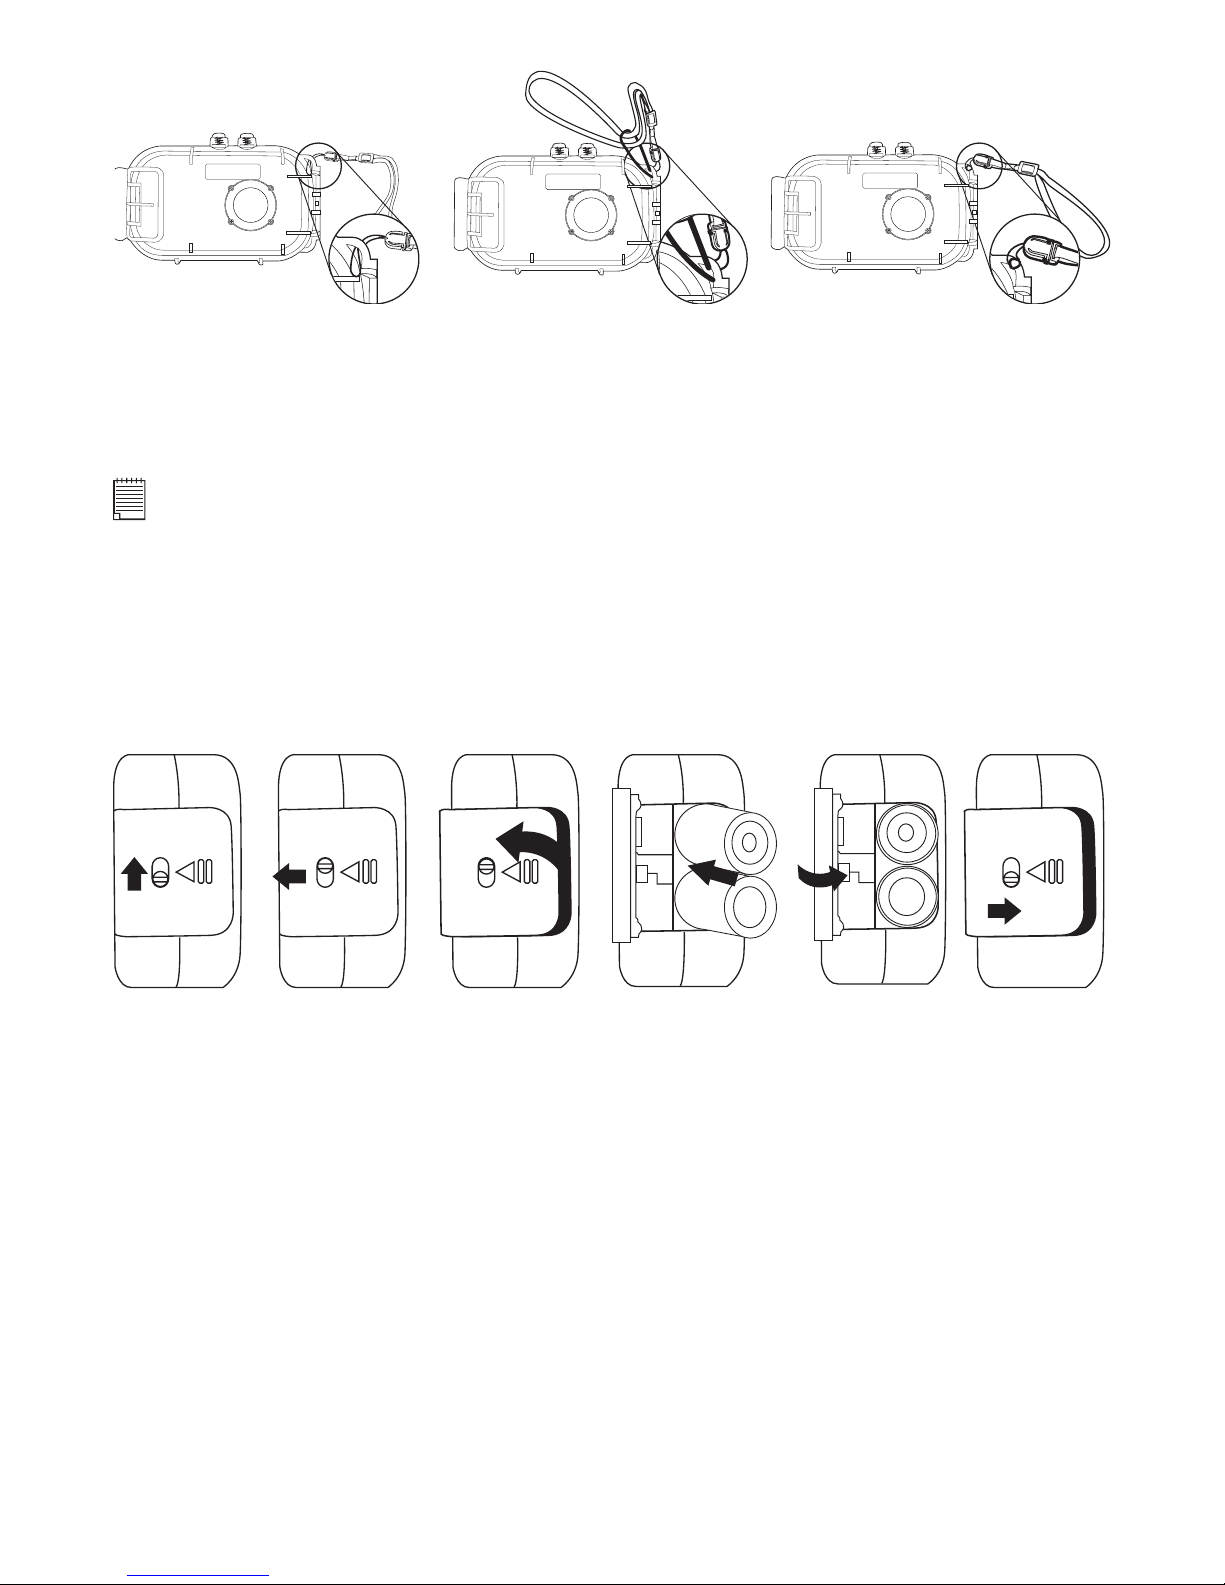
• Attaching the Rubber Strap
• Battery Guidelines
• Never use manganese batteries.
• Battery life differs greatly by manufacturers.
• Battery life is greatly affected by how much you use the flash, Operation LCD and other functions, and
how long you leave the power turned on.
• To prolong battery life, use the Flash button to turn off the flash whenever you are not using it.
NOTE:
For more guidelines on battery usage, see Using Your Batteries.
• Installing the Batteries
2 x AA Alkaline batteries are supplied with the product. Follow the procedure below for installing batteries.
Make sure the batteries are placed correctly in their positive (+/-) negative position. See instructions
marked in the battery compartment.
1. Open the camera battery door by sliding the lock upward and pushing the battery door outwards as
illustrated.
2. Insert the batteries as shown, ensuring you follow the +/- polarity correctly.
3. Close the battery door.
• Turning the Camera On and Off
To turn on the camera, fully press and hold the Power button until the Operation LED turns red. Press and
hold the Power button again, a high beep sounds and the camera will be off. The Operation LED stays on
when the camera is turned on.

6
2 Camera Setting
• Checking Camera Status
Switch the camera on, view the camera LCD screen to check which camera settings are active. If the feature
icon is not displayed, it means that particular feature is not activated.
Picture Quality
High resolution
Low resolution
Battery
Camera Status
Pictures can take
Medium resolution
Full battery
Low battery
Still picture mode
Audio mode
Self-timer mode
A
Auto ash mode
Flash mode on
Remaining recording time
SMC card inserted
Delete last picture, audio or
video clip
LAST
Delete all pictures, audio &
video clips
ALL
USB cable connected
Other Features
Video mode without audio
Video mode with audio
• Checking the Battery Level
Before taking pictures. For guidelines on battery usage, see Using Your Batteries.
1. Turn the camera on.
2. Check the battery level status that appears on the camera LCD screen. When the batteries voltage is too
low to operate. The icon
will blink continuously.
• Low Battery
When battery power is low, the low battery icon
appears and blinks on the Status LCD , the camera
sounds high beeps. It means the batteries need to be replaced or the camera will soon automatically turn
off.
• Automatic Power Off Saves Batteries
Your camera is designed to switch off automatically after 30 seconds of inactivity to save battery life, a
high beep will sound.
NOTE:
Auto power off is automatically disabled. While the camera’s USB port is connected to a computer or it is controlled by
an external device.
 Loading...