

Cool-Icam CIC-222, AQ 2100 User Manual
User’s Manual
AQ 2100
TM
W
A
T
E
R
P
R
O
O
F
D
I
G
I
T
A
L
C
A
M
E
R
A
A
Q
2
1
0
0
2
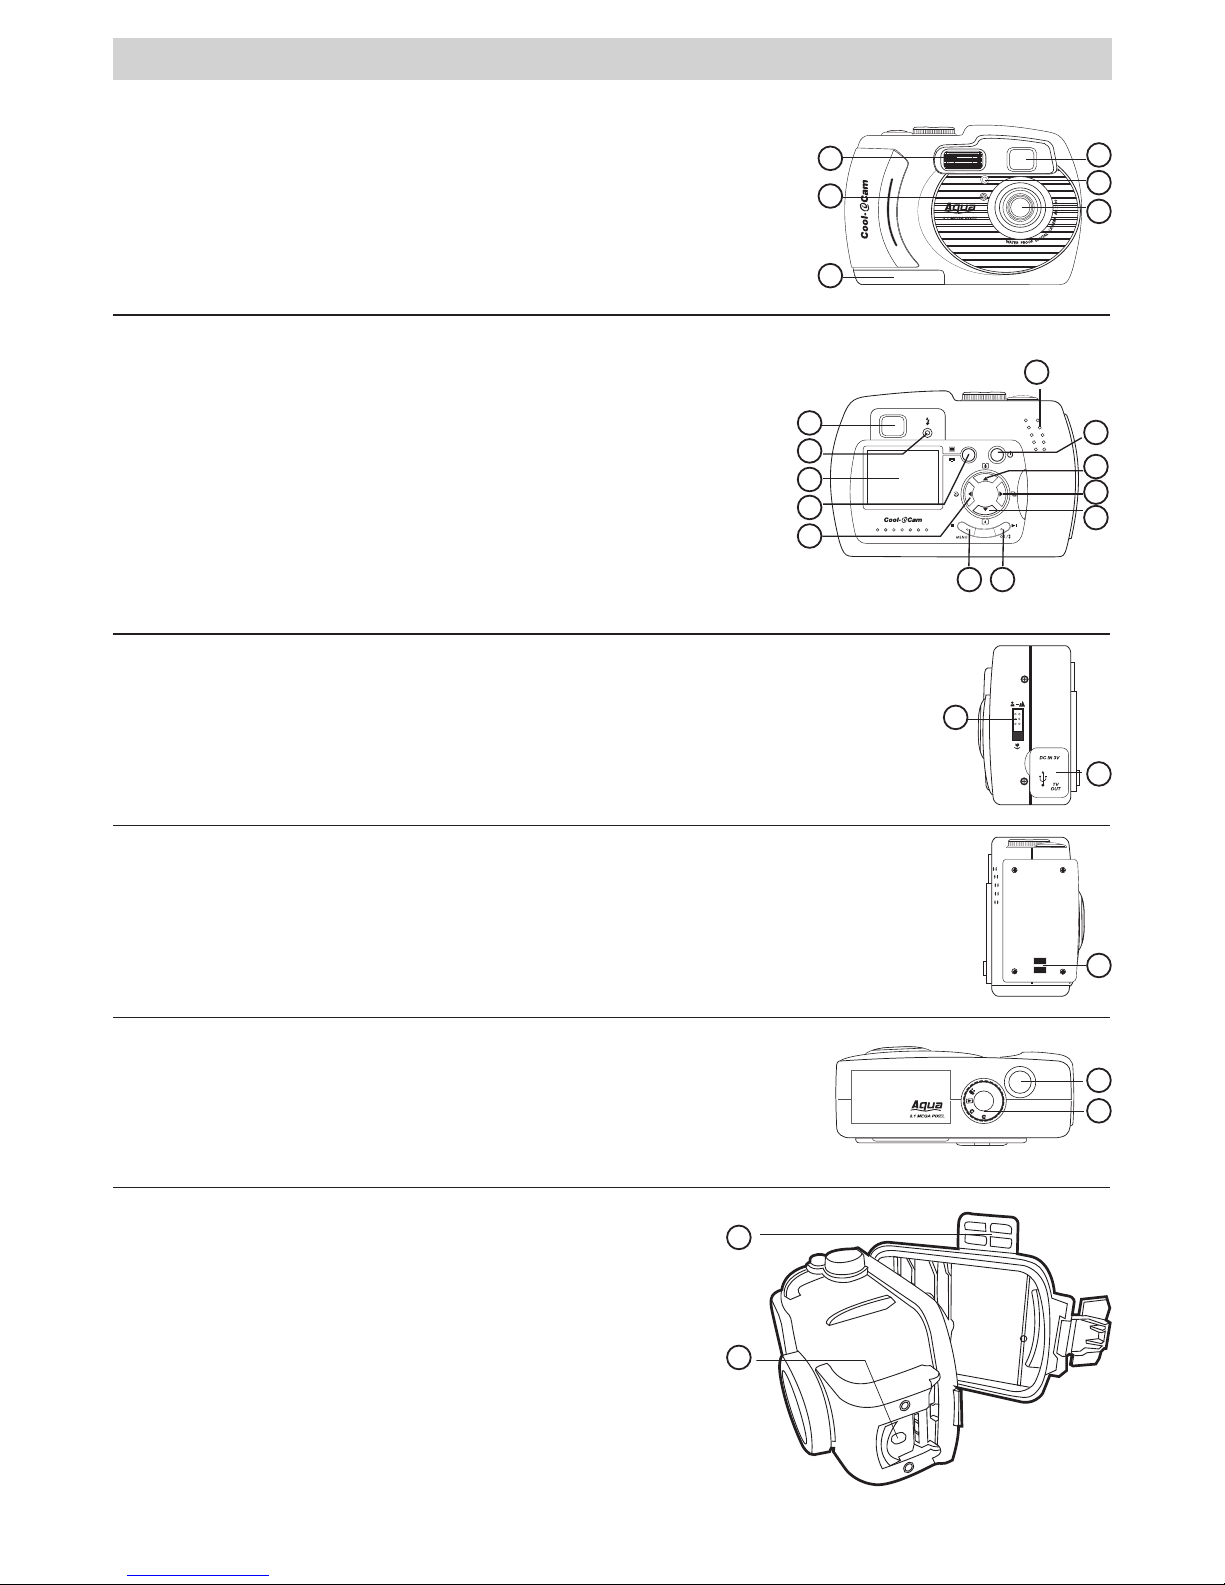
Product Overview
1. Flash
2. Exposure sensor
3. Battery door/SD or MMC card slot
4. Lens
5. Self-timer LED
6. Viewfinder
1
2
3
4
5
6
1. Viewfinder
2. Operation LED
3. LCD screen
4. Display button
5. Left/Self-timer button
6. Menu button
7. OK/Flash button
8. Down/Zoom out button
9. Right/Continuous mode button
10. Up/Zoom in button
11. Power button
12. Buzzer hole
1
2
3
4
5
10
9
8
7
6
11
12
1. Normal/Macro selector
2. Port for USB/Video Cable/DC in terminal
USB
1
2
1. Hand Strap Holder
1
1. Shutter button
2. Mode selector
1
2
1. Underwater viewfinder
2. Hinge lock
2
1

3
Table of Contents
1 Getting Started ........................................................................................................................4
• What can I do with my Camera? ............................................................................................4
• What can I do with my Digital Pictures? ..................................................................................4
• What can I do with my Video Clips?........................................................................................4
• Camera Package Contents.....................................................................................................4
• Attaching the Hand Strap......................................................................................................4
• Installing the Batteries .........................................................................................................5
• Turning the Camera On and Off .............................................................................................5
• Power Save Setting..............................................................................................................5
• Checking the Battery Level ...................................................................................................6
• Connecting AC Adaptor (not included) ....................................................................................6
2 Camera Setting ........................................................................................................................6
• Checking Camera Status.......................................................................................................6
• Camera Mode ......................................................................................................................7
• Turning the Information Display LCD Screen Off.......................................................................7
• Turning the Beep Sound On and Off .......................................................................................7
• Setting the Display Language ................................................................................................8
• Setting the Current Date and Time.........................................................................................8
3 Taking Pictures ........................................................................................................................8
• Taking a picture...................................................................................................................8
• Taking Macro Picture ............................................................................................................9
• Taking Continuous Pictures....................................................................................................9
• Setting the Flash Mode .........................................................................................................9
• Setting Quick View...............................................................................................................9
• Setting the Picture Resolution.............................................................................................. 10
• Setting the Picture Quality ..................................................................................................10
• Setting Self-timer ..............................................................................................................10
• Digital zoom .....................................................................................................................11
• Setting Exposure Compensation ..........................................................................................11
• Setting White Balance ........................................................................................................11
4 Recording Video Clips .............................................................................................................. 12
• Recording Video Clips.........................................................................................................12
5 Playback Pictures and Video Clips.............................................................................................. 12
• Playing Pictures ................................................................................................................. 12
• Playing the Video Clip......................................................................................................... 13
• Protect the Picture(s) or Video Clip(s) Against Deletion ...........................................................13
• Deleting Picture(s) or Video Clip(s) from the Camera .............................................................. 13
6 Using the Camera under Water.................................................................................................14
• Using the Rubber Ring........................................................................................................ 15
• Assemble Waterproof Case..................................................................................................15
7 Using SD/MMC Card ................................................................................................................ 16
• Using the SD(Secure Digital) Card or MMC(MultiMediaCard) Card ............................................. 16
• To Format a Memory Card...................................................................................................16
• Copy Internal Memory Pictures to a Memory Card ..................................................................17
• DPOF(Digital Print Order Format) ......................................................................................... 17
• P.I.M.(PRINT Image Matching).............................................................................................18
8 Installing the Software onto a Computer .................................................................................... 18
• Installing the software........................................................................................................ 18
• Software included with your camera.....................................................................................19
• Computer system requirements ........................................................................................... 19
9 Transferring Pictures, Video Clips To Your Computer.....................................................................20
• Before you transfer pictures ................................................................................................ 20
• Connecting to your computer .............................................................................................. 20
• Transferring and Viewing the Pictures and Video clips .............................................................20
• Connecting to a TV ............................................................................................................20
10 Troubleshooting Problems ...................................................................................................... 21
• Troubleshooting ................................................................................................................ 21
11 Getting Help.........................................................................................................................22
• Online Services .................................................................................................................22
• Customer Support .............................................................................................................22
• ArcSoft Software Help ........................................................................................................22
12 Appendix ............................................................................................................................. 23
• Technical Specifications ......................................................................................................23
• Using your batteries...........................................................................................................24
• Tips, Your Safety & Maintenance..........................................................................................24
• Uninstalling the camera driver ............................................................................................ 25
• Regulatory Information...................................................................................................... 25
4
1 Getting Started
• What can I do with my Camera?
Capture
Enjoy point & shoot operation. Store pictures, video clips to the internal
memory or a SD/MMC card.
Set Up
Select various camera and video recording settings.
• What can I do with my Digital Pictures?
View
View pictures on the LCD screen or on a computer using the Arcsoft®
software supplied.
Save
Save pictures to the computer memory by Mass Storage interface.
Communicate
Send the pictures over the Internet to family and friends.
• What can I do with my Video Clips?
Playback
Playback video clips on a computer using the Windows® Media Player or
other Media software supplied.
Save
Save video clips to the computer memory by Mass Storage interface.
Communicate
Send the video clips over the Internet to family and friends.
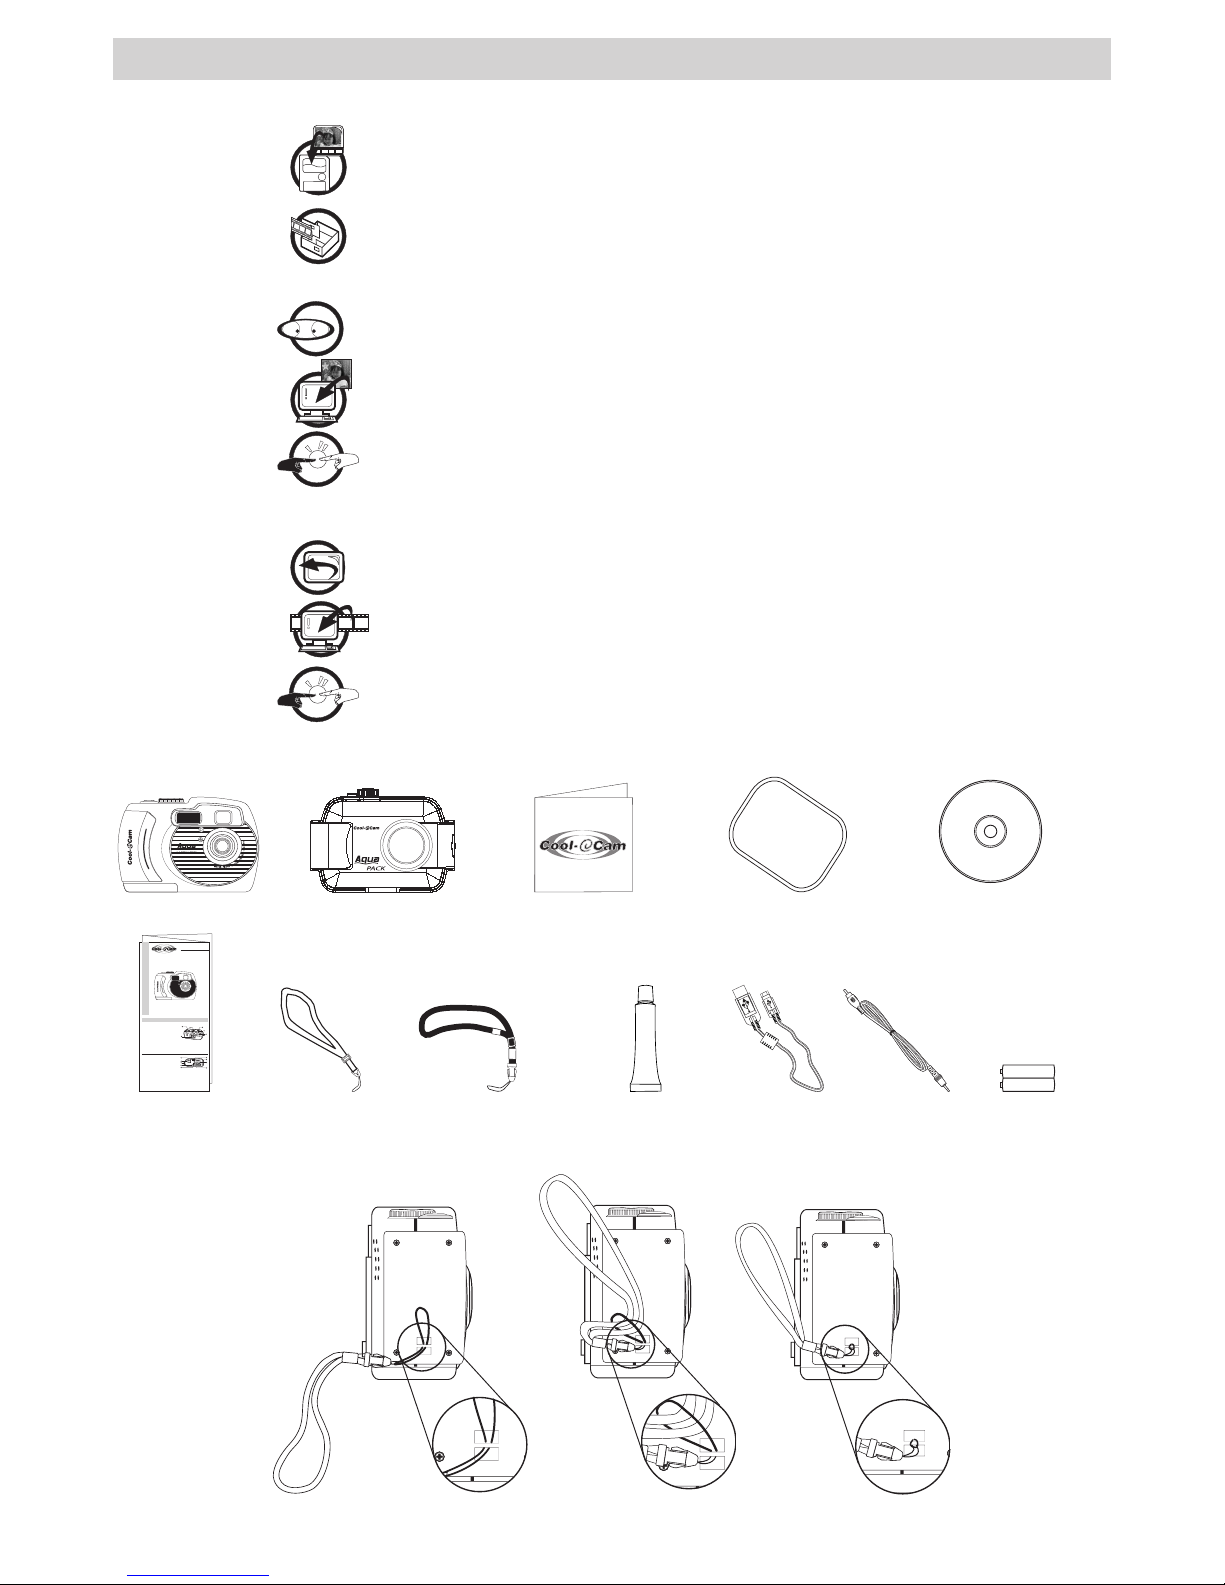
• Camera Package Contents
2 x AA Alkaline
Batteries
The CD-ROM includes
My Digital Cam Driver (PC)
ArcSoft Software Suite (PC & Mac)
Adobe Acrobat Reader (PC & Mac)
User Manual in PDF format
P
l
e
a
s
e
t
a
k
e
a
m
o
m
e
n
t
t
o
f
i
l
l
o
u
t
a
n
d
r
e
t
u
r
n
t
h
i
s
R
e
g
i
s
t
r
a
t
i
o
n
C
a
r
d
.
Y
o
u
r
v
a
l
u
a
b
l
e
i
n
p
u
t
w
i
l
l
h
e
l
p
u
s
t
o
s
e
r
v
e
y
o
u
b
e
t
t
e
r
.
P
r
o
d
u
c
t
R
e
g
is
t
r
a
t
io
n
C
a
r
d
M
Registration CardAQ 2100
Quick Guide
TM
G3
Quick Start Guide
Product Overview
1. Lens
2. Microphone
3. Power LED
4. Viewfinder(open position)
5. LCD Display
6. Mode Button
7. Delete Button
8. Flash Button
1. Viewfinder(closed position)
2. USB & SmartMedia™ Card Door
3. Battery Door
4. Shutter Button
5. SmartMedia™ Card Release Button
6. Hand Strap
2
1
3
4
F
3
.
0
f
=
5
.
6
m
m
C
O
O
L
-
I
C
A
M
1
.
3
M
E
G
A
P
I
X
E
L
C
A
M
E
R
A
5
6
MONITOR
1
2
3
4
5
6
7
8
9
Waterproof Case
USB CableHand Strap
(for camera)
Rubber Ring
Rubber Strap
(for waterproof case)
TV CableCoating Grease
• Attaching the Hand Strap
5
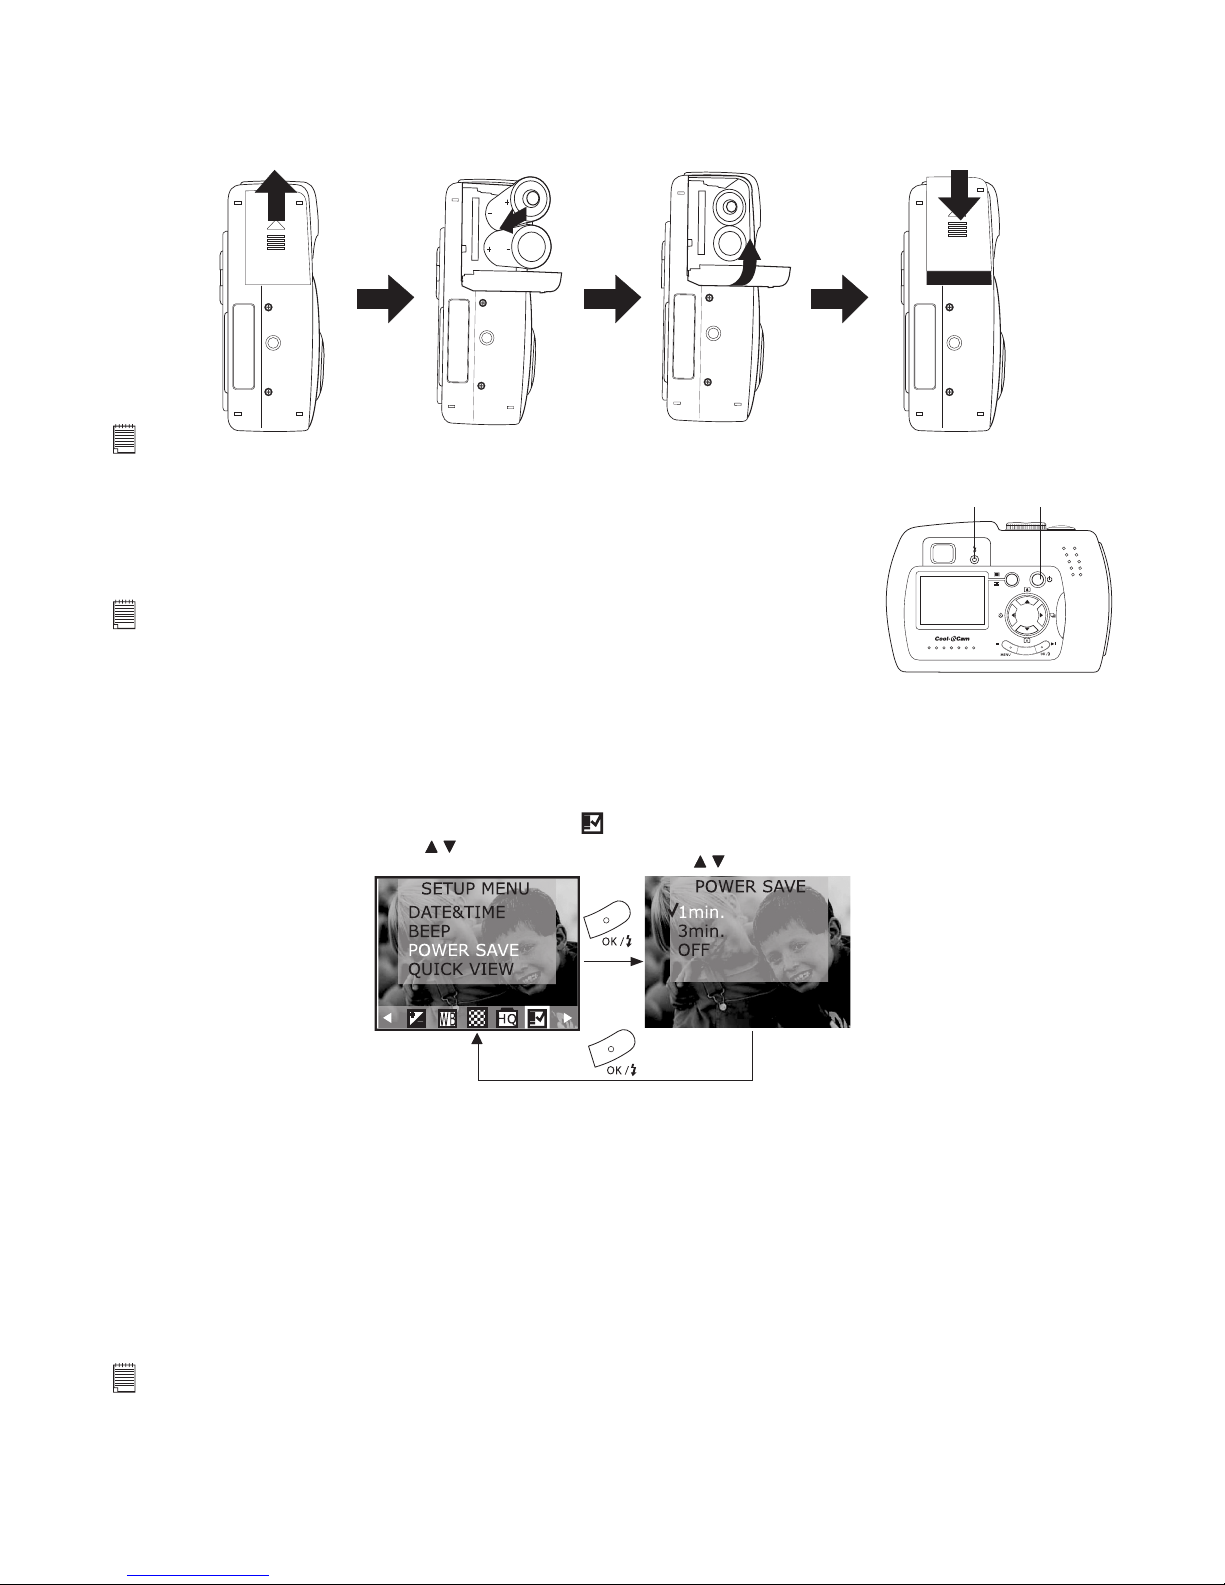
• Installing the Batteries
2 x AA Alkaline batteries are supplied with the product. For more guidelines on battery usage, please see
Using your batteries.
1. Open the camera battery door by pushing it outwards as illustrated.
2. Insert the batteries as shown, ensuring you follow the +/- signs correctly.
3. Close the battery door by pushing it down and then slide it towards the camera to lock.
NOTE:
You can use either 2 X AA batteries or an AC adaptor (DC3.3V, not included) to supply power for the camera.
• Turning the Camera On and Off
Fully press and hold the Power button until the operation LED turns green and the
LCD is on. Press and hold the Power button again to turn off the camera.
Power button
Operation LED
NOTE:
• It takes about 2 seconds to power up the camera.
• When powering on the camera in Auto/Manual/Video mode, the date will display on the
bottom right corner of the LCD screen for one second. Then it changes to time for one
second, after that the date and time indicator will be off.
• Power Save Setting
Your camera is designed to turn off LCD screen and the camera automatically after a period of inactivity
to save battery life. You can change Power Save Setting by the following steps.
1. Turn the camera on.
2. Press Menu button.
3. Press the Right button to select “SETUP MENU ”.
Press to select
“POWER SAVE”.
Press to select item.
The function for each setting is:
One minute: This camera will automatically turn off the LCD screen after one minute of
inactivity (the operation LED will flash.) Press any button will reactivate the LCD screen.
After the above 1 minute power saving, if there is no more operation in another one minute, the camera
will automatically power off. You need to press the Power button if you want to turn on the camera again.
Three minutes: This camera will automatically turn off the LCD screen after three minutes
of inactivity (the operation LED will flash.) Press any button will reactivate the LCD screen.
After the above three minutes power saving, if there is no more operation in another one minute, the camera
will automatically power off. You need to press the Power button if you want to turn on the camera again.
Off: This camera will not perform the power saving function.
NOTE:
• Power save setting is available in all camera modes.
• Auto power off is automatically disabled while the AC adaptor is connected to the camera.
6
• Checking the Battery Level
Check the battery level by pressing Display button before taking pictures.
1. Turn the camera on.
2. Check the battery level that appears on the LCD screen.
NOTE:
• The battery level indicator only appears on the LCD screen for around 5 seconds each time.
• You can check the battery level anytime by pressing Display button.
Batteries have adequate power.
Battery power is low.
Please note that when the batteries need to be replaced, a warning “REPLACE BATTERY!” will show
on LCD screen and the camera will automatically turn off.
• Connecting AC Adaptor (not included)
Connect the adaptor into the DC-In terminal (DC-IN 3.3V) as shown to power
the camera from a household power outlet.
USB
NOTE:
• Please make sure that you use an AC adaptor with the correct specication for the camera (DC3.3V).
• Please be sure to turn off power before connecting or disconnecting the Adaptor.
• The camera automatically switches over to AC adaptor powered operation whenever the AC adaptor is plugged into the camera.
• Recommend using the AC adaptor to power the camera whenever connected to a computer.
2 Camera Setting
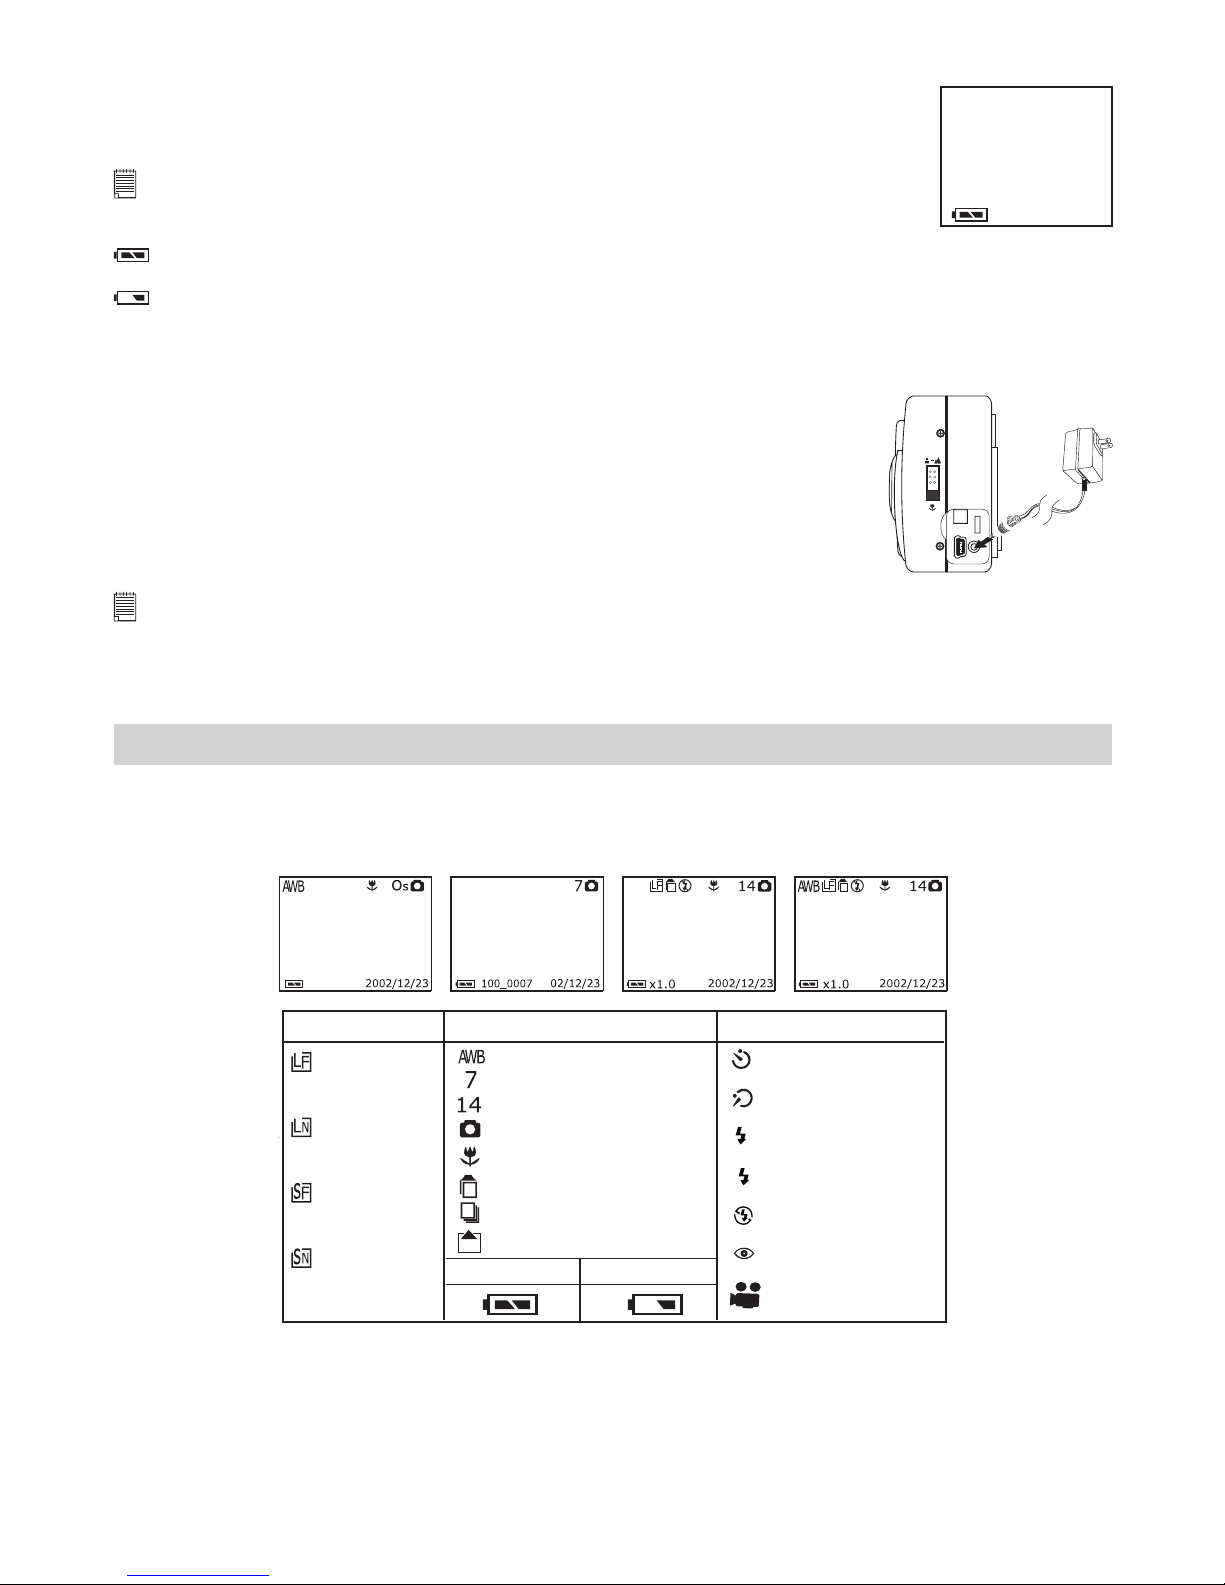
• Checking Camera Status
Switch the camera on, view the camera LCD screen to check which camera settings are active. If feature
icon is not displayed, that particular feature is not activated.
Video Mode Playback Mode Auto Mode Manual Mode
SD card inserted
Picture Quality Camera Status
Full
Low
Other Features
10s self-timer
Video mode
Auto white balance
Flash mode on
Flash mode off
Auto ash mode
A
L: 1600X1200
F: Fine
The number of pictures taken
Record mode
Macro mode
2s self-timer
Red eye
Take single picture
L: 1600X1200
N: Normal
S: 800X600
F: Fine
S: 800X600
N: Normal
Pictures remained
Continuous pictures

7
• Camera Mode
The camera has four working modes. You can select the mode you prefer using
the Mode selector located on the top of the camera.
Mode selector
Auto mode
Under this mode, the camera will automatically judges the environment conditions for you. It will set the
Exposure and White balance automatically according to the shooting environment.
Manual mode
Under this mode, you can set the Exposure and White balance based on different environment condition
before taking pictures. (Further detail refers to Setting Exposure Compensation and Setting White
Balance)
Playback mode
Playback or delete pictures/video clips from the camera.
Video mode
Using this mode to record video clips.
• Turning the Information Display/LCD Screen Off
To turn the information display off, just simply press the Display button once, press it again will turn off
the LCD screen. Press the Display button one more time will turn on the information display and the LCD
screen.
Press Display
button
Press Display
button
Press Display
button
LCD screen on,
information display on
LCD screen on,
information display off
LCD screen off,
information display off
• Turning the Beep Sound On and Off
You can turn the beep sound on and off in any camera mode. When the Beep sound is turned on, the camera
will beep when you press the buttons.
1. Turn on the camera.
2. Press Menu button.
3. Press the Right button to select “SETUP MENU ”.
Press to select item.
NOTE:
The default setting is “On”.
8
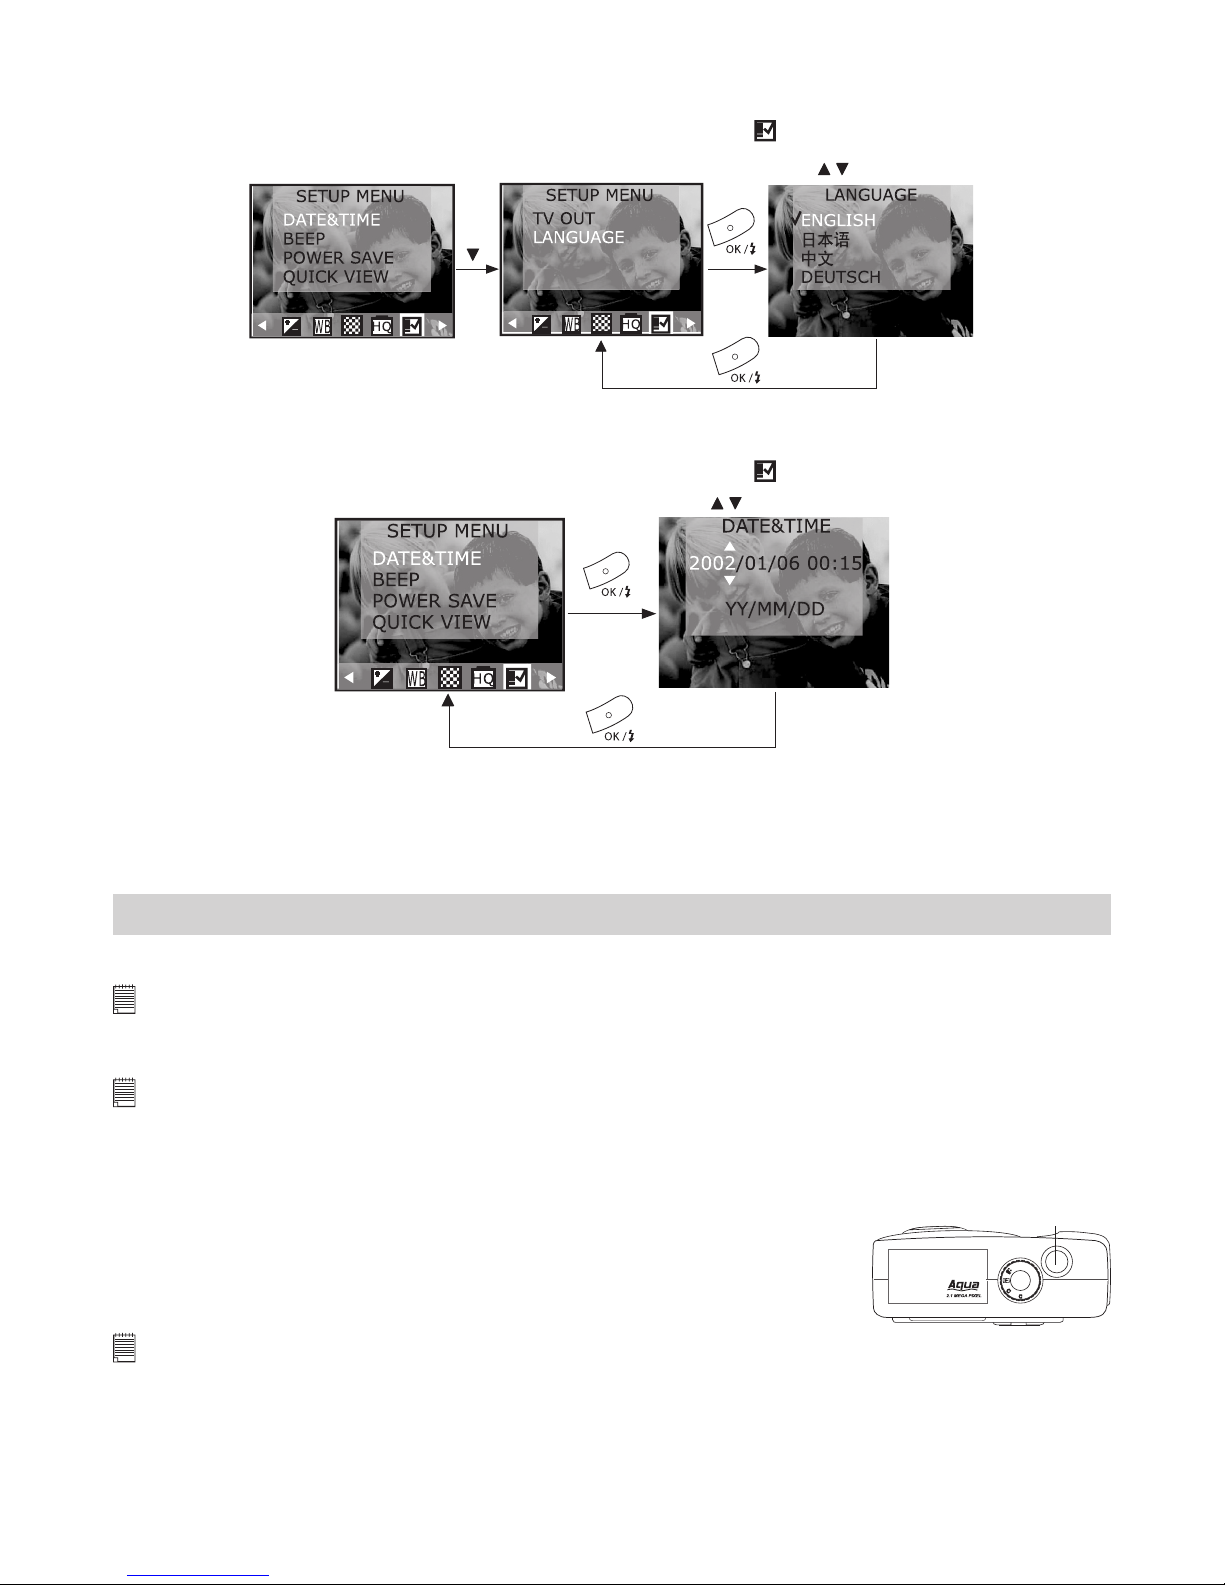
• Setting the Display Language
Under this setting, you can select the language you prefer for the LCD screen. You may change the
language setting in any camera mode.
1. Turn on the camera.
2. Press Menu button and use Right button to select “SETUP MENU ”.
Press to select item.
• Setting the Current Date and Time
1. Turn the camera on.
2. Press Menu button and use Right button to select “SETUP MENU ””.
Press to select item.
Use Up/Down button to change the display of date as:
A. YY/MM/DD
B. MM/DD/YY
C. DD/MM/YY
3 Taking Pictures
Before you take pictures, please read this note rst:
NOTE:
Never remove batteries, disconnect the AC adaptor from the camera, or unplug the adaptor while a picture is being
saved. Doing so will prevent the current picture being saved and may corrupt other pictures already stored on the
camera’s internal memory or on a memory card.
NOTE:
When taking outdoor pictures, avoid intense sunlight that may cause sun spots in pictures. And always make sure that
the sun or other light source is in front of the subject.
• Taking a Picture
1. Set the Mode selector to Auto or Manual mode.
2. Turn on the camera.
3. Frame your subject using the LCD screen.
4. Press the Shutter button completely down to take a picture. Hold the camera
steady. A beep will sound when the picture has been taken.
Shutter button
NOTE:
• In Manual mode, while capturing a picture, you can press the Shutter button halfway down to check whether there is proper
exposure value subject to your current light condition for capturing.
• When the camera has automatically completed the setting of exposure and white balance, the icons on the LCD screen will turn
green.
• When the camera’s auto exposure and auto white balance function is not ready or your capturing condition is over the camera’s
setting, the icons on LCD screen will turn red.
• Under the above condition, if you still take the picture, the picture taken is in risk of over exposure or too dark.
 Loading...