

Radio Controlled BuggyRadio Controlled Buggy
3965/3967
™
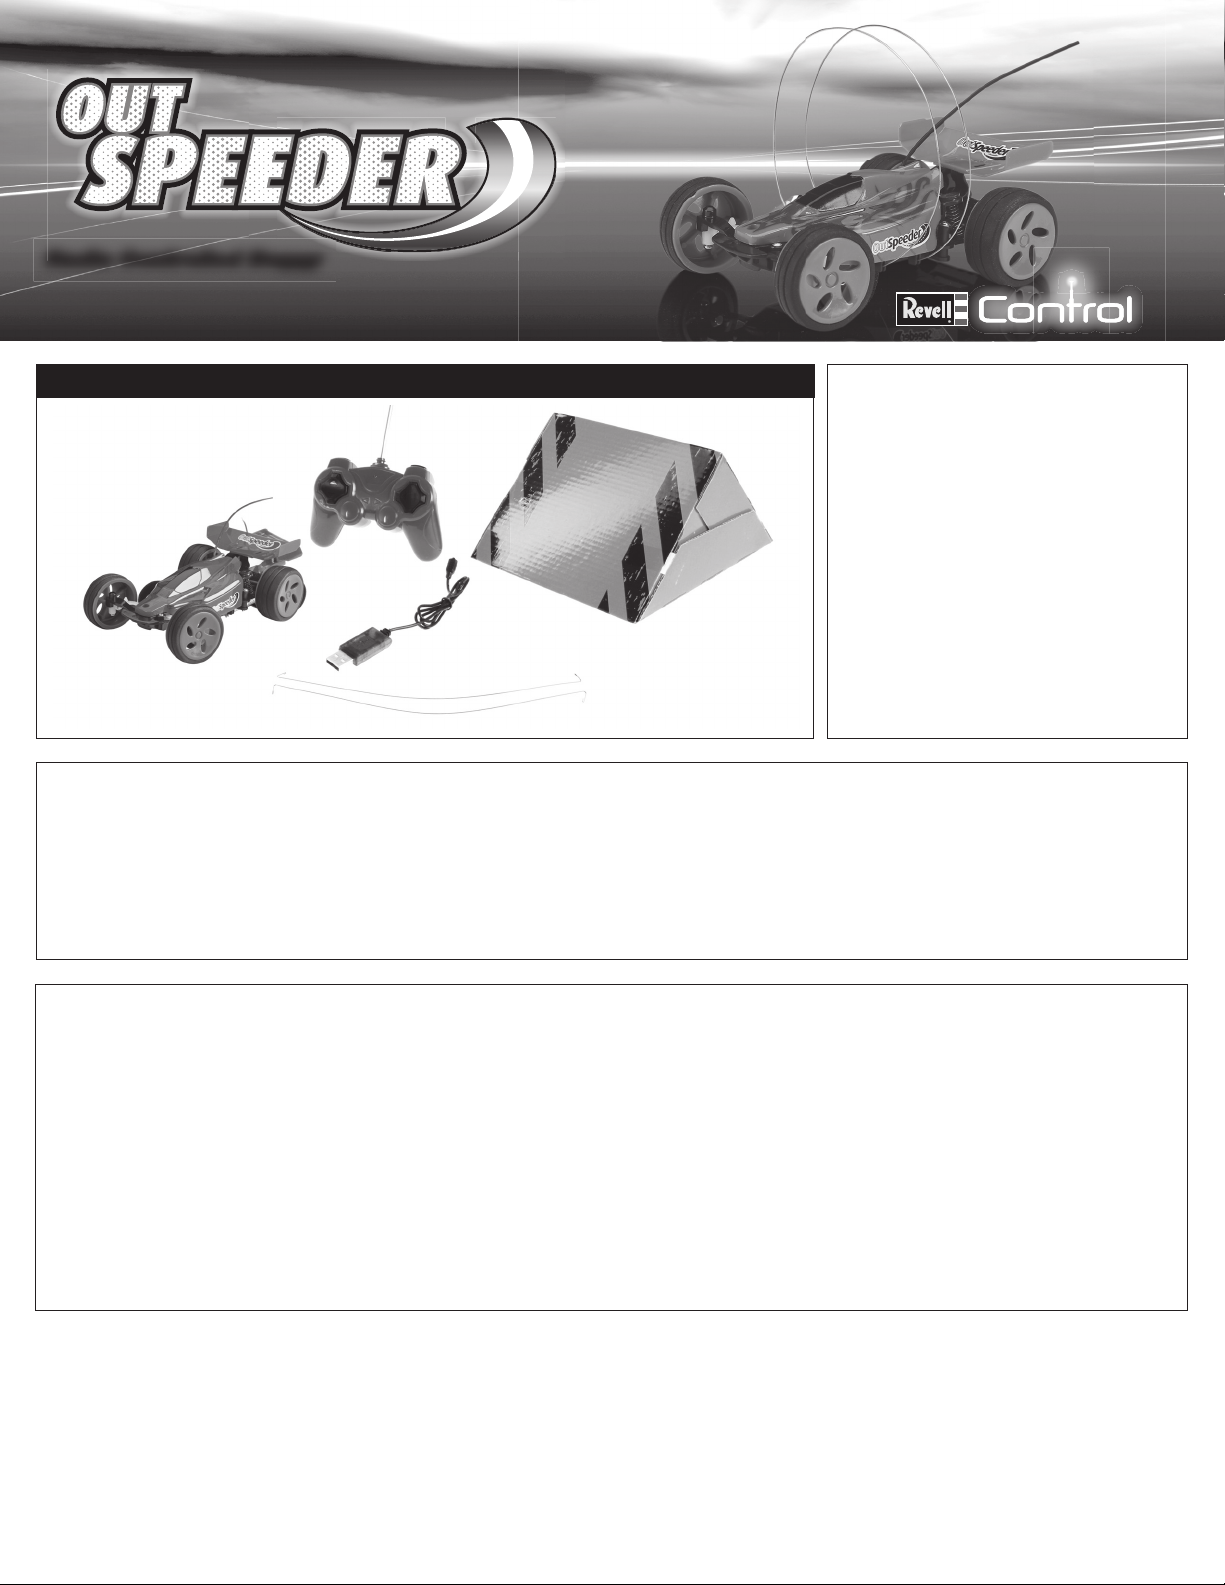
Contents
FCC REQUIREMENT
This device complies with part 15 of the FCC
rules. Operation is subject to the following two
conditions.
(1) This device may not cause harmful
interference.
Outspeeder
™
Controller
(2) This device must accept any interference
received, including interference that may
cause undesired operation.
Ramp
USB Charge Cord
NOTE: THE MANUFACTURER IS NOT RESPONSIBLE
FOR ANY RADIO OR TV INTERFERENCE CAUSED
BY UNAUTHORIZED MODIFICATIONS TO THIS
EQUIPMENT. SUCH MODIFICATIONS COULD
VOID THE USER’S AUTHORITY TO OPERATE THE
Rollbar (2)
EQUIPMENT.
Safety Precautions:
Warning: Do not modify or alter this unit. Changes or modifi cations to this unit not expressly approved by the party responsible for compliance could void the user’s
authority to operate the equipment.
• This vehicle is suitable for indoor or outdoor use in
dry conditions.
•
The vehicle is suitable for ages 8 and above. Parents
should supervise children when operating the vehicle.
• Switch off the car when it is not in use.
• Keep hands, face and loose clothing away from the
vehicle.
•
Remove batteries from the controller when not in use.
• Always keep an eye on the vehicle. Careless or
irresponsible use may cause damage.
• Keep these instructions for future reference.
• Always follow these instructions when operating this
vehicle.
• Do not operate near people, animals or water.
Battery Requirements for Controller:
Requires: 2 x 1.5V AA size batteries (not included)
Power Source Requirements for USB Charge Cord:
Requires USB Output Jack (not included)
Care and Maintenance:
• Regularly examine all parts for damage. If any is
found, do not use again until the damage has been
repaired.
• Use a clean, damp cloth to wipe the vehicle clean.
• Keep the vehicle and batteries away from direct
sunlight and/or heat sources.
Battery Cautions:
• Parental guidance is recommended when installing or
replacing batteries.
• For best performance, use new alkaline batteries in
controller.
• Insert new batteries in the controller as soon as any
function becomes diminished.
• Do not power controller by mixing different types of
batteries, or old and new batteries.
• Use only batteries of the same or equivalent type as
those recommended.
The vehicle is equipped with a Li-Ion battery. Always
follow these safety instructions:
• This product contains a Li-Ion battery. Must be
recycled or disposed of properly.
• Never dispose of batteries in a fi re or store near
sources of heat.
• The charger is specially designed for charging the
battery of this car. Only use it for this purpose.
• Batteries should only be charged on a fi reproof
surface, away from any fl ammable materials.
• Never leave the battery unattended when charging.
• Batteries must be discharged before being disposed
of. Cover exposed poles with adhesive tape to
prevent short-circuiting!
• Never disassemble or alter the battery contacts. Do
not damage or puncture battery cells. Doing so would
result in an explosion hazard!
• Keep the Li-Ion battery away from children.
90 DAY LIMITED WARRANTY
PLEASE DO NOT RETURN YOUR PRODUCT TO THE STORE – Revell will repair or replace factory defects for 90 days from the date of purchase. This warranty
specifi cally does not cover crash damage, misuse or abuse. To make a warranty claim, please contact our product support team at 1-217-398-8970 or e-mail
us at productsupport@hobbico.com
If requested by Product Support, please send defective product to: Hobby Services, 3002 N Apollo Dr., Suite #1, Champaign, IL 61822
This warranty applies only if the product is operated in compliance with the instructions and warnings provided with each model. Revell assumes no liability except for
the exclusive remedy or repair of parts as specifi ed above. Revell shall not be liable for consequential or incidental damages. Some states do not allow the exclusion of
consequential or incidental damages so the above exclusion may not apply to you. This warranty gives you specifi c legal rights and you may also have other rights which
vary from state to state.
1
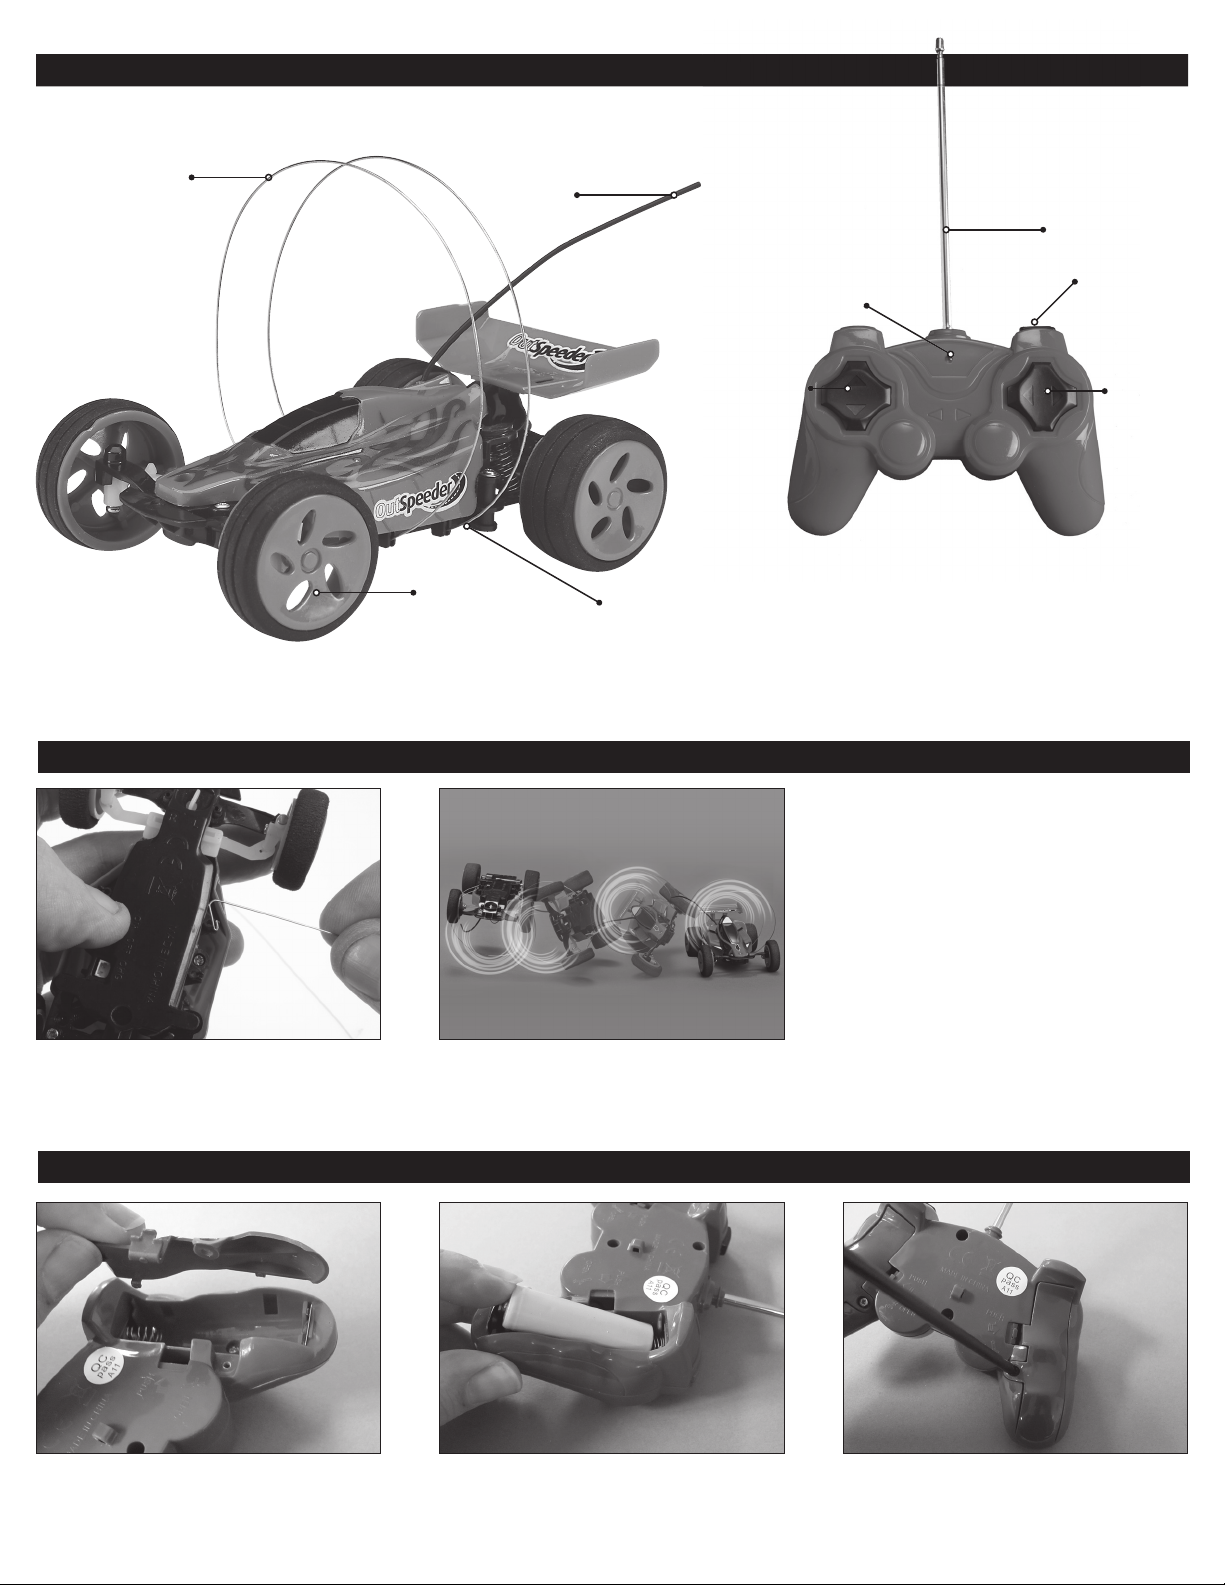
Vehicle and Controller Parts
rts
Rollbar
Wheels with
Foam Tires
Antenna
USB Cable
Connection
Signal Indicator
Forward / Reverse
Antenna
Turbo Button
Right / Left
Insert the ends of each rollbar into the holes
provided on the car until they snap into place.
Attach the Rollbars
The rollbars ensure the car can fl ip and land on its
wheels.
Insert Batteries into the Controller
1. Unscrew and pull off both controller battery
covers.
2
2. Insert one 1.5V AA battery in each side, following
the polarity information.
3. Close covers and tighten screws.
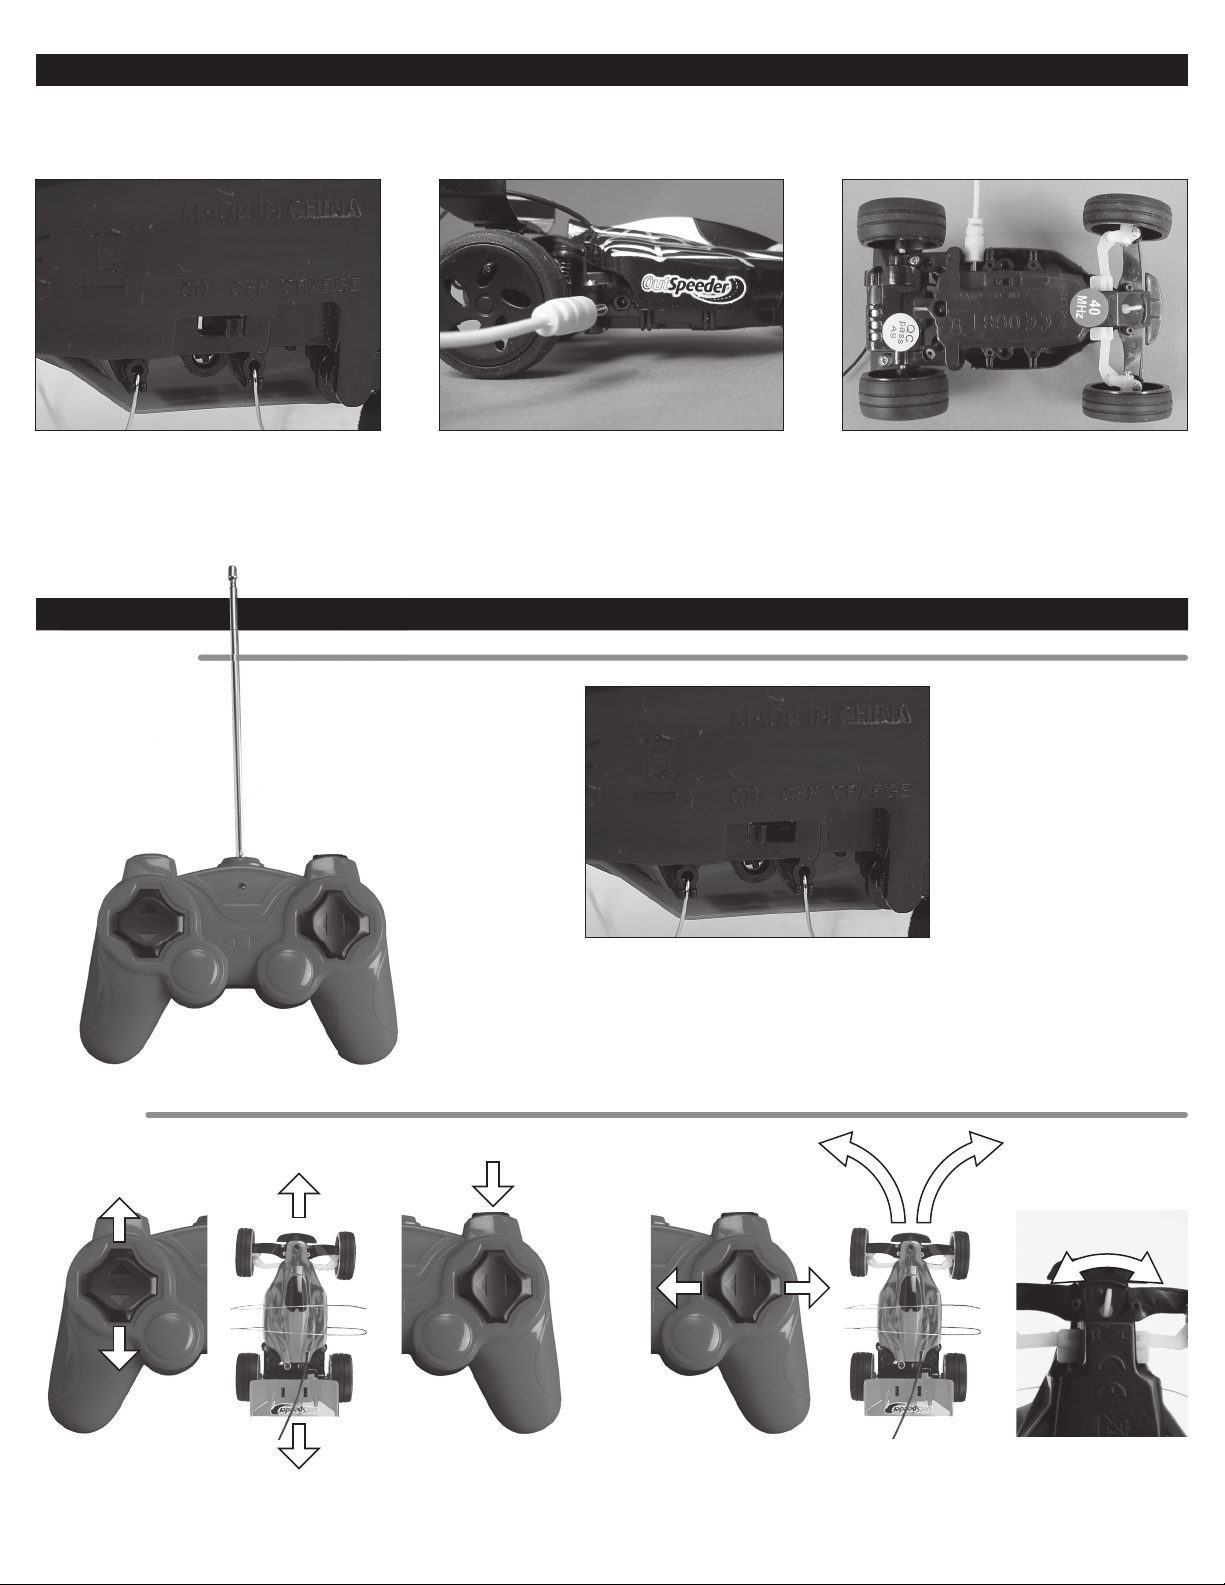
Charging Procedure
t
:
Attention: • Allow the battery to cool off for 10-15 minutes before recharging.
Getting Started:
ting Started
• Be sure the car is switched OFF before starting to charge!
• Do not leave the battery unattended during the charging process.
1. Switch off the car!
2. Carefully connect the USB cable to the car.
3. Connect the other end of the USB cable to a PC.
4. The charging process takes approximately 20 minutes. The USB cable lights up red after the battery
is completely charged. For safety reasons never charge the battery for longer than 20 minutes.
5. Disconnect the USB cable from the PC and the car.
• The car can be driven for approximately 20 minutes
following a charge time of 20 minutes.
Driving the Vehicle
Operation:
1. Extend the antenna on the controller.
1. Extend the antenna
3. The signal indicator on the controller lights
up as soon as a button is actuated.
2. Switch the car to ON.
The car moves forward if the
forward button is pressed
and moves backward if the
backward button is pressed.
maximum speed when the
turbo button is pressed.
The car turns as the right/left button is pressed.The car moves forward at
The steering trim of the
car can be corrected with
the wheel alignment lever.
3

Jumping Over the Ramp:
Driving the Vehicle (continued)
NOTE: Place an object
behind the ramp to
keep it from moving.
Drive the car forward and press the
turbo button at the jump-off point.
Release the forward button. After the car lands, accelerate
Driving Tips:
• Run the car on a fl at surface.
• Watch the car instead of looking at the controller.
• Always release the forward/turbo buttons right away following a crash to prevent damaging the electronics.
• The vehicle should be operated in an area that has as much open space as possible with no people or animals nearby.
• Do not operate this vehicle on the street.
Troubleshooting
Problem: The wheels won’t turn.
Solution: Recharge the battery.
Problem: The controller doesn’t function.
Solution: Make sure the batteries are inserted correctly.
Insert new batteries.
Problem: The car loses speed or comes to a stop.
Solution: Recharge the battery.
If your Outspeeder
DO NOT RETURN TO RETAILER. Contact:
Hobby Services
3002 N. Apollo Drive, Suite 1
Champaign, Il, 61822, U.S.A.
9am-5pm Central Mon.-Fri.
(217) 398-0007
hobbyservices@hobbico.com
to continue its forward motion.
Service
™
requires repairs or replacement,
THIS PRODUCT CONTAINS A LI-ION
BATTERY. MUST BE RECYCLED OR
Li-Ion
DISPOSED OF PROPERLY.
REVELL, INC. 1850 HOWARD ST., UNIT A, ELK GROVE VILLAGE, IL 60007 U.S.A.
A SUBSIDIARY OF HOBBICO
MADE IN CHENGHAI, GUANGDONG, CHINA
© 2013 REVELL INC. PLEASE RETAIN PACKAGING FOR FUTURE REFERENCE.
CONTENTS AND SPECIFICATIONS SUBJECT TO CHANGE WITOUT NOTICE.
4
revell.com

Carrito con radiocontrolCarrito con radiocontrol
3965/3967
™
Contenido
REQUISITO DE LA FCC
Este aparato cumple con la parte 15 de las reglas
la comisión federal de comunicaciones (FCC). El
funcionamiento está sujeto a las siguientes dos
condiciones.
(1) Este aparato pudiera causar interferencia
dañina.
Outspeeder
™
Controlador
(2) Este aparato debe aceptar cualquier
interferencia recibida, incluyendo la
interferencia que pudiera causar algún
funcionamiento no deseado.
Rampa
Cable de carga USB
NOTA: EL FABRICANTE NO SE RESPONSABILIZA
POR NINGUNA INTERFERENCIA DE RADIO O TV
CAUSADA POR MODIFICACIONES NO AUTORIZADAS
DEL EQUIPO. DICHAS MODIFICACIONES PUDIERAN
Arco antivuelco (2)
CANCELAR LA AUTORIZACIÓN CON LA QUE EL
USUARIO CUENTA PARA OPERAR EL EQUIPO.
Precauciones de seguridad:
Advertencia: no modifi car ni alterar este aparato. Los cambios o las modifi caciones que se le hagan a este aparato que no cuenten con la aprobación expresa de la
parte responsable por el cumplimiento pueden cancelar la autorización con la que cuenta el usuario para operar el equipo.
• Este vehículo es adecuado para uso bajo techo y al
aire libre en lugares secos.
•
Este vehículo es adecuado para edades de 8 en
adelante. Los padres deben supervisar a los niños
cuando manejen este vehículo.
• Apagar el carro cuando no se esté usando. Mantener
las manos, la cara y la ropa suelta lejos del alcance
del vehículo.
• Quitar las baterías del controlador cuando no se esté
usando.
• Nunca dejar el vehículo desatendido. El uso
negligente o irresponsable puede causar daño.
•
Seguir siempre las instrucciones al manejar este vehículo.
• No manejarlo cerca de las personas, los animales o
el agua.
Requisitos de la batería para el controlador:
Necesita: 2 baterías de tamaño AA de 1.5V (no incluidas)
Requisitos de potencia del cable USB para cargar.
Necesita un enchufe de salida USB (no incluido)
Cuidado y mantenimiento:
• Inspeccionar con regularidad todas las piezas para ver
si se han dañado. Si alguna está dañada, no se debe
usar hasta que se repare.
•
Para limpiar el vehículo, usar un trapo limpio y húmedo.
• Mantener el vehículo y las baterías lejos del alcance
de la luz directa y de las fuentes de calor.
Precauciones con la batería:
• Al instalar o cambiar las baterías, se recomienda que
un padre proporcione orientación.
• Para mejor desempeño, usar en el controlador baterías
nuevas de alcalino.
• Poner baterías nuevas en el controlador en cuanto
alguna de las funciones no responda adecuadamente.
• No combinar varios tipos de baterías, o baterías viejas
y nuevas para proporcionar potencia al controlador.
• Usar únicamente baterías del mismo tipo o de un tipo
similar a los que se recomiendan.
El vehículo está equipado con una batería Li-Ion.
Siempre sigue las siguientes instrucciones de
seguridad:
• Este producto contiene una batería Li-Ion. Debe
reciclarse o tirarse adecuadamente.
• Nunca tirar las baterías en fuego o cerca de fuentes
de calor.
• El cargador se ha diseñado especialmente para
cargar la batería de este carro. Usarlo únicamente
para este propósito.
• Las baterías deben cargarse únicamente sobre
superfi cies a prueba de fuego, lejos del alcance de
materiales infl amables.
• Nunca dejar la batería sola cuando se esté cargando.
• Las baterías se deben descargar antes de tirarse.
¡Cubrir los polos expuestos con cinta adhesiva para
prevenir cortos circuitos! Nunca desensamblar
o alterar los contactos de la batería. No dañar o
agujerar las células de las baterías. ¡El hacer lo
anterior resultará en peligro de explosión!
•
Mantener la batería Li-Ion lejos del alcance de los niños.
GARANTÍA LIMITADA DURANTE 90 DÍAS
FAVOR DE NO DEVOLVER EL PRODUCTO A LA TIENDA – Revell reparará o remplazará los productos con defectos de fabrica durante un periodo de 90 días a partir de la
fecha de compra. Esta garantía específi camente no cubre el daño causado por estrellamientos, uso indebido o abuso. Para hacer un reclamo cubierto por la garantía, favor
de comunicarse con el equipo de apoyo de productos al 1-217-398-8970 o enviar un mensaje por correo electrónico a productsupport@greatplanes.com.
Si el representante de apoyo de productos pide que el producto defectuoso sea devuelto, favor de enviarlo a: Hobby Services, 3002 N Apollo Dr., Suite #1, Champaign, IL 61822.
Esta garantía aplica únicamente si el producto se opera de acuerdo a las instrucciones y advertencias proporcionadas con cada modelo. Revell únicamente se responsabiliza
por el remedio exclusivo o la reparación de las piezas como se especifi ca anteriormente. Revell no será responsable por daños consecuenciales o incidentales. Algunos
estados no permiten excluir los daños consecuenciales o incidentales así que la exclusión anterior pudiera no aplicar en tu caso. Esta garantía te da derechos legales
específi cos y puede que tengas otros derechos los cuales varían de estado a estado.
5

Piezas del Vehículo y del Controlador
r
ntrolado
Arco antivuelco
Antena
Ruedas con llantas
de espuma
Adelante / Reversa
Conexión para
el cable USB
Antena
Botón turbo
Indicador de señal
Derecha /
Izquierda
Meter los extremos de cada arco antivuelco adentro
de los hoyos que se encuentran en el carro hasta
que entren en su lugar.
Sujetar los Arcos Antivuelco
Los arcos antivuelco aseguran que el carro de
vuelta y aterrice sobre las llantas.
Poner las Baterías en el Controlador
1. Desatornillar y jalar las dos tapas de las baterías.
6
2. Poner una batería AA de 1.5V en cada lado
siguiendo la información de polaridad.
3. Cerrar las tapas y apretar los tornillos.

Procedimiento Para Cargar
d
r
:
Atención: • Dejar que la batería se enfríe de 10 a 15 minutos antes de recargarla.
• ¡Asegurarse de que el carro se encuentre en apagado (OFF) antes de cargarlo!
• No dejar la batería sola mientras se esté cargando.
1. ¡Apagar el carro!
2. Con cuidado, conectar el cable USB al carro.
3. Conectar el otro extremo del cable USB a la computadora.
4. El proceso de carga toma aproximadamente 20 minutos. Cuando la batería termina de cargarse, se prende la
luz del cable USB. Por cuestiones de seguridad, nunca se debe cargar la batería por más de 20 minutos.
5. Desconectar el cable USB de la computadora y del carro.
Manejar el Vehículo
Para Empezar:
a Empezar
• El carro puede manejarse durante aproximadamente
20 minutos después de cargarlo durante 20 minutos.
Manejo:
1. Extender la antena del controlador.
1. Extender la antena
3. En cuanto el botón se active, la señal del
indicador del controlador se prenderá.
2. Poner el interruptor del carro en ON (prendido).
El carro avanza hacia adelante
si se aprieta el botón de hacia
adelante y retrocede si se
aprieta el botón de hacia atrás.
El carro avanza hacia
adelante a máxima
velocidad cuando se
aprieta el botón turbo.
El carro gira a medida que se oprime el botón
de derecha/izquierda.
El equilibrador direccional
del carro puede ajustarse
con la palanca de
alineación de las llantas.
7

Saltar sobre la rampa:
Manejar el Vehículo (continuación)
NOTA: Poner un objeto detrás
de la rampa para evitar que
continúe avanzando.
Manejar el carro hacia adelante y apretar
el botón turbo en el punto de salto.
Soltar el botón de hacia adelante. Después de que el carro aterrice, acelera
para continuar avanzando hacia adelante.
Consejos para manejarlo:
• Correr el carro sobre superfi cies planas.
• Mantener la vista en el carro no en el controlador.
• Siempre soltar inmediatamente los botones de hacia adelante/turbo después de un choque para prevenir daño al sistema electrónico.
• El vehículo debe manejarse en un lugar que tenga tanto espacio como sea posible y donde no haya ni gente ni animales cerca.
• No manejar este vehículo en la calle.
Solución de Problemas
Problema: Las llantas no ruedan.
Solución: Recargar las baterías.
Problema: El controlador no funciona.
Solución: Asegurarse de que las baterías se encuentren
puestas adecuadamente.
Poner baterías nuevas.
Problema: El carro pierde velocidad o se para.
Solución: Recargar la batería.
Si el Outspeeder
DEBE REGRESAR A LA TIENDA.Comunicarse con:
Hobby Services
3002 N. Apollo Drive, Suite 1
Champaign, Il, 61822, U.S.A.
De 9am-5pm hora central de lunes a viernes
(217) 398-0007
hobbyservices@hobbico.com
™
necesita reparación o reemplazo, NO SE
Service
ESTE PRODUCTO CONTIENE
UNA BATERÍA LI-ION. DEBE SER
Li-Ion
RECICLADA CORRECTAMENTE.
REVELL, INC. 1850 HOWARD ST., UNIT A, ELK GROVE VILLAGE, IL 60007 U.S.A.
UNA FILIAL DE HOBBICO
HECHO EN CHENGHAI, GUANGDONG, CHINA
© 2013 REVELL INC. POR FAVOR, CONSERVE EL EMPAQUE PARA REFERENCIA FUTURA.
CONTENIDO Y ESPECIFICACIONES SUJETOS A CAMBIOS SIN PREVIO AVISO.
8
revell.com

Buggy télécommandéBuggy télécommandé
3965/3967
™
Contenu
EXIGENCES FCC
Ce dispositif est conforme à la partie 15 des
règles de l’agence fédérale américaine pour les
télécommunications (FCC). Son utilisation est
soumise aux deux conditions suivantes.
(1) Ce dispositif ne doit pas causer d’interférence
nuisible.
Outspeeder
™
Contrôleur
(2) Ce dispositif doit accepter toute interférence
reçue, y compris toute interférence pouvant
entraîner un fonctionnement indésirable.
REMARQUE : LE FABRICANT N’EST PAS
Rampe
Cordon de charge USB
RESPONSABLE DES INTERFÉRENCES RADIO
OU TV CAUSÉES PAR DES MODIFICATIONS NON
AUTORISÉES DE CE MATÉRIEL. DE TELLES
MODIFICATIONS POURRAIENT ANNULER LA
Arceau de sécurité (2)
POSSIBILITÉ POUR L’UTILISATEUR D’EXPLOITER
LE MATÉRIEL.
Mesures de sécurité
Avertissement : Ne modifi ez ou ne retouchez pas cet appareil. Les changements ou modifi cations apportés à cet appareil sans l’approbation expresse de la partie
responsable de sa conformité pourraient annuler la possibilité par l’utilisateur d’exploiter le matériel.
• Ce véhicule convient à un usage à l’intérieur ou à
l’extérieur par temps sec.
• Le véhicule convient aux enfants de 8 ans et audessus. Il appartient au parents de surveiller les
enfants quand ils l’utilisent.
• Mettez la voiture à l’arrêt quand elle n’est pas utilisée.
• Maintenez les mains, le visage et les vêtements
lâches éloignés du véhicule.
•
Enlevez les piles du contrôleur quand il n’est pas utilisé.
• Ne quittez jamais le véhicule du regard. Un usage
inattentif ou irréfl échi pourrait entraîner des
dommages matériels.
• Observez toujours les instructions quand vous
utilisez ce véhicule.
• Ne l’utilisez pas à proximité de personnes, d’animaux
ou d’eau.
Piles requises pour le contrôleur :
Nécessite : 2 piles AA de 1,5V (non incluses)
Source d’alimentation exigée pour un cordon de
recharge USB :
Nécessite un fi che de sortie USB (non comprise)
Soin et entretien :
• Examinez régulièrement toutes les pièces pour
détecter un endommagement éventuel. En cas
d’endommagement, ne pas utiliser tant que les
réparations ne sont pas faites.
• Employez un chiffon propre et humide pour nettoyer
le véhicule.
• Maintenez le véhicule et les piles éloignés de la
lumière directe du soleil et/ou de sources de chaleur.
Précautions concernant les piles :
• La supervision d’un parent est recommandée lors de
l’installation ou du remplacement des piles.
• Pour obtenir les meilleures performances, utilisez des
piles alcalines neuves dans le contrôleur.
• Insérez des piles neuves dans le contrôleur dès qu’une
fonction montre des signes de défaillance.
• N’alimentez pas le contrôleur en mélangeant des piles
de types différents ou des piles neuves et usées.
• N’employez que des piles de type identique ou
équivalent à celles recommandées.
Le véhicule comporte une pile Li-Ion. Observez
toujours les mesures de sécurité suivantes :
• Ce produit contient une pile Li-Ion. Elle doit être
recyclée ou jetée de façon appropriée.
• Ne jetez jamais des piles au feu ou ne les rangez
jamais près de sources de chaleur.
• Le chargeur est spécialement conçu pour recharger
la pile de cette voiture. Ne l’utilisez qu’à cette fi n.
• Il ne faut recharger les piles que sur une surface à
l’épreuve du feu, loin de tous matériaux infl ammables.
• Ne laissez jamais une pile en cours de chargement
sans surveillance.
• Les piles doivent être déchargées avant d’être jetées.
Couvrez les piles exposées avec du ruban adhésif
afi n d’éviter des courts-circuits !
• Ne démontez ou ne modifi ez jamais les contacts des
piles. N’endommagez ou ne percez pas les éléments
de piles. Faire ainsi serait s’exposer à un risque
d’explosion !
• Maintenez la pile Li-Ion éloignée des enfants.
GARANTIE LIMITÉE DE 90 JOURS
NE RETOURNEZ PAS VOTRE PRODUIT AU MAGASIN. Revell réparera ou remplacera les défectuosités d’usine pendant 90 jours à compter de la date d’achat. Cette garantie
ne couvre spécifi quement pas les dégâts par suite de chute, de mauvaise utilisation ou d’abus. Pour faire une réclamation sous garantie, veuillez contacter notre équipe
d’assistance aux produits à productsupport@greatplanes.com.
Si le service d’assistance aux produits le demande, veuillez envoyer le produit défectueux à : Hobby Services, 3002 N Apollo Dr., Suite #1, Champaign, IL 61822 – U.S.A.
Cette garantie ne s’applique que si le produit est utilisé conformément aux instructions et avertissements fournis avec chaque modèle. Revell n’assume aucune responsabilité
fi nancière sauf pour le recours exclusif ou la réparation de pièces comme spécifi é ci-dessus. Revell n’aura aucune responsabilité fi nancière concernant les dommages
consécutifs ou accidentels. Certains états/provinces n’autorisent pas l’exclusion des dommages consécutifs ou accidentels de sorte que l’exclusion ci-dessus pourrait ne pas
vous concerner. Cette garantie vous donne des droits spécifi ques et vous pourriez également avoir d’autres droits qui varient d’état en état/de province en province.
9

Pièces du Véhicule et du Contrôleur
ntrôleur
Arceau de sécurité
Antenne
Roues avec
pneus en mousse
En avant / En arrière
Connexion de
câble USB
Indicateur de signaux
Antenne
Bouton du
turbocompresseur
À droite /
À gauche
Insérez les extrémités de chaque arceau dans
les trous prévus sur la voiture jusqu’à ce qu’elles
s’enclenchent en place.
Attachez les Arceaux de Sécurité
Les arceaux de sécurité permettent à la voiture de
se retourner et de se retrouver sur ses roues.
Insérez les Piles dans le Contrôleur
1. Dévissez et soulevez les deux couvercles des
compartiments de piles.
10
2. Insérez une pile AA de 1,5 V de chaque côté, en
suivant les consignes de polarité.
3. Fermez les couvercles et serrez les vis.

Procédure de Chargement
:
Attention : • laissez la pile refroidir pendant 10 à 15 minutes avant de la recharger.
Démarrage :
marrage
• Assurez-vous que la voiture est à l’arrêt avant de commencer la recharge !
• Ne laissez jamais une pile en cours de chargement sans surveillance.
1. Mettez la voiture à l’arrêt !
2. Connectez soigneusement le câble USB à la voiture.
3. Connectez l’autre extrémité du câble USB à un ordinateur.
4. Le processus de chargement demande environ 20 minutes. Le câble USB s’allume rouge une fois la pile
complètement chargée. Pour des raisons de sécurité, ne rechargez jamais la pile pendant plus de 20 minutes.
5. Déconnectez le câble USB de l’ordinateur et de la voiture.
Conduite du Véhicule
• La voiture peut être conduite pendant 20 minutes environ
après une recharge d’une durée de 20 minutes.
Manœuvre :
1. Déployez l’antenne sur le contrôleur.
1. Déployez l’antenne
3. L’indicateur de signaux sur le contrôleur
s’allume dès qu’un bouton est actionné.
2. Mettez la voiture en position de marche.
La voiture se déplace en avant si
on appuie sur le bouton de marche
avant et en arrière si on appuie sur
le bouton de marche arrière.
La voiture se déplace en
avant à la vitesse maximale
quand on appuie sur le
bouton du turbocompresseur.
La voiture tourne quand on appuie sur le bouton
de virage à droite ou à gauche.
L’équilibrage de la direction
de la voiture peut être
corrigé à l’aide du levier
d’alignement des roues.
11

Saut par Dessus la Rampe :
Conduite du Véhicule (suite)
REMARQUE : Placez un
objet derrière la rampe
pour l’empêcher de bouger.
Conduisez la voiture en avant et appuyez sur le
bouton du turbocompresseur au point de sauter.
Relâchez le bouton de marche avant. Après l’atterrissage de la voiture, accélérez
pour continuer le mouvement en avant.
Conseils de Conduite :
• Manœuvrez la voiture sur une surface plate.
• Regardez la voiture au lieu de regarder le contrôleur.
• Relâchez toujours les boutons de marche avant/turbocompresseur immédiatement après un impact afi n d’éviter d’endommager les
systèmes électroniques.
• Le véhicule doit être utilisé dans une zone ayant autant d’espace dégagé que possible, sans personne ni animaux à proximité.
• N’utilisez pas ce véhicule dans la rue.
Dépannage
Problème : Les roues ne tournent pas.
Solution : Rechargez la pile.
Problème : Le contrôleur ne fonctionne pas.
Solution : Voyez si les piles sont bien insérées.
Insérez des piles neuves.
Problème : La voiture perd de la vitesse ou s’arrête.
Solution : Rechargez la pile.
Si votre Outspeeder
NE LE RENVOYEZ PAS AU DÉTAILLANT. Contactez :
Hobby Services
3002 N. Apollo Drive, Suite 1
Champaign, Il, 61822, U.S.A.
De 9 h. à 17 h., fuseau horaire centrale, du lundi au vendredi
(217) 398-0007
hobbyservices@hobbico.com
™
a besoin de réparations ou d’un remplacement,
Service
CE PRODUIT CONTIENT UNE BATTERIE
LI-ION. ELLE DOIT ÊTRE RÉCYCLÉE OU
Li-Ion
ÉLIMINÉE DE MANIÈRE APPROPRIÉE.
REVELL, INC. 1850 HOWARD ST., UNIT A, ELK GROVE VILLAGE, IL 60007 U.S.A.
UNE FILIALE DE HOBBICO
FABRIQUÉ À CHENGHAI, GUANGDONG, CHINE
©2013 REVELL INC. S.V.P. GARDEZ L’EMBALLAGE POUR RÉFÉRENCE FUTURE.
CONTENU ET SPÉCIFICATIONS SUJETS À CHANGEMENT SANS PRÉAVIS.
12
revell.com

Warning : Any changes or modifications not expressly approved by the party responsible
authority to operate this equipment.
for compliance could void the user's
 Loading...