

Cooler Master Storm Sniper Operator's Manual
ATX Tower
CONTENTS
How to remove the side panel
How to install the motherboard
How to install the power supply
How to install the add-on cards
How to install the 5.25" devices
How to install the 3.5" HDD/SSD devices
2.2.1 Install the radiator on the Front (360mm/280mm/240mm)
2.8.1 Install Front fan
2.8.2 Install Top fan
2.8.3 Install Rear fan
2.8.5 Install Side fan
2.8.4 Install HDD fan
2.2.2 Install the radiator on the Top (280mm/240mm)
2.2.3 Install the radiator on the rear (120mm)
How to install the radiator
How to remove and clean filter
How to install or replace case fans
02
03 / 04
17 / 18
19
03 / 04
05
05
06/07
07
07
08
09
09
10
10/11/12
13
13
13
14
14
14
15
16
16
01
Diagram / 示意图
Specifications / 规格
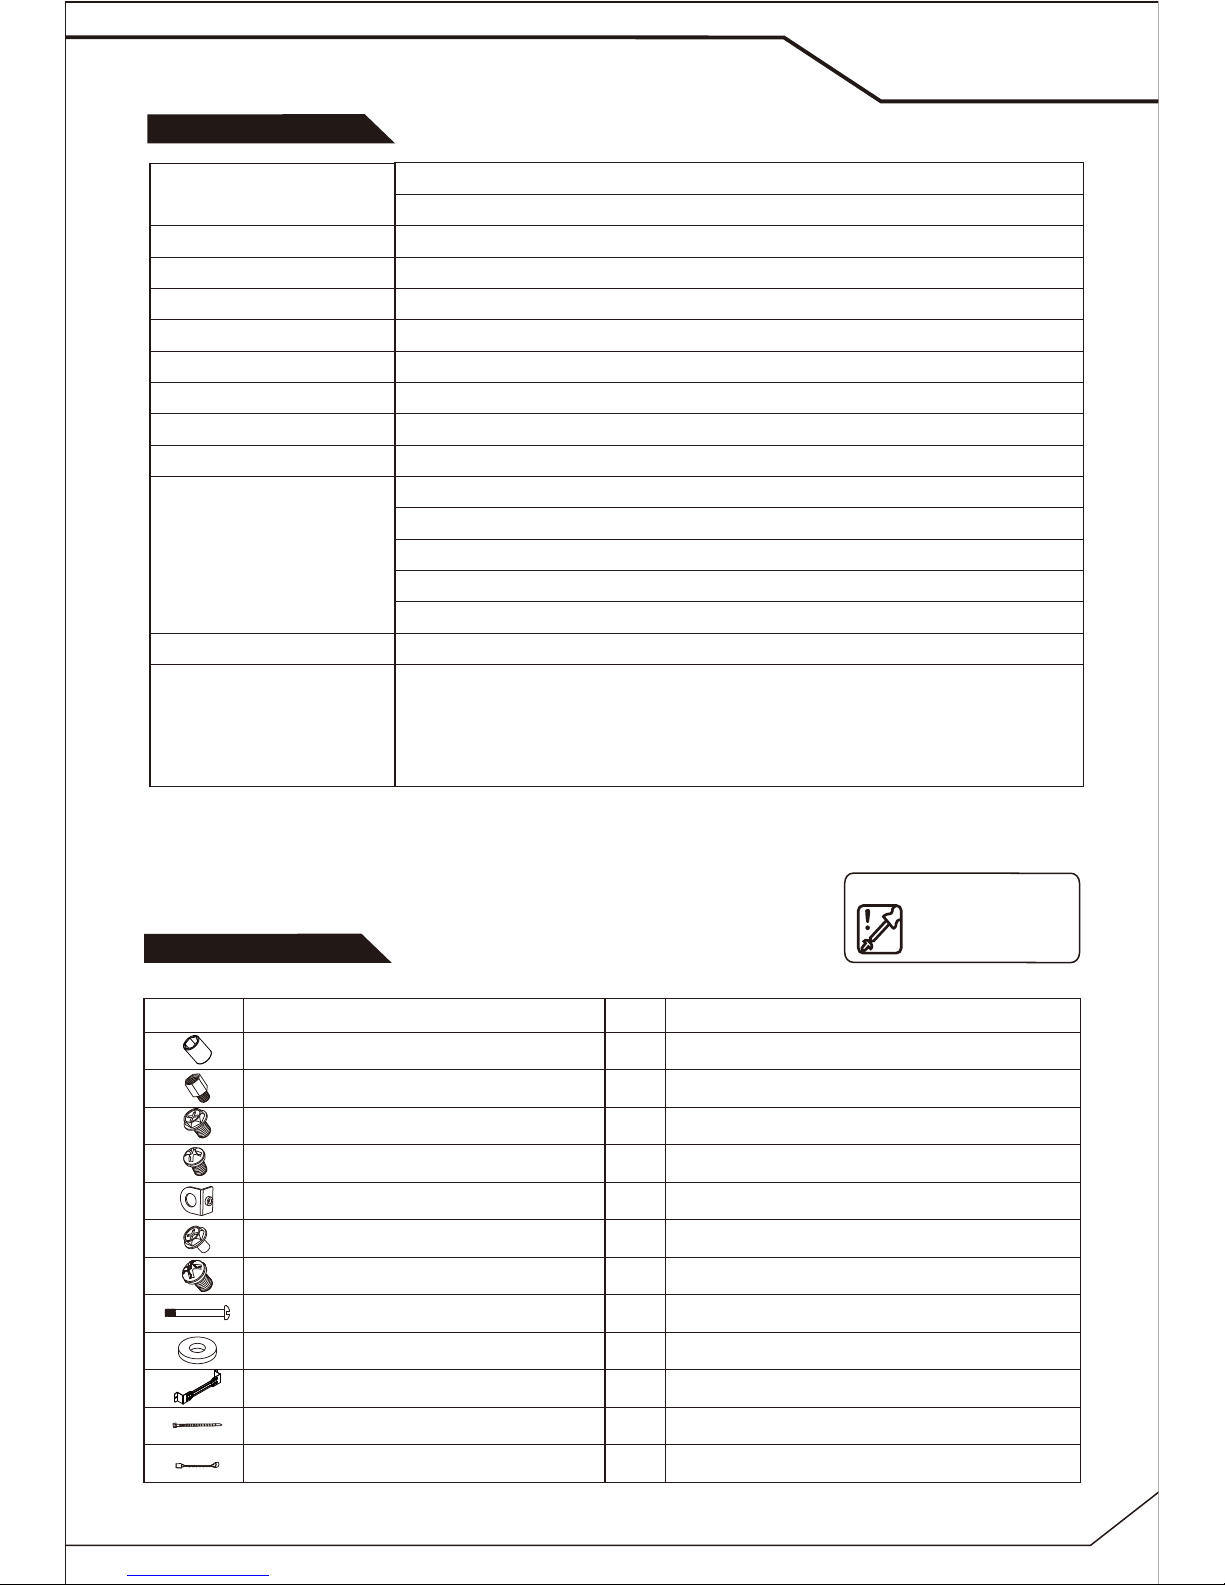
Fittings Pack / 配件包
2.1
2.2
2.3
2.4
2.5
2.6
2.7
2.8
How to install the lock-buckle
2.9
3.0
Completing installation
3.1
Installation Guide / 安装说明
I/O Function panel installation guide / 前I/O面板安裝說明
Warranty Information / 保修信息
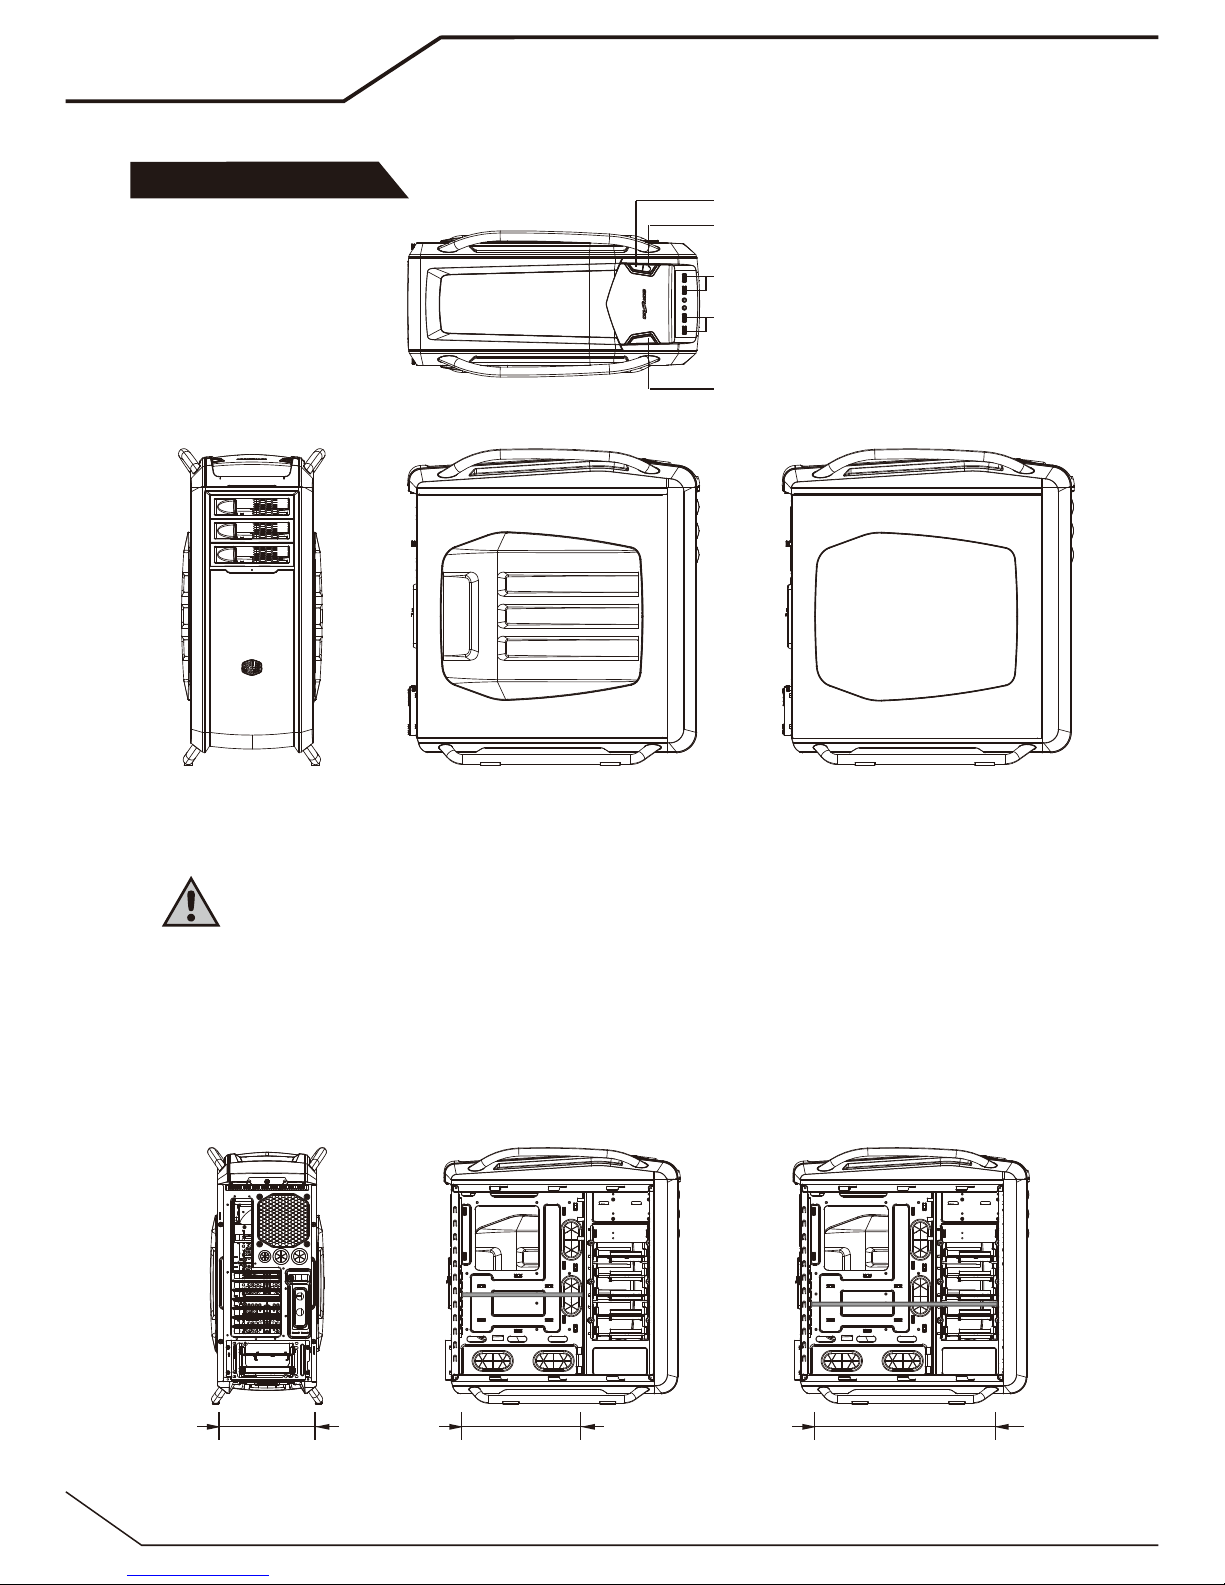
Maximum height
for CPU cooler
1. CPU cooler installation:
Please ensure that your CPU-cooler does NOT exceed 6.9-inches (175 mm) height, it will cause damage to the
side panel of the case and the CPU cooler.
Warning!!
175mm
Maximum length for graphics card
(10.9 inch / 276 mm,with HDD Bracket)
Maximum length for graphics card
(15.6 inch / 395 mm,w/o HDD Bracket)
2.
Please ensure that your graphics card does NOT exceed 10.9-inches (276mm) in length,
it will cause damage to the case and the graphics card. If the upper 3.5" HDD Bracket is removed,
the maximum length of graphics card is 395mm.
Top-View / 顶-视图
Left side-View / 左侧-视图 Left side-View / 左侧-视图(开窗版)Front-View / 正-视图
02
Diagram / 示意图
USB3.0
Power Switch
Reset Switch
Fan LED on/ off switch
USB2.0
276mm 395mm
* Product specifications are subject to change without notice.
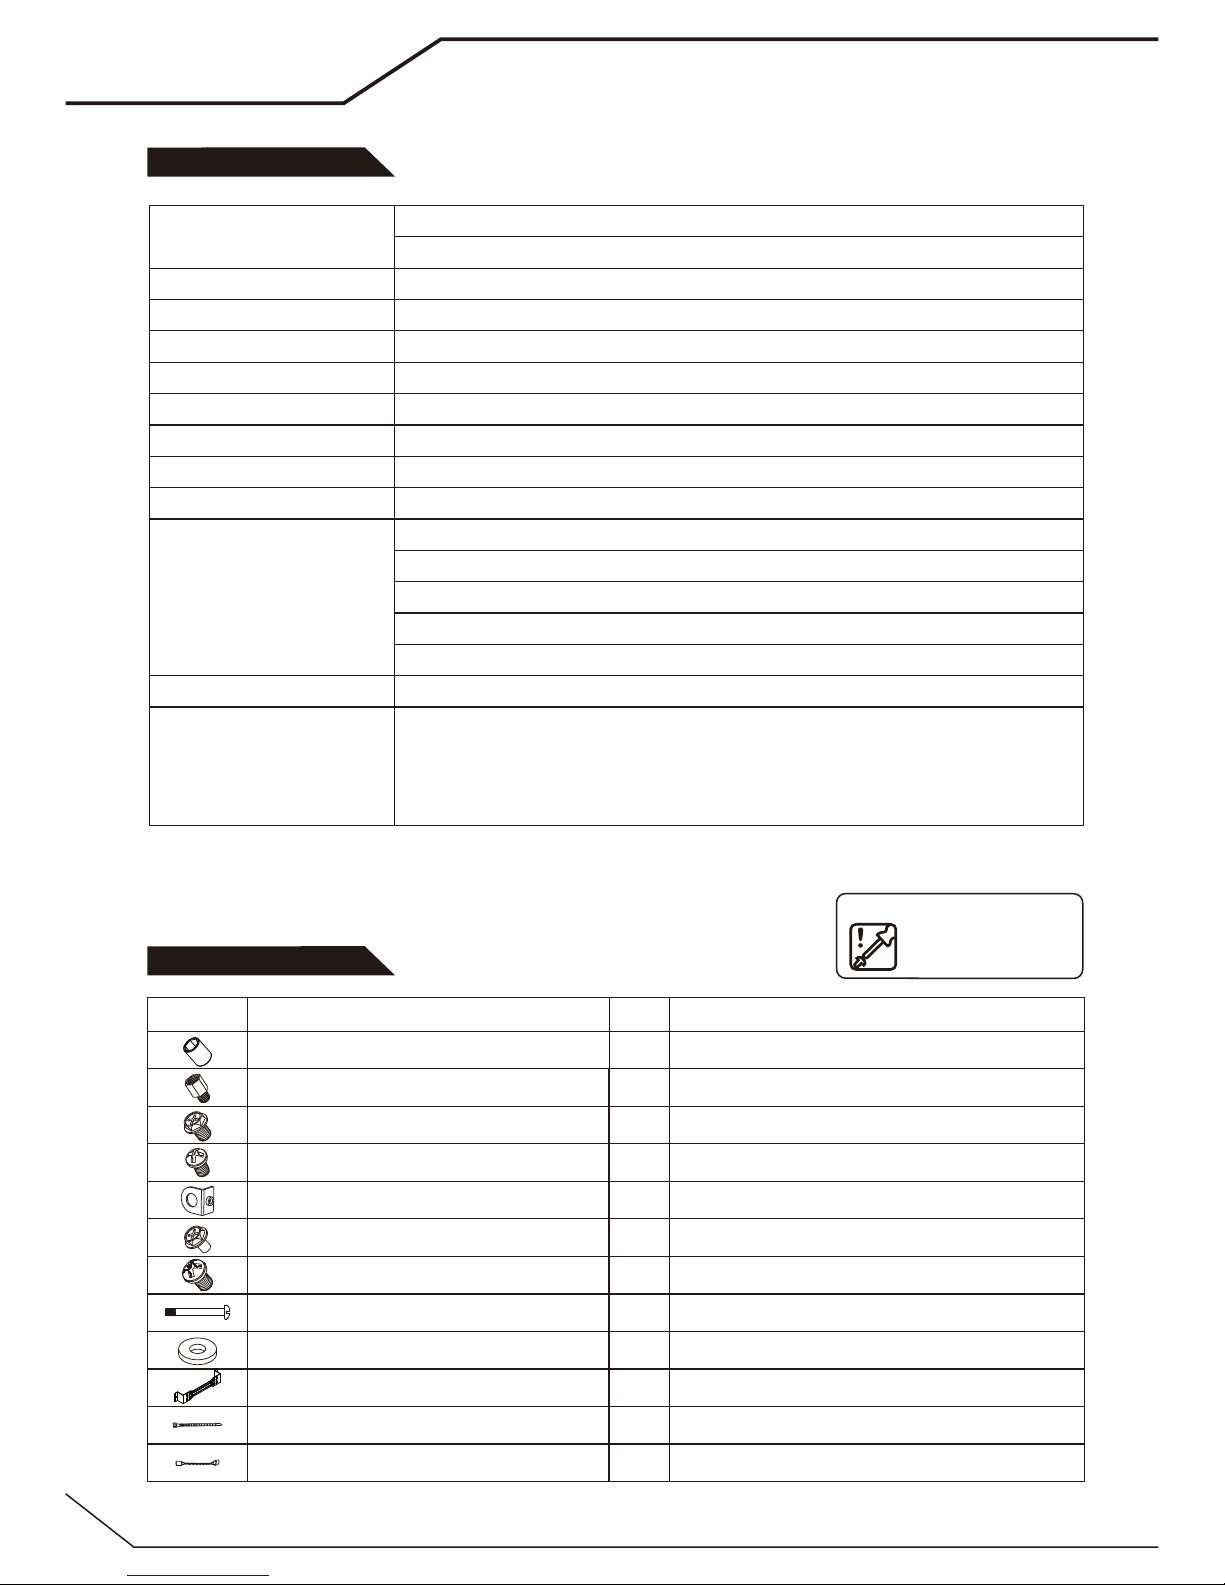
Figure
Name
Q’ty
Used for
A tool for assembling is needed
Icon Description
Specifications
Fittings Pack
03
Materials
Dimension (W x H x D)
Net Weight
M/B Type
5.25” Drive Bay(s)
3.5” Drive Bay(s)
SSD Bay(s)
I/O Panel
Expansion Slots
Cooling System
Power Supply Type
Maximum Compatibility
Exterior: Mesh, Synthetics;
Interior: Steel-Alloy, Synthetics, Rubber
263.8 x 569.4 x 524.4mm / 10.4 x 22.4 x 20.6 inch
10.85 kg / 23.87 lbs
ATX, microATX, Mini-ITX
3
8
18 (16 converted from 3.5" bays )
USB 3.0 x 2, USB 2.0 x 2, Audio In & Out
7
Top: 120/140mm fan x 2 (one 140mm black fan installed, 1200 RPM, 19 dBA)
Front: 120mm blue LED fan x 2 (with LED on/off; converted to one 140mm fan)
Rear: 120mm fan x 1 (installed, 1200 RPM, 17 dBA)
Side: 120/140mm fan x 1 (optional, for mesh side panel only)
HDD cage: 120mm fan x 2 (optional)
Standard ATX PS2
VGA card length:
With HDD bracket: 276mm / 10.9 inch
W/o HDD bracket: 395mm / 15.6 inch
CPU cooler height: 175mm / 6.9 inch
Front Radiator
Radiator Cage
Cable management
Motherboard speaker
#6-32*6 screw
Lock PSU / Radiator Bracket
M3*5 screw
24
M / B tray , ODD
Cable tie
Buzzer
Stand-off
M / B tray
10
#6-32*4 screw
1
Lock buckle
10
2
1
8
8
Lock buckle
Security
1
Fan screw (6#32*34)
HDD fan
HDD Fan
8
Stand-off socket
M / B tray
1
SSD
M3*5 screw
Anti-vibration pad
36
工具需要图示
Icon Description
规格
04
配件包
图 片 名 称 数 量 用 途
* 产品规格变更恕不另外通知.
材质
尺寸 (宽 x 高 x 长)
凈重
主板类型
5.25" 装置
3.5" 装置
SSD 装置
I/O面板
扩充槽
散热系统
电源类型
最大限度
Exterior: Mesh, Synthetics;
Interior: Steel-Alloy, Synthetics, Rubber
263.8 x 569.4 x 524.4mm
10.85 kg
ATX, Micro ATX, Mini ITX
3
8
18 (16 converted from 3.5" bays)
USB 3.0 x 2, USB 2.0 x 2, Audio In and Out
7
顶部: 120/140mm 风扇 x 2 (140mm 黑色风扇 x 1 (标配), 1200 RPM, 19 dBA)
前面: 120mm 蓝色 LED 风扇 x 2 (带 LED 开/关; 由 1 个 140mm 风扇转入)
后面: 120mm 风扇 x 1,( 标配,1200 RPM, 17 dBA)
侧面: 120/140 mm 风扇 x 1 (选配,仅用于冲孔网侧边)
HDD: 120mm fan x 2 (
选配)
Standard ATX PS2
显卡限长
:
(1) 带 HDD Bracket: 276mm
(2) 移除 HDD Bracket: 395mm
CPU 散热器限高: 175 mm
#6-32*4 螺丝
M3*5 螺丝
M3*5 螺丝
#6-32*6 螺丝
铜柱
铜柱套筒
锁片
束线带
蜂鸣器
风扇螺丝(6#32*34)
固定主板
锁电源/水冷排支架
固定主板,光驱
锁锁片
锁固铜柱
防盗
整理线材
主板警报
锁 HDD 风扇
锁前水冷排
HDD 风扇防震
1
24
水冷排支架
8
10
1
1
10
2
1
8
8
固定 SSD
防震墊
36

Installation Guide / 安装说明
2.1
2.2
05
How to remove the side panel
EN
Как се отстранява страничният панел
BG
拆下侧板
CHS
拆下側板
CHT
Jak odstranit postranní kryt
CS
So entfernen Sie die Seitenplatte
DE
Πως να αφαιρέσετε τον πλαινό πίνακα
EL
Cómo quitar el panel lateral
ES
Comment retirer le panneau latéral
FR
Oldalsó panel eltávolítása
HU
Come rimuovere il pannello laterale
IT
サイドパネルの取り外し方法
JP
사이드 패널 제거 방법
KR
Бүйір тақтаны қалай алу керек
KZ
Verwijderen van het zijpaneel
NL
Jak zdjąć pokrywę boczną
PL
Como remover o painel lateral
PT
Как снять боковую панель
RU
Kako da uklonite bočnu ploču
SR
Yan paneli kaldırma
TR
AR
EN
How to install a radiator
BG
Как се инсталира радиаторът
CS
Jak nainstalovat chladič
CHS
安装水冷排
ES
Como instalar el radiador
EL
Πώς να εγκαταστήσετε τον ακτινοβολέα
DE
So installieren Sie einen Wärmetauscher
CHT
安裝水冷排
FR
Comment installer le radiateur
HU
Radiátor beszerelése
TR
Radyatör nasıl kurulur
IT
Come installare il radiatore
JP
ラジエーターの取り付け方法
KR
라디에이터 설치 방법
KZ
Радиаторды қалай орнату керек
NL
Installeren van de radiator
SR
Kako da instalirate hladnjak
RU
Как установить радиатор
PT
Como instalar o radiador
PL
Jak włóżyć radiator
AR
Note:
* If you don’t plan to install a radiator, you could skip this step
* Before you install a radiator in the front, please check the radiator width (it can’t exceed 135-145mm),
length (it can’t exceed 400mm ) and tube length (needs to reach the components you wish to cool).
(1) If the thickness of radiator (w fan) is under 70 mm, the COSMOS SE supports a radiator
width up to 145mm
(2) If the thickness of radiator (w fan) exceed 70 mm, the COSMOS SE supports radiator
width up 135mm
* Avoid any interference, please plan HDD(s) , SSD(s) installation first
06
1
1
3
a
b
b
b
b
b
b
a
a
4
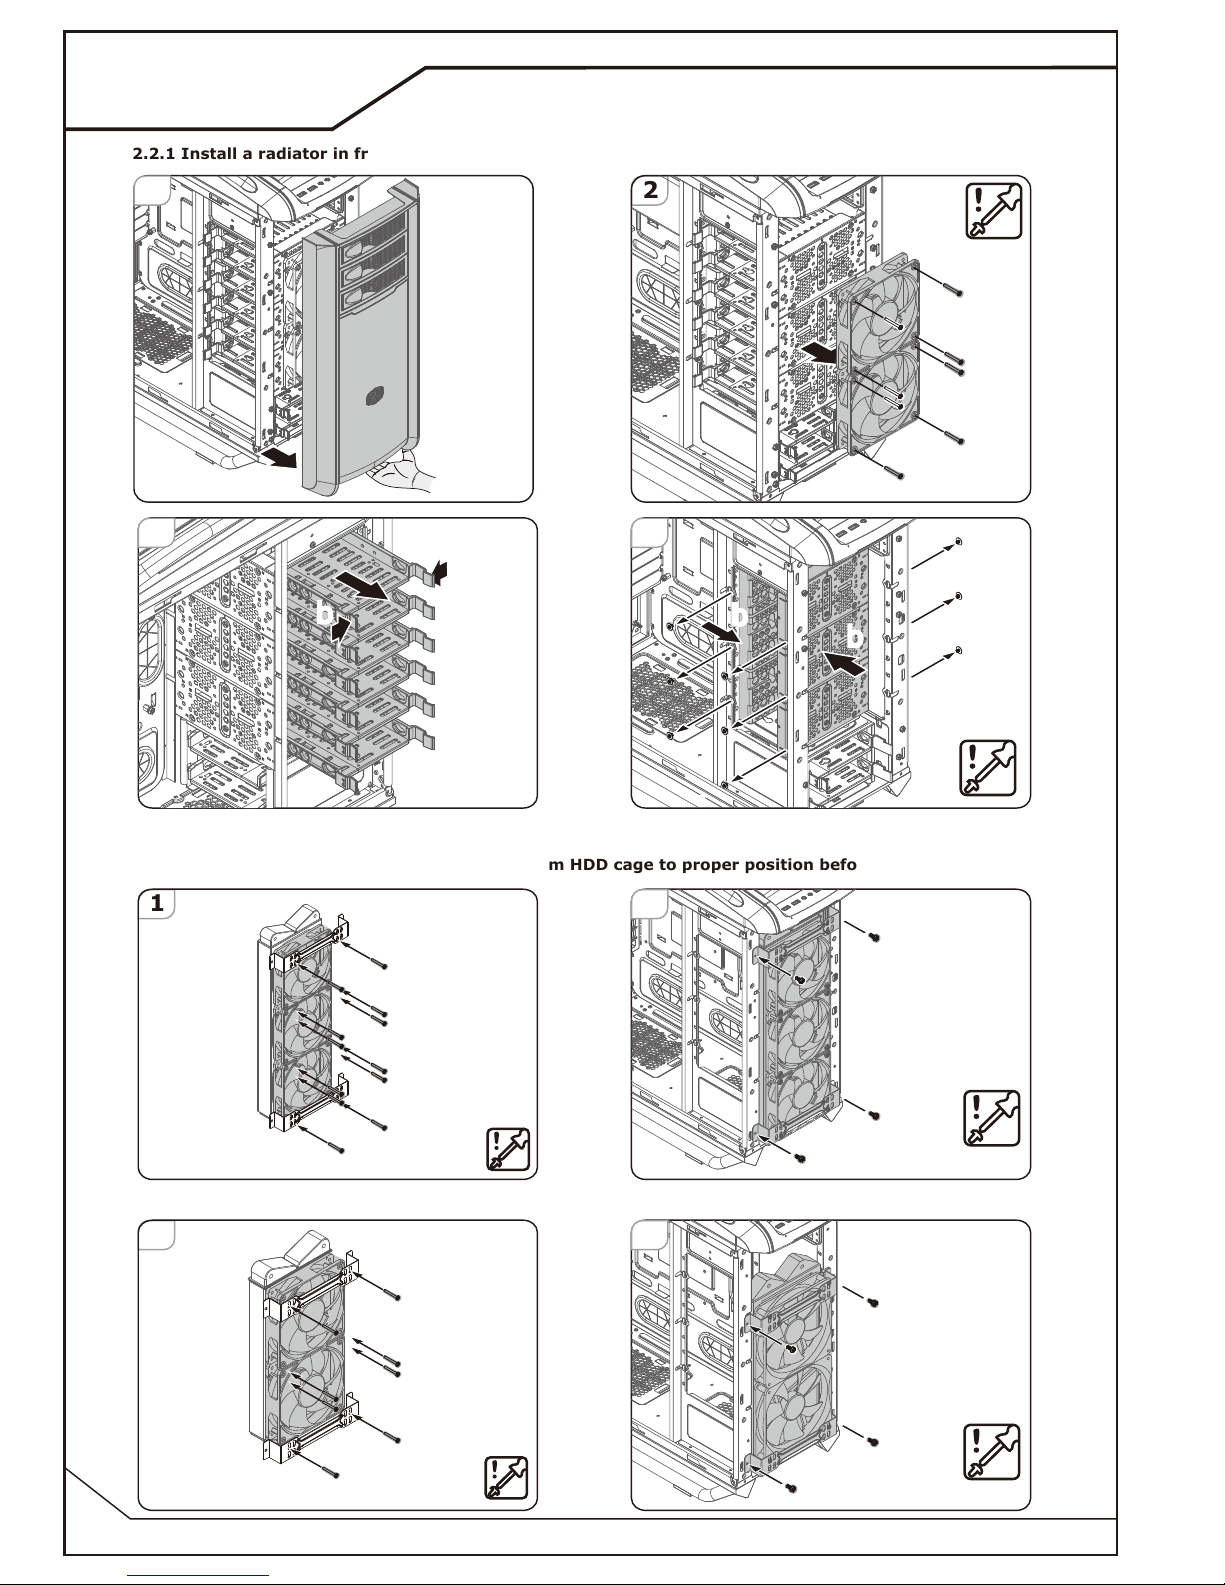
2.2.1 Install a radiator in front of the case.
(A) Install a 360mm radiator in front
(B) Install a 280mm radiator in front
21
* Avoid any interference, please move the bottom HDD cage to proper position before a 360mm installation
2
2
Screw:#6-32*6
Screw:#6-32*6
 Loading...