

Page 1
User manual/English
J;.lJ ~.:iJI / Arabic
I-1HCTPYKl.\~~aa excnnoaraunn / 5bnrapcKI-1
~~i7iafl /
ia!1*<f:>:lt
~~IDtafl /
~H<f:>:lt
Uzivatelska pi'frucka / Cestina
Handuch / Deutsch
EYXE1pii5loxp~all<; / EMIlVIKO
Manual de Usuario / Espafiol
Manuel de I'utilisateur / Francais
Felhasznaloi kezlkonvv / Magyar
Manuale d'uso / Italiano
l-"'7-;(-;"
'='.:I.
7 JL- /
8:<$;ill
Handleiding / Nederlands
~j:1 '2!LH/
korean
K;onAaHywblH¥c~aynblfbl/ Kazakh
Instrukcja Uzvtkownika / Polski
Manual do Usuario / Portuques
PYKOBOACTBOnonsaoaarena / PYCCKH~
Uputstvo za koriscenje / Srpski
Kullarurn Kllavuzu / Turkce
Page 2
~€1
C/I/IS7rSRFIA
g
BY COOLER MASTER
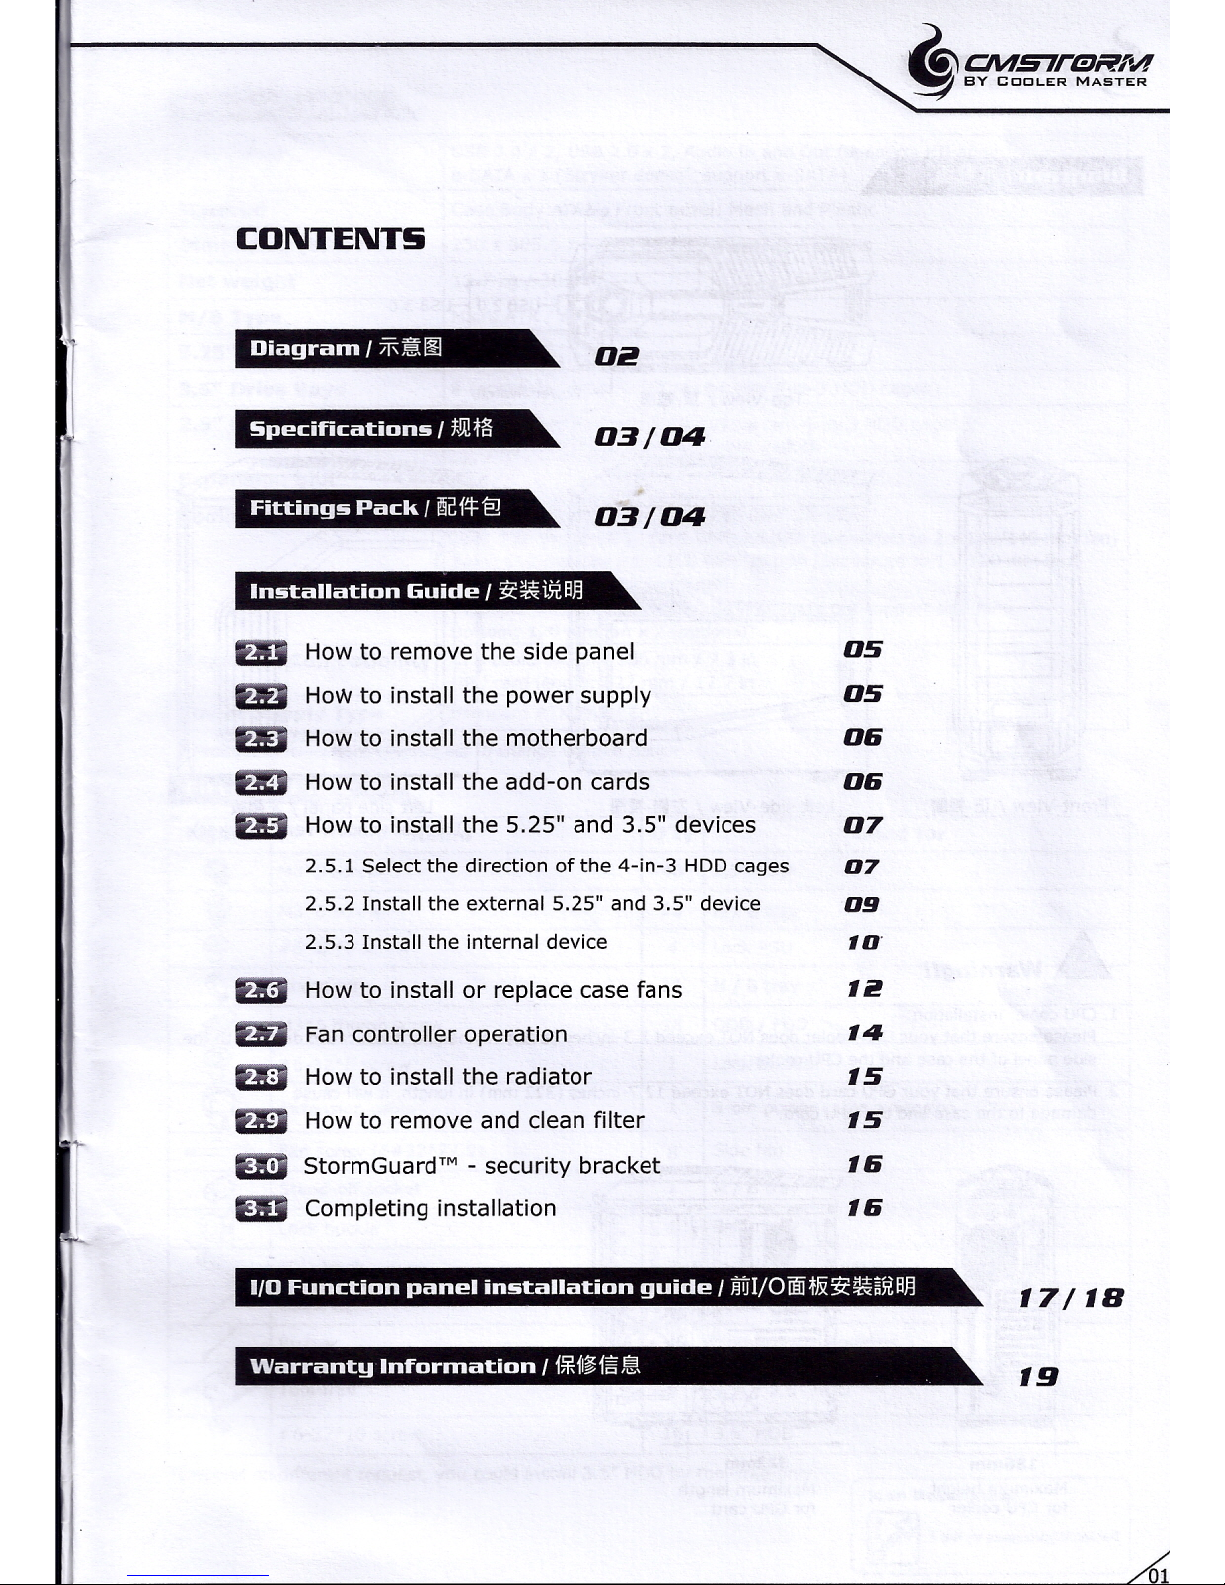
CONTENT!i
_OJ!
03/04
03/04
Imit:allat:ion Guide
I
~~iRBJ3
DJ
How to remove the side panel
05
m
HoWto install the power supply
05
m
How to install the motherboard
0&
DJ
How to install the add-on cards
0&
ID
How to install the 5.25" and 3.5" devices
07
2.5.1 Select the direction of the 4-in-3 HDDcages
07
2.5.2 Install the external 5.25" and 3.5" device
O!l
2.5.3 Install the internal device
'0
ID
How to install or replace case fans
'i!
DJ
Fan controller operation
'4
m
How to install the radiator
'5
m
How to remove and clean filter
'5
1-
ID
StorrnSuard'" - security bracket
,&
I
ID
Completing installation
,&
110Funct:ion panel imit:allat:ion guide
I
jjfjI/OimtJii~~~RBJ3
17/18
Warrant:y Inf'orrnat:ion
l1iiHI~fl'1iJi!!t
19
,L-
-/01
Page 3
~&:\CM~
9
BY COOLER MASTER
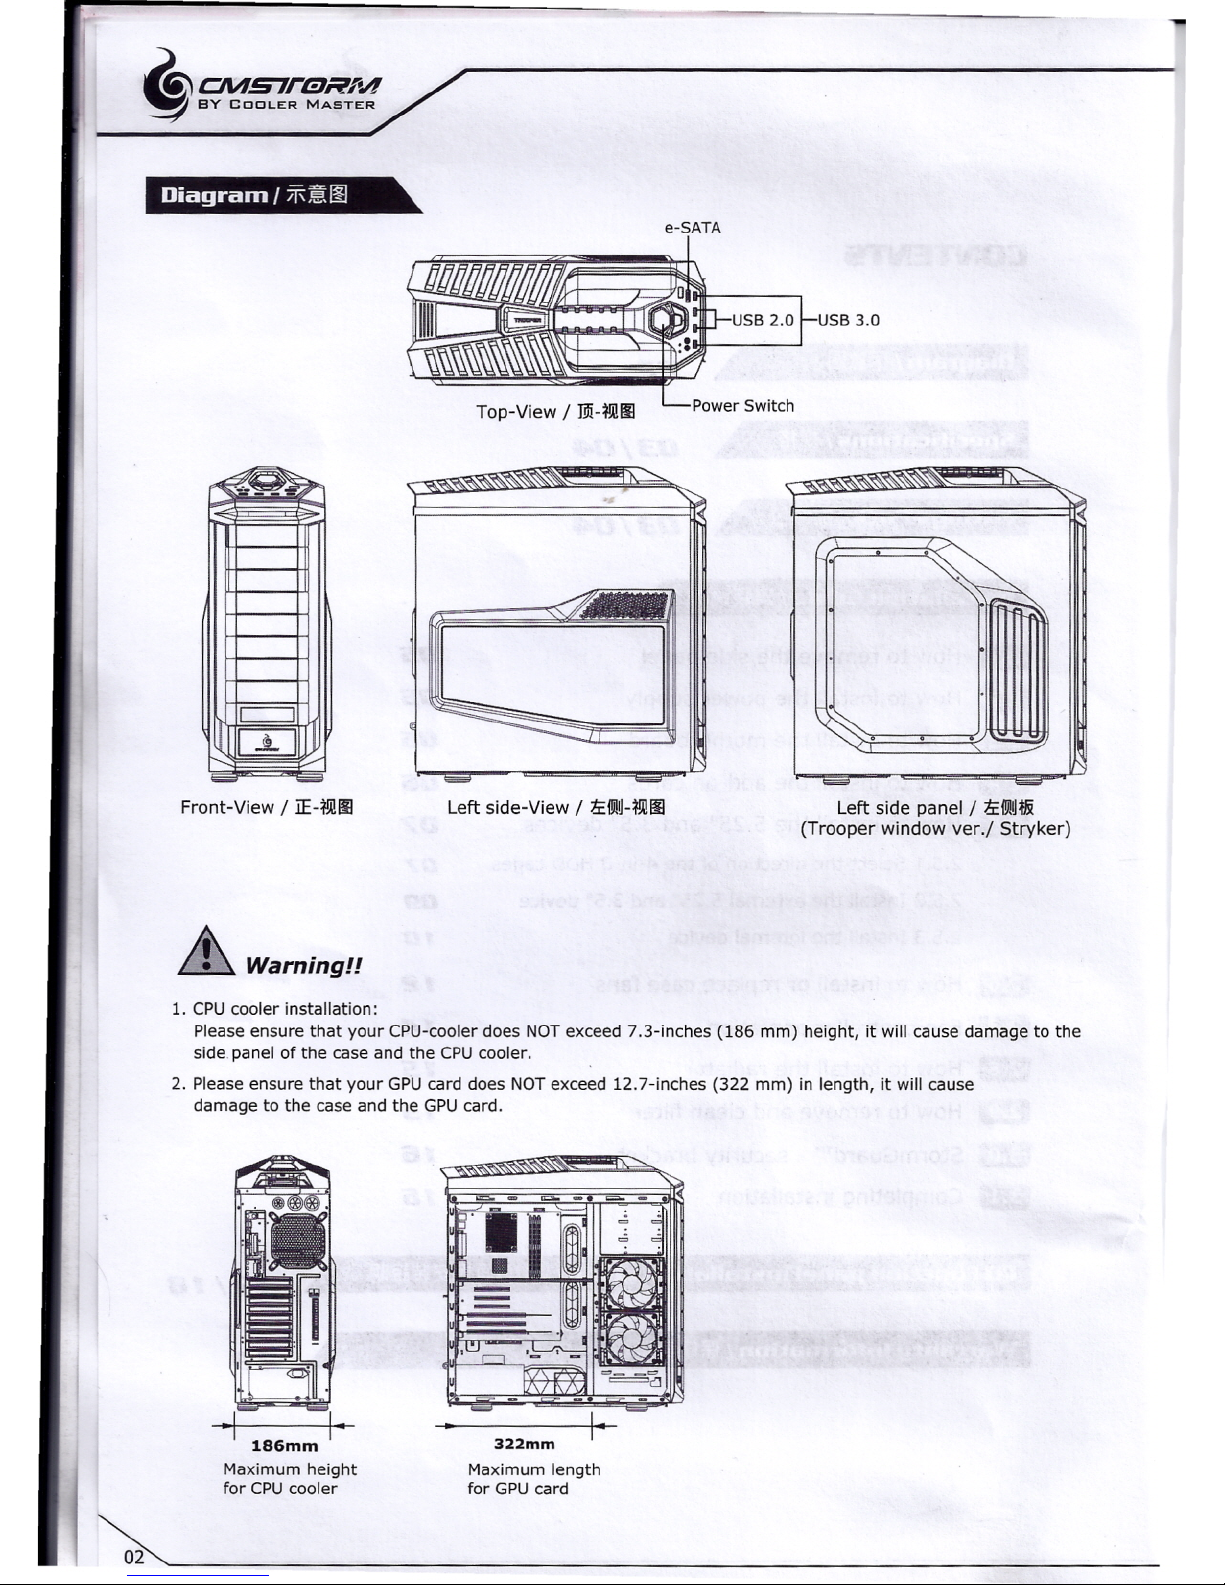
e-SATA
USB3.0
:::,.
~
r
=
~
c::=:J
rn
-
-
Front-View /
iE-flillll
Left side-View /
:li:1J!~-flilOO
Left side panel /
:li:i',\~t&
(Trooper window ver./ Stryker)
~ Warning!!
1. CPUcooler installation:
Please ensure that your CPU-cooler does NOTexceed 7.3-inches (186 mm) height, it will cause damage to the
side.panel of the case and the CPUcooler.
2. Please ensure that your GPUcard does NOT exceed 12.7-inches (322 mm) in length, it will cause
damage to the case and the GPUcard.
186mm
Maximum height
for CPUcooler
Maximum length
for GPU card
02
Page 4
.~~ CJVI57reRFVI
~ BY COOLER MASTER
IJ
.Iq.;.
if;;
i.!.
b
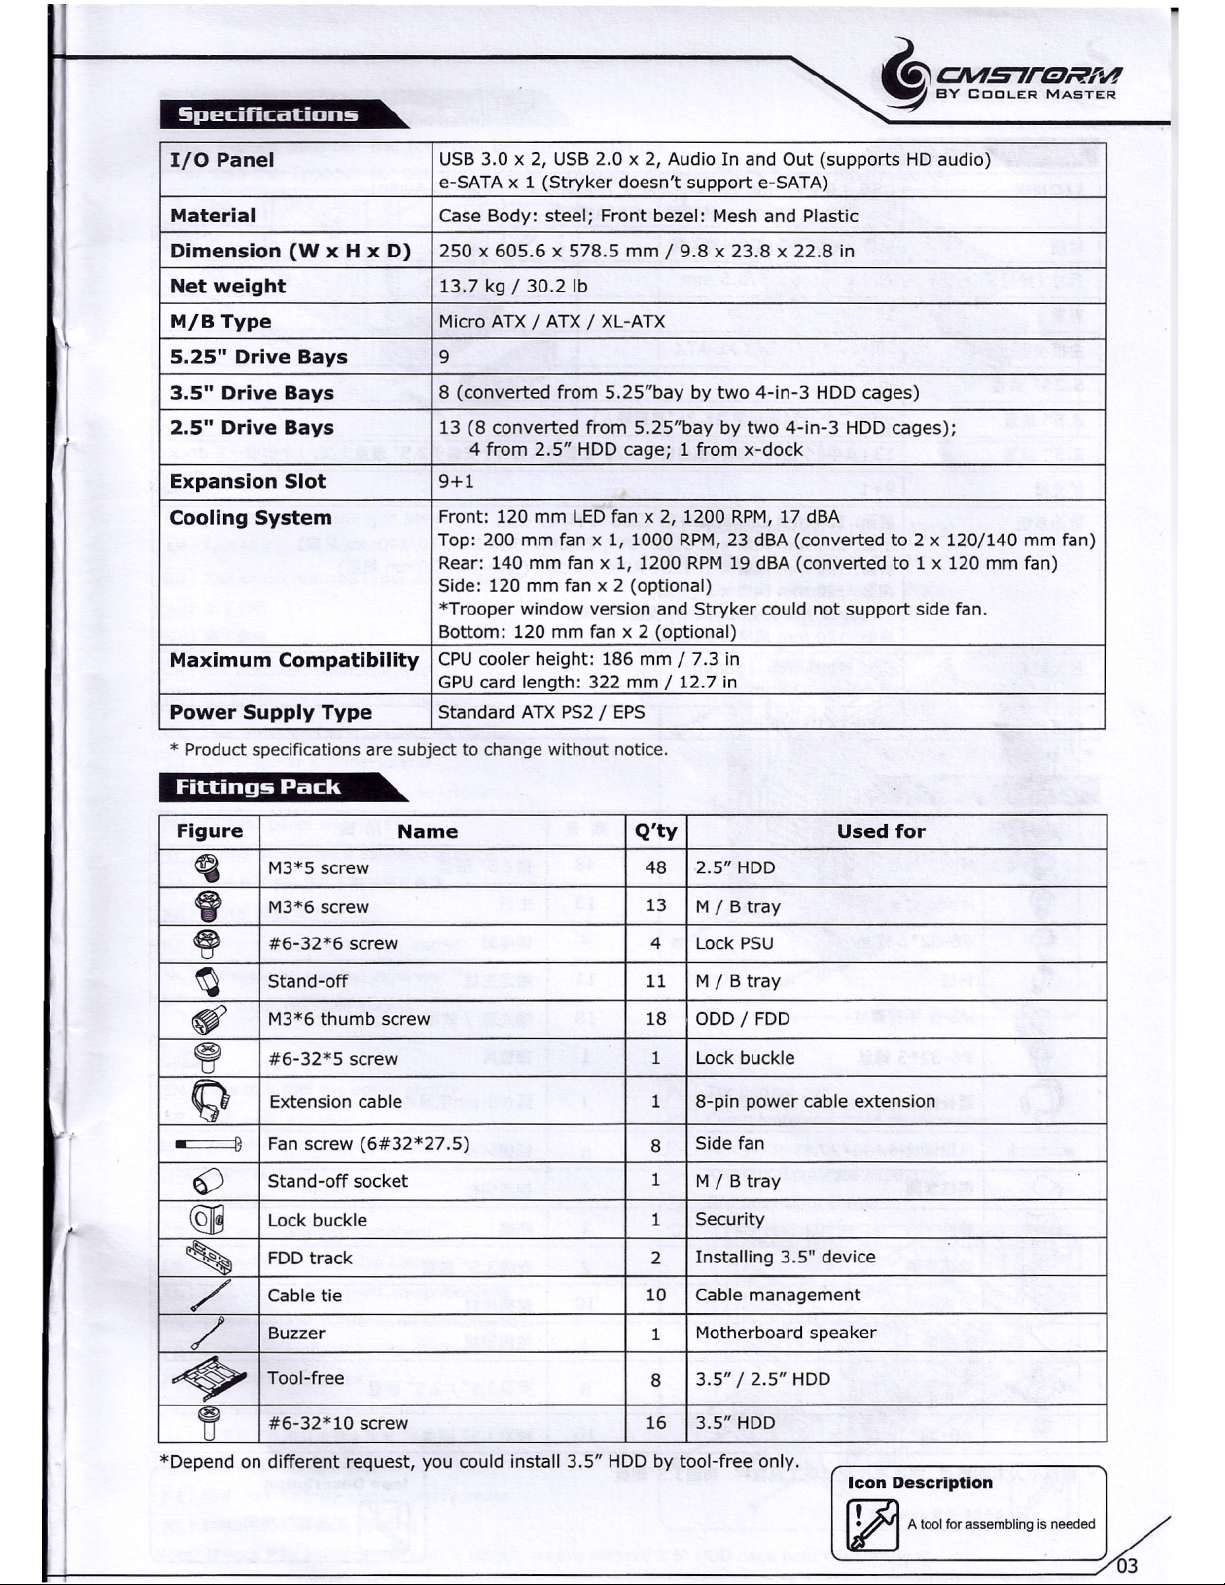
I/O Panel
USB 3.0 x 2, USB 2.0 x 2, Audio In and Out (supports HD audio)
e-SATA x 1 (Stryker doesn't support e-SATA)
Material
Case Body: steel; Front bezel: Mesh and Plastic
Dimension
(WxH
x D)
250 x 605.6 x 578.5 mm / 9.8 x 23.8 x 22.8 in
Net weight
13.7 kg / 30.2 Ib
M/B Type
Micro ATX / ATX / XL-ATX
5.25"
Drive Bays
9
3.5"
Drive Bays
8 (converted from 5.25"bay by two 4-in-3 HDD cages)
2.5"
Drive Bays
13 (8 converted from 5.25"bay by two 4-in-3 HDD cages);
4 from 2.5" HDD cage; 1 from x-dock
Expansion Slot
9+1
Cooling System
Front: 120 mm LEDfan x 2, 1200 RPM, 17 dBA
Top: 200 mm fan x 1, 1000 RPM, 23 dBA (converted to 2 x 120/140 mm fan)
Rear: 140 mm fan x 1, 1200 RPM19 dBA (converted to 1 x 120 mm fan)
Side: 120 mm fan x 2 (optional)
*Trooper window version and Stryker could not support side fan.
Bottom: 120 mm fan x 2 (optional)
Maximum Compatibility
CPUcooler height: 186 mm / 7.3 in
GPUcard length: 322 mm / 12.7 in
Power Supply Type
Standard ATX PS2 / EPS
* Product specifications are subject to change without notice .
• iB!i,j,?i
pm
i_
Figure
Name
~
M3*5 screw
9
M3*6 screw
~
#6-32*6 screw
~
Stand-off
~
M3*6 thumb screw
~
#6-32*5 screw
Q
Extension cable
-===Il
Fan screw (6#32*27.5)
6)
Stand-off socket
t·
@8
Lock buckle
,
FDD track
/
Cable tie
/
Buzzer
•
Tool-free
~
#6-32*10 screw
Q'ty Used for
48 2.5" HDD
13 M/ B tray
4 Lock PSU
11 M/ B tray
18 ODD / FDD
Lock buckle
8-pin power cable extension
8 Side fan
M/ B tray
Security
2 Installing 3.5" device
10 Cable management
Motherboard speaker
8 3.5" /2.5" HDD
16 3.5" HDD
*Depend on different request, you could install 3.5" HDD by tool-free only.
Icon Description
~
..
I£.J
A tool for assembling IS needed
~ ~==========~03
Page 5

,~~ CNfS7reRFV! /
9
BY COOLERMASTER/
Ut:
I/OiliilJY: USB 3.0 x 2, USB 2.0 x 2, Mic x 1, Audio xl (Si:t.f HD Audio)
e-SATA xl (Stryker ::fSi:!i e-SATAltD)
R-t (91:xi'1lix*) 250x605.6x578.5 mm
IJ:!Ii:
13.7 kg
,HJY:lIHI:i Micro ATX/ ATX/ XL-ATX
5.25"
~j[
9
2.5"
~I
13 (;!tq,81'El3=1'3~41llffi.1~1ll5.25"~j[$~J\); 41''J<~T2.5'' lifJ1l;Si:~;11''J<~TX-dock
liJt!!
9+1
l&l.-l\w;m
i\lrilii:120 mm LEDIXlmlx 2,1200 RPM, 17 dBA
mll1l:
200 mm IXlmlx 1, 1000 RPM, 23 dBA (Si:t.f 2 x 120/140mm IXlml)
J§:ilii:140 mm IXlmlx 1, 1200 RPM, 19 dBA(Si:t.f 1 x 120mm IXlml)
l~IJilii:120 mm IXlmlx 2
(ii'£l!1;i)
=Trooper 7fWIJY:&Stryker::fSi:ti1l!~fJY:lXlml
Jll;ll1l:
120 mm IXlmlx 2
(ii'£J!!I)
,ff*~lM[
CPU
nv,HIUl<i'1li:
186mm
illl-t~R*: 322mm
~
I!IF\'
1!5~
1&:;:
Illi£
~
M3*5 ~~ 48
rJi!2.5"~J1I;
"
M3*6 ~~
13
301&
~
#6-32*6 ~~
4 ij!ft!.imi
~
IFoltt
11
1i!il~301&
(f
M3*6 '¥l'i'~~
18
t!JH't~ / $j:~~
~
#6-32*5
tl~
1
t!Jiij!~
Q
l!*~
1
l!*8-pinft!.im.~
-====ll
JXl.m~~(6#32*27.5)
8
~!JiffidJXI.m
Q
IFoltt'ft:FsJ 1
~!Jili!ilmtt
~
~!Ji~
1 1lJ.jl£
~
$j:~:S;:~
2 3i:~3.5"
~lI
/
*~*
10
~1I~~
/
~1!!3~
1
301&W:ta
•
~I~
8
3i:~3.5" / 2.5" ~J1I;
~
#6-32*10 ~~
16
~!Ji~3.5" ~J1I;
Icon Description
,~ l~
I~~~I!I7R
~~------------------~~~~~-
Page 6
Installation liuidl!
I
3C~i5i.a,Ej
'~€1
CNlS7rt!JRFV!
9
BY COOLER MASTER
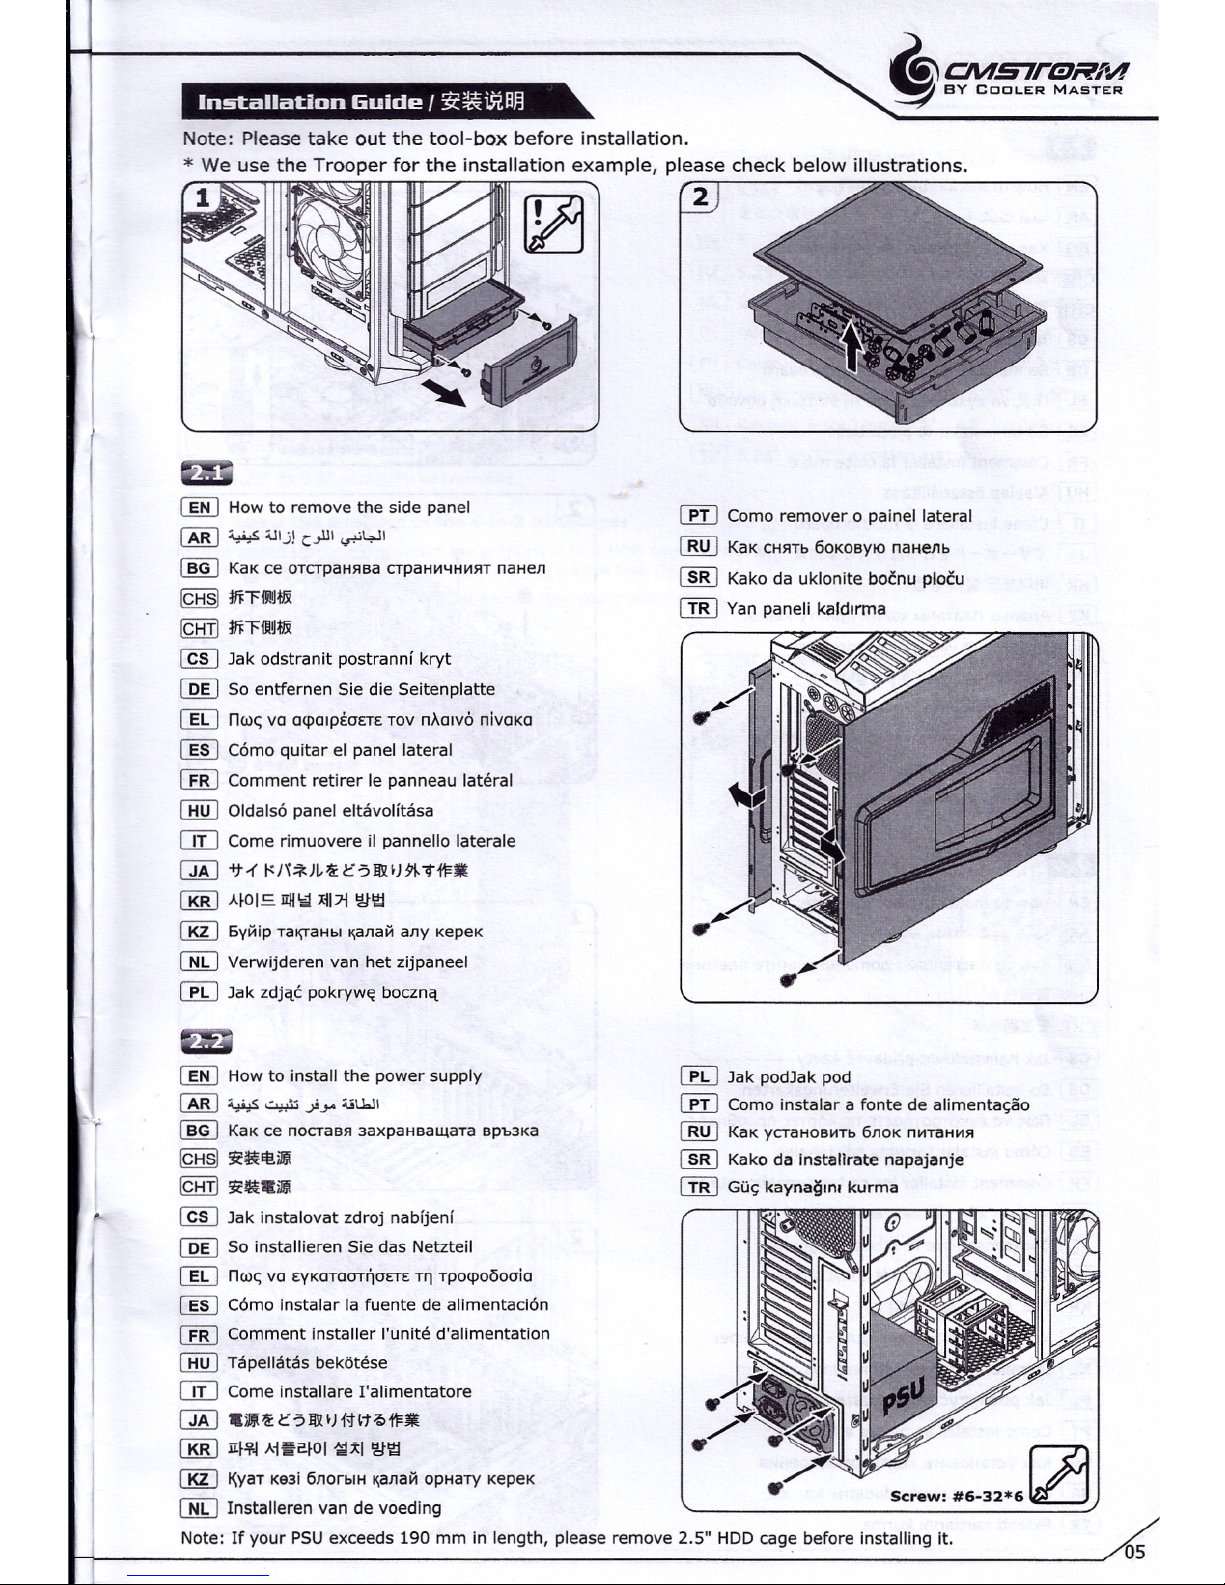
Note: Pleasetake out the tool-box before installation,
(][I
How to remove the side panel
~ ~ Ulj! c.,lll <r'~1
(]§]
KaK ce oTCTpaHHBaCTpaH~4H~HTnaaen
[Qj§]
mnHIX
IQill
mHHIX
@§] Jak odstranit postranni kryt
[Q[) 50 entfernen 5ie die 5eitenplatte
(]g
nw~
va
mpOlpi:oETE TOV
nxorvo nlvoxo
[][J
Corno quitar el panel lateral
I£BJ
Comment retirer le panneau lateral
CHill
Oldalso
panel
eltavolltasa
OIJ
Come rimuovere il pannello laterale
QAJ
<74 t<H*JI,'.U:5m1fJ9I-"ti1=.
[RiD
AIDI=-
IIII\i1
xil71
~\1;j
[gJ
6V~ip Tal\TaHbl~alla~
any kepex
[]!J
Verwijderen van het zijpaneel
[EbJ
Jak zdjac pokrvwe boczna
(][I
How to install the power supply
~~~.)>,"'-iUJI
(]§]
KaK ce
nocraes aaxpauaaurara
Bpb3Ka
[Qj§]
3i'~EI!.ili1.
IQill
3i'~.imi
@§] Jak instalovat zdroj nabfjenf
[Q[) 50 installieren 5ie das Netzteil
(]g
nw~
vo
EVKOTOOT~OETE T~ rpotpoooolo
[][J
Corno instalar la fuente de ahrnentaclon
I£BJ
Comment installer l'unite d'alimentation
CHill
Tapellatas bekotese
OIJ
Come installare I'alimentatore
QAJ
.iIU,c5m1f)f'flt?>i1=ll
[RiD
1I1~4
Ai~~IDI {;;Ixl
~\1;j
[gJ
~yaT Ke3i 6llorblH ~alla~ opaarv xepex
[]!J
Installeren van de voeding
r.m
Como remover 0 painel lateral
IB[J
KaK CHHTb60KOBYlOnaHellb
~ Kako da uklonite bocnu plocu
ill]
Yan paneli katdrrma
[EbJ
Jak podJak pod
r.m
Como instalar a fonte de allmentacao
IB[J
KaK yCTaHoB~Tb6ll0K n~TaH~H
~ Kako da installrate napajanje
CIiD
Gu~
kaynagm. kurma
Screw:
#6-32*6121
Note: If your P5U exceeds
190
mm in length, please remove 2.5" HDD cage before installing it.
05
Page 7
~4i:\CMS7I1!7AOW/
9
BY COOLER MASTER
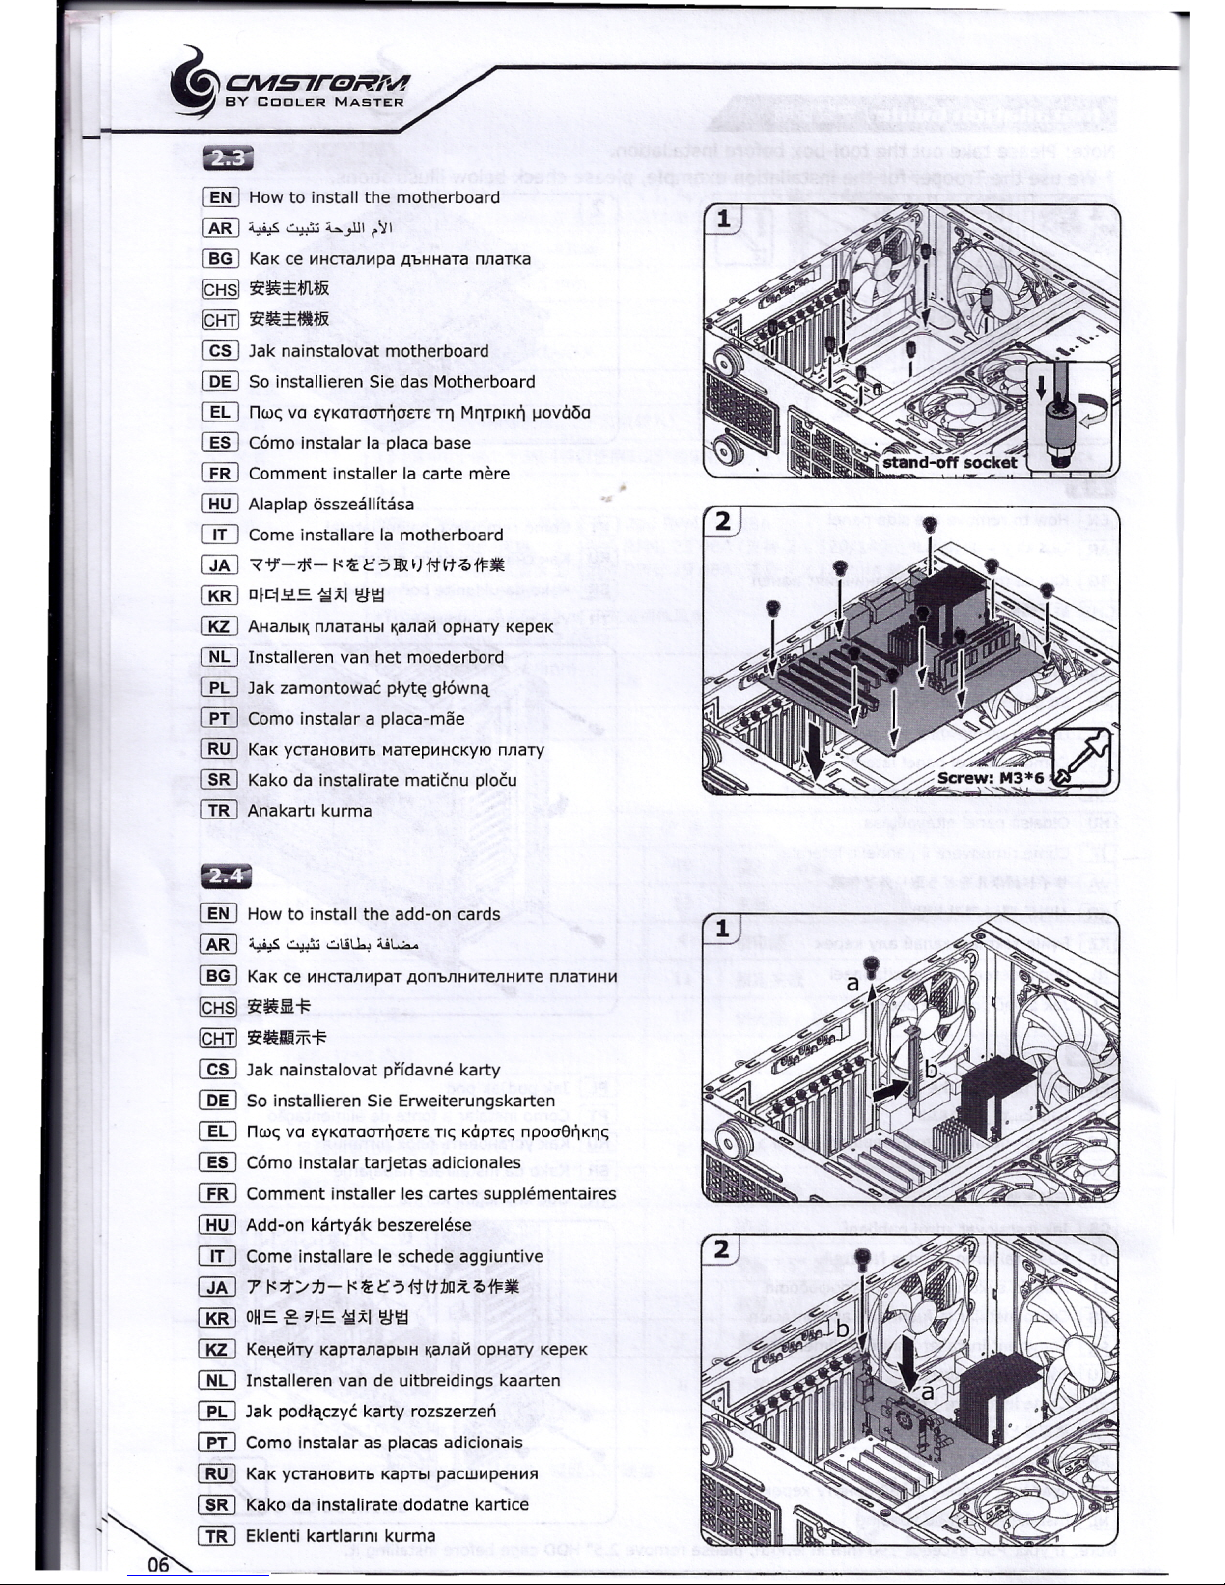
(]"[) How to install the motherboard
~ '-# ~
:c...,ul ,':il
~ KaKce ~HCTan~paAbHHaTannarxa
I9:llil
'$i:!jU~Mj
IQill
'$i:1&::UU&
@[)
Jak nainstalovat motherboard
~ So installieren 5ie das Motherboard
[]iJ
nw~
vo EYKOTOOTIjOETET~ M~TPIKIj~ov6c5o
[][) Corno instalar la placa base
[£RJ
Comment installer la carte mere
ffiill
Alaplap osszeallitasa
O!J
Come installare la motherboard
CM]
",(,"'f->i'-t<'!:/:'5J1l(fHHt;Qt'FlIlt
I][J
olci.§lE
~j:1 ~~
~ AHanbl~nnaraas: ~anai'i opsarv xepex
CEhJ
Installeren van het moederbord
lED
Jak zarnontowac plyt~ glownq
ill]
Como instalar a placa-mile
[]ill
KaKyCTaHoB~TbMaTep~HcKYIOnnarv
[]RJ
Kako da instalirate rnattcnu ploi'u
CIRJ
Anakarti kurma
(]"[) How to install the add-on cards
~ '-# ~
.:.lll.h.; uw..
~ KaKce ~HCTan"paTAonbnH~TenH~TennaT~H~
I9:llil
'$i:
1&lD!
-i<
IQill
'$i:1&1I1IiH
@[)
Jak nainstalovat prfdavne karty
(Q[J
So installieren 5ie Erweiterungskarten
[]iJ
nw~
vo EYKOTOOTIjOETETI~KapTE~npooeljK~~
[][) Corno instalar tarjetas adicionales
[£RJ
Comment installer les cartes supplernentaires
ffiill
Add-on kart yak beszerelese
O!J
Come installare le schede aggiuntive
CM]
7'
t<::>t/:IJ- t<'!:/:'5i<tltiJn;t;Qt'F.
[K[)
OH=-s;>!=-1;Ixl ~~
~ Kefjei'iTy
xapranapsu-
~anai'icpaarv «epex
CEhJ
Installeren van de uitbreidings kaarten
lED
Jak podlaczvc karty rozszerzen
ill]
Como Instalar as placas adicionais
[]ill
KaKyCTaHoB~Tb
xaprst
pacurapeaas
[]RJ
Kako da instalirate dodatne kartice
"~ CIRJ
Eklenti kartlanru kurma
~
-------------------------------------------------------------------
Page 8
,~€\
CNfS7reRfIA
9
BY COOLER MASTER
I]KJ
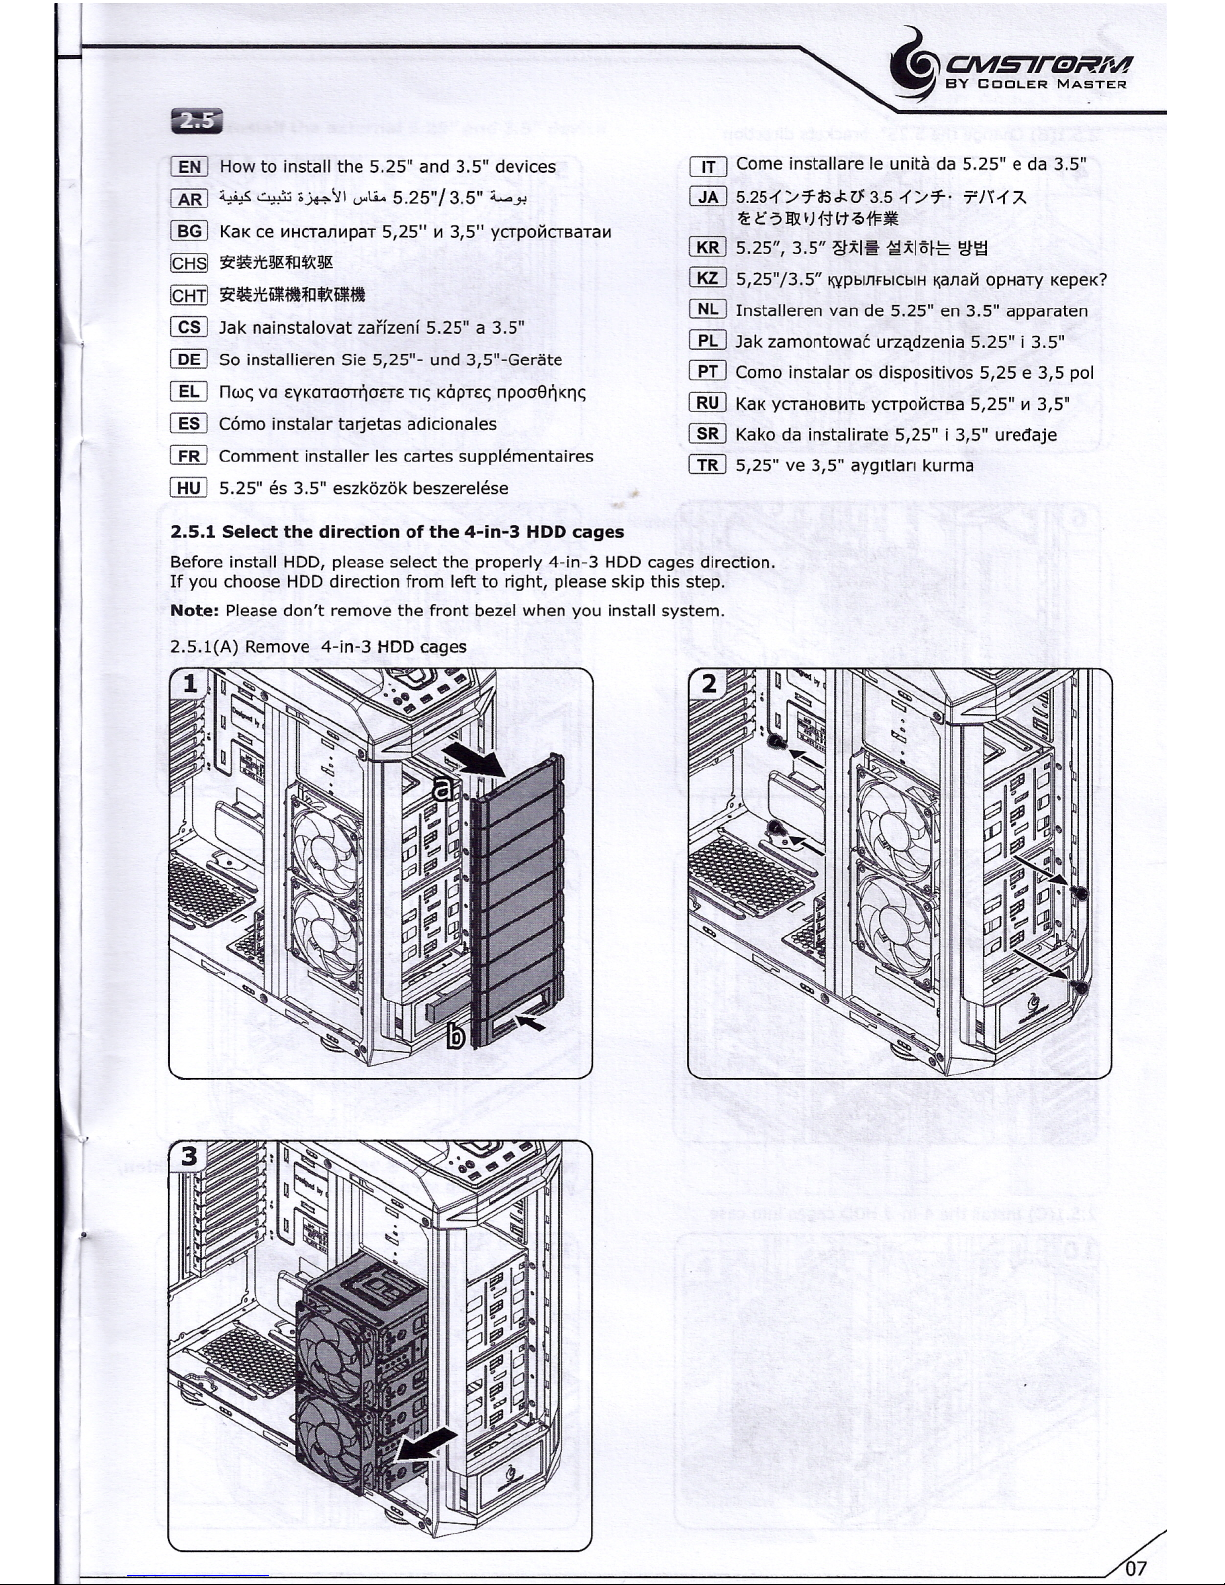
How to install the 5.25" and 3.5" devices
(AB]
l..;;"S ~
,,.,..,.'11L>"~ 5.25"/3.5"
l........,
~ KaK ce ~Hcran~paT 5,25" ~ 3,5" vcrpoacrsaraa
~ 3i:l<i7tiIIHQ$.X~
I9:ill
3i:~7till!1Il1;m~ilI\lIl
cm
Jak nainstalovat zarfzeni 5.25" a 3.5"
[@
So installieren 5ie 5,25"- und 3,5"-Gerate
[ill
nw~
va €YKaTaOT~crET€TI~
xcprec
npocr8~K~~
[][) Corno instalar tarjetas adicionales
Im
Comment installer les cartes supplernentalres
I:Eill
5.25" es 3.5" eszk6z6k beszerelese
2.5.1 Select the direction of the 4-in-3 HDD
cages
Before install HDD, please select the properly 4-in-3 HDDcages direction.
If you choose HDD direction from left to right, please skip this step.
Note:
Pleasedon't remove the front bezel when you install system.
CTIJ
Come installare le unlta da 5.25" e da 3.5"
cm
5.251'/7-ilSJ<V:3.51'/7-'
'TJH'A
-';:C?l&IHHt~t1=•.••
lliRl
5.25", 3.5" ~;tl~ 1;1;tI1'>fE
'2,t'gj
iMJ
5,25"/3.5" 'l¥pblnfblcblH~anaH
opaarv xepex?
[]g
Installeren van de 5.25" en 3.5" apparaten
~ Jak zarnontowec
urzadzenia
5.25" i 3.5"
~ Como instalar os dispositivos 5,25 e 3,5 pol
[][] KaKycrauoaars vcrpoacrsa 5,25" ~ 3,5"
cm
Kako da instalirate 5,25" i 3,5" uredaje
[I[J
5,25" ve 3,5"
ayqrtlar:
kurma
07
Page 9

~€\OtA~V
9
BY
COO LE" MASTE,.
"'~
~-------------------------------------------------------------
---
2.5.1(6) Change the 5.25" brackets direction
2.5.1(C) Install the 4-ln-3 HODcages into case
Note: If you install 5.25" device into this position,
you could skip step
9~11.
Page 10

~~ ClWS7reRf'V!
9
BY COOLER MASTER
2.5.2 Install the external 5.25" and 3.5" device
2.5.2(A) Install the external 5.25" device
Note: You could remove the 4-in-3 HDD cage and install the 5.25" devices
2.5.2(8) Install the external 3.5" device
~ ~ 09
Page 11

~~ CJI/IS7rSRFVf /'
~ BY COOLERMASTER/,
--~--------------------------~,
2.5.2(C) Install the external 2.5" device
2.5.3 Install the internal device
2.5.3(A) Install 3.5" device into internal bay
10
Page 12

~&:\
CNfS7rEJRFIA
~ BY COOLER MASTER
2.5.3(8) Install 2.5" HDD / SSD into 3.5" cage
Screw:M3*S ~
2.5.3(C) Install bottom 2.5" device
.-
3
Note: please ensure the pes is facing upward when
installing the 2.5" HOD in order to prevent short circuit.
Page 13

.~ti;\
CIVIS7reRFV! ./
g
BY COOLER MASTER./
-~~--------------------~"
(][] How to install or replace case fans
~ ~~JIJI~I<"'JjAUo.i~.;l.,.,....sJ1
Ilil
KaK ce ~HCTall~paT ~ll~ 3aMeH"T se-rranaropwre
Ha KYT~"Ta
IQ§) $'~fQY!I!HIl$iltxl~
I0OI
$'~fQY!~llI!$il}j\~
@[)
Jak nainstalovat ci vvrnentt vetn,ky
[][] 50 installieren 5ie Gehauselufter oder tauschen sie aus
lID
nWC;va EYKaTaOT~aETE~ va aVTIKaTaOT~aETETOUC;
aVE~IOT~PEC;TOUnEPJi3A~~aToc; •
[]§J
Corno instalar 0 reemplazar los ventiladores de
la carcasa
CfBJ
Comment installer ou rem placer les ventilateurs
du boltier
[][] Venttletorok szerelese vagy csereje
2.6.1 Install front fan (2 x 120mm fans)
OD
Come installare 0 sostituire le ventole del case
QAJ
7-A"
7:P
/O)1'/A ~-J~*t.:I;j:3{~"t:Q~O)I!Il
fJi'Ht:Qfi'lIt
[KBJ
~1I01~
'1!!
{;;!:<IEfe ~Pi%fe
tg~
cm
~a~~allbl~ xenaenourrepnl ~alla~ opuarv xepex
[Rg Installeren of vervangen van de case fans
[§J
Jak zarnontowac lub wvrnlenlc wentylatory
w obudowie
cm
Como instalar ou substituir ventoinhas da caixa
[]ill
KaK yCTaHoB~Tb~ll~ 3aMeH~Tbxopnycxere
seHTlilnHTopbl
[][) Kako da instalirate ventilatore u kuciste i da
ih menjate
[I[J
Kasa fanlanru kurma veya degi~tirme
2.6.2 Install top fan (2 x 120/140mm fans or 1 x 200mm fan)
",~,-----------------
Page 14

~~ CNfS7rEJRPA
~ BY COOLER MASTER
1 x 200 mm fan
2.6.3 Install rear fan (1 x 120/140mm fan)
2.6.5 Install bottom fan (2 x 120mm fans)
or
2.6.4 Install side fan (2 x 120mm fans)
13
Page 15

_
..
-
~&:\CII#S7I"IDRM/
~ BY COOLER MASTER
Adjusting fans speed
[-]: Decrease Button. Decrease the fan speed
[+]:
Increase Button. Increase the fans speed
Fan speed LEO- indicators on top panel
FanSpeed
(Level)
LEDposition
(A, B, C)
.Trigger LED A
A A, B A, B
A,B,C A,B,C
LED indicator Dim Light Solid Light Dim Light Solid Light
Dim Light Solid Light
Connections
Cable
Cable color Connector
Fan LED cable
CD
@
®
Black 2 pin
120mm fan power cable @ ® Grey
3 pin
1 x 200mm fan / 2 x 120mm
Brown 3 pin
fan power cable ®
I
Power cable
0
Black
I
4 pin
I
:",~
~---------------------------------------------------------------------------
Page 16

~~ CM57rI!1RFV!
~ BY COOLER MASTER
How to install the radiator
Install 120 mm radiator
How to remove and clean filter
Install 240 mm radiator
Note: Because the 240 mm radiators' dimension
are different. Avoid any interference, please check
your radiator dimension and motherboard layout
before install the 240 mm radiator.
15
Page 17

~Ii:\CM57ni7fi'M:/
~ BY COOLER MASTER
_
..
-
~ Completing installation
~JI...S:i..IU#il1
~ 3aSbpwsaHe Ha I1HCTallal1l1Ha
[Qj§]
itPlt'li:~
IQ8I]itPlt'li:!Ii\
(][] Dokonceni instalace
[QgJ
Abschliel3en der Installation
cm
OAOKMpwo~ EYKOT6OTOO~~
IT[]
Completar la instalacion
[£BJ
Terminer I'installation
ClliLJ
Telepltes elveqzese
O!J Completamente dell'installazione
QAJ
-1':"-A
~-)~it7
[KRJ
~;<I ~$:&-f71
IMJ 0pHaTY.Qbla"l\Tay
[]g
Installatie voltooien
[fhJ
konczente instalacji
[fI]
Finalizar a instalacao
[!ill] 3asepweHI1e YCTaHosKI1
[]KJ
bovrsavanje instalacije
::,,~ CIBJ
Kurulum tamamlamyor
5tormGuard™ - security bracket
Page 18

~fi'l
CIVIS7rGlRFV!
~ BY COOLER MASTER
110Funct:ion panel in!it:allat:ion guide
Motherboard
USB3.0connector
IntA_P2_SSRX+
IntA_P2_SSRX-
Case Connector
USB3.0connector
17
• Please refer to the illustrations in the motherboard user manual that describe USB 3.0, USB 2.0, e-SATA and
audio connector support. The motherboard connectors must match the included front panel cables in this case.
Attempting to install anything other than matching connectors may result in damage and loss of function.
• On some motherboards, the connectors for e-SATA, USB 3.0, USB 2.0, e-SATAand Audio are not the same
as the drawing below. Please check with your motherboard manual before installing.
• The following illustration is a diagram showing the I/O connectors.
m
-
GND
-TXP
-TXN
-GND
-RXN
-RXP
-GND
AC'9?
MIC~GND
MIC-BIAS NOPIN
FPOUT-R RET-R
NODEFINITION NOPIN
FPOUT-L RET-L
Azalia(IntelHighDefinitionAudio)
PORT1L~ AUD GND
PORT1R PRESENCE#
PORT2R SENSE1_RETURN
SENSE_SEND NO PIN
PORT2L SENSE2_RETURN
USB2.0connector
e-SATAconnector
Page 19

--
_
..
-
~ti'\
CllAS7rEJRFIA
9
BY COOLER MASTER
USB 3.0 IiCl
e-SATA IiCl
AC'97liCl
~
• j1t~~30~M&1i!llj!i~!la<.JUSB 3.0, USB 2.0, e-SATA, p:;'1iflin~l'ia<.JOOiF. 'il7l', jj!fm!ll~;{l'f;j;)j£USB 3.0, USB 2.0,
e-SATA, 'ij~lili'!J,;,
i!li§e191~*i"",jl,.
• -'El:30~M&a<.Je-SATA, USB 3.0, USB 2.0, 'ij~lili'!J,;~l'OO1'f,J, $;~iltr, il~~30iIU&1i!lli!i~.
• l'OO~I/O~f~a<.JliliiJiOO.
Azalia (IntelF-l'ij1!l\1iCl) HO IiCl
AC'97
fl~fl~~l!I\libc~
ffllf4:g'fij;
Ifl
"'
I/O
"lftlll
~~IIl<li< ~~=li<1lt
(Pb)
(Hg)
(Cd)
[Cr(VI))
(PBB) (PBDE)
;fj'Ullm
X
0
0 0 0 0
iliil1iim
x
0
0 0
0 0
I/omm
X
0
0 0 0 0
JXlJ>ii
x
0 0 0
0
0
!f14@
X
0
0 0 0 0
<1!))l!
X
0 0 0 0 0
0' ;\;","''Ii.fH!!1'IJ1jjit£"'ll\lfflli'liJ;jlli!:l*'l<j>Il'J~.J;jaSJIT 11363-2006.l$;1I11<li!!<J~.'Il'*':l1'.
I
x : ;\;",","'IIHj1!!1'IJlli:!!~a"'ll\lff!<Jlit-J;jIjji!:l*'l<j>!<J~.l!HI\SJ!T 11363-2006If-;lIJ!1.li!Il'J~.'Il'*.
;
-GND
-TXP
-TXN
-GND
-RXN
-RXP
-GND
MIC_BI~~C~ ~~~IN
FPOUT-R RET-R
NO DEFINITION NO PIN
FPOUT-L RET-L
PORT1L~ AUDGND .
PORT1R PRESENCE#
PORT2R SENSE1_RETURN
SENSE_SEND NO PIN
PORT2L SENSE2_RETURN
Page 20

~4ilC/W57rt!1RM
~ BY COOLER MASTER
_.Warrant:y Inforlnat:ion
I
fljHI~fg
,'1i!,
English (EN) ,
Cooler Master guarantees that this device is free of defect in material and workmanship, and provides a two-year limited hardware
warranty for the device commencing from the date of purchase. Please keep your receipt for proof of purchase.
This product is designed for computer usage only. Using this device in any other capacity voids the warranty.Ifyou are not
familiar
with
computer hardware installation, please ask for professional assistance.
The warranty
offered
covers normal use. Defect or damage that result from
improper
operation, storage, misuse or abuse, accident or
neglect, which are not the fault of Cooler Master, are exclude from warranty coverage.
Note: the warranty is voided by removal or alternation of product or parts identification labels.
1.
All OEM/bulk packaging product come with one year limited warranty
2.
In case of conflict between the warranty provided by the country of point of sale and this manual, the warranty of the actual country
of point of sale shall be the prevailing document.
3.
In case of malfunction of electronic components or need of accessories purchase during the warranty period, please return to the
onqinal
store of purchase.
: Arabic (AR)
~..ill
Cooler master fo
j~I
0"" '-:-l~
~1
.ll..,....JIJ~I, r.ll;!J..ill
uL........:.:.
.lJ.l.:..A~ j~I
6.l...o.l
0:!--l&:.
~~I.l..!
0""
~...>I..:i
c.I~I.
""j;J;,\.ih~1
Jt....,~4 w41~ .1y:.J1.,.:;,......-' I;"
&W'
,I~~ y..,...sJI.l.il . ..,.,..,ut.....;,J1
\;t~
Ij!,.:;
,'.>.>.;...11;"
jl-.]I"';
",I~,
"..,..1.
Ij!,-l
tJS:i~.l.l6~I~WI~6..JH.IY~"r.r.~yl..b6~t..........Il~l.
~ut.......Alll".li....lIl"I.l.::i...:i....)'1
tj.lWI.
~0""ut.........;.J1 '-:-l~1
JI,;'--,"""",,)rl
~li.Il~ ~I..>#- ~)l.J1
JI0:!y:...:J1 Jl ••.
..,....l"I~)"..,1 ••.
..,.....u...t....JI..,I
w"yoJl ,I
Jw ~I,
<?" ~
ufo
'~I
....-;'yl..,.....~.
~)L..: ~ut...-;,Jll;;c.)'
~~lj!JI~~I..,1~u--~~16.lh..oo..ll~.
1."";1.:; ~
w~
OEM/bulk
<.,.,....... •.••••
u~.
2. ~
~L.:..
~.;L.UJ\ ~
u~1 r.li..JI
u--~J.l ~\
~J
1.lA~\,
0P:!
0~\
r.li..JI
LJA
-UJ.l
~I.,...
0~1
..,.......,.;11.
3."';
<.it... ''''''
Jl.i.."'; w4.,s...J1""',ysJ~1 ,I"';
<.it... •.••
WI .1y:.JwV,....s!..,;
'ft
ut.....;,Jl,
""Ja
tJ>oyl~! ~ .1y:.JI.)-o~I.
Bulgarian (BG) \
Cooler Master
rapa-rrapa,
qe
roee vcrocacrec e 6e3 Aeq,eKT npa aerepaanare 11113pa6oTKaTa~ naea ,IleyrO,lll1WHarapaH~I1~ Ha xapnvepa,
KO~TOaanovea na
re-re
OTnarara Haaaxvnveaaero My. MOI1R,naaere
senexcere
c~ KaTO,/lOKa3aTeT1CTeo.
nponvcrsr e npe,QHa3HalfeHcaao sa KOMnIOTbp.v13n0l13BaHeTOHayCTpO~CTBOTOaa npvra uen npaaa rapauwsra Heeam1.QHa.
AKOHe ere 3an03HaTI1C I-1HCTal111paHeToHa KOMnlOTbpeHxapnvep, MOll~, norvpcere ncaour OTnpocpeCl'IOHa11I-1CTI1.
repaauaara e npeABI-1AeHanpa HopMallHa vnorpeea. AecJ:leKTI-1111111ncepenw, KOI-1TOca B pesvrrrar Ha aenpaeanaa vnorpeea. csxpaaeaae,
anovnotpeea, 3110nOllYKa111111HeMap11I1BoOTHOWeHl-1e11He ca no BI-1HaHa Cool Master, ce 113K11IO'-IBaTOTrapaHUI-10HHOTOnOKpl-1T\IIe.
aaeeneeee: rapaauaara ce caste aa HeBalll-1AHanpa orcrpaaseaae 1-1111-1npoasaa Ha nponvxre KaKTO1-1Ha
ortpezieneaa
'-IaCTI1OT
1. BCI-1'-1KI-1OEM/HaCl-1nHI-1npoAYKT\III-1MaTe./lHOrOAI-1WHaOrpaHI-14eHarapaH~115=1.
2. B CJ1Y4a~Ha npOTI-1BOpe41-1eMe>K.aYrapaauaara npenocraaeaa 3a crpaaera, OTlCb,Q,eTOe aaxynea npoAYKTbT 1-1T031-1Hapb'-lHIo1Kute esne
B3eTa non BHIo1MaHIo1erapaauaara npeaocraeeaa B crpaaara, OTKbAeTOnbpBOHa'-lal1HOe 3aKyneH nponvcra.
3.
B CJ1Y'-la~Ha Helo13npaBHOCTHa eneKTpOHHHKOMnOHeHTIo1I111HHeo6xOAI1MOCTOTaesvnveeae Ha axcecoapa no epeae Ha rapaHu.Io10HHI1~
nepaon, MOllfl o6bpHeTe ce KbMMara3101Ha,OTKbAeTOm-paouavanac e aaxvnea npOAYKTa.
Cooler MasterililiiE*iJHi,z-MJilI:&J1Jhalll!ll£ . #lI!fJI*illi!.>=ij'.zliil!f'f"lIRilillilli~9t . 13j!tJl!;EI:lUIl- i~Il'!I&.:B'Ji&ll'l!il(1'E'l("z!16. t(le,Cooler Master
:II';J<'I&':II!fJ\*iiElll• *I"O',",,19iHWliltit - -.E!.*l*iltill-IllT':It'f::IllJ£ • mUililllilx!il1·"1&':'FWl~lil!f'f'l(!lIl1!V¥ • i~"'*""li'ztiJll!J - ililIillH~9t{\(mlllT'j£
'Iit{!l;IllTzWllffiID· "*i}"l;Jtllilillill-'li!mz.m;:I!l19/A1ll • ~ • iJ!1ll •
liit:\!( •
EtI/±fJI@!1liJ!. "'9,&*i5ll;:@:;;'ffil3~1<1!f . ~IJililllil;e!il1·
It:@::
lImi",-*IDlIlill'li!jQffij;elM!ltQf'jHliIJtIlIIR'It . ~IJHEJltm·
1.
ffi1l"OEMlRIlIk1!!!lIlB'JF.fMliililllil-ij'.-
2. !lD!IHII1lfI:iilli'ffill!ll\B'Jililllil!o*i)!'JlI§:1l"i<!>'iil!Bt. mt)<;l;\liiiIll11;OOli'zililllil"ll •
3.
ililIlilJtlll*JlI§1l"EtI'rl1lf'fIPJ:"'",-!lGf'fIlll!;I!l*• iWlitllltllll!;i!!ir.s·
Chinese
(1,'lrl'i't)
s
Cooler Masterililm*illtiliZWlii:&l'IU!I\\lIl!ll£· MiIl!fJ\*illtil1i=ij'.zliil!m1l"mililIlilH~m . 13"'1rnEl~>!l· iilJll'!f&':B'Ji&JIf!il(1'E'iG':Z!li. tJle,Cooler Master:!!,*
i,Q;jjMj\*i!!Ill- *iiI1dl.WmUiiltilt· -.E!.JIq;*illtiliIllDt:ltftl!IllJ£ . ~Uililllilfi!il1-•• f&':1'WlHIt3i'I!<I!V¥ . iilJi\;i*w:&zlUl!IJ· ilillliliaUi8IllDtlE1ii{!l;1ll
TzlPJ:rto:!f1'W·"*i}"l!;tlJ!iiltili\ilHllzllltl!llUilll . ~ . ~Ill
·lilL>&.
.1U!fJ\l\!!.m~ • "'IDl.*i5l!!!;ti!;;'ffil3~jjil'i . QIJililllilfi!il1·
It:@':
1liJIli"'-1li~il!l!Itlllffijfi$lIIilliililIlilJtllIlR'It· RH:(fJltm·
1.
ffi1l"OEMlRI3I!1!!!lIiB'Jildl.'i1iililllil-ij'. -
2.!lD*m~~*ffim*B'Jilil~W*m~li1l"~'iil!~·~~.~m~mli'zilil~m~·
3.
ililIlilJtllJ'3''H,m'r~f'fIPJ:!i\!'''-!lGf'fliUlm* . liIlitllltl!l4J1i!!ir.s·
Czech (CS) .
Firma Cooler Master zarvcuje, ze toto zaifzenl je bezporuchove eo se tykil materlalu a zpracovani a poskvtuje dvouletou zaruku na zaffzenl,
ktera zaCina od data zakoupenf. Uchovejte prosfm doklad 0 zakoupeni za
ucerern
ovefenl data zakoupeni. Tento produkt je urcen pouze pro
pouflti v pocftaci. Pouziti tohoto zafizenl jakvmkoll jinym zplisobem tini zaruku neplatnou. Pokud si nejste jtstt s instalad hardwarovvcn
kornponentf pocitace, pofadejte 0
protestcnatnl
asistenci.
Poskvtnuta zaruka se vztahuje na bezne poufttt, Na poruchu ci poskozeni zapricinene nespravnym provozem, uktadanlm, nespravrwrn
poufttim ci zechazenfrn, nahodilou udalosfclnedbalosti, ktere neni zpusobene pochybenim na strane firmy Cooler Master, se zeruka
nevztahuje.
Poznamka: zaruka zenlka odstranenfmclvymenenim identlflkacnlch
stitku
produktu ci casti.
1. vsechnv vvrobkv OEM/hromadneho balenf majl jednoletou omezenou zeruku
2. V pripade sporu mezi zarukcu zarucenou v zemi prodeje a touto pFlruckou, je rozhodujid zaruka v dene zemi prodeje.
3. V pripade zavad
etektrontckvch soucastek
nebo v pripade potfebv zakoupeni prislusenstvi behern zarucnf Ihuty vratte vvrobek do
obchodu puvodnlho prodeje.
19
Page 21

~&:\CMS711!7RM/
~ BY COOLER MASTER
German (DE) ~
Cooler Master garantiert, dess dieses
cerat
frei ist von Material- und Herstellungsfehlern, und qewahrt ab Kaufdatum eine zweijahrlqe
beschrankte Hardware-Garantie fOr das
cerat.
Bewahren Sie die QUittung als Kaufbeleg auf.
Dieses Produkt Ist nur fOr die
Verwendung
mit
Computern
vorgesehen. Wird es in anderen Geraten verwendet,
verliert
die Garantie ihre
GOltigkeit. Wenn Sie sich bel der Installation der Hardware unsicher sind, lassen Sie diese van Fachleuten durchfOhren.
Die Garantie deckt nur eine normale Verwendung des Produkts ab.
Fehter
oder Schaden, die durch
unsachgemaBen Betrieb und
unsacncemage Lagerung, falsche und unsechqemane Verwendung, Unfalle oder fahrtasslqem Verhalten verursacht werden, die nlcht in
der Verantwortung von Cooler Master liegen, sind von der Garantieleistung ausgeschlossen.
Hinweis: Die Garantie verliert ihre GUltigkeit, wenn Etiketten
zur
Produkt- oder Teileidentifikation entfemt oder qeandert werden.
1. Alle OEMjMengenverpackungen haben eine einjahriqe begrenzte Garantie
2. Im Fall einer Nicht-Obereinstimmung der Garantiebedingungen In diesem Handbuch und dem gOltigen Recht im Verkaufsland ist das
gUltige Recht im Verkaufsland maBgebend.
3. Sollten innerhalb der Garantiezeit Fehlfunktionen der elektronischen Komponenten auftreten oder Zubehor benotlqt werden, wenden
Sie sich an das Geschaft, In dem Sie das Gerat erworben haben.
Greek (EL) ••.
H Cooler Master EYYUCTOIC:)TI11O'UOKEUr'\i5EV<pEPEIEAoTTWjJOTO<ITaUAIKOKOIrnv KOTOO'KEUr'\TI"\C:;,KOInap£xEl neptoprouevn EYYUIlOIl2 erov
ono rnv nuepopnvic ovcpoc. rtopcscxouue KPOTr'\OTErqv on6cSEI~Ilwc:;onoi5EIKTIKOTile;IljJEpojJl1vioe;cvoooc.
AUTOTOnpotov EXEIO')(EcSlOOTEiucvo YIOXpr'\OI1O'EunoAOYIOT£C:;.H XPr'\OIlTile;auOKEUr'\C;YIO oncroennore ohAo 'Aoyo OKUPWVEI-mv EyyUIlOI1.
Av cSEVEiOTEE~OIKElwjJtvae;IJETI"\VEYKOTOCJTOOIlUA10IJIKOUunoxovrcnbv, nopoKoAoujJE ~I1Tr)OTE~Or)8EI0on6 EnoYYEAjJOTioTEXVIKO.
H nopExoJ,JEVI1EYYUI"\O'IlKoA.UnTEITIl <puO'loAaYIKr)XPr)O'IlTile;O'UO'KEUr'\e;.Tuyov EAOTTWIJOTOr'\OlIJIEC:;nou npoKlJOToUVono OKOTO'AAIl'Ar)
'AEITOUPyio,ono8r)KwO'r), KOKr)XPr)or), OTUXlljJOr) OJ,JEA.EIO,TOanoia cSEVcnoraxouv Eu8uVr) Tile;Cooler Master, OEIIKa'AunToVTOIono
rnv evvuncn.
Lr)IJEiwOll: '1 EyyurlOll aKupwvETOl jJErnv cocipeon r) rpononolqcq TWVcvcvvcorcneev onucrtev TOUnpotovroc ri TWV jJEPWVTaU.
1. '0'110ro nporovro OEM/ OYKwi5Ele;cucxeuoclec, OUVOi5EUOVTOIone neproorcuevn EYYUIlOTlEIIOe;erouc
2. LE nepirrnocn OVTi8EOIlC;jJETO~UTIlC;EYYUIlOIle;nou nopEX£Tal ono TIl xwpo TaU cnpelou nw'AIlO'IlC;Kat TOUnooevroc EYXEIPIi5iou,11EYYUIlOIl
TIlC;Xwpoc:;TOUcnuelou nwA.1l0lle;OnOTEA.EiTOEntKPOTWVtyVpo<po.
3. IE nepirrnocn 6UO''AEIToupvioe;TWVll'AEKTPOVIKWVE~OPTIljJ6Twv,r'\ovoVKIl YIOcvopc E~OPTIljJ(hwv KOTOrnv neplodo Tile;EYYUIlO'Ile;,
nopokcxoupe
onwe; EnIOTpE:4JETETOnpotcv 0'1'0«crocmpo an' 6nou TOOVOpOOOTE.
Spanish(ES) -e
Cooler Master garantiza que este dispositive esta Hbre de defectos en material y mano de obra y ofrece una garantia de hardware limitada
de dos afios para el dtspostttvo comenzando desde la fecha de compra. Por favor, guarde el recibo como prueba de compra.
Este producto esre orseaeoo para el uso exclusivo en ordenadores. Si utiliza este dlspositivo en cualquier otra capacidad, la garantfa
quedara anulada. Si no esta familiarizado con la lnstalacicn de hardware informatico, pida ayuda profestcnat.
La garantfa of recida cubre el uso normal. El defecto 0 defies provocados por una operaclon 0 lnapropiada, par almacenamiento, mal usa 0
abuso, accidente 0 negligencia, que no son fallos de Cooler Master, se excluyen de la cobertura de la garantia.
Nota: la garantfa queda anulada 51quita 0 altera el productc 0 las ettquetas de identiflcacion de las partes.
1. Todos 105productos empaquetados OEM/bulk vlenen con un afio de garantia limitada
2. En caso de conflicto entre la garantfa ofrecid a per el pais del punto de vente y este manual, la garantfa del pais actual del punto de venta
prevaiecera sobre el documento.
3. En caso de un mal funcionamiento en 105componentes electronlcos 0 de necesidad de compra de accesorios durante el periodo de
garantia, devolver a la tienda de compra original.
French (FR) :
<_
Cooler Master garantit que ce matertel est sans oereut en pieces&de main d'ceuvre, et offre une garantle Limltee de deux ans pour les
pieces de I'appareil, prenant effetala date d'achat. Conservez votre recu comme preuve d'achat.
Ce produit est ccncu pour etre utilise sur ordinateur seulement. L'utilisation de cet appareil dans toute autre application annulerait la
garantie. Si vous n'avez pas I'habitude d'installer des materials informatiques, faites appelaun prcfessicnnel.
La garantie offerte couvre une utilisation normale. Les defauts ou dommages provenant d'un defaut d'utilisation, un mauvais stockage,
mauvaise utilisation ou abus, accident ou negligence, 'qui ne sont pas la faute de Cooler Master, sont exdus de la couverture par la garantie.
Remarque: La garantie est annulee en cas de retralt ou de modification des etiquettes d'identification du produit ou de ses pieces.
1. Tous les produits OEM/en vrac de I'emballage sont fournis avec un an de garantie llmltee
2. En cas de conflit entre la garantie fournie par le pays du point de vente et le manuel, la garantie du pays actuel du point de vente sera
le document de reference.
3. En cas de dysfonctionnement des composants etectrontques ou de besoin d'achat d'accessoires pendant la pertode de garantie, veuillez
retourner au magasin d'achat d'origine.
A Cooler Master qarantalja, hogy ez a termek teljesen mentes anyag- es osszeszerelesi hlbaktol, igy a termekre ket eves korletozott
garanciat biztosit a vesertes napjetcl kezdodfien. KerjOk tartsa meg a nyugtat a vasartas napjanak tnzonvltasanoz.
A termek csak szamftcqepes kornvezetben hasznalhatc. Barmelv rnas celu hasznalat megszOnteti a qaranctat. Ha nines tapasztalata
szamit6gepes eszkozok beszerelesere vonatkozoan, kerje szekember seqltseqet.
A biztositott garancia normal hesznelatra vonatkozik. A nem rendeltetesszerf hasznalatnol, tarolesbol, helytelen hasznalatbol, balesetb51
vagy hanyagsagb61 bekovetkezd hibakra, amelyek nem a Cooler Master hlbal, nem vonatkozik a garancia.
Neqjeqyzes: A garancia meqszflnlk a terrneken vagy alkatreszein telalhato azonosft6 clmkek meqvaltoztatasevel vagy ettavolltasavat.
1. Minden OEM/bulk csomaqctast termek egy eves qaranciaval bir
2. A vasartaskor az orszaq altal kfjelolt qaranclaidd, es a hasznalatl utasftasban lefrt garancia eseten minden esetben a vesertaskcr az
orszeq ane! kijelolt garandaid6 ervenves.
3. Ha a garanciaid6 alatt az elektronikus alkatreszek meqhlbasodnak, vagy tartozekcsere szukseqes, vegye fel a kapcsolatot azzal a
kereskedessel, ahol a termeket vesaroite.
20
Page 22

~Gi:'\
C1V157rEJRFV!
~ BY COOLER MASTER
Italian (IT) ,
Cooler Master garantisce che il dispositiveesenza difetti nei material! e nella manifattura, e fornisce una garanzia lirnitata all'hardware di
due anni, a partire dalla data d'acquisto. Conservare la ricevuta della prova d'acquisto.
11prodottoeprogettato solo per l'uso con un computer. L'uso del dispositive in qualsiasi altra funzione ne invalida la garanzia. Se non si ha
tarnutartta con I'installazione di hardware di computer, rtchledere assistenza a un professionista.
La garanzia offerta copre l'uso normale del dtsposjttvo. Difetti 0 danni risultanti da improprie procedure di conservazione, funzionamento,
cattlvc uso 0 abuso, incident! 0 negligenza, che non costituiscono errori di Cooler Master, sono esclusi dalla copertura della garanzia
Nota: la garanzia viene invalidata dalla rimozlcne 0 alterazione delle etichette del prodotto 0 di part! di esso.
1. Tuttliprodotti con confezione OEM/bulk sono forniti con una garanzia llmltata di un anno
2. In caso di conflitto tra la garanzia fornita dal paese del punto vendita e quella di questo manuale, sara quella effettiva del paese del
punto vend ita a prevalere.
3. In caso di malfunzionamento dei component! elettronlcl 0 di necesslta di acquisto accessori durante il periodo di garanzia, tornare
al punto vendita originale.
Japanese (JA) ,
~!'!!]'O)lIlIiIJlllIIo";t,C::IIIIAb'Gl'Ff.'1:t~'J
*T.
nb<-!'!r..I='fASb<1o t:to!l;<l-I;I:,C::IIIIAllili*1't;r,'L';<I-n1tl";!'L'.
tot=L, illijj,C::IIIIAEl~IiII!Il1',,'.,to)
(Vy-t-~)
~/6!~;!'tLtoll;%l;l:lIlIiIM~*I:t..:'J*T.
lIlliIJlllrolll'l1'o),;j1O)III;<1-I=1;I:'fjllllJllI!I:t..:'J
*T.
• ~a)"'O)ilBJIfJ(.1.
'11*
4fU.lIlliI.,=JIIi;1;Ilit,0)f<!i!b<l!!\(,
vy-
t-~O)IIIIAliIl!Iltl!!\L'lI;<I-
.t;\1I'1*I=J:'.,••• · 31iJ1lli0);i1".lfjfi!'!l, t;1Il1'Jl&L'b<l!HE1't..:L'todJ1ot:to$i\1<·!ill!!
.!'!r..<'=o.7)"':lttnt..:L'~!ll1:i;1;;·
Olllli16·;a~·
OIlii· 'fl!l~t~~lIl:J:'.,III;<1-
.!lIl!;!'tL 1:L''.,11!!O)''-·YI:i!<I!iIT'.,i\1<'''':J:'.,11;<1-
.~~.ff~*~·11!!.·*~·;iZ~O)11!!O)~~11!!~~1'~I!iIT'.,iI1<~~!ilmo)lII;<1-
.Ii!IA!lUI
(1:,-)I-~,·,
t-:t-?Y3:'-W~~il;) 1'C::IIIIAO)II;<I-
1.
OEM:&L'BULK"
','T-;/fii]lto)!'!!,'I=';l:T"1:-'FfdlO)lIlliIb<1tL'1:t; 'J
*T.
LJIIi~~~J:~1:m.;!'tL'.,lIlliIl:~<,=o.7~o)M~.~~~'.,II~~~o)JIIi.OOO)lIl.~~~;!'tL'.,tO)I:T'.,.
3. lIl~Jlllr.lltpO)IIlT:J
:.-;j!-t-:.-
t-O)i\1<~*tol;l:1tl;r..IIlIAO)~J!:b<1ot:t=!I;<I-, t;;;L'.tlillil:m,'L';<I-n1t (t=;!' L'.
Korean (KR)
M
>rei
Cf~E1e 01~"mXHi<:l!X11~:i!I~0iIAi~~Ol 'itl;;;~ S!.~~fllj 'i''1J~51'''El2\'!
;:!~
XUf~~ ofS~<>IS!.~li X11~ttLlq 'i''1J
~\Y
"fi<51
~*
~~ ~SAI S!.~ofAl7I"fWLlCf.01X11i"H~~'ll'E1Af§ §£51~ CI"f~£I!l:l~Ilj. 71EfCfe ~£51 Af§-iI ?;l'i'. X11ilt~ilt~ S!.~g il-Aof'" U"'LlCf. ~Q)
~'ll'E1;;fS~jl<>l-:.l~IOiIQ)~of'" UCf\'1.~..,.~~ 71AfOiPII£*~ £L~ofAI"fWLlCf.'I1t1£1e liB! S!.~g ••m~~ §£ 'i!j¥l~~ S!.~tlLlCf.
>rei
Cf~E1~
'1'1J01of\::!Af§"'~ "'~l<1~ "'~. S!.~.£JEt~. Af:;r.og~IOiIAioPI~ ~:i!I£ ~{!!~ ~~014 "10111=~H! S!.~ 'i!I¥lOiIAiXlI2l'=Llq.
'M~: X1llif!fe X11~lif~"'l~ CI'1!!OIX1I:>1£l714\'l~~ ?;l'i' ~~ S!.~~ il-Aof'" U"'LlCf.
1.5'.§ OEM/\lI.3UIi'I'" 'll~g 1\'!~ '11~~ ~~ S!.15JmOI ~§'=LlCf.
2.19'H~7fOiI21,HXHI~ ilt~ S!.~:i!I01Af*"f 1oI~A1AfOIOiI41§~~ ~l!<01W{!!~?;l'i'. ~'1119'H~7f!!1 iltlil S!.~ol 'i'~nILlCl.
3.
.!i!~
71~ -sC2!~A~ ~~~
.2~~OI'~N!tOPi4
EfE
QllAiIA1~121
TDH7~
WR~?!!!f.~
T~};iOlI'~H~~~AI7I
H~~LjC~.
Kazakh (KZ) ••
Cooler Master KOMnaHVlRCblMaTeplllan,/lb11ia~ayblHbll1>KaHeI)tpblfIFblHblH,3aybl1Tbl~ a~ayf1apbIHbll1>KOl(TblfblHa«erttnneae eeoent }l(aHe
carun
aneau
KyHHeHeacran ekl >Kblllnepalnre IWPblnFblFauiexrevnl Kenlll,QeMeeepenl. Ca'tem anYAbl pacresrrera 'W>KaTTapAblMiH,Ileni TVPAecal(1'al1bl3.
5yn 6V~bIMrex KOMnblOTepAe~onAaHYFaeaua apaaneaa. l<;oHAblPfblHblKe3 «enreu 6acK;aTVPAeK;0J1AaHYKe3iH,Ile6Vll «erunneae
xapancsta.
Erep Ci3 «cnne orepnnc IWPblllfblHbl opaa'ry >K8HeKVl1re«errrtpv VPAiciMeH»cerxinhcri TaHblC501lMaCal1b13,OH.c,aMaMaH,Qapfaxa6apnaCblfo\bI3.
5VJ1«entnneae K;OHAblpFblHblK;allblnTbl>KaF.QaHnapAarase nal1,QanaHfaHKe3Ae)f(apaM,llbl. Cooler Master KOMnaHVlRcblHbl1iKiH8Cici3,AVPblC
naHAanaH6ay, AVPblCeaec caxrav ueaece K;0I1.llaHYH9TIo1)1(eciHAe,COHblMeHxarap AYPblCeaec ueaece YKjblnCbl3Kjapayaeaece OKjblCTaH3aKjblMAay
H9TIo1>KeciH.lleTyblH,IJ,afaHaKjayl1blKjTapMeH3aKjb1M,IJ,aHYl1aPFa«entnneae
xapaacua.
ECKepTy: 6yliiblMHaH ueaece OHbU1'WpaM,IJ,aCSenlkrepluea TaHbIM,IJ,bIKj3TIo1KeTKal1ap,lJ,bl)1(010aeaece al1MaCTblpy>KafAaliibIH,IJ,aKenil1,1J,eMeHi'1
epeeert TOKjTaTbll1aAbl.
1. 9H,IJ,ipywiKeWeH,IJ,i6yj;iblMfa >K3He6ipre KjamallfaH 6apl1blKj6vliiblM,IJ,aPFa6ip >Kbll1«eninneae 6epe,lJ,1.
2. Cary >KafblHayCblHbll1faH«entnneae MeHOCblHycKjaynblKjapecerana ca"Kecci3AiK aHbll,rallfaH «eane, 6acblM KjV)KaTic >Ky3iH,llecarv >KafblHa
6epinreH «enmnexe
eonun
Ta6bll1a,llbl.
3. Kenlnneaeni« Mep3iM iwiH,lle 3I1eKTpOH,IJ,bIKjIWpaM,IJ,aC6elliKTep >KapaMCbl3aeaece vcreae >Ka6.llbIKjTap.llblany Kja>Kenil1iKTepiTyblH,QafaH
>Kaf.llalii,na6aCTan~blcarun allfaH
xepre
xa6apnacy xepex.
Dutch (NL) ;
Cooler Master garandeert dat dit apparaat vrij van defecten in materiaal en fabricage is en geeft een twee jaar durende beperkte hardware
garantie voor het apparaat, beginnend op de aanschafdatum. Bewaar uw recept als bewijs van aanschaf.
Dit product is alleen ontworpen voor gebruik in computers. Het gebruik van dit apparaat in een andere capaciteit maakt de qarantie ongeldig.
Als u niet bekent bent met het installeren van computer hardware, vraag dan om professionele hulp.
Defecten of schade die het gevolg zijn van onjuiste bediening, opslag, rnisbruik of mishandeling, een ongeluk of verwaarlozing, die niet de
fout zijn van Cooler Master, worden niet gedekt door de garantie.
Opmerking: de garantie wordt ongeldig gemaakt door het verwljderen of veranderen van het product of onderdeelidentificatielabels
1. AlIe OEM/Bulk verpakte product hebben 1 jaar gelimiteerde garantie
2. In geval van een tegenspraak tussen de garantievoorwaarden die wettelijk verplicht zijn in het land van aankoop en de voorwaarden in
deze handleiding, zijn de wettelijke garantievoorwaarden van het betreffende land van toepassing.
3. In geval van een defect van elektronische onderdelen of als u accessoires nodig heeft tijdens de garantleperiode, gaat u naar de
winkel waar u het toestel heeft aangeschaft.
21
Page 23

Polish (PL)
Cooler Master gwarantuje, ze urzadzente to jest wolne od wszelkich defektow materialowych orazwwykonaniuioferuje dwu-letnla,
oqrentczona gwarancje poczvnajac od dnia zakupu. Prosze zachcwac paragon
sprzedaiy.
Produkt ten jest przeznaczony wylqcznie do
uiytkuwkomputerach.
Uiywanie
tego urzadzenia do innych
celcw, uniewai:nia
gwarancje.
Osoby nie zaznajomione z instalacjq komputerowego hardware, winny pcprostc0pomoc fachowca.
Gwarancja
pokrywa wvtacznte
normalne
uzvtkowanle.
Defekty, lub uszkodzenia, wynikajqce z
ntewtasdweqo
ui:ytkowania,
przechowywania,
lub uzvtkowenta niezgodnego z przeznaczeniem, nie
Set
winnq Cooler MasteriSq
wykluczone z gwarancji.
Uwaga: Gwarancja jest anulowana, jesli jakies czesct lub identyfikatory zostana zmienicne tub usuntete.
1.
Wszystkie produkty OEMjw opakowaniach zbiorczych objete sa jednorocznq qwarancja 0 ograniczonym zekreste
2. W przypadku sprzeczoosci warunkow gwarancJi pornledzv krajem w ktorvrn dokonano zakupu a informacjami zawartymi w tej instrukcji,
dokumentem wainiejszym jest gwarancja obowlazojaca w kraju w ktorvm dokonano zakupu.
3. W przypadku zaistnienia usterki etementow elektronicznych tub potrzeby zakupu akcesori6w w czasie trwania okresu gwarancyjnego,
prosimy udac sle do sklepu, w ktcrvm dokonano zakupu.
Portugal (PT)
A Cooler Master garante que esse dtspostttvc nao possui defeitos de material e de mao de obra e oferece uma garantia limitada de dois
anos para os componentes do dispositivo a partir da data da compra. Por favor guarde 0 recibo de compra em local seguro.
Este produtoeprojetado para usa somente em computador. 0 uso deste dlspositlvo para qualquer outra finalidade anula a garantia.
Se
voce nao estiver familiarizado com jnstala~ao de equipamentos de ccrnputador, por favor providencie a assistencia de um profissional.
A garantia oferectda cobre 0 usa normal. Defeitos ou danos resultantes de operacao ou armazenagem inadequadas, uso lndevido ou mau
usa, acldente ou negligencia, que nac sejam provenientes de falhas da Cooler Master, estgo excluidos da cobertura da garantia.
Nota: a garantia sera anulada caso sejam removldos ou alteradas etlquetas de identlflcacao do produto DU de pecas.
1. Todos os produtos corn embalagem conjuntajOEM tern um ana de garantia limitada
2. Em caso de confllto entre a garantia fornedda pelo pais do ponto de venda e a deste manual, a garantia do pars do ponto de venda
deve prevalecer.
3. Em caso de mau funcionamento de componentes eletroniccs ou quando houver necessidade de compra de acess6rios durante 0 periodo
de garantia, por favor, retorneitloja onde 0 produto foi adquirldo originalmente.
Russian (RU) .;
KOMnaH~SICooler Master tapaarvpver OTcYTCTBIo1eAe4>eKTOBaarepaana '" 3aaOACKlr1XAe4>eKTOavcrpoacree ~ npeaccresnser orpaH~4eHHylO
rapaHTIo11OHa o60pYAoaaHlile CPOKOMHa ABa rona eo AHSInOKynKIo1.05J=!3aTenbHocoxpaaare AOKYMeHTbl,nOATBep)KJtalOw,Io1enOKynKY.
3TO lr13.Qenlilenpe.QHa3Ha4eHoTonbKOAflSl IiICnonb30BaHIo1S1B KOMnblOTepe.Flpa flIo50M Io1HOMcnoccse nplo1MeHeHHSIvcrpoacree 3Ta rapaHTIo1J=!
He,QeHCTBIo1TenbHa.Ecn~ Bbl HeAocr3T04Ho 3HaKOMblc npoueccca YCTaHoBKIo1~ HacrpoHKt.1KOMnblOTepHoro050PYAOB3Hlr1S1,05paT14TeCb
K
cneuaanacrv.
,QaHHaSlrapaHTIo1S1pacnpocrpaaaerca Ha 050pYAoBaHlr1eronsxc npa HopManbHblXycnOBHSlXero 3KcnnyaTau~Io1.rapaHTIiISIHe pacnpocrpaaaerca
Ha Ae4>eKTbl
WU1
nOBpe>K.QeHIo1S1,«orcpere B03H\.1K11101He no BIo1HeKOMnaHlr1101Cooler Master, a B peavns'rare HenpaBHnbHOHaxcnnvarauaa,
aenpaaaneaorc xpaHeHHSIIo1nlo1npHMeHeHIo1S1,a TaK>KeB peavnerare aenpaaaneaoro Hn~ He5pe>KHoro06pal1.leHHSIwm cnY4aHHoro nOBpe)K,D.eHI1S1.
nplr1Me4aHl1e:B cnvvae YAal1eHIo11114nlo13aMeHbl on03HaBaTenbHblX 3T~KeTOKc Io13Ael1101J=!Io111lr1ere KOMnOHeHTOBAeHCTBlr1erapaHTlr1lr1npespautaerca.
1. np01013BOAlr1Tenbneer OAlr1HrOA rapaHTHIo1Ha
«oemneccaoe
~3Ael1101e101Ha ece H3AenHSI,ynaKoaaHHble poccemeso
2. B cnvvae 06HapY>KeHlr1S1HeCOOTBeTCTBlr1HMe>K.QYrapaeraea, npenocraeneuuoa B crpaae npo,Qa)f(~, ~ AaHHblMPYKOBOACTBOM,
npHop~TeTHblM,QOKYMeHTOMSlBI1S1eTCSlrapaHTHSI,npenoctaaneaaas B crpaae cpaKT~4eCKOHnpO,Qa)f(H.
3. B cnvvee aeacnpaaaocra 3neKTpOHHblXKOMnOHeHTOBIo1nlo1Heo6xoAIiIMOCTIo1nplr105peTeHlr1S1ecncaorareneesrx npIo1HaMe>KHOCTeHB
reveaae rapaHT~YlHOrOcpoxa, cnenyer 05pal1.laTbCSIB rtepaoaacaneaoe MeCTOnpIo106peTeHIo1S1.
Serbian (SR) :
Cooler Master garantuje da je ovej uredej nema defekte materijala i rada i daje dvogodisnju garanciju na hardver uredaja od dana
kupovine. Molimo Vas da zadriite racun kao dokaz 0 kupovinl. Ovaj proizvod je napravljen samo za kortstenje u kompjuteru. Kcristenje
ovog uredaja u bllc kojem drugom kapacitetu ponfstava garanciju. Ako ntste upoznatl sa instalacijom kompjuterskog hardvera, molimo Vas
da se obratite za strucnu pornoc.
Data garancija se odnosi samo na normalno kortscenje. Kvaroviiostecenja koja nastanu usled nepravilnoq kortscenja, skladlstenja,
zloupotrebe, nemara Hi nezgode, koji nisu nastali qreskcm Cooler Master-a, nisu obuhvaceni garancijom.
Napomena: garancija se pontstava otklanjanjem Ill promenom proizvoda Hi dijela identifikaclje.
1.
Svi
OEMjpakovani proizvodi su sa jednoqodtsnjom cqrarucenom garancijom
2. U slucaju sukoba garancije lzdate od strane prodajnog mesta u zemljlione optsaneUovom prtrucotku, prednost ima garancija lzdata od
strane prodajnog mesta date zemlje.
3. U stucaju kvara elektronskih komponenata iIi potrebe za dodatnom opremom tokom period a vaienja garancije, molimo obratite se
prodavnici u kojoj ste kupili prolzvod.
Turkish (TR) .
22
Cooler Master bu cihazda malzeme ve i~~ilik hetasr bufunmacndmr garanti eder ve cihaz i~in satin alma tarihinden bastavan ikl Yllla suurh bir
donamm garantisi verir. Ahrm belgelemek lcln IUtfen makbuzunuzu saklaym.
Bu OrOn yalmzca bilgisayar kultenmu i~in tasartenrmsnr. Bu clhazm baska bir kapsamda kullarulrnasr garantiyi qecerslz krlar. Bilgisayar
donamrru mootajrrn bnmlvcrsarnz, JOtfen profesyonel vannm talep edin.
vernen garanti normal kullantm lcindir. Cooler Naster'm hetasr olmayan uygunsuz kullamm, depolama, yanll~ kullamrn veya keto kullamm,
kaza ya da ihmalden kaynaklanan anza ya da hasarlar garanti kapsammm drsmdadrr.
Dikkat: OrOn ya da parca tamtma etiketlerinin soktnmesr ya da degi~tirilmesi garantiyi cecerstz krlar.
1. TOm OEM/ambalajslz OrOnler bir yll
snurn
garanti He gelir
2. Garantf verilen Olkedekl sans ncktast ve bu kullanma krlavuzu arasmda bir ~eli~ki olursa, sans noktasmm bulunduqu Ulkedekt
garanti hOkOmleri oncattk tesrr.
3. Elektronik bllesenferm anzetanmasr ya da garanti suresinde aksesuarlann satin aunmasr gerekirse, IOtfen OrOnDsatin aldl~mlz
magazaya basvurunuz,
Page 24

~~ CNl57rGJRFV!
9
BY COOLER MASTER
Cooler Master Products: Limited Warranty
This document describes the warranty terms for all Cooler Master product sold in Australia
For Australia only:
Our goods come with guarantees that cannot be excluded under the Australian Consumer Law. You are entitled to a
replacement or refund for a major failure and for compensation for any other reasonably foreseeable loss or damage.
You are also entitled to have the goods repaired or replaced if the goods fail to be of acceptable quality and the failure
does not amount to a major failure. ( Cooler Master Co., Ltd, 9F., No.786, Zhongzheng Rd., Zhonghe Dist., New Taipei
City 235, Taiwan R.O.C. )
Telephone: +886-2-3234-0050 (standard international call charges apply.)
Who the Warranty Protects:
This Warranty is valid to the original purchaser only.
What the warranty protects:
This warranty is valid only for the Cooler Master Products distributed by authorized dealer(s) in Australia. Please
contact Cooler Master for warranty information and services:
• Cooler Master pty Ltd.,: 9F., No.786, Zhongzheng Rd., Zhonghe Dist., New Taipei City
235, Taiwan R.O.C.
• E-mail Support:eservice@coolermaster.com.tw
• Online live chat support: www.coolermaster.comjlivehelp
• Customer service: +886-2-3234-0050 (standard international call charges apply.)
What the warranty does not cover
1. Any product, on which the serial number has been defaced, modified or removed.
2. Accident, misuse, neglect, fire, water, lightning, or other acts of nature, unauthorized
product modification, or failure to follow instructions supplied with the product.
3. Repair or attempted repair by anyone not authorized by Cooler Master.
4. Damage to or loss of any programs, data or removable storage media.
S. Software or data loss occurring during repair or replacement.
6. Any damage of the product due to shipment.
7. Removal or installation of the product.
8. External causes, such as electric power fluctuations or failure.
9. Use of supplies or parts not meeting Cooler Master's specifications.
10. Normal wear and tear.
11. Failure of owners to perform periodic product maintenance as stated in User Guide, Such
as cleaning of user-cleanable projector filters.
12. Any other cause which does not relate to a product defect.
13. Damage caused by static (non-moving) images displayed for lengthy periods oftime
(also referred to as image burn-in).
Limitation of implied warranties:
THERE ARE NO WARRANTIES, EXPRESSOR IMPLIED, WHICH EXTEND BEYOND THE DESCRIPTION CONTAINED
HEREIN INCLUDING THE IMPLIED WARRANTY OF MERCHANTABILITY AND FITNESS FORA PARTICULAR PURPOSE.
Exclusion of damages
COOLER MASTER'S LIABILITY IS LIMITED TO THE COST OF REPAIR OR REPLACEMENTOF THE PRODUCT.COOLER
MASTER SHALL NOT BE LIABLE FOR:
• DAMAGE TO OTHER PROPERTYCAUSED BY ANY DEFECT IN THE PRODUCT, DAMAGES BASED UPON
INCONVENIENCE, LOSS OF USE OF THE PRODUCT, LOSS OF TIME, LOSS OF PROFITS, LOSS OF
BUSINESS OPPORTUNITY, LOSS OF GOODWILL, INTERFERENCE WITH BUSINESS RELATIONSHIPSM
OR OTHER COMMERCIAL LOSS, EVEN IF ADVISED OF THEIR POSSIBILITY OF SUCH DAMAGES.
• ANY OTHER DAMAGES, WHETHER INCIDENTAL, CONSEQUENTIAL OR OTHERWISE
• ANY CLAIM AGAINST THE CUSTOMER BY ANY OTHER PARTY
23
Page 25

~4ilC/IAS7rt1IRM/
9
BY COOLER MASTER
Warranty Information:
If the goods is found with reasonable defect within the period of (refer to Table A.,) starting on the first day of
purchase (with proof of invoice), this is what you must do, to claim the warranty from the above address.
Procedures:
1. Consumers should return to the shop where he/she has bought the goods, After confirming with the shop with a
valid invoice, they may approach the distributor for RMAclaim.
2. After confirmed by the distributor that the goods was damaged due to natural causes, replacement and repair will
be done by distributor (including brand new or refurbished goods)
3. All faulty goods must return to the distributor, expenses for returning the faulty goods will be covered by the
consumer, and distributor will cover the cost involved in the transporting of parts or repaired goods to the consumer.
Regarding all the expenses incurred in making the claim, and this is how you would claim:
1. Within the valid warranty date, starting from the first day of issuing invoice, Retail shops will assist in confirmation
with distributor for the consumer for the following.
A. If the damage was caused by the consumer, then the consumer should cover all expenses in fixing the product,
if the product still can't be fixed, we would suggest consumer in buying a brand new product.
B. Product defect caused under natural use, expenses will be covered by the distributor.
2. Faulty products with expired warranty dates, we would suggest consumer to purchase a brand new products,
without undergoing for repairs.
Table A:
Cooler Master Products
Please check your user manual for the exact warranty period terms for products that are not shown below.
Chassis
All Chassis Series
(Only Electronic Parts)
2 years
C+P ( Chassis + PSU) 1 year
Page 26

~ C/lASi7rSRFV!
~ BY COOLER
MASTER
Taiwan, Asia Pacific - Cooler Master Co., Ltd.
9F, No. 786, Zhongzheng Rd, Zhonghe Dist., New Taipei City 23586, Taiwan (R.O.C.)
Tel: +886-2-3234-0050
Service: eservice@coolermaster.com.tw
China - Cooler Master China
4F., Hui-Cheng Building, Hui-Tai industrial Park, Hui-Huan Town,
Hui-Zhou City, Guang-Dong Province, China
Tel: +86-752-260-8898
Service: web@coolermaster.com.cn
Europe - Cooler Master Europe B.V.
Hudsonweg 3 Trade. Port West 9272, 5928 LW Venlo, The Netherlands
Tel: +31-77-396-8226
Service: Support@coolermaster.nl
North America - Cooler Master USA
4820 Schaefer Ave. Chi no CA, 91710, USA
TEL: +1-909-673-9880
FAX: +1-909-673-9882
Service: support@coolermaster.com
Live Help
http://www.coolermaster.com/livehelp
tRt
For the most updated information, please visit our official website:
http://www.cmstorm.com
l6~
©2012 Cooler Master Co., Ltd. All Rights Reserved. All trademarks are registered to their respective owners.
510006151-GP Ver 2.0: 2012/04
 Loading...