

Cooler Master Centurion 590 Installation Manual
Centurion 590
Chassis
Installation Guide
User Manual / English
使用说明 / 简体中文

CONTENTS
01
1. Product Overview.........................................................02
1.1 Specifications.....................................................................02
1.2 Diagram........................................................................... 02
1.3 Part List............................................................................03
1.4 Fittings Pack......................................................................03
2. Installation Guide.........................................................04
2.1 How to remove the side panel and install the power supply.......04
2.2 How to install the motherboard.............................................05
2.3 How to install add-on cards..................................................05
2.4 How to install the 3.5” and 5.25” devices...............................06
2.5 Install Hard Drives in the 4-in-3 Device Module.......................08
2.6 How to install or replace case fans.........................................09
2.7 Completing Installation........................................................09
2.8 Cable management.............................................................10
3. Front Connector Installation Guide...............................11
Warranty Information......................................................13
Centurion 590
Centurion 590

Black
L510 x W120 x H440mm
Net Weight : 8.5kg; Gross Weight : 9.3kg
Chassis : SECC, Bezel : AL+ABS
Micro-ATX / ATX
9 Exposed (without the use of exposed 3.5" Drive bay)
4 (Hidden; from one 4-in-3 Device Module included)
1 (Exposed; converted from one 5.25" Drive Bay)
7
One 120x120x25 mm front intake fan (Blue LED), 1200 rpm, 17 dBA
One 120x120x25 mm rear exhaust fan, 1200 rpm, 17 dBA
USB 2.0 x 2, IEEE 1394 x 1, Audio x 1, MIC x 1,
(Supports Intel HD Audio)
Standard ATX PS2 / EPS 12V(optional)
Available Color
Dimension
Weight
Material
M/B
5.25” Drive Bay
3.5” Drive Bay
Expansion Slot
Cooling System
I/O Panel
Power Supply
Centurion 590
Centurion 590
POWER BUTTON
IE 1394
MIC
HEADSET
USB 2.0
POWER LED
HDD LED
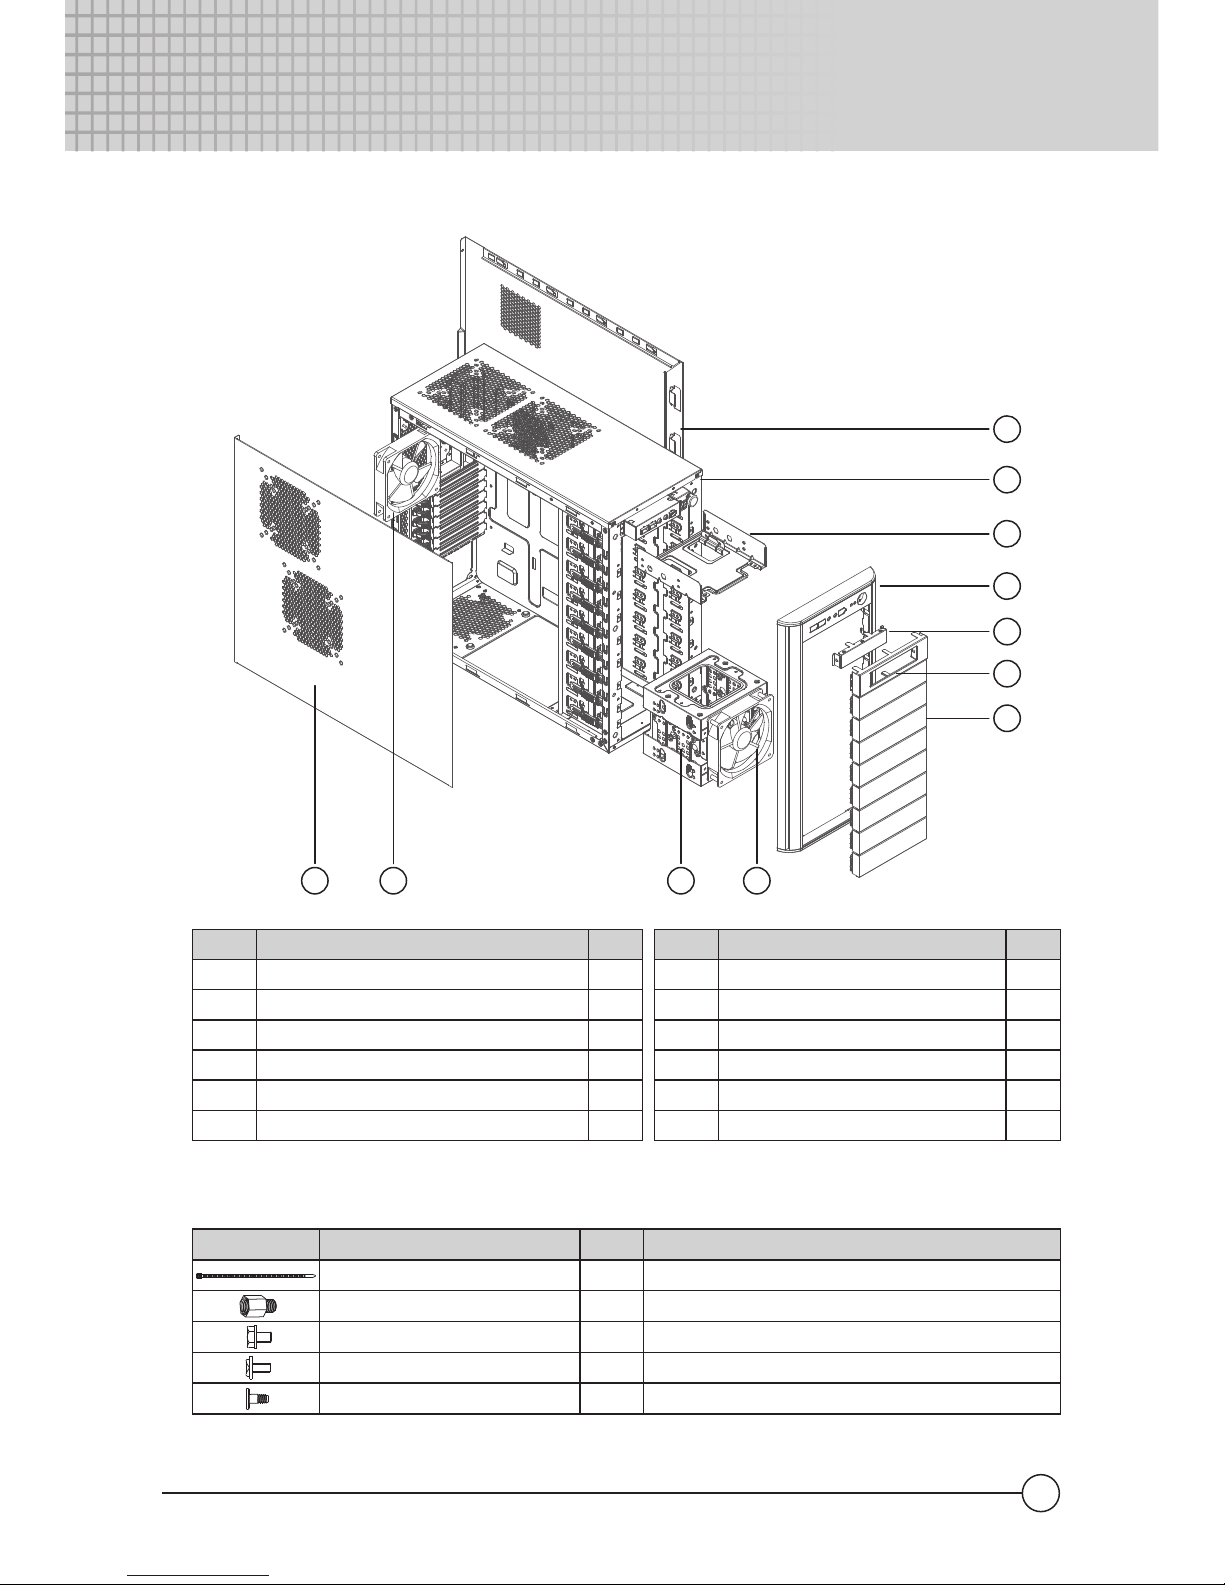
1.3 Part List
Item
1
2
3
4
5
6
Q’ty
1
1
1
1
1
1
Parts Name
right side panel
Casing
5.25" TO 3.5" Bracket Module
front panel
3.5” Shield
5.25"to 3.5"meshed panel
Item
7
8
9
10
11
Q’ty
8
1
1
1
1
Parts Name
5.25” Shield
Front LED fan 120*25mm
4-in-3 Device Module
Rear fan 120*25mm
Left side panel
03
4
3
2
1
6
5
7
891011
Centurion 590
Centurion 590
Figure Parts Name
Cable Tie
Stand-off (6.9mm)
#6-32 screw
M3 screw
HDD-screw installing 3.5" device
Q’ty Used for
Cable management
M/B tray
M/B tray,power supply
CD-ROM,FDD,3.5" Bracket
12
12
20
20
16
1.4 Fittings Pack
2. Installation Guide
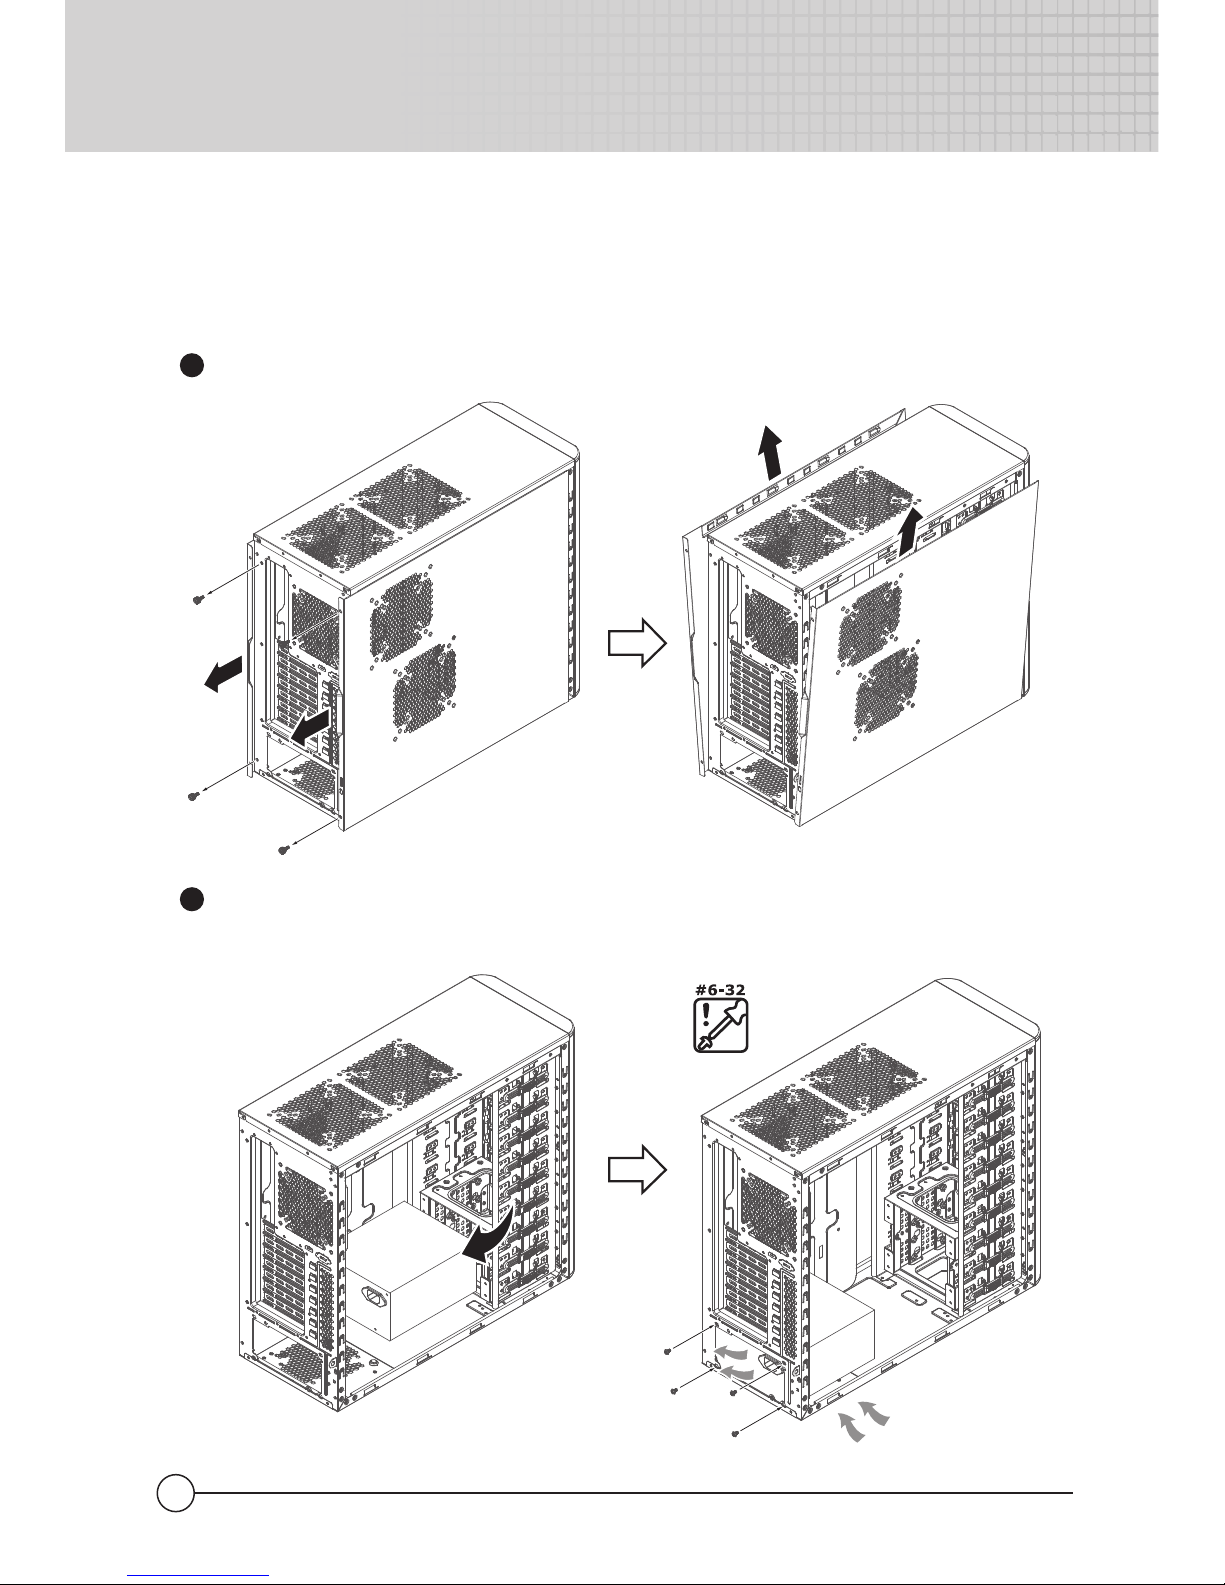
2.1 How to remove the side panel and install the power supply.
Remove the 4 screws and pull the side panel backward.
1
Place the PSU in the location as shown below.If the PSU has a single fan,
please make sure the fan faces the bottom vent.
2
04
Note: The sequence of installation may be different, depending on the type of
case and devices used.
PSU air inlet
Centurion 590
Centurion 590
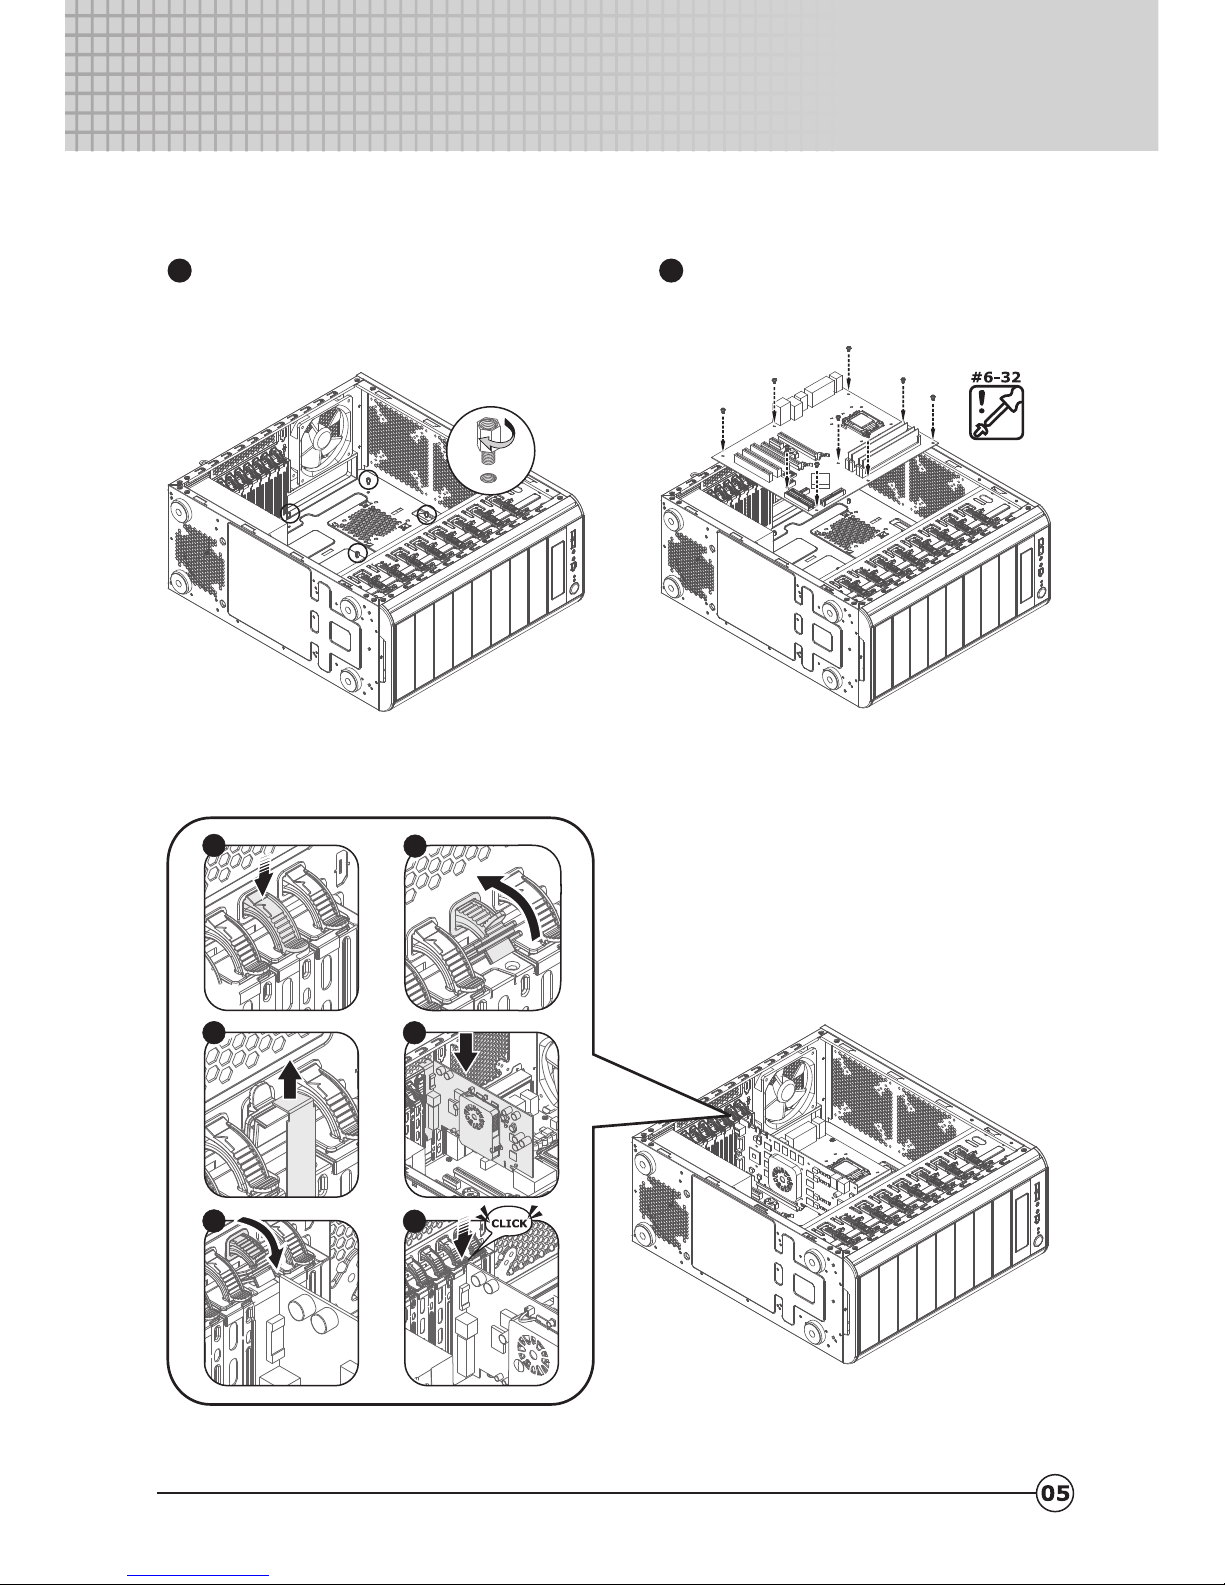
2.2 How to install the motherboard.
2.3 How to install add-on cards.
Adjust the hole position of the M/B with
the MB tray and screw in the spacers.
1
Make sure the holes on the Motherboard
and chassis line up properly before
securing the screws.
2
Centurion 590
Centurion 590
FE
DC
A
B
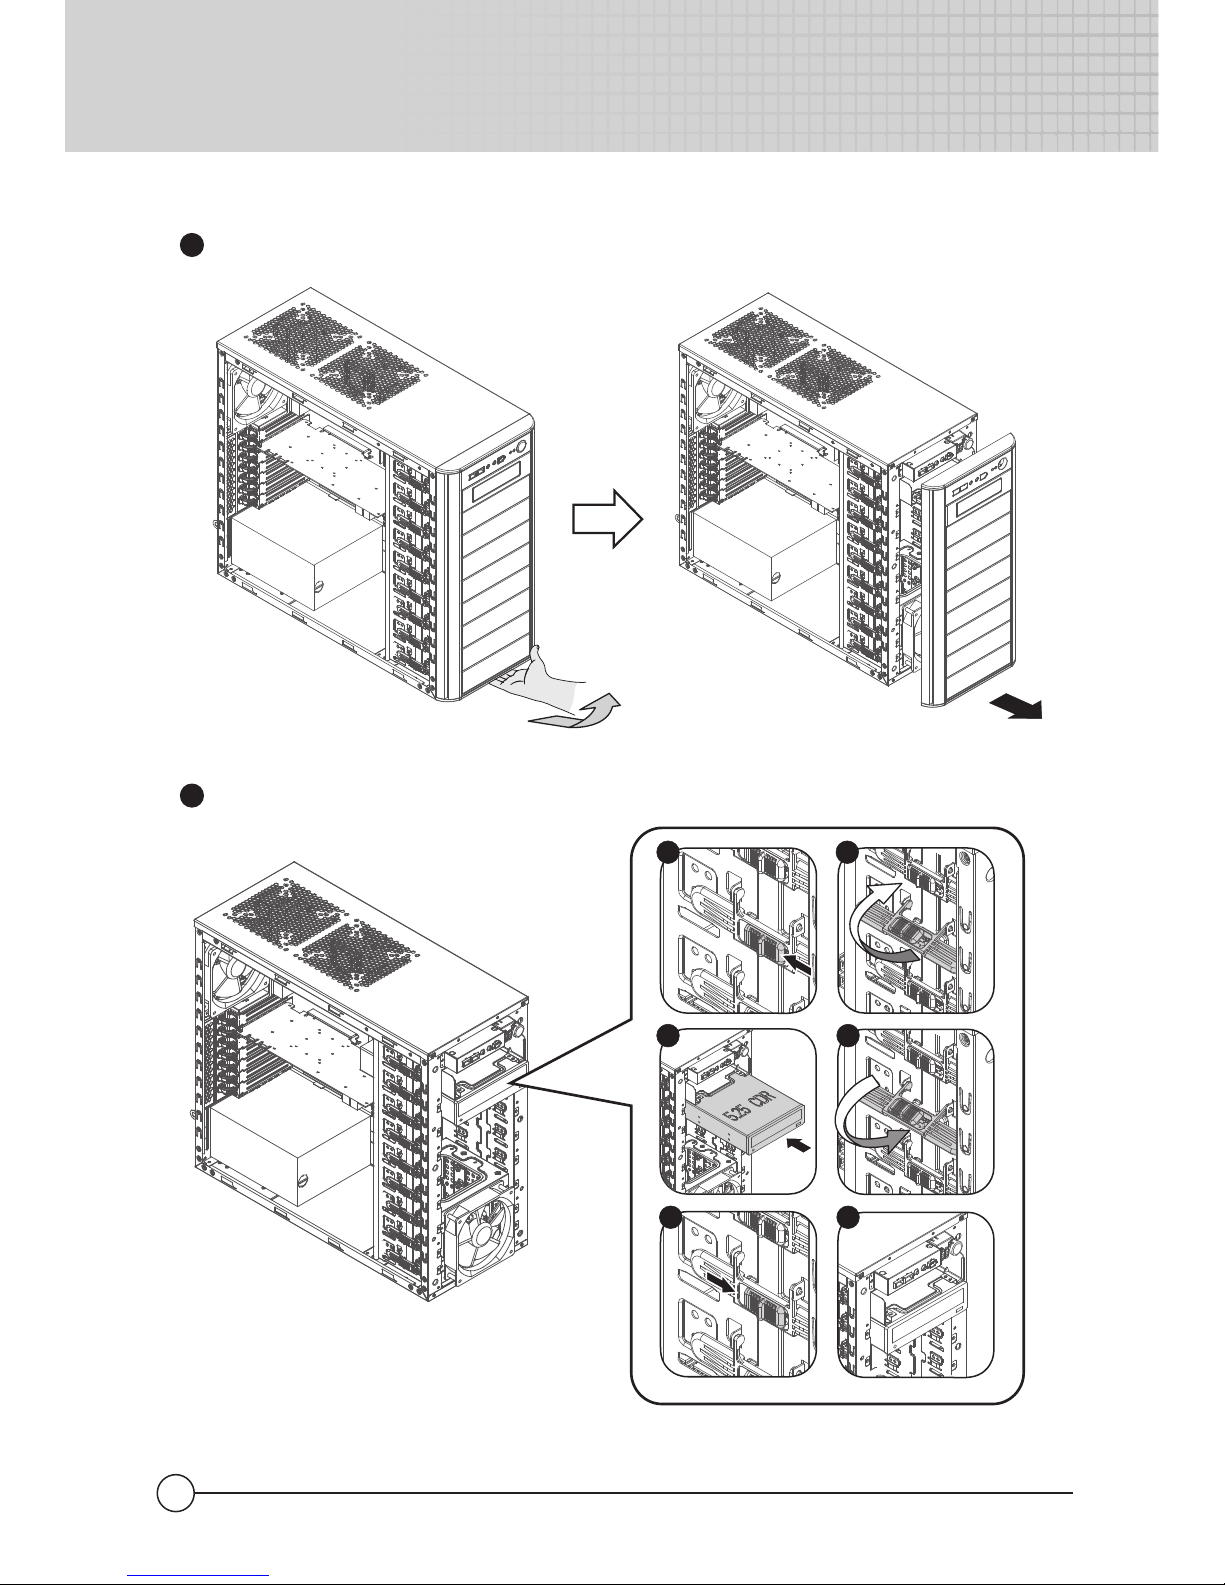
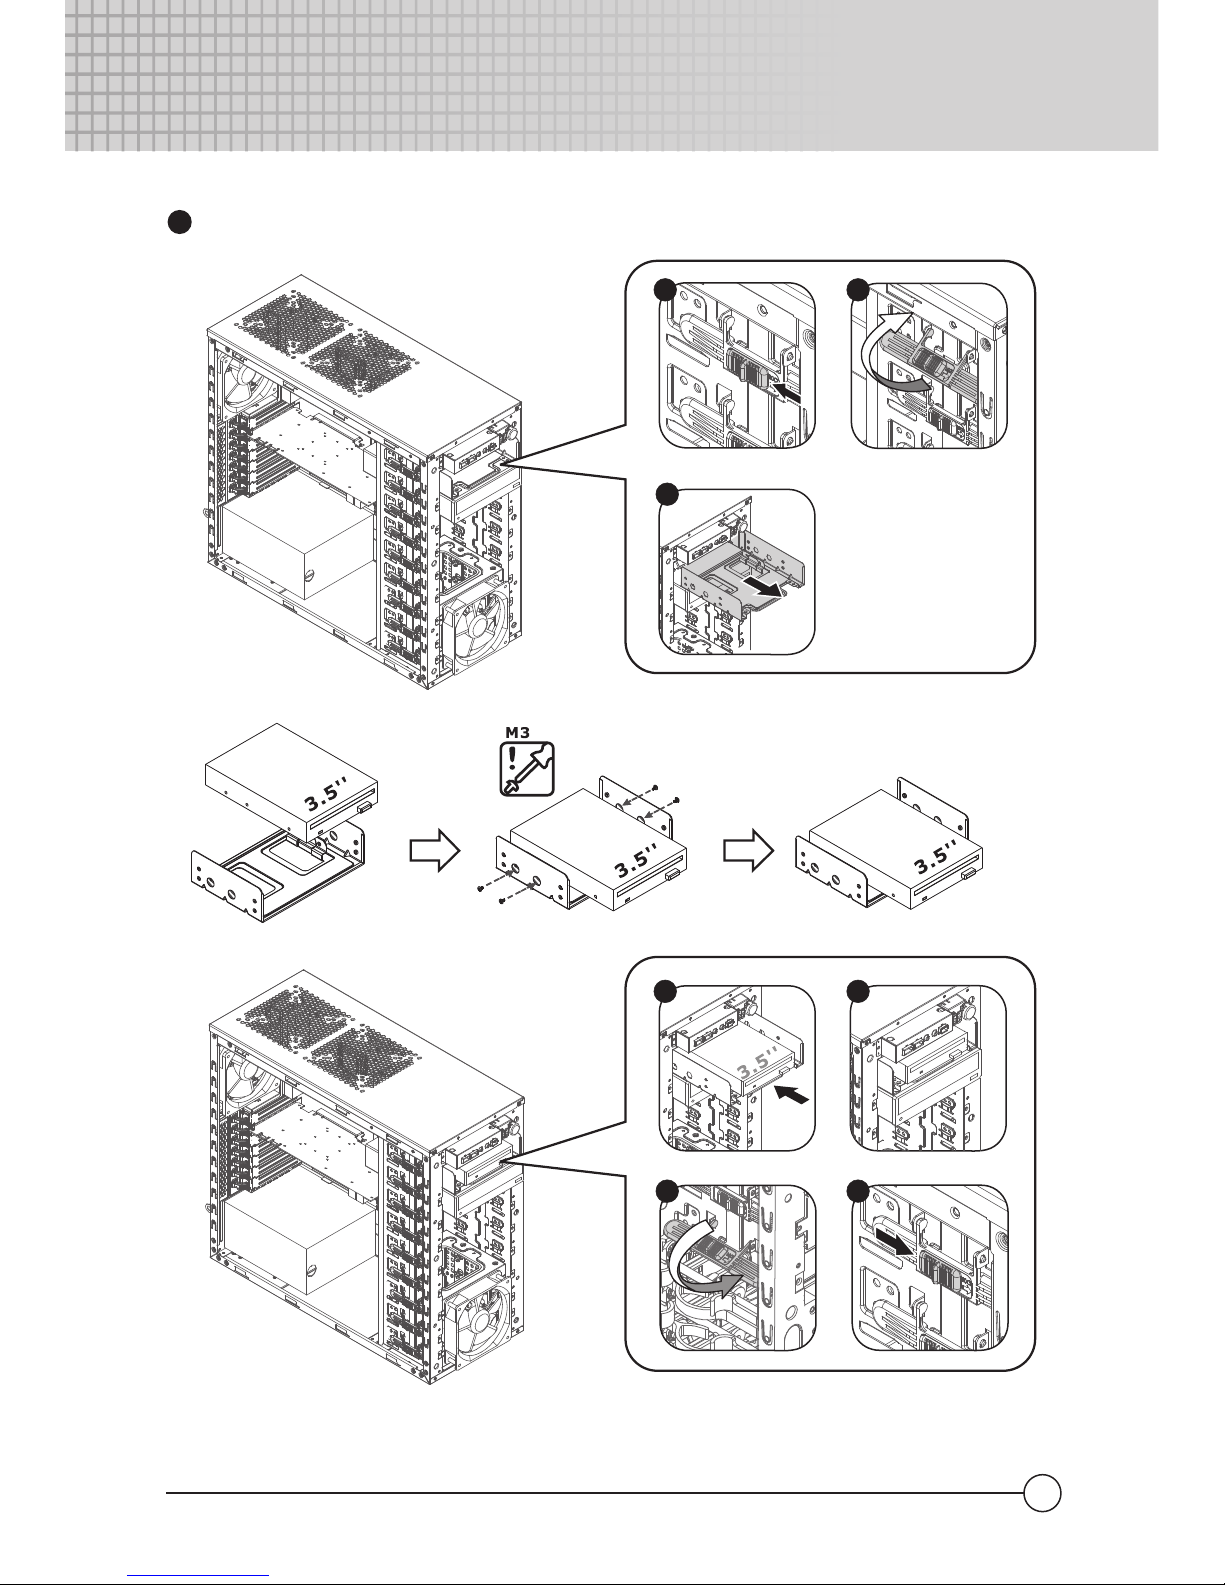
2.4 How to install the 3.5” and 5.25” devices.
06
Remove the front panel.
1
Insert the device into 5.25” drive bay.
2
Centurion 590
Centurion 590
A
C
A
B
D
C
E
F
07
How to install 3.5" devices.
3
Centurion 590
Centurion 590
A
B
A
D
B
C
C
08
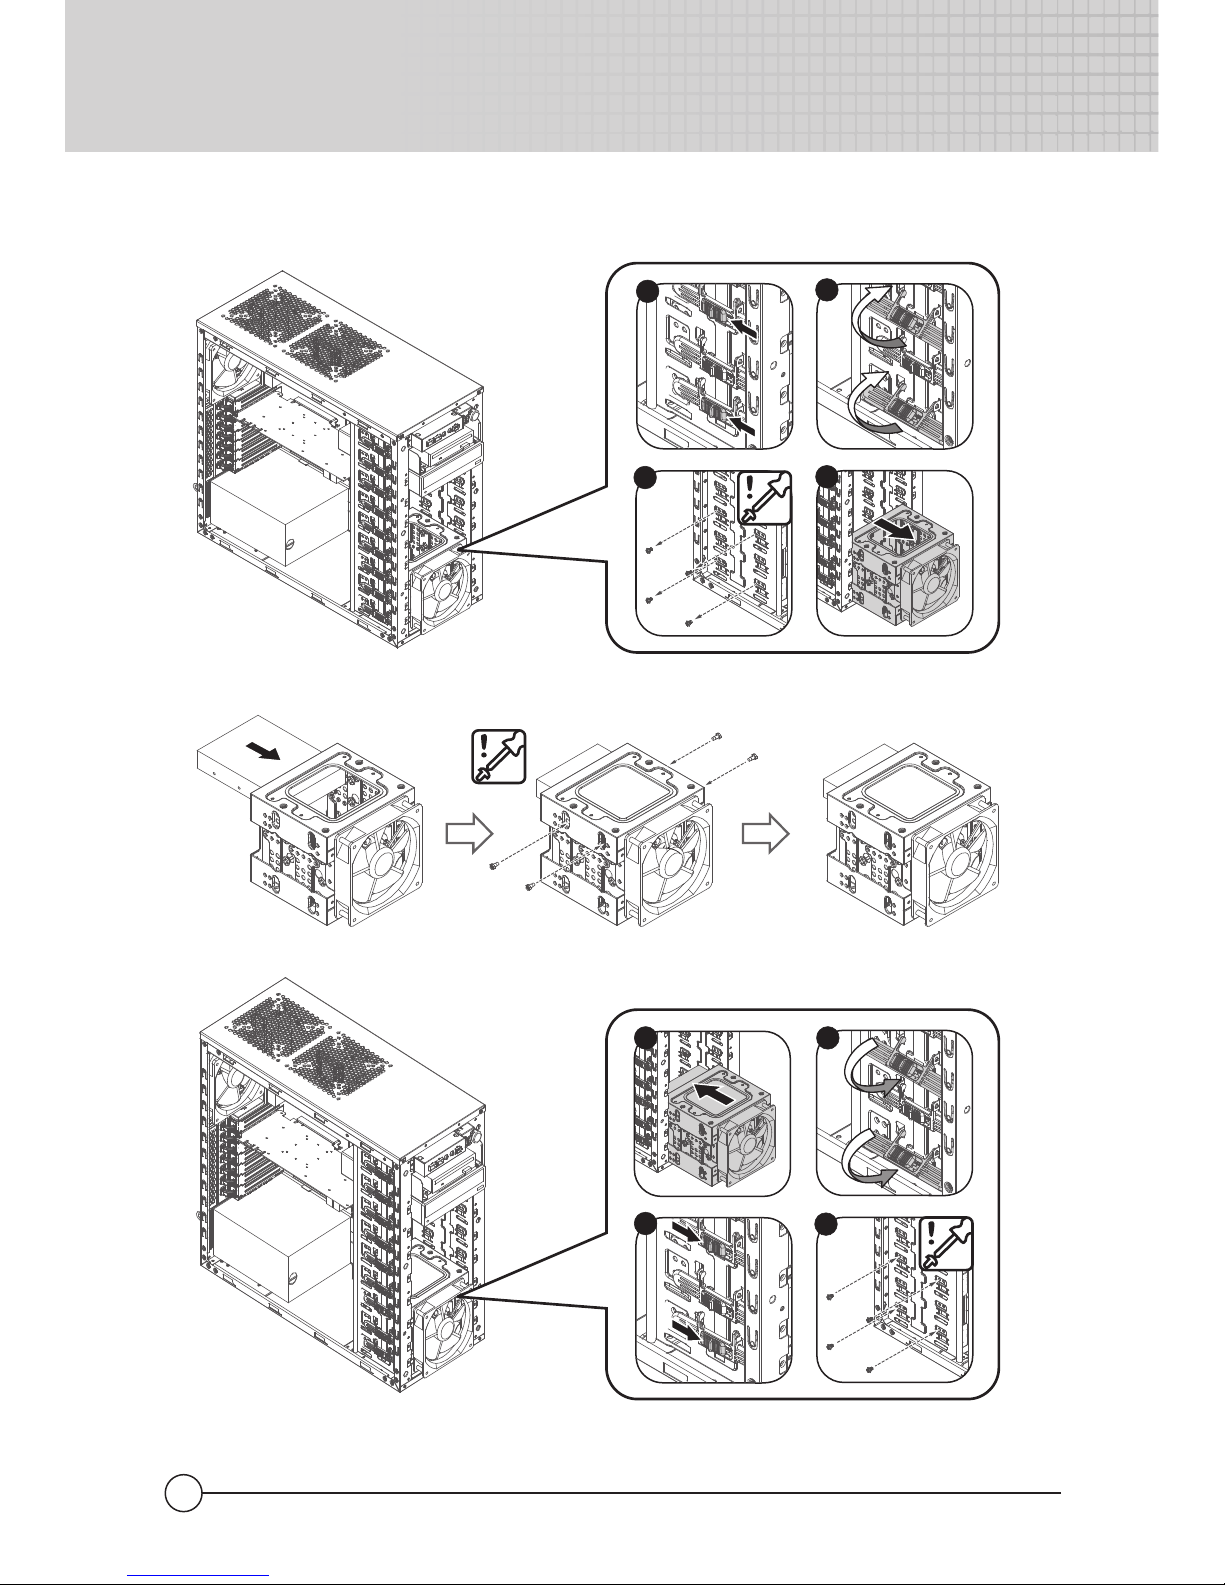
2.5 Install Hard Drives in the 4-in-3 Device Module
Centurion 590
Centurion 590
A
B
C
D
D
C
A
M3
M3
HDD-Screw
B
 Loading...