


ThermoPad User Manual
ThermoPad
Touch Screen
Control Panel
For HVAC Applications
ThermoPad
Revision 1.00 25/10/2010
© 2008 Cool Automation
www.coolautomation.com

ThermoPad Operation Instructions
Table of Contents
2Contents
Foreword
General
Product description
LCD explanation
...................................................................................................................................3
...................................................................................................................................3
Functions and Operation
On/Off
Set Point Temperature
Fan Speed
Operation Mode
Swing
...................................................................................................................................4
...................................................................................................................................5
...................................................................................................................................5
...................................................................................................................................6
...................................................................................................................................7
Timer Functions
Time and Date Settings
Timer Settings
Weekly Schedule Settings
...................................................................................................................................8
...................................................................................................................................8
...................................................................................................................................10
Indications
0
3
4
8
11
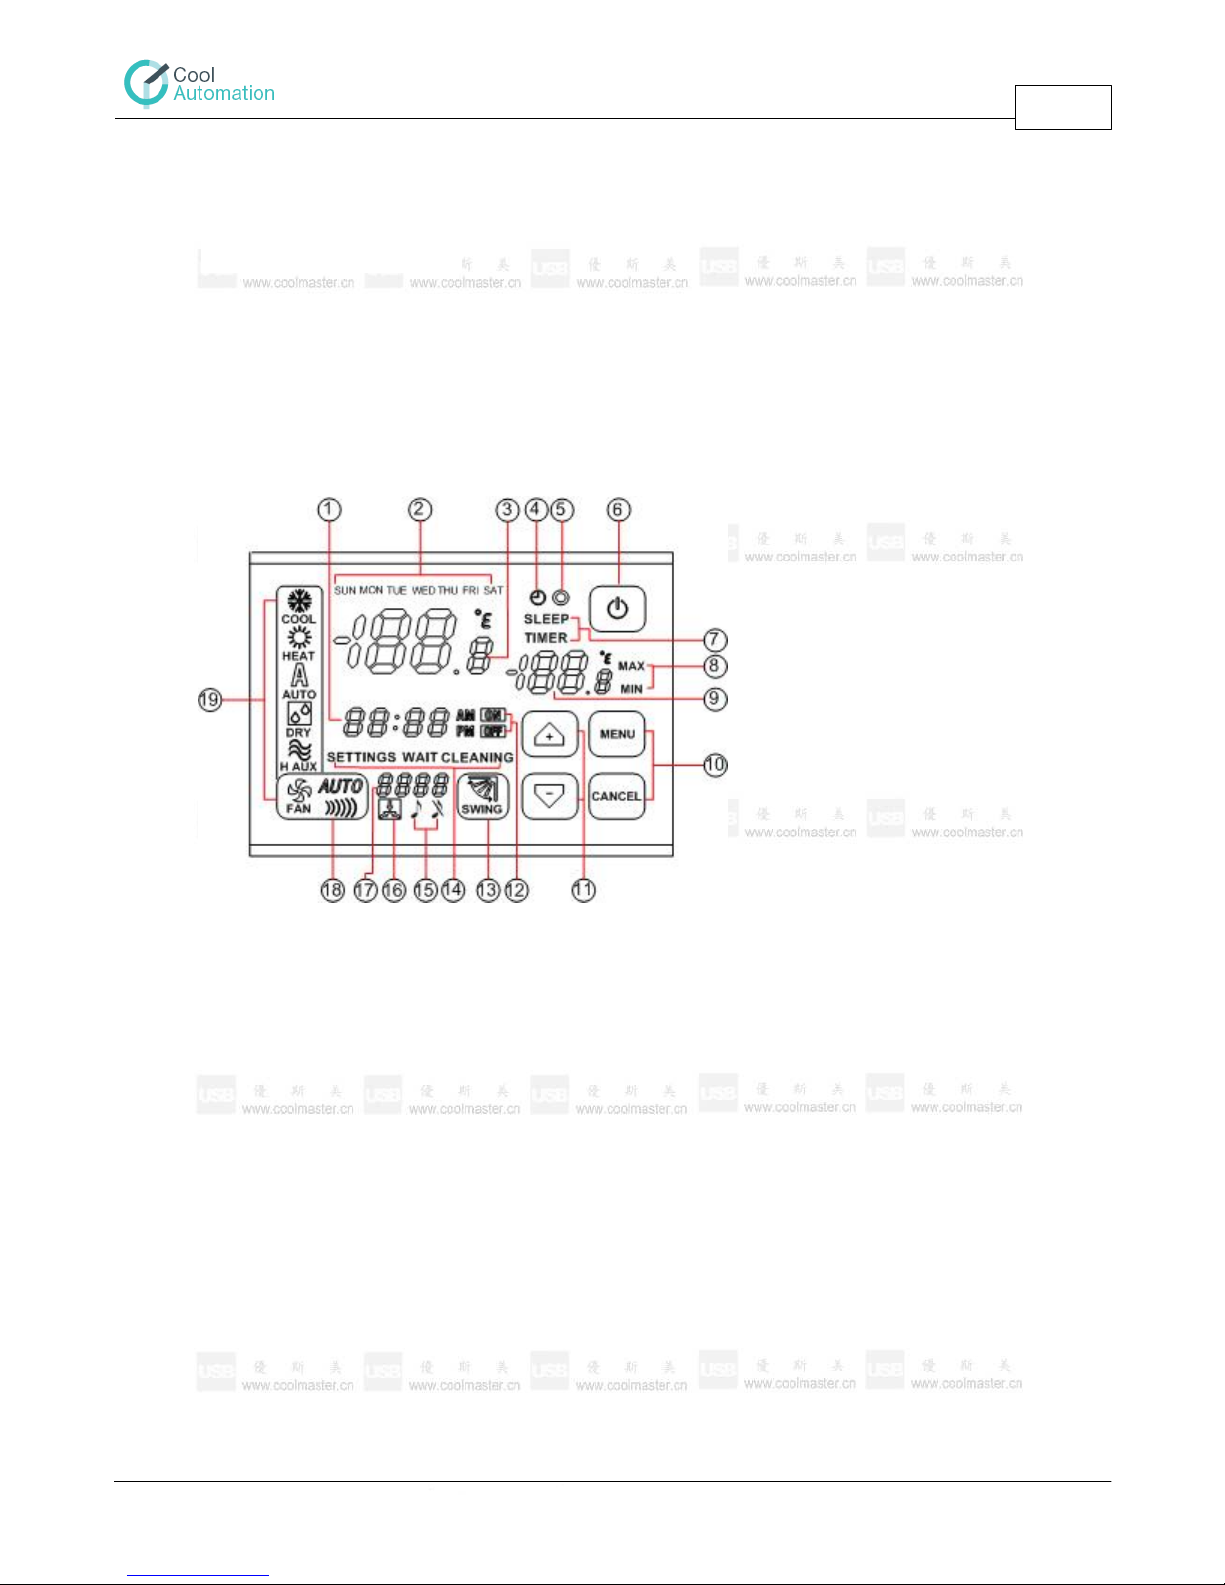
Indication explanation
...................................................................................................................................11
www.coolautomation.com
© 2008 Cool Automation
ThermoPad Operation Instructions
1. Clock
11. Navigation arrows
2. Day of the week indication
12. On/Off signs for different settings (used during
setup)
3. Set point temperature
13. Swing function button
4. Timer Sign
14. Setup indication words (used in setup mode)
5. Proper communication indication
15. Sound on/off indication (currently not in use)
6. On/Off button
16. Currently not in use
7. Timer/Weekly schedule indication
17. Malfunction indication
8. Temperature limitation on/off signs
18. Fan speed button and
9. Room Tempearture
19. Operation mode buttons
10. "Selection" and "Cancel" settings buttons
General
3
1
1.1
1.2
General
Product description
ThermoPad is a control panel for air conditioning and heating of the space, it is installed in. The
operation is performed by touching the signs on the LCD screen. When touching the screen, the back
light will be lit for a few seconds to provide a more clear view of the signs. During this time a desired
function should be selected by touching the screen at the appropriate zone. The back light will turn off
few seconds after the last touch.
LCD explanation
www.coolautomation.com
© 2008 Cool Automation
ThermoPad Operation Instructions
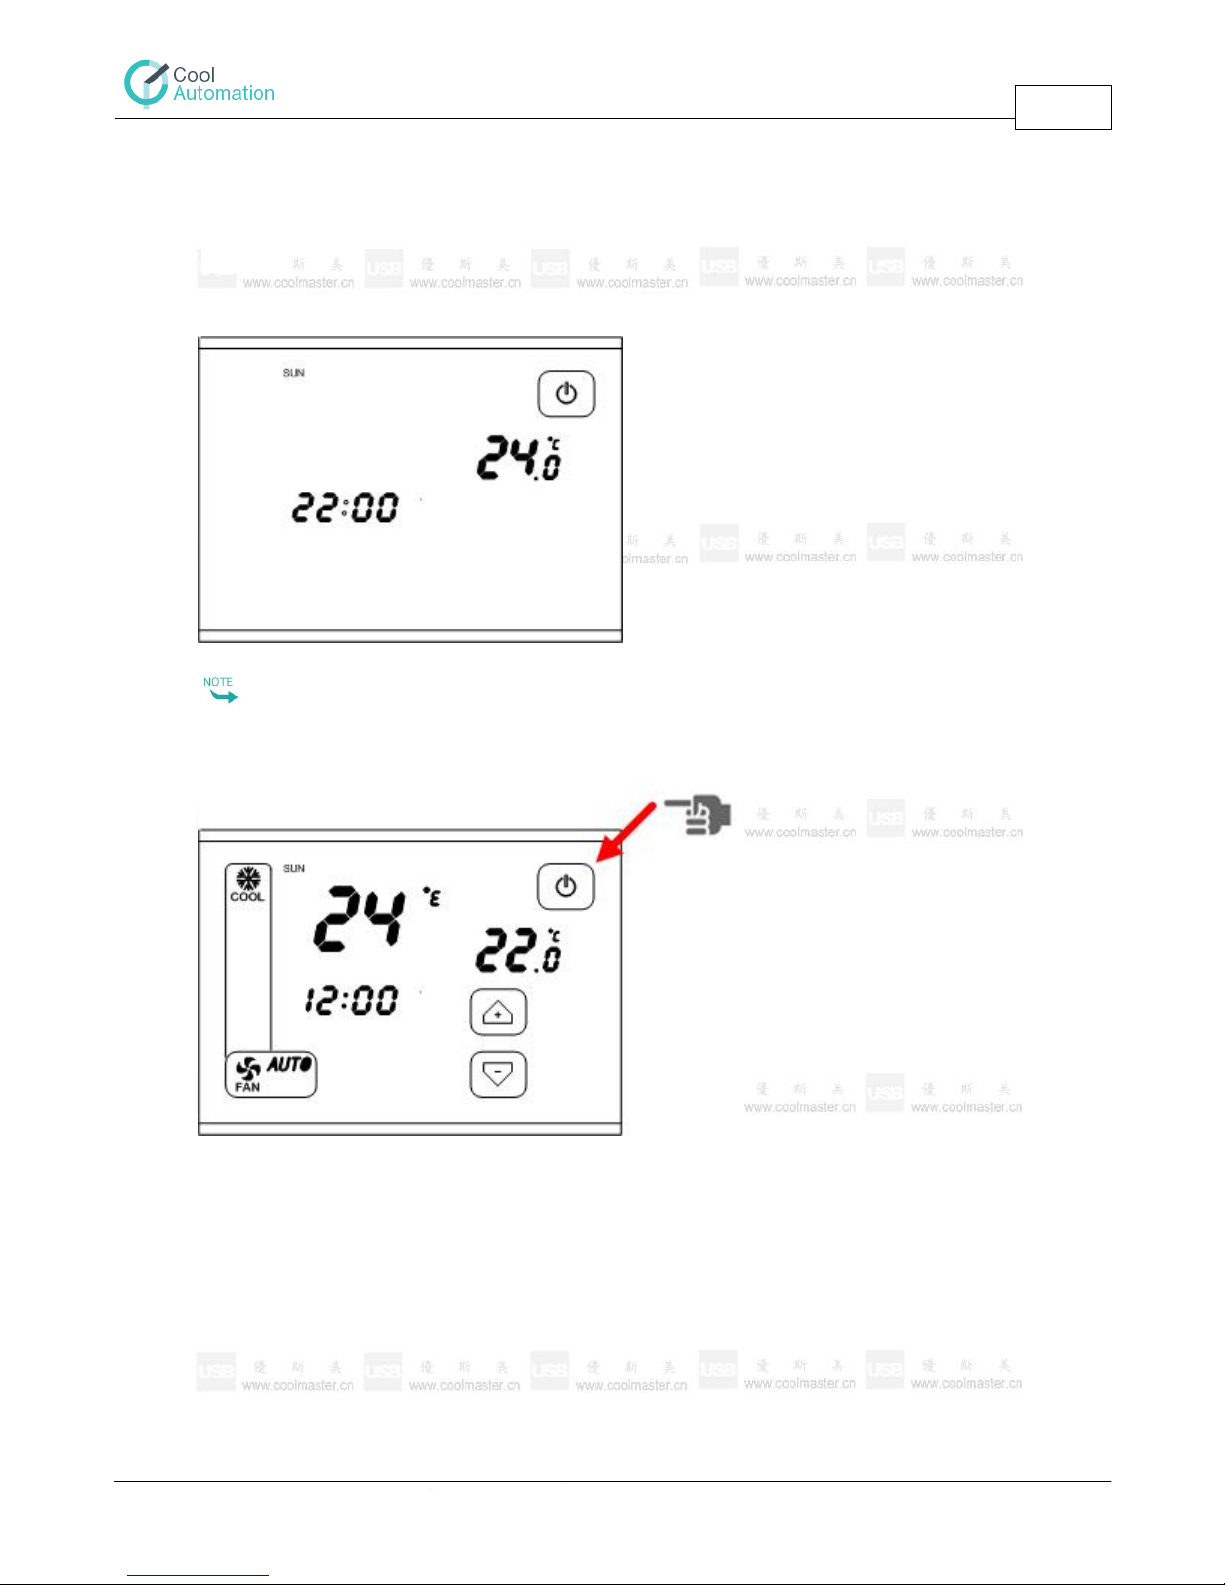
When the appearance of clock and room temperature is disabled from settings it won't be shown
also on the screen when the ThermoPad is off.
Functions and Operation
4
2
2.1
Functions and Operation
On/Off
When the ThernoPad is turned off, the screen will look as shown in the picture below.
Turning the unit "on" is performed by pressing the button (6):
www.coolautomation.com
© 2008 Cool Automation

ThermoPad Operation Instructions
Functions and Operation
5
2.2
Set Point Temperature
The set point temperature is shown at (3).
Changing the set point is performed by pressing on the navigation arrows (11).
2.3
Fan Speed
The current Fan Speed is shown at (18). The selection of the desired fan speed is performed by
pressing the button (18). Each press selects the next fan speed.
ThermoPad allows to select 4 fan speeds: High, Medium, Low and Auto, as shown on the pictures
below.
www.coolautomation.com
© 2008 Cool Automation

ThermoPad Operation Instructions
Functions and Operation
6
2.4
www.coolautomation.com
Operation Mode
ThermoPad supports 6 operations modes: Cool, Heat, Auto, Dry, H_Aux (Auxiliary heat), Fan.
The current operation mode of the system is shown on (19) and can be selected by the following
procedure:
1. Pressing the button (19).
2. Selecting the required operation mode by the navigation arrows (11).
The procedure is shown on the pictures below.
© 2008 Cool Automation

ThermoPad Operation Instructions
Functions and Operation
7
2.5
Swing
www.coolautomation.com
© 2008 Cool Automation

ThermoPad Operation Instructions
Timer Functions
8
3
3.1
Timer Functions
Time and Date Settings
Setting the correct time and day of the week is essential for timer (Sleep Timer) and Weekly Timer
operations.
The procedure of setting the time and the day of the week is performed by the following steps.
1. Pressing on the empty upper space (10) will lit the "Menu" button. Pressing another 3 times at the
same place will enter the time settings screen, and note
"Settings" (14) will appear on the screen.
2. At this stage, the correct day of the week and minutes are blinking.
3. The day of the week can be selected by pressing at the area (2) at the required day, till the correct
day is blinking.
4. The required time is configured by setting the "hours" and "minutes".
a. While "hours" (1) are blinking, the correct time is selected by the navigation arrows (11).
b. After setting the "hours", pressing on "minutes" will make "minutes" blinking.
c. At this stage, navigation arrows (11) are used for setting "minutes".
5. Pressing the "Menu" button (10) will save the settings and move ThermoPad back to the timer
setting screen.
6. Pressing the "Cancel" button (10) will save the settings and return to the normal screen.
3.2
www.coolautomation.com
Timer Settings
ThermoPad supports 4 timer operations (Sleep Timer). Each timer enables to turn the unit on/off by a
preset "time period" from the current time.
The procedure of the programming is shown below.
1. Pressing on the empty upper space (10) will lit the "Menu" button. Pressing again at the same place
will enter programming the timer mode and "Sleep Timer" note will appear on the screen (7).
2. On pressing the "Menu" button the following screen will appear where the timer number "01" is
blinking.
© 2008 Cool Automation

ThermoPad Operation Instructions
Timer Functions
9
3. The operation status (On/Off) is selected by pressing the button (8). When the timer programmed
to turn the unit "On", the operation mode appears on the screen.
When the timer is programmed to turn the unit "Off", the operation mode disappears, as shown in
the pictures below.
4. The "time period" is selected by pressing first on the time area (1), and then navigation arrows
(11).
a. When pressing on the "hours" area, it starts blinking. At this time the "hours" of the time period
are selected.
b. When pressing on the "minutes" area, the minutes start blinking. At this time the "minutes" of the
"time period" can be selected.
5. After selecting the parameters, the timer can be activated or deactivated by pressing on (12).
When the timer is activated, the "ON" sign will appear on the screen
(11). When timer is deactivated, "OFF" sign will appear on the screen (11). Each press on the area
(11) changes the activation status.
6. Pushing the "Cancel" button (10) will save and exit the timer programming.
7. Pressing on the "Timer Number" again will make it blink. At this point, using the navigation arrows
(11) another timer can be chosen for programming.
www.coolautomation.com
© 2008 Cool Automation

ThermoPad Operation Instructions
Timer Functions
10
3.3
Weekly Schedule Settings
ThermoPad allows up to 50 "operations", based on a weekly timer. One "operation" can occur once
(at one day) , or it can occur up to 7 times (if all days are selected). In each "Operation" the user can
choose the operation status (on/off), operation mode (Cool, Heat, Dry, Auto, HAUX, Fan), Fan speed
(Low, Medium,High, Auto), Set point temperature, and the occurrence (day of the week and time).
Each "operation" can be initialized or disabled after the programming.
The programming procedure is performed by the following steps.
1. Pressing on the empty upper space (10) will lit the "Menu" button. Pressing twice at the same place
will enter programming the weekly timer mode and "Timer" note will appear on the screen (7). At
this time, the day of the week (2) and the "timer number" (9) will blink.
2. In order to select the day (or several days) of the "operation", the required day should be pressed.
The signs of the selected days are blinking (others are constantly
lit).
3. In order to select the set point temperature, the set point temperature area should be pressed (3).
At this point it starts blinking and now it can be set by the
navigation arrows (11).
4. The operation mode is selected by pressing at the "mode area" (19) till the desired operation mode
is lit.
5. The fan speed is set by pressing at the fan speed button (18).
6. The operation status (on/off) is selected by pressing On/Off button (6).
7. The time of the operation is selected by pressing the time area (1). Pressing at "hours" will make it
blink and can be set by the navigation arrows (11). After that,
pressing at "minutes" will make the "minutes" blink and can be set by the navigation arrows (11).
8. At this stage the "operation" number 01 is activated, and the sign "ON" is lit next to the clock (12).
Pressing on this sign will deactivate this "operatiion" and the
"OFF" sign will lit (12). Pressing on it again will activate this operation again.
9. Pressing on the Timer number (9) will make it blink. At this stage, using navigation arrows (2) a
second "operation" can be programmed.
Pressing "Menu" button (10) will save the data and move to the Timer Setting screen.
Pressing "Cancel" button (10) will save the data and move to the normal screen.
www.coolautomation.com
© 2008 Cool Automation

ThermoPad Operation Instructions
Indications
11
4
4.1
Indications
Indication explanation
www.coolautomation.com
© 2008 Cool Automation
 Loading...