

Page 1
A S S EMB L Y G U I D E
GAZEBO
B U T T E R F L Y
5YR
Warranty
A
G
A
I
N
S
T
U
V
D
E
G
R
A
D
A
T
I
O
N
5
Y
E
A
R
F
A
B
R
I
C
W
A
R
R
A
N
T
Y
Exposure to ultraviolet (UV) radiation from the sun is the
major cause of skin cancer. In some countries the UV radiation
is strong enough to cause sunburn in just 11 minutes on a
following the Sun Smart steps: slip on clothing, slop on
sunscreen, slap on a hat, slide on sunglasses and seek shade.
Attention: The schematics in this manual are for assembly and operation
T H A N K Y O U
FOR PURCHASING A
COOLAROO PRODUCT
When not in use for long periods of time dismantle the gazebo,
and store in a dry place. If the canopy is wet, allow to dry naturally
opened up before storing.
If necessary, clean the fabric with a hose.
Components subject to turning and sliding can be treated
with a non-staining lubricant spray (silicon-based).
CARE & MAINTENANCE
To register your product go to coolaroo.com.au. The product code can be found
it on the relevant coolaroo.com.au product page.
For help with product assembly
or for any other questions
you may have, contact our
Customer Service Department.
Australia Toll Free: 1800 331 521
New Zealand Toll Free: 0800 555 171
United States Ph: +1 407 772 7900
Middle East Ph: +971 4 881 7114
China Ph: +86 574 5626 8888
WARNING
When assembling and using this product, safety precauti ons should always be followed to reduce the
risk of personal injury and damage to equipment. Please read all instructi ons before assembly and use.
At least two or more people are recommended for safe assembly.
Keep all children and pets away from assembly area.
Check all nuts and bolts for tightness before and during usage.
Non permanent structure. Do not use in extreme weather conditi ons including heavy rain or high winds.
The best under the sun
Coolaroo is the leader in shade fabric technology.
Our extensive range of attractive shade solutions
is carefully manufactured to protect your home,
garden and family from the harsh sun.
coolaroo.com.au
145 Woodlands Drive,
Braeside, Victoria, 3195 Austr alia
Coolaroo is a registered trademark
430559 / 1505
122 Cremorne Street,
Cremorne , Victoria 3121
t 03 9427 1286
f 03 9427 1286
w creativeresults.com.au
© Creative Results
Date 10/06/15 3:30 PM
Job / Version
13295 Coolaroo Cantilever Umbrella Instructions - Butterfly Gazebo A5 2b_FINAL
Flat Size 443mm x 210mm
Finished Size 148mm x 210mm
Product Code 430559
Barcode No.
Barcode Size
Print Process 4CP
Finished Artist
Anthony
Head of Creative
Account Manager
Client
Every eort has been made by
Creative Results to ensure this
artwork is correct. It is, however,
the client’s final responsibility
to check and sign o artwork
proofs or PDFs.
Creative Results will not be
responsible for any errors
approved by the client.
PROCESS
4C
Page 2
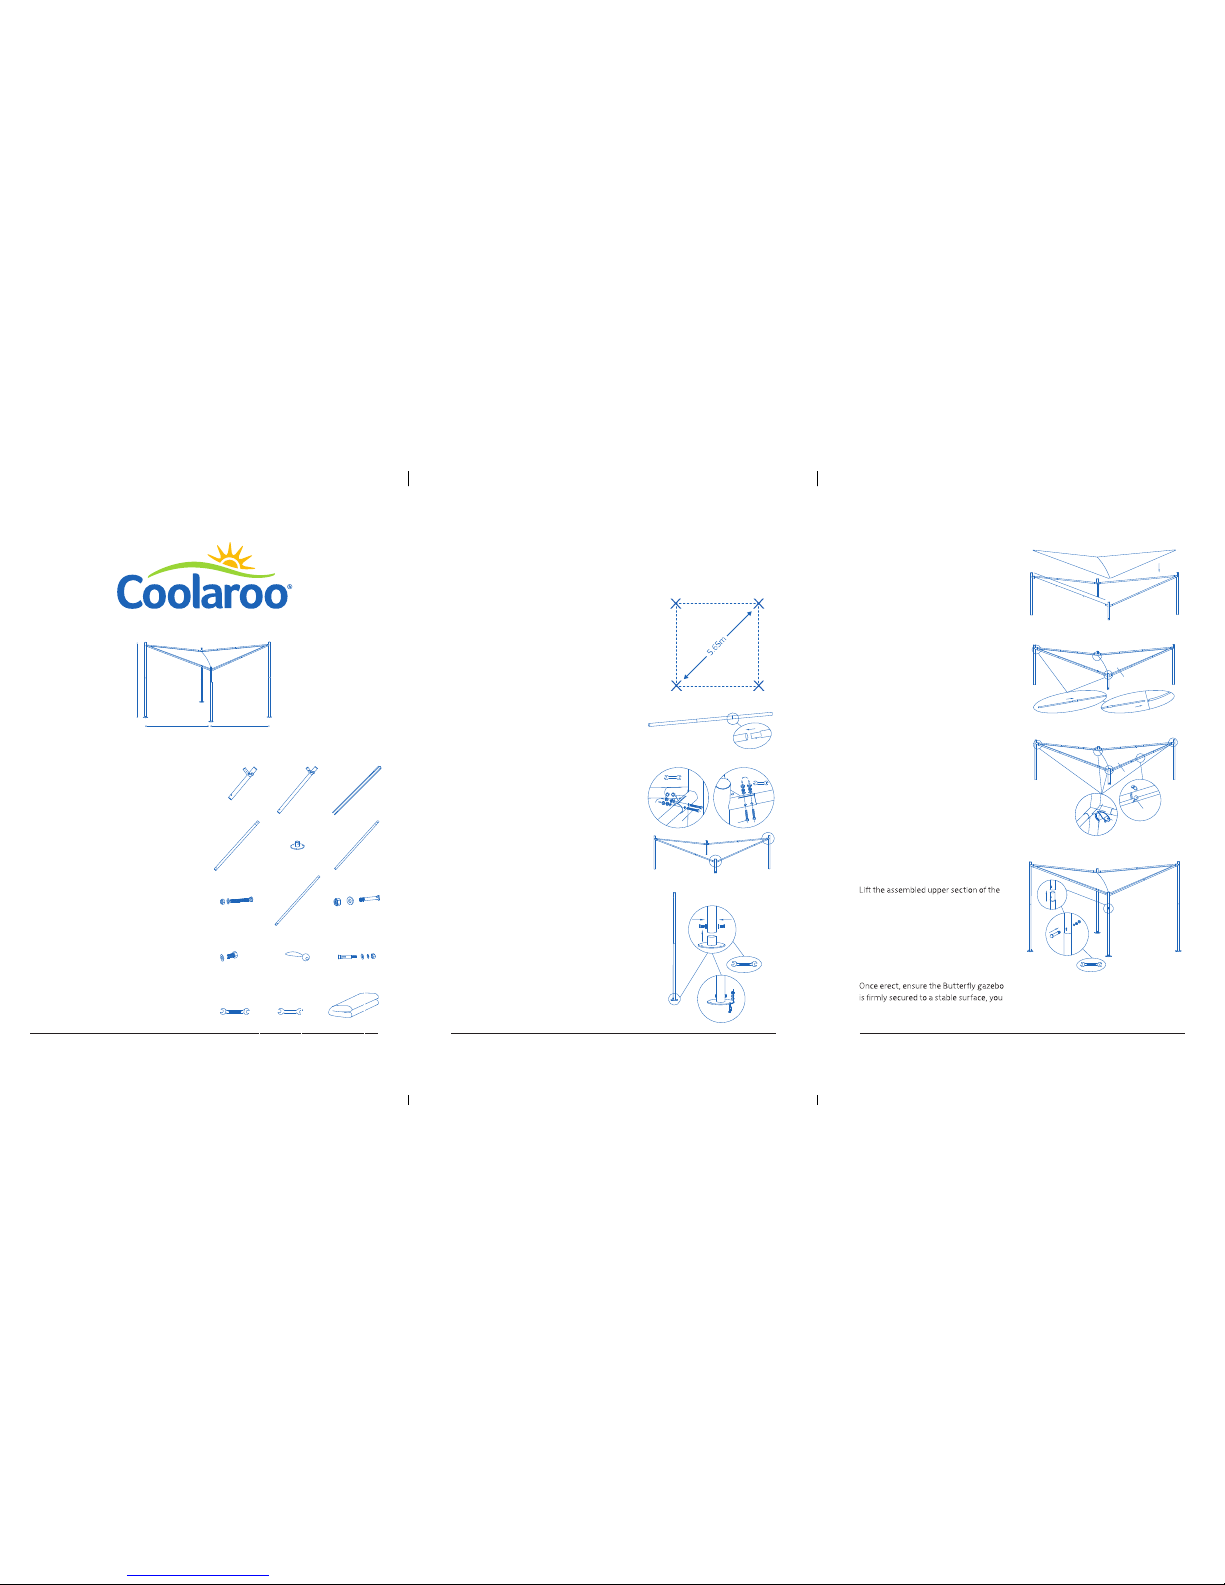
STEP 1
Take all parts out of the box and ensure
they are all present.
a) & b) Upper corner poles x 2
c) Cover poles x 4
d) Lower leg poles x 4
e) Feet x 4
f) Common pole x 8
g) Common bolts x 16
h) Centre pole x 4
i) Leg bolts with plastic caps x 4
j) Lower leg pole bolts with plastic caps x 4
k) Elastic bobbles x 36
l) Feet bolts x 12
m) Spanner 1 (for lower leg pole bolts)
n) Spanner 2 (for upper corner pole bolts)
o) Canopy
STEP 2
Measure a 4 x 4m square in the position you want the
gazebo. Mark the four corners with chalk or tape,
Place pole feet on these markings with even spacing
between poles to provide a sound structure.
STEP 4
Connect the common poles (f) into upper
corner poles (a) and (b) as shown.
Using spanner (n) provided secure with
common bolts (g).
STEP 6
Unfold the canopy (p) within the
assembled upper frame, ensuring the
underside of the canopy (with stitching
and label) is facing downwards.
STEP 5
Attach the feet (e) into lower leg poles (d)
using bolts (j)
and tool (m).
STEP 7
Insert the four cover poles (c) along the
edges of the canopy.
STEP 8
STEP 9
gazebo and insert the lower leg poles (d)
into the upper corner poles (a) and (b).
Secure the connection with bolts and
plastic caps (i).
STEP 10
can use feet bolts (l) if desired.
2.9m/9
'6"
4m/13'1"4m/13'1"
BUTTERFLY
A S S E M B L Y G U I D E
i
m
a
d
g
j
n
b
e
h
k
c
f
l
o
STEP 3
Connect the common poles (f) using
centre poles (h) as shown.
f
f
h
f
g
a
n
f
f
b
g
n
d
d
e
j
m
l
o
a
a
bb
c
c
o
o
k
k
o
o
d
d
d
b
b
a a
d
d
m
i
f
f f
f
f
f
f
f
h
h
h
h
a
b
f
f
h
Secure the edges of the canopy to the
frame with the elastic bobbles (k),
attaching the corners of the canopy last,
by threading the elastic through the corner
hole of the metal frame and looping
through the eyelet of the canopy corner.
For ease of attachment, attach 3 bobbles
on each side and continue around the gazebo
in a uniform fashion attaching 2 at a time until
all bobbles are attached.
ensuring the distance between diagonally opposite
corners are equal, to ensure it is square.
Diagonal distance should be 5.65 metres.
 Loading...